If you’ve read other Excel tutorials covering the topics of macros and Visual Basic for Applications, you’ve probably seen the term procedure mentioned several times. If you’re only beginning to read about these topics, you’ll probably see this term in the near future.
And there are good reasons for this:
If you want to become a powerful macro and VBA user, you must understand the concept of procedures, the different types of procedures and how to work with them. In fact, procedures are so important that I’ve included them among the 16 essential terms you need to know in order to learn VBA programming.
However, the post I reference above only provides an introduction to the topic of procedures. Today I’m digging much deeper and explaining, in a lot more detail, one of the most common types of procedures: VBA Sub procedures. More particularly, in today’s VBA tutorial I cover the following topics:
Let’s start with the most basic topic:
What Is A Procedure: VBA Sub Procedures And Function Procedures
When you’re using Excel’s Visual Basic Editor, a procedure is the block of statements that is enclosed by a particular declaration statement and End declaration. The main purpose of a procedure is to carry out a particular task or action.
VBA instructions are generally within a procedure. Therefore, if you want to master Visual Basic for Applications and macros, you should get familiar with this topic.
The 2 most common types of procedures in Visual Basic for Applications are Sub procedures and Function procedures. In this VBA tutorial, I focus on VBA Sub procedures. I cover Function procedures in this separate Excel tutorial.
The main difference between VBA Sub procedures and Function procedures is the following:
- VBA Sub procedures perform an action with Excel.
In other words, when you execute a VBA Sub procedure, Excel does something. What happens in Excel depends on what the particular VBA code says.
- Function procedures carry out calculations and return a value. As explained by John Walkenbach in Excel VBA Programming for Dummies, this value can be either a single value or an array.
If you’ve worked with regular Excel functions and formulas, you already have a good basis to understand how Function procedures work. Function procedures work similarly to regular Excel functions; they carry out certain calculations behind the scenes before returning a value.
According to Walkenbach, one of the foremost Excel authorities:
Most of the macros you write in VBA are Sub procedures.
Additionally, if you use the macro recorder to create a macro, Excel always creates a VBA Sub procedure.
The above comments make it quite clear that you’ll be working quite a bit with VBA Sub procedures. Therefore, let’s start taking a more detailed look at them…
How Does A VBA Sub Procedure Look Like
The image below shows how a basic VBA Sub procedure looks like in the Visual Basic Editor. Notice how, this VBA Sub procedure:
- Begins with the declaration statement “Sub”.
- Has an End declaration statement.
- Has a block of statements that is enclosed by the declaration and End declaration statements.

The purpose of this particular VBA Sub procedure, named “Delete_Blank_Rows_3”, is to delete rows when some of the cells in those rows are blank.
Before we continue, let’s take a look at the first statement of this VBA Sub procedure. There are 3 items:
- The Sub keyword which you already know is used to declare the beginning of the VBA Sub procedure.
- The name of the VBA Sub procedure.
VBA Sub procedure names must follow certain rules, which I explain in the following section.
- Parentheses.
If you’re creating a particular VBA Sub procedure that uses arguments from other procedures, you should list them here. The arguments must be separated by a comma (,).
You can have a VBA Sub procedure without arguments (they’re optional). However, the parentheses themselves aren’t. If the relevant procedure uses no arguments, such as the example above, you must have the set of empty parentheses.
I’ve described 4 elements that are required in any VBA Sub procedure:
- Sub statement.
- Name.
- Parentheses.
- End Sub keyword.
Additionally, I’ve also described 2 elements that are optional:
- The list of arguments that may go within the parentheses.
- The valid VBA instructions that are enclosed by the declaration and End declaration statements.
However, there 3 other main optional items of a VBA Sub procedure. I introduce them below…
But first, let’s take a look at how a procedure with all the most important elements (both optional and required) is structured, as explained in Excel 2013 Power Programming with VBA:
[Private/Public] [Static] Sub name ([Argument list])
[Instructions]
[Exit Sub]
[Instructions]
End Sub
You can learn more about the different parts of the Sub statement (including some that I don’t describe above) at the Microsoft Dev Center.
Now, let’s take a look at the optional elements within the above structure. You can identify these elements because I’ve written them within square brackets ([ ]).
Element #1: [Private/Public].
Private and Public are known as access modifiers.
If you type “Private” at the beginning of a VBA Sub procedure, the only procedures that are able to access it are those stored in the same VBA module.
If, on the other hand, you use “Public”, the VBA Sub procedure has no access restrictions. Despite this, if the procedure is located in a module that uses the Option Private Statement, the VBA Sub procedure can’t be referenced outside the relevant project.
I explain the topic of procedure scope below.
Element #2: [Static].
If you type “Static” before indicating the beginning of the VBA Sub procedure, the variables of the relevant procedure are preserved when the module ends.
Element #3: [Exit Sub].
An Exit Sub statement is used to immediately exit the VBA Sub procedure in which the statement is included.
How To Name A VBA Sub Procedure
Procedures must always be named. The main rules that you must follow when naming a VBA Sub procedure are the following:
- The first character must be a letter.
- Despite the above, the other characters can be letters, numbers or certain (but not any) punctuation characters.
For example, the following characters can’t be used: #, $, %, &, @, ^, * and !.
- Periods (.) and spaces ( ) are not allowed.
- There is no distinction between upper and lowercase letters. In other words “A” is the same as “a”.
- The maximum number of characters a name can have is 255.
In Excel VBA Programming for Dummies and Excel 2013 Power Programming with VBA, Excel authority John Walkenbach suggests that your VBA Sub procedure names:
- Describe the purpose of the VBA Sub procedure or what the procedure does.
- Are not meaningless.
- Usually, combine a verb and a noun.
Walkenbach goes on to explain how certain practitioners name the VBA Sub procedures using sentences that provide a complete description. In his opinion, this method has one main advantage and one main disadvantage:
- On the one hand, using sentences to name VBA Sub procedures pretty much guarantees that the names are descriptive and unambiguous.
- On the other, typing a full sentence requires more time. This may slow you down a little bit while working.
In my opinion, as long as the VBA Sub procedure names you use are descriptive, meaningful and unambiguous, you should be fine. This is an aspect where you can and should choose a style that you find comfortable and appropriate to achieve your own goals and purposes.
How To Determine The Scope Of A VBA Sub Procedure
The word scope refers to how a VBA Sub procedure may be called.
When creating a VBA Sub procedure you have the option of determining which other procedures are able to call it. This is done through the use of the Public or Private keywords that I introduce above and which are one of the optional elements of VBA Sub procedures. However, let’s take a deeper look at what is the meaning of public or private procedures, and how can you determine whether a particular VBA Sub procedure is public or private.
Public VBA Sub Procedures
VBA Sub procedures are, by default, public. When a particular procedure is public, there are generally no access restrictions.
Since the default is that procedures are public, you actually don’t need to use the Public keyword. For example, the following VBA Sub procedure, Delete_Blank_Rows_3, is public. Note that there is no Public keyword.

However, in order to make your VBA code clearer, you may want to include the Public keyword in your VBA Sub procedures. This practice is relatively common among programmers. The following screenshot shows how the VBA code of the Delete_Blank_Rows_3 macro looks like with this keyword included.

In both of the above cases, the VBA Sub procedures are public. In other words, both are essentially the same.
Private VBA Sub Procedures
As explained by Microsoft, when you use the Private keyword, the relevant element can only be accessed from within the context in which it was declared. In the case of private VBA Sub procedures, this means that they can only be accessed or called by those procedures that are stored in the same VBA module. Any procedures within any other module are not able to call it, even if those other modules are in the same Excel workbook.
For example, continuing with the Delete_Blank_Rows_3 macro, the following screenshot shows the relevant VBA code to make the VBA Sub procedure private:

How To Make All VBA Sub Procedures In a Module Private To A VBA Project
In addition to the public and private scopes that I’ve explained above, you can make all the VBA Sub procedures within a particular module accessible only from the VBA project that contains them (but not from other VBA projects) by using a single statement: the Option Private Statement.
The syntax of the Option Private Statement is: “Option Private Module”. If you decide to use it, the statement must go before the first Sub statement of the module.
For example, the following screenshot shows how the VBA code of a module with 3 macros that delete blank rows based on whether a row has empty cells. The last of these VBA Sub procedures is the Delete_Blank_Rows_3 macro that I’ve used as an example in other parts of this VBA tutorial, and doesn’t appear fully.

All of the 3 VBA Sub procedures contained in the module above can only be referenced and accessed from the VBA project that contains them.
When To Make VBA Sub Procedures Private: An Example
One way of executing a VBA Sub procedure is by having another procedure call it. You’re quite likely to use this method of running procedures in the future. In fact, in some cases, you may have certain procedures that aren’t stand-alone and are designed to be called by another Sub procedure.
If you have such procedures within a particular Excel workbook, it is advisable to make them private. If you do this, these private VBA Sub procedures aren’t listed in the Macro dialog which is one of the most common methods to execute a Sub procedure.
Don’t worry if you don’t fully understand how this works yet. I explain how to execute VBA Sub procedures both by calling them from other procedures or by using the Macro dialog below.
How To Execute / Run / Call a VBA Sub Procedure
While working with macros, you may use the terms execute, run or call when referring to the action of executing a VBA Sub procedure. As explained by John Walkenbach in Excel VBA Programming for Dummies, they mean the same thing and “you can use whatever terminology you like”.
You can execute, run or call a VBA Sub procedure in a variety of ways. In this section, I illustrate 9 of the ways in which you can execute a Sub procedure. There is an additional (tenth) option that I don’t explain in this VBA tutorial: executing a macro from a customized context menu. The reason for this is that context menu customization is a different topic that I may cover in a separate guide. If you want to receive emails whenever I publish new posts in Power Spreadsheets, please enter your email below.
The VBA Sub procedure that I use as an illustration is the Delete_Blank_Rows_3 macro that I show you above.
This Excel VBA Sub Procedures Tutorial is accompanied by Excel workbooks containing the data and macros I use throughout this Tutorial (including Delete_Blank_Rows_3). You can get immediate free access to these example workbooks by subscribing to the Power Spreadsheets Newsletter.
Option #1: How To Execute A VBA Sub Procedure Directly From The Visual Basic Editor
According to Walkenbach, this method is the fastest way to execute a VBA Sub procedure. In this case, you’re basically running the procedure directly from the module within the Visual Basic Editor.
Despite the above, I believe you’ll probably not use this method too often. In practice, you’ll usually want to execute VBA Sub procedures while you’re in Excel, not in the VBE. Some of the other options that I describe below allow you to do this.
This particular method only works when the particular VBA Sub procedure that you want to run doesn’t rely on arguments that come from another procedure. The reason for this is that this option doesn’t allow you to pass the arguments from the other procedures to the VBA Sub procedure you’re calling.
If you want to run a VBA Sub procedure that contains arguments, John Walkenbach explains that you can only do it by calling it from another procedure. That procedure from which you make the calling needs to supply the arguments that are required by the Sub procedure you want to execute.
In any case, if you choose to use this first method, you can call a VBA Sub procedure in 3 easy steps:
Step #1: Open The Visual Basic Editor.
You can open the VBE with the keyboard shortcut “Alt + F11”. Alternatively, click on the Visual Basic icon in the Developer tab of the Ribbon.

Step #2: Open The VBA Module That Contains The VBA Sub Procedure You Want To Execute.
You want the Visual Basic Editor to show you the VBA code of the Sub procedure that you want to call.
You can do this in several ways, which I explain in The Beginner’s Guide to Excel’s Visual Basic Editor. One of the methods you can use is to double-click on the relevant VBA module.
For example, if the VBA Sub procedure is within Module1, simply double-click on “Module1” in the Project Explorer of the VBE.

As a result of the above, the Visual Basic Editor displays the relevant code in the Programming Window and places the cursor there:

Step #3: Run The VBA Sub Procedure.
You can call a VBA Sub Procedure directly from the relevant module in the Visual Basic Editor using any of the following methods:
- Click on “Run Sub/UserForm” in the Run menu.

- Use the keyboard shortcut “F5”.

Option #2: How To Execute A VBA Sub Procedure Using The Macro Dialog
This method only works if the VBA Sub procedure you want to call doesn’t contain arguments. The reason for this is the same that I explained previously: You can’t specify those arguments.
Regardless of the above, this option is one of the most commonly used methods to execute VBA Sub procedures. When using it, you can run a VBA Sub procedure in 2 simple steps. Let’s take a look at them.
Step #1: Open the Macro dialog.
You can ask Excel to open the Macro dialog box in either of the following ways:
- Use the “Alt + F8” keyboard shortcut.
- Click on “Macros” in the Developer tab of the Ribbon.


Excel displays the Macro dialog, which looks roughly as follows:

Step #2: Select The Macro You Want To Execute And Execute It.
You’ve probably notice in the screenshot above that there is only 1 macro in all open Excel workbooks (Delete_Blank_Rows_3). Therefore, this is the only macro listed and, obviously, is the macro that we’ll be executing.
You already know that this method for running macros doesn’t allow you to call VBA Sub procedures that use arguments. Therefore, any such Sub procedure wouldn’t even appear in the Macro dialog.
Additionally, the Macro dialog only shows public procedures. However, you can still execute private VBA Sub procedures from the Macro dialog. To do this, type the name of the relevant private Sub procedure in the Macro name field that appears in the image below.
Similarly, the Macro dialog doesn’t show VBA Sub procedures that are contained in Add-Ins. In that case, you can also execute the procedure by typing the name of the relevant macro in the Macro name field.
In any case, the rules to select and execute a macro are the same regardless of whether you have only 1 or several macros in the open Excel workbooks. You can do the selection and execution in either of the following ways:
- Double-click on the macro you want to execute. For example, in the image below you’d double-click on the macro Delete_Blank_Rows_3.

- Click on the macro you want to execute to select it, and click on the Run button.


Option #3: How To Execute A VBA Sub Procedure Using A Keyboard Shortcut
You can execute VBA Sub procedures by using keyboard shortcuts. To run a macro using this method, simply press the relevant key combination.
This option doesn’t work for macros that use arguments. I explain the reasons for this above.
However, you may be wondering:
How does one assign a keyboard shortcut to a macro?
There are 2 main ways of assigning a keyboard shortcut to a macro.
The first method to assign a keyboard shortcut to a macro works only if you’re using the macro recorder. If this is the case, during the recording process (which I explain in detail in an Excel macro tutorial for beginners), you’ll encounter the Record Macro dialog. This dialog allows you to determine whether the macro you’ll be recording can be called by a keyboard shortcut and which keys compose that shortcut.

The second method of assigning a keyboard shortcut to a macro is perhaps more interesting. This method allows you to assign or edit the keyboard shortcut of any macro in the following 3 quick steps.
Step #1: Open The Macro Dialog.
You can access the Macro dialog by using the “Alt + F8” keyboard shortcut or going to the Developer tab and clicking on “Macros”.

Step #2: Select The Macro You Want To Assign A Keyboard Shortcut To.
On the Macro dialog, simply select the VBA Sub procedure you want to assign a macro to and click on “Options…” on the lower right side of the dialog box. For example, in the screenshot below I’ve selected the macro Delete_Blank_Rows_3.

Step #3: Assign A Keyboard Shortcut.
When Excel displays the Macro Options dialog, assign the keyboard shortcut and click on the OK button at the bottom of the dialog box.

Keyboard shortcuts are of the form “Ctrl + Letter” or “Ctrl + Shift + Letter”.
When selecting a keyboard shortcut, be mindful about what is the combination you’re assigning to the VBA Sub procedure. The reason for this is that assigned macro keyboard shortcuts override built-in shortcuts. Therefore, if you choose a shortcut that is the same as a built-in one, you’ll be disabling the latter.
For example, “Ctrl + B” is the default built-in keyboard shortcut for bold. If you were to assign the same shortcut to a macro, you’ll not be able to use the shortcut in order to make text bold.
Using keyboard shortcuts of the form “Ctrl + Shift + Letter” reduces the risk of overriding pre-existing keyboard shortcuts. In any case, remember to be careful about what is the exact combination that you assign.
Option #4: How To Execute A VBA Sub Procedure Using A Button Or Other Object
The idea behind this method is that you can assign or attach a macro to certain “objects”. I put quotations around the word objects because, in this particular case, I’m not referring to any type of object but to certain types of objects that Excel allows you to put in a worksheet. In Excel 2013 Power Programming with VBA, John Walkenbach classifies these objects into 3 classes:
- ActiveX controls.
- Form controls.
- Inserted objects, such as shapes, text boxes, clip art, SmartArt, WordArt, charts and pictures.
In this guide I explain how you can attach a macro to a button from the Form controls or to other inserted objects.
How To Assign A Macro To A Form Control Button
Let’s look at how you can attach a macro to a Form control button in just 4 steps.
Step #1: Insert A Button.
Go to the Developer tab in the Ribbon. Click on “Insert” and choose the Button Form Control. The following screenshot shows you the location of all of these:

Step #2: Create The Button.
Once you’ve clicked on the Button Form Control, you can actually create the button in the Excel worksheet by simply clicking on section of the worksheet where you want the top left corner of the button to appear.
For example, if I want the button to appear in cell B5, I click on the top left corner of that cell.

Step #3: Assign A Macro To The Button.
Once you’ve clicked on the location where you want the button to appear, Excel displays the Assign Macro dialog.

Excel suggests a macro that is based on the button’s name. In the case below, this is “Button1_Click”.

In many cases, this suggestion isn’t going to match what you want. Therefore, select the macro that you actually want to assign to the button and click on the OK button at the bottom right corner of the Assign Macro dialog.
In the example we’ve been working with, the macro to be assigned to the button is Delete_Blank_Rows_3.

Step #4: Edit Button (Optional).
Once you’ve completed the 3 steps described above, Excel shows the button that you’ve created. Now you can execute the relevant VBA Sub procedure by simply clicking on the button.

After the button has been created, you can edit it in a few ways. The following are 4 of the main things you can change:
- Size: The button created by Excel has the default size. You can change this size by dragging any of the handles with your mouse.

For example, if I want to increase the size of the button so that it covers 4 cells (B5, B6, C5 and C6), I drag the bottom right handle as required.

If the handles are not visible, you can make Excel show them by right-clicking on the button or pressing the left mouse button at the same time as the Ctrl key.
- Location: You can modify the location of the button by dragging it with your mouse.
You can only drag the button with the left button of your mouse if the handles (as shown above) are visible. Therefore, if they’re not, right-click on the button or press the left mouse button at the same time of the the Ctrl key before attempting to drag it somewhere else.
Alternatively, you can simply drag the button using the right mouse button. For example, if you want to move the button a couple of cells down, so that it covers cells B8, B9, C8 and C9, drag the button with the right mouse until the desired point. As you drag, Excel shows a shadow in the new location, but the button continues in the original spot.

Once you let go off the right mouse button, Excel displays a contextual menu. Click on “Move Here” to move the button.

- Text: To edit the text of the button, right click on the button. Excel displays a contextual menu, where you can choose “Edit Text”.

Excel places the cursor inside the button so you can modify the text as you desire. Once you’re done, click outside the button to confirm the change.
In the case used as an example throughout this VBA tutorial, a more appropriate button label is Delete Blank Rows. Once the process is completed, the button looks as follows:
- Assigned macro: If necessary, you can change the VBA Sub procedure that has been assigned to any button by right-clicking on it and selecting “Assign Macro…”.

In that case, Excel takes you back to the Assign Macro dialog, which allows you to select which particular VBA Sub procedure is assigned to the button. You’re already familiar with this dialog box, which I explain above.


In addition to the above, you can edit several other aspects of the button by right-clicking on it and selecting “Format Control…”.

Excel displays the Format Control dialog. By using this dialog you can determine several settings of the macro button.

Some of the main settings you can modify from the Format Control dialog are the following:
- Font, including typeface, style, size, underline, color and effects.
- Text alignment and orientation.
- Internal margins.
- Size.
- Whether the button moves and/or sizes with cells.
How To Assign A Macro To Another Object
In addition to the ability to assign macros to Form Control buttons, Excel allows you to assign a macro to other objects. As I explain above, these objects include shapes, text boxes, clip art, SmartArt, WordArt, charts or pictures.
Attaching a VBA Sub procedure to these objects is very easy. Let’s see how to do it in the case of a WordArt object which says “Delete Blank Rows”.
Step #1: Open The Assign Macro Dialog.
To open the Assign Macro dialog, right-click on the object and select “Assign Macro…”

Step #2: Select Macro To Assign.
Once you’ve completed the first step above, Excel displays the Assign Macro dialog. You’re already familiar with this dialog box.
To complete the process of assigning a VBA Sub procedure to the object, simply select the macro you want to assign and click the OK button on the bottom right corner of the dialog box. In the example used throughout this VBA tutorial, the macro to be assigned is Delete_Blank_Rows_3.

Once you’ve completed the 2 steps above, you can execute the VBA Sub procedure by simply clicking on the relevant object.

Option #5: How To Execute A VBA Sub Procedure From Another Procedure
In Excel 2013 Power Programming with VBA, John Walkenbach explains that executing a VBA Sub procedure from another procedure is fairly common. The term used to refer to this way of running a procedure is procedure call and the code that is invoking the procedure is known as the calling code.
As explained by Microsoft, the calling code specifies the relevant Sub procedure and transfers control to it. Once the called procedure has ran, control returns to the calling code.
According to Walkenbach, there are several reasons why calling other procedures is advisable, including the following:
- As explained by Microsoft, this makes VBA code simpler, smaller and clearer. As a consequence, it is easier to understand, debug, maintain or modify.
More generally, maintaining several separate and small VBA Sub procedures is a good practice. Even though you can create very long procedures, I suggest you avoid this. Instead, when working with Visual Basic for Applications, follow Walkenbach’s suggestion of (i) creating several small procedures, and then (ii) create a main procedure that calls the other small procedures.
The following diagram shows how a possible structure of several VBA Sub procedures calling each other can work. The main procedure appears on the left side. This main procedure then calls each of the smaller VBA Sub procedures, all of which appear on the right side.

- It helps you avoid repetition and redundancies.
There are cases where you’ll need to create a macro that carries out the same action in several different places. You can either create a VBA Sub procedure that is called in all those places, or enter the full piece of VBA code each and every time. As you can imagine, having a VBA Sub procedure that is executed in those different places is a more appropriate option.
- If you have certain VBA Sub procedures that you use frequently, you can store them in a frequently-used module which can be easily imported into all your VBA projects. Once the module is imported, you can easily call those macros whenever you need them.
The alternative is to always be copying and pasting VBA code into your new VBA procedures. You’ll probably agree that the first option (importing a module with frequently-used VBA Sub procedures) is easier and faster to implement on your day-to-day work.

There are 3 methods you can use to call a VBA Sub procedure from another procedure. Let’s take a look at each of them.
Method #1: Use VBA Sub Procedure’s Name
Under this method, you enter the following 2 things in the VBA code of the calling Sub procedure:
- #1: The name of the procedure that is being called.
- #2: The arguments of the procedure that is being called. The arguments are separated by commas.
In other words, the syntax you must apply when using this method is simply “Procedure_Name Arguments”.
As a very simple example, let’s assume that you create a VBA Sub procedure that only calls the Delete_Blank_Rows_3 macro.
This new macro doesn’t make much sense, because you may as well simply execute the Delete_Blank_Rows_3 macro directly. However, since the structure is extremely simple, I’ll use it as an example so you can clearly see how this method works.
The new VBA Sub procedure is called “Calling_Delete_Blank_Rows”. The macro contains just 3 statements:
Sub Calling_Delete_Blank_Rows()
Delete_Blank_Rows_3
End Sub
The following screenshot shows the whole VBA code (including comments) as it appears in the Visual Basic Editor:

You can, obviously, add statements to the VBA Sub procedure used as an example in order to make it more realistic and useful.
Method #2: Use Call Statement
To apply this method you must proceed, to a certain extent, similarly as with method #1 above. In this particular case, you also enter the name and arguments of the procedure that is being called within the VBA code of the calling Sub procedure.
There are, as explained by Microsoft, 2 main differences between methods #1 and #2:
- In method #2, you use the Call statement. This keyword goes before the name of the procedure you’re calling.
- In method #2, the arguments of the VBA Sub procedure being called are enclosed in parentheses.
In other words, when using method #2, the syntax you must apply is “Call Procedure_Name (Arguments)”.
Let’s see how this looks in practice. Again, we’ll be creating a very simple VBA Sub procedure whose sole purpose if to call the Delete_Blank_Rows_3 macro. The VBA code behind this new macro, called “Delete_Blank_Rows_2”, is as follows:
Sub Calling_Delete_Blank_Rows_2()
Call Delete_Blank_Rows_3
End Sub
Within the Visual Basic Editor environment, this VBA Sub procedure looks as follows:

The question you may have is, if I can use method #1 which doesn’t require the use of any keyword to call another VBA Sub procedure, why would I use method #2 which requires the use of the Call keyword?
The main reason for using this method #2 is simple: clarity. In the words of John Walkenbach:
Even though it’s optional, some programmers always use the Call keyword just to make it perfectly clear that another procedure is being called.
Despite the above, Microsoft states that the use of the Call keyword is generally not recommended. According to the information available at the Microsoft Dev Center, the Call statement is usually used when the VBA Sub procedure you’re calling doesn’t begin with an identifier.
Method #3: Use The Application.Run Method
You can use the Application.Run method to run a VBA Sub procedure.
As explained in Excel 2013 Power Programming with VBA, this particular method is useful if you want to call a VBA Sub procedure whose name is assigned to a variable. Using the Application.Run method is the only way of running a procedure like that. The reason for this is that, when you use the Application.Run method, you’re taking the variable and passing it as an argument to the Run method.
You can see an example of this method being applied in the above-cited Excel 2013 Power Programming with VBA.
How To Call A VBA Sub Procedure From A Different Module
When you call a VBA Sub procedure from another procedure, the process followed to search for the relevant Sub procedure is as follows:
- First, the search is carried in the same module.
- If the desired VBA Sub procedure is not found in the same module, search among the accessible procedures in the other modules within the same Excel workbook takes place.
A logical consequence of the above is that, in order for a procedure to be able to call a private procedure, both procedures must be in the same module.
There may be cases where you have procedures that have the same name but are in different modules (they can’t be in the same module). If you try to call one of these VBA Sub procedures by simply stating its name, an error message (Ambiguous name detected) is displayed.
However, this doesn’t mean that you can’t ask Excel to execute the procedure that you want. More precisely:
If you want to call the VBA Sub procedure that is located in a different module, you need to clarify this by:
- Stating the name of the relevant module before the name of the procedure.
- Using a dot (.) to separate the name of the module and the name of the procedure.
The precise syntax you must use in these cases is “Module_Name.Procedure_Name”.
Now you know how to handle the cases where you need to call a VBA Sub procedure that is in a different module. However, there are times where you may want to run procedures that are not only in a different module but in an altogether different Excel workbook. Therefore, let’s take a look at…
How To Call A VBA Sub Procedure From A Different Excel Workbook
In Excel 2013 Power Programming with VBA, John Walkenbach explains that there are 2 main methods to execute a VBA Sub procedure that is stored in a different Excel workbook:
- Establish a reference to the other workbook.
- Use the Run method and specify the name of the workbook explicitly.
Let’s take a look at how you can use either of these methods:
Method #1: Establish A Reference To Another Excel Workbook.
You can establish a reference to an Excel workbook in the following 2 simple steps:
Step #1: Open The References Dialog.
Inside the Visual Basic Editor, go to the Tools menu and select “References…”.

Step #2: Select The Excel Workbook To Add As Reference.
Once you’ve completed step #1 above, Excel displays the References dialog.
This dialog box lists all the possible references you can use and establish. All the Excel workbooks that are currently open are listed there. Notice, for example, all the Excel workbooks that appear in the screenshot below.
In this particular case, Excel workbooks are not listed using their regular file name. Instead, they appear under their VBE project names. Since “VBAProject” is the default name for every project, the situation below (where “VBAProject” appears several times) isn’t uncommon.
In order to help you identify which particular VBA project you want to add as reference, you can use the location data that appears at the bottom of the dialog box. Alternatively, you can go back to the Visual Basic Editor and change the relevant project’s name.

In order to add an Excel workbook that is currently open as reference, double-click on it or select it (by checking the box to its left) and click the OK button.

Even though the References dialog only lists Excel workbooks that are currently open, you can also create references to workbooks that aren’t currently open. To do this, you need to first click on the Browse button on the right side of the References dialog.

The Add Reference dialog is displayed. This dialog looks pretty much like any other browsing dialog box you’ve used before. Use the Add Reference dialog to browse to the folder where the relevant Excel workbook is saved, select the workbook and click on “Open”.
In the example below, I’m adding one of the sample Excel workbooks for this post.

Once you’ve completed the step above, the relevant Excel workbook is added to the bottom of the list of Available References in the References dialog. You can then select it and click the OK button to add it as a reference.

Done! Once you’ve carried out the 2 steps above, the new references that you’ve added are listed in the Project Window of the Visual Basic Editor under the References node.

You can now start calling procedures that are in the reference Excel workbook as if they were in the same workbook of the VBA Sub procedure that is calling them. You can do this, for example, by using the Sub Procedure’s name or the Call keyword.
In Excel 2013 Power Programming with VBA, John Walkenbach suggests that, in order to clearly identify a procedure that is within a different Excel workbook, you use the following syntax:
Project_Name.Module_Name.Procedure_Name
In other words, he suggests that you first specify the name of the project, followed by the name of the module and the name of the actual VBA Sub procedure.
You’ll notice that whenever you open an Excel workbook that references another workbook, the latter is opened automatically. Additionally, you won’t be able to close the referenced Excel workbook without closing the one that you originally opened. If you try to do this, Excel warns you that the workbook is currently referenced by another workbook and cannot be closed.

Method #2: Use The Application.Run Method.
You can use the Application.Run method to execute a VBA Sub procedure.
If you choose to apply this method, you don’t need to create any reference (as explained above). However, the Excel workbook that contains the VBA Sub procedure that you want to execute must be open.
You can see an example of this method being applied in the above-cited Excel 2013 Power Programming with VBA.
Option #6: How To Execute A VBA Sub Procedure Using The Ribbon
You can customize the Ribbon in order to add a new button which is assigned to a particular VBA Sub procedure. Then, you can execute the relevant macro by simply clicking on its button.
I cover the topic of Ribbon customization (with code) in this Excel tutorial. In this particular post, I show you (in a slightly simplified manner) one of the ways in which you can add a button that allows you to execute a VBA Sub procedure from the Ribbon. As with the other sections throughout this VBA tutorial, I use the Delete_Blank_Rows_3 macro as an example.
As explained by Excel experts Bill Jelen and Tracy Syrstad in Excel 2013 VBA and Macros, this method of executing a VBA Sub procedure is most appropriate for macros that are in the personal macro workbook.
The personal macro workbook is a special workbook where you can store macros that later you can apply to any Excel workbook. In other words, the macros saved in the personal macro workbook are available when you use Excel in the same computer, regardless of whether you’re working on a different Excel workbook from the one you were when you created the macro.
Let’s check out these 5 easy steps to add a new button to the Ribbon.
Step #1: Access The Excel Options Dialog.
Right-click anywhere on the Ribbon to have Excel display a context menu. On the context menu, select “Customize the Ribbon…”.

Step #2: Choose To Work With Macros.
At the top left corner of the Customize Ribbon tab in the Excel Options dialog, you’ll see the Choose commands from drop-down menu.

This drop-down menu allows you to choose from several sub-sets of commands to browse when adding commands to the Ribbon. Click on it and select “Macros”.

Once you’ve done this, Excel displays all the Macros that you can currently add to the Ribbon on the Choose commands from list. This is the list that appears just below the Choose commands from drop-down menu, as shown in the image below.

Step #3: Select The Tab And Group Of Commands To Which You Want To Add The Macro.
The Customize the Ribbon list is located on the right side of the Excel Options dialog. Here is where you find all the commands that are currently in the Ribbon. These commands are organized by tabs and groups of commands.
For example, the screenshot below shows how, within the Developer tab, there are 5 group of commands: Code, Add-Ins, Controls, XML and Modify.

In the Customize the Ribbon list is where you’ll be able to choose the location of the button that you’re about to add to the Ribbon. You can expand and contract any tab or group of commands by clicking on the “+” and “-” signs that appear on the left side of the list.

You can also add new tabs or new command groups (and rename them) using the buttons that appear below the Customize the Ribbon list.

Therefore, you can either select a pre-existing command group or create a new one for purposes of adding a macro to the Ribbon. Below I show you how you can add a new tab and group of commands to the Ribbon.
In this example, and for purposes of organization, I add a new tab just after the Developer tab by clicking on “Developer” and the New Tab button.

I rename the tab by selecting the newly added tab and clicking on the Rename button.

Excel displays the Rename dialog. I enter the new display name (Macro Collection) and click the OK button.

I repeat the process with the command group. First, I select “New Group (Custom)” and click on the Rename button.

Excel displays a slightly different Rename dialog, which provides you the opportunity to choose a symbol that represents the new group of commands. I choose an icon, enter the new display name for the command group (Delete Blank Rows) and click the OK button.

Once everything is in order, I select the group of commands to which I want to add the macro. In this example, that command group is the newly created Delete Blank Rows group.

Step #4: Add VBA Sub Procedure To The Ribbon.
To add a macro to the Ribbon, simply select the relevant item in the Choose commands from list and click the Add button that appears in the middle of the Excel Options dialog.
The following screenshot shows how this works for the Delete_Blank_Rows_3 macro:

Step #5: Finish The Process.
Click on the OK button at the lower right corner of the Excel Options dialog to finish the process.

Excel closes the Excel Options dialog and implements the changes you’ve made. Notice how, in the case of the example, Excel has added a new tab (Macro Collection), group of commands (Delete Blank Rows) and button (Delete_Blank_Rows_3) to the Ribbon.

Once you’ve completed the process described above for any VBA Sub procedure, you’ll be able to execute it by simply clicking on the relevant button in the Ribbon. This icon is enabled even if the Excel workbook that is holding the macro is closed. If this is the case, Excel opens the relevant Excel workbook that contains the macro before actually running it.
Option #7: How To Execute A VBA Sub Procedure Using The Quick Access Toolbar
The Quick Access Toolbar is the small toolbar located on the upper left corner of Excel.

Just as with the Ribbon, you can customize the Quick Access Toolbar in order to add a button that is assigned to a VBA Sub procedure. Afterwards, you can execute the macro by clicking that button.
Also, just as with the method of executing VBA Sub procedures using the Ribbon, this method is most appropriate when the macro you want to add to the Quick Access Toolbar is stored in the personal macro workbook. However, as explained in Excel 2013 VBA and Macros, if the VBA Sub procedure you want to add to the Quick Access Toolbar is stored in the Excel workbook you’re currently working on, you can indicate that Excel should only show the button when that particular workbook is open.
I’ll cover how to customize the Quick Access Toolbar more in detail in future tutorials. For the moment, let’s take a look at how you can add a macro button to the Quick Access Toolbar in 5 easy steps.
Step #1: Access The Excel Options Dialog.
You already know one of the ways you can access the options dialog. I will be covering additional methods of doing this in future Excel tutorials.
However, for this particular case, the fastest way to access the Quick Access Toolbar tab (which is the one we need) of the Excel Options dialog is the following:
Right-click on the Quick Access Toolbar and select “Customize Quick Access Toolbar…”.

Once you’ve completed this step, Excel opens the Options dialog.
Step #2: Choose For Which Excel Workbooks The Customized Quick Access Toolbar Applies.
At the top right corner of the Excel Options dialog, you can see the Customize Quick Access Toolbar drop-down menu. This is the section that allows you to determine to which workbooks does the customized Quick Access Toolbar with the macro button applies.

Click on the Customize Quick Access drop-down menu and select your preferred option.
- If you want the macro button to appear in all Excel workbooks, select “For all documents (default)”. As implied by the description, this is the default setting.
- If the macro button should only appear in a particular Excel workbook, select that particular workbook.
The screenshot below shows the rough look of the options above when the Customize Quick Access Toolbar drop-down menu is expanded. In this particular case, the only Excel workbook that is open is called “Book 1”:

For this example, I simply leave the default option. Therefore, the customization applies to all Excel workbooks.

Step #3: Choose To Work With Macros.
At the top left corner of the Quick Access Toolbar tab in the Excel Options dialog you can find the Choose commands from drop-down menu.

Click on this drop-down menu and select “Macros”.

Step #4: Add Macro To Quick Access Toolbar.
After you’ve completed step #3 above, the Excel Options dialog displays a list of macros that you can add to the Quick Access Toolbar. You can find these macros in the Choose commands from list box which appears on the left side of the Quick Access Toolbar tab of the dialog box.

Choose the macro you want to add from the Choose commands from list box and click on the Add button that appears in the middle of the Excel Options dialog. The following screenshot shows how to add the Delete_Blank_Rows_3 macro:

Step #5: Click The OK Button.
Once you’ve completed the 4 steps above, Excel adds the relevant macro button to the Quick Access Toolbar. Notice how it appears in the Customize Quick Access Toolbar list on the right side of the Excel Options dialog:

To complete the process and implement the changes, simply press the OK button on the lower right corner of the Excel Options dialog.

Once you’re back in Excel, notice how the relevant macro button has been added to the Quick Access Toolbar.

Now you can execute the relevant VBA Sub procedure by simply clicking on the button that you’ve just added to the Quick Access Toolbar.
Option #8: How To Execute A VBA Sub Procedure When A Particular Event Occurs
Excel allows you to determine that a particular VBA Sub procedure is to be executed whenever a certain event occurs. I cover this particular topic in more detail here.
In Excel 2013 Power Programming with VBA, John Walkenbach provides several examples of events, such as the following:
- Opening an Excel workbook.
- Entering data in a worksheet.
- Saving a file.
- Clicking a CommandButton ActiveX control.
The name for VBA Sub procedures that are executed when a particular event occurs is “event handler procedure”. These procedures have 2 main characteristics that distinguish them from other types of VBA Sub procedures:
- Their names have a different structures than usual. More particularly, their name syntax is “object_EventName”. In other words, these names are composed of 3 elements:
Element #1: An object.
Element #2: An underscore.
Element #3: The name of the relevant event.
- The VBA module in which they’re stored is the module for the relevant object.
Event handler procedures are different topic that requires its own VBA tutorial. If you’re interested in learning more about this topic, please refer to Chapter 17 of the above cited Excel 2013 Power Programming with VBA.
Option #9: How To Execute A VBA Sub Procedure From The Immediate Window Of The Visual Basic Editor
Executing a VBA Sub procedure from the Immediate Window of the VBE is useful, in particular, if you’re in the middle of the developing a particular procedure within the Visual Basic Editor environment.
When displayed, the Immediate Window usually appears at the bottom of the Visual Basic Editor.

You can check out my introduction to the Immediate Window by checking my post about the Visual Basic Editor. You can find this, along with all other VBA tutorials within Power Spreadsheets, in the Archives.
In order to execute a VBA Sub procedure using the Immediate Window, simply type the name of the relevant procedure in the Immediate Window and press the Enter key.

Conclusion
The concept of procedures is frequently used in the books and blogs that cover the topic of macros and Visual Basic for Applications. If you don’t understand what Excel authorities are talking about when using this term, you’ll have a very hard time learning VBA.
Perhaps most importantly, once you reach a certain expertise level with Excel you must work with VBA Sub procedures.
Therefore, if your purpose is becoming a powerful Excel user, understanding VBA Sub procedures and mastering how to work with them is not optional. However, after reading this VBA tutorial you have a good understanding of the concept itself. Additionally, you probably also have a basic understanding of how to work with Sub procedures in practice, including the following topics:
- What is the syntax you should use when creating VBA Sub procedures.
- What rules and suggestions to bear in mind when naming a VBA Sub procedure.
- What are the different scopes that a VBA Sub procedure can have, and how you can (and whether should) limit that scope.
- What are some of the most common ways to execute a VBA Sub procedure.
Books Referenced In This Excel Tutorial
- Jelen, Bill and Syrstad, Tracy (2013). Excel 2013 VBA and Macros. United States of America: Pearson Education, Inc.
- Walkenbach, John (2013). Excel VBA Programming for Dummies. Hoboken, NJ: John Wiley & Sons Inc.
- Walkenbach, John (2013). Excel 2013 Power Programming with VBA. Hoboken, NJ: John Wiley & Sons Inc.
Excel VBA: Calling Sub Procedures & Functions, Placement in Modules
———————————————————————————
Contents:
Sub procedures, Function Procedures & Property Procedures
Naming Rules & Conventions for Procedures
VBA Procedures Scope — Public vs Private
Placement of Macros / Sub procedures in appropriate Modules
Calling Procedures
Executing Procedures
———————————————————————————
Sub procedures, Function Procedures & Property Procedures
A VBA project can contain multiple modules, class modules and user forms. Each module contains one or more procedures viz. sub-procedures or functions. Procedures break a program into smaller and specific components. A VBA procedure, also referred to as a Macro, is defined as a set of codes which make Excel perform an action. A procedure is usually of two types, a sub procedure or a function. The third type of procedure is Property, used for Class Modules. As explained below in detail: sub-procedures do not return a value; functions return a value; property procedures are used to return and assign values, and set a reference to an object.
Sub procedures
Event Procedures — are predefined by VBA:
One category of sub procedures are Event Procedures which are triggered by a predefined event and are installed within Excel having a standard & predetermined name viz. like the Worksheet change procedure is installed with the worksheet — «Private Sub Worksheet_Change(ByVal Target As Range)», which combines the object name, underscore, and the event name. The other category of sub-procedures are those which are created by the user. For a detailed understanding of Event Procedures, refer our section: Excel VBA Events, Event Procedures (Handlers), Triggering a VBA Macro.
User Created Sub procedures:
Creating a sub procedure: A sub procedure declaration statement starts with the keyword Sub, followed by a name and then followed by a set of parentheses. A sub-procedure ends with an End Sub statement which can be typed but it also appears automatically on going to the next line after the Sub declaration statement is typed. Your vba code or statements are entered inbetween. See below example of a procedure named Greetings, running or executing which will return the message Welcome:
Sub Greetings()
MsgBox «Welcome!»
End Sub
Function Procedures
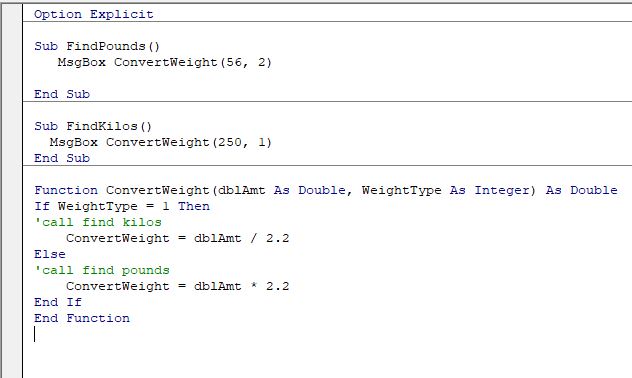
A sub-procedure is a set of vba codes or statements which perform an action, but does not «return a value». A Function is also used to perform an action or calculation (which can also be performed by a sub procedure) but «returns a value», which is a single value. The name of the function can be used within the function procedure to indicate the value returned by the function — refer Example 4 which shows the variance between how a function and sub works. Like you use built-in Excel functions of SUM, MAX, MIN, COUNT, AVERAGE, etc., Function procedures are created in vba to make custom worksheet functions. Function procedure cannot be created using a Macro Recorder. A sub procedure uses a different syntax as compared to a Function. A Function procedure can be called by using its name within an expression which is not possible in respect of a sub procedure which can be called only by a stand-alone statement. Because a function returns a value, it can be used directly in a worksheet (which is not possible with a sub-procedure), by entering/selecting the name of the function after typing an equal sign (refer Image 1).
Creating a Function procedure: A function declaration statement starts with the keyword Function, followed by a name and then followed by a set of parentheses. You must specify the data type which is the type of value the function will return — this is done by typing the keyword As (after the parentheses) followed by the data type. Functions can be created without arguments or with any number of arguments which are listed between the parentheses and in case of multiple arguments, separate them with commas. A function procedure ends with an End Function statement which can be typed but it also appears automatically on going to the next line after the Function declaration statement is typed. Your vba code or statements are entered inbetween the Function declaration statement & the End statement.
Executing a Function procedure: (i) the function can be called from another procedure viz. a sub-procedure or function procedure; and (ii) the function can be used directly in the spreadsheet viz. in a worksheet formula by entering/selecting the name of the function after typing an equal sign. See below examples of Function procedures and how they are called:
Example 1
Function partNames() As String
‘The declaration of the partNames function contains no argument.
Dim strFirstName As String
Dim strSurName As String
strFirstName = InputBox(«Enter first name»)
strSurName = InputBox(«Enter sur name»)
partNames = strFirstName & » » & strSurName
End Function
Sub fullName()
‘call the partNames function and place value in cell A1 of active sheet:
ActiveSheet.Range(«A1») = partNames
End Sub
Example 2
Function cubeRoot() As Double
‘The declaration of the cubeRoot function contains no argument.
Dim i As Integer
i = InputBox(«Enter an Integer»)
cubeRoot = i ^ (1 / 3)
cubeRoot = Format(cubeRoot, «#.##»)
End Function
Sub callCubeRoot()
‘call the cubeRoot function in the message box:
MsgBox «Cube Root of the number is » & cubeRoot
End Sub
Example 3 (refer section on Passing Arguments to Procedures, Excel VBA to understand how arguments are passed in a procedure)
Function triple(i As Integer) As Long
‘The declaration of the triple function contains one variable as argument.
triple = i * 3
End Function
Sub integerTriple()
Dim a As Integer
a = InputBox(«Enter an Integer»)
‘call the triple function:
MsgBox triple(a)
End Sub
Refer Image 1 which displays how the function is used in a worksheet.

It may be noted that the set of parentheses, after the procedure name in the Sub or Function declaration statement, is usually empty. This is the case when the sub procedure or Function does not receive arguments. However, when arguments are passed to a sub procedure or a Function from other procedures, then these are listed between the parentheses.
Refer section on Passing Arguments to Procedures, Excel VBA to understand how arguments are passed in a procedure.
Example 4: shows the variance between how a function and sub works — functions return a value whereas sub-procedures do not return a value.
For live code, click to download excel file.
The addSquare function returns a value which can be used by the calling procedure:
Function addSquare() As Double
‘the addSquare function returns a value in its own name:
Dim a As Double
Dim b As Double
a = InputBox(«Enter first number»)
b = InputBox(«Enter second number»)
addSquare = (a + b) ^ 2
End Function
Sub calculate()
‘This is the calling procedure: calls the addSquare function.
Dim c As Double
‘the addSquare function returns a value which can be used by the calling procedure:
c = addSquare ^ (1 / 2)
MsgBox c
End Sub
The addSquare1 sub-procedure does NOT return a value which can be used by the calling procedure:
Sub addSquare1()
Dim a As Double
Dim b As Double
Dim c As Double
a = InputBox(«Enter first number»)
b = InputBox(«Enter second number»)
c = (a + b) ^ 2
MsgBox c
End Sub
Sub calculate1()
‘This is the calling procedure: calls the addSquare1 sub procedure.
‘the addSquare1 sub-procedure does NOT return a value which can be used by the calling procedure. The calling procedure (calculate1) can only call the addSquare1 sub-procedure without being able to use its result:
addSquare1
End Sub
Property Procedures
For a detailed understanding of Property Procedures, refer section Custom Classes & Objects, Custom Events, using Class Modules in Excel VBA.
Property Procedure is a set of vba codes that creates and manipulates custom properties for a class module. The properties of the class object are manipulated in a Class Module with Property procedures which use the Property Let, Property Get, and Property Set statements. A Property procedure is declared by a Property Let, Property Get or Property Set statement and ends with an End Property statement. Property Let (write-only property) is used to assign a value to a property and Property Get (read-only property — which can only be returned but not set) returns or retrieves the value of a property. Property Set (write-only property) is used to set a reference to an object. Property procedures are usually defined in pairs, Property Let and Property Get OR Property Set and Property Get. A Property Let procedure is created to allow the user to change or set the value of a property, whereas the user cannot set or change the value of a read-only property (viz. Property Get).
A property procedure can do whatever can be done within a vba procedure like performing an action or calculation on data. A Property Let (or Property Set) procedure is an independent procedure which can pass arguments, perform actions as per a set of codes and change the value of its arguments like a Property Get procedure or a Function but does not return a value like them. A Property Get procedure is also an independent procedure which can pass arguments, perform actions as per a set of codes and change the value of its arguments like a Property Let (or Property Set) procedure, and can be used similar to a Function to return the value of a property.
The Property Set procedure is similar to and a variation of the Property Let procedure and both are used to set values. A Property Set procedure is used to create object properties which are actually pointers to other objects, whereas a Property Let procedure sets or assigns values to scalar properties like string, integer, date, etc. Using the Property Set statement enables Properties to be represented as objects.
Naming Rules & Conventions for Procedures
It will help to assign a procedure name which is reflective of the action you wish to perform with the procedure. Some programmers prefer to use a sentence, differentiating words by an underscore or a capital letter viz. total_number_of_rows, TotalNumberOfRows. Use of very lengthy names names is generally avoidable.
There are some rules which are to be followed when naming your procedures:
The name must begin with a letter, and not a number or underscore.
A name can consist of letters, numbers or underscores but cannot have a period (.) or punctuation characters or special characters (such as ! @ # $ % ^ & * ( ) + — = [ ] { } ; ‘ : » , . / < > ? | ` ~).
The name should consist of a string of continuous characters, with no intervening space.
A procedure name can have a maximum of 255 characters.
Procedure names cannot use keywords / reserved words such as If, And, Or, Loop, Do, Len, Close, Date, ElseIf, Else, Select, … that VBA uses as part of its programming language.
Valid Names:
TotalRows
total_rows_10
Total_number_of_Rows
Invalid Names:
Total.Rows
5Rows
Total&Rows
Total Rows (space not allowed)
VBA Procedures Scope — Public vs Private
A vba procedure can have either Public or Private Scope. A procedure can be specified as such by preceding it with the Public or Private keyword. Procedures are Public by default, if the Public keyword is not specified.
A Private procedure can only be called by all procedures in the same module and will not be visible or accessible to procedures of outside modules in the project. A Private procedure will also not appear in the Macros dialog box. A
Public procedure can be called by all procedures in the same module and also by all procedures of outside modules in the project. A Public procedure’s name will appear in the Macros dialog box and can be run therefrom.
Creating a Public procedure:
Sub calculateProcedure()
Public Sub calculateProcedure()
Function cubeRoot() As Double
Public Function cubeRoot() As Double
Creating a Private procedure:
Private Sub calculate()
Private Function cubeRoot() As Double
Placement of Macros / Sub procedures in appropriate Modules
Macros (viz. vba codes or sub-procedures) should reside in their appropriate modules or Excel will not be able to find and execute them. The Object Modules are used for Excel built-in event procedures and to create your own events. Object Modules in Excel are: ThisWorkbook module, Sheet modules (worksheets and chart sheets), UserForm modules and Class modules. General vba code in respect of events not associated with a particular object (like workbook or worksheet) are placed in the standard code module. A generally accepted practice is to place event procedures in the ThisWorkbook module, Sheet modules and UserForm modules, while placing other vba codes in Standard Code modules.
Refer Image 2 which shows the Modules in VBE.

Standard Code Modules:
These are also referred to as Code Modules or Modules, and there can be any number of these Modules (Module1, Module2, …) in a VBA project, wherein each Module can be used for covering a certain aspect of the project. Most vba codes and custom functions (viz. User Defined Functions referred to as UDFs) are placed in Standard Code Modules. Standard Code Modules are not used for event procedures linked and associated to a Workbook or Worksheet or UserForm or for Application events created in a Dedicated Class Module. In respect of events not associated with objects, such as OnTime method (automatically trigger a vba code at periodic intervals or at a specific day or time) and OnKey method (run a specific code on pressing a key or combination of keys), because these are not associated with a particular object like workbook or worksheet, their codes rest in the standard code module. Procedures in standard modules can be called from a procedure in an outside module just like you call a procedure located in the same module ie. without specifying the module of the called procedure.
Workbook module:
ThisWorkbook is the name of the module for the workbook and is used to place workbook events and Application Events. Workbook events are actions associated with the workbook, to trigger a VBA code or macro. Opening / closing / saving / activating / deactivating the workbook are examples of workbook events viz. with a workbook open event, you can run a sub-procedure automatically when a workbook is opened. Workbook events code must be placed in the code module for the ThisWorkbook object, and if they are placed in standard code modules, Excel will not be able to find and execute them. Though Application Events can be created in any object module, they are best placed in either an existing object module like ThisWorkbook or you can create a class module to handle them. Though general vba codes and procedures can also be placed in a workbook, but you will need to include ‘ThisWorkbook’ in the reference to call them (from outside the workbook module) viz. ThisWorkbook.ProcedureName.
Sheet Modules:
A sheet module has the same name as the worksheet’s code name with which it is associated viz. Sheet1, Sheet2, … In VBE, the code name of the selected worksheet appears to the right of (Name) in the Properties Window while the sheet name appears to the right of Name when you scroll down in the Properties Window. The code name can be changed only in the Properties window and not programmatically with code. Sheet module can be for a worksheet or a chart sheet and is used to place worksheet and chart sheet events. Worksheet events are actions or occurrences associated with the worksheet, to trigger a VBA code or macro. Chart sheet events (ie. if a chart is a chart sheet) reside within its chart sheet and are enabled by default, similar to as worksheet events reside in their worksheet. But for using events for a chart object representing an embedded chart in a worksheet, a new class module has to be created.
To use the Excel provided worksheet event procedures, in the Visual Basic Editor after selecting the appropriate worksheet, select Worksheet from the Object box and then select a corresponding procedure from the Procedure box. After selecting the specific event, insert the vba code you want to be executed. Worksheet Event procedures are installed with the worksheet, ie. the code must be placed in the code module of the appropriate Sheet object and if they are placed in standard code modules, Excel will not be able to find and execute them. Instances of worksheet events are: selecting a cell or changing cell selection in a worksheet, making a change in the content of a worksheet cell, selecting or activating a worksheet, when a worksheet is calculated, and so on. For example, with the worskheet change event, a sub-procedure runs automatically when you change the contents of a worksheet cell. Though general vba codes and procedures can also be placed in a worksheet, but you will need to include the sheet module name in the reference to call them (from outside that sheet module) viz. Sheet3.ProcedureName.
UserForm Modules:
Event procedures for UserForm or its Controls are placed in the Code module of the appropriate UserForm. UserForm events are pre-determined events that occur for a particular UserForm and its Controls, examples include Initialize, Activate or Click. These are placed in the user form code module. You must double-click the body of a UserForm to view the UserForm Code module, referred to as a module ‘behind’ the UserForm, and then select UserForm or its Control from the Object box and then select a corresponding procedure from the Procedure box. After selecting the specific event, insert the vba code you want to be executed. Remember to set the Name property of controls before you start using event procedures for them, else you will need to change the procedure name corresponding to the control name given later. Only event procedures for the UserForm or its controls should be placed here. However, general vba codes and procedures can also be placed in a UserForm, but you will need to include the UserForm module name in the reference to call them (from outside that UserForm module) viz. UserForm1.ProcedureName.
Class Modules:
Class Modules are used to create new objects and you can create your own custom events in a class. A Custom Event is defined and declared in a Class Module using the Event keyword. An Event procedure can be created using the WithEvents keyword to declare an object variable of the Class Module type. Though Application Events can be created in any object module, they are best placed in either an existing object module like ThisWorkbook or by creating a class module to handle them. Also, for using events for a chart object representing an embedded chart in a worksheet, a new class module has to be created.
For a detailed understanding of Class Modules, refer section Custom Classes & Objects, Custom Events, using Class Modules in Excel VBA.
Calling Procedures
Subs and Functions can be called within each other. Calling a procedure refers to using or executing a procedure.
Calling Sub procedures in the Same Module
You can call sub-procedures either solely by their name or precede the name with the Call keyword.
Calling a sub named strGetName which does not receive arguments, which was declared as — Sub strGetName():
strGetName
Call strGetName
Calling a sub named strGetName which receives arguments, which was declared as — Sub strGetName(firstName As String, secondName As String):
Call strGetName(firstName, secondName)
strGetName firstName, secondName
Note that argument(s) must be enclosed within parentheses when using the Call keyword, and multiple arguments must omit the parentheses when the Call keyword is not used.
Calling Functions in the Same Module
Functions can be called in a manner similar to Subs and can also be used in an expression by their name. Functions can also be used directly in a worksheet, by entering/selecting the name of the function after typing an equal sign (refer Image 1 for using the Example 3 function in a worksheet).
A function declared as — Function studentNames() As String — can be called as below:
studentNames
Call studentNames
A function which receives arguments and declared as — Function triple(i As Integer, j As Integer) As Long — can be called as below:
Call triple(i, j)
triple i, j
Using a Function in an expression: A function declared as — Function cubeRoot() As Double — can be called as below:
MsgBox cubeRoot * 2
Calling Procedures in Outside Modules
As explained above, Public procedures can be called by all procedures of outside modules. To do so, it is mostly required to specify the module that contains the called procedure. There are different ways to call procedures located in a workbook/ worksheet/ form module, standard module or a class module.
Calling Procedures located in a Workbook Module, Worksheet Module or Forms Module
If the called procedure is located in a Workbook Module, Worksheet Module or Forms Module, then you will need to specify the module while calling it from an outside module.
A sub named strGetName, which was declared as — Sub strGetName() — and located in the workbook module named ThisWorkbook, can be called by specifying — ThisWorkbook.strGetName — in the calling procedure located in an outside module.
A sub named strGetName, which was declared as — Sub strGetName() — and located in the worksheet module named Sheet2, can be called by specifying — Sheet2.strGetName — in the calling procedure located in an outside module.
A sub named strGetName, which was declared as — Sub strGetName() — and located in the UserForm named UserForm1, can be called by specifying — UserForm1.strGetName — in the calling procedure located in an outside module.
Calling Procedures located in Standard Modules
Procedures in standard modules can be called from a procedure in an outside module just like you call a procedure located in the same module ie. without specifying the module of the called procedure. A sub named strGetName, which was declared as — Sub strGetName() — and located in a standard module, can be called from a procedure in a worksheet module by using only its name ie. strGetName, or using the Call keyword ie. Call strGetName.
You might already be aware that procedures of same name are not allowed within the same module but procedures can have same names in separate modules. If both the standard modules (Module1 and Module2) have a procedure named strGetName, to call it from an outside module (say, from a standard module named Module3), you will need to specify the called procedure’s module viz. Module1.strGetName OR Module2.strGetName. However, if the calling procedure is located in Module2 and if you call the procedure named strGetName without specifying the module, then the procedure strGetName located in Module 2 will be called.
Calling Procedures located in Class Modules
In the calling procedure located in an outside module, you need to instantiate an instance of the class in which the called procedure is located. To do this, you create a variable and definine it as a reference to the class. Use this variable with the name of the called procedure located in the class module. For example, in the calling procedure use the statement — Dim iStudent As New clsStudent — to use a variable named iStudent and create an instance of the class named clsStudent. To call the Grade function located in the clsStudent object, use the variable with the function name — iStudent.Grade. If the Grade function receives an argument, then to call the Grade function — iStudent.Grade (argument).
For a detailed understanding of Class Modules, refer section Custom Classes & Objects, Custom Events, using Class Modules in Excel VBA.
Executing Procedures
Executing Function Procedures:
Executing a Function procedure: (i) the function can be called from another procedure viz. a sub procedure or function procedure; and (ii) the function can be used directly in the spreadsheet viz. in a worksheet formula by entering/selecting the name of the function after typing an equal sign. To see examples of Function procedures and how they are called, refer the headings «Function Procedures» & «Calling Procedures» hereinabove.
Executing Event Procedures:
Events are actions performed, or occurrences, which trigger a VBA macro. An event procedure (ie. a vba code) is triggered when an event occurs such as opening / closing / saving / activating / deactivating the workbook, selecting a cell or changing cell selection in a worksheet, making a change in the content of a worksheet cell, selecting or activating a worksheet, when a worksheet is calculated, and so on.
Event procedures are attached to objects: An event procedure is a procedure with a standard name that runs on the occurrence of a corresponding event. The event procedure contains the user written customized code which gets executed when the specific Excel built-in event, such as worksheet change event, is triggered. Event Procedures are triggered by a predefined event and are installed within Excel having a standard & predetermined name viz. like the Worksheet change procedure is installed with the worksheet — «Private Sub Worksheet_Change(ByVal Target As Range)». An Event Procedure is automatically invoked when an object recognizes the occurrence of an event. Event procedures are attached to objects like Workbook, Worksheet, Charts, Application, UserForms or Controls. An event procedure for an object is a combination of the object’s name (as specified in the Name property), an underscore and the event name. To use the Excel provided event procedures, in the Visual Basic Editor select an object from the Object box and then select a corresponding procedure from the Procedure box. After selecting the specific event, insert the vba code you want to be executed.
Using ActiveX controls: ActiveX controls are used: 1) on worksheets — these can be used without or with vba code here; and 2) on UserForms, with vba code. ActiveX controls have event procedures that run on the occurrence of a corresponding event. These procedures are inserted in the code modules of the Worksheet or UserForm within which the controls are used. Some ActiveX controls can only be used on UserForms and not on worksheets. Note that you can assign macros to run directly from Forms controls, but you cannot assign a macro to run directly from ActiveX controls.
Using an ActiveX Control viz. Command Button, in a worksheet: On the Developer tab on the ribbon, click Insert in the Controls group, choose and click Command Button in ActiveX Controls and then click on your worksheet where you want to place the upper-left corner of the Command Button (you can move and resize later). To create an event procedure with the command button, in the code window in VBE, select the command button in the Object drop-down Box on the left, select the relevant event from the Procedure drop-down Box on the right, and insert the vba code. For example, if Click is selected in the Procedure drop-down Box after selecting CommandButton1 in the Object drop-down Box, the event procedure will be called CommandButton1_Click, and the vba code runs on clicking the Command Button.
Events not associated with objects, such as OnTime method (automatically trigger a vba code at periodic intervals or at a specific day or time) and OnKey method (run a specific code on pressing a key or combination of keys). Because these are not associated with a particular object like workbook or worksheet, their codes rest in the standard code module.
Executing Sub Procedures:
Run a Sub procedure (macro) using Macro dialog box, Shortcut key or in VBE:
Macro dialog box: Under the View tab on the ribbon, click Macros in the Macros group, click View Macros which will open the Macro dialog box. In the Macro dialog box, select the Macro name and click Run to execute the Sub/macro. You can also open the Macro dialog box by clicking on Macros in the Code group under the Developer tab on the ribbon. Yet another way is to use the key combination Alt+F8 which opens the Macro dialog box.
Shortcut key: Use the Shortcut key associated with the macro. For this you must already have assigned a Shortcut key to the macro which can be done both at the time when you begin recording a macro or later by selecting the sub / macro name in the macro list (in Macro dialog box) and clicking Options button.
Visual Basic Editor: 1) In the Visual Basic Editor, click within the sub procedure and press F5 (or click Run in the menu bar and then click Run Sub/Userform). 2) In the Visual Basic Editor, click Tools in the menu bar, then click Macros which opens the Macros dialog box. In the Macros dialog box, select the Macro name and click Run to execute the macro,
Obviously these methods are not very user friendly and you will not wish to automate an excel file with multiple macros and have users go through a «process» as described above, to select and run macros. A better way to run a macro would be to click on a button bearing a self-explanatory text «Calculate Bonus» appearing on the worksheet or clicking a Toolbar Button. We show how to assign a macro to an object, shape, graphic or control.
You can assign a sub / macro to:
A Form Control viz. Button: You can assign a macro to any Form control. On the Developer tab on the ribbon, click Insert in the Controls group, choose and click Button in Form Controls and then click on your worksheet where you want to place the the upper-left corner of the Button (you can move and resize later). Right click on the Button and select Assign Macro which opens the Assign Macro dialog box from where you can select and assign a macro to the Button.
The Quick Access Toolbar (Toolbar Button): Click the Office Button (top left of your excel window), click Excel Options which opens the Excel Options dialog box. Click Customize on the left, In the ‘Choose commands from’ drop-down box, select Macros, select a macro name on the left side list box and click ‘Add’ which adds it to the Quick Access Toolbar and the macro name now appears on the right side list box. To modify the macro button: select the macro name on the right side list box, click the Modify button at the bottom which opens the Modify Button dialog box from which you can select and modify the button which appears on the Quick Access Toolbar. Clicking this button on the Quick Access Toolbar will run the macro. Refer Image 3a which shows the Excel Options dialog box after selecting a macro; Image 3b shows (after clicking Add and Modify) the Modify Button dialog box wherein a new button is assigned for the macro; Image 3c (after clicking Ok twice) shows the macro button (i in blue circle) appearing on the Toolbar (we have assigned macro called macro1 in Sheet1 — Sheet1.macro1).


Any Object, Shape, Picture, Chart, Text Box, etc. inserted in the worksheet: Under the Insert tab on the ribbon, you can insert an Object, Shape, Picture, SmartArt graphic, Chart, Text Box, WordArt, etc. in the worksheet. Right click on the object, shape or graphic you have inserted, and select Assign Macro which opens the Assign Macro dialog box from where you can select and assign a macro to the Button.
Calling a Sub procedure from another Procedure:
Subs and Functions can be called within each other, as explained above under the heading «Calling Procedures». This means that a sub-procedure (or function) can be called from another procedure viz. a sub procedure or function procedure.
Assign multiple subs / macros:
You can assign multiple subs/macros to an object, graphic or control, by calling other sub procedures. Refer below example, in the sub procedure (CommandButton1_Click) which is executed on clicking a Command Button, two other sub procedures named macro1 and macro2 are called and executed. In this example macros are called using their names. You can view all macros by clicking Macros in the Macros group (under the View tab on the ribbon) and then selecting View Macros. Remember to type the macro names on separate lines while calling them.
Call sub procedures (macro1 & macro2 are located in standard code modules) using their names:
Private Sub CommandButton1_Click()
macro1
macro2
End Sub
Call sub procedures (using the Call method) where macro1 & macro2 are located in standard code modules and macro3 is in a worskheet module (in Sheet3) and macro4 is in the workbook module (ThisWorkbook), as shown below:
Private Sub CommandButton1_Click()
Call macro1
Call macro2
Call Sheet3.macro3
Call ThisWorkbook.macro4
End Sub
Excel VBA Sub Procedure
SUB in VBA is also known as a subroutine or a procedure that contains all the code. It is an inbuilt statement in VBA, and when used, it automatically gives us the statement of the end sub. The middle portion one may use for coding, the sub statement can be both public and private, and the subprocedure’s name is mandatory in VBA.
Sub means Sub Procedure in VBA. Sub Procedures are used to perform a specific set of tasks provided in the form of code. It performs only the task mentioned in the code as per the VBA language but does not return any value.
Table of contents
- Excel VBA Sub Procedure
- How to write VBA Sub Procedures?
- Example #1 – Simple Sub Procedure
- Example #2 – Simple Subroutine Task
- Types of VBA Subroutine
- Recommended Articles
- How to write VBA Sub Procedures?
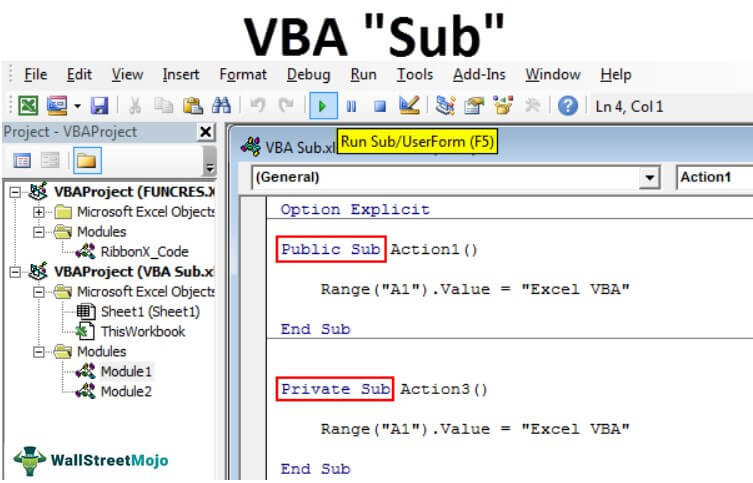
How to write VBA Sub Procedures?
You can download this VBA Sub Procedure Template here – VBA Sub Procedure Template
It is important to understand the structure of the sub procedure to write sub procedure codes. Below is the structure.
Sub [Name of the Procedure] (Parameters)

 [What needs to be done?])

End Sub
To start the sub procedure, we need to use the word “Sub.” We need to give a name to the Sub as a procedure name. Procedure Name is nothing but our macro name. We do not usually have parameters inside the parenthesis in the VBA sub procedure.
After writing the Sub Procedure name, we need to write the tasks that we need to do. Then comes the End statement, i.e., End Sub.
Example #1 – Simple Sub Procedure
Now, take a look at the simple sub procedure writing methods.
Step 1: Start the word “Sub” in the module.

Step 2: Now name the macro name or procedure name.

Step 3: After giving the name to the sub procedure, just hit the enter key. It will automatically apply the end statement.

Now, we can see two things here, one is the start, and another is the end of the subprocedure. For better understanding, we can call it “Head” and “Tail.”

Between the head and tail of the macro, we need to write our code to perform some tasks.
Example #2 – Simple Subroutine Task
Now, we will see how to perform some simple actions here.
Assume you want to insert the value “Excel VBA” in cell A1.
Step 1: Start the sub procedure by using the above methods.
Code:
Sub Action1()

End Sub

Step 2: To access cell A1 we need to use the word RANGE.
Code:
Sub Action1()

  Range(

End Sub

Step 3: It asks what cell1 you want to refer to is? In this case, it is an A1 cell.
Code:
Sub Action1()

  Range ("A1")

End Sub

Step 4: We need to insert the value “Excel VBA,” so select the VALUE property by putting a dot after the range.
Code:
Sub Action1()

  Range("A1").Value

End Sub

When you start typing the word VALUE, you will see many options. These options are called an IntelliSense list, which predicts based on your typing. It is like how formulas will appear in the worksheet when we start typing the formula.
Step 5: After selecting VALUE, put an equal sign and enter the value in doubles quotes as “Excel VBA.”
Code:
Sub Action1()

  Range("A1").Value = "Excel VBA"

End Sub

So, we have completed it.
Now, we need to execute this task. To execute the task, we had a return. So, we need to run this code by pressing the RUN button in the visual basic editor window.
We can press the excel shortcut keyAn Excel shortcut is a technique of performing a manual task in a quicker way.read more by placing the cursor inside the Macro code.

As soon as you run the code, you will get the “Excel VBA” value in cell A1.

Types of VBA Subroutine
We have two more types in sub procedure: Public Sub Procedure and Private Sub Procedure.


The words “Public” and “Private” are accessibility modifiers that allow us to use them differently.
- Public Sub Procedure allows us to use the procedure in all the workbook modules.
- Private Sub Procedure allows us to use the procedure only in the current module.
For example, look at the below image of the Public Code, which is there in Module 1.

Now, in Module 2 also, we can use this sub procedure.

Action1 is the name of the sub procedure we have used in Module 1.
In Module 2, we have mentioned it as “Call Action1”. It means when you run the sub procedure, it will execute the subprocedure Action1 from Module 1.
One cannot access Private Sub Procedures from a different module. We need to access them from the same module only.
Recommended Articles
This article has been a guide to VBA Sub. Here, we learn how to invoke a sub procedure in Excel VBA and types of subroutines, along with examples and downloadable templates. Below are some useful articles related to VBA: –
- VBA StrConv
- VBA MOD
- VBA Worksheet Function
- VBA Time
- VBA Write Text File
“Computers are useless. They can only give you answers.” – Pablo Picasso.
This post provides a complete guide to using the VBA Sub. I also cover VBA functions which are very similar to Subs.
If you want some quick information about creating a VBA Sub, Function, passing parameters, return values etc. then check out the quick guide below.
If you want to understand all about the VBA Sub, you can read through the post from start to finish or you can check out the table of contents below.
Quick Guide to the VBA Sub
| Sub | Example |
|---|---|
Sub
|
|
Function
|
|
| Create a sub | Sub CreateReport()
End Sub |
| Create a function | Function GetTotal() As Long
End Function |
| Create a sub with parameters | Sub CreateReport(ByVal Price As Double)
Sub CreateReport(ByVal Name As String) |
| Create a function with parameters | Function GetTotal(Price As Double)
Function GetTotal(Name As String) |
| Call a sub | Call CreateReport ‘ Or CreateReport |
| Call a function | Call CalcPrice ‘ Or CalcPrice |
| Call a sub with parameters | Call CreateReport(12.99)
CreateReport 12.99 |
| Call a function with parameters | Call CalcPrice(12.99)
CalcPrice 12.99 |
| Call a function and retrieve value (cannot use Call keyword for this) |
Price = CalcPrice |
| Call a function and retrieve object | Set coll = GetCollection |
| Call a function with params and retrieve value/object | Price = CalcPrice(12) Set coll = GetCollection(«Apples») |
| Return a value from Function | Function GetTotal() As Long GetTotal = 67 End Function |
| Return an object from a function | Function GetCollection() As Collection Dim coll As New Collection Set GetCollection = coll End Function |
| Exit a sub | If IsError(Range(«A1»)) Then Exit Sub End If |
| Exit a function | If IsError(Range(«A1»)) Then Exit Function End If |
| Private Sub/Private Function (available to current module) |
Private Sub CreateReport() |
| Public Sub/Public Function (available to entire project) |
Public Sub CreateReport() |
Introduction
The VBA Sub is an essential component of the VBA language. You can also create functions which are very similar to subs. They are both procedures where you write your code. However, there are differences and these are important to understand. In this post I am going to look at subs and functions in detail and answer the vital questions including:
- What is the difference between them?
- When do I use a sub and when do I use a function?
- How do you run them?
- Can I return values?
- How do I pass parameters to them?
- What are optional parameters?
- and much more
Let’s start by looking at what is the VBA sub?
What is a Sub?
In Excel VBA a sub and a macro are essentially the same thing. This often leads to confusion so it is a good idea to remember it. For the rest of this post I will refer to them as subs.
A sub/macro is where you place your lines of VBA code. When you run a sub, all the lines of code it contains are executed. That means that VBA carries out their instructions.
The following is an example of an empty sub
Sub WriteValues()

End Sub
You declare the sub by using the Sub keyword and the name you wish to give the sub. When you give it a name keep the following in mind:
- The name must begin with a letter and cannot contain spaces.
- The name must be unique in the current workbook.
- The name cannot be a reserved word in VBA.
The end of the Sub is marked by the line End Sub.
When you create your Sub you can add some code like the following example shows:
Sub WriteValues()
    Range("A1") = 6
End Sub
What is a Function?
A Function is very similar to a sub. The major difference is that a function can return a value – a sub cannot. There are other differences which we will look at but this is the main one.
You normally create a function when you want to return a value.
Creating a function is similar to creating a sub
Function PerformCalc()

End Function
It is optional to add a return type to a function. If you don’t add the type then it is a Variant type by default. This means that VBA will decide the type at runtime.
The next example shows you how to specify the return type
Function PerformCalc() As Long

End Function
You can see it is simple how you declare a variable. You can return any type you can declare as a variable including objects and collections.
A Quick Comparison
Sub:
- Cannot return a value.
- Can be called from VBAButtonEvent etc.
Function
- Can return a value but doesn’t have to.
- Can be called it from VBAButtonEvent etc. but it won’t appear in the list of Macros. You must type it in.
- If the function is public, will appear in the worksheet function list for the current workbook.
Note 1: You can use “Option Private Module” to hide subs in the current module. This means that subs won’t be visible to other projects and applications. They also won’t appear in a list of subs when you bring up the Macro window on the developer tab.
Note 2:We can use the word procedure to refer to a function or sub
Calling a Sub or Function
When people are new to VBA they tend to put all the code in one sub. This is not a good way to write your code.
It is better to break your code into multiple procedures. We can run one procedure from another.
Here is an example:
' https://excelmacromastery.com/
Sub Main()

    ' call each sub to perform a task
    CopyData

    AddFormulas

    FormatData

End Sub

Sub CopyData()
    ' Add code here
End Sub

Sub AddFormulas()
    ' Add code here
End Sub

Sub FormatData()
    ' Add code here
End Sub
You can see that in the Main sub, we have added the name of three subs. When VBA reaches a line containing a procedure name, it will run the code in this procedure.
We refer to this as calling a procedure e.g. We are calling the CopyData sub from the Main sub.
There is actually a Call keyword in VBA. We can use it like this:
' https://excelmacromastery.com/
Sub Main()

    ' call each sub to perform a task
    Call CopyData

    Call AddFormulas

    Call FormatData

End Sub
Using the Call keyword is optional. There is no real need to use it unless you are new to VBA and you feel it makes your code more readable.
If you are passing arguments using Call then you must use parentheses around them.
For example:
' https://excelmacromastery.com/
Sub Main()

    ' If call is not used then no parentheses
    AddValues 2, 4

    ' call requires parentheses for arguments
    Call AddValues(2, 4)
End Sub

Sub AddValues(x As Long, y As Long)

End Sub
How to Return Values From a Function
To return a value from a function you assign the value to the name of the Function. The following example demonstrates this:
' https://excelmacromastery.com/
Function GetAmount() As Long
    ' Returns 55
    GetAmount = 55
End Function

Function GetName() As String
    ' Returns John
    GetName = "John"
End Function
When you return a value from a function you will obviously need to receive it in the function/sub that called it. You do this by assigning the function call to a variable. The following example shows this:
' https://excelmacromastery.com/
Sub WriteValues()
    Dim Amount As Long
    ' Get value from GetAmount function
    Amount = GetAmount
End Sub

Function GetAmount() As Long
    GetAmount = 55
End Function
You can easily test your return value using by using the Debug.Print function. This will write values to the Immediate Window (View->Immediate window from the menu or press Ctrl + G).
' https://excelmacromastery.com/
Sub WriteValues()
    ' Print return value to Immediate Window
    Debug.Print GetAmount
End Sub

Function GetAmount() As Long
    GetAmount = 55
End Function
Using Parameters and Arguments
We use parameters so that we can pass values from one sub/function to another.
The terms parameters and arguments are often confused:
- A parameter is the variable in the sub/function declaration.
- An argument is the value that you pass to the parameter.
' https://excelmacromastery.com/
Sub UsingArgs()

    ' The argument is 56
    CalcValue 56

    ' The argument is 34
    CalcValue 34

End Sub

' The parameter is amount
Sub CalcValue(ByVal amount As Long)

End Sub
Here are some important points about parameters:
- We can have multiple parameters.
- A parameter is passed using either ByRef or ByVal. The default is ByRef.
- We can make a parameter optional for the user.
- We cannot use the New keyword in a parameter declaration.
- If no variable type is used then the parameter will be a variant by default.
The Format of Parameters
Subs and function use parameters in the same way.
The format of the parameter statement is as follows:
' All variables except arrays
[ByRef/ByVal]  As [Variable Type]

' Optional parameter - can only be a basic type
[Optional] [ByRef/ByVal] [Variable name] As <[Variable Type] =

' Arrays
[ByRef][array name]() As [Variable Type]
Here are some examples of the declaring different types of parameters:
' https://excelmacromastery.com/
' Basic types

Sub UseParams1(count As Long)
End Sub

Sub UseParams2(name As String)
End Sub

Sub UseParams3(amount As Currency)
End Sub

' Collection
Sub UseParamsColl(coll As Collection)
End Sub

' Class module object
Sub UseParamsClass(o As Class1)
End Sub

' Variant
' If no type is give then it is automatically a variant
Sub UseParamsVariant(value)
End Sub

Sub UseParamsVariant2(value As Variant)
End Sub

Sub UseParamsArray(arr() As String)
End Sub
You can see that declaring parameters looks similar to using the Dim statement to declare variables.
Multiple Parameters
We can use multiple parameters in our sub/functions. This can make the line very long
Sub LongLine(ByVal count As Long, Optional amount As Currency = 56.77, Optional name As String = "John")
We can split up a line of code using the underscore (_) character. This makes our code more readable
Sub LongLine(ByVal count As Long _
            , Optional amount As Currency = 56.77 _
            , Optional name As String = "John")
Parameters With a Return Value
This error causes a lot of frustration with new users of VBA.
If you are returning a value from a function then it must have parentheses around the arguments.
The code below will give the “Expected: end of statement” syntax error.
' https://excelmacromastery.com/
Sub UseFunction()

    Dim result As Long

    result = GetValue 24.99

End Sub


Function GetValue(amount As Currency) As Long
    GetValue = amount * 100
End Function

We have to write it like this
result = GetValue (24.99)
ByRef and ByVal
Every parameter is either ByRef or ByVal. If no type is specified then it is ByRef by default
' https://excelmacromastery.com/
' Pass by value
Sub WriteValue1(ByVal x As Long)

End Sub

' Pass by reference
Sub WriteValue2(ByRef x As Long)

End Sub

' No type used so it is ByRef
Sub WriteValue3(x As Long)

End Sub
If you don’t specify the type then ByRef is the type as you can see in the third sub of the example.
The different between these types is:
ByVal – Creates a copy of the variable you pass.
This means if you change the value of the parameter it will not be changed when you return to the calling sub/function
ByRef – Creates a reference of the variable you pass.
This means if you change the value of the parameter variable it will be changed when you return to the calling sub/function.
The following code example shows this:
' https://excelmacromastery.com/
Sub Test()

    Dim x As Long

    ' Pass by value - x will not change
    x = 1
    Debug.Print "x before ByVal is"; x
    SubByVal x
    Debug.Print "x after ByVal is"; x

    ' Pass by reference - x will change
    x = 1
    Debug.Print "x before ByRef is"; x
    SubByRef x
    Debug.Print "x after ByRef is"; x

End Sub

Sub SubByVal(ByVal x As Long)
    ' x WILL NOT change outside as passed ByVal
    x = 99
End Sub

Sub SubByRef(ByRef x As Long)
    ' x WILL change outside as passed ByRef
    x = 99
End Sub
The result of this is:
x before ByVal is 1
x after ByVal is 1
x before ByRef is 1
x after ByRef is 99
You should avoid passing basic variable types using ByRef. There are two main reasons for this:
- The person passing a value may not expect it to change and this can lead to bugs that are difficult to detect.
- Using parentheses when calling prevents ByRef working – see next sub section
A Little-Known Pitfall of ByRef
There is one thing you must be careful of when using ByRef with parameters. If you use parentheses then the sub/function cannot change the variable you pass even if it is passed as ByRef.
In the following example, we call the sub first without parentheses and then with parentheses. This causes the code to behave differently.
For example
' https://excelmacromastery.com/
Sub Test()

    Dim x As Long

    ' Call using without Parentheses - x will change
    x = 1
    Debug.Print "x before (no parentheses): "; x
    SubByRef x
    Debug.Print "x after (no parentheses): "; x

    ' Call using with Parentheses - x will not change
    x = 1
    Debug.Print "x before (with parentheses): "; x
    SubByRef (x)
    Debug.Print "x after (with parentheses): "; x

End Sub

Sub SubByRef(ByRef x As Long)
    x = 99
End Sub
If you change the sub in the above example to a function, you will see the same behaviour occurs.
However, if you return a value from the function then ByRef will work as normal as the code below shows:
' https://excelmacromastery.com/
Sub TestFunc()

    Dim x As Long, ret As Long

    ' Call using with Parentheses - x will not change
    x = 1
    Debug.Print "x before (with parentheses): "; x
    FuncByRef (x)
    Debug.Print "x after (with parentheses): "; x

    ' Call using with Parentheses and return - x will change
    x = 1
    Debug.Print "x before (with parentheses): "; x
    ret = FuncByRef(x)
    Debug.Print "x after (with parentheses): "; x


End Sub

Function FuncByRef(ByRef x As Long)
    x = 99
End Function
As I said in the last section you should avoid passing a variable using ByRef and instead use ByVal.
This means
- The variable you pass will not be accidentally changed.
- Using parentheses will not affect the behaviour.
ByRef and ByVal with Objects
When we use ByRef or ByVal with an object, it only affects the variable. It does not affect the actual object.
If we look at the example below:
' https://excelmacromastery.com/
Sub UseObject()

    Dim coll As New Collection
    coll.Add "Apple"

    ' After this coll with still reference the original
    CollByVal coll


    ' After this coll with reference the new collection
    CollByRef coll

End Sub

Sub CollByVal(ByVal coll As Collection)

    ' Original coll will still reference the original
    Set coll = New Collection
    coll.Add "ByVal"

End Sub

Sub CollByRef(ByRef coll As Collection)

    ' Original coll will reference the new collection
    Set coll = New Collection
    coll.Add "ByRef"

End Sub
When we pass the coll variable using ByVal, a copy of the variable is created. We can assign anything to this variable and it will not affect the original one.
When we pass the coll variable using ByRef, we are using the original variable. If we assign something else to this variable then the original variable will also be assigned to something else.
You can see find out more about this here.
Optional Parameters
Sometimes we have a parameter that will often be the same value each time the code runs. We can make this parameter Optional which means that we give it a default value.
It is then optional for the caller to provide an argument. If they don’t provide a value then the default value is used.
In the example below, we have the report name as the optional parameter:
Sub CreateReport(Optional reportName As String = "Daily Report")

End Sub
If an argument is not provided then name will contain the “Daily Report” text
' https://excelmacromastery.com/
Sub Main()

    ' Name will be "Daily Report"
    CreateReport

    ' Name will be "Weekly Report"
    CreateReport "Weekly Report"

End Sub
The Optional parameter cannot come before a normal parameter. If you do this you will get an Expected: Optional error.

When a sub/function has optional parameters they will be displayed in square parentheses by the Intellisense.
In the screenshot below you can see that the name parameter is in square parentheses.

A sub/function can have multiple optional parameters. You may want to provide arguments to only some of the parameters.
There are two ways to do this:
If you don’t want to provide an argument then leave it blank.
A better way is to use the parameter name and the “:=” operator to specify the parameter and its’ value.
The examples below show both methods:
' https://excelmacromastery.com/
Sub Multi(marks As Long _
            , Optional count As Long = 1 _
            , Optional amount As Currency = 99.99 _
            , Optional version As String = "A")

    Debug.Print marks, count, amount, version

End Sub


Sub UseBlanks()

    ' marks and count
    Multi 6, 5

    ' marks and amount
    Multi 6, , 89.99

    ' marks and version
    Multi 6, , , "B"

    ' marks,count and version
    Multi 6, , , "F"

End Sub

Sub UseName()

    ' marks and count
    Multi 12, count:=5

    ' marks and amount
    Multi 12, amount:=89.99

    ' marks and version
    Multi 12, version:="B"

    ' marks,count and version
    Multi 12, count:=6, version:="F"

End Sub
Using the name of the parameter is the best way. It makes the code more readable and it means you won’t have error by mistakenly adding extra commas.
wk.SaveAs "C:Docsdata.xlsx", , , , , , xlShared

wk.SaveAs "C:Docsdata.xlsx", AccessMode:=xlShared
IsMissing Function
We can use the IsMissing function to check if an Optional Parameter was supplied.
Normally we check against the default value but in certain cases we may not have a default.
We use IsMissing with Variant parameters because it will not work with basic types like Long and Double.
' https://excelmacromastery.com/
Sub test()
    ' Prints "Parameter not missing"
    CalcValues 6

    ' Prints "Parameter missing"
    CalcValues

End Sub

Sub CalcValues(Optional x)

    ' Check for the parameter
    If IsMissing(x) Then
        Debug.Print "Parameter missing"
    Else
        Debug.Print "Parameter Not missing"
    End If

End Sub
Custom Function vs Worksheet Function
When you create a function it appears in the function list for that workbook.
Have a look at the function in the next example.
Public Function MyNewFunction()
    MyNewFunction = 99
End Function
If you add this to a workbook then the function will appear in the function list. Type “=My” into the function box and the function will appear as shown in the following screenshot.

If you use this function in a cell you will get the result 99 in the cell as that is what the function returns.
Conclusion
The main points of this post are:
- Subs and macros are essentially the same thing in VBA.
- Functions return values but subs do not.
- Functions appear in the workbook function list for the current workbook.
- ByRef allows the function or sub to change the original argument.
- If you call a function sub with parentheses then ByRef will not work.
- Don’t use parentheses on sub arguments or function arguments when not returning a value.
- Use parentheses on function arguments when returning a value.
What’s Next?
Free VBA Tutorial If you are new to VBA or you want to sharpen your existing VBA skills then why not try out the The Ultimate VBA Tutorial.
Related Training: Get full access to the Excel VBA training webinars and all the tutorials.
(NOTE: Planning to build or manage a VBA Application? Learn how to build 10 Excel VBA applications from scratch.)
In this Article
- What are Sub Procedures?
- Creating a Sub Procedure with the Macro Recorder
- Creating a Sub Procedure in the VBE Window
- Calling a Sub Procedure from Another Sub-Procedure
- Adding an Argument to a Sub Procedure
- Assigning a Button in Excel to a Sub Procedure
- Creating a Function to Return a Value
This tutorial will explain VBA Sub Procedures in Excel.
What are Sub Procedures?
Sub procedure are one of the major cornerstones of VBA. A Sub procedure does things. They perform actions such as formatting a table or creating a pivot table. The majority of procedures written are Sub procedures. All macros are Sub procedures. A sub procedure begins with a Sub statement and ends with an End Sub statement. The procedure name is always followed by parentheses.
Sub Gridlines ()
  ActiveWindow.DisplayGridlines = False
End Sub
A Sub Procedure in VBA can be created by the Macro Recorder or directly in the Visual Basic Editor (VBE).
Creating a Sub Procedure with the Macro Recorder
In the Ribbon, select View > Macros > Record Macro.
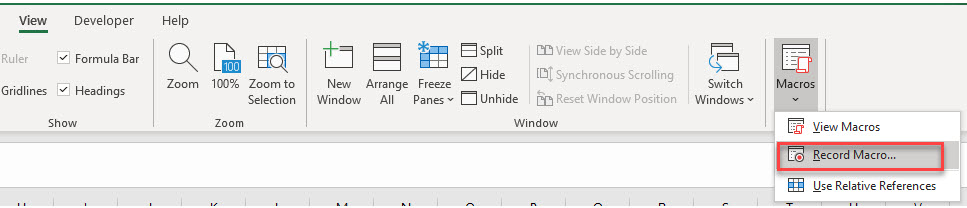
OR
Developer > Visual Basic > Record Macro
Note: If you don’t see the Developer Ribbon, you’ll need to enable it. You can learn how to do that here.
1) Type in the name for your macro, and then 2) Select where to store the macro. This can be in the Personal Macro workbook, the workbook you are currently editing or a new workbook entirely.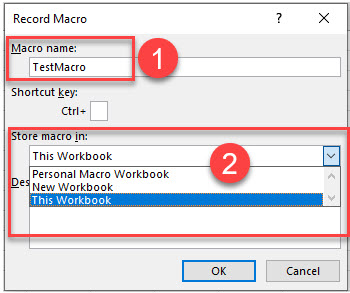
Once you have clicked OK, you can follow the steps that you want in your macro (for example bolding a cell, changing the color of the text, etc.), and then click the stop button at the bottom of the screen to stop recording the macro.

To view your macro, in the Ribbon, select View > Macros > View Macros.
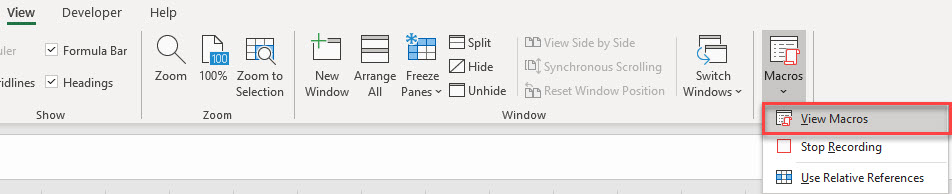
OR
Developer > Visual Basic >Macros
Click on the Macro in the Macro name list, and then click on Edit.
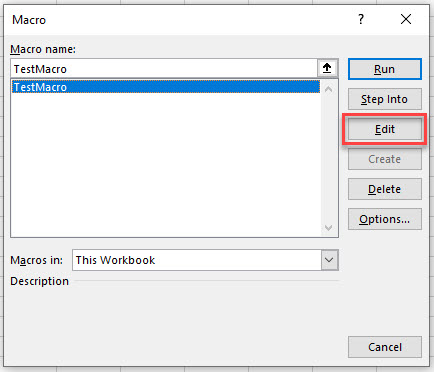
This will open the VBE and jump you into the VBA Code.
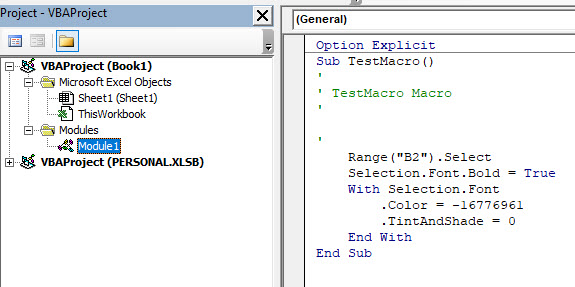
A VBA Project has now automatically been created for your workbook, and within this project, a module (Module 1) has also been created. The Sub Procedure (macro) is contained within this new module on the right hand side.
Creating a Sub Procedure in the VBE Window
To create a new procedure, we first need to insert a module into our VBA Project or make sure you are clicked in the module in which you wish to store the procedure. To insert a new module into your code, click on the Insert option on the menu bar, and click Module. 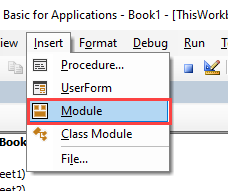 Or, click on the Insert Module button which you will find on the standard ribbon.
 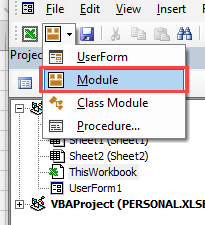 Once you have selected your module, the easiest way to create a procedure is by typing directly into the Module Window. If you type the word Sub followed by the name of the procedure, the End Sub will be automatically added to the code for you.
 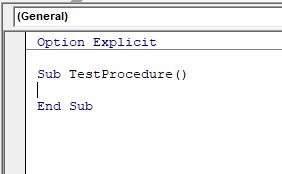 Alternatively, you can go to Insert > Procedure instead:
 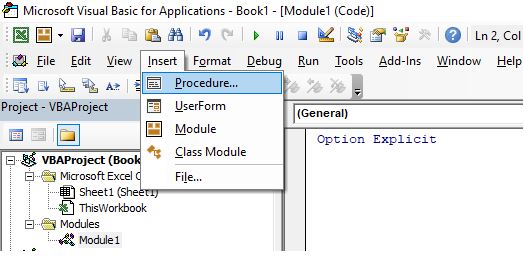 The following dialog box will appear:
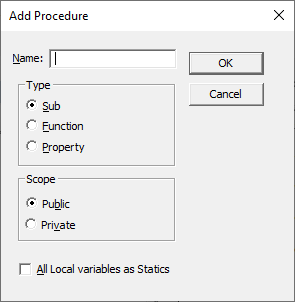
- Type the name of your new procedure in the name box – this must start with a letter of the alphabet and can contain letters and number and be a maximum of 64 characters.
- You can have a Sub procedure, a Function procedure or a Property procedure. (Properties are used in Class modules and set properties for ActiveX controls that you may have created). To create a Sub procedure, make sure that option is selected.
- You can make the scope of the procedure either Public or Private. If the procedure is public (default), then it can be used by all the modules in the project while if the procedure is private, it will only be able to be used by this module.
- You can declare local variables in this procedure as Statics (this is to do with the Scope of the variable and makes a local procedure level variable public to the entire module). We will not use this option.
When you have filled in all the relevant details, click on OK.
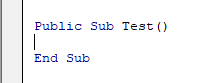
You then type your code between the Sub and End Sub statements.
Public Sub Test()
  ActiveWindow.DisplayGridlines = Not ActiveWindow.DisplayGridlines
End Sub
The code above will switch off the gridlines in the active window if they are on, but if they are off, it will switch them on!
Calling a Sub Procedure from Another Sub-Procedure
Often we write code that can then be used repetitively throughout the VBA Project. We might have a macro that format a cell for example – perhaps makes the text bold and red, and then in a different macro, we also want to format the cell, as well as do some other stuff to the cell. In the second procedure, we can CALL the first procedure, and then continue with our additional code.
Firstly, we create the first procedure:
Sub FormatCell ()
 ActiveCell.Font.Bold = True
 ActiveCell.Font.Color = vbRed
End Sub
Then, in a second procedure, we can refer to the first procedure to run that procedure as well.
Sub AdditionalFormatCell()
 'call first procedure
 FormatCell
 'add additional formatting
 ActiveCell.Font.Italic = True
 ActiveCell.Interior.Color = vbGreen
End Sub
So while the first procedure will make a cell bold and the text red, the second one will in addition to the first one, add italic and make the background of the cell green.
Adding an Argument to a Sub Procedure
We can further control how our code works by adding an argument or arguments to our Sub-Procedure.
Consider the following:
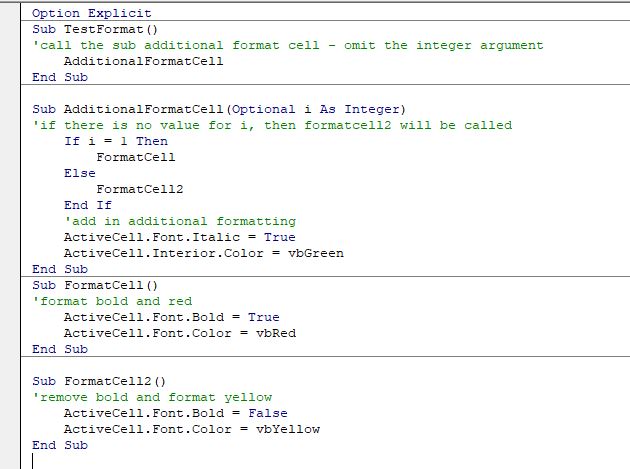
Our sub-procedure TestFormat, is calling the procedure AdditionalFormatCell. Although we have an argument for that procedure, we have marked it as Optional. An optional argument means that you do not have to pass the value to the procedure.
Due to the fact that we are not passing a value, the value of i will be zero – therefore the procedure FormatCell2 will be called instead of FormatCell. If we have passed a value to i – as long as that value was 1, then FormatCell would have been called instead.
Assigning a Button in Excel to a Sub Procedure
Once we have created a macro in Excel VBA, we can create a button on the worksheet to run the macro. We need the Developer tab switched on to do this.
In the Ribbon, select Developer > Insert > Form Controls > Button.
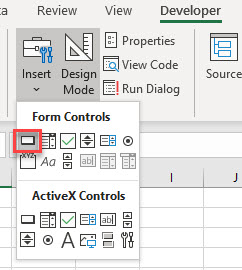
Click and drag in the worksheet to create a button. As soon as you release the mouse button, the assign macro dialog box will appear.
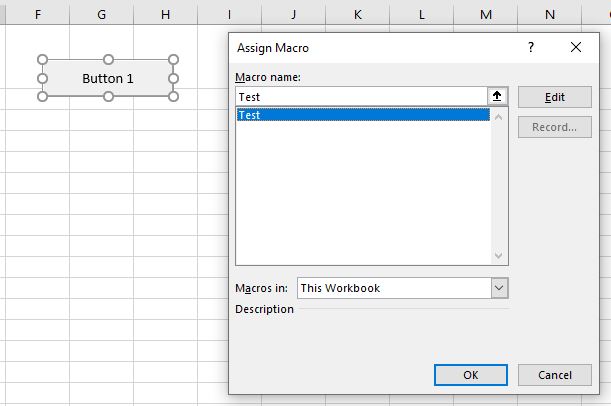
Select the macro you wish to assign to the button, and click OK.
Right click on the button, and select Edit Text to change the text on the button.
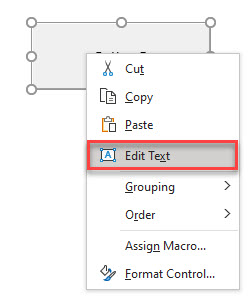
Click on the button to run the macro.
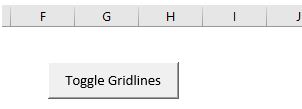
VBA Coding Made Easy
Stop searching for VBA code online. Learn more about AutoMacro — A VBA Code Builder that allows beginners to code procedures from scratch with minimal coding knowledge and with many time-saving features for all users!

Learn More
Creating a Function to Return a Value
A Function procedure differs from a Sub Procedure in that it will return a value. It can have multiple arguments, and the value it returns can be defined by a data type (eg: Text, Number, Date etc).
Function ConvertWeight(dblAmt As Double, WeightType As Integer) As Double
  If WeightType = 1 Then
    ConvertWeight = dblAmt / 2.2
  Else
    ConvertWeight = dblAmt * 2.2
  End If
End Function
We can then create 2 Sub Procedures to use this function. One to convert from pounds to kilos and the other from kilos to pounds.