
Return to VBA Code Examples
In this Article
- Disable ScreenUpdating
- Enable ScreenUpdating
- VBA ScreenUpdating Example
- ScreenUpdating Refresh
- VBA Settings – Speed Up Code
- VBA Coding Made Easy
As cool as it looks watching your VBA macro manipulate the screen, you can help your Macro run faster if you turn off (disable) ScreenUpdating.
Disable ScreenUpdating
1. To disable ScreenUpdating, At the beginning of your code put this line:
Application.ScreenUpdating = FalseEnable ScreenUpdating
2. To re-enable ScreenUpdating, At the end of your code put this line:
Application.ScreenUpdating = TrueVBA ScreenUpdating Example
Your procedure will then look like this:
Sub ScreenUpdating_Example()
    Application.ScreenUpdating = False

    'Do Something
    Range("a1").Copy Range("b1")
    Range("a2").Copy Range("b2")
    Range("a3").Copy Range("b3")


    Application.ScreenUpdating = True
End Sub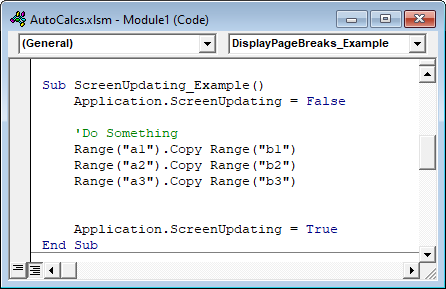
ScreenUpdating Refresh
Disabling ScreenUpdating will make your VBA code run MUCH faster, but it will also make your work appear more professional. End-users typically don’t want to see the behind the scenes actions of your procedures (especially when the procedure runs slow). Also, you may not want end-users to see the behind the scenes functionality (ex. Hidden Worksheets). I recommend disabling (and re-enabling) ScreenUpdating in virtually all of your procedures.
However, there are some times when you want the screen to refresh. To refresh the screen, you will need to temporarily turn back on ScreenUpdating (there is no screen “refresh” command):
    Application.ScreenUpdating = True
    'Do Something
    Application.ScreenUpdating = False
VBA Settings – Speed Up Code
There are several other settings to play with to improve your code speed.
Disabling Automatic Calculations can make a HUGE difference in speed:
Application.Calculation = xlManualDisabling the Status Bar will also make a small difference:
Application.DisplayStatusBar = FalseIf your workbook contains events you should usually disable events at the beginning of your procedure:
Application.EnableEvents = FalseLast, your VBA code can be slowed down when Excel tries to re-calculate page breaks (Note: not all procedures will be impacted). To disable displaying page breaks use this line of code:
ActiveSheet.DisplayPageBreaks = FalseVBA Coding Made Easy
Stop searching for VBA code online. Learn more about AutoMacro – A VBA Code Builder that allows beginners to code procedures from scratch with minimal coding knowledge and with many time-saving features for all users!
VBA Coding Made Easy
Stop searching for VBA code online. Learn more about AutoMacro — A VBA Code Builder that allows beginners to code procedures from scratch with minimal coding knowledge and with many time-saving features for all users!

Learn More!
Home / VBA / VBA ScreenUpdating | How to Turn it ON and OFF
What is VBA Screen Updating?
ScreenUpdating is a property in VBA that you can use to turn “ON” and “OFF” the screen updating while running the code. You can turn it off before running a code that makes your code run faster and then turn it on once the execution of the code completes. You can read and write this property.

By default, screen updating is “ON” in Excel. When you normally run a code it takes a lot of flickering if that code takes time, but if you turn OFF the screen updating it will take less time than normal to run.
Turn OFF Screen Updating in VBA
- First, type the keyword “Application”.
- After that, press a dot “.” to open the properties and methods list.
- Now, select “ScreenUpdating”.
- In the end, specify “False” to it.

Once you turn off screen updating, VBA will not turn it ON once the code is executed. So it’s always better to turn it off from your end. The code would be like something below.

Points to Consider
- Make sure to have the screen updating “ON” when you are using a user form.
- If you are debugging code, it is better to have a screen updating “ON” so that you can see all the activities as they are.
There’s More
VBA With Statement | VBA Wait and Sleep Commands | VBA Status Bar | VBA Random Number | Line Break in a VBA Code | VBA Immediate Window (Debug.Print) | VBA Concatenate | VBA Module | VBA Random Number

Ok! This one is important.
Any good VBA procedure always has this line mentioned at the beginning.
Application.Screenupdating=FALSE
And before the end of the procedure you will see this line too.
Application.Screenupdating=TRUE
What is ScreenUpdating?
Screenupdating is the property of application objects in VBA. It can be set to TRUE or FALSE. It is like a switch, that can be turned On or Off.
And What Does it Do?
The first line speed ups the macro processing by stopping real time screen updating of Excel.
If you have a long macro that writes into different sheets, applies filters, removes filters, changes sheets, saves workbooks, etc. And if you haven’t turned off screen updates using the line Application.Screenupdating=FALSE, then you will see the flickering on screen. Each and every change done by macro in the workbook will be shown dynamically. This slows down the macro speed.
And If you have this line at the beginning of macro, excel will not reflect changes done by macro until screenupdating is turned on using the line Application.Screenupdating=TRUE.
If you want to speed up your macro, disable the screen update at the beginning of subroutine and enable the screen update before the end of subroutine.
Here’s one Example:
Sub Screencheck()
 Application.Screenupdating=FALSE 'Disabling the screen updating.
 Sheet1.Activate
 Range("A1").value ="Hi"
 Range("A2").value ="How are you?"
 Range("A3").value ="Exceltip is amazing, isn't it?"
 Sheet2.Activate
 Application.Screenupdating= TRUE 'Enabling the screen updating.
End Sub
When you run the above sub you will not see any screen flickering. You will see the final result of work done by this macro.
Important Notes:
Make sure that you enable the screen update before your procedure ends. If you don’t enable the screen update, you will not be able to see the work done by the macro.
Unable screen updating before every Exit Sub and End Sub command. It is common to forget enabling screen updates before Exit Sub. If you don’t do this, you may keep wondering why your code didn’t work. But in reality, it did. You just can’t see it.
That’s it. This is what Application.Screenupdating = False does in VBA. This one line of code changes a lot. It is the difference between mature programming and careless programming. If you want to speed up your macro, always use this line in your code.
I hope this was helpful to you. If you have any doubts regarding this article or have any other Excel/VBA related questions, feel free to ask in the comments section below. I’ll be happy to help.
Related Articles:
What is the difference Between ByRef and ByVal Arguments? :This is an important VBA Question. The ByVal and ByRef are used to pass arguments differently. One lets the change be made in the original variable while the other does not alter the original variable.
How To Loop Through Sheets In Excel Using VBA : While automating the usual boring tasks of excel in VBA, you’ll get the need to loop through each sheet. Let’s start with an example. VBA Code to Loop in all sheets in Activeworkbook and print sheet Name
Events in Excel VBA: Sometimes we want something to happen automatically when a certain event occurs. To do something when a specific event happens in Excel, we use Excel VBA event
Popular Articles:
50 Excel Shortcuts to Increase Your Productivity | Get faster at your task. These 50 shortcuts will make you work even faster on Excel.
The VLOOKUP Function in Excel | This is one of the most used and popular functions of excel that is used to lookup value from different ranges and sheets.
COUNTIF in Excel 2016 | Count values with conditions using this amazing function. You don’t need to filter your data to count specific values. Countif function is essential to prepare your dashboard.
How to Use SUMIF Function in Excel | This is another dashboard essential function. This helps you sum up values on specific conditions.
If you ever worked with VBA, you could probably be in a situation where your code is not as fast as you would want it to be. There are a couple of things that you can do to speed it up a little bit.
In the example below, we will show how to speed up the code by turning the screen updating off in VBA.
Screen updating can be turned on or off through the VBA module. In simple terms, it has to be done at the application level. We are going to use the following sentence:
|
Application.ScreenUpdating = False (turning it off) Application.ScreenUpdating = True (turning it on) |
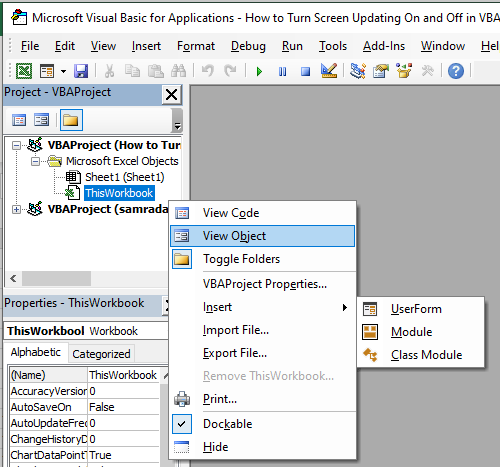
We will show its importance in one example. To do this, we need to open the Excel file, click on ALT + F11, and then right-click on the left window that appears, go to Insert >> Module:
When a new window appears in which we should write our code, we can start with it.
This is what our code will look like:
|
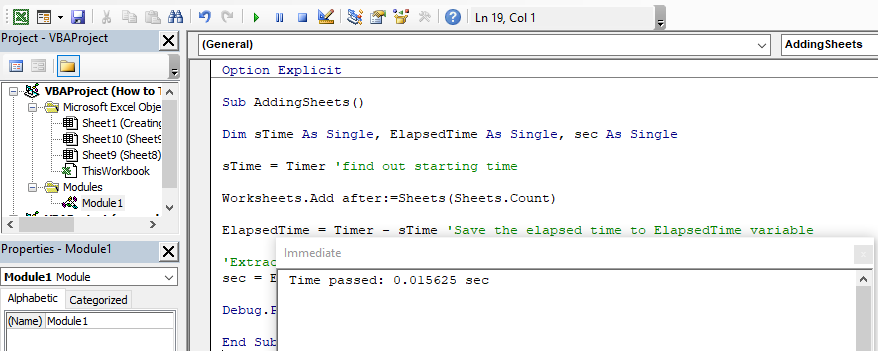
Sub AddingSheets() Application.ScreenUpdating = FALSE Dim sTime As Single, ElapsedTime As Single, sec As Single sTime = Timer ‘find out starting time Worksheets.Add after:=Sheets(Sheets.Count) ElapsedTime = Timer — sTime ‘Save the elapsed time to ElapsedTime variable ‘Extract seconds sec = ElapsedTime Debug.Print «Time passed: « & sec & » sec» End Sub |
This is what our code looks like in the module itself:
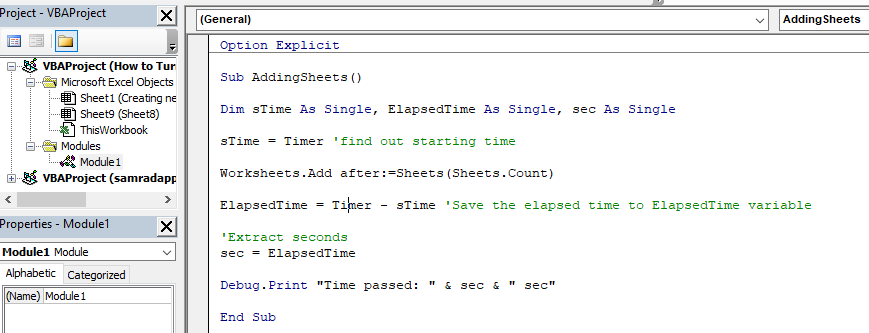
This code first declares variables that we going to use, and then it sets variable sTime to be equal to the Timer:
|
Dim sTime As Single, ElapsedTime As Single, sec As Single sTime = Timer |
Then we need concrete action. In our case, our action is to add a worksheet at the end of our workbooks, i.e. after the end of our sheets list.
After that, we calculate ElapsedTime as the difference between the Timer and start time, and we store that number in the ElapsedTime variable.
|
Worksheets.Add after:=Sheets(Sheets.Count) ElapsedTime = Timer — sTime |
For the next part, we want to extract seconds from our variable, so we do just that by setting the sec variable to be equal to ElapsedTime.
Now, for the final part, we will use the Debug.Print option to show us the time that it took for our sheet to be created:
|
Debug.Print «Time passed: « & sec & » sec» |
Now, Debug.Print option is great for us because it will give us the information that we need (the time spent creating a sheet) without having to store this information in a variable or without showing it in a message box.
To use Debug.Print option, we need to turn on the Immediate window. We will do it by going to the View tab in our Module and choosing the Immediate window, or simply clicking CTRL + G:

With this window visible, we will execute our code (by going into the code and clicking F5) and we will see the message in our Immediate window:
Time passed: 0.015625 seconds
Or in our Module:
We will also have a new sheet created, as defined in our code.
To speed up the execution of our code, we will simply add an Application.ScreenUpdating = False above our code and beneath the part where we defined subroutine (Sub….):
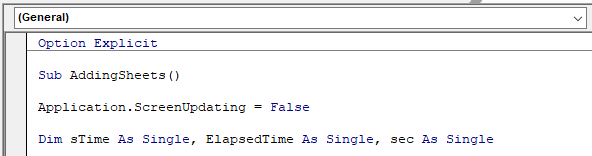
Now, when we execute our code again, these are the results that we will get:
Time passed: 0.0078125 seconds
Or in the module:

To turn on the screen updating again, we just need to insert:
|
Application.ScreenUpdating = True |
You will notice that our code is executed so much faster without screen updating. Although it is a matter of seconds in our case that is only because we defined such a small portion of code (sheet to be added) to be executed. Just imagine how much time can you spare when it comes to more complex code.
Post Views: 111
Disabling Screen Updates in Excel VBA
You can give your VBA code a performance boost by simply turning off screen updating while your code runs. This blog explains how to achieve this and how to create a basic timer to test the results.
Posted by
Andrew Gould
on 26 November 2015
You need a minimum screen resolution of about 700 pixels width to see our blogs. This is because they contain diagrams and tables which would not be viewable easily on a mobile phone or small laptop. Please use a larger tablet, notebook or desktop computer, or change your screen resolution settings.
One quick and easy technique to make your code run faster in Excel VBA is to
simply prevent the screen from being redrawn each time something changes.
You can achieve this by using the ScreenUpdating property of
the Application object.
Creating a Simple Example
To demonstrate the principle of this technique we’ll need a small example
procedure that makes lots of visible changes to the Excel workbook. You
can either download the example here, or create a new blank workbook, add around
five worksheets to it and then copy the code shown below into a new module.
Sub ColourInABunchOfCells()
Dim ws As Worksheet
Dim r As Range
For Each ws In Worksheets
ws.Select
For Each r In Range(«A1:Z50»)
r.Select
r.Interior.Color = rgbRed
Next r
Next ws
End Sub
Running the Code with Screen Updates On
Before disabling screen updates it’s worth running the code with the property
switched on so that you can appreciate the difference. Head back into
Excel and either press ALT + F8
on the keyboard or, from the ribbon select Developer | Macros.
On the dialog box that appears select the ColourInABunchOfCells
macro and then click the Run button.

Select the macro and then click
Run.
You should be able to see the Excel screen flickering in the background as the
macro carries out its tasks until, eventually, it finishes.
Disabling Screen Updates
The next time we run the procedure we don’t want to be able to see the screen
flickering in the background. To achieve this we need to add a single line
of code to the subroutine, just below the variable declarations. It’s
probably also worth changing the colour that we’re using so that we can see when
things have changed.
Sub ColourInABunchOfCells()
Dim ws As Worksheet
Dim r As Range
Application.ScreenUpdating = False
For Each ws In Worksheets
ws.Select
For Each r In Range(«A1:Z50»)
r.Select
r.Interior.Color = rgbBlue
Next r
Next ws
End Sub
Now switch back to Excel, display the list of macros by pressing ALT
+ F8 and then run the code again. This time
you won’t be able to see the macro carrying out its tasks; once the subroutine
has finished the screen will update once at the end to show you the final
result.
The ScreenUpdating property resets at the end of a
procedure. This means that if you run a different subroutine after the one
above and you haven’t added the line of code to disable screen updates to it,
you’ll be able to see the screen updating in the background.
Adding a Basic Timer
You may have noticed that when running the procedure with screen updates
disabled the subroutine appeared to run faster. This should certainly be
the case as Excel doesn’t have to continually redraw the screen each time
something changes. If we want to quantify how much time we’ve saved we can
add some code to create a basic timer system. The general structure of our
timer is shown below:
Sub BasicTimer()
Dim StartTime As Date, EndTime As Date
Dim TimeTaken As Double
StartTime = Time
EndTime = Time
TimeTaken = (EndTime — StartTime) * 24 * 60 * 60
MsgBox TimeTaken
End Sub
This isn’t the most accurate timer system you can create in VBA but it’s good
enough for our example. Should you need something a little more accurate
you might want to investigate the
Timer
function instead. Alternatively, if you’re feeling ambitious, you might
consider using some Windows API functions to
create
incredibly accurate timers.
Adding this timer system to our colour macro should result in the following
code:
Sub ColourInABunchOfCells()
Dim ws As Worksheet
Dim r As Range
Dim StartTime As Date, EndTime As Date
Dim TimeTaken As Double
StartTime = Time
Application.ScreenUpdating = False
For Each ws In Worksheets
ws.Select
For Each r In Range(«A1:Z50»)
r.Select
r.Interior.Color = rgbGreen
Next r
Next ws
EndTime = Time
TimeTaken = (EndTime — StartTime) * 24 * 60 * 60
MsgBox TimeTaken
End Sub
When you run the subroutine again you should now see the time taken in
seconds displayed at the end of the procedure. You should test this both
with and without screen updating to determine how much faster your code runs.
Your results will vary depending on your computer’s specifications and a
range of other factors but you should certainly see an improvement in
performance when screen updates are turned off.
A More Complex Example
Although the example above demonstrates the principle of the technique, it
doesn’t really reflect the type of code you’re likely to write in the real
world. The example below is slightly more realistic. The basic idea
behind this example is to separate a list of films into separate worksheets
based on each film’s genre.

The idea is to create a separate worksheet for each genre and copy each film into the appropriate sheet.
You can download the completed example file here and the code is shown below for
your reference.
Sub SeparateFilmsByGenre()
Dim Genre As String
Dim StartTime As Date, EndTime As Date
Dim TimeTaken As Double
Dim ws As Worksheet
Application.ScreenUpdating = False
StartTime = Time
wsMovies.Select
Range(«A2»).Select
Do Until ActiveCell.Value = «»
Genre = ActiveCell.Offset(0, 7).Value
If Not SheetExists(Genre) Then
Worksheets.Add After:=Sheets(Sheets.Count)
ActiveSheet.Name = Genre
wsMovies.Range(«A1»).EntireRow.Copy ActiveCell
Range(«A2»).Select
End If
wsMovies.Select
ActiveCell.EntireRow.Copy
Worksheets(Genre).Select
ActiveCell.PasteSpecial
ActiveCell.Offset(1, 0).Select
wsMovies.Select
ActiveCell.Offset(1, 0).Select
Loop
Application.CutCopyMode = False
For Each ws In Worksheets
ws.Select
Range(«A1»).Select
ActiveCell.CurrentRegion.EntireColumn.AutoFit
Next ws
wsMovies.Select
EndTime = Time
TimeTaken = (EndTime — StartTime) * 24 * 60 * 60
MsgBox TimeTaken & » seconds»
End Sub
Function SheetExists(SheetName As String) As Boolean
On Error GoTo NoSheet
Sheets(SheetName).Select
SheetExists = True
Exit Function
NoSheet:
SheetExists = False
End Function
There’s also a simple routine that you can run to reset the workbook back to
the original state by deleting all of the genre worksheets.
Sub DeleteAllButMovies()
Dim ws As Worksheet
Application.DisplayAlerts = False
For Each ws In Worksheets
If Not ws Is wsMovies Then ws.Delete
Next ws
End Sub
Again, to test the performance gain you should run the code with screen
updates turned on and then turned off.
An Alternative Approach: Avoiding Selecting Things
Although you can save a lot of time by turning screen updates off, you can
also find performance gains by writing your code in such a way that Excel needs
to update the screen as little as possible. The easiest way to achieve
this to avoid selecting or activating objects such as worksheets and ranges as
much as possible. In the example code shown below the only time an object
is selected is when a new worksheet is added to the workbook.
Sub SeparateFilmsAvoidingSelectingThings()
Dim Genre As String
Dim StartTime As Date, EndTime As Date
Dim TimeTaken As Double
Dim ws As Worksheet
Dim r As Range, rs As Range
StartTime = Time
Set rs = _
wsMovies.Range(«A2», wsMovies.Range(«A1»).End(xlDown))
For Each r In rs
Genre = r.Offset(0, 7).Value
If Not SheetExists(Genre) Then
Worksheets.Add After:=Sheets(Sheets.Count)
ActiveSheet.Name = Genre
wsMovies.Range(«A1»).EntireRow.Copy ActiveCell
End If
r.EntireRow.Copy _
Worksheets(Genre).Range(«A1048576»).End(xlUp).Offset(1, 0)
Next r
Application.CutCopyMode = False
For Each ws In Worksheets
ws.Range(«A1»).CurrentRegion.EntireColumn.AutoFit
Next ws
EndTime = Time
TimeTaken = (EndTime — StartTime) * 24 * 60 * 60
MsgBox TimeTaken & » seconds»
End Sub
Running this code even with screen updates turned on results in the following
time:

This code runs quickly even with screen updates turned on.
This blog has 0 threads
Add post