
Имитация движения и кликов левой и правой кнопками мыши из кода VBA Excel. Эмуляция перемещения курсора и определение его текущих координат.
В VBA Excel нет методов и функций для имитации движения мыши и эмуляции кликов ее левой и правой кнопками. Но для этих целей, а также для определения текущих координат курсора, можно использовать встроенные функции Windows API — GetCursorPos, SetCursorPos и mouse_event.
Если эти функции Windows API объявить без ключевого слова Private, они будут доступны во всех модулях текущего проекта VBA.
Определение координат курсора
Определение текущих координат курсора из кода VBA Excel:
|
Option Explicit Declare PtrSafe Function GetCursorPos Lib «user32» (lpPoint As POINTAPI) As Long Type POINTAPI X As Long Y As Long End Type Sub Get_Cursor() Dim myPoint As POINTAPI GetCursorPos myPoint Debug.Print «Координата X: « & myPoint.X & vbNewLine & _ «Координата Y: « & myPoint.Y & vbNewLine End Sub |
Скопируйте представленный выше код в стандартный модуль и кликните мышью внутри процедуры Get_Cursor(). Затем, перемещайте курсор мыши по экрану, не нажимая кнопок, чтобы мигающая вертикальная линия (точка вставки) не ушла из процедуры, и нажимайте клавишу F5. В окне Immediate будут печататься текущие координаты курсора. Клавишу F5 можно нажимать одновременно с процессом перемещения мыши. Значения координат X и Y отображаются в пикселях.
Имитация движения мыши
Имитация движения мыши, а, точнее, перескока мыши из одной точки в другую, осуществляется из кода VBA Excel путем задания новых координат курсору:
|
Option Explicit Declare PtrSafe Function SetCursorPos Lib «user32» (ByVal X As Long, ByVal Y As Long) As Long Sub Set_Cursor() Dim myX As Long, myY As Long myX = 600 myY = 400 ‘Задаем курсору новые координаты SetCursorPos myX, myY End Sub |
Переменные добавлены в пример для наглядности, их можно не использовать:
А так можно задать множественные перескоки курсора мыши:
|
Sub Many_Set_Cursor() Dim i As Long For i = 1 To 600 Step 20 Application.Wait Now + TimeValue(«0:00:01») SetCursorPos i, i Next End Sub |
Здесь перескок мыши происходит один раз в секунду.
Уменьшив задержку выполнения цикла предыдущего примера с помощью другого цикла, можно ускорить перемещение курсора и сделать его более плавным:
|
Sub Many_Set_Cursor_2() Dim i As Long, i2 As Long, a As Long For i = 1 To 600 For i2 = 1 To 100000 a = i2 / 2 Next SetCursorPos i, i Next End Sub |
Здесь уже более похоже на имитацию движения мыши.
Имитация кликов мыши
Чтобы воспроизвести имитацию кликов левой и правой кнопками мыши, нам понадобятся коды событий кнопок мыши:
| Событие | Код |
|---|---|
| Нажать левую кнопку | &H2 |
| Отпустить левую кнопку | &H4 |
| Нажать правую кнопку | &H8 |
| Отпустить правую кнопку | &H10 |
Следующий пример показывает, как установить курсор мыши в заданное место экрана и сымитировать клик правой кнопкой мыши:
|
Option Explicit Declare PtrSafe Function SetCursorPos Lib «user32» (ByVal X As Long, ByVal Y As Long) As Long Declare PtrSafe Sub mouse_event Lib «user32» (ByVal dwFlags As Long, ByVal dx As Long, ByVal dy As Long, ByVal cButtons As Long, ByVal dwExtraInfo As Long) Sub Set_Cursor_and_RightClick() ‘Устанавливаем курсор в нужную точку экрана SetCursorPos 800, 600 ‘Нажимаем правую кнопку мыши mouse_event &H8, 0, 0, 0, 0 ‘Отпускаем правую кнопку мыши mouse_event &H10, 0, 0, 0, 0 End Sub |
Я выбрал для примера имитацию клика правой кнопкой мыши из-за большей наглядности (за счет отображения контекстного меню).
Обратите внимание, что функции Windows API, используемые в примерах, должны быть объявлены только один раз.
Фразы для контекстного поиска: положение курсора, имитация клика, эмуляция клика, эмуляция движения, имитация мыши, эмуляция мыши, координаты мыши, расположение мыши, расположение курсора.
| title | keywords | f1_keywords | ms.prod | api_name | ms.assetid | ms.date | ms.localizationpriority |
|---|---|---|---|---|---|---|---|
|
Application.Cursor property (Excel) |
vbaxl10.chm133099 |
vbaxl10.chm133099 |
excel |
Excel.Application.Cursor |
5137b89d-aba9-3e5f-b6c4-cd2264a7bd7f |
04/04/2019 |
medium |
Application.Cursor property (Excel)
Returns or sets the appearance of the mouse pointer in Microsoft Excel. Read/write XlMousePointer.
Syntax
expression.Cursor
expression A variable that represents an Application object.
Remarks
XlMousePointer can be one of these constants:
- xlDefault. The default pointer.
- xlIBeam. The I-beam pointer.
- xlNorthwestArrow. The northwest-arrow pointer.
- xlWait. The hourglass pointer.
The Cursor property isn’t reset automatically when the macro stops running. You should reset the pointer to xlDefault before your macro stops running.
Example
This example changes the mouse pointer to an I-beam, pauses, and then changes it to the default pointer.
Sub ChangeCursor()

 Application.Cursor = xlIBeam
 For x = 1 To 1000
 For y = 1 to 1000
 Next y
 Next x
 Application.Cursor = xlDefault

End Sub
[!includeSupport and feedback]
February 19, 2017/
Chris Newman
Why Change Your Userform’s Cursor?
There may be certain instances where it makes sense to change the look of the mouse cursor to notify your users of a particular action. A classic case for this is when you hover over a button. Typically, your mouse cursor will change from the pointer arrow to a pointer hand.
By default, Microsoft has picked a cursor type for each control available to add in a VBA userform. However, there are steps you can take to change the cursor image that appears while interacting with these controls. Here are a list of all the available Mouse Pointers you can use within your userforms
-
fmMousePointerDefault
-
fmMousePointerArrow
-
fmMousePointerCross
-
fmMousePointerIBeam
-
fmMousePointerSizeNESW
-
fmMousePointerSizeNS
-
fmMousePointerSizeNWSE
-
fmMousePointerSizeWE
-
fmMousePointerUpArrow
-
fmMousePointerHourGlass
-
fmMousePointerNoDrop
-
fmMousePointerAppStarting
-
fmMousePointerHelp
-
fmMousePointerSizeAll
-
fmMousePointerCustom
Most of these should be self explanatory but if you are unsure you can always test them out to see how they appear.
You’ll notice that one very important cursor image does not appear on this list and it is the Pointed Finger (aka Hand) icon shown in the image above with the green Accept buttons. I will discuss later on in this article how you can use the fmMousePointerCustom option to load a custom cursor icon. This will allow you to use any cursor icon you want.
How To Change the Mouse Pointer
Here are the basic steps to change which mouse pointer image displays while using a specific control in your VBA userforms.
-
Ensure your userform is showing in the Visual Basic Editor (keyboard shortcut Alt + F11)
-
Ensure the Properties Pane is visible (keyboard shortcut F4)
-
Select the userform you wish to modify
-
Within the Properties Pane, find the Property called MousePointer
-
Select the mouse pointer image you would like shown when you hover over the control with your cursor (fmMousePointerDefault is the default option)
Using A Custom Mouse Pointer
I you do not find any of the built-in mouse pointers suitable for your userform you also have the option to upload your own cursor icon. The steps to do this are as follows:
-
Ensure your userform is showing in the Visual Basic Editor (keyboard shortcut Alt + F11)
-
Ensure the Properties Pane is visible (keyboard shortcut F4)
-
Select the userform you wish to modify
-
Within the Properties Pane, find the Property called MousePointer and change it to the fmMousePointerCustom option
-
Also within the Properties Pane, find the Property called MouseIcon and click the little gray box with three black dots that appears on the far right of the property
-
Find the icon image you would like to appear (file type must be .ico or .cur)
Where Do You Find The Hand Icon on The Web?
I had spent years trying to find a quality hand icon that would be compatible with Microsoft’s userforms. I dug through forums, articles, and everything in between but could only find pixelated hand icons that did not look like the current native hand cursor the Windows OS typcially uses.
About a year ago I finally found a file download that matched the quality I was looking for. I don’t have the slightest clue where I found it but I made sure to save several copies so I would never have to find it again. With this article I also want to save you the pain of having to search for this gem.
About The Author
Hey there! I’m Chris and I run TheSpreadsheetGuru website in my spare time. By day, I’m actually a finance professional who relies on Microsoft Excel quite heavily in the corporate world. I love taking the things I learn in the “real world” and sharing them with everyone here on this site so that you too can become a spreadsheet guru at your company.
Through my years in the corporate world, I’ve been able to pick up on opportunities to make working with Excel better and have built a variety of Excel add-ins, from inserting tickmark symbols to automating copy/pasting from Excel to PowerPoint. If you’d like to keep up to date with the latest Excel news and directly get emailed the most meaningful Excel tips I’ve learned over the years, you can sign up for my free newsletters. I hope I was able to provide you with some value today and I hope to see you back here soon!
— Chris
Founder, TheSpreadsheetGuru.com
To VBA change cursor in an application, you have the Application.Cursor property.
(To change the cursor on a UserForm, see below)
For the shape of the cursor, you have the choice of…
xlDefault
xlWait
xlBeam
xlNorthwestArrow
Here is an example for changing the cursor to an hourglass for the duration that the code is looping…
Sub vba_change_cursor()
Dim Counter As Long, Column As IntegerApplication.Cursor = xlWait
For Counter = 1 To 5000
For Column = 1 To 3
Cells(Counter, Column) = "R: " & Counter & " C: " & Column
DoEvents
Next
Next
Application.Cursor = xlDefault
End Sub
VBA change cursor on a UserForm
On a UserForm, and subsequently, when hovering over the controls on the form, you have the choice of 15 cursor shapes…
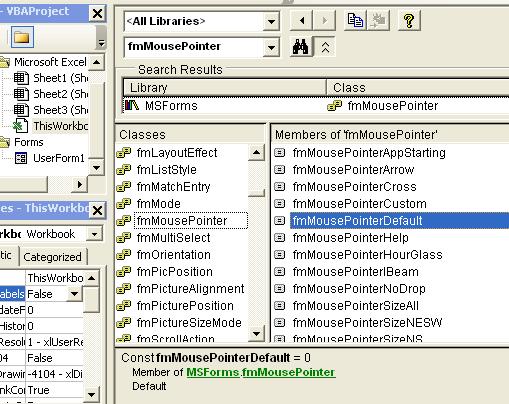
To see them all, go to the View menu in the VBA IDE (VBA Editor) and click on Object Browser. Then, type fmMousePointer
in the find box and click on the binoculars as in the figure below.
When you click on each cursor, you can see its numerical value at the
bottom of the list. In the image, you can see that the numerical value
of the default cursor is 0. you can use the numerical value instead of
the keyword in your code if you please.
This
site is powered by Site Build It!. If you enjoy it, please check out
the
Site
Build It homepage to learn more and on how to build
a success-guaranteed site with no technical skills.

Custom
Search
Return from VBA Change Cursor to VBA Code Samples
Return to our Homepage
Содержание
- Свойство MousePointer
- Синтаксис
- Settings
- Замечания
- См. также
- Поддержка и обратная связь
- An Excel Blog For The Real World
- How To Change The Mouse Cursor Icon In Your VBA Userform
- Why Change Your Userform’s Cursor?
- How To Change the Mouse Pointer
- Using A Custom Mouse Pointer
- Where Do You Find The Hand Icon on The Web?
- About The Author
- Типы курсоров
- Visual Basic Procedure to Get/Set Cursor Position
- Summary
- More Information
- EXAMPLES
- Visual Basic Procedure to Get/Set Cursor Position
- Summary
- More Information
- EXAMPLES
Свойство MousePointer
Определяет тип указателя, который отображается, когда пользователь наводит курсор на определенный объект.
Синтаксис
object. MousePointer [= fmMousePointer ]
Синтаксис свойства MousePointer состоит из следующих частей:
| Part | Описание |
|---|---|
| object | Обязательно. Допустимый объект. |
| fmMousePointer | Необязательный параметр. Форма, которую вы хотите придать указателю мыши. |
Settings
Параметрами для fmMousePointer являются:
| Константа | Значение | Описание |
|---|---|---|
| fmMousePointerDefault | 0 | Стандартный указатель. Изображение определяется объектом (по умолчанию). |
| fmMousePointerArrow | 1 | Стрелку. |
| fmMousePointerCross | 2 | Перекрестье. |
| fmMousePointerIBeam | 3 | I-beam. |
| fmMousePointerSizeNESW | 6 | Двойная стрелка, указывающая на северо-восток и юго-запад. |
| fmMousePointerSizeNS | 7 | Двойная стрелка, указывающая на север и юг. |
| fmMousePointerSizeNWSE | 8 | Двойная стрелка, указывающая на северо-запад и юго-восток. |
| fmMousePointerSizeWE | 9 | Двойная стрелка, указывающая на запад и восток. |
| fmMousePointerUpArrow | 10 | Стрелка вверх. |
| fmMousePointerHourglass | 11 | Песочные часы. |
| fmMousePointerNoDrop | 12 | Символ запрета (круг с диагональной линией) поверх перетаскиваемого объекта. Обозначает неправильно выбранный объект для перетаскивания. |
| fmMousePointerAppStarting | 13 | Стрелка с песочными часами. |
| fmMousePointerHelp | 14 | Стрелка с вопросительным знаком. |
| fmMousePointerSizeAll | 15 | Всенаправленный курсор (стрелки, направленные на север, юг, запад и восток). |
| fmMousePointerCustom | 99 | Использует значок, определяемый свойством MouseIcon. |
Замечания
Используйте свойство MousePointer, если вы хотите указать изменения работы функции при наведении курсора на элементы управления в форме. Например, параметр песочных часов (11) полезно использовать в тех случаях, когда пользователю приходится ждать завершения процесса или действия.
Некоторые значки меняются в зависимости от системных параметров, например, значки, связанные с темой рабочего стола.
См. также
Поддержка и обратная связь
Есть вопросы или отзывы, касающиеся Office VBA или этой статьи? Руководство по другим способам получения поддержки и отправки отзывов см. в статье Поддержка Office VBA и обратная связь.
Источник
An Excel Blog For The Real World
A blog focused primarily on Microsoft Excel, PowerPoint, & Word with articles aimed to take your data analysis and spreadsheet skills to the next level. Learn anything from creating dashboards to automating tasks with VBA code!
How To Change The Mouse Cursor Icon In Your VBA Userform
Why Change Your Userform’s Cursor?
There may be certain instances where it makes sense to change the look of the mouse cursor to notify your users of a particular action. A classic case for this is when you hover over a button. Typically, your mouse cursor will change from the pointer arrow to a pointer hand.
By default, Microsoft has picked a cursor type for each control available to add in a VBA userform. However, there are steps you can take to change the cursor image that appears while interacting with these controls. Here are a list of all the available Mouse Pointers you can use within your userforms
fmMousePointerDefault
fmMousePointerArrow
fmMousePointerCross
fmMousePointerIBeam
fmMousePointerSizeNESW
fmMousePointerSizeNS
fmMousePointerSizeNWSE
fmMousePointerSizeWE
fmMousePointerUpArrow
fmMousePointerHourGlass
fmMousePointerNoDrop
fmMousePointerAppStarting
fmMousePointerHelp
fmMousePointerSizeAll
fmMousePointerCustom
Most of these should be self explanatory but if you are unsure you can always test them out to see how they appear.
You’ll notice that one very important cursor image does not appear on this list and it is the Pointed Finger (aka Hand) icon shown in the image above with the green Accept buttons. I will discuss later on in this article how you can use the fmMousePointerCustom option to load a custom cursor icon. This will allow you to use any cursor icon you want.
How To Change the Mouse Pointer
Here are the basic steps to change which mouse pointer image displays while using a specific control in your VBA userforms.
Ensure your userform is showing in the Visual Basic Editor (keyboard shortcut Alt + F11)
Ensure the Properties Pane is visible (keyboard shortcut F4)
Select the userform you wish to modify
Within the Properties Pane, find the Property called MousePointer
Select the mouse pointer image you would like shown when you hover over the control with your cursor (fmMousePointerDefault is the default option)
Using A Custom Mouse Pointer
I you do not find any of the built-in mouse pointers suitable for your userform you also have the option to upload your own cursor icon. The steps to do this are as follows:
Ensure your userform is showing in the Visual Basic Editor (keyboard shortcut Alt + F11)
Ensure the Properties Pane is visible (keyboard shortcut F4)
Select the userform you wish to modify
Within the Properties Pane, find the Property called MousePointer and change it to the fmMousePointerCustom option
Also within the Properties Pane, find the Property called MouseIcon and click the little gray box with three black dots that appears on the far right of the property
Find the icon image you would like to appear (file type must be .ico or .cur)
Where Do You Find The Hand Icon on The Web?
I had spent years trying to find a quality hand icon that would be compatible with Microsoft’s userforms. I dug through forums, articles, and everything in between but could only find pixelated hand icons that did not look like the current native hand cursor the Windows OS typcially uses.
About a year ago I finally found a file download that matched the quality I was looking for. I don’t have the slightest clue where I found it but I made sure to save several copies so I would never have to find it again. With this article I also want to save you the pain of having to search for this gem.
Here is a direct link to download this cursor icon: Hand Cursor.ico
Hey there! I’m Chris and I run TheSpreadsheetGuru website in my spare time. By day, I’m actually a finance professional who relies on Microsoft Excel quite heavily in the corporate world. I love taking the things I learn in the “real world” and sharing them with everyone here on this site so that you too can become a spreadsheet guru at your company.
Through my years in the corporate world, I’ve been able to pick up on opportunities to make working with Excel better and have built a variety of Excel add-ins, from inserting tickmark symbols to automating copy/pasting from Excel to PowerPoint. If you’d like to keep up to date with the latest Excel news and directly get emailed the most meaningful Excel tips I’ve learned over the years, you can sign up for my free newsletters. I hope I was able to provide you with some value today and I hope to see you back here soon!
Источник
Типы курсоров
Область применения: Access 2013, Office 2013
Как правило, приложение должно использовать самый простой курсор, предоставляющий необходимый доступ к данным. Каждая дополнительная характеристика курсора помимо основных (только для чтения, только для чтения, статическая, прокручиваемая, небуферизованная) имеет цену — в памяти клиента, сетевой нагрузке или производительности. Во многих случаях параметры курсора по умолчанию создают более сложный курсор, чем требуется приложению.
Выбор типа курсора зависит от того, как приложение использует результирующий набор, а также от нескольких аспектов проектирования, включая размер результирующий набор, процент данных, которые могут быть использованы, конфиденциальность к изменениям данных и требования к производительности приложения.
Выбор курсора зависит от того, нужно ли изменить или просто просмотреть данные:
Если вам нужно просто прокрутить набор результатов, но не изменять данные, используйте только переадресацию или статический курсор.
Если у вас большой результирующий набор, и вам нужно выделить всего несколько строк, используйте курсор набора ключей .
Если вы хотите синхронизировать результирующий набор с недавними добавлениями, изменениями и удалениями всеми одновременно работающими пользователями, используйте динамический курсор.
Несмотря на то, что каждый тип курсора представляется уникальным, помните, что эти типы курсоров являются не столько различными разновидностями, сколько просто результатом перекрывающихся характеристик и параметров.
Источник
Visual Basic Procedure to Get/Set Cursor Position
Summary
You can make a Windows API (application programming interface) call to a Microsoft Windows DLL (dynamic-link Library) to get and set the current cursor position. The current position can be obtained by using the GetCursorPos function in USER32.DLL.
More Information
Microsoft Excel does not have the built-in functionality to get or set the cursor position. However, you can use the Declare statement in a Microsoft Excel Visual Basic for Applications macro to call a Microsoft Windows function to access the current position. You can also use another function SetCursorPos to set the cursor position. The SetCursorPos function can be used in a looping structure to move the cursor across the screen.
Microsoft provides examples of Visual Basic for Applications procedures for illustration only, without warranty either expressed or implied, including, but not limited to the implied warranties of merchantability and/or fitness for a particular purpose. The Visual Basic procedures in this article are provided ‘as is’ and Microsoft does not guarantee that they can be used in all situations. While Microsoft support professionals can help explain the functionality of a particular macro, they will not modify these examples to provide added functionality, nor will they help you construct macros to meet your specific needs. If you have limited programming experience, you may want to consult one of the Microsoft Solution Providers. Solution Providers offer a wide range of fee-based services, including creating custom macros. For more information about Microsoft Solution Providers, call Microsoft Customer Information Service at (800) 426-9400.
EXAMPLES
Type the following code into a new module:
Click anywhere inside the text of the Get_Cursor_Pos routine and press the F5 key to run the Get_Cursor_Pos macro.
You will get a message box displayed with the coordinates of the current position of the mouse pointer.
Click anywhere inside the text of the Set_Cursor_Pos routine and press the F5 key to run the Set_Cursor_Pos macro.
The cursor will move diagonally down across the screen.
Источник