
-
#1
Excel 2007.
This is probably something simple, haven’t gotten it though… Making a button on my ribbon that will fire a macro. All the macro needs to do is say, «if sheetX is visible, then hide… if sheetX is hidden, then visible = true»
Here’s where I’m at:
Code:
    For i = LBound(MyArray) To UBound(MyArray)
        If Sheets(MyArray(i)).Visible = True Then
            Sheets(MyArray(i)).visibe = xlHidden
        Else:
            If Sheets(MyArray(i)).Visible = xlHidden Then
                Sheets(MyArray(i)).Visible = True
            End If
        End If
    Next i
MyArray as dimmed variant and it’s just a list of sheet names.
Getting error on «If Sheets(MyArray(i)).Visible = True Then»
Any help very much appreciated.
Using Function Arguments with nested formulas
If writing INDEX in Func. Arguments, type MATCH(. Use the mouse to click inside MATCH in the formula bar. Dialog switches to MATCH.
-
#2
Never mind…
«Sheets(MyArray(i)).visibe»
visible*** lol
-
#3
Excel 2007.
This is probably something simple, haven’t gotten it though… Making a button on my ribbon that will fire a macro. All the macro needs to do is say, «if sheetX is visible, then hide… if sheetX is hidden, then visible = true»
Here’s where I’m at:
Code:
    For i = LBound(MyArray) To UBound(MyArray)
        If Sheets(MyArray(i)).Visible = True Then
            Sheets(MyArray(i)).visibe = xlHidden
        Else:
            If Sheets(MyArray(i)).Visible = xlHidden Then
                Sheets(MyArray(i)).Visible = True
            End If
        End If
    Next i
MyArray as dimmed variant and it’s just a list of sheet names.
Getting error on «If Sheets(MyArray(i)).Visible = True Then»
Since you are going for simple visible or not visible, this should work for you, this replacement code for what you posted should work for you…
Code:
For i = LBound(MyArray) To UBound(MyArray)
  Sheets(MyArray(i)).Visible = Not Sheets(MyArray(i)).Visible
Next i
![]()
На чтение 16 мин. Просмотров 14.5k.

Malcolm Gladwell
Мечтатель начинает с чистого листа бумаги и переосмысливает мир
Эта статья содержит полное руководство по использованию Excel
VBA Worksheet в Excel VBA. Если вы хотите узнать, как что-то сделать быстро, ознакомьтесь с кратким руководством к рабочему листу VBA ниже.
Если вы новичок в VBA, то эта статья — отличное место для начала. Мне нравится разбивать вещи на простые термины и объяснять их на простом языке.
Вы можете прочитать статью от начала до конца, так как она написана в логическом порядке. Или, если предпочитаете, вы можете использовать оглавление ниже и перейти непосредственно к теме по вашему выбору.
Содержание
- Краткое руководство к рабочему листу VBA
- Вступление
- Доступ к рабочему листу
- Использование индекса для доступа к рабочему листу
- Использование кодового имени рабочего листа
- Активный лист
- Объявление объекта листа
- Доступ к рабочему листу в двух словах
- Добавить рабочий лист
- Удалить рабочий лист
- Цикл по рабочим листам
- Использование коллекции листов
- Заключение
Краткое руководство к рабочему листу VBA
В следующей таблице приведен краткий обзор различных методов
Worksheet .
Примечание. Я использую Worksheet в таблице ниже, не указывая рабочую книгу, т.е. Worksheets, а не ThisWorkbook.Worksheets, wk.Worksheets и т.д. Это сделано для того, чтобы примеры были понятными и удобными для чтения. Вы должны всегда указывать рабочую книгу при использовании Worksheets . В противном случае активная рабочая книга будет использоваться по умолчанию.
| Задача | Исполнение |
| Доступ к рабочему листу по имени |
Worksheets(«Лист1») |
| Доступ к рабочему листу по позиции слева |
Worksheets(2) Worksheets(4) |
| Получите доступ к самому левому рабочему листу |
Worksheets(1) |
| Получите доступ к самому правому листу |
Worksheets(Worksheets.Count) |
| Доступ с использованием кодового имени листа (только текущая книга) |
Смотри раздел статьи Использование кодового имени |
| Доступ по кодовому имени рабочего листа (другая рабочая книга) |
Смотри раздел статьи Использование кодового имени |
| Доступ к активному листу | ActiveSheet |
| Объявить переменную листа | Dim sh As Worksheet |
| Назначить переменную листа | Set sh = Worksheets(«Лист1») |
| Добавить лист | Worksheets.Add |
| Добавить рабочий лист и назначить переменную |
Worksheets.Add Before:= Worksheets(1) |
| Добавить лист в первую позицию (слева) |
Set sh =Worksheets.Add |
| Добавить лист в последнюю позицию (справа) |
Worksheets.Add after:=Worksheets(Worksheets.Count) |
| Добавить несколько листов | Worksheets.Add Count:=3 |
| Активировать рабочий лист | sh.Activate |
| Копировать лист | sh.Copy |
| Копировать после листа | sh1.Copy After:=Sh2 |
| Скопировать перед листом | sh1.Copy Before:=Sh2 |
| Удалить рабочий лист | sh.Delete |
| Удалить рабочий лист без предупреждения |
Application.DisplayAlerts = False sh.Delete Application.DisplayAlerts = True |
| Изменить имя листа | sh.Name = «Data» |
| Показать/скрыть лист | sh.Visible = xlSheetHidden sh.Visible = xlSheetVisible sh.Name = «Data» |
| Перебрать все листы (For) | Dim i As Long For i = 1 To Worksheets.Count Debug.Print Worksheets(i).Name Next i |
| Перебрать все листы (For Each) | Dim sh As Worksheet For Each sh In Worksheets Debug.Print sh.Name Next |
Вступление
Три наиболее важных элемента VBA — это Рабочая книга, Рабочий лист и Ячейки. Из всего кода, который вы пишете, 90% будут включать один или все из них.
Наиболее распространенное использование Worksheet в VBA для доступа к его ячейкам. Вы можете использовать его для защиты, скрытия, добавления, перемещения или копирования листа.
Тем не менее, вы будете в основном использовать его для выполнения некоторых действий с одной или несколькими ячейками на листе.
Использование Worksheets более простое, чем использование рабочих книг. С книгами вам может потребоваться открыть их, найти, в какой папке они находятся, проверить, используются ли они, и так далее. С рабочим листом он либо существует в рабочей книге, либо его нет.
Доступ к рабочему листу
В VBA каждая рабочая книга имеет коллекцию рабочих листов. В этой коллекции есть запись для каждого рабочего листа. Эта коллекция называется просто Worksheets и используется очень похоже на коллекцию Workbooks. Чтобы получить доступ к рабочему листу, достаточно указать имя.
Приведенный ниже код записывает «Привет Мир» в ячейках A1 на листах: Лист1, Лист2 и Лист3 текущей рабочей книги.
Sub ZapisVYacheiku1()

    ' Запись в ячейку А1 в листе 1, листе 2 и листе 3
    ThisWorkbook.Worksheets("Лист1").Range("A1") = "Привет Мир"
    ThisWorkbook.Worksheets("Лист2").Range("A1") = "Привет Мир"
    ThisWorkbook.Worksheets("Лист3").Range("A1") = "Привет Мир"

End Sub
Коллекция Worksheets всегда принадлежит книге. Если мы не
указываем рабочую книгу, то активная рабочая книга используется по умолчанию.
Sub ZapisVYacheiku1()

    ' Worksheets относятся к рабочим листам в активной рабочей книге.
    Worksheets("Лист1").Range("A1") = "Привет Мир"
    Worksheets("Лист2").Range("A1") = "Привет Мир"
    Worksheets("Лист3").Range("A1") = "Привет Мир"

End Sub
Скрыть рабочий лист
В следующих примерах показано, как скрыть и показать лист.
ThisWorkbook.Worksheets("Лист1").Visible = xlSheetHidden

ThisWorkbook.Worksheets("Лист1").Visible = xlSheetVisible
Если вы хотите запретить пользователю доступ к рабочему
листу, вы можете сделать его «очень скрытым». Это означает, что это может быть
сделано видимым только кодом.
' Скрыть от доступа пользователя
ThisWorkbook.Worksheets("Лист1").Visible = xlVeryHidden

' Это единственный способ сделать лист xlVeryHidden видимым
ThisWorkbook.Worksheets("Лист1").Visible = xlSheetVisible
Защитить рабочий лист
Другой пример использования Worksheet — когда вы хотите защитить его.
ThisWorkbook.Worksheets("Лист1").Protect Password:="Мойпароль"

ThisWorkbook.Worksheets("Лист1").Unprotect Password:="Мойпароль"
Индекс вне диапазона
При использовании Worksheets вы можете получить сообщение об
ошибке:
Run-time Error 9 Subscript out of Range

Это означает, что вы пытались получить доступ к рабочему листу, который не существует. Это может произойти по следующим причинам:
- Имя Worksheet , присвоенное рабочим листам, написано неправильно.
- Название листа изменилось.
- Рабочий лист был удален.
- Индекс был большим, например Вы использовали рабочие листы (5), но есть только четыре рабочих листа
- Используется неправильная рабочая книга, например Workbooks(«book1.xlsx»).Worksheets(«Лист1») вместо
Workbooks(«book3.xlsx»).Worksheets («Лист1»).
Если у вас остались проблемы, используйте один из циклов из раздела «Циклы по рабочим листам», чтобы напечатать имена всех рабочих листов коллекции.
Использование индекса для доступа к рабочему листу
До сих пор мы использовали имя листа для доступа к листу.
Указатель относится к положению вкладки листа в рабочей книге. Поскольку
положение может быть легко изменено пользователем, не рекомендуется
использовать это.
В следующем коде показаны примеры использования индекса.
' Использование этого кода является плохой идеей, так как
' позиции листа все время меняются
Sub IspIndList()

    With ThisWorkbook
        ' Самый левый лист
        Debug.Print .Worksheets(1).Name
        ' Третий лист слева
        Debug.Print .Worksheets(3).Name
        ' Самый правый лист
        Debug.Print .Worksheets(.Worksheets.Count).Name
    End With

End Sub
В приведенном выше примере я использовал Debug.Print для печати в Immediate Window. Для просмотра этого окна выберите «Вид» -> «Immediate Window » (Ctrl + G).


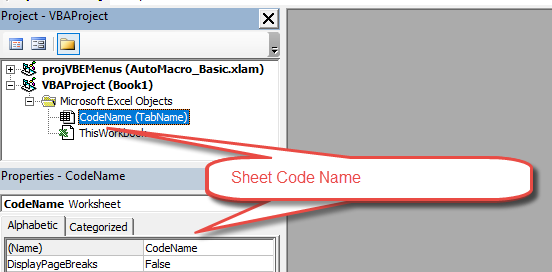
Использование кодового имени рабочего листа
Лучший способ получить доступ к рабочему листу —
использовать кодовое имя. Каждый лист имеет имя листа и кодовое имя. Имя листа
— это имя, которое отображается на вкладке листа в Excel.
Изменение имени листа не приводит к изменению кодового имени, что означает, что ссылка на лист по кодовому имени — отличная идея.
Если вы посмотрите в окне свойств VBE, вы увидите оба имени.
На рисунке вы можете видеть, что кодовое имя — это имя вне скобок, а имя листа
— в скобках.

Вы можете изменить как имя листа, так и кодовое имя в окне
свойств листа (см. Изображение ниже).

Если ваш код ссылается на кодовое имя, то пользователь может
изменить имя листа, и это не повлияет на ваш код. В приведенном ниже примере мы
ссылаемся на рабочий лист напрямую, используя кодовое имя.
Sub IspKodImya2()

    ' Используя кодовое имя листа
    Debug.Print CodeName.Name
    CodeName.Range("A1") = 45
    CodeName.Visible = True

End Sub
Это делает код легким для чтения и безопасным от изменения
пользователем имени листа.
Кодовое имя в других книгах
Есть один недостаток использования кодового имени. Он относится только к рабочим листам в рабочей книге, которая содержит код, т.е. ThisWorkbook.
Однако мы можем использовать простую функцию, чтобы найти
кодовое имя листа в другой книге.
Sub ИспЛист()

    Dim sh As Worksheet
    ' Получить рабочий лист под кодовым именем
    Set sh = SheetFromCodeName("CodeName", ThisWorkbook)
    ' Используйте рабочий лист
    Debug.Print sh.Name

End Sub

' Эта функция получает объект листа из кодового имени
Public Function SheetFromCodeName(Name As String, bk As Workbook) As Worksheet

    Dim sh As Worksheet
    For Each sh In bk.Worksheets
        If sh.CodeName = Name Then
           Set SheetFromCodeName = sh
           Exit For
        End If
    Next sh

End Function
Использование приведенного выше кода означает, что если
пользователь изменит имя рабочего листа, то на ваш код это не повлияет.
Существует другой способ получения имени листа внешней
рабочей книги с использованием кодового имени. Вы можете использовать элемент
VBProject этой Рабочей книги.
Вы можете увидеть, как это сделать, в примере ниже. Я включил это, как дополнительную информацию, я бы рекомендовал использовать метод из предыдущего примера, а не этот.
Public Function SheetFromCodeName2(codeName As String _
                             , bk As Workbook) As Worksheet

    ' Получить имя листа из CodeName, используя VBProject
    Dim sheetName As String
    sheetName = bk.VBProject.VBComponents(codeName).Properties("Name")

    ' Используйте имя листа, чтобы получить объект листа
    Set SheetFromCodeName2 = bk.Worksheets(sheetName)

End Function
Резюме кодового имени
Ниже приведено краткое описание использования кодового имени:
- Кодовое имя рабочего листа может быть
использовано непосредственно в коде, например. Sheet1.Range - Кодовое имя будет по-прежнему работать, если имя
рабочего листа будет изменено. - Кодовое имя может использоваться только для
листов в той же книге, что и код. - Везде, где вы видите ThisWorkbook.Worksheets
(«имя листа»), вы можете заменить его кодовым именем рабочего листа. - Вы можете использовать функцию SheetFromCodeName
сверху, чтобы получить кодовое имя рабочих листов в других рабочих книгах.
Активный лист
Объект ActiveSheet ссылается на рабочий лист, который в данный момент активен. Вы должны использовать ActiveSheet только в том случае, если у вас есть особая необходимость ссылаться на активный лист.
В противном случае вы должны указать рабочий лист, который
вы используете.
Если вы используете метод листа, такой как Range, и не
упоминаете лист, он по умолчанию будет использовать активный лист.
' Написать в ячейку A1 в активном листе
ActiveSheet.Range("A1") = 99

' Активный лист используется по умолчанию, если лист не используется
Range("A1") = 99
Объявление объекта листа
Объявление объекта листа полезно для того, чтобы сделать ваш
код более понятным и легким для чтения.
В следующем примере показан код для обновления диапазонов
ячеек. Первый Sub не объявляет объект листа. Вторая подпрограмма объявляет
объект листа, и поэтому код намного понятнее.
Sub NeObyavObektList()

    Debug.Print ThisWorkbook.Worksheets("Лист1").Name
    ThisWorkbook.Worksheets("Лист1").Range("A1") = 6
    ThisWorkbook.Worksheets("Лист1").Range("B2:B9").Font.Italic = True
    ThisWorkbook.Worksheets("Лист1").Range("B2:B9").Interior.Color = rgbRed

End Sub
Sub ObyavObektList()

    Dim sht As Worksheet
    Set sht = ThisWorkbook.Worksheets("Лист1")

    sht.Range("A1") = 6
    sht.Range("B2:B9").Font.Italic = True
    sht.Range("B2:B9").Interior.Color = rgbRed

End Sub
Вы также можете использовать ключевое слово With с объектом
листа, как показано в следующем примере.
Sub ObyavObektListWith()

    Dim sht As Worksheet
    Set sht = ThisWorkbook.Worksheets("Лист1")

    With sht
        .Range("A1") = 6
        .Range("B2:B9").Font.Italic = True
        .Range("B2:B9").Interior.Color = rgbRed
    End With

End Sub
Доступ к рабочему листу в двух словах
Из-за множества различных способов доступа к рабочему листу вы можете быть сбитыми с толку. Так что в этом разделе я собираюсь разбить его на простые термины.
- Если вы хотите использовать тот лист, который активен в данный момент, используйте ActiveSheet.
ActiveSheet.Range("A1") = 55
2. Если лист находится в той же книге, что и код, используйте кодовое имя.
3. Если рабочая таблица находится в другой рабочей книге, сначала получите рабочую книгу, а затем получите рабочую таблицу.
' Получить рабочую книгу
Dim wk As Workbook
Set wk = Workbooks.Open("C:ДокументыСчета.xlsx", ReadOnly:=True)
' Затем получите лист
Dim sh As Worksheet
Set sh = wk.Worksheets("Лист1")
Если вы хотите защитить пользователя от изменения имени листа, используйте функцию SheetFromCodeName из раздела «Имя кода».
' Получить рабочую книгу
Dim wk As Workbook
Set wk = Workbooks.Open("C:ДокументыСчета.xlsx", ReadOnly:=True)

' Затем получите лист
Dim sh As Worksheet
Set sh = SheetFromCodeName("sheetcodename",wk)
Добавить рабочий лист
Примеры в этом разделе показывают, как добавить новую
рабочую таблицу в рабочую книгу. Если вы не предоставите никаких аргументов для
функции Add, то новый
рабочий лист будет помещен перед активным рабочим листом.
Когда вы добавляете рабочий лист, он создается с именем по умолчанию, например «Лист4». Если вы хотите изменить имя, вы можете легко сделать это, используя свойство Name.
В следующем примере добавляется новый рабочий лист и изменяется имя на «Счета». Если лист с именем «Счета» уже существует, вы получите сообщение об ошибке.
Sub DobavitList()

    Dim sht As Worksheet

    ' Добавляет новый лист перед активным листом
    Set sht = ThisWorkbook.Worksheets.Add
    ' Установите название листа
    sht.Name = "Счета"

    ' Добавляет 3 новых листа перед активным листом
    ThisWorkbook.Worksheets.Add Count:=3

End Sub
В предыдущем примере вы добавляете листы по отношению к
активному листу. Вы также можете указать точную позицию для размещения листа.
Для этого вам нужно указать, какой лист новый лист должен
быть вставлен до или после. Следующий код показывает вам, как это сделать.
Sub DobavitListPervPosl()

    Dim shtNew As Worksheet
    Dim shtFirst As Worksheet, shtLast As Worksheet

    With ThisWorkbook

        Set shtFirst = .Worksheets(1)
        Set shtLast = .Worksheets(.Worksheets.Count)

        ' Добавляет новый лист на первую позицию в книге
        Set shtNew = Worksheets.Add(Before:=shtFirst)
        shtNew.Name = "FirstSheet"

        ' Добавляет новый лист к последней позиции в книге
        Set shtNew = Worksheets.Add(After:=shtLast)
        shtNew.Name = "LastSheet"

    End With

End Sub
Удалить рабочий лист
Чтобы удалить лист, просто вызовите Delete.
Dim sh As Worksheet
Set sh = ThisWorkbook.Worksheets("Лист12")
sh.Delete
Excel отобразит предупреждающее сообщение при удалении листа. Если вы хотите скрыть это сообщение, вы можете использовать код ниже:
Application.DisplayAlerts = False
sh.Delete
Application.DisplayAlerts = True
Есть два аспекта, которые нужно учитывать при удалении таблиц.
Если вы попытаетесь получить доступ к рабочему листу после
его удаления, вы получите ошибку «Subscript out of Range», которую мы видели в
разделе «Доступ к рабочему листу».
Dim sh As Worksheet
Set sh = ThisWorkbook.Worksheets("Лист2")
sh.Delete

' Эта строка выдаст «Subscript out of Range», так как «Лист2» не существует
Set sh = ThisWorkbook.Worksheets("Лист2")
Вторая проблема — когда вы назначаете переменную листа. Если вы попытаетесь использовать эту переменную после удаления листа, вы получите ошибку автоматизации, подобную этой:
Run-Time error -21147221080 (800401a8′) Automation Error
Если вы используете кодовое имя рабочего листа, а не
переменную, это приведет к сбою Excel,
а не к ошибке автоматизации.
В следующем примере показано, как происходят ошибки автоматизации.
sh.Delete

' Эта строка выдаст ошибку автоматизации
Debug.Assert sh.Name
Если вы назначите переменную Worksheet действительному рабочему листу, он будет работать нормально.
sh.Delete

' Назначить sh на другой лист
Set sh = Worksheets("Лист3")

' Эта строка будет работать нормально
Debug.Assert sh.Name
Цикл по рабочим листам
Элемент «Worksheets» — это набор рабочих листов, принадлежащих рабочей книге. Вы можете просмотреть каждый лист в коллекции рабочих листов, используя циклы «For Each» или «For».
В следующем примере используется цикл For Each.
Sub CiklForEach()

    ' Записывает «Привет Мир» в ячейку A1 для каждого листа
    Dim sht As Worksheet
    For Each sht In ThisWorkbook.Worksheets
         sht.Range("A1") = "Привет Мир"
    Next sht

End Sub
В следующем примере используется стандартный цикл For.
Sub CiklFor()

    ' Записывает «Привет Мир» в ячейку A1 для каждого листа
    Dim i As Long
    For i = 1 To ThisWorkbook.Worksheets.Count
         ThisWorkbook.Worksheets(i).Range("A1") = "Привет Мир"
    Next sht

End Sub
Вы видели, как получить доступ ко всем открытым рабочим книгам и как получить доступ ко всем рабочим листам в ThisWorkbook. Давайте сделаем еще один шаг вперед — узнаем, как получить доступ ко всем рабочим листам во всех открытых рабочих книгах.
Примечание. Если вы используете код, подобный этому, для записи на листы, то сначала сделайте резервную копию всего, так как в итоге вы можете записать неверные данные на все листы.
Sub NazvVsehStr()

    ' Печатает рабочую книгу и названия листов для
    ' всех листов в открытых рабочих книгах
    Dim wrk As Workbook
    Dim sht As Worksheet
    For Each wrk In Workbooks
        For Each sht In wrk.Worksheets
            Debug.Print wrk.Name + ":" + sht.Name
        Next sht
    Next wrk

End Sub
Использование коллекции листов
Рабочая книга имеет еще одну коллекцию, похожую на Worksheets под названием Sheets. Это иногда путает пользователей. Чтобы понять, в первую очередь, вам нужно знать о типе листа, который является диаграммой.
В Excel есть возможность создать лист, который является диаграммой. Для этого нужно:
- Создать диаграмму на любом листе.
- Щелкнуть правой кнопкой мыши на графике и выбрать «Переместить».
- Выбрать первый вариант «Новый лист» и нажмите «ОК».
Теперь у вас есть рабочая книга, в которой есть типовые листы и лист-диаграмма.
- Коллекция «Worksheets » относится ко всем рабочим листам в рабочей книге. Не включает в себя листы типа диаграммы.
- Коллекция Sheets относится ко всем листам, принадлежащим книге, включая листы типовой диаграммы.
Ниже приведены два примера кода. Первый проходит через все
листы в рабочей книге и печатает название листа и тип листа. Второй пример
делает то же самое с коллекцией Worksheets.
Чтобы опробовать эти примеры, вы должны сначала добавить лист-диаграмму в свою книгу, чтобы увидеть разницу.
Sub KollSheets()

    Dim sht As Variant
    ' Показать название и тип каждого листа
    For Each sht In ThisWorkbook.Sheets
        Debug.Print sht.Name & " is type " & TypeName(sht)
    Next sht

End Sub

Sub KollWorkSheets()

    Dim sht As Variant
    ' Показать название и тип каждого листа
    For Each sht In ThisWorkbook.Worksheets
        Debug.Print sht.Name & " is type " & TypeName(sht)
    Next sht

End Sub
Если у вас нет листов диаграмм, то использование коллекции Sheets — то же самое, что использование коллекции WorkSheets.
Заключение
На этом мы завершаем статью о Worksheet VBA. Я надеюсь, что было полезным.
Три наиболее важных элемента Excel VBA — это рабочие книги, рабочие таблицы, диапазоны и ячейки.
Эти элементы будут использоваться практически во всем, что вы делаете. Понимание их сделает вашу жизнь намного проще и сделает изучение VBA увлекательнее.
In this Article
- Sheets Vs. Worksheets
- Referencing Sheets
- ActiveSheet
- Sheet Name
- Sheet Index Number
- Sheet “Code Name”
- Referencing Sheets in Other Workbooks
- Activate vs. Select Sheet
- Activate a Sheet
- Select a Sheet
- Select Multiple Sheets
- Worksheet Variable
- Loop Through All Sheets in Workbook
- Worksheet Protection
- Workbook Protection
- Worksheet Protection
- Protect Worksheet
- Unprotect Worksheet
- Worksheet Visible Property
- Unhide Worksheet
- Hide Worksheet
- Very Hide Worksheet
- Worksheet-Level Events
- Worksheet Activate Event
- Worksheet Change Event
- Worksheet Cheat Sheet
- VBA Worksheets Cheatsheet
This is the ultimate guide to working with Excel Sheets / Worksheets in VBA.
At the bottom of this guide, we’ve created a cheat sheet of common commands for working with sheets.
Sheets Vs. Worksheets
There are two ways to reference Sheets using VBA. The first is with the Sheets object:
Sheets("Sheet1").ActivateThe other is with the Worksheets object:
Worksheets("Sheet1").Activate99% of the time, these two objects are identical. In fact, if you’ve searched online for VBA code examples, you’ve probably seen both objects used. Here is the difference:
The Sheets Collection contains Worksheets AND Chart Sheets.

So use Sheets if you want to include regular Worksheets AND Chart Sheets. Use Worksheets if you want to exclude Chart Sheets. For the rest of this guide we will use Sheets and Worksheets interchangeably.
Referencing Sheets
There are several different ways to reference Sheets:
- ActiveSheet
- Sheet Tab Name
- Sheet Index Number
- Sheet Code Name
ActiveSheet
The ActiveSheet is the Sheet that’s currently active. In other words, if you paused your code and looked at Excel, it’s the sheet that is visible. The below code example will display a MessageBox with the ActiveSheet name.
MsgBox ActiveSheet.NameSheet Name
You are probably most familiar with referencing Sheets by their Tab Name:
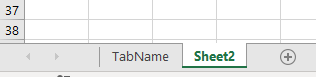
Sheets("TabName").ActivateThis is the sheet name that’s visible to Excel users. Enter it into the sheets object, as a string of text, surrounded by quotations.
Sheet Index Number
The Sheet Index number is the sheet position in the workbook. 1 is the first sheet. 2 is the second sheet etc.:
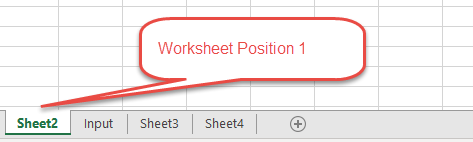
Sheets(1).ActivateSheet Index Number – Last Sheet in Workbook
To reference the last Sheet in the workbook, use Sheets.Count to get the last Index Number and activate that sheet:
Sheets(Sheets.Count).ActivateSheet “Code Name”
The Sheet Code Name is it’s Object name in VBA:
CodeName.ActivateVBA Coding Made Easy
Stop searching for VBA code online. Learn more about AutoMacro — A VBA Code Builder that allows beginners to code procedures from scratch with minimal coding knowledge and with many time-saving features for all users!

Learn More
Referencing Sheets in Other Workbooks
It’s also easy to reference Sheets in other Workbooks. To do so, you need to use the Workbooks Object:
Workbooks("VBA_Examples.xlsm").Worksheets("Sheet1").ActivateImportant: The Workbook must be open before you can reference its Sheets.
Activate vs. Select Sheet
In another article we discuss everything about activating and selecting sheets. The short version is this:
When you Activate a Sheet it becomes the ActiveSheet. This is the sheet you would see if you looked at your Excel program. Only one sheet may be activate at a time.
Activate a Sheet
Sheets("Sheet1").ActivateWhen you select a Sheet, it also becomes the ActiveSheet. However, you can select multiple sheets at once. When multiple sheets are selected at once, the “top” sheet is the ActiveSheet. However, you can toggle the ActiveSheet within selected sheets.
VBA Programming | Code Generator does work for you!
Select a Sheet
Sheets("Sheet1").SelectSelect Multiple Sheets
Use an array to select multiple sheets at once:
Worksheets(Array("Sheet2", "Sheet3")).SelectWorksheet Variable
Assigning a worksheet to an object variable allows you to reference the worksheet by it’s variable name. This can save a lot of typing and make your code easier to read. There are also many other reasons you might want to use variables.
To declare a worksheet variable:
Dim ws as worksheetAssign a worksheet to a variable:
Set ws = Sheets("Sheet1")Now you can reference the worksheet variable in your code:
ws.ActivateLoop Through All Sheets in Workbook
Worksheet variables are useful when you want to loop through all the worksheets in a workbook. The easiest way to do this is:
Dim ws as Worksheet

For Each ws in Worksheets
  MsgBox ws.name
Next ws
This code will loop through all worksheets in the workbook, displaying each worksheet name in a message box. Looping through all the sheets in a workbook is very useful when locking / unlocking or hiding / unhiding multiple worksheets at once.
Worksheet Protection
AutoMacro | Ultimate VBA Add-in | Click for Free Trial!
Workbook Protection
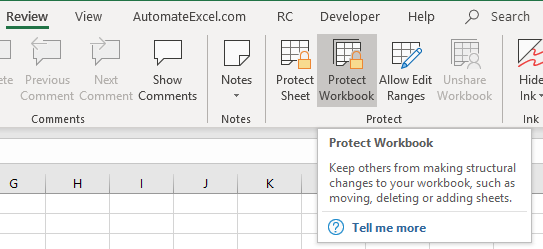
Workbook protection locks the workbook from structural changes like adding, deleting, moving, or hiding worksheets.
You can turn on workbook protection using VBA:
ActiveWorkbook.Protect Password:="Password"or disable workbook protection:
ActiveWorkbook.UnProtect Password:="Password"Note: You can also protect / unprotect without a password by omitting the Password argument:
ActiveWorkbook.ProtectWorksheet Protection
Worksheet-level protection prevents changes to individual worksheets.
Protect Worksheet
Worksheets("Sheet1").Protect "Password"Unprotect Worksheet
Worksheets("Sheet1").Unprotect "Password"There are a variety of options when protecting worksheets (allow formatting changes, allow user to insert rows, etc.) We recommend using the Macro Recorder to record your desired settings.
We discuss worksheet protection in more detail here.
AutoMacro | Ultimate VBA Add-in | Click for Free Trial!
Worksheet Visible Property
You might already know that worksheets can be hidden:
There are actually three worksheet visibility settings: Visible, Hidden, and VeryHidden. Hidden sheets can be unhidden by any regular Excel user – by right-clicking in the worksheet tab area (shown above). VeryHidden sheets can only be unhidden with VBA code or from within the VBA Editor. Use the following code examples to hide / unhide worksheets:
Unhide Worksheet
Worksheets("Sheet1").Visible = xlSheetVisibleHide Worksheet
Worksheets("Sheet1").visible = xlSheetHiddenVery Hide Worksheet
Worksheets("Sheet1").Visible = xlSheetVeryHiddenAutoMacro | Ultimate VBA Add-in | Click for Free Trial!
Worksheet-Level Events
Events are triggers that can cause “Event Procedures” to run. For example, you can cause code to run every time any cell on a worksheet is changed or when a worksheet is activated.
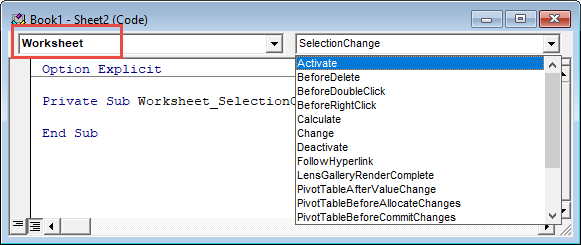
Worksheet event procedures must be placed in a worksheet module:
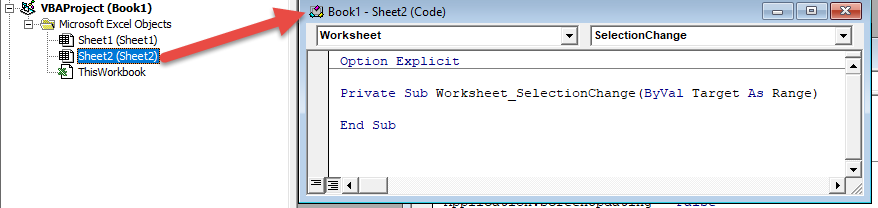
There are numerous worksheet events. To see a complete list, go to a worksheet module, select “Worksheet” from the first drop-down. Then selecting an event procedure from the second drop-down to insert it into the module.
Worksheet Activate Event
Worksheet activate events run each time the worksheet is opened.
Private Sub Worksheet_Activate()
  Range("A1").Select
End Sub
This code will select cell A1 (resetting the view area to the top-left of the worksheet) each time the worksheet is opened.
Worksheet Change Event
Worksheet change events run whenever a cell value is changed on the worksheet. Read our tutorial about Worksheet Change Events for more information.
Worksheet Cheat Sheet
Below you will find a cheat sheet containing common code examples for working with sheets in VBA
VBA Worksheets Cheatsheet
VBA worksheets Cheatsheet
| Description | Code Example |
|---|---|
| Referencing and Activating Sheets | |
| Tab Name | Sheets(«Input»).Activate |
| VBA Code Name | Sheet1.Activate |
| Index Position | Sheets(1).Activate |
| Select Sheet | |
| Select Sheet | Sheets(«Input»).Select |
| Set to Variable | Dim ws as Worksheet Set ws = ActiveSheet |
| Name / Rename | ActiveSheet.Name = «NewName» |
| Next Sheet | ActiveSheet.Next.Activate |
| Loop Through all Sheets | Dim ws as Worksheet
For each ws in Worksheets |
| Loop Through Selected Sheets | Dim ws As Worksheet
For Each ws In ActiveWindow.SelectedSheets |
| Get ActiveSheet | MsgBox ActiveSheet.Name |
| Add Sheet | Sheets.Add |
| Add Sheet and Name | Sheets.Add.Name = «NewSheet» |
| Add Sheet With Name From Cell | Sheets.Add.Name = range(«a3»).value |
| Add Sheet After Another | Sheets.Add After:=Sheets(«Input») |
| Add Sheet After and Name | Sheets.Add(After:=Sheets(«Input»)).Name = «NewSheet» |
| Add Sheet Before and Name | Sheets.Add(Before:=Sheets(«Input»)).Name = «NewSheet» |
| Add Sheet to End of Workbook | Sheets.Add After:=Sheets(Sheets.Count) |
| Add Sheet to Beginning of Workbook | Sheets.Add(Before:=Sheets(1)).Name = «FirstSheet» |
| Add Sheet to Variable | Dim ws As Worksheet Set ws = Sheets.Add |
| Copy Worksheets | |
| Move Sheet to End of Workbook | Sheets(«Sheet1»).Move After:=Sheets(Sheets.Count) |
| To New Workbook | Sheets(«Sheet1»).Copy |
| Selected Sheets To New Workbook | ActiveWindow.SelectedSheets.Copy |
| Before Another Sheet | Sheets(«Sheet1»).Copy Before:=Sheets(«Sheet2») |
| Before First Sheet | Sheets(«Sheet1»).Copy Before:=Sheets(1) |
| After Last Sheet | Sheets(«Sheet1»).Copy After:=Sheets(Sheets.Count) |
| Copy and Name | Sheets(«Sheet1»).Copy After:=Sheets(Sheets.Count) ActiveSheet.Name = «LastSheet» |
| Copy and Name From Cell Value | Sheets(«Sheet1»).Copy After:=Sheets(Sheets.Count) ActiveSheet.Name = Range(«A1»).Value |
| To Another Workbook | Sheets(«Sheet1»).Copy Before:=Workbooks(«Example.xlsm»).Sheets(1) |
| Hide / Unhide Sheets | |
| Hide Sheet | Sheets(«Sheet1»).visible = False or Sheets(«Sheet1»).visible = xlSheetHidden |
| Unhide Sheet | Sheets(«Sheet1»).Visible = True or Sheets(«Sheet1»).Visible = xlSheetVisible |
| Very Hide Sheet | Sheets(Sheet1).Visible = xlSheetVeryHidden |
| Delete or Clear Sheets | |
| Delete Sheet | Sheets(«Sheet1»).Delete |
| Delete Sheet (Error Handling) | On Error Resume Next Sheets(«Sheet1»).Delete On Error GoTo 0 |
| Delete Sheet (No Prompt) | Application.DisplayAlerts = False Sheets(«Sheet1»).Delete Application.DisplayAlerts = True |
| Clear Sheet | Sheets(«Sheet1»).Cells.Clear |
| Clear Sheet Contents Only | Sheets(«Sheet1»).Cells.ClearContents |
| Clear Sheet UsedRange | Sheets(«Sheet1»).UsedRange.Clear |
| Protect or Unprotect Sheets | |
| Unprotect (No Password) | Sheets(«Sheet1»).Unprotect |
| Unprotect (Password) | Sheets(«Sheet1»).Unprotect «Password» |
| Protect (No Password) | Sheets(«Sheet1»).Protect |
| Protect (Password) | Sheets(«Sheet1»).Protect «Password» |
| Protect but Allow VBA Access | Sheets(«Sheet1»).Protect UserInterfaceOnly:=True |
| Unprotect All Sheets | Dim ws As Worksheet
For Each ws In Worksheets |
Суперскрытый лист
Иногда некоторые листы в книге приходится скрывать от глаз пользователей. Классический способ предполагает скрытие листа через меню Формат — Лист — Скрыть или правой кнопкой по ярлычку листа — Скрыть (Hide):

Проблема в том, что пользователь, зайдя в меню Формат — Лист — Отобразить или щелкнув правой кнопкой мыши по ярлычку любого листа и выбрав Показать (Unhide), будет видеть имена скрытых листов и понимать, что часть информации от него скрыта:

Поэтому лучше сделать так, чтобы пользователь и не догадывался о присутствии в книге каких-то скрытых листов. Для этого открываем редактор Visual Basic:
- в Excel 2003 и старше — выбрав в меню Сервис — Макрос — Редактор Visual Basic (Tools — Macro — Visual Basic Editor)
- в Excel 2007 и новее — нажав на кнопку Редактор Visual Basic (Visual Basic Editor) на вкладке Разработчик (Developer) или нажав ALT+F11
Ищем на экране вот такое окно:

Если его не видно, то можно его отобразить через меню View — Project Explorer (верхняя часть) и View — Properties Window (нижняя часть).
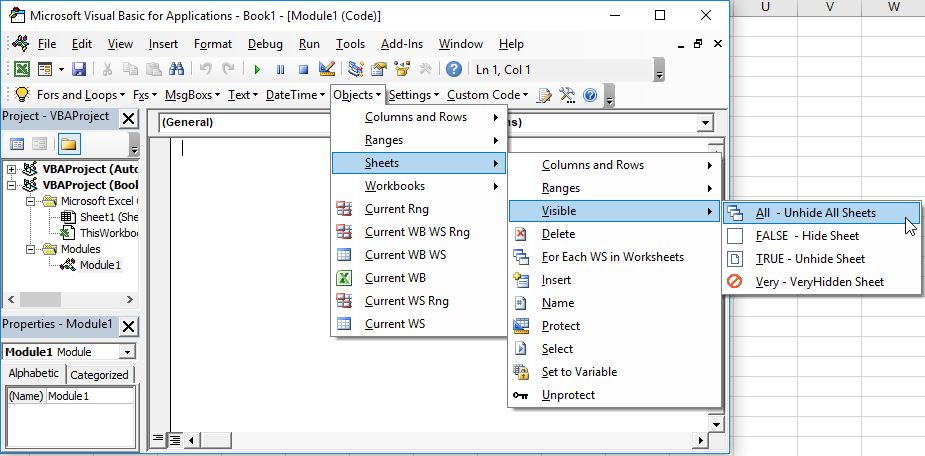
В верхней части на «дереве» находим и выделяем наш лист (на картинке — Лист1), а в нижней части находим свойство Visible (в конце списка) и делаем его xlSheetVeryHidden.

Вуаля! Теперь увидеть этот лист и узнать о его существовании можно только в редакторе Visual Basic и ни в каких окнах и менюшках Excel он отображаться не будет. Меньше знаешь — крепче спишь. 
Ссылки по теме
- 4 уровня защиты в файлах Excel
- Скрытие листов оптом с помощью надстройки PLEX
Обращение к рабочим листам Excel из кода VBA. Переименование листов, скрытие и отображение с помощью кода VBA Excel. Свойства Worksheets.Name и Worksheets.Visible.
Обращение к рабочим листам
Рабочий лист (Worksheet) принадлежит коллекции всех рабочих листов (Worksheets) книги Excel. Обратиться к листу можно как к элементу коллекции и, напрямую, по его уникальному имени.
Откройте редактор VBA и обратите внимание на вашу книгу в проводнике, где уникальные имена листов указаны без скобок, а в скобках — имена листов, отображаемые на ярлычках в открытой книге Excel. Уникальные имена листов отсортированы по алфавиту и их расположение по порядку не будет соответствовать их индексам (номерам), если листы перемещались по отношению друг к другу. Индексы листов смотрите по порядку расположения ярлычков в открытой книге. Переместили листы — изменились их индексы.
Обращение к рабочему листу в коде VBA Excel:
|
‘По уникальному имени УникИмяЛиста ‘По индексу Worksheets(N) ‘По имени листа на ярлычке Worksheets(«Имя листа») |
- УникИмяЛиста — уникальное имя листа, отображаемое в проводнике редактора VBA без скобок, с помощью кода VBA изменить его невозможно.
- N — индекс листа от 1 до количества всех листов в книге, соответствует порядковому номеру ярлычка этого листа в открытой книге Excel.
- Имя листа — имя листа, отображаемое в проводнике редактора VBA в скобках, с помощью кода VBA изменить его можно.
Количество листов в рабочей книге Excel определяется так:
|
‘В активной книге Worksheets.Count ‘В любой открытой книге, ‘например, в «Книга1.xlsm» Workbooks(«Книга1.xlsm»).Worksheets.Count |
Переименование листов
В VBA Excel есть некоторые особенности в наименовании листов, так как у рабочего листа есть два свойства, связанных с именем: (Name) и Name. Откройте окно «Properties» в редакторе VBA, нажав клавишу «F4», и выделите любой лист в проводнике. Вы увидите, что в окне «Properties» свойству (Name) в скобках соответствует в проводнике уникальное имя листа без скобок, а свойству Name без скобок соответствует изменяемое имя листа в скобках. Оба имени в окне «Properties» можно редактировать.
С помощью кода VBA Excel можно редактировать только имя листа Name, отображаемое на ярлычке листа и в проводнике без скобок. Для этого используется свойство рабочего листа Worksheets.Name со следующим синтаксисом:
expression.Name
где expression — переменная, представляющая собой объект Worksheet. Смена имени осуществляется путем присвоения нового значения свойству Worksheets.Name.
Допустим, у нас есть лист с уникальным именем (Name) — Лист1, индексом — 1 и именем Name — МойЛист, которое необходимо заменить на имя — Реестр.
|
Лист1.Name = «Реестр» Worksheets(1).Name = «Реестр» Worksheets(«МойЛист»).Name = «Реестр» |
Скрытие и отображение листов
Для скрытия и отображения рабочих листов в VBA Excel используется свойство Worksheet.Visible со следующим синтаксисом:
expression.Visible
где expression — переменная, представляющая собой объект Worksheet. Свойству Worksheet.Visible могут присваиваться следующие значения:
- False — лист становится невидимым, но он будет присутствовать в списке скрытых листов, и пользователь сможет его отобразить с помощью инструментов рабочей книги Excel.
- xlVeryHidden — лист становится супер невидимым и его не будет в списке скрытых листов, пользователь не сможет его отобразить. Актуально для Excel 2003-2016.
- True — лист становится видимым.
Аналоги присваиваемых значений:
- False = xlHidden = xlSheetHidden = 1
- xlVeryHidden = xlSheetVeryHidden = 2
- True = xlSheetVisible = -1 (константа xlVisible вызывает ошибку)
Примеры:
|
Лист1.Visible = xlSheetHidden Лист2.Visible = —1 Worksheets(Worksheets.Count).Visible = xlVeryHidden Worksheets(«МойЛист»).Visible = True |
Как создать, скопировать, переместить или удалить рабочий лист с помощью кода VBA Excel, смотрите в этой статье.
Bottom line: Learn a few different ways to unhide (show) multiple sheets at the same time with a VBA macro or add-in.
Skill Level: Intermediate
Depending on which version of Excel you are using, you might not be able to unhide two or more sheets at the same time. If you are NOT using Microsoft 365, then the Unhide menu only allows you to select one sheet at a time.
This can make the process of unhiding multiple sheets very time-consuming, especially if you want to unhide all the sheets in the workbook. So in this article, we will look at a few different ways to quickly make sheets visible.
#1 – Use Microsoft 365
In 2021, Microsoft released an update for Excel that now allows you to unhide multiple sheets at the same time.
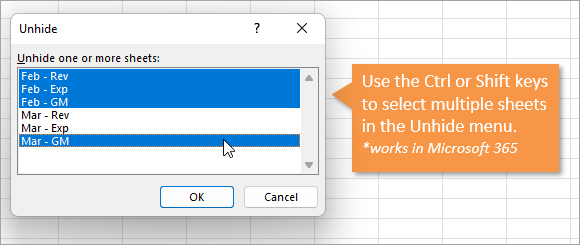
This is the ultimate solution and I’m happy that Microsoft fixed this issue.
If you aren’t on the latest version of Excel yet, then the next three solutions will help you with automating the process of unhiding multiple sheet tabs.
#2 – Use the VBA Immediate Window to Unhide All
The fastest way to make all the sheets visible in Excel is to use a macro (VBA). The following line of VBA code uses a For Next Loop to loop through each sheet in the active workbook and make each sheet visible.
For Each ws In Sheets:ws.Visible=True:Next
You can run this code in the VB Editor’s Immediate Window in three easy steps:
- Alt+F11 (opens the VB Editor Window)
- Ctrl+G (opens the Immediate Window)
- Paste the following line of code in the Immediate Window and press Enter
For Each ws In Sheets:ws.Visible=True:Next
The screencast below shows how to implement these steps.

That line of code loops through all the worksheets in the workbook and sets each sheet’s visible property to “True”. This makes each sheet visible, which is the same as unhiding each sheet.
The colon character “:” used in the code allows you to basically combine multiple lines of code into one line. This makes it possible to run in the Immediate Window because the Immediate Window only evaluates one line of code at a time.
Check out my article on 5 Ways to Use the VBA Immediate Window to learn more. And a big thanks to Jan Karel Pieterse of www.jkp-ads.com for sharing this trick in the comments section.
#3 – Use a Macro to Unhide Multiple Sheets
If you are scratching your head at that line of code in #1, this section should help explain it better.
The macro below is basically that same line of code, but it is broken up into multiple lines. This makes it much easier to read and understand.
Sub Unhide_Multiple_Sheets()
Dim ws As Worksheet

    For Each ws In ActiveWorkbook.Worksheets

        ws.Visible = xlSheetVisible

    Next ws

End Sub
Download the file that contains the macro.
The lines in the code above that start with “For” and “Next” represent a For-Next Loop Statement. The first line “For Each ws In ActiveWorkbook.Worksheets” tells the macro to loop through each worksheet in the worksheets collection of the workbook.
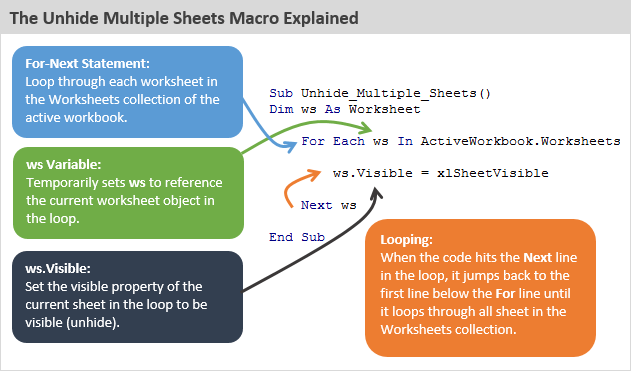
That line also references the variable “ws” and sets it to represent the worksheet object. This means that “ws” temporarily represents the current worksheet in the loop.
When the “Next ws” line of code is hit, the macro jumps back up to the first line of code within the loop and evaluates it again. It continues to loop through all the sheets in the workbook’s worksheet collection (Activeworkbook.Worksheets).
We can then use “ws” inside the loop to change the current worksheet’s properties. In this case, we are setting the “Visible” property of the sheet to be visible (xlSheetVisible). The visible property has three different properties to choose from:
- xlSheetHidden
- xlSheetVeryHidden
- xlSheetVisible

You can also set the property to “True”, which works the same as xlSheetVisible.
Here is the documentation on the VBA Visible property from Microsoft. And checkout my article on the For Next Loop for a detailed explanation of how it works.
Unhide Sheets That Contain a Specific Name
What if we only want to unhide the sheets that contain the word “pivot” in the sheet name?
We can add a simple IF statement to the macro to only unhide sheets that contain a specific name or text.
Sub Unhide_Sheets_Containing()
Dim ws As Worksheet

    For Each ws In ActiveWorkbook.Worksheets
        If InStr(ws.Name, "pivot") > 0 Then
            ws.Visible = xlSheetVisible
        End If
    Next ws

End Sub
Download the file that contains the macro.
The InStr function searches for text in a string and returns the position of the first occurrence of the text. It is short for InString, and the function is similar to the SEARCH or FIND functions in Excel.
So in this case we are looking for any sheet that contains the word “pivot” in the sheet name. The “ws.name” reference returns the name of the worksheet that is currently being evaluated in the For-Next loop.
So this line “If InStr(ws.Name, “pivot”) > 0 Then” basically says, if the word “pivot” is found in the sheet name then the Instr function will return a number greater than zero. The IF statement will evaluate to True and the next line of code will be run to unhide the sheet.
If the word “pivot” is NOT found in the sheet name, then the IF statement will evaluate to False and the code will skip all lines until it gets to the “End If” line. Therefore, the sheet that is currently being evaluated in the loop will keep its current visible property (visible or hidden).
This macro works great if you are hiding and unhiding sheets every day/week/month for a report that you maintain. Run the macro to unhide specific sheets when you open the workbook. After you are finished, run the same code but change the visible property to xlSheetHidden to re-hide the sheets (you can create a new macro for this).
#4 – Use Tab Hound or Tab Control
If all this code is making your head spin, the Tab Hound Add-in allows you to unhide multiple sheets with the click of a few buttons.
The screencast below shows how simple this is.
The Tab Hound window contains a list of all the sheets in the workbook. You can select multiple sheets in the list, then press the Unhide button to unhide all the selected sheets.
This makes the process of unhiding multiple sheets really fast!
Tab Hound also contains additional ways to filter the sheet list. You can type a search in the search box, filter for all visible or hidden tabs, and even filter by tab color. This makes it easy to find the sheets you are looking for and then perform actions on them like hiding/unhiding.
This video also shows how to quickly hide and unhide multiple sheets with Tab Hound.
Click here to learn more about Tab Hound
Publishing Reports? Tab Control Will Save You Time
If you are producing weekly or monthly reports, and want to make sure all the right sheets are hidden before you send it out, the Tab Control add-in can save you a lot of time.
Here is a scenario that we commonly face…
We need to update a workbook with new data this week and make some changes before emailing it out. Those updates require us to unhide a few sheets, make the changes, then hide the sheets again. It can be a time-consuming process if you have to hide/unhide a lot of sheets.
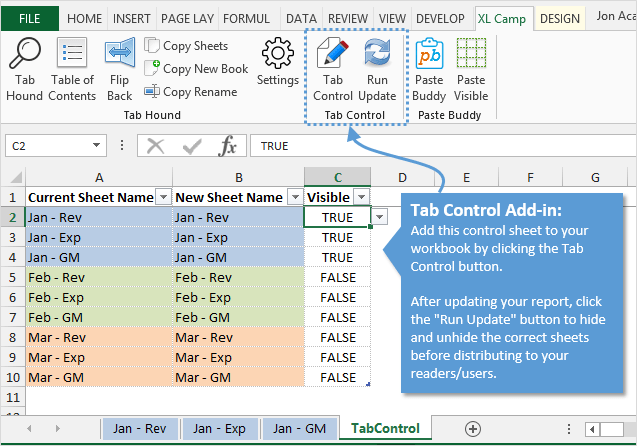
Tab Control will set up a control sheet in your workbook with a list of all the worksheet names. You can set the visible property for each sheet in the list, then click a button to hide or unhide all the sheets based on the list.
This means you can set up the control sheet to a specific view, so only specific worksheets are visible. Click the “Run Update” button and all sheets will be hidden/unhidden based on your control sheet. This ensures that your report will show the correct sheets every time you send it out, and make you look really organized. 🙂
The Tab Control add-in is included with Tab Hound.
Click here to learn more about Tab Hound
Conclusion
Unhiding multiple sheets at the same time in Excel will require code or a macro. There is one other way to use Custom Views, but it has limitations if you use Excel Tables (and I love Tables).
Hopefully, you learned some VBA code that you can implement. You can also add the macros to your Personal Macro workbook to run them anytime you need.
If coding isn’t your thing then check out the Tab Hound add-in. It will save you time and make your life a lot easier. (win-win!) 🙂
Please leave a comment below with any questions. Thanks!
Содержание
- VBA Sheets – The Ultimate Guide
- Sheets Vs. Worksheets
- Referencing Sheets
- ActiveSheet
- Sheet Name
- Sheet Index Number
- Sheet Index Number – Last Sheet in Workbook
- Sheet “Code Name”
- VBA Coding Made Easy
- Referencing Sheets in Other Workbooks
- Activate vs. Select Sheet
- Activate a Sheet
- Select a Sheet
- Select Multiple Sheets
- Worksheet Variable
- Loop Through All Sheets in Workbook
- Worksheet Protection
- Workbook Protection
- Worksheet Protection
- Protect Worksheet
- Unprotect Worksheet
- Worksheet Visible Property
- Unhide Worksheet
- Hide Worksheet
- Very Hide Worksheet
- Worksheet-Level Events
- Worksheet Activate Event
- Worksheet Change Event
- Worksheet Cheat Sheet
- VBA Worksheets Cheatsheet
- VBA Code Examples Add-in
- Скрытие листов и использование константы xlVeryHidden в макросе
- Аннотация
- Дополнительные сведения
- Скрытие листа с помощью команд меню
- Скрытие листа с помощью макроса Visual Basic
- Пример кода Visual Basic
- VBA – Hide (or Unhide) a Worksheet
- Hide Sheet in VBA
- Unhide Sheet
- Very Hidden Sheets
- Unhide Very Hidden Sheets
- Hide / Unhide Sheets in the VBA Editor
- Hide All Worksheet Tabs
- Hide / Unhide Sheets in Protected Workbook
- Unhide All Sheets
- VBA Coding Made Easy
- VBA Code Examples Add-in
VBA Sheets – The Ultimate Guide
In this Article
This is the ultimate guide to working with Excel Sheets / Worksheets in VBA.
At the bottom of this guide, we’ve created a cheat sheet of common commands for working with sheets.
Sheets Vs. Worksheets
There are two ways to reference Sheets using VBA. The first is with the Sheets object:
The other is with the Worksheets object:
99% of the time, these two objects are identical. In fact, if you’ve searched online for VBA code examples, you’ve probably seen both objects used. Here is the difference:
The Sheets Collection contains Worksheets AND Chart Sheets.
So use Sheets if you want to include regular Worksheets AND Chart Sheets. Use Worksheets if you want to exclude Chart Sheets. For the rest of this guide we will use Sheets and Worksheets interchangeably.
Referencing Sheets
There are several different ways to reference Sheets:
- ActiveSheet
- Sheet Tab Name
- Sheet Index Number
- Sheet Code Name
ActiveSheet
The ActiveSheet is the Sheet that’s currently active. In other words, if you paused your code and looked at Excel, it’s the sheet that is visible. The below code example will display a MessageBox with the ActiveSheet name.
Sheet Name
You are probably most familiar with referencing Sheets by their Tab Name:
This is the sheet name that’s visible to Excel users. Enter it into the sheets object, as a string of text, surrounded by quotations.
Sheet Index Number
The Sheet Index number is the sheet position in the workbook. 1 is the first sheet. 2 is the second sheet etc.:
Sheet Index Number – Last Sheet in Workbook
To reference the last Sheet in the workbook, use Sheets.Count to get the last Index Number and activate that sheet:
Sheet “Code Name”
The Sheet Code Name is it’s Object name in VBA:
VBA Coding Made Easy
Stop searching for VBA code online. Learn more about AutoMacro — A VBA Code Builder that allows beginners to code procedures from scratch with minimal coding knowledge and with many time-saving features for all users!
Referencing Sheets in Other Workbooks
It’s also easy to reference Sheets in other Workbooks. To do so, you need to use the Workbooks Object:
Important: The Workbook must be open before you can reference its Sheets.
Activate vs. Select Sheet
In another article we discuss everything about activating and selecting sheets. The short version is this:
When you Activate a Sheet it becomes the ActiveSheet. This is the sheet you would see if you looked at your Excel program. Only one sheet may be activate at a time.
Activate a Sheet
When you select a Sheet, it also becomes the ActiveSheet. However, you can select multiple sheets at once. When multiple sheets are selected at once, the “top” sheet is the ActiveSheet. However, you can toggle the ActiveSheet within selected sheets.
Select a Sheet
Select Multiple Sheets
Use an array to select multiple sheets at once:
Worksheet Variable
Assigning a worksheet to an object variable allows you to reference the worksheet by it’s variable name. This can save a lot of typing and make your code easier to read. There are also many other reasons you might want to use variables.
To declare a worksheet variable:
Assign a worksheet to a variable:
Now you can reference the worksheet variable in your code:
Loop Through All Sheets in Workbook
Worksheet variables are useful when you want to loop through all the worksheets in a workbook. The easiest way to do this is:
This code will loop through all worksheets in the workbook, displaying each worksheet name in a message box. Looping through all the sheets in a workbook is very useful when locking / unlocking or hiding / unhiding multiple worksheets at once.
Worksheet Protection
Workbook Protection
Workbook protection locks the workbook from structural changes like adding, deleting, moving, or hiding worksheets.
You can turn on workbook protection using VBA:
or disable workbook protection:
Note: You can also protect / unprotect without a password by omitting the Password argument:
Worksheet Protection
Worksheet-level protection prevents changes to individual worksheets.
Protect Worksheet
Unprotect Worksheet
There are a variety of options when protecting worksheets (allow formatting changes, allow user to insert rows, etc.) We recommend using the Macro Recorder to record your desired settings.
We discuss worksheet protection in more detail here.
Worksheet Visible Property
You might already know that worksheets can be hidden:
There are actually three worksheet visibility settings: Visible, Hidden, and VeryHidden. Hidden sheets can be unhidden by any regular Excel user – by right-clicking in the worksheet tab area (shown above). VeryHidden sheets can only be unhidden with VBA code or from within the VBA Editor. Use the following code examples to hide / unhide worksheets:
Unhide Worksheet
Hide Worksheet
Very Hide Worksheet
Worksheet-Level Events
Events are triggers that can cause “Event Procedures” to run. For example, you can cause code to run every time any cell on a worksheet is changed or when a worksheet is activated.
Worksheet event procedures must be placed in a worksheet module:
There are numerous worksheet events. To see a complete list, go to a worksheet module , select “Worksheet” from the first drop-down. Then selecting an event procedure from the second drop-down to insert it into the module.
Worksheet Activate Event
Worksheet activate events run each time the worksheet is opened.
This code will select cell A1 (resetting the view area to the top-left of the worksheet) each time the worksheet is opened.
Worksheet Change Event
Worksheet change events run whenever a cell value is changed on the worksheet. Read our tutorial about Worksheet Change Events for more information.
Worksheet Cheat Sheet
Below you will find a cheat sheet containing common code examples for working with sheets in VBA
VBA Worksheets Cheatsheet
VBA worksheets Cheatsheet
| Description | Code Example |
|---|---|
| Referencing and Activating Sheets | |
| Tab Name | Sheets(«Input»).Activate |
| VBA Code Name | Sheet1.Activate |
| Index Position | Sheets(1).Activate |
| Select Sheet | |
| Select Sheet | Sheets(«Input»).Select |
| Set to Variable | Dim ws as Worksheet Set ws = ActiveSheet |
| Name / Rename | ActiveSheet.Name = «NewName» |
| Next Sheet | ActiveSheet.Next.Activate |
| Loop Through all Sheets | Dim ws as Worksheet |
For each ws in Worksheets
Msgbox ws.name
Next ws Loop Through Selected Sheets Dim ws As Worksheet
For Each ws In ActiveWindow.SelectedSheets
MsgBox ws.Name
Next ws Get ActiveSheet MsgBox ActiveSheet.Name Add Sheet Sheets.Add Add Sheet and Name Sheets.Add.Name = «NewSheet» Add Sheet With Name From Cell Sheets.Add.Name = range(«a3»).value Add Sheet After Another Sheets.Add After:=Sheets(«Input») Add Sheet After and Name Sheets.Add(After:=Sheets(«Input»)).Name = «NewSheet» Add Sheet Before and Name Sheets.Add(Before:=Sheets(«Input»)).Name = «NewSheet» Add Sheet to End of Workbook Sheets.Add After:=Sheets(Sheets.Count) Add Sheet to Beginning of Workbook Sheets.Add(Before:=Sheets(1)).Name = «FirstSheet» Add Sheet to Variable Dim ws As Worksheet
Set ws = Sheets.Add Copy Worksheets Move Sheet to End of Workbook Sheets(«Sheet1»).Move After:=Sheets(Sheets.Count) To New Workbook Sheets(«Sheet1»).Copy Selected Sheets To New Workbook ActiveWindow.SelectedSheets.Copy Before Another Sheet Sheets(«Sheet1»).Copy Before:=Sheets(«Sheet2») Before First Sheet Sheets(«Sheet1»).Copy Before:=Sheets(1) After Last Sheet Sheets(«Sheet1»).Copy After:=Sheets(Sheets.Count) Copy and Name Sheets(«Sheet1»).Copy After:=Sheets(Sheets.Count)
ActiveSheet.Name = «LastSheet» Copy and Name From Cell Value Sheets(«Sheet1»).Copy After:=Sheets(Sheets.Count)
ActiveSheet.Name = Range(«A1»).Value To Another Workbook Sheets(«Sheet1»).Copy Before:=Workbooks(«Example.xlsm»).Sheets(1) Hide / Unhide Sheets Hide Sheet Sheets(«Sheet1»).visible = False
or
Sheets(«Sheet1»).visible = xlSheetHidden Unhide Sheet Sheets(«Sheet1»).Visible = True
or
Sheets(«Sheet1»).Visible = xlSheetVisible Very Hide Sheet Sheets(Sheet1).Visible = xlSheetVeryHidden Delete or Clear Sheets Delete Sheet Sheets(«Sheet1»).Delete Delete Sheet (Error Handling) On Error Resume Next
Sheets(«Sheet1»).Delete
On Error GoTo 0 Delete Sheet (No Prompt) Application.DisplayAlerts = False
Sheets(«Sheet1»).Delete
Application.DisplayAlerts = True Clear Sheet Sheets(«Sheet1»).Cells.Clear Clear Sheet Contents Only Sheets(«Sheet1»).Cells.ClearContents Clear Sheet UsedRange Sheets(«Sheet1»).UsedRange.Clear Protect or Unprotect Sheets Unprotect (No Password) Sheets(«Sheet1»).Unprotect Unprotect (Password) Sheets(«Sheet1»).Unprotect «Password» Protect (No Password) Sheets(«Sheet1»).Protect Protect (Password) Sheets(«Sheet1»).Protect «Password» Protect but Allow VBA Access Sheets(«Sheet1»).Protect UserInterfaceOnly:=True Unprotect All Sheets Dim ws As Worksheet
For Each ws In Worksheets
ws.Unprotect «password»
Next ws

VBA Code Examples Add-in
Easily access all of the code examples found on our site.
Simply navigate to the menu, click, and the code will be inserted directly into your module. .xlam add-in.
Источник
Аннотация
В Microsoft Excel можно скрыть листы в книге, чтобы пользователь не отображал их. В книге можно скрыть лист любого типа, но всегда должен быть виден хотя бы один лист.
Дополнительные сведения
Скрытие листа с помощью команд меню
Чтобы скрыть лист, наведите указатель мыши на пункт «Лист» в меню «Формат» и нажмите кнопку «Скрыть». Чтобы отобразить лист, наведите указатель на пункт «Лист» в меню «Формат» и нажмите кнопку «Отобразить». Выберите соответствующий лист и нажмите кнопку «ОК».
Невозможно скрыть листы модулей, так как они отображаются в редакторе Visual Basic.
Скрытие листа с помощью макроса Visual Basic
Вы также можете скрыть или отобразить лист с помощью макроса Visual Basic для приложений майкрософт. При использовании кода Visual Basic можно использовать свойство xlVeryHidden, чтобы скрыть лист и не отображать его в диалоговом окне «Отобразить». При этом единственный способ снова сделать лист видимым — создать другой макрос Visual Basic.
В макросе Visual Basic используйте свойство Visible, чтобы скрыть или отобразить лист. Для свойства Visible можно задать значение True, False или xlVeryHidden. Значения True и False имеют тот же эффект, что и при использовании команд меню «Отобразить» или «Скрыть». Аргумент xlVeryHidden скрывает лист, а также не отображает диалоговое окно «Отобразить».
Пример кода Visual Basic
Корпорация Майкрософт предоставляет примеры программирования только в целях демонстрации без явной или подразумеваемой гарантии. Данное положение включает, но не ограничивается этим, подразумеваемые гарантии товарной пригодности или соответствия отдельной задаче. Эта статья предполагает, что пользователь знаком с представленным языком программирования и средствами, используемыми для создания и отладки процедур. Инженеры службы поддержки Майкрософт могут помочь объяснить функциональные возможности конкретной процедуры, но они не будут изменять эти примеры, чтобы предоставить дополнительные функциональные возможности или процедуры создания в соответствии с конкретными требованиями. В следующих примерах показано, как использовать свойство Visible объекта Sheet.
В следующем примере показано, как использовать аргумент xlVeryHidden свойства Visible для скрытия листа:
Источник
VBA – Hide (or Unhide) a Worksheet
In this Article
This tutorial will teach you how to hide and unhide Worksheets with VBA.
Hide Sheet in VBA
To hide a Sheet in VBA, use the worksheet Visible property.
Either set the Visible property to FALSE:
or set the Visible property to xlSheetHidden:
This is the same as if the user right-clicked the worksheet tab and selected “hide”.
Unhide Sheet
To unhide a Sheet in VBA, use the worksheet Visible property:
Hidden Sheets can be seen by right-clicking in the Worksheet tab area:
The Sheet Visible property has a third option: xlSheetVeryHidden:
Very hidden Sheets are hidden when right-clicking in the Worksheet tab area:
This code will prevent the spreadsheet user from seeing the Worksheet tab at the bottom of the screen. It also hides the Worksheet from the user when they right-click the tabs at the bottom. The only way to see that the Worksheet exists (or unhide the Worksheet) is by opening the Visual Basic Editor.
Unhide Very Hidden Sheets
Very hidden Worksheets are made visible just like regular hidden Worksheets:
Hide / Unhide Sheets in the VBA Editor
You can also toggle the Worksheet Visible property within the VBA Editor:

Hide All Worksheet Tabs
You might also want to hide the Worksheet Tab area altogether to prevent the user from navigating to different worksheets. Learn more about hiding worksheet tabs.
Hide / Unhide Sheets in Protected Workbook
Your workbook must be unprotected before you can hide or unhide worksheets. To unprotect your workbook structure use the following code:
If your workbook structure is password-protected you must do this instead:
Unhide All Sheets
This procedure will unhide all worksheets in a workbook, using a For Each Loop:
Notice that we first unprotect the workbook, just in case it was password protected.
VBA Coding Made Easy
Stop searching for VBA code online. Learn more about AutoMacro – A VBA Code Builder that allows beginners to code procedures from scratch with minimal coding knowledge and with many time-saving features for all users!
VBA Code Examples Add-in
Easily access all of the code examples found on our site.
Simply navigate to the menu, click, and the code will be inserted directly into your module. .xlam add-in.
Источник
Watch Video – How to Unhide All Sheets In Excel
In case you prefer reading a tutorial over watching a video, below is a detailed written tutorial on unhiding sheets in Excel.
When you work with data that is spread across multiple worksheets in Excel, you may want to hide a few worksheets. This could be to avoid the clutter or to not show some data to your client/manager by hiding some worksheets and only keeping the useful ones visible.
And in some cases, you may have a workbook that has some hidden sheets and you want to unhide some or all of these worksheets.
In this tutorial, I will show you some methods to unhide worksheets in Excel (manually as well as automatically using VBA). I will also show you how to selectively unhide worksheets based on the name or a condition.
So let’s get started!
Unhiding Sheets Manually
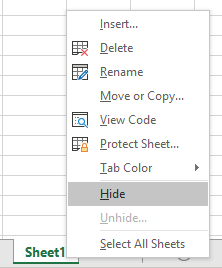
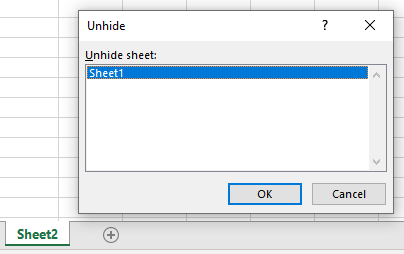
If you only have a few worksheets that are hidden, you can manually unhide some or all of these worksheets.
Suppose you have an Excel workbook that has 10 worksheets that are hidden.
Below are the steps to manually unhide worksheets (one at a time):
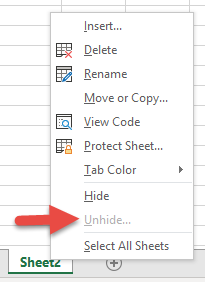
- Right-click on any of the existing worksheet tab

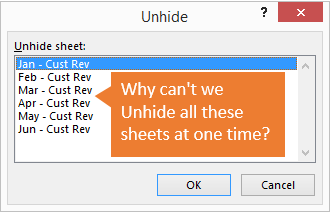
- Click on the Unhide option. This will open the Unhide dialog box that lists all the hidden worksheets
- In the Unhide dialog box, click on the worksheet that you to unhide (you can only select one at a time).

- Click OK.


The above steps would unhide the select worksheet.
Note: Unfortunately, there is no in-built functionality in Excel to quickly unhide all the hidden worksheets (or a way to select more than one worksheet and unhide it). As of now, you need to use the unhide dialog box where you can only select one worksheet to unhide.
You can hide worksheets in bulk, but not unhide in bulk
If you want to hide worksheets, you can select multiple worksheets at once (hold the control key and click on the worksheet tab name), right-click and click on the Hide option.
Unfortunately, there is no in-built functionality in Excel to quickly unhide all the hidden worksheets (or a way to select more than one worksheet and unhide it). As of now, you need to use the unhide dialog box where you can only select one worksheet to unhide.
While there is no-inbuilt functionality to unhide in bulk, you can easily do this with a simple VBA macro code.
Unhide All Sheets At One Go
With VBA, you can easily unhide worksheets in bulk.
For example, if you have 10 hidden worksheets, you can create a simple VBA code to unhide all the worksheets or you can unhide based on a condition (such as unhide only those where there is a specific prefix or year in the name).
Note: The methods covered in this tutorial doesn’t require you to save an Excel workbook in a macro-enabled format (.XLSM) to use the VBA code.
Using Immediate Window
VB Editor in Excel has an immediate window where you can type a line of code and instantly execute it right away.
Below are the steps to use this above line of code to unhide sheets through immediate window:
- Right-click on any of the visible sheets in the workbook
- Click on View code. This will open the VB Editor.

- Click the View option in the menu and then click on the Immediate window. This will make the Immediate window appear in the VB Editor (if not there already).

- In the Immediate window, copy and paste the following line of code: For each Sheet in Thisworkbook.Sheets: Sheet.Visible=True: Next Sheet

- Place the cursor at the end of the line
- Hit the Enter key


That’s it!
The above steps would instantly unhide all the sheets in the workbook.
Once done, you can close the VB Editor.
The best part about this is that you can do this on any workbook. You don’t need to worry about saving the workbook in a macro-enabled format. Just execute a line of code and instantly unhide all the sheets in the workbook.
Let me also quickly explain the below VBA code that we have used in the immediate window to unhide sheets:
For each Sheet in Thisworkbook.Sheets: Sheet.Visible=True: Next Sheet
The above code uses a For Next VBA loop to go through all the sheets in the workbook and set the visible property to TRUE. Once the visible property of all the sheets is changed, the code will end.
The colon (:) used in the code above is equivalent to a line break. While it looks like a single line of code, it has three parts to it which are separated by two colons.
If you’re interested in learning more about the immediate window and some awesome things you can do with it, here is a detailed tutorial about it.
By Adding Macro to QAT (with One Click)
In case you have to unhide worksheets quite often, another good way could be to have the macro code to unhide sheets in the Personal macro workbook and save the icon in the Quick Access Toolbar.
This is just a one time process and once you have it done, you can then unhide sheets in any workbook by simply clicking on a button in the QAT.
This is by far the most efficient way to unhide sheets in Excel (most useful when you get a lot of workbooks with hidden sheets and you have to unhide these).
The trick here is to save the code to unhide sheets in the Personal Macro Workbook.
A Personal Macro Workbook is something that is always open when you open any Excel file (you can’t see it though). When you save a macro code to the Personal Macro workbook, this code is now always available to you. And when you add this to the QAT and you run the macro code with a single click.
Below is the code that you need to add to the Personal Macro Workbook:
Sub UnhideAllSheets()
For Each Sheet In Sheets
    Sheet.Visible = True
Next Sheet
End Sub
Below are the steps to add this code to the Personal Macro Workbook:
- Click on the record macro button (it’s at the bottom left of the Excel workbook application)

- In the Record Macro dialog box, change the Store macro in setting to – Personal Macro Workbook.

- Click OK. This will start recording the macro
- Click on the Stop macro recording icon (at the bottom left of the workbook). This will stop the macro recording

- Right-click on any sheet tab and then click on ‘View Code’
- In the VB Editor, double-click on the Module object in the Personal.XLSB workbook

- Remove any existing code and copy and paste the above code.

- Click the Save icon in the toolbar
- Close the Vb Editor


The above steps allow you to make the Personal Macro Workbook visible in the VB Editor and place the code to unhide sheets in it.
Now all you need to do is add this code to the Quick Access Toolbar so that you can use it anytime from any workbook.
Below are the steps to add this code to the Quick Access Toolbar:
- Click on the Customize Quick Access Toolbar icon.

- Click on More Commands.

- In the Excel Options dialog box, click on the ‘Choose Commands from’ drop-down

- Click on Macros. This will show you a list of all the macros in the workbook (including the ones in PERSONAL.XLSB)

- Select the macro code to unhide sheets

- Click on the Add button

- Click OK.


The above steps would add this macro code to unhide sheets in the Quick Access Toolbar.

Now, whenever you get a workbook that has some sheets hidden, you just need to click on the code icon in the QAT and it will instantly unhide all sheets in one go.
Unhide Sheets With Specific Text in the Name
With VBA, you can also unhide sheets based on the name.
For example, suppose you have a workbook that contains sheets with years in the name and you want to unhide all the ones where the year is 2020.
You can use the below code to unhide all the sheets with the text 2020 in it:
Sub UnhideSheetsWithSpecificText()
For Each ws In ThisWorkbook.Worksheets
    If InStr(ws.Name, "2020") > 0 Then
        ws.Visible = xlSheetVisible
    End If
Next ws
End Sub
The above uses the For Next loop to go through each worksheet in the workbook. The IF Then condition then checks the name of the worksheet and if it contains the specified text (which is 2020 in this code), it will change the visible property to make it visible.
And if the name doesn’t contain the specified text, it will leave it as is.
You can also modify this code to hide sheets based on the text in the name.
For example, if you want to quickly hide all the worksheets where the name contains the text ‘2020’ in it, you can use the below code:
Sub HideSheetsWithSpecificText()
For Each ws In ThisWorkbook.Worksheets
    If InStr(ws.Name, "2020") > 0 Then
        ws.Visible = xlHidden
    End If
Next ws
End Sub
Note: You can save this code in a regular module inside VB Editor or you can save this in the Personal Macro Workbook. In case you save it in a regular module and need to use it again later, you need to save the workbook as a macro-enabled workbook (.XLSM format).
Unhide Selected Sheets (Based on User Selection)
You can also use VBA to give the user the flexibility to choose whether to unhide a sheet or not.
This can be done by showing a message box that asks the user to select whether to unhide a sheet or not. If selected, it unhides that sheet, else it moves to the next one.
Below is the code that will do this:
Sub UnhideSheetsUserSelection()
For Each sh In ThisWorkbook.Sheets
    If sh.Visible <> True Then
        Result = MsgBox("Do You Want to Unhide " & sh.Name, vbYesNo)
        If Result = vbYes Then sh.Visible = True
    End If
Next sh
End Sub
The above code goes through each sheet in the workbook and checks whether it’s already visible or not. If it’s hidden, then it shows the message box with the name of the worksheet.
As a user, you can now decide whether you want to keep this sheet hidden or unhide it.
This can work well if you have some worksheets that are hidden and you want to take a call for every sheet individually.
Note: You can save this code in a regular module inside VB Editor or you can save this in the Personal Macro Workbook. In case you save it in a regular module and need to use it again later, you need to save the workbook as a macro-enabled workbook (.XLSM format).
Here is a tutorial where I show how to save the code in the regular module in Excel (search for the ‘Where to put this code’ section in this article)
Unhide All or Selected Sheets Using Custom View
This is a less known method in case you want to quickly unhide all the worksheets (or some selected worksheets).
‘Custom View’ is functionality in Excel that allows you to create and save views that you can quickly resort to with a click of a button.
For example, suppose you have an Excel workbook with 10 worksheets. You can create a view where all these 10 sheets are visible. In the future, if you have some sheets hidden and you want o go back to the view where all the sheets were visible, you can do that by selecting the already saved custom view.
Don’t worry, you don’t lose any changes you made after creating the custom view. All custom view does is takes you back to the Excel view when you created it. So if some worksheets were visible when you created the view and are now hidden, selecting that custom view would unhide these sheets.
The intended use of Custom View is to allow users to create different views. For example, if you’re an analyst, you can create different views for different departments in your organization. So you can have a specific set of worksheets (or cells/rows/columns) visible for one department and another set for another department. Once you have these views, instead of changing this manually, you simply activate the view for a department and it will show you worksheets (or rows/columns) relevant for them only.
Below are the steps to create a custom view in Excel:
- Unhide all the worksheets to begin with
- Click the View tab
- Click on Custom Views

- In the Custom Views dialog box, click on Add. This will open the Add view dialog box

- Enter any name for this view where all the sheets (or selected sheets) are visible

- Click OK.


Once the view is created, you can anytime ask Excel to activate this view (which would make all those sheets visible that were visible when you created the view).
Below are the steps to show/activate a custom view:
- Click the View tab
- Click on Custom Views
- In the Custom Views dialog box, select the view that you want to show
- Click on Show button


This would instantly unhide sheets and show those that were visible when you created that custom view.
Unhiding Sheets that are ‘Very Hidden’
Sometimes, despite having some hidden sheets in your workbook, you would not be able to unhide it manually.
This could be because these sheets are not just hidden – these are ‘very hidden’.
When you have hidden sheets in a workbook and you right-click on any tab name, you would see the option to ‘Unhide’ sheets. But if you have sheets are ‘very hidden’ or if there are no hidden sheets, then you would not be able to use this option (it will be greyed out).
You can still unhide these ‘very hidden’ sheets by using the VBA code that we have covered above.
Just copy-paste the below code in the immediate window and hit enter and it would instantly unhide all the sheets (hidden as well as very hidden).
For each Sheet in Thisworkbook.Sheets: Sheet.Visible=True: Next Sheet
I also have a full tutorial on how to hide sheets and make these very hidden (in case you’re interested in learning)
You may also like the following Excel tutorials:
- How to Quickly Unhide COLUMNS in Excel
- How to Rename a Sheet in Excel
- Delete Rows Based on a Cell Value (or Condition) in Excel
- Hide Zero Values in Excel
- Working with Worksheets using Excel VBA
- How to Group Worksheets in Excel
- How to Delete All Hidden Rows and Columns in Excel
- Excel Tabs/Sheets Not Showing – How to Fix?