
Программное создание границ ячеек произвольного диапазона с помощью кода VBA Excel. Свойство Borders объекта Range. Создание границ одной ячейки. Код макроса.
Программное создание границ ячеек
Если записать макрос добавления границ к ячейкам какого-нибудь диапазона, то в тексте макроса будет сгенерировано очень много строк с указанием различных параметров. Создать сетку из границ ячеек с параметрами «по умолчанию» можно гораздо проще.
|
1 2 3 4 5 6 7 8 9 10 11 12 13 14 15 16 17 18 19 20 21 22 23 24 25 26 27 28 29 |
‘Для этого необходима всего одна строка: Range(«A1:G7»).Borders.LineStyle = True ‘Вместо ключевого слова True можно ‘использовать константу xlContinuous: Range(«A1:G7»).Borders.LineStyle = xlContinuous ‘Кроме того, для создания границ ячеек можно ‘использовать единственную строку с указанием ‘какого-нибудь параметра, например, ‘для создания сетки из синих границ: Range(«A1:G7»).Borders.Color = vbBlue ‘или для создания сетки из границ в виде двойных линий: Range(«A1:G7»).Borders.LineStyle = xlDouble ‘Чтобы применить при создании границ два ‘параметра, придется использовать уже две ‘строки кода, например, для создания сетки ‘из границ в виде жирных красных линий: Range(«A1:G7»).Borders.Weight = xlThick Range(«A1:G7»).Borders.Color = vbRed ‘Удалить границы можно с помощью строки: Range(«A1:G7»).Borders.LineStyle = False ‘Вместо ключевого слова False можно ‘использовать константу xlNone: Range(«A1:G7»).Borders.LineStyle = xlNone |
Создание границ одной ячейки
Создать границы ячейки (только для одной ячейки) в VBA Excel можно следующим образом:
|
Range(«A5»).Borders.LineStyle = True Cells(2, 8).Borders.Color = vbBlue ActiveCell.Borders.LineStyle = xlDouble ‘Удаление границ: ActiveCell.Borders.LineStyle = False |
Пример кода записанного макроса
Запись макроса: включаем запись, выбираем диапазон «A1:E9», на панели инструментов выбираем значок «Все границы», останавливаем запись. И это все наши выполненные действия, а в результате получаем следующий код:
|
1 2 3 4 5 6 7 8 9 10 11 12 13 14 15 16 17 18 19 20 21 22 23 24 25 26 27 28 29 30 31 32 33 34 35 36 37 38 39 40 41 42 43 44 45 |
Sub Макрос1() Range(«A1:E9»).Select ‘Отображается левая граница диапазона With Selection.Borders(xlEdgeLeft) .LineStyle = xlContinuous .ColorIndex = 0 .TintAndShade = 0 .Weight = xlThin End With ‘Отображается верхняя граница диапазона With Selection.Borders(xlEdgeTop) .LineStyle = xlContinuous .ColorIndex = 0 .TintAndShade = 0 .Weight = xlThin End With ‘Отображается нижняя граница диапазона With Selection.Borders(xlEdgeBottom) .LineStyle = xlContinuous .ColorIndex = 0 .TintAndShade = 0 .Weight = xlThin End With ‘Отображается правая граница диапазона With Selection.Borders(xlEdgeRight) .LineStyle = xlContinuous .ColorIndex = 0 .TintAndShade = 0 .Weight = xlThin End With ‘Отображаются внутренние вертикальные линии With Selection.Borders(xlInsideVertical) .LineStyle = xlContinuous .ColorIndex = 0 .TintAndShade = 0 .Weight = xlThin End With ‘Отображаются внутренние горизонтальные линии With Selection.Borders(xlInsideHorizontal) .LineStyle = xlContinuous .ColorIndex = 0 .TintAndShade = 0 .Weight = xlThin End With End Sub |
Конечно, можно использовать в своих программах код, сгенерированный при записи макроса, который будет прекрасно работать. Вот только нужны ли в самописном коде такие нагромождения лишних строк?
Макросы можно и нужно использовать, когда вы не знаете название нужного свойства или его значения, а после записи макроса открываете модуль и все перед глазами. Это касается не только создания границ ячеек, но и всех остальных случаев, когда предполагаемые действия можно записать с помощью макроса.
Создание и удаление диагональных линий
Диагональные линии не относятся к границам ячеек, но принцип работы с ними тот же. Отличие заключается в том, что для отображения и удаления диагональных линий, их необходимо указывать явно:
|
‘Создание диагональных линий: Range(«A1:G7»).Borders(xlDiagonalDown).LineStyle = True Range(«A1:G7»).Borders(xlDiagonalUp).LineStyle = True ‘Удаление диагональных линий: Range(«A1:G7»).Borders(xlDiagonalDown).LineStyle = xlNone Range(«A1:G7»).Borders(xlDiagonalUp).LineStyle = xlNone |
Расположение границ ячеек и диапазонов
Расположение границ по краям и внутри ячеек и диапазонов описывают константы из коллекции XlBordersIndex.
Список констант XlBordersIndex:
| Константа | Значение | Описание |
|---|---|---|
| xlDiagonalDown | 5 | Диагональная линия от верхнего левого угла к нижнему правому углу в каждой ячейке диапазона. |
| xlDiagonalUp | 6 | Диагональная линия от нижнего левого угла к правому верхнему углу в каждой ячейке диапазона. |
| xlEdgeBottom | 9 | Граница по нижнему краю диапазона. |
| xlEdgeLeft | 7 | Граница по левому краю диапазона. |
| xlEdgeRight | 10 | Граница по правому краю диапазона. |
| xlEdgeTop | 8 | Граница по верхнему краю диапазона. |
| xlInsideHorizontal | 12 | Горизонтальные границы для всех ячеек в диапазоне, за исключением внешних границ диапазона. |
| xlInsideVertical | 11 | Вертикальные границы для всех ячеек в диапазоне, за исключением внешних границ диапазона. |
|
‘Отображаем у выделенной ячейки нижнюю границу с толщиной и стилем по умолчанию (xlThin и xlContinuous) ActiveCell.Borders(xlEdgeBottom).LineStyle = True ActiveCell.Borders(xlEdgeBottom).LineStyle = 1 |
Толщина границ ячеек и диапазонов
Толщину границ по краям и внутри ячеек и диапазонов описывают константы из коллекции XlBorderWeight.
Список констант XlBorderWeight:
| Константа | Значение | Описание |
|---|---|---|
| xlHairline | 1 | Очень тонкая граница |
| xlThin | 2 | Тонкая граница (по умолчанию) |
| xlMedium | -4138 | 3* | Граница средней толщины |
| xlThick | 4 | Толстая граница |
* У меня, в Excel 2016, константе xlMedium соответствует не только числовое значение -4138, но и 3.
|
‘Отображаем у выделенной ячейки нижнюю границу в виде толстой линии ActiveCell.Borders(xlEdgeBottom).Weight = xlThick |
Стили границ (типы линий)
Стили границ по краям и внутри ячеек и диапазонов описывают константы из коллекции XlLineStyle.
Список констант XlLineStyle:
| Константа | Значение | Описание |
|---|---|---|
| xlContinuous | 1 | Непрерывная линия |
| xlDash | -4115 | Штриховая линия |
| xlDashDot | 4 | Чередование точек и тире |
| xlDashDotDot | 5 | Чередование двух точек и тире |
| xlDot | -4118 | Пунктирная линия |
| xlDouble | -4119 | Двойная линия |
| xlLineStyleNone | -4142 | Нет границы (удаление границы) |
| xlSlantDashDot | 13 | Линия, разрезанная двойными слешами |
Применяем разные типы линий к разным сторонам выделенного диапазона:
|
Sub Primer() With Selection .Borders(xlEdgeTop).LineStyle = xlDash .Borders(xlEdgeTop).Weight = xlMedium .Borders(xlEdgeRight).LineStyle = xlDouble .Borders(xlEdgeBottom).LineStyle = xlDot .Borders(xlEdgeLeft).LineStyle = xlDashDot End With End Sub |
Какие могут быть границы в сочетаниях типа линии и ее толщины, вы можете видеть в диалоговом окне «Формат ячеек» на вкладке «Граница».
Borders in Excel VBA
Borders are a necessary part of every worksheet or in any word file. Borders separate data from one another it shows which part of data is referred to which area to avoid any confusion. Also, it looks good to have borders in our datasheet. In excel worksheet we have options for inserting borders manually, but how we do it in VBA is what we will learn in this article.
To apply borders in VBA we need to access the properties of a cell and in the current case, the property we need to access is borders. Now we need to keep in mind that there are various types of options available in borders properties. Such as diagonal vertical up down etc. We will cover some of them here.
How to Use Borders in VBA
To use borders in VBA we need to follow these steps as follows:
- Use range method to access the range value.
- Use borders method if we want to format only a portion of cell or borders around if we want to cover the cells with borders.
- Use different line styles to make the borders look pleasant.
You can download this VBA Border Excel Template here – VBA Border Excel Template
Now let us go through some examples and see how we can insert a border in excel cell.
Example #1 – VBA Borders
Let us use the basic enumerations what VBA provides us when we type the keywords to see the borders. We will put borders in cell A1 and see the result.
Step 1: Go to Developer’s tab, open visual basic and we will see a VB Editor.
Step 2: Insert a new module from the insert tab provided. Click on the module we just inserted which will open a code window for us,
Step 3: Declare a sub-function which means naming our macro.
Code:
Sub Sample()

End Sub
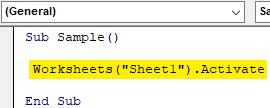
Step 4: Activate the worksheet first in order to use its properties by the following code below,
Code:
Sub Sample()

Worksheets("Sheet1").Activate

End Sub
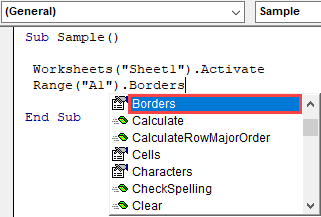
Step 5: Now let us try to change the border of cell A1. Use the range method as below,
Code:
Sub Sample()

Worksheets("Sheet1").Activate
Range("A1").Borders

End Sub
Step 6: Select the borders properties which will give us an option to select the border style as follows,
Code:
Sub Sample()

Worksheets("Sheet1").Activate
Range("A1").Borders(

End Sub
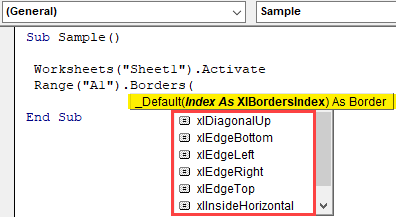
Step 7: Select the first option which is Xdiagonalup as the border style.
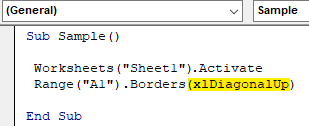
Code:
Sub Sample()

Worksheets("Sheet1").Activate
Range("A1").Borders (xlDiagonalUp)

End Sub
Step 8: Now we need to use the line style for borders. After dot(.) operator use enumerations for line style as follows,
Code:
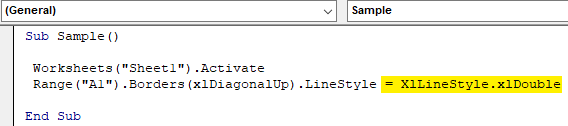
Sub Sample()

Worksheets("Sheet1").Activate
Range("A1").Borders(xlDiagonalUp).LineStyle

End Sub

Step 9: Type = sign and it will give us the numerous enumerations for linestyle as follows,
Code:
Sub Sample()

Worksheets("Sheet1").Activate
Range("A1").Borders(xlDiagonalUp).LineStyle = XlLineStyle.xlDouble

End Sub
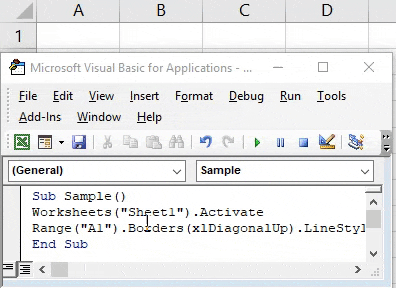
Step 10: Let us run the above code by pressing F5 and see the result in sheet 1 as follows,
Example #2 – VBA Border
Now let us use the other method for the border style in VBA.
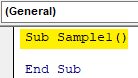
Step 1: We already have our module inserted, Name a macro in it with another sub-function as follows,
Code:
Sub Sample1()

End Sub
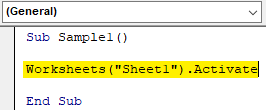
Step 2: Activate the worksheet by the following code written below,
Code:
Sub Sample1()

Worksheets("Sheet1").Activate

End Sub
Step 3: Now let use the range method to activate the border properties such as shown below,
Code:
Sub Sample1()

Worksheets("Sheet1").Activate
Range("C1").Borders(xlEdgeBottom).LineStyle = XlLineStyle.xlDashDot

End Sub
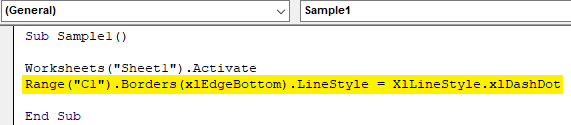
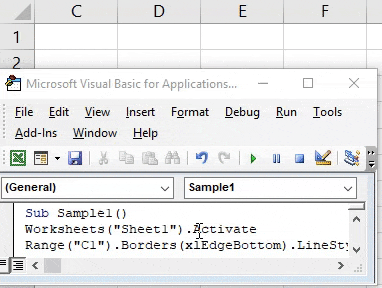
Step 4: Now run the above code and see the result in Sheet 1 as follows,
Example #3 – VBA Border
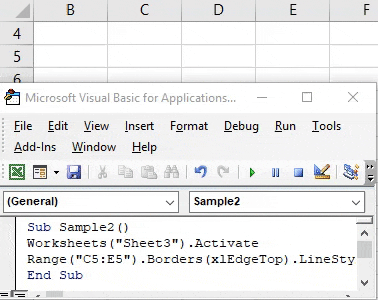
Let us try a few more of the border and line styles in another cell. This time we will use it in a cell range C5:E6.
Step 1: We already have our module inserted, Name a macro in it with another sub-function as follows,
Code:
Sub Sample2()

End Sub
Step 2: Activate the worksheet by the following code written below,
Code:
Sub Sample2()

Worksheets("Sheet3").Activate

End Sub

Step 3: Now let use the range method to activate the border properties such as shown below,
Code:
Sub Sample2()

Worksheets("Sheet3").Activate
Range("C5:E6").Borders(xlEdgeTop).LineStyle = XlLineStyle.xlSlantDashDot

End Sub
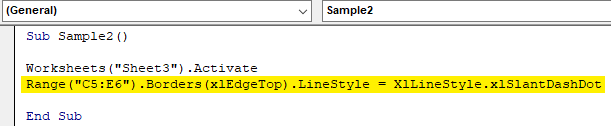
Step 4: Now run the above code and see the result in Sheet 1 as follows,
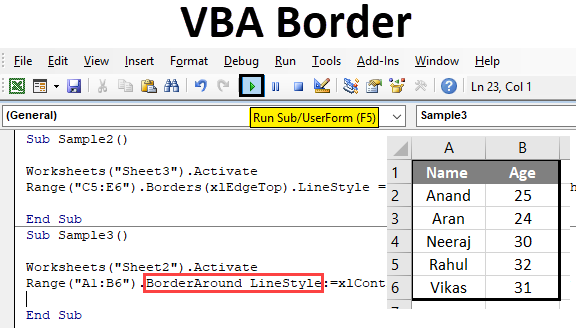
Example #4 – VBA Border
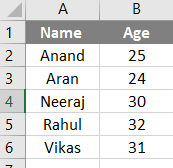
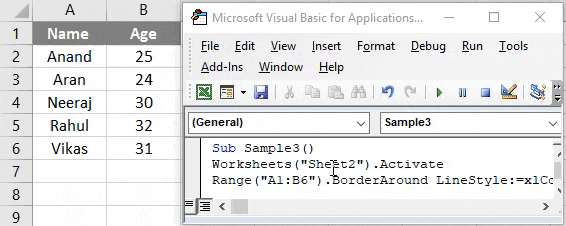
Now in this example, we will use borders around the cell covering the whole cell. Earlier what we did was border only one portion of the cell. Consider the following data we have in sheet 2 as follows,
Let us try to use a border around this data using the border around the method.
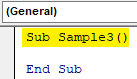
Step 1: We already have our module inserted, Name a macro in it with another sub-function as follows,
Code:
Sub Sample3()

End Sub
Step 2: Activate the worksheet by the following code written below,
Code:
Sub Sample3()

Worksheets("Sheet2").Activate

End Sub

Step 3: Now let’s use the range method to activate the border around properties such as shown below,
Code:
Sub Sample3()

Worksheets("Sheet2").Activate
Range("A1:B6").BorderAround

End Sub

Step 4: Now use the line style and line thickness as follows,
Code:
Sub Sample3()

Worksheets("Sheet2").Activate
Range("A1:B6").BorderAround LineStyle:=xlContinuous, Weight:=xlThick

End Sub

Step 5: Run the above code by pressing F5 and see the result in sheet 2 as follows,
Things to Remember
- Border around is used to cover all parts of cells.
- Borders method is used to cover only a portion of a cell.
- X Linestyles are used to use different types of styles in borders.
- Inserting borders is similar to formatting data.
- Borders in VBA are similar to borders in the worksheet, we need to remember the keyword for it to use.
Recommended Articles
This is a guide to VBA Borders. Here we discuss how to use Borders in Excel VBA along with practical examples and downloadable excel template. You can also go through our other suggested articles –
- VBA IsNumeric
- VBA UCASE
- VBA Worksheets
- VBA RGB
Borders in VBA Excel
We use borders in Excel to highlight our data. In any dashboard, it is a very important skill to represent the important data, and borders do it. Borders are a property in VBA that we can access using the Range method and giving the appropriate border style as we know there are different border styles.
If you are good at formatting in excelFormatting is a useful feature in Excel that allows you to change the appearance of the data in a worksheet. Formatting can be done in a variety of ways. For example, we can use the styles and format tab on the home tab to change the font of a cell or a table.read more, you can call yourself an “Excel Beautician.” Formatting is vital in making the reports look appealing to the end-user or readers. We hope you are well aware of the formatting techniques in the regular worksheet. Formatting through VBA codingConditional formatting is also possible in Excel VBA programming by using the ‘Format Conditions Collection’ macro/procedure. A conditional format is one that is applied only to cells that meet certain criteria, such as values above a certain threshold, positive or negative values, or values with a specific formula, and so on.read more requires a considerable amount of VBA coding languageVBA code refers to a set of instructions written by the user in the Visual Basic Applications programming language on a Visual Basic Editor (VBE) to perform a specific task.read more. This article will show you one of the most underrated formatting techniques, i.e., applying Excel VBA borders.
Table of contents
- Borders in VBA Excel
- Examples of Borders in VBA
- Example #1 – Apply VBA Borders with Coding
- Example #2 – Change the Border Using VBA Borders Around Method
- Recommended Articles
- Examples of Borders in VBA
Examples of Borders in VBA
Let us take a look at some examples to understand this in a better manner.
You can download this VBA Borders Excel Template here – VBA Borders Excel Template
Example #1 – Apply VBA Borders with Coding
Creating a macro to apply Excel VBA borders with different styles, making them available as an add-on to the excelAn add-in is an extension that adds more features and options to the existing Microsoft Excel.read more ribbon, makes the job easier whenever we want to apply VBA borders.
Every cell in a worksheet has borders and background colors. By default, every cell has no border and background color.
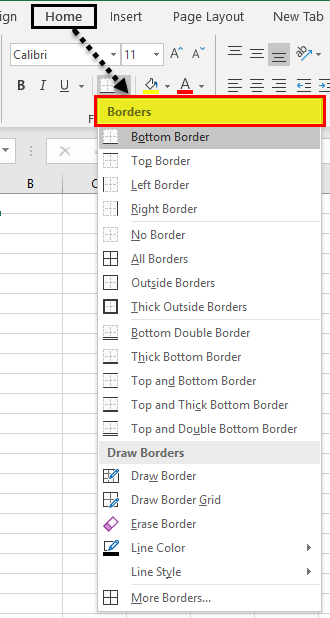
In the worksheet under the HOME tab, we have a border option. In addition, we have various options if you click on the drop-down list in excelA drop-down list in excel is a pre-defined list of inputs that allows users to select an option.read more.
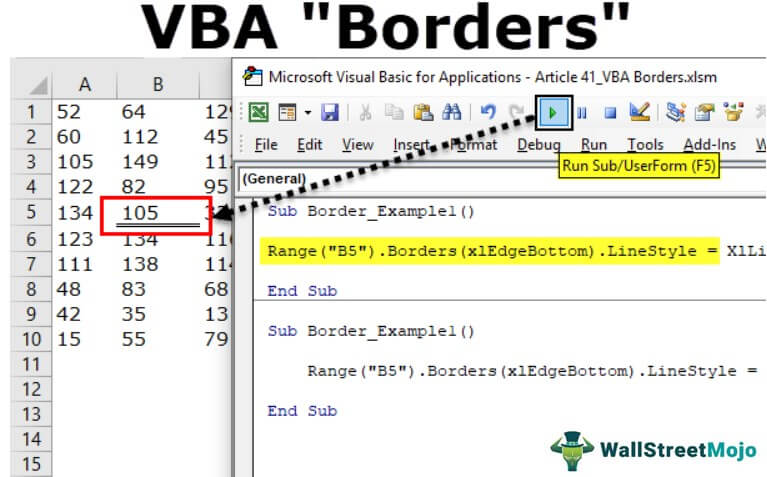
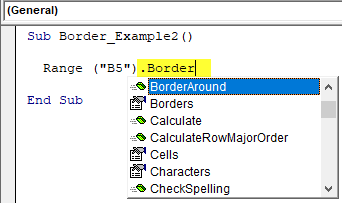
But in VBA, first, we must decide on the cell or range of cells. Then, we will apply the Excel VBA borders formatting styles. So, we can refer to the range of cells or cells using VBA RANGEThe range property of VBA is used to refer to any data, cells, or selection. It is an inbuilt property that allows us to access any part of the worksheet. Using the range property for a single cell-like range is referred to as range cells.read more object. So, for example, if you want to change the border of cell B5, then you can write the code like this.
Range(“B5”)
Then, we need to access the “Borders” property.
Code:
Sub Border_Example1()

  Range("B5").Bo

End Sub

After applying the Excel VBA “Borders” property, we must open parenthesis to see all border formatting options..
Code:
Sub Border_Example1()

  Range("B5").Borders(

End Sub
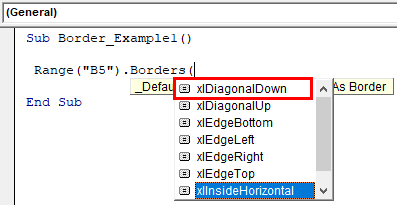
Here, we have xlDiagonalDown, xlDiagonalUp, xlEdgeBottom, xlEdgeLeft, xlEdgeRight, xlEdgeTop, xlInsideHorizontal, and xlInsideVertical.

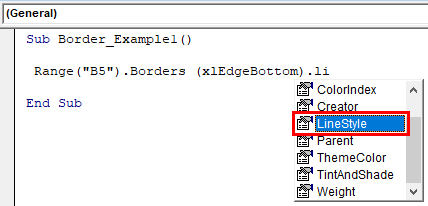
After selecting the border style, we need to select the characteristic we want to work with. One of the characters we need to use here is “LineStyle,” so select the “LineStyle” property.
Code:
Sub Border_Example1()

  Range("B5").Borders (xlEdgeBottom).li

End Sub
Once the line style property is selected, we need to set the line style type of line or type of borders we will apply in VBA.
Put an equal sign and select “XlLineStyle” enumeration.
Code:
Sub Border_Example1()

  Range("B5").Borders(xlEdgeBottom).LineStyle =XlLineStyle.

End Sub

Put a dot to see all the available border styles.
Code:
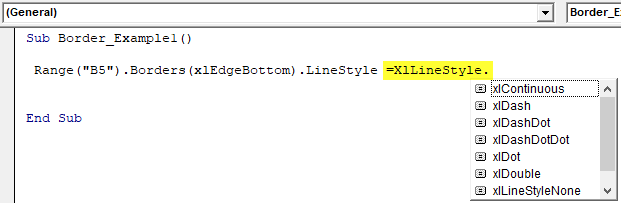
We have many options here. xlContinuous, xldash, xlDashDot, xlDashDotDot, xlDot, xlDouble, XlLineStyleNone, and xlSlantDashDot.
Now, we have selected the option of “xlDouble.”
Code:
Sub Border_Example1()

  Range("B5").Borders(xlEdgeBottom).LineStyle = XlLineStyle.xlDouble

End Sub
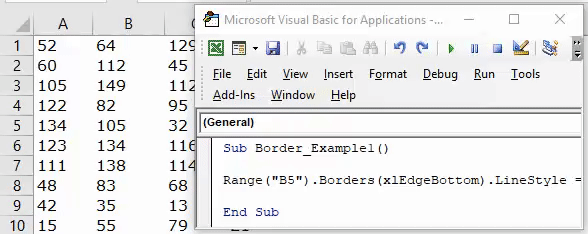
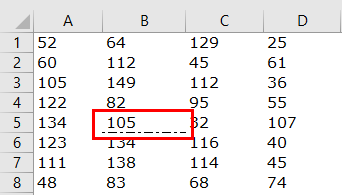
Now, if I run the code, it will apply the Double line to the bottom of cell B5.
Line Type: “xlContinuous”.
Code:
Sub Border_Example1()

  Range("B5").Borders(xlEdgeBottom).LineStyle = XlLineStyle.xlContinuous

End Sub
Result:

Line Type: “clash.”
Code:
Sub Border_Example1()

  Range("B5").Borders(xlEdgeBottom).LineStyle = XlLineStyle.xlDash

End Sub
Result:

Line Type: “xlDashDot.”
Code:
Sub Border_Example1()

  Range("B5").Borders(xlEdgeBottom).LineStyle = XlLineStyle.xlDashDot

End Sub
Result:
Line Type: “xlDashDotDot”.
Code:
Sub Border_Example1()

  Range("B5").Borders(xlEdgeBottom).LineStyle = XlLineStyle.xlDashDotDot

End Sub
Result:
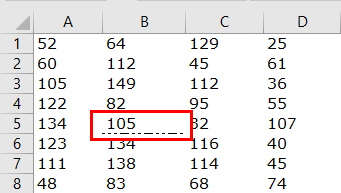
Line Type: “xlDot.”
Code:
Sub Border_Example1()

  Range("B5").Borders(xlEdgeBottom).LineStyle = XlLineStyle.xlDot

End Sub
Result:

Line Type: “xlLineStyleNone”.
Code:
Sub Border_Example1()

  Range("B5").Borders(xlEdgeBottom).LineStyle = XlLineStyle.xlLineStyleNone

End Sub
Result:

It will remove the border of the specified cell.
Line Type: “xlSlantDashDot”.
Code:
Sub Border_Example1()

  Range("B5").Borders(xlEdgeBottom).LineStyle = XlLineStyle.xlSlantDashDot

End Sub
Result:

Example #2 – Change the Border Using VBA Borders Around Method
We can also change the cell’s borders using the VBA Borders Around method. Once we mention the range of cells or cells, we need to access the VBA Borders Around method.
Open parenthesis to see all the parameters.
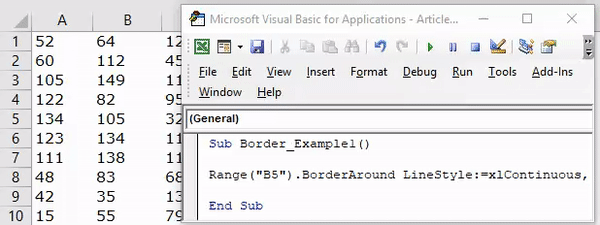
Range(“B5”).BorderAround([Line Style], [Weight as xlBorderWeight], [ColorIndex], [Color], [Theme Color])
We can mention the line style, color, border weight, and many more things we can do with this method.
Code:
Sub Border_Example1()

  Range("B5").BorderAround LineStyle:=xlContinuous, Weight:=xlThick

End Sub
It will change the Line Style to xlContinuous.
LineStyle:=xlContinuous
The weight of the Border is thick.
Weight:=xlThick
And the result of this code is as below.
Like this, using Excel VBA Borders and Border Around property and method, we can change the border and elements of borders through VBA coding.
Recommended Articles
This article has been a guide to VBA Borders. Here, we learn how to set borders with Excel VBA coding, practical examples, and downloadable code templates. You may also have a look at other articles related to Excel VBA: –
- What are Global Variables in Excel VBA?
- Examples to Create a Pivot Table in VBA
- Excel VBA End
- Conditional Formatting for Blank Cells
Содержание
- Объект Borders (Excel)
- Замечания
- Примеры
- Свойства
- См. также
- Поддержка и обратная связь
- Borders object (Excel)
- Remarks
- Examples
- Properties
- See also
- Support and feedback
- Метод Range.BorderAround (Excel)
- Синтаксис
- Параметры
- Возвращаемое значение
- Примечания
- Пример
- Поддержка и обратная связь
- Как сделать границы ячеек макросом в таблице Excel
- Как изменить границы макросом в ячейках таблицы Excel
- How to Apply Borders on a Cell using VBA in Excel
- VBA Border Property
- Using Different Colors with Color Index/Color
- Add Border Inside a Cell
- VBA BorderAround Method
- Add Border to Each Cell in the Range
- Apply Border to All the Cells with Text
- Remove Borders
Объект Borders (Excel)
Коллекция из четырех объектов Border , представляющих четыре границы объекта Range или объекта Style .
Замечания
Используйте свойство Borders , чтобы вернуть коллекцию Borders , которая содержит все четыре границы. Можно применить разные границы к каждой стороне ячейки или диапазона. Дополнительные сведения о применении границ к диапазону ячеек см. в разделе Свойство Range.Borders .
Вы можете задать свойства границы для отдельной границы только с помощью объектов Range и Style . Другие объекты с границами, такие как полосы ошибок и линии рядов, имеют границу, которая обрабатывается как одна сущность, независимо от того, сколько сторон она имеет. Для этих объектов необходимо возвращать и задавать свойства для всей границы в виде единицы. Дополнительные сведения см. в разделе Объект Border .
Примеры
В следующем примере двойная граница добавляется в ячейку A1 на одном листе.
Используйте border (index), где индекс определяет границу, чтобы вернуть один объект Border . Индекс может быть одной из следующих констант XlBordersIndex : xlDiagonalDown, xlDiagonalUp, xlEdgeBottom, xlEdgeLeft, xlEdgeRight, xlEdgeTop, xlInsideHorizontal или xlInsideVertical.
В следующем примере задается красный цвет нижней границы ячеек A1:G1.
В следующем примере создается тонкая граница вокруг всех ячеек в диапазоне.
В следующем примере изменяются только внутренние границы ячейки диапазона.
Свойства
См. также
Поддержка и обратная связь
Есть вопросы или отзывы, касающиеся Office VBA или этой статьи? Руководство по другим способам получения поддержки и отправки отзывов см. в статье Поддержка Office VBA и обратная связь.
Источник
Borders object (Excel)
A collection of four Border objects that represent the four borders of a Range object or Style object.
Use the Borders property to return the Borders collection, which contains all four borders. You can apply different borders to each side of a cell or range. For more information how to apply borders to a range of cells, see Range.Borders property.
You can set border properties for an individual border only with Range and Style objects. Other bordered objects, such as error bars and series lines, have a border that’s treated as a single entity, regardless of how many sides it has. For these objects, you must return and set properties for the entire border as a unit. For more information, see the Border object.
Examples
The following example adds a double border to cell A1 on worksheet one.
Use Borders (index), where index identifies the border, to return a single Border object. Index can be one of the following XlBordersIndex constants: xlDiagonalDown, xlDiagonalUp, xlEdgeBottom, xlEdgeLeft, xlEdgeRight, xlEdgeTop, xlInsideHorizontal, or xlInsideVertical.
The following example sets the color of the bottom border of cells A1:G1 to red.
The following example generates a thin border around all cells in the range.
The following example changes only the inner cell borders of the range.
Properties
See also
Support and feedback
Have questions or feedback about Office VBA or this documentation? Please see Office VBA support and feedback for guidance about the ways you can receive support and provide feedback.
Источник
Метод Range.BorderAround (Excel)
Добавляет границу в диапазон и задает свойства Color, LineStyle и Weight объекта Border для новой границы. Variant.
Синтаксис
expression. BorderAround (LineStyle, Weight, ColorIndex, Color, ThemeColor)
выражение: переменная, представляющая объект Range.
Параметры
| Имя | Обязательный или необязательный | Тип данных | Описание |
|---|---|---|---|
| LineStyle | Необязательный | Variant | Одна из констант XlLineStyle , задающая стиль линии для границы. |
| Weight (Вес) | Необязательный | XlBorderWeight | Вес границы. |
| ColorIndex | Необязательный | XlColorIndex | Цвет границы в виде индекса текущей цветовой палитры или как константы XlColorIndex . |
| Color | Необязательный | Variant | Цвет границы в виде значения RGB. |
| ThemeColor | Необязательный | Variant | Цвет темы в качестве индекса текущей цветовой темы или значения XlThemeColor . |
Возвращаемое значение
Примечания
Необходимо указать только одно из следующих значений: ColorIndex, Color или ThemeColor.
Можно указать lineStyle или Weight, но не оба варианта. Если не указать ни один из аргументов, Microsoft Excel использует стиль строки и вес по умолчанию.
Этот метод описывает весь диапазон без его заполнения. Чтобы задать границы всех ячеек, необходимо задать свойства Color, LineStyle и Weight для коллекции Borders . Чтобы очистить границу, необходимо задать для свойства LineStyle значение xlLineStyleNone для всех ячеек в диапазоне.
Пример
В этом примере вокруг диапазона A1:D4 на листе Sheet1 добавляется толстая красная граница.
Поддержка и обратная связь
Есть вопросы или отзывы, касающиеся Office VBA или этой статьи? Руководство по другим способам получения поддержки и отправки отзывов см. в статье Поддержка Office VBA и обратная связь.
Источник
Как сделать границы ячеек макросом в таблице Excel
Рисовать границы для разных ячеек вручную – это потребует много драгоценного времени и сил. Лучше применить специальный макрос, который сам поставит границы с разными типами и цветами линий для объединенных и необъединенных ячеек. Он автоматически определит положение объединенных ячеек и сам присвоит им линии границ в соответствии со всеми пожеланиями пользователя.
Как изменить границы макросом в ячейках таблицы Excel
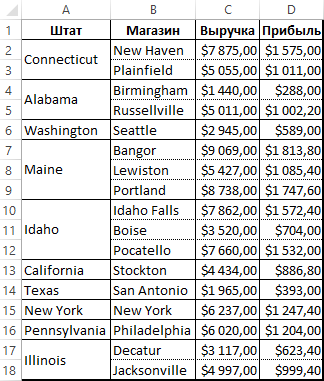
У нас иметься отчет по продажам в магазинах целой ритейловской сети, которые разделены на группы городов по отдельным штатам. В таблице отчета имеются объединенные ячейки:
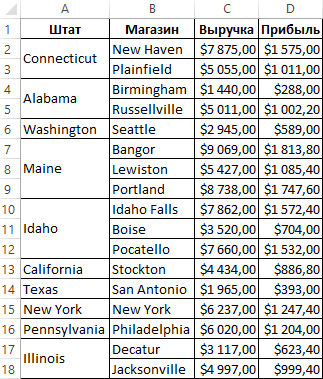
- Отформатировать ячейки таблицы таким образом, чтобы были установленные границы с толстой линией только для диапазонов каждого отдельного штата. А внутри группы городов каждого штата необходимо установить ячейкам границы с тонкой линией.
- Таким же образом хотим форматировать ячейки в объединенных диапазонах, охватывающих несколько столбцов. А, столбцы с показателями продаж и выручки необходимо отделить тонкими линиями. Дополнительно целая таблица должна иметь самую толстую линию для внешней границы по периметру.
- Если объединенная ячейка охватывает несколько строк, то границы ячеек, отделяющие эти строки, будут иметь тоненькие линии. По аналогичному принципу будут определены границы столбцов которых охватывает объединенная ячейка.
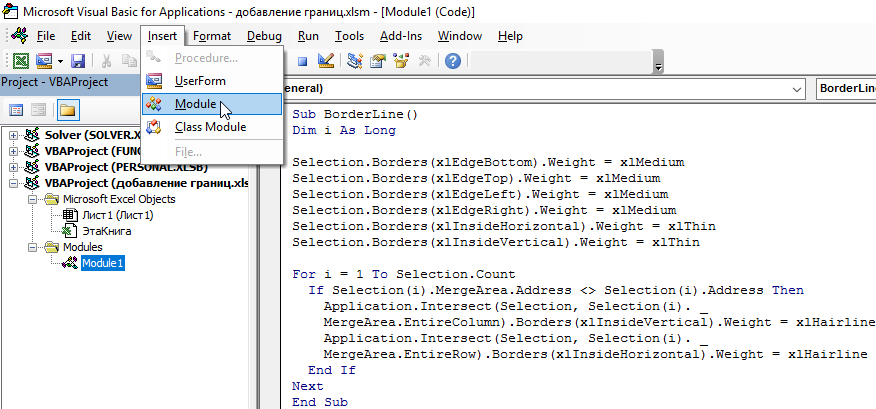
Напишем свой макрос, который сам автоматически выполнит весь этот объем работы для любой таблицы. Откройте редактор Visual Basic (ALT+F11):
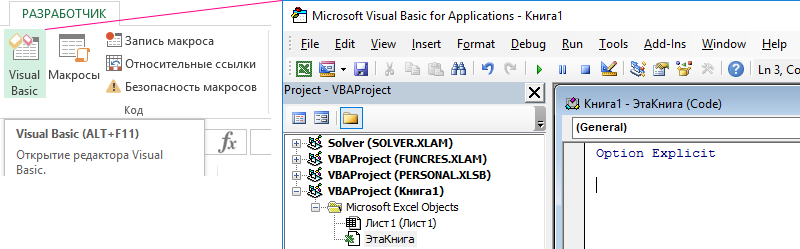
А затем создайте новый модуль с помощью инструмента: «Insert»-«Module». А потом введите в него следующий VBA-код:
Sub BorderLine()
Dim i As Long
Selection.Borders(xlEdgeBottom).Weight = xlMedium
Selection.Borders(xlEdgeTop).Weight = xlMedium
Selection.Borders(xlEdgeLeft).Weight = xlMedium
Selection.Borders(xlEdgeRight).Weight = xlMedium
Selection.Borders(xlInsideHorizontal).Weight = xlThin
Selection.Borders(xlInsideVertical).Weight = xlThin
For i = 1 To Selection.Count
If Selection(i).MergeArea.Address <> Selection(i).Address Then
Application.Intersect(Selection, Selection(i).MergeArea.EntireColumn).Borders(xlInsideVertical).Weight = xlHairline
Application.Intersect(Selection, Selection(i).MergeArea.EntireRow).Borders(xlInsideHorizontal).Weight = xlHairline
End If
Next
End Sub
Теперь если мы хотим автоматически форматировать целую таблицу в один клик мышки, выделите диапазон A1:D18. А потом просто выберите инструмент: «РАЗРАБОТЧИК»-«Код»-«Макросы»-«BorderLine»-«Выполнить».
Чтобы группы данных по строкам и столбцам на против объединенных ячеек были экспонированы границами пользовательской толщены, сначала кода присваиваем линию увеличенной толщины для внешних границ выделенного диапазона. А внутренним границам присваивается линия со стандартной толщиной. Далее с помощью цикла выполняется проход по каждой ячейке выделенного диапазона и все они проверяются. Если ячейка является объединенной, то ей присваивается соответственная граница. Конечно же изменения границ касаются только для ячеек внутри выделенного диапазона.
С помощью свойства Weight можно установить 4 типа толщины линии для границ ячеек:
- xlThink – наиболее толстая линия.
- xlMedium – просто толстая граница.
- xlThin – стандартная толщина линии для границ.
- xlHairLine – свойство для самой тонкой границы ячейки.
Внимание! Если перед использованием макроса некоторые ячейки уже имели свои линии границ в другом цвете кроме черного или их лини были в другом стиле, тогда после запуска макроса некоторые ячейки могут получить другой цвет или стиль обводки. Чтобы перестраховаться от таких ошибок, в начале кода макроса, после строки декларации переменной i, вставим еще 2 строки с кодом:
Selection.Borders.Color = vbBlack Selection.Borders.Color = xlContinuous
Полная версия макроса, работающего безошибочно при любых условиях и форматах для исходной таблицы:
Sub BorderLine()
Dim i As Long
Selection.Borders.Color = vbBlack
Selection.Borders.Color = xlContinuous
Selection.Borders(xlEdgeBottom).Weight = xlMedium
Selection.Borders(xlEdgeTop).Weight = xlMedium
Selection.Borders(xlEdgeLeft).Weight = xlMedium
Selection.Borders(xlEdgeRight).Weight = xlMedium
Selection.Borders(xlInsideHorizontal).Weight = xlThin
Selection.Borders(xlInsideVertical).Weight = xlThin
For i = 1 To Selection.Count
If Selection(i).MergeArea.Address <> Selection(i).Address Then
Application.Intersect(Selection, Selection(i).MergeArea.EntireColumn).Borders(xlInsideVertical).Weight = xlHairline
Application.Intersect(Selection, Selection(i).MergeArea.EntireRow).Borders(xlInsideHorizontal).Weight = xlHairline
End If
Next
End Sub
Теперь можно уверенно и быстро красиво форматировать большие таблицы по одному клику мышкой или нажатию комбинации горячих клавиш для вызова соответственного макроса.
Источник
How to Apply Borders on a Cell using VBA in Excel
To apply borders to a cell using VBA in Excel, you can use two different ways. The first is the “Borders“ property and the second is the “BorderAround” method. The only difference between these two ways is in the “Borders” property you can even apply the border to one side of the cell and in the border around it applies to the cell completely.
In this tutorial, we will explore both ways and look at what are the different ways to add the border.
VBA Border Property
- First, you need to specify the range or the cell where you wish to apply the border using the range object.

- After that, type a dot (.) and then select the “Borders” property from the list of properties and methods.
- Next, specify the border index from the contants avaiable. Here I’m using “xlEdgeBottom” to apply border only to the bottom of the cell.
- From here, specify the line style using the “LineStyle”. I’m using the “xlContinuonus” as the line style.


Now when you run this code, it will add a border to the bottom of the cell A1.

Using Different Colors with Color Index/Color
Just like you normally choose the color for the border when you do it manually. In the border property, you can further use the color index and color property to use a color other than the default color.
Consider the below code.
When you run this macro, it adds a border to the bottom of the cell with a red color.

Or if you want to use the colorindex property then the code would be like.

Add Border Inside a Cell
If you want to apply a border inside a cell, in that case, you need to use “xlDiagonalUp” and “xlDiagonalDown” as the xlBorderIndex.

When you run the above code, it adds a border inside the cell upward and downward.
VBA BorderAround Method
In VBA’s BorderAround property you have 5 arguments to which are optional but two need to be specified to apply the border to a cell in the right way.

The following code applies the border around the range A1:A3 when you run the macro.

Add Border to Each Cell in the Range
The following code loops through all the cells in the range and applies the border to each cell one by one.

Apply Border to All the Cells with Text
The following code uses a FOR LOOP, USED RANGE, IFEMPTY, and IF STATEMENT to apply borders to the only cells where you have value.
Remove Borders
You just need to use line style “xlNone”.
And if you want to remove the border from all the cells in a worksheet where you have a value, consider the following code.
Источник
To apply borders to a cell using VBA in Excel, you can use two different ways. The first is the “Borders“ property and the second is the “BorderAround” method. The only difference between these two ways is in the “Borders” property you can even apply the border to one side of the cell and in the border around it applies to the cell completely.
In this tutorial, we will explore both ways and look at what are the different ways to add the border.
VBA Border Property
- First, you need to specify the range or the cell where you wish to apply the border using the range object.

- After that, type a dot (.) and then select the “Borders” property from the list of properties and methods.

- Next, specify the border index from the contants avaiable. Here I’m using “xlEdgeBottom” to apply border only to the bottom of the cell.

- From here, specify the line style using the “LineStyle”. I’m using the “xlContinuonus” as the line style.


Sub vba_borders()

Range("A1") _
        .Borders(xlEdgeBottom) _
            .LineStyle = XlLineStyle.xlContinuous

End Sub
Now when you run this code, it will add a border to the bottom of the cell A1.

Using Different Colors with Color Index/Color
Just like you normally choose the color for the border when you do it manually. In the border property, you can further use the color index and color property to use a color other than the default color.
Consider the below code.
With Range("A1").Borders(xlEdgeBottom)

            .LineStyle = XlLineStyle.xlContinuous
            .Color = RGB(255, 0, 0)

End With
When you run this macro, it adds a border to the bottom of the cell with a red color.

Or if you want to use the colorindex property then the code would be like.
With Range("A1").Borders(xlEdgeBottom)

            .LineStyle = XlLineStyle.xlContinuous
            .ColorIndex = 7

End With
Related: VBA With Statement
Add Border Inside a Cell
If you want to apply a border inside a cell, in that case, you need to use “xlDiagonalUp” and “xlDiagonalDown” as the xlBorderIndex.
With Range("A1").Borders(xlDiagonalUp)

            .LineStyle = XlLineStyle.xlDashDotDot
            .Color = RGB(255, 0, 0)

End With

With Range("A1").Borders(xlDiagonalDown)

            .LineStyle = XlLineStyle.xlDashDotDot
            .Color = RGB(255, 0, 0)

End With
When you run the above code, it adds a border inside the cell upward and downward.
VBA BorderAround Method
In VBA’s BorderAround property you have 5 arguments to which are optional but two need to be specified to apply the border to a cell in the right way.

The following code applies the border around the range A1:A3 when you run the macro.
Range("A1:A3").BorderAround _
                LineStyle:=xlContinuous, _
                Weight:=xlThin
Add Border to Each Cell in the Range
The following code loops through all the cells in the range and applies the border to each cell one by one.
Sub vba_borders()

Dim iRange As Range
Dim iCells As Range

Set iRange = Range("A1:A10")

For Each iCells In iRange
    iCells.BorderAround _
            LineStyle:=xlContinuous, _
            Weight:=xlThin
Next iCells

End Sub
Apply Border to All the Cells with Text
The following code uses a FOR LOOP, USED RANGE, IFEMPTY, and IF STATEMENT to apply borders to the only cells where you have value.
Dim iRange As Range
Dim iCells As Range

Set iRange = ThisWorkbook.ActiveSheet.UsedRange

For Each iCells In iRange
    If Not IsEmpty(iCells) Then
    iCells.BorderAround _
            LineStyle:=xlContinuous, _
            Weight:=xlThin
    End If
Next iCells
Remove Borders
You just need to use line style “xlNone”.
Range("A1").Borders(xlDiagonalDown).LineStyle = xlNoneAnd if you want to remove the border from all the cells in a worksheet where you have a value, consider the following code.
Dim iRange As Range
Dim iCells As Range

Set iRange = ThisWorkbook.ActiveSheet.UsedRange

For Each iCells In iRange
    If Not IsEmpty(iCells) Then
        iCells.Borders(xlDiagonalDown).LineStyle = xlNone
    End If
Next iCells
More Tutorials
- Count Rows using VBA in Excel
- Excel VBA Font (Color, Size, Type, and Bold)
- Excel VBA Hide and Unhide a Column or a Row
- Excel VBA Range – Working with Range and Cells in VBA
- Find Last Row, Column, and Cell using VBA in Excel
- Insert a Row using VBA in Excel
- Merge Cells in Excel using a VBA Code
- Select a Range/Cell using VBA in Excel
- SELECT ALL the Cells in a Worksheet using a VBA Code
- ActiveCell in VBA in Excel
- Special Cells Method in VBA in Excel
- UsedRange Property in VBA in Excel
- VBA AutoFit (Rows, Column, or the Entire Worksheet)
- VBA ClearContents (from a Cell, Range, or Entire Worksheet)
- VBA Copy Range to Another Sheet + Workbook
- VBA Enter Value in a Cell (Set, Get and Change)
- VBA Insert Column (Single and Multiple)
- VBA Named Range | (Static + from Selection + Dynamic)
- VBA Range Offset
- VBA Sort Range | (Descending, Multiple Columns, Sort Orientation
- VBA Wrap Text (Cell, Range, and Entire Worksheet)
- VBA Check IF a Cell is Empty + Multiple Cells
⇠ Back to What is VBA in Excel
Helpful Links – Developer Tab – Visual Basic Editor – Run a Macro – Personal Macro Workbook – Excel Macro Recorder – VBA Interview Questions – VBA Codes
Рисовать границы для разных ячеек вручную – это потребует много драгоценного времени и сил. Лучше применить специальный макрос, который сам поставит границы с разными типами и цветами линий для объединенных и необъединенных ячеек. Он автоматически определит положение объединенных ячеек и сам присвоит им линии границ в соответствии со всеми пожеланиями пользователя.
Как изменить границы макросом в ячейках таблицы Excel
У нас иметься отчет по продажам в магазинах целой ритейловской сети, которые разделены на группы городов по отдельным штатам. В таблице отчета имеются объединенные ячейки:
Нам необходимо:
- Отформатировать ячейки таблицы таким образом, чтобы были установленные границы с толстой линией только для диапазонов каждого отдельного штата. А внутри группы городов каждого штата необходимо установить ячейкам границы с тонкой линией.
- Таким же образом хотим форматировать ячейки в объединенных диапазонах, охватывающих несколько столбцов. А, столбцы с показателями продаж и выручки необходимо отделить тонкими линиями. Дополнительно целая таблица должна иметь самую толстую линию для внешней границы по периметру.
- Если объединенная ячейка охватывает несколько строк, то границы ячеек, отделяющие эти строки, будут иметь тоненькие линии. По аналогичному принципу будут определены границы столбцов которых охватывает объединенная ячейка.
Напишем свой макрос, который сам автоматически выполнит весь этот объем работы для любой таблицы. Откройте редактор Visual Basic (ALT+F11):
А затем создайте новый модуль с помощью инструмента: «Insert»-«Module». А потом введите в него следующий VBA-код:
Sub BorderLine()
Dim i As Long
Selection.Borders(xlEdgeBottom).Weight = xlMedium
Selection.Borders(xlEdgeTop).Weight = xlMedium
Selection.Borders(xlEdgeLeft).Weight = xlMedium
Selection.Borders(xlEdgeRight).Weight = xlMedium
Selection.Borders(xlInsideHorizontal).Weight = xlThin
Selection.Borders(xlInsideVertical).Weight = xlThin
For i = 1 To Selection.Count
  If Selection(i).MergeArea.Address <> Selection(i).Address Then
    Application.Intersect(Selection, Selection(i).MergeArea.EntireColumn).Borders(xlInsideVertical).Weight = xlHairline
    Application.Intersect(Selection, Selection(i).MergeArea.EntireRow).Borders(xlInsideHorizontal).Weight = xlHairline
  End If
Next
End Sub
Теперь если мы хотим автоматически форматировать целую таблицу в один клик мышки, выделите диапазон A1:D18. А потом просто выберите инструмент: «РАЗРАБОТЧИК»-«Код»-«Макросы»-«BorderLine»-«Выполнить».
Чтобы группы данных по строкам и столбцам на против объединенных ячеек были экспонированы границами пользовательской толщены, сначала кода присваиваем линию увеличенной толщины для внешних границ выделенного диапазона. А внутренним границам присваивается линия со стандартной толщиной. Далее с помощью цикла выполняется проход по каждой ячейке выделенного диапазона и все они проверяются. Если ячейка является объединенной, то ей присваивается соответственная граница. Конечно же изменения границ касаются только для ячеек внутри выделенного диапазона.
С помощью свойства Weight можно установить 4 типа толщины линии для границ ячеек:
- xlThink – наиболее толстая линия.
- xlMedium – просто толстая граница.
- xlThin – стандартная толщина линии для границ.
- xlHairLine – свойство для самой тонкой границы ячейки.
Внимание! Если перед использованием макроса некоторые ячейки уже имели свои линии границ в другом цвете кроме черного или их лини были в другом стиле, тогда после запуска макроса некоторые ячейки могут получить другой цвет или стиль обводки. Чтобы перестраховаться от таких ошибок, в начале кода макроса, после строки декларации переменной i, вставим еще 2 строки с кодом:
Selection.Borders.Color = vbBlack
Selection.Borders.Color = xlContinuous
Полная версия макроса, работающего безошибочно при любых условиях и форматах для исходной таблицы:
Sub BorderLine()
Dim i As Long
Selection.Borders.Color = vbBlack
Selection.Borders.Color = xlContinuous
Selection.Borders(xlEdgeBottom).Weight = xlMedium
Selection.Borders(xlEdgeTop).Weight = xlMedium
Selection.Borders(xlEdgeLeft).Weight = xlMedium
Selection.Borders(xlEdgeRight).Weight = xlMedium
Selection.Borders(xlInsideHorizontal).Weight = xlThin
Selection.Borders(xlInsideVertical).Weight = xlThin
For i = 1 To Selection.Count
  If Selection(i).MergeArea.Address <> Selection(i).Address Then
    Application.Intersect(Selection, Selection(i).MergeArea.EntireColumn).Borders(xlInsideVertical).Weight = xlHairline
    Application.Intersect(Selection, Selection(i).MergeArea.EntireRow).Borders(xlInsideHorizontal).Weight = xlHairline
  End If
Next
End Sub
Теперь можно уверенно и быстро красиво форматировать большие таблицы по одному клику мышкой или нажатию комбинации горячих клавиш для вызова соответственного макроса.
Return to VBA Code Examples
In this Article
- Formatting Borders
- Top Border – Double Line
- Other Cell Borders
- Inside Borders
- LineStyle
This tutorial will show how to adjust cell border settings in VBA.
Formatting Borders
Top Border – Double Line
First let’s look at an example of how to set a blue, thick, doubled top border to the cell B3 on Sheet1:
Sub ExampleSetBorder()

 With Worksheets("Sheet1").Range("B3").Borders(xlEdgeTop)
  .LineStyle = xlDouble
  .Weight = xlThick
  .ColorIndex = 5
 End With

End Sub
Notice we use a With Statement to simplify our coding.
We access the the top border with .Borders(xlEdgeTop).
Other Cell Borders
Instead you can access other borders, including diagonals:
Worksheets("Sheet1").Range("B2").Borders(xlEdgeTop).Color = RGB(128, 0, 0)
Worksheets("Sheet1").Range("B2").Borders(xlEdgeRight).Color = RGB(0, 255, 0)
Worksheets("Sheet1").Range("B2").Borders(xlEdgeBottom).Color = RGB(0, 0, 128)
Worksheets("Sheet1").Range("B2").Borders(xlEdgeLeft).Color = RGB(255, 0, 0)
Worksheets("Sheet1").Range("B2").Borders(xlDiagonalDown).Color = RGB(0, 0, 0)
Worksheets("Sheet1").Range("B2").Borders(xlDiagonalUp).Color = RGB(0, 0, 0)
Inside Borders
You can also adjust horizontal (xlInsideHorizontal) and vertical (xlInsideVertical) borders for all cells in a range:
With Worksheets("Sheet1").Range("B2:C6").Borders(xlInsideHorizontal)
 .LineStyle = xlDashDotDot
 .Weight = xlMedium
 .ColorIndex = 3
End With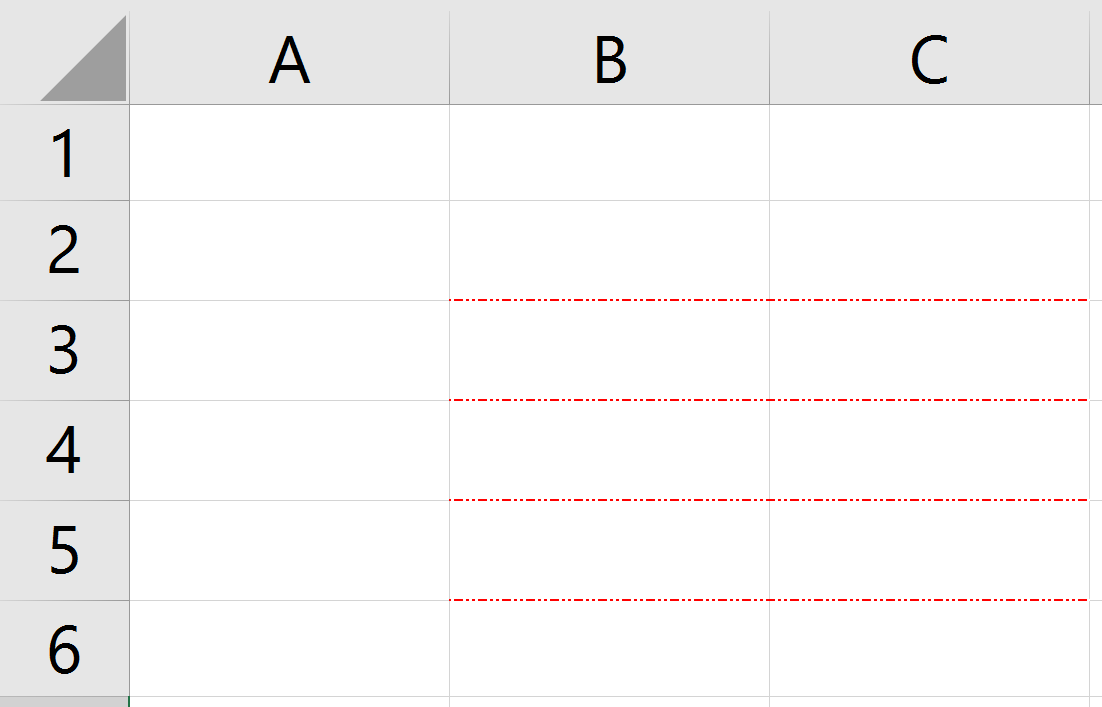
LineStyle
The LineStyle property can be changed to xlContinuous, xlDot, xlDash, xlDashDot, xlDashDotDot, xlDouble, xlSlantDashDot and xlLineStyleNone.
The Weight property can be either xlHariline, xlThin, xlMedium and xlThick. You will have this result with the code below:
Worksheets("Sheet1").Range("C3").Borders(xlEdgeTop).Weight = xlHairline
Worksheets("Sheet1").Range("C3").Borders(xlEdgeBottom).Weight = xlHairline
Worksheets("Sheet1").Range("D3").Borders(xlEdgeTop).Weight = xlThin
Worksheets("Sheet1").Range("D3").Borders(xlEdgeBottom).Weight = xlThin
Worksheets("Sheet1").Range("E3").Borders(xlEdgeTop).Weight = xlMedium
Worksheets("Sheet1").Range("E3").Borders(xlEdgeBottom).Weight = xlMedium
Worksheets("Sheet1").Range("F3").Borders(xlEdgeTop).Weight = xlThick
Worksheets("Sheet1").Range("F3").Borders(xlEdgeBottom).Weight = xlThick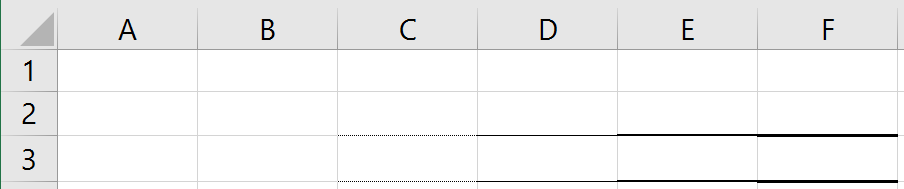
Border colors can be set as ColorIndex or Color (RGB, serial number or vbColor). See more information about color settings here.
You can add borders around a range with a one-line command as well:
Range("B5:C7").BorderAround LineStyle:=xlContinuous, Weight:=xlThick, Color:=vbRedVBA Coding Made Easy
Stop searching for VBA code online. Learn more about AutoMacro — A VBA Code Builder that allows beginners to code procedures from scratch with minimal coding knowledge and with many time-saving features for all users!

Learn More!