
Loops in VBA
Loops are an essential part of any programming language because they help with the repeated running of any code snippet. Just like any other language, VBA offers the following loops to enable efficient programming:
- Do until
- Do while
- For
- Foreach
In this article we will dive dep into the “for” loop which iterates only for “x” number of times where “x” is a known value before the loop’s runtime.
“X” can also be a predictable number at runtime, for example when you determine the Lbound and Ubound values of arrays.
The For Loop in VBA
In VBA, “for loop” is easy to use. It follows a simple and understandable syntax.
Syntax:
For <counter> = <start> to <end> [ <step value> ]
[ <code block to execute> ]
Next [ <counter> ]
where
<counter> is the iterator variable which keeps incrementing by the <step value> after every iteration.
<step value> is optional. If this value is not provided, the default incremental value is “1.”
<Code block to execute> is also optional. It is the snippet of code to be executed during every iteration.
The “Next” statement marks the end of the “for” loop. It indicates to move to the next iteration of this loop with the incremented counter value.
Simple Examples of a For Loop
Print a Mathematical Table for a Number
Sub forloop_demo()
' declare all the required variables
Dim counter, input_number As Integer
' Receive input from user
input_number = InputBox(" Which tables do you want to print ? ")
' Print the mathematical table of the input number upto 12 count
For counter = 1 To 12
Debug.Print (counter &amp;amp; " X " &amp;amp; input_number &amp;amp; " = " &amp;amp; counter * input_number)
Next
End Sub
This program receives a number as an input from the user. Then, using a “for” loop, it is multiplied with each number from 1 to 12 to print a “times table” table of that input number.
A sample output of this program if “3” is input by the user is seen in the image below.

Program to Print Contents of an Array
This program defines an array with its size. All elements of the array are assigned values one by one. Next they are printed as we iterate through a loop. It is noteworthy to say that the iterator variable (i) of the “for” loop is also used as the array index inside the loop (this is not mandatory but makes it easy to read/understand/maintain).
Sub array_cars()

'declaring variable while defining its size
Dim arr_my_cars1(5) As Variant

'initialize array elements for one array
 arr_my_cars1(0) = "Benz"
 arr_my_cars1(1) = "Maruthi"
 arr_my_cars1(2) = "Hyundai"
 arr_my_cars1(3) = "Ford"
 arr_my_cars1(4) = "Nissan"

'print all elements of the array
For i = LBound(arr_my_cars1) To UBound(arr_my_cars1)
    Debug.Print arr_my_cars1(i)
Next

End Sub
Output of the Program:
Benz
Maruthi
Hyundai
Ford
Nissan
Program to Write and Read Array Contents
This program slightly varies from the one above. Here you will create an array and iterate through it using its indices.
Values are given to each array item using a “for” loop initially. (This was not the case in the previous program.)
Then, all the data stored in each element of the same array are read/printed back using another “for” loop.
Two loops are used here one below the other:
- One to write data to array
- Another one to read data from the same array.
Sub array_check_demo1()

' Declaration of array variable
Dim arr1(11)

' Assign values to array elements
For i = LBound(arr1) To UBound(arr1)
    'Allocate data for each array item through a loop
    arr1(i) = Cells(i + 2, 1).Value
Next

' Print values of the array
For i = LBound(arr1) To UBound(arr1)
    'Read data of each array item through a loop
    Debug.Print arr1(i)
Next
End Sub
Input is taken from the table below:
| Principal amount | No of yrs | Age of customer |
| 10000 | 5 | 67 |
| 340600 | 6 | 45 |
| 457800 | 8 | 34 |
| 23400 | 3 | 54 |
| 12000 | 4 | 23 |
| 23545 | 4 | 56 |
| 345243 | 2 | 55 |
| 34543 | 3 | 24 |
| 23223 | 2 | 19 |
| 3656 | 1 | 65 |
Output of the Program

Program That Uses the [step] Value
Check out this program and try to find out why the numbers are not continuous in the output:
Sub step_demo()
' declare a counter
Dim p As Integer

'loop through 10 numbers and print them
For p = 1 To 10 step 3
	Debug.Print p
Next
End Sub
Output of the Program
1
4
7
10
Yes, you might have found that the iterator variable increments by “3” instead of “1” in every iteration. Hence, the numbers printed are skip counted by “3.”
Try the same with different values in the place of [step] to understand it better if you are still confused.
The Nested “For” Loop
A loop within a loop is called a nested loop.
Structure
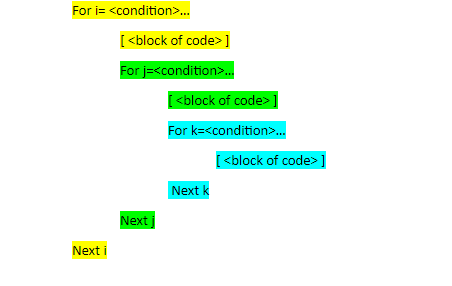
Let me explain this structure with colors:
- The for loop structure in yellow color is the outermost loop.
- The for loop structure/block in green color is the inner loop for the outermost (yellow color) loop. But it also acts as the outer loop for the “for loop” structure in turquoise color.
- The for loop structure in turquoise color is the innermost loop.
In this way , we can have any number of nested loops.
But there are ample chances for you to get confused when you see your own code after several days. You will wonder inside which loop is a specific line and what role it plays in the whole code.
To avoid this, follow the tips below while you code your logic:
- Maintain the alignment in your code with proper tab spaces as shown in the structure above. This can help you find the block of code/loop in which your statement is.
If possible, use the iterator variable next to the “next” keyword. It can help you indicate which “next” statement marks the closure of which loop. This is also marked in the colored structure for reference.
A Few Examples of Nested For Loops
Program to Format Cells with a Specific Word
This program iterates through all the cells (every column of every row in this case). If the cell content has a word “India,” then the specified formatting is applied to it.
Sub format_cell_with()
For i = 1 To 15
For j = 1 To 5
cellcontent = Cells(i, j).Value
If InStr(cellcontent, "India") &amp;gt; 0 Then
With Cells(i, j).Interior
.Pattern = xlSolid
.PatternColorIndex = xlAutomatic
.ThemeColor = xlThemeColorAccent2
.TintAndShade = 0.399975585192419
.PatternTintAndShade = 0
End With
End If
Next
Next
Input sheet:
| ICC Men’s Cricket World Cup Winners – 50 Overs | ||||
| Year | World Cup Winner | Runners Up | Host | Finals Venue |
| 1975 | West Indies | Australia | England | Lord’s Cricket Ground, London |
| 1979 | West Indies | England | England | Lord’s Cricket Ground, London |
| 1983 | India | West Indies | England | Lord’s Cricket Ground, London |
| 1987 | Australia | England | India & Pakistan | Eden Gardens, Kolkata |
| 1992 | Pakistan | England | Australia & New Zealand | Melbourne Cricket Ground, Melbourne |
| 1996 | Sri Lanka | Australia | India, Pakistan & Sri Lanka | Gaddafi Stadium, Lahore |
| 1999 | Australia | Pakistan | England | Lord’s Cricket Ground, London |
| 2003 | Australia | India | Australia | Wanderers, Johannesburg |
| 2007 | Australia | Sri Lanka | West Indies | Kensington Oval, Bridgetown |
| 2011 | India | Sri Lanka | India | Wankhede Stadium, Mumbai |
| 2015 | Australia | New Zealand | Australia | Melbourne Cricket Ground |
| 2019 | England | New Zealand | England | Lord’s, London |
| 2023 | — | — | India | — |
Output sheet – after the program is run:

Program with 2D Array and “NESTED FOR” Loop
This program declares a two dimensional array and initializes data in all its elements.
The first dimension holds the students’ names, and the second dimension holds the “exam results” of the students in the first dimension. These are written back to an Excel sheet.
Warning: As the code does not select any sheet in specific, please ensure that you keep a blank Excel sheet selected. This can prevent any damage to your existing data.
In case you wish to learn more about multidimensional arrays, please check out this article.
Sub Nested_for_demo2()

'declaring and defining size of an array
'3 means 4 rows starting from 0 to 3 and 1 means 2 columns starting from 0 to 1
Dim arr_stu(1 To 5, 1 To 2) As Variant

'initialize array elements

 arr_stu(1, 1) = "Dave"
 arr_stu(1, 2) = "Fail"
 arr_stu(2, 1) = "Trumpo"
 arr_stu(2, 2) = "Pass"
 arr_stu(3, 1) = "Vincent"
 arr_stu(3, 2) = "Pass"
 arr_stu(4, 1) = "Rose Mary"
 arr_stu(4, 2) = "Pass"
 arr_stu(5, 1) = "Eliza"
 arr_stu(5, 2) = "Fail"

' print all elements to the open excel sheet.
For i = 1 To 5
    For j = 1 To 2
        Cells(i, j) = arr_stu(i, j)
    Next j
Next

End Sub
Output of the Program on the Active Excel Sheet: Here
- The rows indicate the “i” value of the array (first dimension) and the iterator variable of the outer “for” loop.
- The columns indicate the “j” value of the array (Col A – first dimension , Col B – second dimension) and the iterator variable of the inner “for” loop.

The “Continue” Statement in Visual Basic: Skip a Part of an Iteration
When you encounter a situation where you wish to skip running the rest of the code inside the loop for a specific iteration based on a condition, the “continue” statement will come to your rescue in Visual Basic Programming.
Continue
Syntax:
Continue { Do | For | While }
Where { Do | For | While } are the respective loops in which it has to be used.
A Simple Example
Sub continue_demo()
' declare a counter
Dim i As Integer

'loop through 10 numbers and print them
For i = 1 To 10
    ' we will skip printing "4"
    If i = 4 Then
        Continue For
    End
    Debug.Print i
Next
End Sub
Your output will not have “4” in this case. As the condition is met in the 4th iteration, the continue statement is hit and the rest of the code is skipped for that iteration. The control then moves to the “next” statement of the loop (inner loop in case of nested loops).
Note: The Next statement is the closure of a loop, as you may be aware.
Output of the above program
1
2
3
5
6
7
8
9
10
Continue Statement is Not Available in VBA
VBA does not offer the “continue statement” because well-built logic in a loop can help us avoid using a “continue” statement. For example, rearranging statement blocks like nested loops and if conditions can help avoid the use of “continue” statements.
An Alternative to the Continue Statement
In unavoidable situations, the Goto statement can be used.
This article can provide you with more insights on how to properly use the “Goto” statement in VBA.
Conclusion
In my experience, I would say that the “for” loop is my favorite compared to the “do while “/“Do until”/“ For each” loops. The reason is the comfort of defining it completely in one line. Even during run-time, you can find how many iterations are completed and how many are yet to come.
I have also been able to use this loop in situations where I do not know the number of iterations. I manage it using conditions inside the loop. It also comes handy when I want to wait for a page load during automation. Once you start using this loop, you will even start playing around nested “for loops” with much more confidence and fewer of mistakes.
So, what are you waiting for ? Why not give it a try? 😊
In this Article
- VBA Loop Quick Examples
- For Each Loops
- For Next Loops
- Do While Loops
- Do Until Loops
- VBA Loop Builder
- VBA For Next Loop
- For Loop Syntax
- For Loop Step
- For Loop Step – Inverse
- Nested For Loop
- Exit For
- Continue For
- VBA For Each Loop
- For Each Cell in Range
- For Each Worksheet in Workbook
- For Each Open Workbook
- For Each Shape in Worksheet
- For Each Shape in Each Worksheet in Workbook
- For Each – IF Loop
- VBA Do While Loop
- Do While
- Loop While
- VBA Do Until Loop
- Do Until
- Loop Until
- Exit Do Loop
- End or Break Loop
- More Loop Examples
- Loop Through Rows
- Loop Through Columns
- Loop Through Files in a Folder
- Loop Through Array
- Loops in Access VBA
To work effectively in VBA, you must understand Loops.
Loops allow you to repeat a code block a set number of times or repeat a code block on a each object in a set of objects.
First we will show you a few examples to show you what loops are capable of. Then we will teach you everything about loops.
VBA Loop Quick Examples
For Each Loops
For Each Loops loop through every object in a collection, such as every worksheet in workbook or every cell in a range.
Loop Through all Worksheets in Workbook
This code will loop through all worksheets in the workbook, unhiding each sheet:
Sub LoopThroughSheets()
Dim ws As Worksheet

    For Each ws In Worksheets
        ws.Visible = True
    Next

End Sub
Loop Through All Cells in Range
This code will loop through a range of cells, testing if the cell value is negative, positive, or zero:
Sub If_Loop()
Dim Cell as Range

  For Each Cell In Range("A2:A6")
    If Cell.Value > 0 Then
      Cell.Offset(0, 1).Value = "Positive"
    ElseIf Cell.Value < 0 Then
      Cell.Offset(0, 1).Value = "Negative"
    Else
      Cell.Offset(0, 1).Value = "Zero"
     End If
  Next Cell

End Sub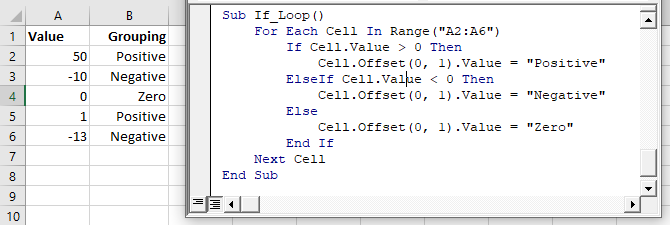
For Next Loops
Another type of “For” Loop is the For Next Loop. The For Next Loop allows you to loop through integers.
This code will loop through integers 1 through 10, displaying each with a message box:
Sub ForLoop()
    Dim i As Integer
    For i = 1 To 10
        MsgBox i
    Next i
End Sub
Do While Loops
Do While Loops will loop while a condition is met. This code will also loop through integers 1 through 10, displaying each with a message box.
Sub DoWhileLoop()
    Dim n As Integer
    n = 1
    Do While n < 11
        MsgBox n
        n = n + 1
    Loop
End Sub
Do Until Loops
Conversely, Do Until Loops will loop until a condition is met. This code does the same thing as the previous two examples.
Sub DoUntilLoop()
    Dim n As Integer
    n = 1
    Do Until n >= 10
        MsgBox n
        n = n + 1
    Loop
End Sub
We will discuss this below, but you need to be extremely careful when creating Do While or Do Until loops so that you don’t create a never ending loop.
VBA Loop Builder
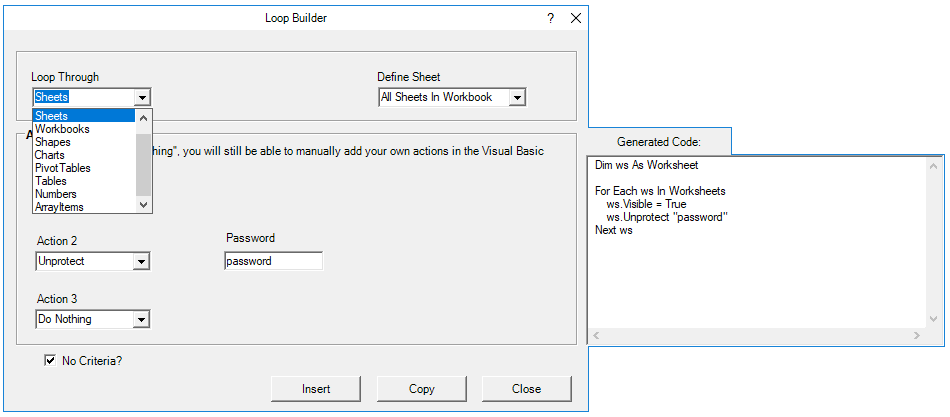
This is a screenshot of the “Loop Builder” from our Premium VBA Add-in: AutoMacro. The Loop Builder allows you to quickly and easily build loops to loop through different objects, or numbers. You can perform actions on each object and/or select only objects that meet certain criteria.
The add-in also contains many other code builders, an extensive VBA code library, and an assortment of coding tools. It’s a must have for any VBA developer.
Now we will cover the different types of loops in depth.
VBA Coding Made Easy
Stop searching for VBA code online. Learn more about AutoMacro — A VBA Code Builder that allows beginners to code procedures from scratch with minimal coding knowledge and with many time-saving features for all users!

Learn More
VBA For Next Loop
For Loop Syntax
The For Next Loop allows you to repeat a block of code a specified number of times. The syntax is:
[Dim Counter as Integer]

For Counter = Start to End [Step Value]
    [Do Something]
Next [Counter]
Where the items in brackets are optional.
- [Dim Counter as Long] – Declares the counter variable. Required if Option Explicit is declared at the top of your module.
- Counter – An integer variable used to count
- Start – The start value (Ex. 1)
- End – The end value (Ex. 10)
- [Step Value] – Allows you to count every n integers instead of every 1 integer. You can also go in reverse with a negative value (ex. Step -1)
- [Do Something] – The code that will repeat
- Next [Counter] – Closing statement to the For Next Loop. You can include the Counter or not. However, I strongly recommend including the counter as it makes your code easier to read.
If that’s confusing, don’t worry. We will review some examples:
Count to 10
This code will count to 10 using a For-Next Loop:
Sub ForEach_CountTo10()

Dim n As Integer
For n = 1 To 10
    MsgBox n
Next n

End Sub
For Loop Step
Count to 10 – Only Even Numbers
This code will count to 10 only counting even numbers:
Sub ForEach_CountTo10_Even()

Dim n As Integer
For n = 2 To 10 Step 2
    MsgBox n
Next n

End Sub
Notice we added “Step 2”. This tells the For Loop to “step” through the counter by 2. We can also use a negative step value to step in reverse:
VBA Programming | Code Generator does work for you!
For Loop Step – Inverse
Countdown from 10
This code will countdown from 10:
Sub ForEach_Countdown_Inverse()

Dim n As Integer
For n = 10 To 1 Step -1
    MsgBox n
Next n
MsgBox "Lift Off"

End Sub
Delete Rows if Cell is Blank
I’ve most frequently used a negative step For-Loop to loop through ranges of cells, deleting rows that meet certain criteria. If you loop from the top rows to the bottom rows, as you delete rows you will mess up your counter.
This example will delete rows with blank cells (starting from the bottom row):
Sub ForEach_DeleteRows_BlankCells()

Dim n As Integer
For n = 10 To 1 Step -1
    If Range("a" & n).Value = "" Then
        Range("a" & n).EntireRow.Delete
    End If
Next n

End Sub
Nested For Loop
You can “nest” one For Loop inside another For Loop. We will use Nested For Loops to create a multiplication table:
Sub Nested_ForEach_MultiplicationTable()

Dim row As Integer, col As Integer

For row = 1 To 9
    For col = 1 To 9
        Cells(row + 1, col + 1).Value = row * col
    Next col
Next row

End Sub
Exit For
The Exit For statement allows you to exit a For Next loop immediately.
You would usually use Exit For along with an If Statement, exiting the For Next Loop if a certain condition is met.
For example, you might use a For Loop to find a cell. Once that cell is found, you can exit the loop to speed up your code.
This code will loop through rows 1 to 1000, looking for “error” in column A. If it’s found, the code will select the cell, alert you to the found error, and exit the loop:
Sub ExitFor_Loop()

Dim i As Integer

For i = 1 To 1000
    If Range("A" & i).Value = "error" Then
        Range("A" & i).Select
        MsgBox "Error Found"
        Exit For
    End If
Next i

End Sub
Important: In the case of Nested For Loops, Exit For only exits the current For Loop, not all active Loops.
Continue For
VBA does not have the “Continue” command that’s found in Visual Basic. Instead, you will need to use “Exit”.
AutoMacro | Ultimate VBA Add-in | Click for Free Trial!
VBA For Each Loop
The VBA For Each Loop will loop through all objects in a collection:
- All cells in a range
- All worksheets in a workbook
- All shapes in a worksheet
- All open workbooks
You can also use Nested For Each Loops to:
- All cells in a range on all worksheets
- All shapes on all worksheets
- All sheets in all open workbooks
- and so on…
The syntax is:
For Each Object in Collection
[Do Something]
Next [Object]
Where:
- Object – Variable representing a Range, Worksheet, Workbook, Shape, etc. (ex. rng)
- Collection – Collection of objects (ex. Range(“a1:a10”)
- [Do Something] – Code block to run on each object
- Next [Object] – Closing statement. [Object] is optional, however strongly recommended.
For Each Cell in Range
This code will loop through each cell in a range:
Sub ForEachCell_inRange()

Dim cell As Range

For Each cell In Range("a1:a10")
    cell.Value = cell.Offset(0,1).Value
Next cell

End Sub
For Each Worksheet in Workbook
This code will loop through all worksheets in a workbook, unprotecting each sheet:
Sub ForEachSheet_inWorkbook()

Dim ws As Worksheet

For Each ws In Worksheets
    ws.Unprotect "password"
Next ws

End Sub
For Each Open Workbook
This code will save and close all open workbooks:
Sub ForEachWB_inWorkbooks()

Dim wb As Workbook

For Each wb In Workbooks
    wb.Close SaveChanges:=True
Next wb

End Sub
AutoMacro | Ultimate VBA Add-in | Click for Free Trial!
For Each Shape in Worksheet
This code will delete all shapes in the active sheet.
Sub ForEachShape()

Dim shp As Shape

For Each shp In ActiveSheet.Shapes
    shp.Delete
Next shp

End Sub
For Each Shape in Each Worksheet in Workbook
You can also nest For Each Loops. Here we will loop through all shapes in all worksheets in the active workbook:
Sub ForEachShape_inAllWorksheets()

Dim shp As Shape, ws As Worksheet

For Each ws In Worksheets
    For Each shp In ws.Shapes
        shp.Delete
    Next shp
Next ws

End Sub
For Each – IF Loop
As we’ve mentioned before, you can use an If statement within a loop, performing actions only if certain criteria is met.
This code will hide all blank rows in a range:
Sub ForEachCell_inRange()

Dim cell As Range

For Each cell In Range("a1:a10")
    If cell.Value = "" Then _
       cell.EntireRow.Hidden = True
Next cell

End Sub
VBA Do While Loop
The VBA Do While and Do Until (see next section) are very similar. They will repeat a loop while (or until) a condition is met.
The Do While Loop will repeat a loop while a condition is met.
Here is the Do While Syntax:
Do While Condition
[Do Something]
Loop
Where:
- Condition – The condition to test
- [Do Something] – The code block to repeat
You can also set up a Do While loop with the Condition at the end of the loop:
Do
[Do Something]
Loop While Condition
We will demo each one and show how they differ:
AutoMacro | Ultimate VBA Add-in | Click for Free Trial!
Do While
Here is the Do While loop example we demonstrated previously:
Sub DoWhileLoop()
    Dim n As Integer
    n = 1
    Do While n < 11
        MsgBox n
        n = n + 1
    Loop
End Sub
Loop While
Now let’s run the same procedure, except we will move the condition to the end of the loop:
Sub DoLoopWhile()
    Dim n As Integer
    n = 1
    Do
        MsgBox n
        n = n + 1
    Loop While n < 11
End Sub
VBA Do Until Loop
Do Until Loops will repeat a loop until a certain condition is met. The syntax is essentially the same as the Do While loops:
Do Until Condition
[Do Something]
Loop
and similarly the condition can go at the start or the end of the loop:
Do
[Do Something]
Loop Until Condition
Do Until
This do Until loop will count to 10, like our previous examples
Sub DoUntilLoop()
    Dim n As Integer
    n = 1
    Do Until n > 10
        MsgBox n
        n = n + 1
    Loop
End Sub
AutoMacro | Ultimate VBA Add-in | Click for Free Trial!
Loop Until
This Loop Until loop will count to 10:
Sub DoLoopUntil()
    Dim n As Integer
    n = 1
    Do
        MsgBox n
        n = n + 1
    Loop Until n > 10
End Sub
Exit Do Loop
Similar to using Exit For to exit a For Loop, you use the Exit Do command to exit a Do Loop immediately
Exit DoHere is an example of Exit Do:
Sub ExitDo_Loop()

Dim i As Integer
i = 1

Do Until i > 1000
    If Range("A" & i).Value = "error" Then
        Range("A" & i).Select
        MsgBox "Error Found"
        Exit Do
    End If
    i = i + 1
Loop

End Sub
End or Break Loop
As we mentioned above, you can use the Exit For or Exit Do to exit loops:
Exit ForExit DoHowever, these commands must be added to your code before you run your loop.
If you are trying to “break” a loop that’s currently running, you can try pressing ESC or CTRL + Pause Break on the keyboard. However, this may not work. If it doesn’t work, you’ll need to wait for your loop to end or, in the case of an endless loop, use CTRL + ALT + Delete to force close Excel.
This is why I try to avoid Do loops, it’s easier to accidentally create an endless loop forcing you to restart Excel, potentially losing your work.
More Loop Examples
AutoMacro | Ultimate VBA Add-in | Click for Free Trial!
Loop Through Rows
This will loop through all the rows in a column:
Public Sub LoopThroughRows()

Dim cell As Range

For Each cell In Range("A:A")
    If cell.value <> "" Then MsgBox cell.address & ": " & cell.Value
Next cell

End Sub
Loop Through Columns
This will loop through all columns in a row:
Public Sub LoopThroughColumns()

Dim cell As Range

For Each cell In Range("1:1")
    If cell.Value <> "" Then MsgBox cell.Address & ": " & cell.Value
Next cell

End Sub
Loop Through Files in a Folder
This code will loop through all files in a folder, creating a list:
Sub LoopThroughFiles ()

Dim oFSO As Object
Dim oFolder As Object
Dim oFile As Object
Dim i As Integer

Set oFSO = CreateObject("Scripting.FileSystemObject")

Set oFolder = oFSO.GetFolder("C:Demo)

i = 2

For Each oFile In oFolder.Files
    Range("A" & i).value = oFile.Name
    i = i + 1
Next oFile

End Sub
Loop Through Array
This code will loop through the array ‘arrList’:
For i = LBound(arrList) To UBound(arrList)
    MsgBox arrList(i)
Next i
The LBound function gets the “lower bound” of the array and UBound gets the “upper bound”.
Loops in Access VBA
Most of the examples above will also work in Access VBA. However, in Access, we loop through the Recordset Object rather than the Range Object.
Sub LoopThroughRecords()
   On Error Resume Next
   Dim dbs As Database
   Dim rst As Recordset
   Set dbs = CurrentDb
   Set rst = dbs.OpenRecordset("tblClients", dbOpenDynaset)
   With rst
      .MoveLast
      .MoveFirst
      Do Until .EOF = True
         MsgBox (rst.Fields("ClientName"))
        .MoveNext
     Loop
   End With
   rst.Close
   Set rst = Nothing
   Set dbs = Nothing
End Sub|
Nik021  Пользователь Сообщений: 63 |
#1 01.08.2017 18:46:47 Добрый день. Есть цикл for, в нем много условий и действие.
|
||
|
The_Prist  Пользователь Сообщений: 14181 Профессиональная разработка приложений для MS Office |
Go to? Даже самый простой вопрос можно превратить в огромную проблему. Достаточно не уметь формулировать вопросы… |
|
как может быть 1 > 2 и 5 = 6? |
|
|
Nik021 Пользователь Сообщений: 63 |
The_Prist, В каждом условии буду вдобавок проверять результат предыдущего условия, пока так… |
|
Equio  Пользователь Сообщений: 274 |
Continue For https://msdn.microsoft.com/en-us/library/z6zekeaa(v=vs.100).aspx Хотя это для VB. Не знаю, будет ли в VBA работать. Update: Попробовал, не работает в VBA. Изменено: Equio — 01.08.2017 19:36:30 |
|
Hugo Пользователь Сообщений: 23249 |
#6 01.08.2017 19:33:21
— как часто слышали это в разных вариантах |
||
|
The_Prist Пользователь Сообщений: 14181 Профессиональная разработка приложений для MS Office |
#7 01.08.2017 19:38:16
значит не используйте, раз Вам так рекомендуют Изменено: The_Prist — 01.08.2017 19:39:18 Даже самый простой вопрос можно превратить в огромную проблему. Достаточно не уметь формулировать вопросы… |
||
|
Nik021 Пользователь Сообщений: 63 |
The_Prist, я искал легкий способ прекратить дальнейшее выполнение кода и перехода к следующему шагу цикла, как, например, exit for (exit полностью завершает цикл, но вы поняли). Рас так просто нельзя, то буду использовать другие доступные варианты. Спасибо. |
|
Влад Пользователь Сообщений: 1189 |
В таких случаях внутри цикла For…Next делается замкнутый Do…Loop с командой выхода в конце. Любое условие, при котором нужно перейти к следующему шагу Next, выполняет Exit Do. |
|
Юрий М  Модератор Сообщений: 60570 Контакты см. в профиле |
#10 01.08.2017 20:49:51
А мне кажется, что Select Case именно то, что Вам нужно. |
||
|
Nik021 Пользователь Сообщений: 63 |
Юрий М, Select Case, на сколько я помню, проверяет только числа, а строковые значение сравнивать не умеет или я что-то путаю уже. Влад, а вот это уже интересная идея !) |
|
Юрий М Модератор Сообщений: 60570 Контакты см. в профиле |
#12 01.08.2017 21:57:11
Или ) |
||
|
The_Prist Пользователь Сообщений: 14181 Профессиональная разработка приложений для MS Office |
#13 02.08.2017 08:59:56
что-то Вы не то помните. Эта конструкция принимает не просто и числа и текст, но и очень такие выражения в качестве условий, для которых в If … then надо будет городить доп.условия. Изменено: The_Prist — 02.08.2017 09:03:02 Даже самый простой вопрос можно превратить в огромную проблему. Достаточно не уметь формулировать вопросы… |
||
|
Влад Пользователь Сообщений: 1189 |
|
|
The_Prist Пользователь Сообщений: 14181 Профессиональная разработка приложений для MS Office |
#15 02.08.2017 13:07:26
Это выбор каждого Даже самый простой вопрос можно превратить в огромную проблему. Достаточно не уметь формулировать вопросы… |
||
|
Ігор Гончаренко Пользователь Сообщений: 13746 |
#16 02.08.2017 14:40:01 и тем более GOTO логически и визуальнео очень органично встраивается в представленнй макрос
Программисты — это люди, решающие проблемы, о существовании которых Вы не подозревали, методами, которых Вы не понимаете! |
|
|
kuklp Пользователь Сообщений: 14868 E-mail и реквизиты в профиле. |
#17 02.08.2017 14:51:01
тоже сделает ElseIf конструкция без всяких гот и меток Я сам — дурнее всякого примера! … |
||
How to achieve Continue Statement Purpose in VBA?
As we know, VBA has “Exit For”, and “Exit Do” to come out of the loop entirely – which is achieved by the break statement (normally in other programming languages).
However, VBA has no Continue statement – to omit an iteration in the loop rather completely exiting the loop.
So, how we can achieve this? The topic of our tutorial.
First Solution – Using an If statement in the For loop
Generally, the continue statement is placed inside the for loop (in any language where it is available).
We are also using VBA If statement and testing the current value.
See how we will omit the current iteration while the loop still goes on until the condition is False.
VBA omit an iteration code:
|
Sub for_continue() Dim x As Integer Dim curr_val For x = 1 To 10 Step 1 If x = 4 Then ‘Do Nothing Else curr_val = curr_val & vbNewLine & x End If Next x MsgBox curr_val End Sub |
Output:
You can see, 4 is not displayed in the MsgBox.
If we have not used the If..Else in the above example, the output should be:
Omitting multiple iterations
Just add more items by using Or operator in the If Statement and you may omit more iterations. For example, we will omit 3, 5, and 7 values in our above example. See the code and output below:
Code:
|
1 2 3 4 5 6 7 8 9 10 11 12 13 14 15 16 17 |
Sub for_continue() Dim x As Integer Dim curr_val For x = 1 To 10 Step 1 ‘Omit multiple iterations If x = 3 Or x = 5 Or x = 7 Then ‘Do Nothing Else curr_val = curr_val & vbNewLine & x End If Next x MsgBox curr_val End Sub |
Output:
VBA “Continue” with Array example
Similarly, you may omit the iteration(s) as working with For..Each and arrays.
In the example below, we have five array elements. The array contains fruits’ names. Normally, it will display the array elements as below:
Code:
|
1 2 3 4 5 6 7 8 9 10 11 12 13 14 15 16 17 18 19 20 21 |
Sub for_continue() Dim Fruits(1 To 5) As String Dim concat_str As String Dim curr_item As Variant ‘Array Elements Fruits(1) = «Apple» Fruits(2) = «Mango» Fruits(3) = «Banana» Fruits(4) = «Peach» Fruits(5) = «strawberry» ‘Omit values like continue does For Each curr_item In Fruits concat_str = concat_str & curr_item & «, « Next curr_item MsgBox concat_str End Sub |
Output:
To demonstrate “Continue”, we will omit two fruit names by using If..Else statements:
Code:
|
1 2 3 4 5 6 7 8 9 10 11 12 13 14 15 16 17 18 19 20 21 22 23 24 25 26 27 28 29 30 |
Sub for_continue() Dim Fruits(1 To 5) As String Dim concat_str As String Dim curr_item As Variant ‘Array Elements Fruits(1) = «Apple» Fruits(2) = «Mango» Fruits(3) = «Banana» Fruits(4) = «Peach» Fruits(5) = «strawberry» ‘Omit values like continue does For Each curr_item In Fruits If curr_item = «Apple» Or curr_item = «Peach» Then ‘Do Nothing Else concat_str = concat_str & curr_item & «, « End If Next curr_item MsgBox concat_str End Sub |
Output:
You can see, the two fruit names are not displayed in the message box.
-
#2
Are you asking a question ? OR you are looking forward for a confirmation of the answer to your question ?
-
#3
i’m looking for the keyword for continue statement in VBA. In java, there is continue keyword. but i’m not sure whether VBA have or not. i need to use the continue keyword to interate my looping
Are you asking a question ? OR you are looking forward for a confirmation of the answer to your question ?
-
#4
Ok, so your question is proper as you wanna know the syntax that can be replaced for the iteration in your program.
A friendly suggestion mate…dont complicate yourself comparing Java with VBA…you bet this is way too different in terms of syntax and logic as well…I am a JCP but here I am so a learner in VBA and I do follow a primary principle «never to compare java syntax with VBA» else you wud mess with your Java funda as well !
-
#5
Hi Stormseed,
Thanks for your golden advise. I thinking to explore further as i’m not sure whether the VBA have the syntax/keywords. if wud be good if there is such syntax.. right…
thanks
Regards
Yee Khoon
A friendly suggestion mate…dont complicate yourself comparing Java with VBA…you bet this is way too different in terms of syntax and logic as well…I am a JCP but here I am so a learner in VBA and I do follow a primary principle «never to compare java syntax with VBA» else you wud mess with your Java funda as well !
-
#6
Yee Khon
What exactly are you trying to do?
As far as I’m aware there is no equivalent of Continue in VBA.
But there are probably other methods to achieve what you want.
-
#7
Hi Norie,
Again, thanks for replying my post…
oh yeah… now i thinking to use the Goto syntax to achieve in my loop.
what i’m exectly want to do is that
Code:
for i = 0 to ubound(dataArray)

    if left(dataArray(i,3), 1) ="z" then continue


   cells(i,1).value = dataArray(i,1)

next i
Yee Khon
What exactly are you trying to do?
As far as I’m aware there is no equivalent of Continue in VBA.
But there are probably other methods to achieve what you want.
-
#8
Yee Khon
I’m sorry but it still isn’t clear what you want to do.
If you want to exit the for loop based then use Exit For.
-
#9
Hi Yee
As you may well know, the use of GoTo is usually considered non structured programming.
There are 4 usual GoTo variations, the GoTo itsef and its pals Break (Exit in vba), Continue (no equivalent in vba) and Return (also Return in vba). Any of the 4 may break the flow of the program (used inside a loop may even break the logic of the loop) and so, according to the supporters of structured programming, should simply be avoided as much as possible (some will go as far as supporting the removal of this statement from the languages). You can find lots of information about structured programming on the Web and in programming / computer science books.
So, your:
Code:
For/Do/While
    ' code'
    If Condition then Continue
    ' more code'
End For/Loop
is equivalent to the also not structured:
Code:
For/Do/While
    ' code'
    If Condition then GoTo EndLoop
    ' more code'
EndLoop:
End For/Loop
or, to the classical structured
Code:
For/Do/While
    ' code'
    If Not Condition then
        ' more code'
    End If
End For/Loop
Remark: I’m just contributing with information, I’m not saying that you should never use these statements. In some cases they may be useful and in others, for example if you use a switch construct in C/C++, unavoidable.
Hope this helps
PGC
-
#10
Excellent information and very useful too….PGC !
thanks a lot for the explanation.
У меня есть цикл for над массивом. То, что я хочу сделать, — это тест для определенного условия в цикле и переход к следующей итерации, если true:
For i = LBound(Schedule, 1) To UBound(Schedule, 1)
    If (Schedule(i, 1) < ReferenceDate) Then
        PrevCouponIndex = i
        Continue   '*** THIS LINE DOESN'T COMPILE, nor does "Next"
    End If
    DF = Application.Run("SomeFunction"....)
    PV = PV + (DF * Coupon / CouponFrequency)
Next
Я знаю, что могу:
If (Schedule(i, 1) < ReferenceDate) Then Continue For
но я хочу иметь возможность записать последнее значение я в переменной PrevCouponIndex.
Любые идеи?
Спасибо
30 дек. 2011, в 14:18
Поделиться
Источник
5 ответов
Не могли бы вы просто сделать что-то простое?
For i = LBound(Schedule, 1) To UBound(Schedule, 1)
  If (Schedule(i, 1) < ReferenceDate) Then
     PrevCouponIndex = i
  Else
     DF = Application.Run("SomeFunction"....)
     PV = PV + (DF * Coupon / CouponFrequency)
  End If
Next
Brian
30 дек. 2011, в 16:43
Поделиться
У VBA нет Continue или любого другого эквивалентного ключевого слова, чтобы сразу перейти к следующей итерации цикла. Я бы предложил разумное использование Goto в качестве обходного пути, особенно если это всего лишь надуманный пример, а ваш реальный код сложнее:
For i = LBound(Schedule, 1) To UBound(Schedule, 1)
    If (Schedule(i, 1) < ReferenceDate) Then
        PrevCouponIndex = i
        Goto NextIteration
    End If
    DF = Application.Run("SomeFunction"....)
    PV = PV + (DF * Coupon / CouponFrequency)
    '....'
    'a whole bunch of other code you are not showing us'
    '....'
    NextIteration:
Next
Если это действительно весь ваш код, @Brian абсолютно прав. Просто поставьте предложение Else в свой оператор If и сделайте с ним.
mwolfe02
30 дек. 2011, в 15:17
Поделиться
Continue For недействителен в VBA или VB6.
Из эта страница MSDN, похоже, она была введена в VB.Net в VS 2005./Net 2.
Как говорили другие, нет другого варианта, кроме использования Goto или Else.
Jon Egerton
30 дек. 2011, в 16:21
Поделиться
Привет, я также сталкиваюсь с этой проблемой, и я решаю это, используя приведенный ниже пример кода
For j = 1 To MyTemplte.Sheets.Count

       If MyTemplte.Sheets(j).Visible = 0 Then
           GoTo DoNothing
       End If


'process for this for loop
DoNothing:

Next j
Singaravelan
05 май 2016, в 04:56
Поделиться
Возможно, попробуйте положить все это в конце, если и использовать другое, чтобы пропустить код, это сделает так, что вы не сможете использовать GoTo.
                        If 6 - ((Int_height(Int_Column - 1) - 1) + Int_direction(e, 1)) = 7 Or (Int_Column - 1) + Int_direction(e, 0) = -1 Or (Int_Column - 1) + Int_direction(e, 0) = 7 Then
                Else
                    If Grid((Int_Column - 1) + Int_direction(e, 0), 6 - ((Int_height(Int_Column - 1) - 1) + Int_direction(e, 1))) = "_" Then
                        Console.ReadLine()
                    End If
                End If
richo7
30 янв. 2017, в 21:08
Поделиться
Ещё вопросы
- 1Android: привязать метод к домашней кнопке смартфона
- 1Затмение из памяти
- 0Отображение tinyint (3) в базе данных mysql из Java Spring Boot
- 0PHP Disposition-Notification-To
- 0AdMob Pro и Cordova — рекламные вставки работают, рекламные баннеры не работают
- 0Двустороннее связывание данных между областями
- 1Java создать список проблем с List <Type> myList = new ArrayList <Type> ();
- 0Делаем обычное угловое приложение, модульное угловое приложение
- 0Керл разбирает текст не xml
- 1Проблемы с Raycast для ARCamera в Unity3d с Vuforia SDK
- 1Android: преобразование RGB888 в Y800
- 1Отслеживайте каждую минуту в таймере обратного отсчета
- 1Хотел бы прочитать в двух столбцах дат, но только получить один
- 0JQuery или Javascript, как получить абзацный плоский текст
- 0AngularJS — Как получить доступ к массиву Javascript?
- 1Эквивалентная функция формата Excel в c #
- 0Получить Вложенный Json с AngularJS
- 1Как завершить состояние в Phaser, а также вернуться к предыдущему состоянию
- 1org.apache.cxf.binding.soap.SoapHeader не может быть приведен к org.apache.cxf.binding.soap.SoapHeader
- 1Как поделиться или сохранить данные между различными исполняемыми файлами?
- 1Maven-плагин для проверки API-совместимости с Android
- 1AmChart умножает значения даты
- 1ASP.NET Создание многоуровневого JSON
- 1Как написать в XML с использованием производных классов?
- 0Open.window с переданной ему переменной PHP [duplicate]
- 0Laravel PHP: загрузка изображения с большим размером файла приводит к тому, что getClientOriginalName () становится null
- 0Попытка зафиксировать значение выбранного параметра
- 1Использование cordova-plugin-file на Android 7 не работает
- 1изменение высоты ActionBar в режиме ориентации
- 1отправить объект диаграммы в памяти в файл Excel
- 1Улучшение производительности на картах Google, рисующих длинные пути
- 1Установить ссылки при разборе XML-перезагрузки
- 1У меня есть атрибут knowntype в datacontract и я не знаю, как изменить xml, чтобы принять эти типы Knowntype
- 0PHP 5 извлекает и затем передает переменные $ _POST
- 1Создайте сервер Socket.IO с express.js в модуле и получите доступ к нему из других модулей.
- 1Как прикрепить аудио файл к MMS в Android?
- 1Common.Logging «void Error (объектное сообщение, исключение исключения);» не регистрирует «Exception»
- 0PHP обратная функция хранимых процедур?
- 0Jest TypeError: функция не найдена
- 1изображение java извлечение белого цвета
- 0загрузить разные данные в таблицу по выбору различных опций, используя раскрывающийся список в угловых?
- 0Включить потокобезопасность для версии 5.6.2 Php
- 1Распечатать 2D-список как полином с использованием Python
- 1python — ошибка при сортировке csv по столбцу
- 1Python-колба-отдыхающий reqparser json со списком json
- 0невозможно установить MySQL на Ubuntu 16.04
- 0Дата и время выбора
- 0Данные в Angular Services / Controllers
- 1Как обновить ячейки в Excel?
- 1Добавить узел в XML

If you’ve been working enough time with Visual Basic for Applications, you’re probably aware that 2 of its most powerful structures are:
- Decision-making structures, such as the If… Then… Else statement.
- Loops.
 These 2 structures allow you to create powerful, flexible, sophisticated macros.
Excel VBA loops are, however, not an easy concept to understand.
My main purpose with this Excel tutorial is to help you get the hang of Excel VBA loops. Therefore, in this blog post, I cover the main aspects you need to understand for purposes of using VBA loops to improve your macros. The topics I cover go from basic aspects, such as what is a loop, to details about the syntax and process followed by the main types of looping structures supported by Excel. The following table of contents lists (in more detail) all of the topics I cover:
Before we go into the details of the different type of loops that Excel supports, let’s start by understanding…
What Is An Excel VBA Loop
Defined very broadly, looping is repeating the execution of certain statements more than one time. Therefore, when you want or need to repeat a particular action (or course of actions) while using Visual Basic for Applications, you can use loops.
In very broad terms, an Excel VBA loop does 2 things:
- #1: Executes certain statements.
- #2: Once all the statements have been executed, it goes (loops) back to the beginning of the structure.
Each of these cycles is known as an iteration. The number of iterations can (but doesn’t have to) be fixed. Based on whether this number of repetitions is fixed or not, you can distinguish between 2 loop categories:
- Category #1: Fixed-iteration loops, which repeat the relevant statements a set number of times.
- Category #2: Indefinite loops, in which the number of iterations is more flexible.
In either case, the factor that determines the number of iterations is sometimes referred to as the loop invariant or determinant. You can generally classify loop determinants in 2 categories:
- Numeric expressions, which can be evaluated as numbers.
- Logical expressions, which evaluate to True or False.
You can write VBA loops in several different ways. The looping structures supported by Excel and covered in this VBA tutorial are the following:
- For… Next.
- For Each… Next.
- Do….
- Do While and Do Until.
- While… Wend.
In practice, you’re most likely to work with only some of these looping structures: For… Next, For Each… Next, Do While and Do Until.
Out of these looping structures, only For… Next and For Each… Next loops are (usually) classified as fixed iteration loops. The other structures are (usually) classified as indefinite loops.
I explain the main aspects you need to know to start working with any of these looping structures in the sections below. However, before we start taking a look at each of them, let’s dive deeper into the question of…
Why Learn About Excel VBA Loops
Loops are an essential part of Visual Basic for Applications and (more generally) any programming language.
From a general perspective, the main beauty of Excel VBA loops is the fact that, as explained above, they allow you to repeatedly execute certain statements. In other words: Loops allow you to repeat a task several times.
The (main) reason you need loops for these purposes is that Visual Basic for Applications is a sequential programming language. As a consequence of this, statements are generally executed in order, line-by-line, from top to bottom. VBA includes some structures that allow you to control the flow of the program (such as If… Then… Else statements). However, as a general matter, the construct that you should usually use to repeat statements is an Excel VBA loop.
Among other things, Excel VBA loops allow you to loop through all the elements within a particular group, and work with each of those elements. Some of the groups you may want to work with in such a manner include: (i) ranges of cells, (ii) open workbooks, (iii) worksheets within a workbook or within all currently open workbooks, (iv) elements of an array, (v) characters within a cell, or (vi) charts on a worksheet or workbook.
From a theoretical standpoint, you could repeat an action by repeating the relevant VBA code as many times as necessary. In most cases, it’s better to use a loop to repeatedly execute the statements (as required).
The following are some advantages of using loops instead of simply repeating blocks of code:
- Advantage #1: Loops allow you to create shorter VBA procedures.
- Advantage #2: Macros that use VBA loops are, generally, more readable and easier to test, debug, maintain or modify than macros that repeat the same block of code several times.
- Advantage #3: Looping structures are significantly more flexible, particularly when it comes to determining the number of times the execution of the statements is repeated.
The main reason why Excel VBA loops are extremely useful is their speed. Loops are significantly faster than manually repeating a task several times.
This isn’t to say that you should never repeat blocks of code in your VBA procedures. I’m aware that learning about loops requires time, although you’re already reading this Excel tutorial which provides all the information you need to start working with loops.
Furthermore, in certain (very basic) situations, the amount of up-front work required to craft a good loop may not be justified by the time you’ll save later. In other words, there may be some (very basic) situations, in which limited repeating of blocks of code may be more efficient than using loops. This may the case with procedures that meet some or (preferably) all of the following conditions:
- Condition #1: Are very short.
- Condition #2: Repeat a small number of actions.
- Condition #3: Have a low and fixed number of repetitions.
In such cases, the VBA code will be longer and (slightly) more difficult to maintain. These issues are (usually) not a big problem when working with short/simple VBA procedures.
In the end, it comes down to a cost-benefit analysis. You must determine whether the amount of up-front work required by a loop is (or isn’t) worth it in the long run.
Despite these exceptional cases where looping may not be as efficient, the fact is that using Excel VBA loops can help you improve your speed when working with Excel.
As you’ll see in this Excel tutorial, they’re not exaggerating.
In addition to the usefulness of Excel VBA loops, there’s another reason why learning about the programming aspects behind these constructs is important:
The macro recorder doesn’t record loops. Therefore, if you want to use loops in your VBA code, you must know the code behind them.
All of this doesn’t mean that you should start using loops whenever you can. Using loops inappropriately can slow down your code. Therefore, you shouldn’t always use loops while working with Visual Basic for Applications. There are (for example) several cases where you can avoid loops by using worksheet functions in VBA.
However, if you’re serious about Visual Basic for Applications, you’ll eventually need to learn about (and work with) loops. Furthermore, in order to be able to determine whether a loop is the appropriate structure to use in a particular situation, you must understand what a loop is and what are the different types of loops you can use.
Therefore, let’s take a look at the main types of loops that you can use while working with Visual Basic for Applications:
For… Next Excel VBA Loops
For… Next Excel VBA loops are perhaps the most basic type of VBA loop. They’re generally considered to be the most commonly used Excel VBA loop. Their purpose is to repeat a particular group of statements a certain number of times.
Let’s take a look at the basic syntax of the For… Next Excel VBA loop. Items within square brackets ([ ]) are generally optional.
For counter = start To end [Step step]
    [statements]
    [Exit For]
    [statements]
Next [counter]
The following are some situations (along with samples of the appropriate VBA code) where you may find For… Next Excel VBA loops helpful:
- Looping through worksheets for purposes of, for example, saving each worksheet as a separate PDF file as explained in the linked blog post from Power Spreadsheets.
- Looping through array items.
- Looping through an entire column.
- Looping through rows for purposes of deleting those that are empty, using the fourth sample macro in this Power Spreadsheets VBA tutorial.
Now, let’s take a look at the main items within this looping structure:
Item #1: Counter
This is, perhaps, the key item of any For… Next loop. The reason is quite straightforward:
For… Next Excel VBA loops repeat statements a certain number of times. Therefore, you need to keep track of the number of times the statements have been executed. You use a loop counter for these purposes.
In other words, the counter controls the looping carried out by a For… Next loop.
The loop counter is simply a normal numeric variable. The loop counter can’t be a Boolean or an array element.
A consequence of the fact that the loop counter is a normal variable is that you can change its value within the For… Next block of code.
However, even though you can change the value of the counter while you’re inside the For… Next loop itself, this isn’t generally advisable (and it’s usually considered to be a poor coding practice). Changing the value of the loop counter in such a way makes your VBA code less readable, more difficult to debug, and may have difficult to predict consequences.
So, to put it simply:
Make sure that your VBA code doesn’t change the value of the counter variable within the For… Next loop itself. Be extra careful about this.
Notice that, within the basic syntax of the For… Next loop, [counter] appears in 2 different positions:
- On the opening statement, after the For keyword.
- This instance of the counter is required.
- At the end of the For… Next loop, after the Next keyword.
- This instance of the counter is optional. If you omit the loop counter in this position, the VBA code is executed as if counter is anyway included.
- In some cases (such as when nesting loops, a topic I cover below), it may be advisable to include this second counter.
When working with Visual Basic for Applications, you’ll often see that the loop counter variable is given a very short name, such as “i”, “j”, “k” and so on. This convention has its origins in the fact that (in the past) using longer names was more inconvenient. This (however) is no longer the case.
As a consequence of the above, you don’t have to continue using the traditional counter variable naming convention when working with Excel VBA loops. In this blog post, I explain the rules that apply to variable naming within VBA and provide some suggestions and ideas about how you can name your variables.
Item #2 And Item #3: Start and End
The loop counter (item #1 above) allows your VBA code to keep track of the number of times the relevant statements have been executed.
Items #2 (start) and #3 (end) allow your VBA code to determine the initial and final values that the counter must take. In other words, these items determine the values at which the counter variable starts and stops.
The value for start doesn’t necessarily need to be smaller than the value for end. In other words, you can structure your loops using either of the following:
- A start value that is smaller than the end value (start < end).
- A start value that is larger than the end value (start > end).
- As I show below, this is very helpful in cases where you need the loop to run backwards.
When determining the starting and ending values of the looping counter, you’re not limited to just using hard-coded values. You can also use variables for these purposes. Additionally, these items can be:
- Hard-coded;
- Passed from either an input or a dialog box; or
- Passed from a value generated by a VBA procedure, including both the same procedure where the loop is or a different procedure.
When using variables, however, you should probably exercise additional caution.
The last main item your For… Next VBA loop needs in order to be able to accurately execute the relevant statements the number of times you want is…
Item #4: Step
By now, you know that a For… Next Excel VBA loop needs a loop counter (item #1 above). You also know that you need to determine the initial and final values that this particular counter takes (items #2 and #3 above).
The optional Item #4, step, allows you to determine the way in which the loop counter changes every time the statements within the For… Next loop are executed. In other words: Step is the amount by which the counter changes each time/iteration.
By appropriate use of the step you can, among other things, skip some of the values of the loop counter.
To make the concept of step clearer, imagine that you must start counting at 1 and stop when you reach 100. In VBA terms, 1 is the start counter value (item #2 of a For… Next loop) and 100 is the end counter value (item #3 of the For… Next loop).

If you’re like me, you’d probably start counting in order: 1, 2, 3, 4, 5, … and so on until you reach 100.
This way of counting may be correct. However…
There are other ways in which you can start counting at 1 and stop when you reach 100. Just to give you some examples:
- You can count by twos (2, 4, 6, 8, …, 100). You could make a further distinction between counting by even and counting by odd (1, 3, 5, 7, 9, …, 99) numbers.
- You can count by fives (5, 10, 15, 20, 25, …, 100).
- You can count by tens (10, 20, 30, 40, …, 100).
- And so on… You probably get the idea.
The For… Next Excel VBA loop works roughly like this. In other words:
- The step item determines how the loop counter changes every time an iteration is completed.
- Despite the above, you don’t need to explicitly determine a step value. If you don’t specify the step, the default value is 1.
- You can, however, set different values for step. In fact, step can be both a positive or a negative number.
- As I explain below, using a negative value for step can be very useful in certain circumstances where you need the loop to run backwards.
The step of a For… Next VBA loop plays a very important role for purposes of loop processing. I explain its specific impact further below.
Item #5: Statements
These are simply the statements that are executed the relevant number of times. Even though statements are an optional item, it’s likely that the For… Next VBA loops you create will include them.
As a general rule, there’s no restriction on the number of statements that you can have within a loop (including a For… Next loop).
Additionally, as I explain below, you can nest For… Next loops within other For… Next loops.
Item #6: Exit For Statement
Exit For statements are generally optional. The Exit For statement is a specific type of Exit statement.
Exit statements allow you to exit a block of code. In the case we’re analyzing the block of code you’re exiting is that of the For… Next loop.
In broad terms, you can use the Exit For statement for purposes of exiting (or terminating) a For… Next loop. If the relevant For…Next VBA loop isn’t nested, an Exit For statement transfers control to the statement that follows the Next keyword of the For… Next loop.
How Does The For… Next Excel VBA Loop Work
Let’s start by taking a broad look at the process followed by the For… Next Excel VBA loop:

And let’s take a more specific look at the 5 basic steps that the For… Next loop goes through before exiting the loop:
Step #1: Determine Whether Statements Must Be Executed
When working with a For… Next loop, Visual Basic for Applications must always determine whether the statements within the For… Next loop must be executed. This is done by comparing (i) the current value of the loop counter with (ii) the end value of the counter.
The rules for determining whether the statements should be executed or not depend on whether the value of step is positive or negative:
- If step is a negative value, the statements in the loop are executed as long as the loop counter is larger than or equal to the end value of the counter. Mathematically, the loop is executed if “counter >= end”.
- If step is non-negative (positive or 0), the statements within the loop are executed as long as the loop counter is smaller than or equal to the end value. In this case, the loop is executed if “counter <= end”.
As you can see, the value of step plays a key role in the process followed by a For… Next loop.
The first time the logical tests described above are carried out (when Visual Basic for Applications enters the loop for the first time), the starting value is assigned to the loop counter. For the subsequent iterations, the relevant counter value is determined in accordance with step #3 below and, therefore, depends on the value of the step.
If the conclusion reached after applying the logical tests explained above is that the statements shouldn’t be executed, the macro exits the For… Next loop. Upon exiting the For… Next loop, execution control generally goes to the statement after the Next keyword.
However, if the conditions for executing the statements again are met, the For… Next loop moves onto…
Step #2: Execute Statements
The statements within a For… Next Excel VBA loop are executed a certain number of times.
Therefore, if VBA determines that the statements within the loop must be executed according to the criteria explained in step #1 above, the macro executes the statements.
Step #3: Add Step To Counter
You already know that the main items that Visual Basic for Applications uses to determine whether the statements within a For… Next VBA loop must be executed are (i) the loop counter and (ii) the end value of the counter.
The first time the statements are executed, the value of the loop counter is its initial value. You determine this value through the start item I explain above.
Every time the statements are executed, the step is added to the counter. As I explain above, the default value of step is 1. However, as you’ve seen, you can specify other values regardless of whether they’re positive or negative.
Step #4: Repeat Step #1
Once step has been added to the loop counter in step #3, the VBA application must determine (once again) whether the loop must be executed. This means that step #1 above is executed again.
For Each… Next Excel VBA Loop
You can use the For Each… Next Excel VBA loop for purposes of repeating the execution of certain statements for each element within a particular array or collection. In broad terms:
- Arrays are sets of values that have a logical relationship between them.
- Collections are groups of related objects.
The For Each… Next Excel VBA loop is a very helpful construct for purposes of manipulating arrays and collections. The For Each… Next loop (and similar constructs such as the With… End With statement) can help you simplify your VBA code when working with objects and collections.
You’ll probably notice that, in some respects, the For Each… Next Excel VBA loop is materially similar to the For… Next loop that I explain above. One of the main advantages of the For Each… Next loop, when compared with the For… Next loop, is that the For Each… Next loop allows you to work with an array or collection without knowing the number of elements within the relevant array or collection. In other words: You don’t have to know the number of loop iterations in advance because VBA will know the number of loop iterations at execution time.
The basic syntax of the For Each… Next loop is as follows. Items within square brackets are optional.
For Each element In group
    [statements]
    [Exit For]
    [statements]
Next [element]
If you’re interested in some practical applications of the For Each… Next VBA loop, the following list may interest you:
- To delete blank rows, you can use macro #5 here, which I explain in another blog post within Power Spreadsheets.
- To loop through a Range, refer to the very simple example I include in this VBA tutorial.
- To modify all open workbooks, and using a loop to go through them.
- To go through every worksheet within every open Excel workbook.
- To loop through (and make changes to) all the graphs within the active Excel workbook.
- To change all tables within an Excel workbook or worksheet, and use loops to go through them.
- To loop through (among others) PivotTables, Shapes, Combo Boxes, Checkboxes, Option Buttons, Buttons (Form Control), Textboxes (ActiveX), Command Buttons (ActiveX) or Toggle Buttons (ActiveX).
Let’s take a closer look at each of the elements within the syntax of a For Each… Next loop:
Item #1: Element
Element makes reference to the variable that the loop uses to iterate through all of the elements within the relevant group. In order for VBA to enter a For Each… Next Excel VBA loop, there must be at least one element within the group that is being used.
There are some restrictions that apply when determining which data types you can use for the element variable. More precisely, which data types can you use is mainly determined by the characteristics of the group you’re looping through. The main restrictions you should remember for these purposes are the following:
- If the group is a collection: You can only use (i) Variant variables, (ii) generic object variables, or (iii) specific object variables.
- If the group is an array: You can only use Variant variables.
In practice, you’re more likely to encounter object variables when working with For Each… Next loops.
In certain respects, the element item within a For Each… Next loop serves a similar purpose as the loop counter in a For… Next loop. More precisely, and as I explain below, element (item #1) and group (item #2) are used by Visual Basic for Applications to determine whether the statements within the For Each… Next loop should be executed.
If you omit the last element (which appears after the Next keyword), macro execution continues as if the element is included. In other words:
- The first instance of element (on the opening statement) is required.
- The last instance of element (at the end of the loop) is optional.
- However, in some cases (such as when nesting loops), you may want to get used to including this instance of element.
Item #2: Group
As anticipated above, group represents the group of elements that you’re looping through.
As a general rule, groups can be either (i) object collections or (ii) arrays. As an exception to this rule, you can’t use arrays of user-defined types. The reason for this is that a Variant variable can’t contain a user-defined type.
Item #3: Statements
Statements are the actual statements that Excel executes for each of the items within the group that you’re working with.
Theoretically, statements are optional. In practice, most of the For Each… Next Excel VBA loops you create will include at least one statement.
Generally, you can include as many statements as you want. Furthermore, you can nest For Each… Next loops within other loops.
Item #4: Exit For Statement
The Exit For statement is optional. This statement is a specific form of the more general Exit statement.
The Exit statement by itself allows you to exit a block of, among others, For Each… Next, Function or Sub code.
You can use the Exit For statement to exit a For Each… Next loop. This is particularly useful, for example, in cases where you don’t need the loop to go through all the elements in the group.
If you use the Exit For statement within a For Each… Next Excel VBA loop, the way in which the code determines to which other statement it transfers control depends on whether the For Each… Next loop is nested or not. More precisely:
- If the For Each… Next loop is nested within other loop(s), the Exit For statement transfers control to the loop that is immediately one level above.
- If the loop isn’t nested, control is transferred to the statement that follows the Next keyword.
How Does The For Each… Next Excel VBA Loop Work
The previous sections give you a good idea of what is the basic structure and elements of the For Each… Next Excel VBA loop. Let’s take a closer look at how this structure and elements work together to achieve the purpose of repeating the execution of the statements for each element within the group.
From a broad perspective, a For Each… Next Excel VBA loop proceeds as follows:

Let’s take a look at the 5 broad steps that a For Each… Next Excel VBA loop goes through before exiting the For Each… Next loop:
Step #1: Enter The For Each Block
The first part of a For Each… Next Excel VBA loop is the For Each block.
A macro only enters this For Each block if there is at least one element in the applicable group.
Therefore, if the group that you’re working with has at least one element, the application enters the For Each block. Once this occurs, the code continues to…
Step #2: Execute Statements For First Element In Group
After the code has entered the For Each block, the macro starts executing all of the statements for the first element within the group.
However, since the main purpose of this loop is to repeat the execution of the statements for each of the elements within the relevant array or collection, this step #2 by itself isn’t enough to achieve that goal. The following steps are the ones that actually carry out the looping.
Step #3: Determine Whether There Are More Elements In Group
Once all of the statements have been executed for a particular element within the group, the For Each… Next loop looks to determine whether there are more elements in the group.
If there are no other elements within the group, the macro exits the For Each… Next loop. Once the macro exits the loop, it generally continues with the statement that follows the Next statement of the For Each… Next loop.
However, if the group contains more elements, the macro goes on to…
Step #4: Execute Statements For Next Element In Group
Notice how this step is pretty much a repetition of step #2 above. The key difference is that the element for which all of the statements are applied changes as the loop progresses.
Step #5: Repeat Step #3
From a general perspective, a For Each… Next Excel VBA loop simply (i) goes through all of the elements within the group and (ii) executes the statements for each of those elements. Therefore, step #3 above is the key in determining whether the loop continues or stops.
In other words, every single time the statements are executed for a certain element within the group, the macro checks whether there are elements left within the group (step #3). If there are still elements, the statements are executed for the next element and the loop continues.
Eventually (assuming your For Each… Next VBA loop is properly structured), the macro will get to the last element in the group. As explained above, once the applicable VBA statements are executed for the last group element, and there aren’t any other elements left, the macro:
- Exits the For Each… Next loop; and
- Generally, continues execution with the statement that follows the Next statement (that is at the end of the For Each… Next loop).
Do While And Do Until Excel VBA Loops
Do While and Do Until Excel VBA loops are 2 versions of the same VBA construct: the Do… Loop statement. Their purpose is to repeat a certain statement (or block of statements) subject to a condition being met. More precisely:
- The Do While Excel VBA loop repeats the relevant statements while a condition is met (True). Once the condition isn’t met (becomes False), Visual Basic for Applications exits the loop.
- The Do Until Excel VBA loop repeats the statements until the condition is met (becomes True). In other words, the statements are repeated as long as the condition isn’t met (False).
As you can see, Do While and Do Until VBA loops are substantially similar. Their main difference is that (i) Do While loops run while the condition is True, while (ii) Do Until loops do the opposite and run while the condition is False.
In other words: The main difference (between Do While and Do Until loops) is in how they handle the tested condition. In fact, both approaches are functionally similar (or even the same). In this context, the choice between one loop or the other (usually) boils down to how you want to manage/structure the applicable condition.
To understand the above, consider the 2 following structures, which generally lead to the same result:
- Set a condition that evaluates to True and use a Do While loop. Once the condition evaluates to False, your code exits the loop.
- For a real life example, imagine that on any particular day you sit down to work and say: “I will work while it’s daytime”. In such a case, you work while it’s daytime (the condition is True) and, once the condition evaluates to False (it’s no longer daytime), you stop working.
- Set the opposite condition and use a Do Until loop. Once the condition evaluates to True, Visual Basic for Applications exits the loop.
- Going back to the real life example above, in this case you’d say “I will work until it’s night-time”. In this situation, you work while the condition is False (it’s not night-time) and, once the condition evaluate to True (it’s night-time), you stop working.
Do Until and Do While are, to a certain extent, simply opposite ways of stating the same condition.
Let’s begin the exploration of these loops by taking a look at the basic syntax of the Do… Loop statement:
Unlike other loops that I explain in this Excel tutorial, you have 2 alternatives for structuring Do While and Do Until loops. In both cases, the items within square brackets ([ ]) are optional.
Do While And Do Until Excel VBA Loops: Syntax #1
Do [{While | Until} condition]
    [statements]
    [Exit Do]
    [statements]
    Loop
Do While And Do Until Excel VBA Loops: Syntax #2
Do
    [statements]
    [Exit Do]
    [statements]
Loop [{While | Until} condition]
Why Are There 2 Syntax Options For Do While And Do Until Excel VBA Loops
Notice that both syntax options are substantially similar. The only real difference lies in the position of “[{While | Until} condition]”.
- In syntax option #1: “[{While | Until} condition]” appears on the opening statement.
- In syntax option #2: “[{While | Until} condition]” appears at the end of the loop.
- Some authors refer to these loops as Do… Loop While or Do… Loop Until.
The position of “[{While | Until} condition]” is relevant because this is the point at which the condition that determines whether the statements within the loop must be executed 1 more time or not is evaluated. In particular:
- In syntax option #1, the statements inside the loop may never be executed.
- In syntax option #12, the statements inside the loop are always executed (at least 1 time).
These differences allow you to determine whether (i) the statements within the loop shouldn’t be executed in certain circumstances (using syntax #1), or (ii) the loop should always be executed the first time around (using syntax #2). These options provide you even greater flexibility for structuring your Excel VBA loops.
The usefulness of the second syntax may not be evident at first. You may wonder in which situations you’d want to execute the statements before checking whether the relevant condition is met…
The second syntax of Do While and Do Until VBA loops is useful when you have to:
- Carry out a particular action at least once; and
- Repeat the action, subject to some condition.
So don’t dismiss the second syntax of Do While and Do Until loops. You’re likely to eventually run into situations where they may help you.
In fact, the situations where you take an action first, and check whether the condition is met later (to determine whether you need to repeat the action) aren’t uncommon in programming.
As you can see, the syntax choice you make when working with for Do While and Do Until loops have a material impact in the way your loops work. They’re not simply cosmetic differences.
Understanding these differences is important to ensure that you know which version of a Do While or a Do Until loop is more appropriate for any particular situation you may face. However, if the difference between the syntax options for Do While and Do Until loops isn’t yet perfectly clear, don’t worry. I show you how these loops proceed (step-by-step) below.
But first, let’s take a look at the basic items that go in a Do While and a Do Until VBA loop. Notice how, despite the different syntax alternatives, these basic items remain the same.
Item #1: {While | Until}
The structure of the Do Until and Do While Excel VBA loops is substantially similar.
However, notice that, in both of the syntax options I describe above, there are curly brackets surrounding the words While and Until ({While | Until}). Here, you must state whether you’re creating a Do While or a Do Until loop by choosing the appropriate word from within the curly brackets ({ }) or, what is the same, delete the word that corresponds to the type of Do… loop that you aren’t creating.
In other words, if you’re using the first syntax option, the actual first statement (Do [{While | Until} condition]) you should use is determined as follows:
- Do While loop: Do [While condition].
- Do Until loop: Do [Until condition].
Similarly, if you’re using the second syntax option, the actual last statement (Loop [{While | Until} condition]) you should use is as follows:
- Do While loop: Loop [While condition].
- Do Until loop: Loop [Until condition].
Item #2: Condition
A condition can be structured as either of the following:
- A numeric expression, which is an expression that can be evaluated as numbers.
- A string expression, which is an expression that evaluates to a sequence of contiguous characters.
The condition must return one of the Boolean values: True or False. Null is treated as False.
From a theoretical standpoint, both items #1 and #2 are optional. However, omitting them can have undesirable consequences, as I explain below.
Item #3: Statements
As in the other types of loops that I explain in this Excel tutorial, these are simply the statements that are repeatedly executed. In the case of Do While and Do Until VBA loops, these are the statements that are executed while (in the Do While loop) or until (in the Do Until loop) the condition is met (True).
Item #4: Exit Do Statement
The Exit Do statement holds some similarities with the Exit For statement that you can use within the For Each… Next and For… Next loops. For example:
- The Exit Do statement is one of the forms of the more general Exit statement.
- You can use an Exit Do statement to create an alternate way to exit the relevant loop.
- You can generally place Exit Do statements anywhere within a Do While or Do Until loop. However, the Exit Do statement is often used after evaluating a condition (with, for example, an If… Then… Else statement).
As a general rule, the Exit Do statement exits a Do While or Do Until loop by transferring control to the statement that follows the Loop. However, if you have a nested Do While or Do Until loop, control is transferred to the loop nested one level above the current loop (the one where the executed Exit Do statement is).
How Do The Do While And Do Until Excel VBA Loops Work
By now, you probably have a good idea of how the different types of Do While and Do Until loops work. However, just as with the For… Next and For Each… Next loops, let’s take a look at the actual process carried out by each of the different Do While and Do Until loops:
Do While Excel VBA Loop: Syntax #1
The Do While loop (syntax #1, where the opening statement is “Do While condition”) proceeds as follows:

The 3 steps that the Do While loop follows (before exiting the loop) are the following:
Step #1: Test Whether Condition Is True.
I explain how you can use 2 different syntaxes for purposes of creating Do While loops above. The main difference between both syntax options is the point at which the condition that determines whether the loop must be executed one more time or not appears.
If you use the first syntax that I explain above, the opening statement of the Do While loop is “Do While condition”. In this case, the condition that determines whether the statements within the loop is executed is tested at the beginning.
In a Do While loop, the relevant statements are executed as long as the condition is True. Therefore:
- If the condition evaluates to False, the loop ends and control passes (usually) to the VBA code that appears immediately below the loop.
- If the condition evaluates to True, Visual Basic for Applications proceeds to…
Step #2: Execute The Statements.
The statements within the Do While loop are executed if the condition (evaluated in step #1 above) continues to be True.
Execution of the statements continues until Visual Basic for Applications encounters the Loop keyword at the end of the Do While VBA loop. At this point, it goes onto…
Step #3: Loop.
Once all the statements within the Do While loop have been executed, Visual Basic for Applications loops. In other words, VBA goes back to step #1 above and tests whether the condition continues to be True.
Now, compare this process with that followed by the second syntax option for the Do While Excel VBA loop. This should clear up any doubts you have regarding the procedural differences between the 2 types (syntaxes) of the Do While loop.
Do While Excel VBA Loop: Syntax #2
In the second syntax option of a Do While VBA loop, the closing statement (“Loop While condition”) is the one checking whether the required condition is met. As I explain above, these loops are sometimes referred to as Do… Loop While loops.
The following image illustrates the process followed by this type of Do While Loops:

The 3 steps followed by this type of Do While loop are substantially the same as those I describe above. The main difference is the order in which the steps are carried out.
Let’s go through each of the steps followed by a Do While when the second syntax is used:
Step #1: Execute The Statements.
When you use the second syntax for a Do While loop, the relevant condition is only tested at the end of the loop.
Therefore, regardless of whether the condition is True or False, the statements within the loop are executed. In other words, as explained above, the statements within a Do While loop that uses the second syntax (also known as a Do… Loop While loop) are always executed at least 1 time.
Once the statements are executed, Visual Basic for Applications proceeds to…
Step #2: Test The Condition.
Within this type of Do While loop, all of the statements are executed until Visual Basic for Applications encounters the statement “Loop While condition”.
At this point, the relevant condition is tested. The way in which execution continues depends on whether the condition is True or False. More precisely:
- If the condition is False, Visual Basic for Applications exits the loop. In such a case, execution usually continues with the statement following “Loop While Condition”.
- If the condition is True, VBA goes on to…
Step #3: Loop.
If the relevant condition is True, Visual Basic for Applications loops. In other words, as long as the condition being evaluated continues to be True, Visual Basic for Applications returns to step #1 above and repeats the loop.
Do Until Excel VBA Loop: Syntax #1
The difference between the 2 syntax options for a Do Until loop roughly mirrors the difference between the 2 alternatives for a Do While loop.
Let’s start by taking a look at the process followed by the first version of a Do Until VBA loop:

Notice that, this process, is substantially the same as that followed by the Do While loop (using syntax #1) that I explain above. The main difference, as explained above, is in the handling of the tested condition which is done in…
Step #1: Test Whether Condition Is False.
A Do While loop runs as long as the tested condition is True. Therefore, the question asked in step #1 of a Do While loop is whether the condition is True.
A Do Until loop asks the opposite question:
Is the condition False?
In other words, a Do Until loop tests the condition (just as a Do While loop does). However, once the condition is tested, a Do Until loop proceeds in the opposite way in which a Do While loop does. More precisely:
- If the condition is True, it exits the loop. Execution then, generally, continues with the statement following the Loop keyword.
- If the condition is False, it carries on with…
Step #2: Execute Statements.
In step #2, a Do Until loop simply executes the statements within its body. In other words, all of the statements before the Loop keyword are executed.
Once Visual Basic for Applications encounters the Loop keyword, it goes on to…
Step #3: Loop.
Once all of the statements within a Do Until loop have been executed, a Do Until loop returns to step #1.
Let’s finish the section about Do While and Do Until Excel VBA loops by taking a look at the second possible syntax of Do Until loops. Just as you did with Do While loops, compare the 2 syntax options you can use when working with Do Until loops.
Do Until Excel VBA Loop: Syntax #2
When working with a Do Until VBA loop using syntax #2 (also known as a Do… Loop Until loop), the statement that checks the relevant condition (Loop Until condition) is at the end of the loop. Therefore, the process followed by this type of loop is as follows:

Let’s go through the 3 main steps that this version of Do Until loop goes through before exit:
Step #1: Execute Statements.
When using the second syntax option of a Do Until loop, the statements within the loop are always executed at least 1 time. Therefore, upon entering the loop, Visual Basic for Applications executes all the statements prior to the closing loop statement (Loop Until condition).
Once the statements are executed, VBA goes on to…
Step #2: Test The Condition.
Do Until loops execute a series of statements as long as the relevant condition is False. Therefore, once VBA encounters the “Loop Until condition” statement, it tests the relevant condition and:
- If the condition evaluates to True, exits the loop. Upon exiting this type of loop, execution usually continues with the statement that follows “Loop Until condition”.
- If the condition evaluates to False, it goes onto to…
Step #3: Loop.
When looping, Visual Basic for Applications goes back to step #1 above.
In other words, as long as the condition evaluated in step #2 is False, VBA continues to go back to step #1 for purposes of executing the statements within the Do Until loop.
While working with Visual Basic for Applications, you’re likely to work most of the time with the loops that I describe above, namely:
- For… Next loops.
- For Each… Next loops.
- Do While and Do Until loops (each having 2 versions).
These, however, aren’t the only ways to create loops in Visual Basic for Applications, although they’re generally the most appropriate. Since you may eventually encounter other type of looping constructs, let’s take a look at 2 alternative looping structures, starting with…
Do… Excel VBA Loops and Avoiding Infinite Loops
In the section above, I introduce Do While and Do Until VBA loops.
As I explain in that section, the keywords While or Until and the condition items are optional.
This means that, strictly speaking, Do… loops don’t have to be Do While or Do Until loops. In other words, you can theoretically use the 2 syntaxes below to create looping structures.
However, as I explain further down this Excel tutorial, neither of these structures is really recommended nor necessary.
Do… Excel VBA Loops: Syntax #1
Do
    [statements]
    [Exit Do]
    [statements]
Loop
Do… Excel VBA Loops: Syntax #2
Do
    [statements]
    [Exit Do]
    [statements]
Loop
Notice that both of these structures are exactly the same as those I explain above when introducing the Do While or Do Until loops with a big exception:
Neither of them includes the optional (i) While or Until keywords or (ii) condition ([{While | Until} condition]).
These absences have big consequences.
As I explain above, in Do While or Do Until loops a certain group of statements is executed repeatedly while or until a particular condition is met. In the absence of these items ({While | Until} condition), there’s no mechanism to stop the looping procedure. In other words: The Do… Loop runs forever because nothing stops it from doing so.
This is sometimes called an infinite loop.
You can actually stop the execution of a such a macro by, for example:
- Pressing the keyboard shortcuts “Ctrl + Break”, although some computer may require different key combinations.
- Use Windows’ Task-Manager (keyboard shortcut “Ctrl + Alt + Del”) to shut down Excel.
- Restart your computer.
However, as I explain in the previous sections of this Excel tutorial, there are better ways to stop the looping.
One option, is to use (i) If… Then… Else statement to carry out conditional tests and determine whether certain conditions are met and, based on the result of the logical test, (ii) continue looping or use the Exit Do statement (which I explain below) to exit the Do… Excel VBA loop.
In most cases, however, the simplest option is likely to stick to Do While and Do Until loops. These constructs allow you to easily determine when Visual Basic for Applications should exit the relevant loop. Therefore, the appropriate use of the Do While and Do Until loops should allow you to achieve the same objectives as an unrestricted Do… VBA loop without the added complexity.
And finally, always ensure the applicable condition (that terminates at loop) will eventually be satisfied. This comment is applicable to other types of Excel VBA loops (not only the Do… loop), particularly Do While loops.
While… Wend Excel VBA Loops
You’ve already seen several different types of Excel VBA loops in the previous sections:
- For… Next loops.
- For Each… Next loops.
- Do While and Do Until loops.
- Do… loops.
There is, however, an additional looping structure that doesn’t appear in this list: The While… Wend loop.
The term “Wend” is a contraction of While… End.
The While… Wend loop exists mainly for compatibility purposes with earlier languages. Therefore, this type of Excel VBA loop is relatively rare and you’re unlikely to work (or find it) too frequently while working with Visual Basic for Applications.
In fact, instead of using While… Wend loops, you’re probably better off using the Do While and Do Until loops that I introduce above. In particular, the general Do… Loop structure is more robust and flexible (than the While… Wend loop). In particular, as you’ll notice below:
- When using the While… Wend Excel VBA loop, you don’t have the possibility of specifying whether the condition should be tested at the beginning or at the end of the loop. As I explain above, Do While and Do Until loops allow you to do this.
- When using Do While and Do Until loops, you can use the Exit Do statement to create alternate exits to the loop. The While… Wend looping structure isn’t as flexible in this regard.
However, the While… Wend looping structure exists and works (if you choose to use it). Therefore, to the extent that you may still encounter it, I might as well introduce it in this Excel tutorial about VBA loops.
The main purpose of the While… Wend VBA loop is to execute certain statements as long as a particular condition is True. Once the condition isn’t met (becomes False), VBA exits the loop.
The basic syntax of the While… Wend loop is as follows:
While condition
    [statements]
Wend
The items within this type of statement may look familiar. After all, they’re substantially similar to some of the elements in the other type of VBA loops that I describe further above. In any case, let’s take a look at those items:
Item #1: Condition
The condition within a While… Wend loop is a numeric or string expression evaluating to either True or False. Similar to what happens with the Do While and Do Until loops, if condition is Null, Visual Basic for Applications treats it as False.
Item #2: Statements
These are the actual statements that Visual Basic for Applications executes repeatedly while the condition is True.
After understanding the basic elements and purpose of the While… Wend statement, we can dive into the actual process followed by this type of Excel VBA loop:
How Does The While… Wend Excel VBA Loop Work
The following diagram illustrates the basics of how the While… Wend loop proceeds:

Notice how this process is materially similar to that followed by the Do While VBA loop I explain above.
The following are the 3 main steps within this process:
Step #1: Check Whether Condition Is True
The main purpose of the While… Wend VBA loop is to execute certain statements as long as the applicable condition is True. Therefore, the process begins by checking whether the condition is actually True.
If the condition isn’t True, Visual Basic for Applications exits the loop. In such cases, execution generally continues with the statement that appears after “Wend”.
If the condition is indeed True, the VBA code proceeds to…
Step #2: Execute All Statements
If the condition within the While… Wend loop is True, all of the statements within the loop are executed.
Execution goes on until the VBA code encounters the Wend statement. At that point, the code goes on to…
Step #3: Repeat Step #1
Once the Wend statement is encountered, control goes back to the While statement that opens the While… Wend loop (step #1 above). This allows the code to check (again) whether the condition continues to be True.
Excel VBA Loops: The Exit Statement And Nesting
As with most VBA constructs, once you understand the basic steps of Excel VBA loops, you can start creating more complex and sophisticated loops. Let’s take a look at 2 common ways you can start doing this:
Excel VBA Loops And The Exit Statement
As explained above, the Exit For statement allows you to exit a For Each… Next or For… Next loop while the Exit Do statement allows you to exit a Do While or Do Until loop. In other words, once Visual Basic for Applications encounters the statement, the relevant loop is immediately terminated.
Note that you can’t use the Exit statement to exit a While… Wend Excel VBA loop.
The usual way of exiting loops is the one I explain in the relevant sections above. More precisely:
- Visual Basic for Applications exits a For… Next loop when the current value of the loop counter variable is (i) larger than the end value of the counter (if the step is positive), or (ii) smaller than the end value of the counter if the loop counter runs backwards (the step is negative) (see step #1 of a For… Next loop above).
- A For Each… Next loop is exited once the relevant VBA statements are executed for the last group element (see steps #3 and #5 of a For Each… Next loop above).
- VBA code exits a Do While VBA loop when the relevant condition isn’t met any longer.
- Visual Basic for Applications exits a Do Until loop when the applicable condition is met.
By using Exit For or Exit Do statements you can create alternate exits when working with loops.
You may wonder why would you want to create an alternate exit to a loop…
One of the main reasons why you may want to use the Exit For or Exit Do statements to create an alternate exit to a loop is that it can greatly speed your code.
The truth is that, in some macros, you simply don’t need to go through the whole looping structure.
This is the case, for example, when you create VBA applications whose objective may be achieved without having to (i) wait until a condition becomes False (or True) in the case of Do While or Do Until loops, or (ii) loop through each element within a group in the case of For Each… Next loops. Consider, for example, a situation where you must find a single record meeting certain criteria. In such a case, once you find the specific record you’re looking for, you can exit/stop the loop.
Other situations where you may want to use the Exit statement include cases where your procedure is responding to an error or to the user cancelling the procedure.
This, however, doesn’t mean that you should use the Exit statement profusely.
To a certain extent, there’s debate regarding the use of the Exit statement and, more precisely, whether this is a good coding practice. Some advanced Excel VBA users argue that the optional Exit statement is rarely necessary. In fact, from this perspective, using the Exit For statement too often may be a sign that your approach to building/structuring loops could be improved.
In any case, the Exit statement exists. Some practitioners agree that there are cases (such as the 3 I mention above) where using the Exit statement is generally acceptable. This is the case with some advanced Excel VBA users who cannot justify continuing a loop after the loop’s objective has been met (for example, you’ve found what you need).
The use of the Exit statement is probably one of those topics where you’ll build your own opinion and practices as you go along. While doing so, you may want to keep in mind that this debate exists.
Personally, whenever working with VBA loops, I do the following:
- Use the Exit statement sparingly; and
- Ask whether I could structure a loop in such a way that allows me to avoid an unnecessary Exit statement.
As a general rule, there aren’t restrictions as to where you should place the Exit For or Exit Do statements. However, they’re usually included after carrying out a conditional test. One way in which you do this is by (i) using the If… Then… Else statement for purposes of checking whether a condition is met and, (ii) depending on whether the condition is met or not, using the Exit For or Exit Do statement to exit the Excel VBA loop.
Nesting Excel VBA Loops
For purposes of this VBA tutorial, nesting a loop means placing a loop within another loop.
You can generally nest loops within other loops. In these cases, a loop (the nested loop) runs within another loop (the outer loop).
As a general rule, you have a good amount of freedom when combining loops by nesting them. You can (for example):
- Nest For… Next or For Each… Next loops within other For… Next or For Each… Next loops.
- Nest For… Next or For Each… Next loops within Do While or Do Until loops.
- Nest Do While or Do Until loops within other Do While or Do Until loops.
- Next Do While or Do Until loops within For… Next or For Each… Next loops.
Even though you can nest loops within loops of a different type, you can’t overlap control structures. This means that each nested VBA loop must close/end with its outer nested level.
More generally, when nesting Excel VBA loops, you’ll probably want to be very organized and ensure that the structure of each loop is clearly differentiated. This allows you to, among others, guarantee that:
- The opening and closing statements of each loop match appropriately.
- For example, as explained in Microsoft’s Official Documentation for the case of While… Wend loops, each “Wend” matches the most recent “While”. Therefore, you want to ensure that the individual statements within your code are where they should be.
- Each element within a For Each… Next loop is unique.
- Each loop counter variable in a For… Next loop has a unique name (as it should be).
Some of the habits that may help you adequately organize the code of your nested Excel VBA loops and make it more readable are the following:
- Habit #1: Make adequate use of indentations. In the case of loops, the lines of code inside a loop have additional indentation.
- The settings of the Visual Basic Editor allow you to determine certain settings regarding code indentation. You can, for example, enable or disable the Auto Indent setting, which makes the indentation of each line of code equal to that of the previous line. You can also use these settings to determine the indentation width. The default tab width is 4 characters.
- Habit #2: When working with For… Next and For Each… Next VBA loops, include the second (and last) instance of the counter or element item.
- As I explain above, the last statement of For… Next loops is “Next [counter]” and the last statement of For Each… Next loops is “Next [element]”. In both cases, the item within square brackets ([ ]) is optional. However, including the counter or element helps improve readability and prevent bugs.
Further to the above, you may want to avoid generating too much complexity when nesting loops. If your VBA code includes too many levels of nested loops (according to some VBA authorities you can theoretically have up to 16 levels), it will likely be difficult to read, modify and maintain.
If you find yourself in the situation where a particular VBA application has too many nested loops, consider whether you can restructure that part of your VBA code for purposes of achieving the same goal using a less complex process.
Conclusion
After reading this Excel tutorial, you know all the basic concepts and information you need to start creating and implementing loops in your VBA applications and macros.
In addition to knowing what a loop is and what are its uses and advantages, you know what are the main looping structures that Excel supports and (out of those structures), which are the types of loops that you’re most likely to encounter and use in practice:
- For… Next loops.
- For Each… Next loops.
- Do While and Do Until loops.
In case you ever need it, you’re now also familiar with While… Wend loops, and understand what is a Do… loop and why you should take extra precautions to avoid infinite loops. Finally, you’ve seen 2 ways in which you can modify the way your loops proceed and add some complexity (as well as the reasons why you shouldn’t overdo this):
- The Exit statement.
- Nesting.
With all these knowledge, you’re ready to start creating amazing Excel VBA loops. You’ll probably start developing your own style and preferences about how to work with loops.