
Цикл For Each… Next в VBA Excel, его синтаксис и описание отдельных компонентов. Примеры использования цикла For Each… Next.
Цикл For Each… Next в VBA Excel предназначен для выполнения блока операторов по отношению к каждому элементу из группы элементов (диапазон, массив, коллекция). Этот замечательный цикл применяется, когда неизвестно количество элементов в группе и их индексация, в противном случае, более предпочтительным считается использование цикла For…Next.
|
For Each element In group [ statements ] [ Exit For ] [ statements ] Next [ element ] |
В квадратных скобках указаны необязательные атрибуты цикла For Each… Next.
Компоненты цикла For Each… Next
| Компонент | Описание |
|---|---|
| element | Обязательный атрибут в операторе For Each, необязательный атрибут в операторе Next. Представляет из себя переменную, используемую для циклического прохода элементов группы (диапазон, массив, коллекция), которая предварительно должна быть объявлена с соответствующим типом данных*. |
| group | Обязательный атрибут. Группа элементов (диапазон, массив, коллекция), по каждому элементу которой последовательно проходит цикл For Each… Next. |
| statements | Необязательный** атрибут. Операторы вашего кода. |
| Exit For | Необязательный атрибут. Оператор выхода из цикла до его окончания. |
*Если цикл For Each… Next используется в VBA Excel для прохождения элементов коллекции (объект Collection) или массива, тогда переменная element должна быть объявлена с типом данных Variant, иначе цикл работать не будет.
**Если не использовать в цикле свой код, смысл применения цикла теряется.
Примеры циклов For Each… Next
Цикл для диапазона ячеек
На активном листе рабочей книги Excel выделите диапазон ячеек и запустите на выполнение следующую процедуру:
|
Sub test1() Dim element As Range, a As String a = «Данные, полученные с помощью цикла For Each… Next:» For Each element In Selection a = a & vbNewLine & «Ячейка « & element.Address & _ » содержит значение: « & CStr(element.Value) Next MsgBox a End Sub |
Информационное окно MsgBox выведет адреса выделенных ячеек и их содержимое, если оно есть. Если будет выбрано много ячеек, то полностью информация по всем ячейкам выведена не будет, так как максимальная длина параметра Prompt функции MsgBox составляет примерно 1024 знака.
Цикл для коллекции листов
Скопируйте следующую процедуру VBA в стандартный модуль книги Excel:
|
Sub test2() Dim element As Worksheet, a As String a = «Список листов, содержащихся в этой книге:» For Each element In Worksheets a = a & vbNewLine & element.Index _ & «) « & element.Name Next MsgBox a End Sub |
Информационное окно MsgBox выведет список наименований всех листов рабочей книги Excel по порядковому номеру их ярлычков, соответствующих их индексам.
Цикл для массива
Присвоим массиву список наименований животных и в цикле For Each… Next запишем их в переменную a. Информационное окно MsgBox выведет список наименований животных из переменной a.
|
Sub test3() Dim element As Variant, a As String, group As Variant group = Array(«бегемот», «слон», «кенгуру», «тигр», «мышь») ‘или можно присвоить массиву значения диапазона ячеек ‘рабочего листа, например, выбранного: group = Selection a = «Массив содержит следующие значения:» & vbNewLine For Each element In group a = a & vbNewLine & element Next MsgBox a End Sub |
Повторим ту же процедуру VBA, но всем элементам массива в цикле For Each… Next присвоим значение «Попугай». Информационное окно MsgBox выведет список наименований животных, состоящий только из попугаев, что доказывает возможность редактирования значений элементов массива в цикле For Each… Next.
|
Sub test4() Dim element As Variant, a As String, group As Variant group = Array(«бегемот», «слон», «кенгуру», «тигр», «мышь») ‘или можно присвоить массиву значения диапазона ячеек ‘рабочего листа, например, выделенного: group = Selection a = «Массив содержит следующие значения:» & vbNewLine For Each element In group element = «Попугай» a = a & vbNewLine & element Next MsgBox a End Sub |
Этот код, как и все остальные в этой статье, тестировался в Excel 2016.
Цикл для коллекции подкаталогов и выход из цикла
В этом примере мы будем добавлять в переменную a названия подкаталогов на диске C вашего компьютера. Когда цикл дойдет до папки Program Files, он добавит в переменную a ее название и сообщение: «Хватит, дальше читать не буду! С уважением, Ваш цикл For Each… Next.».
|
1 2 3 4 5 6 7 8 9 10 11 12 13 14 15 16 17 18 19 20 21 22 |
Sub test5() Dim FSO As Object, myFolders As Object, myFolder As Object, a As String ‘Создаем новый FileSystemObject и присваиваем его переменной «FSO» Set FSO = CreateObject(«Scripting.FileSystemObject») ‘Извлекаем список подкаталогов на диске «C» и присваиваем ‘его переменной «myFolders» Set myFolders = FSO.GetFolder(«C:») a = «Папки на диске C:» & vbNewLine ‘Проходим циклом по списку подкаталогов и добавляем в переменную «a« ‘их имена, дойдя до папки «Program Files«, выходим из цикла For Each myFolder In myFolders.SubFolders a = a & vbNewLine & myFolder.Name If myFolder.Name = «Program Files» Then a = a & vbNewLine & vbNewLine & «Хватит, дальше читать не буду!» _ & vbNewLine & vbNewLine & «С уважением,» & vbNewLine & _ «Ваш цикл For Each... Next.« Exit For End If Next Set FSO = Nothing MsgBox a End Sub |
Информационное окно MsgBox выведет список наименований подкаталогов на диске C вашего компьютера до папки Program Files включительно и сообщение цикла о прекращении своей работы.
В результате работы программы будут выведены не только наименования подкаталогов, видимых при переходе в проводнике к диску C, но и скрытые и служебные папки. Для просмотра списка всех подкаталогов на диске C, закомментируйте участок кода от If до End If включительно и запустите выполнение процедуры в редакторе VBA Excel.
In this Article
- VBA Loop Quick Examples
- For Each Loops
- For Next Loops
- Do While Loops
- Do Until Loops
- VBA Loop Builder
- VBA For Next Loop
- For Loop Syntax
- For Loop Step
- For Loop Step – Inverse
- Nested For Loop
- Exit For
- Continue For
- VBA For Each Loop
- For Each Cell in Range
- For Each Worksheet in Workbook
- For Each Open Workbook
- For Each Shape in Worksheet
- For Each Shape in Each Worksheet in Workbook
- For Each – IF Loop
- VBA Do While Loop
- Do While
- Loop While
- VBA Do Until Loop
- Do Until
- Loop Until
- Exit Do Loop
- End or Break Loop
- More Loop Examples
- Loop Through Rows
- Loop Through Columns
- Loop Through Files in a Folder
- Loop Through Array
- Loops in Access VBA
To work effectively in VBA, you must understand Loops.
Loops allow you to repeat a code block a set number of times or repeat a code block on a each object in a set of objects.
First we will show you a few examples to show you what loops are capable of. Then we will teach you everything about loops.
VBA Loop Quick Examples
For Each Loops
For Each Loops loop through every object in a collection, such as every worksheet in workbook or every cell in a range.
Loop Through all Worksheets in Workbook
This code will loop through all worksheets in the workbook, unhiding each sheet:
Sub LoopThroughSheets()
Dim ws As Worksheet

    For Each ws In Worksheets
        ws.Visible = True
    Next

End Sub
Loop Through All Cells in Range
This code will loop through a range of cells, testing if the cell value is negative, positive, or zero:
Sub If_Loop()
Dim Cell as Range

  For Each Cell In Range("A2:A6")
    If Cell.Value > 0 Then
      Cell.Offset(0, 1).Value = "Positive"
    ElseIf Cell.Value < 0 Then
      Cell.Offset(0, 1).Value = "Negative"
    Else
      Cell.Offset(0, 1).Value = "Zero"
     End If
  Next Cell

End Sub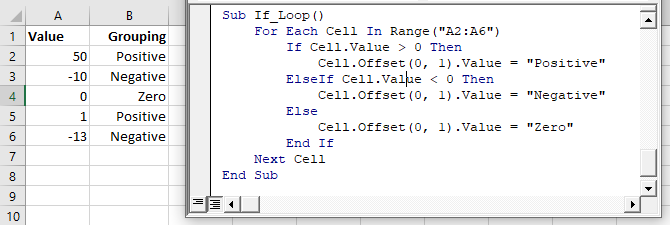
For Next Loops
Another type of “For” Loop is the For Next Loop. The For Next Loop allows you to loop through integers.
This code will loop through integers 1 through 10, displaying each with a message box:
Sub ForLoop()
    Dim i As Integer
    For i = 1 To 10
        MsgBox i
    Next i
End Sub
Do While Loops
Do While Loops will loop while a condition is met. This code will also loop through integers 1 through 10, displaying each with a message box.
Sub DoWhileLoop()
    Dim n As Integer
    n = 1
    Do While n < 11
        MsgBox n
        n = n + 1
    Loop
End Sub
Do Until Loops
Conversely, Do Until Loops will loop until a condition is met. This code does the same thing as the previous two examples.
Sub DoUntilLoop()
    Dim n As Integer
    n = 1
    Do Until n >= 10
        MsgBox n
        n = n + 1
    Loop
End Sub
We will discuss this below, but you need to be extremely careful when creating Do While or Do Until loops so that you don’t create a never ending loop.
VBA Loop Builder
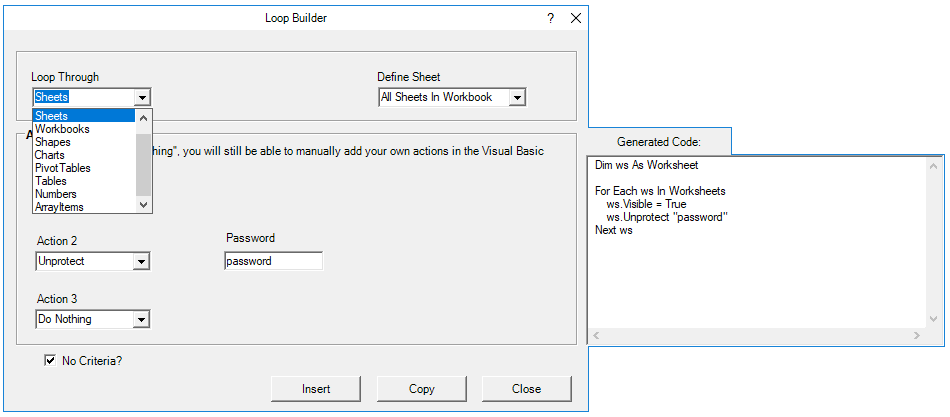
This is a screenshot of the “Loop Builder” from our Premium VBA Add-in: AutoMacro. The Loop Builder allows you to quickly and easily build loops to loop through different objects, or numbers. You can perform actions on each object and/or select only objects that meet certain criteria.
The add-in also contains many other code builders, an extensive VBA code library, and an assortment of coding tools. It’s a must have for any VBA developer.
Now we will cover the different types of loops in depth.
VBA Coding Made Easy
Stop searching for VBA code online. Learn more about AutoMacro — A VBA Code Builder that allows beginners to code procedures from scratch with minimal coding knowledge and with many time-saving features for all users!

Learn More
VBA For Next Loop
For Loop Syntax
The For Next Loop allows you to repeat a block of code a specified number of times. The syntax is:
[Dim Counter as Integer]

For Counter = Start to End [Step Value]
    [Do Something]
Next [Counter]
Where the items in brackets are optional.
- [Dim Counter as Long] – Declares the counter variable. Required if Option Explicit is declared at the top of your module.
- Counter – An integer variable used to count
- Start – The start value (Ex. 1)
- End – The end value (Ex. 10)
- [Step Value] – Allows you to count every n integers instead of every 1 integer. You can also go in reverse with a negative value (ex. Step -1)
- [Do Something] – The code that will repeat
- Next [Counter] – Closing statement to the For Next Loop. You can include the Counter or not. However, I strongly recommend including the counter as it makes your code easier to read.
If that’s confusing, don’t worry. We will review some examples:
Count to 10
This code will count to 10 using a For-Next Loop:
Sub ForEach_CountTo10()

Dim n As Integer
For n = 1 To 10
    MsgBox n
Next n

End Sub
For Loop Step
Count to 10 – Only Even Numbers
This code will count to 10 only counting even numbers:
Sub ForEach_CountTo10_Even()

Dim n As Integer
For n = 2 To 10 Step 2
    MsgBox n
Next n

End Sub
Notice we added “Step 2”. This tells the For Loop to “step” through the counter by 2. We can also use a negative step value to step in reverse:
VBA Programming | Code Generator does work for you!
For Loop Step – Inverse
Countdown from 10
This code will countdown from 10:
Sub ForEach_Countdown_Inverse()

Dim n As Integer
For n = 10 To 1 Step -1
    MsgBox n
Next n
MsgBox "Lift Off"

End Sub
Delete Rows if Cell is Blank
I’ve most frequently used a negative step For-Loop to loop through ranges of cells, deleting rows that meet certain criteria. If you loop from the top rows to the bottom rows, as you delete rows you will mess up your counter.
This example will delete rows with blank cells (starting from the bottom row):
Sub ForEach_DeleteRows_BlankCells()

Dim n As Integer
For n = 10 To 1 Step -1
    If Range("a" & n).Value = "" Then
        Range("a" & n).EntireRow.Delete
    End If
Next n

End Sub
Nested For Loop
You can “nest” one For Loop inside another For Loop. We will use Nested For Loops to create a multiplication table:
Sub Nested_ForEach_MultiplicationTable()

Dim row As Integer, col As Integer

For row = 1 To 9
    For col = 1 To 9
        Cells(row + 1, col + 1).Value = row * col
    Next col
Next row

End Sub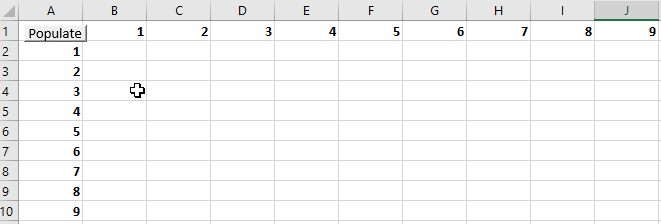
Exit For
The Exit For statement allows you to exit a For Next loop immediately.
You would usually use Exit For along with an If Statement, exiting the For Next Loop if a certain condition is met.
For example, you might use a For Loop to find a cell. Once that cell is found, you can exit the loop to speed up your code.
This code will loop through rows 1 to 1000, looking for “error” in column A. If it’s found, the code will select the cell, alert you to the found error, and exit the loop:
Sub ExitFor_Loop()

Dim i As Integer

For i = 1 To 1000
    If Range("A" & i).Value = "error" Then
        Range("A" & i).Select
        MsgBox "Error Found"
        Exit For
    End If
Next i

End Sub
Important: In the case of Nested For Loops, Exit For only exits the current For Loop, not all active Loops.
Continue For
VBA does not have the “Continue” command that’s found in Visual Basic. Instead, you will need to use “Exit”.
AutoMacro | Ultimate VBA Add-in | Click for Free Trial!
VBA For Each Loop
The VBA For Each Loop will loop through all objects in a collection:
- All cells in a range
- All worksheets in a workbook
- All shapes in a worksheet
- All open workbooks
You can also use Nested For Each Loops to:
- All cells in a range on all worksheets
- All shapes on all worksheets
- All sheets in all open workbooks
- and so on…
The syntax is:
For Each Object in Collection
[Do Something]
Next [Object]
Where:
- Object – Variable representing a Range, Worksheet, Workbook, Shape, etc. (ex. rng)
- Collection – Collection of objects (ex. Range(“a1:a10”)
- [Do Something] – Code block to run on each object
- Next [Object] – Closing statement. [Object] is optional, however strongly recommended.
For Each Cell in Range
This code will loop through each cell in a range:
Sub ForEachCell_inRange()

Dim cell As Range

For Each cell In Range("a1:a10")
    cell.Value = cell.Offset(0,1).Value
Next cell

End Sub
For Each Worksheet in Workbook
This code will loop through all worksheets in a workbook, unprotecting each sheet:
Sub ForEachSheet_inWorkbook()

Dim ws As Worksheet

For Each ws In Worksheets
    ws.Unprotect "password"
Next ws

End Sub
For Each Open Workbook
This code will save and close all open workbooks:
Sub ForEachWB_inWorkbooks()

Dim wb As Workbook

For Each wb In Workbooks
    wb.Close SaveChanges:=True
Next wb

End Sub
AutoMacro | Ultimate VBA Add-in | Click for Free Trial!
For Each Shape in Worksheet
This code will delete all shapes in the active sheet.
Sub ForEachShape()

Dim shp As Shape

For Each shp In ActiveSheet.Shapes
    shp.Delete
Next shp

End Sub
For Each Shape in Each Worksheet in Workbook
You can also nest For Each Loops. Here we will loop through all shapes in all worksheets in the active workbook:
Sub ForEachShape_inAllWorksheets()

Dim shp As Shape, ws As Worksheet

For Each ws In Worksheets
    For Each shp In ws.Shapes
        shp.Delete
    Next shp
Next ws

End Sub
For Each – IF Loop
As we’ve mentioned before, you can use an If statement within a loop, performing actions only if certain criteria is met.
This code will hide all blank rows in a range:
Sub ForEachCell_inRange()

Dim cell As Range

For Each cell In Range("a1:a10")
    If cell.Value = "" Then _
       cell.EntireRow.Hidden = True
Next cell

End Sub
VBA Do While Loop
The VBA Do While and Do Until (see next section) are very similar. They will repeat a loop while (or until) a condition is met.
The Do While Loop will repeat a loop while a condition is met.
Here is the Do While Syntax:
Do While Condition
[Do Something]
Loop
Where:
- Condition – The condition to test
- [Do Something] – The code block to repeat
You can also set up a Do While loop with the Condition at the end of the loop:
Do
[Do Something]
Loop While Condition
We will demo each one and show how they differ:
AutoMacro | Ultimate VBA Add-in | Click for Free Trial!
Do While
Here is the Do While loop example we demonstrated previously:
Sub DoWhileLoop()
    Dim n As Integer
    n = 1
    Do While n < 11
        MsgBox n
        n = n + 1
    Loop
End Sub
Loop While
Now let’s run the same procedure, except we will move the condition to the end of the loop:
Sub DoLoopWhile()
    Dim n As Integer
    n = 1
    Do
        MsgBox n
        n = n + 1
    Loop While n < 11
End Sub
VBA Do Until Loop
Do Until Loops will repeat a loop until a certain condition is met. The syntax is essentially the same as the Do While loops:
Do Until Condition
[Do Something]
Loop
and similarly the condition can go at the start or the end of the loop:
Do
[Do Something]
Loop Until Condition
Do Until
This do Until loop will count to 10, like our previous examples
Sub DoUntilLoop()
    Dim n As Integer
    n = 1
    Do Until n > 10
        MsgBox n
        n = n + 1
    Loop
End Sub
AutoMacro | Ultimate VBA Add-in | Click for Free Trial!
Loop Until
This Loop Until loop will count to 10:
Sub DoLoopUntil()
    Dim n As Integer
    n = 1
    Do
        MsgBox n
        n = n + 1
    Loop Until n > 10
End Sub
Exit Do Loop
Similar to using Exit For to exit a For Loop, you use the Exit Do command to exit a Do Loop immediately
Exit DoHere is an example of Exit Do:
Sub ExitDo_Loop()

Dim i As Integer
i = 1

Do Until i > 1000
    If Range("A" & i).Value = "error" Then
        Range("A" & i).Select
        MsgBox "Error Found"
        Exit Do
    End If
    i = i + 1
Loop

End Sub
End or Break Loop
As we mentioned above, you can use the Exit For or Exit Do to exit loops:
Exit ForExit DoHowever, these commands must be added to your code before you run your loop.
If you are trying to “break” a loop that’s currently running, you can try pressing ESC or CTRL + Pause Break on the keyboard. However, this may not work. If it doesn’t work, you’ll need to wait for your loop to end or, in the case of an endless loop, use CTRL + ALT + Delete to force close Excel.
This is why I try to avoid Do loops, it’s easier to accidentally create an endless loop forcing you to restart Excel, potentially losing your work.
More Loop Examples
AutoMacro | Ultimate VBA Add-in | Click for Free Trial!
Loop Through Rows
This will loop through all the rows in a column:
Public Sub LoopThroughRows()

Dim cell As Range

For Each cell In Range("A:A")
    If cell.value <> "" Then MsgBox cell.address & ": " & cell.Value
Next cell

End Sub
Loop Through Columns
This will loop through all columns in a row:
Public Sub LoopThroughColumns()

Dim cell As Range

For Each cell In Range("1:1")
    If cell.Value <> "" Then MsgBox cell.Address & ": " & cell.Value
Next cell

End Sub
Loop Through Files in a Folder
This code will loop through all files in a folder, creating a list:
Sub LoopThroughFiles ()

Dim oFSO As Object
Dim oFolder As Object
Dim oFile As Object
Dim i As Integer

Set oFSO = CreateObject("Scripting.FileSystemObject")

Set oFolder = oFSO.GetFolder("C:Demo)

i = 2

For Each oFile In oFolder.Files
    Range("A" & i).value = oFile.Name
    i = i + 1
Next oFile

End Sub
Loop Through Array
This code will loop through the array ‘arrList’:
For i = LBound(arrList) To UBound(arrList)
    MsgBox arrList(i)
Next i
The LBound function gets the “lower bound” of the array and UBound gets the “upper bound”.
Loops in Access VBA
Most of the examples above will also work in Access VBA. However, in Access, we loop through the Recordset Object rather than the Range Object.
Sub LoopThroughRecords()
   On Error Resume Next
   Dim dbs As Database
   Dim rst As Recordset
   Set dbs = CurrentDb
   Set rst = dbs.OpenRecordset("tblClients", dbOpenDynaset)
   With rst
      .MoveLast
      .MoveFirst
      Do Until .EOF = True
         MsgBox (rst.Fields("ClientName"))
        .MoveNext
     Loop
   End With
   rst.Close
   Set rst = Nothing
   Set dbs = Nothing
End SubHome / VBA / Loop Through a Range using VBA (Columns, Row, and UsedRange)
To loop through a range in VBA, you need to use the “For Each Loop”. By using this loop, you can write a code where you tell VBA to go through each cell in the range, column, or row and perform a specific activity.
Sub vba_loop_range()
Dim iCell As Range
For Each iCell In Range("A1:A10").Cells
    iCell.Value = "Yes"
Next iCell
End Sub
Following are steps for looping through a range:
- First, declare a variable to use as a cell of the range to loop.

- After that, start the “For Each loop” and use “iCell” variable to represent each cell in the range while the loop.

- Next, you need to write a line of code to perform some activity to each cell we are looping the range.

- In the end, end the code for a loop.


Loop Through Entire Column and a Row using VBA
In the same way, you can loop through each cell of a row using the following code that is just like the code we have used in the earlier example, the only difference is the range that we have specified.

Note: Before you loop through an entire column or a row you need to understand that it can take quite a time to complete the loop and it can make your Excel freeze for few minutes.
Sub vba_loop_range()

Dim iCell As Range

For Each iCell In Range("A:A").Cells
    iCell.Value = "Yes"
Next iCell

End Sub
And in the same way, you can use a full row as a range to loop through.
Sub vba_loop_range()

Dim iCell As Range

For Each iCell In Range("1:1").Cells
    iCell.Value = "Yes"
Next iCell

End Sub
Loop Through Dynamic Range
And if you want to loop through a dynamic range of cells refer to the following code.

Sub vba_dynamic_loop_range()

Dim iCell As Range
Dim iRange1 As String
Dim iRange2 As String
Dim rangeName As String

iRange1 = ActiveCell.Address
iRange2 = ActiveCell.Offset(5, 5).Address
rangeName = iRange1 & ":" & iRange2

For Each iCell In Range(rangeName).Cells

    iCell = "Yes"

Next iCell

End Sub
The art of Excel VBA programming is in the manipulation of properties of objects of Excel. The more skillfully you can play with these objects and properties, the more powerful the macros you can build.
The number one object in Excel you have to process is by far the Range object. In this article, I am going to walk you through the critical skills to loop through ranges in Excel worksheets.
Loop through cells in a range
The main skill to loop through a range is with FOR-NEXT loops. There are two FOR-NEXT loop conventions, which are both very useful when we loop through ranges. I would highly recommend to learn both skills.
Method 1: with a range variable
In the Range object, there are many Cell objects. We can therefore think of a Range as a group of Cells. We can effectively use the “For Each element In group” convention of the For-Next statement to loop through every Cell inside a Range.

The macro LoopCells1 loops through every cell in Range “A1:C5” and applies a sequential counter into the content of each cell.
Sub LoopCells1()
Dim cell As Range
Dim counter As Integer

'loop through each cell object element within a range
For Each cell In Range("A1:C5").Cells
    counter = counter + 1	'denotes the nth cell
    cell.Value = counter
Next
End Sub
The result after running the macro looks like this:

Method 2: with a numeric variable
Most VBA users are more confident with the For-Next loop convention of:
For counter = start To end
This convention can also be used to loop through cells within a range. The macro “LoopCells2” demonstrates how to loop through each cell in range A1:C5 by referring to the index number of cells. The loop begins with the index number of 1 to the upper bound which is the total number of cells in the range.
Sub LoopCells2()
Dim c As Long
Dim counter As Integer

'loop through each cell within a range by calling the index number of the cells
For c = 1 To Range("A1:C5").Cells.Count
    'put the index number into cell
    Range("A1:C5").Cells(c).Value = c
Next
End Sub
The result after running the macro “LoopCells2” looks identical to the result of the previous macro “LoopCells1”.

Important note on numeric variable type
One limitation of this method is with the upper limit of the numeric variable being declared and used in the For-Next loop. There are a few points you need to bear in mind:
- Avoid declaring an Integer typing variable for this purpose because the number of cells in a worksheet is far more than 32,767.
- Declare a Long variable instead, so that the loop can process up to 2,147,483,648 cells, which serves most cases.
- Declaring a Double variable type won’t solve the limitation.
- In case your process exceeded the limit of even a long variable, you will have to restructure your For-Next loop to use the “For Each element In group” convention.
But even with such limitations, this is still a very useful method. It’s often used because, in most situations, the limits of the variable type won’t be reached.
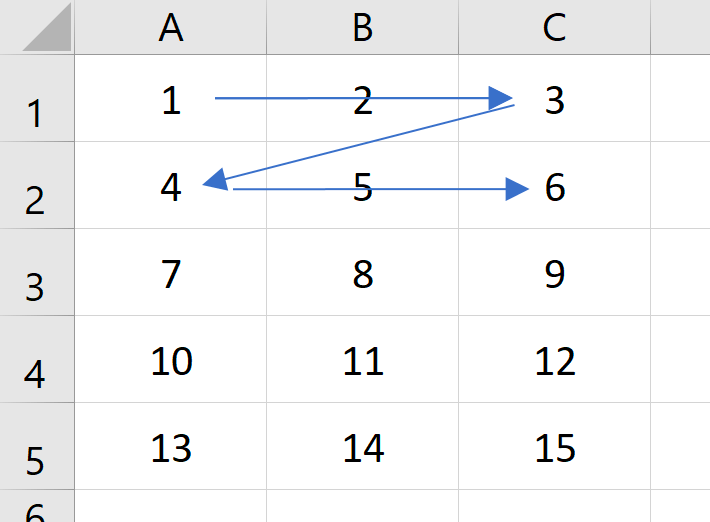
Note on order of cells being processed
When using either of the two methods above, the cells in the range are being processed in the same sequence: from left to right, then from top to bottom. The picture below visualizes such sequence:
If you want the cells to be processed in a different order, you need to learn other strategies which will be explained in the next few sections.
Loop through rows or columns in a range
Sometimes we want to loop through each row in a range (from top to bottom). Similar to looping through cells, we can do it with both conventions of the For-Next statement, either with a range object variable or a numeric variable.
Method 1: with a range variable
Sub LoopRows1()
Dim r As Range
Dim MyString As String

'Loop through each row, and apply a yellow colow fill
For Each r In Range("A1:C5").Rows
    r.Interior.ColorIndex = 6
Next
End Sub
To loop through columns, we just need to change the first line of the For-Next loop to go through the columns instead. In the example below, we want to loop through each column in range A1:C5, and change the column heading to Proper Case (first letter of each word in capital).

Sub LoopColumn1()
Dim c As Range
Dim MyString As String

'Loop through each column and set first cell to Proper Case
For Each c In Range("A1:C5").Columns
    c.Cells(1).Value = StrConv(c.Cells(1).Value, vbProperCase)
Next
End Sub
Method 2: with a numeric variable
In this example, we want to loop through every column in a data table. (See picture of our sample data below.) If a column contains numeric data, we set the NumberFormat to 2 decimal places.

'apply 0.00 number format to columns with numeric values
Sub FormatNumericColumns()
Dim c As Integer
Dim MyString As String

With Range("A1").CurrentRegion
For c = 1 To .Columns.Count
    'test 2nd cell of column for numeric value
    If IsNumeric(.Columns(c).Cells(2).Value) Then
        .Columns(c).NumberFormat = "0.00"
    End If
Next
End Sub
The result of the macro looks like the image below. The number format of the last 3 columns with numeric data has been set to 2 decimal places.

(The dates in the first column are not considered by the VBA IsNumeric function as numeric. Please read my other article all about IsNumeric for more detail on this topic.)
Advanced strategies
Deleting columns (or rows)
Here we want to write a macro to delete the three columns with headings with the word “delete” (the yellow columns). We can tackle this problem with a For-Next loop we learned in the sections above.

First Attempt:
We can try to loop through each column with the “For Each element In group” convention. The macro below looks simple and straight-forward enough, looping through each column (element) within the group of columns in range A1:C5.
Sub DeleteColmns1()
Dim c As Range
Dim x As Integer
    With Range("A1:E5")
        For Each c In .Columns
            If c.Cells(1).Value = "delete" Then
                c.Delete
            End If
        Next
    End With
End Sub
The result of the macro looks like the picture below. The macro has failed to delete all the three columns.

Reminder: When looping through a range, if you want to apply structural change to the range, NEVER use the “For Each element In group” convention because it may create unexpected results. In some cases, (e.g. insert columns), it will even cause an infinite loop and your Excel may be frozen and you’ll have to force quit Excel and lose your unsaved work.
Second Attempt:
Now, how about using the “For counter = start To end” convention?
Sub DeleteColmns2()
Dim tmp As Integer
Dim x As Integer
    With Range("A1:E5")
        For x = 1 To .Columns.Count
            If .Columns(x).Cells(1).Value = "delete" Then
                .Columns(x).Delete
            End If
        Next
    End With
End Sub
The result looks identical to that of the previous macro:

If we looked at the result more carefully, we noticed that the original 2nd and 4th column were deleted, but the original 3rd column was not. This was because when the 2nd column was deleted (when x=2), the 3rd column has become the 2nd column which has been skipped when the For-Next loop proceed to process x = 3.
Solution:
So, how do we tackle this problem? The answer is with the For-Next statement convention of “For counter = end To start step -1″, which processes the range from back to front (from the last column backward to the first column).
Sub DeleteColumnFinal()
Dim x As Integer
    With Range("A1").CurrentRegion
        For x = .Columns.Count To 1 Step -1
            If .Columns(x).Cells(1).Value = "delete" Then
                .Columns(x).Delete
            End If
        Next
    End With
End Sub
Loop though every n-th row in a range
We have a data table, and we want to apply a yellow shading (fill) to the odd number rows. And we don’t want to shade the first row which contains the field headings.

Solution 1:
We can use the “For counter = start To end” convention to tackle this problem. We can loop through each row beginning from the 2nd row (which bypassed the field headings). If the row number is odd, we apply a yellow color.
'Shade alternate (even) rows of data
Sub ShadeRows1()
Dim r As Long
With Range("A1").CurrentRegion
    For r = 1 To .Rows.Count
        If r / 2 = Int(r / 2) Then 'even rows
            .Rows(r).Interior.ColorIndex = 6
        End If
    Next
End With
End Sub

To enhance the macro to shade every n-th row, simply change the 2 in line 5 to n. For example:
If r / 3 = Int(r / 3) Then 'every 3 rows
Solution 2:
We can also use the “For counter = start to end step 2” convention. In the macro “ShadeRows2”, the loop begins from the 2nd row and then the 4th row, then 6th row, etc.
'Shade alternate (odd) rows of data from the 3rd row
Sub ShadeRows2()
Dim r As Long
With Range("A1").CurrentRegion
    'begin from 2nd and shade every other row
    For r = 2 To .Rows.Count Step 2
        .Rows(r).Interior.ColorIndex = 6
    Next
End With
End Sub
To enhance the macro to shade every 3rd row, simple change the 2 in line 5 to 3. For example:
For r = 3 To .Rows.Count Step 3
Conclusion
We have gone through in detail the different approaches to loop through a range in VBA, including the pitfalls and a couple of special scenarios. These techniques can also be applied in combination or with other VBA techniques to achieve more powerful automation with worksheet ranges in your macros.
The following is a summary of the steps we need to accomplish to perform this task:
- Write a macro that will loop through each cell in the used range of a sheet. We don’t want to loop through all 17 billion cells of the sheet; only the used cells.
- Set up a counter to keep track of the number of cells containing formulas. As we examine each cell in the used range, if the cell contains a formula we will add one to our counter.
- Once the examination is complete, display the result stored in the counter in cell B6 of the current worksheet.
- Create a macro button and assign the macro to the button. When the user clicks the button, the macro will execute and the value in cell B6 will be updated.
Writing the Macro
Open the Visual Basic Editor (Alt-F11 or Developer (tab) -> Code (group) -> Visual Basic).
Create a new module sheet called “ProjectActivity” by right-clicking on any item in the current workbook list of the Project Explorer and selecting Insert -> Module.

In the Properties windows, change the name of the new module sheet from Module1 to ProjectActivity.

In the code window we will create a new subprocedure named Count_If_Formula.

To loop through each cell, we will utilize a collection in conjunction with an IF…Then construct. The collection is the used range, and we need to declare a variable to hold a tiny part of the collection during the examination process. In this case, each tiny part is a single cell.
We need to establish a variable to hold the single cell during examination.

Now we will create the loop instruction to loop through each cell in the used range. Because “UsedRange” is a property of a worksheet, we can refer to the active sheet’s used range. We will go ahead and close the logic of the loop with the “Next cell” instruction.

Testing for the Presence of a Formula
Inside of the For…Next structure, let’s create a test to determine if the currently examined cell contains a formula. We will use an IF statement to compare the cell’s contents to the range property HasFormula.
The HasFormula property returns a “True” if the cell contains a formula.
Don’t forget to close the logic of the If…Then with an End If statement.

If the test of the cell returns a “True”, we need to keep record of that occurrence. We need to create a variable to store that occurrence. Then next time we encounter a formula, we will increment that counter by 1.
Create a new variable called “CountFormula” as a Long data type to store this value. The Long data type can hold a value in excess of 9 quadrillion, well in excess of the maximum 17 billion cells on a single sheet.

Accounting for the Presence of a Formula
If the examined cell possesses a formula, we will add 1 to the counter named “CountFormula”. This is performed by the following line of code.

When the macro begins, the value of the variable “CountFormula” is automatically set to 0 (zero). As we loop though each cell in the used range testing for the presence of a formula, if the cell contains a formula, we add 1 (one) to the variable. This overwrites the current value with the updated value.
Displaying the Final Value to the User
We want to show the user the result of the cell examinations. We want to display the value stored in the “CountFormula” variable in cell B3 of the current sheet. The following line of code will perform this action.

Adding a Macro Launch Button
Returning to the Excel workbook, we will add a macro launch button and assign the newly created macro to the button.
From the ribbon, select Developer (tab) -> Controls (group) -> Insert -> Form Controls -> Button (upper left option).

Click anywhere on the active sheet.
From the Assign Macro dialog box, select the Count_If_Formula macro from the list of available macros and select OK.

This will create the macro launch button on the sheet.

Rename the button to “Count Formula” by right-clicking on the button and selecting Edit Text.

You may need to resize the button to display the fully renamed text.

Testing the Macro
Click the Count Formula button and observe the value in cell B6. The current value is 2, since we have formulas in cells B8 and B9.

Add a formula to cell B10 (any formula will do) and execute the macro. The value of cell B6 has been updated to 3.

NOTE: In this case, since we are putting the button on the same sheet we are examining we don’t need to reference the sheet name. We can use “ActiveSheet” and directly use range and not have to specify the sheet. The assumption is that the sheet being examined is the active sheet. If you were going to put your button on a different sheet and you wanted it to count the formulas on this specific sheet, you need to reference the worksheet names.
The Completed Code
Sub Count_IF_Formula()
Dim cell As Range
Dim CountFormula As Long
		For Each cell In ActiveSheet.UsedRange

			If cell.HasFormula Then

				CountFormula = CountFormula + 1

			End If

		Next cell

		Range("B6").Value = CountFormula

End Sub
Published on: January 5, 2019
Last modified: February 17, 2023


Leila Gharani
I’m a 5x Microsoft MVP with over 15 years of experience implementing and professionals on Management Information Systems of different sizes and nature.
My background is Masters in Economics, Economist, Consultant, Oracle HFM Accounting Systems Expert, SAP BW Project Manager. My passion is teaching, experimenting and sharing. I am also addicted to learning and enjoy taking online courses on a variety of topics.