

VBA Coding With Shape Objects
In this comprehensive guide, you will be learning all the ways you can create and manipulate shapes with VBA macros.
Shapes are objects you can insert into your spreadsheet through the Insert Tab via the Shapes gallery button. These objects can add visualizations to your dashboards, store text, or even serve as buttons to launch macro code.
Here is an outline of the topics covered in this guide:
Creating A New Shape With AddShape()
To create a shape object in Excel using VBA, you must call the AddShape function.
The AddShape function has 4 required inputs in order to generate a new shape:
-
Type — Name of the type of shape you wish to generate
-
Left — Where on the spreadsheet the left side of the shape should be located
-
Top — Where on the spreadsheet the top of the shape should be located
-
Width — How wide your shape should be
-
Height — How tall your shape should be
Here is a snippet of VBA code showing how to create 2 shapes and store the newly created shape to a variable for easy reference later on in your code.
Sub CreateShape()
Dim shp1 As Shape
Dim shp2 As Shape
‘Create & Store New Shape to Variable
Set shp1 = ActiveSheet.Shapes.AddShape(msoShape16pointStar, _
ActiveCell.Left, ActiveCell.Top, 80, 27)
‘Create & Store New Shape to Variable (use Enum Code)
Set shp2 = ActiveSheet.Shapes.AddShape(94, _
ActiveCell.Left, ActiveCell.Top, 80, 27)
End Sub
Continue reading through the next few sections to learn how to determine the type, size, and position values you should be using to create your desired shape.
Choosing A Shape Type
There are a TON of shape types available to you through VBA. There are so many in fact, that I have painstakenly gone through and visually cataloged them for your ease in the below slide show.
Once you have determined which shape you would like to create, grab either the shape textual name or the enumeration number. You will use this MSOAutoShapeType reference to code the exact shape you want.
If you have a shape already created on your spreadsheet, you can use the following code to figure out its enumeration code that you can reference in your VBA code.
Sub DetermineShapeType()
‘PURPOSE: Display The Shape Type of Selected Shape
‘SOURCE: www.TheSpreadsheetGuru.com
Dim ActiveShape As Shape
Dim UserSelection As Variant
‘Pull-in what is selected on screen
Set UserSelection = ActiveWindow.Selection
‘Determine if selection is a shape
On Error GoTo NoShapeSelected
Set ActiveShape = ActiveSheet.Shapes(UserSelection.Name)
On Error Resume Next
‘Tell User the Shape Type Enumeration Number
MsgBox «The Select Shape Type = » & ActiveShape.AutoShapeType
Exit Sub
‘Error Handler
NoShapeSelected:
MsgBox «You do not have a shape selected!»
End Sub
Determining Shape Position
There are two properties you can modify to change the location of a shape on the spreadsheet with VBA. These two properties are the Left and Top values of the shape.

If you are unsure what the size of your shape should be, there are two popular ways you can size your shape:
Method 1: You can base it on the left and top positions of a cell on your spreadsheet.
The following VBA code shows you how to use the Left value of Cell B1 and the Top value of Cell B10 to reposition the rectangle shape that is created.
Sub ShapePositionFromCell()
Dim shp As Shape
‘Create Shape
Set shp = ActiveSheet.Shapes.AddShape(msoShapeRectangle, _
Range(«B1»).Left, Range(«B10»).Top, 100, 50)
End Sub
Method 2: You can position the shape to your liking manually on the spreadsheet and read the left and top positions using VBA.
The following VBA code will output a message box that displays the Left and Top positions of a currently selected shape (ActiveShape).
Sub DetermineShapePosition()
‘PURPOSE: Display Selected Shape’s Position
‘SOURCE: www.TheSpreadsheetGuru.com
Dim ActiveShape As Shape
Dim UserSelection As Variant
‘Pull-in what is selected on screen
Set UserSelection = ActiveWindow.Selection
‘Determine if selection is a shape
On Error GoTo NoShapeSelected
Set ActiveShape = ActiveSheet.Shapes(UserSelection.Name)
On Error Resume Next
‘Tell User the Shape Position Values
MsgBox «Left Position = » & ActiveShape.Left & vbNewLine & _
«Top Position = » & ActiveShape.Top
Exit Sub
‘Error Handler
NoShapeSelected:
MsgBox «You do not have a shape selected!»
End Sub
Determining Shape Size
There are two properties you can modify to change the size of a shape with VBA. These two properties are the Width and Height values of the shape.

If you are unsure what the size of your shape should be, there are two popular ways you can size your shape:
Method 1: You can base it on the size of a range of cells
Sub ShapeSizeFromRange()
Dim shp As Shape
Dim rng As Range
‘Provide Range for Shape Size
Set rng = Range(«A1:C4»)
‘Create Shape
Set shp = ActiveSheet.Shapes.AddShape(msoShapeRectangle, _
ActiveCell.Left, ActiveCell.Top, rng.Width, rng.Height)
End Sub
Method 2: You can create the shape to your liking manually and read the width and height using VBA
Sub DetermineShapeSize()
‘PURPOSE: Display Selected Shape’s Size
‘SOURCE: www.TheSpreadsheetGuru.com
Dim ActiveShape As Shape
Dim UserSelection As Variant
‘Pull-in what is selected on screen
Set UserSelection = ActiveWindow.Selection
‘Determine if selection is a shape
On Error GoTo NoShapeSelected
Set ActiveShape = ActiveSheet.Shapes(UserSelection.Name)
On Error Resume Next
‘Tell User the Shape Position Values
MsgBox «Width = » & ActiveShape.Width & vbNewLine & _
«Height = » & ActiveShape.Height
Exit Sub
‘Error Handler
NoShapeSelected:
MsgBox «You do not have a shape selected!»
End Sub
Text Formatting
Sub CreateShapeWithText()
Dim shp As Shape
‘Create & Store New Shape to Variable
Set shp = ActiveSheet.Shapes.AddShape(msoShape16pointStar, _
ActiveCell.Left, ActiveCell.Top, 80, 27)
‘Add Text To Shape
shp.TextFrame2.TextRange.Text = «My Awesome Shape!»
‘Bold/Italicize/Underline Text
shp.TextFrame2.TextRange.Font.Bold = True
shp.TextFrame2.TextRange.Font.Italic = True
shp.TextFrame2.TextRange.Font.UnderlineStyle = msoUnderlineDottedLine
‘Change Text Color
shp.TextFrame2.TextRange.Font.Fill.ForeColor.RGB = RGB(225, 140, 71)
‘Change Text Size
shp.TextFrame2.TextRange.Font.Size = 14
‘Center Align Text
shp.TextFrame.HorizontalAlignment = xlHAlignCenter
shp.TextFrame.VerticalAlignment = xlVAlignCenter
End Sub
Fill Color & Borders
Sub CreateShapeWithBorder()
Dim shp As Shape
‘Create & Store New Shape to Variable
Set shp = ActiveSheet.Shapes.AddShape(msoShapeRoundedRectangle, _
ActiveCell.Left, ActiveCell.Top, 80, 27)
‘Light Orange Fill
shp.Fill.ForeColor.RGB = RGB(253, 234, 218)
‘Add Dotted Border
shp.Line.DashStyle = msoLineDashDotDot
‘Dark Orange Border
shp.Line.ForeColor.RGB = RGB(252, 213, 181)
‘Adjust Border Thickness
shp.Line.Weight = 2
‘Remove Border
shp.Line.Visible = False
End Sub
Change Shape Type
If you are looking to change the shape type of an existing type, you can do so by setting the AutoShapeType to a different shape type value.
Sub ChangeShapeType()
Dim shp As Shape
‘Store specific shape on spreadsheet to a variable
Set shp = ActiveSheet.Shapes(«Shape1»)
‘Change shape type to oval
shp.AutoShapeType = msoShapeOval
End Sub
Create Your Own Macro Button With VBA Code
I personally cannot stand the native Excel form control button. It looks so outdated and really makes your spreadsheets look unprofessional. That is why I prefer to use VBA code to create a shape that looks like a button.
I thought this would be a great example to show you a real-world coding example where I need to create and format a shape to have a specific appearance. The following VBA macro code puts everything we have covered in this guide together and provides you with some sample code that comprises of a true shape-building solution.
Sub Create_Button()
‘PURPOSE: Creates a SpreadsheetGuru macro button shape
‘SOURCE: www.TheSpreadsheetGuru.com
Dim bttn As Shape
‘Create & Position Macro Button
Set bttn = ActiveSheet.Shapes.AddShape(msoShapeRoundedRectangle, _
ActiveCell.Left, ActiveCell.Top, 80, 27)
‘Modify Text Formatting
With bttn.TextFrame2.TextRange
.Text = «Macro»
.Font.Bold = msoTrue
.Font.Fill.ForeColor.RGB = RGB(0, 0, 0)
.Font.Size = 14
End With
‘Center Alignment
bttn.TextFrame.HorizontalAlignment = xlHAlignCenter
bttn.TextFrame.VerticalAlignment = xlVAlignCenter
‘Light Gray Fill
bttn.Fill.ForeColor.RGB = RGB(217, 217, 217)
‘No Border
bttn.Line.Visible = msoFalse
End Sub
Loop Through All Shapes Of Specific Type
If you need to target a specific shape type on your spreadsheet, you can create a loop that tests the AutoShapeType value to filter your results.
The following VBA code example loops through all shape objects in the currently selected spreadsheet and only changes the fill color of the rectangle shapes.
Sub ChangeRectangleShapes()
Dim shp As Shape
‘Loop through each shape on ActiveSheet
For Each shp In ActiveSheet.Shapes
‘Only modify rectangle shapes
If shp.AutoShapeType = msoShapeRectangle Then
shp.Fill.ForeColor.RGB = RGB(253, 234, 218)
End If
Next shp
End Sub
I Hope This Microsoft Excel Article Helped!
Hopefully, I was able to explain how you use VBA code to create and format shapes on your Excel spreadsheets. If you have any questions about these techniques or suggestions on how to improve them, please let me know in the comments section below.

About The Author
Hey there! I’m Chris and I run TheSpreadsheetGuru website in my spare time. By day, I’m actually a finance professional who relies on Microsoft Excel quite heavily in the corporate world. I love taking the things I learn in the “real world” and sharing them with everyone here on this site so that you too can become a spreadsheet guru at your company.
Through my years in the corporate world, I’ve been able to pick up on opportunities to make working with Excel better and have built a variety of Excel add-ins, from inserting tickmark symbols to automating copy/pasting from Excel to PowerPoint. If you’d like to keep up to date with the latest Excel news and directly get emailed the most meaningful Excel tips I’ve learned over the years, you can sign up for my free newsletters. I hope I was able to provide you with some value today and I hope to see you back here soon!
— Chris
Работа с фигурами в VBA Excel: создание фигур методом Shapes.AddShape, типы фигур (MsoAutoShapeType), обращение к фигурам и изменение их свойств. Примеры.
Объекты для работы с фигурами
Фигуры в VBA Excel представлены тремя объектами:
| Объект | Описание |
|---|---|
| Shapes | Коллекция всех фигур на рабочем листе. Используется для создания новых фигур, для обращения к одной фигуре по имени и для перебора фигур циклом. |
| ShapeRange | Коллекция нескольких фигур, аргументом которой является массив имен выбранных объектов. Используется для редактирования сразу всех фигур, входящих в эту коллекцию. |
| Shape | Объект, представляющий одну фигуру. Используется для редактирования одной этой фигуры. |
Фигуры в VBA Excel создаются методом Shapes.AddShape.
Синтаксис метода AddShape
|
Shapes.AddShape (Type, Left, Top, Width, Height) |
Shapes — выражение, возвращающее коллекцию фигур на рабочем листе, например: ActiveSheet.Shapes.
Параметры метода AddShape
| Параметр | Описание |
|---|---|
| Type | Константа из коллекции MsoAutoShapeType, определяющая тип создаваемой фигуры. |
| Left | Расстояние от левой границы фигуры до левой границы табличной части рабочего листа в пунктах.. Тип данных — Single. |
| Top | Расстояние от верхней границы фигуры до верхней границы табличной части рабочего листа в пунктах.. Тип данных — Single. |
| Width | Ширина фигуры по внешним границам в пунктах. |
| Height | Высота фигуры по внешним границам в пунктах. |
Все параметры метода Shapes.AddShape являются обязательными.
Константы MsoAutoShapeType
Константы коллекции MsoAutoShapeType, определяющие основные типы создаваемых фигур:
| Константа | Значение | Тип фигуры |
|---|---|---|
| msoShapeRectangle | 1 | Прямоугольник |
| msoShapeParallelogram | 2 | Параллелограмм |
| msoShapeTrapezoid | 3 | Трапеция |
| msoShapeDiamond | 4 | Ромб |
| msoShapeRoundedRectangle | 5 | Прямоугольник: скругленные углы |
| msoShapeOctagon | 6 | Восьмиугольник (октаэдр) |
| msoShapeIsoscelesTriangle | 7 | Равнобедренный треугольник |
| msoShapeRightTriangle | 8 | Прямоугольный треугольник |
| msoShapeOval | 9 | Овал |
| msoShapeHexagon | 10 | Шестиугольник (гексаэдр) |
| msoShapeCross | 11 | Крест |
| msoShapeRegularPentagon | 12 | Пятиугольник (пентаэдр) |
| msoShapeCan | 13 | Цилиндр |
| msoShapeCube | 14 | Куб |
| msoShapeDonut | 18 | Круг: прозрачная заливка (кольцо) |
| msoShapeLightningBolt | 22 | Молния |
| msoShapeSun | 23 | Солнце |
| msoShapeMoon | 24 | Месяц (луна) |
| msoShape5pointStar | 92 | Звезда: 5 точек (пятиконечная) |
| msoShapeCloud | 179 | Облако |
Все доступные константы из коллекции MsoAutoShapeType смотрите на сайте разработчиков.
Создание объекта ShapeRange
Создание коллекции ShapeRange из выбранных фигур:
|
Dim myShapeRange As ShapeRange Set myShapeRange = ActiveSheet.Shapes.Range(Array(«Пятиугольник 140», «Солнце 141», «Облако 144»)) |
Объектная переменная myShapeRange не обязательна, можно обратиться непосредственно к возвращенной коллекции, например, присвоив всем ее элементам синий цвет:
|
ActiveSheet.Shapes.Range(Array(«Пятиугольник 140», «Солнце 141», «Облако 144»)).Fill.ForeColor.RGB = vbBlue |
Примеры работы с фигурами
Пример 1
Создание пяти разных фигур из кода VBA Excel методом Shapes.AddShape:
|
Sub Primer1() With ActiveSheet.Shapes ‘При создании фигуры без присвоения ее переменной скобки не нужны .AddShape msoShapeCube, 30, 40, 72, 72 .AddShape msoShapeIsoscelesTriangle, 130, 40, 72, 72 .AddShape msoShapeSun, 230, 40, 72, 72 .AddShape msoShapeLightningBolt, 330, 40, 72, 72 ‘Чтобы выбрать фигуру, параметры необходимо заключить в скобки .AddShape(msoShapeCloud, 430, 40, 72, 72).Select End With End Sub |
Результат работы кода:

Пример 2
Работа с одной фигурой:
|
Sub Primer2() Dim myShape As Shape ‘Создаем фигуру «Месяц» и присваивает ссылку на нее переменной myShape Set myShape = ActiveSheet.Shapes.AddShape(msoShapeMoon, 50, 50, 80, 80) With myShape ‘Меняем высоту и ширину фигуры .Height = 150 .Width = 100 ‘Меняем цвет фигуры .Fill.ForeColor.RGB = vbYellow ‘Поворачиваем фигуру влево на 40 градусов .Rotation = —40 End With End Sub |
Пример 3
Редактирование одновременно нескольких фигур с помощью коллекции ShapeRange:
|
Sub Primer3() With ActiveSheet.Shapes.Range(Array(«Овал 1», «Овал 2», «Овал 3»)) ‘Меняем цвет всех фигур из коллекции ShapeRange .Fill.ForeColor.RGB = vbBlue ‘Задаем высоту и ширину овалов .Height = 150 .Width = 50 ‘Поворачиваем фигуры вправо на 45 градусов .Rotation = 45 End With End Sub |
Пример 4
Редактирование одновременно всех фигур на рабочем листе с помощью коллекции ShapeRange:
|
1 2 3 4 5 6 7 8 9 10 11 12 13 14 15 16 17 18 19 |
Sub Primer4() Dim myShapeRange As ShapeRange, i As Integer, _ myShape As Shape, myArray() As String ‘Задаем массиву размерность от 1 до количества фигур на листе ReDim myArray(1 To ActiveSheet.Shapes.Count) ‘Проходим циклом по всем фигурам коллекции и записываем их имена в массив For Each myShape In ActiveSheet.Shapes i = i + 1 myArray(i) = myShape.Name Next ‘Создаем коллекцию ShapeRange и присваиваем ссылку на нее переменной myShapeRange Set myShapeRange = ActiveSheet.Shapes.Range(myArray) With myShapeRange ‘Изменяем цвет всех фигур на рабочем листе .Fill.ForeColor.RGB = RGB(100, 150, 200) ‘Поворачиваем все фигуры вокруг вертикальной оси .Flip msoFlipVertical End With End Sub |
Пример 5
Добавление надписи (текста) на фигуру:
|
Sub Primer5() Dim myShape As Shape Set myShape = ActiveSheet.Shapes.AddShape(msoShapeCloud, 50, 30, 300, 300) With myShape.TextFrame2 ‘Добавление текста на фигуру .TextRange.Characters.Text = «Объект TextFrame представляет текстовую рамку в объекте Shape. Содержит текст в текстовом кадре, а также свойства и методы, которые контролируют выравнивание и закрепление текстового кадра.» ‘Задаем курсивное начертание .TextRange.Characters.Font.Italic = True ‘Указываем размер шрифта .TextRange.Characters.Font.Size = 13 ‘Отступ левой границы текстового поля от левой внутренней границы фигуры .MarginLeft = 30 ‘Отступ верхней границы текстового поля от верхней внутренней границы фигуры .MarginTop = 20 End With End Sub |
Результат работы кода:

Изменить цвет текста, например на черный, можно двумя способами:
|
‘С помощью константы MsoThemeColorIndex myShape.TextFrame2.TextRange.Characters.Font.Fill.ForeColor.ObjectThemeColor = msoThemeColorDark1 ‘С помощью цветовой модели RGB myShape.TextFrame2.TextRange.Characters.Font.Fill.ForeColor.RGB = RGB(0, 0, 0) |
С константами из коллекции MsoThemeColorIndex вы можете ознакомиться на сайте разработчиков.
Пример 6
Удаление фигур с рабочего листа из кода VBA Excel с помощью метода Delete.
Удаление одной фигуры:
|
ActiveSheet.Shapes(«Ромб 5»).Delete |
Удаление нескольких фигур:
|
ActiveSheet.Shapes.Range(Array(«Овал 1», «Овал 2», «Овал 3»)).Delete |
Удаление всех фигур с рабочего листа с помощью цикла:
|
Sub Primer6() Dim myShape As Shape For Each myShape In ActiveSheet.Shapes myShape.Delete Next End Sub |
В 7 примере рассмотрено удаление всех фигур без цикла.
Пример 7
Выделение всех фигур на рабочем листе:
|
ActiveSheet.Shapes.SelectAll |
Выбор всех фигур и удаление выбранного (всех фигур):
|
Sub Primer7() ActiveSheet.Shapes.SelectAll Selection.Delete End Sub |
Продолжение темы в статье VBA Excel. Копирование, перемещение и поворот фигур.
| title | keywords | f1_keywords | ms.prod | ms.assetid | ms.date | ms.localizationpriority |
|---|---|---|---|---|---|---|
|
Working with shapes (drawing objects) |
vbaxl10.chm5206010 |
vbaxl10.chm5206010 |
excel |
aef5dc81-d54f-a01a-f949-a30688a3cf23 |
11/13/2018 |
medium |
Shapes, or drawing objects, are represented by three different objects:
| Object | Description |
|---|---|
| Shapes collection | Use to create shapes and to iterate through all the shapes on a given worksheet. |
| ShapeRange collection | Use to modify multiple shapes the same way you work with multiple shapes in the user interface. |
| Shape object | Use to format or modify a single shape. |
Setting properties for a shape
Many formatting properties of shapes are not set by properties that apply directly to the Shape or ShapeRange object. Instead, related shape attributes are grouped under secondary objects, such as the FillFormat object, which contains all the properties that relate to the shape’s fill, or the LinkFormat object, which contains all the properties that are unique to linked OLE objects.
To set properties for a shape, you must first return the object that represents the set of related shape attributes and then set properties of that returned object. For example, you use the Fill property to return the FillFormat object, and then you set the ForeColor property of the FillFormat object to set the fill foreground color for the specified shape, as shown in the following example.
Worksheets(1).Shapes(1).Fill.ForeColor.RGB = RGB(255, 0, 0)
Applying a property or method to several shapes at the same time
In the user interface, you can perform some operations with several shapes selected; for example, you can select several shapes and set all their individual fills at once. You can perform other operations with only a single shape selected; for example, you can edit the text in a shape only if a single shape is selected.
In Visual Basic, there are two ways to apply properties and methods to a set of shapes. These two ways allow you to perform any operation that you can perform on a single shape on a range of shapes, whether or not you can perform the same operation in the user interface.
-
If the operation works on multiple selected shapes in the user interface, you can perform the same operation in Visual Basic by constructing a ShapeRange collection that contains the shapes you want to work with, and applying the appropriate properties and methods directly to the ShapeRange collection.
-
If the operation does not work on multiple selected shapes in the user interface, you can still perform the operation in Visual Basic by looping through the Shapes collection or through a ShapeRange collection that contains the shapes you want to work with, and applying the appropriate properties and methods to the individual Shape objects in the collection.
Many properties and methods that apply to the Shape object and ShapeRange collection fail if applied to certain kinds of shapes. For example, the TextFrame property fails if applied to a shape that cannot contain text.
If you are not positive that each of the shapes in a ShapeRange collection can have a certain property or method applied to it, don’t apply the property or method to the ShapeRange collection. If you want to apply one of these properties or methods to a collection of shapes, you must loop through the collection and test each individual shape to make sure it is an appropriate type of shape before applying the property or method to it.
Creating a ShapeRange collection that contains all shapes on a sheet
You can create a ShapeRange object that contains all the Shape objects on a sheet by selecting the shapes and then using the ShapeRange property to return a ShapeRange object containing the selected shapes.
Worksheets(1).Shapes.Select
Set sr = Selection.ShapeRange
In Microsoft Excel, the Index argument is not optional for the Range property of the Shapes collection, so you cannot use this property without an argument to create a ShapeRange object containing all shapes in a Shapes collection.
Applying a property or method to a ShapeRange collection
If you can perform an operation on multiple selected shapes in the user interface at the same time, you can do the programmatic equivalent by constructing a ShapeRange collection and then applying the appropriate properties or methods to it. The following example constructs a shape range that contains the shapes named «Big Star» and «Little Star» on myDocument and applies a gradient fill to them.
Set myDocument = Worksheets(1)
Set myRange = myDocument.Shapes.Range(Array("Big Star", _
 "Little Star"))
myRange.Fill.PresetGradient _
 msoGradientHorizontal, 1, msoGradientBrass
The following are general guidelines for how properties and methods behave when they are applied to a ShapeRange collection.
-
Applying a method to the collection is equivalent to applying the method to each individual Shape object in that collection.
-
Setting the value of a property of the collection is equivalent to setting the value of the property of each individual shape in that range.
-
A property of the collection that returns a constant returns the value of the property for an individual shape in the collection if all shapes in the collection have the same value for that property. If not all shapes in the collection have the same value for the property, it returns the «mixed» constant.
-
A property of the collection that returns a simple data type (such as Long, Single, or String) returns the value of the property for an individual shape if all shapes in the collection have the same value for that property.
-
The value of some properties can be returned or set only if there is exactly one shape in the collection. If the collection contains more than one shape, a run-time error occurs. This is generally the case for returning or setting properties when the equivalent action in the user interface is possible only with a single shape (actions such as editing text in a shape or editing the points of a freeform).
The preceding guidelines also apply when you are setting properties of shapes that are grouped under secondary objects of the ShapeRange collection, such as the FillFormat object. If the secondary object represents operations that can be performed on multiple selected objects in the user interface, you’ll be able to return the object from a ShapeRange collection and set its properties.
For example, you can use the Fill property to return the FillFormat object that represents the fills of all the shapes in the ShapeRange collection. Setting the properties of this FillFormat object will set the same properties for all the individual shapes in the ShapeRange collection.
Looping through a Shapes or ShapeRange collection
Even if you cannot perform an operation on several shapes in the user interface at the same time by selecting them and then using a command, you can perform the equivalent action programmatically by looping through a Shapes or ShapeRange collection that contains the shapes you want to work with, applying the appropriate properties and methods to the individual Shape objects in the collection.
The following example loops through all the shapes on myDocument and changes the foreground color for each AutoShape shape.
Set myDocument = Worksheets(1)
For Each sh In myDocument.Shapes
 If sh.Type = msoAutoShape Then
 sh.Fill.ForeColor.RGB = RGB(255, 0, 0)
 End If
Next
The following example constructs a ShapeRange collection that contains all the currently selected shapes in the active window and sets the foreground color for each selected shape.
For Each sh in ActiveWindow.Selection.ShapeRange
 sh.Fill.ForeColor.RGB = RGB(255, 0, 0)
Next
Aligning, distributing, and grouping shapes in a ShapeRange
Use the Align and Distribute methods to position a set of shapes relative to one another or relative to the document that contains them.
Use the Group method or the Regroup method to form a single grouped shape from a set of shapes.
See also
- Excel functions (by category)
[!includeSupport and feedback]
If you can loop through all shapes, you can pull the text from all shapes. I don’t understand why you need to rename first.
— Oh even better!! If you can help point me in the right direction that would be wonderful! —
What is the VBA code you are using now?
— I don’t have any code to rename the shapes, as I wasn’t sure where to start with the looping piece. The code that I was using to export the data to a table was a basic:
Code:
[/COLOR]
[COLOR=#0000ff][/COLOR][COLOR=#0000ff]Sub ExporttoTable()[/COLOR]
[COLOR=#0000ff][/COLOR][COLOR=#0000ff]
[/COLOR]
[COLOR=#0000ff][/COLOR][COLOR=#0000ff]With ActiveSheet[/COLOR]
[COLOR=#0000ff][/COLOR][COLOR=#0000ff].Range("AD1").End(xlDown).Offset(1, 0).Value = .Shapes("Title").TextFrame.Characters.Text[/COLOR]
[COLOR=#0000ff][/COLOR][COLOR=#0000ff].Range("AD1").End(xlDown).Offset(1, 0).Value = .Shapes("Title_1").TextFrame.Characters.Text[/COLOR]
[COLOR=#0000ff][/COLOR][COLOR=#0000ff].Range("AD1").End(xlDown).Offset(1, 0).Value = .Shapes("Title_2").TextFrame.Characters.Text[/COLOR]
[COLOR=#0000ff][/COLOR][COLOR=#0000ff].Range("AD1").End(xlDown).Offset(1, 0).Value = .Shapes("Title_3").TextFrame.Characters.Text[/COLOR]
[COLOR=#0000ff][/COLOR][COLOR=#0000ff].Range("AE1").End(xlDown).Offset(1, 0).Value = .Shapes("Text").TextFrame.Characters.Text[/COLOR]
[COLOR=#0000ff][/COLOR][COLOR=#0000ff].Range("AE1").End(xlDown).Offset(1, 0).Value = .Shapes("Text_1").TextFrame.Characters.Text[/COLOR]
[COLOR=#0000ff][/COLOR][COLOR=#0000ff].Range("AE1").End(xlDown).Offset(1, 0).Value = .Shapes("Text_2").TextFrame.Characters.Text[/COLOR]
[COLOR=#0000ff][/COLOR][COLOR=#0000ff].Range("AE1").End(xlDown).Offset(1, 0).Value = .Shapes("Text_3").TextFrame.Characters.Text[/COLOR]
[COLOR=#0000ff][/COLOR][COLOR=#0000ff]
[/COLOR]
[COLOR=#0000ff][/COLOR][COLOR=#0000ff]End With[/COLOR]
[COLOR=#0000ff][/COLOR][COLOR=#0000ff]End Sub[/COLOR]
[COLOR=#0000ff][/COLOR][COLOR=#0000ff]
What is the name of the shapes? You said the name comprises three parts but the examples you gave only have one part.
—-Sorry for the confusion — the shape is a «post-it» that contains a background square («Background»), title bar («Title») and text box («Text»). The reason they all end up with the exact same name is the VBA used to generate the post-its. I currently have it set-up where the shape is already built and named according to the style above, with the original «template» hidden. The VBA to create a new one based on that color (as I have a button for 9 different post-it color options) is:
Code:
[/COLOR]
[COLOR=#0000ff][/COLOR][COLOR=#0000ff]Sub postit_yellow()[/COLOR]
[COLOR=#0000ff][/COLOR][COLOR=#0000ff]Application.ScreenUpdating = False[/COLOR]
[COLOR=#0000ff][/COLOR][COLOR=#0000ff]ActiveSheet.Shapes.Range(Array("YellowPostIt")).Visible = True[/COLOR]
[COLOR=#0000ff][/COLOR][COLOR=#0000ff]    ActiveSheet.Shapes.Range(Array("YellowPostIt")).Select[/COLOR]
[COLOR=#0000ff][/COLOR][COLOR=#0000ff]    Selection.Copy[/COLOR]
[COLOR=#0000ff][/COLOR][COLOR=#0000ff]    ActiveSheet.Paste[/COLOR]
[COLOR=#0000ff][/COLOR][COLOR=#0000ff]ActiveSheet.Shapes.Range(Array("YellowPostIt")).Visible = False[/COLOR]
[COLOR=#0000ff][/COLOR][COLOR=#0000ff]Application.ScreenUpdating = True[/COLOR]
[COLOR=#0000ff][/COLOR][COLOR=#0000ff]End Sub[/COLOR]
[COLOR=#0000ff][/COLOR][COLOR=#0000ff]
or this one for a blue post-it:
Code:
[/COLOR]
[COLOR=#0000ff][/COLOR][COLOR=#0000ff]Sub postit_blue()[/COLOR]
[COLOR=#0000ff][/COLOR][COLOR=#0000ff]'Application.ScreenUpdating = False[/COLOR]
[COLOR=#0000ff][/COLOR][COLOR=#0000ff]ActiveSheet.Shapes.Range(Array("BluePostIt")).Visible = True[/COLOR]
[COLOR=#0000ff][/COLOR][COLOR=#0000ff]    ActiveSheet.Shapes.Range(Array("BluePostIt")).Select[/COLOR]
[COLOR=#0000ff][/COLOR][COLOR=#0000ff]    Selection.Copy[/COLOR]
[COLOR=#0000ff][/COLOR][COLOR=#0000ff]    ActiveSheet.Paste[/COLOR]
[COLOR=#0000ff][/COLOR][COLOR=#0000ff]ActiveSheet.Shapes.Range(Array("BluePostIt")).Visible = False[/COLOR]
[COLOR=#0000ff][/COLOR][COLOR=#0000ff]Application.ScreenUpdating = True[/COLOR]
[COLOR=#0000ff][/COLOR][COLOR=#0000ff]End Sub[/COLOR]
[COLOR=#0000ff][/COLOR][COLOR=#0000ff]
This causes every generation of a post-it to create a shape with the exact same named pieces («Background», «Text», «Title»). When I then run the basic export to table code above, it only grabs the first one and leaves out all subsequent post-its. Even if I change the original template for each colored post-it to say «Background_Yellow, Text_Yellow, Title_Yellow» and the same for blue, green, etc. It only grabs the first one of each of the post-it copies (so 9 total possible) leaving all other post-its out of the table. This is why I thought perhaps a VBA to loop through and rename by appending an iterating number (Ex. «_1, _2») might solve the problem.
There is probably a MUCH better way to approach this than what I have set-up thus far. At the end of the day, what I’m trying to do is have one-click buttons (of various colors) that allow the user to generate a pre-colored/formatted post-it in that color for a brainstorming activity. A use case could result in having 60 yellow, 30 blue, 4 green, and 19 pink post-its. I then want to export all of the data on all of the post-its created by the user (not the original hidden templates) to a table that captures: post-it color («Background»), post-it title («Title»), and post-it text («Text»). Any ideas?
Your code below is perfect for finding out the name of each shape, as you suggested. But I actually don’t need to find out the name (and I don’t want to pull in the invisible post-it «templates» that are used to generate the user post-its. I just want to be able to export the user-generated post-its and their content.
Thanks in advance!!
The following code loops through all shapes in the activesheet and displays their name.
Code:
Sub shapes()


Dim shp As Shape


For Each shp In ActiveSheet.shapes


MsgBox (shp.name)


Next


End SubIn this Article
- For Each Loop
- For Each: Basic Examples
- Loop Through Cells
- Loop Through Sheets
- Loop Through Workbooks
- Loop Through Shapes
- Loop Through Charts
- Loop Through PivotTables
- Loop Through Tables
- Loop Through Items in Array
- Loop Through Numbers
- For Each Loop Builder
- For Each – If
- For Each Cell in Range – If
- For Each Common Examples
- Close All Workbooks
- Hide All Sheets
- Unhide All Sheets
- Protect All Sheets
- Unprotect All Sheets
- Delete All Shapes On All Worksheets
- Refresh All PivotTables
- Using For Each in Access VBA
This tutorial will show you examples of using the For Each Loop in VBA. Click here to learn more about loops in general.
For Each Loop
The For Each Loop allows you to loop through each object in a collection:
- All cells in a range
- All worksheets in a workbook
- All open workbooks
- All shapes in a worksheet
- All items in an array
- and more!
For Each: Basic Examples
These examples will demonstrate how to set up For Each loops to loop through different types of objects.
Loop Through Cells
This procedure will loop through each cell in range A1:A10, setting the cell to it’s right equal to itself.
Sub ForEachCell()
    Dim Cell As Range

    For Each Cell In Sheets("Sheet1").Range("A1:A10")
        Cell.Offset(0, 1).value = Cell.value
    Next Cell

End Sub
Loop Through Sheets
This procedure will loop through each sheet in a Workbook, unhiding each sheet.
Sub ForEachSheets()
    Dim ws As Worksheet

    For Each ws In Sheets
        ws.Visible = True
    Next ws

End Sub
Loop Through Workbooks
This procedure will loop through each Workbook, closing each one.
Sub ForEachWorkbooks()
    Dim wb As Workbook

    For Each wb In Workbooks
        wb.Close
    Next wb

End Sub
Loop Through Shapes
This procedure will loop through each shape in Sheet1, deleting each one.
Sub ForEachShape()
    Dim Shp As Shape

    For Each Shp In Sheets("Sheet1").Shapes
        Shp.Delete
    Next Shp

End Sub
VBA Coding Made Easy
Stop searching for VBA code online. Learn more about AutoMacro — A VBA Code Builder that allows beginners to code procedures from scratch with minimal coding knowledge and with many time-saving features for all users!

Learn More
Loop Through Charts
This procedure will loop through each Chart in Sheet1, deleting each one.
Sub ForEachCharts()
    Dim cht As ChartObject

    For Each cht In Sheets("Sheet1").ChartObjects
        cht.Delete
    Next cht

End Sub
Loop Through PivotTables
This procedure will loop through each PivotTable in Sheet1, clearing each one
Sub ForEachPivotTables()
    Dim pvt As PivotTable

    For Each pvt In Sheets("Sheet1").PivotTables
        pvt.ClearTable
    Next pvt

End Sub
Loop Through Tables
This procedure will loop through each Table in Sheet1, deleting each one.
Sub ForEachTables()
    Dim tbl As ListObject

    For Each tbl In Sheets("Sheet1").ListObjects
        tbl.Delete
    Next tbl

End Sub
VBA Programming | Code Generator does work for you!
Loop Through Items in Array
This procedure will loop through each item in an Array, display each value in a msgbox,
Sub ForEachItemInArray()
    Dim arrValue As Variant
    Dim Item As Variant
    arrValue = Array("Item 1", "Item 2", "Item 3")

    For Each Item In arrValue
        MsgBox Item
    Next Item

End Sub
Loop Through Numbers
This procedure will loop through each number in an Array, display each value in a msgbox,
Sub ForEachNumberInNumbers()
    Dim arrNumber(1 To 3) As Integer
    Dim num As Variant

    arrNumber(1) = 10
    arrNumber(2) = 20
    arrNumber(3) = 30

    For Each num In arrNumber
        Msgbox num
    Next num

End Sub
For Each Loop Builder
The examples in this article were built with the Loop Builder in our VBA Add-in: AutoMacro.
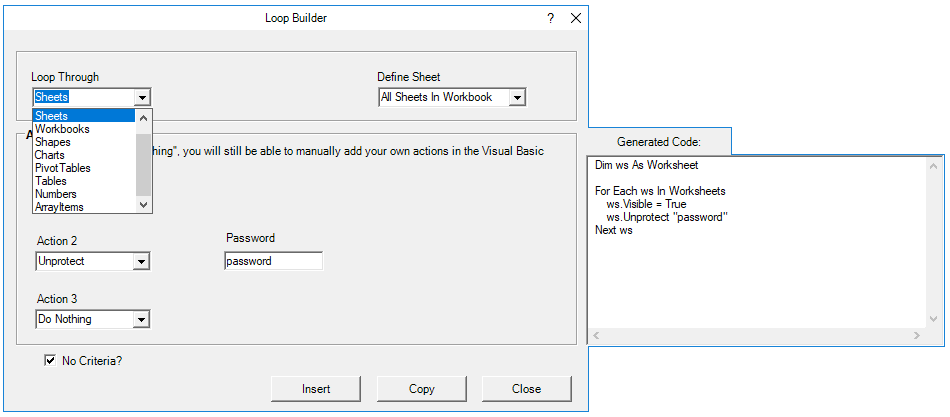
The Loop Builder makes it very easy to generate code to loop through objects. AutoMacro also contains many other Code Generators, an extensive Code Library, and powerful Coding Tools.
For Each – If
You can also use If Statements within Loops to test if objects meet certain criteria, only performing actions on those objects that meet the criteria. Here is an example of looping through each cell in a range:
For Each Cell in Range – If
Sub If_Loop()
Dim Cell as Range

  For Each Cell In Range("A2:A6")
    If Cell.Value > 0 Then
      Cell.Offset(0, 1).Value = "Positive"
    ElseIf Cell.Value < 0 Then
      Cell.Offset(0, 1).Value = "Negative"
    Else
      Cell.Offset(0, 1).Value = "Zero"
    End If
  Next Cell

End Sub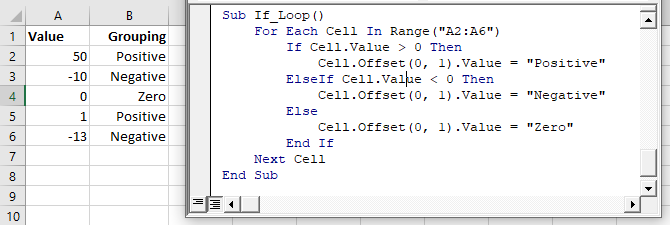
AutoMacro | Ultimate VBA Add-in | Click for Free Trial!
For Each Common Examples
Close All Workbooks
This procedure will close all open workbooks, saving changes.
Sub CloseAllWorkbooks()

    Dim wb As Workbook

    For Each wb In Workbooks
        wb.Close SaveChanges:=True
    Next wb

End Sub
Hide All Sheets
This procedure will hide all worksheets.
Sub HideAllSheets()
    Dim ws As Worksheet

    For Each ws In Sheets
        ws.Visible = xlSheetHidden
    Next ws

End Sub
Unhide All Sheets
This procedure will unhide all worksheets.
Sub UnhideAllSheets()
    Dim ws As Worksheet

    For Each ws In Sheets
        ws.Visible = xlSheetVisible
    Next ws

End Sub
AutoMacro | Ultimate VBA Add-in | Click for Free Trial!
Protect All Sheets
This procedure will protect all worksheets.
Sub ProtectAllSheets()
    Dim ws As Worksheet

    For Each ws In Sheets
        ws.Protect Password:="..."
    Next ws

End Sub
Unprotect All Sheets
This procedure will unprotect all worksheets.
Sub UnprotectAllSheets()
    Dim ws As Worksheet

    For Each ws In Sheets
        ws.Unprotect Password:="..."
    Next ws

End Sub
Delete All Shapes On All Worksheets
This procedure will delete all shapes in a workbook.
Sub DeleteAllShapesOnAllWorksheets()
    Dim Sheet As Worksheet
    Dim Shp As Shape


    For Each Sheet In Sheets
        For Each Shp In Sheet.Shapes
            Shp.Delete
        Next Shp
    Next Sheet

End Sub
Refresh All PivotTables
This procedure will refresh all PivotTables on a sheet.
Sub RefreshAllPivotTables()
    Dim pvt As PivotTable

    For Each pvt In Sheets("Sheet1").PivotTables
        pvt.RefreshTable
    Next pvt

End Sub
Using For Each in Access VBA
The For Each loop works the same way in Access VBA as it does in Excel VBA. The following example will remove all the tables in the current database.
Sub RemoveAllTables()
  Dim tdf As TableDef
  Dim dbs As Database
  Set dbs = CurrentDb
  For Each tdf In dbs.TableDefs
      DoCmd.DeleteObject tdf.Name
  Loop
  Set dbs = Nothing
End Sub