
Return to VBA Code Examples
In this Article
- Select All Cells In Worksheet with .Cells
- An example of selecting all cells on Sheet1 using the code name Sheet1:
- An example of selecting all cells on Sheet1 using it’s tabname. You can replace “PlaceTabNameHere” with the name of your tab
- VBA Coding Made Easy
Select All Cells In Worksheet with .Cells
To select all the cells on a sheet using VBA you can use the .cells property of the worksheet, without specifying a specific cell.
An example of selecting all cells on Sheet1 using the code name Sheet1:
Sub MySelectAll()

     Sheet1.Activate

     Sheet1.Cells.Select

End Sub
An example of selecting all cells on Sheet1 using it’s tabname. You can replace “PlaceTabNameHere” with the name of your tab
Sub MySelectAll2()

     Sheets("PlaceTabNameHere").Activate

     Sheets("PlaceTabNameHere").Cells.Select

End Sub
VBA Coding Made Easy
Stop searching for VBA code online. Learn more about AutoMacro – A VBA Code Builder that allows beginners to code procedures from scratch with minimal coding knowledge and with many time-saving features for all users!
Learn More!
Did you find this VBA tutorial useful? Then share it with your friends and colleagues using the share buttons at the side or the bottom.
Home / VBA / How to SELECT ALL the Cells in a Worksheet using a VBA Code
In VBA, there is a property called CELLS that you can use to select all the cells that you have in a worksheet.
Cells.Select- First, type the CELLS property to refer to all the cells in the worksheet.

- After that, enter a (.) dot.
- At this point, you’ll have a list of methods and properties.

- From that list select “Select” or type “Select”.


Once you select the entire worksheet you can change the font, clear contents from it, or do other things.
Notes
- The CELLS property works just like the way you use the keyboard shortcut Control + A to select all the cells.
- When you run this VBA code, it will select all the cells even if the sheet is protected and some of the cells are locked.
- It will select cells that are hidden as well.
The sheet Must Be Activated
Now you need to understand one thing here when you select all the cells from a sheet that sheet needs to be activated. In short, you can’t select cells from a sheet that is not activated.
Let’s say you want to select all the cells from “Sheet1”. If you use the type below code, you’ll get an error. You need to activate the “Sheet1” first and then use the “Cells” property to select all the cells.
Worksheets("Sheet1").Activate
Cells.Select
Now when you run this it will first activate the “Sheet1” and then select all the cells. This thing gives you a little limitation that you can’t select the entire sheet if that sheet is not activated.
Here’s another thing that you can do: You can add a new sheet and then select all the cells.
Sheets.Add.Name = "mySheet"
Cells.Select
More Tutorials
- Count Rows using VBA in Excel
- Excel VBA Font (Color, Size, Type, and Bold)
- Excel VBA Hide and Unhide a Column or a Row
- Excel VBA Range – Working with Range and Cells in VBA
- Apply Borders on a Cell using VBA in Excel
- Find Last Row, Column, and Cell using VBA in Excel
- Insert a Row using VBA in Excel
- Merge Cells in Excel using a VBA Code
- Select a Range/Cell using VBA in Excel
- ActiveCell in VBA in Excel
- Special Cells Method in VBA in Excel
- UsedRange Property in VBA in Excel
- VBA AutoFit (Rows, Column, or the Entire Worksheet)
- VBA ClearContents (from a Cell, Range, or Entire Worksheet)
- VBA Copy Range to Another Sheet + Workbook
- VBA Enter Value in a Cell (Set, Get and Change)
- VBA Insert Column (Single and Multiple)
- VBA Named Range | (Static + from Selection + Dynamic)
- VBA Range Offset
- VBA Sort Range | (Descending, Multiple Columns, Sort Orientation
- VBA Wrap Text (Cell, Range, and Entire Worksheet)
- VBA Check IF a Cell is Empty + Multiple Cells
⇠ Back to What is VBA in Excel
Helpful Links – Developer Tab – Visual Basic Editor – Run a Macro – Personal Macro Workbook – Excel Macro Recorder – VBA Interview Questions – VBA Codes
The “.Areas.Count” property has the number of areas stored in a Range object. You can loop through the “.Areas” in a Range object to access each of the areas in a range individually. This ability is very handy on subroutines or functions designed to perform actions on all cells a user selected, because this accounts for any number of areas a user may select and will function as intended in all circumstances.
Below is an Excel VBA example of code that can loop through all cells in a range regardless of the number of areas.
Code:
Sub LoopThroughAllCells()
    Dim selectedRange As Range
    Dim area As Range
    Dim cell As Range
    Dim areaCount As Integer
    Set selectedRange = Application.Selection
    areaCount = 1

    Debug.Print "# of Area(s):";
    If selectedRange.Areas.Count = 1 Then
        Debug.Print 1
        For Each cell In selectedRange 'loop through each cell in the selected range
            Debug.Print cell.Address 'do whatever
        Next
    Else
        Debug.Print selectedRange.Areas.Count
        For Each area In selectedRange.Areas 'more than 1 selected area
        Debug.Print "Area#: " & areaCount
            For Each cell In area 'loop through each cell in the selected range
                Debug.Print cell.AddressLocal 'do whatever
            Next
        areaCount = areaCount + 1
        Next
    End If
End Sub
Explanation:
- The line If selectedRange.Areas.Count tests for the number of cell areas that has been selected by the user. If the number is 1, then the user only selected 1 area. If not, then the user selected multiple areas.
- If there is only one area, the script directly loops through all the cells in the one range.
- If there are more than one area, the script loops through each of the ranges (as represented by the variable area). Then nested in the for loop, the script loops through each cell individually for the area.
- You can replace the “Debug.Print” line with “do whatever” comment with the action / function you want to perform for each of the cells.
Example:
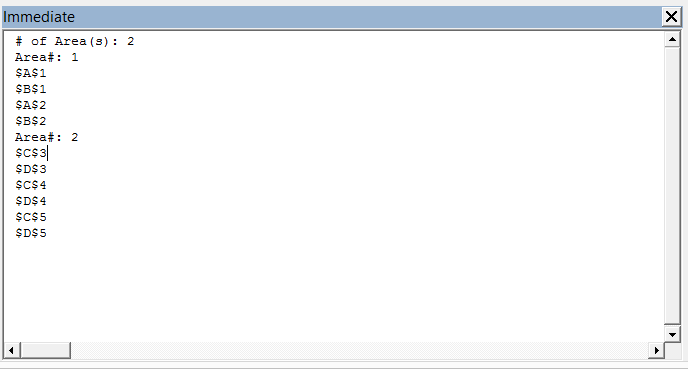
Here is a practical example when running the script with screenshots. A user first selects two cell ranges.
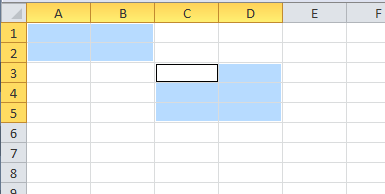
Running the VBA Macro, it detects two selected cell ranges, as you can see with the output “# of Area(s): 2”. And then loops through each of the cells and prints out the cell address of each selected cell.
Questions? Comments? Feel free to leave us a note below!
1 person found this article useful
1 person found this article useful
To get the most out of Excel and VBA, you need to know how to use loops efficiently.
In VBA, loops allow you to go through a set of objects/values and analyze it one by one. You can also perform specific tasks for each loop.
Here is a simple example of using VBA loops in Excel.
Suppose you have a dataset and you want to highlight all the cells in even rows. You can use a VBA loop to go through the range and analyze each cell row number. If it turns out to be even, you give it a color, else you leave it as is.
Now this, of course, is very simple of looping in Excel VBA (and you can also do this using conditional formatting).
In real life, you can do a lot more with VBA loops in Excel that can help you automate tasks.
Here are some more practical examples where VBA loops can be useful:
- Looping through a range of cells and analyzing each cell (highlight cells with a specific text in it).
- Looping through all the worksheets and do something with each (such as protect/unprotect it).
- Loop through all the open workbooks (and save each workbook or close all except the active workbook).
- Loop through all the characters in a cell (and extract the numeric part from a string).
- Loop through all the values an array.
- Loop through all the charts/objects (and give a border or change the background color).
Now to best use loops in Excel VBA, you need to know about the different kinds that exist and the correct syntax of each.

In this tutorial, I’ll showcase different types of Excel VBA loops and cover a few examples for each loop
Note: This is going to be a huge tutorial, where I will try and cover each VBA loop in some detail. I recommend you bookmark this page for future reference.
If you’re interested in learning VBA the easy way, check out my Online Excel VBA Training.
For Next Loop
The ‘For Next’ loop allows you to go through a block of code for the specified number of times.
For example, if I ask you to add the integers from 1 to 10 manually, you would add the first two numbers, then add the third number to the result, then add the fourth number to the result, as so on..
Isn’t it?
The same logic is used in the For Next loop in VBA.
You specify how many times you want the loop to run and also specify what you want the code to do each time the loop is run.
Below is the syntax of the For Next loop:
For Counter = Start To End [Step Value]
[Code Block to Execute]
Next [counter]
In the For Next loop, you can use a Counter (or any variable) that will be used to run the loop. This counter allows you to run this loop for a required number of times.
For example, if I want to add the first 10 positive integers, then my Counter value would be from 1 to 10.
Let’s have a look at a few examples to better understand how For Next loop works.
Example 1 – Adding the first 10 positive integers
Below is the code that will add the first 10 positive integers using a For Next loop.
It will then display a message box showing the sum of these numbers.
Sub AddNumbers()
Dim Total As Integer
Dim Count As Integer
Total = 0
For Count = 1 To 10
Total = Total + Count
Next Count
MsgBox Total
End Sub
In this code, the value of Total is set to 0 before getting into the For Next loop.
Once it gets into the loop, it holds the total value after every loop. So after the first loop, when Counter is 1, ‘Total’ value becomes 1, and after the second loop it becomes 3 (1+2), and so on.
And finally, when the loop ends, ‘Total’ variable has the sum of the first 10 positive integers.
A MsgBox then simply displays the result in a message box.
Example 2 – Adding the first 5 Even Positive Integers
To sum the first five even positive integers (i.e, 2,4,6,8, and 10), you need a similar code with a condition to only consider the even numbers and ignore the odd numbers.
Here is a code that will do it:
Sub AddEvenNumbers()
Dim Total As Integer
Dim Count As Integer
Total = 0
For Count = 2 To 10 Step 2
Total = Total + Count
Next Count
MsgBox Total
End Sub
Note that we started the Count value from 2 and also used ‘Step 2‘.
When you use ‘Step 2’, it tells the code to increment the ‘Count’ value by 2 every time the loop is run.
So the Count value starts from 2 and then becomes 4, 6, 8 and 10 as the looping occurs.
NOTE: Another way of doing this could be to run the loop from 1 to 10 and within the loop check whether the number is even or odd. However, using Step, in this case, is a more efficient way as it does not require the loop to run 10 times, but only 5 times.
The Step value can also be negative. In such as case, the Counter starts at a higher value and keeps getting decremented by the specified Step value.
Example 3 – Entering Serial Number in the Selected Cells
You can also use the For Next loop to go through a collection of objects (such as cells or worksheets or workbooks),
Here is an example that quickly enters serial numbers in all the selected cells.
Sub EnterSerialNumber()
Dim Rng As Range
Dim Counter As Integer
Dim RowCount As Integer
Set Rng = Selection
RowCount = Rng.Rows.Count
For Counter = 1 To RowCount
ActiveCell.Offset(Counter - 1, 0).Value = Counter
Next Counter
End Sub
The above code first counts the number of selected rows and then assigns this value to the variable RowCount. We then run the loop from ‘1 to RowCount’.
Also note that since selection can be any number of rows, we have Set the variable Rng to Selection (with the line ‘Set Rng = Selection’). Now we can use the ‘Rng’ variable to refer to the selection in our code.
Example 4 – Protect All Worksheets in the Active Workbook
You can use the ‘For Next’ loop to go through all the worksheets in the active workbook, and protect (or unprotect) each of the worksheets.
Below is the code that will do this:
Sub ProtectWorksheets()
Dim i As Integer
For i = 1 To ActiveWorkbook.Worksheets.Count
Worksheets(i).Protect
Next i
End Sub
The above code counts the number of sheets by using ActiveWorkbook.Worksheets.Count. This tells VBA how many times the loop needs to be run.
In each instance, it refers to the Ith workbook (using Worksheets(i)) and protects it.
You can use this same code to Unprotect worksheets too. Just change the line Worksheets(i).Protect to Worksheets(i).UnProtect.
Nested ‘For Next’ Loops
You can use nested ‘For Next’ loops to get more complex automation done in Excel. A nested ‘For Next’ loop would mean that there is a ‘For Next’ loop within a ‘For Next’ loop.
Let me show you how to use this using an example.
Suppose I have 5 workbooks open in my system and I want to protect all the worksheets in all these workbooks.
Below is the code that will do this:
Sub ProtectWorksheets()
Dim i As Integer
Dim j As Integer
For i = 1 To Workbooks.Count
For j = 1 To Workbooks(i).Worksheets.Count
Workbooks(i).Worksheets(j).Protect
Next j
Next i
End Sub
The above is a nested For Next loop as we have used one For Next loop within another.
‘EXIT For’ Statements in For Next Loops
‘Exit For’ statement allows you to exit the ‘For Next’ loop completely.
You can use it in cases where you want the For Next loop to end when a certain condition is met.
Let’s take an example where you have a set of numbers in Column A and you want to highlight all the negative numbers in red font. In this case, we need to analyze each cell for its value and then change the font color accordingly.
But to make the code more efficient, we can first check if there are any negative values in the list or not. If there are no negative values, we can use the Exit For the statement to simply come out of the code.
Below is the code that does this:
Sub HghlightNegative()
Dim Rng As Range
Set Rng = Range("A1", Range("A1").End(xlDown))
Counter = Rng.Count
For i = 1 To Counter
If WorksheetFunction.Min(Rng) >= 0 Then Exit For
If Rng(i).Value < 0 Then Rng(i).Font.Color = vbRed
Next i
End Sub
When you use the ‘Exit For’ statement within a nested ‘For Next’ loop, it will come out of the loop in which it is executed and go on to execute the next line in the code after the For Next loop.
For example, in the below code, the ‘Exit For’ statement will get you out of the inner loop, but the outer loop would continue to work.
Sub SampleCode()
For i = 1 To 10
For j = 1 to 10
Exit For
Next J
Next i
End Sub
Do While Loop
A ‘Do While’ loop allows you to check for a condition and run the loop while that condition is met (or is TRUE).
There are two types of syntax in the Do While Loop.
Do [While condition]
[Code block to Execute]
Loop
and
Do
[Code block to Execute]
Loop [While condition]
The difference between these two is that in the first, the While condition is checked first before any code block is executed, and in the second case, the code block is executed first and then the While condition is checked.
This means that if the While condition is False is both the cases, the code will still run at least once in the second case (as the ‘While’ condition is checked after the code has been executed once).
Now let’s see some examples of using Do While loops in VBA.
Example 1 – Add First 10 Positive Integers using VBA
Suppose you want to add the first ten positive integers using the Do While loop in VBA.
To do this, you can use the Do While loop until the next number is less than or equal to 10. As soon as the number is greater than 1o, your loop would stop.
Here is the VBA code that will run this Do While loop and the show the result in a message box.
Sub AddFirst10PositiveIntegers()
Dim i As Integer
i = 1
Do While i <= 10
Result = Result + i
i = i + 1
Loop
MsgBox Result
End Sub
The above loop continues to work until the value of ‘i’ becomes 11. As soon as it becomes 11, the loop ends (as the While condition becomes False).
Within the loop, we have used a Result variable that holds the final value Once the loop is completed, a message box shows the value of the ‘Result’ variable.
Example 2 – Enter Dates For the Current Month
Let’s say you want to enter all the dates of the current month into a worksheet column.
You can do that by using the following Do While loop code:
Sub EnterCurrentMonthDates()
Dim CMDate As Date
Dim i As Integer
i = 0
CMDate = DateSerial(Year(Date), Month(Date), 1)
Do While Month(CMDate) = Month(Date)
Range("A1").Offset(i, 0) = CMDate
i = i + 1
CMDate = CMDate + 1
Loop
End Sub
The above code would enter all the dates in the first column of the worksheet (starting from A1). The loops continue till the Month value of the variable ‘CMDate’ matches that of the current month.
Exit Do Statement
You can use the Exit Do statement to come out of the loop. As soon as the code executes the ‘Exit Do’ line, it comes out of the Do While loop and passes the control to the next line right after the loop.
For example, if you want to enter the first 10 dates only, then you can exit the loop as soon as the first 10 dates are entered.
The below code will do this:
Sub EnterCurrentMonthDates()
Dim CMDate As Date
Dim i As Integer
i = 0
CMDate = DateSerial(Year(Date), Month(Date), 1)
Do While Month(CMDate) = Month(Date)
Range("A1").Offset(i, 0) = CMDate
i = i + 1
If i >= 10 Then Exit Do
CMDate = CMDate + 1
Loop
End Sub
In the above code, the IF statement is used to check if the value of i is greater than 10 or not. As soon as the value of ‘i’ becomes 10, Exit Do statement is executed and the loop ends.
Do Until Loop
‘Do Until’ loops are very much like the ‘Do While’ loops.
In ‘Do While’, the loop runs till the given condition is met, while in ‘Do Until’, it loops until the specified condition is met.
There are two types of syntax in the Do Until Loop.
Do [Until condition]
[Code block to Execute]
Loop
and
Do
[Code block to Execute]
Loop [Until condition]
The difference between these two is that in the first, the Until condition is checked first before any code block is executed, and in the second case, the code block is executed first and then the Until condition is checked.
This means that if the Until condition is TRUE is both cases, the code will still run at least once in the second case (as the ‘Until’ condition is checked after the code has been executed once).
Now let’s see some examples of using Do Until loops in VBA.
Note: All the examples for Do Until are the same as that of Do While. These have been modified to show you how the Do Until loop works.
Example 1 – Add First 10 Positive Integers using VBA
Suppose you want to add the first ten positive integers using the Do Until loop in VBA.
To do this, you need to run the loop until the next number is less than or equal to 10. As soon as the number is greater than 1o, your loop would stop.
Here is the VBA code that will run this loop and show the result in a message box.
Sub AddFirst10PositiveIntegers()
Dim i As Integer
i = 1
Do Until i > 10
Result = Result + i
i = i + 1
Loop
MsgBox Result
End Sub
The above loop continues to work until the value of ‘i’ becomes 11. As soon as it becomes 11, the loop ends (as the ‘Until’ condition becomes True).
Example 2 – Enter Dates For the Current Month
Let’s say you want to enter all the dates of the current month into a worksheet column.
You can do that by using the following Do Until loop code:
Sub EnterCurrentMonthDates()
Dim CMDate As Date
Dim i As Integer
i = 0
CMDate = DateSerial(Year(Date), Month(Date), 1)
Do Until Month(CMDate) <> Month(Date)
Range("A1").Offset(i, 0) = CMDate
i = i + 1
CMDate = CMDate + 1
Loop
End Sub
The above code would enter all the dates in the first column of the worksheet (starting from A1). The loop continues until the Month of variable CMDate is not equal to that of the current month.
Exit Do Statement
You can use the ‘Exit Do’ statement to come out of the loop.
As soon as the code executes the ‘Exit Do’ line, it comes out of the Do Until loop and passes the control to the next line right after the loop.
For example, if you want to enter the first 10 dates only, then you can exit the loop as soon as the first 10 dates are entered.
The below code will do this:
Sub EnterCurrentMonthDates()
Dim CMDate As Date
Dim i As Integer
i = 0
CMDate = DateSerial(Year(Date), Month(Date), 1)
Do Until Month(CMDate) <> Month(Date)
Range("A1").Offset(i, 0) = CMDate
i = i + 1
If i >= 10 Then Exit Do
CMDate = CMDate + 1
Loop
End Sub
In the above code, as soon as the value of ‘i’ becomes 10, Exit Do statment is executed and the loop ends.
For Each
In VBA, you can loop through a set of collections using the ‘For Each’ loop.
Here are some examples of collections in Excel VBA:
- A collection of all the open Workbooks.
- A collection of all worksheets in a workbook.
- A collection of all the cells in a range of selected cells.
- A collection of all the charts or shapes in the workbook.
Using the ‘For Each’ loop, you can go through each of the objects in a collection and perform some action on it.
For example, you can go through all the worksheets in a workbook and protect these, or you can go through all the cells in the selection and change the formatting.
With the ‘For Each’ loop (also referred to as the ‘For Each-Next’ loop), you don’t need to know how many objects are there in a collection.
‘For Each’ loop would automatically go through each object and perform the specified action. For example, if you want to protect all the worksheets in a workbook, the code would be the same whether you have a workbook with 3 worksheets or 30 worksheets.
Here is the syntax of For Each-Next loop in Excel VBA.
For Each element In collection
[Code Block to Execute]
Next [element]
Now let’s see a couple of examples of using the For Each Loop in Excel.
Example 1 – Go through All the Worksheets in a Workbook (and Protect it)
Suppose you have a workbook where you want to protect all the worksheets.
Below For Each-Next loop can do this easily:
Sub ProtectSheets()
Dim ws As Worksheet
For Each ws In ActiveWorkbook.Worksheets
ws.Protect
Next ws
End Sub
In the above code, we have defined ‘ws’ variable as a Worksheet object. This tells VBA that ‘ws’ should be interpreted as a worksheet object in the code.
Now we use the ‘For Each’ statement to go through each ‘ws’ (which is a worksheet object) in the collection of all the worksheets in the active workbook (given by ActiveWorkbook.Worksheets).
Note that unlike other loops where we have tried to protect all the worksheets in a workbook, here we don’t need to worry about how many worksheets are there in the workbook.
We don’t need to count these to run the loop. For Each loop ensures that all the objects are analyzed one by one.
Example 2 – Go through All the Open Workbooks (and Save All)
If you work with multiple workbooks at the same time, it can come in handy to be able to save all these workbooks at once.
Below VBA code can do this for us:
Sub SaveAllWorkbooks()
Dim wb As Workbook
For Each wb In Workbooks
wb.Save
Next wb
End Sub
Note that in this code, you don’t get a prompt that asks you to save the workbook in a specific location (if saving it for the first time).
It saves it in the default folder (it was the ‘Documents’ folder in my case). This code works best when these files are already saved and you’re making changes and you want to save all the workbooks quickly.
Example 3 – Go through All the Cells in a Selection (Highlight negative values)
Using the ‘For Each’ loop, you can loop through all the cells in a specific range or in the selected range.
This can be helpful when you want to analyze each cell and perform an action based on it.
For example, below is the code that will go through all the cells in the selection and change the cell color of the cells with negative values to red.
Sub HighlightNegativeCells()
Dim Cll As Range
For Each Cll In Selection
If Cll.Value < 0 Then
Cll.Interior.Color = vbRed
End If
Next Cll
End Sub
(Note I’ve used Cll as a short variable name for Cell. It’s advisable not to use object names such as Sheets or Range as variable names)
In the above code, the For Each-Next loop goes through the collection of cells in the selection. IF statement is used to identify if the cell value is negative or not. In case it is, the cell is given a red interior color, else it goes to the next cell.
In case you don’t have a selection, and instead want VBA to select all the filled cells in a column, starting from a specific cell (just like we use Control + Shift + Down arrow key to select all filled cells), you can use the below code:
Sub HighlightNegativeCells()
Dim Cll As Range
Dim Rng As Range
Set Rng = Range("A1", Range("A1").End(xlDown))
For Each Cll In Rng
If Cll.Value < 0 Then
Cll.Interior.Color = vbRed
End If
Next Cll
End Sub
In the above example, it doesn’t matter how many filled cells are there. It will start from cell A1 and analyze all the contiguous filled cells in the column.
You also don’t need to have cell A1 selected. You can have any far-off cell selected and when the code runs, it will still consider all the cells in column A (starting from A1) and color the negative cells.
‘Exit For’ Statment
You can use the ‘Exit For’ statement in the For Each-Next loop to come out of the loop. This is usually done in case a specific condition is met.
For example, in Example 3, as we are going through a set of cells, it can be more efficient to check if there are any negative values or not. In case there are no negative values, we can simply exit the loop and save some VBA processing time.
Below is the VBA code that will do this:
Sub HighlightNegativeCells()
Dim Cll As Range
For Each Cll In Selection
If WorksheetFunction.Min(Selection) >= 0 Then Exit For
If Cll.Value < 0 Then
Cll.Interior.Color = vbRed
End If
Next Cll
End Sub
Where to Put the VBA Code
Wondering where the VBA code goes in your Excel workbook?
Excel has a VBA backend called the VBA editor. You need to copy and paste the code in the VB Editor module code window.
Here are the steps to do this:
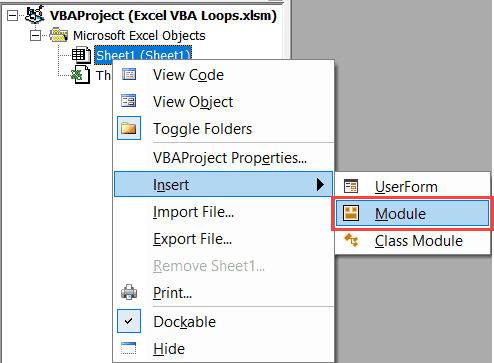
- Go to the Developer tab.

- Click on the Visual Basic option. This will open the VB editor in the backend.
- In the Project Explorer pane in the VB Editor, right-click on any object for the workbook in which you want to insert the code. If you don’t see the Project Explorer go to the View tab and click on Project Explorer.
- Go to Insert and click on Module. This will insert a module object for your workbook.

- Copy and paste the code in the module window.


You May Also Like the Following Excel Tutorials:
- How to record a macro in Excel.
- Creating User-defined functions in Excel.
- Excel VBA Msgbox
- How to Run a Macro in Excel.
- How to Create and Use Add-ins in Excel.
- Excel VBA Events – An Easy (and Complete) Guide.
- How to Sort Data in Excel using VBA (A Step-by-Step Guide).
- 24 Useful Excel Macro Examples for VBA Beginners (Ready-to-use).
- How to Use Excel VBA InStr Function (with practical EXAMPLES).
- Excel Personal Macro Workbook | Save & Use Macros in All Workbooks.
- Using Select Case in Excel VBA.
After the basic stuff with VBA, it is important to understand how to work with a range of cells in the worksheet. Once you start executing the codes practically, you need to work with various cells. So, it is important to understand how to work with various cells. One such concept is VBA’s “Selection of Range.” This article will show you how to work with the “Selection Range” in Excel VBA.
Selection and Range are two different topics, but when we say to select the range or selection of range, it is a single concept. RANGE is an object, “Selection” is a property, and “Select” is a method. People tend to be confused about these terms. It is important to know the differences in general.
Table of contents
- Excel VBA Selection Range
- How to Select a Range in Excel VBA?
- Example #1
- Example #2 – Working with Current Selected Range
- Things to Remember Here
- Recommended Articles
- How to Select a Range in Excel VBA?

How to Select a Range in Excel VBA?
You can download this VBA Selection Range Excel Template here – VBA Selection Range Excel Template
Example #1
Assume you want to select cell A1 in the worksheet, then. But, first, we need to specify the cell address by using a RANGE object like below.
Code:

After mentioning the cell, we need to select and put a dot to see the IntelliSense list, which is associated with the RANGE object.

From this variety of lists, choose the “Select” method.
Code:
Sub Range_Example1()

  Range("A1").Select

End Sub

Now, this code will select cell A1 in the active worksheet.

To select the cell in the different worksheets, specify the worksheet by its name. To specify the worksheet, we need to use the “WORKSHEET” object and enter the worksheet name in double quotes.
For example, if you want to select cell A1 in the worksheet “Data Sheet,” specify the worksheet just like below.
Code:
Sub Range_Example1()

  Worksheets ("Data Sheet")

End Sub
Then continue the code to specify what we need to do in this sheet. For example, in “Data Sheet,” we need to select cell A1 so that the code will be RANGE(“A1”).Select.
Code:
Sub Range_Example1()

  Worksheets("Data Sheet").Range("A1").Select

End Sub
When you try to execute this code, we will get the below error.
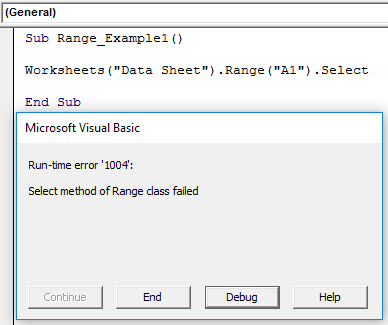
It is because “we cannot directly supply a range object and select method to the worksheets object.”
First, we need to select or activate the VBA worksheetWhen working with VBA, we frequently refer to or use the properties of another sheet. For instance, if we’re working on sheet 1 and need a value from cell A2 on sheet 2, we won’t be able to access it unless we first activate the sheet. So, to activate a sheet in VBA we use worksheet property as Worksheets(“Sheet2”). Activate.read more, and then we can do whatever we want.
Code:
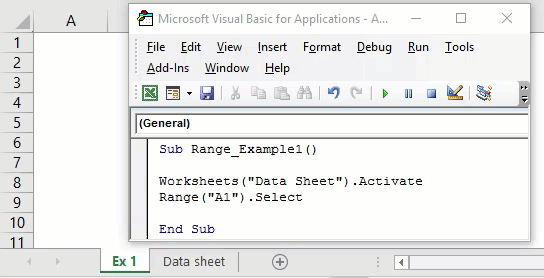
Sub Range_Example1()

  Worksheets("Data Sheet").Activate
  Range("A1").Select

End Sub
It will now select cell A1 in the worksheet “Data Sheet.”
Example #2 – Working with Current Selected Range
Selecting is different, and working with an already selected range of cells is different. For example, assume you want to insert a value “Hello VBA” to cell A1 then we can do it in two ways.
Firstly we can directly pass the VBA codeVBA code refers to a set of instructions written by the user in the Visual Basic Applications programming language on a Visual Basic Editor (VBE) to perform a specific task.read more as RANGE(“A1”).Value = “Hello, VBA.”
Code:
Sub Range_Example1()

  Range("A1").Value = "Hello VBA"

End Sub
This code will insert the value “Hello VBA” to cell A1, irrespective of which cell is currently selected.

Look at the above result of the code. When we execute this code, it has inserted the value “Hello VBA,” even though the currently selected cell is B2.
Secondly, we can insert the value into the cell using the “Selection” property. But, first, we need to select the cell manually and execute the code.
Code:
Sub Range_Example1()

  Selection.Value = "Hello VBA"

End Sub
What this code will do is insert the value “Hello VBA” to the currently selected cell. For example, look at the below example of execution.
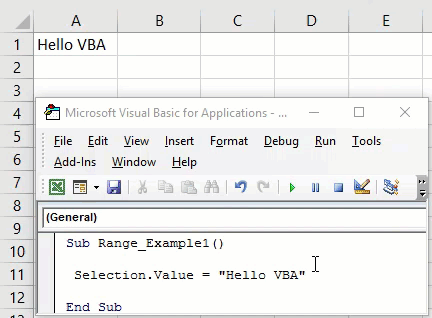
When we executed the code, my current selected cell was B2. Therefore, our code inserted the same value to the currently selected cell.
Now, we will select cell B3 and execute. There also, we will get the same value.

Another thing we can do with the “selection” property is insert a value to more than one cell. So, for example, we will select the range of cells from A1 to B5 now.

If we execute the code for all the selected cells, we get the value “Hello VBA.”

So, the simple difference between specifying a cell address by RANGE object and Selection property is that the Range object code will insert value to the cells specified explicitly.
But in the Selection object, it does not matter which cell you are in. It will insert the mentioned value to all the selected cells.
Things to Remember Here
- We cannot directly supply the select method under the Selection property.
- The RANGE is an object, and selection is property.
- Instead of range, we can use the CELLS property.
Recommended Articles
This article is a guide to VBA Selection Range. Here, we learn how to select a range in Excel VBA along with examples and download an Excel template. Below are some useful Excel articles related to VBA: –
- VBA DoEvents
- Range Cells in VBA
- VBA Intersect
- VBA Switch Function