
The FileSystemObject VBA GetFile function will return a File object on which you can run several methods (Copy, Delete, Move, OpenAsTextStream) and obtain file properties (e.g. Date Created, Size, Type etc. see more below).
VBA FileSystemObject Methods
- BuildPath
- CopyFile
- CopyFolder
- CreateFolder
- CreateTextFile
- DeleteFile
- DeleteFolder
- DriveExists
- FileExists
- FolderExists
- GetAbsolutePathName
- GetBaseName
- GetDrive
- GetDriveName
- GetExtensionName
- GetFile
- GetFileName
- GetFolder
- GetParentFolderName
- GetSpecialFolder
- GetTempName
- MoveFile
- MoveFolder
- OpenTextFile
VBA GetFile Syntax
fso.GetFile( path )
path
The path to the file for which a File object is to be returned.
VBA GetFile Examples
Set fso = CreateObject("Scripting.FileSystemObject")

Set f = fso.GetFile("C:SrcHello.txt") 'Return the File object

'Now we can obtain various properties of the File
Debug.Print f.DateCreated 'Date when file was created
Debug.Print f.Drive 'Result: "C:" - the drive of the file path
Debug.Print f.Name 'Result: "Hello.txt" - name of the file
Debug.Print f.ParentFolder 'Result: "Hello.txt" - name of the file
Debug.Print f.Path 'Result: "Hello.txt" - name of the file
Debug.Print f.ShortName 'Returns short name of file with 8.3 naming convention
Debug.Print f.ShortPath 'Returns short path to file with 8.3 naming convention
Debug.Print f.Size 'Size of file in bytes
Debug.Print f.Type 'Result: "Text Document" - type of the file

'We can also run several basic file operations on the file
f.Copy "C:NewFolderNewName.txt" 'Copy file
f.Move "C:NewFolder" 'Move the file to new destination
Set ts = f.OpenAsTextStream(ForReading, TristateUseDefault) 'Open file as text stream for read write or append
f.Delete 'Delete the fil
In this Article
- Get Folder and File Properties with VBA FileSystemObject
- Set VBA Reference
- FileSystemObject
- Use of GetFolder Method
- GetParentFolderName Method
- GetSpecialFolder Method
- GetFile Method
This tutorial will demonstrate how to use the GetFolder and GetFile methods of the FileSystemObject.
Get Folder and File Properties with VBA FileSystemObject
The GetFolder method returns a Folder object corresponding to the folder in a specified path and lets you access its properties. The GetFile method does the same with the file specified.
Set VBA Reference
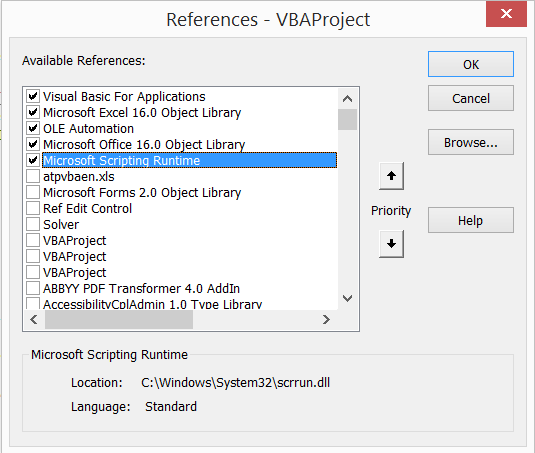
First, when using FileSystemObjects, you may have to set a reference to the VB script run-time library: open the Visual Basic Editor (ALT+F11), select Tools > References from the drop-down menu and tick the check-box of ‘Microsoft Scripting Runtime’.
FileSystemObject
Second, you must create the FileSystemObject:
Dim FSO As New FileSystemObject
Set FSO = CreateObject("Scripting.FileSystemObject")
Now you have access to GetFolder, and the other FileSystemObject Methods.
Use of GetFolder Method
After specifying the folder you want to access
Set fld = FSO.GetFolder("C:Src")you can copy the folder:
fld.Copy "C:NewFolder"move the folder:
fld.Move "C:NewFolder"delete the folder:
fld.Deleteor create a new text file in the folder:
fld.CreateTextFile “NewTextFile.txt"By using this method, you get access to the folder’s properties such as its attributes (fld.Attributes), the date and time when it was created (fld.DateCreated), last accessed (fld.DateLastAccessed), last modified (fld.DateLastModified), its drive’s letter (fld.Drive), its name and short name (fld.Name, fld.ShortName), its path and short path (fld.Path, fld.ShortPath), its size (fld.Size), its type (fld.Type), its parent folder (fld.ParentFolder), check whether it is a root folder (fld.IsRootFolder) or you can loop through, count, etc. its files (fld.Files) or subfolders (fld.SubFolders).
Putting this all together in a procedure would look like this:
Sub FSOGetFolder()
    Dim FSO As New FileSystemObject
    Set FSO = CreateObject("Scripting.FileSystemObject")
    Set fld = FSO.GetFolder("C:Src")

    Debug.Print fld.DateCreated
    Debug.Print fld.Drive
    Debug.Print fld.Name
    Debug.Print fld.ParentFolder
    Debug.Print fld.Path
    Debug.Print fld.ShortPath
    Debug.Print fld.Size
    Debug.Print fld.Files.Count
    Debug.Print fld.Type

    For Each fold In fld.SubFolders
        Debug.Print fold.Name
    Next fold

    For Each fil In fld.Files
        Debug.Print fil.Name
    Next fil

End Sub
Please note that you can press Ctrl + G to see the result of Debug.Print in the VBA immediate window.
GetParentFolderName Method
Alternatively to the above mentioned way, you can access a folder’s parent folder’s name by using this code:
Dim FSO As New FileSystemObject
Set FSO = CreateObject("Scripting.FileSystemObject")

ParentFold= FSO.GetParentFolderName("C:ParentTestTest")
ParentFold will be in this case “C:ParentTest”.
Please note that this method will not resolve the path, nor does it check for the existence of the specified path.
GetSpecialFolder Method
With the GetSpecialFolder method, by passing 0, 1 or 2 as an argument, you can get your Windows folder path (with files installed by the Windows operating system), your system folder path (with libraries, fonts, and device drivers) and temporary folder path (the folder that is used for storing temporary files), respectively.
Sub FSOGetSpecialFolder()
    Dim FSO As New FileSystemObject
    Set FSO = CreateObject("Scripting.FileSystemObject")

    Debug.Print FSO.GetSpecialFolder(0) ‘Result can be: C:WindowsSystem32

End Sub
VBA Coding Made Easy
Stop searching for VBA code online. Learn more about AutoMacro — A VBA Code Builder that allows beginners to code procedures from scratch with minimal coding knowledge and with many time-saving features for all users!

Learn More
GetFile Method
You can use the GetFile method in a very similar way as the GetFolder method. After specifying the file you want to access
Set fil = FSO.GetFile("C:SrcTest.xlsx")you can copy the file:
fil.Copy "C:Dst"move the file:
fil.Move "C:Dst"delete the file:
fil.Deleteor open it as a TextStream object:
fil.OpenAsTextStreamThe file’s properties such as its attributes, the date and time when it was created, last accessed or last modified, its drive’s letter, name and short name, path and short path, size, type and its parent folder can be accessed the same way as described at the GetFolder method.
Macro Objective
Our objective is to write a simple macro that prompts the user for a file using a traditional “file open” dialog box. With this information, we will open the file in the background, copy a range of data, paste it into our active worksheet, then close the user-selected file.
Open the VBA Editor to Start Writing Code
Begin by opening the Visual Basic Editor by pressing ALT-F11 on the keyboard.
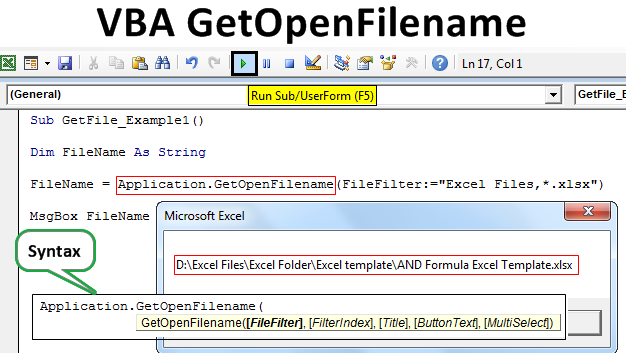
The process of presenting a dialog box to open files can be accomplished by accessing a built-in method of the Application object. The method is called GetOpenFilename.
To use the GetOpenFilename method in a macro, start a new procedure and enter the following code.
Sub Get_Data_From_File()
	Application.GetOpenFilename
End Sub

That’s it!
To test, run the macro to watch as Excel presents us with the Open dialog box.
Notice that the title of the dialog box is “Open” and the default file type filter is to display all file types.

These are customizable options.
If we cancel the macro or select a file and click Open, nothing happens.
This is because the purpose of the GetOpenFilename method is to capture the name of a selected file; nothing more. The act of opening the file would need to be performed by a separate piece of code.
To make this method useful, we will store the selected file in a variable then use the variable in an Open method to perform the file open operation.
Customizing the GetOpenFilename Method
The syntax for the GetOpenFilename method is:
GetOpenFilename( FileFilter, FilterIndex, Title, ButtonText, MultiSelect)There are several customizable options with the GetOpenFilename method.
- FileFilter –defines the pattern by which files are filtered. If you only wish to display text files (files with a .TXT or .CSV extension) you would define the filter as (“Text Files (*.TXT; *.CSV), *.txt; *.csv”).
- FilterIndex – specifies the default filter from the list supplied in the FileFilter If not defined, the first item in the list is selected as the default.
- Title – specifies the text to be displayed in the title bar of the dialog box.
- ButtonText – customizes the text for the buttons (Macintosh only).
- MultiSelect – Use TRUE to allow multiple files to be selected. Use FALSE to only allow a single file selection. FALSE is the default choice.
If you’d like to understand how to use MultiSelect correctly, check out the complete course.
Updating the Code
The following are modifications we will make to our existing code:
- We want to capture the user’s selection in a variable named “FileToOpen”. This will be declared as a string data type.
- We will use an SET assignment statement to place the user’s selection in the “FileToOpen” variable.
- We will customize the title of the dialog box to read “Browse for your File & Import Range”.
- Finally, we will only display Excel files in the dialog box; i.e. files ending in .XLS, .XLSX, .XLSM, or .XLSB.
Using the argument positions to define the options, the updated code will appear as follows:
Sub Get_Data_From_File()
Dim FileToOpen as String
	FileToOpen = Application.GetOpenFilename(“Excel Files (*.xls*), *xls*”, , “Browse for your File & Import Range”)
End Sub
(click image to zoom)
Using the option titles to define the options, the updated code can be made more readable:
Sub Get_Data_From_File()
Dim FileToOpen as String
	FileToOpen = Application.GetOpenFilename(Title:=“Browse for your File & Import Range”, FileFilter:= “Excel Files (*.xls*), *xls*”)
End Sub

(click image to zoom)
Testing the Code
When we run the code, we are presented with the following (note the custom title and filters):

Selecting a file and clicking Open returns us back to Excel with no action. We’re still not convinced anything happened.
To see the user’s file selection captured as a variable, perform the following:
- Add a breakpoint to the “End Sub” step of the code (click the light gray column to the left of the “End Sub” line of code)
- Highlight the “FileToOpen” variable
- Right-click the highlighted variable and select “Add Watch…”
- Click OK to add the watch (the Watch window will open automatically)


(click image to zoom)
Run the code.
After selecting a test file and clicking Open, the code will pause on the final line.
Examining the Watch window, we can see the selected file name has been captured and stored in the “FileToOpen” variable. (NOTE: You can also hover your mouse pointer over any reference to “FileToOpen” and observe a pop-up that displays the variable’s contents.)

(click image to zoom)
Cancelling Our Choice
Suppose the user cancels the Open dialog box. How will the code respond to this action?
If we launch the code and press the Cancel button without selecting a file, the GetOpenFilename method returns a “False” response and stores it in our “FileToOpen” variable.

(click image to zoom)
Because the “FileToOpen” variable was declared as a string data type, the word “False” will be interpreted as the filename to be opened.
Fixing the Code
Because we want to capture a text string when the user selects a file or capture a Boolean response when the user clicks the Cancel button, we need to change the data type of our “FileToOpen” variable to a Variant data type.
Dim FileToOpen as VariantDim FileToOpen as Variant
If we execute the code with this modification, we can see when we pause on the last line that the “FileToOpen” variable is holding a Boolean FALSE response, not a text response.

(click image to zoom)
We will test the “FileToOpen” variable for the presence of a Boolean FALSE. If the variable is NOT False, we will execute the remainder of the code. Otherwise, we will do nothing.
Sub Get_Data_From_File()
Dim FileToOpen As Variant
	FileToOpen = Application.GetOpenFilename(Title:="Browse for your File & Import Range", FileFilter:="Excel Files (*.xls*),*xls*")
	If FileToOpen <> False Then
		(Things happen here)
	End If
End Sub
(click image to zoom)
The below code contains instructions for what is to be performed when a valid filename is supplied.
We have added an additional variable named “OpenBook” to store the contents of the selected file. The “OpenBook” variable is declared as a Workbook data type.
The additional code will perform the following tasks:
- Open the selected file
- Store the contents of the file in the variable “OpenBook”
- Select the first sheet in the workbook
- Copy the contents of cells A1 through E20
- Paste the copied data as values into the file named “SelectFile” starting in cell A10
- Close the workbook selected by the user
Sub Get_Data_From_File()
Dim FileToOpen As Variant
Dim OpenBook as Workbook
	FileToOpen = Application.GetOpenFilename(Title:="Browse for your File & Import Range", FileFilter:="Excel Files (*.xls*),*xls*")
	If FileToOpen <> False Then
		Set OpenBook = Application.Workbooks.Open(FileToOpen)
		OpenBook.Sheets(1).Range("A1:E20").Copy
		ThisWorkbook.Worksheets("SelectFile").Range("A10").PasteSpecial xlPasteValues
		OpenBook.Close False
	End If
End Sub

(click image to zoom)
Optimizing the Code
To reduce screen flicker when opening background files, we will add the “Application.ScreenUpdating” toggle to our code.
We will place the toggle at the beginning with a FALSE setting and the same toggle at the end of the code with a TRUE setting.
Sub Get_Data_From_File()
Dim FileToOpen As Variant
Dim OpenBook as Workbook
Application.ScreenUpdating = False
	(Original OPEN and IF operations go here)
Application.ScreenUpdating = True
End Sub
BONUS: Defining Multiple Filters with Defaults
If you wish to filter for a variety of file type; such as Excel files, text files, or all files, you can define your FileFilter argument as follows:
Application.GetOpenFilename("Excel Files (*xls*), *xls*, Text Files (*.TXT), *.txt, All Files (*.*), *.*")Notice when run, the list has been filtered for Excel files, but you are provided a dropdown to select one of the other two categories of files.

If we add a value to the FilterIndex option, we can pre-select one of the defined filters to be a default choice. For our three filters, we would define the following values:
1 – for Excel files
2 – for Text files
3 – for All files
The updated code will appear as follows if we wish for Text files to be the default filter selection.
Application.GetOpenFilename("Excel Files (*xls*), *xls*, Text Files (*.TXT), *.txt, All Files (*.*), *.*", 2)
Practice Workbook
Feel free to Download the Workbook HERE.
![]()
Published on: September 26, 2019
Last modified: February 28, 2023


Leila Gharani
I’m a 5x Microsoft MVP with over 15 years of experience implementing and professionals on Management Information Systems of different sizes and nature.
My background is Masters in Economics, Economist, Consultant, Oracle HFM Accounting Systems Expert, SAP BW Project Manager. My passion is teaching, experimenting and sharing. I am also addicted to learning and enjoy taking online courses on a variety of topics.
| title | keywords | f1_keywords | ms.prod | api_name | ms.assetid | ms.date | ms.localizationpriority |
|---|---|---|---|---|---|---|---|
|
Application.GetOpenFilename method (Excel) |
vbaxl10.chm133142 |
vbaxl10.chm133142 |
excel |
Excel.Application.GetOpenFilename |
83931dc2-59b3-550b-6ce1-880413fd23d6 |
04/04/2019 |
high |
Application.GetOpenFilename method (Excel)
Displays the standard Open dialog box and gets a file name from the user without actually opening any files.
Syntax
expression.GetOpenFilename (FileFilter, FilterIndex, Title, ButtonText, MultiSelect)
expression A variable that represents an Application object.
Parameters
| Name | Required/Optional | Data type | Description |
|---|---|---|---|
| FileFilter | Optional | Variant | A string specifying file filtering criteria. |
| FilterIndex | Optional | Variant | Specifies the index numbers of the default file filtering criteria, from 1 to the number of filters specified in FileFilter. If this argument is omitted or greater than the number of filters present, the first file filter is used. |
| Title | Optional | Variant | Specifies the title of the dialog box. If this argument is omitted, the title is «Open.» |
| ButtonText | Optional | Variant | Macintosh only. |
| MultiSelect | Optional | Variant | True to allow multiple file names to be selected. False to allow only one file name to be selected. The default value is False. |
Return value
Variant
Remarks
This string passed in the FileFilter argument consists of pairs of file filter strings followed by the MS-DOS wildcard file filter specification, with each part and each pair separated by commas. Each separate pair is listed in the Files of type drop-down list box. For example, the following string specifies two file filters—text and addin:
"Text Files (*.txt), *.txt,Add-In Files (*.xla), *.xla"
To use multiple MS-DOS wildcard expressions for a single file filter type, separate the wildcard expressions with semicolons; for example: "Visual Basic Files (*.bas; *.txt), *.bas;*.txt".
If FileFilter is omitted, this argument defaults to "All Files (*.*), *.*".
This method returns the selected file name or the name entered by the user. The returned name may include a path specification. If MultiSelect is True, the return value is an array of the selected file names (even if only one file name is selected). Returns False if the user cancels the dialog box.
This method may change the current drive or folder.
Example
This example displays the Open dialog box, with the file filter set to text files. If the user chooses a file name, the code displays that file name in a message box.
fileToOpen = Application _
 .GetOpenFilename("Text Files (*.txt), *.txt")
If fileToOpen <> False Then
 MsgBox "Open " & fileToOpen
End If
[!includeSupport and feedback]
GetOpenFilename is a method that is also an attribute of FSO. This method is used in VBA to find a certain file with a file name and select it. The important factor in this method is the path of the file name provided to open it. Therefore, we can either pass the file name in the function or ask the user to present a file path to select it.
Table of contents
- Excel VBA Application.GetOpenFilename
- What Does GetOpenFilename do in Excel VBA?
- Example of GetOpenFilename in Excel VBA
- Recommended Articles
Excel VBA Application.GetOpenFilename
There are situations where we need to access the specified file name, which can be possible with VBA coding. To access the file, we need to mention the folder path and file name along with its file extension. To get the file name, many coders will give the VBA input boxVBA InputBox is inbuilt function used to get a value from the user, this function has two major arguments in which one is the heading for the input box and another is the question for the input box, input box function can store only the data types input which it variable can hold.read more as the option to enter the file path and file name. But this is not a good option to practice because when you present an input box in front of the user, they do not always remember the file path, backslashes to separate one folder from another folder, file names, and extension of the files. It makes the input the user gives messier. In the end, everything will screw up, even if there is a small space character mistake. The best way is to replace the input box with VBA’s method called “GetOpenFileName.”
This article will show you how to use VBA GetOpenFileName to get the file name without errors.
What Does GetOpenFilename do in Excel VBA?
VBA “GetOpenFileName” allows the user to select the file from the computer we are working on without opening the file.
With the help of the “GetOpenFileName” method, we can present a dialog box in front of the user to select the file in the required folder. “GetOpenFileName” will copy the file location along with the file name and file extension.
Syntax of GetOpenFilename in Excel VBA
Take a look at the syntax of the “GetOpenFilename” method.
![]()
- File Filter: In this argument, we can specify what kind of files to be displayed to select. For example, if you mention “Excel Files,*.xlsx,” it will display only Excel Files saved with the excel extensionExcel extensions represent the file format. It helps the user to save different types of excel files in various formats. For instance, .xlsx is used for simple data, and XLSM is used to store the VBA code.read more “xlsx.” It will display no other files. However, if you ignore it, it will display all kinds of files.
- Filter Index: With this, we restrict the user from selecting the file type. We can specify the number of filters visible under File Filter.
- Title: It shows the select file dialogue box title.
- Button Text: This is only for Macintosh.
- Multi-Select: TRUE if you want to select multiple files or else FALSE. The default value is FALSE.
Example of GetOpenFilename in Excel VBA
Below are examples of VBA Application.GetOpenFilename.
You can download this VBA GetOpenFilename Excel Template here – VBA GetOpenFilename Excel Template
Let us write a code to get the file name and path address.
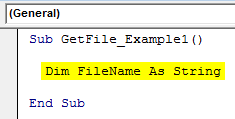
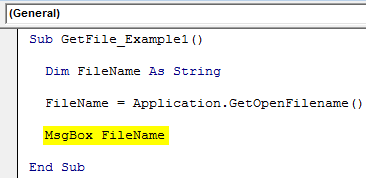
Step 1: Start the subroutine.
Code:
Sub GetFile_Example1()

End Sub

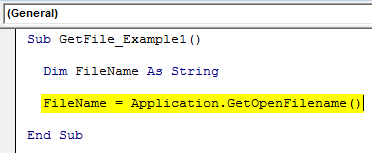
Step 2: Declare a variable as String.
Code:
Sub GetFile_Example1()

   Dim FileName As String

End Sub
Step 3: For this variable, we will assign the GetOpenFileName.
Code:
Sub GetFile_Example1()

  Dim FileName As String

  FileName = Application.GetOpenFilename()

End Sub
As of now, we have ignored all the parameters.
Step 4: Now show the result of the variable in the message box.
Code:
Sub GetFile_Example1()

  Dim FileName As String

  FileName = Application.GetOpenFilename()

  MsgBox FileName

End Sub
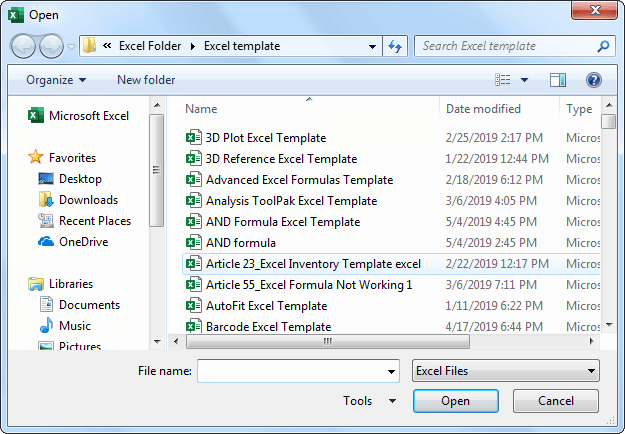
Now run the code through the excel shortcut keyAn Excel shortcut is a technique of performing a manual task in a quicker way.read more F5 or manually. It will show the below dialog box to select the file.

We will select any one file and click on “OK.”

When we select the file, we get a message box in VBAVBA MsgBox function is an output function which displays the generalized message provided by the developer. This statement has no arguments and the personalized messages in this function are written under the double quotes while for the values the variable reference is provided.read more like this. It shows the full folder path, selected Excel file name, and file extension.
As seen in the above image, we could see all kinds of files.
Now we will add the first parameter, i.e., File Filter, as “Excel Files,*.xlsx.”
Code:
Sub GetFile_Example1()

  Dim FileName As String

  FileName = Application.GetOpenFilename(FileFilter:="Excel Files,*.xlsx")

  MsgBox FileName

End Sub
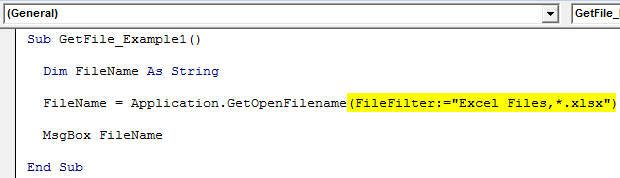
If we run this code using the F5 key or manually. We will see only Excel files with the extension “xlsx.”
Like this, we can use the “VBA Application.GetOpenFileName” method to get the folder path along with the file name and extension.
Recommended Articles
This article has been a guide to VBA GetOpenFilename. Here we learn how to use the VBA Application.GetOpenFileName method to select the files from the folders along with examples. Below are some useful Excel articles related to VBA: –
- VBA FileCopy
- VBA FileDialog
- Operators in VBA
- Call Subroutine in VBA