
Содержание
- Как сделать код vba совместимым с libre office
- 5 ответов
- Как перенести макросы из excel в libreoffice
- Как сделать код vba совместимым с libre office
- Преобразование макроса из Excel в LibreOffice Calc
- Copyright
- Contributors
- Feedback
- Using LibreOffice on macOS
- Introduction
- On Visual Basic for Applications (VBA) compatibility
- Using the macro recorder
- Write your own functions
- Create a function macro
- Using a macro as a function
- Macro security warnings
- Loaded / unloaded libraries
- Passing arguments to a macro
- Arguments are passed as values
- Writing macros that act like built-in functions
- Deleting LibreOffice Basic macros
- Accessing cells directly
- Sorting
- Overview of BeanShell, JavaScript, and Python macros
- Introduction
- BeanShell macros
- JavaScript macros
- Python macros
- ScriptForge library
- Built-in object inspector
- Working with VBA macros
- Loading VBA code
- Option VBASupport statement
- VBA UserForms (LibreOffice Basic Dialogs)
- Conclusion
Как сделать код vba совместимым с libre office
Я недавно перешел на pclinuxos из окон, и мне это нравится. Единственная проблема, с которой я столкнулся, заключается в том, что libreoffice, пакет электронных таблиц по умолчанию, несовместим с макросами Excel. Ниже приведен код vba, который у меня есть:
Есть ли способ преобразовать этот код, чтобы сделать его совместимым с libreoffice, или мне нужно выучить совершенно новый язык, например python? Изучение python не будет проблемой, но не является решением моей проблемы, поскольку у меня есть много файлов, связанных с работой, в excel, которые содержат много кода vba, и я не могу использовать открытый офис / libreoffice на работе .
Я просто хочу добавить, что функция SinceLastWash выдает правильное значение в некоторых ячейках, где я ее использую, а в других выдает ошибку #NAME?
5 ответов
Вы должны перевести части, которые управляют документом, чтобы использовать UNO API. К сожалению, это может быть сложно в зависимости от того, что делает ваш макрос. Основные утверждения работают напрямую. Как правило, при изменении документа этого не происходит.
Команда Cells возвращает определенную ячейку на основе строки и столбца. Итак, вам нужна текущая строка. Вот какое безумие получить активную ячейку:
Когда у вас есть активная ячейка, вы получаете адрес ячейки, а из него — строку. Вам вообще не нужно использовать диапазон, поскольку вас интересует только одна ячейка, поэтому вы получаете активный лист, а затем получаете конкретную ячейку из листа.
Примерно так: ThisComponent.getCurrentController (). GetActiveSheet (). GetCellByPosition (nCol, nRow) .getString () = «a»
Я не хочу разбираться в том, что это делает
Единственный автоматический инструмент, о котором я знаю, — это бизнес-таблицы (обратите внимание, что у меня нет личных или профессиональный опыт, или какое-либо отношение к сайту).
Это похоже на OpenOffice, но я думаю, что он работает и с LibreOffice.
В общем, лучше сделать это самому, инструмент далек от совершенства .
Из файла интерактивной справки LibreOffice:
За некоторыми исключениями, Microsoft Office и LibreOffice не могут запускать один и тот же код макроса. Microsoft Office использует код VBA (Visual Basic для приложений), а LibreOffice использует код Basic, основанный на среде LibreOffice API (интерфейс прикладных программ). Хотя язык программирования тот же, объекты и методы разные.
Самые последние версии LibreOffice могут запускать некоторые сценарии Excel Visual Basic, если вы включите эту функцию в LibreOffice — PreferencesTools — Параметры — Загрузить / Сохранить — Свойства VBA.
На самом деле вам, скорее всего, придется сесть за LibreOffice API. и перепишем функционал.
Источник
Как перенести макросы из excel в libreoffice
Как сделать код vba совместимым с libre office
Недавно я перешел на pclinuxos из окон и, похоже, понравился. Единственная проблема, с которой я столкнулся, заключается в том, что libreoffice, пакет электронной таблицы по умолчанию несовместим с макросами excel. Ниже приведен код vba:
Есть ли способ конвертировать этот код, чтобы сделать его совместимым с libreoffice или мне нужно изучить совершенно новый язык, такой как python? Изучение python не будет проблемой, но не является решением моей проблемы, так как у меня есть много связанных с работой файлов в excel, у которых много кода vba, и я не могу использовать open office/libreoffice на работе.
Я просто хочу добавить, что функция SinceLastWash дает правильное значение в некоторых ячейках, где я их использую, а в других — ошибка, #NAME?
За некоторыми исключениями Microsoft Office и LibreOffice не могут запускать один и тот же макрокод. Microsoft Office использует код VBA (Visual Basic для приложений), а LibreOffice использует базовый код на основе интерфейса LibreOffice API (Application Program Interface). Хотя язык программирования один и тот же, объекты и методы разные.
Самые последние версии LibreOffice могут запускать некоторые сценарии Excel Visual Basic, если вы включите эту функцию в LibreOffice — PreferencesTools — Options — Load/Save — VBA Properties.
В действительности вам, скорее всего, нужно будет с API LibreOffice и переписать функциональность.
Единственным автоматическим инструментом, о котором я знаю, является Бизнес-таблицы (учтите, что у меня нет личного или профессионального опыта или какой-либо связи с сайтом).
Это похоже на OpenOffice, но я думаю, что он работает и с LibreOffice.
В общем, вам лучше сделать это самостоятельно, так как инструмент далеко не идеален.
В LibreOffice 4.4 первая подпрограмма не будет работать вообще (я подозреваю, что все переменные начинаются с «xl». Остальные два работают отлично, если вы меняете ThisCell на ActiveCell.
Вы должны перевести части, которые манипулируют документом, чтобы использовать API-интерфейс UNO. К сожалению, это может быть сложно в зависимости от того, что делает ваш макрос. Основные утверждения работают напрямую. Обычно изменение документа не выполняется.
Команда Cells возвращает определенную ячейку на основе строки и столбца. Итак, вам нужна текущая строка. Вот несколько безумств, чтобы получить активную ячейку:
Когда у вас есть активная ячейка, вы получаете адрес ячейки, и из этого вы имеете строку. Вам вообще не нужно использовать диапазон, поскольку вам нужна только одна ячейка, поэтому вы получаете активный лист, а затем получаете конкретную ячейку с листа.
Преобразование макроса из Excel в LibreOffice Calc
Помогите преобразовать макрос из excel, что бы он работал в LibreOffice Calc. Или напишите пожалуйста код макроса для создания сводной таблицы в LibreOffice Calc.
Помощь в написании контрольных, курсовых и дипломных работ здесь.
CreatePivotTable.xls (35.0 Кб, 1 просмотров)
Совместимость таблиц Excel, с таблицей Calc LibreOffice
Здравствуйте уважаемые читатели форума! Появился вопрос , который возможно возникал сотни раз :). .
LibreOffice Calc — диаграммы
Подскажите, пожалуйста. Не могу понять как вместо цифр 1, 2, 3 и т. д. идущих по горизонтальной оси.
Из DBgrid в LibreOffice Calc
Доброго времени суток. пришлось перейти с MS Excel на libreOffice Calc. в связи с етим слетел.
Макросы в LibreOffice Calc
Здравствуйте, вы мой последний шанс ! Задание: Посчитать сумму произведений четных и нечетных.
Помощь в написании контрольных, курсовых и дипломных работ здесь.
Чтение данных из LibreOffice Calc
Уважаемые специалисты, подскажите пожалуйста, как прочитать данные из LibreOffice Calc Но при.
LibreOffice Calc плавная прокрутка
В LibreOffice Calc по умолчанию прокрутка дискретная, по строчкам. Это значит, что мы тянем.
Формирование отчета LibreOffice Calc
Привет. Необходимо сформировать отчет в LibreOffice Calc. При этом чтоб формирование отчета было в.
Клик по кнопке -Открытие LibreOffice Calc
Сделал кнопочку. Кликаю раз- появляется документ — 1.ods Кликаю второй- появляется ещё один.
Источник
Copyright
This document is Copyright В© 2021 by the LibreOffice Documentation Team. Contributors are listed below. You may distribute it and/or modify it under the terms of either the GNU General Public License (https://www.gnu.org/licenses/gpl.html), version 3 or later, or the Creative Commons Attribution License (https://creativecommons.org/licenses/by/4.0/), version 4.0 or later.
All trademarks within this guide belong to their legitimate owners.
Contributors
To this edition
To previous editions
Jean Hollis Weber
Feedback
Please direct any comments or suggestions about this document to the Documentation Team’s mailing list: documentation@global.libreoffice.org.
Everything you send to a mailing list, including your email address and any other personal information that is written in the message, is publicly archived and cannot be deleted.
Published November 2021. Based on LibreOffice 7.2 Community.
Other versions of LibreOffice may differ in appearance and functionality.
Using LibreOffice on macOS
Some keystrokes and menu items are different on macOS from those used in Windows and Linux. The table below gives some common substitutions for the instructions in this document. For a more detailed list, see the application Help and Appendix A (Keyboard Shortcuts) to this guide.
Windows or Linux
Tools > Options menu selection
Access setup options
Control +click and/or right-click depending on computer setup
Open a context menu
Used with other keys
Open the Styles deck in the Sidebar
Introduction
Chapter 13 of the Getting Started Guide (entitled Getting Started with Macros ) is an introduction to the macro facilities that are available in LibreOffice. The current chapter provides further introductory information about the use of macros within a Calc spreadsheet.
A macro is a set of commands or keystrokes that are stored for later use. An example of a simple macro is one that enters your address into the current cell of an open spreadsheet. You can use macros to automate both simple and complex tasks, and they enable you to introduce new features that are not built into Calc.
The simplest way to create a macro is to record a series of actions through Calc’s user interface. Calc saves recorded macros using the open-source LibreOffice Basic scripting language, which is a dialect of the well-known BASIC programming language. Such macros can be edited and enhanced after recording using the built-in LibreOffice Basic Integrated Development Environment (IDE).
The most powerful macros in Calc are created by writing code using one of the four supported scripting languages (LibreOffice Basic, Python, JavaScript, and BeanShell). This chapter provides an overview of Calc’s macro facilities, mostly focused on its default macro scripting language, LibreOffice Basic. Some examples are included for the Python, JavaScript, and BeanShell scripting languages but fuller descriptions of the facilities for these languages are beyond the scope of this document.
On Visual Basic for Applications (VBA) compatibility
The LibreOffice Basic programming language and the VBA programming language – found in many Microsoft Office documents including Excel spreadsheets – are dialects of the BASIC language. If you want to use macros written in Microsoft Excel using the VBA macro code in LibreOffice, you must first edit the code in the LibreOffice Basic IDE.
Some tips for converting Excel macros written in VBA are detailed at the end of this chapter.
Using the macro recorder
Chapter 13, Getting Started With Macros , of the Getting Started Guide includes examples showing how to use the macro recorder and understand the generated LibreOffice Basic scripts. The following steps give a further example, specific to a Calc spreadsheet, without the more detailed explanations of the Getting Started Guide . A macro is created and saved which performs a paste special with multiply operation across a range of spreadsheet cells.
Use Tools > Options > LibreOffice > Advanced on the Menu bar and select the Enable macro recording (may be limited) option to enable the macro recorder.
1)В Use File > New > Spreadsheet on the Menu bar to create a new spreadsheet.
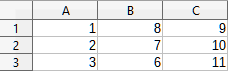
2)В Enter the numbers shown in Figure 1 into cells A1:C3 of Sheet1 in the new spreadsheet.
Figure 1: Enter numbers into cells A1:C3
3)В Select cell A3, which contains the number 3, and use Edit > Copy on the Menu bar to copy the value to the clipboard.
4)В Select all cells in the range A1:C3.
5)В Use Tools > Macros > Record Macro on the Menu bar to start the macro recorder. Calc displays the Record Macro dialog, which includes a Stop Recording button (Figure 2).
Figure 2: Record Macro dialog with Stop Recording button

6)В Use Edit > Paste Special > Paste Special on the Menu bar to open the Paste Special dialog (Figure 3).
Figure 3: Paste Special dialog
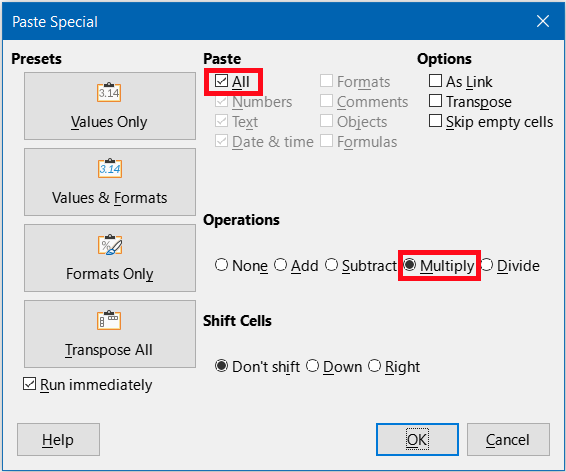
7)В Select the All option in the Paste area and Multiply in the Operations area (both options are highlighted with a red box in Figure 3), and click OK . The values in cells A1:C3 are now multiplied by 3 (Figure 4).
Figure 4: Cells A1:C3 multiplied by 3
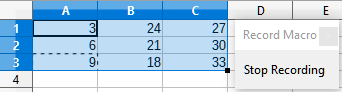
8)В Click the Stop Recording button to stop the macro recorder. Calc displays a variant of the Basic Macros dialog (Figure 5).
The Save Macro In area of the Basic Macros dialog shows the existing LibreOffice Basic macros, hierarchically structured into library containers, libraries, modules, and macros as described in Chapter 13 of the Getting Started Guide . Figure 5 shows the My Macros library container, the LibreOffice Macros library container, the library container for the open balance.ods file, and the library container for the untitled file created at step . Use the expand/collapse icons to the left of each library container name to view the libraries, modules, and macros within that container.

Create new library
Create new module in library
Macros in selected module
Figure 5: Parts of the Basic Macros dialog
9)В Select the entry for the current document in the Save Macro In area. As the current document in this example has not been saved, it is referred to by its default name UntitledВ 1 .
10)В Documents that have been saved include a macro library named Standard . This library is not created until the document is saved or the library is needed, so at this point in the example procedure your new document does not contain a library. You can create a new library to contain the macro you have just created, but this is not necessary.
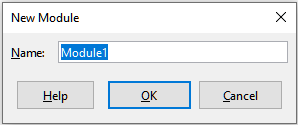
11)В Click the New Module button. Calc displays the New Module dialog (Figure 6). Type a name for the new module or leave the name as the default Module1 .
Figure 6: New Module dialog
The libraries, modules, and macro names must follow some strict rules. Following the main rules, the names must:
Comprise lower case letters (a..z), upper case letters (A..Z), digits (0..9), and underscore characters (_)
Begin with a letter or an underscore
Not contain any other spaces, punctuation symbols, or special characters (including accents)
12)В Click the OK button to create a new module. As no macro libraries exist in our current document, Calc automatically creates and uses a Standard library.
13)В On the Basic Macros dialog, select the entry for the newly created module in the Save Macro In area, type the text PasteMultiply in the Macro Name box, and click the Save button (Figure 7).
Figure 7: Select the module and name the macro
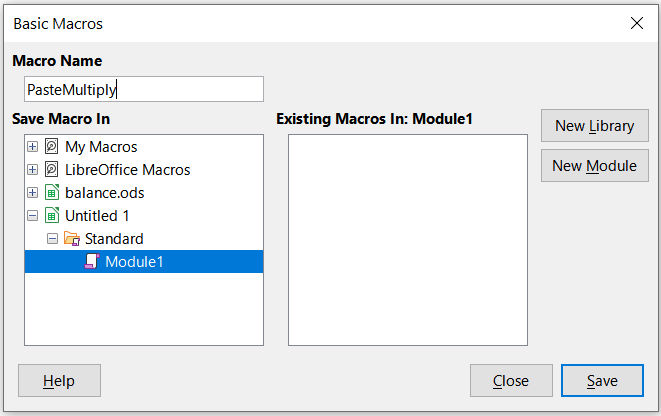
The macro is saved with the name PasteMultiply in the newly created module within the Standard library of the Untitled 1 document. Listing 1 shows the contents of the macro.
Listing 1. Paste special with multiply macro
Sub PasteMultiply
‘ —————————————————————
‘ define variables
dim document as object
dim dispatcher as object
‘ —————————————————————
‘ get access to the document
document = ThisComponent . CurrentController . Frame
dispatcher = createUnoService ( «com.sun.star.frame.DispatchHelper» )
‘ —————————————————————
dim args1 ( 5 ) as new com . sun . star . beans . PropertyValue
args1 ( 0 ). Name = «Flags»
args1 ( 0 ). Value = «A»
args1 ( 1 ). Name = «FormulaCommand»
args1 ( 1 ). Value = 3
args1 ( 2 ). Name = «SkipEmptyCells»
args1 ( 2 ). Value = false
args1 ( 3 ). Name = «Transpose»
args1 ( 3 ). Value = false
args1 ( 4 ). Name = «AsLink»
args1 ( 4 ). Value = false
args1 ( 5 ). Name = «MoveMode»
args1 ( 5 ). Value = 4
dispatcher . executeDispatch ( document , «.uno:InsertContents» , «» , 0 , args1 ())
The component model used in LibreOffice is Universal Network Objects (UNO) and the macro recorder uses the UNO dispatcher for most commands. However, there are two problems associated with this technical approach. One is that the dispatches are not fully documented and may be subject to change. Another is that the recorder ignores some values from dialogs that are opened while recording a macro – it is possible, therefore, that you will record a complicated macro that will not actually execute everything as expected. For more information, search for “macro recording – limitations” in the Help index.
Write your own functions
Create a function macro
You can write a macro and then call it as you would call a Calc function. Use the following steps to create a simple function macro:
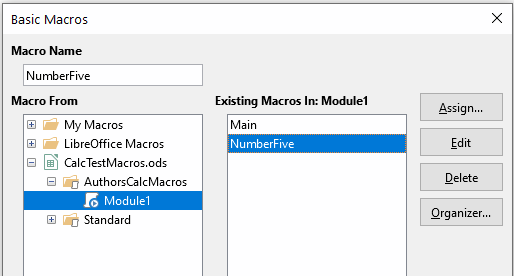
1)В Use File > New > Spreadsheet on the Menu bar to create a new spreadsheet, save it with the name CalcTestMacros.ods, and leave it open in Calc.
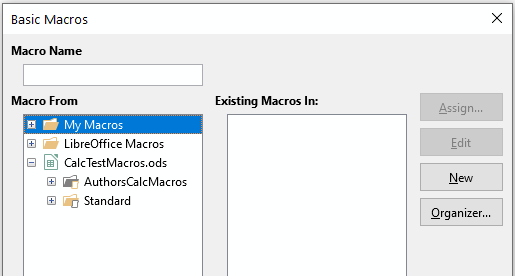
2)В Use Tools > Macros > Organize Macros > Basic on the Menu bar to open the Basic Macros dialog (Figure 8). Note that the layout of the Basic Macros dialog in this circumstance is different from the version that Calc displays when the user clicks the Stop Recording button on the Record Macro dialog (Figure 5).
Figure 8: Basic Macros dialog
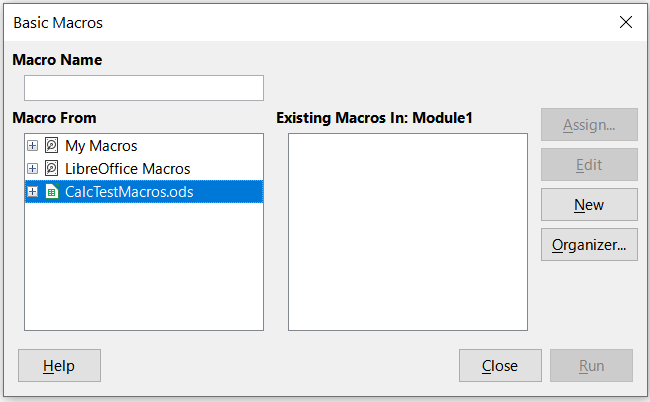
3)В The Macro From area lists the available macro library containers, including those relating to any LibreOffice documents that are currently open. My Macros contains macros that you write or add to LibreOffice and are available to more than one document. LibreOffice Macros contains macros that were included with your LibreOffice installation and should not be changed.
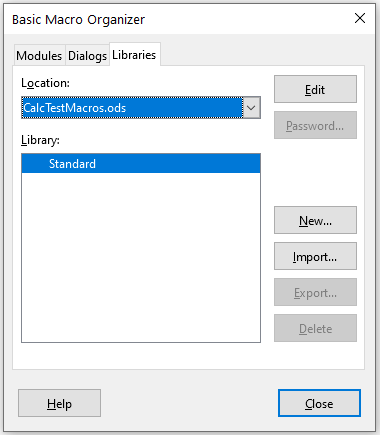
4)В Click Organizer to open the Basic Macro Organizer dialog (Figure 9).
Click on the Libraries tab and, in the Location area, select the entry for the name of the current document. The Library area updates to show the name of the empty Standard library.
Figure 9: Basic Macro Organizer
5)В Click New to open the New Library dialog to create a new library for this document (Figure 10).
Figure 10: New Library dialog
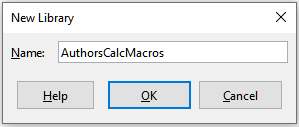
6)В Enter a descriptive library name (such as AuthorsCalcMacros ) and click OK to create the library. The Library area of the Basic Macro Organizer dialog updates to include the name of the newly created library. A library name can comprise up to 30 characters. Note that in some cases, the dialog may show only a portion of the name.
Figure 11: The new library is shown in the Library area

7)В Select the AuthorsCalcMacros entry in the Library area and click Edit to edit the library. Calc automatically creates a module named Module1 and a macro named Main . Calc displays the LibreOffice Basic Integrated Development Environment (IDE), shown in Figure 12.
Figure 12 shows the default configuration for the LibreOffice Basic IDE. This comprises:
Two toolbars (Macro and Standard). The Macro toolbar provides various icons for editing and testing programs.
The Object Catalog, enabling the selection of the required library container, library, module, and macro.
Figure 12: LibreOffice Basic Integrated Development Environment
The Editor Window, in which you can edit the LibreOffice Basic program code. The column on the left side is used to set breakpoints in the program code.
The Watch Window (located at the left, below the Object Catalog and Editor Window) displays the contents of variables or arrays during a single step process.
The Calls Window (located to the right, below the Object Catalog and Editor Window) provides information about the call stack of procedures and functions when a program runs.
A tab control area.
The LibreOffice Basic IDE provides powerful facilities for the development and debugging of LibreOffice Basic macros. A fuller description of this facility is beyond the scope of this document, but more information can be found in the Help system.
8)В In the Editor Window, modify the code so that it is the same as that shown in Listing 2. The important addition is the creation of the NumberFive function, which returns the value 5.
The Option Explicit statement forces all variables to be declared before they are used. If Option Explicit is omitted, variables are automatically defined at first use as type Variant .
Listing 2. Function that returns the value 5
‘ ***** BASIC *****
Option Explicit
Function NumberFive ()
NumberFive = 5
End Function
9)В Within the LibreOffice Basic IDE select File > Save on the Menu bar, or click the Save icon on the Standard toolbar, or press Ctrl + S , to save the modified Module1 .
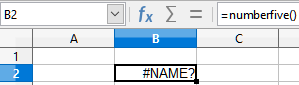
Using a macro as a function
Using your newly created CalcTestMacros.ods spreadsheet, select a cell and enter the formula =NumberFive() (Figure 13). Calc finds the macro, calls it, and displays the result (5) in that cell.
Figure 13: Use the NumberFive macro as a Calc function

Function names are not case sensitive. In Figure 13, the function name was entered as NumberFive but Calc displays it as NUMBERFIVE in the Formula bar.
Macro security warnings
You should now save the Calc document, close it, and open it again. Depending on your settings in the Macro Security dialog accessed using Tools > Options > LibreOffice > Security > Macro Security on the Menu bar, Calc may display one of the warnings shown in Figures Figure 14 and Figure 15.
Figure 14: Warning that a document contains macros
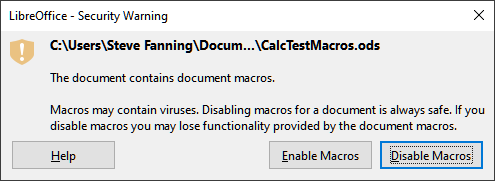
In the case of the warning shown in Figure 14, you will need to click Enable Macros , or Calc will not allow any macros to be run in the document. If you do not expect a document to contain a macro, it is safer to click Disable Macros in case the macro is a virus.
In the case of the warning shown in Figure 15, Calc will not allow any macros to be run in the document and you should click the OK button to remove the warning from the screen.
When the document loads with macros disabled, Calc will not be able to find any macro functions and will indicate an error in any affected cell by displaying the text #NAME? in that cell.
Figure 15: Warning that macros in the document are disabled

Loaded / unloaded libraries
When it opens a spreadsheet, Calc does not open all macro libraries that it can find in the available library containers because this would be a waste of resources. Instead, Calc automatically loads just the Standard library within the My Macros library container and the document’s own Standard library.
When you re-open your CalcTestMacros.ods spreadsheet, Calc does not contain a function named NumberFive() , so it checks all visible, loaded macro libraries for the function. Loaded libraries in LibreOffice Macros , My Macros , and the document are checked for an appropriately named function. In our initial implementation, the NumberFive() function is stored in the AuthorsCalcMacros library, which is not automatically loaded when the document is opened. Hence the NumberFive() function is not found and an error condition appears in the cell where it is called (Figure 16).
Figure 16: The macro function is not available
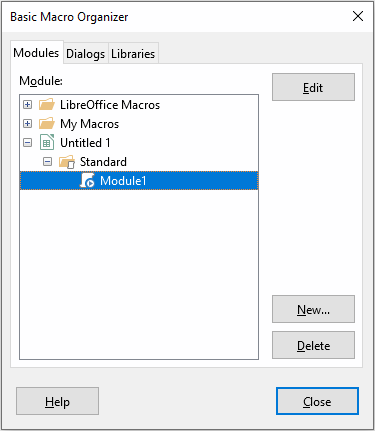
Use Tools > Macros > Organize Macros > Basic on the Menu bar to open the Basic Macros dialog (Figure 17). The icon for a loaded library (for example, Standard ) has a different appearance to the icon for a library that is not loaded (for example, AuthorsCalcMacros ).
Click the expand icon next to AuthorsCalcMacros to load the library. The icon changes appearance to indicate that the library is now loaded. Click Close to close the Basic Macros dialog.
Figure 17: Different symbols for loaded and unloaded libraries
Unfortunately, the cell containing =NumberFive() in our initial implementation is still in error. Calc does not recalculate cells in error unless you edit them or somehow change them. The usual solution is to store macros used as functions in the Standard library. If the macro is large or if there are many macros, a stub with the desired name is stored in the Standard library. The stub macro loads the library containing the implementation and then calls the implementation. The following steps illustrate this method.
1)В Use Tools > Macros > Organize Macros > Basic on the Menu bar to open the Basic Macros dialog. Select the NumberFive macro and click Edit to open the macro for editing (Figure 18).
Figure 18: Select a macro and click Edit
2) Calc displays the LibreOffice Basic IDE (Figure 12), with the input cursor in the Editor Window at the line Function NumberFive () . Change the name of NumberFive to NumberFive_Implementation so that the function’s code matches Listing 3.
Listing 3. Change the name of NumberFive to NumberFive_Implementation
Function NumberFive_Implementation ()
NumberFive_Implementation = 5
End Function
3)В Click the Select Macro button in the Standard toolbar of the LibreOffice Basic IDE to open the Basic Macros dialog (Figure 18).
4)В Select the Standard library in the CalcTestMacros.ods document and click the New button to create a new module. Enter a meaningful name such as CalcFunctions and click OK . Calc automatically creates a macro named Main and opens the module for editing.
5)В Create a macro in the CalcFunctions module of the Standard library that loads the AuthorsCalcMacros library if it is not already loaded, and then calls the implementation function. See Listing 4.
Listing 4. Create a new NumberFive function to call the NumberFive_Implementation function
Function NumberFive ()
If NOT BasicLibraries . isLibraryLoaded ( «AuthorsCalcMacros» ) Then
BasicLibraries . LoadLibrary ( «AuthorsCalcMacros» )
End If
NumberFive = NumberFive_Implementation ()
End Function
6)В Save, close, and reopen the Calc document. This time, if macros are enabled, the NumberFive() function works as expected.
Passing arguments to a macro
To illustrate a function that accepts arguments, we will write a macro that calculates the sum of its arguments that are positive. It will ignore arguments that are less than zero (see Listing 5).
Listing 5. PositiveSum calculates the sum of its positive arguments
Function PositiveSum ( Optional x )
Dim TheSum As Double
Dim iRow As Integer
Dim iCol As Integer
TheSum = 0.0
If NOT IsMissing ( x ) Then
If NOT IsArray ( x ) Then
If x > 0 Then TheSum = x
Else
For iRow = LBound ( x , 1 ) To UBound ( x , 1 )
For iCol = LBound ( x , 2 ) To UBound ( x , 2 )
If x ( iRow , iCol ) > 0 Then TheSum = TheSum + x ( iRow , iCol )
Next
Next
End If
End If
PositiveSum = TheSum
End Function
The macro in Listing 5 demonstrates some important techniques:
1)В The argument x is Optional . When an argument is not Optional and the function is called without it, Calc outputs a warning message every time the macro is called. If Calc calls the function many times, then the error is displayed many times.
2)В The function IsMissing checks that an argument was passed before it is used.
3)В The function IsArray checks to see if the argument is a single value, or an array. For example, =PositiveSum(7) or =PositiveSum(A4) . In the first case, the number 7 is passed as an argument, and in the second case, the value of cell A4 is passed to the function. In both these cases, IsArray returns the value False .
4)В If a range is passed to the function, it is passed as a two-dimensional array of values; for example, =PositiveSum(A2:B5) . The functions LBound and UBound are used to determine the array bounds that are used. Although the lower bound is one, it is considered safer to use LBound in case it changes in the future.
The macro in Listing 5 is careful and checks to see if the argument is an array or a single argument. The macro does not verify that each value is numeric. You may be as careful as you like. The more things you check, the more robust the macro is, but the slower it runs.
Passing one argument is as easy as passing two: add another argument to the function definition (see Listing 6). When calling a function with two arguments, separate the arguments with a comma; for example, =TestMax(3, -4) .
Listing 6. TestMax accepts two arguments and returns the larger one
Function TestMax ( x , y )
If x >= y Then
TestMax = x
Else
TestMax = y
End If
End Function
Arguments are passed as values
Arguments passed to a macro from Calc are always values. It is not possible to know what cells, if any, are used. For example, =PositiveSum(A3) passes the value of cell A3, and PositiveSum has no way of knowing that cell A3 was used. If you must know which cells are referenced rather than the values in the cells, pass the range as a string, parse the string, and obtain the values in the referenced cells.
Writing macros that act like built-in functions
Although Calc finds and calls macros as normal functions, they do not really behave as built-in functions. For example, macros do not appear in the function lists. It is possible to write functions that behave as regular functions by writing an Add-In. However, this is an advanced topic that is for experienced programmers and is beyond the scope of this guide. Some information, along with links to more detailed reading, is available in the Help.
Deleting LibreOffice Basic macros
Use the following steps to delete an unwanted macro:
1)В Use Tools > Macros > Organize Macros > Basic on the Menu bar to open the Basic Macros dialog (Figure 18).
2)В Select the macro to be deleted and click the Delete button.
3)В Calc displays a confirmation dialog. Click Yes to continue.
4)В Click the Close button to remove the Basic Macros dialog from the screen.
Use the following steps to delete an unwanted module:
1)В Use Tools > Macros > Organize Macros > Basic on the Menu bar to open the Basic Macros dialog (Figure 18).
2)В Click the Organizer button to open the Basic Macro Organizer dialog (Figure 19).
3)В Make sure that the Modules tab is selected.
Figure 19: Basic Macro Organizer dialog, Modules tab
4)В Select the module to be deleted in the Module area.
5)В Click the Delete button.
6)В Calc displays a confirmation dialog. Click Yes to continue.
7)В Click the Close button to remove the Basic Macro Organizer dialog from the screen.
8)В Click the Close button to close the Basic Macros dialog.
Accessing cells directly
You can access the LibreOffice internal objects directly to manipulate a Calc document. For example, the macro in Listing 7 adds the values in cell A2 from every sheet in the current document. ThisComponent is automatically set to reference the current document when the macro starts. A Calc document contains sheets and the macro accesses these via a call to ThisComponent.getSheets() . Use getCellByPosition(col, row) to return a cell at a specific row and column.
Listing 7. SumCellsAllSheets adds the values in cell A2 of every sheet
Function SumCellsAllSheets ()
Dim TheSum As Double
Dim i As integer
Dim oSheets
Dim oSheet
Dim oCell
TheSum = 0
oSheets = ThisComponent . getSheets ()
For i = 0 To oSheets . getCount () — 1
oSheet = oSheets . getByIndex ( i )
oCell = oSheet . getCellByPosition ( 0 , 1 ) ‘ GetCell A2
TheSum = TheSum + oCell . getValue ()
Next
SumCellsAllSheets = TheSum
End Function
A cell object supports the methods getValue() , getString() , and getFormula() to get the numerical value, the string value, or the formula used in a cell. Use the corresponding set functions to set appropriate values.
Use oSheet.getCellRangeByName(«A2») to return a range of cells by name. If a single cell is referenced, then a cell object is returned. If a cell range is given, then an entire range of cells is returned (see Listing 8). Notice that a cell range returns data as an array of arrays, which is more cumbersome than treating it as an array with two dimensions as is done in Listing 5.
Listing 8. SumCellsAllSheets adds the values in cells A2:C5 of every sheet
Function SumCellsAllSheets ()
Dim TheSum As Double
Dim iRow As Integer , iCol As Integer , i As Integer
Dim oSheets , oSheet , oCells
Dim oRow (), oRows ()
TheSum = 0
oSheets = ThisComponent . getSheets ()
For i = 0 To oSheets . getCount () — 1
oSheet = oSheets . getByIndex ( i )
oCells = oSheet . getCellRangeByName ( «A2:C5» )
‘ The getDataArray() method returns strings and numbers
‘ but is not used in this function.
‘ The getData() method returns only numbers and is applicable
‘ to this function.
oRows () = oCells . getData ()
For iRow = LBound ( oRows ()) To UBound ( oRows ())
oRow () = oRows ( iRow )
For iCol = LBound ( oRow ()) To UBound ( oRow ())
TheSum = TheSum + oRow ( iCol )
Next
Next
Next
SumCellsAllSheets = TheSum
End Function
When a macro is called as a Calc function, the macro cannot modify any value in the sheet from which the macro was called, except the value of the cell that contains the function.
Sorting
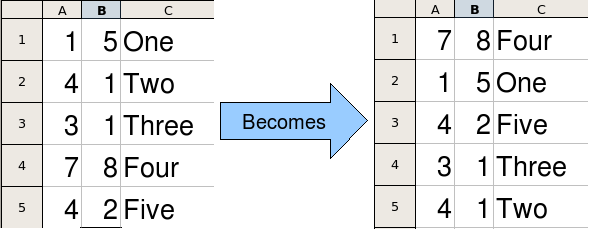
Consider sorting the data shown in Figure 20. First, sort on column B descending and then on column A ascending.
Figure 20: Sort column B descending and column A ascending
The example in Listing 9 demonstrates how to sort on these two columns. Run the macro by clicking the Run icon in the Macro toolbar of the LibreOffice Basic IDE.
Listing 9. SortRange sorts cells A1:C5 of Sheet 1
Sub SortRange
Dim oSheet ‘ Calc sheet containing data to sort.
Dim oCellRange ‘ Data range to sort.
‘ An array of sort fields determines the columns that are
‘ sorted. This is an array with two elements, 0 and 1.
‘ To sort on only one column, use:
‘ Dim oSortFields(0) As New com.sun.star.util.SortField
Dim oSortFields ( 1 ) As New com . sun . star . util . SortField
‘ The sort descriptor is an array of properties.
‘ The primary property contains the sort fields.
Dim oSortDesc ( 0 ) As New com . sun . star . beans . PropertyValue
‘ Get the sheet named «Sheet1»
oSheet = ThisComponent . Sheets . getByName ( «Sheet1» )
‘ Get the cell range to sort
oCellRange = oSheet . getCellRangeByName ( «A1:C5» )
‘ Uncomment the following code to select the range to sort.
‘ The only purpose would be to emphasize the sorted data.
‘ThisComponent.getCurrentController.select(oCellRange)
‘ The columns are numbered starting with 0, so
‘ column A is 0, column B is 1, etc.
‘ Sort column B (column 1) descending.
oSortFields ( 0 ). Field = 1
oSortFields ( 0 ). SortAscending = FALSE
‘ If column B has two cells with the same value,
‘ then use column A ascending to decide the order.
oSortFields ( 1 ). Field = 0
oSortFields ( 1 ). SortAscending = TRUE
‘ Setup the sort descriptor.
oSortDesc ( 0 ). Name = «SortFields»
oSortDesc ( 0 ). Value = oSortFields ()
‘ Sort the range.
oCellRange . Sort ( oSortDesc ())
End Sub
Overview of BeanShell, JavaScript, and Python macros
Introduction
Many programmers may not be familiar with LibreOffice Basic and so Calc supports macros written in three other languages that may be more familiar. These are BeanShell, JavaScript, and Python.
The primary macro scripting language for Calc is LibreOffice Basic and the standard LibreOffice installation provides a powerful integrated development environment (IDE) together with more options for this language.
Macros are organized in the same way for all four scripting languages. The LibreOffice Macros container holds all the macros that are supplied in the LibreOffice installation. The My Macros library container holds your macros that are available to any of your LibreOffice documents. Each document can also contain your macros that are not available to any other document.
When you use the macro recording facility, Calc creates the macro in LibreOffice Basic. To use the other available scripting languages you must write the code yourself.
When you select to run a macro using Tools > Macros > Run Macro on the Menu bar, Calc displays the Macro Selector dialog. This dialog enables the selection and running of any available macro, coded in any of the available languages (Figure 21).
When you select to edit a macro using Tools > Macros > Edit Macros on the Menu bar, Calc displays the LibreOffice Basic IDE. This dialog enables selection and editing of any available LibreOffice Basic macro, but not macros in other languages.
The component model used in LibreOffice is known as Universal Network Objects or UNO. LibreOffice macros in any scripting language use a UNO runtime application programming interface (API). The XSCRIPTCONTEXT interface is provided to macro scripts in all four languages and provides a means of access to the various interfaces which they might need to perform some action on a document.
Figure 21: Macro Selector dialog

BeanShell macros
BeanShell is a Java-like scripting language that was first released in 1999.
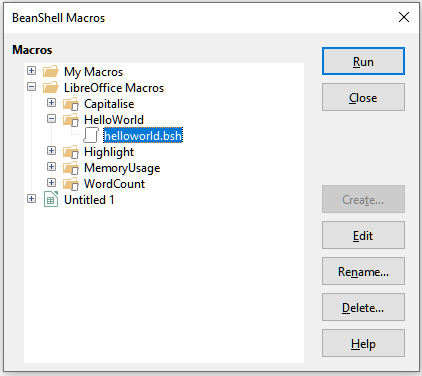
When you select Tools > Macros > Organize Macros > BeanShell on the Menu bar, Calc displays the BeanShell Macros dialog (Figure 22).
Figure 22: BeanShell Macros dialog
Click the Edit button on the BeanShell Macros dialog to access the BeanShell Debug Window (Figure 23).
Figure 23: BeanShell Debug Window
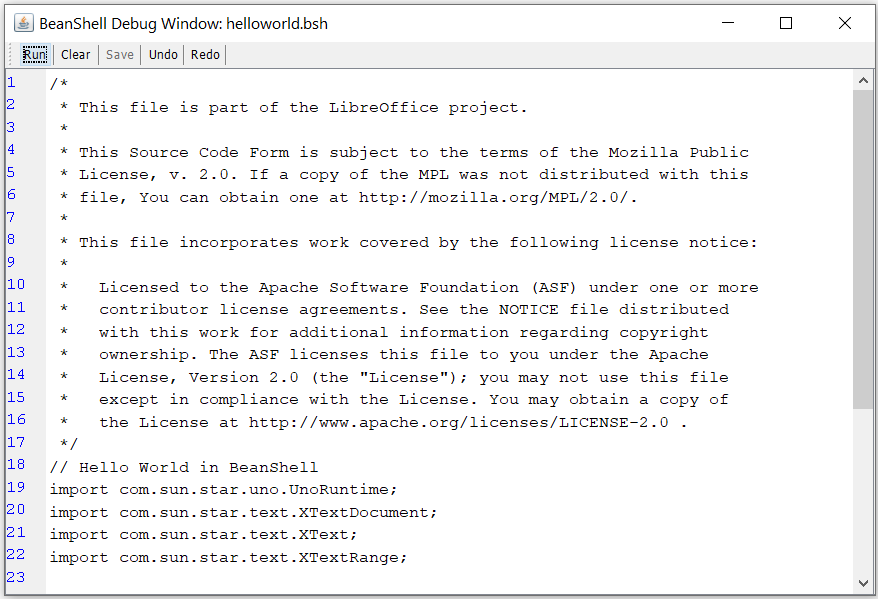
Listing 10 is an example of a BeanShell macro that inserts the text “Hello World from BeanShell” in cell A1 of the active Calc spreadsheet.
Listing 10. Sample BeanShell macro
import com.sun.star.uno.UnoRuntime ;
import com.sun.star.sheet.XSpreadsheetView ;
import com.sun.star.text.XText ;
view = UnoRuntime.queryInterface ( XSpreadsheetView.class , controller );
cell = sheet.getCellByPosition ( 0 , 0 );
cellText = UnoRuntime.queryInterface ( XText.class , cell );
cellText.insertString ( textCursor , «Hello World from BeanShell» , true );
JavaScript macros
JavaScript is a high-level scripting language that was first released in 1995.
When you select Tools > Macros > Organize Macros > JavaScript on the Menu bar, Calc displays the JavaScript Macros dialog (Figure 24).
Figure 24: JavaScript Macros dialog
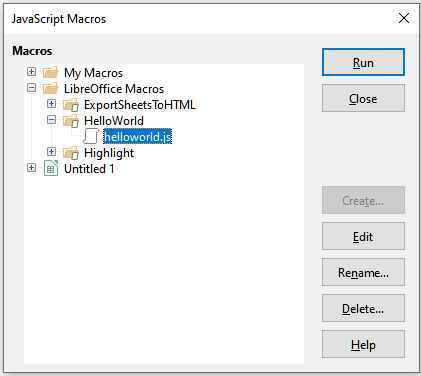
Click the Edit button on the JavaScript Macros dialog to access the Rhino JavaScript Debugger (Figure 25). Rhino is an easy-to-use open source JavaScript engine from the Mozilla Foundation and more information can be found at https://github.com/mozilla/rhino.
Figure 25: Rhino JavaScript Debugger

Listing 11 is an example of a JavaScript macro that inserts the text “Hello World from JavaScript” in cell A1 of the first sheet in a Calc spreadsheet.
Listing 11. Sample JavaScript macro
importClass ( Packages.com.sun.star.uno.UnoRuntime );
importClass ( Packages.com.sun.star.sheet.XSpreadsheetDocument );
importClass ( Packages.com.sun.star.container.XIndexAccess );
importClass ( Packages.com.sun.star.table.XCellRange );
importClass ( Packages.com.sun.star.table.XCell );
spreadsheetInterface = UnoRuntime.queryInterface ( XSpreadsheetDocument , documentRef );
allSheets = UnoRuntime.queryInterface ( XIndexAccess , spreadsheetInterface.getSheets ());
theSheet = allSheets.getByIndex ( 0 );
Cells = UnoRuntime.queryInterface ( XCellRange , theSheet );
cellA1 = Cells.getCellByPosition ( 0 , 0 );
theCell = UnoRuntime.queryInterface ( XCell , cellA1 );
theCell.setFormula ( «Hello World from JavaScript» );
Python macros
Python is a high-level, general-purpose programming language that was first released in 1991. In recent years it has grown in popularity and is commonly used by data scientists
When you select Tools > Macros > Organize Macros > Python on the Menu bar, Calc displays the Python Macros dialog (Figure 26).
Figure 26: Python Macros dialog
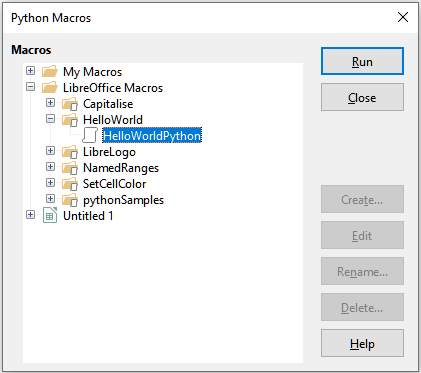
Facilities to edit and debug Python scripts are not currently integrated into the standard LibreOffice user interface. However, you can edit Python scripts with your preferred text editor or an external IDE. The Alternative Python Script Organizer (APSO) extension eases the editing of Python scripts, in particular when embedded in a document. Using APSO you can configure your preferred source code editor, start the integrated Python shell and debug Python scripts. For more information search for “Python macros” in the LibreOffice Help system and visit the Designing & Developing Python Applications section of The Document Foundation’s wiki (https://wiki.documentfoundation.org/Macros/Python_Design_Guide).
Listing 12 is an example of a Python macro that sets cell A1 of the first sheet in a Calc spreadsheet to the text “Hello World from Python”.
Listing 12. Sample Python macro
doc = XSCRIPTCONTEXT . getDocument ()
cell = doc . Sheets [ 0 ][ ‘A1’ ]
cell . setString ( ‘Hello World from Python’ )
ScriptForge library
Macro programmers frequently need to perform tasks such as creating and opening files, accessing form controls, reading data from databases embedded in LibreOffice Base documents, and so forth. The objective of the ScriptForge library is to simplify the creation of macros by making it easier to execute such commands without having to learn the required LibreOffice APIs (Application Programming Interfaces) and commands, which may be difficult for casual programmers.
The ScriptForge library supports both LibreOffice Basic and Python. It is organized into a set of services, each of which provides methods and properties related to a specific topic. For example, the Dialog service provides access to dialogs available in script modules and the Database service allows execution of SQL commands in Base documents.
Chapter 13, Getting Started with Macros, of the Getting Started Guide contains additional introductory material about the ScriptForge library and includes a simple example. More detailed information and many examples can be found in the LibreOffice Help system, by searching for the term “ScriptForge” in the index.
Built-in object inspector
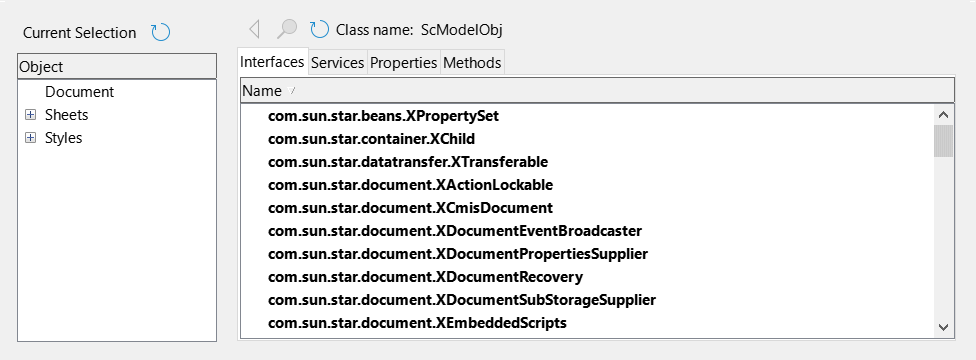
LibreOffice has an extensive API (Application Programming Interface) that can be used by macro programmers to automate almost any aspect of its applications. However, one of the main challenges for programmers is to discover UNO (Universal Network Objects) object types as well as their supported services, methods, and properties.
The built-in object inspector can be used to help macro developers inspect objects and discover how they can be accessed and used. To access this tool, go to Tools > Development Tools on the Menu bar and an object inspector window (Figure 27) will be opened. By default this window is docked at the bottom of the user interface.
The left portion of the window consists of the Document Object Model (DOM) navigator, which allows the user to navigate through all the objects in the document. When an object is selected, the following information about the object is shown on tabs within the right portion of the window:
The names of all implemented interfaces.
The names of all services supported by the object.
The names and types of all properties available in the object.
The names, arguments and return types of all methods that can be called by the object.
Instead of inspecting objects using the DOM navigator, it is possible to directly inspect the currently selected object in the document by toggling the Current Selection button.
Figure 27: Object inspector window
Chapter 13, Getting Started with Macros, of the Getting Started Guide contains additional information about the built-in object inspector. More detailed information and examples can be found in the LibreOffice Help system, by searching for the term “development tools” in the help index.
Working with VBA macros
For the Excel/VBA programmer, LibreOffice Basic is a programming language very similar to VBA. The primary reason that VBA does not work in Calc, even though Calc can read the Excel workbook, is that Calc uses a different mechanism to access the workbook (called spreadsheet in Calc) components, such as cells on the worksheet (called sheet in Calc). Specifically, the objects, attributes, and methods use different names and the corresponding behavior is sometimes slightly different.
To convert VBA code, you must first load the VBA code in LibreOffice.
Loading VBA code
On the VBA Properties page ( Tools > Options > Load/Save > VBA Properties ), you can choose whether to keep any macros in Microsoft Office documents that are opened in LibreOffice.
Figure 28: Choosing Load/Save VBA Properties
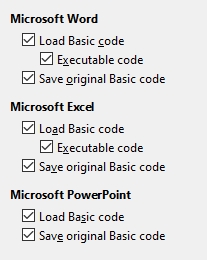
If you choose Load Basic code , you can edit the macros in LibreOffice. The changed code is saved in an ODF document but is not retained if you save it into a Microsoft Office format.
If you choose Save original Basic code , the macros will not work in LibreOffice but are retained unchanged if you save the file into Microsoft Office format.
If you are importing a Microsoft Word or Excel file containing VBA code, you can select the option Executable code . Whereas normally the code is preserved but rendered inactive (if you inspect it with the Basic IDE you will notice that it is all commented), with this option the code is ready to be executed.
Save original Basic code takes precedence over Load Basic code . If both options are selected and you edit the disabled code in LibreOffice, the original VBA code will be saved when saving in a Microsoft Office format.
To remove any possible macro viruses from the Microsoft Office document, deselect Save original Basic code . The document will be saved without the VBA code.
Option VBASupport statement
The Option VBASupport statement specifies that LibreOffice Basic will support some VBA statements, functions, and objects. The statement must be added before the executable program code in a module.
The support for VBA is not complete but covers a large portion of the common usage patterns.
When VBASupport is enabled, LibreOffice Basic function arguments and return values are the same as their VBA counterparts. When the support is disabled, LibreOffice Basic functions may accept arguments and return values different from their VBA counterparts.
Listing 13. Option VBASupport usage
Option VBASupport 1
Sub Example
Dim sVar As Single
sVar = Worksheets ( «Sheet1» ). Range ( «A1» )
Print sVar
End Sub
Without the Option VBASupport statement, the code in Listing 13 must be converted to the LibreOffice Basic of Listing 14.
Listing 14. Converted VBA code
Sub Example
Dim sVar As Single
Dim oSheet as Object
Dim oCell as Object
‘ Worksheets(“Sheet1”).
oSheet = ThisComponent . getSheets (). getByIndex ( 0 )
‘ Range(«A1»)
oCell = oSheet . getCellByPosition ( 0 , 0 )
sVar = oCell . getValue ()
Print sVar
End Sub
Option VBASupport may affect or assist in the following situations:
Allow special characters as identifiers. All characters that are defined as letters in the Latin-1 (ISO 8859-1) character set, are accepted as part of identifiers. For example, variables with accented characters in their names.
Create VBA constants including non-printable characters ( vbCrLf , vbNewLine . ).
Support Private / Public keywords for procedures.
Compulsory Set statement for objects.
Default values for optional parameters in procedures.
Named arguments when multiple optional parameters exist.
Preload of LibreOffice Basic libraries.
VBA UserForms (LibreOffice Basic Dialogs)
UserForms (Dialogs) appear frequently in macros that demand your interaction and parameter selections. The code snippet below is a recipe for such conversions, which are not handled automatically by VBA options.
Listing 15. VBA display of a UserForm [Dialog] called “MyForm”
Sub MyProc
MyForm . Show
End Sub
Listing 16. LibreOffice Basic display of a UserForm [Dialog] called “MyForm”
‘ oDlg should be visible at the module level
Dim oDlg As Object
Sub MyProc
DialogLibraries . LoadLibrary ( «Standard» )
oDlg = CreateUnoDialog ( DialogLibraries . Standard . MyForm )
oDlg . execute ()
End Sub
The oDlg variable is visible at the module level to all other procedures that are accessing controls on the dialog. This means all the procedures manipulating or accessing controls on this dialog panel are housed in a single module.
Conclusion
This chapter provides an overview of how to create libraries and modules, using the macro recorder, using macros as Calc functions, writing your own macros without the macro recorder, and converting VBA to LibreOffice Basic. Each topic deserves at least one chapter, and writing your own macros for Calc could easily fill an entire book. In other words, this is just the beginning of what you can learn.
Источник
Sub Адрес()'' Адрес'dosyaadi1 = Cells(1, 3)donbasa:Set klasor = CreateObject("shell.application").Browseforfolder(0, "Выберите место для сохранения заключений", 100, &H0) If klasor Is Nothing Then GoTo donbasakaynak = klasor.self.PathCells(1, 3) = kaynakkayityeri = Cells(1, 3) End Sub Sub Печать() '' Печать' reportno = Cells(8, 3)dosyayolu = Cells(1, 3)AA = Cells(6, 3)BB = Cells(6, 4)If AA > BB Then Cells(6, 3) = AA BB = Cells(6, 3)ElseEnd IfIf dosyayolu = "" Then MsgBox "Lutfen Klasor Secimini Yapiniz !", vbInformation, "Uyari" Call Адрес dosyayolu = Cells(1, 3)ElseEnd IfApplication.ScreenUpdating = FalseFor jts = AA To BB Step 1 Cells(6, 3) = jts Sheets("Данные").Calculate reportno = Cells(5, 9) ChDir dosyayolu Sheets("ВИК-РД").Select ActiveWindow.SelectedSheets.PrintOut Copies:=1, Collate:=True, _ IgnorePrintAreas:=False Sheets("РК-РД").Select ActiveWindow.SelectedSheets.PrintOut Copies:=1, Collate:=True, _ IgnorePrintAreas:=False Sheets("КАП-РД").Select ActiveWindow.SelectedSheets.PrintOut Copies:=1, Collate:=True, _ IgnorePrintAreas:=False Sheets("ВИК-РАД").Select ActiveWindow.SelectedSheets.PrintOut Copies:=1, Collate:=True, _ IgnorePrintAreas:=False Sheets("РК-РАД").Select ActiveWindow.SelectedSheets.PrintOut Copies:=1, Collate:=True, _ IgnorePrintAreas:=False Sheets("КАП-РАД").Select ActiveWindow.SelectedSheets.PrintOut Copies:=1, Collate:=True, _ IgnorePrintAreas:=False Worksheets(Array("ВИК-РД", "РК-РД", "КАП-РД")).Select Клеймо = Sheets("ВИК-РД").Cells(2, 12) имяфайла = Клеймо & " Заключение-РД" ActiveSheet.ExportAsFixedFormat Type:=xlTypePDF, Filename:= _ имяфайла, Quality:=xlQualityStandard, _ IncludeDocProperties:=True, IgnorePrintAreas:=False, OpenAfterPublish:=False Worksheets(Array("ВИК-РАД", "РК-РАД", "КАП-РАД")).Select Клеймо = Sheets("ВИК-РАД").Cells(2, 12) имяфайла = Клеймо & " Заключение-РАД" ActiveSheet.ExportAsFixedFormat Type:=xlTypePDF, Filename:= _ имяфайла, Quality:=xlQualityStandard, _ IncludeDocProperties:=True, IgnorePrintAreas:=False, OpenAfterPublish:=False Sheets("Данные").Select Next jtsApplication.ScreenUpdating = True End Sub
Внимание! Написание макроса выполнялось в LibreOffice 4.4.3.2 и Windows XP.
Запустите LibreOffice Calc. Выберите пункт меню Сервис -> Макросы -> Управление макросами -> LibreOffice Basic
В окне Макросы Libre Office BASIC в поле «Имя макроса» пишем «Main». В поле «Макрос из» выбираем «Мои макросы» — «Standard» и нажимаем кнопку «Создать». Смотрите рисунок 1.
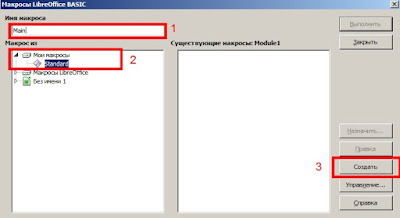
Рисунок 1. Окно макросы LibreOffice Basic
В окне Новый модуль задаем название «Module1» и нажимаем кнопку «OK». Смотрите рисунок 2.

Рисунок 2. Создание нового модуля
Далее в окне редактора макрасов LibreOffice Basic приступаем к созданию диалога и написанию макроса. Смотрите рисунок 3.

Рисунок 3. Редактор макросов LibreOffice Basic
Сам модуль Module1 с главной процедурой Main у нас созданы. Чтобы создать диалог выберите в редакторе макросов LibreOffice Basic пункт меню Сервис -> Макросы -> Управление диалогами…
Выбираем вкладку «Диалоги». В разделе «Диалог» выбираем «Мои диалоги» -> «Standard» и нажимаем кнопку «Создать». Смотрите рисунок 4.

Рисунок 4. Создание диалога макроса
В окне Новый диалог задаем название «Dialog1» и нажимаем кнопку «OK». Смотрите рисунок 5. Потом кнопку «Закрыть» окна Управление макросами LibreOffice Basic.

Рисунок 5. Создание нового диалога
Далее в окне редактора макросов LibreOffice Basic дважды нажимаем на нашем только что созданом диалоге с именем «Dialog1», смотрите цифру 1 на рисунке 6. После этого откроется визуальный редактор диалога, смотрите цифру 2 на рисунке 6.

Рисунок 6. Редактор диалога LibreOffice Basic
Теперь перенесите на наш диалог визуальный элемент под именем метка и визуалный элемент кнопка. Визуальные элементы можно перетащить из панели визуальных элементов, смотрите цифру 3 на рисунке 6.
Если выделить визуальный элемент Метку, то откроется набор свойств данного элемента. Через эти свойства можно настроить элемент. Присвоим имя lblNow элементу метка и текст оставим пустым. Для элемента кнопка имя присвоем OKButton и текст зададим OK. Смотрите цифры 1,2,3 рисунка 7.

Рисунок 7. Добавление визуальных элементов в редакторе диалогов LibreOffice Basic
Как я писал выше, модуль Module1 с главной процедурой Main создана (смотрите рисунок 8), но она еще не заполнена.
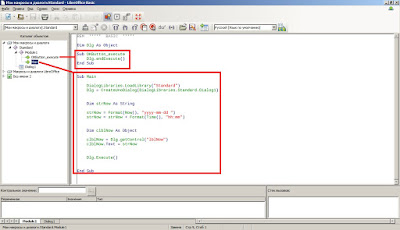
Рисунок 8. Добавляем исходный код макроса
Процедура Main является основной, в ней мы загружаем диалоговое окно с именем Dialog1, это следующие строчки кода:
DialogLibraries.LoadLibrary(«Standard»)
Dlg = CreateUnoDialog(DialogLibraries.Standard.Dialog1)
Формируем строку с текущей датой и временем, это следующие строчки кода:
Dim strNow As String
strNow = Format(Now(), «yyyy-mm-dd «)
strNow = strNow + Format(Time(), «hh:mm»)
Присваеваем строку с датой и временем визуальному элементу метка с именем lblNow, это следующие строчки кода:
Dim clblNow As Object
clblNow = Dlg.getControl(«lblNow»)
clblNow.Text = strNow
Последней строчкой кода в процедуре Main мы выполняем диалоговое окно с именем Dialog1:
Dlg.Execute()
Есть еще одна процедура, ее имя OKButton_execute, это событийная процедура, она выполняется в момент нажатия кнопки с именем OKButton, и выполняет она закрытие диалогового окна с именем Dialog1, это следующая строчка кода:
Dlg.endExecute()
Теперь присвойте процедуру с именем OKButton_execute кнопке с именем OKButton как событие на «Отпускание клавишы мыши». Для этого откройте визкальный редактор диалога Dialog1, смотрите цифру 1 на рисунке 9. Выделите Кнопку с именем OKButton и перейдите на вкладку «События», смотрите цифру 2 на рисунке 9. В событие «Отпускание клавиши мыши» укажите процедуру с именем OKButton_execute, нажав конопку с тремя точками, смотрите цифру 3 на рисунке 9.

Рисунок 9. Назначение события кнопке ОК
Все необходимое для запуска макроса мы сделали. Для начала посмотрим что у нас делает макрос. Под цифрой 2 рисунка 10 вы видите созданное диалоговое окно с отображаемой текущей датой и временем. Если нажать кнопку OK, то диалоговое окно закроется.

Рисунок 10. Окно нашего макроса
Далее рассмотрим все варианты запуска нашего макроса по порядку.
1. Запуск макроса из редактора макросов LibreOffice Basic.Откройте в редакторе макросов LibreOffice Basic наш код и выполнтите его нажав клавишу F5 или нажав на кнопку выполнения макроса, смотрите цифру 1 рисунка 10.
2. Запуск макроса из диалогового окна «Выбор макроса», смотрите цифру 1 на рисунке 11. В диалоговом окне нам нужно выбрать наш макрос и нажать кнопку «Выполнить», смотрите цифру 2 на рисунке 11.

Рисунок 11. Запуск макроса из диалога «Выбор макроса»
3. Запуск макроса из меню и подменю в приложениях LibreOffice Calc или LibreOffice Writer, смотрите цифру 0 рисунка 12. Для создания меню и подменю выберите пункт меню «Сервис» и подменю «Настройка», смотрите цифры 1 и 2 рисунка 12. В диалоговом окне «Настройка» на вкладке «Меню» нажмите кнопку «Создать…», введите имя нашего меню (например «Макросы»), смотрите цифру 3 рисунка 12. Чтобы создать подменю нашего меню «Макросы» нажмите кнопку «Добавить…» (смотрите цифру 4 рисунка 12.).
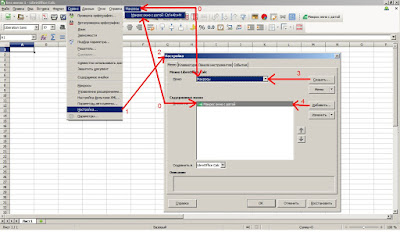
Рисунок 12. Запуск макроса из меню и подменю в приложениях LibreOffice Calc или LibreOffice Writer
Потом в диалоговом окне «Добавить команды» выберите команду которая будет выполнятся при выборе нашего подменю (смотрите цифры 1 и 2 рисунка 13), т.е. мы выбираем наш макроc с именем Main.
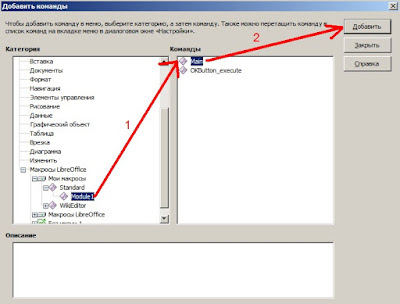
Рисунок 13. Добавляем команду для подменю
Переименуйте наше подменю выбрав пункт меню «Переименовать…» кнопки «Изменить» диалогового окна «Настройка» вкладки «Меню» (смотрите цифры 1,2,3,4 рисунка 14). Подменю назовите «Макрос окно с датой».

Рисунок 14. Переименование подменю
4. Запуск макроса в приложениях LibreOffice Calc или LibreOffice Writer по нажатию сочетания клавиш на клавиатуре. Для это откройте диалог «Настройка» и выбирите вкладку «Клавиатура» (смотрите цифру 1 рисунка 15). Потом выбираем команду, которая является нашим макросом с именем «Main» (смотрите цифру 2 рисунка 15). Потом выбираем свободную комбинацию клавиш и назначаем их нашей команде, т.е. макросу с именем Main (смотрите цифры 3,4,5 рисунка 15).

Рисунок 15. Назначение комбинации клавиш для запуска макроса
5. Запуск макроса в приложениях LibreOffice Calc или LibreOffice Writer по нажатию кнопки на панели инструментов (смотрите цифру 4 рисунка 16). Для создания кнопки на панели инструментов выберите пункт меню «Сервис» и подменю «Настройка», смотрите цифру 1 рисунка 16. В диалоговом окне «Настройка» на вкладке «Панели инструментов» нажмите кнопку «Создать…», введите имя нашей панели инструментов (например «Панель макросов»), смотрите цифру 2 рисунка 16. Чтобы создать кнопку на панели инструментов нажмите кнопку «Добавить…» (смотрите цифру 3 рисунка 16).
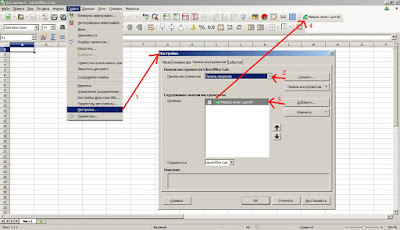
Рисунок 16. Запуск макроса из панели инструментов
Потом в диалоговом окне «Добавить команды» выберите команду которая будет выполнятся при нажатие по нашей кнопке нашей панели инструментов (смотрите цифры 1 и 2 рисунка 13), т.е. мы выбираем наш макроc с именем Main.
Переименуйте нашу кнопку нашей панели инструментов выбрав пункт меню «Переименовать…» кнопки «Изменить» диалогового окна «Настройка» вкладки «Панели инструментов» (смотрите цифры 1,2,3,4 рисунка 17). Кнопку назовите «Макрос окно с датой».
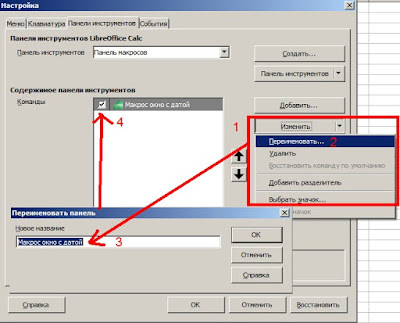
Рисунок 17. Переименование кнопки панели инструментов
6. Запуск макроса в приложениях LibreOffice Calc или LibreOffice Writer в ответ на какое-то событие, например события запуска приложения. Таким образам наш макрос выполняется когда запускается приложение LibreOffice Calc или LibreOffice Writer. Для создания события выберите пункт меню «Сервис» и подменю «Настройка», смотрите цифру 1 рисунка 18. В диалоговом окне «Настройка» на вкладке «События» выберите событие «Запуск приложения» и нажмите кнопку «Макрос…», смотрите цифру 2 рисунка 18.
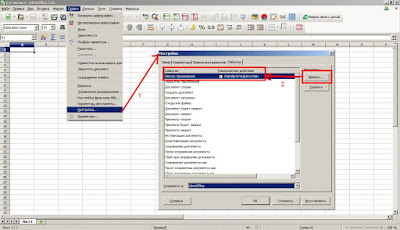
Рисунок 18. Назначение события для запуска макроса
Далее выберите макрос Main в окне «Выбор макроса» (смотрите цифры 1,2,3 рисунка 19).

Рисуной 19. Диалог выбора макроса
Перезапустите приложение LibreOffice Calc или LibreOffice Writer и вы увидете что наш макрос запускается.
Ниже размещен полный код макроса.
REM ***** BASIC *****
Dim Dlg As Object
Sub OKButton_execute
Dlg.endExecute()
End Sub
Sub Main
DialogLibraries.LoadLibrary(«Standard»)
Dlg = CreateUnoDialog(DialogLibraries.Standard.Dialog1)
Dim strNow As String
strNow = Format(Now(), «yyyy-mm-dd «)
strNow = strNow + Format(Time(), «hh:mm»)
Dim clblNow As Object
clblNow = Dlg.getControl(«lblNow»)
clblNow.Text = strNow
Dlg.Execute()
End Sub
Я недавно перешел на pclinuxos из окон, и мне это нравится. Единственная проблема, с которой я столкнулся, заключается в том, что libreoffice, пакет электронных таблиц по умолчанию, несовместим с макросами Excel. Ниже приведен код vba, который у меня есть:
Option VBASupport
Sub DeleteToLeft()
    Selection.SpecialCells(xlBlanks).Delete shift:=xlToLeft
End Sub
Function SinceLastWash()
    Application.Volatile
    WashCount = 0
    WearCount = 0
    CurrentRow = Application.ThisCell.Row
    For i = 3 To 35
        If Range(Cells(CurrentRow, i), Cells(CurrentRow, i)).Value = "a" Then
            WearCount = WearCount + 1
        End If
        If Range(Cells(CurrentRow, i), Cells(CurrentRow, i)).Value = "q" Then
            WashCount = WashCount + 1
            WearCount = 0
        End If
    Next i
    SinceLastWash = WearCount
End Function
Function testhis()
testhis = Application.ThisCell.Row
End Function
Есть ли способ преобразовать этот код, чтобы сделать его совместимым с libreoffice, или мне нужно выучить совершенно новый язык, например python? Изучение python не будет проблемой, но не является решением моей проблемы, поскольку у меня есть много файлов, связанных с работой, в excel, которые содержат много кода vba, и я не могу использовать открытый офис / libreoffice на работе …
Я просто хочу добавить, что функция SinceLastWash выдает правильное значение в некоторых ячейках, где я ее использую, а в других выдает ошибку #NAME?
Благодарность
5 ответов
Лучший ответ
Вы должны перевести части, которые управляют документом, чтобы использовать UNO API. К сожалению, это может быть сложно в зависимости от того, что делает ваш макрос. Основные утверждения работают напрямую. Как правило, при изменении документа этого не происходит.
Range(Cells(CurrentRow, i), Cells(CurrentRow, i)).Value = "a"
Команда Cells возвращает определенную ячейку на основе строки и столбца. Итак, вам нужна текущая строка. Вот какое безумие получить активную ячейку:
Sub RetrieveTheActiveCell()
  Dim oOldSelection 'The original selection of cell ranges
  Dim oRanges       'A blank range created by the document
  Dim oActiveCell   'The current active cell
  Dim oConv         'The cell address conversion service
  Dim oDoc
  oDoc = ThisComponent

  REM store the current selection
  oOldSelection = oDoc.CurrentSelection

  REM Create an empty SheetCellRanges service and then select it.
  REM This leaves ONLY the active cell selected.
  oRanges = oDoc.createInstance("com.sun.star.sheet.SheetCellRanges")
  oDoc.CurrentController.Select(oRanges)

  REM Get the active cell!
  oActiveCell = oDoc.CurrentSelection

  oConv = oDoc.createInstance("com.sun.star.table.CellAddressConversion")
  oConv.Address = oActiveCell.getCellAddress
  Print oConv.UserInterfaceRepresentation
  print oConv.PersistentRepresentation

  REM Restore the old selection, but lose the previously active cell
  oDoc.CurrentController.Select(oOldSelection)
End Sub
Когда у вас есть активная ячейка, вы получаете адрес ячейки, а из него — строку. Вам вообще не нужно использовать диапазон, поскольку вас интересует только одна ячейка, поэтому вы получаете активный лист, а затем получаете конкретную ячейку из листа.
Примерно так: ThisComponent.getCurrentController (). GetActiveSheet (). GetCellByPosition (nCol, nRow) .getString () = «a»
Я не хочу разбираться в том, что это делает
Selection.SpecialCells(xlBlanks).Delete shift:=xlToLeft
4
Andrew
29 Окт 2015 в 17:19
Единственный автоматический инструмент, о котором я знаю, — это бизнес-таблицы (обратите внимание, что у меня нет личных или профессиональный опыт, или какое-либо отношение к сайту).
Это похоже на OpenOffice, но я думаю, что он работает и с LibreOffice.
В общем, лучше сделать это самому, инструмент далек от совершенства …
1
djikay
13 Июл 2014 в 19:25
Из файла интерактивной справки LibreOffice:
За некоторыми исключениями, Microsoft Office и LibreOffice не могут запускать один и тот же код макроса. Microsoft Office использует код VBA (Visual Basic для приложений), а LibreOffice использует код Basic, основанный на среде LibreOffice API (интерфейс прикладных программ). Хотя язык программирования тот же, объекты и методы разные.
Самые последние версии LibreOffice могут запускать некоторые сценарии Excel Visual Basic, если вы включите эту функцию в LibreOffice — PreferencesTools — Параметры — Загрузить / Сохранить — Свойства VBA.
На самом деле вам, скорее всего, придется сесть за LibreOffice API. и перепишем функционал.
14
Community
20 Июн 2020 в 12:12
Selection.SpecialCells(xlBlanks).Delete shift:=xlToLeft удаляет пустые ячейки, если я не ошибаюсь
0
T-Heron
12 Апр 2017 в 03:18
В LibreOffice 4.4 первая подпрограмма не будет работать вообще (я подозреваю, что все переменные начинаются с ‘xl’. Две другие работают отлично, если вы измените ThisCell на ActiveCell.
Скорее, чем
Option VBASupport
Я использую
Option VBASupport 1
Option Compatible
2
A. Harding
1 Окт 2015 в 22:33
Как сделать код vba совместимым с libre office
Недавно я перешел на pclinuxos из окон и, похоже, понравился. Единственная проблема, с которой я столкнулся, заключается в том, что libreoffice, пакет электронной таблицы по умолчанию несовместим с макросами excel. Ниже приведен код vba:
Есть ли способ конвертировать этот код, чтобы сделать его совместимым с libreoffice или мне нужно изучить совершенно новый язык, такой как python? Изучение python не будет проблемой, но не является решением моей проблемы, так как у меня есть много связанных с работой файлов в excel, у которых много кода vba, и я не могу использовать open office/libreoffice на работе.
Я просто хочу добавить, что функция SinceLastWash дает правильное значение в некоторых ячейках, где я их использую, а в других — ошибка, #NAME?
За некоторыми исключениями Microsoft Office и LibreOffice не могут запускать один и тот же макрокод. Microsoft Office использует код VBA (Visual Basic для приложений), а LibreOffice использует базовый код на основе интерфейса LibreOffice API (Application Program Interface). Хотя язык программирования один и тот же, объекты и методы разные.
Самые последние версии LibreOffice могут запускать некоторые сценарии Excel Visual Basic, если вы включите эту функцию в LibreOffice — PreferencesTools — Options — Load/Save — VBA Properties.
В действительности вам, скорее всего, нужно будет с API LibreOffice и переписать функциональность.
Единственным автоматическим инструментом, о котором я знаю, является Бизнес-таблицы (учтите, что у меня нет личного или профессионального опыта или какой-либо связи с сайтом).
Это похоже на OpenOffice, но я думаю, что он работает и с LibreOffice.
В общем, вам лучше сделать это самостоятельно, так как инструмент далеко не идеален.
В LibreOffice 4.4 первая подпрограмма не будет работать вообще (я подозреваю, что все переменные начинаются с «xl». Остальные два работают отлично, если вы меняете ThisCell на ActiveCell.
Вы должны перевести части, которые манипулируют документом, чтобы использовать API-интерфейс UNO. К сожалению, это может быть сложно в зависимости от того, что делает ваш макрос. Основные утверждения работают напрямую. Обычно изменение документа не выполняется.
Команда Cells возвращает определенную ячейку на основе строки и столбца. Итак, вам нужна текущая строка. Вот несколько безумств, чтобы получить активную ячейку:
Когда у вас есть активная ячейка, вы получаете адрес ячейки, и из этого вы имеете строку. Вам вообще не нужно использовать диапазон, поскольку вам нужна только одна ячейка, поэтому вы получаете активный лист, а затем получаете конкретную ячейку с листа.
Помогите преобразовать макрос из excel, что бы он работал в LibreOffice Calc. Или напишите пожалуйста код макроса для создания сводной таблицы в LibreOffice Calc.
Помощь в написании контрольных, курсовых и дипломных работ здесь.
Вложения
| CreatePivotTable.xls (35.0 Кб, 1 просмотров) |
Совместимость таблиц Excel, с таблицей Calc LibreOffice
Здравствуйте уважаемые читатели форума! Появился вопрос , который возможно возникал сотни раз :). .
LibreOffice Calc — диаграммы
Подскажите, пожалуйста. Не могу понять как вместо цифр 1, 2, 3 и т. д. идущих по горизонтальной оси.
Из DBgrid в LibreOffice Calc
Доброго времени суток. пришлось перейти с MS Excel на libreOffice Calc. в связи с етим слетел.
Макросы в LibreOffice Calc
Здравствуйте, вы мой последний шанс ! Задание: Посчитать сумму произведений четных и нечетных.
Помощь в написании контрольных, курсовых и дипломных работ здесь.
Чтение данных из LibreOffice Calc
Уважаемые специалисты, подскажите пожалуйста, как прочитать данные из LibreOffice Calc Но при.
LibreOffice Calc плавная прокрутка
В LibreOffice Calc по умолчанию прокрутка дискретная, по строчкам. Это значит, что мы тянем.
Формирование отчета LibreOffice Calc
Привет. Необходимо сформировать отчет в LibreOffice Calc. При этом чтоб формирование отчета было в.
Клик по кнопке -Открытие LibreOffice Calc
Сделал кнопочку. Кликаю раз- появляется документ — 1.ods Кликаю второй- появляется ещё один.
Автор Keny, 17 мая 2022, 23:17
0 Пользователи и 1 гость просматривают эту тему.
Доброе время суток.
На работе неожиданно перешли с Excel на LO. Не все сотрудники готовы каждый раз при открытии файла «подвязывать» макросы к кнопкам. Большую часть макросов мне уже удалось адаптировать с помощью «просторов интернета» (я не специалист в области программирования), а один (пока один) мне не поддается.
Не могли бы вы помочь переписать этот макрос для LO версии 7.3.2.2 (x64)?
Option VBASupport 1
Sub Макрос2()
Sheets(«ИНФОЛИСТЫ»).Select
PalletsNumber = Sheets(«Данные»).Cells(4, 3).Value + 1
ActiveWindow.SelectedSheets.PrintOut From:=1, To:=PalletsNumber, Copies:=1, Collate _
:=True
Sheets(«Данные»).Select
End Sub
Заранее спасибо.
Цитировать«Вы будете долго смеяться» (c)
но данный конкретный макрос работает без изменений и в LibreOffice.
«Родной» макрос может быть таким:
Sub TestPrint
  Dim oDoc, oSheet
  Dim props(1) As New com.sun.star.beans.PropertyValue
  oDoc=ThisComponent
  oSheet=oDoc.Sheets.GetByName("ИНФОЛИСТЫ")
  oDoc.CurrentController.setActiveSheet oSheet
  props(0).Name="Pages"
  props(0).Value="1-" & (oDoc.Sheets.GetByName("Данные").getCellByPosition(2,3).Value + 1)
  props(1).Name="Wait"
  props(1).Value=True
  oDoc.Print props
  oDoc.CurrentController.setActiveSheet oDoc.Sheets.GetByName("Данные")
End Sub
Да, макрос Excel работает, но файл каким-то образом вечно «ломают» (пришлось снять пароль, стали сохранять непонятно как, хотя было сказано «НЕ СОХРАНЯТЬ»). Приходилось постоянно корректировать.
Надеюсь теперь проблем не будет.
Огромное спасибо.
Переназначила макросы, сохранила в родном формате — всё работает.
Доброе время суток.
Мне подкинули ещё одну задачку: при нажатии на копку «Печать документа» на листе «Ввод данных» должны распечататься определенные листы (к примеру лист3, лист5 и листы 8-9). В Excel у меня на этот случай был макрос:
Sub PrintReg
Sheets(Array(«Лист3», «Лист5», «Лист8», «Лист9»)).Select
Sheets(«Ввод данных»).Activate
ActiveWindow.SelectedSheets.PrintOut Copies:=4, Collate:=True
End Sub
При сохранение в формате .xlsm макрос «теряется».
Хотелось бы его переписать под «родной» формат. Попытки сделать это самой не увенчались успехом.
Заранее спасибо.
«Родной» аналог может быть таким:
Sub TestPrint2
 Dim aPrn(2) as new com.sun.star.beans.PropertyValue
 Dim aSel(0) as new com.sun.star.beans.PropertyValue
aSel(0).Name="Tables"
aSel(0).Value=Array(2, 3) ' индексы листов для печати (нумерация от 0)
With createUnoService("com.sun.star.frame.DispatchHelper")
.executeDispatch(ThisComponent.CurrentController.Frame, ".uno:SelectTables", "", 0, aSel)
End With
aPrn(0).Name = "Wait" ' ожидать пока напечатается
aPrn(0).Value = True
aPrn(1).Name = "CopyCount" ' количество экземпляров
aPrn(1).Value = 2
aPrn(2).Name = "Collate" ' разобрать по экземплярам
aPrn(2).Value = True
ThisComponent.Print(aPrn())
End Sub
Обратите внимание, что мы указываем индексы (от 0) листов, а не их имена. Узнать индекс листа по его имени можно, например, так:
sheetIndex=ThisComponent.Sheets.getByName("Sheet4").RangeAddress.Sheet
Еще один нюанс. В указанном выше примере отпечатаются листы с индексами 2 и 3, а также лист, который является текущим (выделенным) на начало выполнения макроса. Если это нежелательно, то нужно до выполнения макроса выделить лист, который принадлежит множеству листов для печати.
И еще. Если документ в момент старта макроса находится в режиме предварительного просмотра (Print Preview), то будет отпечатан только текущий лист.
Дополнила двумя строчками:
oDoc = Thiscomponent
oDoc.CurrentController.setActiveSheet oDoc.Sheets.GetByName(«Ввод данных»)
и «вуаля» — всё работает.
Огромное спасибо!!!
- Форум поддержки пользователей LibreOffice, Apache OpenOffice
-
►
Главная категория -
►
Calc -
►
Адаптировать макрос Excel под LibreOffice Calc