
Macro codes can save you a ton of time.
You can automate small as well as heavy tasks with VBA codes.
And do you know?
With the help of macros…
…you can break all the limitations of Excel which you think Excel has.
And today, I have listed some of the useful codes examples to help you become more productive in your day to day work.
You can use these codes even if you haven’t used VBA before that.
But here’s the first thing to know:
What is a Macro Code?
In Excel, macro code is a programming code which is written in VBA (Visual Basic for Applications) language.
The idea behind using a macro code is to automate an action which you perform manually in Excel, otherwise.
For example, you can use a code to print only a particular range of cells just with a single click instead of selecting the range -> File Tab -> Print -> Print Select -> OK Button.
How to use a Macro Code in Excel
Before you use these codes, make sure you have your developer tab on your Excel ribbon to access VB editor. Once you activate developer tab you can use below steps to paste a VBA code into VB editor.
List of Top 100 macro Examples (CODES) for VBA beginners
I have added all the codes into specific categories so that you can find your favorite codes quickly. Just read the title and click on it to get the code.

- This is my Ultimate VBA Library which I update on monthly basis with new codes and Don’t forget to check the VBA Examples Sectionꜜ at the end of this list.
- VBA is one of the Advanced Excel Skills.
- To manage all of these codes make sure to read about Personal Macro Workbook to use these codes in all the workbooks.
- I have tested all of these codes in different versions of Excel (2007, 2010, 2013, 2016, and 2019). If you found any error in any of these codes, make sure to share with me.
Basic Codes
These VBA codes will help you to perform some basic tasks in a flash which you frequently do in your spreadsheets.
1. Add Serial Numbers
Sub AddSerialNumbers()
Dim i As Integer
On Error GoTo Last
i = InputBox("Enter Value", "Enter Serial Numbers")
For i = 1 To i
ActiveCell.Value = i
ActiveCell.Offset(1, 0).Activate
Next i
Last:Exit Sub
End Sub
This macro code will help you to automatically add serial numbers in your Excel sheet which can be helpful for you if you work with large data.
To use this code you need to select the cell from where you want to start the serial numbers and when you run this it shows you a message box where you need to enter the highest number for the serial numbers and click OK. And once you click OK, it simply runs a loop and add a list of serial numbers to the cells downward.
2. Insert Multiple Columns
Sub InsertMultipleColumns()
Dim i As Integer
Dim j As Integer
ActiveCell.EntireColumn.Select
On Error GoTo Last
i = InputBox("Enter number of columns to insert", "Insert Columns")
For j = 1 To i
Selection.Insert Shift:=xlToRight, CopyOrigin:=xlFormatFromRightorAbove
Next j
Last: Exit Sub
End Sub
This code helps you to enter multiple columns in a single click. When you run this code it asks you the number columns you want to add and when you click OK, it adds entered number of columns after the selected cell. If you want to add columns before the selected cell, replace the xlToRight to xlToLeft in the code.
3. Insert Multiple Rows
Sub InsertMultipleRows()
Dim i As Integer
Dim j As Integer
ActiveCell.EntireRow.Select
On Error GoTo Last
i = InputBox("Enter number of columns to insert", "Insert Columns")
For j = 1 To i
Selection.Insert Shift:=xlToDown, CopyOrigin:=xlFormatFromRightorAbove
Next j
Last: Exit Sub
End Sub
With this code, you can enter multiple rows in the worksheet. When you run this code, you can enter the number of rows to insert and make sure to select the cell from where you want to insert the new rows. If you want to add rows before the selected cell, replace the xlToDown to xlToUp in the code.
4. Auto Fit Columns
Sub AutoFitColumns()
Cells.Select
Cells.EntireColumn.AutoFit
End Sub
This code quickly auto fits all the columns in your worksheet. So when you run this code, it will select all the cells in your worksheet and instantly auto-fit all the columns.
5. Auto Fit Rows
Sub AutoFitRows()
Cells.Select
Cells.EntireRow.AutoFit
End Sub
You can use this code to auto-fit all the rows in a worksheet. When you run this code it will select all the cells in your worksheet and instantly auto-fit all the row.
6. Remove Text Wrap
Sub RemoveTextWrap()
Range("A1").WrapText = False
End Sub
This code will help you to remove text wrap from the entire worksheet with a single click. It will first select all the columns and then remove text wrap and auto fit all the rows and columns. There’s also a shortcut that you can use (Alt + H +W) for but if you add this code to Quick Access Toolbar it’s convenient than a keyboard shortcut.
7. Unmerge Cells
Sub UnmergeCells()
Selection.UnMerge
End Sub
This code simply uses the unmerge options which you have on the HOME tab. The benefit of using this code is you can add it to the QAT and unmerge all the cell in the selection. And if you want to un-merge a specific range you can define that range in the code by replacing the word selection.
8. Open Calculator
Sub OpenCalculator()
Application.ActivateMicrosoftApp Index:=0
End Sub
In Windows, there is a specific calculator and by using this macro code you can open that calculator directly from Excel. As I mentioned that it’s for windows and if you run this code in the MAC version of VBA you’ll get an error.
9. Add Header/Footer Date
Sub DateInHeader()
With ActiveSheet.PageSetup
.LeftHeader = ""
.CenterHeader = "&D"
.RightHeader = ""
.LeftFooter = ""
.CenterFooter = ""
.RightFooter = ""
End With
End Sub
This macro adds a date to the header when you run it. It simply uses the tag «&D» for adding the date. You can also change it to the footer or change the side by replacing the «» with the date tag. And if you want to add a specific date instead of the current date you can replace the «&D» tag with that date from the code.
10. Custom Header/Footer
Sub CustomHeader()
Dim myText As String
myText = InputBox("Enter your text here", "Enter Text")
With ActiveSheet.PageSetup
.LeftHeader = ""
.CenterHeader = myText
.RightHeader = ""
.LeftFooter = ""
.CenterFooter = ""
.RightFooter = ""
End With
End Sub
When you run this code, it shows an input box that asks you to enter the text which you want to add as a header, and once you enter it click OK.
If you see this closely you have six different lines of code to choose the place for the header or footer. Let’s say if you want to add left-footer instead of center header simply replace the “myText” to that line of the code by replacing the «» from there.
Formatting Codes
These VBA codes will help you to format cells and ranges using some specific criteria and conditions.
11. Highlight Duplicates from Selection
Sub HighlightDuplicateValues()
Dim myRange As Range
Dim myCell As Range
Set myRange = Selection
For Each myCell In myRange
If WorksheetFunction.CountIf(myRange, myCell.Value) > 1 Then
myCell.Interior.ColorIndex = 36
End If
Next myCell
End Sub
This macro will check each cell of your selection and highlight the duplicate values. You can also change the color from the code.
12. Highlight the Active Row and Column
Private Sub Worksheet_BeforeDoubleClick(ByVal Target As Range, Cancel As Boolean)
Dim strRange As String
strRange = Target.Cells.Address & "," & _
Target.Cells.EntireColumn.Address & "," & _
Target.Cells.EntireRow.Address
Range(strRange).Select
End Sub
I really love to use this macro code whenever I have to analyze a data table. Here are the quick steps to apply this code.
- Open VBE (ALT + F11).
- Go to Project Explorer (Ctrl + R, If hidden).
- Select your workbook & double click on the name of a particular worksheet in which you want to activate the macro.
- Paste the code into it and select the “BeforeDoubleClick” from event drop down menu.
- Close VBE and you are done.
Remember that, by applying this macro you will not able to edit the cell by double click.
13. Highlight Top 10 Values
Sub TopTen()
Selection.FormatConditions.AddTop10
Selection.FormatConditions(Selection.FormatConditions.Count).S
tFirstPriority
With Selection.FormatConditions(1)
.TopBottom = xlTop10Top
.Rank = 10
.Percent = False
End With
With Selection.FormatConditions(1).Font
.Color = -16752384
.TintAndShade = 0
End With
With Selection.FormatConditions(1).Interior
.PatternColorIndex = xlAutomatic
.Color = 13561798
.TintAndShade = 0
End With
Selection.FormatConditions(1).StopIfTrue = False
End Sub
Just select a range and run this macro and it will highlight top 10 values with the green color.
14. Highlight Named Ranges
Sub HighlightRanges()
Dim RangeName As Name
Dim HighlightRange As Range
On Error Resume Next
For Each RangeName In ActiveWorkbook.Names
Set HighlightRange = RangeName.RefersToRange
HighlightRange.Interior.ColorIndex = 36
Next RangeName
End Sub
If you are not sure about how many named ranges you have in your worksheet then you can use this code to highlight all of them.
15. Highlight Greater than Values
Sub HighlightGreaterThanValues()
Dim i As Integer
i = InputBox("Enter Greater Than Value", "Enter Value")
Selection.FormatConditions.Delete
Selection.FormatConditions.Add Type:=xlCellValue, _
Operator:=xlGreater, Formula1:=i
Selection.FormatConditions(Selection.FormatConditions.Count).S
tFirstPriority
With Selection.FormatConditions(1)
.Font.Color = RGB(0, 0, 0)
.Interior.Color = RGB(31, 218, 154)
End With
End Sub
Once you run this code it will ask you for the value from which you want to highlight all greater values.
16. Highlight Lower Than Values
Sub HighlightLowerThanValues()
Dim i As Integer
i = InputBox("Enter Lower Than Value", "Enter Value")
Selection.FormatConditions.Delete
Selection.FormatConditions.Add _
Type:=xlCellValue, _
Operator:=xlLower, _
Formula1:=i
Selection.FormatConditions(Selection.FormatConditions.Count).S
tFirstPriority
With Selection.FormatConditions(1)
.Font.Color = RGB(0, 0, 0)
.Interior.Color = RGB(217, 83, 79)
End With
End Sub
Once you run this code it will ask you for the value from which you want to highlight all lower values.
17. Highlight Negative Numbers
Sub highlightNegativeNumbers()
Dim Rng As Range
For Each Rng In Selection
If WorksheetFunction.IsNumber(Rng) Then
If Rng.Value < 0 Then
Rng.Font.Color= -16776961
End If
End If
Next
End Sub
Select a range of cells and run this code. It will check each cell from the range and highlight all cells the where you have a negative number.
18. Highlight Specific Text
Sub highlightValue()
Dim myStr As String
Dim myRg As range
Dim myTxt As String
Dim myCell As range
Dim myChar As String
Dim I As Long
Dim J As Long
On Error Resume Next
If ActiveWindow.RangeSelection.Count > 1 Then
myTxt = ActiveWindow.RangeSelection.AddressLocal
Else
myTxt = ActiveSheet.UsedRange.AddressLocal
End If
LInput: Set myRg = _
Application.InputBox _
("please select the data range:", "Selection Required", myTxt, , , , , 8)
If myRg Is Nothing Then
Exit Sub
If myRg.Areas.Count > 1 Then
MsgBox "not support multiple columns"
GoTo LInput
End If
If myRg.Columns.Count <> 2 Then
MsgBox "the selected range can only contain two columns "
GoTo LInput
End If
For I = 0 To myRg.Rows.Count - 1
myStr = myRg.range("B1").Offset(I, 0).Value
With myRg.range("A1").Offset(I, 0)
.Font.ColorIndex = 1
For J = 1 To Len(.Text)
Mid(.Text, J, Len(myStr)) = myStrThen
.Characters(J, Len(myStr)).Font.ColorIndex = 3
Next
End With
Next I
End Sub
Suppose you have a large data set and you want to check for a particular value. For this, you can use this code. When you run it, you will get an input box to enter the value to search for.
19. Highlight Cells with Comments
Sub highlightCommentCells()
Selection.SpecialCells(xlCellTypeComments).Select
Selection.Style= "Note"
End Sub
To highlight all the cells with comments use this macro.
20. Highlight Alternate Rows in the Selection
Sub highlightAlternateRows()
Dim rng As Range
For Each rng In Selection.Rows
If rng.Row Mod 2 = 1 Then
rng.Style = "20% -Accent1"
rng.Value = rng ^ (1 / 3)
Else
End If
Next rng
End Sub
By highlighting alternate rows you can make your data easily readable, and for this, you can use below VBA code. It will simply highlight every alternate row in selected range.
21. Highlight Cells with Misspelled Words
Sub HighlightMisspelledCells()
Dim rng As Range
For Each rng In ActiveSheet.UsedRange
If Not Application.CheckSpelling(word:=rng.Text) Then
rng.Style = "Bad"
End If
Next rng
End Sub
If you find hard to check all the cells for spelling error then this code is for you. It will check each cell from the selection and highlight the cell where is a misspelled word.
22. Highlight Cells With Error in the Entire Worksheet
Sub highlightErrors()
Dim rng As Range
Dim i As Integer
For Each rng In ActiveSheet.UsedRange
If WorksheetFunction.IsError(rng) Then
i = i + 1
rng.Style = "bad"
End If
Next rng
MsgBox _
"There are total " & i _
& " error(s) in this worksheet."
End Sub
To highlight and count all the cells in which you have an error, this code will help you. Just run this code and it will return a message with the number error cells and highlight all the cells.
23. Highlight Cells with a Specific Text in Worksheet
Sub highlightSpecificValues()
Dim rng As range
Dim i As Integer
Dim c As Variant
c = InputBox("Enter Value To Highlight")
For Each rng In ActiveSheet.UsedRange
If rng = c Then
rng.Style = "Note"
i = i + 1
End If
Next rng
MsgBox "There are total " & i & " " & c & " in this worksheet."
End Sub
This code will help you to count the cells which have a specific value which you will mention and after that highlight all those cells.
24. Highlight all the Blank Cells Invisible Space
Sub blankWithSpace()
Dim rng As Range
For Each rng In ActiveSheet.UsedRange
If rng.Value = " " Then
rng.Style = "Note"
End If
Next rng
End Sub
Sometimes there are some cells which are blank but they have a single space and due to this, it’s really hard to identify them. This code will check all the cell in the worksheet and highlight all the cells which have a single space.
25. Highlight Max Value In The Range
Sub highlightMaxValue()
Dim rng As Range
For Each rng In Selection
If rng = WorksheetFunction.Max(Selection) Then
rng.Style = "Good"
End If
Next rng
End Sub
It will check all the selected cells and highlight the cell with the maximum value.
26. Highlight Min Value In The Range
Sub Highlight_Min_Value()

Dim rng As Range

For Each rng In Selection
	If rng = WorksheetFunction.Min(Selection) Then
		rng.Style = "Good"
	End If
Next rng

End Sub
It will check all the selected cells and highlight the cell with the Minimum value.
27. Highlight Unique Values
Sub highlightUniqueValues()
Dim rng As Range
Set rng = Selection
rng.FormatConditions.Delete
Dim uv As UniqueValues
Set uv = rng.FormatConditions.AddUniqueValues
uv.DupeUnique = xlUnique
uv.Interior.Color = vbGreen
End Sub
This codes will highlight all the cells from the selection which has a unique value.
28. Highlight Difference in Columns
Sub columnDifference()
Range("H7:H8,I7:I8").Select
Selection.ColumnDifferences(ActiveCell).Select
Selection.Style= "Bad"
End Sub
Using this code you can highlight the difference between two columns (corresponding cells).
29. Highlight Difference in Rows
Sub rowDifference()
Range("H7:H8,I7:I8").Select
Selection.RowDifferences(ActiveCell).Select
Selection.Style= "Bad"
End Sub
And by using this code you can highlight difference between two row (corresponding cells).
Printing Codes
These macro codes will help you to automate some printing tasks which can further save you a ton of time.
30. Print Comments
Sub printComments()
With ActiveSheet.PageSetup
.printComments = xlPrintSheetEnd
End With
End Sub
Use this macro to activate settings to print cell comments in the end of the page. Let’s say you have 10 pages to print, after using this code you will get all the comments on 11th last page.
31. Print Narrow Margin
Sub printNarrowMargin()
With ActiveSheet.PageSetup
.LeftMargin = Application
.InchesToPoints (0.25)
.RightMargin = Application.InchesToPoints(0.25)
.TopMargin = Application.InchesToPoints(0.75)
.BottomMargin = Application.InchesToPoints(0.75)
.HeaderMargin = Application.InchesToPoints(0.3)
.FooterMargin = Application.InchesToPoints(0.3)
End With
ActiveWindow.SelectedSheets.PrintOut _
Copies:=1, _
Collate:=True, _
IgnorePrintAreas:=False
End Sub
Use this VBA code to take a print with a narrow margin. When you run this macro it will automatically change margins to narrow.
32. Print Selection
Sub printSelection()
Selection.PrintOut Copies:=1, Collate:=True
End Sub
This code will help you print selected range. You don’t need to go to printing options and set printing range. Just select a range and run this code.
33. Print Custom Pages
Sub printCustomSelection()
Dim startpage As Integer
Dim endpage As Integer
startpage = _
InputBox("Please Enter Start Page number.", "Enter Value")
If Not WorksheetFunction.IsNumber(startpage) Then
MsgBox _
"Invalid Start Page number. Please try again.", "Error"
Exit Sub
End If
endpage = _
InputBox("Please Enter End Page number.", "Enter Value")
If Not WorksheetFunction.IsNumber(endpage) Then
MsgBox _
"Invalid End Page number. Please try again.", "Error"
Exit Sub
End If
Selection.PrintOut From:=startpage, _
To:=endpage, Copies:=1, Collate:=True
End Sub
Instead of using the setting from print options you can use this code to print custom page range. Let’s say you want to print pages from 5 to 10. You just need to run this VBA code and enter start page and end page.
Worksheet Codes
These macro codes will help you to control and manage worksheets in an easy way and save your a lot of time.
34. Hide all but the Active Worksheet
Sub HideWorksheet()
Dim ws As Worksheet
For Each ws In ThisWorkbook.Worksheets
If ws.Name <> ThisWorkbook.ActiveSheet.Name Then
ws.Visible = xlSheetHidden
End If
Next ws
End Sub
Now, let’s say if you want to hide all the worksheets in your workbook other than the active worksheet. This macro code will do this for you.
35. Unhide all Hidden Worksheets
Sub UnhideAllWorksheet()
Dim ws As Worksheet
For Each ws In ActiveWorkbook.Worksheets
ws.Visible = xlSheetVisible
Next ws
End Sub
And if you want to un-hide all the worksheets which you have hide with previous code, here is the code for that.
36. Delete all but the Active Worksheet
Sub DeleteWorksheets()
Dim ws As Worksheet
For Each ws In ThisWorkbook.Worksheets
If ws.name <> ThisWorkbook.ActiveSheet.name Then
Application.DisplayAlerts = False
ws.Delete
Application.DisplayAlerts = True
End If
Next ws
End Sub
If you want to delete all the worksheets other than the active sheet, this macro is useful for you. When you run this macro it will compare the name of the active worksheet with other worksheets and then delete them.
37. Protect all Worksheets Instantly
Sub ProtectAllWorskeets()
Dim ws As Worksheet
Dim ps As String
ps = InputBox("Enter a Password.", vbOKCancel)
For Each ws In ActiveWorkbook.Worksheets
ws.Protect Password:=ps
Next ws
End Sub
If you want to protect your all worksheets in one go here is a code for you. When you run this macro, you will get an input box to enter a password. Once you enter your password, click OK. And make sure to take care about CAPS.
38. Resize All Charts in a Worksheet
Sub Resize_Charts()
Dim i As Integer
For i = 1 To ActiveSheet.ChartObjects.Count
With ActiveSheet.ChartObjects(i)
.Width = 300
.Height = 200
End With
Next i
End Sub
Make all chart same in size. This macro code will help you to make all the charts of the same size. You can change the height and width of charts by changing it in macro code.
39. Insert Multiple Worksheets
Sub InsertMultipleSheets()
Dim i As Integer
i = _
InputBox("Enter number of sheets to insert.", _
"Enter Multiple Sheets")
Sheets.Add After:=ActiveSheet, Count:=i
End Sub
You can use this code if you want to add multiple worksheets in your workbook in a single shot. When you run this macro code you will get an input box to enter the total number of sheets you want to enter.
40. Protect Worksheet
Sub ProtectWS()
ActiveSheet.Protect "mypassword", True, True
End Sub
If you want to protect your worksheet you can use this macro code. All you have to do just mention your password in the code.
41. Un-Protect Worksheet
Sub UnprotectWS()
ActiveSheet.Unprotect "mypassword"
End Sub
If you want to unprotect your worksheet you can use this macro code. All you have to do just mention your password which you have used while protecting your worksheet.
42. Sort Worksheets
Sub SortWorksheets()
Dim i As Integer
Dim j As Integer
Dim iAnswer As VbMsgBoxResult
iAnswer = MsgBox("Sort Sheets in Ascending Order?" & Chr(10) _
& "Clicking No will sort in Descending Order", _
vbYesNoCancel + vbQuestion + vbDefaultButton1, "Sort Worksheets")
For i = 1 To Sheets.Count
For j = 1 To Sheets.Count - 1
If iAnswer = vbYes Then
If UCase$(Sheets(j).Name) > UCase$(Sheets(j + 1).Name) Then
Sheets(j).Move After:=Sheets(j + 1)
End If
ElseIf iAnswer = vbNo Then
If UCase$(Sheets(j).Name) < UCase$(Sheets(j + 1).Name) Then Sheets(j).Move After:=Sheets(j + 1)
End If
End If
Next j
Next i
End Sub
This code will help you to sort worksheets in your workbook according to their name.
43. Protect all the Cells With Formulas
Sub lockCellsWithFormulas()
With ActiveSheet
.Unprotect
.Cells.Locked = False
.Cells.SpecialCells(xlCellTypeFormulas).Locked = True
.Protect AllowDeletingRows:=True
End With
End Sub
To protect cell with formula with a single click you can use this code.
44. Delete all Blank Worksheets
Sub deleteBlankWorksheets()
Dim Ws As Worksheet
On Error Resume Next
Application.ScreenUpdating= False
Application.DisplayAlerts= False
For Each Ws In Application.Worksheets
If Application.WorksheetFunction.CountA(Ws.UsedRange) = 0 Then
Ws.Delete
End If
Next
Application.ScreenUpdating= True
Application.DisplayAlerts= True
End Sub
Run this code and it will check all the worksheets in the active workbook and delete if a worksheet is blank.
45. Unhide all Rows and Columns
Sub UnhideRowsColumns()
Columns.EntireColumn.Hidden = False
Rows.EntireRow.Hidden = False
End Sub
Instead of unhiding rows and columns on by one manually you can use this code to do this in a single go.
46. Save Each Worksheet as a Single PDF
Sub SaveWorkshetAsPDF()
Dimws As Worksheet
For Each ws In Worksheets
ws.ExportAsFixedFormat _
xlTypePDF, _
"ENTER-FOLDER-NAME-HERE" & _
ws.Name & ".pdf"
Next ws
End Sub
This code will simply save all the worksheets in a separate PDF file. You just need to change the folder name from the code.
47. Disable Page Breaks
Sub DisablePageBreaks()
Dim wb As Workbook
Dim wks As Worksheet
Application.ScreenUpdating = False
For Each wb In Application.Workbooks
For Each Sht In wb.Worksheets
Sht.DisplayPageBreaks = False
Next Sht
Next wb
Application.ScreenUpdating = True
End Sub
To disable page breaks use this code. It will simply disable page breaks from all the open workbooks.
Workbook Codes
These codes will help you to perform workbook level tasks in an easy way and with minimum efforts.
48. Create a Backup of a Current Workbook
Sub FileBackUp()
ThisWorkbook.SaveCopyAs Filename:=ThisWorkbook.Path & _
"" & Format(Date, "mm-dd-yy") & " " & _
ThisWorkbook.name
End Sub
This is one of the most useful macros which can help you to save a backup file of your current workbook.
It will save a backup file in the same directory where your current file is saved and it will also add the current date with the name of the file.
49. Close all Workbooks at Once
Sub CloseAllWorkbooks()
Dim wbs As Workbook
For Each wbs In Workbooks
wbs.Close SaveChanges:=True
Next wb
End Sub
Use this macro code to close all open workbooks. This macro code will first check all the workbooks one by one and close them. If any of the worksheets is not saved, you’ll get a message to save it.
50. Copy Active Worksheet into a New Workbook
Sub CopyWorksheetToNewWorkbook()
ThisWorkbook.ActiveSheet.Copy _
Before:=Workbooks.Add.Worksheets(1)
End Sub
Let’s say if you want to copy your active worksheet in a new workbook, just run this macro code and it will do the same for you. It’s a super time saver.
51. Active Workbook in an Email
Sub Send_Mail()
Dim OutApp As Object
Dim OutMail As Object
Set OutApp = CreateObject("Outlook.Application")
Set OutMail = OutApp.CreateItem(0)
With OutMail
.to = "Sales@FrontLinePaper.com"
.Subject = "Growth Report"
.Body = "Hello Team, Please find attached Growth Report."
.Attachments.Add ActiveWorkbook.FullName
.display
End With
Set OutMail = Nothing
Set OutApp = Nothing
End Sub
Use this macro code to quickly send your active workbook in an e-mail. You can change the subject, email, and body text in code and if you want to send this mail directly, use «.Send» instead of «.Display».
52. Add Workbook to a Mail Attachment
Sub OpenWorkbookAsAttachment()
Application.Dialogs(xlDialogSendMail).Show
End Sub
Once you run this macro it will open your default mail client and attached active workbook with it as an attachment.
53. Welcome Message
Sub auto_open()
MsgBox _
"Welcome To ExcelChamps & Thanks for downloading this file."
End Sub
You can use auto_open to perform a task on opening a file and all you have to do just name your macro «auto_open».
54. Closing Message
Sub auto_close()
MsgBox "Bye Bye! Don't forget to check other cool stuff on
excelchamps.com"
End Sub
You can use close_open to perform a task on opening a file and all you have to do just name your macro «close_open».
55. Count Open Unsaved Workbooks
Sub VisibleWorkbooks()
Dim book As Workbook
Dim i As Integer
For Each book In Workbooks
If book.Saved = False Then
i = i + 1
End If
Next book
MsgBox i
End Sub
Let’s you have 5-10 open workbooks, you can use this code to get the number of workbooks which are not saved yet.
Pivot Table Codes
These codes will help you to manage and make some changes in pivot tables in a flash.
56. Hide Pivot Table Subtotals
Sub HideSubtotals()
Dim pt As PivotTable
Dim pf As PivotField
On Error Resume Next
Set pt = ActiveSheet.PivotTables(ActiveCell.PivotTable.Name)
If pt Is Nothing Then
MsgBox "You must place your cursor inside of a PivotTable."
Exit Sub
End If
For Each pf In pt.PivotFields
pf.Subtotals(1) = True
pf.Subtotals(1) = False
Next pf
End Sub
If you want to hide all the subtotals, just run this code. First of all, make sure to select a cell from your pivot table and then run this macro.
57. Refresh All Pivot Tables
Sub vba_referesh_all_pivots()
Dim pt As PivotTable
For Each pt In ActiveWorkbook.PivotTables
pt.RefreshTable
Next pt
End Sub
A super quick method to refresh all pivot tables. Just run this code and all of your pivot tables in your workbook will be refresh in a single shot.
58. Create a Pivot Table
Follow this step by step guide to create a pivot table using VBA.
59. Auto Update Pivot Table Range
Sub UpdatePivotTableRange()
Dim Data_Sheet As Worksheet
Dim Pivot_Sheet As Worksheet
Dim StartPoint As Range
Dim DataRange As Range
Dim PivotName As String
Dim NewRange As String
Dim LastCol As Long
Dim lastRow As Long
'Set Pivot Table & Source Worksheet
Set Data_Sheet = ThisWorkbook.Worksheets("PivotTableData3")
Set Pivot_Sheet = ThisWorkbook.Worksheets("Pivot3")
'Enter in Pivot Table Name
PivotName = "PivotTable2"
'Defining Staring Point & Dynamic Range
Data_Sheet.Activate
Set StartPoint = Data_Sheet.Range("A1")
LastCol = StartPoint.End(xlToRight).Column
DownCell = StartPoint.End(xlDown).Row
Set DataRange = Data_Sheet.Range(StartPoint, Cells(DownCell, LastCol))
NewRange = Data_Sheet.Name & "!" & DataRange.Address(ReferenceStyle:=xlR1C1)
'Change Pivot Table Data Source Range Address
Pivot_Sheet.PivotTables(PivotName). _
ChangePivotCache ActiveWorkbook. _
PivotCaches.Create(SourceType:=xlDatabase, SourceData:=NewRange)
'Ensure Pivot Table is Refreshed
Pivot_Sheet.PivotTables(PivotName).RefreshTable
'Complete Message
Pivot_Sheet.Activate
MsgBox "Your Pivot Table is now updated."
End Sub
If you are not using Excel tables then you can use this code to update pivot table range.
60. Disable/Enable Get Pivot Data
Sub activateGetPivotData()
Application.GenerateGetPivotData = True
End Sub
Sub deactivateGetPivotData()
Application.GenerateGetPivotData = False
End Sub
To disable/enable GetPivotData function you need to use Excel option. But with this code you can do it in a single click.
Charts Codes
Use these VBA codes to manage charts in Excel and save your lot of time.
61. Change Chart Type
Sub ChangeChartType()
ActiveChart.ChartType = xlColumnClustered
End Sub
This code will help you to convert chart type without using chart options from the tab. All you have to do just specify to which type you want to convert.
Below code will convert selected chart to a clustered column chart. There are different codes for different types, you can find all those types from here.
62. Paste Chart as an Image
Sub ConvertChartToPicture()
ActiveChart.ChartArea.Copy
ActiveSheet.Range("A1").Select
ActiveSheet.Pictures.Paste.Select
End Sub
This code will help you to convert your chart into an image. You just need to select your chart and run this code.
63. Add Chart Title
Sub AddChartTitle()
Dim i As Variant
i = InputBox("Please enter your chart title", "Chart Title")
On Error GoTo Last
ActiveChart.SetElement (msoElementChartTitleAboveChart)
ActiveChart.ChartTitle.Text = i
Last:
Exit Sub
End Sub
First of all, you need to select your chart and the run this code. You will get an input box to enter chart title.
Advanced Codes
Some of the codes which you can use to preform advanced task in your spreadsheets.
64. Save Selected Range as a PDF
Sub HideSubtotals()
Dim pt As PivotTable
Dim pf As PivotField
On Error Resume Next
Set pt = ActiveSheet.PivotTables(ActiveCell.PivotTable.name)
If pt Is Nothing Then
MsgBox "You must place your cursor inside of a PivotTable."
Exit Sub
End If
For Each pf In pt.PivotFields
pf.Subtotals(1) = True
pf.Subtotals(1) = False
Next pf
End Sub
If you want to hide all the subtotals, just run this code. First of all, make sure to select a cell from your pivot table and then run this macro.
65. Create a Table of Content
Sub TableofContent()
Dim i As Long
On Error Resume Next
Application.DisplayAlerts = False
Worksheets("Table of Content").Delete
Application.DisplayAlerts = True
On Error GoTo 0
ThisWorkbook.Sheets.Add Before:=ThisWorkbook.Worksheets(1)
ActiveSheet.Name = "Table of Content"
For i = 1 To Sheets.Count
With ActiveSheet
.Hyperlinks.Add _
Anchor:=ActiveSheet.Cells(i, 1), _
Address:="", _
SubAddress:="'" & Sheets(i).Name & "'!A1", _
ScreenTip:=Sheets(i).Name, _
TextToDisplay:=Sheets(i).Name
End With
Next i
End Sub
Let’s say you have more than 100 worksheets in your workbook and it’s hard to navigate now.
Don’t worry this macro code will rescue everything. When you run this code it will create a new worksheet and create a index of worksheets with a hyperlink to them.
66. Convert Range into an Image
Sub PasteAsPicture()
Application.CutCopyMode = False
Selection.Copy
ActiveSheet.Pictures.Paste.Select
End Sub
Paste selected range as an image. You just have to select the range and once you run this code it will automatically insert a picture for that range.
67. Insert a Linked Picture
Sub LinkedPicture()
Selection.Copy
ActiveSheet.Pictures.Paste(Link:=True).Select
End Sub
This VBA code will convert your selected range into a linked picture and you can use that image anywhere you want.
68. Use Text to Speech
Sub Speak()
Selection.Speak
End Sub
Just select a range and run this code. Excel will speak all the text what you have in that range, cell by cell.
69. Activate Data Entry Form
Sub DataForm()
ActiveSheet.ShowDataForm
End Sub
There is a default data entry form which you can use for data entry.
70. Use Goal Seek
Sub GoalSeekVBA()
Dim Target As Long
On Error GoTo Errorhandler
Target = InputBox("Enter the required value", "Enter Value")
Worksheets("Goal_Seek").Activate
With ActiveSheet.Range("C7")
.GoalSeek_ Goal:=Target, _
ChangingCell:=Range("C2")
End With
Exit Sub
Errorhandler: MsgBox ("Sorry, value is not valid.")
End Sub
Goal Seek can be super helpful for you to solve complex problems. Learn more about goal seek from here before you use this code.
71. VBA Code to Search on Google
Sub SearchWindow32()
Dim chromePath As String
Dim search_string As String
Dim query As String
query = InputBox("Enter here your search here", "Google Search")
search_string = query
search_string = Replace(search_string, " ", "+")
'Uncomment the following line for Windows 64 versions and comment out Windows 32 versions'
'chromePath = "C:Program FilesGoogleChromeApplicationchrome.exe"
'Uncomment the following line for Windows 32 versions and comment out Windows 64 versions
'chromePath = "C:Program Files (x86)GoogleChromeApplicationchrome.exe"
Shell (chromePath & " -url http://google.com/#q=" & search_string)
End Sub
Formula Codes
These codes will help you to calculate or get results which often you do with worksheet functions and formulas.
72. Convert all Formulas into Values
Sub convertToValues()
Dim MyRange As Range
Dim MyCell As Range
Select Case _
MsgBox("You Can't Undo This Action. " _
& "Save Workbook First?", vbYesNoCancel, _
"Alert")
Case Is = vbYes
ThisWorkbook.Save
Case Is = vbCancel
Exit Sub
End Select
Set MyRange = Selection
For Each MyCell In MyRange
If MyCell.HasFormula Then
MyCell.Formula = MyCell.Value
End If
Next MyCell
End Sub
Simply convert formulas into values. When you run this macro it will quickly change the formulas into absolute values.
73. Remove Spaces from Selected Cells
Sub RemoveSpaces()
Dim myRange As Range
Dim myCell As Range
Select Case MsgBox("You Can't Undo This Action. " _
& "Save Workbook First?", _
vbYesNoCancel, "Alert")
Case Is = vbYesThisWorkbook.Save
Case Is = vbCancel
Exit Sub
End Select
Set myRange = Selection
For Each myCell In myRange
If Not IsEmpty(myCell) Then
myCell = Trim(myCell)
End If
Next myCell
End Sub
One of the most useful macros from this list. It will check your selection and then remove all the extra spaces from that.
74. Remove Characters from a String
Public Function removeFirstC(rng As String, cnt As Long)
removeFirstC = Right(rng, Len(rng) - cnt)
End Function
Simply remove characters from the starting of a text string. All you need is to refer to a cell or insert a text into the function and number of characters to remove from the text string.
It has two arguments «rng» for the text string and «cnt» for the count of characters to remove. For Example: If you want to remove first characters from a cell, you need to enter 1 in cnt.
75. Add Insert Degree Symbol in Excel
Sub degreeSymbol( )
Dim rng As Range
For Each rng In Selection
rng.Select
If ActiveCell <> "" Then
If IsNumeric(ActiveCell.Value) Then
ActiveCell.Value = ActiveCell.Value & "°"
End If
End If
Next
End Sub
Let’s say you have a list of numbers in a column and you want to add degree symbol with all of them.
76. Reverse Text
Public Function rvrse(ByVal cell As Range) As String
rvrse = VBA.strReverse(cell.Value)
End Function
All you have to do just enter «rvrse» function in a cell and refer to the cell in which you have text which you want to reverse.
77. Activate R1C1 Reference Style
Sub ActivateR1C1()
If Application.ReferenceStyle = xlA1 Then
Application.ReferenceStyle = xlR1C1
Else
Application.ReferenceStyle = xlR1C1
End If
End Sub
This macro code will help you to activate R1C1 reference style without using Excel options.
78. Activate A1 Reference Style
Sub ActivateA1()
If Application.ReferenceStyle = xlR1C1 Then
Application.ReferenceStyle = xlA1
Else
Application.ReferenceStyle = xlA1
End If
End Sub
This macro code will help you to activate A1 reference style without using Excel options.
79. Insert Time Range
Sub TimeStamp()
Dim i As Integer
For i = 1 To 24
ActiveCell.FormulaR1C1 = i & ":00"
ActiveCell.NumberFormat = "[$-409]h:mm AM/PM;@"
ActiveCell.Offset(RowOffset:=1, ColumnOffset:=0).Select
Next i
End Sub
With this code, you can insert a time range in sequence from 00:00 to 23:00.
80. Convert Date into Day
Sub date2day()
Dim tempCell As Range
Selection.Value = Selection.Value
For Each tempCell In Selection
If IsDate(tempCell) = True Then
With tempCell
.Value = Day(tempCell)
.NumberFormat = "0"
End With
End If
Next tempCell
End Sub
If you have dates in your worksheet and you want to convert all those dates into days then this code is for you. Simply select the range of cells and run this macro.
81. Convert Date into Year
Sub date2year()
Dim tempCell As Range
Selection.Value = Selection.Value
For Each tempCell In Selection
If IsDate(tempCell) = True Then
With tempCell
.Value = Year(tempCell)
.NumberFormat = "0"
End With
End If
Next tempCell
End Sub
This code will convert dates into years.
82. Remove Time from Date
Sub removeTime()
Dim Rng As Range
For Each Rng In Selection
If IsDate(Rng) = True Then
Rng.Value = VBA.Int(Rng.Value)
End If
Next
Selection.NumberFormat = "dd-mmm-yy"
End Sub
If you have time with the date and you want to remove it then you can use this code.
83. Remove Date from Date and Time
Sub removeDate()
Dim Rng As Range
For Each Rng In Selection
If IsDate(Rng) = True Then
Rng.Value = Rng.Value - VBA.Fix(Rng.Value)
End If
NextSelection.NumberFormat = "hh:mm:ss am/pm"
End Sub
It will return only time from a date and time value.
84. Convert to Upper Case
Sub convertUpperCase()
Dim Rng As Range
For Each Rng In Selection
If Application.WorksheetFunction.IsText(Rng) Then
Rng.Value = UCase(Rng)
End If
Next
End Sub
Select the cells and run this code. It will check each and every cell of selected range and then convert it into upper case text.
85. Convert to Lower Case
Sub convertLowerCase()
Dim Rng As Range
For Each Rng In Selection
If Application.WorksheetFunction.IsText(Rng) Then
Rng.Value= LCase(Rng)
End If
Next
End Sub
This code will help you to convert selected text into lower case text. Just select a range of cells where you have text and run this code. If a cell has a number or any value other than text that value will remain same.
86. Convert to Proper Case
Sub convertProperCase()
Dim Rng As Range
For Each Rng In Selection
If WorksheetFunction.IsText(Rng) Then
Rng.Value = WorksheetFunction.Proper(Rng.Value)
End If
Next
End Sub
And this code will convert selected text into the proper case where you have the first letter in capital and rest in small.
87. Convert to Sentence Case
Sub convertTextCase()
Dim Rng As Range
For Each Rng In Selection
If WorksheetFunction.IsText(Rng) Then
Rng.Value = UCase(Left(Rng, 1)) & LCase(Right(Rng, Len(Rng) - 1))
End If
Next Rng
End Sub
In text case, you have the first letter of the first word in capital and rest all in words in small for a single sentence and this code will help you convert normal text into sentence case.
88. Remove a Character from Selection
Sub removeChar()
Dim Rng As Range
Dim rc As String
rc = InputBox("Character(s) to Replace", "Enter Value")
For Each Rng In Selection
Selection.Replace What:=rc, Replacement:=""
Next
End Sub
To remove a particular character from a selected cell you can use this code. It will show you an input box to enter the character you want to remove.
89. Word Count from Entire Worksheet
Sub Word_Count_Worksheet()
Dim WordCnt As Long
Dim rng As Range
Dim S As String
Dim N As Long
For Each rng In ActiveSheet.UsedRange.Cells
S = Application.WorksheetFunction.Trim(rng.Text)
N = 0
If S <> vbNullString Then
N = Len(S) - Len(Replace(S, " ", "")) + 1
End If
WordCnt = WordCnt + N
Next rng
MsgBox "There are total " _
& Format(WordCnt, "#,##0") & _
" words in the active worksheet"
End Sub
It can help you to count all the words from a worksheet.
90. Remove the Apostrophe from a Number
Sub removeApostrophes()
Selection.Value = Selection.Value
End Sub
If you have numeric data where you have an apostrophe before each number, you run this code to remove it.
91. Remove Decimals from Numbers
Sub removeDecimals()
Dim lnumber As Double
Dim lResult As Long
Dim rng As Range
For Each rng In Selection
rng.Value = Int(rng)
rng.NumberFormat = "0"
Next rng
End Sub
This code will simply help you to remove all the decimals from the numbers from the selected range.
92. Multiply all the Values by a Number
Sub addNumber()
Dim rng As Range
Dim i As Integer
i = InputBox("Enter number to multiple", "Input Required")
For Each rng In Selection
If WorksheetFunction.IsNumber(rng) Then
rng.Value = rng + i
Else
End If
Next rng
End Sub
Let’s you have a list of numbers and you want to multiply all the number with a particular. To use this code: Select that range of cells and run this code. It will first ask you for the number with whom you want to multiple and then instantly multiply all the numbers with it.
93. Add a Number in all the Numbers
Sub addNumber()
Dim rng As Range
Dim i As Integer
i = InputBox("Enter number to multiple", "Input Required")
For Each rng In Selection
If WorksheetFunction.IsNumber(rng) Then
rng.Value = rng + i
Else
End If
Next rng
End Sub
Just like multiplying you can also add a number into a set of numbers.
94. Calculate the Square Root
Sub getSquareRoot()
Dim rng As Range
Dim i As Integer
For Each rng In Selection
If WorksheetFunction.IsNumber(rng) Then
rng.Value = Sqr(rng)
Else
End If
Next rng
End Sub
To calculate square root without applying a formula you can use this code. It will simply check all the selected cells and convert numbers to their square root.
95. Calculate the Cube Root
Sub getCubeRoot()
Dim rng As Range
Dimi As Integer
For Each rng In Selection
If WorksheetFunction.IsNumber(rng) Then
rng.Value = rng ^ (1 / 3)
Else
End If
Nextrng
End Sub
To calculate cube root without applying a formula you can use this code. It will simply check all the selected cells and convert numbers to their cube root.
96. Add A-Z Alphabets in a Range
Sub addsAlphabets1()
Dim i As Integer
For i = 65 To 90
ActiveCell.Value = Chr(i)
ActiveCell.Offset(1, 0).Select
Next i
End Sub
Sub addsAlphabets2()
Dim i As Integer
For i = 97 To 122
ActiveCell.Value = Chr(i)
ActiveCell.Offset(1, 0).Select
Next i
End Sub
Just like serial numbers you can also insert alphabets in your worksheet. Beloware the code which you can use.
97. Convert Roman Numbers into Arabic Numbers
Sub convertToNumbers()
Dim rng As Range
Selection.Value = Selection.Value
For Each rng In Selection
If Not WorksheetFunction.IsNonText(rng) Then
rng.Value = WorksheetFunction.Arabic(rng)
End If
Next rng
End Sub
Sometimes it’s really hard to understand Roman numbers as serial numbers. This code will help you to convert roman numbers into Arabic numbers.
98. Remove Negative Signs
Sub removeNegativeSign()
Dim rng As Range
Selection.Value = Selection.Value
For Each rng In Selection
If WorksheetFunction.IsNumber(rng) Then
rng.Value = Abs(rng)
End If
Next rng
This code will simply check all the cell in the selection and convert all the negative numbers into positive. Just select a range and run this code.
99. Replace Blank Cells with Zeros
Sub replaceBlankWithZero()
Dim rng As Range
Selection.Value = Selection.Value
For Each rng In Selection
If rng = "" Or rng = " " Then
rng.Value = "0"
Else
End If
Next rng
End Sub
For data where you have blank cells, you can use the below code to add zeros in all those cells. It makes easier to use those cells in further calculations.
More Codes
100. More VBA Examples and Tutorials
- User Defined Function [UDF] in Excel using VBA
- VBA Interview Questions
- Add a Comment in a VBA Code (Macro)
- Add a Line Break in a VBA Code (Single Line into Several Lines)
- Add a New Line (Carriage Return) in a String in VBA
- Personal Macro Workbook (personal.xlsb)
- Record a Macro in Excel
- VBA Exit Sub Statement
- VBA Immediate Window (Debug.Print)
- VBA Module
- VBA MSGBOX
- VBA Objects
- VBA With Statement
- Count Rows using VBA
- Excel VBA Font (Color, Size, Type, and Bold)
- Excel VBA Hide and Unhide a Column or a Row
- Excel VBA Range – Working with Range and Cells in VBA
- Apply Borders on a Cell using VBA in Excel
- Find Last Row, Column, and Cell using VBA in Excel
- Insert a Row using VBA in Excel
- Merge Cells in Excel using a VBA Code
- Select a Range/Cell using VBA in Excel
- How to SELECT ALL the Cells in a Worksheet using a VBA Code
- use ActiveCell in VBA in Excel
- How to use Special Cells Method in VBA in Excel
- How to use UsedRange Property in VBA in Excel
- VBA AutoFit (Rows, Column, or the Entire Worksheet)
- VBA ClearContents (from a Cell, Range, or Entire Worksheet)
- VBA Copy Range to Another Sheet + Workbook
- VBA Enter Value in a Cell (Set, Get and Change)
- VBA Insert Column (Single and Multiple)
- VBA Named Range
- VBA Range Offset
- VBA Sort Range | (Descending, Multiple Columns, Sort Orientation
- VBA Wrap Text (Cell, Range, and Entire Worksheet)
- How to CLEAR an Entire Sheet using VBA in Excel
- How to Copy and Move a Sheet in Excel using VBA
- How to COUNT Sheets using VBA in Excel
- How to DELETE a SHEET using VBA in Excel
- How to Hide & Unhide a Sheet using VBA in Excel
- How to PROTECT and UNPROTECT a Sheet using VBA in Excel
- RENAME a Sheet using VBA
- Write a VBA Code to Create a New Sheet
- VBA Worksheet Object
- Activate a Sheet using VBA
- Copy an Excel File (Workbook)
- VBA Activate Workbook (Excel File)
- VBA Close Workbook (Excel File)
- VBA Combine Workbooks (Excel Files)
- VBA Create New Workbook (Excel File)
- VBA Delete Workbook (Excel File)
- VBA Open Workbook (Excel File)
- VBA Protect/Unprotect Workbook (Excel File)
- VBA Rename Workbook (Excel File)
- VBA Save Workbook (Excel File)
- VBA ThisWorkbook (Current Excel File)
- VBA Workbook
- Declare Global Variable (Public) in VBA
- Range or a Cell as a Variable in VBA
- Option Explicit Statement in VBA
- Variable in a Message Box
- VBA Constants
- VBA Dim Statement
- VBA Variables (Declare, Data Types, and Scope)
- VBA Add New Value to the Array
- VBA Array
- VBA Array Length (Size)
- VBA Array with Strings
- VBA Clear Array (Erase)
- VBA Dynamic Array
- VBA Loop Through an Array
- VBA Multi-Dimensional Array
- VBA Range to an Array
- VBA Search for a Value in an Array
- VBA Sort Array
- How to Average Values in Excel using VBA
- Get Today’s Date and Current Time using VBA
- Sum Values in Excel using VBA
- Match Function in VBA
- MOD in VBA
- Random Number
- VBA Calculate (Cell, Range, Row, & Workbook)
- VBA Concatenate
- VBA Worksheet Function (Use Excel Functions in a Macro)
- How to Check IF a Sheet Exists using VBA in Excel
- VBA Check IF a Cell is Empty + Multiple Cells
- VBA Check IF a Workbook Exists in a Folder (Excel File)
- VBA Check IF a Workbook is Open (Excel File)
- VBA Exit IF
- VBA IF – IF Then Else Statement
- VBA IF And (Test Multiple Conditions)
- VBA IF Not
- VBA IF OR (Test Multiple Conditions)
- VBA Nested IF
- VBA SELECT CASE Statement (Test Multiple Conditions)
- VBA Automation Error (Error 440)
- VBA Error 400
- VBA ERROR Handling
- VBA Invalid Procedure Call Or Argument Error (Error 5)
- VBA Object Doesn’t Support this Property or Method Error (Error 438)
- VBA Object Required Error (Error 424)
- VBA Out of Memory Error (Error 7)
- VBA Overflow Error (Error 6)
- VBA Runtime Error (Error 1004)
- VBA Subscript Out of Range Runtime Error (Error 9)
- VBA Type Mismatch Error (Error 13)
- Excel VBA Do While Loop and (Do Loop While)
- How to Loop Through All the Sheets using VBA
- Loop Through a Range using VBA
- VBA FOR LOOP
- VBA GoTo Statement
- Input Box in VBA
- VBA Create and Write to a Text File
- VBA ScreenUpdating
- VBA Status Bar
- VBA Wait and Sleep
About the Author

Puneet is using Excel since his college days. He helped thousands of people to understand the power of the spreadsheets and learn Microsoft Excel. You can find him online, tweeting about Excel, on a running track, or sometimes hiking up a mountain.
Return to VBA Code Examples
In this Article
- VBA Cheat Sheet PDF (Free Download)
- VBA Cheat Sheets
- Sheets
- Cells & Ranges
- Rows
- Columns
- Workbooks
- Settings
- Errors
- Files
- Arrays
- Collections
- Dictionaries
- AutoMacro – The Ultimate VBA Add-in
.
VBA Cheat Sheet PDF (Free Download)
Download our free Excel VBA Cheat Sheet PDF for quick reference!
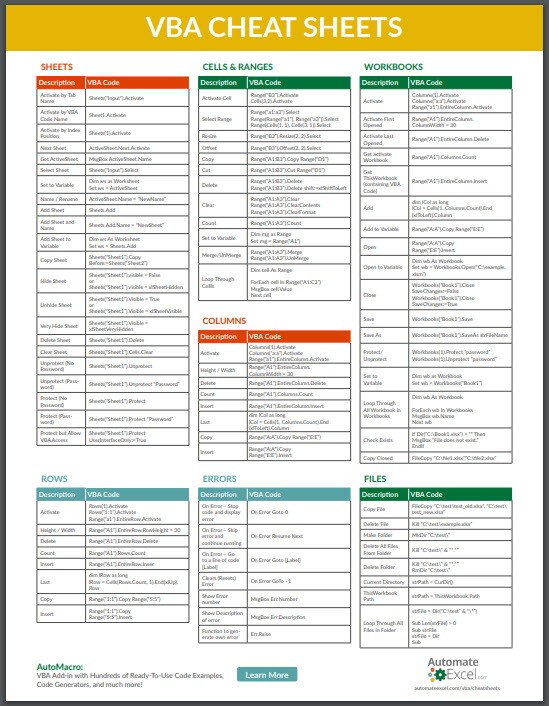
VBA Cheat Sheets
Reference this page for lists of all common VBA Commands & Syntax. You will find many basic commands (ex. insert a sheet) and some advanced syntax (ex. working with arrays).
Tips:
Use CTRL + F to search this page.
Bookmark this page (CTRL + D on Chrome)!
Sheets
Activate by Tab Name
Sheets(“Input”).Activate
Activate by VBA Code Name
Sheet1.Activate
Activate by Index Position
Sheets(1).Activate
Next Sheet
ActiveSheet.Next.Activate
Get ActiveSheet
MsgBox ActiveSheet.Name
Select Sheet
Sheets(“Input”).Select
Set to Variable
Dim ws as Worksheet
Set ws = ActiveSheet
Name / Rename
ActiveSheet.Name = “NewName”
Add Sheet and Name
Sheets.Add.Name = “NewSheet”
Add Sheet to Variable
Dim ws As Worksheet
Set ws = Sheets.Add
Copy Sheet
Sheets(“Sheet1”).Copy Before:=Sheets(“Sheet2”)
Hide Sheet
Sheets(“Sheet1”).visible = False
or
Sheets(“Sheet1”).visible = xlSheetHidden
Unhide Sheet
Sheets(“Sheet1”).Visible = True
or
Sheets(“Sheet1”).Visible = xlSheetVisible
Very Hide Sheet
Sheets(“Sheet1”).Visible = xlSheetVeryHidden
Delete Sheet
Sheets(“Sheet1”).Delete
Clear Sheet
Sheets(“Sheet1”).Cells.Clear
Unprotect (No Password)
Sheets(“Sheet1”).Unprotect
Unprotect (Password)
Sheets(“Sheet1”).Unprotect “Password”
Protect (No Password)
Sheets(“Sheet1”).Protect
Protect (Password)
Sheets(“Sheet1”).Protect “Password”
Protect but Allow VBA Access
Sheets(“Sheet1”).Protect UserInterfaceOnly:=True
Return to Top
Cells & Ranges
Activate Cell
Range(“B3”).Activate
Cells(3,2).Activate
Select Range
Range(“a1:a3”).Select
Range(Range(“a1”), Range(“a3”)).Select
Range(Cells(1, 1), Cells(3, 1)).Select
Resize
Range(“B3”).Resize(2, 2).Select
Offset
Range(“B3”).Offset(2, 2).Select
Copy
Range(“A1:B3”).Copy Range(“D1”)
Cut
Range(“A1:B3”).Cut Range(“D1”)
Delete
Range(“A1:B3”).Delete
Range(“A1:B3”).Delete shift:=xlShiftToLeft
Clear
Range(“A1:A3”).Clear
Range(“A1:A3”).ClearContents
Range(“A1:A3”).ClearFormat
Count
Range(“A1:A3”).Count
Set to Variable
Dim rng as Range
Set rng = Range(“A1”)
Merge/UnMerge
Range(“A1:A3”).Merge
Range(“A1:A3”).UnMerge
Loop Through Cellls
Dim cell As Range
For Each cell In Range(“A1:C3”)
MsgBox cell.Value
Next cell
Return to Top
Rows
Activate
Rows(1).Activate
Rows(“1:1”).Activate
Range(“a1”).EntireRow.Activate
Height / Width
Range(“A1”).EntireRow.RowHeight = 30
Delete
Range(“A1”).EntireRow.Delete
Count
Range(“A1”).Rows.Count
Insert
Range(“A1”).EntireRow.Insert
Last
dim lRow as long
lRow = Cells(Rows.Count, 1).End(xlUp).Row
Copy
Range(“1:1”).Copy Range(“5:5”)
Insert
Range(“1:1”).Copy
Range(“5:5”).Insert
Return to Top
Columns
Activate
Columns(1).Activate
Columns(“a:a”).Activate
Range(“a1”).EntireColumn.Activate
Height / Width
Range(“A1”).EntireColumn.ColumnWidth = 30
Delete
Range(“A1”).EntireColumn.Delete
Count
Range(“A1”).Columns.Count
Insert
Range(“A1”).EntireColumn.Insert
Last
dim lCol as long
lCol = Cells(1, Columns.Count).End(xlToLeft).Column
Copy
Range(“A:A”).Copy Range(“E:E”)
Insert
Range(“A:A”).Copy
Range(“E:E”).Insert
Return to Top
VBA Coding Made Easy
Stop searching for VBA code online. Learn more about AutoMacro — A VBA Code Builder that allows beginners to code procedures from scratch with minimal coding knowledge and with many time-saving features for all users!

Learn More
Workbooks
Activate
Workbooks(“Book1”).Activate
Activate First Opened
Workbooks(1).Activate
Activate Last Opened
Workbooks(Workbooks.Count).Activate
Get ActivateWorkbook
MsgBox ActiveWorkbook.Name
Get ThisWorkbook (containing VBA Code)
MsgBox ThisWorkbook.Name
Add to Variable
Dim wb As Workbook
Set wb = Workbooks.Add
Open
Workbooks.Open(“C:example.xlsm”)
Open to Variable
Dim wb As Workbook
Set wb = Workbooks.Open(“C:example.xlsm”)
Close
Workbooks(“Book1”).Close SaveChanges:=False
Workbooks(“Book1”).Close SaveChanges:=True
Save
Workbooks(“Book1”).Save
Save As
Workbooks(“Book1”).SaveAs strFileName
Protect/Unprotect
Workbooks(1).Protect “password”
Workbooks(1).Unprotect “password”
Set to Variable
Dim wb as Workbook
Set wb = Workbooks(“Book1”)
Loop Through All Workbook in Workbooks
Dim wb As Workbook
For Each wb In Workbooks
MsgBox wb.Name
Next wb
Check Exists
If Dir(“C:Book1.xlsx”) = “” Then
MsgBox “File does not exist.”
EndIf
Copy Closed
FileCopy “C:file1.xlsx”,”C:file2.xlsx”
Return to Top
Settings
Screen Updating
Application.ScreenUpdating = False
Application.ScreenUpdating = True
Display Alerts
Application.DisplayAlerts = False
Application.DisplayAlerts = True
Events
Application.EnableEvents = False
Application.EnableEvents = True
Enable Cancel Key
Application.EnableCancelKey = xlDisabled
Application.EnableCancelKey = xlInterrupt
Text Compare – Ignore Case
Option Compare Text
Require Variable Declaration
Option Explicit
Automatic Calculations
Application.Calculation = xlManual
Application.Calculation = xlAutomatic
Background Error Checking
Application.ErrorCheckingOptions.BackgroundChecking = False
Application.ErrorCheckingOptions.BackgroundChecking = True
Display Formula Bar
Application.DisplayFormulaBar = False
Application.DisplayFormulaBar = True
Freeze Panes
ActiveWindow.FreezePanes = False
ActiveWindow.FreezePanes = True
Full Screen View
Application.DisplayFullScreen = False
Application.DisplayFullScreen = True
PageBreak Preview
ActiveWindow.View = xlPageBreakPreview
ActiveWindow.View = xlNormalView
Display Scroll Bars
With ActiveWindow
.DisplayHorizontalScrollBar = False
.DisplayVerticalScrollBar = False
End WithWith ActiveWindow
.DisplayHorizontalScrollBar = True
.DisplayVerticalScrollBar = True
End With
Display Status Bar
Application.DisplayStatusBar = False
Application.DisplayStatusBar = True
Status Bar Contents
Application.StatusBar = “I’m working Now!!!”
Application.StatusBar = False
Display Workbook Tabs
ActiveWindow.DisplayWorkbookTabs = False
ActiveWindow.DisplayWorkbookTabs = True
UserName
Application.UserName = “AutomateExcel.com”
App Caption
Application.Caption = “AutomateExcel Model”
Zoom
ActiveWindow.Zoom = 80
Return to Top
Errors
On Error – Stop code and display error
On Error Goto 0
On Error – Skip error and continue running
On Error Resume Next
On Error – Go to a line of code [Label]
On Error Goto [Label]
Clears (Resets) Error
On Error GoTo –1
Show Error number
MsgBox Err.Number
Show Description of error
MsgBox Err.Description
Function to generate own error
Err.Raise
Return to Top
VBA Programming | Code Generator does work for you!
Files
Copy File
FileCopy “C:testtest_old.xlsx”, “C:testtest_new.xlsx”
Delete File
Kill “C:testexample.xlsx”
Make Folder
MkDir “C:test”
Delete All Files From Folder
Kill “C:test” & “*.*”
Delete Folder
Kill “C:test” & “*.*”
RmDir “C:test”
Current Directory
strPath = CurDir()
ThisWorkbook Path
strPath = ThisWorkbook.Path
Loop Through All Files in Folder
strFile = Dir(“C:test” & “*”)
Do While Len(strFile) > 0
Debug.Print strFile
strFile = Dir
Loop
Return to Top
Arrays
Create
Dim arr(1 To 3) As Variant
arr(1) = “one”
arr(2) = “two”
arr(3) = “three”
Create From Excel
Dim arr(1 To 3) As Variant
Dim cell As Range, i As Integer
i = LBound(arr)
For Each cell In Range(“A1:A3”)
i = i + 1
arr(i) = cell.value
Next cell
Read All Items
Dim i as Long
For i = LBound(arr) To UBound(arr)
MsgBox arr(i)
Next i
Array to String
Dim sName As String
sName = Join(arr, “:”)
Increase Size
ReDim Preserve arr(0 To 100)
Return to Top
Collections
Create
Dim coll As New Collection
coll.Add “one”
coll.Add “two”
Create From Excel
Dim coll As New Collection
Dim cell As Range
For Each cell In Range(“A1:A2”)
coll.Add cell.value
Next cell
Add Item
coll.Add “Value”
Add Item Before
coll.Add “Value”, Before:=1
Add Item After
coll.Add “Value”, After:=1
Read Item
MsgBox coll (1)
Read All Items
Dim item As Variant
For Each item In coll
MsgBox item
Next item
Remove Item
coll.Remove (1)
Remove All Items
Set coll = New Collection
Return to Top
Dictionaries
Required Reference
Tools > References > Microsoft Scripting Runtime
Create
Dim dict As New Scripting.Dictionary
dict.Add “”
dict.Add “”
Create From Excel
Dim dict As New Scripting.Dictionary
Dim cell As Range
Dim key As Integer
For Each cell In Range(“A1:A10”)
key = key + 1
dict.Add key, cell.value
Next cell
Add Item
dict.Add “Key”, “Value”
Change Value
dict(“Key”) = “Value”
Get Value
MsgBox dict(“Key”)
Check For Value
If dict.Exists(“Key”) Then
MsgBox “Exists”
End If
Remove Item
dict.Remove (“Key”)
Remove All Items
dict.RemoveAll
Loop Through Items
Dim key As Variant
For Each key In dict.Keys
MsgBox key, dict(key)
Next key
Make Key Case Sensitive
dict.CompareMode = vbBinaryCompare
Make Key Case Insensitive
dict.CompareMode = vbTextCompare
Return to Top
AutoMacro – The Ultimate VBA Add-in

AutoMacro: VBA Add-in with Hundreds of Ready-To-Use VBA Code Examples & much more!
Learn More
Памятка для начинающих по коду VBA Excel. Краткий справочник по часто используемым выражениям при написании программного кода.
Краткий справочник (памятка) позволяет быстро найти нужное выражение (оператор, функцию, метод) для копирования и вставки в код VBA Excel при написании программы.
Обращение к ячейке
Способы обращения к диапазону в виде одной ячейки на примере ячейки B5 на активном листе:
|
Range(«B5») [B5] Cells(5, 2) Cells(5, «B») |
Обращение к ячейке на неактивном листе активной книги:
|
Worksheets(«Имя листа»).Range(«B5») = 123 |
Обращение к ячейке в неактивной книге:
|
Workbooks(«Книга2.xlsm»).Worksheets(«Имя листа»).Range(«B5») = 123 |
Обращение к ячейке в неактивной текущей книге с исполняемым кодом:
|
ThisWorkbook.Worksheets(«Имя листа»).Range(«B5») = 123 |
"Имя листа" — это имя на ярлыке листа, которое в проводнике проекта VBA отображается в скобках.
Обращение к диапазону
Способы обращения к диапазону на активном листе:
|
‘смежный диапазон Range(«B5:E10») [B5:E10] Range(Cells(5, 2), Cells(10, 5)) Range(Cells(5, «B»), Cells(10, «E»)) ‘несмежный диапазон Range(«B5:E10, G2:I7, D12:F17») Application.Union([B5:E10], [G2:I7], [D12:F17]) |
С помощью метода Application.Union можно объединить в несмежный диапазон и выражения типа Range(Cells(5, 2), Cells(10, 5)).
Способы обращения к диапазону на неактивном листе и в неактивной книге те же, что и для диапазона в виде одной ячейки (смотрите выше).
Обмен значениями
Ячейка-переменная-ячейка
Диапазон-массив-диапазон
|
Dim arr arr = Range(«A1:E5») Range(«A7:E11») = arr |
Аналог Ctrl+стрелка
Аналог сочетания клавиш Ctrl+стрелка — свойство End объекта Range:
|
Dim myRange As Range, a As String Set myRange = Range(«D10»).End(xlDown | xlToLeft | xlToRight | xlUp) a = Range(«D10»).End(xlDown | xlToLeft | xlToRight | xlUp).Address |
В качестве аргумента свойства End оставляем одну константу в зависимости от нужного направления.
Последняя строка таблицы
Варианты определения номера последней строки таблицы:
|
Dim n as Long n = Range(«A1»).CurrentRegion.Rows.Count n = Range(«A1»).End(xlDown).Row n = Cells(Rows.Count, «A»).End(xlUp).Row |
Шаблоны для копирования
Краткий справочник по циклам и другим блокам кода. Копируйте шаблоны из памятки для начинающих и вставляйте их в свой код VBA Excel. Используйте свои переменные, условия и операторы.
Оператор With
|
With объект операторы End With |
Функция IIf
|
IIf(условие, если True, если False) |
Оператор If…Then…Else
Однострочная конструкция:
|
If условие Then операторы |
Многострочная конструкция полная:
|
If условие Then операторы ElseIf условие Then операторы ———————— Else операторы End If |
Многострочная конструкция неполная:
|
If условие Then операторы Else операторы End If |
Оператор Select Case
|
Select Case выражение Case условие 1 операторы 1 Case условие 2 операторы 2 ——————————— Case условие n операторы n Case Else операторы End Select |
Цикл For… Next
Полная конструкция:
|
Dim i As Long For i = 1 To 20 Step 1 операторы Exit For операторы Next |
Неполная конструкция:
|
Dim i As Long For i = 1 To 20 операторы Next |
Цикл For Each… Next
Полная конструкция:
|
For Each элемент In группа операторы Exit For операторы Next |
Неполная конструкция:
|
For Each элемент In группа операторы Next |
Цикл Do While… Loop
Условие до операторов:
|
Do While условие операторы Exit Do операторы Loop |
Условие после операторов:
|
Do операторы Exit Do операторы Loop While условие |
Цикл Do Until… Loop
Условие до операторов:
|
Do Until условие операторы Exit Do операторы Loop |
Условие после операторов:
|
Do операторы Exit Do операторы Loop Until условие |
Цикл While… Wend
|
While условие операторы Wend |
Отключение обновлений экрана
Отключение обновлений экрана позволяет ускорить длинную процедуру и скрыть мельтешение (мерцание) экрана во время ее выполнения:
|
Application.ScreenUpdating = False операторы Application.ScreenUpdating = True |
Отмена оповещений и сообщений
Отмена оповещений и сообщений в ходе выполнения процедуры:
|
Application.DisplayAlerts = False операторы Application.DisplayAlerts = True |
Например, при закрытии книги Excel из кода VBA без сохранения не будет появляться диалоговое окно с предложением сохранить книгу перед закрытием.
InputBox и MsgBox
|
Dim a As String a = InputBox(«Напишите что-нибудь:») MsgBox a |
Скрыть лист
|
‘Скрыть лист Sheets(«Лист1»).Visible = False ‘Отобразить лист Sheets(«Лист1»).Visible = True |
Защита листа
|
‘Защитить лист Worksheets(«Лист1»).Protect ‘Снять защиту листа Worksheets(«Лист1»).Unprotect |
Пользовательская форма
Памятка по работе с формой:
|
‘Загрузить (открыть) форму в модальном окне UserForm1.Show ‘Загрузить (открыть) форму в немодальном окне UserForm1.Show 0 ‘Скрыть форму UserForm1.Hide Me.Hide ‘Показать скрытую форму UserForm1.Show ‘Выгрузить (закрыть) форму Unload UserForm1 Unload Me |
Немодальное окно можно скрыть и закрыть как из модуля формы, так и из других модулей. Модальное окно можно скрыть и закрыть только из модуля формы. Ключевое слово Me используется только в модуле формы.
Удаление строк и столбцов
|
‘Удалить строку №9 Cells(9, 4).EntireRow.Delete ‘Удалить столбец №4 Cells(9, 4).EntireColumn.Delete |
Открыть папку или файл
Открыть папку из кода VBA Excel или любой файл по его расширению в программе по умолчанию для просмотра:
|
‘Открыть папку ThisWorkbook.FollowHyperlink («C:Тестовая») ‘Открыть файл ThisWorkbook.FollowHyperlink («C:ТестоваяДокумент1.docx») |
Закрыть все книги
Закрыть все книги Excel без сохранения изменений, кроме текущей книги с кодом:
|
Dim myWB As Workbook For Each myWB In Workbooks If Not myWB Is ThisWorkbook Then myWB.Close False Next |
Чтобы закрыть все книги с сохранением изменений, необходимо заменить False на True.
Вы можете сохранить краткий справочник для начинающих программировать в VBA Excel в свою социальную сеть, чтобы эта памятка всегда была под рукой.
With macros, we can automate Excel and save time; big tasks or small tasks, it doesn’t matter. All that matters is that we’ve become more efficient.
In this post, I share 30 of the most useful VBA codes for Excel that you can use today.
If you’ve never used VBA before, that’s fine. Part 1 contains instructions of how to use the codes and part 2 contains the code sample themselves.
Download the eBook
Get our FREE VBA eBook of the 30 most useful Excel VBA macros.
Claim your free eBook
PART ONE: How to use VBA Macros
What is VBA?
Visual Basic for Applications (VBA) is the programming language created by Microsoft to control parts of their applications. Most things which you can do with the mouse or keyboard in the Microsoft Office suite, you can also do using VBA. For example, in Excel, you can create a chart; you can also create a chart using VBA, it is just another method of achieving the same thing.
Advantages of using VBA
Since VBA code can do the same things as we could with the mouse or keyboard, why bother to use VBA at all?
Saves time:
VBA code will operate at the speed your computer will allow, which is still significantly faster than you can operate. For example, if you have to open 10 workbooks, print the documents, then close the workbook, it might take you 2 minutes with a mouse and keyboard, but with VBA it could take seconds.
Reduces errors:
Do you ever click the wrong icons or type the wrong words? Me too, but VBA doesn’t. It will do the same task over and over again, without making any errors. Don’t get me wrong, you still have to program the VBA code correctly. If you tell it to do the wrong things 10 times, then it will. But if we can get it right, then it can remove the errors created by human interaction.
Completes repetitive actions without complaining:
Have you ever had to carry out the same action many times? Maybe creating 100 charts, or printing 100 documents, or changing the heading on 100 spreadsheets. That’s not fun, nobody wants to do that. But VBA is more than happy to do it for you. It can do the same thing in a repetitive way (without complaining). In fact, repetitive tasks is one of the things VBA does best.
Integration with other applications:
You can use VBA in Word, Access, Excel, Outlook and many other programs, including Windows itself. But it doesn’t end there, you can use VBA in Excel to control Word and PowerPoint, without even needing to open those applications.
What is programming?
Programming is simply writing words in a way which a computer can understand. However, computers are not particularly flexible, so we have to be very specific about what we want the computer to do, and how we tell it to do it. The skill of programming is learning how to convey the request to the computer as clearly, as simply and as efficiently as possible.
What is the difference between a Macro and VBA?
This is a common question which can be confusing. Put simply, VBA is the language used to write a macro – just in the same way as a paragraph might be written using the English language.
The terms ‘macro’ and ‘VBA’ are often used interchangeably.
The golden rule of learning VBA
If you are still learning to write VBA, there is one thing which will help you. While it may be common practice, to copy and paste code, it will not help you to learn VBA quickly. Here is the one rule I am going to ask you to stick to… type out the code yourself.
Why am I asking you to do this? Because it will help you learn the VBA language much faster.
Let’s get started
Now you know what VBA is, why you should use it, and the golden rule, so there is only one thing left to do… let’s get started!
Setting up Excel
Before you can get stuck in with using the code in this post, you must first have Excel set up correctly. This involves:
- Ensuring the correct macro security settings have been applied
- Enabling the Developer ribbon.
Macro security settings
Macros can be used for malicious purposes, such as installing a virus, recording key-strokes, etc. This can be blocked with the security settings. However, if the settings are set too high, you cannot run any macros, or too low, you will not be protected. Neither of these is a good option.
Let’s apply suitable settings which will give you the power to decide when to allow macros or not.
- In Excel, click File > Options
- In the Excel Options dialog box, click Trust Centre > Trust Centre Settings…

- In the Trust Centre dialog box, click Macro Settings > Disable all macros with notification.

- Click OK to close the Trust Centre, then OK again to close the Excel Options.

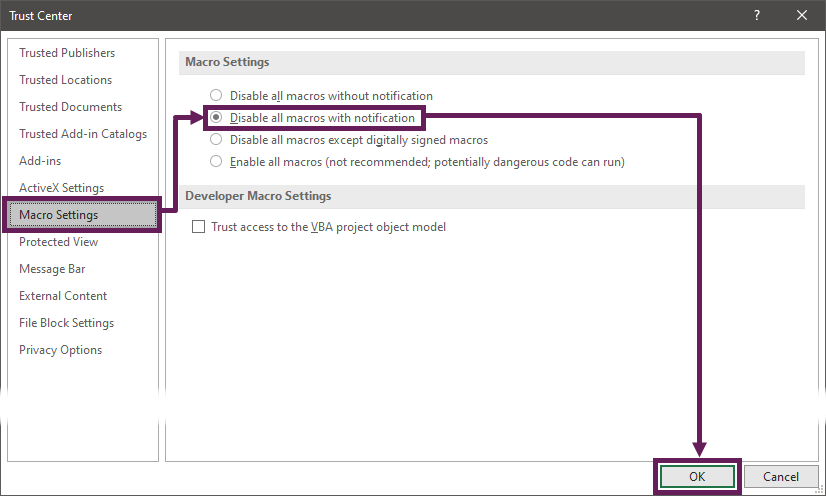
Workbooks containing macros will now be automatically disabled until you click the Enable Content button at the top of the screen.
Enable the Developer ribbon
The Developer ribbon is the place where all the VBA tools are kept. It is unlikely that this is already enabled, unless you or your IT department have already done so.
Look at the top of your Excel Window if you see the word ‘Developer’ in the menu options, then you are ready to go. You can skip straight ahead to the next part. However, if the ‘Developer’ ribbon is not there, just follow these instructions.
- In Excel, click File > Options
- In the Excel Options dialog box, click Customize Ribbon
- Ensure the Developer option is checked

- Click OK to close the Excel Options
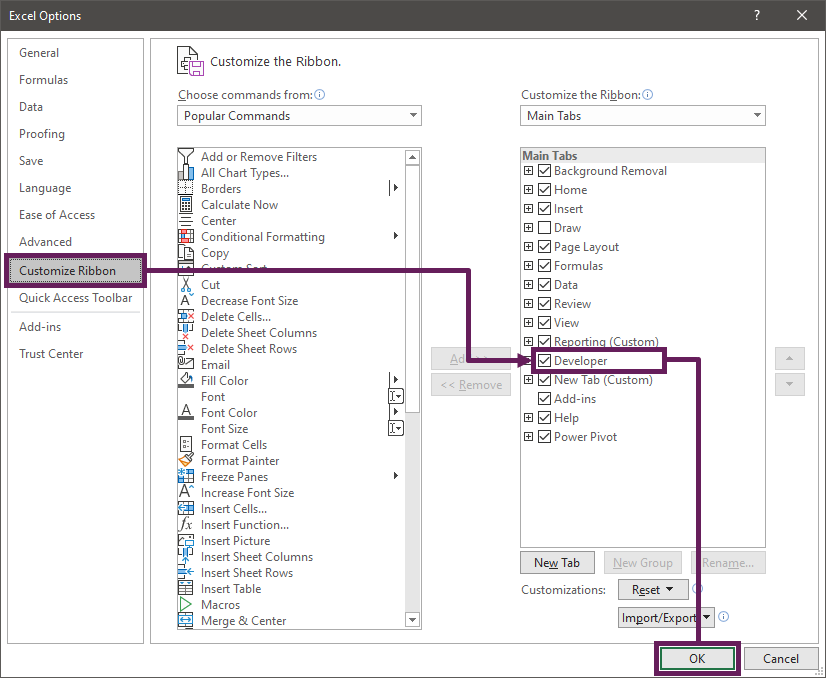
The Developer ribbon should now be visible at the top of the Excel window.
File format for macro enabled files
To save a workbook containing a macro, the standard .xlsx format will not work.
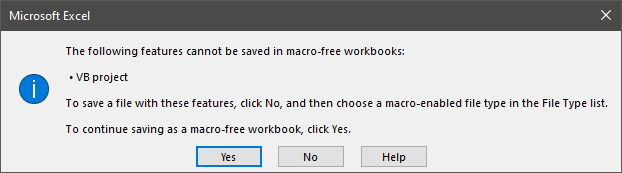
Generally, the .xlsm (Excel Macro-Enabled Workbook) file format should be used for workbooks containing macros. However .xlam (Excel Add-in), .xlsb (Excel Binary Workbook) and .xltx (Excel Macro-Enabled Template) are scenario specific formats which can also contain macros.
The legacy .xls and .xla file formats can both contain macros. They were superseded in 2007, and should now be avoided.
The basic rule is… if you don’t know, go for .xlsm.
Personal macro workbook
If we want macros to be reusable for many workbooks, often the best place to save them is in the personal macro workbook.
A personal macro workbook is a hidden file which opens whenever the Excel application opens.
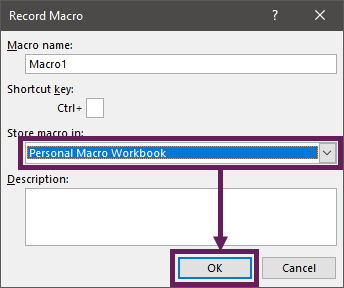
How to create a personal macro workbook?
A personal macro workbook does not exist by default; we have to create it. There are many ways to do this, but the easiest is to let Excel do it for us.
- In the ribbon, click Developer > Record Macro.

- In the Record Macro dialog box, select Personal Macro Workbook from the drop-down list.

- Click OK.
- Do anything in Excel, such as typing your name into cell A1.
- Click Developer > Stop Recording

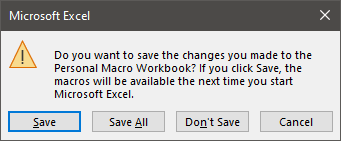
- Close all the open workbooks in Excel, this will force the personal macro workbook to be saved. A warning message will appear, click Save.


In the next part, we will learn how to use the Visual Basic Editor, which gives us access to the personal macro workbook.
Using the Visual Basic Editor
The Visual Basic Editor (or VBE as it can be known) is the place where we enter or edit VBA code. The Visual Basic Editor is found within the Developer Ribbon
In Excel, click Developer > Visual Basic to open the VBE.
Alternatively, you could use the keyboard; press ALT+F11 (the + indicates that you should hold down the ALT key, press F11, then release the ALT key), which toggles between the Excel window and the VBE.
The Visual Basic Editor Window
The Visual Basic Editor contains four main sections.
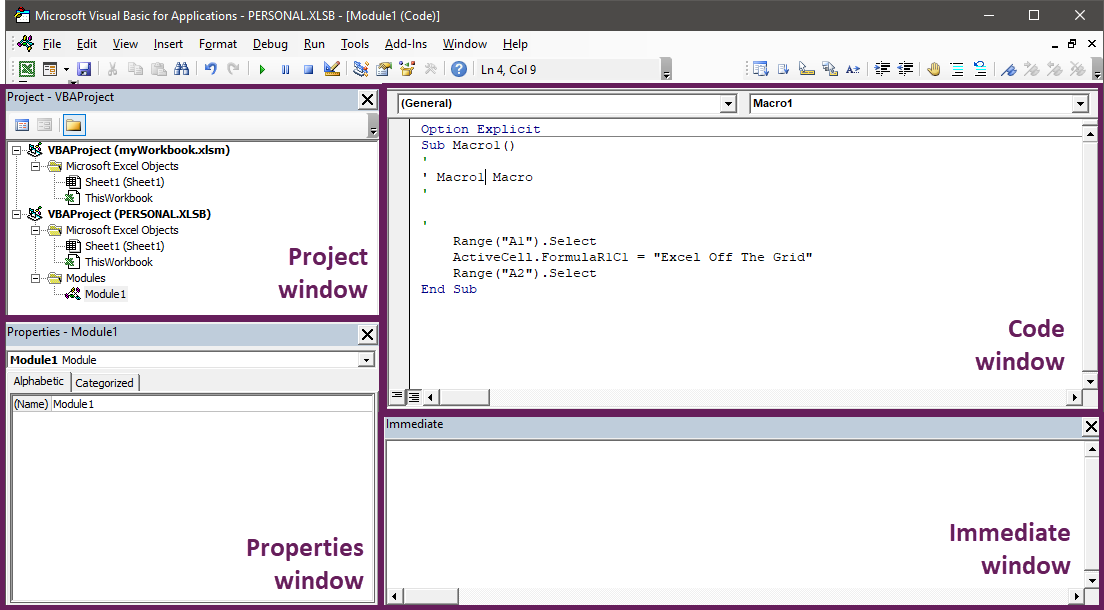
Within the top left of the VBE, we will see a list of items which can contain VBA code (known as the project window)
Double-clicking any sheet name, workbook or module, will open the code window associated with that item. VBA code is entered into the code window.
Unless you have specific reasons, the best option is to enter the macro into a module. To create a module, click Insert > Module within the VBE.
Running a macro
There are many ways to run VBA code. This section is not exhaustive, but is intended to provide an overview of the most common methods.
Running a macro from within Visual Basic Editor
When testing VBA code, it is common to execute that code from the VBE.
Click anywhere within the code, between the Sub and End Sub lines, choose one of the following options:
- Click Run > Run Sub/UserForm from the menu at the top of the VBE
- Using the keyboard, you can press ALT+F5
- Click the play button at the top of the VBE

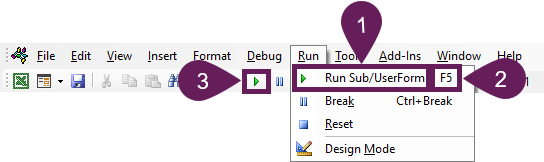
The code you entered will be executed.
Running a macro from within Excel
Once the code has been tested and in working order, it is common to execute it directly within Excel. There are lots of options for this too (including events, or user defined functions), however the three most common methods I will show you are:
Run from the Macro window
- Click View > Macros or Developer > Macros

- Select the macro from the list and click Run.


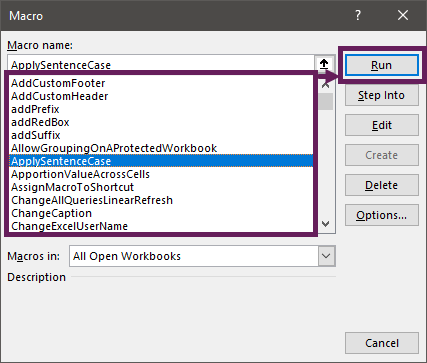
Create a custom ribbon
Having macros always available in the ribbon is a great time saver. Therefore, learning how to customize the ribbon is useful.
- In Excel, click File > Options
- In the Excel Options dialog box, click Customize Ribbon
- Click New Tab to create a new ribbon tab, then click New Group to create a section within the new tab.
- In the Choose commands from drop-down, select Macros. Select your macro and click
Add >> to move the macro it into your new group. - Use the Rename… button to give the tab, group or macro a more useful name.

- Click OK to close the window.
- The new ribbon menu will appear containing your macro. Click the button to run the macro.

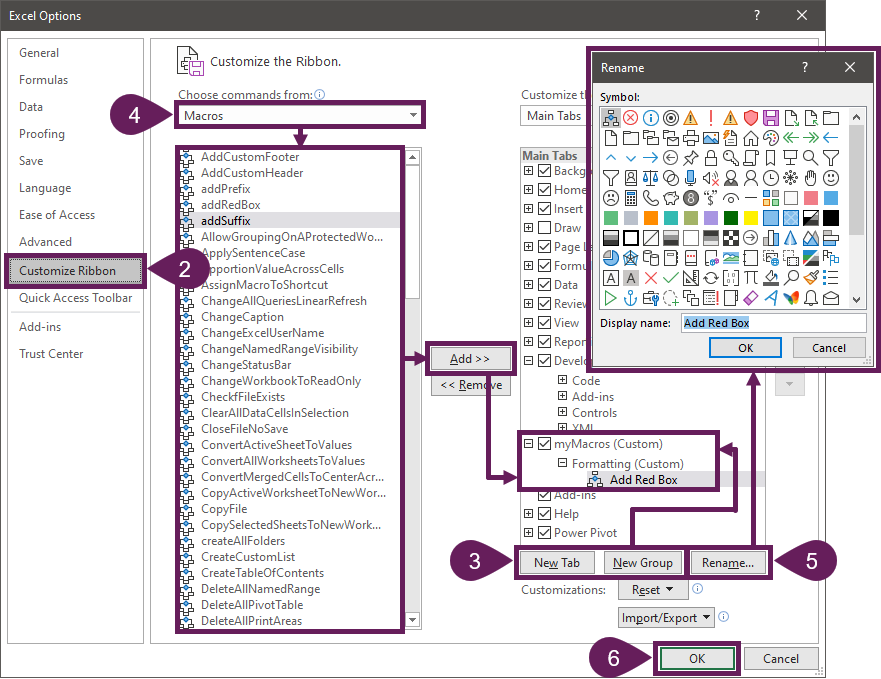
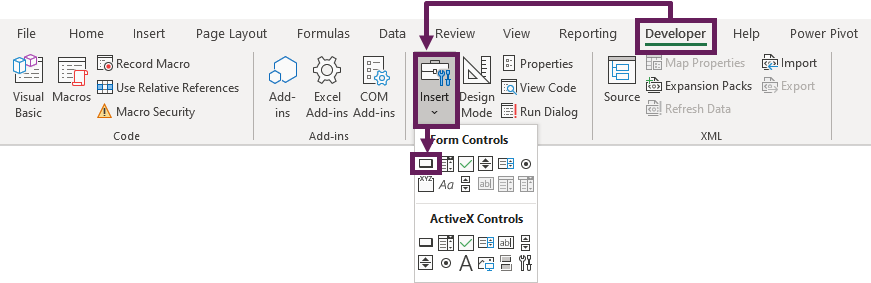
Create a button/shape on a worksheet
Macros can be executed using buttons or shapes on the worksheet.
- To create a button, click Developer > Insert > Form Control > Button
- Draw a shape on the worksheet to show the location and size of the button
- The Assign Macro dialog will appear, select the macro and click OK.
- The button will appear. Clicking the button will run the macro

- Right-click on the button to change the description
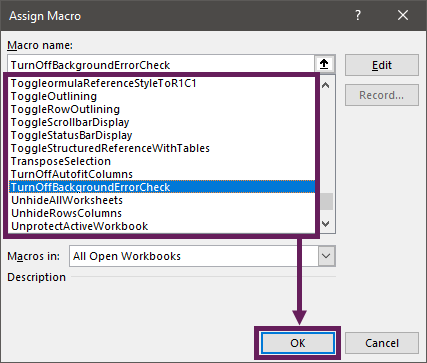
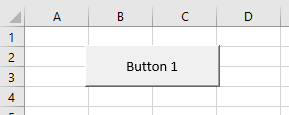
To assign a different macro, right-click on the button and select Assign Macro… from the menu.
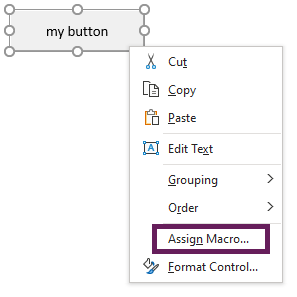
Alternatively, a macro can be assigned to a shape. After creating a shape, right-click on it and select Assign Macro… from the menu, then follow the same process as for a button.
Hide all selected sheets
What does it do?
Hides all the selected sheets.
VBA code
Sub HideAllSelectedSheets()

'Create variable to hold worksheets
Dim ws As Worksheet

'Ignore error if trying to hide the last worksheet
On Error Resume Next

'Loop through each worksheet in the active workbook
For Each ws In ActiveWindow.SelectedSheets

    'Hide each sheet
    ws.Visible = xlSheetHidden

Next ws

'Allow errors to appear
On Error GoTo 0

End Sub
Notes:
Excel requires at least one active worksheet. If all the visible sheets are selected, to avoid an error, the VBA code will not hide the last sheet.
For other examples of hiding worksheets check out these posts:
- Macro to hide all sheets except one
- Hide all sheets except one with Office Scripts
Unhide all sheets
What does it do?
Makes all worksheets visible.
VBA code
Sub UnhideAllWorksheets()

'Create variable to hold worksheets
Dim ws As Worksheet

'Loop through each worksheet in the active workbook
For Each ws In ActiveWorkbook.Worksheets

    'Unhide each sheet
    ws.Visible = xlSheetVisible

Next ws

End Sub
Protect all selected worksheets
What does it do?
Protects all the selected worksheets with a password determined by the user.
VBA code
Sub ProtectSelectedWorksheets()

Dim ws As Worksheet
Dim sheetArray As Variant
Dim myPassword As Variant

'Set the password
myPassword = Application.InputBox(prompt:="Enter password", _
    Title:="Password", Type:=2)

'The User clicked Cancel
If myPassword = False Then Exit Sub

'Capture the selected sheets
Set sheetArray = ActiveWindow.SelectedSheets

'Loop through each worksheet in the active workbook
For Each ws In sheetArray

    On Error Resume Next

    'Select the worksheet
    ws.Select

    'Protect each worksheet
    ws.Protect Password:=myPassword

    On Error GoTo 0

Next ws

sheetArray.Select

End Sub
Unprotect all worksheets
What does it do?
Unprotects all worksheets with a password determined by the user.
VBA code
Sub UnprotectAllWorksheets()

'Create a variable to hold worksheets
Dim ws As Worksheet

'Create a variable to hold the password
Dim myPassword As Variant

'Set the password
myPassword = Application.InputBox(prompt:="Enter password", _
    Title:="Password", Type:=2)

'The User clicked Cancel
If myPassword = False Then Exit Sub

'Loop through each worksheet in the active workbook
For Each ws In ActiveWindow.SelectedSheets

    'Protect each worksheet
    ws.Unprotect Password:=myPassword

Next ws

End Sub
Lock cells containing formulas
What does it do?
Password protects a single worksheet with cells containing formulas locked, all other cells are unlocked.
VBA code
Sub LockOnlyCellsWithFormulas()

'Create a variable to hold the password
Dim myPassword As Variant

'If more than one worksheet selected exit the macro
If ActiveWindow.SelectedSheets.Count > 1 Then

    'Display error message and exit macro
    MsgBox "Select one worksheet and try again"
    Exit Sub

End If

'Set the password
myPassword = Application.InputBox(prompt:="Enter password", _
    Title:="Password", Type:=2)

'The User clicked Cancel
If myPassword = False Then Exit Sub

'All the following to apply to active sheet
With ActiveSheet

    'Ignore errors caused by incorrect passwords
    On Error Resume Next

    'Unprotect the active sheet
    .Unprotect Password:=myPassword

    'If error occured then exit macro
    If Err.Number <> 0 Then

        'Display message then exit
        MsgBox "Incorrect password"
        Exit Sub

    End If

    'Turn error checking back on
    On Error GoTo 0

    'Remove lock setting from all cells
    .Cells.Locked = False

    'Add lock setting to all cells
    .Cells.SpecialCells(xlCellTypeFormulas).Locked = True

    'Protect the active sheet
    .Protect Password:=myPassword

    End With

End Sub
Hide formulas when protected
What does it do?
When the active sheet is protected, formulas will not be visible in the formula bar. Uses a predefined password of mypassword.
VBA code
Sub HideFormulasWhenProtected()

'Create a variable to hold the password
Dim myPassword As String

'Set the password
myPassword = "myPassword"

'All the following to apply to active sheet
With ActiveSheet

    'Unprotect the active sheet
    .Unprotect Password:=myPassword

    'Hide formulas in all cells
    .Cells.FormulaHidden = True

    'Protect the active sheet
    .Protect Password:=myPassword

End With

End Sub
Save time stamped backup file
What does it do?
Save a backup copy of the workbook with a time stamp.
VBA code
Sub SaveTimeStampedBackup()

'Create variable to hold the new file path
Dim saveAsName As String

'Set the file path
saveAsName = ActiveWorkbook.Path & "" & _
Format(Now, "yymmdd-hhmmss") & " " & ActiveWorkbook.Name

'Save the workbook
ActiveWorkbook.SaveCopyAs Filename:=saveAsName

End Sub
Prepare workbook for saving
What does it do?
The macro will, for each worksheet:
- Close all group outlining
- Set the view to the normal view
- Remove gridlines
- Hide all row numbers and column numbers
- Select cell A1
The first sheet is selected.
After running the macro, every worksheet in the workbook will be in a tidy state for the next use.
VBA code
Sub PrepareWorkbookForSaving()

'Declare the worksheet variable
Dim ws As Worksheet

'Loop through each worksheet in the active workbook
For Each ws In ActiveWorkbook.Worksheets

    'Activate each sheet
    ws.Activate

    'Close all of groups
    ws.Outline.ShowLevels RowLevels:=1, ColumnLevels:=1

    'Set the view settings to normal
    ActiveWindow.View = xlNormalView

    'Remove the gridlines
    ActiveWindow.DisplayGridlines = False

    'Remove the headings on each of the worksheets
    ActiveWindow.DisplayHeadings = False

    'Get worksheet to display top left
    ws.Cells(1, 1).Select
Next ws

'Find the first visible worksheet and select it
For Each ws In Worksheets

    If ws.Visible = xlSheetVisible Then

        'Select the first visible worksheet
        ws.Select

        'Once the first visible worksheet is found exit the sub
        Exit For

    End If

Next ws

End Sub
Convert merged cells to center across
What does it do?
Changes all single row merged cells into center across formatting.
VBA code
Sub ConvertMergedCellsToCenterAcross()

Dim c As Range
Dim mergedRange As Range

'Loop through all cells in Used range
For Each c In ActiveSheet.UsedRange

    'If merged and single row
    If c.MergeCells = True And c.MergeArea.Rows.Count = 1 Then

        'Set variable for the merged range
        Set mergedRange = c.MergeArea

        'Unmerge the cell and apply Centre Across Selection
        mergedRange.UnMerge
        mergedRange.HorizontalAlignment = xlCenterAcrossSelection

    End If

Next

End Sub
Fit selection to screen
What does it do?
Zoom the screen on the selected cells.
VBA code
Sub FitSelectionToScreen()

'To zoom to a specific area, then select the cells
Range("A1:I15").Select

'Zoom to selection
ActiveWindow.Zoom = True

'Select first cell on worksheet
Range("A1").Select

End Sub
Flip number signage on selected cells
What does it do?
Flips the number signage of all numeric values in the selected cells
VBA code
Sub FlipNumberSignage()

'Create variable to hold cells in the worksheet
Dim c As Range

'Loop through each cell in selection
For Each c In Selection

    'Test if the cell contents is a number
    If IsNumeric(c) Then

        'Convert signage for each cell
        c.Value = -c.Value

    End If

Next c

End Sub
Clear all data cells
What does it do?
Clears all cells in the selection which are constants (i.e. not formulas).
VBA code
Sub ClearAllDataCellsInSelection()

'Clear all hardcoded values in the selected range
Selection.SpecialCells(xlCellTypeConstants).ClearContents

End Sub
Add prefix to each cell in selection
What does it do?
Adds a prefix to each cell in the selected cells (excludes formulas and blanks).
VBA code
Sub AddPrefix()

Dim c As Range
Dim prefixValue As Variant

'Display inputbox to collect prefix text
prefixValue = Application.InputBox(Prompt:="Enter prefix:", _
    Title:="Prefix", Type:=2)

'The User clicked Cancel
If prefixValue = False Then Exit Sub

For Each c In Selection

    'Add prefix where cell is not a formula or blank
    If Not c.HasFormula And c.Value <> "" Then

        c.Value = prefixValue & c.Value

    End If

Next

End Sub
Add suffix to each cell in selection
What does it do?
Adds a suffix to each value in the selected cells (excludes formulas and blanks).
VBA code
Sub AddSuffix()

Dim c As Range
Dim suffixValue As Variant

'Display inputbox to collect prefix text
suffixValue = Application.InputBox(Prompt:="Enter Suffix:", _
    Title:="Suffix", Type:=2)

'The User clicked Cancel
If suffixValue = False Then Exit Sub

    'Loop through each cellin selection
    For Each c In Selection

        'Add Suffix where cell is not a formula or blank
        If Not c.HasFormula And c.Value <> "" Then

            c.Value = c.Value & suffixValue

        End If

Next

End Sub
Reverse row order
What does it do?
Reverses the order of all rows of data in the selection.
VBA code
Sub ReverseRows()

'Create variables
Dim rng As Range
Dim rngArray As Variant
Dim tempRng As Variant
Dim i As Long
Dim j As Long
Dim k As Long

'Record the selected range and it's contents
Set rng = Selection
rngArray = rng.Formula

'Loop through all cells and create a temporary array
For j = 1 To UBound(rngArray, 2)
    k = UBound(rngArray, 1)
    For i = 1 To UBound(rngArray, 1) / 2
        tempRng = rngArray(i, j)
        rngArray(i, j) = rngArray(k, j)
        rngArray(k, j) = tempRng
        k = k - 1
    Next
Next

'Apply the array
rng.Formula = rngArray

End Sub
Reverse column order
What does it do?
Reverses the order of all column data in the selection.
VBA code
Sub ReverseColumns()

'Create variables
Dim rng As Range
Dim rngArray As Variant
Dim tempRng As Variant
Dim i As Long
Dim j As Long
Dim k As Long

'Record the selected range and it's contents
Set rng = Selection
rngArray = rng.Formula

'Loop through all cells and create a temporary array
For i = 1 To UBound(rngArray, 1)
    k = UBound(rngArray, 2)
    For j = 1 To UBound(rngArray, 2) / 2
        tempRng = rngArray(i, j)
        rngArray(i, j) = rngArray(i, k)
        rngArray(i, k) = tempRng
        k = k - 1
    Next
Next

'Apply the array
rng.Formula = rngArray

End Sub
Transpose selection
What does it do?
Transposes the selected cells with a single click.
VBA code
Sub TransposeSelection()

'Create variables
Dim rng As Range
Dim rngArray As Variant
Dim i As Long
Dim j As Long
Dim overflowRng As Range
Dim msgAns As Long

'Record the selected range and it's contents
Set rng = Selection
rngArray = rng.Formula

'Test the range and identify if any cells will be overwritten
If rng.Rows.Count > rng.Columns.Count Then

    Set overflowRng = rng.Cells(1, 1). _
        Offset(0, rng.Columns.Count). _
        Resize(rng.Columns.Count, _
        rng.Rows.Count - rng.Columns.Count)

ElseIf rng.Rows.Count < rng.Columns.Count Then

    Set overflowRng = rng.Cells(1, 1).Offset(rng.Rows.Count, 0). _
        Resize(rng.Columns.Count - rng.Rows.Count, rng.Rows.Count)

End If

If rng.Rows.Count <> rng.Columns.Count Then

    If Application.WorksheetFunction.CountA(overflowRng) > 0 Then

        msgAns = MsgBox("Worksheet data in " & overflowRng.Address & _
            " will be overwritten." & vbNewLine & _
            "Do you wish to continue?", vbYesNo)

    If msgAns = vbNo Then Exit Sub

    End If

End If

'Clear the rnage
rng.Clear

'Reapply the cells in transposted position
For i = 1 To UBound(rngArray, 1)

    For j = 1 To UBound(rngArray, 2)

        rng.Cells(1, 1).Offset(j - 1, i - 1) = rngArray(i, j)

    Next

Next

End Sub
Create red box around selected areas
What does it do?
Draws a rectangle shape to fit around the selected cells.
VBA code
Sub AddRedBox()

Dim redBox As Shape
Dim selectedAreas As Range
Dim i As Integer
Dim tempShape As Shape

'Loop through each selected area in active sheet
For Each selectedAreas In Selection.Areas

    'Create a rectangle
    Set redBox = ActiveSheet.Shapes.AddShape(msoShapeRectangle, _
        selectedAreas.Left, selectedAreas.Top, _
        selectedAreas.Width, selectedAreas.Height)

    'Change attributes of shape created
    redBox.Line.ForeColor.RGB = RGB(255, 0, 0)
    redBox.Line.Weight = 2
    redBox.Fill.Visible = msoFalse

    'Loop to find a unique shape name
    Do
        i = i + 1
        Set tempShape = Nothing

        On Error Resume Next
        Set tempShape = ActiveSheet.Shapes("RedBox_" & i)
        On Error GoTo 0

    Loop Until tempShape Is Nothing

    'Rename the shape
    redBox.Name = "RedBox_" & i

Next

End Sub
Delete all red boxes on active sheet
What does it do?
Having created the red boxes in the macro above. This code removes all the red boxes on the active sheet with a single click.
VBA code
Sub DeleteRedBox()

Dim shp As Shape

'Loop through each shape on active sheet
For Each shp In ActiveSheet.Shapes

    'Find shapes with a name starting with "RedBox_"
    If Left(shp.Name, 7) = "RedBox_" Then

        'Delete the shape
        shp.Delete

    End If

Next shp

End Sub
Save selected chart as an image
What does it do?
Saves the selected chart as a picture to the file location contained in the macro.
VBA code
Sub ExportSingleChartAsImage()

'Create a variable to hold the path and name of image
Dim imagePath As String
Dim cht As Chart

imagePath = "C:UsersmarksDocumentsmyImage.png"
Set cht = ActiveChart

'Export the chart
cht.Export (imagePath)

End Sub
Resize all charts to same as active chart
What does it do?
Select the chart with the dimensions you wish to use, then run the macro. All the charts will resize to the same dimensions.
VBA code
Sub ResizeAllCharts()

'Create variables to hold chart dimensions
Dim chtHeight As Long
Dim chtWidth As Long

'Create variable to loop through chart objects
Dim chtObj As ChartObject

'Get the size of the first selected chart
chtHeight = ActiveChart.Parent.Height
chtWidth = ActiveChart.Parent.Width

For Each chtObj In ActiveSheet.ChartObjects

    chtObj.Height = chtHeight
    chtObj.Width = chtWidth

Next chtObj

End Sub
Refresh all Pivot Tables in workbook
What does it do?
Refresh all the Pivot Tables in the active workbook.
VBA code
Sub RefreshAllPivotTables()

'Refresh all pivot tables
ActiveWorkbook.RefreshAll

End Sub
Turn off auto fit columns on all Pivot Tables
What does it do?
By default, PivotTables resize columns to fit the contents. This macro changes the setting for every PivotTable in the active workbook, so that column widths set by the user are maintained.
VBA code
Sub TurnOffAutofitColumns()

'Create a variable to hold worksheets
Dim ws As Worksheet

'Create a variable to hold pivot tables
Dim pvt As PivotTable

'Loop through each sheet in the activeworkbook
For Each ws In ActiveWorkbook.Worksheets

    'Loop through each pivot table in the worksheet
    For Each pvt In ws.PivotTables

        'Turn off auto fit columns on PivotTable
        pvt.HasAutoFormat = False

    Next pvt

Next ws

End Sub
Get color code from cell fill color
What does it do?
Returns the RGB and Hex for the active cell’s fill color.
VBA code
Sub GetColorCodeFromCellFill()

'Create variables hold the color data
Dim fillColor As Long
Dim R As Integer
Dim G As Integer
Dim B As Integer
Dim Hex As String

'Get the fill color
fillColor = ActiveCell.Interior.Color

'Convert fill color to RGB
R = (fillColor Mod 256)
G = (fillColor  256) Mod 256
B = (fillColor  65536) Mod 256

'Convert fill color to Hex
Hex = "#" & Application.WorksheetFunction.Dec2Hex(fillColor)

'Display fill color codes
MsgBox "Color codes for active cell" & vbNewLine & _
    "R:" & R & ", G:" & G & ", B:" & B & vbNewLine & _
    "Hex: " & Hex, Title:="Color Codes"

End Sub
Create a table of contents
What does it do?
Creates or refreshes a hyperlinked table of contents on a worksheet called “TOC”, which is placed at the start of a workbook.
VBA code
Sub CreateTableOfContents()

Dim i As Long
Dim TOCName As String

'Name of the Table of contents
TOCName = "TOC"

'Delete the existing Table of Contents sheet if it exists
On Error Resume Next
Application.DisplayAlerts = False
ActiveWorkbook.Sheets(TOCName).Delete
Application.DisplayAlerts = True
On Error GoTo 0

'Create a new worksheet
ActiveWorkbook.Sheets.Add before:=ActiveWorkbook.Worksheets(1)
ActiveSheet.Name = TOCName

'Loop through the worksheets
For i = 1 To Sheets.Count

    'Create the table of contents
    ActiveSheet.Hyperlinks.Add _
        Anchor:=ActiveSheet.Cells(i, 1), _
        Address:="", _
        SubAddress:="'" & Sheets(i).Name & "'!A1", _
        ScreenTip:=Sheets(i).Name, _
        TextToDisplay:=Sheets(i).Name

Next i

End Sub
Excel to speak the cell contents
What does it do?
Excel speaks back the contents of the selected cells
VBA code
Sub SpeakCellContents()

'Speak the selected cells
Selection.Speak

End Sub
Fix the range of cells which can be scrolled
What does it do?
Fixes the scroll range to the selected cell range. It prevents a user from scrolling into other parts of the worksheet.
If a single cell is selected, the scroll range is reset.
VBA code
Sub FixScrollRange()

If Selection.Cells.Count = 1 Then

    'If one cell selected, then reset
    ActiveSheet.ScrollArea = ""

Else

    'Set the scroll area to the selected cells
    ActiveSheet.ScrollArea = Selection.Address

End If

End Sub
Invert the sheet selection
What does it do?
Select some worksheet tabs, then run the macro to reverse the selection.
VBA code
Sub InvertSheetSelection()

'Create variable to hold list of selected worksheet
Dim selectedList As String

'Create variable to hold worksheets
Dim ws As Worksheet

'Create variable to switch after the first sheet selected
Dim firstSheet As Boolean

'Convert selected sheest to a text string
For Each ws In ActiveWindow.SelectedSheets
    selectedList = selectedList & ws.Name & "[|]"
Next ws

'Set the toggle of first sheet
firstSheet = True

'Loop through each worksheet in the active workbook
For Each ws In ActiveWorkbook.Sheets

    'Check if the worksheet was not previously selected
    If InStr(selectedList, ws.Name & "[|]") = 0 Then

        'Check the worksheet is visible
        If ws.Visible = xlSheetVisible Then

            'Select the sheet
            ws.Select firstSheet

            'First worksheet has been found, toggle to false
            firstSheet = False

        End If

    End If

Next ws

End Sub
Assign a macro to a shortcut key
What does it do?
Assigns a macro to a shortcut key.
VBA code
Sub AssignMacroToShortcut()

'+ = Ctrl
'^ = Shift
'{T} = the shortcut letter

Application.OnKey "+^{T}", "nameOfMacro"

'Reset shortcut to default - repeat without the name of the macro
'Application.OnKey "+%{T}"

End Sub
Apply single accounting underline to selection
What does it do?
Single accounting underline is a formatting style which is not available in the ribbon. The macro below applies single accounting underline to the selected cells.
VBA code
Sub SingleAccountingUnderline()

'Apply single accounting underline to selected cells
Selection.Font.Underline = xlUnderlineStyleSingleAccounting

End Sub

About the author
Hey, I’m Mark, and I run Excel Off The Grid.
My parents tell me that at the age of 7 I declared I was going to become a qualified accountant. I was either psychic or had no imagination, as that is exactly what happened. However, it wasn’t until I was 35 that my journey really began.
In 2015, I started a new job, for which I was regularly working after 10pm. As a result, I rarely saw my children during the week. So, I started searching for the secrets to automating Excel. I discovered that by building a small number of simple tools, I could combine them together in different ways to automate nearly all my regular tasks. This meant I could work less hours (and I got pay raises!). Today, I teach these techniques to other professionals in our training program so they too can spend less time at work (and more time with their children and doing the things they love).
Do you need help adapting this post to your needs?
I’m guessing the examples in this post don’t exactly match your situation. We all use Excel differently, so it’s impossible to write a post that will meet everybody’s needs. By taking the time to understand the techniques and principles in this post (and elsewhere on this site), you should be able to adapt it to your needs.
But, if you’re still struggling you should:
- Read other blogs, or watch YouTube videos on the same topic. You will benefit much more by discovering your own solutions.
- Ask the ‘Excel Ninja’ in your office. It’s amazing what things other people know.
- Ask a question in a forum like Mr Excel, or the Microsoft Answers Community. Remember, the people on these forums are generally giving their time for free. So take care to craft your question, make sure it’s clear and concise. List all the things you’ve tried, and provide screenshots, code segments and example workbooks.
- Use Excel Rescue, who are my consultancy partner. They help by providing solutions to smaller Excel problems.
What next?
Don’t go yet, there is plenty more to learn on Excel Off The Grid. Check out the latest posts:
Excel macro codes can be used to automate regular Excel tasks and prevent you from performing them manually. This results in time saved and more reliable work.
This VBA code library is a list of useful VBA codes for Excel that you can start using immediately.
These codes are perfect for beginners who have not used Excel VBA before, or are just starting out.
Let us first describe what a macro code is and how you can start using them. Then we will get to the exciting part and explore the Excel macro examples in this list.
Learn the best Excel shortcuts!
Download our printable shortcut cheatsheet for PC and Mac
What is macro code?
Macro code refers to the VBA (Visual Basic for Applications) code for the macro.
You can create macros in Excel by either recording the steps you want it to perform (the VBA is written for you), or by writing the VBA yourself.
Writing this VBA or macro code yourself gives you far greater control over your macro.
The VBA code can be simple, and perform a basic formatting step or freeze panes. Or it could do something greater such as export all sheets of a workbook as a separate PDF.
This VBA code library provides a list of macro codes for you to copy and paste to get started.
This saves you from having to create them yourself, but is also a great way to begin learning VBA.
Show the Developer tab
To use the VBA codes, you will need access to the Developer tab.
If you do not have the Developer tab on your Ribbon, follow these steps to enable it.
- Click File > Options.
- Select the Customize Ribbon category and then check the box for the Developer tab.
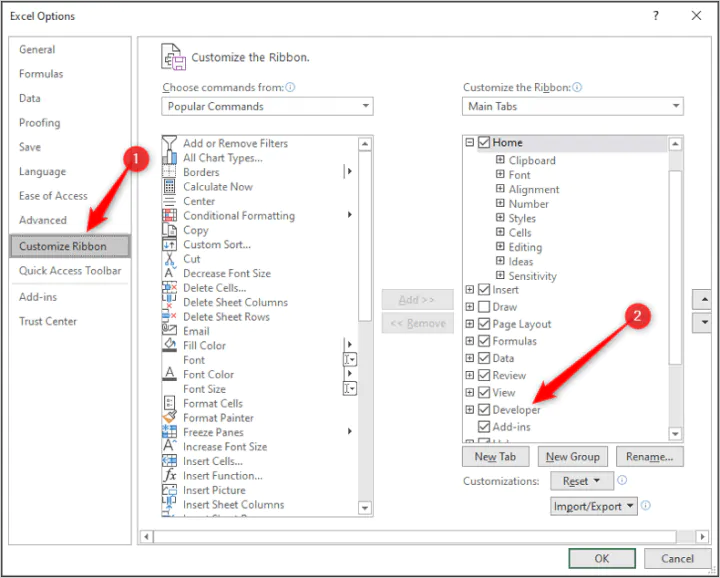
- Click Ok.
How to use the macro code
Using the macro codes require just a simple copy and paste. However, you need to ensure that you paste them to the correct place.
- Click Developer > Visual Basic, or press Alt + F11.
 The Visual Basic Editor opens. The Project Explorer window is shown on the left. It lists the open workbooks and other projects.
- Click within the workbook where you want to insert the VBA code, click Insert > Module.
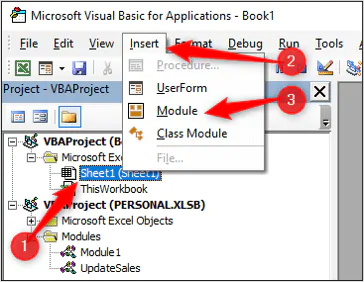
- Copy and paste the code from this article into the code window.
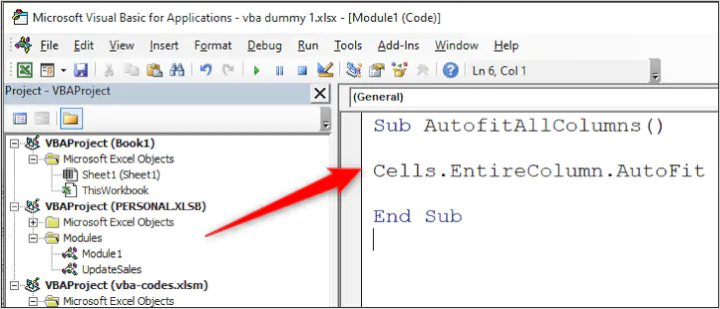
The macro will then be available to run in the Macros window.
- Click Developer > Macros. Select the macro from the list and click Run.
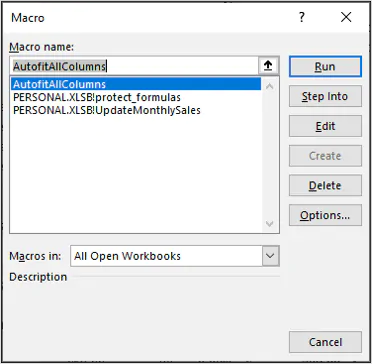 In this VBA code library, there is a category named Events. These macros will not be stored in modules, but in the object where the event occurs.
This will be explained when we present the code. The majority of the macros in this list are stored in modules and follow the procedure explained above.
Adding a button to trigger your macros
Although it is possible to run the macro from the macros window. Assigning the macro to a button that you can click, will make it easier to run your macros.
You can insert buttons on the Quick Access Toolbar (where the Save and Undo buttons reside), the Ribbon, or onto a worksheet.
The approach you take depends on what the macro does, and when you want to run it.
For this example, we will show you how to add a button to the Quick Access Toolbar to run your macros.
- Click the Customize Quick Access Toolbar arrow and click More Commands.
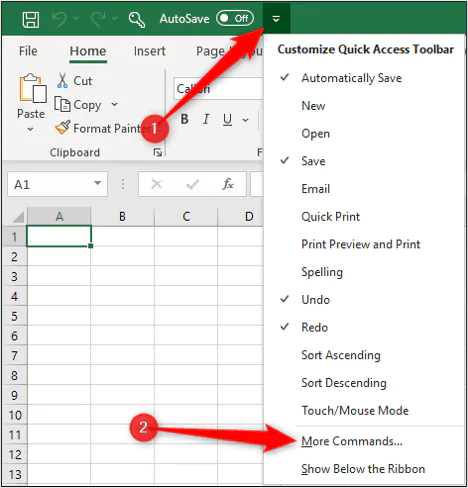
- Click the Popular Commands list arrow and select Macros. Select the macro you want and click Add.
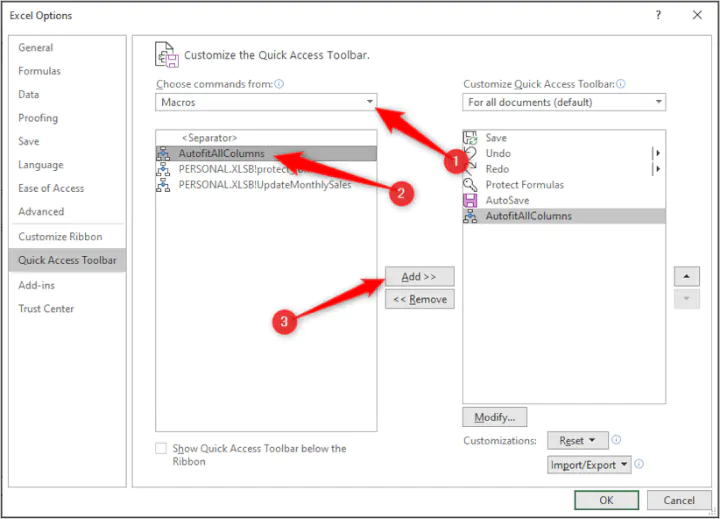
- Click the Modify button to change the image and the display name of the button.
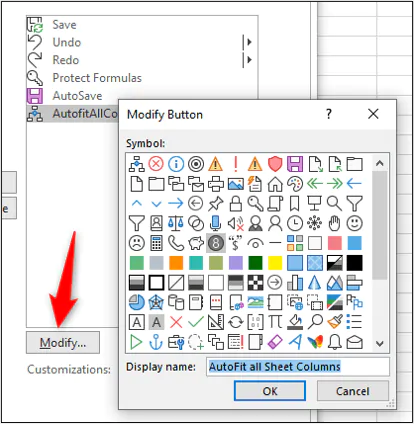 The button will appear on the Quick Access Toolbar and will run your macro when clicked.
The display name is shown as you position your mouse over the button.
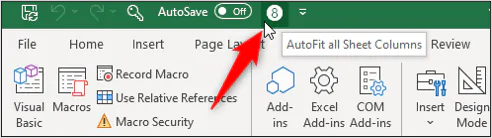
Excel VBA code examples
The macro code examples in this list have been split into categories to make it easier to find those that you are interested in using.
Common Excel tasks
- AutoFit column widths
- Copy and paste
- Clear all hyperlinks on a sheet
- Format cells with formulas
- Convert formulas to values
Worksheet codes
- Unhide all columns
- Protect a worksheet
- Loop through all the worksheets of a workbook
Workbook codes
- Unhide all worksheets
- Protect a workbook
- Opening and closing a workbook
- Email the active workbook with Outlook
Files and folders
- Export each worksheet as a single PDF
- Export the active sheet as a PDF
- Export multiple sheets to a single PDF
- Loop through all the files of a folder
- Selecting a file with a FileDialog
Useful Excel features
- Sorting columns
- Filter your data
- Create a chart
Events
- Go to a specific worksheet on Open
- Perform an action on Cell Change
A recap!
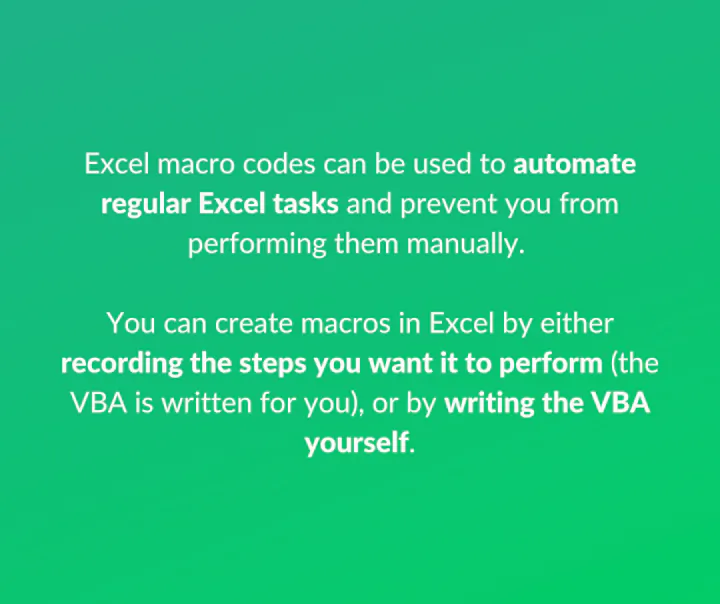
Common Excel tasks
These VBA codes will perform common Excel tasks quickly.
AutoFit column widths
This code will automatically fit the column widths for all the columns of the worksheet.
Sub AutofitAllColumns()

Cells.EntireColumn.AutoFit

End Sub
This code will automatically fit the widths of specific columns on a worksheet. In this example, it is columns D and F.
Sub AutofitSpecificColumns()

Range("D:D,F:F").EntireColumn.AutoFit

End Sub
Copy and paste
Copy and paste is one of the most common actions in Excel. It can be written with just one line of VBA code.
The following code copies range A1:B6 into A1 of another worksheet.
Sub CopyAndPaste()

Range("A1:B6").Copy Worksheets("Sheet2").Range("A1")

End Sub
You may not have a specific range to paste the content into. Often you are trying to append the copied data to the bottom of another list.
This code copies the used range around cell A2 and pastes it to the first empty cell at the bottom of column A on a sheet named Archive.
Sub CopyAndPaste()

Range("A2").CurrentRegion.Copy Worksheets("Archive").Range("A1").End(xlDown).Offset(1, 0)

End Sub
Finally, you may want to use some of the paste special options available in Excel. To access these in VBA, we will separate the copy and paste operation into two statements.
This code uses the PasteSpecial method to paste the values only.
Sub CopyAndPasteValues()

Range("A1:B6").Copy
Worksheets("Sheet2").Range("A1").PasteSpecial Paste:=xlPasteValues

End Sub
Clear all hyperlinks on a sheet
The following macro code will clear all the hyperlinks on a worksheet.
Sub ClearHyperlinks()

ActiveSheet.Hyperlinks.Delete

End Sub
Format cells with formulas
Formatting cells that contain formulas makes them easy to identify on a worksheet. This macro code will format the formula cells with a yellow fill color (ColorIndex = 6).
It declares a range variable named rng and uses it to loop through each cell that contains a formula.
Sub FormatFormulas()

Dim rng As Range

For Each rng In Cells.SpecialCells(xlCellTypeFormulas)

rng.Interior.ColorIndex = 6

Next rng

End Sub
Convert formulas to values
Another common action with formulas is to convert them into values. This VBA code will do this for all formulas on the worksheet.
Sub ConvertFormulastoValues()

Dim rng As Range

For Each rng In Cells.SpecialCells(xlCellTypeFormulas)

rng.Formula = rng.Value

Next rng

End Sub
Worksheet codes
These codes will perform some typical worksheet tasks.
Unhide all columns
Hiding columns is great for reducing worksheet clutter and protecting data. This macro code will unhide all the hidden columns with the click of a button.
Sub UnhideAllColumns()

Columns.EntireColumn.Hidden = False

End Sub
Protect a worksheet
The following code will protect the active sheet.
Sub ProtectWS()

ActiveSheet.Protect

End Sub
You may want to take this further and assign a password or specify actions to be allowed. This macros code assigns the password Excel and allows the inserting of rows only.
If you know worksheet protection well, you will know that there are various actions that you can allow or prevent. And we can do this with our VBA code.
Sub ProtectWS()

ActiveSheet.Protect Password:=”Excel”, AllowInsertingRows:=True

End Sub
A common reason to protect a worksheet is to save your formulas from accidental damage. This code will protect only cells on a worksheet that contains formulas.
It begins by unprotecting the sheet and unlocking all cells. It then locks those containing formulas before applying protection.
Sub ProtectFormulas()

With ActiveSheet

.Unprotect
.Cells.Locked = False
.Cells.SpecialCells(xlCellTypeFormulas).Locked = True
.Protect

End With

End Sub
Loop through all the worksheets of a workbook
It is simple to set up a loop to perform an action to all the worksheets of a workbook. You can insert any action you require.
In this example, we protect the worksheets. Replace the line ws.Protect with the actions that you require. Use the variable ws when referencing the worksheet.
Sub LoopAllSheets()

Dim ws As Worksheet

For Each ws In ActiveWorkbook.Worksheets
ws.Protect
Next ws

End Sub
Workbook codes
The following codes will perform some common workbook tasks.
Unhide all worksheets
In Excel, you can only unhide one worksheet at a time. So, this code will unhide all the worksheets with one click.
Sub UnhideAllWorksheets()

Dim ws As Worksheet

For Each ws In ActiveWorkbook.Worksheets
ws.Visible = xlSheetVisible
Next ws

End Sub
Protect a workbook
The following code will protect a workbook to prevent structure changes. It sets a password, but this is optional and can be excluded.
Sub ProtectWorkbook()

ThisWorkbook.Protect Password:="Excel"

End Sub
Opening and closing a workbook
The following code follows a procedure to copy data from the currently active workbook to a workbook named North.
It assigns the active workbook to a variable, then opens the North workbook to copy data from range A1:C250 into it. This workbook is then saved and closed.
There are many techniques to reference workbooks and a few are demonstrated in this small code.
Sub OpenCloseWorkbooks()

Dim wbk As Workbook
Set wbk = ActiveWorkbook

Workbooks.Open "C:UsersAdminOneDriveDesktopSalesNorth.xlsx"
wbk.Sheets("Sheet1").Range("A1:C250").Copy Destination:=Range("A1")

ActiveWorkbook.Close SaveChanges:=True

End Sub
Email the active workbook with Outlook
The following VBA code creates a new email in Microsoft Outlook with the recipient’s email, subject line, and the body text all populated. The active workbook is added as an attachment.
The email is displayed so that the email can be checked and changes made before sending. Change .display to .send to email the attached workbook with one click.
Sub AttachToEmail()

Dim OutApp As Object
Dim OutMail As Object
Set OutApp = CreateObject("Outlook.Application")
Set OutMail = OutApp.CreateItem(0)

With OutMail
.to = "admin@computergaga.com"
.Subject = "A Fabulous Spreadsheet"
.Body = "Hello, I hope you enjoy the fabulous spreadsheet that is attached to this email."
.Attachments.Add ActiveWorkbook.FullName
.display
End With

Set OutMail = Nothing
Set OutApp = Nothing

End Sub
Files and folders
Using VBA to automate working with files and folders during a process is very helpful.
Export each worksheet as a single PDF
This code exports all the worksheets as a separate PDF. The sheet name is used as the PDF file name, and they are saved to the folder that is assigned to the FolderPath variable. Simply change this path to what you need.
Sub ExportAsPDF()

Dim FolderPath As String
Dim ws As Worksheet

FolderPath = "C:UsersComputergagaDesktopSales"

For Each ws In ActiveWorkbook.Worksheets

ws.ExportAsFixedFormat Type:=xlTypePDF, Filename:=FolderPath & "" &
ws.Name, openafterpublish:=False

Next

MsgBox "All PDF's have been successfully exported."

End Sub
Export the active sheet as a PDF
If you only need to export the active worksheet, then only the following few lines of code are required.
Sub ExportAsPDF()

FolderPath = "C:UsersComputergagaDesktopSales"

ActiveSheet.ExportAsFixedFormat Type:=xlTypePDF, Filename:=FolderPath & "" &
Activesheet.Name, openafterpublish:=False

End Sub
Export multiple sheets to a single PDF
You may want to export the worksheets into a single PDF. This code exports the worksheets named London and Berlin into one PDF file.
The sheets are referenced by their name in this example, but you can also reference them using their index number. For example, Sheets(Array(3, 6)).Select
Sub ExportAsPDF()

Dim FolderPath As String

FolderPath = "C:UsersTrainee1DesktopPDFs"

Sheets(Array("London", "Berlin")).Select
ActiveSheet.ExportAsFixedFormat Type:=xlTypePDF, Filename:=FolderPath & "Sales", openafterpublish:=False, ignoreprintareas:=False

MsgBox "All PDF's have been successfully exported."

End Sub
Loop through all the files of a folder
The following VBA code will loop through each file in a folder, the Sales folder on the desktop.
Each file is opened, the number 20 entered into cell A1 of Sheet1 then saved and closed. This is a simple operation, but this code can be replaced with whatever actions you want to perform on each file in the folder.
The Dir function is used for this process. The first instance of Dir is when the file path is provided. It grabs the filename of the first file in the folder.
It is then used again at the end of the loop to grab the name of the next file.
Sub LoopAllFiles()

Dim fileName As Variant
fileName = Dir("C:UsersadminOneDriveDesktopSales")

Do While fileName <> ""

    Workbooks.Open fileName
    Worksheets("Sheet1").Range("A1").Value = 20
    ActiveWorkbook.Close savechanges:=True

    fileName = Dir

Loop

End Sub
You can loop through specific files only by using wildcards. The code below can be used to replace the first instance of the Dir function and loop through .xlsx files only.
fileName = Dir("C:UsersadminOneDriveDesktopSales*.xlsx")Selecting a file with a FileDialog
When interacting with files, the FileDialogs in Excel VBA are very useful. They are an environment that the user is instantly familiar with.
There are FileDialogs for the file open, save, picker, and a folder picker. In this example, the open dialog is used. This is known as msoFileDialogOpen.
Now, this is a little misleading, because the dialog will not actually open the file. It only provides the environment to locate and select it easily. You can then do whatever actions you want to it.
In this VBA code, different properties of the FileDialog are manipulated so it is used with the With construct.
The selected workbook is opened and the number 20 written into cell A1. Once again a sample action that you can replace with whatever you want.
Sub UsingFileDialog()

Dim Filename As String

With Application.FileDialog(msoFileDialogOpen)
.AllowMultiSelect = False
.Title = "Select a workbook to use"
.Show
Filename = .SelectedItems(1)
End With

Workbooks.Open Filename
Worksheets("Sheet1").Range("A1").Value = 20
ActiveWorkbook.Close SaveChanges:=True

MsgBox "Workbook updated"

End Sub
Useful Excel features
These VBA codes will simplify the use of some of the most useful features of Excel.
Sorting columns
The following code sorts range A1:K250 by a single column. It assumes that the range has headers in the first row.
The Key1 argument specifies the column to sort by. In this example, the argument is set to C1, so the range is sorted by column C in descending order.
Sub SortSingleColumn()

Range("A1:K250").Sort Key1:=Range("C1"), Order1:=xlDescending

End Sub
In the following macro code, the defined name of Sales is used as the range to sort by. The defined name does not include the headers.
This time the range is sorted by column B in ascending order.
Sub SortSingleColumn()

Range("Sales").Sort Key1:=Range("B1"), Order1:=xlAscending

End Sub
Extra Key and Order arguments can be added to sort by multiple columns.
In this example, the defined name Sales was used as the range. The range is sorted by column D first in ascending order, and then by column J in descending order.
Sub SortMultipleColumns()

Range("Sales").Sort Key1:=Range("D1"), Order1:=xlAscending, Key2:=Range("J1"), Order2:=xlDescending

End Sub
Finally, if your data is formatted as a table, the following VBA code can be used.
In this example, the table is named Sales and the table is sorted by the Country field in ascending order.
Sub SortTable()

With ActiveSheet.ListObjects("Sales").Sort
   .SortFields.Clear
   .SortFields.Add Key:=Range("Sales[Country]"), Order:=xlAscending
   .Apply
End With

End Sub
Filter your data
The following macro code can be used to turn on the AutoFilter feature. It applies to the active worksheet and uses the current region for range A1.
Sub TurnFilterOn()

Range("A1").AutoFilter

End Sub
To turn the AutoFilter feature off, you can use this code.
Sub TurnFilterOff()

ActiveSheet.AutoFilterMode = False

End Sub
In this example, a filter is applied to column D (Field:=4) to show the records for Denmark only.
Sub FilterByText()

Range("A1").AutoFilter Field:=4, Criteria1:="Denmark"

End Sub
To filter by more than one text value, the xlOr operator can be used. Here, the data is filtered to show the rows for Denmark and the UK.
Sub FilterByText()

Range("A1").AutoFilter Field:=4, Criteria1:="Denmark", Operator:=xlOr, Criteria2:="UK"

End Sub
There are plenty of operators available for use such as xlFilterIcon and xlTop10Items.
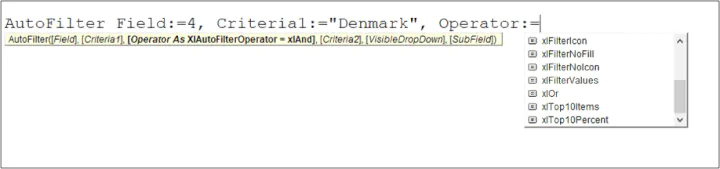
To filter with numbers, ensure you enter the logical operators into the criteria string. The code below filters column H to only show rows where the number is greater than 5 and less than 20.
Sub FilterByNumber()

Range("A1").AutoFilter Field:=8, Criteria1:=">5", Operator:=xlAnd, Criteria2:="<20"

End Sub
The following example filters the list by multiple columns. It filters column D for Denmark only and column H for numbers greater than 5 and less than 20.
Sub FilterByTwoColumns()

With Range("A1")

.AutoFilter Field:=4, Criteria1:="Denmark"
.AutoFilter Field:=8, Criteria1:=">5", Operator:=xlAnd, Criteria2:="<20"

End With

End Sub
To clear any applied filters and show all data, use the following code. This code checks if any filters have been applied first, and if so, clears them to show all the data.
Sub ClearFilters()

If ActiveSheet.FilterMode = True Then

ActiveSheet.ShowAllData

End If

End Sub
The AutoFilter is not the only filter in Excel. Learn how to use the Advanced Filter with VBA in Excel.
Create a chart
You can use Excel VBA to create charts at the click of a button.
This VBA code will create a column chart (default chart type) from range C3:D8. It uses the chart object variable, so parameters are set for the chart area size and position. Data is then set for the chart.
Sub CreateChart()

Dim MChart As ChartObject

Set MyChart = ActiveSheet.ChartObjects.Add(Top:=50, Left:=100, Width:=450, Height:=250)
MyChart.Chart.SetSourceData Range("C3:D8")

End Sub
You may want to use a different type of chart, so this code will change the chart to a line chart. A list of all chart types will appear as you type.
Sub ChangeChartType()

Dim MyChart As Chart
Set MyChart = ActiveSheet.ChartObjects(1).Chart

MyChart.Chart.ChartType = xlLine

End Sub
Finally, you might want to add or remove chart elements. This code adds a chart title and also data labels.
When using the SetElement method, a list of chart elements will appear. It is important that you choose one to work with your type of chart. The msoElementDataLabelOutSideEnd used in this example works with column charts, but not line charts so it would produce an error.
Sub EditChartElements()

Dim MyChart As Chart
Set MyChart = ActiveSheet.ChartObjects(1).Chart

MyChart.HasTitle = True
MyChart.ChartTitle.Text = "Product Sales"
MyChart.SetElement msoElementDataLabelOutSideEnd

End Sub
The code here is a start guide to give you the foundation to work off of. It is sure to require some minor editing to work for your spreadsheets.
Events
These macro codes are run when events are triggered as someone uses Excel. These events can include changing cell values, opening Excel workbooks, and changing sheet tabs.
They do not require the user to consciously click a button to run the macro. They occur naturally as and when the specified event happens.
Go to a specific worksheet on Open
This VBA code example will occur automatically when the Excel workbook is opened. For this to happen, we need to use the Workbook Open procedure.
- In the Visual Basic Editor, double click the workbook object from the Project Explorer window that you want to use the code with.
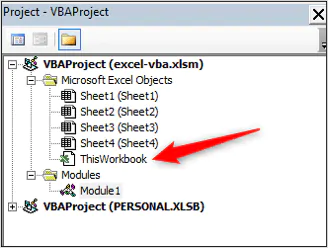
- Select Workbook from the Object list.
- Select Open from the Procedure list.
- Paste the required code in the procedure which is shown in the Code window.
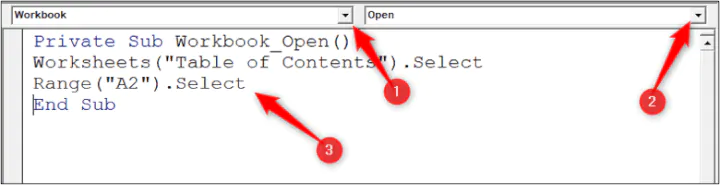 For this code to be activated when the workbook is opened, do not edit the procedure name.
You can use any code you want here. In this example, you are automatically taken to a sheet named Table of Contents and cell A2.
Private Sub Workbook_Open()

Worksheets("Table of Contents").Select
Range("A2").Select

End Sub
There are many other workbook events including BeforeSave, NewSheet, and SheetActivate. These events can be very useful when automating processes such as validating data entry, setting print settings and so on.
Perform an action on Cell Change
The Change event is found on the Worksheet object. It is very useful as it is triggered when a cell value is changed.
To create the Worksheet_Change procedure:
- Double click the worksheet you want to use in the Project Explorer window to open its code window.
- Select Worksheet from the Object list, Change from the Procedure list and the procedure will appear in the Code window.
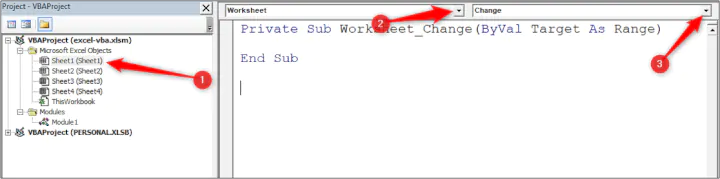 In this code, the changed cell is tested with an If statement to check if the changed cell was in column 5, and if the result of the change was the value Yes.
The variable Target is provided by the worksheet change event. This is the changed cell.
If these conditions are met, the row contents are copied to the bottom of the list on sheet 2 and the cell fill changes to a yellow color.
The Application.EnableEvents statement is used as best practice because the procedures actions can trigger another change event whilst this one is still running.
In this example, it is unnecessary but I wanted to provide it with the code to protect the actions you set from producing errors.
Private Sub Worksheet_Change(ByVal Target As Range)

If Target.Column = 5 And Target = "Yes" Then

Application.EnableEvents = False
Target.EntireRow.Copy Worksheets("Sheet2").Range("A1").End(xlDown).Offset(1, 0)
Target.Interior.ColorIndex = 6

End If

Application.EnableEvents = True

End Sub
What next?
These VBA codes are a great time-saver, but it is just the beginning.
You should learn Excel VBA to really take advantage of its potential in improving your Excel productivity.
Enroll in our Excel Macros and VBA course to start your journey today.
Ready to become a certified Excel ninja?
Take GoSkills’ Macros & VBA course today!
Start free trial