
Say you have two Workbooks one called “MyWorkbook” and the other called “PatchMyWorkbook”. Both workbooks are open at the save time. The “PatchMyWorkbook” has a macro to add a button and assign an existing macro of “MyWorkbook” to “MyWorkbook” The existing macro in “MyWorkbook” is called “PrintPage”
Windows(“MyWorkbook”).Activate
Sheets("Sheet1").Activate
ActiveSheet.Buttons.Add(665.25, 43.5, 89.25, 45).Select
Selection.OnAction = "PrintPage"
This does not cause an error while the “PatchMyWorkbook” code executes but the newly added buttons macro will point to “’PatchMyWorkbook’!PrintPage” rather than just “PrintPage” of the “MyWorkbook”
Question: How can you set the “OnAction” for a macro button across workbooks so that the macro will point to the current workbook not the workbook from where the macro has been created?
![]()
asked Sep 8, 2013 at 16:22
![]()
user1283776user1283776
18.8k43 gold badges135 silver badges267 bronze badges
1
In my opinion .OnAction property should be set in this way:
Selection.OnAction = myWbk.Name & "!PrintPage"
By the way, the idea from your comment (changed a bit below):
Selection.OnAction = "'" & myWbk.Name & "'" & "!" & "PrintPage"
is working for me as well (Excel 2010).
answered Sep 8, 2013 at 20:44
![]()
Kazimierz JaworKazimierz Jawor
18.8k7 gold badges35 silver badges55 bronze badges
You need to include the name of the sheet or module where PrintPage is defined.
Dim methodName As String
With <module or sheet where 'PrintPage' is defined>
    methodName = "'" & MyWbk.Name & "'!" & .CodeName & ".PrintPage"
End With
MyWbk.Sheets("Sheet1").Shapes("ButtonName").OnAction = methodName
The single quotes surrounding MyWbk.Name are important.
answered Feb 26, 2014 at 1:42
![]()
A quick and easy way is :
workbooks("name_of_workbook").Worksheets("name_of_sheet").Shapes("name_of_button").OnAction = "name_of_your_macro"
Just substitute the different «name_of_…» by your names.
Does it work?
![]()
Undo♦
25.4k37 gold badges110 silver badges129 bronze badges
answered Mar 31, 2014 at 19:24
![]()
user3294649user3294649
311 gold badge1 silver badge2 bronze badges
Содержание
- 1.6 Adding Buttons to an Excel Spreadsheet
- ActiveCell
- [SOLVED] Buttons, onAction and Parameter
- [SOLVED] Buttons, onAction and Parameter
- Re: Buttons, onAction and Parameter
- Re: Buttons, onAction and Parameter
- Re: Buttons, onAction and Parameter
- Add a Button and Assign a Macro in Excel
- Excel Buttons
- Run a Macro From a Button
- The Excel Developer Tab
- Add a Macro Button
- Assigning a Macro to a Button
- Assign Existing Macro to a Button
- Edit an Existing Macro Before Assigning to a Button
- Record a Macro and Assign to Button
- Write VBA Procedure and Assign to Button
- Change Macro Assigned to Button
- How to Adjust Button Properties in Excel
- Move or Resize Excel Button
- Rename Button
- Format Button
- Assign a Macro to a Shape
- Assign a Macro to a Hyperlink
1.6 Adding Buttons to an Excel Spreadsheet
In the previous lesson, you created a simple Sub in the code window. In this lesson, you’ll activate that Sub from a button on a spreasheet.
At the top of the VBA Editor, locate the Excel icon, just under the File menu:
Click this icon to return to your spreadsheet. We’ll now place a button control on the spreadsheet.
Locate the Controls panel on the Developer toolbar, and then click the Insert item. From the Insert menu, click the first item, which is a button:
Now move your mouse to your spreadsheet. Hold down your left mouse button somewhere on the F column (F3 will do). Keep it held down and draw out a rectangular button. Let go of the left mouse button when your cursor is on H4
As soon as you let go of the left mouse button you’ll see the Assign Macro dialogue box appear:

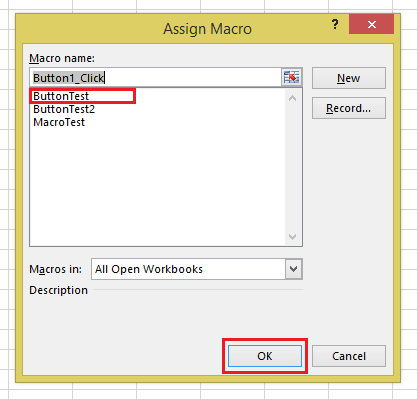
Select your Macro from the list and click OK. The button on your spreadsheet should now look like this:
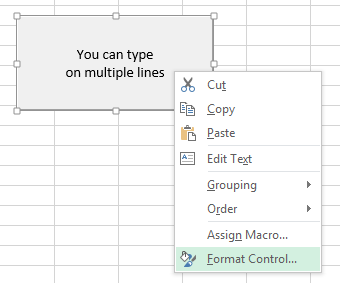
You can edit the text on a button quite easily. Right click the button to see a menu appear. From the menu, select Edit Text:
When you select Edit Text, a cursor will appear at the start of the text. Use the arrow keys on your keyboard to move the cursor to the end of the line. Delete the text Button 1 and type Range(«A1:D6»).Select instead (If you accidentally click away from the button, click on it again with right mouse button and not the left button. This will select your button again.):
Click away from the button to exit edit mode and you’ll see the sizing handles disappear.
You can now test your button out. Give it a click and you’ll see the cells A1 to D6 highlighted:

Congratulations! You have now written Excel VBA code to select a range of cells on a spreadsheet. And all with the click of a button!
Now return to the Visual Basic editor (From the Developer toolbar, click Visual Basic on the Code panel.) Type a single quote before your Range line. The line should turn green:

The reason it turns green is because a single quote is used for comments. When the line is commented out it means Visual Basic will no longer see it as code, so doesn’t do anything with it. You can add comments to remind yourself what your code does, as in the image below:
Adding comments to your code is a good habit to get in to. Especially when you come back to your code after a few weeks or so. If you haven’t added comments you may not quite understand what it was you were trying to do.
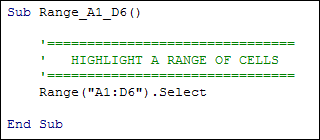
Back to the Range code, though. Notice how we referred to the range of cells A1 to D6:
Another way to refer to the same range is like this:
This time, the start cell A1 and the end cell D6 are enclosed with double quotes. In between the two we have a comma.
Both the examples above do the same thing: they first select the top left cell of the range, and then the bottom right cell of the range. It’s entirely up to you which you use. But with the second version you can use something called the ActiveCell.
ActiveCell
Instead of typing the name of a cell you can also refer to which cell on your spreadsheet is currently highlighted. The currently highlighted cell is called the ActiveCell (no spaces and with capital letters for the «A» and «C»). You can use this in your code. Let’s see how it works.
After the End Sub of your first Subroutine, add the following:
Press the enter key on your keyboard to let the VB editor add the End Sub for you. Now add the following line between the Sub and End Sub of your code:
Your coding window will then look like this:
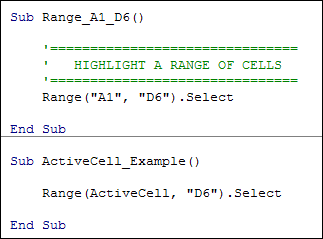
So the top left cell we want to select is the ActiveCell, which is whatever cell you clicked in on your spreadsheet. The bottom right cell we want to select is D6.
Click the icon to return to your Excel spreadsheet. Now draw another button on your form, just below the first one. You should see the Assign Macro dialogue box appear again:

Select your new Macro (your Sub) from the list and click OK.
When you get back to your spreadsheet, edit the text of the button again. Type ActiveCell as the text. When you have finished editing the text, click away. Click inside another cell on your spreadsheet, cell A2 for example. Now click your button. You should see the cells A2 to D6 highlighted:
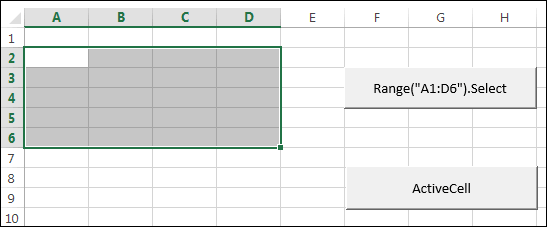
Click inside any other cell on your spreadsheet and click the button again. The cells from your active cell to D6 will be selected.
In the next part of this tutorial, we’ll take a look at the Offset property. So save you work before moving on.
Источник
[SOLVED] Buttons, onAction and Parameter
LinkBack
Thread Tools
Rate This Thread
Display
[SOLVED] Buttons, onAction and Parameter
I am trying to create some buttons on my sheet, that execute a macro on
click. I want to add a parameter or a reference to the button somehow.
The code I have is the following:
With ActiveSheet.Buttons.Add(194, (rownr) * 12.75 — 5, 13, 13)
..Characters.Text = «+»
..Name = artikel
..OnAction = «mymacro»
‘ .Parameter = name ‘this does not work
End With
now in this mymacro i have the following code:
sub mymacro()
‘ name = CommandBars.ActionControl.Name ‘this does not work
‘ name = Selection.name ‘ this does not work either
I am a little confused by the differences between the different ways of
creating buttons (buttons.add, shapes.add, oleobjects.add,
commandbars.controls.add)
I don’t know which command to use and why. The sheet is created on the
fly and creates a given number of buttons based on other data. What I
need to do is to fill in some data when the buttons are clicked, and
create a combobox somewhere.
Thanks in advance
Re: Buttons, onAction and Parameter
There are buttons and there are buttons, as you already know. But you are
very close; the macro called will recognize the button name with
Application.Caller. Try this:
Sub tester()
Dim rownr As Long
rownr = 5
With ActiveSheet.Buttons.Add(194, (rownr) * 12.75 — 5, 13, 13)
..Characters.Text = «+»
..Name = «Plus button»
..OnAction = «mymacro»
End With
rownr = rownr + 1
With ActiveSheet.Buttons.Add(194, (rownr) * 12.75 — 5, 13, 13)
..Characters.Text = «-»
..Name = «Minus button»
..OnAction = «mymacro»
End With
Sub mymacro()
MsgBox Application.Caller
End Sub
HTH. Best wishes Harald
skrev i melding
news:1106125687.355433.75650@c13g2000cwb.googlegroups.com.
> Hi,
>
> I am trying to create some buttons on my sheet, that execute a macro on
> click. I want to add a parameter or a reference to the button somehow.
> The code I have is the following:
>
>
> With ActiveSheet.Buttons.Add(194, (rownr) * 12.75 — 5, 13, 13)
> .Characters.Text = «+»
> .Name = artikel
> .OnAction = «mymacro»
> ‘ .Parameter = name ‘this does not work
> End With
>
>
> now in this mymacro i have the following code:
>
>
> sub mymacro()
> ‘ name = CommandBars.ActionControl.Name ‘this does not work
> ‘ name = Selection.name ‘ this does not work either
>
>
> I am a little confused by the differences between the different ways of
> creating buttons (buttons.add, shapes.add, oleobjects.add,
> commandbars.controls.add)
> I don’t know which command to use and why. The sheet is created on the
> fly and creates a given number of buttons based on other data. What I
> need to do is to fill in some data when the buttons are clicked, and
> create a combobox somewhere.
>
> Thanks in advance
>
Re: Buttons, onAction and Parameter
Parameter applies to commandbar buttons, and you are not creating this type
of button, but a shapes button. Thus you can not add a parameter or access
such.
These buttons are a little limited in what you can pass. AFAIK there are no
properties that you can tap into, but you could always use a worksheet range
and test that in the macro.
If you are using 1 macro for many buttons, you could use Application.Caller
to get the name of the button initiating the macro.
RP
(remove nothere from the email address if mailing direct)
wrote in message
news:1106125687.355433.75650@c13g2000cwb.googlegroups.com.
> Hi,
>
> I am trying to create some buttons on my sheet, that execute a macro on
> click. I want to add a parameter or a reference to the button somehow.
> The code I have is the following:
>
>
> With ActiveSheet.Buttons.Add(194, (rownr) * 12.75 — 5, 13, 13)
> .Characters.Text = «+»
> .Name = artikel
> .OnAction = «mymacro»
> ‘ .Parameter = name ‘this does not work
> End With
>
>
> now in this mymacro i have the following code:
>
>
> sub mymacro()
> ‘ name = CommandBars.ActionControl.Name ‘this does not work
> ‘ name = Selection.name ‘ this does not work either
>
>
> I am a little confused by the differences between the different ways of
> creating buttons (buttons.add, shapes.add, oleobjects.add,
> commandbars.controls.add)
> I don’t know which command to use and why. The sheet is created on the
> fly and creates a given number of buttons based on other data. What I
> need to do is to fill in some data when the buttons are clicked, and
> create a combobox somewhere.
>
> Thanks in advance
>
Re: Buttons, onAction and Parameter
The following is based on the CommandBar example on my website.
In the Workbook Code Module:
Private Sub Workbook_Activate()
Toolbar_ON
End Sub
Private Sub Workbook_Deactivate()
Toolbar_OFF
End Sub
In a standard Code Module:
Const cCommandBar = «MyCommandBar»
Sub Toolbar_OFF()
Dim bar As CommandBar
»’ Delete the Commandbar if it already exists
For Each bar In Application.CommandBars
If bar.Name = cCommandBar Then bar.Delete
Next
End Sub
Sub Toolbar_ON()
Dim bar As CommandBar
Источник
Add a Button and Assign a Macro in Excel
Excel Buttons
In Excel, Buttons are used to call Macros. This tutorial will cover how to create Excel buttons, assign Macros to them, adjust their properties, and more.
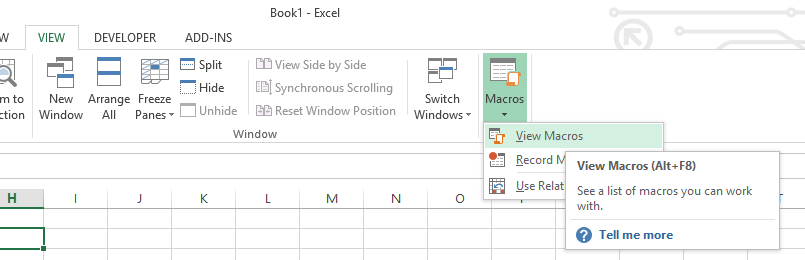
By default, Excel macros are accessible in a list via the “Macros” button on the View ribbon.
Often though, you’ll want to provide easy access to a particular macro directly on your worksheet. This can be achieved using a Button control.
A Button control looks like a Microsoft Windows button, and runs a macro when clicked. It’s a much handier way to access your most commonly used macros, and is an easy way to expose custom functionality to other users of your workbook.
Run a Macro From a Button
To run a Macro from a button in Excel, simply click the button:
The Excel Developer Tab
Buttons are accessible via the Developer Tab.

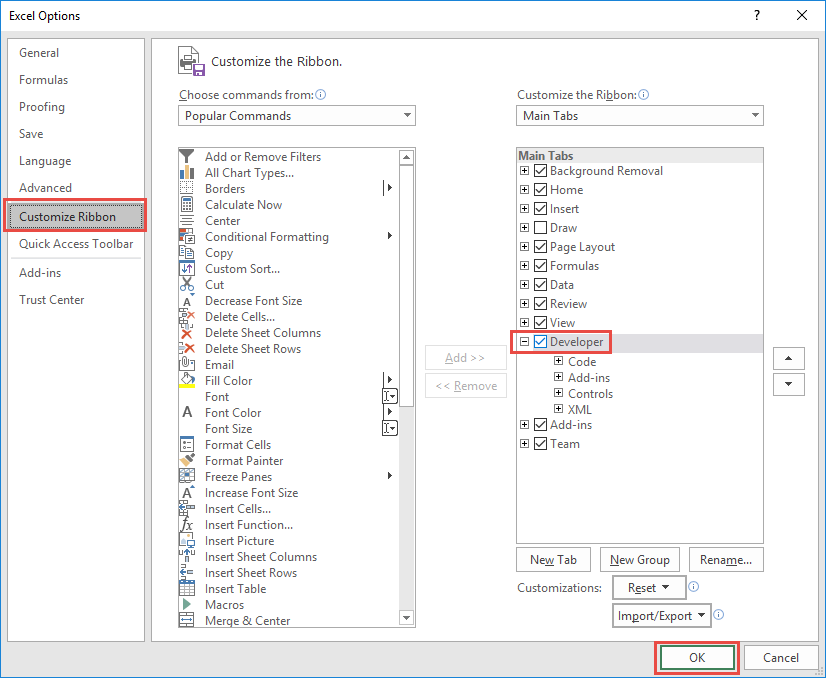
Unfortunately, Excel hides the Developer tab by default. If you don’t see the Developer Ribbon, follow these steps:
- Click File >Options in the list on the left-hand border
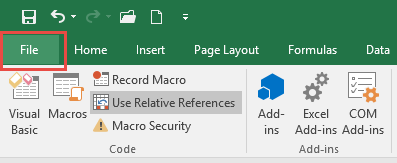
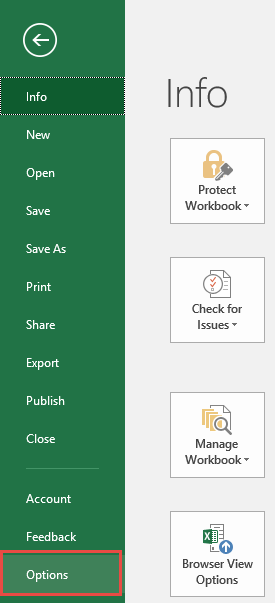
- In the Options dialog select Customize Ribbon > Customize the Ribbon > Main Tabs and add a check-mark in the box for “Developer”, and click OK.
Add a Macro Button
In Excel, select the Developer tab, then click on the “Insert” dropdown in the Controls section. There are several types of controls divided into two sections, “Form Controls” and “ActiveX Controls”.
For now, just click on the Button control under “Form Controls”. Next, move the mouse anywhere over the worksheet surface, then hold left-click and drag the mouse to draw the outline of a rectangle. When you release left-click, a new dialog will appear titled “Assign Macro”.
Assigning a Macro to a Button
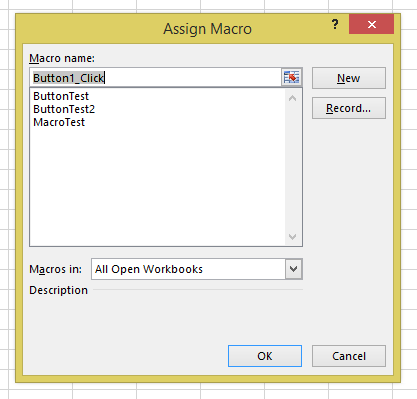
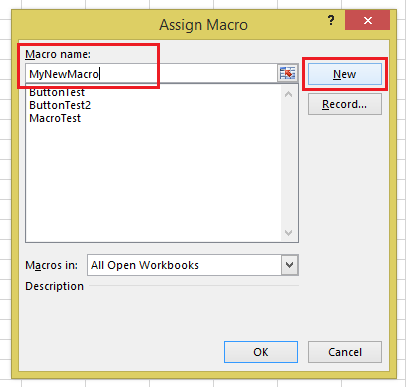
Here you can assign an existing Macro to the button, record a new macro, create a new macro from scratch using VBA, or click “Cancel” and return to your button later.
Assign Existing Macro to a Button
To assign an existing Macro, you simply select the macro’s name in the list, then click OK.
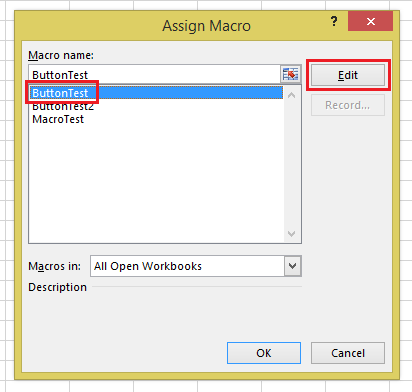
Edit an Existing Macro Before Assigning to a Button
To edit a macro before assigning it to the button, select the macro’s name in the list and click the “Edit” button (the “New” button text changes to “Edit”).
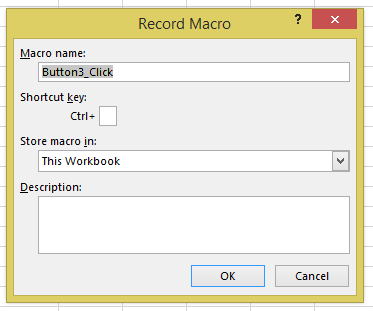
Record a Macro and Assign to Button
To record a new macro and assign it to the button, click “Record…”. This brings up the Record Macro dialog, where you specify a name and click “OK”. The button will be assigned that macro. Meanwhile, Excel will remain in a recording state until you click “Stop Recording” in the “Code” section of the Developer tab. 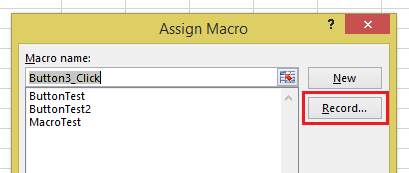
Write VBA Procedure and Assign to Button
To write a new macro for the button, type a new name for your macro in the textbox at the top of the dialog, then click “New”. Excel will bring up the VB Editor, in which you’ll see a new empty macro procedure with the name you entered. This procedure will be stored in a new module, visible in the Project window.
Change Macro Assigned to Button
To change the Macro that’s assigned to a button, simply right-click the button and select Assign Macro:
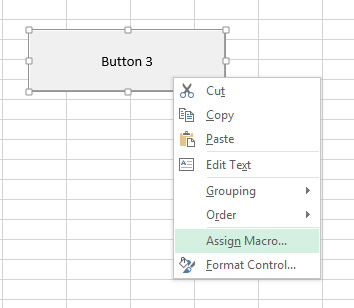
Here you can see the assigned Macro and make any desired changes.

How to Adjust Button Properties in Excel
Move or Resize Excel Button
After you’ve placed a button, you can easily move or resize it. To perform any of these actions, right-click on the button. Then you can left-click and drag the button to your desired location or resize it.
Rename Button
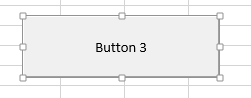
With the button selected, left-click on the button text to edit.
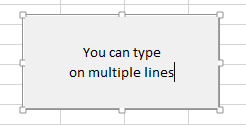
To add multiple lines, simple press the ENTER key.
Format Button
To format other button properties, Right-Click > Format Control
Here you can adjust font sizes, and many other button properties:
Of particular note is the “Properties” tab, which changes how the button behaves as surrounding rows and columns are inserted, deleted, resized, or hidden/unhidden.
- Move and size with cells: The button will move and resize when rows and columns are changed.
- Move but don’t size with cells: The button will move, but not resize.
- Don’t move or size with cells: The button will not move or resize.
- Finally, Print Object can set the object to appear on printouts. This is unchecked by default, but can be toggled on if desired.
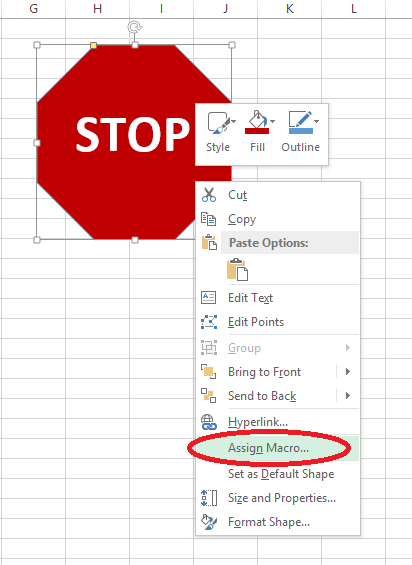
Assign a Macro to a Shape
Besides buttons, macros can assigned to other objects like Pictures, Textboxes, and Shapes. With a Picture or Shape, you can make a button that looks any way you like. Excel includes a wide variety of customizable Shapes including polygons, arrows, banners, and more that may be better suited to your worksheet than a regular button control.
Shapes are accessed from the Insert tab:
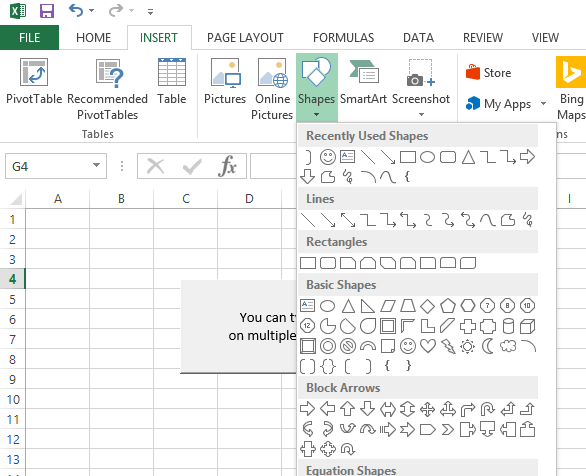
Select the shape you want from the Shape dropdown, draw it onto your worksheet as you would a button control, then right-click it and select “Assign Macro…” from the pop-up dialog. The options are the same as assigning a macro to a button.
Assign a Macro to a Hyperlink
Macros can also be assigned to hyperlinks by using VBA Events. Events are procedures that are triggered when certain actions are performed:
- Open/Close/Save Workbook
- Activate / Deactivate Worksheet
- Cell Values Change
- Click Hyperlink
- and more.
Events require knowledge of VBA. To learn more about events, visit our VBA Tutorial.
Источник
The following is based on the CommandBar example on my website.
In the Workbook Code Module:
Private Sub Workbook_Activate()
Toolbar_ON
End SubPrivate Sub Workbook_Deactivate()
Toolbar_OFF
End SubIn a standard Code Module:
Const cCommandBar = «MyCommandBar»
Sub Toolbar_OFF()
Dim bar As CommandBar»’ Delete the Commandbar if it already exists
For Each bar In Application.CommandBars
If bar.Name = cCommandBar Then bar.Delete
Next
End SubSub Toolbar_ON()
Dim bar As CommandBarToolbar_OFF
Set bar = Application.CommandBars.Add(Name:=cCommandBar,
Position:=msoBarTop, Temporary:=True)»’ Button 1
With bar.Controls.Add(Type:=msoControlButton)
.FaceId = 136
.Caption = «Click Me 1»
.TooltipText = «Click here for a Message Box»
.Style = msoButtonIconAndCaption
.Parameter = «My Button 1»
.OnAction = «Button_Click»
End With»’ Button 2
With bar.Controls.Add(Type:=msoControlButton)
.FaceId = 136
.Caption = «Click Me 2»
.TooltipText = «Click here for a Message Box»
.Style = msoButtonIconAndCaption
.Parameter = «My Button 2»
.OnAction = «Button_Click»
End With»’ Toggle
With bar.Controls.Add(Type:=msoControlButton)
.FaceId = 134
.Caption = «Toggle Me»
.Style = msoButtonIconAndCaption
.State = msoButtonUp
.OnAction = «Toggle_Click»
End With»’ Edit
With bar.Controls.Add(Type:=msoControlEdit)
.OnAction = «Edit_Enter»
End With»’ Dropdown
With bar.Controls.Add(Type:=msoControlDropdown)
.AddItem «Newton»
.AddItem «Galileo»
.AddItem «Einstein»
.DropDownLines = 15
.DropDownWidth = 100
‘.ListHeaderCount = 1
.ListIndex = 3
.OnAction = «Dropdown_Click»
End With»’ Combo
With bar.Controls.Add(Type:=msoControlComboBox)
.AddItem «Processor»
.AddItem «Hard Drive»
.AddItem «Memory»
.AddItem «Graphics»
.DropDownLines = 15
.DropDownWidth = 100
‘.ListHeaderCount = 1
.ListIndex = 2
.OnAction = «ComboBox_Click»
End With»’ Popup
With bar.Controls.Add(Type:=msoControlPopup)
.Caption = «Cards»
With .CommandBar.Controls.Add(Type:=msoControlButton)
.FaceId = 481
.Caption = «Heart»
.OnAction = «Popup_Click»
End With
With .CommandBar.Controls.Add(Type:=msoControlButton)
.FaceId = 482
.Caption = «Diamond»
.OnAction = «Popup_Click»
End With
With .CommandBar.Controls.Add(Type:=msoControlButton)
.BeginGroup = True
.FaceId = 483
.Caption = «Spade»
.OnAction = «Popup_Click»
End With
With .CommandBar.Controls.Add(Type:=msoControlButton)
.FaceId = 484
.Caption = «Club»
.OnAction = «Popup_Click»
End With
End Withbar.Visible = True
End SubSub Button_Click()
With Application.CommandBars.ActionControl
MsgBox «You clicked the button!» & vbNewLine & _
«The Parameter is » & .Parameter
End With
End SubSub Toggle_Click()
With Application.CommandBars.ActionControl
If .State = msoButtonUp Then
.FaceId = 135
.State = msoButtonDown
Else
.FaceId = 134
.State = msoButtonUp
End If
End With
End SubSub Edit_Enter()
With Application.CommandBars.ActionControl
MsgBox «You typed: » & .Text
End With
End SubSub Dropdown_Click()
With Application.CommandBars.ActionControl
MsgBox «You selected: » & .Text
End With
End SubSub ComboBox_Click()
With Application.CommandBars.ActionControl
MsgBox «You selected: » & .Text
End With
End SubSub Popup_Click()
With Application.CommandBars.ActionControl
MsgBox «You selected: » & .Caption
End With
End Sub—
Rob van Gelder — http://www.vangelder.co.nz/excel<s205787@student.windesheim.nl> wrote in message
news:1106125687.355433.75650@c13g2000cwb.googlegroups.com…
> Hi,
>
> I am trying to create some buttons on my sheet, that execute a macro on
> click. I want to add a parameter or a reference to the button somehow.
> The code I have is the following:
>
>
> With ActiveSheet.Buttons.Add(194, (rownr) * 12.75 — 5, 13, 13)
> .Characters.Text = «+»
> .Name = artikel
> .OnAction = «mymacro»
> ‘ .Parameter = name ‘this does not work
> End With
>
>
> now in this mymacro i have the following code:
>
>
> sub mymacro()
> ‘ name = CommandBars.ActionControl.Name ‘this does not work
> ‘ name = Selection.name ‘ this does not work either
>
>
> I am a little confused by the differences between the different ways of
> creating buttons (buttons.add, shapes.add, oleobjects.add,
> commandbars.controls.add)
> I don’t know which command to use and why. The sheet is created on the
> fly and creates a given number of buttons based on other data. What I
> need to do is to fill in some data when the buttons are clicked, and
> create a combobox somewhere.
>
> Thanks in advance
>
-
#1
I have some buttons in my worksheet.And all those buttons will do the same action. Since I will also dynamically create even more buttons using VBA during runtime, is there any way to create the actions for them without typing for example «Private Sub Line15_Click() SendData (15)» manually? I mean I want to add the action to the button at the same time the button is created.
Thank you~~~
The example of the current button action is as below.
Code:
Private Sub Line15_Click()
    SendData (15)

End Sub
Private Sub Line16_Click()
    SendData (16)

End Sub
Private Sub Line17_Click()
    SendData (17)

End Sub
Private Sub Line18_Click()
    SendData (18)
Yours sincerely,
lolo
Last edited: Jun 22, 2011
Format cells as date
Select range and press Ctrl+Shift+3 to format cells as date. (Shift 3 is the # sign which sort of looks like a small calendar).
-
#2
I have figured it out!
Code:
Sub AddButton()
    Dim newButton As OLEObject
    With ActiveCell
        Set newButton = ActiveSheet.OLEObjects.Add _
            (ClassType:="Forms.CommandButton.1", _
            Link:=False, DisplayAsIcon:=False, _
            Left:=.Left, _
            Top:=.Top, _
            Height:=.Height, _
            Width:=.Width)
        newButton.Object.Caption = .Row
        newButton.Object.Font.Size = 6
        newButton.Object.Font.Bold = True
        newButton.Object.WordWrap = True
        newButton.Name = "Line" & .Row
        newButton.Object.Font.Name = "MS Gothic"
    End With
     ' Inserts code for the button
    With ThisWorkbook.VBProject.VBComponents(ActiveSheet.CodeName).CodeModule
        Line = .CountOfLines
        .InsertLines Line + 1, "Sub " & newButton.Name & "_Click()"
        .InsertLines Line + 2, "sendData(" & ActiveCell.Row & ")"
        .InsertLines Line + 3, "End Sub"
    End With
End Sub
-
#3
I have figured it out!
Code:
Sub AddButton()
    Dim newButton As OLEObject
    With ActiveCell
        Set newButton = ActiveSheet.OLEObjects.Add _
            (ClassType:="Forms.CommandButton.1", _
            Link:=False, DisplayAsIcon:=False, _
            Left:=.Left, _
            Top:=.Top, _
            Height:=.Height, _
            Width:=.Width)
        newButton.Object.Caption = .Row
        newButton.Object.Font.Size = 6
        newButton.Object.Font.Bold = True
        newButton.Object.WordWrap = True
        newButton.Name = "Line" & .Row
        newButton.Object.Font.Name = "MS Gothic"
    End With
     ' Inserts code for the button
    With ThisWorkbook.VBProject.VBComponents(ActiveSheet.CodeName).CodeModule
        Line = .CountOfLines
        .InsertLines Line + 1, "Sub " & newButton.Name & "_Click()"
        .InsertLines Line + 2, "sendData(" & ActiveCell.Row & ")"
        .InsertLines Line + 3, "End Sub"
    End With
End Sub
-
#4
Instead of ActiveX controls you better create Forms controls. Procedures for them can be created before creating button and can be linked to button with only one line: btn.OnAction = «MySub». That’s all.
-
#5
Wow, I’ll have a try! Thank you so much~~~
Best regards,
lolo
Instead of ActiveX controls you better create Forms controls. Procedures for them can be created before creating button and can be linked to button with only one line: btn.OnAction = «MySub». That’s all.
-
#6
Example.
In worksheet module:
Code:
[COLOR="Blue"][COLOR="Blue"]Sub[/COLOR][/COLOR] AddDropDown()

    [COLOR="Blue"][COLOR="Blue"]Dim[/COLOR][/COLOR] dd [COLOR="Blue"][COLOR="Blue"]As[/COLOR][/COLOR] DropDown

    [COLOR="Blue"]With[/COLOR] ActiveCell
        [COLOR="Blue"][COLOR="Blue"]Set[/COLOR][/COLOR] dd = ActiveSheet.DropDowns.Add(.Left, .Top, .Width, .Height)
    [COLOR="Blue"][COLOR="Blue"]End[/COLOR][/COLOR] [COLOR="Blue"]With[/COLOR]

    [COLOR="Blue"]With[/COLOR] dd
        .AddItem "Item 1"
        .AddItem "Item 2"
        .AddItem "Item 3"
        .OnAction = "ItemSelection"
    [COLOR="Blue"][COLOR="Blue"]End[/COLOR][/COLOR] [COLOR="Blue"]With[/COLOR]

[COLOR="Blue"][COLOR="Blue"]End[/COLOR][/COLOR] [COLOR="Blue"][COLOR="Blue"]Sub[/COLOR][/COLOR]

[COLOR="Blue"][COLOR="Blue"]Private[/COLOR][/COLOR] [COLOR="Blue"][COLOR="Blue"]Sub[/COLOR][/COLOR] ItemSelection()
    [COLOR="Blue"]With[/COLOR] ActiveSheet.DropDowns(Application.Caller)
        .TopLeftCell = .List(.ListIndex)
        .Delete
    [COLOR="Blue"][COLOR="Blue"]End[/COLOR][/COLOR] [COLOR="Blue"]With[/COLOR]
[COLOR="Blue"][COLOR="Blue"]End[/COLOR][/COLOR] [COLOR="Blue"][COLOR="Blue"]Sub[/COLOR][/COLOR]
-
#7
Wow Sektor, so nice!
Thank you so much!!! This is exactly what I want!
Best regards,
lolo^-^
Example.
In worksheet module:
Code:
[COLOR=blue][COLOR=blue]Sub[/COLOR][/COLOR] AddDropDown()

    [COLOR=blue][COLOR=blue]Dim[/COLOR][/COLOR] dd [COLOR=blue][COLOR=blue]As[/COLOR][/COLOR] DropDown

    [COLOR=blue]With[/COLOR] ActiveCell
        [COLOR=blue][COLOR=blue]Set[/COLOR][/COLOR] dd = ActiveSheet.DropDowns.Add(.Left, .Top, .Width, .Height)
    [COLOR=blue][COLOR=blue]End[/COLOR][/COLOR] [COLOR=blue]With[/COLOR]

    [COLOR=blue]With[/COLOR] dd
        .AddItem "Item 1"
        .AddItem "Item 2"
        .AddItem "Item 3"
        .OnAction = "ItemSelection"
    [COLOR=blue][COLOR=blue]End[/COLOR][/COLOR] [COLOR=blue]With[/COLOR]

[COLOR=blue][COLOR=blue]End[/COLOR][/COLOR] [COLOR=blue][COLOR=blue]Sub[/COLOR][/COLOR]

[COLOR=blue][COLOR=blue]Private[/COLOR][/COLOR] [COLOR=blue][COLOR=blue]Sub[/COLOR][/COLOR] ItemSelection()
    [COLOR=blue]With[/COLOR] ActiveSheet.DropDowns(Application.Caller)
        .TopLeftCell = .List(.ListIndex)
        .Delete
    [COLOR=blue][COLOR=blue]End[/COLOR][/COLOR] [COLOR=blue]With[/COLOR]
[COLOR=blue][COLOR=blue]End[/COLOR][/COLOR] [COLOR=blue][COLOR=blue]Sub[/COLOR][/COLOR]
-
#8
Oops. I misleaded you. Here’s correct code (double-click a cell):
1. In worksheet module.
Code:
[COLOR="Blue"]Private[/COLOR] [COLOR="Blue"]Sub[/COLOR] Worksheet_BeforeDoubleClick([COLOR="Blue"]ByVal[/COLOR] Target [COLOR="Blue"]As[/COLOR] Range, Cancel [COLOR="Blue"]As[/COLOR] [COLOR="Blue"]Boolean[/COLOR])
    [COLOR="Blue"]Call[/COLOR] AddDropDown
    Cancel = [COLOR="Blue"]True[/COLOR]
[COLOR="Blue"]End[/COLOR] [COLOR="Blue"]Sub[/COLOR]
2. In standard module.
Code:
[COLOR="Blue"]Sub[/COLOR] AddDropDown()

    [COLOR="Blue"]Dim[/COLOR] dd [COLOR="Blue"]As[/COLOR] DropDown

    [COLOR="Blue"]With[/COLOR] ActiveCell
        [COLOR="Blue"]Set[/COLOR] dd = ActiveSheet.DropDowns.Add(.Left, .Top, .Width, .Height)
    [COLOR="Blue"]End[/COLOR] [COLOR="Blue"]With[/COLOR]

    [COLOR="Blue"]With[/COLOR] dd
        .AddItem "Item 1"
        .AddItem "Item 2"
        .AddItem "Item 3"
        .OnAction = "ItemSelection"
    [COLOR="Blue"]End[/COLOR] [COLOR="Blue"]With[/COLOR]

[COLOR="Blue"]End[/COLOR] [COLOR="Blue"]Sub[/COLOR]

[COLOR="Blue"]Private[/COLOR] [COLOR="Blue"]Sub[/COLOR] ItemSelection()
    [COLOR="Blue"]With[/COLOR] ActiveSheet.DropDowns(Application.Caller)
        .TopLeftCell = .List(.ListIndex)
        .Delete
    [COLOR="Blue"]End[/COLOR] [COLOR="Blue"]With[/COLOR]
[COLOR="Blue"]End[/COLOR] [COLOR="Blue"]Sub[/COLOR]
-
#9
Hi Sektor,
I created a new workbook and copied your code into VBA. But there is a error message says»Cannot run macro. The macro may not be available in this workbook or all macros may be disabled.»
What’s wrong with it? And what does the sub «ItemSelection» do?
Best regards,
lolo
Example.
In worksheet module:
Code:
[COLOR=blue][COLOR=blue]Sub[/COLOR][/COLOR] AddDropDown()

    [COLOR=blue][COLOR=blue]Dim[/COLOR][/COLOR] dd [COLOR=blue][COLOR=blue]As[/COLOR][/COLOR] DropDown

    [COLOR=blue]With[/COLOR] ActiveCell
        [COLOR=blue][COLOR=blue]Set[/COLOR][/COLOR] dd = ActiveSheet.DropDowns.Add(.Left, .Top, .Width, .Height)
    [COLOR=blue][COLOR=blue]End[/COLOR][/COLOR] [COLOR=blue]With[/COLOR]

    [COLOR=blue]With[/COLOR] dd
        .AddItem "Item 1"
        .AddItem "Item 2"
        .AddItem "Item 3"
        .OnAction = "ItemSelection"
    [COLOR=blue][COLOR=blue]End[/COLOR][/COLOR] [COLOR=blue]With[/COLOR]

[COLOR=blue][COLOR=blue]End[/COLOR][/COLOR] [COLOR=blue][COLOR=blue]Sub[/COLOR][/COLOR]

[COLOR=blue][COLOR=blue]Private[/COLOR][/COLOR] [COLOR=blue][COLOR=blue]Sub[/COLOR][/COLOR] ItemSelection()
    [COLOR=blue]With[/COLOR] ActiveSheet.DropDowns(Application.Caller)
        .TopLeftCell = .List(.ListIndex)
        .Delete
    [COLOR=blue][COLOR=blue]End[/COLOR][/COLOR] [COLOR=blue]With[/COLOR]
[COLOR=blue][COLOR=blue]End[/COLOR][/COLOR] [COLOR=blue][COLOR=blue]Sub[/COLOR][/COLOR]
-
#10
Did you insert all subs into appropriate modules? Worksheet_BeforeDoubleClick must be in the sheet module, and AddDropDown and ItemSelection — in standard module.
When you double-click a cell, Worksheet_BeforeDoubleClick calls AddDropDown procedure. It creates DropDown and fills it with some values with AddItem method. Then by using OnAction property I tell DropDown to execute ItemSelection procedure when you choose any item from DropDown. When you selected item, ItemSelection procedure is executed. It enters selected item into cell which is beyond DropDown and deletes DropDown. So, your task is to fill DropDown with your values and decide what Sub to execute with OnAction property.
Доброе время суток !
Помогите пожалуйста разобраться :
в VBA создаётся кнопка меню : (пример во вложении)
http://slil.ru/25435147
Код:
Dim pop As Office.CommandBarPopup
Dim btn As Office.CommandBarButton
Set pop = Application.CommandBars.Item(«Worksheet Menu
bar»).Controls.Add(msoControlPopup)
With pop
.Caption = «SAMPLE»
.Tag = «sample»
.BeginGroup = True
End With
Set btn = pop.Controls.Add(msoControlButton)
With btn
.Caption = «Function sample»
.Tag = «sample»
.OnAction = «sample»
‘ .OnAction = «sample(1)»
End With
если .OnAction = «sample» — то всё ОК
проблема в том, что если задавать
.OnAction = «sample(1)», т.е. передавать параметр
(на деле необходимо создать двенадцать кнопок (на каждый месяц) и в функцию
передавать номер месяца)
то функция
sample(1)
— выполняется два раза
— в ней не отрабатывает очистка листа :
Workbooks(«sample.xls»).Worksheets(«Лист1»).Cells.Clear
— В строке
WS.Cells(i, j) = CDbl(rec(f.Name))
начинает ругаться на : CDbl()
Заранее спасибо за ответ . . .
8 ответов
275
04 февраля 2008 года
![]()
pashulka
985 / / 19.09.2004
Передать параметр конечно же можно, но в данном конкретном случае, в этом нет необходимости, ибо для определения номера месяца можно воспользоваться любым из двух нижеопубликованных вариантов.
Код:
Private Sub Auto_Open()
With Application.CommandBars(1)
.Protection = msoBarNoProtection
With .Controls.Add(Type:=msoControlPopup)
.BeginGroup = True
.Caption = «Месяц»
For iCount& = 1 To 12
With .Controls.Add(Type:=msoControlButton)
.Caption = Application.GetCustomListContents(4)(iCount&)
‘.Caption = MonthName(iCount&) ‘MS Excel 2000
.OnAction = «MyMacro»
End With
Next
End With
End With
End Sub
Private Sub MyMacro()
iMonth& = Application.Caller(1)
MsgBox iMonth&, , «Вариант I»
iMonth& = Application.CommandBars.ActionControl.Index
MsgBox iMonth&, , «Вариант II»
End Sub
35K
05 февраля 2008 года
![]()
NovaC
4 / / 04.02.2008
Цитата:
Передать параметр конечно же можно, но в данном конкретном случае, в этом нет необходимости, ибо для определения номера месяца можно воспользоваться любым из двух нижеопубликованных вариантов.
pashulka, большое спасибо за советы.
Подскажи, пожалуйста, как программно в VBA реализовать нажатие на конкретную кнопку меню ?
(в моём случае нужно в Auto_Open обновляться текущим месяцем — т.е. программно нажать кнопку «Февраль»)
275
05 февраля 2008 года
![]()
pashulka
985 / / 19.09.2004
Код:
Private Sub Auto_Open()
With Application.CommandBars(1)
.Protection = msoBarNoProtection
With .Controls.Add(Type:=msoControlPopup)
.BeginGroup = True
.Caption = «Месяц»
For iCount& = 1 To 12
With .Controls.Add(Type:=msoControlButton)
.Caption = Application.GetCustomListContents(4)(iCount&)
‘.Caption = MonthName(iCount&) ‘MS Excel 2000
.OnAction = «MyMacro»
End With
Next
.Controls(Month(Now)).Execute ‘
End With
End With
End Sub
Private Sub MyMacro()
iMonth& = Application.Caller(1)
MsgBox iMonth&, , «Вариант I»
iMonth& = Application.CommandBars.ActionControl.Index
MsgBox iMonth&, , «Вариант II»
‘Здесь наличествует основной код
End Sub
При желании можно обойтись и без использования метода Execute, например :
Код:
Private Sub Auto_Open()
With Application.CommandBars(1)
.Protection = msoBarNoProtection
With .Controls.Add(Type:=msoControlPopup)
.BeginGroup = True
.Caption = «Месяц»
For iCount& = 1 To 12
With .Controls.Add(Type:=msoControlButton)
.Caption = Application.GetCustomListContents(4)(iCount&)
‘.Caption = MonthName(iCount&) ‘MS Excel 2000
.OnAction = «MyMacro»
End With
Next
MyMacro Month(Now)
‘Call MyMacro(Month(Now))
‘Application.Run _
Macro:=»MyMacro», Arg1:=Month(Now) ‘Run «MyMacro», Month(Now)
End With
End With
End Sub
Private Sub MyMacro(Optional iMonth)
If IsMissing(iMonth) = True Then
iMonth = Application.Caller(1)
MsgBox iMonth, , «Вариант I»
iMonth = Application.CommandBars.ActionControl.Index
MsgBox iMonth, , «Вариант II»
End If
‘Здесь наличествует основной код
End Sub
P.S. При ответе цитировать предыдущее сообщение (часть сообщения) вовсе не обязательно.
35K
06 февраля 2008 года
![]()
NovaC
4 / / 04.02.2008
pashulka, ещё раз спасибо за подробный ответ.
Есть ещё один вопрос по этой задаче :
— при построении графика (в моём случае OX это дни месяца [1..31]) необходимо чтобы пустые ячейки входящие в ряд для построения графика не отображались на нём (в моём случае график строится от 1 до 31, но там где ячейки пустые график = 0). Это работает только в том случае если она действительно пустая, но не срабатывает если :
1. Ячейка содержит формулу : =ЕСЛИ(C10<>»»;C10/Лист1!D$7;»») т.е если результат вычислить невозможно, то проставляется «» (пробовал » «, «0», «—«)
2. В эту ячейку копируется или приравнивается заведомо пустая ячейка
Вышел из ситуации следующим образом :
— добавил лист
— все формулы перенёс на него
— на лист с которого строятся графики копирую только значения
(причём если копировать всё значения — от 1 до 31 где например от 20 до 31 — это пустые ячейки, то они опять же отобразятся на графике нулями, поэтому определяю только непустые ячейки и копирую только их)
Может есть способ проще (например настроики самого графика) ?
Насколько рационально организовать работу с графиками (создание, добавление рядов, полная настройка) полностью на run-time ?
275
06 февраля 2008 года
![]()
pashulka
985 / / 19.09.2004
NovaC, Не могли бы Вы предоставить данные, на основании которых строится график, и конечный результат, т.е. ту диаграмму, которая удовлетворяет Вашим требованиям.
35K
07 февраля 2008 года
![]()
NovaC
4 / / 04.02.2008
пожалуйста — пример
В VBA можно объявить массив как константу ?
напрмер вот так не получается :
Код:
Public Const ColGb = Array(«C», «E», «G», «I», «K», «M», «O», «Q», «S», «U», «W», «Y», «AA», «AC»)
251
07 февраля 2008 года
![]()
SkyMаn
1.7K / / 31.07.2007
Нет, так как массив — это не константа.
275
07 февраля 2008 года
![]()
pashulka
985 / / 19.09.2004
[quote=NovaC]В VBA можно объявить массив как константу ?[/quote]
Нет, но если Вы используете MS Office 2000 (или старше), то можно использовать следующий вариант :
Код:
Public Const iColumns = «C;E;G;I;K;M;O;Q;S;U;W;Y;AA;AC»
Private Sub Auto_Open()
iMassivColumns = Split(iColumns, «;»)
‘И дальше работаете с этим массивом
For Each iColumn In Split(iColumns, «;»)
MsgBox «Столбец : » & iColumn, , «»
Next
‘Или так, например, если в переменной нет необходимости
End Sub
Примечание : Обратите внимание на то, что в некоторых случаях, можно работать с диапазоном несмежных ячеек, без использования цикла :
Код:
Range(«C1,E1,G1,I1,K1,M1,O1,Q1,S1,U1,W1,Y1,AA1,AC1»).Clear
Что касается диаграммы, то в Вашем случае вполне можно обойтись без использования макросов (см. пример)