
Содержание
- Документация Excel Tools
- Добро пожаловать в пошаговое руководство надстройки — Excel Tools VBA
- Excel Tools VBA – надстройка, дополняющая MS Excel уникальными инструментами, которая позволяет автоматизировать рутинные и монотонные операции в MS Excel
- Excel Tools VBA — надстройка автоматизации рутинных и монотонных операций в MS Excel
- Авторские права 2015-2020 от авторов VBATools
- С Уважением VBATools.ru
- Excel Tools VBA-add-in for automating routine and monotonous operations in MS Excel
- Copyright 2015-2020 by the contributors VBATools
- Настройка среды Visual Basic Editor
- Вкладка Editor
- Вкладка Editor Format
- Вкладка General
- Вкладка Docking
- Advanced options
- Editing options
- Cut, Copy, and Paste
- Chart
- Display
- Display options for this workbook
- Display options for this worksheet
- Formulas
- When calculating this workbook
- General
- Lotus Compatibility
- Lotus Compatibility Settings for
Добро пожаловать в пошаговое руководство надстройки — Excel Tools VBA
Excel Tools VBA — надстройка автоматизации рутинных и монотонных операций в MS Excel
Авторские права 2015-2020 от авторов VBATools
Эта программа является свободным программным обеспечением.
Вы можете распространять его и / или изменять в соответствии с условиями GNU General Public License, опубликованной фондом свободного программного обеспечения (Free Software Foundation)
Эта программа распространяется в надежде, что она будет полезна, но без каких-либо гарантий. Даже без подразумеваемой гарантии товарного состояния или пригодности для определенной цели. См. GNU General Public License для более подробной информации.
С Уважением VBATools.ru
Excel Tools VBA-add-in for automating routine and monotonous operations in MS Excel
Copyright 2015-2020 by the contributors VBATools
This program is free software.
You can redistribute it and/or modify it under the terms of the GNU General Public License as published by the (Free Software Foundation)
This program is distributed in the hope that it will be useful, but WITHOUT ANY WARRANTY. Without even the implied warranty of MERCHANTABILITY or FITNESS FOR A PARTICULAR PURPOSE. See the GNU General Public License for more details.
Источник
Настройка среды Visual Basic Editor
В процессе программирования на VBA в Excel вы будете проводить много времени, работая в окнах VBE. Чтобы сделать редактор более удобным, вам понадобится настройка среды Visual Basic Editor под ваши предпочтения.[1] Находясь в Excel, перейдите в окно VBE, например, нажав Alt+F11. В строке меню окна VBE выберите команду Tools –> Options. Появится диалоговое окно Options (Параметры) с четырьмя вкладками: Editor (Редактор), Editor Format (Формат редактора), General (Общие) и Docking (Прикрепление). Кстати, не путайте это окно с диалоговым окном Параметры Excel программы Excel, которое можно открыть в Excel с помощью команды Файл –> Параметры Excel.

Рис. 1. Вкладка Editor диалогового окна VBE Options (Параметры)
Скачать заметку в формате Word или pdf
Вкладка Editor
На рис. 1 показаны параметры, доступ к которым можно получить, щелкнув на вкладке Editor (Редактор).
Настройка Auto Syntax Check (Автоматическая проверка синтаксиса) определяет, будет ли появляться диалоговое окно, когда VBE обнаружит синтаксическую ошибку в коде VBA. В этом диалоговом окне указывается тип допущенной ошибки. Если отменить установку этого флажка, то VBE выделит синтаксические ошибки, отобразив соответствующие фрагменты кода другим цветом, и вам не придется работать в диалоговых окнах, которые появляются на экране. Начинающим программистам рекомендуется установить эту опцию.
При установленном параметре Require Variable Declaration (Обязательное декларирование переменных) VBE вставляет в начале каждого нового модуля оператор Option Explicit. Если в модуле задан этот оператор, то вы должны явно определить каждую используемую в нем переменную. Таким образом, у вас вырабатывается хорошая привычка, которая, правда, требует дополнительных усилий. Если вы не объявляете переменные, все они имеют тип данных Variant; это достаточно гибко, но неэффективно с точки зрения использования аппаратных ресурсов и скорости выполнения кода. Имейте ввиду, что изменение параметра Require Variable Declaration влияет на новые модули, а не на существующие.
Если выбрана опция Auto List Members (Автоматическая вставка объектов), VBE предоставляет помощь при вводе кода VBA, отображая список элементов текущего объекта. К этим элементам относятся методы и свойства объекта, название которого вводится вручную. Данный параметр весьма полезен, поэтому его рекомендуется всегда активизировать. На рис. 2 показан пример использования этого параметра – VBE отображает список элементов объекта Application. Можете выбрать элемент из списка, чтобы не вводить его с помощью клавиатуры (в результате название элемента будет введено без ошибок).

Рис. 2. Автоматическая вставка объектов при ручном вводе кода
Если включен параметр Auto Quick Info (Отображать краткие сведения), VBE будет отображать информацию об аргументах функций, свойств и методов, названия которых вы вводите с клавиатуры. Рекомендуется всегда оставлять эту настройку включенной. На рис. 3 отображается синтаксис свойства Cells.

Рис. 3. Автоматическое отображение кратких сведений о синтаксисе
Если включен параметр Auto Data Tips, VBE отображает при отладке кода значение переменной, над которой находится указатель мыши. Рекомендуется всегда держать его включенным.
Настройка Auto Indent (Автоматический отступ) определяет, располагает ли автоматически VBE каждую новую строку программы с тем же отступом, который задан для предыдущей строки. Тем, кто использует отступы в программных кодах, советуем всегда обращаться к этому параметру. Вы можете также задать количество символов в отступе (по умолчанию указано значение 4). Используйте клавишу , а не пробел, чтобы задать отступ в коде. При использовании клавиши отступы получаются более «правильными». Кроме того, для отмены отступа в конкретной строке воспользуйтесь комбинацией клавиш . Она может применяться при выделении нескольких строк.
При выборе параметра Drag-and-Drop Text Editing (Включить редактирование перетаскиванием) вы можете копировать и перемещать текст, перетаскивая его с помощью мыши. Если вы любите такой метод работы, оставьте этот параметр включенным. Я никогда не пользуюсь функцией перетаскивания, так как предпочитаю для копирования и вставки обращаться к комбинациям клавиш.
Параметр Default to Full Module View (По умолчанию использовать полный режим просмотра) определяет принцип просмотра процедуры. Если он включен, процедуры в окне кода помещаются в одно окно с полосой прокрутки. Если же он отключен, то вы можете просмотреть в определенный момент только одну процедуру. Рекомендуем активизировать этот параметр.
Когда параметр Procedure Separator (Разделение процедур) включен, в конце каждой процедуры в окне кода отображаются специальные разделители. Если вам нравятся эти визуальные подсказки окончания процедуры, выставляйте данный флажок.
Вкладка Editor Format
Параметры на этой вкладке определяют формат шрифта кода в VBE и некоторые иные свойства (рис. 4).

Рис. 4. Вкладка Editor Format в диалоговом окне Options
Параметр Code Colors (Цвета кода). Предоставляет возможность выбрать цвета кода (текста и фона) и индикатора, который используется для выделения разных элементов программы VBA. Цвета, конечно, выбираются в зависимости от личных предпочтений. Вы можете согласиться с цветами, принятыми по умолчанию. Для разнообразия можете изменить эти настройки.
Параметр Font (Шрифт). Предоставляет возможность указать шрифт, используемый в модулях VBA. Наибольшая эффективность достигается при работе с моноширинным шрифтом (например, Courier New). В таком шрифте все символы имеют одинаковую ширину, что делает программу более удобной для восприятия и анализа, так как все символы одинаково выровнены; кроме того, хорошо видны пробелы между словами.
Список Size (Размер). Определяет размер шрифта кода модулей VBA. Эта настройка зависит от личных предпочтений, которые, в свою очередь, определяются разрешением монитора и вашим зрением. По умолчанию размер задан равным 10.
Параметр Margin Indicator Ваг (Полоса индикатора границы). Отображает вертикальную полосу вдоль левой границы окна кода, на которой высвечиваются всевозможные индикаторы. Его необходимо выставить; в противном случае вы не увидите полезные графические извещения при отладке кода.
Вкладка General
На рис. 5 показаны параметры, доступные на вкладке General (Общие) диалогового окна Options.

Рис. 5. Вкладка General в диалоговом окне Options
Раздел Form Grid Settings (Параметры сетки формы). Находящиеся в этом разделе параметры предназначены для настройки пользовательских диалоговых окон; с их помощью определяются параметры сетки, которая облегчает позиционирование элементов управления в окне UserForm.
Флажок Show ToolTips (Показать подсказки). Определяет поведение кнопок панели инструментов. Рекомендуется всегда его устанавливать.
Флажок Collapse Proj. Hides Windows (Скрывать окна при сворачивании проектов). Установка этого флажка приведет к автоматическому закрытию окон в случае сворачивания проекта в окне Project. Рекомендуется установить этот флажок.
Раздел Edit and Continue (Редактировать и продолжать). Содержит единственный флажок, который может оказаться полезным в процессе отладки. В случае установки этого флажка VBA отображает сообщение, если переменные теряют присвоенные им значения в результате появления каких-либо проблем.
Раздел Error Trapping (Перехват ошибок). Находящиеся в этом разделе параметры определяют, что происходит при возникновении ошибки. Если вы создаете процедуры обработки ошибок, убедитесь в том, что установлен переключатель Break on Unhandled Errors (Остановка при возникновении неисправимой ошибки). При заданном параметре Break on All Errors (Остановка при возникновении любой ошибки) процедуры обработки ошибок игнорируются (вряд ли это нужно).
Раздел Compile (Компиляция). Находящиеся в этом разделе два параметра управляют процессом компиляции кода. Рекомендуется установить оба этих параметра. На современных компьютерах компиляция кода происходит практически мгновенно, если его размеры сравнительно невелики.
Вкладка Docking
На рис. 6 показана вкладка Docking (Прикрепление) диалогового окна Options. Ее параметры определяют поведение нескольких окон редактора VBE. На вкладке отображаются окна, которые могут быть прикреплены. Когда окно прикреплено, оно фиксируется по отношению к одной из границ окна VBE. В результате намного легче найти вспомогательное окно, так как оно отображается в строго определенной области. Если вы отключите все параметры прикрепления, то окна перемешаются между собой, а это усложнит работу. Как правило, идеальным выбором будут настройки по умолчанию.

Рис. 6. Вкладка Docking диалогового окна Options
Для прикрепления окна просто перетащите его в новое место. Например, вам может понадобиться присоединить окно Project Explorer к левой границе окна. Захватите его за заголовок и переместите влево. Отпустите кнопку мыши в момент, когда окно прилипнет к левому краю экрана. Прикрепление окна в VBE всегда было основной проблемой при настройке рабочей среды, однако после многочисленных попыток вам, будем надеяться, все же удастся решить эту задачу.
[1] По материалам книги Джон Уокенбах. Excel 2010. Профессиональное программирование на VBA. – М: Диалектика, 2013. – С. 177–183.
Источник
Advanced options
Editing options
After pressing Enter, move selection Makes an adjacent cell the next active cell after you press ENTER in the current active cell. In the Direction box, indicate which adjacent cell becomes active.
Direction Makes an adjacent cell the next active cell after you press ENTER in the current active cell. In the Direction box, indicate which adjacent cell becomes active.
Automatically insert a decimal point Select this check box to display a number with decimal points by default.
Places Enter the number of decimal places in the Places box to indicate where Microsoft Office Excel automatically places the decimal point in the numbers that you type as constants on a worksheet. A positive number moves the decimal point to the left; a negative number moves the decimal point to the right. If the Places box is left blank or is set to 0 (zero), you need to enter the decimal point manually. To override this option, type a decimal point in the cell when you type the number.
Enable fill handle and cell drag-and-drop Select this check box to move and to copy cells and data by dragging. When this option is selected, you can also drag the fill handle to copy data and to fill adjacent cells with a series of data.
Alert before overwriting cells Displays a message if you drop cells over other cells that contain data.
Allow editing directly in cells Select this check box to enable editing inside a cell by double-clicking the cell, rather than by editing the cell contents in the formula bar.
Extend data range formats and formulas Select to automatically format new items added to the end of a list to match the format of the rest of the list. Formulas that are repeated in every row are also copied. To be extended, formats and formulas must appear in at least three of the five last rows preceding the new row.
Enable automatic percent entry Select to multiply by 100 all of the numbers less than 1 that you enter in cells that are formatted in the Percentage format. Clear this check box to multiply by 100 all of the numbers that you enter in cells that are formatted in the Percentage format, including numbers equal to or greater than 1.
Enable AutoComplete for cell values Completes text entries that you start to type in a column of data. If the first few letters that you type match an existing entry in that column, Excel fills in the remaining text for you.
Zoom on roll with IntelliMouse If you have the Microsoft IntelliMouse pointing device, sets the wheel button to zoom instead of scroll on your worksheet or chart sheet.
Alert the user when a potentially time consuming operation occurs Select if you want to be notified when an operation affects a large number of cells and may take a long time to process.
When this number of cells (in thousands) is affected Lets you specify the maximum number of cells that are affected by an operation without being notified. If more cells than the maximum number of cells are affected, you are notified.
Use system separators Select to use the default Decimal and Thousands separators. Clear to enter alternate separators.
Decimal separator To change the default decimal separator, clear Use system separators, select the default separator in the Decimal separator box, and then type the separator that you want to use.
Thousands separator To change the default thousands separator, clear Use system separators, select the default separator in the Thousands separator box, and then type the separator that you want to use.
Cut, Copy, and Paste
Show Paste Options buttons Select to have Excel automatically display a dialog box with special options when you paste, such as Formatting Only and Link Cells.
Show Insert Options buttons Select to have Excel automatically display a dialog box with special options when you insert cells, rows or columns, such as Formatting Same As Above and Clear Formatting.
Cut, copy, and sort inserted objects with their parent cells Keeps graphic objects, buttons, text boxes, drawn objects, and pictures with their associated cells whenever you cut, copy, filter, or sort on a worksheet.
Chart
Show chart element names on hover Displays the name of a chart element when you rest the pointer over it.
Show data point values on hover Displays the value of a data point when you rest the pointer over it.
Properties follow chart data point for all new workbooks Select this option to have formatting and data labels follow data points when they move or change, for all new workbooks you create.
Current workbook Choose an open workbook to use with the next setting ( Properties follow chart data point for current workbook)
Properties follow chart data point for current workbook Select this option to have formatting and data labels follow data points when they move or change, for the workbook shown under the previous setting, Current workbook.
Display
Show this number of Recent Workbooks A list of recently used workbooks is displayed under Recent in the Backstage, allowing you to reopen those workbooks quickly. Enter the number of workbooks that you want to display in the Show this number of Recent Workbooks box. Enter or select a positive number between 0 and 50.
Quickly access this number of Recent Workbooks When checked, a list of files is displayed at the bottom of the File tab, under Options. Set the number of files to display by changing the number to the right.
Show this number of unpinned Recent Folders A list of recently accessed folders is displayed under Recent in the Backstage, allowing you to reopen those folders quickly. Enter the number of workbooks that you want to display in the Show this number of unpinned Recent Folders box. Enter or select a positive number between 0 and 50.
Ruler units Lets you select the units that you want to display on the Layout view ruler.
Show formula bar Displays the formula bar. The formula bar appears at the top of the worksheet.
Show function ScreenTips Displays brief descriptions of the functions that you select in the list of functions that is displayed when Formula AutoComplete is turned on.
For cells with comments, show Select one of the following options to determine how notes and comments are displayed on the worksheet.
No comments or indicators If you have cells that contain notes or comments, this setting hides the small indicator in the upper-right corner of the cells.
Indicators only, and comments on hover If you have cells that contain notes or comments, this setting shows the small indicator in the upper-right corner of the cells. This setting also enables you to display notes or comments by hovering over cells.
Comments and indicators If you have cells that contain notes or comments, this setting shows the small indicator in the upper-right corner of the cells. If a cell contains a note, Excel will show keep the note shown. If a cell contains a comment, the comment stays hidden until you hover over the cell.
Default direction chooses the flow direction for the workbook canvas. You must reopen any existing workbooks for this change to take effect.
Right-to-left places cell A1 at the top right of the view, with sheet tabs aligned to the right side of the window. Cell-specific controls appear on the left side of cells.
Left-to-right places cell A1 at the top left of the view, with the sheet tabs aligned to the left side of the window. Cell-specific controls appear on the right side of cells.
Display options for this workbook
Display options for this workbook Select the workbook in this list box that is affected by the following options.
Show horizontal scroll bar Displays the horizontal scroll bar at the bottom of the worksheet.
Show vertical scroll bar Displays the vertical scroll bar on the right side of the worksheet (when you are using left-to-right language mode) or on the left side (when you are using right-to-left language mode).
Show sheet tabs Displays worksheet tabs so that you can move among and select individual worksheets. Worksheet tabs appear at the bottom of the worksheet window.
Group dates in the AutoFilter menu Changes the hierarchical grouping of dates to a nonhierarchical list of dates in the list of dates at the bottom of the AutoFilter menu in a date filter. For example, you can filter for just two-digit years by manually selecting two-digit years from a nonhierarchical list.
For objects, show Select one of the following options to display or hide graphic objects in the workbook.
All Displays all of the graphic objects, buttons, text boxes, drawn objects, and pictures.
Nothing (hide objects) Hides all of the graphic objects, buttons, text boxes, drawn objects, and pictures. Hidden objects are not printed.
Display options for this worksheet
Display options for this worksheet Select the worksheet in this list box that is affected by the following options.
Show row and column headers Displays row numbers on the left side (when you are using left-to-right language mode) or on the right side (when you are using right-to-left language mode) of the worksheet and column letters at the top of the worksheet.
Show formulas in cells instead of their calculated results Displays the formulas in cells instead of the values that the formulas produce.
Show page breaks Displays page breaks that have been set automatically by Excel.
Show a zero in cells that have zero value Displays a 0 (zero) in cells that contain zero values.
Show outline symbols if an outline is applied Displays outline symbols. Outline symbols are not displayed unless the worksheet contains an outline.
Show gridlines Displays cell gridlines. To print gridlines, make sure that the Print check box is selected under Gridlines in the Sheet Options group on the Page Layout tab.
Gridline color Sets the color for gridlines. If you click Automatic, the gridline color is based on the text color defined in Windows Control Panel.
Formulas
Enable multi-threaded calculation Selected by default, this option enables fast calculation by using multiple processors. Please note that Excel only supports using up to 64 processor cores.
Number of calculation threads Lets you specify the number of processors that are used for calculation.
Use all processors on this computer Selected by default, this option uses all of the processors that are available on your computer.
Manual Lets you specify the number of processors that you want to use. In the Manual box, enter a positive number between 1 and 1024.
When calculating this workbook
When calculating this workbook Select the workbook in this list box that is affected by the following options.
Update links to other documents Calculates and updates formulas that include references to other applications.
Set precision as displayed Permanently changes stored values in cells from full precision (15 digits) to whatever format is displayed, including decimal places.
Use 1904 date system Changes the starting date from which all dates are calculated from January 1, 1900, to January 2, 1904.
Save external link values Saves copies of the values contained in an external document linked to an Excel worksheet. If a worksheet with links to large ranges on an external document requires an unusually large amount of disk space or takes a very long time to open, clearing the Save external link values check box can reduce the disk space and time that is needed to open the worksheet.
General
Ignore other applications that use Dynamic Data Exchange (DDE) Prevents the exchange of data with other applications that use Dynamic Data Exchange (DDE).
Ask to update automatic links Displays a message that lets you confirm before linked items are updated.
Show add-in user interface errors Displays errors in the user-interface of add-ins that you install and use.
Scale content for A4 or 8.5 x 11″ paper sizes For some countries or regions, the standard paper size is Letter; for others, the standard size is A4. Select this check box if you want Excel to automatically adjust documents formatted for the standard paper size of another country or region (for example, A4) so that they print correctly on the standard paper size for your country or region (for example, Letter). This option affects the printout only. It does not affect the formatting in your document.
At startup, open all files in At startup, Excel automatically opens files from the folder that you type in this text box. Type the full path to the folder in the text box to indicate the location of the files.
Web Options Sets options for how Excel data looks and responds when the data is viewed in a Web browser.
Lotus Compatibility
Microsoft Office Excel menu key Sets the key that you can use to access the commands on the Ribbon, a component of the Microsoft Office Fluent user interface.
Transition navigation keys Activates an alternate set of keys for worksheet navigation, formula entry, label entry, and other actions.
Lotus Compatibility Settings for
Lotus Compatibility Settings for Select the worksheet in this list box that is affected by the following options.
Transition formula evaluation Opens and evaluates Lotus 1-2-3 files without losing or changing information. When this option is selected, Excel evaluates text strings as 0 (zero), Boolean expressions as 0 or 1, and database criteria according to the rules that are used in Lotus 1-2-3.
Transition formula entry Converts formulas that are entered in Lotus 1-2-3 release 2.2 syntax to Excel syntax, and makes names that are defined in Excel behave like names that are defined in Lotus 1-2-3.
Источник
Excel Tools VBA – надстройка автоматизации рутинных и монотонных операций в MS Excel
Авторские права 2015-2020 от авторов VBATools
Эта программа является свободным программным обеспечением.
Вы можете распространять его и / или изменять в соответствии с условиями GNU General Public License, опубликованной фондом свободного программного обеспечения (Free Software Foundation)
Эта программа распространяется в надежде, что она будет полезна, но без каких-либо гарантий. Даже без подразумеваемой гарантии товарного состояния или пригодности для определенной цели. См. GNU General Public License для более подробной информации.
С Уважением VBATools.ru
Excel Tools VBA-add-in for automating routine and monotonous operations in MS Excel
Copyright 2015-2020 by the contributors VBATools
This program is free software.
You can redistribute it and/or modify it under the terms of the GNU General Public License as published by the (Free Software Foundation)
This program is distributed in the hope that it will be useful, but WITHOUT ANY WARRANTY. Without even the implied warranty of MERCHANTABILITY or FITNESS FOR A PARTICULAR PURPOSE. See the GNU General Public License for more details.
With Respect VBATools.ru
Workspace organization with the help of changing settings and options in Excel.
Custom managing of tools for comfortable work in the program
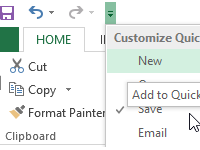 Quick Access Toolbar in Excel.
Frequently used tools are better placed to get to obese quickly. There are the functions and settings for the Quick Access Toolbar.
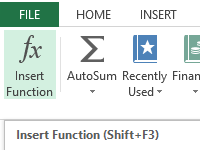 The toolbars on the strip.
There are practical exercises for managing toolbars on the each tab of the strip.
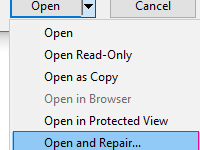 How to repair corrupt or unsaved Excel file.
You can restore corrupted files yourself using MS Office or a computer. This task is solved in various ways: retrieving data, moving the book.
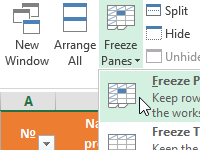 How to fix a row and column in Excel when scrolling.
The tool to anchor the area allows you to lock the table header, column, and several rows and columns at the same time when you scroll horizontally or vertically.
There is no one size that fits all. When it comes to Excel, the default settings work fine in most of the cases. But if need be, you can easily customize many of the Excel Options.
In this blog post, I will show you how to use Excel Options to customize your workbooks and get a better spreadsheet experience.
Accessing Excel Options
To open the Excel Options dialog box:
In Excel 2010/13: Go to File –> Options.
In Excel 2007: Go to Menus –> Tools –> Excel Options.

Don’t be overwhelmed with all the categories and checkboxes in the Excel Options dialog box. You do not need to change everything, and in most cases, default setting works just fine. But here are some of the features that can give you more control on the way your Excel spreadsheets behave.
#1 Change the Default Font Type and Size
By default, Excel uses Calibri (body font) font size 11. If you or your organization is using a different font type and size, you can change the default by following these steps:
- In Excel Options, select General.
- In General options, within ‘When creating new workbooks’ section, change the default font type and font size.

Now when you open a new workbook, it will use the new font setting by default.
#2 Always Save Files in .xls format
If you are sharing your excel workbooks with people who have 2003 version, you need to manually change the format to .xls. Instead of doing this manually every time, you can change the default file format Save setting.
Here are the steps to do this:
- In Excel Options, select Save.
- In Save options, within ‘Save workbooks’ section, change the Save File format to Excel 97-2003 Workbook.

You can also set the default to Excel Macro-Enabled Workbook if you work with macros.
Now whenever you save a workbook, it will get saved in .xls format.
#3 Change Calculation mode from Automatic to Manual
With automatic calculation, a recalculation is triggered whenever there is a change in a cell/value that affects formulas (more so with volatile formulas). With worksheets that are loaded with a lot of data and formulas, this recalculation can waste a lot of time (and most of the time it is unnecessary) and make our workbooks slow.
To save time, you can change the calculation setting to manual. To do this:
- In Excel Options, select Formulas.
- In Formulas options, change calculation options to Manual.

When manual mode is selected, you need to manually force a recalculation by pressing F9 key.
#4 Keep the active cell selected after pressing Enter
By default, if you select a cell and press enter, the selection goes down. In a lot of cases, you may want to keep the same cell selected after hitting Enter.
Here is how you can make this change:
- In Excel Options, select Advanced.
- In Editing Options, uncheck the option ‘After pressing Enter, move selection’.

TIP: You can also achieve the same effect by pressing Control + Enter (instead of Enter).
#5 Automatically Insert Decimal Points during Data Entry
If your work involves a lot of numeric data entry with decimals, this one would be mighty useful.
How it works – If you have to enter numeric values with 2 data points, instead of typing 123.45, you can simply type 12345, and Excel would automatically insert 2 decimal places.
Here is how you can enable this:
- In Excel Options, select Advanced.
- In Editing Options, select ‘Automatically insert a decimal point’ and specify the places.

Caution: Remember, every time you enter a number, it will have 2 decimal places. So if you need 1 as the value, you will have to type 100 (considering there are 2 decimal places).
#6 Show All Comments at Once
When you insert a comment, by default there is a small red triangle that appears at the top left of the cell. While this is a good enough indicator, you are likely to miss comments if you have a lot of data/comments.
One workaround could be to show all the comments at once.
To do this:
- In Excel Options, select Advanced.
- In the Display section, under the ‘For cells with comments, show:’ option, select Comments and Indicators.
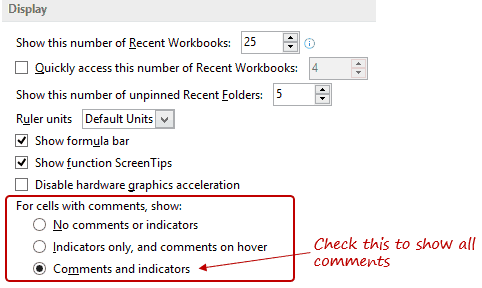
TIP: This would also be helpful if you are editing comments. Just click on the comment and edit it.
#7 Hide All 0’s
You can hide all the 0 values in your spreadsheet with one single click (you heard it right!).
Here is how to do this:
- In Excel Options, select Advanced.
- Scroll down and go to the section – ‘Display Options for this worksheet’.
- Uncheck ‘Show a zero in cells that have zero value’.

#8 Open Selected Workbooks Whenever You Start Excel
If you start your work with the same set of Excel workbooks (for example, to-do lists, project trackers, etc.), there is a way Excel will automatically open these workbooks whenever you start it. Here is how to do this:
- In Excel Options, select Advanced.
- Scroll Down and go to General section.
- In the field. ‘At startup, open all files in:’, enter the path of the folder that has the files that you want to open whenever you start Excel.

Note: You can add more files to the folder and it would automatically open when you open Excel next.
See Also: Excel Data Entry Tips.
#9 Automatically Complete Abbreviations
There is a feature in Excel where you can specify shorthand text and Excel will automatically complete it for you. For example, whenever you type ABC, Excel would automatically replace it with ABC Technology Corporation Limited. Something as shown below:
Here is how you can enable this:
- In Excel Options, select Proofing
- Click on AutoCorrect Options button

- In the AutoCorrect dialog box, type what you want to Replace (in Replace field) with what you want to replace it with (in With field)


- Click Add and then Ok
Now whenever you type ABC and hit enter (or space bar), it will automatically get replaced with ABC Technology Corporation Limited.
Note: this change takes place for all office applications such as word and PowerPoint).
There are tons of other features that can also be customized using Excel Options. If you get some free time, do go through it and you may find some additional options that you can use.
Give these options a try, let me know what you think. #5 and #9 are my favorites. How about you?
You May like the Following Excel Tutorials:
- 100+ Excel Interview Questions + Answers.
- 20 Excel Keyboard Shortcuts that will Impress Your Boss.
- A Collection FREE Excel Templates for Your Daily Use.
- 200+ Excel Keyboard Shortcuts
- Automatically Open Specific Excel Files on Startup
- How to Hide or Show Formula Bar in Excel?
- Using A1 or R1C1 Reference Notation in Excel (& How to Change These)
- How to Customize the Ribbon in Excel (Step-by-Step)
Editing options
After pressing Enter, move selection
Makes an adjacent cell the next active cell after you press ENTER in the current active cell. In the Direction box, indicate which adjacent cell becomes active.
Direction
Makes an adjacent cell the next active cell after you press ENTER in the current active cell. In the Direction box, indicate which adjacent cell becomes active.
Automatically insert a decimal point
Select this check box to display a number with decimal points by default.
-
Places
Enter the number of decimal places in the Places box to indicate where Microsoft Office Excel automatically places the decimal point in the numbers that you type as constants on a worksheet. A positive number moves the decimal point to the left; a negative number moves the decimal point to the right. If the Places box is left blank or is set to 0 (zero), you need to enter the decimal point manually. To override this option, type a decimal point in the cell when you type the number.
Enable fill handle and cell drag-and-drop
Select this check box to move and to copy cells and data by dragging. When this option is selected, you can also drag the fill handle to copy data and to fill adjacent cells with a series of data.
-
Alert before overwriting cells
Displays a message if you drop cells over other cells that contain data.
Allow editing directly in cells
Select this check box to enable editing inside a cell by double-clicking the cell, rather than by editing the cell contents in the formula bar.
Extend data range formats and formulas
Select to automatically format new items added to the end of a list to match the format of the rest of the list. Formulas that are repeated in every row are also copied. To be extended, formats and formulas must appear in at least three of the five last rows preceding the new row.
Enable automatic percent entry
Select to multiply by 100 all of the numbers less than 1 that you enter in cells that are formatted in the Percentage format. Clear this check box to multiply by 100 all of the numbers that you enter in cells that are formatted in the Percentage format, including numbers equal to or greater than 1.
Enable AutoComplete for cell values
Completes text entries that you start to type in a column of data. If the first few letters that you type match an existing entry in that column, Excel fills in the remaining text for you.
Zoom on roll with IntelliMouse
If you have the Microsoft IntelliMouse pointing device, sets the wheel button to zoom instead of scroll on your worksheet or chart sheet.
Alert the user when a potentially time consuming operation occurs
Select if you want to be notified when an operation affects a large number of cells and may take a long time to process.
-
When this number of cells (in thousands) is affected
Lets you specify the maximum number of cells that are affected by an operation without being notified. If more cells than the maximum number of cells are affected, you are notified. -
Use system separators
Select to use the default Decimal and Thousands separators. Clear to enter alternate separators.-
Decimal separator
To change the default decimal separator, clear Use system separators, select the default separator in the Decimal separator box, and then type the separator that you want to use. -
Thousands separator
To change the default thousands separator, clear Use system separators, select the default separator in the Thousands separator box, and then type the separator that you want to use.
-
Cut, Copy, and Paste
Show Paste Options buttons
Select to have Excel automatically display a dialog box with special options when you paste, such as Formatting Only and Link Cells.
Show Insert Options buttons
Select to have Excel automatically display a dialog box with special options when you insert cells, rows or columns, such as Formatting Same As Above and Clear Formatting.
Cut, copy, and sort inserted objects with their parent cells
Keeps graphic objects, buttons, text boxes, drawn objects, and pictures with their associated cells whenever you cut, copy, filter, or sort on a worksheet.
Chart
Show chart element names on hover
Displays the name of a chart element when you rest the pointer over it.
Show data point values on hover
Displays the value of a data point when you rest the pointer over it.
Properties follow chart data point for all new workbooks
Select this option to have formatting and data labels follow data points when they move or change, for all new workbooks you create.
Current workbook
Choose an open workbook to use with the next setting (Properties follow chart data point for current workbook)
Properties follow chart data point for current workbook
Select this option to have formatting and data labels follow data points when they move or change, for the workbook shown under the previous setting, Current workbook.
Display
Show this number of Recent Workbooks A list of recently used workbooks is displayed under Recent in the Backstage, allowing you to reopen those workbooks quickly. Enter the number of workbooks that you want to display in the Show this number of Recent Workbooks box. Enter or select a positive number between 0 and 50.
Quickly access this number of Recent Workbooks
When checked, a list of files is displayed at the bottom of the File tab, under Options. Set the number of files to display by changing the number to the right.
Show this number of unpinned Recent Folders
A list of recently accessed folders is displayed under Recent in the Backstage, allowing you to reopen those folders quickly. Enter the number of workbooks that you want to display in the Show this number of unpinned Recent Folders box. Enter or select a positive number between 0 and 50.
Ruler units
Lets you select the units that you want to display on the Layout view ruler.
Show formula bar
Displays the formula bar. The formula bar appears at the top of the worksheet.
Show function ScreenTips
Displays brief descriptions of the functions that you select in the list of functions that is displayed when Formula AutoComplete is turned on.
For cells with comments, show
Select one of the following options to determine how notes and comments are displayed on the worksheet.
-
No comments or indicators
If you have cells that contain notes or comments, this setting hides the small indicator in the upper-right corner of the cells. -
Indicators only, and comments on hover
If you have cells that contain notes or comments, this setting shows the small indicator in the upper-right corner of the cells. This setting also enables you to display notes or comments by hovering over cells. -
Comments and indicators
If you have cells that contain notes or comments, this setting shows the small indicator in the upper-right corner of the cells. If a cell contains a note, Excel will show keep the note shown. If a cell contains a comment, the comment stays hidden until you hover over the cell.
Default direction chooses the flow direction for the workbook canvas. You must reopen any existing workbooks for this change to take effect.
-
Right-to-left places cell A1 at the top right of the view, with sheet tabs aligned to the right side of the window. Cell-specific controls appear on the left side of cells.
-
Left-to-right places cell A1 at the top left of the view, with the sheet tabs aligned to the left side of the window. Cell-specific controls appear on the right side of cells.
Display options for this workbook
Display options for this workbook
Select the workbook in this list box that is affected by the following options.
Show horizontal scroll bar
Displays the horizontal scroll bar at the bottom of the worksheet.
Show vertical scroll bar
Displays the vertical scroll bar on the right side of the worksheet (when you are using left-to-right language mode) or on the left side (when you are using right-to-left language mode).
Show sheet tabs
Displays worksheet tabs so that you can move among and select individual worksheets. Worksheet tabs appear at the bottom of the worksheet window.
Group dates in the AutoFilter menu
Changes the hierarchical grouping of dates to a nonhierarchical list of dates in the list of dates at the bottom of the AutoFilter menu in a date filter. For example, you can filter for just two-digit years by manually selecting two-digit years from a nonhierarchical list.
For objects, show
Select one of the following options to display or hide graphic objects in the workbook.
-
All
Displays all of the graphic objects, buttons, text boxes, drawn objects, and pictures. -
Nothing (hide objects)
Hides all of the graphic objects, buttons, text boxes, drawn objects, and pictures. Hidden objects are not printed.
Display options for this worksheet
Display options for this worksheet Select the worksheet in this list box that is affected by the following options.
Show row and column headers
Displays row numbers on the left side (when you are using left-to-right language mode) or on the right side (when you are using right-to-left language mode) of the worksheet and column letters at the top of the worksheet.
Show formulas in cells instead of their calculated results
Displays the formulas in cells instead of the values that the formulas produce.
Show page breaks
Displays page breaks that have been set automatically by Excel.
Show a zero in cells that have zero value
Displays a 0 (zero) in cells that contain zero values.
Show outline symbols if an outline is applied
Displays outline symbols. Outline symbols are not displayed unless the worksheet contains an outline.
Show gridlines
Displays cell gridlines. To print gridlines, make sure that the Print check box is selected under Gridlines in the Sheet Options group on the Page Layout tab.
-
Gridline color
Sets the color for gridlines. If you click Automatic, the gridline color is based on the text color defined in Windows Control Panel.
Formulas
Enable multi-threaded calculation
Selected by default, this option enables fast calculation by using multiple processors. Please note that Excel only supports using up to 64 processor cores.
Number of calculation threads
Lets you specify the number of processors that are used for calculation.
-
Use all processors on this computer
Selected by default, this option uses all of the processors that are available on your computer. -
Manual
Lets you specify the number of processors that you want to use. In the Manual box, enter a positive number between 1 and 1024.
When calculating this workbook
When calculating this workbook Select the workbook in this list box that is affected by the following options.
Update links to other documents
Calculates and updates formulas that include references to other applications.
Set precision as displayed
Permanently changes stored values in cells from full precision (15 digits) to whatever format is displayed, including decimal places.
Use 1904 date system
Changes the starting date from which all dates are calculated from January 1, 1900, to January 2, 1904.
Save external link values
Saves copies of the values contained in an external document linked to an Excel worksheet. If a worksheet with links to large ranges on an external document requires an unusually large amount of disk space or takes a very long time to open, clearing the Save external link values check box can reduce the disk space and time that is needed to open the worksheet.
General
Ignore other applications that use Dynamic Data Exchange (DDE)
Prevents the exchange of data with other applications that use Dynamic Data Exchange (DDE).
Ask to update automatic links
Displays a message that lets you confirm before linked items are updated.
Show add-in user interface errors
Displays errors in the user-interface of add-ins that you install and use.
Scale content for A4 or 8.5 x 11″ paper sizes
For some countries or regions, the standard paper size is Letter; for others, the standard size is A4. Select this check box if you want Excel to automatically adjust documents formatted for the standard paper size of another country or region (for example, A4) so that they print correctly on the standard paper size for your country or region (for example, Letter). This option affects the printout only. It does not affect the formatting in your document.
At startup, open all files in
At startup, Excel automatically opens files from the folder that you type in this text box. Type the full path to the folder in the text box to indicate the location of the files.
Web Options
Sets options for how Excel data looks and responds when the data is viewed in a Web browser.
Lotus Compatibility
Microsoft Office Excel menu key
Sets the key that you can use to access the commands on the Ribbon, a component of the Microsoft Office Fluent user interface.
Transition navigation keys
Activates an alternate set of keys for worksheet navigation, formula entry, label entry, and other actions.
Lotus Compatibility Settings for
Lotus Compatibility Settings for
Select the worksheet in this list box that is affected by the following options.
Transition formula evaluation
Opens and evaluates Lotus 1-2-3 files without losing or changing information. When this option is selected, Excel evaluates text strings as 0 (zero), Boolean expressions as 0 or 1, and database criteria according to the rules that are used in Lotus 1-2-3.
Transition formula entry
Converts formulas that are entered in Lotus 1-2-3 release 2.2 syntax to Excel syntax, and makes names that are defined in Excel behave like names that are defined in Lotus 1-2-3.