
In VBA, we can open or read or write a text file. To write a text file means the data we have in an Excel sheet, and we want it to be a text file or a notepad file. Therefore, there are two methods: the FileSystemObject property of VBA and the Open and Write method in VBA.
In most corporate companies, once finalizing the report, they look to upload the report to the database. They use the “Text Files” format to update the database to upload to the database. We usually copy the data from Excel and paste it into a text file. We rely on text files because they are very easy to work with because of their lightweight and simpler ways. By using VBA codingVBA code refers to a set of instructions written by the user in the Visual Basic Applications programming language on a Visual Basic Editor (VBE) to perform a specific task.read more, we can automate the task of copying data from an Excel file to a text file. This article will show you how to copy or write data from an Excel file to a text file using VBA code.
Table of contents
- Excel VBA Write Text File
- How to Write Data to Text Files using VBA?
- Syntax of Open Text File
- Example #1
- Step 1: Declare Variable
- Step 2: Determine File Number
- Step 3: Assign File Path
- Step 4: Assign Free File Function
- Step 5: Open Text File
- Step 6: Use the Print/Write Method
- Step 7: Save and Close Text File
- Example #2
- Recommended Articles
- How to Write Data to Text Files using VBA?
How to Write Data to Text Files using VBA?
Writing data from Excel to text is complex and requires very good knowledge of VBA coding. Follow the below steps to write the VBA code to copy dataFile Copy is an inbuilt VBA function that is used to copy a file from one location to another. To use this function, we must specify the current file path as well as the destination file path. read more from Excel to a text file.
Before we show you how to write the code, let me explain how to open the text file using an open statement.
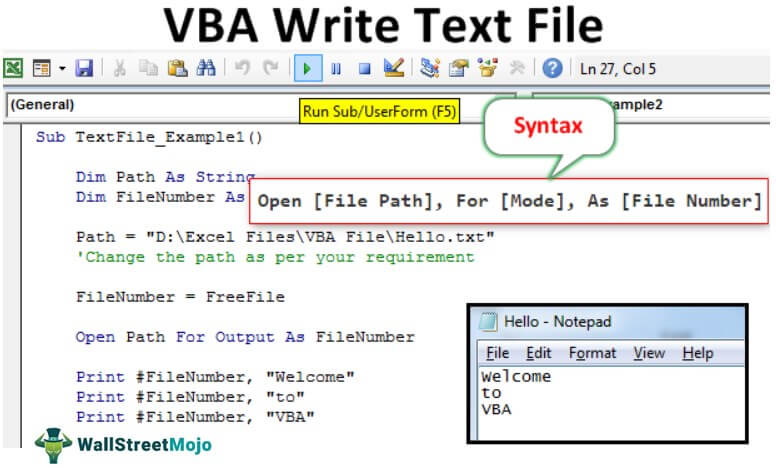
Syntax of Open Text File
Open [File Path], For [Mode], As [File Number]
File Path: The path of the file we are trying to open on the computer.
Mode: Mode is the control we can have over opening text files. We can have three types of control over the text file.
- Input Mode: This suggests “Read-only” control of the opening text file. If we use “Input Mode,” we cannot do anything with the file. Instead, we can just read the contents of the text file.
- Output Mode: We can write the content on this option. We need to remember that it will overwrite all the existing data. So, we must be wary of the possible loss of old data.
- Append Mode: This mode is completely the opposite of the Output Mode. Using this method, we can write the new data at the end of the existing data in the file.
File Number: This will count the text file number of all the opened text files. It will recognize the opened file numbers in integer values from 1 to 511. However, assigning the file number is tricky and leads to confusion. For this, we can use the free File function.
Free File returns the unique number for the opened files. This way, we can assign the unique file number without duplicate values.
You can download this VBA Write Text File Template here – VBA Write Text File Template
Example #1
Follow the below steps to write the code to create a new text file.
Assume you already have a text file named “Hello.txt” in your computer storage, and we will show you how to write the data in it.
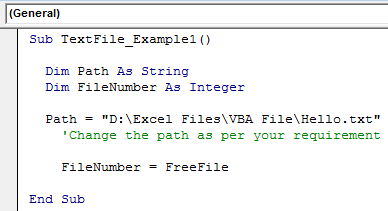
Step 1: Declare Variable
Declare the variable to hold the file path as String.
Code:
Sub TextFile_Example1()

  Dim Path As String

End Sub

Step 2: Determine File Number
To determine which file number we refer to, declare one more variable as IntegerIn VBA, an integer is a data type that may be assigned to any variable and used to hold integer values. In VBA, the bracket for the maximum number of integer variables that can be kept is similar to that in other languages. Using the DIM statement, any variable can be defined as an integer variable.read more.
Code:
Sub TextFile_Example1()

  Dim Path As String
  Dim FileNumber As Integer

End Sub

Step 3: Assign File Path
Now, assign the file path with a name for the Path variable.
Code:
Sub TextFile_Example1()

  Dim Path As String
  Dim FileNumber As Integer

  Path = "D:Excel FilesVBA FileHello.txt"
     'Change the path as per your requirement

End Sub

Step 4: Assign Free File Function
Now, assign the function “Free File” to store unique file numbers for the File Number variable.
Code:
Sub TextFile_Example1()

  Dim Path As String
  Dim FileNumber As Integer

  Path = "D:Excel FilesVBA FileHello.txt"
    'Change the path as per your requirement

  FileNumber = FreeFile

End Sub
Step 5: Open Text File
Now, we need to open the text file to work with it. As we have explained, we need to use the OPEN statement to open the text file.

Step 6: Use the Print/Write Method
Once the file opens, we need to write something in it. We need either the “Write” or “Print” method to write in the text file.
Code:
Sub TextFile_Example1()

    Dim Path As String
    Dim FileNumber As Integer

    Path = "D:Excel FilesVBA FileHello.txt"
       'Change the path as per your requirement

    FileNumber = FreeFile

Open Path For Output As FileNumber

    Print #FileNumber, "Welcome"
    Print #FileNumber, "to"
    Print #FileNumber, "VBA"

End Sub
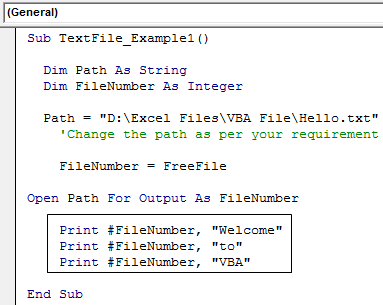
First, we need to mention the file number (here, we have assigned the file through the “FileNumber” variable), then we need to add the content we want to add to a text file.
Step 7: Save and Close Text File
Once we write the content in a text file, we need to save and close the text file.
Code:
Sub TextFile_Example1()

  Dim Path As String
  Dim FileNumber As Integer

  Path = "D:Excel FilesVBA FileHello.txt"
     'Change the path as per your requirement

   FileNumber = FreeFile

Open Path For Output As FileNumber

   Print #FileNumber, "Welcome"
   Print #FileNumber, "to"
   Print #FileNumber, "VBA"

   Close FileNumber

End Sub

Now, run the code manually or through the shortcut excel keyAn Excel shortcut is a technique of performing a manual task in a quicker way.read more F5. It will write the mentioned content in the mentioned text file.

Example #2
Now, we will see how to write the data of the Excel sheet into a text file.
For this example, we have created simple data in Excel like below.

Step 1: With the continuation of the old example, define two more variables as Integer to find the last row and last column.
Code:
Sub TextFile_Example2()

   Dim Path As String
   Dim FileNumber As Integer
   Dim LR As Integer
   Dim LC As Integer

End Sub

Step 2: Find the last used row and column in the worksheet.

Step 3: Now, assign the file path and file number.

Step 4: Use the OPEN statement to open the text file.

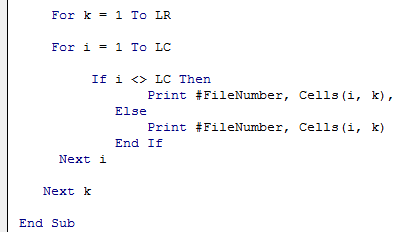
Step 5: We need to loop through rows and columns, so declare two more variables as Integer.

Step 6: Now, open the loop to loop through the row (For next loop in VBAAll programming languages make use of the VBA For Next loop. After the FOR statement, there is a criterion in this loop, and the code loops until the criteria are reached. read more)

Step 7: To loop through columns, open one more loop inside the existing loop.

Step 8: We need to write the same data line until it reaches the last column. So for this, apply the IF statement in VBA.
Step 9: Now, save and close the text file.

This code will write the details to a text file, but to open the text file after writing, we need to use the below code.

Code:
Sub TextFile_Example2()

    Dim Path As String
    Dim FileNumber As Integer
    Dim LR As Integer
    Dim LC As Integer

    Dim k As Integer
    Dim i As Integer

   LR = Worksheets("Text").Cells(Rows.Count, 1).End(xlUp).Row
   LC = Worksheets("Text").Cells(1, Columns.Count).End(xlToLeft).Column

   Path = "D:Excel FilesVBA FileHello.txt"
   FileNumber = FreeFile

   Open Path For Output As FileNumber

   For k = 1 To LR

       For i = 1 To LC
           If i <> LC Then
               Print #FileNumber, Cells(i, k),
           Else
              Print #FileNumber, Cells(i, k)
           End If
      Next i

   Next k

   Close FileNumber

   Shell "notepad.exe " & Path, vbNormalFocus

End Sub
So, run the code using the F5 key or manually. Then, it will copy the data below.

Recommended Articles
This article is a guide to VBA Write Text File. Here, we learn how to copy/write data from a worksheet to a text file with practical examples and a downloadable template. Below you can find some useful Excel VBA articles: –
- VBA Wait
- VBA FileDialog
- InStr VBA Function
I am looking to have my Macro save a new sheet that i created as a .txt file. this is the code i have so far.
Sub Move()
'
' Move Macro
'
' Keyboard Shortcut: Ctrl+m
'
Sheets("Sheet1").Select
Range("A1").Select
Range(Selection, Selection.End(xlToRight)).Select
Range(Selection, Selection.End(xlDown)).Select
Selection.Copy
Workbooks.Add
ActiveSheet.Paste

ActiveWorkbook.SaveAs Filename:="e:" & _
"HDR" + Format(Now(), "YYYYMMDDhhmmss") & ".txt"

End Sub
That includes my macro. I am having trouble with the last part where it saves as a .txt file.
I am currently getting a bunch of crap on my .txt file, here is an example,
«PK ! !}ñU{ Š [Content_Types].xml ¢( ÌTÝNÂ0¾7ñ–Þš€‰1†Á…⥒ˆPÚ3¶ÐµMOÁñöž•Ÿ¨».
Any help would be great.
asked Oct 1, 2014 at 21:32
![]()
2
Manually changing the extension of the file name does not actually change the file type. The SaveAs method takes a file type argument. The code you want is
ActiveWorkbook.SaveAs Filename:="e:" & "HDR" + Format(Now(), "YYYYMMDDhhmmss") _
& ".txt", FileFormat:= xlTextWindows
Doing a search from within Excel help for XlFileFormat will get you (almost) the full list of possible file formats, including 6 text formats, and 4 CSV formats.
![]()
answered Oct 1, 2014 at 21:41
![]()
DegustafDegustaf
2,6352 gold badges15 silver badges27 bronze badges
1
Adding txt to the name does not automatically encode the word document into plain text format.
Instead attempt
ActiveWorkbook.SaveAs Filename:="e:" & _
"HDR" + Format(Now(), "YYYYMMDDhhmmss") & ".txt", FileFormat:=wdFormatText, Encoding:=1252
answered Oct 1, 2014 at 21:42
![]()
AJYAJY
1882 silver badges12 bronze badges
1
The ActiveWorkbook.SaveAs method adds double quote to the beginning and end of every line in the file.
This method parses each line from a given range and transforms it into a CSV file:
Sub SaveSheetToCSVorTXT()
    Dim xFileName As Variant
    Dim rng As Range
    Dim DelimChar As String

    DelimChar = "," 'The delimitation character to be used in the saved file. This will be used to separate cells in the same row

    xFileName = Application.GetSaveAsFilename(ActiveSheet.Name, "CSV File (*.csv), *.csv, Text File (*.txt), *.txt")
    If xFileName = False Then Exit Sub

    If Dir(xFileName) <> "" Then
        If MsgBox("File '" & xFileName & "' already existe.  Overwrite?", vbYesNo + vbExclamation) <> vbYes Then Exit Sub
        Kill xFileName
    End If

    Open xFileName For Output As #1
    'Save range contents. Examples of ranges:
    'Set rng = Activesheet.Range("A1:D4")   'A rectangle between 2 cells
    'Set rng = Activesheet.columns(1)       'An entire column
    Set rng = ActiveSheet.Range("B14").CurrentRegion   'The "region" from a cell. This is the same as pressing CTRL+T on the selected cell

    For i = 1 To rng.Rows.Count
        For j = 1 To rng.Columns.Count
            lineText = IIf(j = 1, "", lineText & DelimChar) & rng.Cells(i, j)
        Next j
        Print #1, lineText
    Next i
    Close #1

    MsgBox "File saved!"
End Sub
answered Feb 28, 2020 at 22:30
![]()
cyberponkcyberponk
1,51617 silver badges19 bronze badges
Below we will look at a program in Excel VBA that writes an Excel range to a CSV (comma-separated-value) text file.
Situation:

Place a command button on your worksheet and add the following code lines:
1. First, we declare a variable called myFile of type String, an object called rng of type Range, a variable called cellValue of type Variant, a variable called i of type Integer, and a variable called j of type Integer. We use a Variant variable here because a Variant variable can hold any type of value.
Dim myFile As String, rng As Range, cellValue As Variant, i As Integer, j As Integer
2. We need to specify the full path and the filename of the file.
myFile = Application.DefaultFilePath & «sales.csv»
Note: the DefaultFilePath property returns the default file path. To change the default file location, on the File tab, click Options, Save.
3. We initialize the range object rng with the selected range.
Set rng = Selection
4. Add the following code line:
Open myFile For Output As #1
Note: this statement allows the file to be written to. We can refer to the file as #1 during the rest of our code. If the file already exists, it will be deleted and a new file with the same name will be created.
5. Start a Double Loop.
For i = 1 To rng.Rows.Count
For j = 1 To rng.Columns.Count
Note: rng.Rows.Count returns the number of rows (17 in this example) and rng.Columns.Count returns the number of columns (4 in this example).
6. Excel VBA writes the value of a cell to the variable cellValue.
cellValue = rng.Cells(i, j).Value
7. Add the following code lines to write the value of cellValue to the text file.
If j = rng.Columns.Count Then
Write #1, cellValue
Else
Write #1, cellValue,
End If
Explanation: due to the If Then Else statement, Excel VBA only starts a new line (Write #1, cellValue) when j equals the number of columns (last value in a row). To separate the values with a comma, use Write #1, cellValue, (with a comma).
8. Don’t forget to close both loops.
Next j
Next i
9. Close the file.
Close #1
10. Select the data and click the command button on the sheet.
Result:

This VBA Program reads an Excel Range (Sales Data) and write to a Text file (Sales.txt)
Excel VBA code to read data from an Excel file (Sales Data – Range “A1:E26”). Need two “For loop” for rows and columns. Write each value with a comma in the text file till the end of columns (write without comma only the last column value). Do the above step until reach the end of rows.
Sales Data in Excel: 5 columns and 25 rows
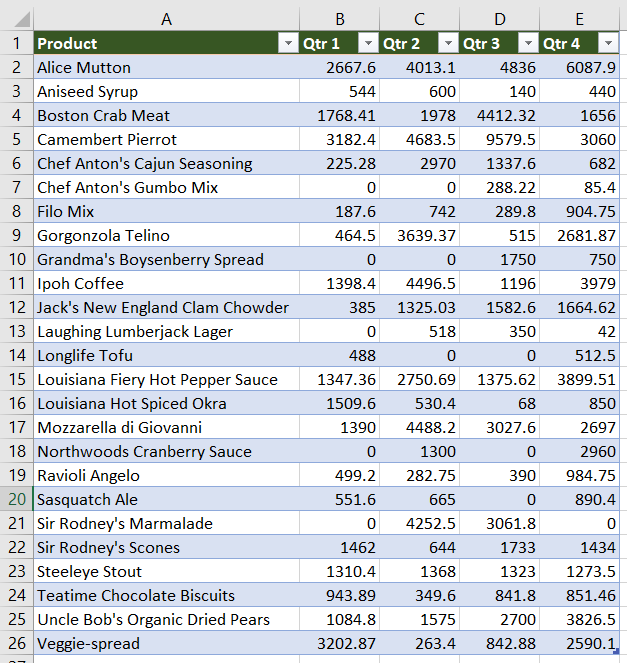
Sales Data
VBA code to create a text file as below
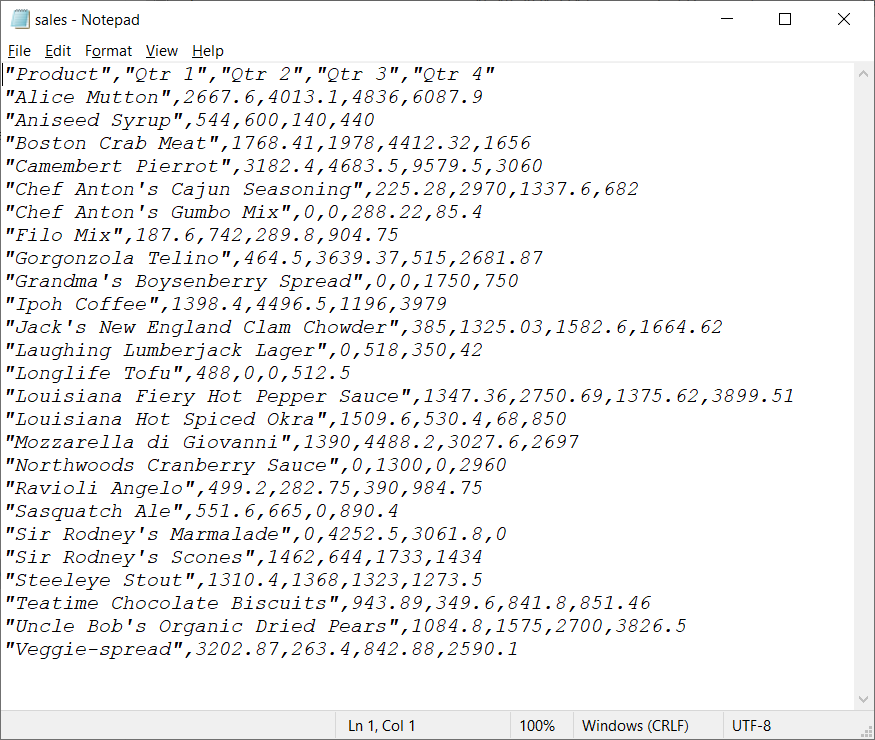
VBA Code:
- Declaring Variables :
| Variable | Data Type | Comments |
|---|---|---|
| myFileName | String | Output text file (Full path with file name) |
| rng | Range | Excel range to read |
| cellVal | Variant | Variable to assign each cell value |
| row | Integer | Iterate rows |
| col | Integer | Iterate columns |
'Variable declarations
Dim myFileName As String, rng As Range, cellVal As Variant, row As Integer, col As Integer
- Initialize variables:
- myFileName: The file name with the full path of the output text file
- rng: Excel range to read data from an excel.
'Full path of the text file
myFileName = "D:ExcelWriteTextsales.txt"
'Data range need to write on text file
Set rng = ActiveSheet.Range("A1:E26")
Open the output text file and assign a variable “#1”
'Open text file
Open myFileName For Output As #1
‘Nested loop to iterate both rows and columns of a given range eg: “A1:E26” [5 columns and 26 rows]
'Number of Rows
For row = 1 To rng.Rows.Count
   'Number of Columns
   For col = 1 To rng.Columns.Count
Assign the value to variable cellVal
cellVal = rng.Cells(row, col).Value
Write cellVal with comma. If the col is equal to the last column of a row. write-only value without the comma.
'write cellVal on text file
    If col = rng.Columns.Count Then
        Write #1, cellVal
    Else
        Write #1, cellVal,
    End If
Close both for loops
   Next col
Next row
Close the file
Close #1
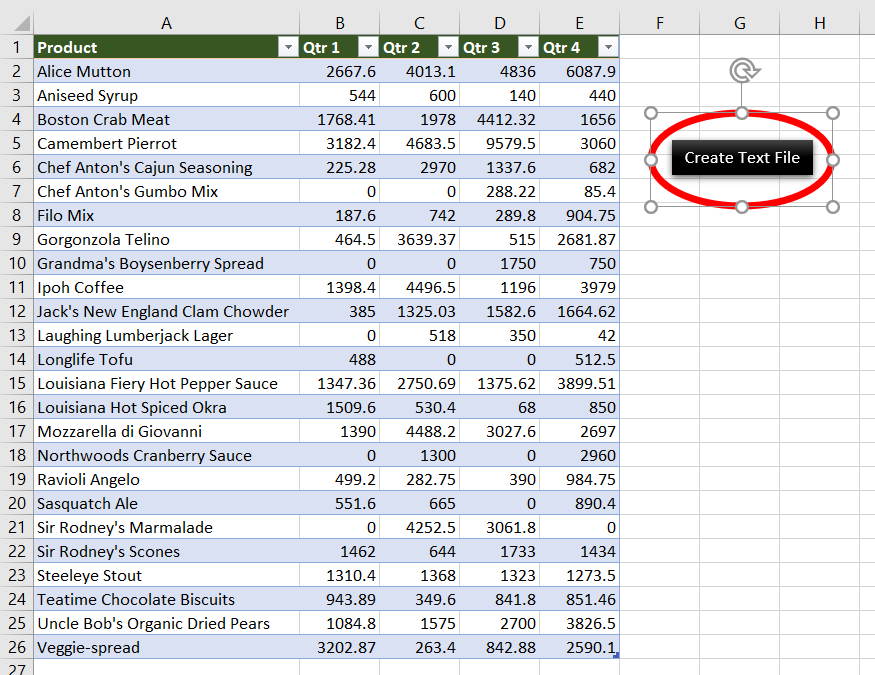
Approach:
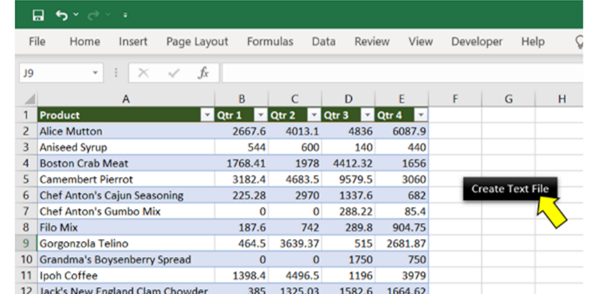
Step 1: Add a shape (Create Text File) to your worksheet
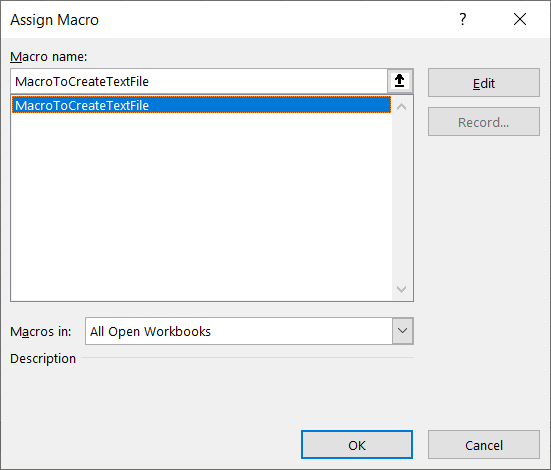
Step 2: Right-click on “Create a Text file” and “Assign Macro..”
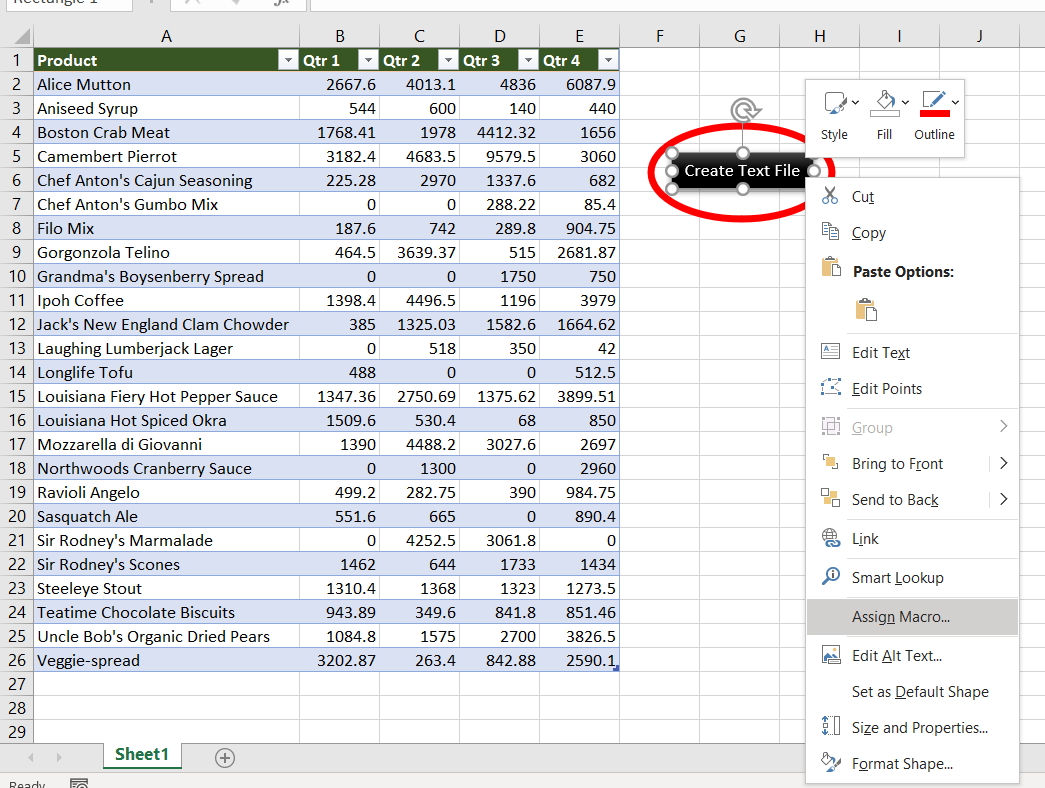
Step 3: Select MacroToCreateTextFile
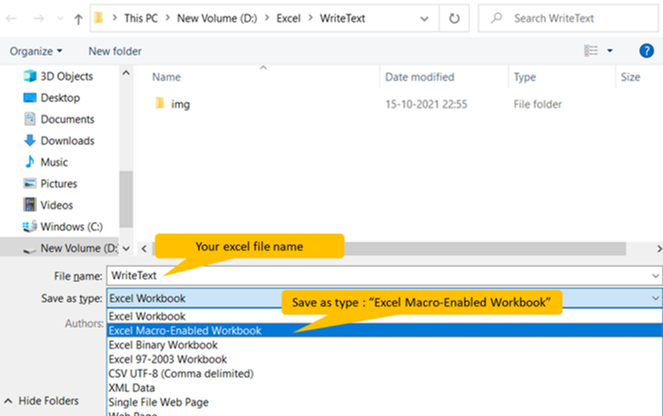
Step 4: Save your excel file as “Excel Macro-Enabled Workbook” *.xlsm
Step 5: Click “Create Text file”
In this article I will explain how you can create a text file and how write data to a text file in overwrite and append modes.
You can download the file and code related to this article here.
Create a text file using the file system object:
You can create a text file using the file system object using the code below.
Sub CreateTextFile() Dim fs As Object Dim stream As Object Set fs = CreateObject("Scripting.FileSystemObject") On Error GoTo fileexists Set stream = fs.CreateTextFile("e:TextFile.txt", False, True) fileexists: If Err.Number = 58 Then MsgBox "File already Exists" 'Your code here Else stream.Write ("No new line character inserted") stream.WriteLine ("This will take the cursor to next line.") stream.Close End If On Error GoTo 0 End SubThe CreateTextFile function takes 3 arguments.
- First is the name of the file along with the complete path
- Overwrite – Second (optional) argument indicates if an existing file can be overwritten. The value is True if the file can be overwritten; False if it can’t be overwritten. Default is false
- Unicode – Third (optional) argument indicates whether the file is created as a Unicode or ASCII file. The value is True if the file is created as a Unicode file; False if it’s created as an ASCII file. Default is ASCII.
As we have specified overwritten as false, an error will be thrown if the file already exists (Error number 58). So, we are using error handling to check for this condition.
We can use the Write and WriteLine function to write to the file. As you can guess, the WriteLine function will take the cursor to the next line, while the Write function will not. –
Example 1, Write One Line of Data to Text File:
The example below creates a text file at the location “D:Temp” under the name “Test.txt” and writes the value in cell A1 in the first line of the text file:
Sub Example1()
Open "D:TempTest.txt" For Output As #1
Write #1, Cells(1, 1)
Close #1
End SubThe first line checks if the file “D:TempTest.txt” exists. If it doesn’t it will create a file named “Test.txt” at the location ” D:Temp”. If it does exist it will overwrite the file.
Open "D:TempTest.txt" For Output As #1In our example the file does not exist, therefore a new file is created:
It has 3 parts:
“D:TempTest.txt”: Specifies the full path of the file.
Output: Specifies that this file is for writing to. This is opposed to the value Input used in the article Excel VBA, Reading Text Files
#1: This could be any number between #1 and #511. Whatever number is chosen here should be used in the rest of the program to reference this file.
The next line prints the data in cell A1 to the first line of the text file:
Write #1, Cells(1, 1)The content of cell A1 can be seen below:
The last line of code closes the file that has the reference #1:
Close #1Had we chosen another number when opening the file, we would have had to choose the same number here when closing it. For example lets say we decide to user the number #4. We would have to user the #4 throughout the code:
Sub Example1()
Open "D:TempTest.txt" For Output As #4
Write #4, Cells(1, 1);
Close #4
End Sub
End SubThe code above will yield the same result as our original code.
Always remember to close the file at the end of your code. Closing the file does the following:


- Saves the data written to the file.
- Allows other programs to modify the file.
- If the file is not closed, you will not be able to reopen it using another number index.
Final Result:

–
Example 2, Write Multiple Lines of Data to Text File:
The example below creates a text file at the location “D:Temp” under the name “Test.txt” and writes all the data in column A to it:
Sub Example2()
Dim flag As Boolean
Dim i As Integer
'open the file for writing
Open "D:TempTest.txt" For Output As #4
flag = True
i = 1
'keeps going until the end of the file is reacheed
While flag = True
    'check if the current cell has data in it
    If Cells(i, 1) <> "" Then
        'write the data to the file
        Write #4, Cells(i, 1)
        'go to next cell
        i = i + 1
    Else
        'if the last row has been reached exit the loop
        flag = False
    End If
Wend
'close the file
Close #4
End Sub
The following data was written in column A:

Result:

–
Example 3, Save File Dialog:
In the example below the user will initially be asked to choose the location for the output text file using a save file dialog. A text file will then be created and the data in column A will be printed to the text file. For more information about save file dialogs please see the following links:
- VBA Save File Dialog, FileDialog(msoFileDialogSaveAs)
- Excel VBA, Save File Dialog, GetSaveAsFilename
Sub Example3()
Dim flag As Boolean
Dim i As Integer
Dim strPath As String
strPath = Application.GetSaveAsFilename(FileFilter:= _
"Text Files (*.txt), *.txt", Title:="Save Location")
If strPath <> "False" Then
    'open the file for writing
    Open strPath For Output As #4
flag = True
i = 1
'keeps going until the end of the file is reacheed
While flag = True
'check if the current cell has data in it
If Cells(i, 1) <> "" Then
'write the data to the file
Write #4, Cells(i, 1)
'go to next cell
i = i + 1
Else
'if the last row has been reached exit the loop
flag = False
End If
Wend
'close the file
Close #4
End If
End Sub
The highlighted code creates a save file dialog and asks the user to select a location to save the file:

The final result is similar to the previous examples.
Sub Example4()
Dim flag As Boolean
Dim i As Integer
Dim strPath As String
On Error GoTo lblError:
strPath = Application.GetSaveAsFilename(FileFilter:= _
"Text Files (*.txt), *.txt", Title:="Save Location")
If strPath <> "False" Then
    'open the file for writing
    Open strPath     For Output As #4
    flag = True
    i = 1
    'keeps going until the end of the file is reached
    While flag = True
        'check if the current cell has data in it
        If Cells(i, 1) <> "" Then
           'write the data to the file
           Write #4, Cells(i, 1)
           'go to next cell
           i = i + 1
        Else
           'if the last row has been reached exit the loop
           flag = False
        End If
    Wend
    'close the file
    Close #4
End If
Exit Sub
lblError:
Err.Clear
End Sub
Example 5, Use print function in append mode:
The examples covered so far rewrite the existing file. Now let us look at how to open a file in append mode. Here we will be using the print function to write to the file. The difference being, the text will not be inserted within double quotes.
Sub AppendFile() Dim strFile_Path As String Dim rangeToWrite As range strFile_Path = "e:TextFile.txt" On Error GoTo cleanup Open strFile_Path For Append As #1 Set rangeToWrite = range("A1:A10") For Each cell In rangeToWrite Print #1, cell.Value Next cell Close #1 Cleanup: Close #1 End Sub“Open file for Append” will first check if the file exists. If the file does not exist, a new one will be created. Else, the file will be opened in append mode.
We use the Print function to write the text from the Excel file to the text file. We have selected a single to column from Excel. You can easily modify the range to include multiple columns.
This is how the Excel and the text files look after executing the code.
If you run the code again, the text file will look like this:
You can download the file and code related to this article here.
See also:


- Excel VBA, Reading Text Files
- VBA, Modify Existing Text File
- VBA Save File Dialog, FileDialog(msoFileDialogSaveAs)
- Excel VBA, Save File Dialog, GetSaveAsFilename
- VBA, Check if Text File is Open
- VBA Append Data to Text File
If you need assistance with your code, or you are looking for a VBA programmer to hire feel free to contact me. Also please visit my website www.software-solutions-online.com