
JavaScript is a versatile platform that allows easy customization of client-side scripting tools. In some applications, it’s helpful to have some sort of spreadsheet interface that is easy to code and maintain. The SpreadJS client-side JavaScript spreadsheet component is perfect for this.
Add complete JavaScript spreadsheets into your enterprise web apps. Download SpreadJS Now!
In this blog, we will cover how to import/export to Excel in JavaScript following these steps:
- Set Up the JavaScript Spreadsheet Project
- Add Excel Import Code
- Add Data to the Imported Excel File
- Add a Sparkline
- Add Excel Export Code
Set Up the JavaScript Spreadsheet Project
To start, we can use the SpreadJS files hosted on NPM. To do this, we can install using a command line argument. Open a command prompt and navigate to the location of your application. There, you can install the required files with one command.
In this case, we need the base Spread-Sheets library, Spread-ExcelIO, and jQuery:
npm i @grapecity/spread-sheets @grapecity/spread-excelio jquery
SpreadJS isn’t dependent on jQuery, but in this case, we use it for the easy cross-origin-request support, which we will review later.
Once those are installed, we can add references to those script and CSS files in our code:
<!DOCTYPE html>
<html>
<head>
    <title>SpreadJS ExcelIO</title>
    <script src="./node_modules/jquery/dist/jquery.min.js" type="text/javascript"></script>
    <script src="https://cdnjs.cloudflare.com/ajax/libs/FileSaver.js/2014-11-29/FileSaver.min.js"></script>

    <link href="./node_modules/@grapecity/spread-sheets/styles/gc.spread.sheets.excel2013white.css" rel="stylesheet" type="text/css" />
    <script type="text/javascript" src="./node_modules/@grapecity/spread-sheets/dist/gc.spread.sheets.all.min.js"></script>
    <script type="text/javascript" src="./node_modules/@grapecity/spread-excelio/dist/gc.spread.excelio.min.js"></script>

</head>
<body>
    <div id="ss" style="height:600px; width :100%; "></div>
</body>
</html>
We will also need the FileSaver library, which we have imported in addition to the SpreadJS and jQuery files.
Then we can add a script to the page that initializes the Spread.Sheets component and a div element to contain it (since the SpreadJS spreadsheet component utilizes a canvas, this is necessary to initialize the component):
    <script type="text/javascript">
        $(document).ready(function () {
            var workbook = new GC.Spread.Sheets.Workbook(document.getElementById("ss"));
        });
    </script>
</head>
<body>
    <div id="ss" style="height:600px ; width :100%; "></div>
</body>
Add Excel Import Code
We need to create an instance of the client-side ExcelIO component that we can use to open the file:
var excelIO = new GC.Spread.Excel.IO(); Then we need to add a function to import a file. In this example, we import a local file, but you can do the same thing with a file on a server. You need to reference the location if importing a file from a server. The following is an example of an input element where the user can enter the location of the file:
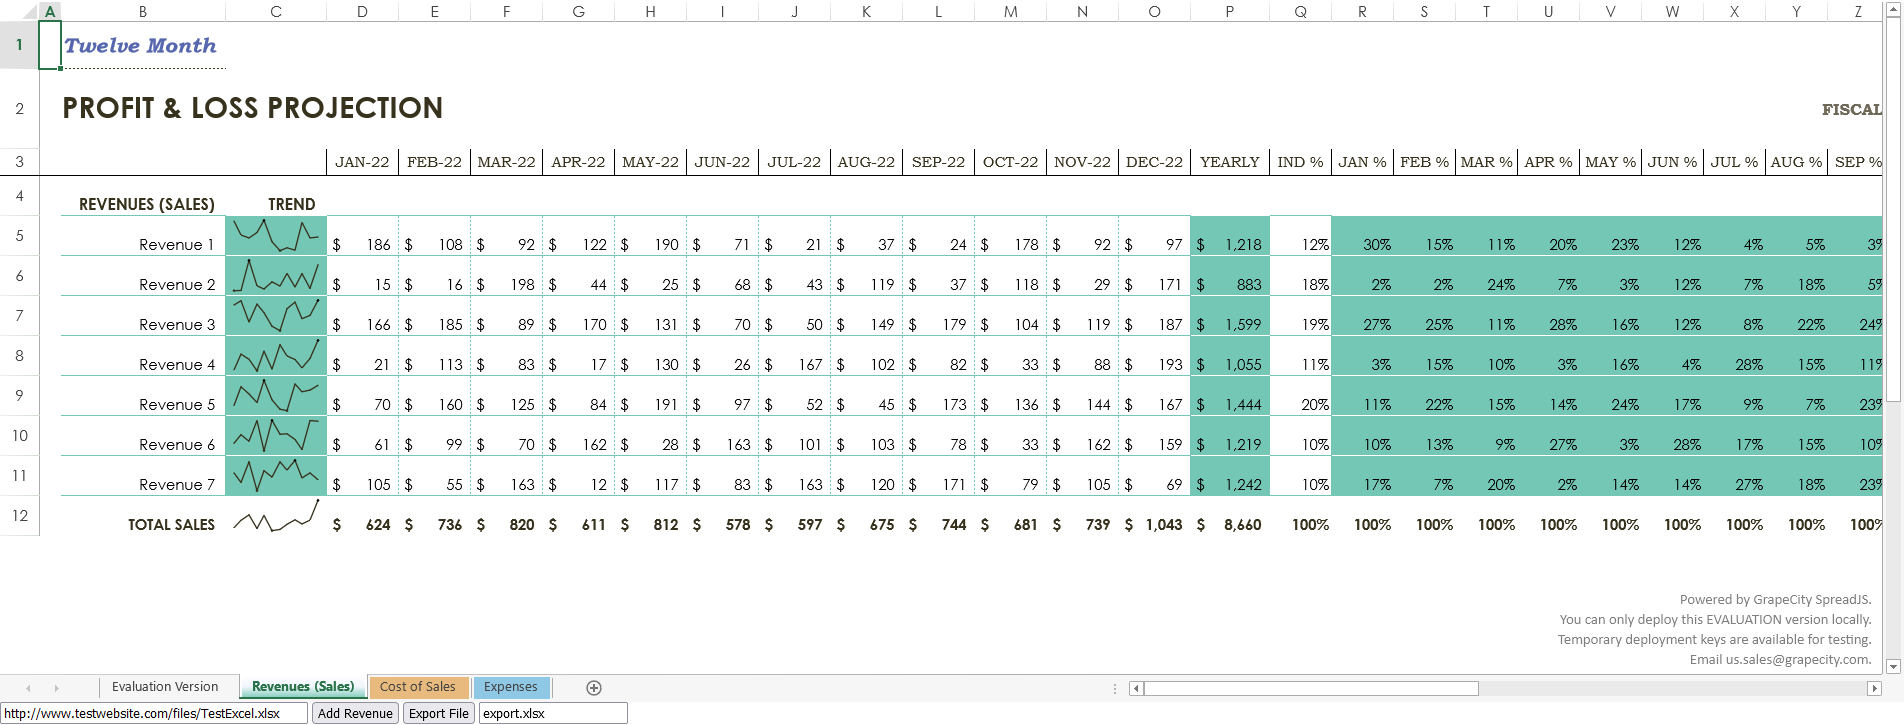
<input type="text" id="importUrl" value="http://www.testwebsite.com/files/TestExcel.xlsx" style="width:300px" />Once you have that, you can directly access that value in script code:
var excelUrl = $("#importUrl").val(); The following code for the import function uses a local file for the «excelUrl» variable:
function ImportFile() {
    var excelUrl = "./test.xlsx";

    var oReq = new XMLHttpRequest();
    oReq.open('get', excelUrl, true);
    oReq.responseType = 'blob';
    oReq.onload = function () {
        var blob = oReq.response;
        excelIO.open(blob, LoadSpread, function (message) {
            console.log(message);
        });
    };
    oReq.send(null);
}
function LoadSpread(json) {
    jsonData = json;
    workbook.fromJSON(json);

    workbook.setActiveSheet("Revenues (Sales)");
}
Whether you’re referencing a file on a server or locally, you’ll need to add the following to your script inside the $(document).ready function:
$(document).ready(function () {
    $.support.cors = true;
    workbook = new GC.Spread.Sheets.Workbook(document.getElementById("ss"));
    //...
});
In this case, we need to enable Cross-Origin-Request-Support because we are potentially loading a file from a URL. Hence the $.support.cors = true; line, or else attempting to load it will result in a CORS error.
Add Data to the Imported Excel File
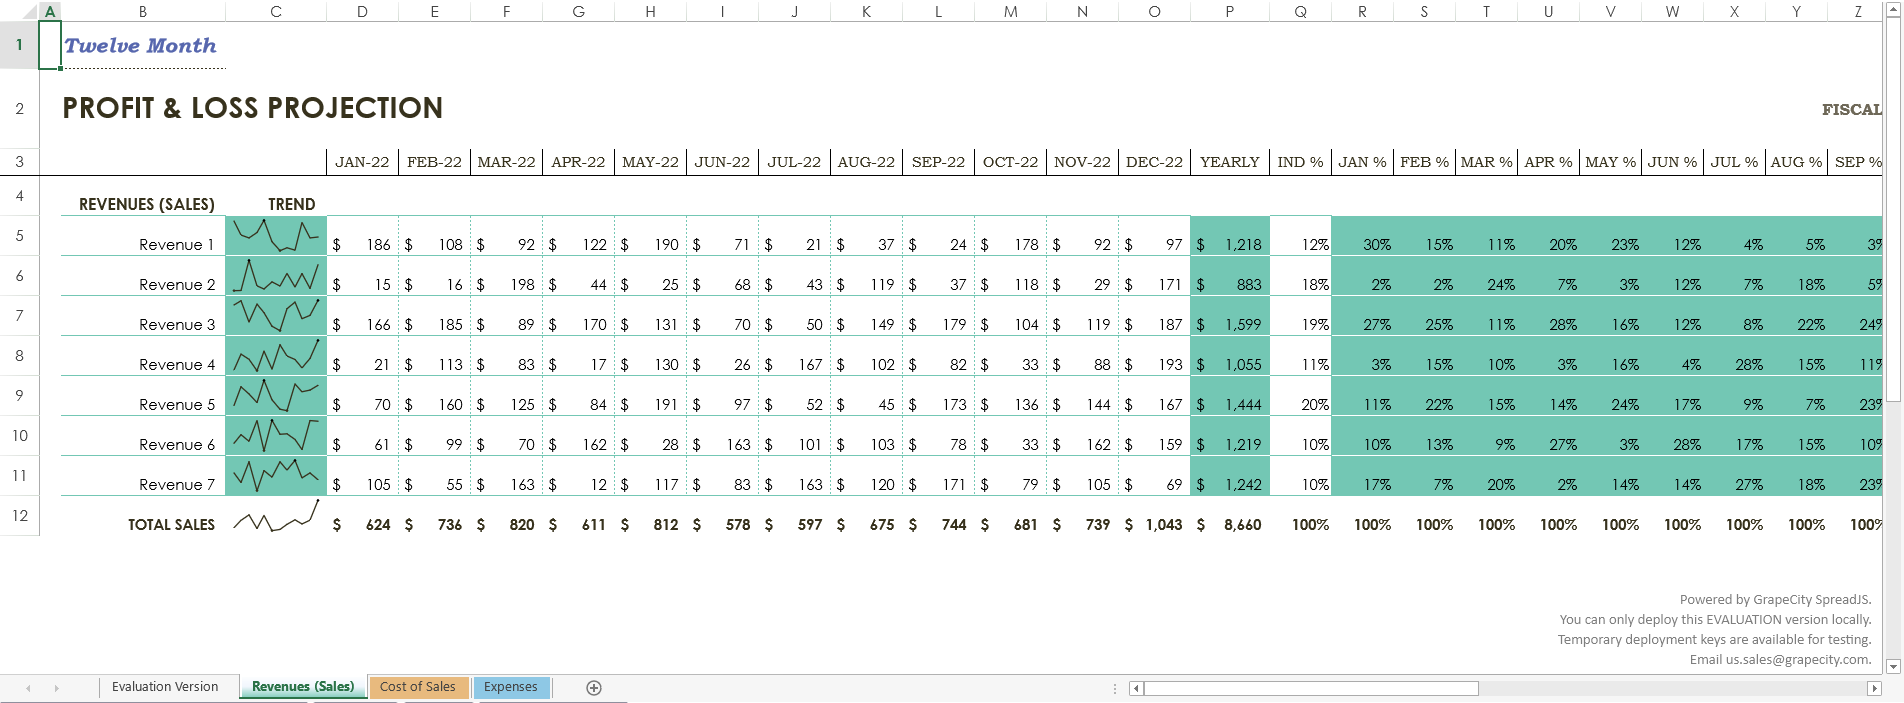
We import a local file using the “Profit loss statement” Excel template for this tutorial.

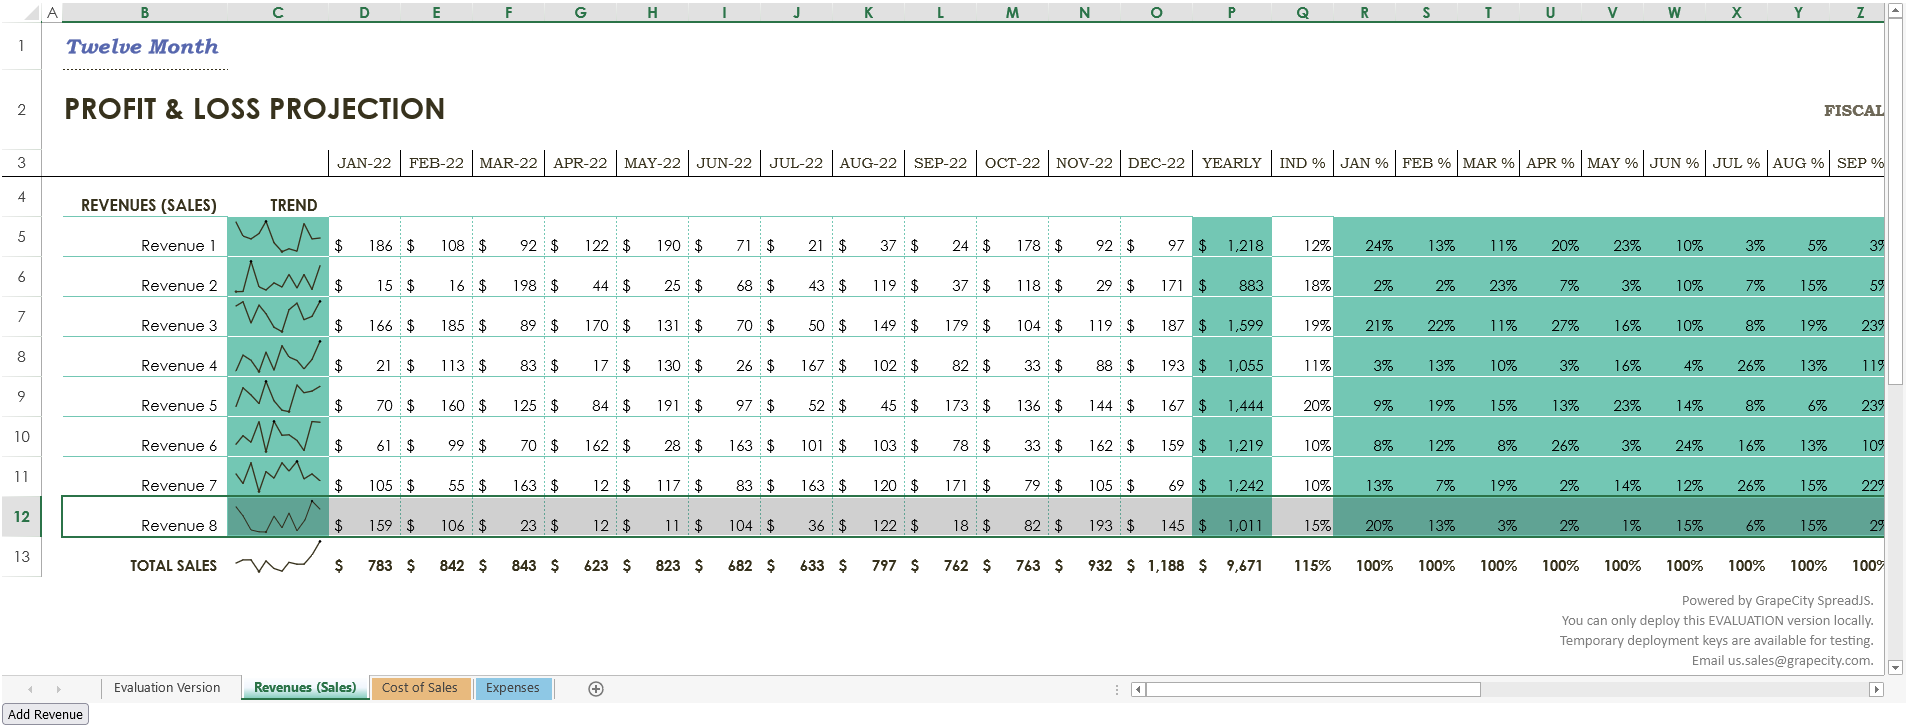
Now we can use Spread.Sheets script to add another revenue line into this file. Let’s add a button to the page that will do just that:
<button id="addRevenue">Add Revenue</button> We can write a function for the click event handler for that button to add a row and copy the style from the previous row in preparation for adding some data. To copy the style, we will need to use the copyTo function and pass in:
- the origin and destination row and column indices
- row and column count
- the CopyToOptions value for style
document.getElementById("addRevenue").onclick = function () {
    var sheet = workbook.getActiveSheet();
    sheet.addRows(newRowIndex, 1);
    sheet.copyTo(10, 1, newRowIndex, 1, 1, 29, GC.Spread.Sheets.CopyToOptions.style);
}
The following script code for adding data and a Sparkline will be contained within this button click event handler. For most of the data, we can use the setValue function. This allows us to set a value in a sheet in Spread by passing in a row index, column index, and value:
sheet.setValue(newRowIndex, 1, "Revenue 8");

for (var c = 3; c < 15; c++) {
    sheet.setValue(newRowIndex, c, Math.floor(Math.random() * 200) + 10);
}
Set a SUM formula in column P to match the other rows and set a percentage for column Q:
sheet.setFormula(newRowIndex, 15, "=SUM([@[Jan]:[Dec]])")
sheet.setValue(newRowIndex, 16, 0.15);
Lastly, we can copy the formulas from the previous rows to the new row for columns R through AD using the copyTo function again, this time using CopyToOptions.formula:
sheet.copyTo(10, 17, newRowIndex, 17, 1, 13, GC.Spread.Sheets.CopyToOptions.formula); Add a Sparkline
Now we can add a sparkline to match the other rows of data. To do this, we need to provide a range of cells to get the data from and some settings for the sparkline. In this case, we can specify:
- the range of cells, we just added data to
- settings to make the sparkline look like the other sparklines in the same column
var data = new GC.Spread.Sheets.Range(11, 3, 1, 12);
var setting = new GC.Spread.Sheets.Sparklines.SparklineSetting();
setting.options.seriesColor = "Text 2";
setting.options.lineWeight = 1;
setting.options.showLow = true;
setting.options.showHigh = true;
setting.options.lowMarkerColor = "Text 2";
setting.options.highMarkerColor = "Text 1";
After that, we call the setSparkline method and specify:
- a location for the sparkline
- the location of the data
- the orientation of the sparkline
- the type of sparkline
- the settings we created
sheet.setSparkline(11, 2, data, GC.Spread.Sheets.Sparklines.DataOrientation.horizontal, GC.Spread.Sheets.Sparklines.SparklineType.line, setting); If you were to try running the code now, it might seem a little slow because the workbook is repainting every time data is changed and styles are added. To drastically speed it up and increase performance, Spread.Sheets provide the ability to suspend painting and the calculation service. Let’s add the code to suspend both before adding a row and its data and then resume both after:
workbook.suspendPaint();
workbook.suspendCalcService();
//...
workbook.resumeCalcService();
workbook.resumePaint();
Once we add that code, we can open the page in a web browser and see the Excel file load into Spread.Sheets with an added revenue row. Important: Keep in mind that Chrome doesn’t allow you to open local files for security purposes, so you need to use a web browser like Firefox to run this code successfully. Alternatively, loading a file from a website URL should open fine in any browser.
Add Excel Export Code
Finally, we can add a button to export the file with the added row. To do this, we can use the client-side ExcelIO code built into Spread.Sheets:
function ExportFile() {
    var fileName = $("#exportFileName").val();
    if (fileName.substr(-5, 5) !== '.xlsx') {
        fileName += '.xlsx';
    }
    var json = JSON.stringify(workbook.toJSON());

    excelIO.save(json, function (blob) {
        saveAs(blob, fileName);
    }, function (e) {
        if (e.errorCode === 1) {
            alert(e.errorMessage);
        }
    });
}
That code gets the export file name from an exportFileName input element. We can define it and let users name the file like so:
<input type="text" id="exportFileName" placeholder="Export file name" value="export.xlsx" /> Then we can add a button that calls this function:
<button id="export">Export File</button> document.getElementById("export").onclick = function () {
ExportFile();
} 
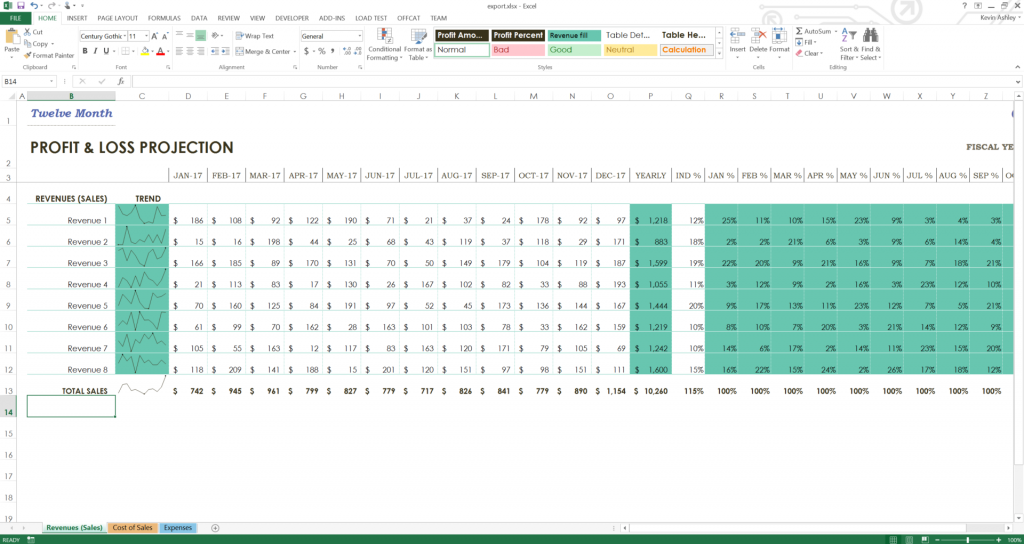
Once you add a revenue row, you can export the file using the Export File button. Make sure to add the FileSaver external library to allow users to save the file where they want:
<script src="https://cdnjs.cloudflare.com/ajax/libs/FileSaver.js/2014-11-29/FileSaver.min.js"></script> When the file is successfully exported, you can open it in Excel and see that the file looks like it did when it was imported, except there is now an extra revenue line that we added.
This is just one example of how you can use SpreadJS JavaScript spreadsheets to add data to your Excel files and then export them back to Excel with simple JavaScript code.
Download the sample here.
In another article series, we demonstrate how to import/export Excel spreadsheets in other Javascript frameworks:
- React
- Vue
- Angular
Add complete JavaScript spreadsheets into your enterprise web apps. Download SpreadJS Now!
js-xlsx введение
кSheetJSПроизведеноjs-xlsxЭто очень удобная библиотека инструментов, которой для чтения и экспорта в Excel нужен только чистый JS. Она имеет мощные функции, поддерживает множество форматов и поддерживаетxls、xlsx、ods(Собственный формат файлов таблицы OpenOffice) и более десятка форматов. Вся эта статья основана наxlsxВозьмем, к примеру, формат.
- Официальный гитхаб:https://github.com/SheetJS/js-xlsx
- Онлайн-демонстрационный адрес поддерживающей демонстрации для этой статьи:http://demo.haoji.me/2017/02/08-js-xlsx/
- Эта статья впервые была опубликована у меня синхронноличный блогсБлог сад。
1.1. Совместимость
Совместимость следующая:

1.2. Как пользоваться
distВ каталоге много JS-файлов, обычно используйтеxlsx.core.min.jsдовольно,xlsx.full.min.jsОн содержит все функциональные модули.

непосредственныйscriptЭтикетка может быть введена:
<script type="text/javascript" src="./js/xlsx.core.min.js"></script>Читать в Excel
Чтение в Excel происходит в основном черезXLSX.read(data, {type: type});Способ достижения, ответьте на звонокWorkBookОсновные значения типа следующие:
base64: Читать в режиме base64;binary: Формат BinaryString (n-й байт — это data.charCodeAt (n))string: Строка в кодировке UTF8;buffer: nodejs Buffer;array: Uint8Array, 8-битный беззнаковый массив;file: Путь к файлу (поддерживается только в nodejs);
2.1. Получить объект книги
2.1.1. Чтение локальных файлов
Непосредственно по коду:
// читаем локальный файл Excel
function readWorkbookFromLocalFile(file, callback) {
    var reader = new FileReader();
    reader.onload = function(e) {
        var data = e.target.result;
        var workbook = XLSX.read(data, {type: 'binary'});
        if(callback) callback(workbook);
    };
    reader.readAsBinaryString(file);
}
2.1.2. Чтение сетевых файлов
// Чтобы прочитать файл Excel из Интернета, URL-адрес должен находиться в том же домене, иначе будет сообщено об ошибке
function readWorkbookFromRemoteFile(url, callback) {
    var xhr = new XMLHttpRequest();
    xhr.open('get', url, true);
    xhr.responseType = 'arraybuffer';
    xhr.onload = function(e) {
        if(xhr.status == 200) {
            var data = new Uint8Array(xhr.response)
            var workbook = XLSX.read(data, {type: 'array'});
            if(callback) callback(workbook);
        }
    };
    xhr.send();
}
2.2. Подробная рабочая тетрадь
2.2.1. Workbook Object
workbookЧто в нем, распечатаем и посмотрим:

можно увидеть,SheetNamesВ нем сохраняются все названия листов, а затемSheetsКонкретное содержимое каждого листа сохраняется (мы называем этоSheet Object). КаждыйsheetЧерез что-то вродеA1Такое значение ключа сохраняет содержимое каждой ячейки, и мы называем его объектом ячейки (Cell Object):

2.2.2. Sheet Object
КаждыйSheet ObjectПредставляет форму, если она не!Те, что в начале, указывают на обычныеcell, В противном случае это означает какое-то особое значение, а именно:
sheet['!ref']: Указывает диапазон всех ячеек, например, от A1 до F8, он записывается какA1:F8;sheet[!merges]: Хранить некоторую информацию о слиянии ячеек, это массив, каждый массив состоит изsсeСоставьте композицию объекта,sЗначит старт,eОзначает конец,rПредставляет строку,cПредставляет столбец;- и многое другое;
Что касается слияния ячеек, в принципе не проблема понять следующую картину:

Результаты приведены ниже:

2.2.3. Объект Cell
Каждая ячейка — это объект (Cell Object),Естьt、v、r、h、wИ другие поля (см.Здесь):
- t: указывает тип содержимого,
sПредставляет тип строки,nПредставляет числовой тип,bПредставляет логический тип,dПредставляет тип даты и т. Д. - v: представляет исходное значение;
- f: представляет формулу, например
B2+B3; - h: HTML-контент
- w: форматированный контент
- r: богатый текстовый контент
rich text - и многое другое
2.2.4. Читать книгу
Обычный метод:
// читаем файл Excel
function outputWorkbook(workbook) {
         var sheetNames = workbook.SheetNames; // набор имен рабочих листов
    sheetNames.forEach(name => {
                 var worksheet = workbook.Sheets [name]; // Указанный рабочий лист можно получить только по имени рабочего листа
        for(var key in worksheet) {
                         // v - исходное значение прочитанной ячейки
            console.log(key, key[0] === '!' ? worksheet[key] : worksheet[key].v);
        }
    });
}
в соответствии с!refОпределите сферу применения Excel, а затем в соответствии с!mergesУбедитесь, что ячейки объединены (если есть), и, наконец, выведите всю таблицу, что вызывает затруднения. К счастью, сам плагин уже написал инструментXLSX.utilsДля непосредственного использования, без нашего собственного обхода, выходные данные инструмента в основном включают следующее:

Некоторые из них обычно не используются, наиболее часто используются:
XLSX.utils.sheet_to_csv: Создать формат CSVXLSX.utils.sheet_to_txt: Создать текстовый форматXLSX.utils.sheet_to_html: Создать формат HTMLXLSX.utils.sheet_to_json: Выходной формат JSON
Чаще всего используютсяsheet_to_csvили жеsheet_to_html, Формат, объединение ячеек и другая информация будут игнорироваться при преобразовании в CSV, поэтому сложные таблицы могут быть неприменимы. Если вы конвертируете в html, ячейки будут объединены, но результат будет<html></html>Код вместо<table></table>, Это неудобно, когда вам нужно внести некоторые изменения в форму, поэтому вам все равно придется использовать соответствующие инструменты в зависимости от ситуации.
Вот простой пример вывода результатов путем преобразования в CSV, вы можете щелкнуть здесь, чтобы просмотретьДЕМО онлайн:
function readWorkbook(workbook)
{
         var sheetNames = workbook.SheetNames; // набор имен рабочих листов
         var worksheet = workbook.Sheets [sheetNames [0]]; // здесь мы читаем только первый лист
    var csv = XLSX.utils.sheet_to_csv(worksheet);
    document.getElementById('result').innerHTML = csv2table(csv);
}

 // Преобразование csv в простую таблицу, игнорирование слияния ячеек, добавление индекса, аналогичного excel, в первой строке и первом столбце
function csv2table(csv)
{
    var html = '<table>';
    var rows = csv.split('n');
         rows.pop (); // последняя строка бесполезна
    rows.forEach(function(row, idx) {
        var columns = row.split(',');
                 columns.unshift (idx + 1); // добавляем индекс строки
                 if (idx == 0) {// добавляем индекс столбца
            html += '<tr>';
            for(var i=0; i<columns.length; i++) {
                html += '<th>' + (i==0?'':String.fromCharCode(65+i-1)) + '</th>';
            }
            html += '</tr>';
        }
        html += '<tr>';
        columns.forEach(function(column) {
            html += '<td>'+column+'</td>';
        });
        html += '</tr>';
    });
    html += '</table>';
    return html;
}
Экспорт в Excel
Существует два типа экспорта: один основан на существующей модификации Excel, другой — нового поколения, первый относительно прост, здесь мы сосредоточимся на втором.
3.1. Создайте собственный рукописный код
Экспорт файла Excel, в основном, как его создатьsheet, Здесь мы пишем простой пример csv для Excel:
// csv в объект листа
function csv2sheet(csv) {
         var sheet = {}; // лист, который будет сгенерирован
    csv = csv.split('n');
    csv.forEach(function(row, i) {
        row = row.split(',');
        if(i == 0) sheet['!ref'] = 'A1:'+String.fromCharCode(65+row.length-1)+(csv.length-1);
        row.forEach(function(col, j) {
            sheet[String.fromCharCode(65+j)+(i+1)] = {v: col};
        });
    });
    return sheet;
}

 // Преобразование листа в объект blob окончательного файла Excel, а затем использование URL.createObjectURL для загрузки
function sheet2blob(sheet, sheetName) {
    sheetName = sheetName || 'sheet1';
    var workbook = {
        SheetNames: [sheetName],
        Sheets: {}
    };
    workbook.Sheets[sheetName] = sheet;
         // Создание элементов конфигурации для Excel
    var wopts = {
                 bookType: 'xlsx', // тип создаваемого файла
                 bookSST: false, // Следует ли генерировать общую таблицу строк, официальное объяснение состоит в том, что если она включена, скорость генерации уменьшится, но есть лучшая совместимость с устройствами IOS более низкой версии
        type: 'binary'
    };
    var wbout = XLSX.write(workbook, wopts);
    var blob = new Blob([s2ab(wbout)], {type:"application/octet-stream"});
         // Строка в ArrayBuffer
    function s2ab(s) {
        var buf = new ArrayBuffer(s.length);
        var view = new Uint8Array(buf);
        for (var i=0; i!=s.length; ++i) view[i] = s.charCodeAt(i) & 0xFF;
        return buf;
    }
    return blob;
}
Получите объект blob выше, и вы можете загрузить его напрямую, см. Мой предыдущийJS всплывает диалоговое окно загрузкиИнкапсулирован внутриopenDownloadDialogметод:
/**
   * Общий метод открытия диалогового окна загрузки не тестировался на совместимость
   * @param url-адрес загрузки, это также может быть объект blob, обязательно
   * @param saveName имя файла сохранения, необязательно
 */
function openDownloadDialog(url, saveName)
{
    if(typeof url == 'object' && url instanceof Blob)
    {
                 url = URL.createObjectURL (url); // Создание адреса большого двоичного объекта
    }
    var aLink = document.createElement('a');
    aLink.href = url;
         aLink.download = saveName || ''; // новый атрибут HTML5, укажите имя файла сохранения, суффикс не требуется, обратите внимание, что он не вступит в силу в режиме file: ///
    var event;
    if(window.MouseEvent) event = new MouseEvent('click');
    else
    {
        event = document.createEvent('MouseEvents');
        event.initMouseEvent('click', true, false, window, 0, 0, 0, 0, 0, false, false, false, false, 0, null);
    }
    aLink.dispatchEvent(event);
}
Таким образом, окончательная загрузка выглядит следующим образом:
// Передаем csv, и после выполнения появится окно загрузки
function exportExcel(csv) {
    var sheet = csv2sheet(csv);
    var blob = sheet2blob(sheet);
         openDownloadDialog (blob, 'Export.xlsx');
}
3.2. Используйте официальные инструменты для создания
На самом деле, нам не нужно писать ни один из вышеперечисленных кодов. Чиновник предоставил нам готовые инструменты, в основном в том числе:
aoa_to_sheet: Этот класс инструментов является наиболее мощным и практичным.Преобразование двумерного массива в лист автоматически обработает числовые, строковые, логические, даты и другие типы данных;table_to_sheet: Поставить одинtable domНепосредственно преобразованный в лист, он будет автоматически распознанcolspanсrowspanИ преобразовать его в соответствующую ячейку и объединить;json_to_sheet: Преобразовать массив объектов в лист;
aoa_to_sheetПример:
var aoa = [
         ["Имя", "Пол", "Возраст", "Время регистрации"],
         ['Zhang San', 'Male', 18 лет, новое свидание ()],
         [' ', ' ', 22, новая дата ()]
];
var sheet = XLSX.utils.aoa_to_sheet(aoa);
openDownloadDialog (sheet2blob (лист), 'Export.xlsx');table_to_sheetЕще проще, прямоXLSX.utils.table_to_sheet($('table')[0])Может
3.3. Решение проблемы слияния ячеек
Вообще говоря, интерфейсное поколениеexcelВместоcsvОсновная цель — решить проблему, заключающуюся в том, что csv не может выполнить слияние ячеек. В противном случае было бы неплохо напрямую экспортировать файл csv. Зачем вводить несколько сотен килобайт плагинов.
Предположим, мы хотим сгенерировать файл Excel в следующем формате, гдеA1-C1Чтобы объединить ячейки:

код показан ниже:
var aoa = [
         ['Основная информация', null, null, 'Другая информация'], // Особое внимание следует уделить резервированию 2 нулевых значений за объединенным местом
         ["Имя", "Пол", "Возраст", "Время регистрации"],
         ['Zhang San', 'Male', 18 лет, новое свидание ()],
         [' ', ' ', 22, новая дата ()]
];
var sheet = XLSX.utils.aoa_to_sheet(aoa);
sheet['!merges'] = [
         // Устанавливаем слияние ячеек A1-C1
    {s: {r: 0, c: 0}, e: {r: 0, c: 2}}
];
 openDownloadDialog (sheet2blob (sheet), 'Слияние ячеек example.xlsx');
Стоит обратить внимание на использование объединенных ячеек.nullЗарезервируйте место, иначе следующий контент (в этом примере четвертый столбецДополнительная информация) Будет перезаписан.
3.4. Пользовательский стиль
Обычная версия не поддерживает определение шрифтов, цветов, цветов фона и т. Д., Вы можете использовать ее, если вам нужна эта функция.профессиональная версия, Вроде заряжено, потому что официальный сайт не видел адреса загрузки.
Персональный сайт:https://haoji.me
github:https://github.com/sxei
Сад блогов:http://www.cnblogs.com/liuxianan
авторское право © 2012-2018 одноклассник Xiaominggrapecity.com.cn/spreadjs/excel-online/content/index.html
The reason the solution you found on the internet is no working is because of the line that starts var colCount. The variable mytable only has two elements being <thead> and <tbody>. The var colCount line is looking for all the elements within mytable that are <tr>. The best thing you can do is give an id to your <thead> and <tbody> and then grab all the values based on that. Say you had <thead id='headers'> :
function write_headers_to_excel()
{
  str="";

  var myTableHead = document.getElementById('headers');
  var rowCount = myTableHead.rows.length;
  var colCount = myTableHead.getElementsByTagName("tr")[0].getElementsByTagName("th").length;

var ExcelApp = new ActiveXObject("Excel.Application");
var ExcelSheet = new ActiveXObject("Excel.Sheet");
ExcelSheet.Application.Visible = true;

for(var i=0; i<rowCount; i++)
{
    for(var j=0; j<colCount; j++)
    {
        str= myTableHead.getElementsByTagName("tr")[i].getElementsByTagName("th")[j].innerHTML;
        ExcelSheet.ActiveSheet.Cells(i+1,j+1).Value = str;
    }
}

}
and then do the same thing for the <tbody> tag.
EDIT: I would also highly recommend using jQuery. It would shorten this up to:
function write_to_excel()
{
 var ExcelApp = new ActiveXObject("Excel.Application");
 var ExcelSheet = new ActiveXObject("Excel.Sheet");
 ExcelSheet.Application.Visible = true;

  $('th, td').each(function(i){
    ExcelSheet.ActiveSheet.Cells(i+1,i+1).Value = this.innerHTML;
  });
}
Now, of course, this is going to give you some formatting issues but you can work out how you want it formatted in Excel.
EDIT: To answer your question about how to do this for n number of tables, the jQuery will do this already. To do it in raw Javascript, grab all the tables and then alter the function to be able to pass in the table as a parameter. For instance:
var tables = document.getElementsByTagName('table');
for(var i = 0; i < tables.length; i++)
{
  write_headers_to_excel(tables[i]);
  write_bodies_to_excel(tables[i]);
}
Then change the function write_headers_to_excel() to function write_headers_to_excel(table). Then change var myTableHead = document.getElementById('headers'); to var myTableHead = table.getElementsByTagName('thead')[0];. Same with your write_bodies_to_excel() or however you want to set that up.
Парсинг нетабличных данных с сайтов
Проблема с нетабличными данными
С загрузкой в Excel табличных данных из интернета проблем нет. Надстройка Power Query в Excel легко позволяет реализовать эту задачу буквально за секунды. Достаточно выбрать на вкладке Данные команду Из интернета (Data — From internet), вставить адрес нужной веб-страницы (например, ключевых показателей ЦБ) и нажать ОК:

Power Query автоматически распознает все имеющиеся на веб-странице таблицы и выведет их список в окне Навигатора:

Дальше останется выбрать нужную таблицу методом тыка и загрузить её в Power Query для дальнейшей обработки (кнопка Преобразовать данные) или сразу на лист Excel (кнопка Загрузить).
Если с нужного вам сайта данные грузятся по вышеописанному сценарию — считайте, что вам повезло.
К сожалению, сплошь и рядом встречаются сайты, где при попытке такой загрузки Power Query «не видит» таблиц с нужными данными, т.е. в окне Навигатора попросту нет этих Table 0,1,2… или же среди них нет таблицы с нужной нам информацией. Причин для этого может быть несколько, но чаще всего это происходит потому, что веб-дизайнер при создании таблицы использовал в HTML-коде страницы не стандартную конструкцию с тегом <TABLE>, а её аналог — вложенные друг в друга теги-контейнеры <DIV>. Это весьма распространённая техника при вёрстке веб-сайтов, но, к сожалению, Power Query пока не умеет распознавать такую разметку и загружать такие данные в Excel.
Тем не менее, есть способ обойти это ограничение 
В качестве тренировки, давайте попробуем загрузить цены и описания товаров с маркетплейса Wildberries — например, книг из раздела Детективы:

Загружаем HTML-код вместо веб-страницы
Сначала используем всё тот же подход — выбираем команду Из интернета на вкладке Данные (Data — From internet) и вводим адрес нужной нам страницы:
https://www.wildberries.ru/catalog/knigi/hudozhestvennaya-literatura/detektivy
После нажатия на ОК появится окно Навигатора, где мы уже не увидим никаких полезных таблиц, кроме непонятной Document:

Дальше начинается самое интересное. Жмём на кнопку Преобразовать данные (Transform Data), чтобы всё-таки загрузить содержимое таблицы Document в редактор запросов Power Query. В открывшемся окне удаляем шаг Навигация (Navigation) красным крестом:

… и затем щёлкаем по значку шестерёнки справа от шага Источник (Source), чтобы открыть его параметры:

В выпадающием списке Открыть файл как (Open file as) вместо выбранной там по-умолчанию HTML-страницы выбираем Текстовый файл (Text file). Это заставит Power Query интерпретировать загружаемые данные не как веб-страницу, а как простой текст, т.е. Power Query не будет пытаться распознавать HTML-теги и их атрибуты, ссылки, картинки, таблицы, а просто обработает исходный код страницы как текст.
После нажатия на ОК мы этот HTML-код как раз и увидим (он может быть весьма объемным — не пугайтесь):

Ищем за что зацепиться
Теперь нужно понять на какие теги, атрибуты или метки в коде мы можем ориентироваться, чтобы извлечь из этой кучи текста нужные нам данные о товарах. Само-собой, тут всё зависит от конкретного сайта и веб-программиста, который его писал и вам придётся уже импровизировать.
В случае с Wildberries, промотав этот код вниз до товаров, можно легко нащупать простую логику:

- Строчки с ценами всегда содержат метку lower-price
- Строчки с названием бренда — всегда с меткой brand-name c-text-sm
- Название товара можно найти по метке goods-name c-text-sm
Иногда процесс поиска можно существенно упростить, если воспользоваться инструментами отладки кода, которые сейчас есть в любом современном браузере. Щёлкнув правой кнопкой мыши по любому элементу веб-страницы (например, цене или описанию товара) можно выбрать из контекстного меню команду Инспектировать (Inspect) и затем просматривать код в удобном окошке непосредственно рядом с содержимым сайта:

Фильтруем нужные данные
Теперь совершенно стандартным образом давайте отфильтруем в коде страницы нужные нам строки по обнаруженным меткам. Для этого выбираем в окне Power Query в фильтре [1] опцию Текстовые фильтры — Содержит (Text filters — Contains), переключаемся в режим Подробнее (Advanced) [2] и вводим наши критерии:

Добавление условий выполняется кнопкой со смешным названием Добавить предложение [3]. И не забудьте для всех условий выставить логическую связку Или (OR) вместо И (And) в выпадающих списках слева [4] — иначе фильтрация просто не сработает.
После нажатия на ОК на экране останутся только строки с нужной нам информацией:

Чистим мусор
Останется почистить всё это от мусора любым подходящим и удобным лично вам способом (их много). Например, так:
- Удалить заменой на пустоту начальный тег: <span class=»price»> через команду Главная — Замена значений (Home — Replace values).
- Разделить получившийся столбец по первому разделителю «>» слева командой Главная — Разделить столбец — По разделителю (Home — Split column — By delimiter) и затем ещё раз разделить получившийся столбец по первому вхождению разделителя «<» слева, чтобы отделить полезные данные от тегов:

- Удалить лишние столбцы, а в оставшемся заменить стандартную HTML-конструкцию " на нормальные кавычки.

В итоге получим наши данные в уже гораздо более презентабельном виде:

Разбираем блоки по столбцам
Если присмотреться, то информация о каждом отдельном товаре в получившемся списке сгруппирована в блоки по три ячейки. Само-собой, нам было бы гораздо удобнее работать с этой таблицей, если бы эти блоки превратились в отдельные столбцы: цена, бренд (издательство) и наименование.
Выполнить такое преобразование можно очень легко — с помощью, буквально, одной строчки кода на встроенном в Power Query языке М. Для этого щёлкаем по кнопке fx в строке формул (если у вас её не видно, то включите её на вкладке Просмотр (View)) и вводим следующую конструкцию:
= Table.FromRows(List.Split(#»Замененное значение1″[Column1.2.1],3))
Здесь функция List.Split разбивает столбец с именем Column1.2.1 из нашей таблицы с предыдущего шага #»Замененное значение1″ на кусочки по 3 ячейки, а потом функция Table.FromRows конвертирует получившиеся вложенные списки обратно в таблицу — уже из трёх столбцов:

Ну, а дальше уже дело техники — настроить числовые форматы столбцов, переименовать их и разместить в нужном порядке. И выгрузить получившуюся красоту обратно на лист Excel командой Главная — Закрыть и загрузить (Home — Close & Load…)

Вот и все хитрости 
Ссылки по теме
- Импорт курса биткойна с сайта через Power Query
- Парсинг текста регулярными выражениями (RegExp) в Power Query
- Параметризация путей к данным в Power Query
- Download source — 100.2 KB
Introduction
Many times, we have the need to export from a web application data into Excel format. Usually, we have this data already in the browser: as part of a table content, as an instantiation of a model …. The user has reviewed it, s/he is happy with it, and wants to open it in Excel. In this situation, the developer has different options:
- DO NOTHING, do not even offer the option. In this case, the user is forced to select the data directly from the browser, and then copy & paste it into Excel.
- BACK-END, generates the Excel file on the server. I am pretty sure that for whatever back-end you are using (.NET, Java, Node.js, PHP, …) there are many libraries that allow to generate nice Excel files.
- FRONT-END, generate the Excel directly on the browser.
The DO NOTHING approach works most of the time, but usually the results are awful. All cell formatting is lost in the process, multiple cells in the same row get merged,…
The BACK-END approach is the most popular. The available libraries makes implementing this functionality fast and cheap. However, there some drawbacks, which might or might not affect you:
- It uses server resources, this can be a problem in highly loaded systems.
- There is a «latency», the browser has to send the «generate my Excel» request to the server, the server has to generate it and then send back to the browser for download. This translates in a perceptible «delay» between the user pressing the «Export As Excel» button, and the actual file being downloaded
- Usually, the back-end needs to access the same data that is already present in the front-end. For persistent data then, we need a database query, some data cache implemented on the server,… or just the browser sends along with the «generate Excel request» the data to be included. All of them increase back-end workload, network traffic and the aforementioned latency.
Using the FRONT-END approach, all the previous issues just vanish. Usually this is pretty fast, as there is no network involved at all. However, the number of libraries available is quite short, and usually there is some kind of trade-off.
On the one hand, we have libraries that do not generate a true Excel, but another format (XML, CSV,…) that Excel is able to open. They are fine if you just require plain data export, without any of the Excel specifics (more than a Sheet, cell formatting, …)
About the libraries that generate true Excel, either they are small libraries with limited options (i.e.,: no cell formatting at all) or they are big libraries (>1MB) offering the full range of Excel options (js-xlsx, exceljs, openxmlsdkjs,… ) and with, usually a huge documentation.
In this article, I present a small library that presents the most basic functionality in a clean and concise way. Nevertheless, it is the functionality that I have needed for 90% of my Excel generation needs.
Using the Code
The library is intended to be used on the browser, so it is a JavaScript library, with two dependencies:
- JSZip v3.1.3 by Stuart Knightley, http://stuartk.com/jszip
- FileSaver.js by Eli Grey, http://eligrey.com
To use it, we just include them in our <HEAD> tag:
<script type="text/javascript" src="jszip.js"></script>
<script type="text/javascript" src="FileSaver.js"></script>
<script type="text/javascript" src="myexcel.js"></script>
The library defines a single global object $JExcel. This object includes some generic conversions and a generator for Excel objects.
var excel = $JExcel.new();
var excel = $JExcel.new("Arial 10 #333333");
And Excel object defines four methods:
addSheetaddStylesetgenerate
addSheet is used to add additional sheets to the Excel object. It requires a name. An Excel object always has a default sheet (index 0). Sheets are referenced by their index of creation.
addStyle is used to register styles in the Excel document. It requires a style definition object which is made of up to 5 properties:
{
  fill: "#ECECEC" ,
  border: "none,none,none,thin #333333"
  font: "Calibri 12 #0000AA B"});
  format: "yyyy.mm.dd hh:mm:ss",
  align: "R T",
}
A border definition is made up of a «border style» and «border color in RGB». Allowed border styles are available in the $JExcel.borderStyles array.
If font-style includes the B character, then the font is bold, U if underlined and I if italic.
There are a number of predefined display formats in the $JExcel.formats array. It is also possible to personalize them.
For horizontal-align and vertical-align, the following conventions apply: C: center L: left R: right T: top B: bottom -: none.
set is used to set values or styles on cells/rows/columns/sheets. What is set is decided by the non-undefined parameters. The following rules apply:
- If only a sheet index is defined, the sheet name is set
- If only a sheet index and a row number are defined, a style can be set for the row in the sheet, and a value for the row height
- If only a sheet index and a column number are defined, a style can be set for the column in the sheet and a value for the column width
- If a sheet index, a column and a row number are defined, then a style can be set for the defined cell and a value for its content
The set method allows a canonical list of parameters, or a single object parameter. In the canonical form, use undefined as the not-apply value, in the object parameter, just do not include the property.
set(0,undefined,undefined,"Summary");

var fillEC=excel.addStyle ( {fill: "#ECECEC"});
set(2,undefined,1,undefined,fillEC);
set( {sheet:2,row:1,style:fillEC});

var Arial10B=excel.addStyle ({font: "Arial 10 B"});
set( {sheet:0,col:5,row:3,value: "HELLO",style:Arial10B});
set(0,5,3,"HELLO",Arial10B);
The generate method generates an Excel WorkBook and makes it available for downloading.
Points of Interest
The XLSX format is just a bunch of XML files that are zipped together. This XML files follow the OpenXML convention. The library works by defining a model of Excel objects (sheets, rows, cells, styles,…) that are SET in memory, when the generate method is called, the necessary XML nodes for the Excel obejcts are created.
These XML nodes are then «printed» and merged with the OpenXML templates, then everything is zipped and the resulting stream is ready for download.
EXCEL does not handle date times as JavaScript, They use different EPOCH moments. The library defines the following conversion functions $JExcel.toExcelLocalTime(jsDate), $JExcel.toExcelUTCTime(jsDate)
For handling RGB values, the following function is also provided $JExcel.rgbToHex(red,green,blue).
Sample
The following sample…
function randomDate(start, end) {
    var d= new Date(start.getTime() + Math.random() * (end.getTime() - start.getTime()));
    return d;
}

var excel = $JExcel.new("Calibri light 10 #333333");
excel.set( {sheet:0,value:"This is Sheet 0" } );
var evenRow=excel.addStyle( { border: "none,none,none,thin #333333"});
var oddRow=excel.addStyle ( { fill: "#ECECEC" ,border: "none,none,none,thin #333333"});
for (var i=1;i<50;i++) excel.set({row:i,style: i%2==0 ? evenRow: oddRow  });
excel.set({row:3,value: 30  });

var headers=["Header 0","Header 1","Header 2","Header 3","Header 4"];
var formatHeader=excel.addStyle ( {
    border: "none,none,none,thin #333333",font: "Calibri 12 #0000AA B"}
);

for (var i=0;i<headers.length;i++){
    excel.set(0,i,0,headers[i],formatHeader);
    excel.set(0,i,undefined,"auto");
}

var initDate = new Date(2000, 0, 1);
var endDate = new Date(2016, 0, 1);
var dStyle = excel.addStyle ( {
    align: "R",
    format: "yyyy.mm.dd hh:mm:ss",
    font: "#00AA00"}
);

for (var i=1;i<50;i++){
    excel.set(0,0,i,"This is line "+i);
    var d=randomDate(initDate,endDate);
    excel.set(0,1,i,d.toLocaleString());
    excel.set(0,2,i,$JExcel.toExcelLocalTime(d));
    excel.set(0,3,i,$JExcel.toExcelLocalTime(d),dStyle);
    excel.set(0,4,i,"Some other text");
}

excel.set(0,1,undefined,30);
excel.set(0,3,undefined,30);
excel.set(0,4,undefined,20, excel.addStyle( {align:"R"}));
excel.set(0,1,3,undefined,excel.addStyle( {align:"L T"}));
excel.set(0,2,3,undefined,excel.addStyle( {align:"C C"}));
excel.set(0,3,3,undefined,excel.addStyle( {align:"R B"}));
excel.generate("SampleData.xlsx");
…generates the following Excel WorkBook:
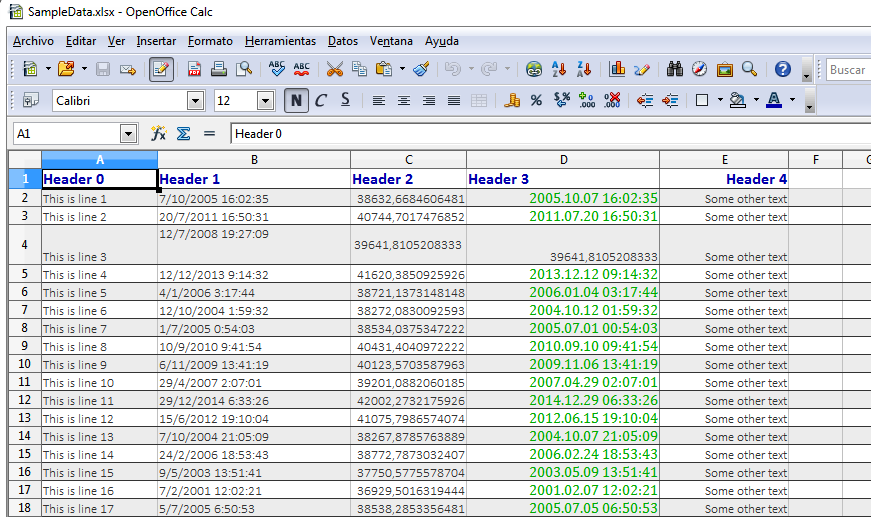
Notice the different display in columns B,C & D, they basically hold the same data, but in different formats. Also, the different sizes and cell alignments all along row 4 is noticeable.
Formulas
To use a formula, just enter it as you would do in Excel:
excel.set(0,8,1,15);
excel.set(0,8,2,13);
excel.set(0,8,3,"=I2+I3");
Finally
Implementing this conversor was easier than expected. The code is short and well commented, and should be easily hackable for adding new capabilities (i.e., cell merging). You can find a demo on http://jsegarra1971.github.io/MyExcel/sample.html and the latest code is available at https://github.com/jsegarra1971/MyExcel
If you use it, let me know !!!
This member has not yet provided a Biography. Assume it’s interesting and varied, and probably something to do with programming.
In the previous post, I have explained how we can read csv file using javascript and HTML 5 filereader, now in this post, I have explained how we can use external library like xlsx to parse or read excel file using javascript and show it’s contents in HTML table. When file is uploaded using Javascript, it is read as Binary string initially, and then binary data is read using xlsx plugin.
Read XLSX using Javascript
Let’s beging by adding simple HTML file input and button to upload file
<input type="file" id="fileUpload" />
<input type="button" id="upload" value="Upload" onclick="UploadProcess()" />
<br/>

<div id="ExcelTable"></div>
I have also included empty HTML div to create table inside it from our Excel file.
Now, we will create the function to upload the file and process the Excel file to get data from it and convert it into HTML table.
<script type="text/javascript" src="https://cdnjs.cloudflare.com/ajax/libs/xlsx/0.13.5/xlsx.full.min.js"></script>
<script type="text/javascript" src="https://cdnjs.cloudflare.com/ajax/libs/xlsx/0.13.5/jszip.js"></script>
<script type="text/javascript">
    function UploadProcess() {
        //Reference the FileUpload element.
        var fileUpload = document.getElementById("fileUpload");

        //Validate whether File is valid Excel file.
        var regex = /^([a-zA-Z0-9s_\.-:])+(.xls|.xlsx)$/;
        if (regex.test(fileUpload.value.toLowerCase())) {
            if (typeof (FileReader) != "undefined") {
                var reader = new FileReader();

                //For Browsers other than IE.
                if (reader.readAsBinaryString) {
                    reader.onload = function (e) {
                        GetTableFromExcel(e.target.result);
                    };
                    reader.readAsBinaryString(fileUpload.files[0]);
                } else {
                    //For IE Browser.
                    reader.onload = function (e) {
                        var data = "";
                        var bytes = new Uint8Array(e.target.result);
                        for (var i = 0; i < bytes.byteLength; i++) {
                            data += String.fromCharCode(bytes[i]);
                        }
                        GetTableFromExcel(data);
                    };
                    reader.readAsArrayBuffer(fileUpload.files[0]);
                }
            } else {
                alert("This browser does not support HTML5.");
            }
        } else {
            alert("Please upload a valid Excel file.");
        }
    };
    function GetTableFromExcel(data) {
        //Read the Excel File data in binary
        var workbook = XLSX.read(data, {
            type: 'binary'
        });

        //get the name of First Sheet.
        var Sheet = workbook.SheetNames[0];

        //Read all rows from First Sheet into an JSON array.
        var excelRows = XLSX.utils.sheet_to_row_object_array(workbook.Sheets[Sheet]);

        //Create a HTML Table element.
        var myTable  = document.createElement("table");
        myTable.border = "1";

        //Add the header row.
        var row = myTable.insertRow(-1);

        //Add the header cells.
        var headerCell = document.createElement("TH");
        headerCell.innerHTML = "Id";
        row.appendChild(headerCell);

        headerCell = document.createElement("TH");
        headerCell.innerHTML = "Name";
        row.appendChild(headerCell);

        headerCell = document.createElement("TH");
        headerCell.innerHTML = "Country";
        row.appendChild(headerCell);

        headerCell = document.createElement("TH");
        headerCell.innerHTML = "Age";
        row.appendChild(headerCell);

        headerCell = document.createElement("TH");
        headerCell.innerHTML = "Date";
        row.appendChild(headerCell);

         headerCell = document.createElement("TH");
        headerCell.innerHTML = "Gender";
        row.appendChild(headerCell);


        //Add the data rows from Excel file.
        for (var i = 0; i < excelRows.length; i++) {
            //Add the data row.
            var row = myTable.insertRow(-1);

            //Add the data cells.
            var cell = row.insertCell(-1);
            cell.innerHTML = excelRows[i].Id;

            cell = row.insertCell(-1);
            cell.innerHTML = excelRows[i].Name;

            cell = row.insertCell(-1);
            cell.innerHTML = excelRows[i].Country;

            cell = row.insertCell(-1);
            cell.innerHTML = excelRows[i].Age;

            cell = row.insertCell(-1);
            cell.innerHTML = excelRows[i].Date;

            cell = row.insertCell(-1);
            cell.innerHTML = excelRows[i].Gender;
        }


        var ExcelTable = document.getElementById("ExcelTable");
        ExcelTable.innerHTML = "";
        ExcelTable.appendChild(myTable);
    };
</script>
In the above Javascript code, we are first adding references of XLSX plugin files and then adding two functions
- UploadProcess: Uploads the file on button click and convert it into Binary data, it also check if Browser is IE then process accordingly to convert file into binary.
- ProcessExcel: this function takes the binary data, reads the Sheet name, create Table element and append each row in it.
I have explained lines of code using Comment.
Suppose our sample Excel file looks like this
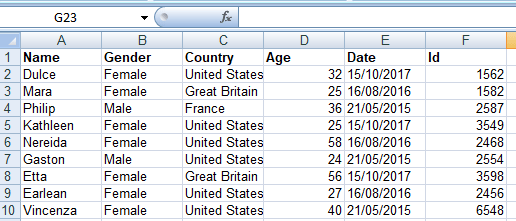
So, if use the above code in HTML/Javascript, output will be as below

Here is the fiddle link https://jsfiddle.net/abj98oxf/3/
Read XLS file using Javascript
In a Similar way, we can read .xls (excel) file also and show it in HTML table, I will repeat the same code, just few lines of code is different, also we will be using different plugin in it which is for .xls
<input type="file" id="fileUpload" />
<input type="button" id="upload" value="Upload" onclick="UploadProcess()" />
<br/>

<div id="ExcelTable"></div>

<script src="https://cdnjs.cloudflare.com/ajax/libs/xls/0.7.4-a/xls.js"></script>
<script type="text/javascript" src="https://cdnjs.cloudflare.com/ajax/libs/xlsx/0.13.5/jszip.js"></script>
<script type="text/javascript">
    function UploadProcess() {
        //Reference the FileUpload element.
        var fileUpload = document.getElementById("fileUpload");

        //Validate whether File is valid Excel file.
        var regex = /^([a-zA-Z0-9s_\.-:])+(.xls|.xlsx)$/;
        if (regex.test(fileUpload.value.toLowerCase())) {
            if (typeof (FileReader) != "undefined") {
                var reader = new FileReader();

                //For Browsers other than IE.
                if (reader.readAsBinaryString) {
                    reader.onload = function (e) {
                        GetTableFromExcel(e.target.result);
                    };
                    reader.readAsBinaryString(fileUpload.files[0]);
                } else {
                    //For IE Browser.
                    reader.onload = function (e) {
                        var data = "";
                        var bytes = new Uint8Array(e.target.result);
                        for (var i = 0; i < bytes.byteLength; i++) {
                            data += String.fromCharCode(bytes[i]);
                        }
                        GetTableFromExcel(data);
                    };
                    reader.readAsArrayBuffer(fileUpload.files[0]);
                }
            } else {
                alert("This browser does not support HTML5.");
            }
        } else {
            alert("Please upload a valid Excel file.");
        }
    };
    function GetTableFromExcel(data) {
        //Read the Excel File data in binary
        var cfb = XLS.CFB.read(data, {type: 'binary'});
        var workbook = XLS.parse_xlscfb(cfb);

        //get the name of First Sheet.
        var Sheet = workbook.SheetNames[0];

        //Read all rows from First Sheet into an JSON array.
        var excelRows = XLS.utils.sheet_to_row_object_array(workbook.Sheets[Sheet]);

        //Create a HTML Table element.
        var myTable  = document.createElement("table");
        myTable.border = "1";

        //Add the header row.
        var row = myTable.insertRow(-1);

        //Add the header cells.
        var headerCell = document.createElement("TH");
        headerCell.innerHTML = "Id";
        row.appendChild(headerCell);

        headerCell = document.createElement("TH");
        headerCell.innerHTML = "Name";
        row.appendChild(headerCell);

        headerCell = document.createElement("TH");
        headerCell.innerHTML = "Country";
        row.appendChild(headerCell);

        headerCell = document.createElement("TH");
        headerCell.innerHTML = "Age";
        row.appendChild(headerCell);

        headerCell = document.createElement("TH");
        headerCell.innerHTML = "Date";
        row.appendChild(headerCell);

         headerCell = document.createElement("TH");
        headerCell.innerHTML = "Gender";
        row.appendChild(headerCell);


        //Add the data rows from Excel file.
        for (var i = 0; i < excelRows.length; i++) {
            //Add the data row.
            var row = myTable.insertRow(-1);

            //Add the data cells.
            var cell = row.insertCell(-1);
            cell.innerHTML = excelRows[i].Id;

            cell = row.insertCell(-1);
            cell.innerHTML = excelRows[i].Name;

            cell = row.insertCell(-1);
            cell.innerHTML = excelRows[i].Country;

            cell = row.insertCell(-1);
            cell.innerHTML = excelRows[i].Age;

            cell = row.insertCell(-1);
            cell.innerHTML = excelRows[i].Date;

            cell = row.insertCell(-1);
            cell.innerHTML = excelRows[i].Gender;
        }


        var ExcelTable = document.getElementById("ExcelTable");
        ExcelTable.innerHTML = "";
        ExcelTable.appendChild(myTable);
    };
</script>
The XLS file upload code is the same as .XLSX one was, here are the changes
- We included difference JS plugin file : <script src=»https://cdnjs.cloudflare.com/ajax/libs/xls/0.7.4-a/xls.js»></script>
- Changed a few lines of code for the function «GetTableFromExcel»
       //Read the Excel File data in binary
         var cfb = XLS.CFB.read(data, {type: 'binary'});
        var workbook = XLS.parse_xlscfb(cfb);

        //get the name of First Sheet.
        var Sheet = workbook.SheetNames[0];

        //Read all rows from First Sheet into an JSON array.
        var excelRows = XLS.utils.sheet_to_row_object_array(workbook.Sheets[Sheet]);?
The rest of the code remains the same.
Here is the working fiddle link: https://jsfiddle.net/y3tx8wk4/1/
Note: You need to pass .xls file in this code to make it work.
Convert Excel to JSON using Javascript
You can also upload excel and then convert it to JSON data and proceed with it further.
<form enctype="multipart/form-data">
  <input id="upload" type=file name="files[]">
</form>

<textarea class="form-control" rows=35 cols=120 id="xlx_json"></textarea>


<script src="https://ajax.googleapis.com/ajax/libs/jquery/2.1.1/jquery.min.js"></script>
<script src="https://cdnjs.cloudflare.com/ajax/libs/xlsx/0.8.0/jszip.js"></script>
<script src="https://cdnjs.cloudflare.com/ajax/libs/xlsx/0.8.0/xlsx.js"></script>
<script>
  document.getElementById('upload').addEventListener('change', handleFileSelect, false);
  var ExcelToJSON = function() {

    this.parseExcel = function(file) {
      var reader = new FileReader();

      reader.onload = function(e) {
        var data = e.target.result;
        var workbook = XLSX.read(data, {
          type: 'binary'
        });
        workbook.SheetNames.forEach(function(sheetName) {
          // Here is your object
          var XL_row_object = XLSX.utils.sheet_to_row_object_array(workbook.Sheets[sheetName]);
          var json_object = JSON.stringify(XL_row_object);
          console.log(JSON.parse(json_object));
          jQuery('#xlx_json').val(json_object);
        })
      };

      reader.onerror = function(ex) {
        console.log(ex);
      };

      reader.readAsBinaryString(file);
    };
  };

  function handleFileSelect(evt) {

    var files = evt.target.files; // FileList object
    var xl2json = new ExcelToJSON();
    xl2json.parseExcel(files[0]);
  }
</script>
Here is the fiddle: https://jsfiddle.net/aszchkr0/ using which you can test the above code, just to search excel file and once value is changed you will find JSON result in textarea.
In the above code, we are reading excel using XLSX plugin, then we loop through each sheet and get XL row object and further convert it to JSON.
You may also like to read:
Read PDF file using Javascript
Convert Image to base64 string using Javascript
Convert seconds to hh:mm:ss using Javascript
Uncaught Error: «Cannot use import statement outside a module»
Encrypt and Decrypt string in Javascript
Email validation using jQuery (Various Methods)
Toggle Password input field using Javascript (Show/hide password)