
Как организовать отслеживание версий Excel файлов?
Обучать пользователей основам Mercurial (или Git, Subversion) не хочется — будут капризы, мол сколько нужно действий, чтобы сохранить файл. Этот вариант я оставил напоследок.
Есть какие-нибудь варианты проще?
Онлайн сервис или локальный — не важно.
-
Вопрос заданболее трёх лет назад
-
5389 просмотров
Используйте dropbox, он хранит все версии файлов, точнее журнал изменений, насколько я знаю.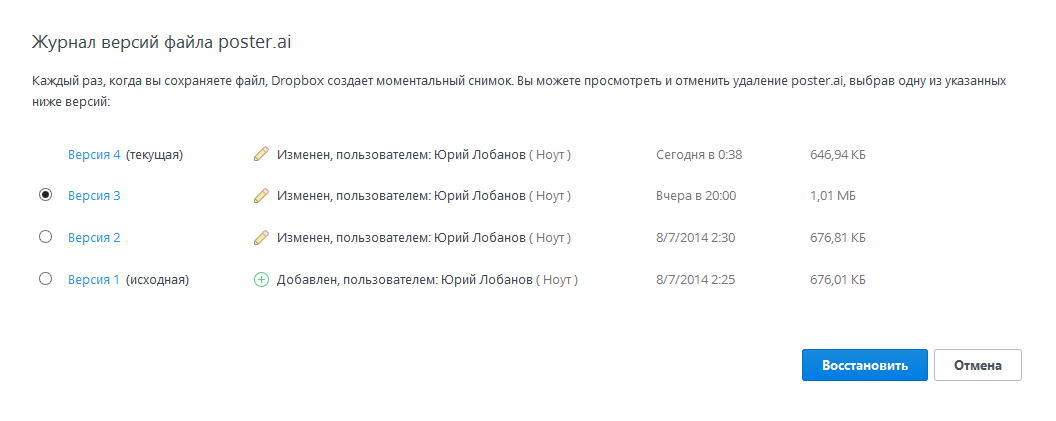
Помимо этого в эксель есть журнал изменений. Это не совсем то, но может помочь. Вы открываете общий доступ к файлу и все изменения пишутся в журнал, кем, когда, строе значение, новое значение.
Пригласить эксперта
-
Показать ещё
Загружается…
14 апр. 2023, в 04:52
5000 руб./за проект
14 апр. 2023, в 01:55
1000 руб./в час
13 апр. 2023, в 23:50
3000 руб./за проект
Минуточку внимания
Контроль версий файлов
Данный инструмент доступен для MS Excel и MS Word в надстройке Macro Tools VBA

Инструмент “контроль версии файлов” Excel позволяет хранить несколько версий файла Excel. При необходимости возвращаться к более ранним версиям. Определять, кто и когда сделал то или иное изменение.
При нажатии кнопки “Загрузить” – происходит замена текущего файла, выбранным файлом из хранилище. Текущий файл будет перезаписан, файлом из хранилища.
При нажатии кнопки “Открыть” – открывается выбранный файл из хранилища параллельно с текущим файлом.
При нажатии кнопки “Создать” – создается новая версия файла в хранилище, с автоматическим присвоением номера версии файла и коментария.

Taking @Demosthenex ‘s answer a step further, if you’d like to also keep track of the code in your Microsoft Excel Objects and UserForms you have to get a little bit tricky.
First I altered my SaveCodeModules() function to account for the different types of code I plan to export:
Sub SaveCodeModules(dir As String)

'This code Exports all VBA modules
Dim moduleName As String
Dim vbaType As Integer

With ThisWorkbook.VBProject
    For i = 1 To .VBComponents.count
        If .VBComponents(i).CodeModule.CountOfLines > 0 Then
            moduleName = .VBComponents(i).CodeModule.Name
            vbaType = .VBComponents(i).Type

            If vbaType = 1 Then
                .VBComponents(i).Export dir & moduleName & ".vba"
            ElseIf vbaType = 3 Then
                .VBComponents(i).Export dir & moduleName & ".frm"
            ElseIf vbaType = 100 Then
                .VBComponents(i).Export dir & moduleName & ".cls"
            End If

        End If
    Next i
End With

End Sub
The UserForms can be exported and imported just like VBA code. The only difference is that two files will be created when a form is exported (you’ll get a .frm and a .frx file for each UserForm). One of these holds the software you’ve written and the other is a binary file which (I’m pretty sure) defines the layout of the form.
Microsoft Excel Objects (MEOs) (meaning Sheet1, Sheet2, ThisWorkbook etc) can be exported as a .cls file. However, when you want to get this code back into your workbook, if you attempt to import it the same way you would a VBA module, you’ll get an error if that sheet already exists in the workbook.
To get around this issue, I decided not to try to import the .cls file into Excel, but to read the .cls file into excel as a string instead, then paste this string into the empty MEO. Here is my ImportCodeModules:
Sub ImportCodeModules(dir As String)

Dim modList(0 To 0) As String
Dim vbaType As Integer

' delete all forms, modules, and code in MEOs
With ThisWorkbook.VBProject
    For Each comp In .VBComponents

        moduleName = comp.CodeModule.Name

        vbaType = .VBComponents(moduleName).Type

        If moduleName <> "DevTools" Then
            If vbaType = 1 Or _
                vbaType = 3 Then

                .VBComponents.Remove .VBComponents(moduleName)

            ElseIf vbaType = 100 Then

                ' we can't simply delete these objects, so instead we empty them
                .VBComponents(moduleName).CodeModule.DeleteLines 1, .VBComponents(moduleName).CodeModule.CountOfLines

            End If
        End If
    Next comp
End With

' make a list of files in the target directory
Set FSO = CreateObject("Scripting.FileSystemObject")
Set dirContents = FSO.getfolder(dir) ' figure out what is in the directory we're importing

' import modules, forms, and MEO code back into workbook
With ThisWorkbook.VBProject
    For Each moduleName In dirContents.Files

        ' I don't want to import the module this script is in
        If moduleName.Name <> "DevTools.vba" Then

            ' if the current code is a module or form
            If Right(moduleName.Name, 4) = ".vba" Or _
                Right(moduleName.Name, 4) = ".frm" Then

                ' just import it normally
                .VBComponents.Import dir & moduleName.Name

            ' if the current code is a microsoft excel object
            ElseIf Right(moduleName.Name, 4) = ".cls" Then
                Dim count As Integer
                Dim fullmoduleString As String
                Open moduleName.Path For Input As #1

                count = 0              ' count which line we're on
                fullmoduleString = ""  ' build the string we want to put into the MEO
                Do Until EOF(1)        ' loop through all the lines in the file

                    Line Input #1, moduleString  ' the current line is moduleString
                    If count > 8 Then            ' skip the junk at the top of the file

                        ' append the current line `to the string we'll insert into the MEO
                        fullmoduleString = fullmoduleString & moduleString & vbNewLine

                    End If
                    count = count + 1
                Loop

                ' insert the lines into the MEO
                .VBComponents(Replace(moduleName.Name, ".cls", "")).CodeModule.InsertLines .VBComponents(Replace(moduleName.Name, ".cls", "")).CodeModule.CountOfLines + 1, fullmoduleString

                Close #1

            End If
        End If

    Next moduleName
End With

End Sub
In case you’re confused by the dir input to both of these functions, that is just your code repository! So, you’d call these functions like:
SaveCodeModules "C:...YourDirectoryProjectsource"
ImportCodeModules "C:...YourDirectoryProjectsource"
nerv

Пользователь
Сообщений: 3071
Регистрация: 22.12.2012
| Цитата |
|---|
| ikki пишет: заманчиво. тащи и ягодки. чё уж теперь… |
я только начал изучать и много чего не знаю. Например, можно отследить всю историю изменений файла. Можно сравнить любое временное состояние с любым (т.е. не только до и после). Можно вести коллективную разработку. Допустим, есть удаленный репозиторий(хранилище). Ты работаешь с проектом на локальной машине, делаешь частые правки, сохраняешь состояния, а на сервер заливаешь это все одним коммитом (состоянием). Возможность комментировать сохраненные состояния. Вообще, очень трудно что-то потерять в Git’е ![]()
| Цитата |
|---|
| EducatedFool пишет: nerv, а ты уверен, что система контроля версий всегда (во всех случаях) удобнее? |
ну, я сам нехотя на нее переходил, скептически относился поначалу. Даже сказал бы противился ![]() Первое впечатление: да, уверен.
Первое впечатление: да, уверен.
| Цитата |
|---|
| EducatedFool пишет: В любой момент, я могу одним нажатием кнопки открыть в Excel любую из прежних версий |
в Git’е практически так же
| Цитата |
|---|
| EducatedFool пишет: Или тот же Git позволит мне сравнивать разные версии кода VBA (даже из запароленных VBA-проектов)? |
сравнить не позволит, но переключаться между версиями файлов, труда не составит. Чтобы можно было сравнивать состояния, придется экспортировать модули, классы, формы. В принципе, это может сделать тот же макрос (т.е. максимально автоматизировано). Зато всегда сможешь наглядно увидеть, что где, почему и отчего.
| Цитата |
|---|
| EducatedFool пишет: что мне надо нажать, чтобы текущая версия сохранилась? |
| Код |
|---|
$ git add * $ git commit |
изначально Git это консольное приложение, но я работаю преимущество через GUI (одну кнопку). Там все как на ладони.
| Цитата |
|---|
| EducatedFool пишет: я так понимаю, на сервере сохраняется, а не на локальном компе? |
храниться на локальной машине. На сервер пушится (push) при коллективной разработке или если ты сам этого захочешь. Вместе с тем, на сервере могут быть приватные и публичные репозитории (в моем примере публичный).
| Цитата |
|---|
| EducatedFool пишет: Сохраняется копия файла XLA целиком, или только код (одного модуля, или все модули)? |
сохраняется слепок всего проекта, т.е. каждого файла в отдельности. Разумеется если файлы не изменялись, там там это все как-то хитро оптимизируется.
| Цитата |
|---|
| EducatedFool пишет: Или ты копируешь (экспортируешь) код модуля вручную? |
тот пример был первый и сделан вручную. Позже планирую автоматизировать.
Изменено: nerv — 24.12.2012 15:22:38
83
83 people found this article helpful
A great feature for spreadsheet collaboration
Before you ask your team members to review your Excel worksheets, turn on Excel revision tracking for your shared workbook. When you use the legacy track changes feature in Excel, you’ll see who made changes to the worksheet or workbook, and the changes they made. After your team finishes the review, compare your original data with the reviewers’ changed data. Then, accept or reject their changes, and turn off Track Changes to finalize the document.
Instructions in this article apply to Excel for Microsoft 365, Excel 2019, and Excel 2016.
Can You Track Changes in Excel?
When you want your team to review and edit your Excel workbook, you have two options. If everyone on your team uses Excel for Microsoft 365, the co-authoring feature is a straightforward and quick way to review a document. If you want more information about the revisions made or if your team members work with older versions of Excel, use the legacy Track Changes feature.
You won’t find the option to track changes in Excel for Microsoft 365 and Excel 2019 on the Excel Ribbon. You’ll only see the track changes commands in the Review tab of Excel 2016 and older versions. The option is available in newer versions of Excel, but you’ll need to add the associated track changes commands to a new group in the Review tab.
Microsoft recommends that you use the co-authoring feature of Excel, which replaces Shared Workbooks. With co-authoring, you’ll see the changes others make in real time, and each person’s changes may be in a different color. However, co-authoring doesn’t track the changes, and you can’t reject changes to revert to your original data. Co-authoring is only available with a Microsoft 365 subscription.
Enable Track Changes in Newer Versions of Excel
To enable the legacy Track Changes feature in Windows:
-
Go to the File tab and select Options.
-
In the Excel Options dialog box, select Customize Ribbon.
-
Select the Choose command from drop-down arrow and choose All commands.
-
Select the Customize the Ribbon drop-down arrow and choose Main Tabs.
-
Expand and highlight the Review category.
-
Select New Group.
-
Make sure the New Group entry is highlighted, then select Rename.
-
In the Rename dialog box, enter a display name for the group. For example, enter Track Changes.
-
Select OK to apply the change and close the Rename dialog box.
-
In the Excel Options dialog box, go to the All Commands list, then choose each of the following:
- Compare and Merge Workbooks (Legacy)
- Protect Sharing (Legacy)
- Share Workbook (Legacy)
- Track Changes (Legacy)
After you select each command, select Add to add that command to the Review tab.
-
Select OK to apply your changes and close the Excel Options dialog box.
-
The four track changes commands appear on the Review tab in the new group that you created.
How to Turn On Track Changes in Excel
After you’ve entered all the information in the worksheet, turn on the Track Changes feature before making the Excel workbook available for review.
-
Go to the Review tab and select Track Changes > Highlight Changes.
-
In the Highlight Changes dialog box, select the Track changes while editing check box.
-
Select the When check box and set it to All.
-
Select the Who check box and set it to Everyone.
-
Select the Highlight changes on screen check box.
-
Select OK.
-
On the Review tab, select Share Workbook.
-
In the Share Workbook dialog box, go to the Editing tab and select the Use the old shared workbooks feature instead of the new co-authoring experience check box.
-
Select OK.
-
On the Review tab, select Protect Shared Workbook.
-
In the Protect Shared Workbook dialog box, select the Sharing with track changes check box.
-
Select OK.
Share the Workbook
When your shared workbook is ready to be reviewed, upload the file to a location that your team members can access. For example, upload the workbook to a SharePoint site, a OneDrive folder, or Dropbox.
The Track Changes feature doesn’t work with workbooks that contain tables. Tables must be converted to a range.
After the workbook is uploaded, inform your team members that the file is ready for their review. One way to do this is to use the Share feature in Excel.
If you don’t have a space set up that is accessible to all the reviewers, email the workbook file to each reviewer.
How to View and Accept Changes
After all your reviewers have had a chance to review and edit the workbook, it’s time to accept or reject those changes.
-
Go to the Review tab and select Track Changes > Accept or Reject Changes.
-
In the Select Changes to Accept or Reject dialog box, clear the Where checkbox to accept or reject changes to the entire workbook.
-
Select OK.
-
For each change, select either Accept or Reject.
How to Turn Off Track Changes
When you’re finished with the review and don’t want to continue to track changes made to the workbook, turn off the Track Changes feature.
-
Go to the Review tab and select Track Changes > Highlight Changes.
-
In the Highlight Changes dialog box, clear all the check boxes.
-
Select OK.
Thanks for letting us know!
Get the Latest Tech News Delivered Every Day
Subscribe