
Skip to main content
Support
Support
Sign in
Sign in with Microsoft
Sign in or create an account.
Hello,
Select a different account.
You have multiple accounts
Choose the account you want to sign in with.
Excel 2013
-
Shift+Spacebar to select the row.
-
Ctrl+-(minus sign) to delete the row.
Excel 2016
-
Shift+Spacebar to select the row.
-
Ctrl+-(minus sign) to delete the row.


Need more help?
Want more options?
Discover
Community
Explore subscription benefits, browse training courses, learn how to secure your device, and more.

Microsoft 365 subscription benefits

Microsoft 365 training

Microsoft security

Accessibility center
Communities help you ask and answer questions, give feedback, and hear from experts with rich knowledge.

Ask the Microsoft Community

Microsoft Tech Community

Windows Insiders
Microsoft 365 Insiders
Was this information helpful?
(The more you tell us the more we can help.)
(The more you tell us the more we can help.)
What affected your experience?
Resolved my issue
Clear instructions
Easy to follow
No jargon
Pictures helped
Other
Didn’t match my screen
Incorrect instructions
Too technical
Not enough information
Not enough pictures
Other
Any additional feedback? (Optional)
Thank you for your feedback!
×
As you know, Excel is a very user-friendly software for daily business purpose data manipulation. In day-to-day data management, we maintain the data in Excel sheets. However, sometimes we need to delete the row and number of rows from the data. We can delete the selected row in Excel just by CTRL –(minus sign).
To delete multiple rows quickly, we can use the same shortcut.
Also, have a look at this list of Excel ShortcutsAn Excel shortcut is a technique of performing a manual task in a quicker way.read more.
Table of contents
- Shortcut to Delete Row in Excel
- How to Delete Row In Excel Shortcut?
- Deleting a Row Using Excel (ctrl -) Shortcut – Example #1
- Deleting a Row Using Right Click – Example #2
- Deleting the Multiple Rows – Example #3
- Things to Remember
- Recommended Articles
- How to Delete Row In Excel Shortcut?
How to Delete Row In Excel Shortcut?
Let us understand the Excel shortcut keys working with simple examples below.
You can download this Delete Row Excel Shortcut Template here – Delete Row Excel Shortcut Template
Deleting a Row Using Excel (ctrl -) Shortcut – Example #1
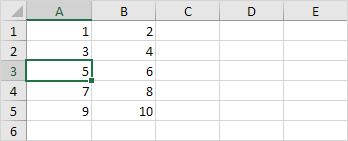
The table below shows a sales data set to apply the delete row in the Excel shortcut operation.
Below are the steps for deleting a row in Excel (CTRL -) shortcut:
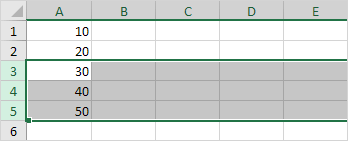
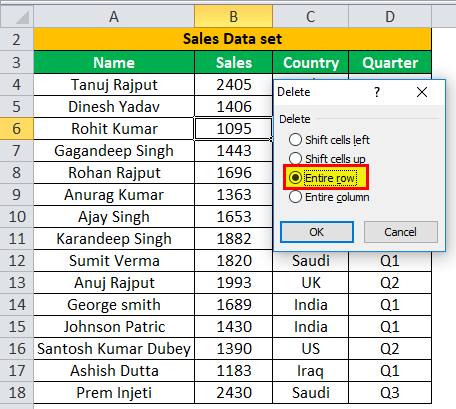
- We must first select the row we want to delete from the sales data table. Here, we pick row no.3.
- Then, press the CTRL – (minus sign) keys.

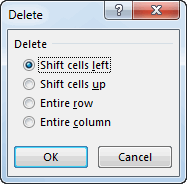
- We may get the below four options to decide the place for the remaining data:
That are shift cells left
Shift cells up (by default)
Entire Row
Entire Column - We may select the whole row from the available option by pressing the “R” button, then the “OK” key.

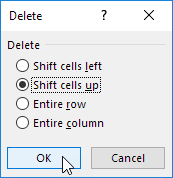
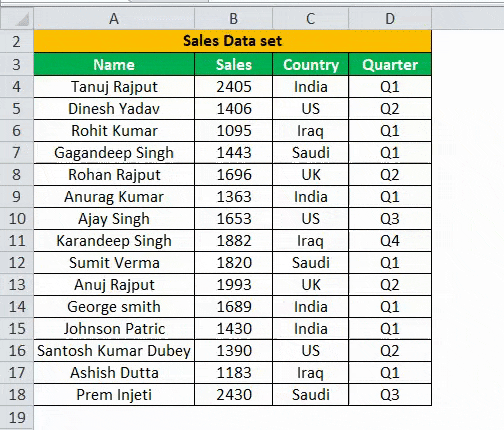
- As a result, row no.3 will be deleted from the given data set.

Deleting a Row Using Right Click – Example #2
Let us consider the below country-wise sales data, and we want to delete row 2 from it.
Now, we must select row no. 2 and right-click and choose the “Delete” option, as shown below.
As a result, it will enable the below four options to decide the place for the remaining data:
- Shift cells left.
- Shift cells up (by default)
- Entire Row
- Entire Column
Select the “Entire Row” from the available option and press the “OK” key.
The output will be:
Deleting the Multiple Rows – Example #3
This example will apply the shortcut key on multiple rows at once.
Let us consider the table below and select the multiple rows from the table we want to delete from this table. For example, suppose we want to delete the 3rd,4th, and 5th rows from the below table.
Then, select the 3rd,4th, and 5th rows and press the CTRL-
Now, we must choose the “Entire Row” and click “OK.”
And we will get the below table after deletion.
Things to Remember
- We must always select the “Entire Row” option while deleting the row. Otherwise, we may face the wrong data moving problem in your table.
- Suppose we select the “Shift cell up” option from the table, then only the cell from the table gets deleted, not the whole row, and our data from the cell below gets shifted upwards.
- Suppose we select the “Shift cell left” option from the table, then only the cell from the table gets deleted, not the whole row, and the entire row data gets shifted to the left.
- If we select the “Entire Column” option, the selected column will get deleted.
Recommended Articles
This article is a guide to keyboard Shortcut to Delete Row in Excel. Here, we discuss how to delete a row in Excel using shortcuts – 1) Using CTRL (-) 2) Using right-click, 3) Deleting the multiple rows along with practical examples. You may learn more about Excel from the following articles: –
- Insert Row in VBA
- Insert Row Shortcut in Excel
- Excel Delete Blank Rows
- Excel Create List
Bottom line: Learn some of my favorite keyboard shortcuts when working with rows and columns in Excel.
Skill level: Easy

Whether you are creating a simple list of names or building a complex financial model, you probably make a lot of changes to the rows and columns in the spreadsheet. Tasks like adding/deleting rows, adjusting column widths, and creating outline groups are very common when working with the grid.
This post contains some of my favorite shortcuts that will save you time every day.
I’ve also listed the equivalent shortcuts for the Mac version of Excel where available.
#1 – Select Entire Row or Column
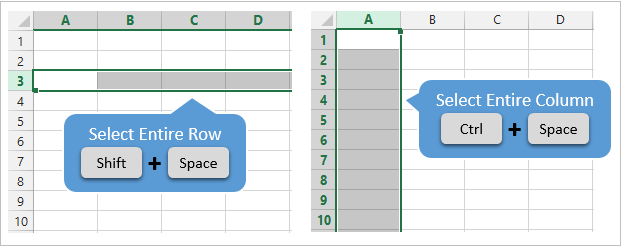
Shift+Space is the keyboard shortcut to select an entire row.
Ctrl+Space is the keyboard shortcut to select an entire column.
Mac Shortcuts: Same as above
The keyboard shortcuts by themselves don’t do much. However, they are the starting point for performing a lot of other actions where you first need to select the entire row or column. This includes tasks like deleting rows, grouping columns, etc.
These shortcuts also work for selecting the entire row or column inside an Excel Table.
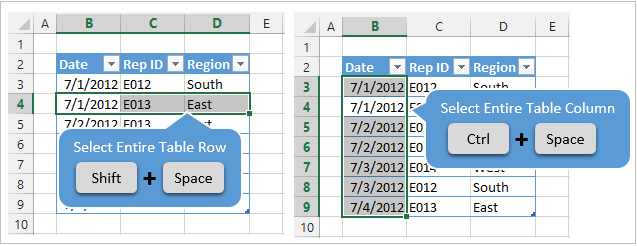
When you press the Shift+Space shortcut the first time it will select the entire row within the Table. Press Shift+Space a second time and it will select the entire row in the worksheet.
The same works for columns. Ctrl+Space will select the column of data in the Table. Pressing the keyboard shortcut a second time will include the column header of the Table in the selection. Pressing Ctrl+Space a third time will select the entire column in the worksheet.
You can select multiple rows or columns by holding Shift and pressing the Arrow Keys multiple times.
![]()
#2 – Insert or Delete Rows or Columns
There are a few ways to quickly delete rows and columns in Excel.
If you have the rows or columns selected, then the following keyboard shortcuts will quickly add or delete all selected rows or columns.
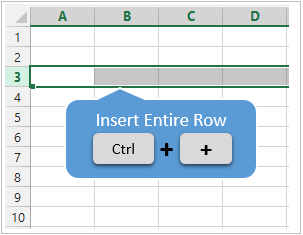
Ctrl++ (plus character) is the keyboard shortcut to insert rows or columns. If you are using a laptop keyboard you can press Ctrl+Shift+= (equal sign).
Mac Shortcut: Cmd++ or Cmd+Shift+
Ctrl+- (minus character) is the keyboard shortcut to delete rows or columns.
Mac Shortcut: Cmd+-

So for the above shortcuts to work you will first need to select the entire row or column, which can be done with the Shift+Space or Ctrl+Space shortcuts explained in #1.
If you do not have the entire row or column selected then you will be presented with the Insert or Delete Menus after pressing Ctrl++ or Ctrl+-.
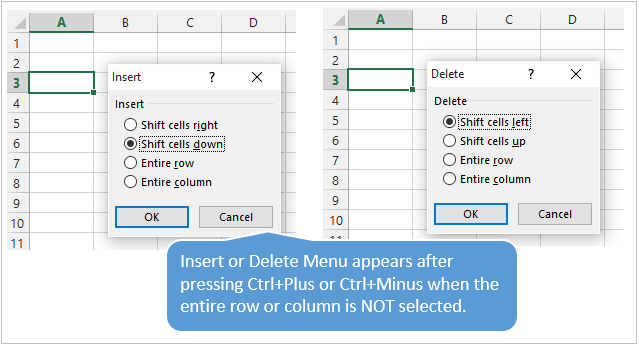
You can then press the up or down arrow keys to make your selection from the menu and hit Enter. For me it is easier to first select the entire row or column, then press Ctrl++ or Ctrl+-.
So, the entire keyboard shortcut to delete a column would be Ctrl+Space, Ctrl+-. You could also use the keyboard shortcut Alt+H+D+C to delete columns and Alt+H+D+R to delete rows. There are lots of ways to do a simple task… 🙂
#3 – AutoFit Column Width
There are also a lot of different ways to AutoFit column widths. AutoFit means that the width of the column will be adjusted to fit the contents of the cell.
You can use the mouse and double-click when you hover the cursor between columns when you see the resize column cursor.
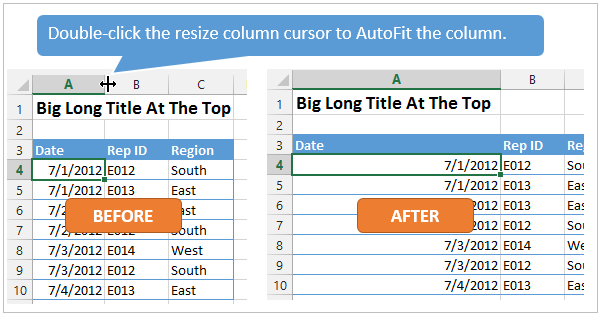
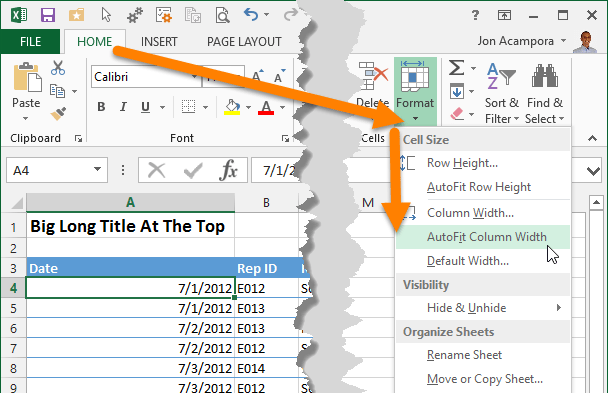
The problem with this is that you might just want to resize the column for the date in cell A4, instead of the big long title in cell A1. To accomplish this you can use the AutoFit Column Width button. It is located on the Home tab of the Ribbon in the Format menu.
The AutoFit Column Width button bases the width of the column on the cells you have selected. In the image above I have cell A4 selected. So the column width will be adjusted to fit the contents of A4, as shown in the results below.
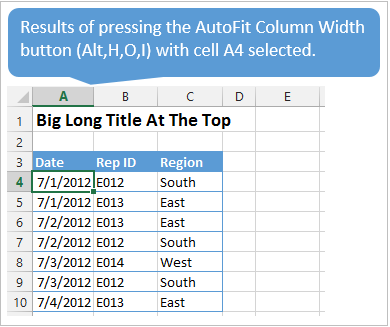
Alt,H,O,I is the keyboard shortcut for the AutoFit Column Width button. This is one I use a lot to get my reports looking shiny. 🙂
Alt,H,O,A is the keyboard shortcut to AutoFit Row Height. It doesn’t work exactly the same as column width, and will only adjust the row height to the tallest cell in the entire row.
Mac Shortcuts: None that I know of. The Mac version does not use the Alt key sequence which I believe is a limitation of the Mac OS.
#3.5 – Manually Adjust Row or Column Width
The column width or row height windows can be opened with keyboard shortcuts as well.
Alt,O,R,E is the keyboard shortcut to open the Row Height window.
Alt,O,C,W is the keyboard shortcut to open the Column Width window.
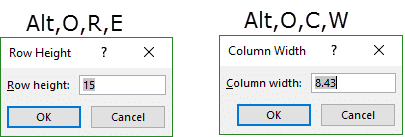
The row height or column width will be applied to the rows or columns of all the cells that are currently selected.
These are old shortcuts from Excel 2003, but they still work in the modern versions of Excel.
Mac Shortcuts: None that I know of. The Mac version does not use the Alt key sequence which I believe is a limitation of the Mac OS.
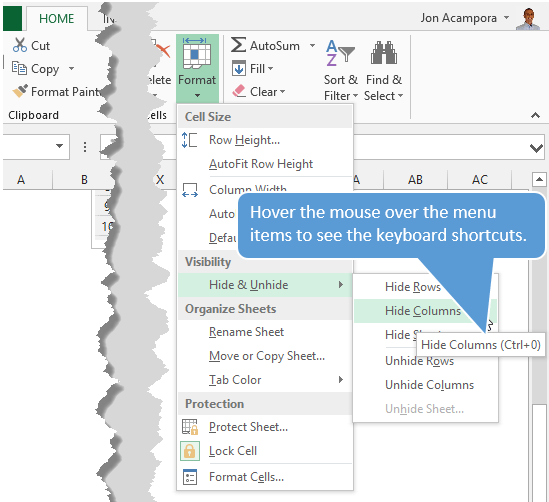
#4 – Hide or Unhide Rows or Columns
There are several dedicated keyboard shortcuts to hide and unhide rows and columns.
- Ctrl+9 to Hide Rows
- Ctrl+0 (zero) to Hide Columns
- Ctrl+Shift+( to Unhide Rows
- Ctrl+Shift+) to Unhide Columns – If this doesn’t work for you try Alt,O,C,U (old Excel 2003 shortcut that still works). You can also modify a Windows setting to prevent the conflict with this shortcut. See the comment from Pablo Baez on Oct 5, 2015 below for further instructions. Thanks Pablo! 🙂
Mac Shortcuts: Same as above
The buttons are also located on the Format menu on the Home tab of the Ribbon. You can hover over any of the items in the menu and the keyboard shortcut will display in the screentip (see screenshot below).
The trick with getting these shortcuts to work is to have the proper cells selected first.
To hide rows or columns you just need to select cells in the rows or columns you want to hide, then press the Ctrl+9 or Ctrl+Shift+( shortcut.
To unhide rows or columns you first need to select the cells that surround the rows or columns you want to unhide. In the screenshot below I want to unhide rows 3 & 4. I first select cell B2:B5, cells that surround or cover the hidden rows, then press Ctrl+Shift+( to unhide the rows.
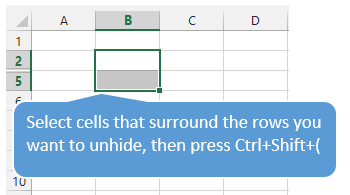
The same technique works to unhide columns.
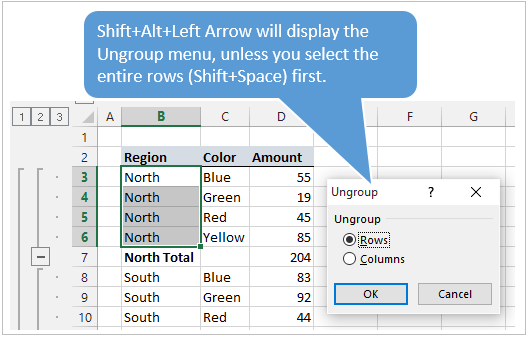
#5 – Group or Ungroup Rows or Columns
Row and Column groupings are a great way to quickly hide and unhide columns and rows.
Shift+Alt+Right Arrow is the shortcut to group rows or columns.
Mac Shortcut: Cmd+Shift+K
Shift+Alt+Left Arrow is the shortcut to ungroup.
Mac Shortcut: Cmd+Shift+J
Again, the trick here is to select the entire rows or columns you want to group/ungroup first. Otherwise you will be presented with the Group or Ungroup menu.
Alt,A,U,C is the keyboard shortcut to remove all the row and columns groups on the sheet. This is the same as pressing the Clear Outline button on the Ungroup menu of the Data tab on the Ribbon.
*Bonus funny: At some point when using the group/ungroup shortcuts, you will accidentally press Ctrl+Alt+Right Arrow. This is a Windows shortcut that orientates the entire screen to the right. I call it “neck ache view”. To get it back to normal press Ctrl+Alt+Up Arrow.
If your co-worker or boss accidentally leaves their computer unlocked and you want to play a joke on them, press Ctrl+Alt+Down Arrow. This will turn their screen upside down. Don’t forget to record a video of their WTF reaction… 🙂
What Are Your Favorites?
There are a ton of keyboard shortcuts for working with rows and columns. The above are some of my favorites that I use everyday. What are some of your favorites? Please leave a comment below. Thanks! 🙂
About This Shortcut
This shortcut will delete rows that are selected.
Note: In Mac 2016, Control — also works (same as Windows).
Related videos
The videos below demonstrate this shortcut.

Author![]()
Dave Bruns
Hi — I’m Dave Bruns, and I run Exceljet with my wife, Lisa. Our goal is to help you work faster in Excel. We create short videos, and clear examples of formulas, functions, pivot tables, conditional formatting, and charts.
There are hundreds and hundreds of Excel sites out there. I’ve been to many and most are an exercise in frustration. Found yours today and wanted to let you know that it might be the simplest and easiest site that will get me where I want to go.
Get Training
Quick, clean, and to the point training
Learn Excel with high quality video training. Our videos are quick, clean, and to the point, so you can learn Excel in less time, and easily review key topics when needed. Each video comes with its own practice worksheet.
View Paid Training & Bundles
Содержание
- Delete Row
- Delete Row
- Delete Rows
- Delete Cells
- Delete Row Shortcut in Excel
- Shortcut to Delete Row in Excel
- How to Delete Row In Excel Shortcut?
- Deleting a Row Using Excel (ctrl -) Shortcut – Example #1
- Deleting a Row Using Right Click – Example #2
- Deleting the Multiple Rows – Example #3
- Things to Remember
- Recommended Articles
- 5 Important Excel Shortcut Keys That Make You An Expert In MS Excel Select, Insert or Delete Row or Column
- 2 Useful Excel shortcut keys for Fast Data Entry | Auto Fill | Fill down, Fill Right
- 2. Insert Entire Column Ctrl + Addition Symbol (+)
- 3. Select or Deselect Column using Excel Shortcut Key’s — Shift + Arrow
- A. Select right-side columns — Shift + Right Arrow
- B. Deselect Right Side Columns then Select Left Side Column — Shift + Left Arrow
- C. Deselect Left Side Column — Shift + Right Arrow
- 4. Delete selected column — Ctrl + Minus Symbol Button
- 5. Selecting the entire row of the selected cell —
- Insert Entire Row- Ctrl + Addition Symbol (+)
- 3.1 Select or Deselect Row’s using Excel Shortcut Key’s — Shift + Arrow
- A. Selecting Row at the bottom of the selected cell
- B. Deselect the row below the selected cell and select the row above the selected cell — Shift + Up Arrow
- C. Deselecting Up Row of Selected Cell — Shift + Down Arrow
- 4.1 Deleting Selected Cells — Ctrl + Minus Symbol
- How to remove rows in Excel based on a cell value
- The fastest Excel shortcut to delete rows in your table
- Remove rows from the entire table
- Delete rows if there is data to the right of your table
- Delete rows that contain certain text in a single column
- How to remove rows in Excel by cell color
- Delete rows that contain certain text in different columns
- Excel VBA macro to delete rows or remove every other row
- You may also be interested in
Delete Row
To quickly delete a row in Excel, select a row and use the shortcut CTRL — (minus sign). To quickly delete multiple rows, select multiple rows and use the same shortcut.
Delete Row
To delete a row in Excel, execute the following steps.
2. Right click, and then click Delete.
Note: instead of executing step 2, use the shortcut CTRL — (minus sign).
Delete Rows
To quickly delete multiple rows in Excel, execute the following steps.
1. Select multiple rows by clicking and dragging over the row headers.
2. Press CTRL — (minus sign).
Delete Cells
Excel displays the Delete Cells dialog box if you don’t select a row or multiple rows before using the shortcut CTRL — (minus sign).
1. Select cell A3.

2. Press CTRL — (minus sign).
3a. Excel automatically selects «Shift cells up». Click OK.
3b. To delete a row, select «Entire row» and click OK.
Источник
Delete Row Shortcut in Excel


Shortcut to Delete Row in Excel
As you know, Excel is a very user-friendly software for daily business purpose data manipulation. In day-to-day data management, we maintain the data in Excel sheets. However, sometimes we need to delete the row and number of rows from the data. We can delete the selected row in Excel just by CTRL –(minus sign).
To delete multiple rows quickly, we can use the same shortcut.
Table of contents
How to Delete Row In Excel Shortcut?
Let us understand the Excel shortcut keys working with simple examples below.
Deleting a Row Using Excel (ctrl -) Shortcut – Example #1
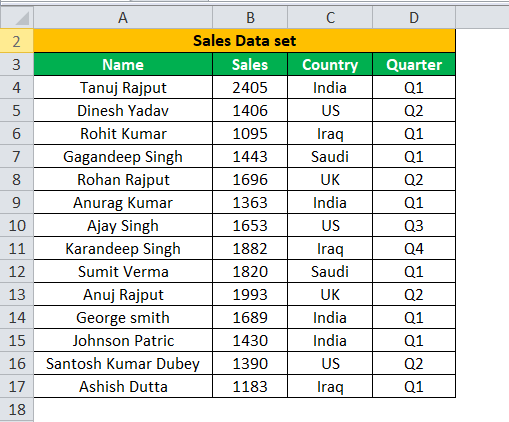
The table below shows a sales data set to apply the delete row in the Excel shortcut operation.
Below are the steps for deleting a row in Excel (CTRL -) shortcut:
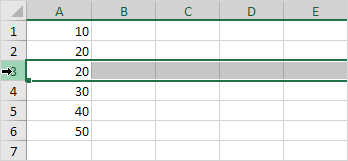
- We must first select the row we want to delete from the sales data table. Here, we pick row no.3.
Then, press the CTRL – (minus sign) keys.
We may get the below four options to decide the place for the remaining data:
That are shift cells left
Shift cells up (by default)
Entire Row
Entire Column
We may select the whole row from the available option by pressing the “R” button, then the “OK” key.
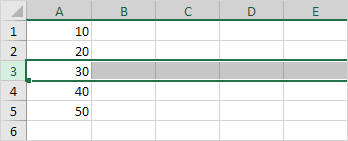
As a result, row no.3 will be deleted from the given data set.
Deleting a Row Using Right Click – Example #2
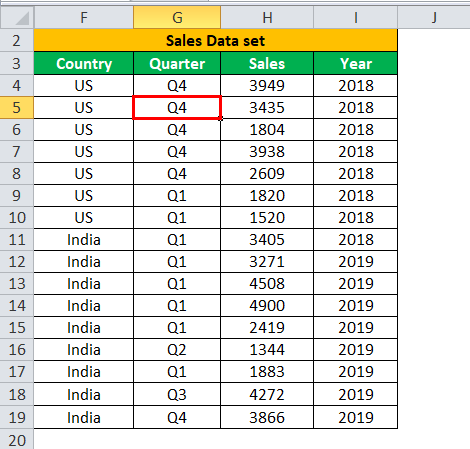
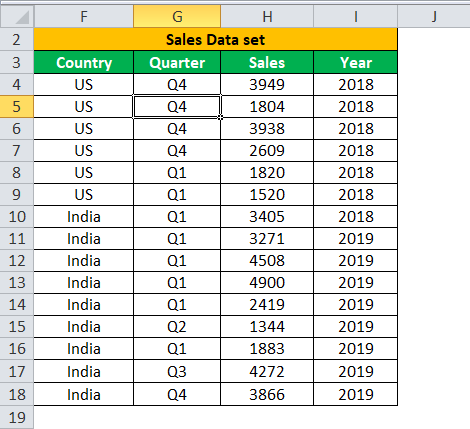
Let us consider the below country-wise sales data, and we want to delete row 2 from it.
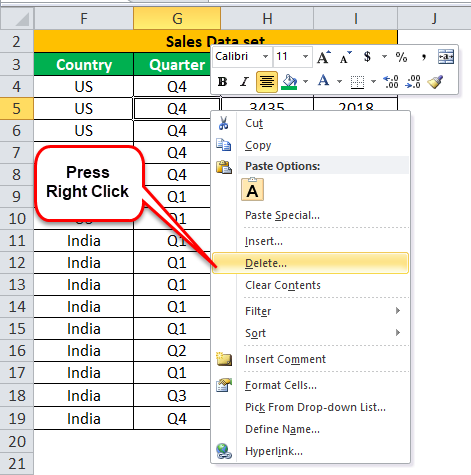
Now, we must select row no. 2 and right-click and choose the “Delete” option, as shown below.
As a result, it will enable the below four options to decide the place for the remaining data:
- Shift cells left.
- Shift cells up (by default)
- Entire Row
- Entire Column
Select the “Entire Row” from the available option and press the “OK” key.
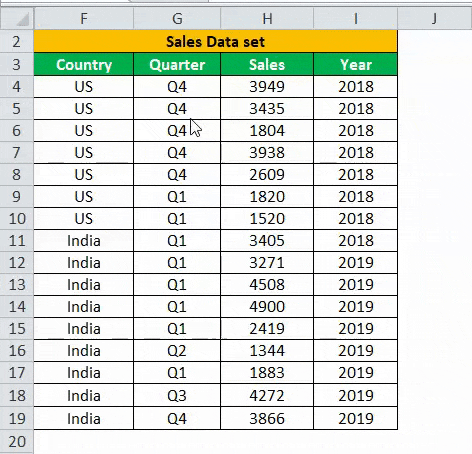
The output will be:
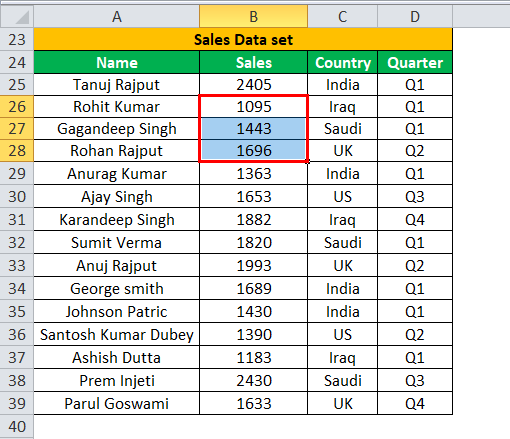
Deleting the Multiple Rows – Example #3
This example will apply the shortcut key on multiple rows at once.
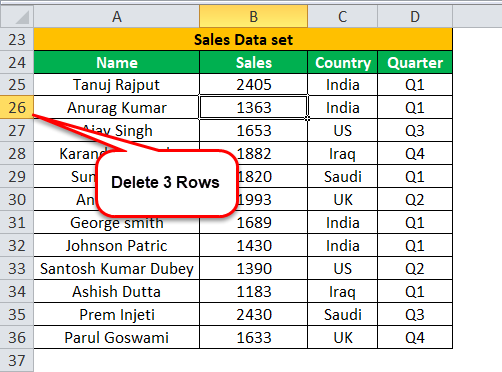
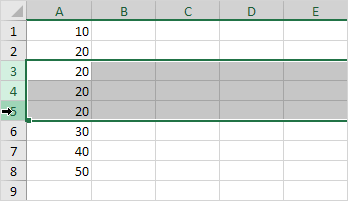
Let us consider the table below and select the multiple rows from the table we want to delete from this table. For example, suppose we want to delete the 3rd,4th, and 5th rows from the below table.
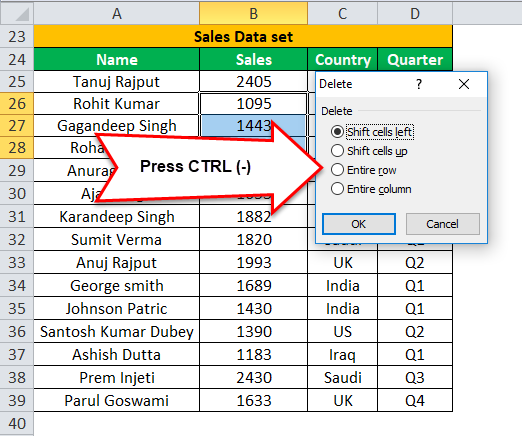
Then, select the 3rd,4th, and 5th rows and press the CTRL-
Now, we must choose the “Entire Row” and click “OK.”
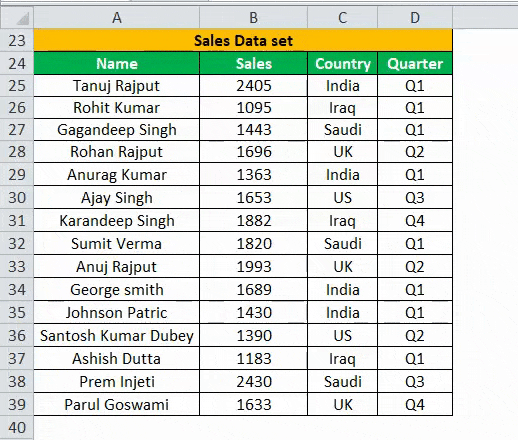
And we will get the below table after deletion.
Things to Remember
- We must always select the “Entire Row” option while deleting the row. Otherwise, we may face the wrong data moving problem in your table.
- Suppose we select the “Shift cell up” option from the table, then only the cell from the table gets deleted, not the whole row, and our data from the cell below gets shifted upwards.
- Suppose we select the “Shift cell left” option from the table, then only the cell from the table gets deleted, not the whole row, and the entire row data gets shifted to the left.
- If we select the “Entire Column” option, the selected column will get deleted.
Recommended Articles
This article is a guide to keyboard Shortcut to Delete Row in Excel. Here, we discuss how to delete a row in Excel using shortcuts – 1) Using CTRL (-) 2) Using right-click, 3) Deleting the multiple rows along with practical examples. You may learn more about Excel from the following articles: –
Источник
5 Important Excel Shortcut Keys That Make You An Expert In MS Excel Select, Insert or Delete Row or Column
2 Useful Excel shortcut keys for Fast Data Entry | Auto Fill | Fill down, Fill Right
In this article, today we are going to learn Excel shortcuts keys to select and delete row or columns of MS Excel. Perhaps you know this excel shortcuts keys, but reading this article will teach you all the things. Using these shortcuts, we can easily select the entire row column and insert or delete. This will speed up your work without using a mouse. We keep bringing more information about such shortcuts.Excel Shortcut Keys of Fill Down and Fill Right of learned data entry
To select the entire column in the cell in which you enter the cell, press and hold the Ctrl Button on the keyboard and press the Space bar button. The entire column will be selected. You can select multiple Column at one time by selecting multiple Cells.
Ctrl + Space This Excel shortcut key makes it easy to select columns. To delete a selected column or to select a column or to insert a column, the following shortcuts are used.
In the image below, the cell was on C7. On pressing Ctrl + Space, the entire column is selected. Now further shortcuts will work according to this column.
2. Insert Entire Column Ctrl + Addition Symbol (+)
Ctrl + Addition Symbol Button (+) will insert a column in the left side of the selected cell. Pressing Ctrl and pressing Addition Symbol Button (+) will insert more columns.
3. Select or Deselect Column using Excel Shortcut Key’s — Shift + Arrow
A. Select right-side columns — Shift + Right Arrow
Now the selected column is C here. If you want to select more columns on the right side of the C column, then Shift + Right Arrow will be selected with this Excel Shortcut Key.
B. Deselect Right Side Columns then Select Left Side Column — Shift + Left Arrow
Shift + Left Arrow This is the use of the Excel Shortcut Key to Deselect the selected columns.
Shift + Left Arrow is Deselecting the right-side columns from Excel Shortcut Key, the left-side columns will be selected as soon as they come to the C column.
C. Deselect Left Side Column — Shift + Right Arrow
Again Shift + Right Arrow is used to deselect the selected column on the left side.
Meaning that the first column you selected can select or deselect its right side and left side columns using Excel Shortcut Key Shift + Right & Left Arrow.
4. Delete selected column — Ctrl + Minus Symbol Button
Ctrl + Minus Symbol’s Button is used to delete all the columns that are selected.
5. Selecting the entire row of the selected cell —
Excel Shortcut Key Shift + Space Bar is used to select the entire row of the cell in which you enter. You can select Multiple Row by selecting Multiple Vertical Cells.
Insert Entire Row- Ctrl + Addition Symbol (+)
The new row will be inserted on the row selected from Ctrl + Addition Symbol. Row is inserted every time you press the shortcut.
Row was the number 5 selection in the image above. In the image below, Ctrl + Addition Symbol
After press, the new number 5 row has been inserted above the number 5 row.
3.1 Select or Deselect Row’s using Excel Shortcut Key’s — Shift + Arrow
Just as Shift + Right or Left Arrow is used to select and deselect columns, Shift + Up & Down Arrow Excel Shortcut Keys is used to select the row above and below the selected row.
A. Selecting Row at the bottom of the selected cell
In the above image, column 5 was selected. Now the image below Shift + Down Arrow has selected the row below the selected cell using Shift + Down Arrow excel shortcut key.
B. Deselect the row below the selected cell and select the row above the selected cell — Shift + Up Arrow
Shift + Up Arrow will be used to deselect the row selected below. While pressing Shift + Up Arrow, while pressing on Shift + Up Arrow, press Shift + Up Arrow, above selected Row 5 will continue to be selected.
C. Deselecting Up Row of Selected Cell — Shift + Down Arrow
Shift + Down Arrow will have to be used again to deselect the top row of the selected cell.
4.1 Deleting Selected Cells — Ctrl + Minus Symbol
Ctrl + Minus Symbol is used to delete the selected cell. In the above image there was a Blank Row 5 Select. Now the Blank cell has been deleted using Ctrl + Minus Symbol in the image below.
6. Similarly, if you do not select Row and enter only in the cell, then you can also press or press Excel Shortcut Key Ctrl + Minus Symbol and delete the entire row.
7. If you do not select the column and enter it in the cell only, then you can insert the cell or the entire column by pressing Excel Shortcut Key Ctrl + Addition Symbol.
Источник
How to remove rows in Excel based on a cell value
 by Alexander Frolov, updated on March 11, 2023
This article lists several ways to delete rows in Excel based on a cell value. In this post you’ll find hotkeys as well as Excel VBA. Delete rows automatically or use the standard Find option in combination with helpful shortcuts.
Excel is a perfect tool to store data that change every now and then. However, updating your table after some changes may need really much time. The task can be as simple as removing all blank rows in Excel. Or you may need to find and delete the duplicated data. One thing we know for sure is that whenever details come or go, you search for the best solution to help you save time on the current work.
For example, you have a marketplace where different vendors sell their products. For some reason one of the vendors closed their business and now you need to delete all rows that contain the vendor’s name, even if they are in different columns.
In this post you’ll find Excel VBA and shortcuts to delete rows based on certain text or value. You’ll see how to easily find and select the necessary information before removing. If your task is not about deleting but adding rows, you can find how to do it in Fastest ways to insert multiple rows in Excel.
The fastest Excel shortcut to delete rows in your table
If you want to use the fastest method of deleting multiple rows according to the cell value they contain, you need to correctly select these rows first.
To select the rows, you can either highlight the adjacent cells with the needed values and click Shift + Space or pick the needed non-adjacent cells keeping the Ctrl key pressed.
You can also select entire lines using the row number buttons. You’ll see the number of the highlighted rows next to the last button.
After you select the necessary rows, you can quickly remove them using an Excel «delete row» shortcut. Below you’ll find how to get rid of the selected lines whether you have a standard data table, or a table that has data to the right.
Remove rows from the entire table
If you have a simple Excel list that has no additional information to the right, you can use the delete row shortcut to remove rows in 2 easy steps:
You’ll see the unused rows disappear in a snap.
Tip. You can highlight only the range that contains the values you want to remove. Then use the shortcut Ctrl + — (minus on the main keyboard) to get the standard Excel Delete dialog box allowing you to select the Entire row radio button, or any other deleting option you may need.
Delete rows if there is data to the right of your table
Ctrl + — (minus on the main keyboard) Excel shortcut is the fastest means to delete rows. However, if there is any data to the right of your main table like on the screenshot below, it may remove rows along with the details you need to keep. 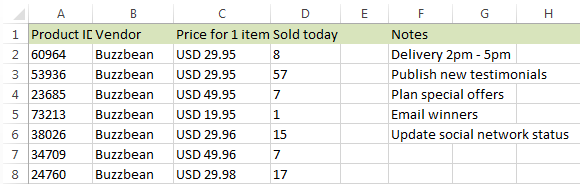
If that’s your case, you need to format your data as Excel Table first.
- Press Ctrl + T , or go to the Home tab -> Format as Table and pick the style that suites you best.
Format as Table button» title=»Go to the Home tab -> Format as Table button» width=»451″ height=»186″>
You will see the Create Table dialog box that you can use to highlight the necessary range. 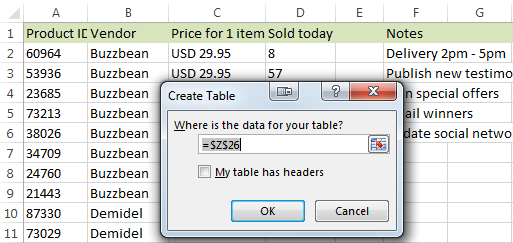
Now that your list is formatted, select the range with the values or rows you want to delete within your table. 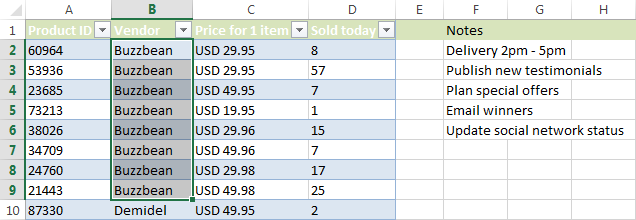
Note. Please make sure you don’t use the row buttons to select the entire rows.
Hope you’ve found this «remove row» shortcut helpful. Continue reading to find Excel VBA for deleting rows and learn how to eliminate data based on certain cell text.
Delete rows that contain certain text in a single column
If the items in the rows you want to remove appear only in one column, the following steps will guide you through the process of deleting the rows with such values.
- First you need to apply Filter to your table. To do this, navigate to the Data tab in Excel and click on the Filter icon.
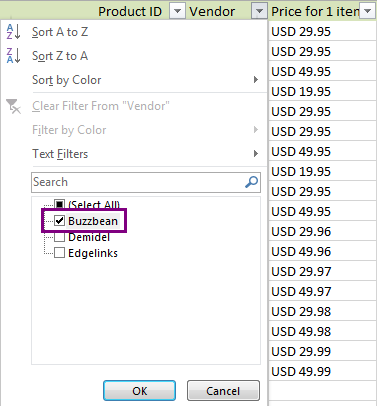
- Filter the column that contains the values for deleting by the needed text. Click on the arrow icon next to the column that contains the needed items. Then uncheck the Select All option and tick the checkboxes next to the correct values. If the list is long, just enter the necessary text in the Search field. Then click OK to confirm.

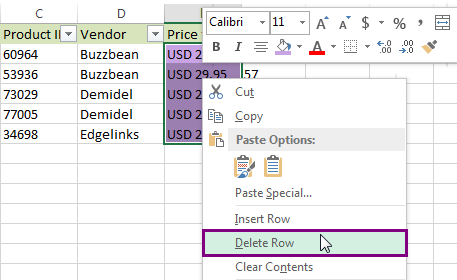
- Select the filtered cells in the rows you want to delete. It’s not necessary to select entire rows.
- Right-click on the highlighted range and and pick the Delete row option from the menu list.
Finally click on the Filter icon again to clear it and see that the rows with the values disappeared from your table.
How to remove rows in Excel by cell color
The filter option allows sorting your data based on the color of cells. You can use it to delete all rows that contain certain background color.
- Apply Filter to your table. Go to the Data tab in Excel and click on the Filter icon.
- Click on the small arrow next to the needed column name, go to Filter by Color and pick the correct cell color. Click OK and see all highlighted cells on top.
- Select the filtered colored cells, right-click on them and pick the Delete Row option from the menu.
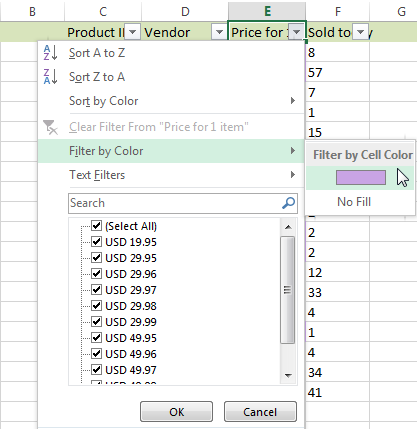
That’s it! The rows with identically colored cells are removed in an instant.
Delete rows that contain certain text in different columns
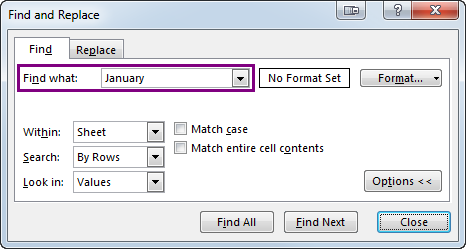
If the values you want to remove are scattered around different columns, sorting may complicate the task. Below you’ll find a helpful tip to remove rows based on the cells that contain certain values or text. From my table below, I want to remove all rows that contain January which appears in 2 columns.
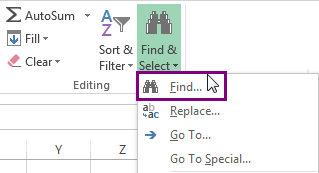
- Start by searching and selecting the cells with the needed value using the Find and Replace dialog. Click Ctrl + F to run it.
Tip. You can find the same dialog box if you go to the Home tab -> Find & Select and pick the Find option from the drop-down list.
 Find & Select and pick the Find option» title=»Go to the Home tab -> Find & Select and pick the Find option» width=»319″ height=»173″>
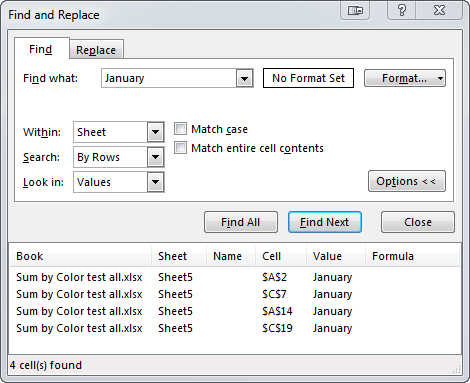
Select the found values in the window keeping the Ctrl key pressed. You will get the found values automatically highlighted in your table. 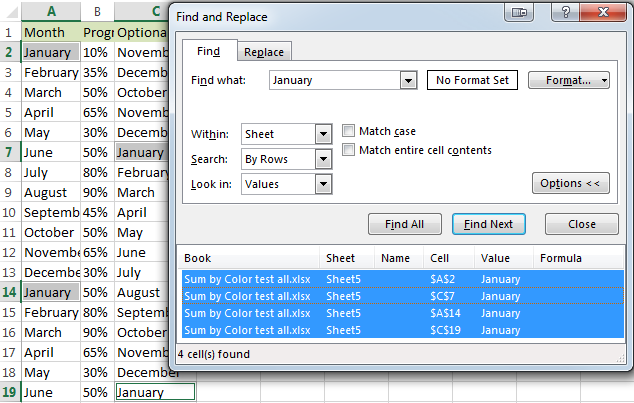
Now navigate to the Home tab -> Delete -> Delete Sheet Rows.  Delete -> Delete Sheet Rows» title=»Navigate to the Home tab -> Delete -> Delete Sheet Rows» width=»324″ height=»179″>
Tip. You can delete the rows with the selected values if you press Ctrl + — (minus on the main board) and select the radio button Entire rows.
Voila! The unwanted rows are deleted.
Excel VBA macro to delete rows or remove every other row
If you always search for a solution to automate this or that Excel routine, grab the macros below to streamline your delete-rows task. In this part you’ll find 2 VBA macros that will help you remove rows with the selected cells or delete every other row in Excel.
The macro RemoveRowsWithSelectedCells will eliminate all lines that contain at least one highlighted cell.
The macro RemoveEveryOtherRow as its name suggests, will help you get rid of every second/third, etc., row according to your settings. It will remove rows beginning with the current mouse cursor location and till the end of your table.
If you don’t know how to insert macros, feel free to look at How to insert and run VBA code in Excel.
Tip. If your task is to color every second/third, etc., row with a different color, you will find the steps in Alternating row color and column shading in Excel (banded rows and columns).
In this article I described how to delete rows in Excel. Now you have several useful VBA macros to delete the selected rows, you know how to remove every other row and how to use Find & Replace to help you search and select all the lines with the same values before eliminating them. Hope the tips above will simplify your work in Excel and let you get more free time for enjoying these last summer days. Be happy and excel in Excel!
You may also be interested in
Table of contents
I have a large spreadsheet, 35000 entries. One column has multiple duplicates. I would like to get rid of the rows those duplicates are in but keep one instance. How, if at all, do I find all the duplicates and keep one instance of each and then delete the rows the remaining duplicates are in? For the most part ALL of the cells in each row are the same except for a few. Example. one column lists 5 instances of RED KIDS STOCKINGS in the TITLE column with different sizes in a different cell named SIZE. I want to keep one of those rows and delete the other 4 that list RED KIDS STOCKINGS in the TITLE cell. Highlighting and clicking on each row I want to delete is very tedious with this many entries.
Hope this makes sense.
Hello!
To extract the first occurrence of a string and remove duplicate rows, you can use one of the instructions:
How to remove duplicate rows in Excel by filtering or
How to delete duplicates in Excel.
The easiest way to remove duplicates is using the Remove Duplicates tool. It is available as a part of our Ultimate Suite for Excel that you can install in a trial mode and check how it works for free.
I have VB based excel file with auto filter and formatting cells,. I want to delete old data. When I tried to put new data I got error message » 1004 application defined» Please advised me.
Hi!
When you use VBA code to select a range that is not on the active worksheet, VBA will show you a runtime error 1004.
Thanks for your reply I am totally new with VB code please help me how to delete my old data?
Can you please tell me how to delete my old data for my VB based excel file with auto filter and conditional formatting?
Hi!
I can’t see your data and your code. I’m really sorry, we cannot help you with this.
I have a spreadsheet having a specific color in column. I want to identify that cell & delete that column using VBA code. How can I do it ?
Is there a way to use a Macro to delete all rows that have a non-colored cell? I need to leave only the row not changed by the conditional formatting in one particular column. Ay help is appreciated.
I have a spreadsheet from an app that transferred all my cell # and added name, phone # address etc.
I would like to:
clean this up big time to make a mailing list.
some contacts have — home address,
Is there a way to remove the entire row if there is no address in a certain cell?
example
a first name
b second name
cell H is primary street no address no further information
I want to weed all of these people out of this excel
am I crazy for wanting this? #55&annoyed
Hello Gina Ann!
You can apply a filter to your table to display only those rows that contain empty cells in a certain column. Please see here how to create and use Excel Advanced Filter.
Then select all the rows you need to delete at once, right-click and choose the Delete option from the context menu.
I also recommend looking through carefully the «Delete rows that contain certain text in a single column» paragraph above on this page.
2016 Excel spreadsheet that has random cells with red font. Those cells are highlighted. Need to preserve the rows if they have a single cell highlighted. If the row does not have any highlighted cell, delete that row. Is that possible?
RemoveRowsWithSelectedCells — like this except RemoveRowsWithoutSelectedCell
This was awesome! saved me a lot of time! thanks!
I have a excel sheet, I have been able to filter the data and get some cells into red (to be deleted) and green (to be used) using macro. I am looking for a macro by which I can delete the complete row if a cell is red.
The red and green colors are same which we get using conditional formatting in excel 2013.
i have 300 column in sheet1,but i need only 3 column from that to sheet2.out of that 3 column i need to filter for some values and the filtered values only need to display other values are not need …that are must hide or delete.. anybody help me………………
Thank you. very helpful!
Hello,
I have a master file with data of various stores which needs to be split into various sheets store wise. I have managed to split it, but I don’t have a code to delete the blank rows in between the data.
Please look at the following video, it should help:
https://www.youtube.com/watch?v=tmA3oI0LhPg
I need to fetch data of a single coloum from a web page,but I am getting the complete page.Please tell me how do I fix it so that i will get only a single data which will update while refreshing.
For me to be able to assist you better, please send me a sample table with your data in Excel and the result you want to get. Thank you.
Copyright © 2003 – 2023 Office Data Apps sp. z o.o. All rights reserved.
Microsoft and the Office logos are trademarks or registered trademarks of Microsoft Corporation. Google Chrome is a trademark of Google LLC.
Источник