
To prevent other users from accidentally or deliberately changing, moving, or deleting data in a worksheet, you can lock the cells on your Excel worksheet and then protect the sheet with a password. Say you own the team status report worksheet, where you want team members to add data in specific cells only and not be able to modify anything else. With worksheet protection, you can make only certain parts of the sheet editable and users will not be able to modify data in any other region in the sheet.
Important: Worksheet level protection is not intended as a security feature. It simply prevents users from modifying locked cells within the worksheet. Protecting a worksheet is not the same as protecting an Excel file or a workbook with a password. See below for more information:
-
To lock your file so that other users can’t open it, see Protect an Excel file.
-
To prevent users from adding, modifying, moving, copying, or hiding/unhiding sheets within a workbook, see Protect a workbook.
-
To know the difference between protecting your Excel file, workbook, or a worksheet see Protection and security in Excel.
The following sections describe how to protect and unprotect a worksheet in Excel for Windows.
Here’s what you can lock in an unprotected sheet:
-
Formulas: If you don’t want other users to see your formulas, you can hide them from being seen in cells or the Formula bar. For more information, see Display or hide formulas.
-
Ranges: You can enable users to work in specific ranges within a protected sheet. For more information, see Lock or unlock specific areas of a protected worksheet.
Note: ActiveX controls, form controls, shapes, charts, SmartArt, Sparklines, Slicers, Timelines, to name a few, are already locked when you add them to a spreadsheet. But the lock will work only when you enable sheet protection. See the subsequent section for more information on how to enable sheet protection.
Worksheet protection is a two-step process: the first step is to unlock cells that others can edit, and then you can protect the worksheet with or without a password.
Step 1: Unlock any cells that needs to be editable
-
In your Excel file, select the worksheet tab that you want to protect.
-
Select the cells that others can edit.
Tip: You can select multiple, non-contiguous cells by pressing Ctrl+Left-Click.
-
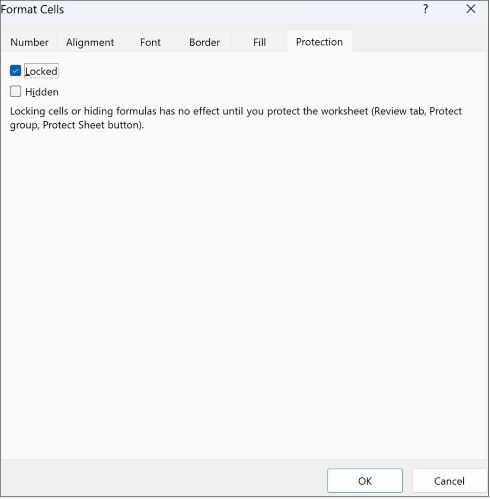
Right-click anywhere in the sheet and select Format Cells (or use Ctrl+1, or Command+1 on the Mac), and then go to the Protection tab and clear Locked.

Step 2: Protect the worksheet
Next, select the actions that users should be allowed to take on the sheet, such as insert or delete columns or rows, edit objects, sort, or use AutoFilter, to name a few. Additionally, you can also specify a password to lock your worksheet. A password prevents other people from removing the worksheet protection—it needs to be entered to unprotect the sheet.
Given below are the steps to protect your sheet.
-
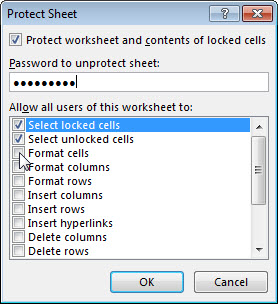
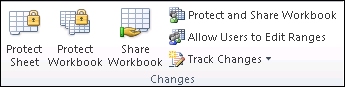
On the Review tab, click Protect Sheet.
-
In the Allow all users of this worksheet to list, select the elements you want people to be able to change.
Option
Allows users to
Select locked cells
Move the pointer to cells for which the Locked box is checked on the Protection tab of the Format Cells dialog box. By default, users are allowed to select locked cells.
Select unlocked cells
Move the pointer to cells for which the Locked box is unchecked on the Protection tab of the Format Cells dialog box. By default, users can select unlocked cells, and they can press the TAB key to move between the unlocked cells on a protected worksheet.
Format cells
Change any of the options in the Format Cells or Conditional Formatting dialog boxes. If you applied conditional formatting before you protected the worksheet, the formatting continues to change when a user enters a value that satisfies a different condition.
Format columns
Use any of the column formatting commands, including changing column width or hiding columns (Home tab, Cells group, Format button).
Format rows
Use any of the row formatting commands, including changing row height or hiding rows (Home tab, Cells group, Format button).
Insert columns
Insert columns.
Insert rows
Insert rows.
Insert hyperlinks
Insert new hyperlinks, even in unlocked cells.
Delete columns
Delete columns.
Note: If Delete columns is protected and Insert columns is not protected, a user can insert columns but cannot delete them.
Delete rows
Delete rows.
Note: If Delete rows is protected and Insert rows is not protected, a user can insert rows but cannot delete them.
Sort
Use any commands to sort data (Data tab, Sort & Filter group).
Note: Users can’t sort ranges that contain locked cells on a protected worksheet, regardless of this setting.
Use AutoFilter
Use the drop-down arrows to change the filter on ranges when AutoFilters are applied.
Note: Users cannot apply or remove AutoFilter on a protected worksheet, regardless of this setting.
Use PivotTable reports
Format, change the layout, refresh, or otherwise modify PivotTable reports, or create new reports.
Edit objects
Doing any of the following:
-
Make changes to graphic objects including maps, embedded charts, shapes, text boxes, and controls that you did not unlock before you protected the worksheet. For example, if a worksheet has a button that runs a macro, you can click the button to run the macro, but you cannot delete the button.
-
Make any changes, such as formatting, to an embedded chart. The chart continues to be updated when you change its source data.
-
Add or edit notes.
Edit scenarios
View scenarios that you have hidden, making changes to scenarios that you have prevented changes to, and deleting these scenarios. Users can change the values in the changing cells, if the cells are not protected, and add new scenarios.
-
-
Optionally, enter a password in the Password to unprotect sheet box and click OK. Reenter the password in the Confirm Password dialog box and click OK.
Important:
-
Use strong passwords that combine uppercase and lowercase letters, numbers, and symbols. Weak passwords don’t mix these elements. Passwords should be 8 or more characters in length. A passphrase that uses 14 or more characters is better.
-
It is critical that you remember your password. If you forget your password, Microsoft cannot retrieve it.
-
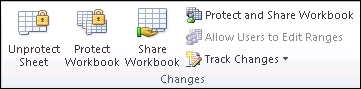
The Protect Sheet option on the ribbon changes to Unprotect Sheet when a sheet is protected. To view this option, click the Review tab on the ribbon, and in Changes, see Unprotect Sheet.
To unprotect a sheet, follow these steps:
-
Go to the worksheet you want to unprotect.
-
Go to File > Info > Protect > Unprotect Sheet, or from the Review tab > Changes > Unprotect Sheet.
-
If the sheet is protected with a password, then enter the password in the Unprotect Sheet dialog box and click OK.
The following sections describe how to protect and unprotect a worksheet in Excel for the Web.
-
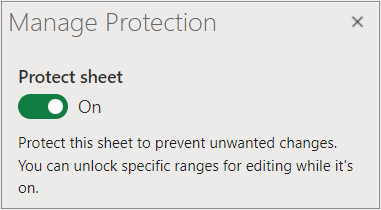
Select Review > Manage Protection.
-
To turn on protection, in the Manage Protection task pane, select Protect sheet.
Note Although you can selectively protect parts of the sheet by setting various options in the Options section, these settings only apply when the Protect sheet setting is on.
-
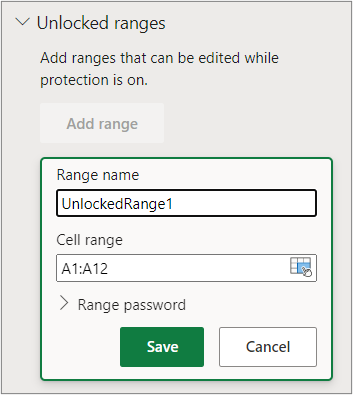
By default, the entire sheet is locked and protected. To unlock specific ranges, select Unlocked ranges, and then enter a range name and cell range. You can add more than one range.
-
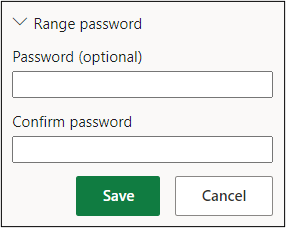
Optionally, to require a password to edit a range, select Range password, enter and confirm the password, and then select Save. Make sure sheet protection is turned on.
-
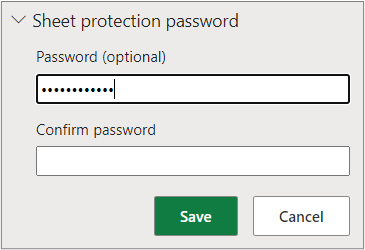
Optionally, to control the ability to edit protections for the entire sheet with a password, select Sheet protection password, enter and confirm the password, and then select Save.
Important-
Use strong passwords that combine uppercase and lowercase letters, numbers, and symbols. Weak passwords don’t mix these elements. Passwords should be 8 or more characters in length. Make sure the CAPS LOCK key is off and use correct capitalization. Passwords are case-sensitive.
-
It is critical that you remember your password. If you forget your password, Microsoft cannot retrieve it.
-
-
Optionally, if you want to selectively enable and disable specific sheet elements, select the Options section, and then select one or more options.
Option
Allows users to
Select locked cells
Move the pointer to cells for which the Locked box is checked on the Protection tab of the Format Cells dialog box. By default, users are allowed to select locked cells.
Select unlocked cells
Move the pointer to cells for which the Locked box is unchecked on the Protection tab of the Format Cells dialog box. By default, users can select unlocked cells, and they can press the TAB key to move between the unlocked cells on a protected worksheet.
Format cells
Change any of the options in the Font and Alignment groups of the Home tab.
Note If cell formatting and hidden properties were previously protected by using the Format Cells or Conditional Formatting dialog boxes, they remain protected, but you can only modify options in these dialog boxes by using Excel for Windows. If you applied conditional formatting before you protected the worksheet, the formatting continues to change when a user enters a value that satisfies a different condition.
Format columns
Use any of the column formatting commands, including changing column width or hiding columns (Home tab, Cells group, Format button).
Format rows
Use any of the row formatting commands, including changing row height or hiding rows (Home tab, Cells group, Format button).
Insert columns
Insert columns.
Insert rows
Insert rows.
Insert hyperlinks
Insert new hyperlinks, even in unlocked cells.
Delete columns
Delete columns.
Note: If Delete columns is protected and Insert columns is not protected, a user can insert columns but cannot delete them.
Delete rows
Delete rows.
Note: If Delete rows is protected and Insert rows is not protected, a user can insert rows but cannot delete them.
Sort
Use any commands to sort data (Data tab, Sort & Filter group).
Note: Users can’t sort ranges that contain locked cells on a protected worksheet, regardless of this setting.
Use AutoFilter
Use the drop-down arrows to change the filter on ranges when AutoFilters are applied.
Note: Users cannot apply or remove AutoFilter on a protected worksheet, regardless of this setting.
Use PivotTable reports
Format, change the layout, refresh, or otherwise modify PivotTable reports, or create new reports.
Edit objects
Doing any of the following:
-
Make changes to graphic objects including maps, embedded charts, shapes, text boxes, and controls that you did not unlock before you protected the worksheet. For example, if a worksheet has a button that runs a macro, you can click the button to run the macro, but you cannot delete the button.
-
Make any changes, such as formatting, to an embedded chart. The chart continues to be updated when you change its source data.
-
Add or edit notes.
Edit scenarios
View scenarios that you have hidden, making changes to scenarios that you have prevented changes to, and deleting these scenarios. Users can change the values in the changing cells, if the cells are not protected, and add new scenarios.
Notes
-
If you don’t want other users to see your formulas, you can hide them from being seen in cells or the Formula bar. For more information, see Display or hide formulas.
-
ActiveX controls, form controls, shapes, charts, SmartArt, Sparklines, Slicers, Timelines, and so on, are already locked when you add them to a spreadsheet. But the lock works only when you enable sheet protection. For more information, see Protect controls and linked cells on a worksheet.
-
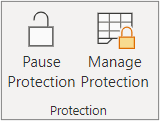
There are two ways to unprotect a sheet, disable it or pause it.
Disable protection
-
Select Review > Manage Protection.
-
To turn off protection, In the Manage Protection task pane, turn off Protect sheet.

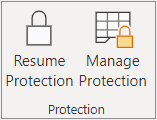
Pause protection
Pausing protection turns off protection for the current editing session while maintaining the protection for other users in the workbook. For example, you can pause protection to edit a locked range but maintain protection for other users.
-
To pause sheet protection, select Review > Pause Protection.
Note If the sheet has a protection password, you must enter that password to pause protection.
-
To resume sheet protection, select Review > Resume Protection.
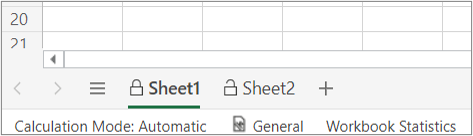
At the bottom of the sheet, the sheet tab displays a locked icon if the sheet is protected (Sheet1), and an unlocked icon if it is paused (Sheet2).
See Also
Protection and security in Excel
Protect an Excel file
Protect a workbook
Lock or unlock specific areas of a protected worksheet
Lock cells to protect them
Display or hide formulas
Protect controls and linked cells on a worksheet
Copy and paste in a protected worksheet
Video: Password protect workbooks and worksheets (Excel 2013)
Содержание
- Установка пароля
- Способ 1: установка пароля при сохранении файла
- Способ 2: установка пароля в разделе «Сведения»
- Способ 3: Установка пароля и его снятие во вкладке «Рецензирование»
- Вопросы и ответы
Безопасность и защита данных являются одним из главных направлений развития современных информационных технологий. Актуальность этой проблемы не уменьшается, а только растет. Особенно важна защита данных для табличных файлов, в которых зачастую хранится важная информация коммерческого характера. Давайте узнаем, как защитить файлы Excel при помощи пароля.
Установка пароля
Разработчики программы прекрасно понимали важность возможности установки пароля именно на файлы Excel, поэтому внедрили сразу несколько вариантов выполнения данной процедуры. При этом, существует возможность установить ключ, как на открытие книги, так и на её изменение.
Способ 1: установка пароля при сохранении файла
Один из способов предполагает установить пароль непосредственно при сохранении книги Excel.
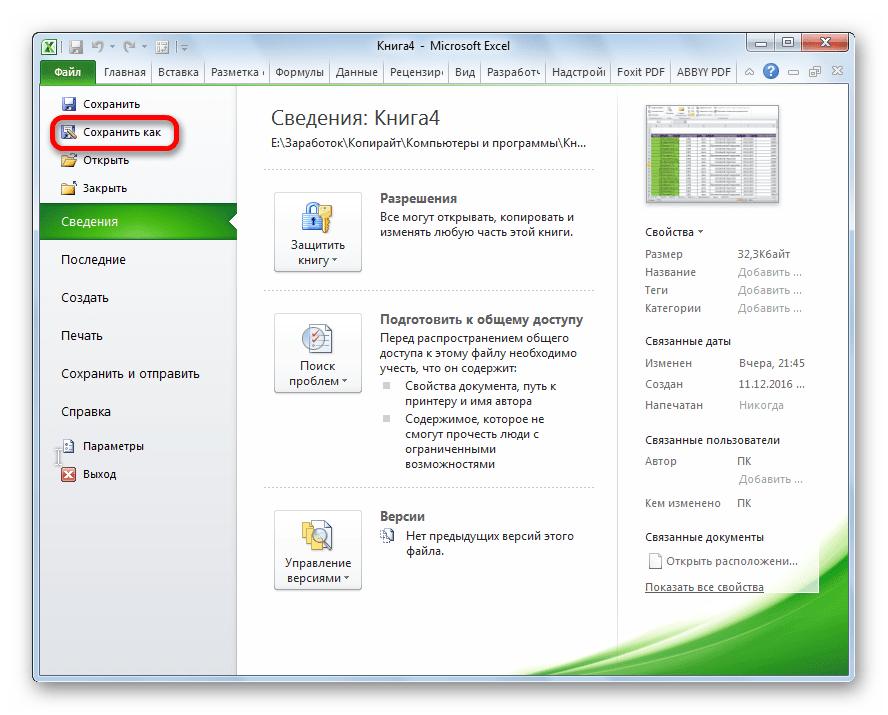
- Переходим во вкладку «Файл» программы Excel.
- Кликаем по пункту «Сохранить как».
- В открывшемся окне сохранения книги жмем на кнопку «Сервис», расположенную в самом низу. В появившемся меню выбираем пункт «Общие параметры…».
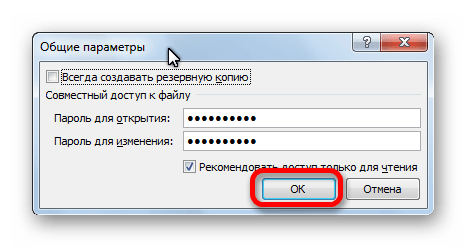
- Открывается ещё одно небольшое окно. Как раз в нём можно указать пароль на файл. В поле «Пароль для открытия» вводим ключевое слово, которое нужно будет указать при открытии книги. В поле «Пароль для изменения» вводим ключ, который нужно будет ввести, если понадобится отредактировать данный файл.
Если вы хотите, чтобы ваш файл не могли редактировать посторонние лица, но доступ к просмотру желаете оставить свободным, то, в таком случае, вводите только первый пароль. Если задано два ключа, то при открытии файла будет предложено ввести оба. Если пользователь знает только первый из них, то ему доступно будет исключительно чтение, без возможности редактирования данных. Вернее, редактировать он сможет всё что угодно, но вот сохранить эти изменения не получится. Можно будет только сохранить в виде копии без изменения первоначального документа.
Кроме того, тут же можно поставить галочку около пункта «Рекомендовать доступ только для чтения».
При этом, даже для пользователя, знающего оба пароля, файл по умолчанию откроется без панели инструментов. Но, при желании он всегда сможет открыть эту панель, нажав соответствующую кнопку.
После того, как все настройки в окне общих параметров выполнены, жмем на кнопку «OK».
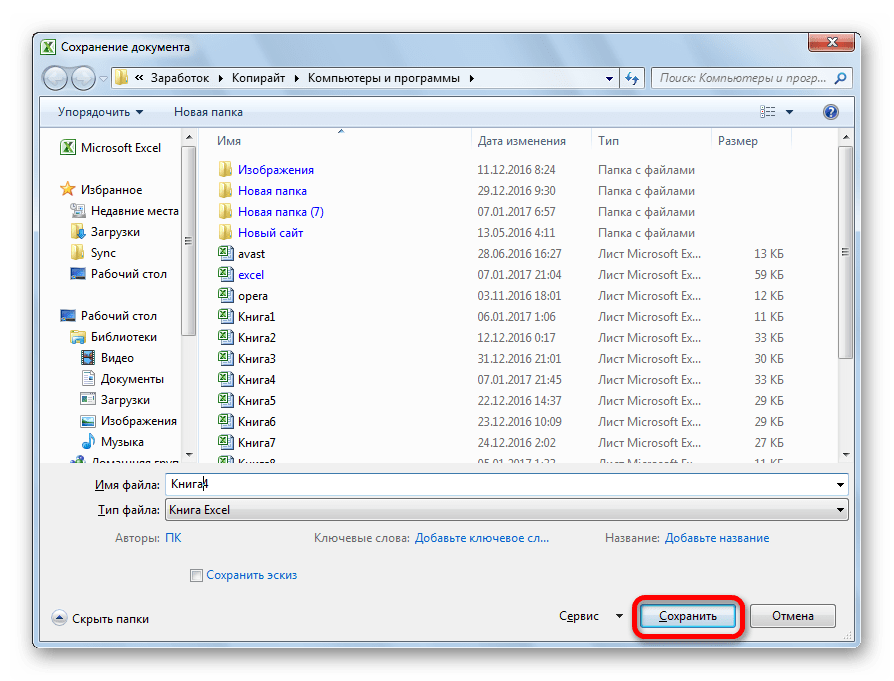
- Открывается окно, где нужно ввести ключ ещё раз. Это сделано для того, чтобы пользователь ошибочно при первом вводе не совершил опечатку. Жмем на кнопку «OK». В случае несовпадения ключевых слов программа предложит ввести пароль ещё раз.
- После этого мы опять возвращаемся в окно сохранения файла. Тут можно при желании изменить его название и определить директорию, где он будет находиться. Когда все это сделано, жмем на кнопку «Сохранить».


Таким образом мы защитили файл Excel. Теперь для его открытия и редактирования потребуется вводить соответствующие пароли.
Способ 2: установка пароля в разделе «Сведения»
Второй способ подразумевает установку пароля в разделе Excel «Сведения».

- Как и в прошлый раз, переходим во вкладку «Файл».
- В разделе «Сведения» кликаем на кнопку «Защитить файл». Открывается список возможных вариантов защиты ключом файла. Как видим, тут можно защитить паролем не только файл в целом, но и отдельный лист, а также установить защиту на изменения структуры книги.
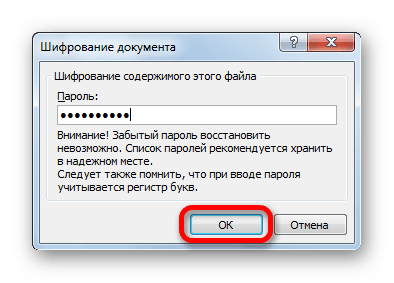
- Если мы остановим выбор на пункте «Зашифровать паролем», то откроется окно, в которое следует ввести ключевое слово. Этот пароль соответствует ключу для открытия книги, который мы применяли в предыдущем способе при сохранении файла. После ввода данных жмем на кнопку «OK». Теперь без знания ключа файл никто не сможет открыть.
- При выборе пункта «Защитить текущий лист» откроется окно с большим количеством настроек. Тут также есть окно для ввода пароля. Данный инструмент позволяет защитить конкретный лист от редактирования. При этом, в отличие от защиты от изменения через сохранение, данный способ не предусматривает возможности даже создавать измененную копию листа. Все действия на нём блокируются, хотя в целом книгу сохранить можно.
Настройки степени защиты пользователь может установить сам, выставляя галочки в соответствующих пунктах. По умолчанию из всех действий для пользователя, который не владеет паролем, доступным на листе является только выделение ячеек. Но, автор документа может разрешить форматирование, вставку и удаление строк и столбцов, сортировку, применение автофильтра, изменение объектов и сценариев, и т.д. Можно снять защиту практически с любого действия. После установки настроек жмем на кнопку «OK».
- При нажатии на пункт «Защитить структуру книги» можно установить защиту структуры документа. В настройках предусмотрена блокировка изменения структуры, как с паролем, так и без него. В первом случае, это, так называемая «защита от дурака», то есть от непреднамеренных действий. Во втором случае, это уже защита от целенаправленного изменения документа другими пользователями.


Способ 3: Установка пароля и его снятие во вкладке «Рецензирование»
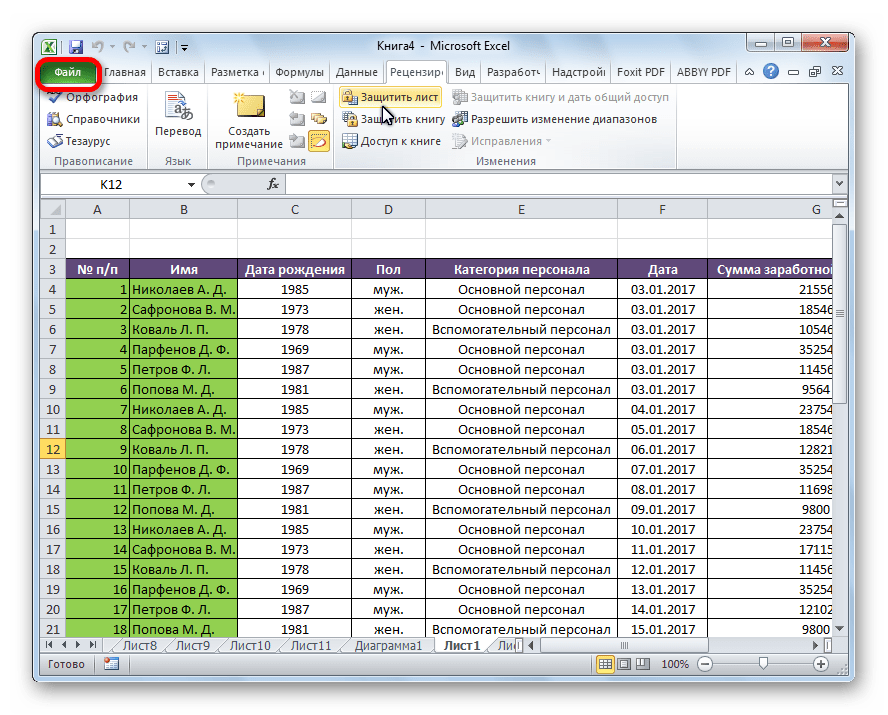
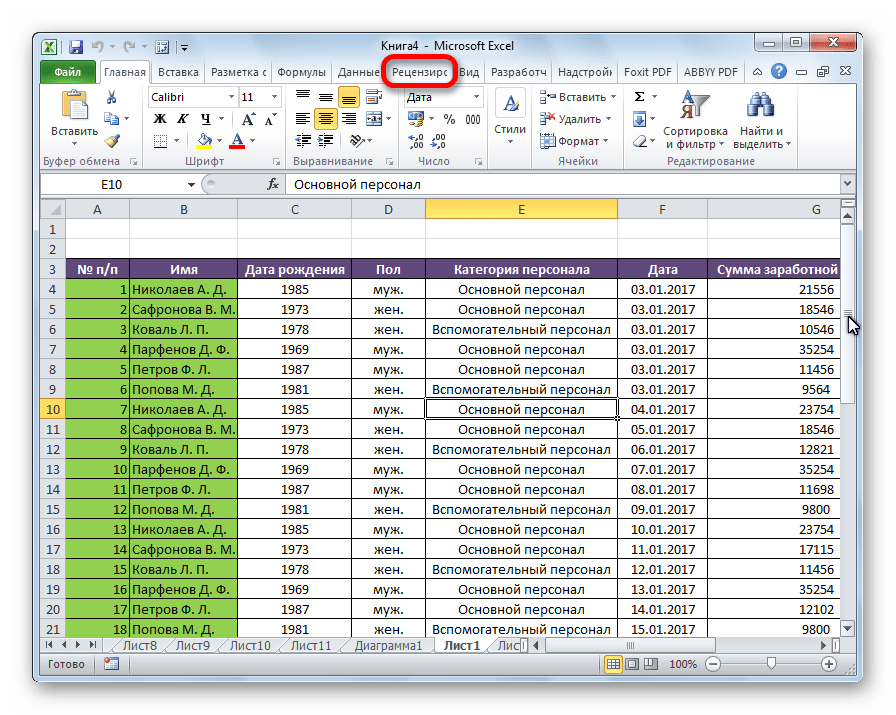
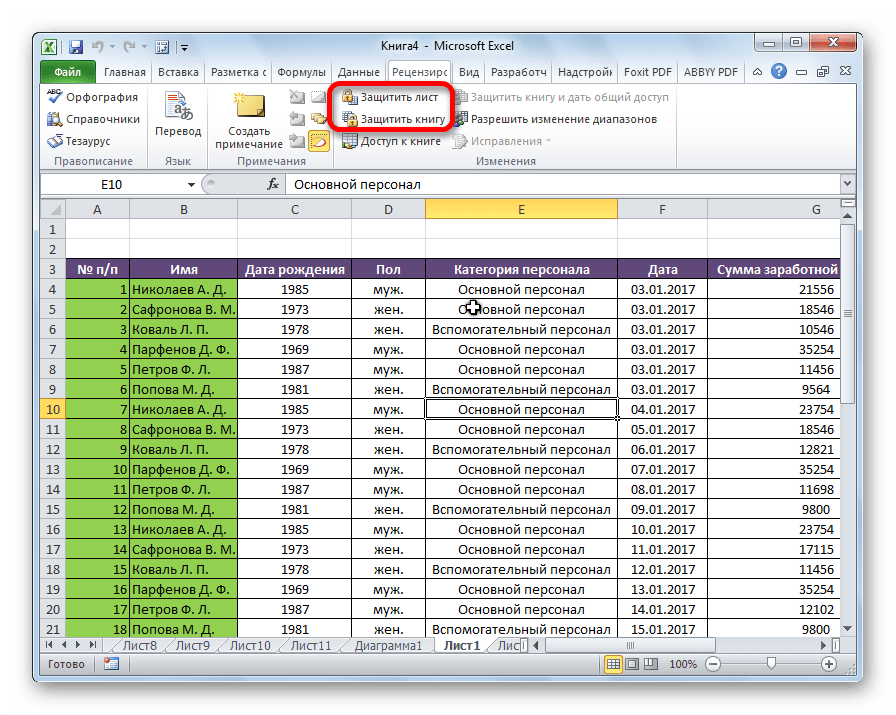
Возможность установки пароля существует также во вкладке «Рецензирование».
- Переходим в вышеуказанную вкладку.
- Ищем блок инструментов «Изменение» на ленте. Кликаем на кнопку «Защитить лист», или «Защитить книгу». Эти кнопки полностью соответствуют пунктам «Защитить текущий лист» и «Защитить структуру книги» в разделе «Сведения», о которых мы уже говорили выше. Дальнейшие действия тоже полностью аналогичные.
- Для того, чтобы удалить пароль, нужно нажать на кнопку «Снять защиту с листа» на ленте и ввести соответствующее ключевое слово.

Как видим, программа Microsoft Excel предлагает сразу несколько способов защитить файл паролем, как от преднамеренного взлома, так и от неумышленных действий. Запаролить можно, как открытие книги, так и редактирование или изменение её отдельных структурных элементов. При этом, автор может сам определять, от каких именно изменений он хочет защитить документ.
Еще статьи по данной теме:
Помогла ли Вам статья?
If you use your PC or Mac for work purposes, there are great chances to have a Microsoft Excel and Excel files that you wouldn’t allow anyone else to open or read. Excel is an excellent tool used by consumers, business men, government institution and millions of other users around the world. Fortunately, you can encrypt your personal data in Excel file by adding a layer of password protection on it. It will prevent unwanted modifications and accidental deletion of the file. There are number of password protection types you can use, if you are trying to find, how to add password to Excel then keep on reading.
Part 1. How Many Kinds of Passwords in Excel?
There are number of password protection forms that can be used for security purposes on Excel files, these password protections types are listed below with step by step procedure on how to use them. These protection layers include:
- Password to Open: This won’t allow you to open Excel file without knowing the password.
- Password to Modify: This won’t allow you to do changes in Excel data without entering the password.
- Shared Workbook Password: This allows you to set password on Excel workbook that is shared on a network.
- Workbook Password: You can prevent unauthorized users to access or edit certain workbook.
- Worksheet Password: You can prevent unauthorized users to access or edit certain worksheet
- VBA Project Password: It allows you to lock your entire VBA project.
Part 2. How to Add Each Password to Excel?
This is how you can add password to Excel with each type in step by step procedure, follow the instructions carefully.
1. Add Password to Open:
You can add password to prevent unauthorized opening of file, password input will be prompted every time someone tries to access the Excel(2007) File, this is how you do it:
Step 1: Open the Excel File you want to encrypt.
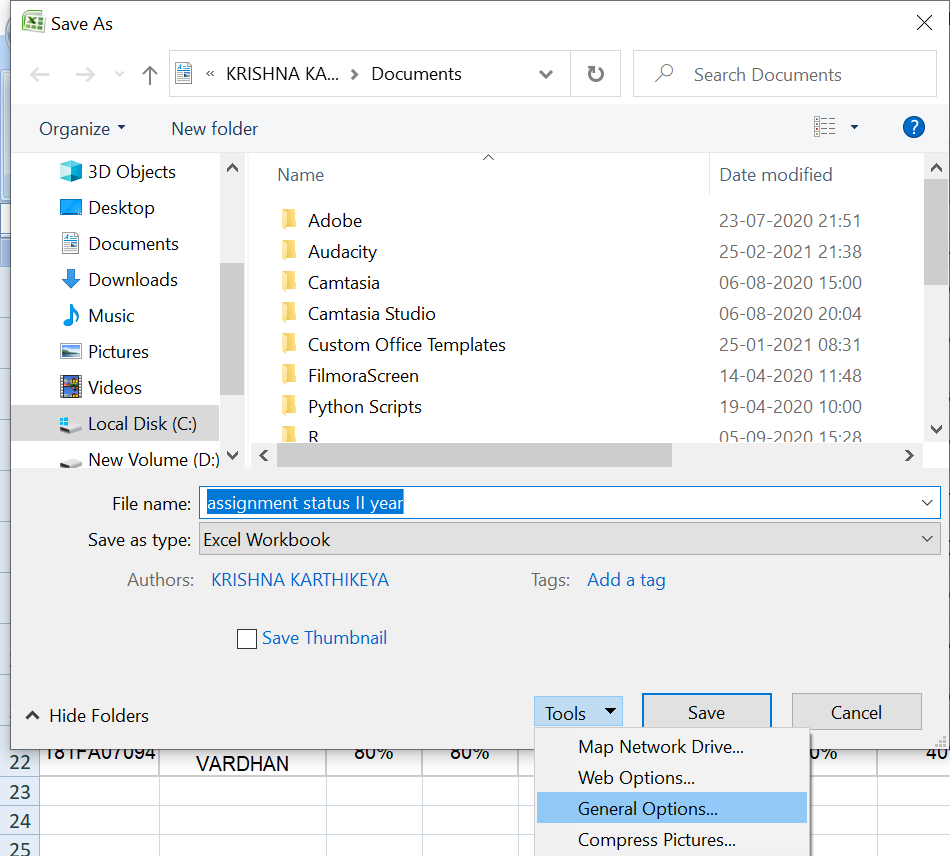
Step 2: Open ‘Save As» dialog box, a tool dropdown will appear near «Save As» button.
![]()
Step 3: Open the dropdown and choose «General Options».
![]()
Step 4: Enter desired password in «Password to open» textbox and click «OK».
2. Add Password to Modify(Excel 2007, 2010):
This protections will prevent modification from unauthorized by asking password every time someone tries to change data in the excel file. This is how to add a password to an Excel file and restrict modify permission:
Step 1: Open the Excel File you want to encrypt.
Step 2: Open ‘’Save As» dialog box, a tool dropdown will appear near «Save As» button.
![]()
Step 3: Open the dropdown and choose «General Options».
![]()
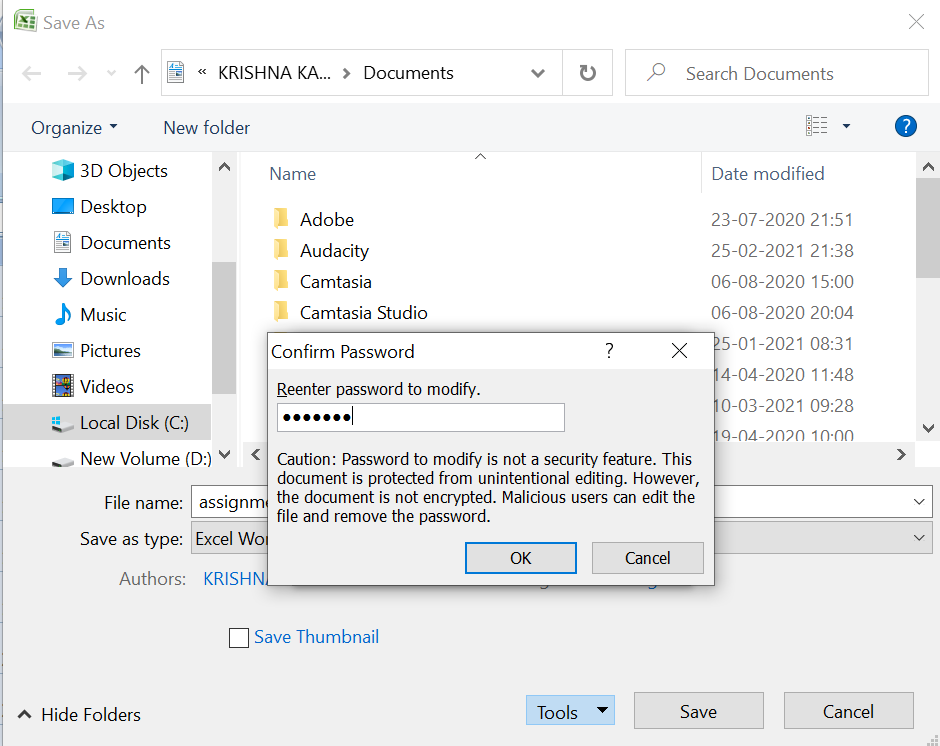
Step 4: Enter desired password in «Password to modify» textbox and click «OK».
3. Add Shared Workbook Password(Excel 2010, 2013):
This will allow you to set password on workbook file that has been shared over network to make sure only authorized person can access and modify the file, this is how you do it:
Step 1: Open the Workbook you want to protect.
Step 2: Now press «ALT +RO», it will open Protect Shared Workbook dialog box.
![]()
Step 3: Select «Sharing with Track Changes» check box to enable file sharing and turn on change tracking.
Step 4: Now, «Password(optional)» textbox will be available, where you can enter password and then click «OK».
4. Add Workbook Password(Excel 2010, 2013):
This will allow you to set password encryption on your whole Excel Workbook, it is very simple to do:
Step 1: Open the Excel File you want to protect.
Step 2: Open ‘Save As» dialog box, a tool dropdown will appear near «Save As» button.
![]()
Step 3: Open the dropdown and choose «General Options».
![]()
Step 4: Enter desired password in single or both textboxes and click «OK».
Step 5: Now «Save» the workbook.
5. Add Worksheet Password(Excel 2010, 2013):
This will allow you to set password on any specific worksheet you want ant prevent unauthorized modifications up to cell level, this is how you do it:
Step 1: Click on «Review» tab and then select «Protect Sheet».
![]()
Step 2: You can select checkboxes according to your security level in «All all users of this worksheet to» section.
![]()
Step 3: Now, click «OK».
6. Add VBA Project Password(Excel 2007,2010, 2013):
In addition to add password to excel file you can also add password protection to VBA project very easily, this is how you do it:
Step 1: Open and view the project in Excel you want to protect.
Step 2: Create a macro you want to protect.
![]()
Step 3: Now click «Tools» and then «VBAProject Properties».
![]()
Step 4: Go to «Protection» tab and check «Lock project for viewing» and enter password below.
Step 5: Now, click «OK» and save the file.
Bonus Tips: How to Remove/Recover Lost Excel Password
If you are locked up on your Excel file and you know how to add a password to excel but now aware of removing it in case you forget, then worry no more there are several methods you can use to recover forgotten password. Below is one of the most effective and simplest method to get rid of password:
Option 1. Remove Excel Password with 7-ZIP
Step 1: Download and install 7-Zip, Excel files are archive so we can use 7-Zip to edit parts of archive
![]()
Step 2: Open the Excel file using 7-Zip, you can do that by right clicking the file and opening it with 7-Zip program.
![]()
Step 3: Now find «xl» folder and right click on «workbook.xml» and select «Edit»
![]()
Step 4: Remove this tag completely:
< workbookProtection workbookPassword="93AF" lockStructure="1" lockWindows="1"/>
Step 5: 7-Zip will prompt to replace the existing XML file, select «Yes».
Step 6: If you have password protection on worksheet then navigate to ‘’xlworksheetssheet1.xml» and remove the tag «<sheetProtection … >»
Option 2. Recover Excel Password with PassFab Software
You can also use PassFab for Excel program, this tool works for almost all versions of Microsoft Excel files. It can unlock your password very easily with brute force attacks. It works for both workbooks and spreadsheets, this is how to use the program to unlock your password protected Excel files:
Step 1: Download, install and open the program.
Step 2: Launch the encrypted file by clicking «Add» button on main UI.
![]()
Step 3: Select the appropriate recovery mode, you can select «Brute Force Attack», «Brute Force with Mask Attack» or «Dictionary Attack».
![]()
Step 4: Click «Start», this will initiate brute force attack, it may take time according to password length and complexity.
![]()
Summary
This guide covered how to set different kind of password protection to Excel files and prevent unauthorized access and modification and later on we also covered ow you can recover forgotten password to open your Excel files and an awesome tool which can break almost all kind of password protection and supports every version of Microsoft Excel.
-
Home
- Computing
- Guides

If you use a computer, you probably have some Microsoft Excel documents on your Mac or PC that you wouldn’t want other people to find and read.
After all, Excel serves not only the average person, but also businesses, government institutions, and millions of other folks worldwide. Whether you’re creating graphs, converting PDFs, or just inputting rows and rows of data, the best way to keep that information safe is to learn how to password-protect an Excel file.
Adding a password

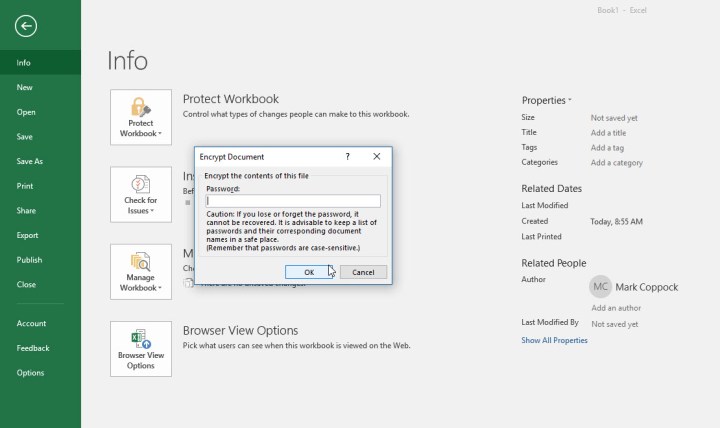
Step 1: In Excel, open the document you want to secure with a password.
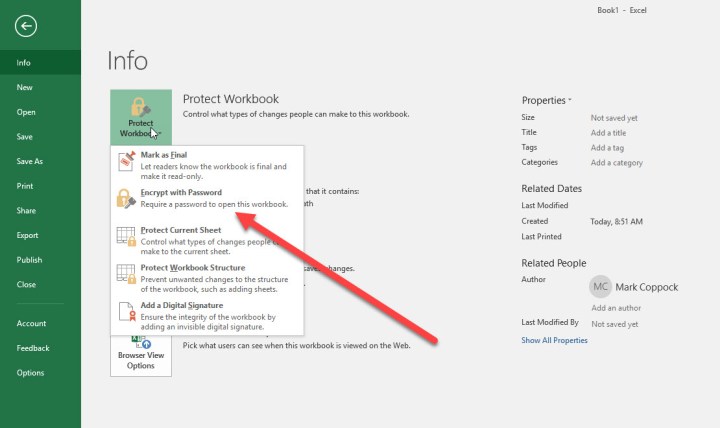
Step 2: Click File, followed by Info.
Step 3: Next, click the Protect Workbook button. From the drop-down menu, select Encrypt with Password.
Step 4: Excel will then prompt you to type in a password. Pick one that’s complicated and unique and note it down in your password manager.
It is paramount that you remember it, or have access to a copy of it in a secure location because if you forget it, you will lose access to the Excel file and recovering it will be complicated. There’s no way to access a forgotten password, so keep it in a password manager or similar method in case it is forgotten.
From now on, any time you try to open that file, Excel will prompt you to input your newly chosen password. Note that this password only protects that individual document, not every Excel document on your PC. If you want all Excel files to have similar protection, you’ll need to password-protect each file individually or look at more advanced protections.
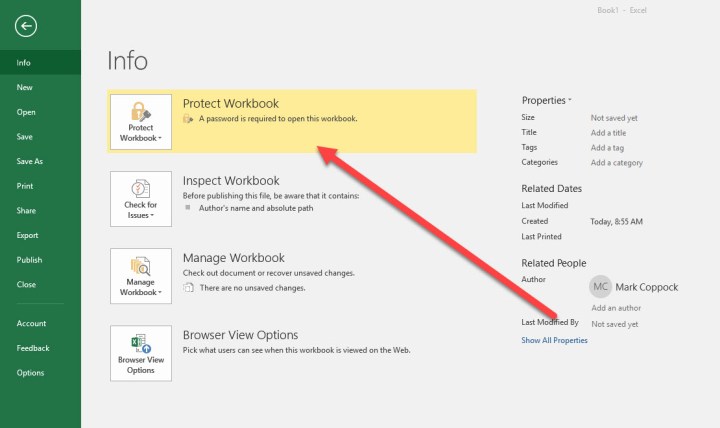
If you want to see whether an Excel file has password protection or not, check out the Info tab for the document and look at the Protect Workbook section. It will tell you whether a password is required to open it or not.
Now that you’ve password-protected your most essential files, it might be worth considering adding extra layers of security to your system. The easiest way to protect a large number of records is to encrypt them. Luckily, encryption programs are not hard to find. Windows 10 Professional users have a built-in encryption utility called Bitlocker. Still, if you want to download a free version with lots of customization options for many types of data, you can try Crypto Expert 8 or VeraCrypt open source downloads.
Additional security options

Excel also allows you to apply more customized security options to your file if necessary. It’s important to know what these other options do so you can create the right security for your project. Under Protect Document, you’ll find several additional features that may prove useful:
Mark as Final: This will mark the file as completed, which lets other people know that they shouldn’t make any changes. Using this option will not secure the data behind a password, however, so it doesn’t offer any security.
Protect Current Sheet: This will guard the currently selected worksheet with a password so that people can’t make any changes. It’s a handy option if there’s only one sheet in the workbook that you want to protect, and you don’t mind if people can see the info — you just don’t want them messing with anything. You will notice that there’s also an option to do this with Workbook Structure, which protects data throughout the workbook from changes unless people have the password.
Restrict Access: Businesses in particular benefit from restricting access to Excel files. Businesses know that all employees have access to the company’s system, and yet some aren’t authorized to open certain documents. Just as IT has made security templates that keep Excel files safe from particular users, the Restrict Access feature backs up these settings. It’s helpful in big groups where some people need to get to data, but not everyone needs to move in and out of the document.
Add a Digital Signature: You can guarantee that only you have access to and control over your Excel files by establishing a unique and inimitable digital signature.
Safeguarding Excel files is a crucial task that many people overlook. There are plenty of safety measures available to ensure that your information remains private and secure, starting with password protection. If you want to improve your information security, look at our crash course on encryption and our article on hiding files in Windows 10.
Editors’ Recommendations
-
Wi-Fi not working? How to fix the most common problems
-
Here’s how to rewatch the first public demo of ChatGPT-4
-
Best Microsoft Office deals for January 2023
-
The best all-in-one computers for 2023
-
How to fix audio issues in macOS
-
Computing
Microsoft Teams Premium uses AI to automatically recap your meetings

Microsoft has just made Teams Premium available for a short time. The preview will allow Microsoft’s customers to test out some of the new features that won’t be widely available for a while yet.
A few interesting features are making an appearance during this short trial run, including the ability to add custom branding to meetings, live translated captions, and meeting recaps prepared by artificial intelligence (AI).
Read more
-
Computing
How to use the new communities feature in Microsoft Teams

Microsoft has announced a new communities feature for its free Microsoft Teams communication platform that is intended for personal use rather than exclusively for large businesses.
The communities feature is available for Microsoft 365 Personal and Family and Teams Essentials accounts and allows users to easily organize, share, communicate, and collaborate in a hybrid manner. The feature allows you to not only connect online directly, but also to prepare for in-person meetings.
Read more
-
Computing
Hacker ranks explode — here’s how you can protect yourself

The number of people that have hacking skills has exploded recently but it’s still possible to protect yourself against almost all attacks, according to Microsoft’s latest Digital Defense Report.
Microsoft has among the most complete collections of cybersecurity data compiled from Windows computers around the world and has analyzed that information to uncover some interesting insights for 2022. Something immediately obvious from the report is the threat from phishing attacks and ransomware is growing rapidly and at the same time becoming more sophisticated but you can still protect yourself.
Read more
Excel sheets are also known as spreadsheets. Excel was developed by Microsoft for Apple’s Macintosh in 1985. The data stored in rows and columns format. We can create Excel sheets with infinite data. There will be n number of rows and n number of columns, which means we can store lakhs and crores of data into an Excel sheet. In this article, we will look into the process of adding passwords on a new Excel Sheet and an Existing Excel sheet.
Note: The password protection may not work for CSV files in some MS Excel versions.
Setting password for existing Excel file
Follow the below steps to set a password on an already existing Excel file
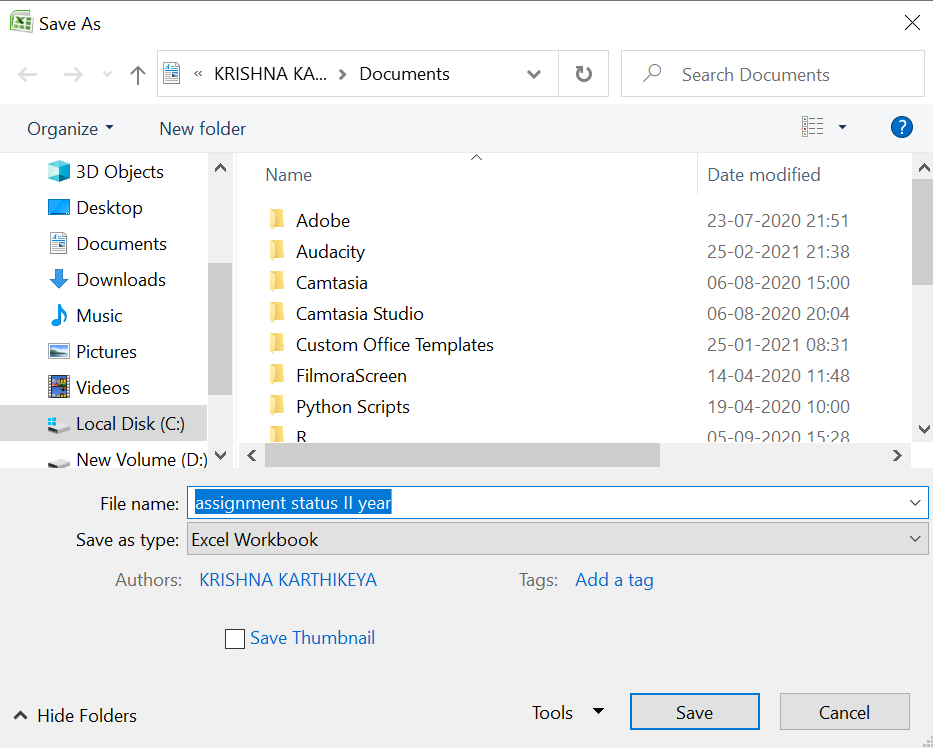
Step 1: Open existing Excel file
Step 2: Click on the save as button.

Step 3: Click on the drop-down list called tools.
Step 4: In the drop-down list select the General option.
Step 5: Set a password for opening the sheet and for writing.
Step 6: After setting the password click on the save button.
After setting the password, open the encrypted Excel file, we will find a dialog box with a text box for entering the password.
Setting password for a new Excel file
Follow the below steps to set a password on an already existing Excel file
Step 1: Create a new Excel file and add some data to it.
Step 2: Click on the save as button.
Step 3: Click on the drop-down list called tools.
Step 4: In the drop-down list select the General options.
Step 5: Set a password for opening the sheet and for writing.
Step 6: After setting the password click on the save button.