
Author: Oscar Cronquist Article last updated on February 17, 2023
There are two different kinds of text boxes, Form controls and ActiveX Controls. Form controls can only be used on worksheets whereas ActiveX Controls are far more advanced, offers a lot more customization, can be manipulated in more ways using VBA, and can also be used on userforms.
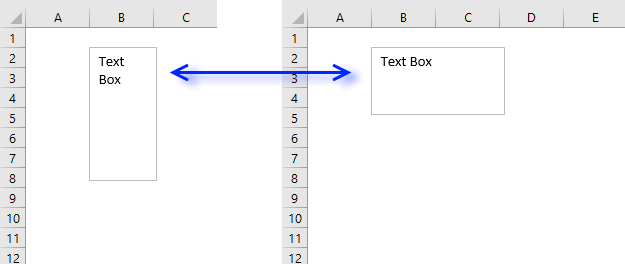
The examples in this post are text boxes from the group Form Controls. A text box is an empty field that can be used to submit data from the user or show data to the user. The image above shows a textbox containing text TextBox.
What’s on this page
- Formatting a text box
- Insert a text box
- Position, size and align a text box
- Link text box to cell
- Insert a text box programmatically
- Font and font size (VBA)
- Add or edit text (VBA)
- Position a text box (VBA)
- Resize a text box (VBA)
- Link a macro to a text box (VBA)
- Link text box to cell programmatically (VBA)
- Hide/Show text box (VBA)
- Delete text box (VBA)
- Change text box color (VBA)
- Where to put the VBA code?
- Get excel *.xlsm file
There are more VBA articles in the VBA knowledge base. Text boxes are great for dynamic worksheets, dashboards, or interactive charts. They allow you to build amazing workbooks with minimal effort.
Back to top
Formatting a text box

A textbox can be formatted in many different ways.
- Opacity
- background color
- border width
- border color
- font size
- font color
- font
The image above shows a textbox containing text «A textbox», a black border and a blue background. Select the text box you want to format.
To select a textbox press with left mouse button on it with the left mouse button. A selected textbox has white circles around it called sizing handles.
I will explain how to use the sizing handles later in this article. Go to tab «Shape Format» on the ribbon. This allows you to change the background color, border size, border color, etc.

The «Shape Format» tab is only visible on the ribbon if a textbox is selected.
Back to top
Insert a text box

To create a text box simply go to tab «Insert» on the ribbon and press with left mouse button on the «Text box» button.
Now press and hold with the left mouse button where you want to place the text box on the worksheet.
Drag with mouse to size the button. Release left mouse button to create the text box.
Back to top
Position, size and align a text box

Press with left mouse button on with left mouse button to select the text box. Move the mouse cursor to the edge of the text box, the cursor changes.
Press and hold with left mouse button on the border of the text box. Drag with mouse to its new location. Release the mouse button to release the text box.

To resize a textbox you first select the textbox so the sizing handles appear, they are white circles surrounding the textbox.
Press and hold with left mouse button on a sizing handle, then drag with mouse to resize the textbox.
To align a text box to the cell grid, select the text box in order to see the sizing handles. Press and hold the Alt key, press and hold with left mouse button on a sizing handle.
Drag with mouse to align the sizing handle with the cell grid. Release the left mouse button and the Alt key.
Back to top
Link a text box to a cell

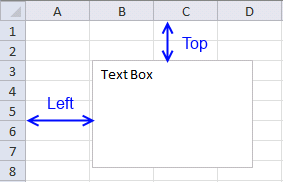
These steps show how to link a text box to a cell value. The image above shows a text box linked to cell G3, cell G3 has value «Text value». The text box shows the exact same value as in cell G3.
- Press with left mouse button on the text box to select it.
- Press with left mouse button on in the formula bar, a prompt appears.
- Type the cell reference to a cell you want to link. See the image above.

This makes the text box dynamic meaning if the linked cell value changes the text box cell value changes accordingly. This technique is useful in an interactive dashboard, chart or worksheet.
Back to top
Insert a text box programmatically
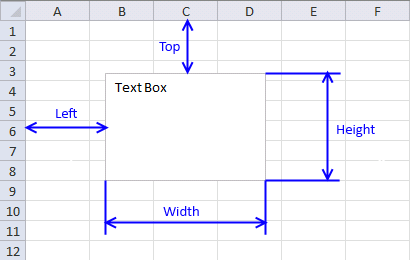
The AddTextBox method allows you to specify the distance from the cell grids top and left border, see picture above.
AddTextbox( Orientation, Left, Top, Width, Height)
It also lets you specify the width and height of the textbox you want to create. The macro below inserts a text box on worksheet Sheet1 60 points from the top border and 40 points from the left border. The text box width is 120 points and height is 80 points.
Sub TextBox()
Worksheets("Sheet1").Shapes.AddTextbox(msoTextOrientationHorizontal, _
   60, 40, 120, 80).TextFrame.Characters.Text = "Text Box"
End Sub
I will explain where to put this macro later in this article.
Back to top
Font and font size
The following code changes the font to Arial and font size to 20 of text box «Textbox 1» located on worksheet Sheet1.
'Name macro
Sub ChangeFontSize()

'The With ... End With statement allows you to write shorter code by referring to an object only once instead of using it with each property.
With Worksheets("Sheet1").Shapes("TextBox 1").TextFrame.Characters.Font

'Change font
.Name = "Arial"

'Change font size
.Size = 20
End With
End Sub
 The picture to the right shows text font Arial and font size 20 in text box «Text Box 1» on worksheet Sheet1.
Back to top
Add or edit text
 The macro below changes text in the text box named «Shape1» to «Text Box1» on worksheet Sheet1.
'Name macro
Sub ChangeText()

'Change text box text
Worksheets("Sheet1").Shapes("Shape1").TextFrame.Characters.Text _
   = "Text Box1"
End Sub
Back to top
Position a text box
 The macro below changes the location of text box «TextBox 1» on Sheet1.
50 points from the left border and 30 points from the top border.
'Name macro
Sub PositionShape()

'The With ... End With statement allows you to write shorter code by referring to an object only once instead of using it with each property.
With Worksheets("Sheet1").Shapes("TextBox 1")

   'Move text box 50 points from left worksheet border
   .Left = 50

   ''Move text box 30 points from top worksheet border
   .Top = 30
End With
End Sub
Read more: Move a shape (vba)
Back to top
Resize a text box
The picture above demonstrates a text box that resizes from height 100 points and width 50 points (left text box) to height 50 points and width 100 points (right text box).
'Name macro
Sub ResizeShape()

'The With ... End With statement allows you to write shorter code by referring to an object only once instead of using it with each property.
With Worksheets("Sheet1").Shapes("TextBox 1")

    'Change text box height to 50
    .Height = 50

    'Change text box width to 100
    .Width = 100
End With
End Sub
Back to top
Assign a macro to a text box
The text box allows you to link a macro to a text box, what happens is that when a user press with left mouse button ons on a text box the assigned macro runs.
To assign a macro to a specific text box using VBA see following code.
'Name macro
Sub AssignMacro()

'Assign macro named Macro1 to text box named Textbox 1
Worksheets("Sheet1").Shapes("TextBox 1").OnAction = "Macro1"
End Sub
The macro above assigns Macro1 to «TextBox 1» on worksheet Sheet1.
Back to top
Change text box color
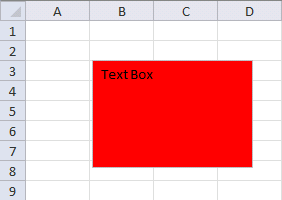 The picture to the right shows «TextBox 1» with the color red.
The macro below changes the color of «TextBox 1» using RGB values.
Sub ColorShape()

'Change background color
Worksheets("Sheet1").Shapes("TextBox 1").Fill.ForeColor.RGB = RGB(255, 0, 0)
End Sub
Back to top
Link text box to cell
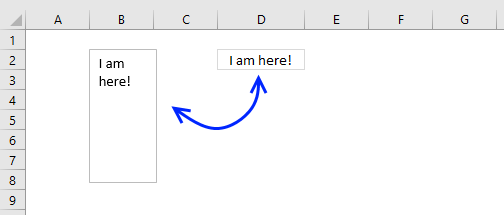
This macro links text box «TextBox 1» to cell D2, the text box will now show the value in cell D2 making it dynamic meaning you can easily change what is shown in the text box by changing the value, for example, with a formula in cell D2.
'Name macro
Sub LinkCell()

'Link cell to text box
Worksheets("Sheet1").TextBoxes("TextBox 1").Formula = "=$D$2"
End Sub
Back to top
Hide/Show text box
The visible property allows you to hide the text box.
This macro hides «TextBox 1» on worksheet Sheet1.
'Name macro
Sub HideTextBox()

'Hide text box named Textbox 1
Worksheets("Sheet1").TextBoxes("TextBox 1").Visible = False
End Sub
Back to top
Delete text box
This macro deletes «TextBox 2» on worksheet Sheet1.
'Name macro
Sub DeleteTextBox()

'Delete text box named Textbox 2
Worksheets("Sheet1").TextBoxes("TextBox 2").Delete
End Sub
Back to top
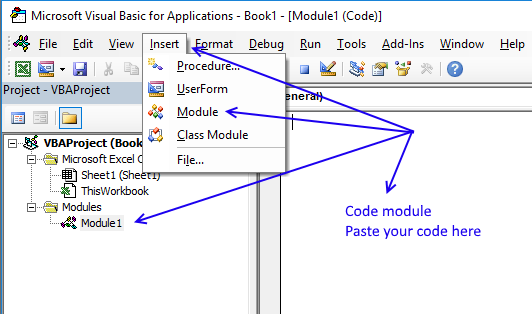
Where to copy the code?
Follow these steps to insert macro to your workbook.
- Copy macro.
- Go to VB Editor (Alt+F11).

- Press with mouse on «Insert» on the top menu.
- Press with left mouse button on «Module» to insert a module to the workbook.
- Paste macro to the code module.
- Exit VB Editor.
- Save the workbook as a macro-enabled workbook (*.xlsm).
If you don’t the macro will be gone the next time you open the workbook.
Back to top
Back to top
Recommended articles
- Excel VBA Text boxes on userforms
What This VBA Code Does
This VBA macro has a ton of great stuff! First it creates a shape and adjusts its size and location on the active slide. After that, the macro tackles the main formatting commands that I personally use the most in PowerPoint. Enjoy!
Sub Create_A_Shape()
‘PURPOSE:Create a Text Box Shape and Reformat it
‘SOURCE: www.TheSpreadsheetGuru.com
Dim Sld As Slide
Dim Shp As Shape
‘ERROR HANDLING
If ActivePresentation.Slides.Count = 0 Then
MsgBox «You do not have any slides in your PowerPoint project.»
Exit Sub
End If
Set Sld = Application.ActiveWindow.View.Slide
‘Create shape with Specified Dimensions and Slide Position
Set Shp = Sld.Shapes.AddShape(Type:=msoShapeRectangle, _
Left:=24, Top:=65.6, Width:=672, Height:=26.6)
‘FORMAT SHAPE
‘Shape Name
Shp.Name = «My Header»
‘No Shape Border
Shp.Line.Visible = msoFalse
‘Shape Fill Color
Shp.Fill.ForeColor.RGB = RGB(184, 59, 29)
‘Shape Text Color
Shp.TextFrame.TextRange.Font.Color.RGB = RGB(255, 255, 255)
‘Text inside Shape
Shp.TextFrame.TextRange.Characters.Text = «[Header]»
‘Center Align Text
Shp.TextFrame.TextRange.Paragraphs.ParagraphFormat.Alignment = ppAlignCenter
‘Vertically Align Text to Middle
Shp.TextFrame2.VerticalAnchor = msoAnchorMiddle
‘Adjust Font Size
Shp.TextFrame2.TextRange.Font.Size = 14
‘Adjust Font Style
Shp.TextFrame2.TextRange.Font.Name = «Arial»
End Sub
Using VBA Code Found On The Internet
Now that you’ve found some VBA code that could potentially solve your Excel automation problem, what do you do with it? If you don’t necessarily want to learn how to code VBA and are just looking for the fastest way to implement this code into your spreadsheet, I wrote an article (with video) that explains how to get the VBA code you’ve found running on your spreadsheet.
Getting Started Automating Excel
Are you new to VBA and not sure where to begin? Check out my quickstart guide to learning VBA. This article won’t overwhelm you with fancy coding jargon, as it provides you with a simplistic and straightforward approach to the basic things I wish I knew when trying to teach myself how to automate tasks in Excel with VBA Macros.
Also, if you haven’t checked out Excel’s latest automation feature called Power Query, I have put together a beginner’s guide for automating with Excel’s Power Query feature as well! This little-known built-in Excel feature allows you to merge and clean data automatically with little to no coding!
How Do I Modify This To Fit My Specific Needs?
Chances are this post did not give you the exact answer you were looking for. We all have different situations and it’s impossible to account for every particular need one might have. That’s why I want to share with you: My Guide to Getting the Solution to your Problems FAST! In this article, I explain the best strategies I have come up with over the years to get quick answers to complex problems in Excel, PowerPoint, VBA, you name it!
I highly recommend that you check this guide out before asking me or anyone else in the comments section to solve your specific problem. I can guarantee that 9 times out of 10, one of my strategies will get you the answer(s) you are needing faster than it will take me to get back to you with a possible solution. I try my best to help everyone out, but sometimes I don’t have time to fit everyone’s questions in (there never seem to be quite enough hours in the day!).
I wish you the best of luck and I hope this tutorial gets you heading in the right direction!
Chris
Founder, TheSpreadsheetGuru.com
| title | keywords | f1_keywords | ms.prod | api_name | ms.assetid | ms.date | ms.localizationpriority |
|---|---|---|---|---|---|---|---|
|
Shapes.AddTextbox method (Excel) |
vbaxl10.chm638086 |
vbaxl10.chm638086 |
excel |
Excel.Shapes.AddTextbox |
c594be81-95e6-37da-2c55-418f11ad7554 |
05/15/2019 |
medium |
Shapes.AddTextbox method (Excel)
Creates a text box. Returns a Shape object that represents the new text box.
Syntax
expression.AddTextbox (Orientation, Left, Top, Width, Height)
expression A variable that represents a Shapes object.
Parameters
| Name | Required/Optional | Data type | Description |
|---|---|---|---|
| Orientation | Required | MsoTextOrientation | The orientation of the textbox. |
| Left | Required | Single | The position (in points) of the upper-left corner of the text box relative to the upper-left corner of the document. |
| Top | Required | Single | The position (in points) of the upper-left corner of the text box relative to the top of the document. |
| Width | Required | Single | The width of the text box, in points. |
| Height | Required | Single | The height of the text box, in points. |
Return value
Shape
Example
This example adds a text box that contains the text Test Box to myDocument.
Set myDocument = Worksheets(1)
myDocument.Shapes.AddTextbox(msoTextOrientationHorizontal, _
    100, 100, 200, 50) _
    .TextFrame.Characters.Text = "Test Box"
[!includeSupport and feedback]
The Excel VBA Shape object represents an object in the
drawing layer, such as an AutoShape, freeform, OLE object, or picture. It is a
member of the Shapes collection, which contains all the shapes in a workbook,
but represents a single shape in a worksheet.
How to refer to the Shape
object
We refer to the Shapes collection in a given worksheet as indicated below:
ActiveSheet.Shapes
Then, we can use properties and methods of the Shapes collection as per the Excel object model structure. Some useful methods of the Shapes collection are: AddShape,
AddTextBox, AddFormControl, AddPicture, Item, SelectAll. See below an example
of the structure (for AddShape see next section).
ActiveSheet.Shapes.SelectAll ‘selects all the shapes in
the active sheet
ActiveSheet.Shapes.Item(1).Select ‘selects the first shape in the
active sheet
The latest can simply be referred to as either of the below two
options: the first one using the index, and the second using the shape name. Thus, we refer to a single Shape object.
ActiveSheet.Shapes(1)
ActiveSheet.Shapes(«Rectangle 1»)
Add new shapes
We use the method AddShape of the Excel VBA Shapes
collection to create or add a new shape in a given worksheet. Excel
automatically gives a default name depending on the type of shape (for example,
Rectangle 1, TextBox 2, etc), but we can easily change the name of the shape
and many other properties (see later). See below the standard statement to add
a new AutoShape in the active worksheet.
ActiveSheet.Shapes.AddShape MsoAutoShapeType, pLeft, pTop, pWidth, pHeight
Where MsoAutoShapeType specifies the type of
an AutoShape object (MsoAutoShapeType enumeration for Microsoft Office), and pLeft, pTop, pWidth, and pHeight determine the position and
size of the shape in points. Note that the pLeft and pTop refer to the upper
left corner of the shape in reference to the upper left edge of the worksheet.
In the following example, we add a rectangle
to the active worksheet.
ActiveSheet.Shapes.AddShape
msoShapeRectangle, 20, 20, 200, 100

In order to add the shape to a specific cell
or range in the worksheet, we need to specify the position and size of the
shape as follows:
Dim rng As Range
Set rng = ActiveSheet.Range(«D4:H8»)
rngLeft = rng.Left
rngTop = rng.Top
rngHeight = rng.Height
rngWidth = rng.Width
ActiveSheet.Shapes.AddShape msoShapeRectangle,
rngLeft, rngTop, rngWidth, rngHeight

It is more practical to add the shape to an
object variable in order to easily apply formatting properties or methods later.
In the following example, we define an object variable called “MyShape” to add
a rectangle to the active worksheet, then we change the name of the shape and
apply any other properties (for this see next section).
Dim MyShape As Shape
Set MyShape =
ActiveSheet.Shapes.AddShape(msoShapeRectangle, 50, 50, 140, 80)
With MyShape
.Name =
«MyFirstShape»
‘other
properties
End With
We can add other types of shapes such as text
boxes, form controls, smart art shapes, pictures, etc, with the corresponding
method of the Shapes collection. Here are some useful examples.
The code below adds a textbox into the active
worksheet with given dimensions (100×60) and some inner text. Note that we use
the TextFrame.Characters method to work with text inside the box.
Dim
txtbox As Shape
Set
txtbox = ActiveSheet.Shapes.AddTextbox(msoTextOrientationHorizontal, 50, 50,
100, 60)
With
txtbox.TextFrame.Characters
.Text = «This is my first textbox»
.Font.Color = vbRed
End
With

We can add form controls such as buttons,
check boxes, combo boxes, etc, with the AddFormControl method of the Shapes
collection. For example, to add a command button we can use a similar structure
than the one we have seen earlier:
ActiveSheet.Shapes.AddFormControl
xlButtonControl, 20, 20, 100, 40
In this particular case we
can also use the Buttons.Add method directly. The following subroutine adds a command button to the active worksheet,
and assigns another procedure (ButtonAction) to be run when clicked.
Sub
AddButtonToWorksheet()
Dim
btn As Object
Set
btn = ActiveSheet.Buttons.Add(20, 20, 100, 40)
btn.OnAction = «ButtonAction»
End Sub
Sub
ButtonAction()
MsgBox «You have pressed the button»
End Sub

Select, copy, and delete shapes
We can select, copy, or delete a shape using
the corresponding methods of the Shape object, and specifying that particular
shape with either the number or name (as we have seen earlier).
ActiveSheet.Shapes(«Rectangle 1»).Select ‘selects Rectangle 1
ActiveSheet.Shapes(2).Select ‘selects
the second shape
ActiveSheet.Shapes.SelectAll ‘selects all shapes in the
active sheet
ActiveSheet.Shapes(«Rectangle 1»).Copy
ActiveSheet.Paste
ActiveSheet.Shapes(«Rectangle
1»).Delete
In order to copy or delete all shapes in the
worksheet we need to loop through all shapes using a For Each loop. If you are
not familiar with loops, please check the lesson 6 (Conditions and Loops) in
the training for beginners. The following example deletes all shapes in the
active worksheet:
Dim shp As Shape
For Each shp In ActiveSheet.Shapes
shp.Delete
Next shp
If we want to select and work with a subset of shapes (more
than just one), we have to construct a ShapeRange
collection that contains the shapes we want to work with. In the example below,
we select a rectangular shape (Rectangle 1) and a textbox (TextBox 2) through
an array of shapes. We can now work with those shapes and apply for example
formatting properties to both at the same time.
Dim ShpSubsetArray() As Variant
Dim ShpSubset As Object
ShpSubsetArray = Array(«Rectangle 1»,
«TextBox 2»)
Set ShpSubset =
ActiveSheet.Shapes.Range(ShpSubsetArray)
ShpSubset.Select
Format shapes
There are a bunch of properties to format
shapes in Excel VBA. We can specify the position in the worksheet with the Top
and Left properties as we have seen earlier. Similarly, we can set the width
and height of the shape with the respective properties of the Shape
object.
With ActiveSheet.Shapes(«Rectangle 1»)
.Top = 100
.Left = 100
.Width = 200
.Height = 120
End With

We can also change the aspect of the interior
and border of the shape. The following example changes the interior color of the
rectangle to blue and sets a thick red border around using the Fill and Line
properties.
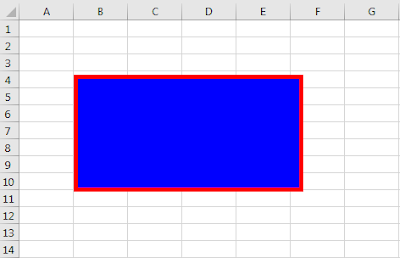
With ActiveSheet.Shapes(«Rectangle 1»)
.Fill.ForeColor.RGB = RGB(0, 0, 255)
.Line.ForeColor.RGB = RGB(255, 0, 0)
.Line.Weight = xlThick
End With
In order to add text to the shape we need to
use the TextFrame property. This may be particularly useful when dealing with
textboxes. We use the TextFrame.Characters method to add text, change font
properties, etc. The example below adds some text red and bold inside the
textbox.
With ActiveSheet.Shapes(«TextBox 2»)
With .TextFrame.Characters
.Text = «This is my textbox»
.Font.Color = vbRed
.Font.Bold = True
End With
End With

Other VBA Objects
Application
Workbook
Worksheet
WorksheetFunction
Range
Chart
Работа с фигурами в VBA Excel: создание фигур методом Shapes.AddShape, типы фигур (MsoAutoShapeType), обращение к фигурам и изменение их свойств. Примеры.
Объекты для работы с фигурами
Фигуры в VBA Excel представлены тремя объектами:
| Объект | Описание |
|---|---|
| Shapes | Коллекция всех фигур на рабочем листе. Используется для создания новых фигур, для обращения к одной фигуре по имени и для перебора фигур циклом. |
| ShapeRange | Коллекция нескольких фигур, аргументом которой является массив имен выбранных объектов. Используется для редактирования сразу всех фигур, входящих в эту коллекцию. |
| Shape | Объект, представляющий одну фигуру. Используется для редактирования одной этой фигуры. |
Фигуры в VBA Excel создаются методом Shapes.AddShape.
Синтаксис метода AddShape
|
Shapes.AddShape (Type, Left, Top, Width, Height) |
Shapes — выражение, возвращающее коллекцию фигур на рабочем листе, например: ActiveSheet.Shapes.
Параметры метода AddShape
| Параметр | Описание |
|---|---|
| Type | Константа из коллекции MsoAutoShapeType, определяющая тип создаваемой фигуры. |
| Left | Расстояние от левой границы фигуры до левой границы табличной части рабочего листа в пунктах.. Тип данных — Single. |
| Top | Расстояние от верхней границы фигуры до верхней границы табличной части рабочего листа в пунктах.. Тип данных — Single. |
| Width | Ширина фигуры по внешним границам в пунктах. |
| Height | Высота фигуры по внешним границам в пунктах. |
Все параметры метода Shapes.AddShape являются обязательными.
Константы MsoAutoShapeType
Константы коллекции MsoAutoShapeType, определяющие основные типы создаваемых фигур:
| Константа | Значение | Тип фигуры |
|---|---|---|
| msoShapeRectangle | 1 | Прямоугольник |
| msoShapeParallelogram | 2 | Параллелограмм |
| msoShapeTrapezoid | 3 | Трапеция |
| msoShapeDiamond | 4 | Ромб |
| msoShapeRoundedRectangle | 5 | Прямоугольник: скругленные углы |
| msoShapeOctagon | 6 | Восьмиугольник (октаэдр) |
| msoShapeIsoscelesTriangle | 7 | Равнобедренный треугольник |
| msoShapeRightTriangle | 8 | Прямоугольный треугольник |
| msoShapeOval | 9 | Овал |
| msoShapeHexagon | 10 | Шестиугольник (гексаэдр) |
| msoShapeCross | 11 | Крест |
| msoShapeRegularPentagon | 12 | Пятиугольник (пентаэдр) |
| msoShapeCan | 13 | Цилиндр |
| msoShapeCube | 14 | Куб |
| msoShapeDonut | 18 | Круг: прозрачная заливка (кольцо) |
| msoShapeLightningBolt | 22 | Молния |
| msoShapeSun | 23 | Солнце |
| msoShapeMoon | 24 | Месяц (луна) |
| msoShape5pointStar | 92 | Звезда: 5 точек (пятиконечная) |
| msoShapeCloud | 179 | Облако |
Все доступные константы из коллекции MsoAutoShapeType смотрите на сайте разработчиков.
Создание объекта ShapeRange
Создание коллекции ShapeRange из выбранных фигур:
|
Dim myShapeRange As ShapeRange Set myShapeRange = ActiveSheet.Shapes.Range(Array(«Пятиугольник 140», «Солнце 141», «Облако 144»)) |
Объектная переменная myShapeRange не обязательна, можно обратиться непосредственно к возвращенной коллекции, например, присвоив всем ее элементам синий цвет:
|
ActiveSheet.Shapes.Range(Array(«Пятиугольник 140», «Солнце 141», «Облако 144»)).Fill.ForeColor.RGB = vbBlue |
Примеры работы с фигурами
Пример 1
Создание пяти разных фигур из кода VBA Excel методом Shapes.AddShape:
|
Sub Primer1() With ActiveSheet.Shapes ‘При создании фигуры без присвоения ее переменной скобки не нужны .AddShape msoShapeCube, 30, 40, 72, 72 .AddShape msoShapeIsoscelesTriangle, 130, 40, 72, 72 .AddShape msoShapeSun, 230, 40, 72, 72 .AddShape msoShapeLightningBolt, 330, 40, 72, 72 ‘Чтобы выбрать фигуру, параметры необходимо заключить в скобки .AddShape(msoShapeCloud, 430, 40, 72, 72).Select End With End Sub |
Результат работы кода:

Пример 2
Работа с одной фигурой:
|
Sub Primer2() Dim myShape As Shape ‘Создаем фигуру «Месяц» и присваивает ссылку на нее переменной myShape Set myShape = ActiveSheet.Shapes.AddShape(msoShapeMoon, 50, 50, 80, 80) With myShape ‘Меняем высоту и ширину фигуры .Height = 150 .Width = 100 ‘Меняем цвет фигуры .Fill.ForeColor.RGB = vbYellow ‘Поворачиваем фигуру влево на 40 градусов .Rotation = —40 End With End Sub |
Пример 3
Редактирование одновременно нескольких фигур с помощью коллекции ShapeRange:
|
Sub Primer3() With ActiveSheet.Shapes.Range(Array(«Овал 1», «Овал 2», «Овал 3»)) ‘Меняем цвет всех фигур из коллекции ShapeRange .Fill.ForeColor.RGB = vbBlue ‘Задаем высоту и ширину овалов .Height = 150 .Width = 50 ‘Поворачиваем фигуры вправо на 45 градусов .Rotation = 45 End With End Sub |
Пример 4
Редактирование одновременно всех фигур на рабочем листе с помощью коллекции ShapeRange:
|
1 2 3 4 5 6 7 8 9 10 11 12 13 14 15 16 17 18 19 |
Sub Primer4() Dim myShapeRange As ShapeRange, i As Integer, _ myShape As Shape, myArray() As String ‘Задаем массиву размерность от 1 до количества фигур на листе ReDim myArray(1 To ActiveSheet.Shapes.Count) ‘Проходим циклом по всем фигурам коллекции и записываем их имена в массив For Each myShape In ActiveSheet.Shapes i = i + 1 myArray(i) = myShape.Name Next ‘Создаем коллекцию ShapeRange и присваиваем ссылку на нее переменной myShapeRange Set myShapeRange = ActiveSheet.Shapes.Range(myArray) With myShapeRange ‘Изменяем цвет всех фигур на рабочем листе .Fill.ForeColor.RGB = RGB(100, 150, 200) ‘Поворачиваем все фигуры вокруг вертикальной оси .Flip msoFlipVertical End With End Sub |
Пример 5
Добавление надписи (текста) на фигуру:
|
Sub Primer5() Dim myShape As Shape Set myShape = ActiveSheet.Shapes.AddShape(msoShapeCloud, 50, 30, 300, 300) With myShape.TextFrame2 ‘Добавление текста на фигуру .TextRange.Characters.Text = «Объект TextFrame представляет текстовую рамку в объекте Shape. Содержит текст в текстовом кадре, а также свойства и методы, которые контролируют выравнивание и закрепление текстового кадра.» ‘Задаем курсивное начертание .TextRange.Characters.Font.Italic = True ‘Указываем размер шрифта .TextRange.Characters.Font.Size = 13 ‘Отступ левой границы текстового поля от левой внутренней границы фигуры .MarginLeft = 30 ‘Отступ верхней границы текстового поля от верхней внутренней границы фигуры .MarginTop = 20 End With End Sub |
Результат работы кода:

Изменить цвет текста, например на черный, можно двумя способами:
|
‘С помощью константы MsoThemeColorIndex myShape.TextFrame2.TextRange.Characters.Font.Fill.ForeColor.ObjectThemeColor = msoThemeColorDark1 ‘С помощью цветовой модели RGB myShape.TextFrame2.TextRange.Characters.Font.Fill.ForeColor.RGB = RGB(0, 0, 0) |
С константами из коллекции MsoThemeColorIndex вы можете ознакомиться на сайте разработчиков.
Пример 6
Удаление фигур с рабочего листа из кода VBA Excel с помощью метода Delete.
Удаление одной фигуры:
|
ActiveSheet.Shapes(«Ромб 5»).Delete |
Удаление нескольких фигур:
|
ActiveSheet.Shapes.Range(Array(«Овал 1», «Овал 2», «Овал 3»)).Delete |
Удаление всех фигур с рабочего листа с помощью цикла:
|
Sub Primer6() Dim myShape As Shape For Each myShape In ActiveSheet.Shapes myShape.Delete Next End Sub |
В 7 примере рассмотрено удаление всех фигур без цикла.
Пример 7
Выделение всех фигур на рабочем листе:
|
ActiveSheet.Shapes.SelectAll |
Выбор всех фигур и удаление выбранного (всех фигур):
|
Sub Primer7() ActiveSheet.Shapes.SelectAll Selection.Delete End Sub |
Продолжение темы в статье VBA Excel. Копирование, перемещение и поворот фигур.