
Содержание
- Send Email From Excel With Formula (No Macros!)
- Create Hyperlink Formula
- Link Location
- Mail To
- Subject
- Friendly Name
- Copy Formula Down
- VBA Send Email from Excel
- VBA Code to Send Emails From Excel
- Set Reference to Microsoft Office Library
- 13 Easy Steps to Send Emails from Excel
- Step #1
- Step #2
- Step #3
- Step #4
- Step #5
- Step #6
- Step #7
- Step #8
- Step #9
- Step #10
- Step #11
- Step #12
- Step #13
- Recommended Articles
- Exceltip
- Блог о программе Microsoft Excel: приемы, хитрости, секреты, трюки
- Три способа отправить письмо из Excel с помощю VBA
- Отправить письмо в Excel с помощью VBA
- Отправить письмо в Excel с помощью CDO
- Отправить письмо в Excel с помощью Send Keys
Send Email From Excel With Formula (No Macros!)
This tutorial demonstrates how to send an email from Excel with a formula (no macros necessary).

In Excel, you can send an email by running a macro, but if you prefer not to use VBA, keep reading.
Create Hyperlink Formula
In Excel, it’s possible to click on a cell and send an email automatically. This can be done with a formula using the HYPERLINK Function. You can create a hyperlink formula that uses the mailto command and auto-populates fields like to, subject, cc, and the body of an email.
The HYPERLINK formula is made up of the following parts:
Link Location
The Link_Location is the first part of the formula. This example sets mailto, subject, and body.
Mail To
The “mailto:” part of the formula sets the email recipient. This needs to be a valid email address entered into the formula – or, in this example – linked to a cell (C3) that contains a valid email address.
Subject
The “?subject=” can have text between the equals sign and quotation marks, link to a cell, or contain a formula. In this example, there’s a formula to check the status of an order. If the status is 1, use “Thank you for your order” from cell I3.
To do that, use the following IF statement for the subject part of the formula.
Note that there has to be a ? symbol before the word “subject.”
If you want to add a cc to your email, insert it into the formula after the subject in quotation marks. You need an ampersand (&) before the “cc.”. You can either type in the email address to cc the mailto, or you can link it to an external cell as with the subject and body of the email.
The “&body=” part of the formula can contain additional text before the closing quotation mark. You can also create a customized IF statement with a formula:
This IF statement looks at the status of the order, and then adds a message to the end of the email body (Thank you for your business!).
As with the cc, you need an ampersand (&) before the word “body.”
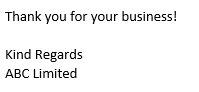
The message at the end (in cell J7) contains the text:
where the “%0A” adds blank lines. The text in the email is displayed as follows:
Note: In the formula, the cells that refer to the lookup columns (for the subject and body text) have been put in the formulas as absolute (or “locked”) cell addresses. This lets you copy the formula down to the rest of the order records.
Friendly Name
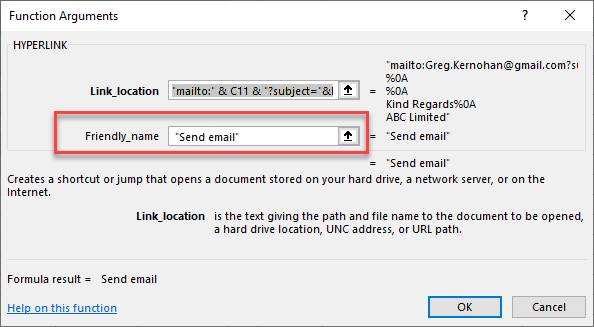
The final part of the formula is what displays in the hyperlinked cell in Excel – this is the text you click on to create the email. This example uses the text “Send email,” but any text can be entered, as long as it is within quotation marks.
View the formula in the Function Dialog box by clicking on the formula, and then clicking the Insert Function box in the formula bar.

The Link_location and Friendly_name are shown in the function arguments.
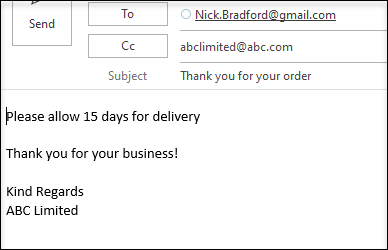
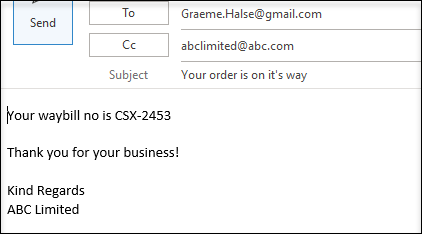
Therefore, the formula:
produces this email:
Copy Formula Down
Since the formula uses absolute cell addresses to refer to the subject and body “lookup” cells, you only need to type in the whole formula once. Then, copy the first cell down to the rest of the rows of your range.
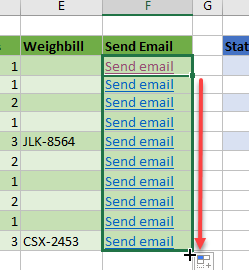
Click any of the “Send email” hyperlinks to send a customized email to the client.
Источник
VBA Send Email from Excel


VBA Code to Send Emails From Excel
In VBA, to send emails from Excel, we can automatically automate our mailing feature to send emails to multiple users at a time. However, to do so, we need to remember that we may do it by outlook, another product of outlook, so we need to enable outlook scripting in VBA. Once done, we use the .Application method to use outlook features.
VBA’s versatility is just amazing. VBA coders love Excel because by using VBA, we not only can work within Excel. Rather, we can also access other Microsoft tools. For example, we can access PowerPoint, Word, and Outlook by using VBA Outlook By Using VBA Microsoft Outlook has a VBA reference that can be used to control Outlook. This makes it easy to automate repetitive activities in Outlook. To use VBA in Outlook, you’ll need to enable the developer feature, just like in Excel. read more . So I was impressed when I heard of sending emails from Excel. Yes, it is true. We can send emails from excel. This article will show you how to send emails from Excel with attachments using VBA Coding Using VBA Coding VBA code refers to a set of instructions written by the user in the Visual Basic Applications programming language on a Visual Basic Editor (VBE) to perform a specific task. read more .
Table of contents

You are free to use this image on your website, templates, etc., Please provide us with an attribution link How to Provide Attribution? Article Link to be Hyperlinked
For eg:
Source: VBA Send Email from Excel (wallstreetmojo.com)
Set Reference to Microsoft Office Library
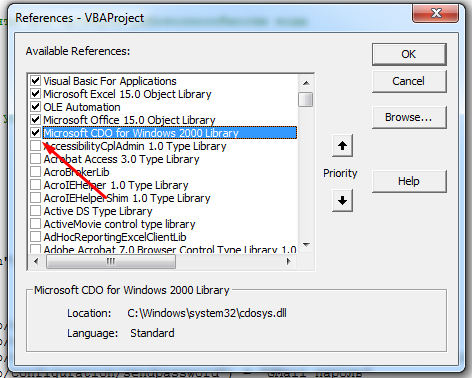
We need to send emails from Outlook. Since Outlook is an external objec, we first need object reference to “Microsoft Outlook 16.0 Object Library.”
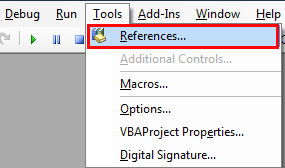
- 1. In VBA, Go to Tools > References.
Now, we will see the object reference library. In this window, we need to set the reference to “Microsoft Outlook 16.0 Object Library.”
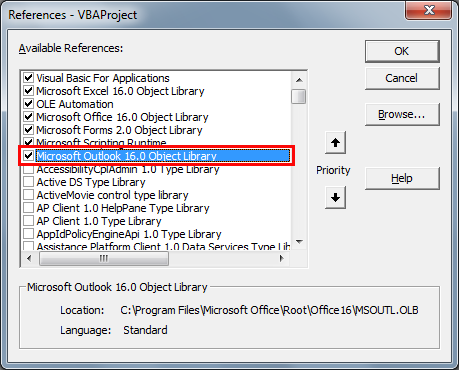
After setting the object reference, click on “OK.”
Now, we can access Outlook objects in VBA coding.
13 Easy Steps to Send Emails from Excel
Writing the code to send an email with an attachment from Excel is quite complicated but worth spending some time.
Step #1
Code:
Step #2
Declare the variable Outlook.Application
Code:
Step #3
The above variable is an object variable. Therefore, we need to create an instance of a new object separately. Below is the code to create a new instance of the external object.
Code:
Step #4
Now, to write the email, we declare one more variable as “Outlook.MailItem”.
Code:
Step #5
To launch a new email, we need to set the reference to our previous variable as “CreateItem.”
Code:
Now, the variable “EmailApp” will launch outlook. In the variable “EmailItem,” we can start writing the email.
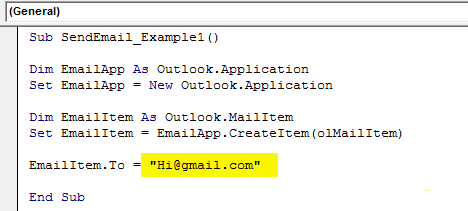
Step #6
We need to be aware of our items while writing an email. First, we need to decide to whom we are sending the email. So for this, we need to access the “TO” property.
Step #7
Enter the email ID of the receiver in double quotes.
Code:
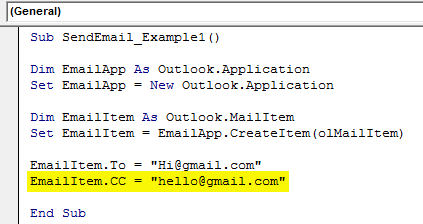
Step #8
After addressing the main receiver, if you would like to CC anyone in the email, we can use the “CC” property.
Code:
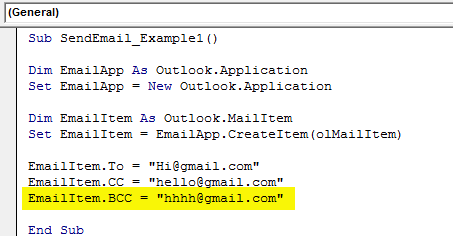
Step #9
After the CC, we can set the BCC email ID as well.
Code:
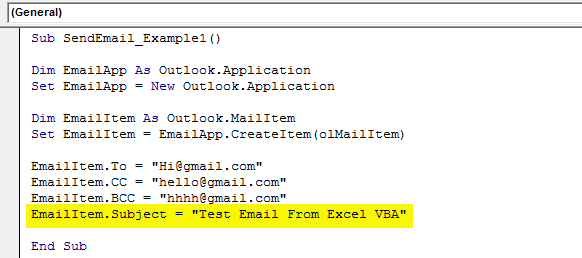
Step #10
We need to include the subject of the email we are sending.
Code:
Step #11
We need to write the email body using HTML body type.
Code:
Step #12
We are working on if we want to add an attachment to the current workbook. Then, we need to use the attachments property. First, declare a variable source as a string.
Code:
Then in this variable, write ThisWorkbook.FullName after Email body.
Code:
In this VBA Code, ThisWorkbook is used for the current workbook and .FullName is used to get the full name of the worksheet.
Then, write the following code to attach the file.
Code:
Step #13
Finally, we need to send the email to the mentioned email IDs. We can do this by using the “Send” method.
Code:
We have completed the coding part.
Code:
Run the above code. It will send the email with the mentioned body with the current workbook as the attachment.
Recommended Articles
This article has been a guide to VBA Send Email from Excel. Here, we learn how to write VBA code to send emails from Excel with attachments along with an example and downloadable Excel template. You can learn more about VBA from the following articles: –
Источник
Exceltip
Блог о программе Microsoft Excel: приемы, хитрости, секреты, трюки
Три способа отправить письмо из Excel с помощю VBA

Excel позволяет создавать диаграммы высокого качества, работать с огромным количеством данных, обрабатывать картинки, блок-схемы и многое другое. И даже если вам и этого не достаточно, можно использовать Excel для автоматической отправки писем с помощью встроенного VBA редактора.
Данная статья описывает три способа отправки писем с помощью VBA в Excel. Вы можете скачать файл с примером отправки email с помощью VBA в Excel.
Отправить письмо в Excel с помощью VBA
Один из самых простых способов для автоматизации отправки почты с Excel заключается в вызове функции Create («ObjectOutlook.Application»). Данная функция возвращающает ссылку на ActiveX объект (в данном случает приложение Outlook), которое затем используется для создания и отправки электронной почты.
Чтобы проверить данный способ в работе, скопируйте и вставьте код ниже в VB редактор.
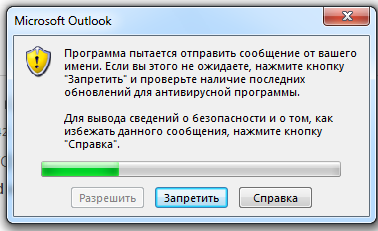
В качестве напоминания: Когда вы пытаетесь отправить письмо вышеуказанным способом, система безопасности будет выдавать каждый раз предупреждающее окно, в котором будет говориться о том, что Программа пытается отправить сообщение от вашего имени… и возможности обойти этот шаг нет.
К счастью, существует еще два способа, с помощью которых данный вопрос может быть решен: первый – через использование CDO, второй – имитирующий использование событий нажатий клавиш клавиатуры.
Отправить письмо в Excel с помощью CDO
Что такое CDO? CDO является библиотекой объектов, которая предоставляет интерфейс Messaging Application Programming Interface (MAPI). CDO позволяет манипулировать обменом данных, и отправлять и получать сообщения.
Использование CDO может быть предпочтительно в случаях, когда вы хотите предотвратить появление вплывающих окон безопасности Программа пытается отправить сообщение от вашего имени… и следовательно, предотвратить задержку отправки сообщения.
В нашем примере мы используем функцию CreateObject («CDO.Message»). Важно отметить, что необходимо правильно установить конфигурацию SMTP сервера, чтобы не допустить появления ошибок Run-time error 2147220973(80040213) или sendUsing configuration value is invalid. Пример ниже настроен на отправку сообщений через почту Google (Gmail). Для других почтовых серверов, вам потребуется ввести свои значения SMTP-сервера и SMTP-порта.
Обратите внимание, чтобы воспользоваться данным методом вам необходимо подключить библиотеку CDO в редакторе макросов Tool –> References.
Отправить письмо в Excel с помощью Send Keys
Другой способ отправки email с помощью Excel – использование команды ShellExecute, которая выполняет любую программу в VBA. Команда ShellExecute используется для загрузки документа с соответствующей программой. По сути, вы создаете объект String (текстовые данные) и передаете его в качестве параметра для функции ShellExecute. Остальная часть операций выполняется в окнах. Автоматически определяется, какая программа связана с данным типом документа и используется для загрузки документа. Вы можете использовать функцию ShellExecute, чтобы открыть Internet Explorer, Word, Paint и множество других приложений. В коде ниже используется задержка в три секунды, чтобы убедиться, что отправляемое письмо корректно и для возможности предотвратить отправку, если вы вдруг нашли какие-нибудь недочеты.
Источник
Yes, you can use the Application.VLookup function which takes the same sort of arguments as the worksheet function of same name.
Dim myValue as Variant

'Modify the function to use YOUR arguments
myValue = Application.Vlookup(value_to_lookup, range_to_search, column_number, exact_match)

if IsError(myValue) Then
    MsgBox "Not found!", vbInformation
    Exit Sub
End If
Please clarify what this means and it should be easy to help revise your code:
When a country in the «Info Table» (Column C) matches a country in the
«Email List» (row 2, columns A:K), an email will be sent to the emails
listed in rows 3-13 for that country.
Specifically: what is going to trigger the Send_Email procedure? How will you call it? Does it need to be in a loop searching against all values in Info Table (column C)? Etc.
In the meantime, let’s improve your code a bit. VBA does not support implicit type declarations, each variable must be Dim with it’s own As {type}, otherwise it will be treated as Variant. Best practice is to avoid variant in favor of strongly-typed variables whenever possible.
You can also avoid the For i = 3 to 13 loop and assign to nameList in a single statement.
Then, I would just call this procedure in a loop over Column C, using the Match function to check if the country exists on the Email List worksheet.
Sub foo()
Dim c as Range
Dim match as Integer

With Sheets("Info Table")
    For each c in .Range("C1:C10").Cells ''Modify this as needed
        match = 0
        On Error Resume Next
        match = IfError( _
                     Application.Match( _
                         c.Value, Sheets("Email List").Range("A2:K2"), False)
                       )
        On Error GoTo 0
        If Not match = 0 Then Call Send_Email(match)
    Next

End Sub
If it exists, then you send the result of the match function to the Send_Email procedure, and define the range using match to indicate the column which contains the email list for that particular country:
Sub Send_Email(match as Integer)

Dim Email_Subject As String, Email_Send_From  As String, Email_Body As String, i As Integer
Dim Mail_Object as Object, nameList As String, o As Variant

    Email_Send_From = ""

    If Sheets("Email List").Cells(match, 3).Value <> "" Then
        nameList = Join(Application.Transpose(Sheets("Email List").Range("A3:A13").Offset(,match-1).Value, ";")
    End If

    Next
    Set Mail_Object = CreateObject("Outlook.Application")
    With Mail_Object.CreateItem(o)
        .Subject = ""
        .To = nameList
        .Cc = ""
        .Body = "I am testing a new VBA, sorry if you received this message in error." & vbNewLine & vbNewLine & _
                "Best Regards," & vbNewLine & _
                ""
        .display
    End With
        Application.DisplayAlerts = False

End Sub
This tutorial demonstrates how to send an email from Excel with a formula (no macros necessary).
In Excel, you can send an email by running a macro, but if you prefer not to use VBA, keep reading.
Create Hyperlink Formula
In Excel, it’s possible to click on a cell and send an email automatically. This can be done with a formula using the HYPERLINK Function. You can create a hyperlink formula that uses the mailto command and auto-populates fields like to, subject, cc, and the body of an email.
=HYPERLINK("mailto:" & C3 & "?subject="&IF(D3=1,$I$3,IF(D3=2,$I$4,$I$5)) &"&cc=abclimited@abc.com"&"&body="&IF(D3=1,$J$3,IF(D3=2,$J$4,$J$5&E3)) & " " &$J$7, "Send email")The HYPERLINK formula is made up of the following parts:
Link Location
The Link_Location is the first part of the formula. This example sets mailto, subject, and body.
Mail To
The “mailto:” part of the formula sets the email recipient. This needs to be a valid email address entered into the formula – or, in this example – linked to a cell (C3) that contains a valid email address.
"mailto:" & C4Subject
The “?subject=” can have text between the equals sign and quotation marks, link to a cell, or contain a formula. In this example, there’s a formula to check the status of an order. If the status is 1, use “Thank you for your order” from cell I3.
To do that, use the following IF statement for the subject part of the formula.
"?subject="&IF(D4=1,$I$3,IF(D4=2,$I$4,$I$5))Note that there has to be a ? symbol before the word “subject.”
CC
If you want to add a cc to your email, insert it into the formula after the subject in quotation marks. You need an ampersand (&) before the “cc.”. You can either type in the email address to cc the mailto, or you can link it to an external cell as with the subject and body of the email.
"&cc=abclimited@abc.com"Body
The “&body=” part of the formula can contain additional text before the closing quotation mark. You can also create a customized IF statement with a formula:
"&body="&IF(D5=1,$J$3,IF(D5=2,$J$4,$J$5&E5)) & " " &$J$7This IF statement looks at the status of the order, and then adds a message to the end of the email body (Thank you for your business!).
As with the cc, you need an ampersand (&) before the word “body.”
The message at the end (in cell J7) contains the text:
"%0A%0AThank you for your business! %0A %0A Kind Regards%0A ABC Limited"where the “%0A” adds blank lines. The text in the email is displayed as follows:
Note: In the formula, the cells that refer to the lookup columns (for the subject and body text) have been put in the formulas as absolute (or “locked”) cell addresses. This lets you copy the formula down to the rest of the order records.
Friendly Name
The final part of the formula is what displays in the hyperlinked cell in Excel – this is the text you click on to create the email. This example uses the text “Send email,” but any text can be entered, as long as it is within quotation marks.
View the formula in the Function Dialog box by clicking on the formula, and then clicking the Insert Function box in the formula bar.
The Link_location and Friendly_name are shown in the function arguments.
Therefore, the formula:
=HYPERLINK("mailto:" & C3 & "?subject="&IF(D3=1,$I$3,IF(D3=2,$I$4,$I$5)) &"&cc=abclimited@abc.com"&"&body="&IF(D3=1,$J$3,IF(D3=2,$J$4,$J$5&E3)) & " " &$J$7, "Send email")produces this email:
Copy Formula Down
Since the formula uses absolute cell addresses to refer to the subject and body “lookup” cells, you only need to type in the whole formula once. Then, copy the first cell down to the rest of the rows of your range.
Click any of the “Send email” hyperlinks to send a customized email to the client.
VBA Code to Send Emails From Excel
In VBA, to send emails from Excel, we can automatically automate our mailing feature to send emails to multiple users at a time. However, to do so, we need to remember that we may do it by outlook, another product of outlook, so we need to enable outlook scripting in VBA. Once done, we use the .Application method to use outlook features.
VBA’s versatility is just amazing. VBA coders love Excel because by using VBA, we not only can work within Excel. Rather, we can also access other Microsoft tools. For example, we can access PowerPoint, Word, and Outlook by using VBAMicrosoft Outlook has a VBA reference that can be used to control Outlook. This makes it easy to automate repetitive activities in Outlook. To use VBA in Outlook, you’ll need to enable the developer feature, just like in Excel.read more. So I was impressed when I heard of sending emails from Excel. Yes, it is true. We can send emails from excel. This article will show you how to send emails from Excel with attachments using VBA CodingVBA code refers to a set of instructions written by the user in the Visual Basic Applications programming language on a Visual Basic Editor (VBE) to perform a specific task.read more.
Table of contents
- VBA Code to Send Emails From Excel
- Set Reference to Microsoft Office Library
- 13 Easy Steps to Send Emails from Excel
- Step #1
- Step #2
- Step #3
- Step #4
- Step #5
- Step #6
- Step #7
- Step #8
- Step #9
- Step #10
- Step #11
- Step #12
- Step #13
- Recommended Articles
Set Reference to Microsoft Office Library
We need to send emails from Outlook. Since Outlook is an external objec, we first need object reference to “Microsoft Outlook 16.0 Object Library.”
- 1. In VBA, Go to Tools > References.

- Now, we will see the object reference library. In this window, we need to set the reference to “Microsoft Outlook 16.0 Object Library.”

- After setting the object reference, click on “OK.”
Now, we can access Outlook objects in VBA coding.
13 Easy Steps to Send Emails from Excel
Writing the code to send an email with an attachment from Excel is quite complicated but worth spending some time.
You can download this VBA Send Email Excel Template here – VBA Send Email Excel Template
Follow the below steps to write your first email excel macroA macro in excel is a series of instructions in the form of code that helps automate manual tasks, thereby saving time. Excel executes those instructions in a step-by-step manner on the given data. For example, it can be used to automate repetitive tasks such as summation, cell formatting, information copying, etc. thereby rapidly replacing repetitious operations with a few clicks.
read more.
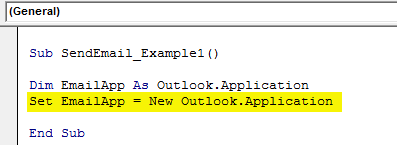
Step #1
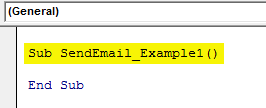
Start the sub procedure in VBASUB in VBA is a procedure which contains all the code which automatically gives the statement of end sub and the middle portion is used for coding. Sub statement can be both public and private and the name of the subprocedure is mandatory in VBA.read more.
Code:
Sub SendEmail_Example1()

End Sub
Step #2
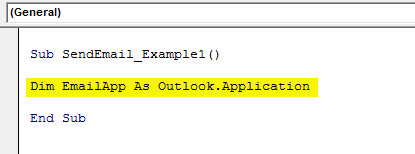
Declare the variable Outlook.Application
Code:
Dim EmailApp As Outlook.Application 'To refer to outlook application
Step #3
The above variable is an object variable. Therefore, we need to create an instance of a new object separately. Below is the code to create a new instance of the external object.
Code:
Set EmailApp = New Outlook.Application 'To launch outlook application
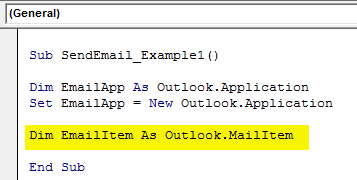
Step #4
Now, to write the email, we declare one more variable as “Outlook.MailItem”.
Code:
Dim EmailItem As Outlook.MailItem 'To refer new outlook email
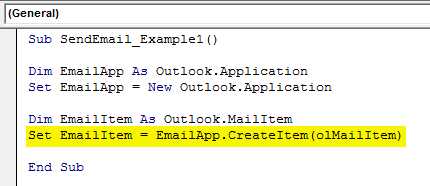
Step #5
To launch a new email, we need to set the reference to our previous variable as “CreateItem.”
Code:
Set EmailItem = EmailApp.CreateItem(olMailItem) 'To launch new outlook email
Now, the variable “EmailApp” will launch outlook. In the variable “EmailItem,” we can start writing the email.
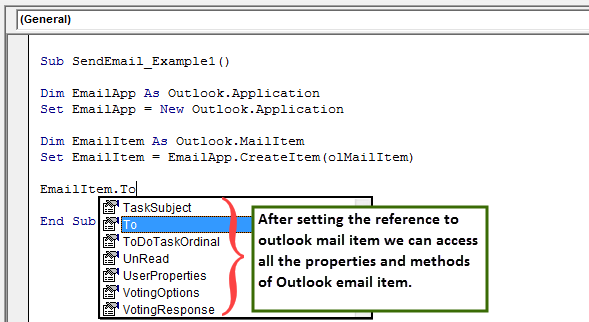
Step #6
We need to be aware of our items while writing an email. First, we need to decide to whom we are sending the email. So for this, we need to access the “TO” property.
Step #7
Enter the email ID of the receiver in double quotes.
Code:
EmailItem.To = "[email protected]"
Step #8
After addressing the main receiver, if you would like to CC anyone in the email, we can use the “CC” property.
Code:
EmailItem.CC = "[email protected]"
Step #9
After the CC, we can set the BCC email ID as well.
Code:
EmailItem.BCC = "[email protected]"
Step #10
We need to include the subject of the email we are sending.
Code:
EmailItem.Subject = "Test Email From Excel VBA"
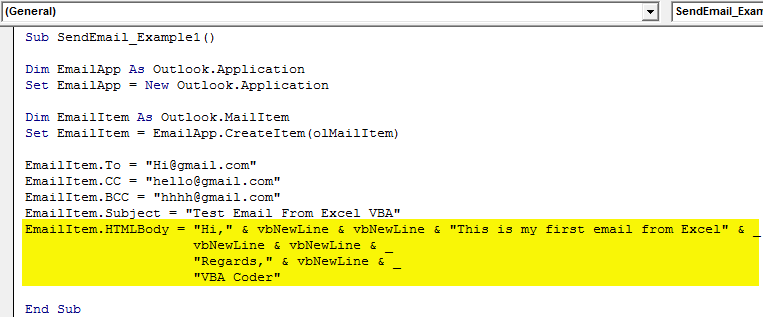
Step #11
We need to write the email body using HTML body type.
Code:
EmailItem.HTMLBody = "Hi," & vbNewLine & vbNewLine & "This is my first email from Excel" & _
                     vbNewLine & vbNewLine & _
                     "Regards," & vbNewLine & _
                     "VBA Coder" 'VbNewLine is the VBA Constant to insert a new line
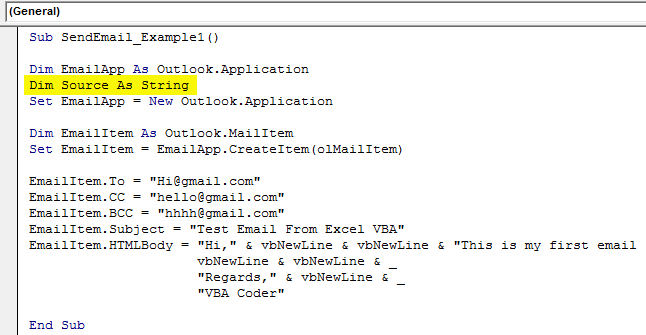
Step #12
We are working on if we want to add an attachment to the current workbook. Then, we need to use the attachments property. First, declare a variable source as a string.
Code:
Dim Source As String
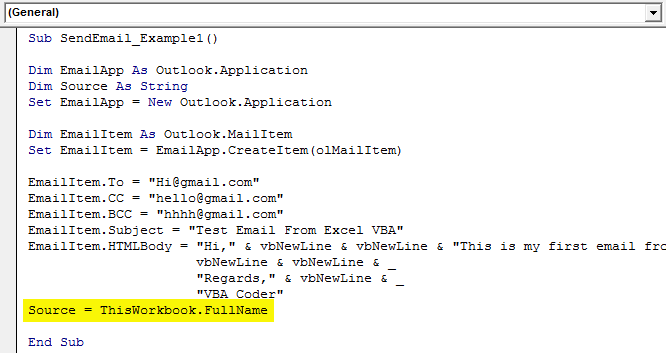
Then in this variable, write ThisWorkbook.FullName after Email body.
Code:
Source = ThisWorkbook.FullName
In this VBA Code, ThisWorkbook is used for the current workbook and .FullName is used to get the full name of the worksheet.
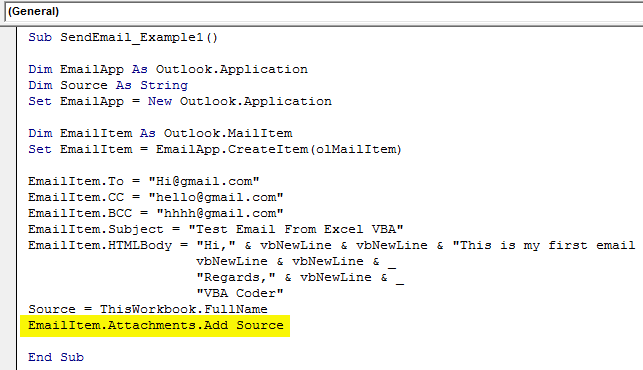
Then, write the following code to attach the file.
Code:
EmailItem.Attachments.Add Source
Step #13
Finally, we need to send the email to the mentioned email IDs. We can do this by using the “Send” method.
Code:
EmailItem.Send
We have completed the coding part.
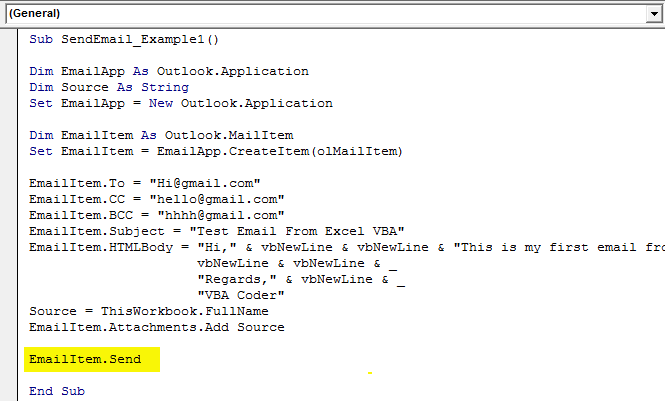
Code:
Sub SendEmail_Example1()

Dim EmailApp As Outlook.Application
Dim Source As String
Set EmailApp = New Outlook.Application

Dim EmailItem As Outlook.MailItem
Set EmailItem = EmailApp.CreateItem(olMailItem)

EmailItem.To = "[email protected]"
EmailItem.CC = "[email protected]"
EmailItem.BCC = "[email protected]"
EmailItem.Subject = "Test Email From Excel VBA"
EmailItem.HTMLBody = "Hi," & vbNewLine & vbNewLine & "This is my first email from Excel" & _
vbNewLine & vbNewLine & _
"Regards," & vbNewLine & _
"VBA Coder"
Source = ThisWorkbook.FullName
EmailItem.Attachments.Add Source

EmailItem.Send

End Sub
Run the above code. It will send the email with the mentioned body with the current workbook as the attachment.
Recommended Articles
This article has been a guide to VBA Send Email from Excel. Here, we learn how to write VBA code to send emails from Excel with attachments along with an example and downloadable Excel template. You can learn more about VBA from the following articles: –
- VBA TimeValue Function
- Dictionary in VBA
- Create Progress Bar in VBA
- GetOpenFilename VBA
This Sub read the selected cells (column) where the condition is applied, execute the test if True read the email, subject, body and send the email and write Sent at the same row after sending
It works with Outlook
Column 1    Column 2      Column 3         column 4   column 5       column 6
80           email        Manager Name    Body Text   Employee Name  Sent or empty
You can change cell(s,c+2), cell(s,c+4)… to correspond to your columns
for example G2 (column 2) will be cell(s,c+6) if A2 is column 1 and move the others according to your Data
You have to select the cells in column 1 and the Sub will continue
 Sub SendReminderMail()
        Dim s As Long, c As Long
        Dim OutLookApp As Object
        Dim OutLookMailItem As Object
        Dim strBody As String


    Set OutLookApp = CreateObject("Outlook.application")
    Set OutLookMailItem = OutLookApp.CreateItem(0)


     For Each Cell In Selection
     Cell.Select

     s = ActiveCell.Row
     c = ActiveCell.Column


       If Cells(s, c).Value > 80 And Cells(s, c).Value < 90 Then
        strBody = Cells(s, c + 3) & " " & Cells(s, c + 4)
          Set OutLookMailItem = OutLookApp.CreateItem(0)
          With OutLookMailItem

              .To = Cells(s, c + 1).Value
              .Subject = "Reminder: "
              .Body = "Dear " & Cells(s, c + 2).Value & "," & vbCrLf & vbCrLf & strBody

              .Display ' or .Send
          End With
          Cells(s, c + 5) = "Sent"
      End If

    Next Cell
End Sub