
Excel for Microsoft 365 Excel for Microsoft 365 for Mac Excel 2021 Excel 2021 for Mac Excel 2019 Excel 2019 for Mac Excel 2016 Excel 2016 for Mac Excel 2013 Excel 2010 Excel 2007 Excel for Mac 2011 Excel Mobile More…Less
You can select cells and ranges in a table just like you would select them in a worksheet, but selecting table rows and columns is different from selecting worksheet rows and columns.
|
To select |
Do this |
|---|---|
|
A table column with or without table headers |
Click the top edge of the column header or the column in the table. The following selection arrow appears to indicate that clicking selects the column.
Note: Clicking the top edge once selects the table column data; clicking it twice selects the entire table column. You can also click anywhere in the table column, and then press CTRL+SPACEBAR, or you can click the first cell in the table column, and then press CTRL+SHIFT+DOWN ARROW. Note: Pressing CTRL+SPACEBAR once selects the table column data; pressing CTRL+SPACEBAR twice selects the entire table column. |
|
A table row |
Click the left border of the table row. The following selection arrow appears to indicate that clicking selects the row.
You can click the first cell in the table row, and then press CTRL+SHIFT+RIGHT ARROW. |
|
All table rows and columns |
Click the upper-left corner of the table. The following selection arrow appears to indicate that clicking selects the table data in the entire table.
Click the upper-left corner of the table twice to select the entire table, including the table headers. You can also click anywhere in the table, and then press CTRL+A to select the table data in the entire table, or you can click the top-left most cell in the table, and then press CTRL+SHIFT+END. Press CTRL+A twice to select the entire table, including the table headers. |
Need more help?
You can always ask an expert in the Excel Tech Community or get support in the Answers community.
See Also
Overview of Excel tables
Video: Create and format an Excel table
Total the data in an Excel table
Format an Excel table
Resize a table by adding or removing rows and columns
Filter data in a range or table
Convert a table to a range
Using structured references with Excel tables
Excel table compatibility issues
Export an Excel table to SharePoint
Need more help?
| Windows | Mac |
|---|---|
| ShiftSpace | ⇧Space |
About This Shortcut
This shortcut selects one or more table rows in a table, when the cursor is in an Excel table. The first time you use it, the entire table row is selected. The second time, the entire worksheet row is selected.
Related videos
The videos below demonstrate this shortcut.

Author![]()
Dave Bruns
Hi — I’m Dave Bruns, and I run Exceljet with my wife, Lisa. Our goal is to help you work faster in Excel. We create short videos, and clear examples of formulas, functions, pivot tables, conditional formatting, and charts.
There are hundreds and hundreds of Excel sites out there. I’ve been to many and most are an exercise in frustration. Found yours today and wanted to let you know that it might be the simplest and easiest site that will get me where I want to go.
Get Training
Quick, clean, and to the point training
Learn Excel with high quality video training. Our videos are quick, clean, and to the point, so you can learn Excel in less time, and easily review key topics when needed. Each video comes with its own practice worksheet.
View Paid Training & Bundles
Содержание
- Select rows and columns in an Excel table
- Need more help?
- How to Select Entire Column (or Row) in Excel – Shortcut
- Select Entire Column/Row Using Keyboard Shortcut
- Selecting the Entire Row
- Select Entire Column (or Multiple Columns) Using Mouse
- Select One Column (or Row)
- Select Multiple Contiguous Columns (or Rows)
- Select Multiple Non-Contiguous Columns (or Rows)
- Select Entire Column (or Multiple Columns) Using Name Box
- The Named Range Trick
- Select Column in an Excel Table
- Select Column in an Pivot Table
- Select cell contents in Excel
- Select one or more cells
- Select one or more rows and columns
- Select table, list or worksheet
- Need more help?
Select rows and columns in an Excel table
You can select cells and ranges in a table just like you would select them in a worksheet, but selecting table rows and columns is different from selecting worksheet rows and columns.
A table column with or without table headers
Click the top edge of the column header or the column in the table. The following selection arrow appears to indicate that clicking selects the column.

Note: Clicking the top edge once selects the table column data; clicking it twice selects the entire table column.
You can also click anywhere in the table column, and then press CTRL+SPACEBAR, or you can click the first cell in the table column, and then press CTRL+SHIFT+DOWN ARROW.
Note: Pressing CTRL+SPACEBAR once selects the table column data; pressing CTRL+SPACEBAR twice selects the entire table column.
Click the left border of the table row. The following selection arrow appears to indicate that clicking selects the row.

You can click the first cell in the table row, and then press CTRL+SHIFT+RIGHT ARROW.
All table rows and columns
Click the upper-left corner of the table. The following selection arrow appears to indicate that clicking selects the table data in the entire table.

Click the upper-left corner of the table twice to select the entire table, including the table headers.
You can also click anywhere in the table, and then press CTRL+A to select the table data in the entire table, or you can click the top-left most cell in the table, and then press CTRL+SHIFT+END.
Press CTRL+A twice to select the entire table, including the table headers.
Need more help?
You can always ask an expert in the Excel Tech Community or get support in the Answers community.
Источник
How to Select Entire Column (or Row) in Excel – Shortcut
Working with Excel means working with cells and ranges in the rows and columns in it.
And if you work with large datasets, selecting entire rows and columns is quite a common task.
Just like with most things in Excel, there is more than one way to select a column or row in Excel.
In this tutorial, I will show you how to select a column or row using a simple shortcut, as well as some other easy methods.
I will also show you how to do this when you’re working with an Excel table or Pivot Table.
So let’s get started!
This Tutorial Covers:
Select Entire Column/Row Using Keyboard Shortcut
Suppose you have a dataset as shown below and you want to select an entire column (say column C).

The first thing to do is select any cell in Column C.
Once you have any cell in column C selected, use the below keyboard shortcut:
Hold the Control key and then press the spacebar key on your keyboard
In case you’re using Excel on Mac, use COMMAND + SPACE
The above shortcut would instantly select the entire column (as you will see it gets highlighted in gray – indicating that it’s selected)

You can use the same shortcut to select multiple contiguous columns as well. For example, suppose you want to select both columns C and D.
To do this, select two adjacent cells (one in column C and one in Column D) and then use the same keyboard shortcut.
Selecting the Entire Row
If you want to select the entire row, select any cell in the row that you want to be selected and then use the below keyboard shortcut
Hold the Shift key and then press the Spacebar key.
You will again see that it gets selected and highlighted in gray.

In case you want to select multiple contiguous rows, select multiple adjacent cells in the same column and then use the keyboard shortcut.
Select Entire Column (or Multiple Columns) Using Mouse
I have a feeling you may already know this method, but let me cover it anyway (it will be short).
Select One Column (or Row)
If you want to select an entire column (say column D), hover the cursor over the column headers (where it says D). You will notice that the cursor changes to a black downward-pointing arrow.
![]()
Now, click the left mouse key.
Doing this will select the entire column D.

Similarly, if you want to select the entire row, click on the row number (in the row header on the left)
Select Multiple Contiguous Columns (or Rows)
Suppose you want to select multiple columns that are next to each other (say column D, E, and F)
Follow the below steps to do this:
- Place the cursor on the left most column header of column D
- Press the left mouse key and keep it pressed
- With the left key pressed, drag the mouse to also cover column E and F
The above steps would automatically select all the columns in between the first and the last selected column.

And the same way, you can also select multiple contiguous rows.
Select Multiple Non-Contiguous Columns (or Rows)
This is the most common scenario where you need to select multiple columns that are not next to each other (say column D, and F).
Below are the steps to do this:
- Place the cursor at the column heading of one of the columns (say column D in this case)
- Click the mouse left key to select the column
- Press and hold the Control key
- With the Control key pressed, select all the other columns you want to select

You can do the same with rows as well.
Select Entire Column (or Multiple Columns) Using Name Box
Use this method when you want to:
- Select a far-off row or column
- Select multiple contiguous or non-contiguos rows/columns
Name box is a small box that is left of the formula bar.

While the main purpose of the Name Box is to quickly name a cell or range of cells, you can also use it to quickly select any column (or row).
For example, if you want to select the entire column D, enter the following in the name box and hit enter:
Similarly, if you want to select multiple columns (say D, E, and F), enter the following in the name box:
And that’s not it!
If you want to select multiple columns that are not adjacent, say D, H, and I, you can enter the below:
When I used to work as a financial analyst years ago, I found this trick extremely useful. It allowed me to quickly select columns and format them at once, or delete/hide these columns in one go.
The Named Range Trick
Let me also show you another wonderful trick.
Suppose you’re working in a workbook where you may often have a need to select far-off columns (say column B, D, and G).
Instead of doing it one by one or entering it manually in the Name Box, here is what you can do – create a named range that refers to the columns you want to select.
Once created, you can simply enter the named range name in the Name box (or select it from the drop-down)
Below are the steps to create a named range for specific columns:
- Select the columns for which you want to create the named range (hold the Control key and then select the columns one-by-one)
- Enter the name you want to give to the selection in the Name Box (no spaces allowed in the name). In this example, I will use the name SalesData

Once this is done, you have created a named range in Excel that now refers to the columns you selected (B, D, and G in my example).
And now it’s time for magic.
If you want to quickly select the columns B, D, and G, just enter the name in the Name box and hit enter (or click on the small drop-down icon at the end of the name box and select the name from the list).

Voila, all the columns would be selected.

This technique is useful if you may have a need to select the same columns multiple times in the same sheet.
You can use this technique to select rows as well as different ranges. For example, if you want to select two separate ranges in Excel, just follow the same steps (instead of selected columns, select the ranges and give them a name).
Select Column in an Excel Table
When working with Excel Tables, you may sometimes have a need to select an entire row or column in the table.
This means that you don’t want to select the entire column in the worksheet, but the entire column of the table.
Here is the trick to do this:
- Place the cursor on the header of the Excel table (note this is the header of the column in the Excel table, not the one that displays the column letter)
- You will notice that the cursor would chnage into a downward pointing black arrow

The above steps would select the entire column in the Excel Table (and not the full column).
And if you want to select multiple columns, hold the Control key and repeat the process for all the columns you want to select.
Select Column in an Pivot Table
Just like the Excel table, you can also quickly select an entire row or column in a Pivot Table.
Suppose you have a Pivot Table as shown below and you want to select the Sales columns,
Below are the steps to do this:
- Place the cursor on the header of the Pivot table header that you want to select
- You will notice that the cursor would chnage into a downward pointing black arrow

These steps would select the Sales column. Similarly, if you want to select multiple columns, hold the Control key and then make the selection.
So these are some of the common ways you can use to select an entire column or an entire row in Excel.
I hope you found this tutorial useful!
Other Excel tutorials you may also like:
Источник
Select cell contents in Excel
In Excel, you can select cell contents of one or more cells, rows and columns.

Note: If a worksheet has been protected, you might not be able to select cells or their contents on a worksheet.
Select one or more cells
Click on a cell to select it. Or use the keyboard to navigate to it and select it.
To select a range, select a cell, then with the left mouse button pressed, drag over the other cells.
Or use the Shift + arrow keys to select the range.
To select non-adjacent cells and cell ranges, hold Ctrl and select the cells.
Select one or more rows and columns
Select the letter at the top to select the entire column. Or click on any cell in the column and then press Ctrl + Space.
Select the row number to select the entire row. Or click on any cell in the row and then press Shift + Space.
To select non-adjacent rows or columns, hold Ctrl and select the row or column numbers.
Select table, list or worksheet
To select a list or table, select a cell in the list or table and press Ctrl + A.
To select the entire worksheet, click the Select All button at the top left corner.

Note: In some cases, selecting a cell may result in the selection of multiple adjacent cells as well. For tips on how to resolve this issue, see this post How do I stop Excel from highlighting two cells at once? in the community.
Click the cell, or press the arrow keys to move to the cell.
A range of cells
Click the first cell in the range, and then drag to the last cell, or hold down SHIFT while you press the arrow keys to extend the selection.
You can also select the first cell in the range, and then press F8 to extend the selection by using the arrow keys. To stop extending the selection, press F8 again.
A large range of cells
Click the first cell in the range, and then hold down SHIFT while you click the last cell in the range. You can scroll to make the last cell visible.
All cells on a worksheet
Click the Select All button.
To select the entire worksheet, you can also press CTRL+A.
Note: If the worksheet contains data, CTRL+A selects the current region. Pressing CTRL+A a second time selects the entire worksheet.
Nonadjacent cells or cell ranges
Select the first cell or range of cells, and then hold down CTRL while you select the other cells or ranges.
You can also select the first cell or range of cells, and then press SHIFT+F8 to add another nonadjacent cell or range to the selection. To stop adding cells or ranges to the selection, press SHIFT+F8 again.
Note: You cannot cancel the selection of a cell or range of cells in a nonadjacent selection without canceling the entire selection.
An entire row or column
Click the row or column heading.
2. Column heading
You can also select cells in a row or column by selecting the first cell and then pressing CTRL+SHIFT+ARROW key (RIGHT ARROW or LEFT ARROW for rows, UP ARROW or DOWN ARROW for columns).
Note: If the row or column contains data, CTRL+SHIFT+ARROW key selects the row or column to the last used cell. Pressing CTRL+SHIFT+ARROW key a second time selects the entire row or column.
Adjacent rows or columns
Drag across the row or column headings. Or select the first row or column; then hold down SHIFT while you select the last row or column.
Nonadjacent rows or columns
Click the column or row heading of the first row or column in your selection; then hold down CTRL while you click the column or row headings of other rows or columns that you want to add to the selection.
The first or last cell in a row or column
Select a cell in the row or column, and then press CTRL+ARROW key (RIGHT ARROW or LEFT ARROW for rows, UP ARROW or DOWN ARROW for columns).
The first or last cell on a worksheet or in a Microsoft Office Excel table
Press CTRL+HOME to select the first cell on the worksheet or in an Excel list.
Press CTRL+END to select the last cell on the worksheet or in an Excel list that contains data or formatting.
Cells to the last used cell on the worksheet (lower-right corner)
Select the first cell, and then press CTRL+SHIFT+END to extend the selection of cells to the last used cell on the worksheet (lower-right corner).
Cells to the beginning of the worksheet
Select the first cell, and then press CTRL+SHIFT+HOME to extend the selection of cells to the beginning of the worksheet.
More or fewer cells than the active selection
Hold down SHIFT while you click the last cell that you want to include in the new selection. The rectangular range between the active cell and the cell that you click becomes the new selection.
Need more help?
You can always ask an expert in the Excel Tech Community or get support in the Answers community.
Источник
Working with Excel means working with cells and ranges in the rows and columns in it.
And if you work with large datasets, selecting entire rows and columns is quite a common task.
Just like with most things in Excel, there is more than one way to select a column or row in Excel.
In this tutorial, I will show you how to select a column or row using a simple shortcut, as well as some other easy methods.
I will also show you how to do this when you’re working with an Excel table or Pivot Table.
So let’s get started!
Select Entire Column/Row Using Keyboard Shortcut
Let’s start with the keyboard shortcut.
Suppose you have a dataset as shown below and you want to select an entire column (say column C).
The first thing to do is select any cell in Column C.
Once you have any cell in column C selected, use the below keyboard shortcut:
CONTROL + SPACE
Hold the Control key and then press the spacebar key on your keyboard
In case you’re using Excel on Mac, use COMMAND + SPACE
The above shortcut would instantly select the entire column (as you will see it gets highlighted in gray – indicating that it’s selected)
You can use the same shortcut to select multiple contiguous columns as well. For example, suppose you want to select both columns C and D.
To do this, select two adjacent cells (one in column C and one in Column D) and then use the same keyboard shortcut.
Selecting the Entire Row
If you want to select the entire row, select any cell in the row that you want to be selected and then use the below keyboard shortcut
SHIFT + SPACE
Hold the Shift key and then press the Spacebar key.
You will again see that it gets selected and highlighted in gray.
In case you want to select multiple contiguous rows, select multiple adjacent cells in the same column and then use the keyboard shortcut.
Also read: Select Every Other Row in Excel
Select Entire Column (or Multiple Columns) Using Mouse
I have a feeling you may already know this method, but let me cover it anyway (it will be short).
Select One Column (or Row)
If you want to select an entire column (say column D), hover the cursor over the column headers (where it says D). You will notice that the cursor changes to a black downward-pointing arrow.
Now, click the left mouse key.
Doing this will select the entire column D.
Similarly, if you want to select the entire row, click on the row number (in the row header on the left)
Select Multiple Contiguous Columns (or Rows)
Suppose you want to select multiple columns that are next to each other (say column D, E, and F)
Follow the below steps to do this:
- Place the cursor on the left most column header of column D
- Press the left mouse key and keep it pressed
- With the left key pressed, drag the mouse to also cover column E and F
The above steps would automatically select all the columns in between the first and the last selected column.
And the same way, you can also select multiple contiguous rows.
Select Multiple Non-Contiguous Columns (or Rows)
This is the most common scenario where you need to select multiple columns that are not next to each other (say column D, and F).
Below are the steps to do this:
- Place the cursor at the column heading of one of the columns (say column D in this case)
- Click the mouse left key to select the column
- Press and hold the Control key
- With the Control key pressed, select all the other columns you want to select
You can do the same with rows as well.
Select Entire Column (or Multiple Columns) Using Name Box
Use this method when you want to:
- Select a far-off row or column
- Select multiple contiguous or non-contiguos rows/columns
Name box is a small box that is left of the formula bar.
While the main purpose of the Name Box is to quickly name a cell or range of cells, you can also use it to quickly select any column (or row).
For example, if you want to select the entire column D, enter the following in the name box and hit enter:
D:D
Similarly, if you want to select multiple columns (say D, E, and F), enter the following in the name box:
D:F
And that’s not it!
If you want to select multiple columns that are not adjacent, say D, H, and I, you can enter the below:
D:D,H:H,I:I
When I used to work as a financial analyst years ago, I found this trick extremely useful. It allowed me to quickly select columns and format them at once, or delete/hide these columns in one go.
The Named Range Trick
Let me also show you another wonderful trick.
Suppose you’re working in a workbook where you may often have a need to select far-off columns (say column B, D, and G).
Instead of doing it one by one or entering it manually in the Name Box, here is what you can do – create a named range that refers to the columns you want to select.
Once created, you can simply enter the named range name in the Name box (or select it from the drop-down)
Below are the steps to create a named range for specific columns:
- Select the columns for which you want to create the named range (hold the Control key and then select the columns one-by-one)
- Enter the name you want to give to the selection in the Name Box (no spaces allowed in the name). In this example, I will use the name SalesData
- Hit Enter
Once this is done, you have created a named range in Excel that now refers to the columns you selected (B, D, and G in my example).
And now it’s time for magic.
If you want to quickly select the columns B, D, and G, just enter the name in the Name box and hit enter (or click on the small drop-down icon at the end of the name box and select the name from the list).
Voila, all the columns would be selected.
This technique is useful if you may have a need to select the same columns multiple times in the same sheet.
You can use this technique to select rows as well as different ranges. For example, if you want to select two separate ranges in Excel, just follow the same steps (instead of selected columns, select the ranges and give them a name).
Select Column in an Excel Table
When working with Excel Tables, you may sometimes have a need to select an entire row or column in the table.
This means that you don’t want to select the entire column in the worksheet, but the entire column of the table.
Here is the trick to do this:
- Place the cursor on the header of the Excel table (note this is the header of the column in the Excel table, not the one that displays the column letter)
- You will notice that the cursor would chnage into a downward pointing black arrow
- Click the left mouse key
The above steps would select the entire column in the Excel Table (and not the full column).
And if you want to select multiple columns, hold the Control key and repeat the process for all the columns you want to select.
Also read: AutoSum in Excel (Shortcut)
Select Column in an Pivot Table
Just like the Excel table, you can also quickly select an entire row or column in a Pivot Table.
Suppose you have a Pivot Table as shown below and you want to select the Sales columns,
Below are the steps to do this:
- Place the cursor on the header of the Pivot table header that you want to select
- You will notice that the cursor would chnage into a downward pointing black arrow
- Click the left mouse key
These steps would select the Sales column. Similarly, if you want to select multiple columns, hold the Control key and then make the selection.
So these are some of the common ways you can use to select an entire column or an entire row in Excel.
I hope you found this tutorial useful!
Other Excel tutorials you may also like:
- Flip Data in Excel | Reverse Order of Data in Column/Row
- How to Lock Row Height & Column Width in Excel (Easy Trick)
- How to Delete All Hidden Rows and Columns in Excel
- 7 Easy Ways to Select Multiple Cells in Excel
- How to Insert Multiple Rows in Excel
- How to Copy and Paste Column in Excel? 3 Easy Ways!
- How to Multiply a Column by a Number in Excel
- Select Till End of Data in a Column in Excel (Shortcuts)
- How to Group Columns in Excel?
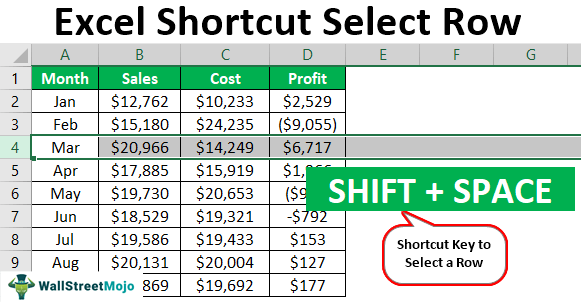
These everyday tasks are unavoidable for those who use Excel to perform some routine activities in their workplace. However, those who fulfill these activities need to work smartly to perform those regular tasks. There is no better smart way to perform everyday tasks than shortcut keys. So, we all perform one activity, “selecting rows” in Excel. So, in this article, we will show you some of the circumstances where we can use the shortcut key to select the row in Excel.
Table of contents
- Select Row Shortcut in Excel
- General Scenarios of Selecting a Row in Excel
- How to Select a Row?
- Shortcut Way of Selecting Row in Excel
- Things to Remember Here
- Recommended Articles
General Scenarios of Selecting a Row in Excel
Selecting a row or column differs from case to case. So, let us illustrate some of the cases here.
- Deleting a Particular Row: If we want to get rid of a particular row or several rows, we usually need to select those rows and delete the selected rows.
- Inserting a New Row: Like how we need to select rows before deleting them similarly, we need to choose columns or columns to insert the new one. Suppose we choose and press the “Insert” option. It will insert only one column. These new rows will be inserted with as many numbers of columns as selected.
- Formatting a Row: If we want to apply any specific formatting to a particular row(s), we need to select the row and use the formatting as per our liking.
How to Select a Row?
Below is an example of using the keyboard shortcut keyAn Excel shortcut is a technique of performing a manual task in a quicker way.read more to select a row in excel.
You can download this Shortcut to Select Row Excel Template here – Shortcut to Select Row Excel Template
For beginners, selecting a row is often performed manually. But to work productively, we need to use shortcut keys. Before that, let us recollect the manual ways of selecting a row.
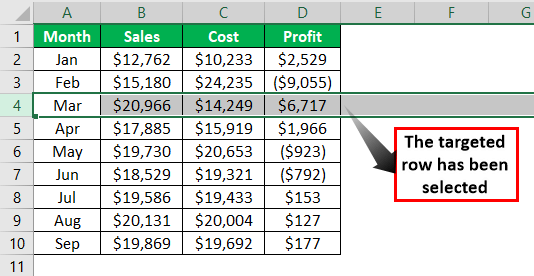
- For example, let us look at the below data set.
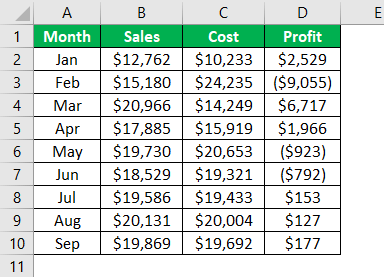
- If we want to select row number 4, we need to place a cursor on the row header (numerical header), then we should see a small arrow key.
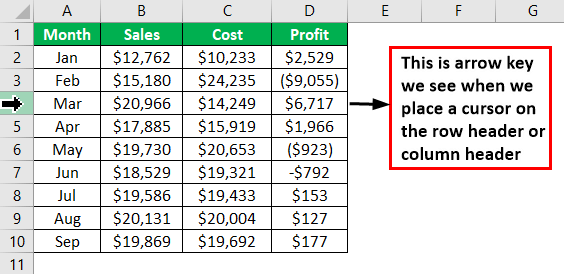
- As soon as we see the arrow key, we must press the left key of the mouse, and it will select the targeted row.
After selecting the row, we can press different shortcut keys depending on requirements like “inserting a new row,” “deleting the row,” and “choosing other rows below or above.”
Shortcut Way of Selecting Row in Excel
We want to mention that there is no major difference between selecting the row manually and selecting the row using the shortcut. The only difficulty here is that we need to move our hands from the keyboard to the mouse. But once we get the hang of shortcut keys, we may start loving them.
The Shortcut Key to Select a Row:
![]()
- For example, take the above data table only to illustrate this example. Assume we want to select row number 4, so we must choose any of the cells from this row first.
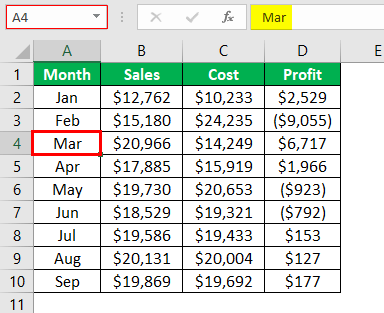
- We have chosen the A4 cell in row number 4. Now, press the “Spacebar” by holding the “Shift” key.
So as soon as we have pressed the shortcut key, it has selected the entire row of the active cell (the active cell was the A4 cell).
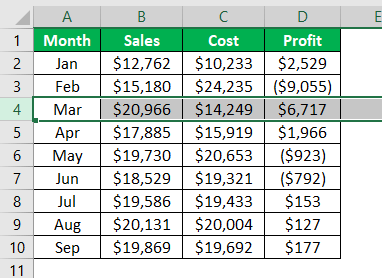
- Now assume after selecting row number 4, we need to select all the rows below the selected row, then we can press another shortcut key, “Shift + Ctrl + Down Arrow.”
![]()
- So the moment we press this, it may select all the rows below the selected row.
Suppose we press “Shift + Ctrl + Down Arrow” one more time; it may take us to the next non-break cell or row.
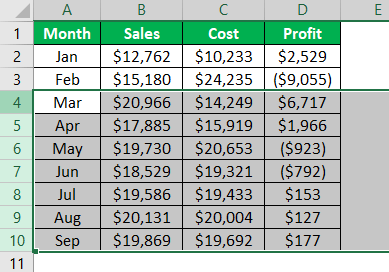
Similarly, if we want to select all the rows above the selected row, we must press the shortcut key “Shift + Ctrl + Up Arrow.“
Things to Remember Here
- We must select the cell in that particular row to select the row before pressing the shortcut key.
- We need to press the shortcut key in order, i.e., “Shift” and then “Space.”
Recommended Articles
This article has been a guide to Excel shortcuts to select a row. We discuss using the keyboard shortcut key to select a row in Excel, examples, and a downloadable Excel template. You may learn more about Excel from the following articles: –
- Edit Cell Using Excel Shortcut
- Excel Degrees Function
- Count Number of Excel Rows & Columns
- Group Rows in Excel
- Split Panes in Excel