
Explanation
In this example, the goal is to create a formula that will return «Done» in column E when a cell in column D contains a value. In other words, if the cell in column D is «not blank», then the formula should return «Done». In the worksheet shown, column D is is used to record the date a task was completed. Therefore, if the column contains a date (i.e. is not blank), we can assume the task is complete. This problem can be solved with the IF function alone or with the IF function and the ISBLANK function. It can also be solved with the LEN function. All three approaches are explained below.
IF function
The IF function runs a logical test and returns one value for a TRUE result, and another value for a FALSE result. You can use IF to test for a blank cell like this:
=IF(A1="",TRUE) // IF A1 is blank
=IF(A1<>"",TRUE) // IF A1 is not blank
In the first example, we test if A1 is empty with =»». In the second example, the <> symbol is a logical operator that means «not equal to», so the expression A1<>»» means A1 is «not empty». In the worksheet shown, we use the second idea in cell E5 like this:
=IF(D5<>"","Done","")
If D5 is «not empty», the result is «Done». If D5 is empty, IF returns an empty string («») which displays as nothing. As the formula is copied down, it returns «Done» only when a cell in column D contains a value. To display both «Done» and «Not done», you can adjust the formula like this:
=IF(D5<>"","Done","Not done")
ISBLANK function
Another way to solve this problem is with the ISBLANK function. The ISBLANK function returns TRUE when a cell is empty and FALSE if not. To use ISBLANK directly, you can rewrite the formula like this:
=IF(ISBLANK(D5),"","Done")
Notice the TRUE and FALSE results have been swapped. The logic now is if cell D5 is blank. To maintain the original logic, you can nest ISBLANK inside the NOT function like this:
=IF(NOT(ISBLANK(D5)),"Done","")
The NOT function simply reverses the result returned by ISBLANK.
LEN function
One problem with testing for blank cells in Excel is that ISBLANK(A1) or A1=»» will both return FALSE if A1 contains a formula that returns an empty string. In other words, if a formula returns an empty string in a cell, Excel interprets the cell as «not empty». To work around this problem, you can use the LEN function to test for characters in a cell like this:
=IF(LEN(A1)>0,TRUE)This is a much more literal formula. We are not asking Excel if A1 is blank, we are literally counting the characters in A1. The LEN function will return a positive number only when a cell contains actual characters.
Excel for Microsoft 365 Excel for Microsoft 365 for Mac Excel 2021 Excel 2021 for Mac Excel 2019 Excel 2019 for Mac Excel 2016 Excel 2016 for Mac Excel 2013 Excel 2010 Excel 2007 Excel for Mac 2011 More…Less
Sometimes you need to check if a cell is blank, generally because you might not want a formula to display a result without input.

In this case we’re using IF with the ISBLANK function:
-
=IF(ISBLANK(D2),»Blank»,»Not Blank»)
Which says IF(D2 is blank, then return «Blank», otherwise return «Not Blank»). You could just as easily use your own formula for the «Not Blank» condition as well. In the next example we’re using «» instead of ISBLANK. The «» essentially means «nothing».
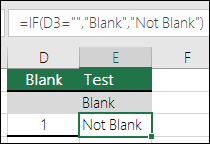
=IF(D3=»»,»Blank»,»Not Blank»)
This formula says IF(D3 is nothing, then return «Blank», otherwise «Not Blank»). Here is an example of a very common method of using «» to prevent a formula from calculating if a dependent cell is blank:
-
=IF(D3=»»,»»,YourFormula())
IF(D3 is nothing, then return nothing, otherwise calculate your formula).
Need more help?
Want more options?
Explore subscription benefits, browse training courses, learn how to secure your device, and more.
Communities help you ask and answer questions, give feedback, and hear from experts with rich knowledge.
EXCEL FORMULA 1. If a cell is not blank using the IF function
EXCEL
Hard coded formula

Cell reference formula

|
GENERIC FORMULA =IF(cell_ref<>»», value_if_true, value_if_false) ARGUMENTS GENERIC FORMULA =IF(cell_ref<>»», value_if_true, value_if_false) ARGUMENTS EXPLANATION This formula uses the IF function with a test criteria of two double quotation marks («»), without any value inserted between them and ‘does not equal to’ sign (<>) in front of them, to assess if a cell is not empty and return a specific value. The expression <>»» means «not empty». If a cell is not blank the formula will return a value that has been assigned as the true value, alternatively if a cell is blank the formula will return a value assigned as the false value. With this formula you can enter the values, that will be returned if the cell is empty or not, directly into the formula or reference them to specific cells that capture these values. Click on either the Hard Coded or Cell Reference button to view the formula that has the return values directly entered into the formula or referenced to specific cells that capture these values, respectively. In this example the formula tests if a specific cell is not blank. If the cell is not blank the formula will return a value of «Yes» (hard coded example) or value in cell C5 (cell reference example). If the cell is empty the formula will return a value of «No» (hard coded example) or value in cell C6 (cell reference example). If you are using the formula with values entered directly in the formula and want to return a numerical value, instead of a text value, you do not need to apply the double quotation marks around the values that are to be returned e.g. (=IF(C5<>»»,1,0)). |
EXCEL FORMULA 2. If a cell is not blank using the IF, NOT and ISBLANK functions
EXCEL
Hard coded formula

Cell reference formula

|
GENERIC FORMULA =IF(NOT(ISBLANK(cell_ref)), value_if_true, value_if_false) ARGUMENTS GENERIC FORMULA =IF(NOT(ISBLANK(cell_ref)), value_if_true, value_if_false) ARGUMENTS EXPLANATION This formula uses a combination of the IF, NOT and ISBLANK functions to assess if a cell is not blank and return a specific value. Unlike the first formula, which uses the double quotation marks («») to test if the selected cell is not blank, this formula uses the NOT and ISBLANK functions. If the cell is not blank the ISBLANK function will return FALSE, alternatively it will return TRUE. The NOT function will then return the opposite to what the ISBLANK function has returned. Therefore, if the cell is not blank the combination of the NOT and ISBLANK function will return a TRUE value. The formula will then return a value that has been assigned as the true value, alternatively if the cell is blank the formula will return a value assigned as the false value. With this formula you can enter the values, that will be returned if the cell is empty or not, directly into the formula or reference them to specific cells that capture these values. Click on either the Hard Coded or Cell Reference button to view the formula that has the return values directly entered into the formula or referenced to specific cells that capture these values, respectively. In this example the formula tests if a specific cell is not blank. If the cell is not blank the formula will return a value of «Yes» (hard coded example) or value in cell C5 (cell reference example). If the cell is empty the formula will return a value of «No» (hard coded example) or value in cell C6 (cell reference example). If you are using the formula with values entered directly in the formula and want to return a numerical value, instead of a text value, you do not need to apply the double quotation marks around the values that are to be returned e.g. (=IF(NOT(ISBLANK(C5)),1,0)). |
VBA CODE 1. If a cell is not blank using the If Statement
VBA
Hard coded against single cell
Sub If_a_cell_is_not_blank()
Dim ws As Worksheet
Set ws = Worksheets(«Analysis»)
If ws.Range(«C5») <> «» Then
ws.Range(«D5») = «Yes»
Else
ws.Range(«D5») = «No»
End If
End Sub
Cell reference against single cell
Sub If_a_cell_is_not_blank()
Dim ws As Worksheet
Set ws = Worksheets(«Analysis»)
If ws.Range(«C9») <> «» Then
ws.Range(«D9») = ws.Range(«C5»)
Else
ws.Range(«D9») = ws.Range(«C6»)
End If
End Sub
Hard coded against range of cells
Sub If_a_cell_is_not_blank()
Dim ws As Worksheet
Set ws = Worksheets(«Analysis»)
For x = 5 To 11
If ws.Cells(x, 3) <> «» Then
ws.Cells(x, 4) = «Yes»
Else
ws.Cells(x, 4) = «No»
End If
Next x
End Sub
Cell reference against range of cells
Sub If_a_cell_is_not_blank()
Dim ws As Worksheet
Set ws = Worksheets(«Analysis»)
For x = 9 To 15
If ws.Cells(x, 3) <> «» Then
ws.Cells(x, 4) = ws.Range(«C5»)
Else
ws.Cells(x, 4) = ws.Range(«C6»)
End If
Next x
End Sub
KEY PARAMETERS
Output Range: Select the output range by changing the cell reference («D5») in the VBA code.
Cell to Test: Select the cell that you want to check if it’s not blank by changing the cell reference («C5») in the VBA code.
Worksheet Selection: Select the worksheet which captures the cells that you want to test if they are not blank and return a specific value by changing the Analysis worksheet name in the VBA code. You can also change the name of this object variable, by changing the name ‘ws’ in the VBA code.
True and False Results: In this example if a cell is not blank the VBA code will return a value of «Yes». If a cell is blank the VBA code will return a value of «No». Both of these values can be changed to whatever value you desire by directly changing them in the VBA code.
NOTES
Note 1: If the cell that is being tested is returning a value of («») this VBA code will identify the cell as blank.
Note 2: If your True or False result is a text value it will need to be captured within quotation marks («»). However, if the result is a numeric value, you can enter it without the use of quotation marks.
KEY PARAMETERS
Output Range: Select the output range by changing the cell reference («D9») in the VBA code.
Cell to Test: Select the cell that you want to check if it’s not blank by changing the cell reference («C9») in the VBA code.
Worksheet Selection: Select the worksheet which captures the cells that you want to test if they are not blank and return a specific value by changing the Analysis worksheet name in the VBA code. You can also change the name of this object variable, by changing the name ‘ws’ in the VBA code.
True and False Results: In this example if a cell is not blank the VBA code will return a value stored in cell C5. If a cell is blank the VBA code will return a value stored in cell C6. Both of these values can be changed to whatever value you desire by either referencing to a different cell that captures the value that you want to return or change the values in those cells.
NOTES
Note 1: If the cell that is being tested is returning a value of («») this VBA code will identify the cell as blank.
KEY PARAMETERS
Output and Test Range: Select the output rows and the rows that captures the cells that are to be tested by changing the x values (5 to 11). This example assumes that both the output and the associated test cell will be in the same row.
Test Column: Select the column that captures the cells that are to be tested by changing number 3, in ws.Cells(x, 3).
Output Column: Select the output column by changing number 4, in ws.Cells(x, 4).
Worksheet Selection: Select the worksheet which captures the cells that you want to test if they are not blank and return a specific value by changing the Analysis worksheet name in the VBA code. You can also change the name of this object variable, by changing the name ‘ws’ in the VBA code.
True and False Results: In this example if a cell is not blank the VBA code will return a value of «Yes». If a cell is blank the VBA code will return a value of «No». Both of these values can be changed to whatever value you desire by directly changing them in the VBA code.
NOTES
Note 1: If the cell that is being tested is returning a value of («») this VBA code will identify the cell as blank.
Note 2: If your True or False result is a text value it will need to be captured within quotation marks («»). However, if the result is a numeric value, you can enter it without the use of quotation marks.
KEY PARAMETERS
Output and Test Range: Select the output rows and the rows that captures the cells that are to be tested by changing the x values (9 to 15). This example assumes that both the output and the associated test cell will be in the same row.
Test Column: Select the column that captures the cells that are to be tested by changing number 3, in ws.Cells(x, 3).
Output Column: Select the output column by changing number 4, in ws.Cells(x, 4).
Worksheet Selection: Select the worksheet which captures the cells that you want to test if they are not blank and return a specific value by changing the Analysis worksheet name in the VBA code. You can also change the name of this object variable, by changing the name ‘ws’ in the VBA code.
True and False Results: In this example if a cell is not blank the VBA code will return a value stored in cell C5. If a cell is blank the VBA code will return a value stored in cell C6. Both of these values can be changed to whatever value you desire by either referencing to a different cell that captures the value that you want to return or change the values in those cells.
NOTES
Note 1: If the cell that is being tested is returning a value of («») this VBA code will identify the cell as blank.
VBA CODE 2. If a cell is not blank using Not and IsEmpty
VBA
Hard coded against single cell
Sub If_a_cell_is_not_blank_using_Not_and_IsEmpty()
Dim ws As Worksheet
Set ws = Worksheets(«Analysis»)
If Not (IsEmpty(ws.Range(«C5»)))Then
ws.Range(«D5») = «Yes»
Else
ws.Range(«D5») = «No»
End If
End Sub
Cell reference against single cell
Sub If_a_cell_is_not_blank_using_Not_and_IsEmpty()
Dim ws As Worksheet
Set ws = Worksheets(«Analysis»)
If Not (IsEmpty(ws.Range(«C9»)))Then
ws.Range(«D9») = ws.Range(«C5»)
Else
ws.Range(«D9») = ws.Range(«C6»)
End If
End Sub
Hard coded against range of cells
Sub If_a_cell_is_not_blank_using_Not_and_IsEmpty()
Dim ws As Worksheet
Set ws = Worksheets(«Analysis»)
For x = 5 To 11
If Not (IsEmpty(ws.Cells(x, 3))) Then
ws.Cells(x, 4) = «Yes»
Else
ws.Cells(x, 4) = «No»
End If
Next x
End Sub
Cell reference against range of cells
Sub If_a_cell_is_not_blank_using_Not_and_IsEmpty()
Dim ws As Worksheet
Set ws = Worksheets(«Analysis»)
For x = 9 To 15
If Not (IsEmpty(ws.Cells(x, 3))) Then
ws.Cells(x, 4) = ws.Range(«C5»)
Else
ws.Cells(x, 4) = ws.Range(«C6»)
End If
Next x
End Sub
KEY PARAMETERS
Output Range: Select the output range by changing the cell reference («D5») in the VBA code.
Cell to Test: Select the cell that you want to check if it’s not blank by changing the cell reference («C5») in the VBA code.
Worksheet Selection: Select the worksheet which captures the cells that you want to test if they are not blank and return a specific value by changing the Analysis worksheet name in the VBA code. You can also change the name of this object variable, by changing the name ‘ws’ in the VBA code.
True and False Results: In this example if a cell is not blank the VBA code will return a value of «Yes». If a cell is blank the VBA code will return a value of «No». Both of these values can be changed to whatever value you desire by directly changing them in the VBA code.
NOTES
Note 1: If the cell that is being tested is returning a value of («») this VBA code will identify the cell as not blank.
Note 2: If your True or False result is a text value it will need to be captured within quotation marks («»). However, if the result is a numeric value, you can enter it without the use of quotation marks.
KEY PARAMETERS
Output Range: Select the output range by changing the cell reference («D9») in the VBA code.
Cell to Test: Select the cell that you want to check if it’s not blank by changing the cell reference («C9») in the VBA code.
Worksheet Selection: Select the worksheet which captures the cells that you want to test if they are not blank and return a specific value by changing the Analysis worksheet name in the VBA code. You can also change the name of this object variable, by changing the name ‘ws’ in the VBA code.
True and False Results: In this example if a cell is not blank the VBA code will return a value stored in cell C5. If a cell is blank the VBA code will return a value stored in cell C6. Both of these values can be changed to whatever value you desire by either referencing to a different cell that captures the value that you want to return or change the values in those cells.
NOTES
Note 1: If the cell that is being tested is returning a value of («») this VBA code will identify the cell as not blank.
KEY PARAMETERS
Output and Test Range: Select the output rows and the rows that captures the cells that are to be tested by changing the x values (5 to 11). This example assumes that both the output and the associated test cell will be in the same row.
Test Column: Select the column that captures the cells that are to be tested by changing number 3, in ws.Cells(x, 3).
Output Column: Select the output column by changing number 4, in ws.Cells(x, 4).
Worksheet Selection: Select the worksheet which captures the cells that you want to test if they are not blank and return a specific value by changing the Analysis worksheet name in the VBA code. You can also change the name of this object variable, by changing the name ‘ws’ in the VBA code.
True and False Results: In this example if a cell is not blank the VBA code will return a value of «Yes». If a cell is blank the VBA code will return a value of «No». Both of these values can be changed to whatever value you desire by directly changing them in the VBA code.
NOTES
Note 1: If the cell that is being tested is returning a value of («») this VBA code will identify the cell as blank.
Note 2: If your True or False result is a text value it will need to be captured within quotation marks («»). However, if the result is a numeric value, you can enter it without the use of quotation marks.
KEY PARAMETERS
Output and Test Range: Select the output rows and the rows that captures the cells that are to be tested by changing the x values (9 to 15). This example assumes that both the output and the associated test cell will be in the same row.
Test Column: Select the column that captures the cells that are to be tested by changing number 3, in ws.Cells(x, 3).
Output Column: Select the output column by changing number 4, in ws.Cells(x, 4).
Worksheet Selection: Select the worksheet which captures the cells that you want to test if they are not blank and return a specific value by changing the Analysis worksheet name in the VBA code. You can also change the name of this object variable, by changing the name ‘ws’ in the VBA code.
True and False Results: In this example if a cell is not blank the VBA code will return a value stored in cell C5. If a cell is blank the VBA code will return a value stored in cell C6. Both of these values can be changed to whatever value you desire by either referencing to a different cell that captures the value that you want to return or change the values in those cells.
NOTES
Note 1: If the cell that is being tested is returning a value of («») this VBA code will identify the cell as blank.
VBA CODE 3. If a cell is not blank using vbNullString
VBA
Hard coded against single cell
Sub If_a_cell_is_not_blank_using_vbNullString()
Dim ws As Worksheet
Set ws = Worksheets(«Analysis»)
If ws.Range(«C5») <> vbNullString Then
ws.Range(«D5») = «Yes»
Else
ws.Range(«D5») = «No»
End If
End Sub
Cell reference against single cell
Sub If_a_cell_is_not_blank_using_vbNullString()
Dim ws As Worksheet
Set ws = Worksheets(«Analysis»)
If ws.Range(«C9») <> vbNullString Then
ws.Range(«D9») = ws.Range(«C5»)
Else
ws.Range(«D9») = ws.Range(«C6»)
End If
End Sub
Hard coded against range of cells
Sub If_a_cell_is_not_blank_using_vbNullString()
Dim ws As Worksheet
Set ws = Worksheets(«Analysis»)
For x = 5 To 11
If ws.Cells(x, 3) <> vbNullString Then
ws.Cells(x, 4) = «Yes»
Else
ws.Cells(x, 4) = «No»
End If
Next x
End Sub
Cell reference against range of cells
Sub If_a_cell_is_not_blank_using_vbNullString()
Dim ws As Worksheet
Set ws = Worksheets(«Analysis»)
For x = 9 To 15
If ws.Cells(x, 3) <> vbNullString Then
ws.Cells(x, 4) = ws.Range(«C5»)
Else
ws.Cells(x, 4) = ws.Range(«C6»)
End If
Next x
End Sub
KEY PARAMETERS
Output Range: Select the output range by changing the cell reference («D5») in the VBA code.
Cell to Test: Select the cell that you want to check if it’s not blank by changing the cell reference («C5») in the VBA code.
Worksheet Selection: Select the worksheet which captures the cells that you want to test if they are not blank and return a specific value by changing the Analysis worksheet name in the VBA code. You can also change the name of this object variable, by changing the name ‘ws’ in the VBA code.
True and False Results: In this example if a cell is not blank the VBA code will return a value of «Yes». If a cell is blank the VBA code will return a value of «No». Both of these values can be changed to whatever value you desire by directly changing them in the VBA code.
NOTES
Note 1: If the cell that is being tested is returning a value of («») this VBA code will identify the cell as blank.
Note 2: If your True or False result is a text value it will need to be captured within quotation marks («»). However, if the result is a numeric value, you can enter it without the use of quotation marks.
KEY PARAMETERS
Output Range: Select the output range by changing the cell reference («D9») in the VBA code.
Cell to Test: Select the cell that you want to check if it’s not blank by changing the cell reference («C9») in the VBA code.
Worksheet Selection: Select the worksheet which captures the cells that you want to test if they are not blank and return a specific value by changing the Analysis worksheet name in the VBA code. You can also change the name of this object variable, by changing the name ‘ws’ in the VBA code.
True and False Results: In this example if a cell is not blank the VBA code will return a value stored in cell C5. If a cell is blank the VBA code will return a value stored in cell C6. Both of these values can be changed to whatever value you desire by either referencing to a different cell that captures the value that you want to return or change the values in those cells.
NOTES
Note 1: If the cell that is being tested is returning a value of («») this VBA code will identify the cell as blank.
KEY PARAMETERS
Output and Test Rows: Select the output rows and the rows that captures the cells that are to be tested by changing the x values (5 to 11). This example assumes that both the output and the associated test cell will be in the same row.
Test Column: Select the column that captures the cells that are to be tested by changing number 3, in ws.Cells(x, 3).
Output Column: Select the output column by changing number 4, in ws.Cells(x, 4).
Worksheet Selection: Select the worksheet which captures the cells that you want to test if they are not blank and return a specific value by changing the Analysis worksheet name in the VBA code. You can also change the name of this object variable, by changing the name ‘ws’ in the VBA code.
True and False Results: In this example if a cell is not blank the VBA code will return a value of «Yes». If a cell is blank the VBA code will return a value of «No». Both of these values can be changed to whatever value you desire by directly changing them in the VBA code.
NOTES
Note 1: If the cell that is being tested is returning a value of («») this VBA code will identify the cell as blank.
Note 2: If your True or False result is a text value it will need to be captured within quotation marks («»). However, if the result is a numeric value, you can enter it without the use of quotation marks.
KEY PARAMETERS
Output and Test Rows: Select the output rows and the rows that captures the cells that are to be tested by changing the x values (9 to 15). This example assumes that both the output and the associated test cell will be in the same row.
Test Column: Select the column that captures the cells that are to be tested by changing number 3, in ws.Cells(x, 3).
Output Column: Select the output column by changing number 4, in ws.Cells(x, 4).
Worksheet Selection: Select the worksheet which captures the cells that you want to test if they are not blank and return a specific value by changing the Analysis worksheet name in the VBA code. You can also change the name of this object variable, by changing the name ‘ws’ in the VBA code.
True and False Results: In this example if a cell is not blank the VBA code will return a value stored in cell C5. If a cell is blank the VBA code will return a value stored in cell C6. Both of these values can be changed to whatever value you desire by either referencing to a different cell that captures the value that you want to return or change the values in those cells.
NOTES
Note 1: If the cell that is being tested is returning a value of («») this VBA code will identify the cell as blank.
Sometimes we get data in Excel from External sources. These data may not be in an ordered format, they may contain blank rows that you don’t need. In that case, you first try to delete the blank rows. That is one approach. You can do that too. But the best way is to copy the data in a separate excel file or sheet and leave the source data intact. You may need it later to check the original data.
So, how do we retain only non-blank cells/ranges in Excel? There are two approaches I take.
- Select and Copy only the non-blank range using Go To Special
- Select and Copy only the Non-blank using Filter
Let’s see the first method
Select and Copy only the non-blank range using Go To Special
Here, I have sample data in Excel. It has some blank rows. I want to copy only the non-blank cells to a new sheet. For that, I have to first select those non-blank cells and then copy it. To do so, I will use the Go To Special option. Follow these steps:
- First, select the entire range.
- Press CTRL+G shortcut to open the Go To Dialog box.
- At the bottom of the dialog, you can see the «Special» button. It is really special. Click on it. You can press ALT+s key, while the dialog is visible, to open the special options.
- Now from the available options, select the Constants and Hit Ok. You can see that only cells that have visible values are selected.
- Now use CTRL+C to copy the selected range. Go to the workbook or sheet where you want to copy this data.
Now you wave the data without blank records.
Note: If you have selected only one cell while using go to special method, it will select all the cells that are not blank the entire sheet. This may prevent the copying of data.
Select And Copy Only The Non-blank Using Filter
Another method to copy non-empty ranges in a table is to use the filter. Let’s use the above data to do the same.

Follow these steps:
- Select the entire range that contains data. Now use apply the filter using CTRL+SHIFT+L.
- Click on the dropdown and unselect the (blanks). Hit Enter.
- Now You can see the ranges that contain something in the row. All the blank ranges are hidden. Select this filtered data. (Use Alt+; a shortcut to ensure the visible selection. Any hidden row will be excluded).
- Hit CTRL+C shortcut key to copy the visible range.
- Now go to the sheet where you want to paste and past it using CTRL+V. It will be copied to the range.
That’s it. This how you can copy non-empty ranges to new sheets in excel. If you have any doubts regarding this topic or any other Excel/VBA related query, ask in the comments section below.
Related Articles:
Only Return Results from Non-Blank Cells | The ISBLANK function helps a lot when we want to consider blank cells while doing calculations in Excel. The non-blank cells are
How to Calculate Only If Cell is Not Blank in Excel | To restrict the calculation if a certain cell is blank we can use the ISBLANK function. The COUNTBLANK can also help…
How to use ISBLANK Function in Excel | The ISBLANK function calculates if a cell is blank or not and returns the boolean result. Here’s how we use it…
How to Use COUNTBLANK Function in Excel | Learn how to use the COUNTBLANK function to count the number of blank cells in a specified range.
SUMIF with non-blank cells | The SUMIF function sums the values on a condition. But if you want to sum a range if and only if a cell or range is blank or not, then you have to use the ISBLANK or COUNTBLANK function.
3 Best Ways to Find Last non-blank Row and Column Using VBA | While doing calculations, it gets important to know the last cells that are blank. It can be for entring data automatically in the last blank cells or selecting a table.
Popular Articles:
50 Excel Shortcuts to Increase Your Productivity | Get faster at your task. These 50 shortcuts will make you work even faster on Excel.
The VLOOKUP Function in Excel | This is one of the most used and popular functions of excel that is used to lookup value from different ranges and sheets.
COUNTIF in Excel 2016 | Count values with conditions using this amazing function. You don’t need filter your data to count specific value. Countif function is essential to prepare your dashboard.
How to Use SUMIF Function in Excel | This is another dashboard essential function. This helps you sum up values on specific conditions.
In an Excel worksheet, if data is entered in nonadjacent cells, you may discover it a bit troublesome to select and copy the data in non-blank cells. Now, in this post, we will introduce 2 ways to quickly select all non-blank cells.
Excel users are frequently required to copy and paste data. However, sometimes, there may be some troubles. For example, there are multiple discontinuous blank cells in an Excel worksheet. In this case, it is a bit hard to select all the cells which have content. But, don’t worry. Here we will share you 2 approaches to select all non-blank cells in an Excel sheet.
Method 1: Select via “Go To Special”
- At the outset, open the Excel worksheet.
- Then, press “F5” to trigger “Go To” dialog box.

- In the “Go To” dialog, click “Special” button.
- Next, check the “Constants” option and then “Numbers”, “Text”, “Logicals” and “Errors” options.

- Finally, click “OK”.
- When dialog box closes, as you see, all non-blank cells have been selected.


Method 2: Select with Excel VBA
- First off, get access to Excel VBA editor with reference to “How to Run VBA Code in Your Excel“.
- Then, put the following code into an unused module.
Sub SelectAllNonBlankCells()
    Dim objUsedRange As Range
    Dim objRange As Range
    Dim objNonblankRange As Range

    Set objUsedRange = Application.ActiveSheet.UsedRange

    For Each objRange In objUsedRange
        If Not (objRange.Value = "") Then
           If objNonblankRange Is Nothing Then
              Set objNonblankRange = objRange
           Else
              Set objNonblankRange = Application.Union(objNonblankRange, objRange)
           End If
        End If
    Next

    If Not (objNonblankRange Is Nothing) Then
       objNonblankRange.Select
    End If
End Sub

- After that, exit the VBA editor and add this macro to Quick Access Toolbar.
- Now, open your desired worksheet and click the macro button.
- At once, all non-blank cells will be selected, as shown in the following image.


Comparison
| Advantages | Disadvantages | |
| Method 1 | Easy to operate | Users have to manually open “Go To” dialog box and check options every time when they need to select non-blank cells |
| Method 2 | Easy and convenient for reuse | Arise the dangers of external malicious macros |
Repair Annoying Excel Troubles
Excel file is prone to errors and corruption. For instance, if MS Excel is frequently closed improperly, the file can get damaged with ease. Hence, users have to make some precautions, including backing up the files on a periodical basis. In addition, a proficient, robust and reliable xlsx fix tool, like DataNumen Excel Repair, is a matter of necessity.
Author Introduction:
Shirley Zhang is a data recovery expert in DataNumen, Inc., which is the world leader in data recovery technologies, including SQL Server recovery and outlook repair software products. For more information visit www.datanumen.com