
I have an Oracle 10G database and I need to write a fairly straightforward query that joins two tables and selects some data. However, I’d like to export the result list to an excel, so end users can use this .xls document to see the results and filter by one of the fields (location)
When I write the query, is there an easy way I can generate/ create an excel document that would hold these results as described above? The SQL doesn’t need to run from within excel, but I guess that would be a useful feature now that I think about it!
Thanks.
asked Aug 3, 2012 at 12:46
![]()
GrumPGrumP
1,1836 gold badges19 silver badges43 bronze badges
0
There is simple solution for your request.
By using ora_excel, small pl/sql package which generates Excel xlsx file, you can select data and export selected data to Excel and set filtering.
Please see following example:
BEGIN
    ORA_EXCEL.new_document;

    ORA_EXCEL.add_sheet('My sheet');
    ORA_EXCEL.query_to_sheet('select * from employees'); -- Select data from database
    ORA_EXCEL.set_cells_filter('A1', 'K1'); -- Add cell filtering from column A1 to column K1


    -- Save generated Excel to file with name example.xlsx to Oracle folder EXAMPLE_XLSX
    ORA_EXCEL.save_to_file('EXPORT_DIR', 'example.xlsx');
END;
For more details please check here
Cheers
answered Jan 15, 2014 at 9:57
![]()
1
Pretty easy to do in excel; and when done user can right click the data and say «Refresh» to get the latest updates.
but why reinvent the wheel lots of online articles already explain how to do this… Here’s one
After you’ve connected to a table, you can edit the properties on the connection and enter custom SQL (copy and paste from your developer tools)
answered Aug 3, 2012 at 12:51
![]()
xQbertxQbert
34.5k2 gold badges40 silver badges62 bronze badges
1
Since you cannot use OLE DB in your version of Excel. Use SPOOL to create a CSV file.
 SQL> SET echo off
 SQL> SET verify off
 SQL> SET colsep ,
 SQL> SET pagesize 0
 SQL> SET trimspool on
 SQL> SET feedback off
 SQL> SPOOL ON
 SQL> SPOOL C:data.csv
 SQL> SELECT COLUMN1,COLUMN2,COLUMN3....
      FROM TABLE;
 SQL> SPOOL OFF
The .csv file should open in Excel by default. Use proper column aliases so that users understand the column headers.
answered Aug 4, 2012 at 19:22
![]()
Anjan BiswasAnjan Biswas
7,7065 gold badges47 silver badges76 bronze badges
4
Quick way:
At first create a view which contains your Query(Best way because you might need to change this query later).
Be sure to properly have installed oracle client.
- In Excel(2007 and above) in Data tab go this way:
From Other sources -> From Data Connection Wizard -> Microsoft Data Access — OLE DB Provider for Oracle
-
Now Enter your DataSource Name(Stored in tnsnames.ora) and user password
-
Find you view and Then You’ll have what you need.
You can save password and set option to refresh automatically in connection properties.
answered Aug 3, 2012 at 13:04
![]()
hmmftghmmftg
1,2651 gold badge19 silver badges31 bronze badges
You are able to query an oracle database directly from Excel 2003 however, your sql statements are interpreted by MS Query and because of this it can often be frustrating. I will assume the machine in question already has the ability to query your database and has properly configured the database naming.
To query your database from excel 2003 you must:
-
Install and configure oracle’s ODBC Driver (You must have the 32bit drivers installed since excel03 is a 32bit application). ODBC can be configured under start > administrative tools > ODBC Data Source Administrator
-
Open excel 2003 and goto data > import external data > new database query.
This should bring up MS Query which is an Access-like interface.
Obviously this is a very brief starter to get you stepping in the right direction. If you have any specific questions, please comment and I will try and help you.
answered Aug 8, 2012 at 17:15
![]()
2
You can do one thing.
- First generate the output in a form that includes column separators using symbols (like , or #).
- Import the data to the excel and then define the placeholders as the column separators.
answered Aug 3, 2012 at 17:47
![]()
2
In this oracle tutorial, we will learn how to connect excel to an oracle database. also, we will cover these topics.
- Connect Excel to Oracle Database
- Connect Excel to Oracle Database 12c
- Excel Connect to Oracle Database without ODBC
- Excel Connect to Oracle Database with ODBC
- Excel Connect to Oracle Database using OLED
- Excel Connection String to Oracle Database
- Can you link excel to Oracle Database
In this section, we will learn how to connect Excel to Oracle Database without ODBC.
- Microsoft Excel has built-in feature of connecting excel to oracle database and we show show you how to use it.
- Once the connection is established, you will be able to access all the files in the oracle database of that common particular user.
- In our case, c##sqlserverguides is the name of our common user name. Please note that it is mandatory to c## as suffix while creating a user name.
- There are three things required to connect excel with the oracle database.
- Server or SSID
- Username
- Password
- Default ssid is “orcl” which is also the Global Database name. In case you have changed it or created a new one then please mention that one.
- Open Microsoft Excel and click on the Data tab, from there click on the the From Database dropdown and select ‘From Oracle Database‘.

- If you encounter this error then simply click on the on the OK button. The error won’t create problem while connecting excel with the Oracle database.

- Enter the name of server or ssid here. ssid is the name of the global database created at the time of installation. In our case, it is ‘orcl’, click on the ok button to proceed.

- Excel is connected to oracle database now you can browse of all the oracle data on the microsoft excel.

Read How to Check Oracle Database Version
Connect Excel to Oracle Database with ODBC
In this section, we will learn how to connect excel to the oracle database on the windows operating system.
- Offline installed Excel software can only be connected to the oracle database. Web based excel won’t give option to connect with the database.
- First step in the process is we have to create a new data source on “Windows Administrative Tools” on windows operating system.

- Inside “Windows Administrative Tool” click on the ODBC Data Sources (64-bit). From the appeared prompt select “User DSN” tab and click on Add button.
- Another prompt will appear “Create New Data Source” in that prompt select “Oracle in OraDB19Home1“. This name may change in future but it will always start with the key ‘oracle’. Click on the the finish button.

- Once you clicked on the finish button in the previous option, you will see “Oracle Database Driver Configuration” window.
- Data Source Name: Name provided here will reflect in excel and you have to choose it over there.
- Description: If you want to add a little description about your database you can write it here. Description can also be treated as instruction for other users of the database.
- TNS Service Name: ‘orcl’ is the global database configured while installing the Oracle databse software. Incase you have changed it or created a new one then mention that here.
- User ID: It is optional to provide user id. You can mention the common username here.
- Click on the “Test Connection” button and provide the username and password and click on the ok button. If a prompt appear “Test Successful” that means you can move to next step now. Click on the Ok button on the “Oracle ODBC Driver Configuration” window.

- Open Microsoft Excel and click on the Data tab, from there click on the the Get Data dropdown and select ‘From Other Sources‘, click on the option “From ODBC“.

- Select the Data Source Name that we created in Oracle Odbc Driver Configuration.
- Once done, it will ask for the username and password. Enter the credential and you will see that a screen with Navigation title will appear and now you can browse your data there. This is how we can connct excel with oracle database.

Read How to Get List all Tables in Oracle Database
Connect Excel to Oracle Database 12c
In this section, we will learn how to connect excel to oracle database 12c on the windows operating system.
- Oracle has released various versions so far out of these 12c and 11g were most popular and widely used versions.
- Current stable long term version is Oracle database 19c and 21c is in innovation mode.
- Though 12c has been obsolete still many organisations are still using it.
- Steps to connect excel to oracle database 12c is similar to oracle database 19c. So you can follow section section “Connect Excel to Oracle Database with ODBC” of this tutorial.
Read: How to create table in Oracle
Excel Connect to Oracle Database without ODBC
In this section, we will learn how to connect excel connect to the oracle database without ODBC on the windows operating system.
- Most of the connection between microsoft excel and oracle database are established using ODBC.
- This type of connections are established in previous versions of microsoft excel when there was no option for from connecting oracle directly with excel.
- In new versions there is already option to connect with oracle database as you can see in the below image.

- In case this option is not available then using oled you can connect with the database.
- to see practical implementation of excel connect to oracle database with oled visit the first section of this tutorial ” Connect Excel to Oracle Database”.
Also, check: How to Fetch Data from Oracle Database in Python
Excel Connect to Oracle Database using OLED
In this section, we will learn how excel connects to an oracle database using OLED in the Microsoft Windows operating system.
- Open Microsoft Excel and click on the Data tab, from there click on the the Get Data dropdown, now click on ‘From Other Sources‘ and select From OLEDB.

- In the connection string prompt enter the below code. In our case ‘orcl’ is the name of our global database so we have set source=orcl.
provider=OraOLEDB.Oracle.1;data source=orcl
- After entering the above code click on the build button a new promot will appear “Data Link Properties”. Enter the user name and password for the user you want to connect with. In our case we are connecting with “c##sqlserverguides”.
- Once filled all the required information (username & password) click on “Test connection” button. If Test connection succeeded click on ok for all the three screens.

- New prompt will appear immedietly after clicking on ok button of “From OLE
DB” window. - Enter username and password one last time and click on connect. It may take few seconds then excel will be connected to oracle database.

- Below is the window that will appear on the successful establishment of the connection. You will be able to access all the files, folder and tables available inside the connected user.
Read: Oracle get database name
Excel Connection String to Oracle Database
In this section, we will learn how to establish an excel connection string to an oracle database.
- While connecting excel to oracle database you must have noticed ‘Credential Connection String’ box that might be optional in some cases.
- Excel Connection String holds all the information about the connecting database like host, hostname, port, IP address, server type and service name.
- while connecting excel to oracle database using oled we have to provide excel connection string that you can us the below excel connection string to connect with oracle databse.
provider=OraOLEDB.Oracle.1;data source=orcl
- If you are advance user and want to connect via oracle database on server than you can configure the setting using the below code.
provider=OraOLEDB.Oracle.1;data source=
             ("
              DESCRIPTION =
                 (ADDRESS =
                   (PROTOCOL = TCP)
                   (HOST = localhost)
                   (PORT = 1521)
                 )
              (CONNECT_DATA =
                  (SERVER = DEDICATED)
                  (SERVICE_NAME = orcl))
              )"
Can you link excel to Oracle Database
In this section, we will answer the question “can you link excel to the oracle database“.
- Yes, we can link excel to oracle database and there are multiple ways of doing that.
- In this tutorial, we have explained 3 mojor ways that are widely used to connect excel to oracle database.
- Connect excel to oracle database
- Excel Connect to Oracle Database with ODBC
- Excel Connect to Oracle Database using OLED
- Visit each section to learn more about how to connect excel with oracle database.
In this tutorial, we have learned how to connect excel to an oracle database. Also, we have covered these topics.
- Connect Excel to Oracle Database
- Connect Excel to Oracle Database 12c
- Excel Connect to Oracle Database without ODBC
- Excel Connect to Oracle Database using OLED
- Excel Connection String to Oracle Database
- Can you link excel to Oracle Database
I am Bijay having more than 15 years of experience in the Software Industry. During this time, I have worked on MariaDB and used it in a lot of projects. Most of our readers are from the United States, Canada, United Kingdom, Australia, New Zealand, etc.
Want to learn MariaDB? Check out all the articles and tutorials that I wrote on MariaDB. Also, I am a Microsoft MVP.
You can import data into Excel from a wide variety of data sources and the sections that follow show you how. For more information on what to do with your data once it’s imported, see How data journeys through Excel.
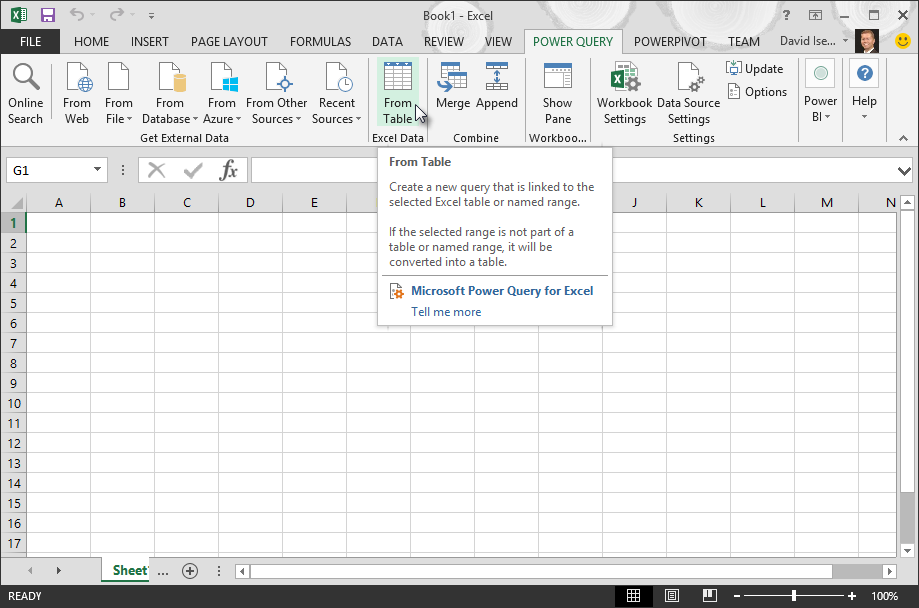
You can create a query from an Excel table, named range, or dynamic array in the current workbook. If the selected data is a simple range, it’s converted to a table. Importing dynamic arrays requires a Microsoft 365 subscription. For more information on dynamic arrays, see Dynamic array formulas and spilled array behavior.
-
Select any cell within your data range.
-
Select Data > From Table/Range.
This command is also available from Data > From Other Sources > From Table/Range.
-
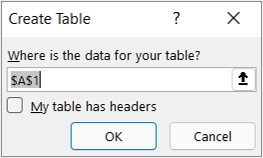
If prompted, in the Create Table dialog box, you can select the Range Selection button to select a specific range to use as a data source.

-
If the table or range of data has column headers, select My table has headers. The header cells are used to define the column names for the query.
-
Select OK.
For more information, see Import from an Excel Table.
-
Select Data > Get Data > From File > From Excel Workbook.
-
In the Excel Browse dialog box, browse for or type a path to the file that you want to query.
-
Select Open.
If your source workbook has named ranges, the name of the range will be available as a data set.
For more information about advanced connector options, see Excel Workbook (docs.com).
The following procedure shows the basic steps. For more detailed coverage, see Import or export text (.txt or .csv) files.
-
Select Data > Get Data > From File > From Text/CSV.
-
In the Comma-Separated Values Browse dialog box, browse for or type a path to the file that you want to query.
-
Select Open.
Note: If you are importing data from a CSV file, Power Query will automatically detect column delimiters including column names and types. For example, if you imported the example CSV file below, Power Query automatically uses the first row as the column names and changes each column data type.
Example CSV file
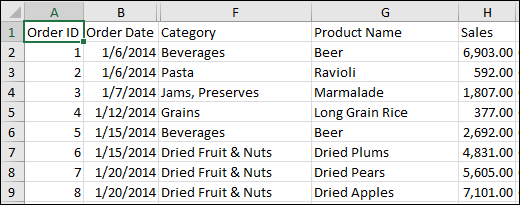
Power Query automatically changes each column data type:
-
Order ID changes to number
-
Order Date changes to date
-
Category remains text (the default column type)
-
Product Name remains text (the default column type)
-
Sales changes to number
For more information about advanced connector options, see Text/CSV (docs.com).
The following procedure shows the basic steps of importing data. For more detailed coverage, see Import XML data.
-
Select Data > Get Data > From File > From XML.
-
In the From XML Browse dialog box, browse for or type a file URL to import or link to a file.
-
Select Open.
After the connection succeeds, use the Navigator pane to browse and preview the collections of items in the XML file in a tabular form.
For more information about advanced connector options, see XML (docs.com).
-
Select Data > Get Data > From File > From JSON. The Import Data dialog box appears.
-
Locate the JSON file, and then select Open.
For more information about advanced connector options, see JSON (docs.com).
Important When you try to import a PDF file, you may get the following PDF message: “This connector requires one or more additional components to be installed before it can be used.” The PDF connector requires .NET Framework 4.5 or higher to be installed on your computer. You can download the latest .NET Framework from here.
-
Select Data > Get Data > From File > From PDF.
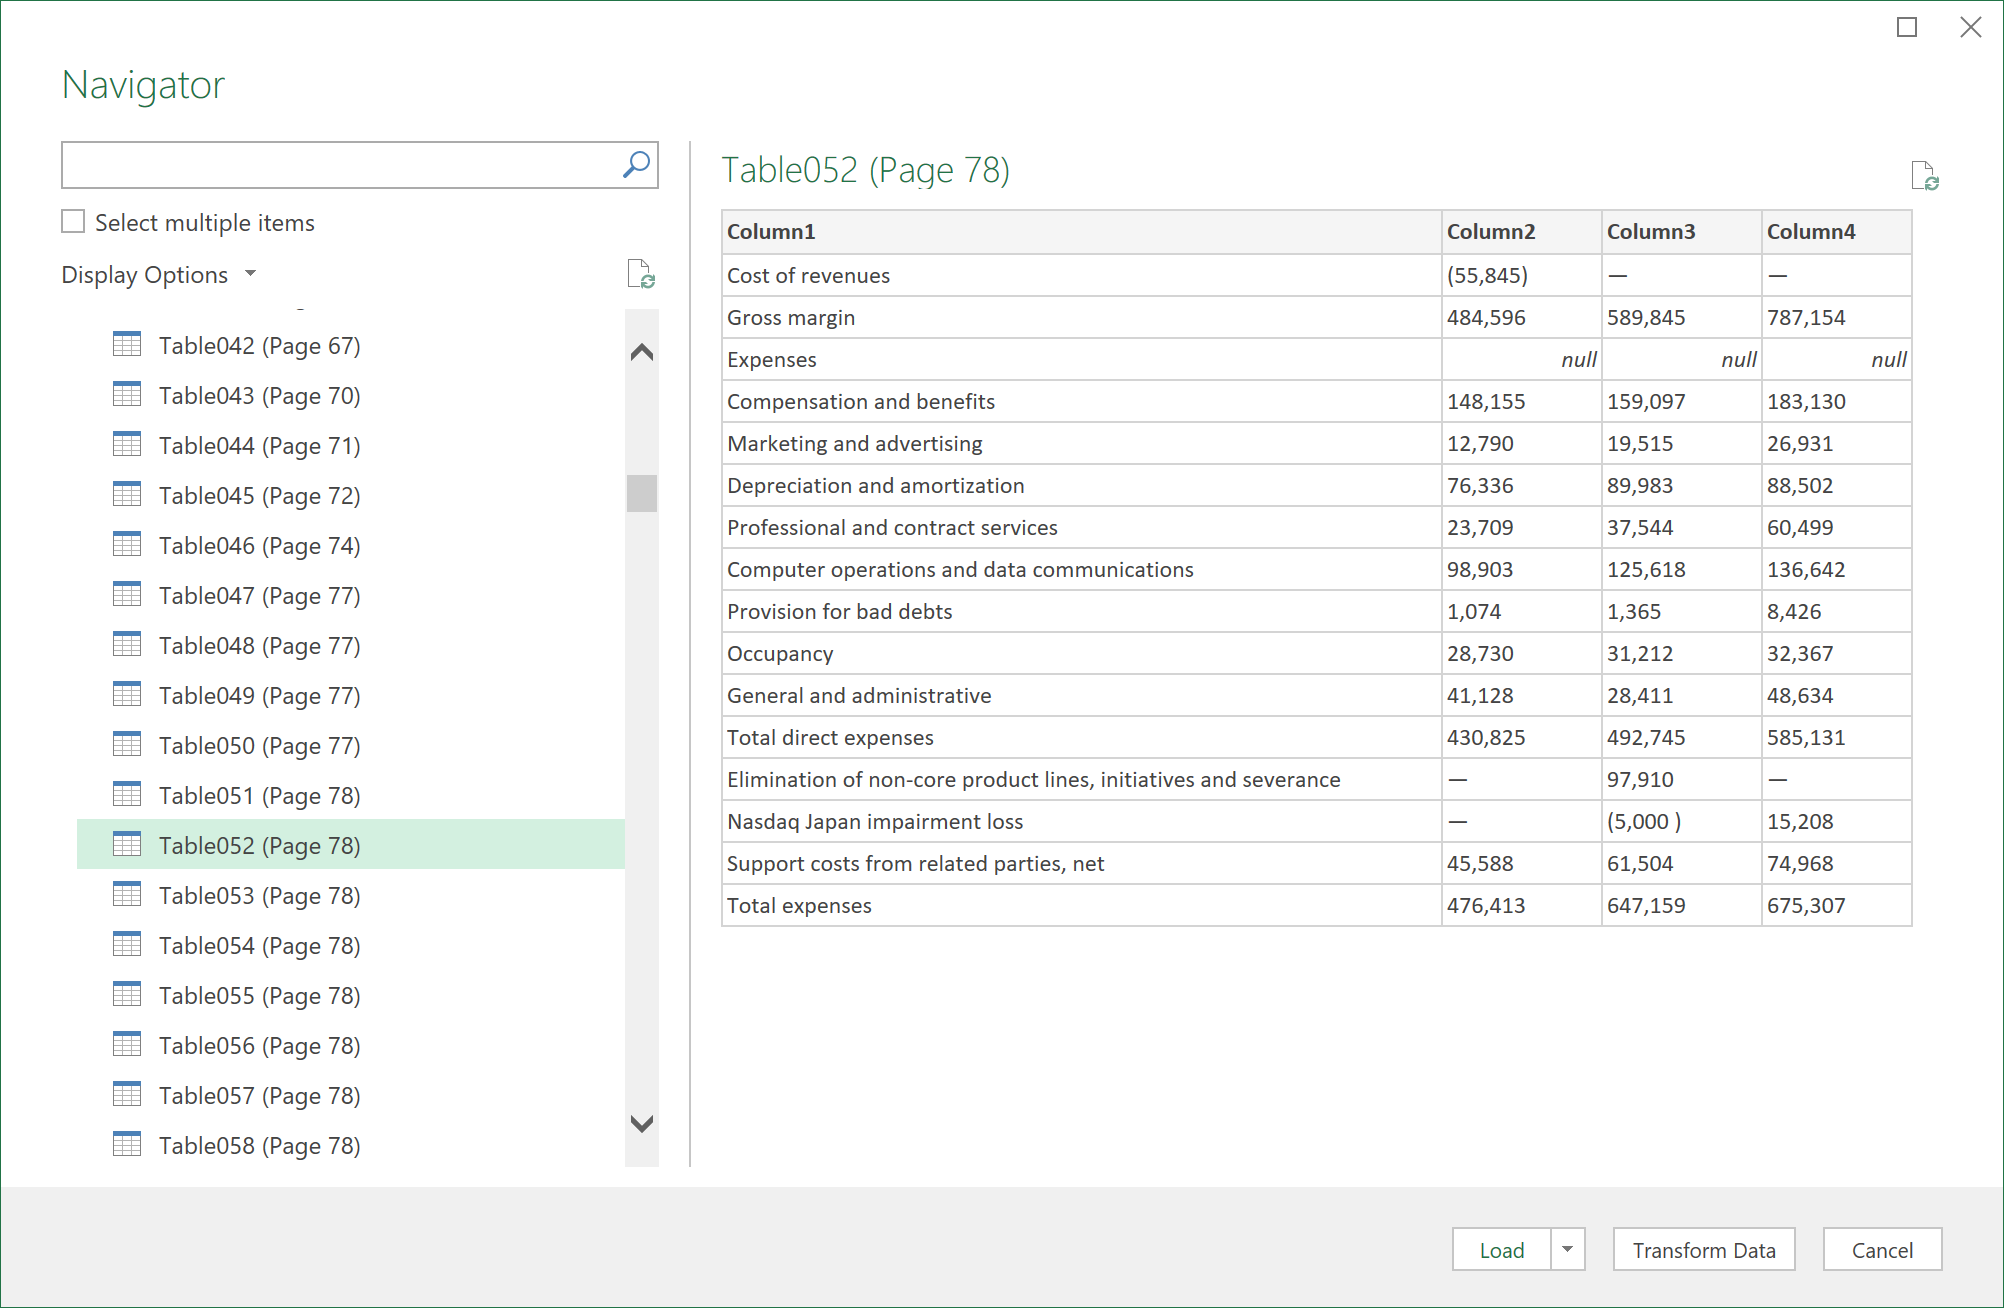
-
Select your PDF file, and then click Open. The Navigator dialog box opens your PDF and displays available tables.
-
Select the tables you want to import, then do one of the following:
-
To view the data directly in Excel, Select Load > Load or to see the Import dialog box, select Load > Load To.
-
To work with the data in Power Query first, select Transform Data.
-
For more information about advanced connector options, see PDF (docs.com).
You can import data from several files having a similar schema and format from a folder. Then, you can append the data into one table.
-
Select Data > Get Data > From File > From Folder.
-
In the Browse dialog box, locate the folder, and then select Open.
-
For detailed steps, see Import data from a folder with multiple files.
For more information about advanced connector options, see Folder (docs.com).
You can import data from several files having a similar schema and format from a SharePoint library. Then, you can append the data into one table.
-
Select Data > Get Data > From File > From SharePoint Folder.
-
In the SharePoint Folder dialog box, enter the root URL for the SharePoint site not including any reference to a library, and then navigate to the library.
-
For detailed steps, see Import data from a folder with multiple files.
For more information about advanced connector options, see SharePoint folder (docs.com).
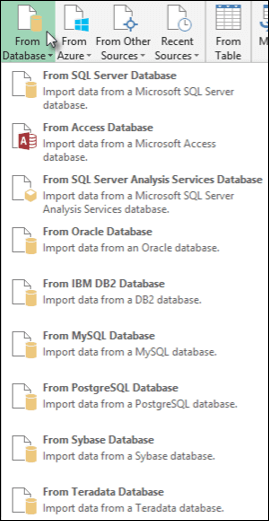
-
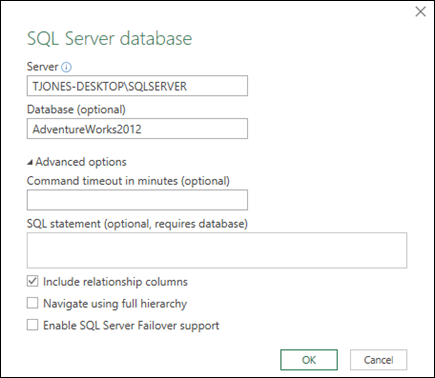
Select Data > Get Data > From Database > From SQL Server Database.
-
In the Microsoft SQL Database dialog box, specify the SQL Server to connect to in the Server Name box. Optionally, you can specify a Database Name as well.
-
If you want to import data using a native database query, specify your query in the SQL Statement box. For more information, see Import Data from Database using Native Database Query.
-
Select OK.
-
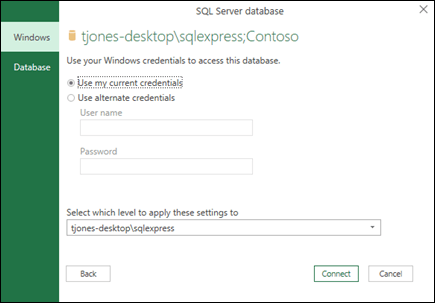
Select the authentication mode to connect to the SQL Server database.
-
Windows This is the default selection. Select this if you want to connect using Windows authentication. -
Database Select this if you want to connect using SQL Server authentication. After you select this, specify a user name and password to connect to your SQL Server instance.
-
-
By default, the Encrypt connection check box is selected to signify that Power Query connects to your database using an encrypted connection. If you do not want to connect using an encrypted connection, clear this check box, and then click Connect.
If a connection to your SQL Server is not established using an encrypted connection, Power Query prompts you to connect using an unencrypted connection. Click OK in the message to connect using an unencrypted connection.
For more information about advanced connector options, see SQL Server database (docs.com).
-
Select Data > Get Data > From Database > From Microsoft Access Database.
-
In the Import Data dialog box, browse for and locate the Access database file (.accdb).
-
Select the file, and then select Open. The Navigator dialog box appears.
-
Select the table or query in the left pane to preview the data in the right pane.
-
If you have many tables and queries, use the Search box to locate an object or use the Display Options along with the Refresh button to filter the list.
-
Select Load or Transform.
For more information about advanced connector options, see Access database (docs.com).
Note When you use a workbook connected to a SQL Server Analysis Services database, you may need additional information to answer specific product questions, such as reference information about multidimensional expressions (MDX), or configuration procedures for an online analytical processing (OLAP) server.
-
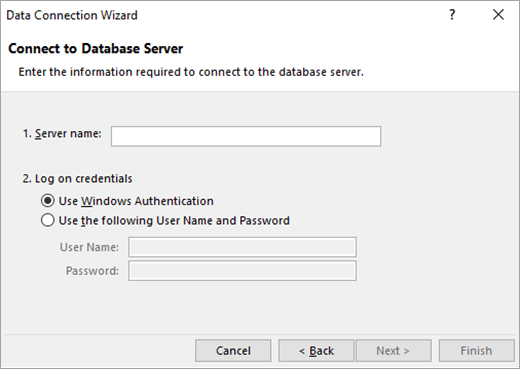
Select Data > Get External Data > From Database > From Analysis Services. The first page of the Data Connection Wizard appears. Its title is Connect to Database Server.
-
In the Server name box, enter the name of the OLAP database server.
Tip: If you know the name of the offline cube file that you want to connect to, you can type the complete file path, file name, and extension.
-
Under Log on credentials, do one of the following, then click Next:
-
To use your current Windows user name and password, click Use Windows Authentication.
-
To enter a database user name and password, click Use the following User Name and Password, and then type your user name and password in the corresponding User Name and Password boxes.
Security Note
-
Use strong passwords that combine uppercase and lowercase letters, numbers, and symbols. Weak passwords don’t mix these elements. For example, Y6dh!et5 is a strong password and House27 is a weak password. Passwords should contain 8 or more characters. A pass phrase that uses 14 or more characters is better.
-
It is critical that you remember your password. If you forget your password, Microsoft cannot retrieve it. Store the passwords that you write down in a secure place away from the information that they help protect.
-
-
-
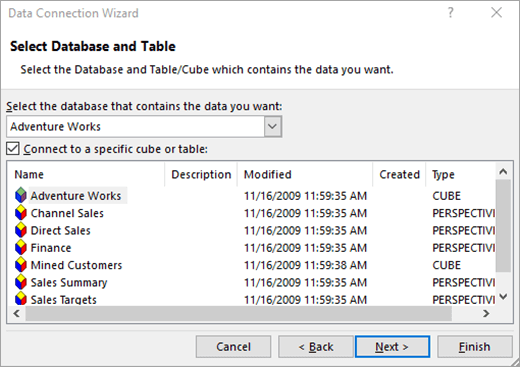
Select Next to go to the second wizard screen. Its title is Select Database and Table.
To connect to a specific cube file in the database, make sure that Connect to a specific cube or table is selected, and then select a cube from the list.
-
In the Select the database that contains the data you want box, select a database, and then click Next.
-
Click Next to go to the third wizard screen. Its titled Save Data Connection File and Finish.
-
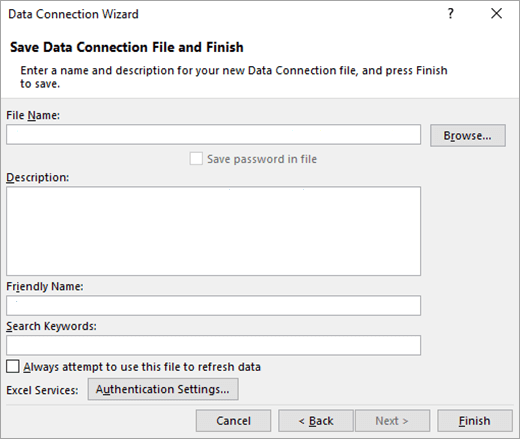
In the File Name box, revise the default file name as needed (optional).
-
Click Browse to change the default file location of My Data Sources, or check for existing file names.
-
In the Description, Friendly Name, and Search Keywords boxes, type a description of the file, a friendly name, and common search words (all are optional).
-
To ensure that the connection file is used when the PivotTable is refreshed, click Always attempt to use this file to refresh this data.
Selecting this check box ensures that updates to the connection file will always be used by all workbooks that use that connection file.
-
You can specify how a PivotTable is accessed if the workbook is saved to Excel Services and is opened by using Excel Services.
Note: The authentication setting is only used by Excel Services, and not by Microsoft Office Excel. If you want to ensure that the same data is accessed whether you open the workbook in Excel or Excel Services, make sure that the authentication setting in Excel is the same.
Select Authentication Settings, and select one of the following options to log on to the data source:
-
Windows Authentication Select this option to use the Windows username and password of the current user. This is the most secure method, but it can affect performance when there are many users.
-
SSO Select this option to use Single Sign On, and then enter the appropriate identification string in the SSO ID text box. A site administrator can configure a SharePoint site to use a Single Sign On database where a username and password can be stored. This method can be the most efficient when there are many users.
-
None Select this option to save the username and password in the connection file.
Important: Avoid saving logon information when connecting to data sources. This information may be stored as plain text, and a malicious user could access the information to compromise the security of the data source.
-
-
Select OK.
-
Select Finish to close the Data Connection Wizard. The Import Data dialog box appears.
-
Decide how you want to import the data, and then select OK. For more information about using this dialog box, select the question mark (?).
You can create a dynamic connection between an Excel workbook and a SQL Server Analysis Services Online Analytical Processing (OLAP) database server, then refresh that connection whenever the data changes. You can connect to a specific offline cube file if it has been created on the database server. You can also import data into Excel as either a Table or a PivotTable report.
-
Select Data > Get Data > From Database > From SQL Server Analysis Services Database (Import).
-
Enter the Server name, and then select OK.
Note: You have the option of entering a specific database name, and you can also add an MDX (docs.com) or DAX query.
-
In the Navigator pane select the database, and then select the cube or tables you want to connect.
-
Click Load to load the selected table into a worksheet, or click Edit to perform additional data filters and transformations in the Power Query Editor before loading it.
-
Select Data > Get Data > From Database > From Oracle Database.
-
In the Oracle Database dialog box, in Server Name specify the Oracle Server to connect to. If a SID is required, this can be specified in the form of “ServerName/SID”.
-
If you want to import data using native database query, specify your query in the SQL Statement box. For more information, see Import data from database using Native Database Query.
-
Select OK.
-
If the Oracle server requires database user credentials:
-
In the Access a Database dialog box, enter your username and password.
-
Click Connect.
-
For more information about advanced connector options, see Oracle Database (docs.com).
Warning:
-
Before you can connect to an IBM DB2 database, you need the IBM DB2 Data Server Driver installed on your computer (minimum requirement is the IBM Data Server Driver Package (DS Driver)). Select the driver that matches your Power Query installation (32-bit or 64-bit).
-
There are known issues reported by IBM installing the IBM DB2 Data Server Driver on Windows 8. If you are using Windows 8 and want to connect to IBM DB2 using Power Query, you need to follow additional installation steps. Find more information about the IBM DB2 Data Server Driver on Windows 8.
-
Select Data > Get Data > From Database > From IBM DB2 Database.
-
In the IBM DB2 Database dialog box, in Server Name specify the IBM DB2 Database Server to connect to.
-
If you want to import data using native database query, specify your query in the SQL Statement box. For more information, see Import data from a database using Native Database Query.
-
Select OK.
-
If the IBM DB2 server requires database user credentials:
-
In the Access a Database dialog box, enter your username and password.
-
Click Connect.
-
For more information about advanced connector options, see IBM DB2 database (docs.com).
Note: If receive the message “This connector requires one or more additional components to be installed before it can be used.”, you need to download the appropriate ODBC Driver for MySQL to your Windows device from here. For more information, see MySQL Connectors.
-
Select Data > Get Data > From Database > From MySQL Database.
-
In the MySQL Database dialog box, in Server Name specify the MySQL Database Server to connect to.
-
If you want to import data using native database query, specify your query in the SQL Statement box. For more information, see Import data from a database using Native Database Query.
-
Select OK.
-
If the MySQL server requires database user credentials:
-
In the Access a Database dialog box, enter your username and password.
-
Click Connect.
-
For more information about advanced connector options, see MySQL database (docs.com).
Note: Before you can connect to a PostgreSQL database in Power Query, you need the Ngpsql data provider for PostgreSQL installed on your computer. Select the driver that matches your Office version (32-bit or 64-bit). For more information, see Which version of Office am I using? . Also make sure you have the provider registered in the machine configuration that matches the most recent .NET version on your device.
-
Select Data > Get Data > From Database > From PostgreSQL Database.
-
In the PostgreSQL Database dialog box, specify the PostgreSQL Database Server you want to connect to in the Server Name section.
-
If you want to import data using native database query, specify your query in the SQL Statement box. For more information, see Import data from a database using Native Database Query.
-
Select OK.
-
If the PostgreSQL server requires database user credentials:
-
In the Access a Database dialog box, enter your username and password.
-
Select Connect.
-
For more information about advanced connector options, see PostgreSQL (docs.com).
Note: Before you can connect to an SAP SQL Anywhere database, you need the SAP SQL Anywhere driver installed on your computer. Select the driver that matches your Excel installation (32-bit or 64-bit).
-
Select Data > Get Data > From Database > From Sybase Database.
-
In the Sybase Database dialog box, specify the Sybase Server to connect to in the Server Name box. Optionally, you can specify a Database Name as well.
-
If you want to import data using a native database query, specify your query in the SQL Statement box. For more information, see Import data from a database using Native Database Query.
-
Select OK.
-
By default, the Encrypt connection check box is selected so that Power Query connects to your database using a simple encrypted connection.
-
Select Connect.
For more information, see Sybase database (docs.com).
-
Select Data > Get Data > From Database > From Teradata Database.
-
In the Teradata Database dialog box, in Server Name specify the Teradata Server to connect to.
-
If you want to import data using native database query, specify your query in the SQL Statement box. For more information, see Import data from a database using Native Database Query.
-
Select OK.
-
If the Teradata server requires database user credentials:
-
In the Access a Database dialog box, enter your username and password.
-
Click Save.
-
For more information, see Terabase database (docs.com).
Notes:
-
This feature is only available in Excel for Windows if you have Office 2019 or later, or a Microsoft 365 subscription. If you are a Microsoft 365 subscriber, make sure you have the latest version of Office.
-
Before you can connect to an SAP HANA database using Power Query, you need the SAP HANA ODBC Driver on your computer. Select the driver that matches your Power Query installation (32-bit or 64-bit).
-
You will need an SAP account to login to the website and download the drivers. If you are unsure, contact the SAP administrator in your organization.
To connect to an SAP HANA database:
-
Click Data > New Query > From Database > From SAP HANA Database.
-
In the SAP HANA Database dialog box, specify the server you want to connect to. The server name should follow the format ServerName:Port.
-
Optionally, if you want to import data using native database query, Select Advanced options and in the SQL Statement box enter the query.
-
Select OK.
-
If the SAP HANA server requires database user credentials, then in the Access an SAP HANA database dialog box, do the following:
-
Click the Database tab, and enter your username and password.
-
Click Connect.
-
For more information about advanced connector options, see SAP HANA database (docs.com).
Azure SQL Database is a high-performing, fully managed, scalable relational database built for the cloud and used for mission-critical applications. For more information, see What is Azure SQL? (docs.com).
-
Select Data > Get Data > From Azure > From Azure SQL Database.
-
In the Microsoft SQL Database dialog box, specify the SQL Server to connect to in the Server Name box. Optionally, you can specify a Database Name as well.
-
If you want to import data using a native database query, specify your query in the SQL Statement box. For more information, see Import Data from Database using Native Database Query.
-
Select OK.
-
Select the authentication mode to connect to the SQL Server database.
-
Windows This is the default selection. Select this if you want to connect using Windows authentication. -
Database Select this if you want to connect using SQL Server authentication. After you select this, specify a user name and password to connect to your SQL Server instance.
-
-
By default, the Encrypt connection check box is selected to signify that Power Query connects to your database using an encrypted connection. If you do not want to connect using an encrypted connection, clear this check box, and then click Connect.
If a connection to your SQL Server is not established using an encrypted connection, Power Query prompts you to connect using an unencrypted connection. Click OK in the message to connect using an unencrypted connection.
For more information about advanced connector options, see Azure SQL database (docs.com).
Azure Synapse Analytics combines big data tools and relational queries by using Apache Spark to connect to Azure data services and the Power Platform. You can load millions of rows in no time. Then, you can work with tabular data by using familiar SQL syntax for queries. For more information, see What is Azure Synapse Analytics (docs.com).
-
Select Data > Get Data > From Azure > From Azure Synapse Analytics.
-
In the Microsoft SQL Database dialog box, specify the SQL Server to connect to in the Server Name box. Optionally, you can specify a Database Name as well.
-
If you want to import data using a native database query, specify your query in the SQL Statement box. For more information, see Import Data from Database using Native Database Query.
-
Select OK.
-
Select the authentication mode to connect to the SQL Server database.
-
Windows This is the default selection. Select this if you want to connect using Windows authentication. -
Database Select this if you want to connect using SQL Server authentication. After you select this, specify a user name and password to connect to your SQL Server instance.
-
-
By default, the Encrypt connection check box is selected to signify that Power Query connects to your database using an encrypted connection. If you do not want to connect using an encrypted connection, clear this check box, and then click Connect.
If a connection to your SQL Server is not established using an encrypted connection, Power Query prompts you to connect using an unencrypted connection. Click OK in the message to connect using an unencrypted connection.
For more information about advanced connector options, see Azure Synapse Analytics (docs.com).
Azure HDInsight is used for big data analysis when you need to process large amounts of data. It supports data warehousing and machine learning; you can think of it as a data flow engine. For more information, see What is Azure HDInsight? (docs.com).
-
Select Data > Get Data > From Azure > From Azure HDInsight (HDFS).
-
Enter the Account name or URL of the Microsoft Azure Blob Storage account associated with your HDInsight cluster, and then select OK.
-
In the Access Microsoft Azure HDInsight dialog box, enter your Account Key, and click Connect.
-
Select your cluster in the Navigator dialog, and then find and select a content file.
-
Select Load to load the selected table, or Edit to perform additional data filters and transformations before loading it.
Microsoft Azure Blob Storage is a service for storing large amounts of unstructured data, like images, videos, audio, and documents, which can be accessed from anywhere in the world via HTTP or HTTPS. For more information about Azure Blob Storage service, see How to Use Blob Storage.
-
Select Data > Get Data > From Azure > From Azure Blob Storage.
-
In the Microsoft Azure Blob Storage dialog box, enter your Microsoft Azure storage account name or URL, and then select OK.
-
If you are connecting to the Blob storage service for the first time, you will be prompted to enter and save the storage access key. In the Access Microsoft Azure Blob Storage dialog box, enter your storage access key in the Account Key box, and click Save.
Note: If you need to retrieve your storage access key, browse to the Microsoft Azure Portal, select your storage account, and then select the Manage Access Key icon on the bottom of the page. Select the copy icon to the right of the primary key, and then paste the value in the Account Key box.
-
The Query Editor lists all the available containers in your Microsoft Azure Blob Storage. In the Navigator, select a container from where you want to import data, and then select Apply & Close.
For more information, see Azure Blob Storage (docs.com).
The Azure Storage provides storage services for a variety of data objects. The Table storage component targets NoSQL data stored as key/attribute pairs. For more information, see Introduction to Table storage (docs.com).
-
Select Data > Get Data > From Azure > From Azure Synapse Analytics.
-
Enter the Account name or URL of the Microsoft Azure Table Storage account, and then select OK.
-
Select Data > Get Data > From Azure > From Azure Data Lake Storage.
-
Enter the Account name or URL of the Microsoft Azure Data Lake Storage account, and then select OK.
For example: swebhdfs://contoso.azuredatalake.net/
-
Optionally, enter a value in the Page Size in Bytes box.
For more information, see Azure Data Lake Storage (docs.com).
Azure Data Lake Storage Gen 2 combines different data warehouses into a single, stored environment. You can use a new generation of query tools to explore and analyze data, working with petabytes of data. For more information, see Azure Data Lake Storage (docs.com).
-
In the Azure Data Lake Storage Gen2 dialog box, provide the account URL. URLs for Data Lake Storage Gen2 have the following pattern:
https://<accountname>.dfs.core.windows.net/<container>/<subfolder>
For example, https://contosoadlscdm.dfs.core.windows.net/ -
Select whether you want to use the File System View or the Common Data Model (CDM) Folder View.
-
Select OK.
-
You may need to choose an authentication method.
For example, if you select the Organizational account method, select Sign in to sign into your storage account. You’ll be redirected to your organization’s sign-in page. Follow the prompts to sign into the account. After you’ve successfully signed in, select Connect.
-
In the Navigator dialog box verify the information, and then select either Transform Data to transform the data in Power Query or Load to load the data.
For more information, see Azure Data Lake Storage (docs.com).
Azure Data Explorer is a fast and highly scalable data exploration service for log and telemetry data. It can handle large volumes of diverse data from any data source, such as websites, applications, IoT devices, and more. For more information, see What is Azure Data Explorer (docs.com).
-
Select Data > Get Data > From Azure > From Azure Data Explorer.
-
In the Azure Data Explorer (Kusto) dialog box, enter appropriate values.
Each prompt provides helpful examples to walk you through the process.
-
Select OK.
You can import Datasets from your organization with appropriate permission by selecting them from the Power BI Datasets pane, and then creating a PivotTable in a new worksheet.
-
Select Data > Get Data > From Power BI (<Tenant name>). The Power BI Datasets pane appears. <Tenant name> varies depending on your organization, for example, Power BI (Contoso).
-
If many Datasets are available, use the Search box. Select the arrow next to the box to display keyword filters for versions and environments to target your search.
-
Select a Dataset and create a PivotTable in a new worksheet. For more information, see Overview of PivotTables and PivotCharts.
For more information on Power BI, see Create a PivotTable from Power BI datasets and Data Management Experience in Power BI for Office 365 Help (docs.com).
A dataflow is a data preparation technology that enables ingesting, transforming, and loading data into Microsoft Dataverse environments, Power BI workspaces, or Azure Data Lake. You can trigger dataflows to run either on demand or automatically on a schedule so that data is always kept up to date.
-
Select Data > Get Data > From Power Platform > From Dataflows.
-
If prompted, enter the required credentials, or sign in as a different user. The Navigator pane appears.
-
Select the dataflow in the left pane to preview it in the right pane.
-
Do one of the following:
-
To add the data to a worksheet, select Load.
-
To add the data to the Power Query Editor, select Transform Data.
-
For more information, see An overview of dataflows across Microsoft Power Platform.
Use Dataverse to securely store and manage data in the cloud. You can create or import custom tables specific to your organization, populate them with data by using Power Query, and then use Power Apps or Microsoft Access to build rich business applications.
-
Select Data > Get Data > From Power Platform > From Dataverse.
-
If prompted, enter the required credentials, or sign in as a different user. The Navigator pane appears.
-
Select the data in the left pane to preview it in the right pane.
-
Do one of the following:
-
To add the data to a worksheet, select Load.
-
To add the data to the Power Query Editor, select Transform Data.
-
For more information, see What is Microsoft Dataverse.
-
Select Data > Get Data > From Online Services > From SharePoint Online List.
-
In the SharePoint Folder dialog box, enter the root URL for the SharePoint site not including any reference to a library, and then navigate to the library.
-
Select the 2.0 Beta SharePoint implementation, which enables Advanced options, so you can select a View mode:
All Retrieves all columns from a SharePoint List.
Default Retrieves the columns set in the Default View of a SharePoint List. -
As an alternative to 2.0 Beta, you can select 1.0, which corresponds to the earlier version of SharePoint.
For more information about advanced connector options, see SharePoint Online list (docs.com).
-
Select Data > Get Data > From Online Services from SharePoint Online List.
-
In the Microsoft Exchange dialog box enter your email address in the form of <alias>@<organization>.com
-
If you have many objects, use the Search box to locate an object or use he Display Options along with the Refresh button to filter the list.
-
Select or clear the Skip files with errors checkbox at the bottom of the dialog box.
-
Select the table you want: Calendar, Mail, Meeting Requests, People, and Tasks.
-
Do one of the following:
-
To create a query, and then load to a worksheet, select Load > Load.
-
To create a query, and then display the Import Data dialog box, select Load > Load To.
-
To create a query, and then launch the Power Query Editor, select Transform Data.
-
Select the Environment you want to connect to.
-
In the menu, select the Settings icon > Advanced customizations > Developer resources.
-
Copy the Instance Web API value.
Notes:
-
The url format will be something like https://<tenant>.crm.dynamics.com/api/data/v9.0.
-
The exact format of the URL you will use to connect depends on your region and the version of CDS for Apps you’re using. For more information see: Web API URL and versions (docs.com).
-
-
Select Data > Get Data > From Online Services > From Dynamics 365 (online).
-
In the dialog box, with the Basic option selected, enter the Web API URL for your CDS for Apps connection, and click OK.
-
If you select the Advanced option, you can append certain additional parameters to the query to control what data is returned. For more information see: Query Data using the Web API (docs.com).
-
-
Select Organization account.
-
If you aren’t signed in using the Microsoft Work or School account you use to access Dataverse for Apps, select Sign in and enter the account username and password.
-
-
Select Connect.
-
Within the Navigator dialog, select the data you want to retrieve.
-
Verify the data is correct, and then select Load or Edit to open the Power Query Editor.
-
Select Data > Get Data > From Online Services > From Salesforce Objects. The Salesforce Objects dialog box appears.
-
Select either Production or Custom. If you select Custom, enter the URL of a custom instance.
-
Select or clear Include relationships column.
-
Select OK.
For more information about advanced connector options, see Salesforce Objects (docs.com).
Because Salesforce Reports has API limits retrieving only the first 2,000 rows for each report, consider using the Salesforce Objects connector to work around this limitation if needed.
-
Select Data > Get Data > From Online Services > From Salesforce Reports. The Salesforce Reports dialog box appears.
-
Select either Production or Custom. If you select Custom, enter the URL of a custom instance.
-
Select or clear Include relationships column.
-
Select OK.
For more information about advanced connector options, see Salesforce Reports (docs.com).
Make sure you have the latest version of the Adobe Analytics connector. For more information, see Connect to Adobe Analytics in Power BI Desktop (docs.com).
-
Select Data > Get Data > From Online Services > From Adobe Analytics.
-
Select Continue. The Adobe Account dialog box appears.
-
Sign in with you Adobe Analytics Organizational account, and then select Connect.
For more information about advanced connector options, see Adobe Analytics.
For more information, see From Table/Range.
Important:
-
When you try to import a data from the web, you may get the following message: “This connector requires one or more additional components to be installed before it can be used.” The Web connector requires WebView 2 Framework to be installed on your computer.
-
You can download it from here.

Procedure
-
Select Data > New Query > From Other Sources > From Web.
-
In the From Web dialog box, enter a web page URL, then click OK.
In this case, we’re using: http://en.wikipedia.org/wiki/UEFA_European_Football_Championship.
If the web page requires user credentials:
-
Select Advanced, and then In the Access Web dialog box, enter your credentials.
-
Select Save.
-
-
Select OK.
-
In the Navigator pane, do the following:
Select Table View, such as Results.
Select Web View to see the table as a web page.
-
Select Load to load the data into a worksheet.

For more information about advanced connector options, see Web (docs.com).
-
Select Data > Get Data > From Other Sources > From SharePoint List.
-
In the Microsoft SharePoint Lists dialog box, enter the URL for a SharePoint site.
Note: When connecting to a SharePoint list, enter the site URL instead of the list URL. In the Access SharePoint dialog box, select the most general URL to authenticate against the site correctly. By default, the most general URL is selected.
-
Select OK.
-
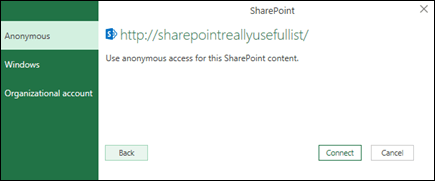
In the Access SharePoint dialog box, select a credentials option:
-
Select Anonymous if the SharePoint Server does not require any credentials.
-
Select Windows if the SharePoint Server requires your Windows credentials.
-
Select Organizational account if the SharePoint Server requires organizational account credentials.
-
-
Select Connect.
For more information about advanced connector options, see SharePoint list (docs.com).
-
Select Data > Get Data > From Other Sources > From OData Feed.
-
In the OData Feed dialog box, enter the URL for an OData feed.
-
Select OK.
-
If the OData feed requires user credentials, in the Access an OData feed dialog box:
-
Select Windows if the OData feed requires Windows Authentication.
-
Select Basic if the OData feed requires your username and password.
-
Select Marketplace key if the OData feed requires a Marketplace account key. You can select the Get your Marketplace Account Key to subscribe to Microsoft Azure Marketplace OData feeds. You can also Sign up for Microsoft Azure Marketplace from the Access an OData Feed dialog box.
-
Click Organizational account if the OData feed requires federated access credentials. For Windows Live ID, log into your account.
-
Select Save.
-
Note: Importing to an OData feed supports the JSON light data service format.
For more information about advanced connector options, see OData feed (docs.com).
Hadoop Distributed File System (HDFS) is designed to store terabytes and even petabytes of data. HDFS connects computer nodes within clusters over which data files are distributed and you can access these data files as one seamless file stream.
-
Select Data > Get Data > From Other Sources > From Hadoop File (HDFS).
-
Enter the name of the server in the Server box, and then select OK.
-
Select Data > Get Data > From Other Sources > From Active Directory.
-
Enter your domain in the Active Directory dialog box.
-
In the Active Directory Domain dialog box for your domain, select Use my current credentials, or select Use alternate credentials and then enter your Username and Password.
-
Select Connect.
-
After the connection succeeds, use the Navigator pane to browse all the domains available within your Active Directory, and then drill down into Active Directory information including Users, Accounts, and Computers.
-
Select Data > Get Data > From Other Sources > From Microsoft Exchange.
-
In the Access an Exchange Server dialog box, enter your Email Address and Password.
-
Select Save.
-
In the Microsoft Exchange Autodiscover Service dialog box, select Allow to allow the Exchange Service to trust your credentials.
-
Select Data > Get Data > From Other Sources > From ODBC.
-
In the From ODBC dialog box, if displayed, select your Data Source Name (DSN).
-
Enter your connection string, and then select OK.
-
In the next dialog box, select from Default or Custom, Windows, or Database connection options, enter your credentials, and then select Connect.
-
In the Navigator pane, select the tables or queries that you want to connect to, then select Load or Edit.
For more information about advanced connector options, see ODBC data source (docs.com).
-
Select Data > Get Data > From Other Sources > From OLEDB.
-
In the From OLE DB dialog box, enter your connection string, and then select OK.
-
In the OLEDB Provider dialog, select from the Default or Custom, Windows, or Database connection options, enter the appropriate credentials, and then select Connect.
-
In the Navigator dialog box, select the database, and tables or queries you want to connect to, and then select Load or Edit.
Important:
Retirement of Facebook data connector notice Import and refresh data from Facebook in Excel will stop working in April, 2020. You will still be able to use the Facebook Power Query (Get & Transform) connector until then, but starting in April, 2020, you will be unable to connect to Facebook and will receive an error message. We recommend revising or removing any existing Power Query (Get & Transform) queries that use the Facebook connector as soon as possible to avoid unexpected results.
Note: If this is the first time you’ve connected to Facebook, you will be asked to provide credentials. Sign in using your Facebook account, and allow access to the Power Query application. You can turn off future prompts by clicking the Don’t warn me again for this connector option.
-
On the Data tab, click Get Data > From Online Services > From Facebook. If you don’t see the Get Data button, click New Query > From Other Sources > From Facebook.
-
In the Facebook dialog box, connect to Facebook using “Me”, your Username, or Object ID.
Note: Your Facebook username is different from your login email.
-
Select a category to connect to from the Connection drop-down list. For example, select Friends to give you access to all information available in your Facebook Friends category.
-
Click OK.
-
If necessary, click Sign in from the Access Facebook dialog, then enter your Facebook email or phone number, and password. You can check the option to remain logged in. Once signed in, click Connect.
-
After the connection succeeds, you will be able to preview a table containing information about the selected category. For instance, if you select the Friends category, Power Query renders a table containing your Facebook friends by name.
-
Click Load or Edit.
You can create a blank query. You might want to enter data to try out some commands, or you can select the source data from Power Query:
-
To change a setting such as credentials or privacy, select Home > Data Source Settings. For more information, see Manage data source settings and permissions.
-
To import an external data source, select Home > New Source. This command is similar to the Get Data command on the Data tab of the Excel ribbon.
-
To import a recent source, select Home > Recent Sources. This command is similar to the Recent Sources command on the Data tab of the Excel ribbon.
When you append two or more queries, the data is added to a query based on the names of the column headers in both tables. If the queries don’t have matching columns, null values are added to the unmatched column. The queries are appended in the order in which they’re selected.
For more information, see Append queries (Power Query) and Append queries (docs.com).
If you are a developer, there are several approaches within Excel that you can take to import data:
-
You can use Visual Basic for Applications to gain access to an external data source. Depending on the data source, you can use either ActiveX Data Objects or Data Access Objects to retrieve the data. You can also define a connection string in your code that specifies the connection information. Using a connection string is useful, for example, when you want to avoid requiring system administrators or users to first create a connection file, or to simplify the installation of your application.
-
If you import data from an SQL Server database, consider using SQL Native Client, which is a standalone data access Application Programming Interface (API) that is used for both OLE DB and ODBC. It combines the SQL OLE DB Provider and the SQL ODBC Driver into one native, dynamic link library (DLL), while also providing new functionality that is separate and distinct from the Microsoft Data Access Components (MDAC). You can use SQL Native Client to create new applications or enhance existing applications that can take advantage of newer SQL Server features, such as Multiple Active Result Sets (MARS), User-Defined Types (UDT), and XML data type support.
-
The RTD function retrieves real-time data from a program that supports COM automation. The RTD COM automation add-in must be created and registered on a local computer.
-
The SQL.REQUEST function connects with an external data source and runs a query from a worksheet. The SQL.REQUEST function then returns the result as an array without the need for macro programming. If this function is not available, you must install the Microsoft Excel ODBC add-in program (XLODBC.XLA). You can install the add-in from Office.com.
For more information about creating Visual Basic for Applications, see Visual Basic Help.
-
Select Data > Get Data (Power Query).
-
In the Choose data source dialog box, select Excel workbook.
-
Select Browse to locate the file you want to connect as the data source.
-
In the File picker dialog box, select the file, review the file details, and then select Get Data and Next.
-
On the left, select the data you want to import, and then on the right, confirm the selection in data preview.
-
At the bottom right, select Load.
-
Select Data > Get Data (Power Query).
-
In the Choose data source dialog box, select Text/CSV.
-
Select Browse to locate the file you want to connect as the data source.
-
In the File picker dialog box, select the file, review the file details, and then select Get Data and Next.
-
Confirm the file origin and delimiter selection in data preview.
-
At the bottom right, select Load.
-
Select Data > Get Data (Power Query).
-
In the Choose data source dialog box, select XML.
-
Select Browse to locate the file you want to connect as the data source.
-
In the File picker dialog box, select the file, review the file details, and then select Get Data and Next.
-
On the left, select the data you want to import, and then on the right, confirm the selection in data preview.
-
At the bottom right, select Load.
-
Select Data > Get Data (Power Query).
-
In the Choose data source dialog box, select JASON.
-
Select Browse to locate the file you want to connect as the data source.
-
In the File picker dialog box, select the file, review the file details, and then select Get Data and Next.
-
At the bottom right, select Close & Load.
-
Select Data > Get Data (Power Query).
-
In the Choose data source dialog box, select SQL Server database.
-
Under Connection settings, enter the name of the server.
-
Under Connection credentials, enter the username and password, decide whether to use an encrypted connection, and then select Next.
-
On the left, select the data you want to import, and then on the right, confirm the selection in data preview.
-
At the bottom right, select Load.
-
Select Data > Get Data (Power Query).
-
In the Choose data source dialog box, select SharePoint Online list.
-
In the Connect to data source dialog box, enter the root URL for the SharePoint site not including any reference to a library, and then sign in to your organizational account.
-
Select the 2.0 SharePoint implementation, which enables Advanced options, so you can select a View mode:
-
All which retrieves all columns from a SharePoint List.
-
Default which retrieves the columns set in the Default View of a SharePoint List.
Note As an alternative to 2.0, you can select 1.0, which corresponds to the earlier version of SharePoint.
-
-
Select Next.
-
On the left, select the data you want to import, and then on the right, confirm the selection in data preview.
-
At the bottom right, select Load.
-
Select Data > Get Data (Power Query).
-
In the Choose data source dialog box, select OData.
-
In the OData Feed dialog box, enter the URL for the OData feed.
-
If the OData feed requires user credentials, in the Connection credentials dialog box under Authentication kind:
-
Select Basic if the OData feed requires your username and password.
-
Select Organizational account if the OData feed requires federated access credentials, and select Sign in.
-
-
Select Next.
-
Select Data > Get Data (Power Query).
-
In the Choose data source dialog box, select Blank table.
-
Enter the desired data to the cells of the table. You can also rename the table under Name at the bottom.
-
Select Next.
-
After editing the query, on the top-right select Close & load.
-
Select Data > Get Data (Power Query).
-
In the Choose data source dialog box, select Blank query.
-
Enter the desired source and commands and then select Next.
-
After editing the query, on the top-right select Close & load.
You can use the Power Query add-in to connect to external data sources and perform advanced data analyses. The following sections provide steps for connecting to your data sources — web pages, text files, databases, online services, and Excel files, tables, and ranges.
Important: Before you can use Power Query in Excel 2013, you must activate it: click File > Options > Add-Ins. In the Manage section at the bottom, choose the COM Add-ins option from the drop-down list, then click Go. Click the Power Query check box, then OK. The Power Query ribbon should appear automatically, but if it doesn’t, close and restart Excel.
Using the Query Editor
Note: The Query Editor appears when you load, edit, or create a new query using Power Query. The following video shows the Query Editor window appearing after editing a query from an Excel workbook. To view the Query Editor without loading or editing an existing workbook query, from the Get External Data section in the Power Query ribbon tab, select From Other Sources > Blank Query. The following video shows one way to display the Query Editor.
-
In the Power Query ribbon tab, click From File > From CSV, or From Text.
-
In the Comma-Separated Values Browse dialog box, browse for or type a path to the file that you want to query.
-
Click Open.
Note: If you are importing data from a CSV file, Power Query will automatically detect column delimiters including column names and types. For example, if you imported the example CSV file below, Power Query automatically uses the first row as the column names and changes each column data type.
Example CSV file
Power Query automatically changes each column data type:
-
Order ID changes to number
-
Order Date changes to date
-
Category remains text (the default column type)
-
Product Name remains text (the default column type)
-
Sales changes to number
In the Query Editor, Power Query automatically applies a FirstRowAsHeader step and ChangeType step. These automatic actions are equivalent to manually promoting a row and manually changing each column type.
After Power Query auto detects columns, you can also use the Query Editor to write formulas for Power Query. For example:
= Csv.Document(File.Contents("C:ExamplesProducts Categories and Orders.csv"),null,",",null,1252)

= Table.PromoteHeaders(Source)

= Table.TransformColumnTypes(FirstRowAsHeader,{{"OrderID", type number}, {"CustomerID", type text}, {"EmployeeID", type number}, {"OrderDate", type date}, {"RequiredDate", type date}, {"ShipName", type text}})
Note: The Query Editor only appears when you load, edit, or create a new query using Power Query. The following video shows the Query Editor window in Excel 2013 appearing after editing a query from an Excel workbook. To view the Query Editor without loading or editing an existing workbook query, from the Get External Data section in the Power Query ribbon tab, select From Other Sources > Blank Query. The following video shows one way to display the Query Editor.
-
Select any cell within your data range.
-
In the Power Query ribbon tab, click From Table.
-
If prompted, in the From Table dialog box, you can click the Range Selection button to select a specific range to use as a data source.
-
If the range of data has column headers, you can check My table has headers. The range header cells are used to set the column names for the query.
-
In the Query Editor, click Close & Load.
Note: If your data range has been defined as a named range, or is in an Excel table, then Power Query will automatically sense the entire range and load it into the Query Editor for you. Plain data will automatically be converted to a table when it is loaded into the Query Editor.
You can use the Query Editor to write formulas for Power Query.
= Excel.CurrentWorkbook(){[Name="Table1"]}[Content]

Note: The Query Editor only appears when you load, edit, or create a new query using Power Query. The following video shows the Query Editor window appearing after editing a query from an Excel workbook. To view the Query Editor without loading or editing an existing workbook query, from the Get External Data section in the Power Query ribbon tab, select From Other Sources > Blank Query. The following video shows one way to display the Query Editor.
-
In the Power Query ribbon tab, click From File > From Excel.
-
In the Excel Browse dialog box, browse for or type a path to the file that you want to query.
-
Click Open.
If your source workbook has named ranges, the name of the range will be available as a data set.
You can also use the Query Editor to write formulas for Power Query. For example:
= Excel.Workbook
 (File.Contents("C:ExampleProducts and Orders.xlsx"))
Note: The Query Editor only appears when you load, edit, or create a new query using Power Query. The following video shows the Query Editor window in Excel 2013 appearing after editing a query from an Excel workbook. To view the Query Editor without loading or editing an existing workbook query, from the Get External Data section in the Power Query ribbon tab, select From Other Sources > Blank Query. The following video shows one way to display the Query Editor.
Note: While trying to import data from a legacy Excel file or an Access database in certain setups, you may encounter an error that the Microsoft Access Database Engine (Microsoft.ACE.OLEDB.12.0 provider) is not registered on the local machine. The error occurs on systems with only Office 2013 installed. To resolve this error, download the following resources to ensure that you can proceed with the data sources you are trying to access.
-
Microsoft Access Database Engine 2010 Redistributable
-
Access Database Engine 2010 Service Pack 1
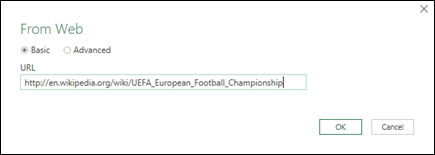
-
Click the Power Query ribbon, then From Web.
-
In the From Web dialog box, enter a web page URL, then OK.
In this case, we’re using: http://en.wikipedia.org/wiki/UEFA_European_Football_Championship.
If the web page requires user credentials:
-
In the Access Web dialog box, click a credentials option, and provide authentication values.
-
Click Save.
-
-
Click OK.
-
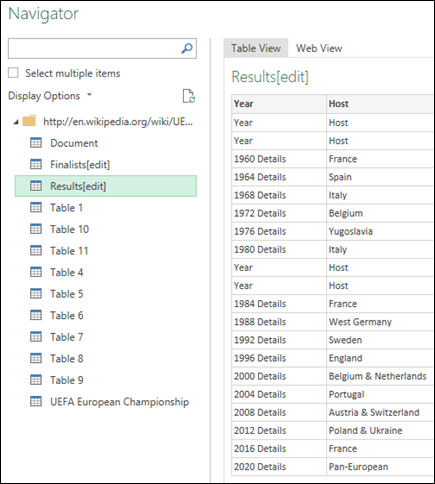
Power Query will analyze the web page, and load the Navigator pane in Table View.
If you know which table you want to connect to, then click it from the list. For this example, we chose the Results table.
Otherwise, you can switch to the Web View and pick the appropriate table manually. In this case, we’ve selected the Results table.
-
Click Load, and Power Query will load the web data you selected into Excel.
-
In the Power Query ribbon tab, click From Database > From SQL Server Database.
-
In the Microsoft SQL Database dialog box, specify the SQL Server to connect to in the Server Name box. Optionally, you can specify a Database Name as well.
-
If you want to import data using a native database query, specify your query in the SQL Statement box. For more information, see Import Data from Database using Native Database Query.
-
Select OK.
-
Select the authentication mode to connect to the SQL Server database.
-
Windows: This is the default selection. Select this if you want to connect using Windows authentication.
-
Database: Select this if you want to connect using SQL Server authentication. After you select this, specify a user name and password to connect to your SQL Server instance.
-
-
By default, the Encrypt connection check box is selected to signify that Power Query connects to your database using an encrypted connection. If you do not want to connect using an encrypted connection, clear this check box, and then click Connect.
If a connection to your SQL Server is not established using an encrypted connection, Power Query prompts you to connect using an unencrypted connection. Click OK in the message to connect using an unencrypted connection.
Formula Example
You can also use the Query Editor to write formulas for Power Query.
= Sql.Databases(".")
= Sql.Database(".","Contoso")
-
Click the Power Query tab on the Ribbon, then select Get External Data > From Other Sources > From ODBC.
-
In the From ODBC dialog, if displayed, select your Data Source Name (DSN).
-
Enter your connection string, then press OK.
-
In the next dialog box, select from Default or Custom, Windows, or Database connection options, enter your credentials, then press Connect.
-
In the Navigator pane, select the tables or queries that you want to connect to, then press Load or Edit.
-
In the Power Query ribbon tab, select From Database > From Access Database.
-
In the Browse dialog box, browse for or type a file URL to import or link to a file.
-
Follow the steps in the Navigator dialog to connect to the table or query of your choice.
-
Click Load or Edit.

-
In the Power Query ribbon tab, click From File > From XML.
-
In the From XML Browse dialog box, browse for or type a file URL to import or link to a file.
-
Click Open.
After the connection succeeds, you will be able to use the Navigator pane to browse and preview the collections of items in the XML file in a tabular form.

You can also use the Query Editor to write formulas for Power Query. For example:
= Xml.Tables(File.Contents("C:DownloadsXML Example.xml"))
Note: The Query Editor only appears when you load, edit, or create a new query using Power Query. The following video shows the Query Editor window appearing after editing a query from an Excel workbook. To view the Query Editor without loading or editing an existing workbook query, from the Get External Data section in the Power Query ribbon tab, select From Other Sources > Blank Query. The following video shows one way to display the Query Editor.
-
On the Data tab, in the Get External Data group, click From Other Sources, and then click From Analysis Services.
The Data Connection Wizard is displayed. This wizard has three panes.
-
Connect to Database Server
-
Select Database and Table
-
Save Data Connection File and Finish
-
-
In the Connect to Database Server pane, in the Server name box, type the name of the OLAP database server.
Tip: If you know the name of the offline cube file that you want to connect to, you can type the complete file path, file name, and extension.
-
Under Log on credentials, do one of the following, then click Next:
-
To use your current Windows user name and password, click Use Windows Authentication.
-
To enter a database user name and password, click Use the following User Name and Password, and then type your user name and password in the corresponding User Name and Password boxes.
-
-
In the Select the database that contains the data you want pane, select a database, then click Next.
To connect to a specific cube in the database, make sure that Connect to a specific cube or table is selected, and then select a cube from the list.
-
In the Save Data Connection File and Finish pane, in the File Name box, revise the default file name as needed (optional).
Click Browse to change the default file location of My Data Sources, or check for existing file names.
-
In the Description, Friendly Name, and Search Keywords boxes, type a description of the file, a friendly name, and common search words (all are optional).
-
To ensure that the connection file is used when the PivotTable is refreshed, click Always attempt to use this file to refresh this data.
Selecting this check box ensures that updates to the connection file will always be used by all workbooks that use that connection file.
-
Click Finish to close the Data Connection Wizard.
-
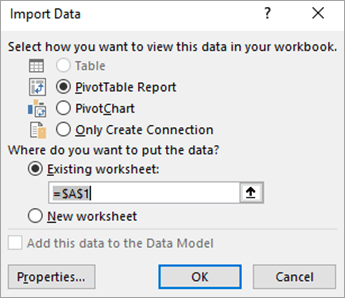
In the Import Data dialog box, under Select how you want to view this data in your workbook, do one of the following:
-
To create just a PivotTable report, click PivotTable Report.
-
To create a PivotTable report and a PivotChart report, click PivotChart and PivotTable Report.
-
To store the selected connection in the workbook for later use, click Only Create Connection. This check box ensures that the connection is used by formulas that contain Cube functions that you create and that you don’t want to create a PivotTable report.
-
-
Under Where do you want to put the data, do one of the following:
-
To place the PivotTable report in an existing worksheet, select Existing worksheet, and then type the cell reference of the first cell in the range of cells where you want to locate the PivotTable report.
You can also click Collapse Dialog
to temporarily hide the dialog box, select the beginning cell on the worksheet that you want to use, and then press Expand Dialog .
-
-
To place the PivotTable report in a new worksheet starting at cell A1, click New worksheet.
-
To verify or change connection properties, click Properties, make the necessary changes in the Connection Properties dialog box, and then click OK.

 to temporarily hide the dialog box, select the beginning cell on the worksheet that you want to use, and then press Expand Dialog
  .
.-
On the Power Query tab, click From Other Sources > Blank Query.
-
In the Query Editor, click Advanced Editor.
-
Input your query string as follows, replacing «C:UsersNameDesktopJSONTest.json» with the path to your JSON file.
let

    Source = Json.Document(File.Contents("C:UsersNameDesktopJSONTest.json")),
    #"Converted to Table" = Record.ToTable(Source)

in

    #"Converted to Table"
-
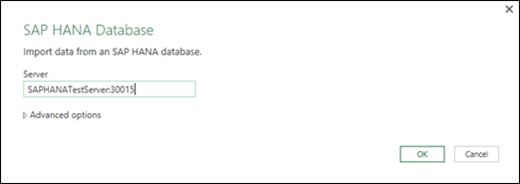
In the Power Query ribbon tab, click From Database > From Oracle Database.
-
In the Oracle Database dialog box, in Server Name specify the Oracle Server to connect to. If a SID is required, this can be specified in the form of “ServerName/SID”.
-
If you want to import data using native database query, specify your query in the SQL Statement box. For more information, see Import Data from Database using Native Database Query.
-
Click OK.
-
If the Oracle server requires database user credentials:
-
In the Access a Database dialog box, enter your username and password.
-
Click Connect.
-
-
In the Power Query ribbon tab, select From Other Sources > From SharePoint List.
-
In the Microsoft SharePoint Lists dialog box that appears, enter the URL for a SharePoint site.
Note: When connecting to a SharePoint list, enter the site URL instead of the list URL. In the Access SharePoint dialog box, select the most general URL to authenticate against the site correctly. By default, the most general URL is selected.
-
Select OK to continue.
-
In the Access SharePoint dialog box that appears next, select a credentials option:
-
Select Anonymous if the SharePoint Server does not require any credentials.
-
Select Windows if the SharePoint Server requires your Windows credentials.
-
Select Organizational account if the SharePoint Server requires organizational account credentials.
-
-
Select Connect.

-
In the Power Query ribbon tab, select From Other Source > From OData Feed.
-
In the OData Feed dialog box, enter the URL for an OData feed.
-
Select OK.
-
If the OData feed requires user credentials, in the Access an OData feed dialog box:
-
Select Windows if the OData feed requires Windows Authentication.
-
Select Basic if the OData feed requires your username and password.
-
Select Marketplace key if the OData feed requires a Marketplace account key. You can select the Get your Marketplace Account Key to subscribe to Microsoft Azure marketplace OData feeds. You can also Sign up for Microsoft Azure Marketplace from the Access an OData Feed dialog box.
-
Click Organizational account if the OData feed requires federated access credentials. For Windows Live ID, log into your account.
-
Select Save.
-
Note: Connect to an OData feed supports the JSON light data service format.
-
Click the Data tab, then Get Data > From Other Sources > From OLEDB. If you don’t see the Get Data button, follow the Data Connection Wizard instructions below.
-
In the From OLE DB dialog, enter your connection string, then press OK.
-
In the OLEDB Provider dialog, select from the Default or Custom, Windows, or Database connection options, enter the appropriate credentials, then click Connect.
-
In the Navigator dialog, select the Database and tables or queries you want to connect to, then press Load or Edit.
-
In the Power Query Editor, press Close & Load.
-
In the Power Query ribbon tab, click From Database > From MySQL Database.
-
In the MySQL Database dialog box, in Server Name specify the MySQL Database Server to connect to.
-
If you want to import data using native database query, specify your query in the SQL Statement box. For more information, see Import Data from Database using Native Database Query.
-
Click OK.
-
If the MySQL server requires database user credentials:
-
In the Access a Database dialog box, enter your username and password.
-
Click Connect.
-
-
In the Power Query ribbon tab, select From Other Sources > From Microsoft Exchange.
-
In the Access an Exchange Server dialog box, specify your Email Address and Password.
-
Click Save.
-
In the Microsoft Exchange Autodiscover Service dialog box, select Allow to allow the Exchange Service to trust your credentials.
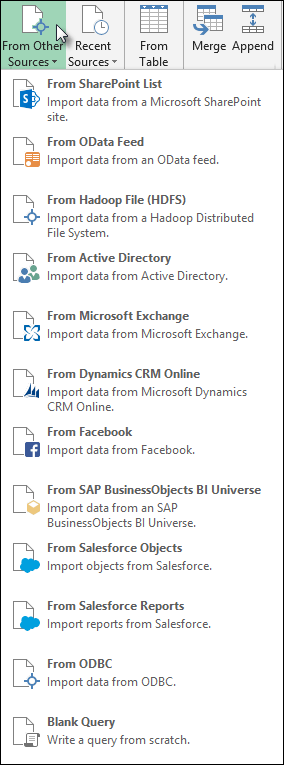
Important: Make sure you have downloaded and installed the Power Query Add-In.
-
In the Power Query ribbon tab, click From Other Sources > From Active Directory.
-
Enter your domain in the Active Directory dialog box.
-
In the Active Directory Domain dialog box for your domain, click Use my current credentials, or Use alternate credentials. For Use alternate credentials authentication, enter your Username and Password.
-
Click Connect.
-
After the connection succeeds, you can use the Navigator pane to browse all the domains available within your Active Directory, and drill down into Active Directory information including Users, Accounts, and Computers.
Warning:
-
Before you can connect to an IBM DB2 database, you need the IBM DB2 Data Server Driver installed on your computer (minimum requirement is the IBM Data Server Driver Package (DS Driver)). Select the driver that matches your Power Query installation (32-bit or 64-bit).
-
There are known issues reported by IBM installing the IBM DB2 Data Server Driver on Windows 8. If you are using Windows 8 and want to connect to IBM DB2 using Power Query, you need to follow additional installation steps. Find more information about the IBM DB2 Data Server Driver on Windows 8.
-
In the Power Query ribbon tab, click From Database > From IBM DB2 Database.
-
In the IBM DB2 Database dialog box, in Server Name specify the IBM DB2 Database Server to connect to.
-
If you want to import data using native database query, specify your query in the SQL Statement box. For more information, see Import Data from Database using Native Database Query.
-
Click OK.
-
If the IBM DB2 server requires database user credentials:
-
In the Access a Database dialog box, enter your username and password.
-
Click Connect.
-
Note: Before you can connect to a PostgreSQL database in Power Query, you need the Ngpsql data provider for PostgreSQL installed on your computer. Select the driver that matches your Office version (32-bit or 64-bit). See: Which version of Office am I using? for more information. Also make sure you have the provider registered in the machine configuration that matches the most recent .NET version on your device.
-
In the Power Query ribbon tab, select From Database > From PostgreSQL Database.
-
In the PostgreSQL Database dialog box, specify the PostgreSQL Database Server you want to connect to in the Server Name section.
-
If you want to import data using native database query, specify your query in the SQL Statement box. For more information, see Import Data from Database using Native Database Query.
-
Select OK.
-
If the PostgreSQL server requires database user credentials:
-
In the Access a Database dialog box, enter your username and password.
-
Select Connect.
-
-
Navigate to https://web.powerapps.com/
-
Select the Environment you want to connect to.
-
In the menu, select the Settings icon > Advanced customizations > Developer resources.
-
Copy the Instance Web API value.
Notes:
-
The url format will be something like https://<tenant>.crm.dynamics.com/api/data/v9.0.
-
The exact format of the URL you will use to connect depends on your region and the version of CDS for Apps you’re using. For more information see: Web API URL and versions (docs.com).
-
-
Select the Data tab, then Get Data > From Online Services > From Dynamics 365 (online).
-
If you don’t see the Get Data button, click New Query > From Other Sources > From Dynamics 365 (online).
-
-
In the dialog box, with the Basic option selected, enter the Web API URL for your CDS for Apps connection, and click OK.
-
If you select the Advanced option, you can append certain additional parameters to the query to control what data is returned. For more information see: Query Data using the Web API.
-
-
Select Organization account.
-
If you aren’t signed in using the Microsoft Work or School account you use to access CDS for Apps, click Sign in and enter the account username and password.
-
-
Click Connect.
-
Within the Navigator dialog, select the data you want to retrieve.
-
If the data is good to be imported as is, then select the Load option, otherwise choose the Edit option to open the Power Query Editor.
Note: The Power Query Editor gives you multiple options to modify the data returned. For instance, you might want to import fewer columns than your source data contains. In that case, go to the Home tab > Manage Columns > Choose Columns, select the columns you want to keep, then click OK. When you’re ready, click Close & Load to return the modified data to Excel.
-
In the Power Query ribbon tab, select From Database > From Teradata Database.
-
In the Teradata Database dialog box, in Server Name specify the Teradata Server to connect to.
-
If you want to import data using native database query, specify your query in the SQL Statement box. For more information, see Import Data from Database using Native Database Query.
-
Select OK.
-
If the Teradata server requires database user credentials:
-
In the Access a Database dialog box, enter your username and password.
-
Click Save.
-
Important:
Retirement of Facebook data connector notice Import and refresh data from Facebook in Excel will stop working in April, 2020. You will still be able to use the Facebook Get & Transform (Power Query) connector until then, but starting in April, 2020, you will be unable to connect to Facebook and will receive an error message. We recommend revising or removing any existing Get & Transform (Power Query) queries that use the Facebook connector as soon as possible to avoid unexpected results.
Note: If this is the first time you’ve connected to Facebook, you will be asked to provide credentials. Sign in using your Facebook account, and allow access to the Power Query application. You can turn off future prompts by clicking the Don’t warn me again for this connector option.
-
In the Power Query ribbon tab, click From Other Sources > From Facebook.
-
In the Facebook dialog box, connect to Facebook using “Me”, your Username, or Object ID.
Note: Your Facebook username is different from your login email.
-
Select a category to connect to from the Connection drop-down list. For example, select Friends to give you access to all information available in your Facebook Friends category.
-
Click OK.
-
If necessary, click Sign in from the Access Facebook dialog, then enter your Facebook email or phone number, and password. You can check the option to remain logged in. Once signed in, click Connect.
-
After the connection succeeds, you will be able to preview a table containing information about the selected category. For instance, if you select the Friends category, Power Query renders a table containing your Facebook friends by name.
-
Click Load or Edit.
You can use the Query Editor to write formulas for Power Query.
= Facebook.Graph("https://graph.facebook.com/v2.8/me/friends")
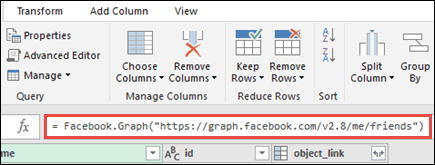
Note: The Query Editor only appears when you load, edit, or create a new query using Power Query. The following video shows the Query Editor window appearing after editing a query from an Excel workbook. To view the Query Editor without loading or editing an existing workbook query, from the Get External Data section in the Power Query ribbon tab, select From Other Sources > Blank Query. The following video shows one way to display the Query Editor.
Notes:
-
Before you can connect to an SAP SQL Anywhere database, you need the SAP SQL Anywhere driver installed on your computer. Select the driver that matches your Power Query installation (32-bit or 64-bit).
-
In the POWER QUERY ribbon tab, select From Database > From SAP Sybase SQL Anywhere.
-
In the Sybase Database dialog box, specify the Sybase Server to connect to in the Server Name box. Optionally, you can specify a Database Name as well.
-
If you want to import data using a native database query, specify your query in the SQL Statement box. For more information, see Import Data from Database using Native Database Query.
-
Click OK.
-
By default, the Encrypt connection check box is selected so that Power Query connects to your database using a simple encrypted connection.
-
Click Connect.
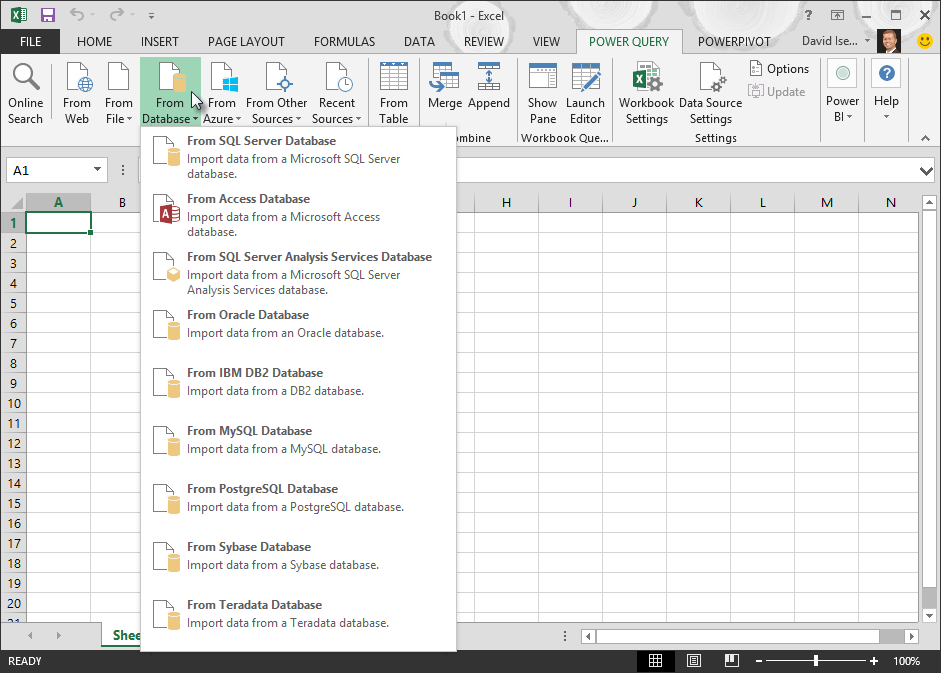
Microsoft Azure Blob Storage is a service for storing large amounts of unstructured data, like images, videos, audio, and documents, which can be accessed from anywhere in the world via HTTP or HTTPS. For more information about Azure Blob Storage service, see How to Use Blob Storage.
-
In the Power Query ribbon tab, select From Azure > From Microsoft Azure Blob Storage.
-
In the Microsoft Azure Blob Storage dialog box, enter your Microsoft Azure storage account name or URL, and then click OK.
-
If you are connecting to the Blob storage service for the first time, you will be prompted to enter and save the storage access key. In the Access Microsoft Azure Blob Storage dialog box, enter your storage access key in the Account Key box, and click Save.
Note: If you need to retrieve your storage access key, browse to the Microsoft Azure Portal, select your storage account, and then click on the Manage Access Key icon on the bottom of the page. Click on the copy icon to the right of the primary key, and then paste the value in the Account Key box.
-
The Query Editor lists all the available containers in your Microsoft Azure Blob Storage. In the Navigator, select a container from where you want to import data, and then click Apply & Close.
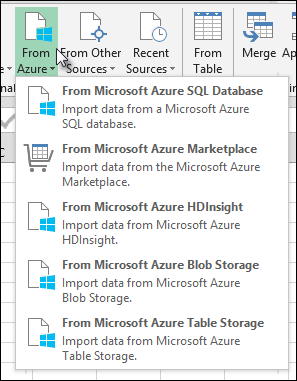
-
In the POWER QUERY ribbon tab, select From Azure > From Microsoft Azure HDInsight.
-
In the Microsoft Azure HDInsight dialog box, enter an Account Name and click OK.
-
Next, enter your Account Key, and click Connect.
Note: If you need to retrieve your key, return to the Microsoft Azure Portal, select your storage account, and click on the Manage Access Key icon on the bottom of the page. Click on the copy icon to the right of the primary key and paste the value into the wizard.
-
Select your cluster in the Navigator dialog, and then find and select a content file.
-
Click Load to load the selected table, or click Edit to perform additional data filters and transformations before loading it.
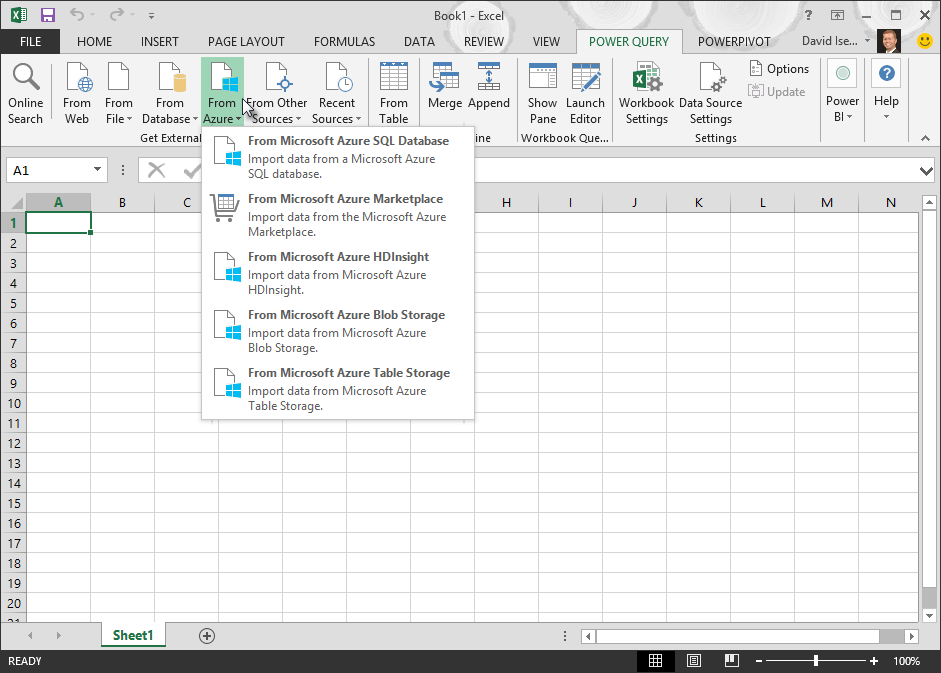
If you are a developer, there are several approaches within Excel that you can take to import data:
-
You can use Visual Basic for Applications to gain access to an external data source. Depending on the data source, you can use either ActiveX Data Objects or Data Access Objects to retrieve the data. You can also define a connection string in your code that specifies the connection information. Using a connection string is useful, for example, when you want to avoid requiring system administrators or users to first create a connection file, or to simplify the installation of your application.
-
If you import data from an SQL Server database, consider using SQL Native Client, which is a standalone data access Application Programming Interface (API) that is used for both OLE DB and ODBC. It combines the SQL OLE DB Provider and the SQL ODBC Driver into one native, dynamic link library (DLL), while also providing new functionality that is separate and distinct from the Microsoft Data Access Components (MDAC). You can use SQL Native Client to create new applications or enhance existing applications that can take advantage of newer SQL Server features, such as Multiple Active Result Sets (MARS), User-Defined Types (UDT), and XML data type support.
-
The RTD function retrieves real-time data from a program that supports COM automation. The RTD COM automation add-in must be created and registered on a local computer.
-
The SQL.REQUEST function connects with an external data source and runs a query from a worksheet. The SQL.REQUEST function then returns the result as an array without the need for macro programming. If this function is not available, you must install the Microsoft Excel ODBC add-in program (XLODBC.XLA). You can install the add-in from Office.com.
For more information about creating Visual Basic for Applications, see Visual Basic Help.
See Also
Power Query for Excel Help
Import data from database using native database query
Use multiple tables to create a PivotTable
Import data from a database in Excel for Mac
Getting data (docs.com)
Представьте себе ситуацию, Вы получили целевую выборку из одной базы данных, но для полноты картины, как всегда, нужны дополнительные данные. Проблема может быть в том, что нужная информация хранится в другой базе данных и возможности создать на ней свою таблицу нет, подключиться используя link тоже нельзя, да и количество элементов, по которым нужно получить данные, несколько больше, чем допустимое на данном источнике. Вот и получается, что возможность написать SQL запрос и получить нужные данные есть, но написать придется не один запрос, а потом потратить время на объединение полученных данных.
Выйти из подобной ситуации поможет Excel.
Уверен, что ни для кого не секрет, что MS Excel имеет встроенный модуль VBA и надстройки, позволяющие подключаться к внешним источникам данных, то есть по сути является мощным инструментом для аналитики, а значит идеально подходит для решения подобных задач.
Для того чтобы обойти проблему, нам потребуется таблица с целевой выборкой, в которой содержатся идентификаторы, по которым можно достаточно корректно получить недостающую информацию (это может быть уникальный идентификатор, назовем его ID, или набор из данных, находящихся в разных столбцах), ПК с установленным MS Excel, и доступом к БД с недостающей информацией и, конечно, желание получить ту самую информацию.
Создаем в MS Excel книгу, на листе которой размещаем таблицу с идентификаторами, по которым будем в дальнейшем формировать запрос (если у нас есть уникальный идентификатор, для обеспечения максимальной скорости обработки таблицу лучше представить в виде одного столбца), сохраняем книгу в формате *.xlsm, после чего приступаем к созданию макроса.
Через меню «Разработчик» открываем встроенный VBA редактор и начинаем творить.
Sub job_sql() — Пусть наш макрос называется job_sql.
Пропишем переменные для подключения к БД, записи данных и запроса:
Dim cn As ADODB.Connection
Dim rs As ADODB.Recordset
Dim sql As String
Опишем параметры подключения:
sql = «Provider=SQLOLEDB.1;Integrated Security=SSPI;Persist Security Info=True;Data Source=Storoge.company.ru Storoge.»
Объявим процедуру свойства, для присвоения значения:
Set cn = New ADODB.Connection
cn.Provider = » SQLOLEDB.1″
cn.ConnectionString = sql
cn.ConnectionTimeout = 0
cn.Open
Вот теперь можно приступать непосредственно к делу.
Организуем цикл:
For i = 2 To 1000
Как вы уже поняли конечное значение i=1000 здесь только для примера, а в реальности конечное значение соответствует количеству строк в Вашей таблице. В целях унификации можно использовать автоматический способ подсчета количества строк, например, вот такую конструкцию:
Dim LastRow As Long
LastRow = ActiveSheet.UsedRange.Row — 1 + ActiveSheet.UsedRange.Rows.Count
Тогда открытие цикла будет выглядеть так:
For i = 2 To LastRow
Как я уже говорил выше MS Excel является мощным инструментом для аналитики, и возможности Excel VBA не заканчиваются на простом переборе значений или комбинаций значений. При наличии известных Вам закономерностей можно ограничить объем выгружаемой из БД информации путем добавления в макрос простых условий, например:
If Cells(i, 2) = «Ваше условие» Then
Итак, мы определились с объемом и условиями выборки, организовали подключение к БД и готовы формировать запрос. Предположим, что нам нужно получить информацию о размере ежемесячного платежа [Ежемесячный платеж] из таблицы [payments].[refinans_credit], но только по тем случаям, когда размер ежемесячного платежа больше 0
sql = «select [Ежемесячный платеж] from [PAYMENTS].[refinans_credit] » & _
«where [Ежемесячный платеж]>0 and [Номер заявки] ='» & Cells(i, 1) & «‘ «
Если значений для формирования запроса несколько, соответственно прописываем их в запросе:
«where [Ежемесячный платеж]>0 and [Номер заявки] = ‘» & Cells(i, 1) & «‘ » & _
» and [Дата платежа]='» & Cells(i, 2) & «‘»
В целях самоконтроля я обычно записываю сформированный макросом запрос, чтобы иметь возможность проверить его корректность и работоспособность, для этого добавим вот такую строчку:
Cells(i, 3) = sql
в третьем столбце записываются запросы.
Выполняем SQL запрос:
Set rs = cn.Execute(sql)
А чтобы хоть как-то наблюдать за выполнением макроса выведем изменение i в статус-бар
Application.StatusBar = «Execute script …» & i
Application.ScreenUpdating = False
Теперь нам нужно записать полученные результаты. Для этого будем использовать оператор Do While:
j = 0
Do While Not rs.EOF
For ii = 0 To rs.Fields.Count — 1
Cells(i, 4 + j + ii) = rs.Fields(0 + ii) ‘& «;»
Указываем ячейки для вставки полученных данных (4 в примере это номер столбца с которого начинаем запись результатов)
Next ii
j = j + rs.Fields.Count
s.MoveNext
Loop
rs.Close
End If
— закрываем цикл If, если вводили дополнительные условия
Next i
cn.Close
Application.StatusBar = «Готово»
End Sub
— закрываем макрос.
В дополнение хочу отметить, что данный макрос позволяет обращаться как к БД на MS SQL так и к БД Oracle, разница будет только в параметрах подключения и собственно в синтаксисе SQL запроса.
В приведенном примере для авторизации при подключении к БД используется доменная аутентификация.
А как быть если для аутентификации необходимо ввести логин и пароль? Ничего невозможного нет. Изменим часть макроса, которая отвечает за подключение к БД следующим образом:
sql = «Provider= SQLOLEDB.1;Password=********;User ID=********;Data Source= Storoge.company.ru Storoge;APP=SFM»
Но в этом случае при использовании макроса возникает риск компрометации Ваших учетных данных. Поэтому лучше программно удалять учетные данные после выполнения макроса. Разместим поля для ввода пароля и логина на листе и изменим макрос следующим образом:
sql = «Provider= SQLOLEDB.1;Password=» & Sheets(«Лист аутентификации»).TextBox1.Value & «;User ID=» & Sheets(«Лист аутентификации «).TextBox2.Value & «;Data Source= Storoge.company.ru Storoge;APP=SFM»
Место для расположения текстовых полей не принципиально, можно расположить их на листе с таблицей в первых строках, но мне удобней размещать поля на отдельном листе. Чтобы введенные учетные данные не сохранялись вместе с результатом выполнения макроса в конце исполняемого кода дописываем:
Sheets(«Выгрузка»).TextBox1.Value = «« Sheets(»Выгрузка«).TextBox2.Value = »»
То есть просто присваиваем текстовым полям пустые значения, таким образом после выполнения макроса поля для ввода пароля и логина окажутся пустыми.
Вот такое вполне жизнеспособное решение, позволяющее сократить трудозатраты при получении и обработке данных, я использую. Надеюсь мой опыт применения SQL запросов в Excel будет полезен и вам в решении текущих задач.
I caught a post on the OTN forum asking how to do this, and it happened to be something I’m working on for a new course that I’ll be teaching on data analytics. Ultimately, Microsoft Excel is the de facto tool of many accounts and financial analysts, protests notwithstanding.
This shows you how to query an Oracle 11g database from Excel 2007 (only available when you do a FULL install of Excel 2007). Actually, it should work on any current version of the Oracle database. The key to making this work is having the Oracle 10g Client software or an Oracle 11g database on the same machine. The Oracle client software allows you to resolve an Oracle Network Alias (found in the %ORACLE_HOME%networkadmintnsnames.ora file).
Here are the instructions with screen shots:
1. Click on the Data ribbon, and then click on the From Other Sources icon in the Get External Data section, as shown:

2. When you click on the From Other Sources icon, you’ll get the following drop down list. Click on the From Data Connection Wizard item.

3.The Data Connection Wizard provides a number of Microsoft data sources, but you click the Other/Advanced option to connect to an Oracle database.

4. The Other/Advanced selection launches the Data Link Properties dialog with the Provider tab open and active. Click the Oracle Provider for OLE DB choice. If you don’t have the Oracle Provider for OLE DB option, download the Oracle Data Access Components for Windows from Oracle site. The installation should also load it as a new data source, if not you can follow the same instructions provided for MySQL’s ODBC here. After clicking the Oracle Provider for OLE DB choice, you click the Next button.

5. The Next button brings you to the Connection tab. You should fill it out as noted below, and if you wish check the Allow saving password checkbox.

6. Before preceding, you should verify that the connection works. Click the Test Connection button to do that, and if successful you’ll see the following. Click the OK button in the Microsoft Data Link dialog to complete the test and the OK button in the Data Link Properties dialog.

7. After setting up the data connection in the Data Link Properties dialog, you’ll be taken to the Data Connection Wizard dialog. Here you can pick any table that you have access to within the PL/SQL schema (remember a schema in Oracle is a database in Microsoft SQL Server or MySQL). Click the Next button to continue.

8. After clicking the Next button, you’ll see the second Data Connection Wizard dialog. Click the Finish button to begin importing the data.

9. The Import Data dialog asks you how and where you want to import it. The following chooses to import it as an ordinary table. Click the OK button to import the data from a table. If you want to write a query against one or more tables, click here for the additional instructions.

10. Imports into Excel 2007 as a table are automatically created as a table. The following screen shot formats the display columns.

You have a number of very advantageous features in Excel 2007. They allow a number of options that resemble working within a database but honestly they’re much more difficult than working in SQL. I’d advise you create preformatted data by using views. Then, query the views through these steps.