
Excel for Microsoft 365 Excel 2021 Excel 2019 Excel 2016 Excel 2013 Excel 2010 Excel 2007 More…Less
To select all cells on a worksheet, use one of the following methods:
-
Click the Select All button.

-
Press CTRL+A.
Note If the worksheet contains data, and the active cell is above or to the right of the data, pressing CTRL+A selects the current region. Pressing CTRL+A a second time selects the entire worksheet.
Tip If you want to select all cells in the active range, press CTRL+SHIFT+*.
Need more help?
Want more options?
Explore subscription benefits, browse training courses, learn how to secure your device, and more.
Communities help you ask and answer questions, give feedback, and hear from experts with rich knowledge.
Содержание
- Select cell contents in Excel
- Select one or more cells
- Select one or more rows and columns
- Select table, list or worksheet
- Need more help?
- Select worksheets
- Need more help?
- 7 Keyboard Shortcuts for Selecting Cells and Ranges in Excel
- Video Tutorial
- Download the Excel File
- Keyboard Shortcuts to Select Cells
- 1. Select the Last Used Cell
- 2. Select the First Visible Cell
- 3. Select Last Cell in Contiguous Range
- An Alternative Using the Mouse
- 4. Add Cells to the Selected Range
- 5. Select Multiple Cells in Contiguous Range
- 6. Select All Cells to First or Last Cell
- 7. Select All Cells
- Better, Faster, Smarter
Select cell contents in Excel
In Excel, you can select cell contents of one or more cells, rows and columns.

Note: If a worksheet has been protected, you might not be able to select cells or their contents on a worksheet.
Select one or more cells
Click on a cell to select it. Or use the keyboard to navigate to it and select it.
To select a range, select a cell, then with the left mouse button pressed, drag over the other cells.
Or use the Shift + arrow keys to select the range.
To select non-adjacent cells and cell ranges, hold Ctrl and select the cells.
Select one or more rows and columns
Select the letter at the top to select the entire column. Or click on any cell in the column and then press Ctrl + Space.
Select the row number to select the entire row. Or click on any cell in the row and then press Shift + Space.
To select non-adjacent rows or columns, hold Ctrl and select the row or column numbers.
Select table, list or worksheet
To select a list or table, select a cell in the list or table and press Ctrl + A.
To select the entire worksheet, click the Select All button at the top left corner.

Note: In some cases, selecting a cell may result in the selection of multiple adjacent cells as well. For tips on how to resolve this issue, see this post How do I stop Excel from highlighting two cells at once? in the community.
Click the cell, or press the arrow keys to move to the cell.
A range of cells
Click the first cell in the range, and then drag to the last cell, or hold down SHIFT while you press the arrow keys to extend the selection.
You can also select the first cell in the range, and then press F8 to extend the selection by using the arrow keys. To stop extending the selection, press F8 again.
A large range of cells
Click the first cell in the range, and then hold down SHIFT while you click the last cell in the range. You can scroll to make the last cell visible.
All cells on a worksheet
Click the Select All button.
To select the entire worksheet, you can also press CTRL+A.
Note: If the worksheet contains data, CTRL+A selects the current region. Pressing CTRL+A a second time selects the entire worksheet.
Nonadjacent cells or cell ranges
Select the first cell or range of cells, and then hold down CTRL while you select the other cells or ranges.
You can also select the first cell or range of cells, and then press SHIFT+F8 to add another nonadjacent cell or range to the selection. To stop adding cells or ranges to the selection, press SHIFT+F8 again.
Note: You cannot cancel the selection of a cell or range of cells in a nonadjacent selection without canceling the entire selection.
An entire row or column
Click the row or column heading.
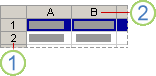
2. Column heading
You can also select cells in a row or column by selecting the first cell and then pressing CTRL+SHIFT+ARROW key (RIGHT ARROW or LEFT ARROW for rows, UP ARROW or DOWN ARROW for columns).
Note: If the row or column contains data, CTRL+SHIFT+ARROW key selects the row or column to the last used cell. Pressing CTRL+SHIFT+ARROW key a second time selects the entire row or column.
Adjacent rows or columns
Drag across the row or column headings. Or select the first row or column; then hold down SHIFT while you select the last row or column.
Nonadjacent rows or columns
Click the column or row heading of the first row or column in your selection; then hold down CTRL while you click the column or row headings of other rows or columns that you want to add to the selection.
The first or last cell in a row or column
Select a cell in the row or column, and then press CTRL+ARROW key (RIGHT ARROW or LEFT ARROW for rows, UP ARROW or DOWN ARROW for columns).
The first or last cell on a worksheet or in a Microsoft Office Excel table
Press CTRL+HOME to select the first cell on the worksheet or in an Excel list.
Press CTRL+END to select the last cell on the worksheet or in an Excel list that contains data or formatting.
Cells to the last used cell on the worksheet (lower-right corner)
Select the first cell, and then press CTRL+SHIFT+END to extend the selection of cells to the last used cell on the worksheet (lower-right corner).
Cells to the beginning of the worksheet
Select the first cell, and then press CTRL+SHIFT+HOME to extend the selection of cells to the beginning of the worksheet.
More or fewer cells than the active selection
Hold down SHIFT while you click the last cell that you want to include in the new selection. The rectangular range between the active cell and the cell that you click becomes the new selection.
Need more help?
You can always ask an expert in the Excel Tech Community or get support in the Answers community.
Источник
Select worksheets
By clicking the sheet tabs at the bottom of the Excel window, you can quickly select one or more sheets. To enter or edit data on several worksheets at the same time, you can group worksheets by selecting multiple sheets. You can also format or print a selection of sheets at the same time.
Click the tab for the sheet you want to edit. The active sheet will be a different color than other sheets. In this case, Sheet4 has been selected.
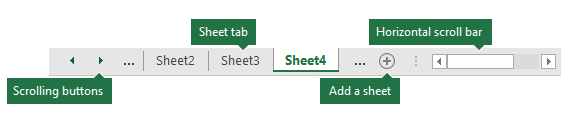
If you don’t see the tab that you want, click the scrolling buttons to locate the tab. You can add a sheet by pressing the Add Sheet button to the right of the sheet tabs.
Two or more adjacent sheets
Click the tab for the first sheet, then hold down SHIFT while you click the tab for the last sheet that you want to select.
By keyboard: First, press F6 to activate the sheet tabs. Next, use the left or right arrow keys to select the sheet you want, then you can use Ctrl+Space to select that sheet. Repeat the arrow and Ctrl+Space steps to select additional sheets.
Two or more nonadjacent sheets
Click the tab for the first sheet, then hold down CTRL while you click the tabs of the other sheets that you want to select.
By keyboard: First, press F6 to activate the sheet tabs. Next, use the left or right arrow keys to select the sheet you want, then you can use Ctrl+Space to select that sheet. Repeat the arrow and Ctrl+Space steps to select additional sheets.
All sheets in a workbook
Right-click a sheet tab, and then click the Select All Sheets option.
TIP: After choosing multiple sheets, [Group] appears in the title bar at the top of the worksheet. To cancel a selection of multiple worksheets in a workbook, click any unselected worksheet. If no unselected sheet is visible, right-click the tab of a selected sheet, and then click Ungroup Sheets on the shortcut menu.
Data that you enter or edit in the active worksheet will appear in all selected sheets. These changes might replace data on the active sheet and—perhaps unintentionally—on other selected sheets.
Data that you copy or cut in grouped sheets cannot be pasted onto another sheet, because the size of the copy area includes all layers of the selected sheets (which is different from the paste area in a single sheet). It’s important to ensure that only one sheet is selected before you copy or move data to another worksheet.
When you save a workbook that contains grouped sheets and then close the workbook, the sheets that you selected remain grouped when you reopen that workbook.
In Excel for the web you can’t select more than one sheet at a time, but it’s easy to find the sheet you want.
Select the All Sheets menu, then choose a sheet from the menu to open it.
From the sheets listed along the bottom, select a sheet name to open it. Use the arrows just beside the All Sheets menu to scroll forward and backward through sheets to review ones that aren’t currently visible.
Need more help?
You can always ask an expert in the Excel Tech Community or get support in the Answers community.
Источник
7 Keyboard Shortcuts for Selecting Cells and Ranges in Excel
Bottom Line: Save time by learning seven ways to select cells and ranges using keyboard shortcuts.
Skill Level: Beginner
Video Tutorial
Download the Excel File
If you’d like to follow along with the video using the same worksheet I’m using, you can download it here:
Keyboard Shortcuts to Select Cells
Who doesn’t love a keyboard shortcut to help make things faster and easier? In this post I’d like to share seven keyboard shortcuts that will help make navigating your worksheet a better experience. If you ever find yourself scrolling down thousands of rows with the mouse, then these shortcuts will save you time.
1. Select the Last Used Cell
No matter where you start from in your worksheet, Ctrl + End will take you to the intersection of the last used column and last used row.
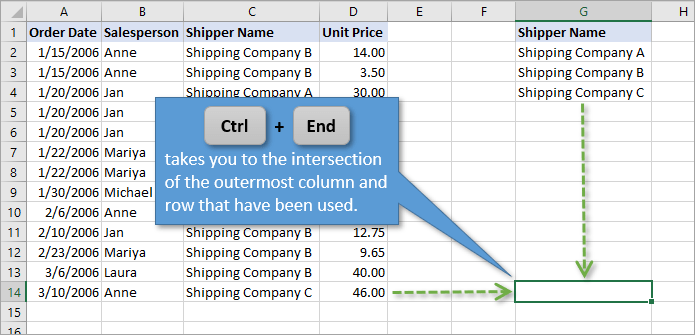
Sometimes, when you use this shortcut, Excel will move your selection so that is farther to the right or farther down than the data range you can see.
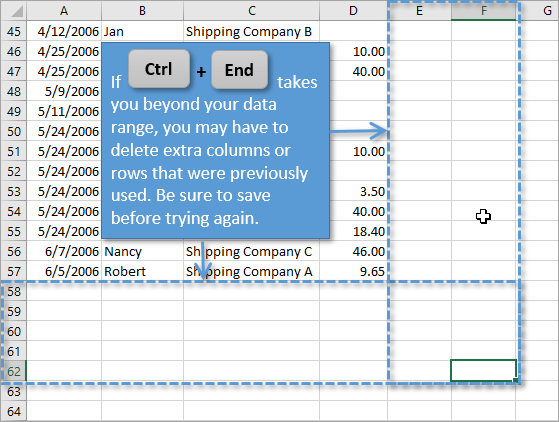
This is usually because there was previously data or formatting in those cells, but it has been deleted. You can clear that by deleting any of those previously used rows or columns and then saving your workbook. (Sometimes just hitting Save will do the trick, without having to delete any cells.)
Ctrl + End will select the last used cell on the sheet. However, there could be shapes (charts, slicers, etc.) on the sheet below or to the right of that cell. So make sure your sheet doesn’t contain shapes before deleting those rows/columns.
2. Select the First Visible Cell
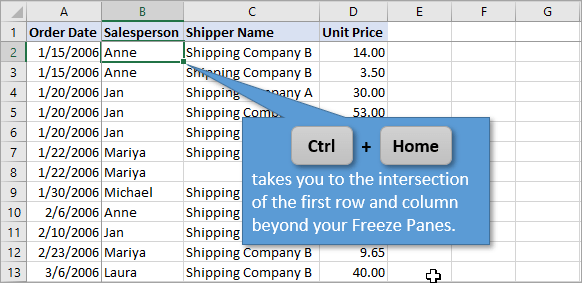
Using Ctrl + Home will always take you to the first visible cell (excluding hidden rows/columns) on the sheet, unless your sheet has Freeze Panes.
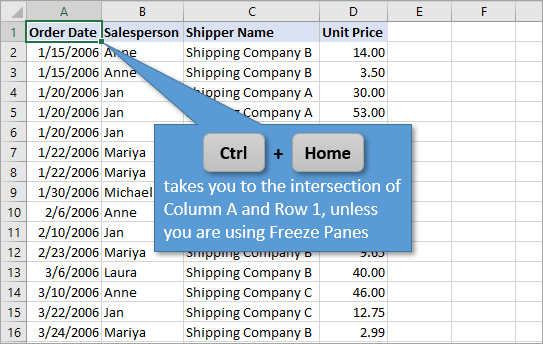
Freeze Panes lock rows and columns in place so that they are always visible, no matter where you scroll to in the worksheet. Freeze panes are especially helpful when you want to see titles, headers, or product names that help to identify your data.
If you are using Freeze Panes, the Ctrl + Home shortcut will take you to the first cell in your sheet that is beyond the Freeze Panes. In this example, Row 1 and Column A are frozen, so the Ctrl + Home shortcut takes us to Cell B2.
3. Select Last Cell in Contiguous Range
Ctrl + Arrow Key
Using Ctrl along with your arrow keys allows you to move to the beginning or end of contiguous data in a row or column. For example, if you start at the top of a column and then press Ctrl + ? you will jump to the last cell in that column before an empty cell. Repeating this process will move you further down the column to just before the next blank cell.
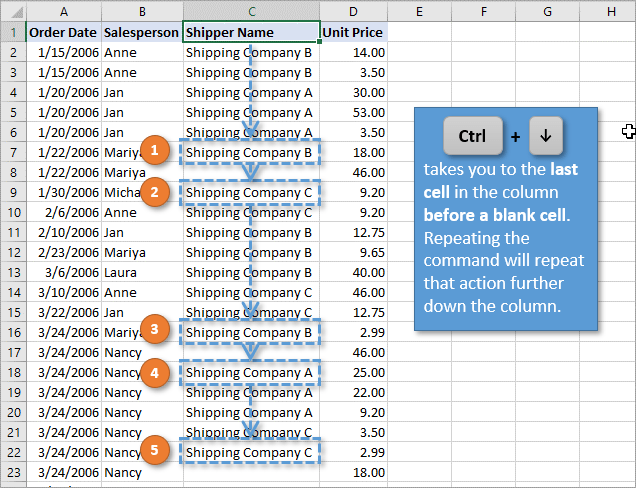
Ctrl + ? will reverse that process in the upward direction. And of course, holding Ctrl while using the left or right arrow key accomplishes the same action horizontally instead of vertically.
An Alternative Using the Mouse
You can accomplish this same action using your mouse instead of the keyboard, if you like. Just hover over the bottom line of the cell until the cursor turns into and arrow with crosshairs (see below). Then double-click. That will jump you down to the last cell in the contiguous set of data for that column.

4. Add Cells to the Selected Range
If you use Shift along with your arrow keys, you can select multiple cells, one at a time. For example, if you start in any cell and press Shift + ? , it highlights the original cell and the cell just below it.
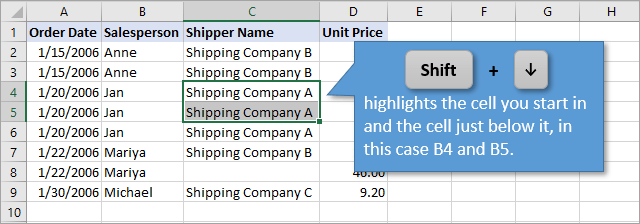
The same idea applies to the left, right, or up arrows. And if you keep the Shift key held down, you can continue to move over multiple cells in multiple directions to select an entire range of data.
5. Select Multiple Cells in Contiguous Range
Ctrl + Shift + Arrow Key
Using the same process as in Shortcut 3, but adding the Shift key, allows you to select multiple cells simultaneously. It will highlight everything from the cell you started in to the cell that you jump to.

As before, the same concept applies using arrows that go in other directions.
This process only selects cells that come before a blank cell. However, sometimes a column can have many blank cells. If so, this method may not be your best option. To select large amounts of data containing many blanks, I recommend checking out this post for some alternatives:
![]()
6. Select All Cells to First or Last Cell
Shortcuts 1 and 2 taught us how to jump from whatever cell we are in to the beginning corner (Home) or ending corner (End) of our data range. Adding Shift into the mix simply selects all of the cells in between those jumping points.
So if, for example, we start in Cell C5 and Press Ctrl + Shift + Home , the following range will be selected.
Ctrl + Shift + Home

If instead we were to begin at C5 and press Ctrl + Shift + End , this range of data will be selected:
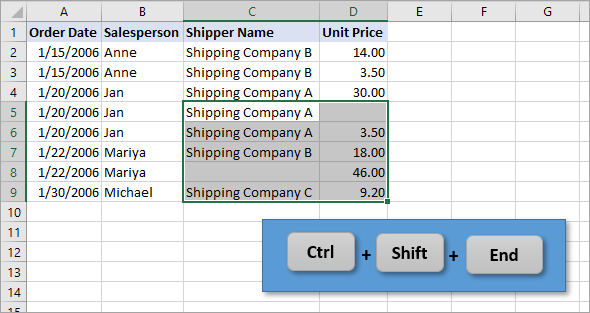
Ctrl + Shift + End
7. Select All Cells
Press Ctrl + A a second time to select all cells on the sheet.
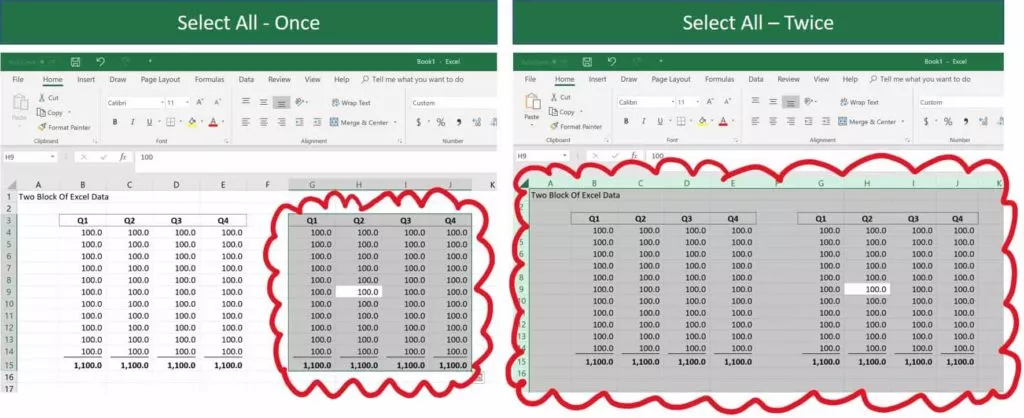
If your spreadsheet has multiple blocks of data, Excel does a pretty good job of selecting the block of data that is surrounding your cell when you press Ctrl + A . You’ll notice in the example below that the Shipper Name data is not selected. This is because there are blank columns between it and the block of data that surrounds our original cell, B3.

If your intention is to select all of the cells on the sheet, you simply press Ctrl + A a second time and your entire worksheet will be highlighted.
Better, Faster, Smarter
I hope you are able to commit some of these shortcuts to memory. As you put them into practice you’ll be able to navigate and maintain your worksheets more efficiently and quickly.
Have a keyboard shortcut that you want to share? Leave a comment below. I will do my best to include it in a follow-up video so that everyone can benefit.
Источник
Many users learn early on the “click + hold + drag” method for selecting a range of data using Microsoft Excel. If you have hundreds of rows of data, this method can be very tedious when needing to select all of the data within a worksheet.

3 Different Keyboard Shortcuts to Select “All” Data within a Worksheet
A much easier method to select an entire Excel worksheet is to use the shortcut key Ctrl+A (the “A” stands for “All”). However, your selection may vary:
- When you press Ctrl+A in a worksheet, you are selecting the current range. If there are any blank rows or columns separating the data, the selection area ends: Excel will not select a noncontiguous range.
- If you press Ctrl+A a second time, you’ll select your entire worksheet.
- NOTE: If your data is in a table format, you will need to press Ctrl+A a third time to select the entire worksheet.
Using Excel’s “Select All” Button to Select All Data
Yet another method for selecting all data in a spreadsheet is to click on the “select all” button at the top left corner of Excel. To the left of column A and above row 1, there is a grey half square looking button:

Using Your Selected Data
With all of your data selected you can:
- Copy and paste the content to a different location within the worksheet or move it to a different worksheet.
- Apply various formatting changes or clear formatting from cells.
- Modify the row height or column widths.
Bonus Tip: Absolute References vs. Relative References
Microassist’s lead instructor, Andy Weaver, talks about absolute and relative references in this virtual class.
Additional Microsoft Excel Resources
This just scratches the surface on what you can learn in Microsoft Excel! We offer multiple courses in Excel, from beginner introductions to Excel to advanced classes, to classes on Pivot Tables and more. Check out our Course Schedule to learn more.
Additional Microsoft Excel Tips
Excel Tip: Speed up Excel Data Entry by Changing Enter Key Behavior
Excel Tip: Highlight All Cells Referenced by a Formula
Excel 2013 Tip: Inserting Comments
NOTE: This post was originally published in December 2008 and has been revamped for currency and accuracy.
Subscribe to Monthly Training Updates
Receive monthly productivity and training insights, software tips, and notices of upcoming classes!
In this article you’ll learn all of the different Select All shortcuts in Word, Excel and PowerPoint, and how to use Select All to quickly grab things like:
- Objects (PowerPoint)
- Text with similar formatting (Word)
- Formulas (Excel)
- Constants (Excel)
- Comments (Excel)
- And more!
This allows you to quickly grab EXACTLY what you need in each of the programs when you need it. This saves you from otherwise having to manually selecting everything yourself, one-by-one.
Select All shortcut (A Must Know)
The universal Select All shortcut for most program (Mac or PC) is:

Select All shortcut (PC Users): Ctrl + A
Select All shortcut (Mac Users) Cmd + A
That said there are a variety of different ways you can use the shortcut in Word, Excel and PowerPoint to finish your tasks faster and get you to Happy Hour (all discussed below).
How to best use the Select All command?
In short, this command is best used to quickly grab all the text, numbers, objects, formulas etc. that you want to quickly format or work with.
This allows you to quickly make changes to everything at once. For example:
- Change the font style of all the text in a Word document
- Grab all the formulas or constants in an Excel spreadsheet to change their font color
- Grab all your PowerPoint objects on a slide to change their shape fill
Which makes sense, right?
Why bother doing things manually (one-by-one) when you can select all your objects at once.
And it’s this kind of know-how why one person leaves the office at a decent hour, while another wastes away at the office all night.
How to Select All in Word

You have 4 different types of selection options in Microsoft Word.
And if you are on a PC, you can additionally shortcut all of these using your Ribbon Guides (details below).

1. Select All (Ctrl + A)
Selects everything within your document so that you can make all the formatting edits that you want at the same time.
Clicking this command with your mouse is the same as hitting Ctrl + A on your keyboard (Cmd + A on a Mac).
2. Select Objects
Changes your mouse cursor into an arrow symbol that allows you to select an element (chart, picture, SmartArt graphic, etc.) as an object.
This is different than when you click things with your mouse. When you click with your mouse, you normally click into the object as if you are going to edit it.
The Select Objects command ensures that you select the object itself. That way you can cut and paste it, or move it around within your document.
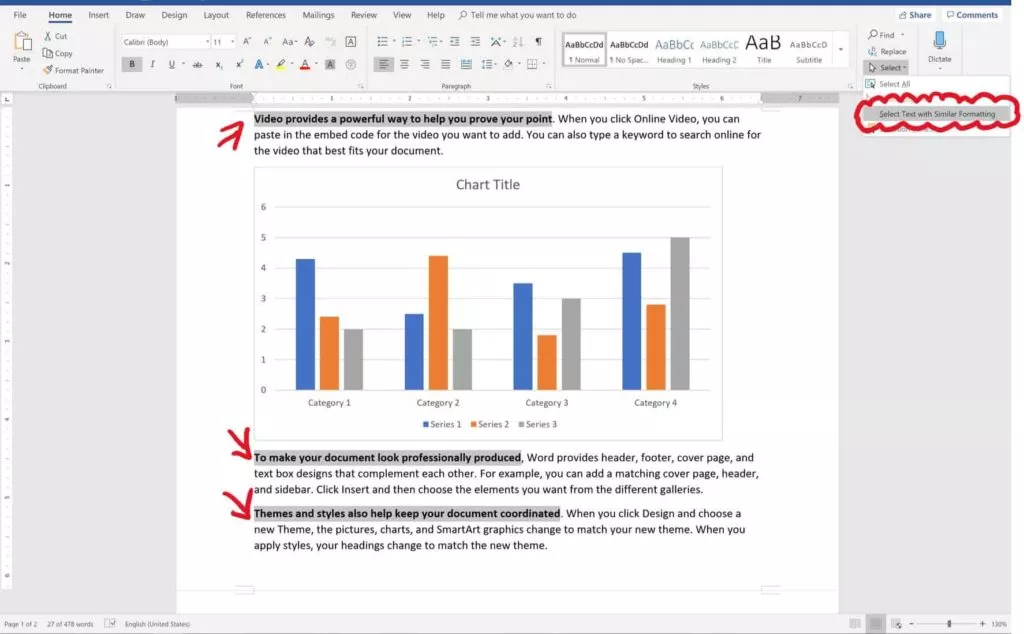
3. Select Text with Similar Formatting
Selects all of the text within a Word document that matches the formatting of the text that you have already selected.
This is one of the coolest features in Microsoft Word that hardly anyone knows about. This command grabs all of the same formatted text within a document, so you can change it’s formatting all at once.
Ahem… amazing!
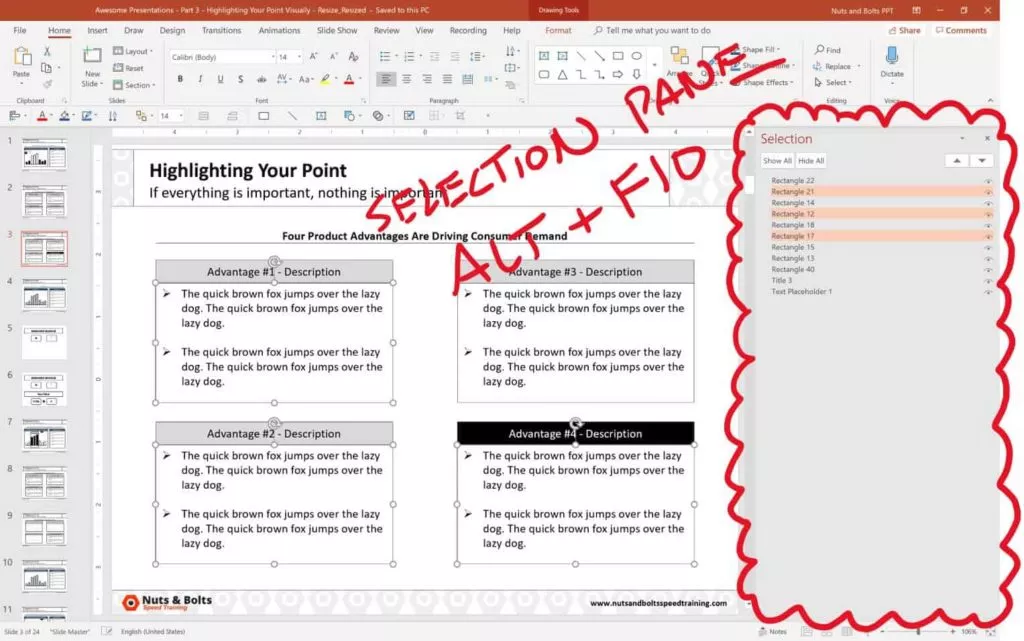
4. The Selection Pane in Word (Alt + F10)
Opens or closes the Selection Pane in Microsoft Word.
Inside the Selection Pane you can see (and quickly manipulate) all the objects in a Word document.
Similar to the Selection Pane in PowerPoint, it only only shows you the objects on the current page you are currently working on.
That means that if you have 100 charts in your Word document but only 1 chart on your current page, you will only see 1 chart in the Selection Pane.
Select All Shortcuts in Word (Ribbon Guides)
Instead of using your mouse to access the selection commands, on a PC you can use your Ribbon Guides.
To use these shortcuts, simply hit the Alt key on your keyboard. Hitting the Alt key, you will see alphabetical sequences to the commands across your Ribbon.

On a PC, your select all Ribbon Guide shortcuts are:
- Select All: Alt, H, SL, A
- Select Objects: Alt, H, SL, O
- Select Text with Similar Formatting: Alt, H, SL, S
- Selection Pane: Alt, H, SL, P
Note: When using your Ribbon Guide shortcuts in Word, you do not need to hold them down. Instead, simply hit and let go of them one at a time (following the letters forward).
To learn more about the Microsoft Office ribbon, see this guide by Microsoft here.
Select All in Excel
Because there are so many more inputs that can go into an Excel spreadsheet, there are 7 different selection commands in Excel (all covered below)
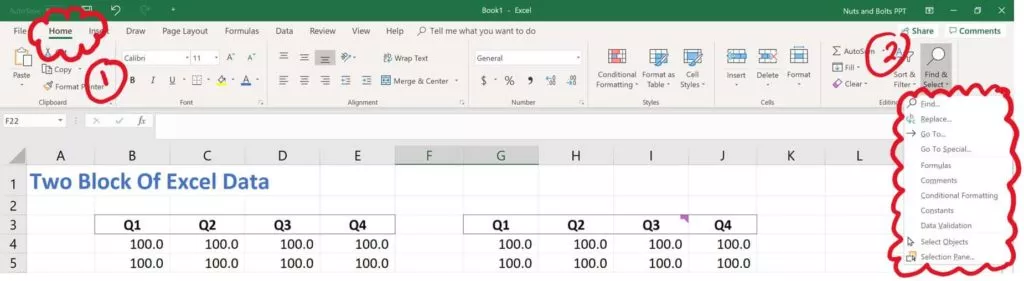
1. Select All (Ctrl + A)
Hitting Ctrl + A triggers the Select All command (which is otherwise not up in your Excel ribbon.
It’s also important to note that the Select All command works a little bit differently in Excel.
Using the command once, first selects the block of cells that you are currently active in.
Using the command a second time, then selects everything within your spreadsheet.
See images above for hitting it once, then twice.
2. Select Formulas
Clicking Formulas will grab all the formulas in your current spreadsheet (pictured below).
This is a fast way and easy way to quickly identify and change the formatting of any formulas in your spreadsheet.

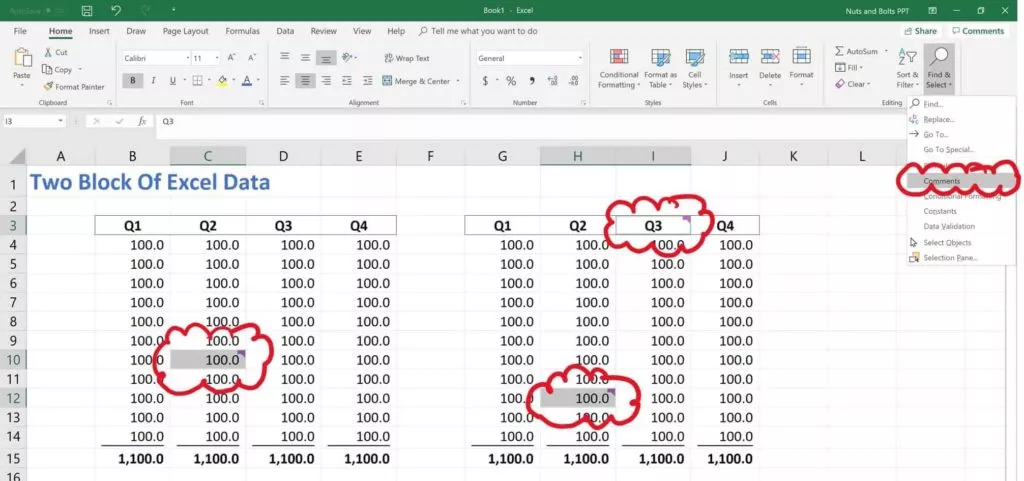
3. Select Comments
Clicking Comments automatically selects all of the comments in your spreadsheet (pictured below).
Comments show up in your spreadsheet as little markers in the upper-right hand corner of your cells. If you don’t want to waste time searching for them, simply use these command.
This allows you to quickly grab all the comments in your spreadsheet and format the cells.
4. Select Conditional Formatting
Clicking Conditional Formatting selects any cells within your spreadsheet that have conditional formatting in them.
This allows you to spot check or change the conditional formatting rules for those specific cells.
To learn more about conditional formatting rules, and how to use them, see this article by Microsoft here.
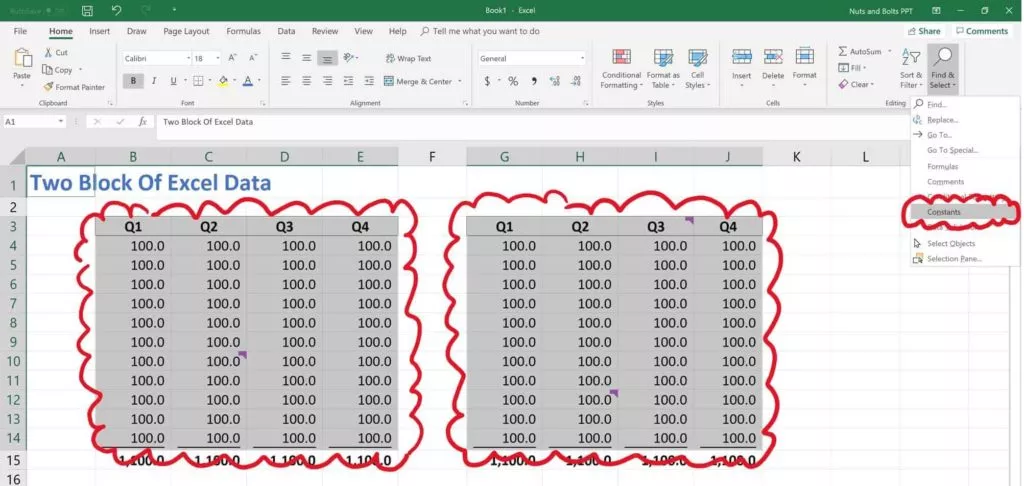
5. Select Constants
Selects all the constant values in your spreadsheet (i.e. values that are not formula-driven).
This is a fast and easy way to find all of the inputs that someone is using in their financial model or spreadsheet so that you can double-check their assumptions (pictured below).
6. Select Objects
Turns your cursor into an arrow that allows you to select objects that are within your spreadsheet (charts, pictures, SmartArt graphics etc.).
This is useful when you have a large spreadsheet or dashboard and you want to just select a single graphic without accidentally selecting the cells around it.
7. The Selection Pane in Excel (Alt + F10)
Opens the Selection Pane in Excel, showing you all of the charts, pictures, SmartArt graphics, etc., that are currently within your active spreadsheet.
Just keep in mind that the Selection Pane will only show you objects that are within the current sheet you are on. It will not show you objects that are on other sheets within your Excel file.
Select All Shortcuts in Excel (Ribbon Guides):
On top of using your mouse to activate the different Select commands in Excel, if you are on a PC, you can also use your Ribbon Guides to shortcut these commands (see key combinations below).
If you use any of these selection commands A LOT when working in Excel and are on a PC, I highly recommend learning these key combinations to save you time.

On a PC, your Ribbon Guide Shortcuts to these different commands are:
- Formulas: Alt, H, FD, U
- Comments: Alt, H, FD, M
- Conditional Formatting: Alt, H, FD, C
- Constants: Alt, H, FD, N
- Data Validation: Alt, H, FD, V
- Select Objects: Alt, H, FD, O
- Selection Pane: Alt, H, FD, P
Note: When using your Ribbon Guide shortcuts, you do not need to hold down the keys to make them work. Instead, simply hit and let go of them one at a time.
Select All in PowerPoint

You have 3 different types of selection options in PowerPoint (all of which you can shortcut on a PC using your Ribbon Guide shortcuts as discussed further below).

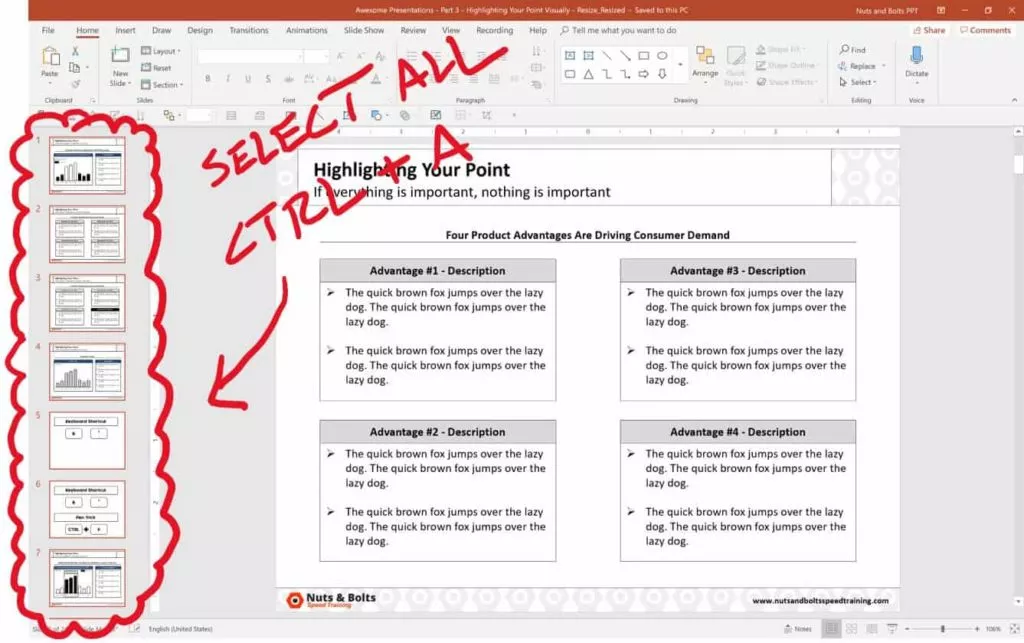
1. Select All (Ctrl + A)
Selects all of the objects that are currently on your slide.
This shortcut works in all of the different PowerPoint views including:
- The Normal View
- The Slide Master View
- The Handout Master View
- The Notes Master View, etc.
To learn more about setting up these different views in PowerPoint, see our guide on custom PowerPoint templates here.
On top of that, if you first click into the thumbnail view (pictured below) you can use the command to grab all of your slides. This allows you to copy and paste those slides, apply a new layout, reset the slides, etc.
2. Select Objects
This is the default selection option in PowerPoint, allowing you to select objects (shapes, text boxes, charts, SmartArt graphics, etc.) which is what all of your slides are made of.
3. Selection Pane in PowerPoint (Alt + F10)
Opens the Selection Pane in PowerPoint, giving you a bird’s eye view of everything that is on your slide (even if it is buried beneath something else).
To learn other useful PowerPoint shortcuts like this to save you time in the program, see our guide here.
Selection Pane Shortcuts in PowerPoint
To learn more about how to use the Selection Pane shortcuts in PowerPoint, watch the short video below.
Inverse selected objects in PowerPoint
Another way to cleverly use the Select All command in PowerPoint is to ‘inverse-select’ your objects.
For example, let’s say you want to select EVERYTHING on your slide except for the title.
To do so, follow these steps:
- Hit Ctrl + A to select everything on your slide
- While holding the Shift key or the Ctrl key, select your Title to un-select it
Doing so leaves you with everything on your slide selected except for your slide title (or whatever else you unselected by holding the Shift or Ctrl key).
Select All shortcuts in PowerPoint (Ribbon Guides)
Besides navigating these selection commands using your mouse, you can also use your Ribbon Guide shortcuts to access them if you are on a PC.
To use your Ribbon Guide shortcuts, simply hit and let go of the Alt key, and then follow the alphabetical or numerical queues to find your command (all shortcut combinations are listed below).

On a PC, your Select All Ribbon Shortcuts are:
- Select All: Alt, H, SL, A
- Select Objects: Alt, H, SL, O
- Selection Pane: Alt, H, SL, P
Note: When using your Ribbon Guide shortcuts, you do not need to hold down the keys to make them work. Instead, simply hit and let go of them one at a time.
Conclusion
So those all the different ways you can Select All in Word, Excel and PowerPoint, and the different Select All shortcuts available to you if you are on a PC version of Microsoft Office.
Knowing how to properly use these, allows you to quickly grab exactly what you’re looking for so you can format it. This saves you time and gets you once step closer to Happy Hour.
If you are interested in taking your PowerPoint skills to the next level, you can learn more about our online courses and training here.
What’s next?
What To Know
- To highlight rows: Shift+Space. Arrows Up or Down for additional rows.
- To select columns: Ctrl+Space. Arrows Left or Right for additional columns.
- To highlight every cell in the sheet: Ctrl+A
This article explains how to change column/row dimensions, hiding columns/rows, inserting new columns/rows, and applying cell formatting in Excel, using a series of convenient hotkeys. Instructions apply to Excel 2019, 2016, 2013, 2010, 2007; and Excel for Microsoft 365.
Select Entire Rows in a Worksheet
Use Shortcut Keys to Select Rows
-
Click on a worksheet cell in the row to be selected to make it the active cell.
-
Press and hold the Shift key on the keyboard.
-
Press and release the Spacebar key on the keyboard.
Shift+Spacebar
-
Release the Shift key.
-
All cells in the selected row are highlighted; including the row header.
Use Shortcut Keys to Select Additional Rows
-
Press and hold the Shift key on the keyboard.
-
Use the Up or Down arrow keys on the keyboard to select additional rows above or below the selected row.
-
Release the Shift key when you’ve selected all the rows.
Use the Mouse to Select Rows
-
Place the mouse pointer on the row number in the row header. The mouse pointer changes to a black arrow pointing to the right.
-
Click once with the left mouse button.
Use the Mouse to Select Additional Rows
-
Place the mouse pointer on the row number in the row header.
-
Click and hold the left mouse button.
-
Drag the mouse pointer up or down to select the desired number of rows.
Select Entire Columns in a Worksheet
Use Shortcut Keys to Select Columns
-
Click on a worksheet cell in the column to be selected to make it the active cell.
-
Press and hold the Ctrl key on the keyboard.
-
Press and release the Spacebar key on the keyboard.
Ctrl+Spacebar
-
Release the Ctrl key.
-
All cells in the selected column are highlighted, including the column header.
Use Shortcut Keys to Select Additional Columns
To select additional columns on either side of the selected column:
-
Press and hold the Shift key on the keyboard.
-
Use the Left or Right arrow keys on the keyboard to select additional columns on either side of the highlighted column.
Use the Mouse to Select Columns
-
Place the mouse pointer on the column letter in the column header. The mouse pointer changes to a black arrow pointing down.
-
Click once with the left mouse button.
Use the Mouse to Select Additional Columns
-
Place the mouse pointer on the column letter in the column header.
-
Click and hold the left mouse button.
-
Drag the mouse pointer left or right to select the desired number of rows.
Select All Cells in a Worksheet
Use Shortcut Keys to Select All Cells
-
Click on a blank area of a worksheet that contains no data in the surrounding cells.
-
Press and hold the Ctrl key on the keyboard.
-
Press and release the letter A key on the keyboard.
Ctrl+A
-
Release the Ctrl key.
Use ‘Select All’ to Select All Cells
If you prefer not to use the keyboard, use Select All to quickly select all cells in a worksheet.
As shown in the image above, Select All is located in the top left corner of the worksheet where the row header and column header meet. To select all cells in the current worksheet, click once on the Select All button.
Select All Cells in a Table
Depending on the way the data in a worksheet is formatted, using the shortcut keys above will select different amounts of data. If the active cell is located within a contiguous range of data:
- Press Ctrl+A to select all the cells containing data in the range.
If the data range has been formatted as a table and has a heading row that contains drop-down menus:
- Press Ctrl+A a second time to select the heading row.
The selected area can then be extended to include all cells in a worksheet.
- Press Ctrl+A a third time to select the entire worksheet.
Select Multiple Worksheets
Not only is it possible to move between sheets in a workbook using a keyboard shortcut, but you can also select multiple adjacent sheets with a keyboard shortcut as well. Simply add the Shift key to the key combinations above.
To select pages to the left:
Ctrl+Shift+PgUp
To select pages to the right:
Ctrl+Shift+PgDn
Selecte Multiple Sheets
Using the mouse along with keyboard keys has one advantage over using just the keyboard. It allows you to select non-adjacent sheets as well as adjacent ones.
Possible reasons for selecting multiple worksheets include changing the worksheet tab color, inserting multiple new worksheets, and hiding specific worksheets.
Select Multiple Adjacent Sheets
-
Click on one sheet tab to select it.
-
Press and hold the Shift key on the keyboard.
-
Click on additional adjacent sheet tabs to highlight them.
Select Multiple Non-Adjacent Sheets
-
Click one sheet tab to select it.
-
Press and hold the Ctrl key on the keyboard.
-
Click on additional sheet tabs to highlight them.
FAQ
-
How do you merge cells in Excel?
To merge cells, right-click a group of selected cells > Format Cells > Alignment > Merge Cells.
-
How do you lock cells in Excel?
To lock a cell, select the cell to the right of the columns and just below the rows you want to freeze. Select the View tab > Freeze Panes > Freeze Panes.
Thanks for letting us know!
Get the Latest Tech News Delivered Every Day
Subscribe