|
Открыть гиперссылку с картинкой макросом и вставить в ячейку |
||||||||
Ответить |
||||||||
Ответить |
||||||||
Ответить |
||||||||
Ответить |
||||||||
Ответить |
||||||||
Ответить |
||||||||
Ответить |
||||||||
Ответить |
||||||||
Ответить |
||||||||
Ответить |
||||||||
Ответить |
||||||||
Ответить |
||||||||
Ответить |
||||||||
Ответить |
||||||||
Ответить |
||||||||
Ответить |
||||||||
Ответить |
||||||||
Ответить |
||||||||
Ответить |
||||||||
Ответить |
12.11.18 — 14:41
Добрый день!Такая проблема: Выгружаю остатки в ексель файл,помимо остаток туда прикрепляется картинка в эксель . Проблема в том, что я вижу картинку,а клиент нет. В чем может быть проблема?
1 — 12.11.18 — 14:43
(0) Клиент слепой?
2 — 12.11.18 — 14:46
(0) В настройках Экселя где-то есть галочка «отображать картинки». Иногда случайно на нее натыкаюсь, но не скажу где она
3 — 12.11.18 — 14:48
+2 важно — что именно экселя (ну или опен офиса),а не самого файла
4 — 12.11.18 — 15:05
(3) Да нет,не помогло. А влияет как то то, что картинка хранится у меня на диске во временных файлах?Но в экселе в ячейке написано «Не удается отобразить связанный рисунок. Убедитесь, что ссылка указывает на правильный файл или верное размещение»
5 — 12.11.18 — 15:15
(4) Хе, так если ссылка, то конечно у него ничего не будет
6 — 12.11.18 — 15:16
(4) Картинка-то у тебя, а не у клиента… Откуда он её увидит?
7 — 12.11.18 — 15:16
(5) Как быть то тогда?
8 — 12.11.18 — 15:17
(6) Как тогда хранить ее?
9 — 12.11.18 — 15:18
(8) Встраивать в файл
10 — 12.11.18 — 15:20
(9) Так у меня картинка сохраняется в папку Temp,а потом вставляется в эксель файл,все как надо
11 — 12.11.18 — 15:23
(10) Очистить temp и открыть еще раз excel?
12 — 12.11.18 — 15:27
(10) «а потом вставляется в эксель файл,все как надо» — покажи код
13 — 12.11.18 — 15:28
Вот одна из множества тем Загрузка картинок в excel
14 — 12.11.18 — 15:29
ИмяФайлаКартинки = СохранитьФайлКартинки(ТекСтр.Номенклатура);
Картинка= Книга.ActiveSheet.Pictures.Insert(ИмяФайлаКартинки);
Картинка.ShapeRange.LockAspectRatio = true;
Картинка.ShapeRange.Left =Range.Left + 1;
Картинка.ShapeRange.Top =Range.Top + 1;
//Картинка.Width =Range.Width — 1;
Картинка.Height =119;//Range.Height — 1;
//Картинка.Locked=0;
ФайлКартинки =»»;
//ограничение максимальное по ширине ячейки, вдруг картинка превысит этот размер
//Если Картинка.Height>Range.Height Тогда
// Картинка.Height =Range.Height;
//КонецЕсли;
Если Картинка.Width>Range.Width Тогда
Картинка.Width = Range.Width-1;
КонецЕсли;
15 — 12.11.18 — 15:42
Файл вставляется в эксель!На сервере я его вижу,а вот клиент видит вместо этой картинки надпись о том, что картинка не найдена
16 — 12.11.18 — 15:51
Третий параметр у метода
17 — 12.11.18 — 15:52
(18) не понял
18 — 12.11.18 — 15:53
Shapes.AddPicture надо
19 — 12.11.18 — 15:53
Твои ожидания от использования метода Pictures.Insert расходятся с действительностью
20 — 12.11.18 — 16:12
(19) Спасибо!
Cyberhawk
21 — 13.11.18 — 10:26
Ну что там, получилось что-нибудь?
Option Explicit
Sub РазнестиСчетаВерсия1()
    Dim КнигаПриемник As Workbook, КнигаИсточник As Workbook, Ячейка As Range, i, ПоследняяСтрока
    Dim j, x
    Set КнигаПриемник = ActiveWorkbook
    Dim НомерВарианта As Long
НомерВарианта = 1
    Application.ScreenUpdating = 0
    With Application.FileDialog(msoFileDialogFilePicker)
            .InitialFileName = "C:UserscompDesktopАВСЕ СЧЕТА" ' Путь к папке по умочанию, там будет открывать
            .AllowMultiSelect = True
            .ButtonName = "OK"
            .Filters.Clear
            .Filters.Add Description:="Файлы Microsoft Excel", _
                Extensions:="*.xls; *.xlsx; *.xlt"
            If .Show = 0 Then
                Exit Sub
            End If
            Set Ячейка = shDATA.Rows(1).Find("Новый клиент", , , xlWhole) ' последний столбец
            For i = 1 To .SelectedItems.Count
                DoEvents
                Application.StatusBar = Split(.SelectedItems(i), "")(UBound(Split(.SelectedItems(i), "")))
                Set КнигаИсточник = Workbooks.Open(.SelectedItems(i))
                ПоследняяСтрока = shDATA.Range("D" & shDATA.Rows.Count).End(xlUp).Row + 1
                shDATA.Range("a" & ПоследняяСтрока) = Val(КнигаИсточник.Sheets(1).[B4])
                shDATA.Range("b" & ПоследняяСтрока) = Val(КнигаИсточник.Sheets(1).[C4])
                shDATA.Range("c" & ПоследняяСтрока) = Val(КнигаИсточник.Sheets(1).[D4])
                shDATA.Range("fo" & ПоследняяСтрока) = Split(КнигаИсточник.Sheets(1).[F22], " ")(1)
                shDATA.Range("d" & ПоследняяСтрока) = Split(КнигаИсточник.Name, ".xls")(0)
                shDATA.Range("e" & ПоследняяСтрока) = Trim( _
                                Split(КнигаИсточник.Sheets(1).[B16], " ") _
                                (UBound(Split(КнигаИсточник.Sheets(1).[B16], " "))))
                shDATA.Range("f" & ПоследняяСтрока).FormulaR1C1 = "=SUM(RC[1]:RC[" & Ячейка.Column - 4 - 3 & "])*1.18" 'shDATA.Cells(ПоследняяСтрока, 3) + shDATA.Cells(ПоследняяСтрока, x) + (КнигаИсточник.Sheets(1).Range("AD" & j) * 0.18)
                j = 25
                Do
                    j = j + 1 ' перебор строк в исходнике
                    DoEvents
                    If КнигаИсточник.Sheets(1).Range("F" & j) = "" Then
                        If НомерВарианта > 0 Then
                            Call ПреоброзованиеСчета(КнигаИсточник.Sheets(1), НомерВарианта)
                        Else
                            КнигаИсточник.Close False
                        End If
                        Exit Do
                    End If
                    For x = 4 To Ячейка.Column - 1 'Перебор столбцов в приемнике
                        DoEvents
                        If shDATA.Cells(1, x) <> "" Then
                            If КнигаИсточник.Sheets(1).Range("F" & j) Like "*" & shDATA.Cells(1, x) & "*" Then 'Совпадает ли название ключу колонки
                                shDATA.Cells(ПоследняяСтрока, x) = shDATA.Cells(ПоследняяСтрока, x) + КнигаИсточник.Sheets(1).Range("AD" & j)
'                                КнигаИсточник.Sheets(1).Range("A" & j & ":AD" & j).Interior.Color = vbGreen
'                                Debug.Print x
                                Exit For
                            End If
                        End If
                    Next
                Loop
            Next
    End With
    Application.ScreenUpdating = 1
    MsgBox "Макрос завершил свою работу!"
End Sub


Sub ПреоброзованиеСчета(Счет As Worksheet, НомерВарианта As Long)
'Dim Счет As Worksheet, НомерВарианта As Long
'Set Счет = Workbooks("Я000012883_ИП_Басов_Александр_Алексеевич___г._Самара.xls").Worksheets(1)
'НомерВарианта = 1
Счет.Rows("14:15").Delete
Счет.Rows("5:6").Delete
Счет.Rows("1:3").Delete

Счет.Rows(Счет.Columns("Ac:ac").Find("Итого к оплате:").Row + 1).Resize(2).Delete
    Счет.Rows("1:17").Insert Shift:=xlDown
Счет.Cells(1, 2).Resize(1, 32).Merge
Счет.Cells(1, 2) = "РЕКОМЕНДУЕМ ОБРАТИТЬ ВНИМАНИЕ НА:"
Счет.Cells(1, 2).Font.Size = 12
Счет.Cells(1, 2).Font.Bold = True
Счет.Cells(1, 2).HorizontalAlignment = xlCenter

Счет.Cells(16, 23).Resize(2, 11).Merge
Счет.Cells(16, 23) = "НАШ САЙТ: http://voint.ru/"
Счет.Cells(16, 23).Font.Bold = True
Счет.Cells(16, 23).HorizontalAlignment = xlCenter
Счет.Cells(16, 23).VerticalAlignment = xlCenter


Счет.Cells(2, 23).Resize(5, 11).Merge
Счет.Cells(2, 23) = Справочник.Cells(НомерВарианта + 1, 2)
Счет.Cells(2, 23).Font.Bold = True
Счет.Cells(2, 23).HorizontalAlignment = xlCenter
Счет.Cells(2, 23).VerticalAlignment = xlCenter
Счет.Cells(2, 23).WrapText = True


Счет.Cells(7, 23).Resize(9, 11).Merge
Счет.Cells(7, 23) = Справочник.Cells(НомерВарианта + 1, 3)
Счет.Cells(7, 23).HorizontalAlignment = xlCenter
Счет.Cells(7, 23).VerticalAlignment = xlCenter
Счет.Cells(7, 23).WrapText = True

Счет.Cells(2, 2).Resize(16, 21).Merge

Dim Адресс
Адресс = Справочник.Cells(1, 5) & "" & НомерВарианта & ".jpg"
Dim Рисунок As Picture
Set Рисунок = Счет.Range("B2:V17").Parent.Pictures.Insert(Адресс)
Рисунок.Top = Счет.Range("B2:V17").Top + 1: Рисунок.Left = Счет.Range("B2:V17").Left + 1
Рисунок.ShapeRange.Width = 345.4409448819

Dim Рисунок2 As Shape
If Not Рисунок.Name = Счет.Shapes(1).Name Then
 Счет.Shapes.Range(Array("Рисунок 1")).Top = Счет.Cells(Rows.Count, 3).End(xlUp).Offset(1).Top
 End If

Счет.Cells(1, 2).Resize(17, 32).Borders(xlEdgeLeft).LineStyle = xlContinuous
Счет.Cells(1, 2).Resize(17, 32).Borders(xlEdgeTop).LineStyle = xlContinuous
Счет.Cells(1, 2).Resize(17, 32).Borders(xlEdgeBottom).LineStyle = xlContinuous
Счет.Cells(1, 2).Resize(17, 32).Borders(xlEdgeRight).LineStyle = xlContinuous
Счет.Cells(1, 2).Resize(17, 32).Borders(xlInsideVertical).LineStyle = xlContinuous
Счет.Cells(1, 2).Resize(17, 32).Borders(xlInsideHorizontal).LineStyle = xlContinuous

Application.DisplayAlerts = False
Счет.Parent.SaveAs Filename:= _
    Счет.Parent.Path & "" & Счет.Parent.Name _
        , FileFormat:=xlExcel8, Password:="", WriteResPassword:="", _
        ReadOnlyRecommended:=False, CreateBackup:=False

Счет.Parent.Close
Application.DisplayAlerts = True

End Sub
Sub Макрос1()
'
Dim НомерВарианта As Long
On Error Resume Next
НомерВарианта = InputBox("Введите НОМЕР ФОТО")
On Error GoTo 0
Dim Счет As Worksheet
Set Счет = Workbooks("Я000012883_ИП_Басов_Александр_Алексеевич___г._Самара.xls").Worksheets(1)
'НомерВарианта = 1
Call ПреоброзованиеСчета(Счет, НомерВарианта)
End Sub

Sub РазнестиСчетаВерсия2()
    Dim КнигаПриемник As Workbook, КнигаИсточник As Workbook, Ячейка As Range, i, ПоследняяСтрока
    Dim j, x
    Set КнигаПриемник = ActiveWorkbook
    Dim НомерВарианта As Long
НомерВарианта = 2
    Application.ScreenUpdating = 0
    With Application.FileDialog(msoFileDialogFilePicker)
            .InitialFileName = "C:UserscompDesktopАВСЕ СЧЕТА" ' Путь к папке по умочанию, там будет открывать
            .AllowMultiSelect = True
            .ButtonName = "OK"
            .Filters.Clear
            .Filters.Add Description:="Файлы Microsoft Excel", _
                Extensions:="*.xls; *.xlsx; *.xlt"
            If .Show = 0 Then
                Exit Sub
            End If
            Set Ячейка = shDATA.Rows(1).Find("Новый клиент", , , xlWhole) ' последний столбец
            For i = 1 To .SelectedItems.Count
                DoEvents
                Application.StatusBar = Split(.SelectedItems(i), "")(UBound(Split(.SelectedItems(i), "")))
                Set КнигаИсточник = Workbooks.Open(.SelectedItems(i))
                ПоследняяСтрока = shDATA.Range("D" & shDATA.Rows.Count).End(xlUp).Row + 1
                shDATA.Range("a" & ПоследняяСтрока) = Val(КнигаИсточник.Sheets(1).[B4])
                shDATA.Range("b" & ПоследняяСтрока) = Val(КнигаИсточник.Sheets(1).[C4])
                shDATA.Range("c" & ПоследняяСтрока) = Val(КнигаИсточник.Sheets(1).[D4])
                shDATA.Range("fo" & ПоследняяСтрока) = Split(КнигаИсточник.Sheets(1).[F22], " ")(1)
                shDATA.Range("d" & ПоследняяСтрока) = Split(КнигаИсточник.Name, ".xls")(0)
                shDATA.Range("e" & ПоследняяСтрока) = Trim( _
                                Split(КнигаИсточник.Sheets(1).[B16], " ") _
                                (UBound(Split(КнигаИсточник.Sheets(1).[B16], " "))))
                shDATA.Range("f" & ПоследняяСтрока).FormulaR1C1 = "=SUM(RC[1]:RC[" & Ячейка.Column - 4 - 3 & "])*1.18" 'shDATA.Cells(ПоследняяСтрока, 3) + shDATA.Cells(ПоследняяСтрока, x) + (КнигаИсточник.Sheets(1).Range("AD" & j) * 0.18)
                j = 25
                Do
                    j = j + 1 ' перебор строк в исходнике
                    DoEvents
                    If КнигаИсточник.Sheets(1).Range("F" & j) = "" Then
                        If НомерВарианта > 0 Then
                            Call ПреоброзованиеСчета(КнигаИсточник.Sheets(1), НомерВарианта)
                        Else
                            КнигаИсточник.Close False
                        End If
                        Exit Do
                    End If
                    For x = 4 To Ячейка.Column - 1 'Перебор столбцов в приемнике
                        DoEvents
                        If shDATA.Cells(1, x) <> "" Then
                            If КнигаИсточник.Sheets(1).Range("F" & j) Like "*" & shDATA.Cells(1, x) & "*" Then 'Совпадает ли название ключу колонки
                                shDATA.Cells(ПоследняяСтрока, x) = shDATA.Cells(ПоследняяСтрока, x) + КнигаИсточник.Sheets(1).Range("AD" & j)
'                                КнигаИсточник.Sheets(1).Range("A" & j & ":AD" & j).Interior.Color = vbGreen
'                                Debug.Print x
                                Exit For
                            End If
                        End If
                    Next
                Loop
            Next
    End With
    Application.ScreenUpdating = 1
    MsgBox "Макрос завершил свою работу!"
End Sub
- Remove From My Forums

Не удается отобразить связанный рисунок как решить проблему?
-
Question
-
Не удается отобразить связанный рисунок. Возможно, этот файл был перемещен, переименован или удален. Убедитесь, что ссылка указывает на правильный файл и верное размещение. С такой ошибкой столкнулся сегодня, не зависимо какой
версии Microsoft
Office
All replies
-
ну так может причина проблемы не в офис, а в связанном рисунке который был удален?
The opinion expressed by me is not an official position of Microsoft
-
рисунок и сам файл не перемещался/ не удалялся все находится в первоисточнике, сам фал передавался на другие ПК и там все отображалось без ошибок, но теперь появилась такая вот ошибка
|
1 / 1 / 1 Регистрация: 12.11.2018 Сообщений: 72 |
|
|
1 |
|
|
30.11.2018, 12:32. Показов 18420. Ответов 12
Здравствуйте, в чем может быть проблема? Тут должна была быть картинка, но почему не открывается. Впервые с таким сталкиваюсь Кликните здесь для просмотра всего текста
ОС: Windows 10; Office: Word 2010
0 |
|
1232 / 670 / 238 Регистрация: 22.12.2015 Сообщений: 2,089 |
|
|
30.11.2018, 13:31 |
2 |
|
Тут должна была быть картинка, но почему не открывается. Впервые с таким сталкиваюсь Вкладка «вставка», кнопка «рисунки», выбрать рисунок, затем нажать не «выбрать», а стрелочку рядом с этой кнопкой — откроется меню вставки, и там можно выбрать «вставить связь». То есть рисунок не будет помещен в *.docxwordmedia, а будет подгружаться из указанной папки.
1 |
|
1 / 1 / 1 Регистрация: 12.11.2018 Сообщений: 72 |
|
|
30.11.2018, 13:45 [ТС] |
3 |
|
Dinoxromniy, Это документ загружен из интернета, так что не прокатит. Скажите, пожалуйста, у вас открываются картинки в этом документе?
0 |
|
1232 / 670 / 238 Регистрация: 22.12.2015 Сообщений: 2,089 |
|
|
30.11.2018, 13:51 |
4 |
|
у вас открываются картинки в этом документе? Dr_Mann, в этом документе нет картинок, в принципе нет.
1 |
|
1 / 1 / 1 Регистрация: 12.11.2018 Сообщений: 72 |
|
|
30.11.2018, 13:52 [ТС] |
5 |
|
Dinoxromniy, Понял. Попробую связаться с источником документа..
0 |
|
1232 / 670 / 238 Регистрация: 22.12.2015 Сообщений: 2,089 |
|
|
30.11.2018, 13:56 |
6 |
|
Решение
Попробую связаться с источником документа.. Если у него видны эти картинки, он может внедрить из в документ.
1 |
|
1 / 1 / 1 Регистрация: 12.11.2018 Сообщений: 72 |
|
|
30.11.2018, 14:02 [ТС] |
7 |
|
Dinoxromniy, Еще раз попробовал скачать документ с источника (онлайн-калькулятор), проблему исправили. По-моему разработчики следят за темой))
0 |
|
0 / 0 / 0 Регистрация: 22.07.2019 Сообщений: 9 |
|
|
22.07.2019, 11:42 |
8 |
|
Я здесь пишу, чтобы не создавать новую тему. У меня примерно такая же проблема, но не совсем. Дело вот в чём имеется документ Word (doc или docx, неважно), с ним связыны (не внедрены!) несколько десятков рисунков ( — нельзя внедрять, поскольку часть рисунков всё время редактируется!). При перемещении папки с файлом (или после переноса его на другой компьютер) картинки не отображаются, то есть Word хранит не относительный, а абсолютный путь к картинкам. Вопрос вот в чём: Можно ли сделать так, чтобы в настройках конкретного документа Word абсолютный путь заменялся на относительный?
0 |
|
Модератор 11336 / 4655 / 748 Регистрация: 07.08.2010 Сообщений: 13,484 Записей в блоге: 4 |
|
|
22.07.2019, 12:08 |
9 |
|
Можно ли сделать так, чтобы в настройках конкретного документа Word абсолютный путь заменялся на относительный? видимо можно, с помощью макросика , который будет корректировать поля связи
0 |
|
0 / 0 / 0 Регистрация: 22.07.2019 Сообщений: 9 |
|
|
22.07.2019, 12:52 |
10 |
|
Можно ли сделать так, чтобы в настройках конкретного документа Word абсолютный путь заменялся на относительный? видимо можно, с помощью макросика , который будет корректировать поля связи Это решение не годится по двум причинам: слишком сложно и, главное, мои партнёры категорически отказываются принимать/открывать документы Word со встроенными макросами.
0 |
|
1232 / 670 / 238 Регистрация: 22.12.2015 Сообщений: 2,089 |
|
|
22.07.2019, 14:11 |
11 |
|
Alek2014, кокретезируйте задачу, возможно сгодятся следующие костыли:
0 |
|
Модератор 11336 / 4655 / 748 Регистрация: 07.08.2010 Сообщений: 13,484 Записей в блоге: 4 |
|
|
22.07.2019, 14:25 |
12 |
|
пример через явное описание поля связи(макросом, на своем компе) Миниатюры
Вложения
1 |
|
0 / 0 / 0 Регистрация: 22.07.2019 Сообщений: 9 |
|
|
22.07.2019, 16:49 |
13 |
|
пример через явное описание поля связи(макросом, на своем компе) Годится, подробнее об этом написано в https://www.msofficeforums.com… files.html
0 |
Есть множество excel файлов с рисунками, и для удобства разработал в отдельном файле excel макрос, который копирует все листы выбранного файла из этого множества. Что кучка файлов, что сам excel с макросом хранится на сетевом шаре, и проблема в том, что у части пользователей при копировании картинки отображаются корректно, а у остальных нет.. Пишет, что «не удаётся отобразить рисунок с красным крестиком». Рисунки в файлах прикреплены не по ссылке, т.е они зашиты в файл.
В чем же может быть проблема?
Код копирования листов из файла
Private Sub CopySheets(ByVal Path As String)
    Dim Item As Object
    Dim oWbk As Workbook
    Set oWbk = Workbooks.Open(Path)
            For Each Item In oWbk.Sheets
                    oWbk.Sheets(Item.Name).Copy After:=ThisWorkbook.Worksheets(ThisWorkbook.Worksheets.Count)
            Next
    oWbk.Close False
End Sub
задан 21 мар 2019 в 12:25
2
Не дочитал до конца, в итоге не то написал 
Всё зависит видимо от версии офиса и установленных компонентов.
А может тривиально — у тех у кого не отображается «крестик» — нет на чтение прав.
ответ дан 21 мар 2019 в 13:03
1
Не следует переменые называть зарезервированными словами (Item, Path). Даже если причина причина потери рисунков не в этом…
Private Sub CopySheets(ByVal sPath As String)
Dim wBook As Workbook, sht As Worksheet
    With Application: .ScreenUpdating = False: .DisplayAlerts = False: End With
    Set wBook = ThisWorkbook

    With Workbooks.Open(Filename:=sPath)
        For Each sht In .Sheets
            sht.Copy After:=wBook.Worksheets(wBook.Worksheets.Count)
        Next sht

        .Close
    End With

    Set wBook = Nothing
    With Application: .ScreenUpdating = True: .DisplayAlerts = True: End With
End Sub
ответ дан 21 мар 2019 в 19:58
Checking your computer for viruses can solve the issue
by Madalina Dinita
Madalina has been a Windows fan ever since she got her hands on her first Windows XP computer. She is interested in all things technology, especially emerging technologies… read more
Updated on January 4, 2023
Reviewed by
Alex Serban
After moving away from the corporate work-style, Alex has found rewards in a lifestyle of constant analysis, team coordination and pestering his colleagues. Holding an MCSA Windows Server… read more
- Outlook normally displays images from incoming emails.
- Sometimes you get the infamous red X button and the linked image cannot be displayed.
Many Outlook users have encountered an error message when trying to display a linked image.
Outlook normally displays images from incoming emails, but oftentimes users get the infamous red X button and the message the linked image cannot be displayed.
The error mainly occurs in Outlook 2013 and Outlook 2016 users. The linked image cannot be displayed message in Outlook can be quite annoying and prevent you from viewing your emails properly.
Let’s see how to easily correct that.
- How do I fix an Outlook image that can’t be displayed?
- 1. Check your antivirus software
- 2. Modify the registry
- 3. Relocate your Temporary Internet Files folder (IE)
- 4. Disable the setting for encrypted pages
- 5. Repair the Office Outlook app
- 6. Add a sender to the Safe Senders List
- 7. Create a new user account
- 8. Reinstall Outlook
How do I fix an Outlook image that can’t be displayed?
1. Check your antivirus software
In some instances, it’s possible that your antivirus is causing this issue.
If the linked image cannot be displayed in Outlook, it might be possible that email protection feature is causing the problem.
To fix the problem, open email protection settings and try disabling certain features. If that doesn’t help, you might have to disable your antivirus altogether.
In some cases, the only way to fix this issue is to remove your antivirus, so you might want to try that as well.
Even if you remove your third-party antivirus, you’ll still be protected by Windows Defender on Windows 10, so there’s no need to worry about your safety.
Many users had this issue with McAfee, but other antivirus applications can also cause this problem to appear.
For Norton users, we’ve got a dedicated guide on how to completely remove it from your PC. There’s a similar guide for McAffe users, as well.
If you’re using any antivirus and you want to completely remove it from your PC, after removing the antivirus, check if the problem is still there. If the problem doesn’t appear, you should consider switching to a different antivirus.
2. Modify the registry
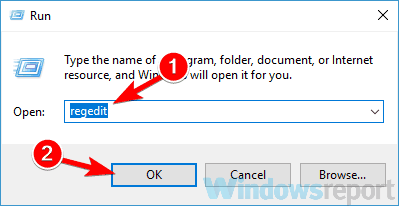
1. Press Windows Key+R to open a Run dialog box, and type regedit and press Enter.
2. Locate and select the following subkey:
HKEY_CURRENT_USERSoftwareMicrosoftOfficex.0Common
DWORD: BlockHTTPimages
Value: 1
or this subkey if the Group Policy is enabled
HKEY_CURRENT_USERSoftwarepoliciesMicrosoftOfficex.0Common
DWORD: BlockHTTPimages
Value: 1
3. Right-click the BlockHTTPimages key > select Delete, and confirm the deletion.
5. Go to the File menu, and click Exit.
According to users, sometimes the linked image cannot be displayed in Outlook due to certain issues in your registry.
Your registry holds all sorts of values, and if one of those values is corrupted, you might encounter this and many other problems.
As always, before modifying the registry, back it up in case anything goes wrong.
However, you can fix that problem by completing the above procedure. After making these changes to the registry, check if the problem is still there.
If you can’t edit your Windows 10’s registry, read this handy guide and find the quickest solutions to the issue.
Can’t access the Registry Editor? Things aren’t as scary as they seem. Check out this simple guide and solve the issue quickly.
3. Relocate your Temporary Internet Files folder (IE)
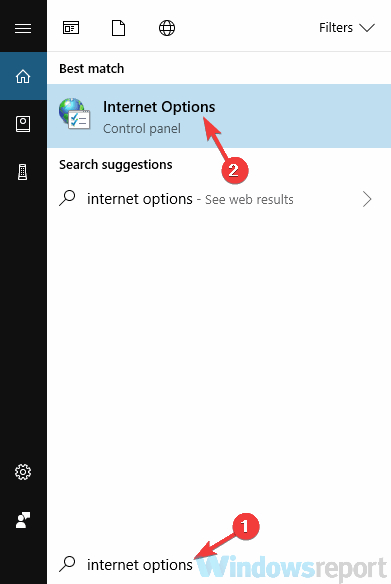
- Press Windows Key + S and enter internet options.
- Choose Internet Options from the list of results.
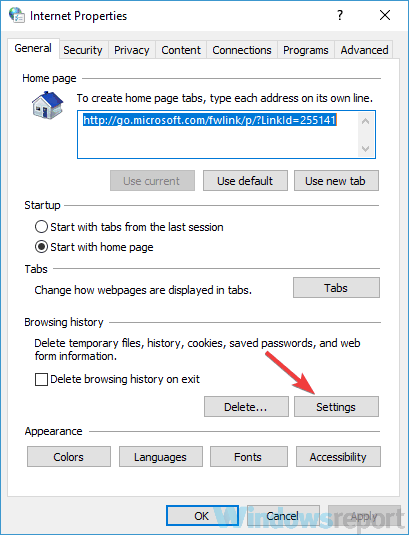
- In the Browsing history section click the Settings button.
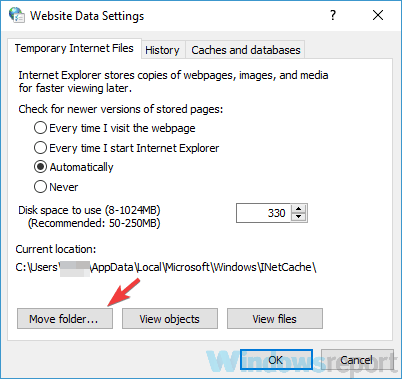
- Now click the Move folder button and choose a new location for temporary Internet files.
After doing that, save changes and restart your PC. Once your PC restarts, check if the problem is still there.
Sometimes the linked image cannot be displayed in Outlook due to your Temporary Internet Files folder.
Some PC issues are hard to tackle, especially when it comes to corrupted repositories or missing Windows files. If you are having troubles fixing an error, your system may be partially broken.
We recommend installing Restoro, a tool that will scan your machine and identify what the fault is.
Click here to download and start repairing.
The contents of this folder can get corrupted, and the best way to fix the issue is to choose a different location for a new Temporary Internet Files folder.
By doing so, you’ll recreate the Temporary Internet Files directory. To choose a new location for Temporary Internet Files, follow the above steps.
4. Disable the setting for encrypted pages
- Open Internet Options window.
- We showed you how to do that in one of our previous solutions.
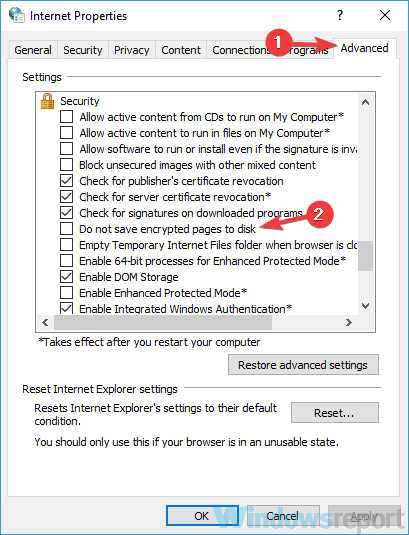
- Navigate to the Advanced tab.
- In the Security section, disable Do not save encrypted pages to disk option.
- Now click Apply and OK to save changes.
According to users, sometimes the linked image cannot be displayed in Outlook due to certain settings.
Sometimes certain settings can lead to various issues, but you can solve the problem simply by disabling them. After disabling this option, check if the problem is still there.
5. Repair the Office Outlook app
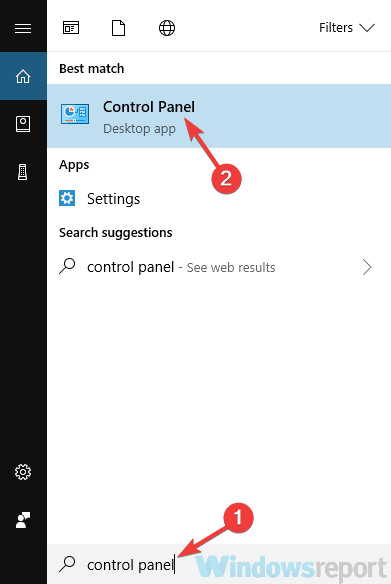
- Press Windows Key + S and enter control panel.
- Select Control Panel from the list of results.
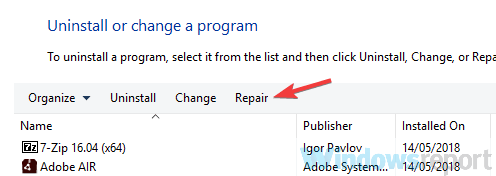
- Head over to the Programs and Features section.
- A list of installed applications should now appear.
- Locate Microsoft Office on the list and click Repair.
- Select Online Repair and click Repair once again to confirm.
- Now follow the instructions on the screen to repair the Office installation.
If the linked image cannot be displayed in Outlook, it’s possible that your Office installation is corrupted. To fix this problem, it’s advised to repair the installation.
After the Office installation is repaired, check if the problem is still there.
You can’t open Control Panel? Take a look at this step-by-step guide to find a solution.
6. Add a sender to the Safe Senders List
- In Outlook, go to the Home tab, click Junk, and choose Junk E-mail Options.
- Head over to the Safe Senders tab and check Automatically add people I e-mail to the Safe Senders List check box.
In order to fix the problem with linked images, it’s important that you add a specific sender to a Safe Senders List.
In addition, you can also add the entire domain to the Safe Senders List. To do that, just follow the above procedure.
In addition, there should be an option to add individual emails and domains to the Safe Senders List, so you can add only specific contacts and domains.
After making these changes, check if the problem is still there.
7. Create a new user account
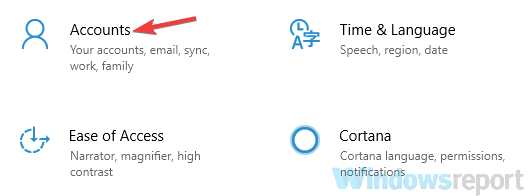
- Open the Settings app by using Windows Key + I shortcut.
- When the Settings app opens, navigate to the Accounts section.
- Select Family & other people from the left pane.
- Now click Add someone else to this PC button in the right pane.
- Now select I don’t have this person’s sign-in information.
- Choose to Add a user without a Microsoft account.
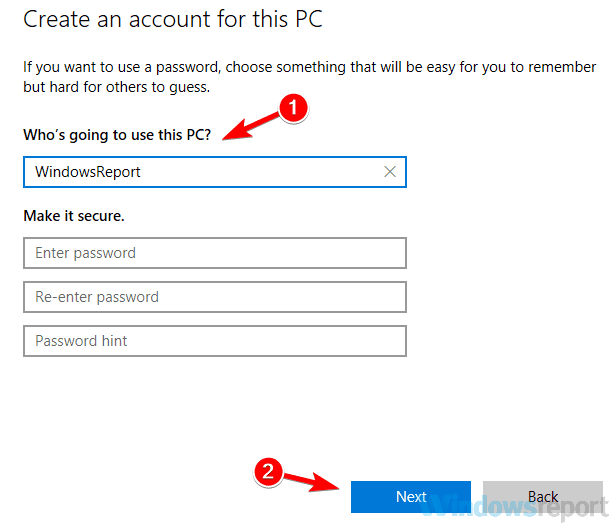
- Enter the desired username for the new account and click Next.
According to users, if the linked image cannot be displayed in Outlook, the issue might be your user account.
Sometimes the user account can get corrupted, and this can lead to this and many other problems.
However, you can fix the issue simply by creating a new user account. After creating a new user account, switch to it and check if the problem is still there.
If the issue doesn’t appear on the new account, you’ll need to move your personal files to it and start using it instead of your old account.
If you’re having trouble opening the Setting app, take a look at this detailed article to solve the issue.
8. Reinstall Outlook
If the linked image cannot be displayed in Outlook, you might want to try reinstalling it. Sometimes the Outlook installation can be corrupted, and one way to fix it is to reinstall Outlook.
There are several ways to do that, but the most effective one is to use uninstaller software.
In case you don’t know, uninstaller software is a special application that will completely remove all files and registry entries associated with an application.
The best uninstaller software will be able to force the uninstallation of nonresponsive or malicious apps without causing any damage to your system.
Once Outlook is removed, install it again and the problem should be resolved.
Which solution worked for you? Leave your answer along with any other questions or suggestions in the comments section below and we’ll be sure to take a look.
Speaking of these solutions, apply them when encountering similar issues:
- The linked image cannot be displayed Office 365 – According to users, this issue can be caused by your antivirus software and in order to fix it, you might have to disable your antivirus.
- The linked image cannot be displayed. The file may have been moved renamed or deleted– This issue can appear if there’s a problem with a Temporary Internet Files directory. Simply move this directory to a different location and the problem should be resolved.
- Outlook 2016, 2013, 2010 error the linked image cannot be displayed – This issue can affect almost any version of Outlook. However, most of our solutions are compatible with all versions of Outlook, so you should be able to apply them.
- Outlook email signature the linked image cannot be displayed – If this issue occurs on your PC, you might be able to solve it simply by making a couple of changes in your registry.
- How do I get images to show in Outlook?
Still having issues? Fix them with this tool:
SPONSORED
If the advices above haven’t solved your issue, your PC may experience deeper Windows problems. We recommend downloading this PC Repair tool (rated Great on TrustPilot.com) to easily address them. After installation, simply click the Start Scan button and then press on Repair All.


 . Замените ее на:


 Сообщение было отмечено Dr_Mann как решение


