
Сохранение файла рабочей книги Excel, существующего или нового, с помощью кода VBA. Методы Save и SaveAs объекта Workbook, параметр SaveChanges метода Close.
Сохранение существующего файла
Сохранить существующий открытый файл рабочей книги Excel из кода VBA можно несколькими способами. В примерах используется выражение ActiveWorkbook, которое может быть заменено на ThisWorkbook, Workbooks(«ИмяКниги.xlsx»), Workbooks(myFile.Name), где myFile — объектная переменная с присвоенной ссылкой на рабочую книгу Excel.
Простое сохранение файла после внесенных кодом VBA Excel изменений:
Сохранение файла под другим именем (исходная рабочая книга будет автоматически закрыта без сохранения внесенных изменений):
|
ActiveWorkbook.SaveAs Filename:=«C:ТестоваяНоваяКнига.xlsx» |
Сохранить файл рабочей книги можно перед закрытием, используя параметр SaveChanges метода Close со значением True:
|
ActiveWorkbook.Close SaveChanges:=True |
Чтобы закрыть файл без сохранения, используйте параметр SaveChanges метода Close со значением False:
|
ActiveWorkbook.Close SaveChanges:=False |
Сохранение файла под другим именем при закрытии рабочей книги:
|
ActiveWorkbook.Close SaveChanges:=True, Filename:=«C:ТестоваяНоваяКнига.xlsx» |
Если в примерах с методом Close параметр SaveChanges пропустить, будет открыто диалоговое окно с запросом о сохранении файла.
Новая книга сохраняется с указанием полного имени:
|
Workbooks.Add ActiveWorkbook.SaveAs Filename:=«C:ТестоваяНоваяКнига.xlsx» |
После этого к новой книге можно обращаться по имени: Workbooks ("НоваяКнига.xlsx").
Если не указать полное имя для сохраняемого файла:
|
Workbooks.Add ActiveWorkbook.Save |
тогда новая книга будет сохранена с именем и в папке по умолчанию, например: Книга1.xlsx, Книга2.xlsx, Книга3.xlsx и т.д. в папке «Документы».
If you’ve worked with Excel before, you’re probably quite familiar with 2 basic commands for saving workbooks:
- Save.
- Save As.
 It may not surprise you to know that, when working with VBA, you can carry out these same activities.
In fact, knowing how to save Excel workbooks using VBA is essential. As you work with Visual Basic for Applications, you’ll notice that saving workbooks is one of the most important things your macros can do.
Due to the importance of knowing how to save workbooks using VBA, this Excel tutorial focuses on this particular topic:
How to save an Excel workbook using VBA.
In addition to providing some examples of VBA code that you can use to save workbooks, I explain the basics surrounding 4 VBA methods that you’re likely to encounter and use constantly while saving workbooks. The following table of contents shows the specific topics that I explain in this Excel tutorial:
This Excel tutorial doesn’t cover the topic of saving an Excel workbook as PDF using VBA. I explain how to export an Excel file to PDF using macros, and provide several code examples, here.
Let’s start taking a look at the basic ways to save an Excel workbook using VBA.
How To Save An Excel Workbook Using the Workbook.Save VBA Method
The most basic method to save Excel workbooks using VBA is the Workbook.Save method. Workbook.Save saves the relevant workbook.
In other words, the Workbook.Save method is, roughly, the VBA equivalent of the Save command in Excel.
The syntax of the Workbook.Save method is as follows:
expression.Save
Where “expression” is the relevant Workbook object you want to save.
Let’s take a look at an example to make this clearer. The following macro, named “Save_Workbook”, saves the current active workbook:

This Excel VBA Save Workbook Tutorial is accompanied by an Excel workbook containing the data and macros I use (including the Save_Workbook macro). You can get immediate free access to this example workbook by subscribing to the Power Spreadsheets Newsletter.
Notice that the macro has only 1 statement which follows the general syntax of the Workbook.Save method explained above:
ActiveWorkbook.Save
In this case, ActiveWorkbook is a simplified reference to the Application.ActiveWorkbook property. This property returns a Workbook object, as required by the Workbook.Save method. The workbook that is returned by the ActiveWorkbook property is, more precisely, the workbook in the current active window.
In summary, the sample Save_Workbook macro above simply saves the current active Excel workbook.
Just as when working directly with Excel, the Save method is an important command/method that is relatively easy and straightforward to execute. However, it doesn’t allow you to determine much in connection with the way the relevant Excel workbook is saved. The workbook is saved and that’s pretty much it.
When working directly in Excel, you use the Save As command if you want to be able to determine more about the way the actual saving of a workbook takes place. Things work in a similar fashion within Visual Basic for Applications.
More precisely, when working with Visual Basic for Applications, you can use the SaveAs method for these purposes. So let’s take a look at:
How To Save An Excel Workbook Using The Workbook.SaveAs VBA Method
The arguments or parameters of a method are what allows you to determine the characteristics of the action that a particular method performs.
As explained above, the Workbook.Save method doesn’t have any parameters. As a consequence, you can’t really determine much about how the relevant workbook is saved.
The Workbook.SaveAs method is different. Its 12 parameters allow you to further determine several aspects about the way in which an Excel workbook is saved. In other words, Workbook.SaveAs is more flexible and complex than Workbook.Save.
Workbook.SaveAs is, roughly speaking, the VBA equivalent of the Save As command in Excel. Therefore, it allows you to save a workbook in a particular file. The complete syntax of the Workbook.SaveAs method is as follows:
expression.SaveAs(FileName, FileFormat, Password, WriteResPassword, ReadOnlyRecommended, CreateBackup, AccessMode,ConflictResolution, AddToMru, TextCodepage, TextVisualLayout, Local)
“expression” is, just as in the case of the Workbook.Save method above, the relevant Workbook object.
All of the parameters (which appear within parentheses) of the SaveAs method are optional. However, in order to understand what this method can help you with, I explain these parameters below.
However, as usual, I use a practical macro example for purposes of illustrating how Workbook.SaveAs works. So let’s start by taking a look at the basic VBA code of the macro example:
How To Save An Excel Workbook With A New Name Using The Workbook.SaveAs Method
The following piece of VBA code saves the current active workbook with a new name provided by the user.
Dim workbook_Name As Variant
workbook_Name = Application.GetSaveAsFilename
If workbook_Name <> False Then
ActiveWorkbook.SaveAs Filename:=workbook_Name
End If
The following screenshot shows the VBA code behind the example macro (called “Save_Workbook_NewName”) which is included in the Excel workbook that accompanies this Excel VBA Save Workbook Tutorial. You can get immediate free access to this example workbook by subscribing to the Power Spreadsheets Newsletter.

This macro can be divided in the following 3 parts:

Let’s take a quick look at each of these parts to understand how the Save_Workbook_NewName macro works:
Part #1: Dim workbook_Name As Variant
This statement simply declares a variable named workbook_Name. The variable is of the Variant data type.
Even though Variant variables are sometimes undesirable, in this particular case that’s not necessarily the case. A Variant variable allows the GetSaveAsFilename (which I introduce below) to be quite flexible.
As implied by its name, and made evident by the following parts of the macro, the purpose of the workbook_Name variable is to store the new name of the saved Excel workbook.
Part #2: workbook_Name = Application.GetSaveAsFilename
This statement assigns a value to the workbook_Name variable. Which value is actually assigned is determined by the Application.GetSaveAsFilename method, which I explain thoroughly below.
At its most basic level, the GetSaveAsFilename method, does the following 2 things:
- Step #1: Displays the Save As dialog box.
You’re probably quite familiar with this dialog box, as it’s the one Excel displays when you execute the Save As command.

- Step #2: Once the user has provided a file name through the Save As dialog box, GetSaveAsFilename gets that particular name.
This is the name that the whole statement we’re analyzing assigns to the variable workbook_Name.

Note that the Application.GetSaveAsFilename method doesn’t actually save a file. It simply gets a name.
To actually save the file using the name provided by the GetSaveAsFilename method, you usually rely on the Workbook.SaveAs method. This method is used in the last part of the Save_Workbook_NewName macro:
Part #3: If workbook_Name <> False Then ActiveWorkbook.SaveAs Filename:=workbook_Name End If
This is an If… Then… Else statement. These type of statements conditionally execute a particular group of statement depending on whether a condition is met or not. The statement begins with the word If. The whole block finishes with the End If statement.
In the case of the Save_Workbook_NewName macro, the If… Then… Else statement proceeds as follows:
Step #1: Test Whether workbook_Name <> False.
The first part of the If… Then… Else statement carries out a logical test. This logical test seeks to confirm whether the variable workbook_Name has a value that is different from (<>) the logical value False.
If the value of workbook_Name isn’t False, the logical test (workbook_Name <> False) evaluates to True. In such a case, the statements within the If… Then… Else are executed.
However, if the value of workbook_Name is equal to the Boolean value False, the logical test evaluates to False. In this case, the conditional statements aren’t executed.
For purposes of this logical test, the value of the variable workbook_Name is that assigned in the previous part. Therefore, the value depends on the input given by the user when the Save As dialog box is displayed. More precisely:
- If the user cancels the Save As dialog box, the value of workbook_Name is False.
- If the user provides a file name through the Save As dialog box, the value of the workbook_Name variable is (generally) that assigned by the user.
In other words:
- If the user provides a file name:
- The logical test carried out by the first part of the If… Then… Else statement is True; and
- The conditional statements that follow are executed.
- If the user cancels the Save As dialog box (by, for example, clicking on the Cancel button):
- The logical test is False; and
- The conditional statements within the If… Then… Else statement aren’t executed.
Step#2: Execute The Statement ActiveWorkbook.SaveAs Filename:=workbook_Name If The Tested Condition Is True.
You already know that, roughly speaking, the logical test workbook_Name <> False returns True if the user has assigned a file name through the Save As dialog box.
In such case, the following statement is executed:
ActiveWorkbook.SaveAs Filename:=workbook_Name
This is where the Workbook.SaveAs method comes into play. This statement does the following:
- Step #1: Uses the Application.ActiveWorkbook property to return the workbook in the current active window.
- Step #2: Saves the active workbook in a file whose name is that given by the user through the Save As dialog displayed by the GetSaveAsFilename method.
In this particular case, only 1 argument of the Workbook.SaveAs method is used: Filename. The Filename argument, as implied by its name, allows you to specify the name of the saved workbook.
I explain more about the Filename argument, and the other arguments of the SaveAs method, in the sections below.
If the tested condition isn’t true, no further statements are executed. In other words, the workbook isn’t saved when the used has cancelled the Save As dialog box.
The Workbook.SaveAs Method: Parameters
The following table introduces the 10 most important optional parameters of the Workbook.SaveAs method:
| Position | Name | Description |
|---|---|---|
| 1 | Filename | Name of saved workbook. |
| 2 | FileFormat | File format for saved workbook. |
| 3 | Password | Protection password for saved workbook |
| 4 | WriteResPassword | Write-reservation password for saved workbook. |
| 5 | ReadOnlyRecommended | Determines whether workbook is saved as read-only recommended. |
| 6 | CreateBackup | Determines whether a backup file of the saved workbook is created. |
| 7 | AccessMode | Determines the access mode of the saved workbook. |
| 8 | ConflictResolution | Applies only if saved workbook is shared.
Determines how conflicts that show up when saving are resolved. |
| 9 | AddToMru | Determines whether saved workbook is added to list of recently used files. |
| 12 | Local | Determines whether the workbook is saved against the language of Excel (usually local) or VBA (usually US-English). |
2 parameters of the SaveAs method (#10, TextCodepage and #11, TextVisualLayout) aren’t included in the table above nor explained below. According to Microsoft’s Official Documentation (at the time of writing), both of these parameters are ignored.
Let’s take a closer look at each of the individual arguments of Workbook.SaveAs:
Argument #1: Filename
As implied by its name, you use the Filename argument of the Workbook.SaveAs method to specify the name of the saved workbook.
When working with the Filename argument, you can either:
- Specify the full file path; or
- Don’t specify the file path.
If you don’t specify the file path, Excel saves the workbook in the current folder.
For most users, specifying the file path isn’t very convenient. You (or the user) need to specify accurate file paths, names and extensions. The approach is tedious and error prone.
This is the main reason why the Application.GetSaveAsFilename used in the Save_Workbook_NewName is so helpful: it allows the user to browse the different folders and easily specify the full file path and name of the saved Excel workbook.
The initial basic version of the Save_Workbook_NewName macro uses the Filename argument, as shown in the screenshot below:

Argument #2: FileFormat
You can use the FileFormat argument of the Workbook.SaveAs method to specify the file format of the saved file.
If you don’t use the FileFormat argument, Excel determines the file format as follows:
- In the case of workbooks that already exist, the workbook is saved using the same file format as the last time.
- If the workbook is new, the workbook is saved using the format of the Excel version you’re using.
Even though this parameter (as all other arguments of the SaveAs method) is optional, you may want to develop the habit of using it.
You specify a particular file format using the XlFileFormat enumeration. The Microsoft Developer Network lists more than 50 different possible values.
In practice, you’re unlikely to need/use so many different formats. In fact, some of the formats that are listed at the Microsoft Developer Network are not supported in the more recent versions of Excel.
Therefore, I provide a basic overview and breakdown of the XlFileFormat values that you may actually encounter. Even though this list is much shorter than that at the Microsoft Developer Network, you’re still likely to use only a subset of the values I explain below.
The following are the 4 main file formats in Excel 2007-2013:
- 50: xlExcel12.
- 51: xlOpenXMLWorkbook.
- 52: xlOpenXMLWorkbookMacroEnabled.
- 56: xlExcel8.
As a general rule, it’s better to use the FileFormat values (numbers) instead of the names. The reason for this is that this avoids some compilation problems whenever you execute the relevant macro in an older version of Excel that may not recognize the name.
So let’s a look at some of the values that the FileFormat argument can take:
| Value | Name | Description |
|---|---|---|
| Add-Ins And Templates | ||
| 17 | xlTemplate / xlTemplate8 | Template / Template 8.
Generally used in versions between Excel 97 and Excel 2003. |
| 18 | xlAddIn / xlAddIn8 | Excel 1997 to 2003 Add-In. |
| 53 | xlOpenXMLTemplateMacroEnabled | Macro-Enabled Open XML template. |
| 54 | xlOpenXMLTemplate | Open XML template. |
| 55 | xlOpenXMLAddIn | Open XML Add-In. |
| Text Files | ||
| -4158 | xlCurrentPlatformText | Text file format for platform in which workbook is saved. |
| 2 | xlSYLK | Symbolic Link Format file.
Only the active sheet is saved. |
| 6 | xlCSV | CSV (comma-separated values) text file format. |
| 9 | xlDIF | Data Interchange Format file.
Only saves the current active sheet. |
| 19 | xlTextMac | Mac text file format. Ensures that basic formatting (such as tab and line breaks) and characters are interpreted correctly.
xlTestMac saves only the active sheet. |
| 20 | xlTextWindows | Windows text file format. Ensures that basic formatting (such as tab and line breaks) and characters are interpreted correctly.
xlTestWindows saves only the active sheet. |
| 21 | xlTextMSDOS | MSDOS text file format. Ensures that basic formatting (such as tab and line breaks) and characters are interpreted correctly.
xlTestMSDOS saves only the active sheet. |
| 22 | xlCSVMac | CSV file format for Mac platform. Ensures that basic formatting (such as tab and line breaks) and characters are interpreted correctly.
xlCSVMac saves only the active sheet. |
| 23 | xlCSVWindows | CSV file format for Windows platform. Ensures that basic formatting (such as tab and line breaks) and characters are interpreted correctly.
xlCSVWindows saves only the active sheet. |
| 24 | xlCSVMSDOS | CSV file format for MS-DOS platform. Ensures that basic formatting (such as tab and line breaks) and characters are interpreted correctly.
xlCSVMSDOS saves only the active sheet. |
| 36 | xlTextPrinter | Formatted text file.
Only saves the current active worksheet. |
| 42 | xlUnicodeText | Unicode text file format. |
| Spreadsheets (Excel and Others) | ||
| -4143 | xlWorkbookNormal | Excel workbook file format. |
| 39 | xlExcel5 / xlExcel7 | Excel versions from 1993 (Excel 5.0) and 1995 (Excel 7.0). |
| 43 | xlExcel9795 | Excel versions from 1995 and 1997.
However, as explained by author Richard Mansfield in Mastering VBA for Microsoft Office 2013, this file format is generally compatible with Excel 95 and later versions. |
| 46 | xlXMLSpreadsheet | XML spreadsheet file format.
Generally used in Excel 2003. |
| 50 | xlExcel12 | Excel 2007 version. |
| 51 | xlOpenXMLWorkbook / xlWorkbookDefault | Open XML workbook / Workbook default file format. |
| 52 | xlOpenXMLWorkbookMacroEnabled | Macro-Enabled Open XML workbook. |
| 56 | xlExcel8 | Excel version from 1997. |
| 60 | xlOpenDocumentSpreadsheet | Open Document Spreadsheet file format.
OpenDocument Spreadsheet files can be opened using spreadsheet applications that use the OpenDocument Spreadsheet format. Examples of such applications are Google Sheets, Open Office Calc and Excel itself. Formatting may be affected when saving or opening Open Document Spreadsheet files. |
| 61 (&H3D) | xlOpenXMLStrictWorkbook | ISO Strict Open XML file format. |
| Clipboard Files | ||
| 44 | xlHtml | HTML / webpage file format. |
If you save the Excel workbook to a CSV or text file format, the following 2 things happen:
- Excel selects the code page to use by checking the system locale configuration in the computer where the workbook is saved. The code page used is the one corresponding to the language for the system locale in use. In Windows 10, you can find these settings by going to Settings > Time & Language > Region & Language.
- Excel saves the file in logical layout. This is relevant, in particular, when working with files containing bi-directional text, where text may be in different directions (left-to-right and right-to-left). Whenever text in one direction is embedded within text in the other direction, the logical layout saves the file in such a way that the reading order is correct for all languages being used, regardless of their directionality. Then, when such a file is opened later, all the text within the file is (generally) displayed in the appropriate direction. This direction is determined by the character value ranges of the code page being used.
Let’s go back to the sample Save_Workbook_NewName. The following screenshot shows how the VBA code of this macro looks like when I add the FileFormat argument and set its value to 52 (Macro-Enabled Open XML workbooks).

Argument #3: Password
The Password argument of the Workbook.SaveAs method allows you to (as you may expect) enter a password to protect the saved Excel workbook.
The Password argument has the following 3 main characteristics:
- Is a string.
- Is case-sensitive.
- Its maximum length is 15 characters.
The following screenshot shows the VBA code behind the Save_Workbook_NewName macro with a password. In this case, the password is “Excel Tutorial”.

If you save a workbook using a macro such as the above, next time anyone (you or another user) tries to open the Excel workbook, Excel displays the Password dialog.

If the wrong password is entered, Excel doesn’t open the workbook. Instead, it displays a warning.

Argument #4: WriteResPassword
The WriteResPassword parameter of the Workbook.SaveAs method is, in some ways, similar to the Password argument that I explain above. However, Password and WriteResPassword differ in one essential characteristic:
They protect different things.
As explained above, Password protects the workbook. If you (or the relevant user) fail to provide the correct password, Excel doesn’t open the workbook.
WriteResPassword protects the write-reservation characteristic of the workbook. To see what this is, and how it works in practice, I add the WriteResPassword argument to the Save_Workbook_NewName macro. The password for these purposes is “Excel Course”.

The dialog box that Excel displays to ask for the WriteResPassword is slightly different than the one it uses when asking for the Password. Notice how it informs that the user who has saved the workbook reserved it and provides 2 options:
- You can enter the password and Excel grants you write access.
- Otherwise, you can open the workbook as read-only.

If I choose to open the workbook as read-only, Excel does precisely so. In that case, it warns in a few places that the workbook is read-only and changes aren’t saved.

If you enter the wrong WriteResPassword, Excel reacts in the same way as it does when you enter the wrong Password (as shown above). In other words, it doesn’t open the workbook and displays the following message:

Argument #5: ReadOnlyRecommended
The ReadOnlyRecommended argument provides you with a less strict way (when compared with the WriteResPassword above) to protect the Excel workbook you’re saving.
More precisely, if you set a particular workbook to be read-only recommended, Excel displays a message making such recommendation whenever the file is opened.

Setting a workbook to be read-only recommended doesn’t actually protect or reserve the workbook in the same way as the Password or the WriteResPassword do. Any user can open a read-only recommended Excel workbook normally (not as read-only) by, for example:
- Clicking “No” in the dialog box above.
- Setting the IgnoreReadOnlyRecommended argument of the Workbooks.Open argument to True when opening the workbook using VBA.
To determine that an Excel workbook is read-only recommended, you simply set the ReadOnlyRecommended argument to True.

Argument #6: CreateBackup
The CreateBackup argument of the Workbook.SaveAs method allows you to determine whether a backup of the workbook being saved is created.
If you want to create a backup of the saved Excel workbook, set the CreateBackup argument to True.

Argument #7: AccessMode
The AccessMode argument allows you to specify the access mode for the saved workbook. This argument can take the following 3 values:
- 1: Stands for xlNoChange. In this case, the default access mode is used.
- 2: Represents xlShared. In this case, the access mode is share list.
- 3: Value for xlExclusive. In this scenario, access mode is exclusive mode.
The following screenshot shows the VBA code of the Save_Workbook_NewName macro with the AccessMode parameter set to xlNoChange:

Argument #8: ConflictResolution
ConflictResolution applies when you’re working with shared workbooks. More precisely, this argument allows you to determine how conflicts (while saving the Excel workbook) are resolved.
You can set the ConflictResolution parameter to any of the following 3 values:
- 1: Stands for xlUserResolution. In this case, Excel displays a dialog box asking the user to resolve the conflict. This is the default setting in case you omit the ConflictResolution argument.
- 2: Represents xlLocalSessionChanges. If you choose this value, the changes made by the local user are accepted always.
- 3: The value for xlOtherSessionChanges. This is the opposite from the above: the changes made by the local user are rejected always.
The following screenshot shows the code of the Save_Workbook_NewName macro with the ConflictResolution parameter set to the default xlUserResolution.

Argument #9: AddToMru
MRU stands for Most Recently Used. This makes reference to Excel’s list of most recently used files which, generally, you find on the Backstage View.

The AddToMru argument of the Workbook.Save method allows you to determine whether the saved workbook is added to this most recently used list.
If AddToMru is set to True, the Excel workbook is added to the list. The default value of AddToMru is, however, False.
In the following image, you can see the VBA code behind the sample Save_Workbook_NewName macro with AddToMru set to True:

As mentioned above, I’m not covering in detail the TextCodePage and TextVisualLayout arguments (arguments #10 and #11).
Argument #12: Local
The last argument of the Workbook.SaveAs method is Local. As implied by its name, Local refers to language and localization aspects of the saved workbook.
More precisely, the Local parameter allows you to determine whether the saved workbook is saved against the language of:
- Excel, as generally determined from the control panel setting; or
- VBA, which is usually US-English. The basic exception to this rule of VBA’s language being US-English occurs when the VBA project that executes the Workbook.SaveAs method is an internationalized XL5/95 VBA project. My guess is that you’re unlikely to work with such projects often.
To determine how Excel proceeds in connection with this topic, you can set the Local argument to True or False.
- True: Saves the workbook against Excel’s language.
- False: Saves the Excel workbook against VBA’s language.
In the following image, you can see the sample Save_Workbook_NewName with the Local parameter set to True:

How To Save A Copy Of An Excel Workbook Using The Workbook.SaveCopyAs VBA Method
The Save and SaveAs methods explained above are the basic methods you’ll need to save Excel workbooks using VBA.
However, both of these methods save and modify the current open Excel workbook. You may encounter some situations where this isn’t the outcome you desire.
In other words, you’ll probably be in situations where you want a macro to simply:
- Save a copy of the current Excel workbook, but…
- Don’t actually modify the current file in the memory of the computer.
These type of situations are great for using the Workbook.SaveCopyAs VBA method. This method does precisely this. It takes the workbook and:
- Saves a copy to a file.
- Doesn’t modify it in memory.
The syntax of the SaveCopyAs method is, once again, relatively simple:
expression.SaveCopyAs(Filename)
Just as with the other methods explored in this Excel tutorial, “expression” represents a Workbook object. “Filename”, the only parameter of the SaveCopyAs method is the full file path, name and extension of the copy that you’re saving.
Since you’re likely to use this method on the active workbook most of the time, you’ll probably end up using the following syntax often:
ActiveWorkbook.SaveCopyAs(Filename)
Another commonly used alternative is to use the ThisWorkbook property instead of ActiveWorkbook. The main difference between ThisWorkbook and ActiveWorkbook is that:
- ActiveWorkbook refers to the current active workbook.
- ThisWorkbook refers to the workbook where the macro is actually stored.
Let’s take a look at an example of a macro that uses the Workbook.SaveCopyAs method to save a copy of the current active workbook:
The screenshot below shows a macro called “Save_Copy_Workbook”.

This macro has a single (quite long) statement. This goes as follows:
ActiveWorkbook.SaveCopyAs Filename:=ActiveWorkbook.Path & “Copy ” & Format(Now, “yy-mm-dd”) & ” ” & ActiveWorkbook.Name
Notice that the structure I use in the Save_Copy_Workbook macro follows the basic syntax of the Workbook.SaveCopyAs method explained above. However, let’s split the statement in 2 parts in order to understand better what’s going on, and what can this particular method do for you:

Part #1: ActiveWorkbook.SaveCopyAs
This is the reference to the SaveCopyAs method. It follows the basic syntax explained above.
“ActiveWorkbook” makes reference to the Application.Workbook property. This property returns a Workbook object representing the current active workbook. This active workbook is the one which is manipulated by the SaveCopyAs method.
In other words, the statement simply tells Excel to proceed as follows:
- Step #1: Take the current active workbook.
- Step #2: Save a copy of the current active workbook, without actually modifying it in memory.
Part #2: Filename:=ActiveWorkbook.Path & “Copy ” & Format(Now, “yy-mm-dd”) & ” ” & ActiveWorkbook.Name
This part of the statement specifies the only argument of the Workbook.SaveCopyAs method:
The Filename.
This particular file name for the copy is slightly long but, basically, is built by concatenating 5 items. You use the ampersand (&) operator to concatenate the different items.
Item #1: ActiveWorkbook.Path
This makes reference to the Workbook.Path property. The Path property returns the complete path to the relevant workbook.
In the case of the example above, “ActiveWorkbook.Path” is used to get the path to the current active workbook.
Let’s assume, for example, that the current active workbook (called “Book1”) is saved in the D drive. In this case the path is, simply “D:”.
This sample path (D:) isn’t very long or complicated. However, in practice, you’re more likely to work with longer and more complicated paths that you are to work with just the D drive.
Items #2 And #4: “Copy ” and ” “
This are, simply, text strings. The first string specifies that the first word in the file name is “Copy”. The second string adds a space ( ).
Item #3: Format(Now, “yy-mm-dd”)
This particular statement uses 2 VBA built-in functions, as follows:
- Now returns today’s date and the current time. Alternatively, you can use the Date function, which returns the current date.
- Format takes the date returned by Now and formats it according to the date format “yy-mm-dd”.
In other words, this part of the argument is responsible for returning the date in which the copy is saved in the format yy-mm-dd.
For example, if the date in which you save the copy of the workbook is November 30 of 2015, this item returns 15-11-30.
Item #5: ActiveWorkbook.Name
This item uses the Workbook.Name property to get the name of the workbook.
For example, if the name of the workbook is “Best Excel Tutorial”, Workbook.Name returns exactly that.
In order to make everything clear regarding the Workbook.SaveCopyAs method, let’s take a look at an example:
How To Save A Copy Of An Excel Workbook Using The Workbook.SaveCopyAs VBA Method: An Example
Let’s assume that the current active workbook is called “Best Excel Tutorial” and is saved in the D drive (D:). This is how the D drive looks like before I run the sample Save_Copy_Workbook macro:

The following screenshot shows how the same drive looks after I run the macro. Notice how, now, there’s a new Excel workbook. This is the copy created by the Save_Copy_Workbook Sub procedure.

Let’s go back to the Filename argument of the SaveCopyAs method used within the Save_Copy_Workbook macro:
Filename:=ActiveWorkbook.Path & “Copy ” & Format(Now, “yy-mm-dd”) & ” ” & ActiveWorkbook.Name
Notice how, each of the 5 items explained above expresses itself in practice once the macro is run:
- Item #1: The copy is saved in the same folder as the original workbook, as given by the Workbook.Path property.
- Items #2 and #4: The first word in the actual workbook name is Copy, as determined by the string “Copy”. Also, there is a space between the date (15-11-19) and the original workbook’s name (Best Excel Tutorial) as specified by ” “.
- Item #3: The date in which the workbook is saved (November 19 of 2015 in the example above) is added to the name in the format yy-mm-dd (15-11-19).
- Item #5: The name of the original workbook (Best Excel Tutorial) is added at the end of the copy’s name.
The following image shows this:

How To Name A Workbook Using The Application.GetSaveAsFilename Method
I introduced the Application.GetSaveAsFilename method above. This method is used by one of the sample macros (Save_Workbook_NewName) for purposes of opening the Save As dialog box and allow users to easily browse and enter the path, name and file extension of the saved Excel workbook.
The screenshot below shows the VBA code of the Save_Workbook_NewName macro. Notice the presence of the Application.GetSaveAsFilename method.

The Application.GetSaveAsFilename method doesn’t actually save a file. However, GetSaveAsFilename is a helpful method to use whenever you have a macro that needs to get a file name from the user in order to, among others, save a workbook.
GetSaveAsFilename is useful when the procedure needs to receive/know the name of the file to save. This gives the user the possibility of specifying the file’s path and filename.
As I explain below, you can use the Application.GetSaveAsFilename method precisely for these purposes.
The GetSaveAsFilename method has a few parameters that allow you to customize some of its characteristics. Let’s take a closer look at the method itself and its arguments, starting with:
The Application.GetSaveAsFilename Method: Purpose
The Application.GetSaveAsFilename method does 2 things:
- Displays the Save As dialog box.
- Gets the file name entered by the user in the Save As dialog box.
GetSaveAsFilename doesn’t save a workbook by itself. That’s why, for example, the Save_Workbook_NewName macro above includes uses the Workbook.SaveAs method to actually save the Excel workbook.
The Application.GetSaveAsFilename Method: Syntax
The full syntax of the Application.GetSaveAsFilename method is as follows:
expression.GetSaveAsFilename(InitialFilename, FileFilter, FilterIndex, Title, ButtonText)
“expression” is used to represent the Application object. You’re, therefore, likely to usually use the following basic syntax for this method:
Application.GetSaveAsFilename
This is the syntax used in the version of the Save_Workbook_NewName method shown above.
All of the 5 arguments of the GetSaveAsFilename method are optional. Let’s take a look at them:
The Application.GetSaveAsFilename Method: Arguments
The following table provides a basic description of the 5 parameters of the Application.GetSaveAsFilename method. I explain each of them more thoroughly below.
| Position | Name | Description |
|---|---|---|
| 1 | InitialFilename | Specifies a suggested/default file name. |
| 2 | FileFilter | Determines file filtering criteria. |
| 3 | FilterIndex | Determines the default file filter. |
| 4 | Title | Determines the title of the (usually called) Save As dialog box. |
| 5 | ButtonText | Applies only in the Mac platform.
Determines the text of the (normally called) Save As button. |
There are quite a few similarities between the GetSaveAsFilename method and the GetOpenFilename method (which I describe here). In terms of their arguments, the main differences are as follows:
- GetSaveAsFilename has the InitialFilename argument. GetOpenFilename doesn’t.
- GetOpenFilename has the MultiSelect argument. GetSaveAsFilename doesn’t.
Both of these differences make sense. For example, MultiSelect allows you to determine whether a user can select multiple file names at the same time. This makes sense in the context of opening files. But not in the context of saving files with the GetSaveAsFilename method.
Let’s take a look at each of the parameters introduced above:
Argument #1: InitialFilename
The InitialFilename of the Application.GetSaveAsFilename method allows you to set a suggested file name. This suggested file name is the one that appears, by default, in the File name box of the Save As dialog.

The Save As dialog box displayed above is the result of running the following version of the Save_Workbook_NewName macro. Notice that the InitialFilename argument is added and the suggested name is “Best Excel Tutorial”, as displayed in the image above.

Argument #2: FileFilter
The FileFilter argument of the Application.GetSaveAsFilename method allows you to determine the criteria for file filtering within the Save As dialog box.
These file filtering criteria determine what appears in the Save as type drop-down list box of the Save As dialog box. If you omit the FileFilter argument, the default (as shown in the image below) is All Files.

This isn’t ideal because it may lead to the saved Excel workbook being of an unrecognizable file type if the user doesn’t enter the file extension when saving the file.
However, my guess is that you’ll be in situations where specifying the file filtering criteria is more convenient or, even, necessary. In order to be able to determine which file filters appear in the Save As dialog box, you’ll need to follow the 4 guidelines below.
Don’t worry if the guidelines don’t seem that clear at first. I show you a practical example of VBA code after making the introduction and basic description.
Guideline #1: Each Filter Consists Of A Pair Of Strings.
Each filter you specify when using the FileFilter argument is made up of 2 strings separated by a comma. This looks, roughly, as follows:
String1,String2
String1 and String2 have different structures and purposes. More precisely:
- String1: Is a descriptive string. This string determines what actually appears in the Save as type drop-down box of the Save As dialog box.
- String2: Is the MS-DOS wildcard file-type filter specification. In other words, this string determines how the files are actually filtered depending on their file format.
You don’t need to follow many guidelines regarding the way in which the first string (String1) is specified. However, you do need to follow a more specific syntax when specifying the second string (String2). Let’s take a look at it:
Guideline #2: Syntax To Specify The File-Type Filter.
The second string that you use to specify a file filter is itself composed of 3 elements which are, generally speaking, as follows:
- Element #1: An asterisk (*), used as a wildcard.
- Element #2: A dot (.).
- Element #3: An indication of the file extension used to filter the files. This particular element is usually composed of (where appropriate) an asterisk (*), used as a wildcard, and/or (if appropriate), some text.
The most basic filter is all files, which in practice means that there’s no filter. To specify a file-type filter than includes all files using the syntax above, you’d type asterisk dot asterisk (*.*).
Other examples of file-type filter specifications following this syntax are the following:
- *.txt for text files.
- *.xla for add-ins.
- *.xlsx for Excel workbooks.
- *.xlsm for Macro-Enable Excel workbooks.
- *.xls for Excel 97 to Excel 2003 workbooks.
- *.csv for CSV files.
Knowing these first 2 guidelines is enough for you to start using the FileFilter argument. However, they only explain how to specify a single filter according to a single file type.
However, when working with FileFilter, you can actually specify:
- Several different filters; as well as
- Several different file types for each filter.
The next 2 guidelines show how you can do each of these:
Guideline #3: Syntax To Specify Several Filters.
You can create more than a single filter with the FileFilter argument. In order to so, use commas (,) to separate the filters. In other words, separate each of the pair of strings that constitute a filter from the other pair of strings by using commas (,).
This looks, roughly, as follows:
String1Filter1,String2Filter1,String1Filter2,String2Filter2
Guideline #4: Syntax To Specify Several File Types In A Single Filter.
If you need to filter according to several different data types, you can use several filters by using the syntax explained above.
Alternatively, you can specify several data types for a particular single filter. To do this, separate the MS-DOS wildcard expressions that you use with semicolons (;). This looks roughly as follows:
String1,String2.1;String2.2
Those are the 4 basic guidelines you need to bear in mind to start using the FileFilter argument. Let’s go back to the Save_Workbook_NewName macro and create some file filters:
The following screenshot shows (again) the VBA code behind Save_Workbook_NewName. Notice that the FileFilter argument has been inserted and its syntax follows all of the guidelines I explained above.

To make this clearer, let’s break the argument value into its different parts and highlight how it complies with all of the guidelines described above.
The complete argument is as follows:
“Excel Workbook,*.xlsx,Excel Macro-Enabled Workbook,*xlsm,Excel Templates,*.xltx;*.xltm”
Notice the following things:
- There are 3 filters. Each of the filters is separated from the other by commas (,).

- Each filter is composed of 2 parts: a descriptive string and the relevant MS-DOS wildcard file-type filter specification. These 2 parts are separated by commas (,).
- MS-DOS wildcard file-type filter specifications follow the syntax described above: (i) asterisk (*); (ii) dot (.); and (iii) file extension specification, without wildcard asterisks in this case.
- The last filter uses 2 different file types. These file types are separated by a semicolon (;).


The following image shows how all of the above looks like in practice. Notice how, now, there are 3 different options within the Save as Type box of the Save As dialog box. These 3 filters are those created by the FileFilter argument of the Application.GetSaveAsFilename method.

Argument #3: FilterIndex
Notice how, in the image above, the default file filtering criteria is “Excel Workbook”. This is the first filter that was specified with the FileFilter argument.
You can, however, change the default file filtering criteria by using the FilterIndex argument. You do this by specifying the index number of the criteria you want to set as default.
As a consequence of the above, the FilterIndex argument can take any value between 1 (the first filter) and the number of filters you’ve specified with the FileFilter argument (3 in the example above).
If you set the FilterIndex value to a number higher than the amount of available filters (4 or higher in the case of the Save_Workbook_NewName macro), the first filter is used. In other words, the practical result of specifying an index number that is too high, is the same as that of omitting the FilterIndex parameter.
The following screenshot shows the code of the Save_Workbook_NewName macro with the FilterIndex parameter set to 2.

In the case of this macro, a FilterIndex value of 2 means that “Excel Macro-Enabled Workbook” is the new default filter.

Argument #4: Title
The Title argument of the Application.GetSaveAsFilename method allows you to modify the title of the (usually called) Save As dialog box. If you omit the argument, the default title (Save As) is maintained.
The following image shows how this argument can be used to change the title of the Save As dialog box when executing the Save_Workbook_NewName macro. In this case, the Title argument is set to “VBA Save Excel Workbook”.

When this macro is executed, the (previously called) Save As dialog looks as follows. Notice that the title has indeed changed to “VBA Save Excel Workbook”.

Argument #5: ButtonText
The ButtonText parameter is only applicable in the Mac platform. If you use this argument in Windows, it’s simply ignored.
For those cases where it is applicable, the ButtonText argument allows you to set the text that appears in the (usually known as) Save button.

Conclusion
Knowing how to save Excel workbooks using VBA is essential.
If you’ve read this Excel tutorial, you now know the basics of how to save workbooks using VBA. In fact, you’ve seen 3 different ways to achieve this:
- Using the Workbook.Save method.
- Using the Workbook.SaveAs method.
- Using the Workbook.SaveCopyAs method.
Each of these cases is explained with the help of a real example of VBA code.
Additionally, in the last section of this blog post, I explained the Application.GetSaveAsFilename method. Even though this method doesn’t actually save a file by itself, it allows you to display the Save As dialog so that the users of your macro can easily specify the path and file name of the workbook they’re saving.
SaveAs Method of Workbook Object VBA
We can save workbook by using ‘SaveAs’ method of workbook object in Excel VBA. Please find the following brief description about saveas method of workbook object.

- Why we need to SaveAS a Workbook using VBA?
- VBA SaveAS Workbook – Syntax
- VBA SaveAS Workbook: Example 1
- VBA SaveAS Workbook – Instructions
Why we need to SaveAS a Workbook using VBA?
When we do any changes in the existing workbook, later we may wanted to see the file without changes. So that we can saves changes to the workbook in a different file using ‘SaveAs’ method of workbook object.
VBA SaveAS Workbook – Syntax
Here is the syntax to SaveAs workbook using VBA.
Workbooks(“Your Workbook Name”).SaveAs(
In the above syntax we are using ‘SaveAs’ method of workbook object to save the workbook in another location with modification(s).
VBA SaveAS Workbook:Example 1
Please find the below example, It will show you how to do saveas workbook.
Sub SaveAs_Workbook()
    Dim Wkb As Workbook
    Set Wkb = Workbooks.Add
    ActiveWorkbook.SaveAs Filename:="C:Sample.xlsm"
End Sub
Explanation: In the above example we have created variable named Wkb in the first statement. We have used ‘Add’ method of workbook object to add new workbook and then assigned it to object named Wkb in the second statement. At last in the third statement we have used ‘SaveAs’ method of workbook object to save workbook in another location and the file name is “C:Sample.xlsm” (You can change the file name according to your wish).
VBA SaveAS Workbook – Instructions
Please follow the below step by step instructions to execute the above mentioned VBA macros or codes:
- Open an Excel Workbook
- Press Alt+F11 to Open VBA Editor
- Insert a Module from Insert Menu
- Copy the above code for activating a range and Paste in the code window(VBA Editor)
- Save the file as macro enabled workbook
- Press ‘F5’ to run it or Keep Pressing ‘F8’ to debug the code line by line.
A Powerful & Multi-purpose Templates for project management. Now seamlessly manage your projects, tasks, meetings, presentations, teams, customers, stakeholders and time. This page describes all the amazing new features and options that come with our premium templates.
Save Up to 85% LIMITED TIME OFFER

All-in-One Pack
120+ Project Management Templates
Essential Pack
50+ Project Management Templates
Excel Pack
50+ Excel PM Templates
PowerPoint Pack
50+ Excel PM Templates
MS Word Pack
25+ Word PM Templates
Ultimate Project Management Template
Ultimate Resource Management Template
Project Portfolio Management Templates
-
-
- In this topic:
-
- Why we need to SaveAS a Workbook using VBA?
- VBA SaveAS Workbook – Syntax
- VBA SaveAS Workbook:Example 1
- VBA SaveAS Workbook – Instructions
VBA Reference
Effortlessly
Manage Your Projects
120+ Project Management Templates
Seamlessly manage your projects with our powerful & multi-purpose templates for project management.
120+ PM Templates Includes:
3 Comments
-
Tommaso
August 18, 2016 at 6:35 PM — ReplyHi,
I am trying to combine the :
strFileToOpen = Application.GetOpenFilename
Workbooks.Open Filename:=strFileToOpenwith a SaveAs function. I need it becuase I am trying to create a Macro where I need to open a file that is not always named in the same way, have the macro save it with a standard name, for example: Test Sample, and have the macro work on it. The Macro should take the infomartion needed from this file and report it on the main file where the Macro is running. Finally the Macro should delete the “Test Sample” file and save the file where the Macro is running with a new name.
I hope this makes sense enough for you to understand what I am struggling with!
Thanks!
T -
murali
March 28, 2019 at 7:34 PM — Replyhow to save as same workbook with cells vales text names
-
Carlos
July 28, 2020 at 4:02 AM — ReplyI am trying to do a save as and its function the first time but the second time indicates that i can save with the same name as the open workbook.
Effectively Manage Your
Projects and Resources
ANALYSISTABS.COM provides free and premium project management tools, templates and dashboards for effectively managing the projects and analyzing the data.
We’re a crew of professionals expertise in Excel VBA, Business Analysis, Project Management. We’re Sharing our map to Project success with innovative tools, templates, tutorials and tips.
Project Management
Excel VBA
Download Free Excel 2007, 2010, 2013 Add-in for Creating Innovative Dashboards, Tools for Data Mining, Analysis, Visualization. Learn VBA for MS Excel, Word, PowerPoint, Access, Outlook to develop applications for retail, insurance, banking, finance, telecom, healthcare domains.
Page load link
Go to Top
- Excel VBA Сохранить как
Excel VBA Сохранить как
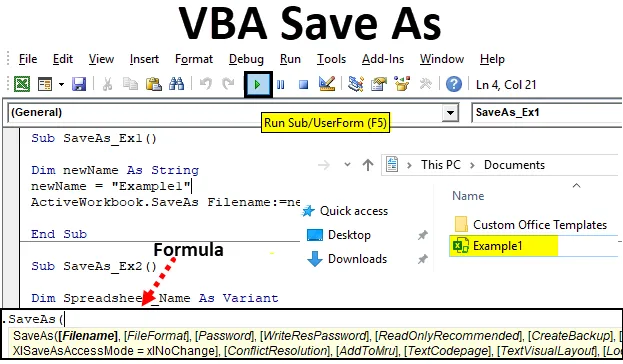
Если вы часто пользуетесь Microsoft Excel, вы должны использовать в нем функцию «Сохранить как», которая позволяет сохранять открытую в настоящий момент книгу с другим именем или другим форматом (Excel Macro-enabled, CSV, PDF и т. Д.). Вы также можете сохранить файл в другой папке, используя этот метод. Однако возможно ли использовать ту же функцию под VBA? Ответ абсолютный Да! У нас также есть функция «Сохранить как» в VBA, которая помогает нам выполнять все вышеупомянутые задачи наряду с некоторыми дополнительными преимуществами (очевидно, автоматизация — одно из преимуществ). В этой статье мы рассмотрим различные примеры функции VBA SAVE AS.
Формула для функции Сохранить как в Excel VBA
Давайте посмотрим ниже формулу для функции Сохранить как в VBA.

Где,
- FileName — имя книги, которую нужно сохранить.
- FileFormat — формат файла, в котором файл должен быть сохранен (напр. Pdf, CSV и т. Д.)
- Пароль — пароль для защиты рабочей книги (рабочая книга не может быть доступна без пароля)
- WriteResPassword — Напишите пароль бронирования для книги.
- ReadOnlyRecommended — распознает, сохранена ли книга в формате только для чтения или нет.
- CreateBackup — определяет, создан ли файл резервной копии для книги.
- AccessMode — распознает режим доступа к книге .
- ConflictResolution — распознает конфликты, возникающие, когда рабочая книга является общей и используется более чем одним пользователем.
- AddToMru — проверяет, добавлена ли рабочая книга в недавно использованный файл или нет.
- Локальный — Проверяет, сохранена ли рабочая книга с законами Excel (местный язык) или с законами VBA (США — английский).
Тише! Много аргументов, верно? Но что, если я скажу вам, все эти аргументы являются необязательными и могут быть пропущены при использовании функции VBA SAVE AS. Однако верно то, что именно эти аргументы делают VBA SaveAs более гибкой в использовании функцией. «Выражение» в начале синтаксиса — не что иное, как выражение, против которого можно использовать эту функцию. Like Workbook — это выражение, с которым можно использовать SaveAs.
Примеры сохранения файла Excel с помощью функции VBA Save As
Ниже приведены различные примеры сохранения файла Excel с использованием функции VBA Save As.
Вы можете скачать этот шаблон VBA Сохранить как Excel здесь — VBA Сохранить как шаблон Excel
Пример № 1 — Как сохранить копию рабочей книги с другим именем?
Давайте посмотрим, как мы можем сохранить текущую книгу под другим именем.
Чтобы использовать функцию «Сохранить как» в Excel VBA, выполните следующие действия:
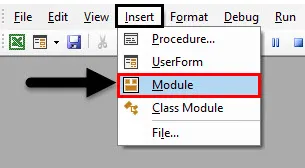
Шаг 1. Добавьте новый модуль в редактор Visual Basic (VBE). Перейдите на Вставить и затем выберите Модуль.
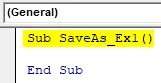
Шаг 2: Определите новую подпроцедуру, которая может хранить макрос.
Код:
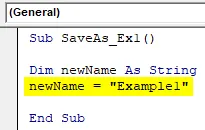
Sub SaveAs_Ex1 () End Sub
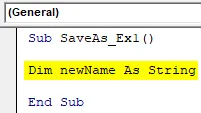
Шаг 3: Определите новую переменную, которая может содержать имя, под которым будет сохранен файл.
Код:
Sub SaveAs_Ex1 () Dim newName As String End Sub
Шаг 4: Теперь используйте оператор присваивания, чтобы присвоить имя этой переменной, используя который текущий файл может быть сохранен как.
Код:
Sub SaveAs_Ex1 () Dim newName As String newName = "Example1" End Sub
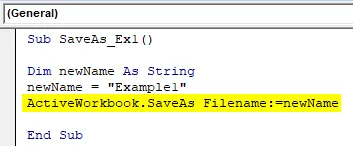
Шаг 5: Теперь используйте функцию SaveAs с аргументом FileName, чтобы сохранить файл с именем «Example1».
Код:
Sub SaveAs_Ex1 () Dim newName As String newName = "Example1" ActiveWorkbook.SaveAs Имя файла: = newName End Sub
Шаг 6: Вот и все, теперь запустите этот код, нажав F5 или вручную, используя кнопку Run, и посмотрите вывод.
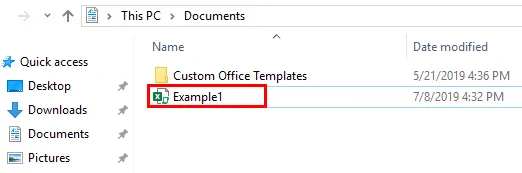
Вы можете видеть, что файл с именем « Пример1 » сохраняется в Документах .
Если бы вы могли записать, файл сохраняется как Macro-Enabled File, потому что исходный файл, на котором я использовал функцию SaveAs, это файл с Macro-Enabled. Это означает, что эта функция в VBA автоматически проверяет формат файла предыдущего файла и сохраняет его в том же формате. Также по умолчанию файл будет сохранен в Документах на этом ПК . Это местоположение по умолчанию может быть предоставлено явно во время определения имени листа.
Пример №2 — Сохранение книги с предоставленным пользователем именем
Вместо первоначального определения имени, можно ли написать код, который позволяет пользователю сохранять рабочий лист под именем по своему выбору, так же как функция Excel Save As?
Выполните следующие шаги, чтобы использовать функцию «Сохранить как» в Excel VBA.
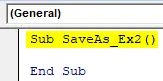
Шаг 1: Определите новую подпроцедуру в недавно вставленном модуле, который может хранить макрос.
Код:
Sub SaveAs_Ex2 () End Sub
Шаг 2: Определите новую переменную, которая может содержать значение пользовательского имени.
Код:
Sub SaveAs_Ex2 () Dim Spreadsheet_Name As Variant End Sub
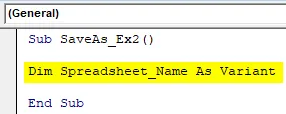
Причина, по которой эта переменная определяется как Variant, заключается в том, что этот тип данных делает соглашения об именах универсальными. Например, пользователь может добавить некоторый дополнительный специальный символ (который разрешен в соглашениях об именах) или может также добавить даты под именем файла.
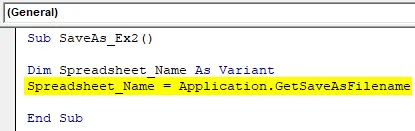
Шаг 3: Теперь с помощью оператора присваивания и комбинации функций, называемой application.GetSaveAsFilename, создайте оператор, который позволит системе принять определенное пользователем имя. Посмотрите, как это было достигнуто на скриншоте ниже.
Код:
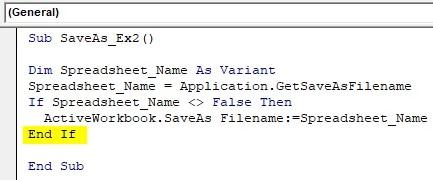
Sub SaveAs_Ex2 () Dim Spreadsheet_Name As Variant Spreadsheet_Name = Application.GetSaveAsFilename End Sub
Шаг 4: Используйте условный IF, чтобы убедиться, что имя, которое вводит пользователь, является действительным согласно соглашениям об именах.
Код:
Sub SaveAs_Ex2 () Dim Spreadsheet_Name As Variant Spreadsheet_Name = Application.GetSaveAsFilename Если Spreadsheet_Name False, тогда End Sub
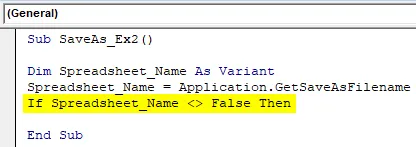
Это условие проверяет, соответствует ли имя, данное пользователем для сохранения рабочего листа, правилам именования, установленным для именования файла, или нет.
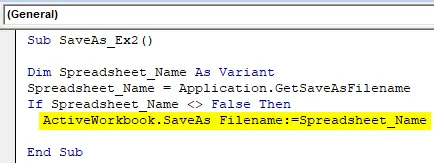
Шаг 5: Запишите утверждение, которое оценивается для данного условия IF.
Код:
Sub SaveAs_Ex2 () Dim Spreadsheet_Name As Variant Spreadsheet_Name = Application.GetSaveAsFilename Если Spreadsheet_Name False Тогда ActiveWorkbook.SaveAs Имя файла: = Spreadsheet_Name End Sub
Этот фрагмент кода оценивается, когда условие IF выполнено. Если это так, активная рабочая книга будет сохранена под именем, определенным в переменной Spreadsheet_Name (которая будет определяться пользователем)
Шаг 6: Завершите цикл IF и запустите этот код, чтобы увидеть результат.
Код:
Sub SaveAs_Ex2 () Dim Spreadsheet_Name As Variant Spreadsheet_Name = Application.GetSaveAsFilename Если Spreadsheet_Name False, тогда ActiveWorkbook.SaveAs Имя файла: = Spreadsheet_Name End If End End
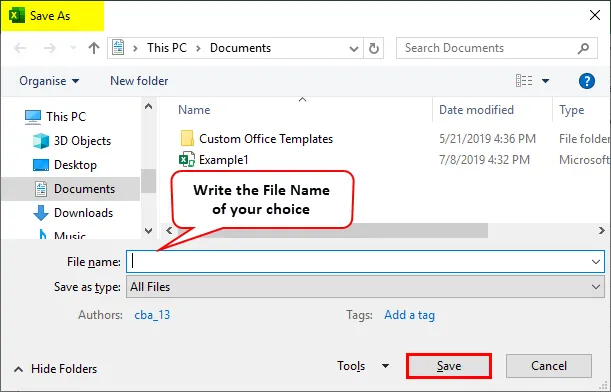
Шаг 7: Как только вы запустите этот код, вы получите диалоговое окно Сохранить как, которое позволит вам ввести имя по вашему выбору и сохранить файл.
Пример № 3 — Как сохранить файл в формате PDF с помощью функции Excel VBA SaveAs?
Предположим, у вас есть данные, указанные ниже в вашей таблице Excel, и вам нужно преобразовать их в PDF.

Выполните следующие шаги, чтобы преобразовать этот файл в PDF с помощью функции VBA Сохранить как:
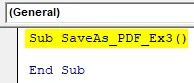
Шаг 1: Определите новую подпроцедуру для хранения макроса.
Код:
Sub SaveAs_PDF_Ex3 () End Sub
Шаг 2. Теперь используйте следующий код, чтобы сохранить этот файл в формате PDF.
Код:
Sub SaveAs_PDF_Ex3 () ActiveSheet.SaveAs Имя файла: = "Vba Save as.pdf" End Sub
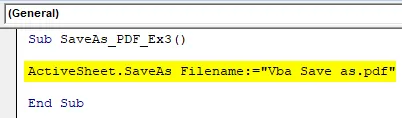
Шаг 3: Запустите этот код, и вы увидите файл PDF, созданный в разделе «Этот ПК»> «Документы».
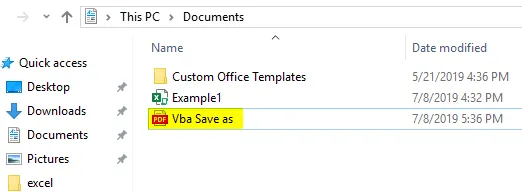
В этом коде ActiveSheet.SaveAs позволяет сохранить файл с тем же именем. Поскольку мы добавили расширение как .pdf в конец файла, оно экспортируется в файл PDF. Вы можете увидеть изображение выше для вашей справки.
То, что нужно запомнить
- По умолчанию местом сохранения файла, используемого в VBA SaveAs, будет Этот ПК> Документы. Тем не менее, вы можете указать каталог вручную во время определения имени файла.
- По умолчанию файл, сохраненный с помощью VBA SaveAs, будет сохранен в том же формате, что и исходный файл. Тем не менее, он также может быть определен в соответствии с требованиями пользователя во время определения переменной.
Рекомендуемые статьи
Это руководство к VBA Сохранить как. Здесь мы обсудим, как сохранить файл с помощью функции Excel VBA Save As вместе с примером и загружаемым шаблоном Excel. Ниже приведены несколько полезных статей о Excel, связанных с VBA.
- VBA Exit Sub
- Создать электронную таблицу в Excel
- VBA Object
- Excel Автосохранение
To save an Excel workbook using VBA, you need to use the SAVE method to write a macro. And in that macro, you need to specify the workbook that you want to save and then use the SAVE method. When you run this code, it works like the keyboard shortcut (Control + S).

- Specify the workbook hat you want to save.
- Type a dot to get the list of all the properties and methods.
- Select the “Save” method out of those or type “Save”
- In the end, run the code to save the workbook.
In this tutorial, we will look at different ways that we can use to save a workbook. So make sure to open the VBA editor from the developer tab to use the code you have in this tutorial.
Helpful Links: Run a Macro – Macro Recorder – Visual Basic Editor – Personal Macro Workbook
Save the ActiveWorkbook
If you want to save the active workbook in that case you can use a code like the following code, instead of specifying the workbook by its name.
ActiveWorkbook.SaveWhen you use the ActiveWorkbook as the workbook, VBA always refers to the workbook which is active despite in which file you are writing the code.
Save the Workbook where you are Writing Code
If you want to save the file where you are writing the code you need to use “ThisWorkbook” instead of the workbook name.
ThisWorkbook.SaveSave All the Open Workbooks
Here we can use a loop to loop through all the workbooks that are open and save them one by one. Look at the below code.
Sub vba_save_workbook()
'variable to use as a workbook
Dim wb As Workbook
'For each to loop through each open workbook and save it
For Each wb In Workbooks
    wb.Save
Next wb
End Sub
The above code uses the FOR EACH loop in each workbook it uses the SAVE method to each file one by one.
Note: If you are trying to save a workbook with the SAVE method that is not saved already, Excel will show a dialog box to ask for your permission to save that file, and then you need to choose if you want to save that file on the default location in the default format.
Now here’s the point: As you are using a macro to save the workbook, that file should be saved in the macro-enabled format and the best way to deal with this situation is to use the SAVE AS method (we’ll see in the next section of this tutorial).
To SAVE a file that is not saved yet, using VBA, you need to use the SAVE AS method. In this method, you can define the file name and the path where you want to save the file, and apart from that, there are ten more arguments that you can define.
expression.SaveAs (FileName, FileFormat, Password, WriteResPassword, ReadOnlyRecommended, CreateBackup, AccessMode, ConflictResolution, AddToMru, TextCodepage, TextVisualLayout, Local)In the following code, you don’t have any argument with the “SAVE AS” method.

When you run this code, it asks you a few things, like, which format you want to use to save the file, do you want to replace the existing file that is already saved with the same name. So it’s better to define the use of some of the arguments.
Save As File on the Current Location
By default, VBA uses the current location to save the file. When you write code with the SAVE AS method and just specify the name that file straight goes to the current folder. You can see in the following code where you have the which saves the active workbook.

Sub save_as_file()
    ActiveWorkbook.SaveAs Filename:="myNewWorkbook"
End Sub
Save As File on a Specific Location
The filename argument also allows you to use the location path in case you want to use a different location to save the file.

Sub save_as_file()
    ActiveWorkbook.SaveAs _
        Filename:="C:UsersDellDesktopmyNewBook"
End Sub
In the above code, you have the path in the FileName argument and VBA uses that path to the file.
Note: You can also use this method to check if a workbook exists in a folder or not before you use the SAVE AS method to save it on a particular location and you can learn more about SAVE AS method from here.
More on VBA Workbooks
VBA Close Workbook | VBA Delete Workbook | VBA ThisWorkbook | VBA Rename Workbook | VBA Activate Workbook | VBA Combine Workbook | VBA Protect Workbook (Unprotect) | VBA Check IF a Workbook is Open | VBA Open Workbook | VBA Check IF an Excel Workbook Exists in a Folder| VBA Create New Workbook (Excel File)
- VBA Workbook