
Change the column width or row height in Excel
You can manually adjust the column width or row height or automatically resize columns and rows to fit the data.

Note: The boundary is the line between cells, columns, and rows. If a column is too narrow to display the data, you will see ### in the cell.
Resize rows
-
Select a row or a range of rows.
-
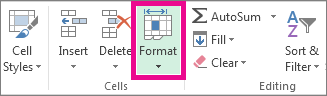
On the Home tab, select Format > Row Width (or Row Height).
-
Type the row width and select OK.
Resize columns
-
Select a column or a range of columns.
-
On the Home tab, select Format > Column Width (or Column Height).
-
Type the column width and select OK.
Automatically resize all columns and rows to fit the data
-
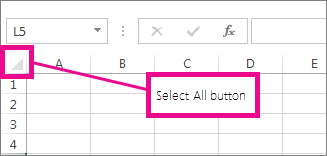
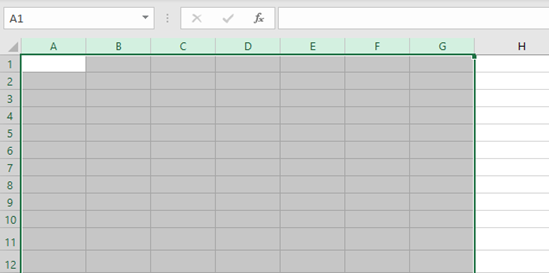
Select the Select All button
 at the top of the worksheet, to select all columns and rows.
 -
Double-click a boundary. All columns or rows resize to fit the data.
 at the top of the worksheet, to select all columns and rows.
Need more help?
You can always ask an expert in the Excel Tech Community or get support in the Answers community.
See Also
Insert or delete cells, rows, and columns
Need more help?
If you find yourself needing to expand or reduce Excel’s row widths and column heights, there are several ways to adjust them. The table below shows the minimum, maximum and default sizes for each based on a point scale.
|
Type |
Min |
Max |
Default |
|---|---|---|---|
|
Column |
0 (hidden) |
255 |
8.43 |
|
Row |
0 (hidden) |
409 |
15.00 |
Notes:
-
If you are working in Page Layout view (View tab, Workbook Views group, Page Layout button), you can specify a column width or row height in inches, centimeters and millimeters. The measurement unit is in inches by default. Go to File > Options > Advanced > Display > select an option from the Ruler Units list. If you switch to Normal view, then column widths and row heights will be displayed in points.
-
Individual rows and columns can only have one setting. For example, a single column can have a 25 point width, but it can’t be 25 points wide for one row, and 10 points for another.

Set a column to a specific width
-
Select the column or columns that you want to change.
-
On the Home tab, in the Cells group, click Format.
-
Under Cell Size, click Column Width.
-
In the Column width box, type the value that you want.
-
Click OK.
Tip: To quickly set the width of a single column, right-click the selected column, click Column Width, type the value that you want, and then click OK.
-
Select the column or columns that you want to change.
-
On the Home tab, in the Cells group, click Format.
-
Under Cell Size, click AutoFit Column Width.
Note: To quickly autofit all columns on the worksheet, click the Select All button, and then double-click any boundary between two column headings.
-
Select a cell in the column that has the width that you want to use.
-
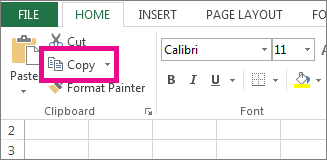
Press Ctrl+C, or on the Home tab, in the Clipboard group, click Copy.
-
Right-click a cell in the target column, point to Paste Special, and then click the Keep Source Columns Widths
button.
 button.
The value for the default column width indicates the average number of characters of the standard font that fit in a cell. You can specify a different number for the default column width for a worksheet or workbook.
-
Do one of the following:
-
To change the default column width for a worksheet, click its sheet tab.
-
To change the default column width for the entire workbook, right-click a sheet tab, and then click Select All Sheets on the shortcut menu.
-
-
On the Home tab, in the Cells group, click Format.
-
Under Cell Size, click Default Width.
-
In the Standard column width box, type a new measurement, and then click OK.

Do one of the following:
-
To change the width of one column, drag the boundary on the right side of the column heading until the column is the width that you want.
-
To change the width of multiple columns, select the columns that you want to change, and then drag a boundary to the right of a selected column heading.
-
To change the width of columns to fit the contents, select the column or columns that you want to change, and then double-click the boundary to the right of a selected column heading.
-
To change the width of all columns on the worksheet, click the Select All button, and then drag the boundary of any column heading.
-
Select the row or rows that you want to change.
-
On the Home tab, in the Cells group, click Format.
-
Under Cell Size, click Row Height.
-
In the Row height box, type the value that you want, and then click OK.
-
Select the row or rows that you want to change.
-
On the Home tab, in the Cells group, click Format.
-
Under Cell Size, click AutoFit Row Height.
Tip: To quickly autofit all rows on the worksheet, click the Select All button, and then double-click the boundary below one of the row headings.
Do one of the following:
-
To change the row height of one row, drag the boundary below the row heading until the row is the height that you want.
-
To change the row height of multiple rows, select the rows that you want to change, and then drag the boundary below one of the selected row headings.
-
To change the row height for all rows on the worksheet, click the Select All button, and then drag the boundary below any row heading.
-
To change the row height to fit the contents, double-click the boundary below the row heading.
Top of Page
If you prefer to work with column widths and row heights in inches, you should work in Page Layout view (View tab, Workbook Views group, Page Layout button). In Page Layout view, you can specify a column width or row height in inches. In this view, inches are the measurement unit by default, but you can change the measurement unit to centimeters or millimeters.
-
In Excel 2007, click the Microsoft Office Button
> Excel Options> Advanced. -
In Excel 2010, go to File > Options > Advanced.
 > Excel Options> Advanced.
Set a column to a specific width
-
Select the column or columns that you want to change.
-
On the Home tab, in the Cells group, click Format.
-
Under Cell Size, click Column Width.
-
In the Column width box, type the value that you want.

-
Select the column or columns that you want to change.
-
On the Home tab, in the Cells group, click Format.
-
Under Cell Size, click AutoFit Column Width.
Tip To quickly autofit all columns on the worksheet, click the Select All button and then double-click any boundary between two column headings.

-
Select a cell in the column that has the width that you want to use.
-
On the Home tab, in the Clipboard group, click Copy, and then select the target column.
-
On the Home tab, in the Clipboard group, click the arrow below Paste, and then click Paste Special.
-
Under Paste, select Column widths.

The value for the default column width indicates the average number of characters of the standard font that fit in a cell. You can specify a different number for the default column width for a worksheet or workbook.
-
Do one of the following:
-
To change the default column width for a worksheet, click its sheet tab.
-
To change the default column width for the entire workbook, right-click a sheet tab, and then click Select All Sheets on the shortcut menu.
-
-
On the Home tab, in the Cells group, click Format.
-
Under Cell Size, click Default Width.
-
In the Default column width box, type a new measurement.

Tip If you want to define the default column width for all new workbooks and worksheets, you can create a workbook template or a worksheet template, and then base new workbooks or worksheets on those templates. For more information, see Save a workbook or worksheet as a template.
Do one of the following:
-
To change the width of one column, drag the boundary on the right side of the column heading until the column is the width that you want.
-
To change the width of multiple columns, select the columns that you want to change, and then drag a boundary to the right of a selected column heading.
-
To change the width of columns to fit the contents, select the column or columns that you want to change, and then double-click the boundary to the right of a selected column heading.
-
To change the width of all columns on the worksheet, click the Select All button, and then drag the boundary of any column heading.
-
Select the row or rows that you want to change.
-
On the Home tab, in the Cells group, click Format.
-
Under Cell Size, click Row Height.
-
In the Row height box, type the value that you want.
-
Select the row or rows that you want to change.
-
On the Home tab, in the Cells group, click Format.
-
Under Cell Size, click AutoFit Row Height.
Tip To quickly autofit all rows on the worksheet, click the Select All button and then double-click the boundary below one of the row headings.
Do one of the following:
-
To change the row height of one row, drag the boundary below the row heading until the row is the height that you want.
-
To change the row height of multiple rows, select the rows that you want to change, and then drag the boundary below one of the selected row headings.
-
To change the row height for all rows on the worksheet, click the Select All button, and then drag the boundary below any row heading.
-
To change the row height to fit the contents, double-click the boundary below the row heading.
Top of Page
See Also
Change the column width or row height (PC)
Change the column width or row height (Mac)
Change the column width or row height (web)
How to avoid broken formulas
See all How-To Articles
In this tutorial, you will learn how to resize multiple rows or columns at once in Excel and Google Sheets.
In Excel, you can resize multiple rows or columns at once by right-clicking or using the Format option in the Ribbon.
Resize Multiple Rows at Once by Right-Clicking
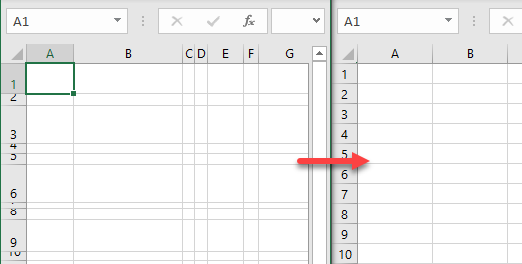
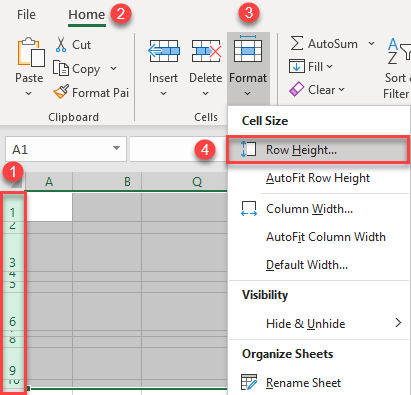
- To change the height of multiple rows at once, (1) first select multiple rows by clicking on a row number and dragging down to the last row you want to resize.
OR hold CTRL and click on the rows number you want to select (e.g., 1–10). - After that, (2) right-click anywhere in the selected area and (3) choose Row Height.
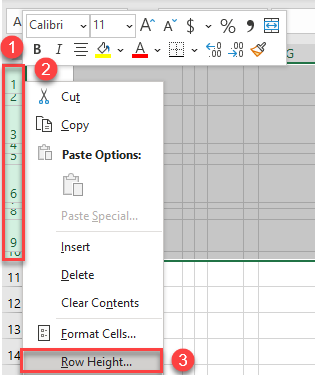
- In the pop-up screen, set the Row height (e.g., 15).
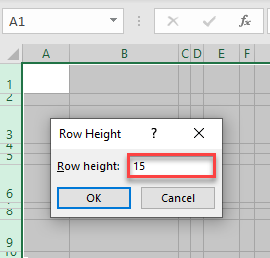
As a result, Rows 1–10 now have the same height: 15.
Resize Multiple Rows at Once Using the Format Option
You can achieve the same thing using the Format option in the Ribbon.
- First, (1) select multiple rows by clicking on a row number and dragging down to the last row you want to resize.
OR hold CTRL and click on the rows number you want to select (e.g., 1–10). - After that, in the Ribbon, (2) go to the Home tab, (3) choose Format in the Cells group, and (4) click on Row Height.
- In the pop-up screen, set the Row height.
You get the same result as above: Rows 1–10 now have the same height, 15.
Resize Multiple Columns at Once by Right-Clicking
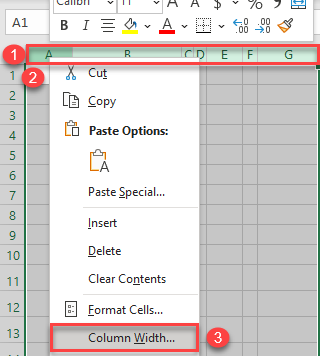
- To change the width of multiple columns at once, (1) first select multiple columns by clicking on a column heading (letter) and dragging across to the last column you want to resize.
OR hold CTRL and click on the column letters that you want to select (e.g., A–G). - After that, (2) right-click anywhere in the selected area, and (3) choose Column Width.
- In the pop-up screen, set the Column width (e.g., 10).
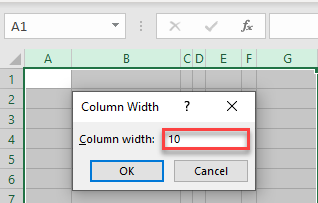
As a result, Columns A–G now have the same width: 10.
Resize Multiple Columns at Once Using the Format Option
You can achieve the same thing using the Format option in the Ribbon.
- First, (1) select multiple columns by clicking on a column heading (letter) and dragging across to the last column you want to resize.
OR hold CTRL and click on the column letter you want to select (e.g., A–G). - In the Ribbon, (2) go to the Home tab, (3) choose Format in the Cells group and (4) click on Column Width.
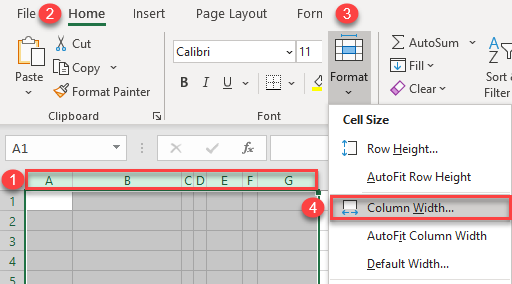
- In the pop-up screen, set the Column width.
You get the same result as above: Columns A–G now have the same width (10).

Resize Multiple Rows at Once in Google Sheets
The only way you can resize multiple rows in Google Sheets is by right-clicking. This is almost the same procedure as in Excel.
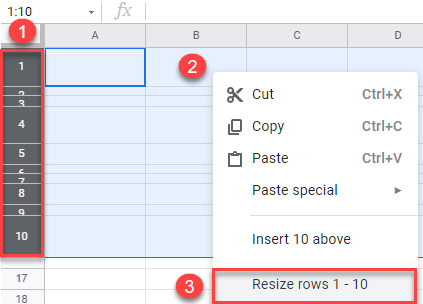
- First, (1) select multiple rows by clicking on a row number and dragging down to the last row you want to resize.
OR hold CTRL and click on the rows number you want to select (e.g., 1–10). - After that, (2) right-click anywhere in the selected area, and (3) choose Resize rows 1 – 10.
- In the pop-up screen, select Specify row height and set the row height (e.g., 30).
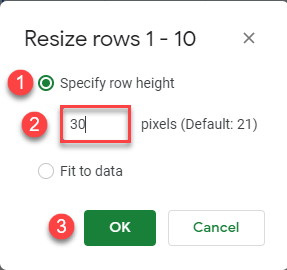
As a result, Rows 1–10 now have the same height: 30.
Resize Multiple Columns at Once in Google Sheets
Resizing columns in Google Sheets works exactly the same as in Excel.
- First, (1) select multiple columns by clicking on a column heading (letter) and dragging across to the last column you want to resize.
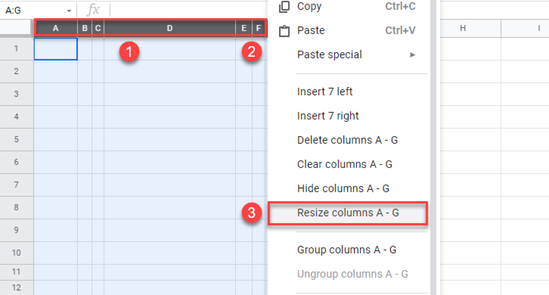
OR hold CTRL and click on the column letters that you want to select (e.g., A–G). - After that, (2) right-click anywhere in the selected area and choose (3) Resize columns A – G.
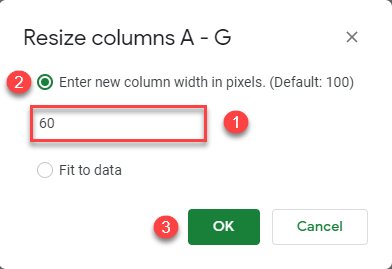
- In the pop-up screen, select Enter new column width in pixels and then set the column width (e.g., 60).
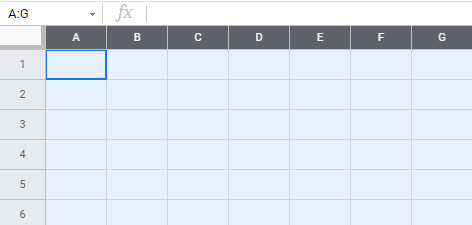
As a result, Columns A–G now have the same width: 60.
Select the row or rows that you want to change. On the Home tab, in the Cells group, click Format. Under Cell Size, click AutoFit Row Height. Tip: To quickly autofit all rows on the worksheet, click the Select All button, and then double-click the boundary below one of the row headings.
Contents
- 1 What is the shortcut to make all Cells the same size in Excel?
- 2 How do I resize all rows and columns in Excel?
- 3 How do you change the size of all columns?
- 4 How do you make Excel Cells expand to fit text automatically?
- 5 How do I make all the cells the same size?
- 6 How do I make all cells the same size in sheets?
- 7 How do I change the size of cells without changing the whole column?
- 8 Are all cells the same shape?
- 9 How do you Uncollapse rows in Excel?
- 10 How do you stop Excel columns from resizing?
- 11 Are all cells of same size?
- 12 Why are all cells not the same size or shape?
- 13 Are all cells have the same size?
- 14 How do I stretch the whole page in Excel?
- 15 Is there a way to expand all rows in Excel?
- 16 How do you expand all groups in Excel?
What is the shortcut to make all Cells the same size in Excel?
AutoFit column width and row height using a keyboard shortcut
- To autofit multiple non-adjacent columns/rows, select one column or row and hold down the Ctrl key while selecting the other columns or rows.
- To autofit the entire sheet, press Ctrl + A or click the Select All button.
How do I resize all rows and columns in Excel?
Automatically resize all columns and rows to fit the data
- Select the Select All button. at the top of the worksheet, to select all columns and rows.
- Double-click a boundary. All columns or rows resize to fit the data.
How do you change the size of all columns?
Select one or more columns that you wish to resize. To select all columns, press Ctrl + A or click the Select All button. On the Home tab, in the Cells group, click Format > Column Width. In the Column width box, type the desired number, and click OK.
How do you make Excel Cells expand to fit text automatically?
Wrap text automatically
On the Home tab, in the Alignment group, click Wrap Text. (On Excel for desktop, you can also select the cell, and then press Alt + H + W.) Notes: Data in the cell wraps to fit the column width, so if you change the column width, data wrapping adjusts automatically.
How do I make all the cells the same size?
If you want to resize your entire worksheet, do the following:
- Click on the ‘Select All’ button on the top-left of the Excel window.
- Set the Column width for all the cells. Right-click on any column header.
- Set the Row height for all the cells. Right-click on any row, select ‘Row Height’ from the popup menu.
How do I make all cells the same size in sheets?
- On your computer, open a spreadsheet in Google Sheets.
- Select a row or column to resize. To highlight multiple rows or columns: Mac: ⌘ + click the rows or columns.
- Right-click the row number or column letter.
- Click Resize row or Resize column. Then, choose an option: Enter a custom height or width.
- Click OK.
How do I change the size of cells without changing the whole column?
Generally, every cell in a row or column has the same size, so you can’t adjust the size of a cell individually without affecting the others in its same row or column. You can merge adjacent cells to create larger compound cells, however, and you can set rows and columns to automatically adjust to fit text.
Are all cells the same shape?
Cells have different shapes because they do different things. Each cell type has its own role to play in helping our bodies to work properly, and their shapes help them carry out these roles effectively.Animal cells come in many different shapes and sizes.
How do you Uncollapse rows in Excel?
How to unhide all rows in Excel
- To unhide all hidden rows in Excel, navigate to the “Home” tab.
- Click “Format,” which is located towards the right hand side of the toolbar.
- Navigate to the “Visibility” section.
- Hover over “Hide & Unhide.”
- Select “Unhide Rows” from the list.
How do you stop Excel columns from resizing?
This applies to Excel 2016 (Office 365) only.
- Go to File > Options.
- Select the Data menu on the left sidebar.
- Click the Edit Default Layout button.
- Click the PivotTable Options… button.
- Uncheck the Autofit column width on update setting.
- Press OK 3 times to save & close the Excel Options menu.
Are all cells of same size?
Answer : All cells are of the same size and shape . :- False . Explanation: All cells are the same shape, but notall cells are the same size. Differentcells can have both different sizes and different shapes.
Why are all cells not the same size or shape?
Cell size is limited by a cell’s surface area to volume ratio. A smaller cell is more effective and transporting materials, including waste products, than a larger cell. Cells come in many different shapes. A cell’s function is determined, in part, by its shape.
Are all cells have the same size?
The individual cells that compose all of their bodies–from shrews to people to dinosaurs–are roughly the same size.Big animals just have many more cells than little animals.
How do I stretch the whole page in Excel?
Follow these steps: Click the Page Layout tab on the ribbon. In the Scale to Fit group, in the Width box, select 1 page, and in the Height box, select Automatic. Columns will now appear on one page, but the rows may extend to more than one page.
Is there a way to expand all rows in Excel?
Press the “Ctrl-Shift-(” keys together to expand all hidden rows in your Excel spreadsheet.
How do you expand all groups in Excel?
Expand or close all groups rows and columns in Excel
- Press Alt + F11 keys to enable the Microsoft Visual Basic for Applications window.
- Click Insert > Module, copy and paste blow code to the new Module。 VBA: Expand all groups. Sub ExpandAll()
- Press F5 key, the groups in Sheet1 have been expanded.
You may need to resize a column to fit the width of your data or a row for a better appearance. But what if you want to resize all columns and rows in an Excel spreadsheet?
We’ll show you a few easy ways to change the sizes of your columns and rows at one time. Plus, we’ll explain how to adjust the default size of all new columns in a sheet.
Resize All Columns and Rows in a Sheet
Whether you want to change the size of all columns, all rows, or both, you can do so in just a few clicks.
Start by selecting the entire sheet. You can do this by clicking the Select All triangle on the top left corner of the spreadsheet.

Drag a Header to Adjust the Sizes
To eyeball the sizes of the columns or rows rather than enter exact measurements, just click and drag. For columns, drag the letter header for any column in the sheet. For rows, drag the number header for any row.

You’ll immediately see all columns or rows update to the new size.
Perform a Right-Click for Exact Sizes
Another way to change all column and row sizes is to enter a precise measurement. The default sizes are 8.43 points wide for columns 15 points high for rows. You can adjust columns up to 255 points and rows up to 409 points.
With the entire sheet selected, right-click a column and choose “Column Width.”

Enter the measurement in points and click “OK.”

For a row, right-click and choose “Row Height,” enter the measurement, and click “OK.”

You’ll then see all columns and/or rows set to the new points measurement.
Use the Format Button for Exact Sizes
One more way to resize all columns and rows to exact sizes is using the Format option on the Home tab. In the Cells section of the ribbon, select the Format drop-down arrow and pick either “Column Width” or “Row Height.”

Enter the measurement in points for the columns or rows and click “OK.”

Use the Format Button for AutoFit
If you don’t necessarily want all columns or rows to be a particular size, but prefer they adjust to fit your data, this is one more option.
RELATED: How to AutoFit in Microsoft Excel
With the sheet selected, use the Format button on the Home tab. Choose “AutoFit Column Width,” “AutoFit Row Height,” or both.

You’ll see your sheet update the columns and/or rows to accommodate the sizes of the data in the cells. Just keep in mind that if you have blank columns or rows, those sizes remain at the default sizes.

Set the Default Size for All Columns in a Sheet
Another option for changing the width for all columns in a sheet is to set the default width. This is only an option for columns because row height depends on the font size you use.
Select the entire sheet as described above and head to the Home tab. Click the Format drop-down arrow and pick “Default Width.”

Enter the measurement in points and click “OK.”

All existing columns and new ones you add to your sheet will conform to this size.
Column and Row Sizes for New Workbooks
When you resize columns and rows in an Excel sheet, the changes only apply to the current sheet. It does not affect other sheets in the workbook or new workbooks and sheets you create.
If you want to change the sizes of columns and rows for all new books and sheets, consider creating a template. You can set the sizes for the sheet(s) using any of the above methods, save the workbook as a template, and then open that template for each new workbook you create.
Another option when you create the template is to have it open each time you launch Excel. Follow our how-to for always opening a specific workbook in Excel if you’re interested in this option.
Resizing all columns and rows in your Excel sheet lets you avoid the ##### error, ensure that your data fits nicely, and provides a consistent appearance.
Denial of responsibility! My droll is an automatic aggregator of the all world’s media. In each content, the hyperlink to the primary source is specified. All trademarks belong to their rightful owners, all materials to their authors. If you are the owner of the content and do not want us to publish your materials, please contact us by email – [email protected]. The content will be deleted within 24 hours.