
Export SQL Data to Excel from Microsoft SQL Server
Let’s go over three ways to export an SQL Query to an Excel File Using MSSQL
Despite the pushback from Database aficionados, sometimes it makes sense to export data from SQL to an Excel file. It really depends on who is the audience of the information. Not everyone is great with SQL Analysis. Few people require access to the database.
And lots of times the boss just needs to see the information in Excel.
So, if Excel is the Output required this article is here to help you Export SQL Queries to Excel.
Here are three ways to Export a SQL query to Excel format. The last one can be kind of tricky. I’ll provide a condensed version followed by a detailed version with screenshots.
Three quick ways to Export SQL Data to Excel:
Choose the Summarized Version and then scroll to further down to use the SQL Export Version to Excel that works best for you.
Method Number 1 – Copy Grid results and Paste into Excel
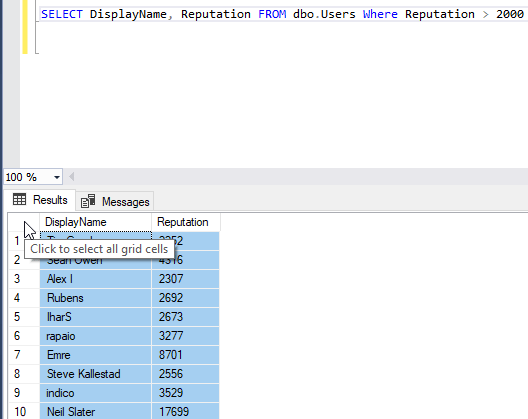
Under Query, Make sure results to Grid are selected.
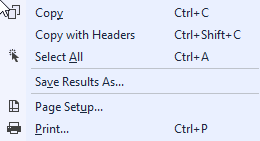
After Running your query, right-click the top right corner of the grid.
Copy With Headers.
Paste into an Excel File
Possible Issues:
I’ve seen formatting issues with this strategy. For Example, there are situations where the spreadsheet drops preceding zeroes after the copy-paste.
I’ve also noticed lengthy fields, (think of a really long free text field) end up running into the next line.
For the reasons above, I prefer this next method for a clean Excel file.
Method Number 2: Export the Query Results as a Task
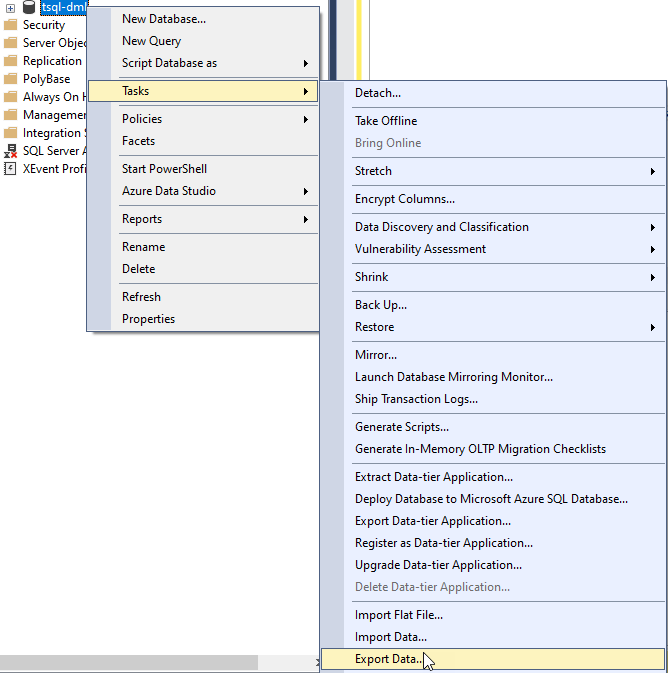
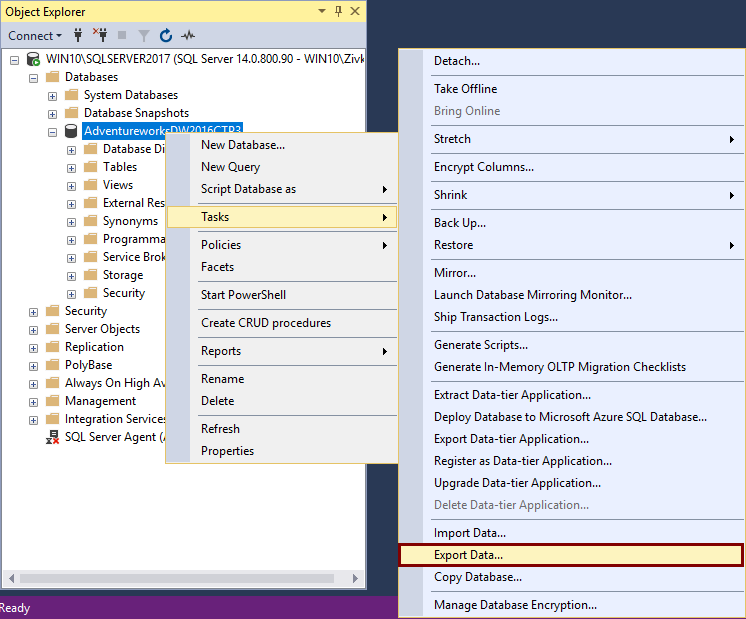
In the object explorer window, find the database you want to export from.
Right Click the Database, Click Tasks, and Export Data
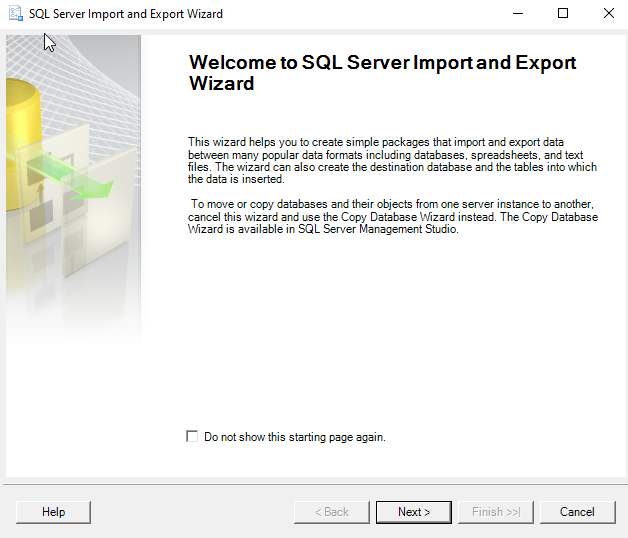
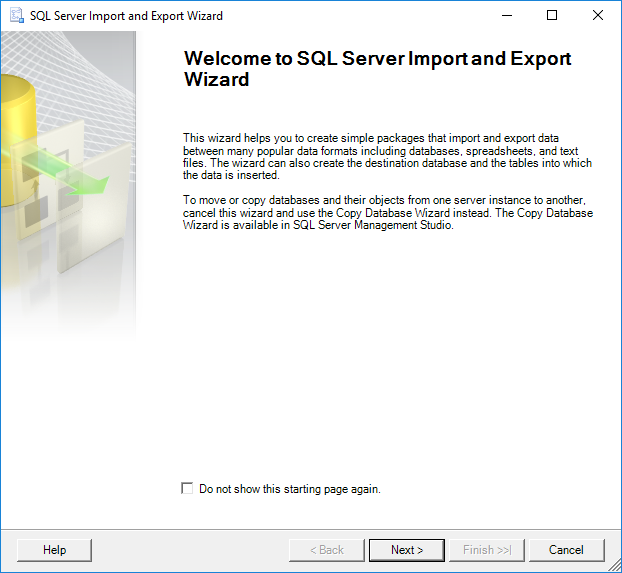
The Wizard walks you through the rest of the steps but I have included screenshots below.
Method Number 3 – Use Good Old fashioned TSQL to send the data to an excel file
For those who value speed above all use the following script format.
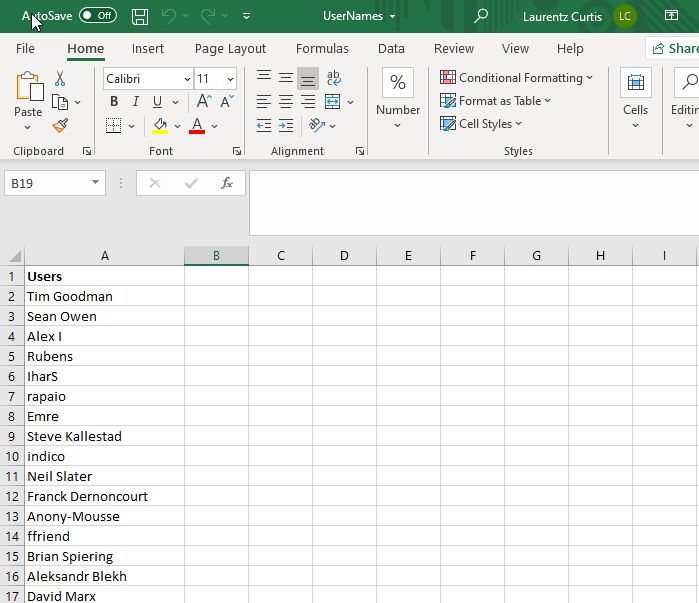
INSERT INTO OPENROWSET(‘Microsoft.ACE.OLEDB.12.0′,’Excel 12.0; Database=C:SQL2019ReportsUsernames.xlsx;’,’SELECT * FROM [Sheet1$]’) SELECT DisplayName FROM dbo.Users Where Reputation > 2000
Possible Issues – Configuring this might not be your type of fun and getting this straight deserves its own article.
Step by Step instructions with screenshots
Method Number 1 – Copy Grid results and paste into Excel
After ensuring results to grid turned on, Execute your query, right-click the top left-hand corner of the results grid.
Choose Copy with Headers and then you are ready to paste in Excel with Ctrl + C
Method 2 – Export Via the Export Wizard
Right-click on the database you want to export from. Then Select tasks and “Export Data”.
The SQL Server Wizard will startup. Click Next through the prompts.
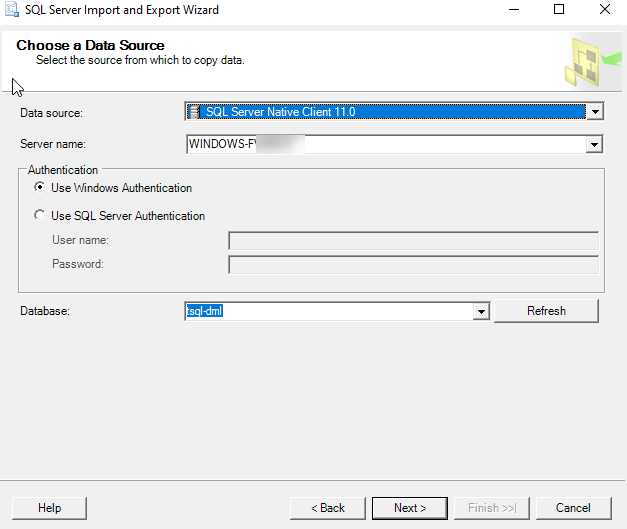
Select the appropriate Native client, your server name, and database and choose “Next”.
Next, Select Microsoft Excel and the file path where you want to import the data. The .xls file that you name will be created by this process.
Now you can choose to export a whole table or a query. For the purpose of this exercise, we are creating a query.
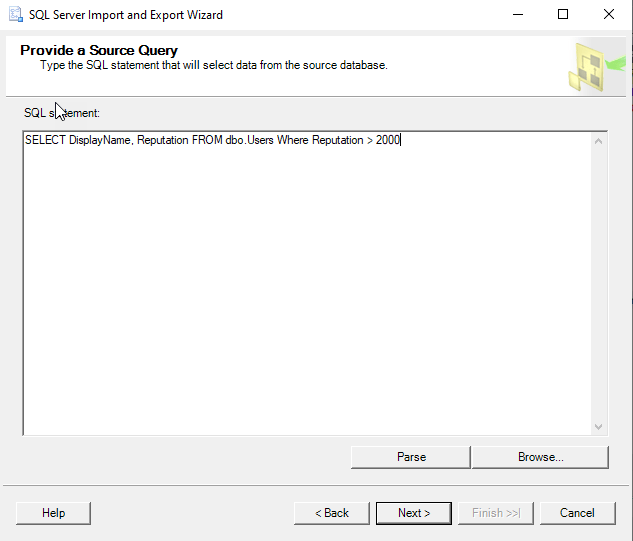
Paste the query into the SQL Statement field. Make sure every output field has a unique name.
Click Next on the “Select Source Tables and Views” screen.

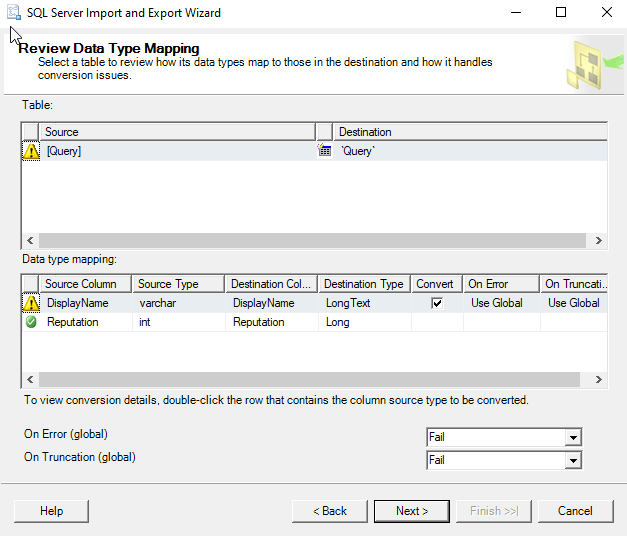
I use the default settings on the “conversion issues and data type mapping screen”
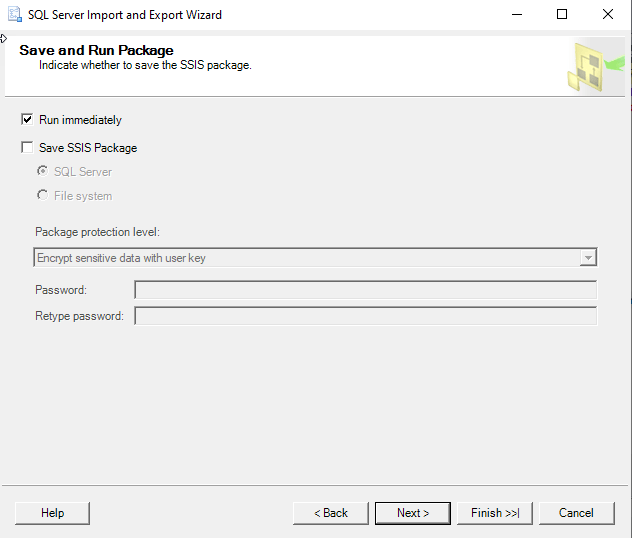
Now you can choose to Run immediately or Save an SSIS Package for later reuse.
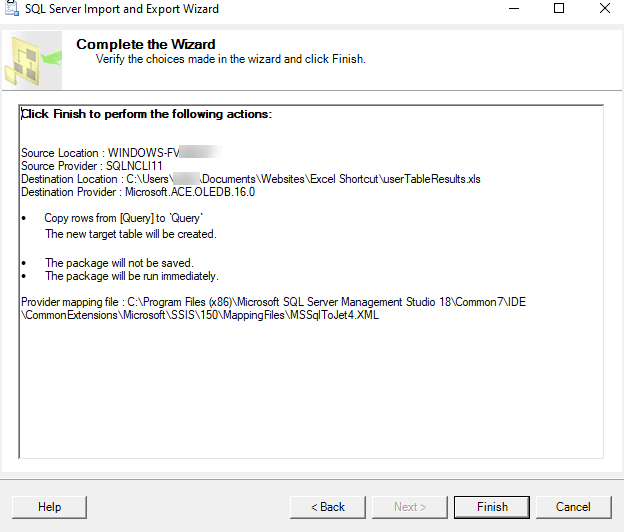
Double Check your settings and click finish.
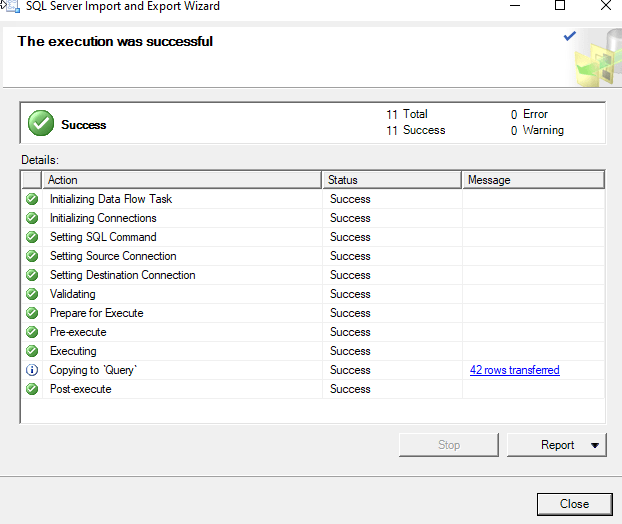
Make sure there were no errors in the Export.
Now Go to the directory you choose earlier and make sure you have a sweet-looking Excel File at that location!
Method Number 3 – Use TSQL to send the data to an excel file
This method is the quickest once you get it set up but the configuration is the tricky part. Permissions can be a limiting factor.
Also with the script below, you have to make sure the file exists before you run the query for it to import properly.
First, create a blank excel file at the directory of your choosing.
C:SQL2019ReportsUsernames.xlsx
Then run this script below.
INSERT INTO OPENROWSET(‘Microsoft.ACE.OLEDB.12.0’,’Excel 12.0;
Database=C:SQL2019ReportsUsernames.xlsx;’,’SELECT * FROM [Sheet1$]’)
SELECT DisplayName FROM dbo.Users Where Reputation > 2000

Configuring this can be tricky and dependent on your level of permissions. Make sure you have the correct Linked Server/Provider installed (‘Microsoft.ACE.OLEDB.12.0’) And check your Database user settings to this server .

Phil and I have teamed up on this workbench, which demonstrates how to create, read, update and delete information in Excel using T-SQL, from SQL Server. As always, the workbench is structured so that it can be pasted into Query Analyser and SSMS, and the individual examples executed – you can download the .sql from the “Code Download” link at the bottom of the article, load it up and start experimenting!
We start by showing you how to create an Excel Spreadsheet from SQL Server in TSQL(Transact SQL), create a worksheet, attach to it as a linked server, write to it, read from it, update it as if it was an ordinary SQL Server Database table, and then synchronise the data in the worksheet with SQL Server. We also illustrate the use of OPENQUERY, OPENDATASOURCE and OPENROWSET.
To create the Excel spreadsheet, we show how to attach to an ADODB source from SQL Server and execute SQL against that source. We then show you an alternative ‘quick cheat’ way (using sp_makewebtask) to create and populate an Excel spreadsheet from Transact SQL.
If you need more control over the Excel Spreadsheet that you are creating, we then show you how to do it via OLE automation. This will enable you to do anything you can do via keystrokes, and allow you to generate full Excel reports with pivot tables and Graphs.
Using this technique, you should be able to populate the data, or place data in particular calls or ranges. You can even do ‘macro substitutions’.
A word of caution before you start. If you have your security wide open, it is not just you who would be able to write out data as a spreadsheet. An intruder would be able to do it with that list of passwords or credit-card numbers. In a production system, this sort of operation needs to be properly ring-fenced. We tend to create a job queue and have a special user, with the appropriate permissions, on the Task Scheduler, to do anything that involves OLE automation or xp_CMDShell. Security precautions can get quite complex, but they are outside the scope of the article.
Some of what we illustrate can be done using DTS or SSIS. Unfortunately, these are outside the scope of this article. In fact, transferring data between Excel and SQL Server can be done in a surprising variety of ways and it would be fun one day to try to list them all.
|
1 2 3 4 5 6 7 8 9 10 11 12 13 14 15 16 17 18 19 20 21 22 23 24 25 26 27 28 29 30 31 32 33 34 35 36 37 38 39 |
CREATE TABLE ##CambridgePubs (Pubname VARCHAR(40), Address VARCHAR(80), Postcode VARCHAR(8)) INSERT INTO ##CambridgePubs (PubName, Address, Postcode) SELECT ‘Bees In The Wall’,’36 North Road, Whittlesford, Cambridge’,‘CB2 4NZ’ INSERT INTO ##CambridgePubs (PubName, Address, Postcode) SELECT ‘Blackamoors Head’,‘205 Victoria Road, Cambridge’,‘CB4 3LF’ INSERT INTO ##CambridgePubs (PubName, Address, Postcode) SELECT ‘Blue Lion’,‘2 Horningsea Road, Fen Ditton, Cambridge’,‘CB5 8SZ’ INSERT INTO ##CambridgePubs (PubName, Address, Postcode) SELECT ‘Cambridge Blue’,’85-87 Gwydir Street, Cambridge’,‘CB1 2LG’ INSERT INTO ##CambridgePubs (PubName, Address, Postcode) SELECT ‘Champion Of The Thames’,’68 King Street, Cambridge’,‘CB1 1LN’ INSERT INTO ##CambridgePubs (PubName, Address, Postcode) SELECT ‘Cross Keys’,’77 Ermine Street, Caxton, Cambridge’,‘CB3 8PQ’ INSERT INTO ##CambridgePubs (PubName, Address, Postcode) SELECT ‘Crown Inn’,’11 High Street, Linton, Cambridge’,‘CB1 6HS’ INSERT INTO ##CambridgePubs (PubName, Address, Postcode) SELECT ‘Devonshire Arms’,‘1 Devonshire Road, Cambridge’,‘CB1 2BH’ INSERT INTO ##CambridgePubs (PubName, Address, Postcode) SELECT ‘Duke Of Argyle’,’90 Argyle Street, Cambridge’,‘CB1 3LS’ INSERT INTO ##CambridgePubs (PubName, Address, Postcode) SELECT ‘Duke Of Wellington’,’49 Alms Hill, Bourn, Cambridge’,‘CB3 7SH’ INSERT INTO ##CambridgePubs (PubName, Address, Postcode) SELECT ‘Eagle Public House’,‘Benet Street, Cambridge’,‘CB2 3QN’ |
And so on. (The full import file is in the ZIP, as is the Excel file!).
Create the table and then execute the contents of CambridgePubs.SQL.
First, we need to create the spreadsheet with the correct headings (PubName, Address, PostCode).
There are two possible ways one might do this. The most obvious way is using the CREATE statement to create the worksheet and define the columns, but there seems to be no way of doing this by linking the Excel file, unless the Excel file already exists. We need a utility stored procedure to get at ADODB in order to create databases and execute DDL and SQL against it.
|
1 2 3 4 5 6 7 8 9 10 11 12 13 14 15 16 17 18 19 20 21 22 23 24 25 26 27 28 29 30 31 32 33 34 35 36 37 38 39 40 41 42 43 44 45 46 47 48 49 50 51 52 53 54 55 56 57 58 |
CREATE PROCEDURE spExecute_ADODB_SQL @DDL VARCHAR(2000), @DataSource VARCHAR(100), @Worksheet VARCHAR(100)=NULL, @ConnectionString VARCHAR(255) = ‘Provider=Microsoft.Jet.OLEDB.4.0; Data Source=%DataSource; Extended Properties=Excel 8.0′ AS DECLARE @objExcel INT, @hr INT, @command VARCHAR(255), @strErrorMessage VARCHAR(255), @objErrorObject INT, @objConnection INT, @bucket INT SELECT @ConnectionString =REPLACE (@ConnectionString, ‘%DataSource’, @DataSource) IF @Worksheet IS NOT NULL SELECT @DDL=REPLACE(@DDL,‘%worksheet’,@Worksheet) SELECT @strErrorMessage=‘Making ADODB connection ‘, @objErrorObject=NULL EXEC @hr=sp_OACreate ‘ADODB.Connection’, @objconnection OUT IF @hr=0 SELECT @strErrorMessage=‘Assigning ConnectionString property «‘ + @ConnectionString + ‘»‘, @objErrorObject=@objconnection IF @hr=0 EXEC @hr=sp_OASetProperty @objconnection, ‘ConnectionString’, @ConnectionString IF @hr=0 SELECT @strErrorMessage =‘Opening Connection to XLS, for file Create or Append’ IF @hr=0 EXEC @hr=sp_OAMethod @objconnection, ‘Open’ IF @hr=0 SELECT @strErrorMessage =‘Executing DDL «‘+@DDL+‘»‘ IF @hr=0 EXEC @hr=sp_OAMethod @objconnection, ‘Execute’, @Bucket out , @DDL IF @hr<>0 BEGIN DECLARE @Source VARCHAR(255), @Description VARCHAR(255), @Helpfile VARCHAR(255), @HelpID INT EXECUTE sp_OAGetErrorInfo @objErrorObject, @source output, @Description output,@Helpfile output,@HelpID output SELECT @strErrorMessage=‘Error whilst ‘ +COALESCE(@strErrorMessage,‘doing something’)+‘, ‘ +COALESCE(@Description,») RAISERROR (@strErrorMessage,16,1) END EXEC @hr=sp_OADestroy @objconnection GO |
Now we have it, it is easy.
The Excel file will have been created on the Database server of the database you currently have a connection to.
We can now link to the created Excel file as follows.
As we are directly manipulating the Excel data in the worksheet as if it was a table we can do JOINs.
To try this out, you’ll need to DELETE, ALTER and INSERT a few rows from the Excel spreadsheet, remembering to close it after you’ve done it.
Firstly, we’ll delete any rows from ##CambridgePubs that do not exist in the Excel spreadsheet.
Then we insert into ##CambridgePubs any rows in the spreadsheet that don’t exist in ##CambridgePubs.
All done (reverse syncronisation would be similar).
You can read and write to the Excel sheet using OpenRowSet, if the mood takes you.
Instead of creating the Excel spreadsheet with OLEDB One can use the sp_makewebtask.
Users must have SELECT permissions to run a specified query and CREATE PROCEDURE permissions in the database in which the query will run. The SQL Server account must have permissions to write the generated HTML document to the specified location. Only members of the sysadmin server role can impersonate other users.
This is fine for distributing information from databases but no good if you subsequently want to open it via ODBC.
So far, so good. However, we really want rather more than this. When we create an Excel file for a business report, we want the data and we also want nice formatting, defined ranges, sums, calculated fields and pretty graphs. If we do financial reporting, we want a pivot table and so on in order to allow a degree of data mining by the recipient. A different approach is required.
We can, of course, use Excel to extract the data from the database. However, in this example, we’ll create a spreadsheet, write the data into it, fit the columns nicely and define a range around the data.
|
1 2 3 4 5 6 7 8 9 10 11 12 13 14 15 16 17 18 19 20 21 22 23 24 25 26 27 28 29 30 31 32 33 34 35 36 37 38 39 40 41 42 43 44 45 46 47 48 49 50 51 52 53 54 55 56 57 58 59 60 61 62 63 64 65 66 67 68 69 70 71 72 73 74 75 76 77 78 79 80 81 82 83 84 85 86 87 88 89 90 91 92 93 94 95 96 97 98 99 100 101 102 103 104 105 106 107 108 109 110 111 112 113 114 115 116 117 118 119 120 121 122 123 124 125 126 127 128 129 130 131 132 133 134 135 136 137 138 139 140 141 142 143 144 145 146 147 148 149 150 151 152 153 154 155 156 157 158 159 160 161 162 163 164 165 166 167 168 169 170 171 172 173 174 175 176 177 178 179 180 181 182 183 184 185 186 187 188 189 190 191 192 193 194 195 196 197 198 199 200 201 202 203 204 205 206 207 208 209 210 211 212 213 214 215 216 217 218 219 220 221 222 223 224 225 226 227 228 229 230 231 232 233 234 235 236 237 238 239 240 241 242 243 244 245 246 247 248 249 250 251 252 253 254 255 256 257 258 259 260 261 262 263 264 265 266 267 268 269 270 271 272 273 274 275 276 277 278 |
*/ ALTER PROCEDURE [dbo].[spDMOExportToExcel] ( @SourceServer VARCHAR(30), @SourceUID VARCHAR(30)=NULL, @SourcePWD VARCHAR(30)=NULL, @QueryText VARCHAR(200), @filename VARCHAR(100), @WorksheetName VARCHAR(100)=‘Worksheet’, @RangeName VARCHAR(80)=‘MyRangeName’ ) AS DECLARE @objServer INT, @objQueryResults INT, @objCurrentResultSet INT, @objExcel INT, @objWorkBooks INT, @objWorkBook INT, @objWorkSheet INT, @objRange INT, @hr INT, @Columns INT, @Rows INT, @Output INT, @currentColumn INT, @currentRow INT, @ResultSetRow INT, @off_Column INT, @off_Row INT, @command VARCHAR(255), @ColumnName VARCHAR(255), @value VARCHAR(255), @strErrorMessage VARCHAR(255), @objErrorObject INT, @Alphabet VARCHAR(27) SELECT @Alphabet=‘ABCDEFGHIJKLMNOPQRSTUVWXYZ’ IF @QueryText IS NULL BEGIN RAISERROR (‘A query string is required for spDMOExportToExcel’,16,1) RETURN 1 END — Sets the server to the local server IF @SourceServer IS NULL SELECT @SourceServer = @@servername SET NOCOUNT ON SELECT @strErrorMessage = ‘instantiating the DMO’, @objErrorObject=@objServer EXEC @hr= sp_OACreate ‘SQLDMO.SQLServer’, @objServer OUT IF @SourcePWD IS NULL OR @SourceUID IS NULL BEGIN —use a trusted connection IF @hr=0 SELECT @strErrorMessage= ‘Setting login to windows authentication on ‘ +@SourceServer, @objErrorObject=@objServer IF @hr=0 EXEC @hr=sp_OASetProperty @objServer, ‘LoginSecure’, 1 IF @hr=0 SELECT @strErrorMessage= ‘logging in to the requested server using windows authentication on ‘ +@SourceServer IF @SourceUID IS NULL AND @hr=0 EXEC @hr=sp_OAMethod @objServer, ‘Connect’, NULL, @SourceServer IF @SourceUID IS NOT NULL AND @hr=0 EXEC @hr=sp_OAMethod @objServer, ‘Connect’, NULL, @SourceServer ,@SourceUID END ELSE BEGIN IF @hr=0 SELECT @strErrorMessage = ‘Connecting to ‘»+@SourceServer+ »‘ with user ID ‘»+@SourceUID+»», @objErrorObject=@objServer IF @hr=0 EXEC @hr=sp_OAMethod @objServer, ‘Connect’, NULL, @SourceServer, @SourceUID, @SourcePWD END —now we execute the query IF @hr=0 SELECT @strErrorMessage=‘executing the query «‘ +@querytext+‘», on ‘+@SourceServer, @objErrorObject=@objServer, @command = ‘ExecuteWithResults(«‘ + @QueryText + ‘»)’ IF @hr=0 EXEC @hr=sp_OAMethod @objServer, @command, @objQueryResults OUT IF @hr=0 SELECT @strErrorMessage=‘getting the first result set for «‘ +@querytext+‘», on ‘+@SourceServer, @objErrorObject=@objQueryResults IF @hr=0 EXEC @hr=sp_OAMethod @objQueryResults, ‘CurrentResultSet’, @objCurrentResultSet OUT IF @hr=0 SELECT @strErrorMessage=‘getting the rows and columns «‘ +@querytext+‘», on ‘+@SourceServer IF @hr=0 EXEC @hr=sp_OAMethod @objQueryResults, ‘Columns’, @Columns OUT IF @hr=0 EXEC @hr=sp_OAMethod @objQueryResults, ‘Rows’, @Rows OUT —so now we have the queryresults. We start up Excel IF @hr=0 SELECT @strErrorMessage=‘Creating the Excel Application, on ‘ +@SourceServer, @objErrorObject=@objExcel IF @hr=0 EXEC @hr=sp_OACreate ‘Excel.Application’, @objExcel OUT IF @hr=0 SELECT @strErrorMessage=‘Getting the WorkBooks object ‘ IF @hr=0 EXEC @hr=sp_OAGetProperty @objExcel, ‘WorkBooks’, @objWorkBooks OUT —create a workbook IF @hr=0 SELECT @strErrorMessage=‘Adding a workbook ‘, @objErrorObject=@objWorkBooks IF @hr=0 EXEC @hr=sp_OAGetProperty @objWorkBooks, ‘Add’, @objWorkBook OUT —and a worksheet IF @hr=0 SELECT @strErrorMessage=‘Adding a worksheet ‘, @objErrorObject=@objWorkBook IF @hr=0 EXEC @hr=sp_OAGetProperty @objWorkBook, ‘worksheets.Add’, @objWorkSheet OUT IF @hr=0 SELECT @strErrorMessage=‘Naming a worksheet as «‘ +@WorksheetName+‘»‘, @objErrorObject=@objWorkBook IF @hr=0 EXEC @hr=sp_OASetProperty @objWorkSheet, ‘name’, @WorksheetName SELECT @currentRow = 1 —so let’s write out the column headings SELECT @currentColumn = 1 WHILE (@currentColumn <= @Columns AND @hr=0) BEGIN IF @hr=0 SELECT @strErrorMessage=‘getting column heading ‘ +LTRIM(STR(@currentcolumn)) , @objErrorObject=@objQueryResults, @Command=‘ColumnName(‘ +CONVERT(VARCHAR(3),@currentColumn)+‘)’ IF @hr=0 EXEC @hr=sp_OAGetProperty @objQueryResults, @command, @ColumnName OUT IF @hr=0 SELECT @strErrorMessage=‘assigning the column heading ‘+ + LTRIM(STR(@currentColumn)) + ‘ from the query string’, @objErrorObject=@objExcel, @command=‘Cells(‘+LTRIM(STR(@currentRow)) +‘, ‘ + LTRIM(STR(@CurrentColumn))+‘).value’ IF @hr=0 EXEC @hr=sp_OASetProperty @objExcel, @command, @ColumnName SELECT @currentColumn = @currentColumn + 1 END —format the headings in Bold nicely IF @hr=0 SELECT @strErrorMessage=‘formatting the column headings in bold ‘, @objErrorObject=@objWorkSheet, @command=‘Range(«A1:’ +SUBSTRING(@alphabet,@currentColumn/26,1) +SUBSTRING(@alphabet,@currentColumn % 26,1) +‘1’+‘»).font.bold’ IF @hr=0 EXEC @hr=sp_OASetProperty @objWorkSheet, @command, 1 —now we write out the data SELECT @currentRow = 2 WHILE (@currentRow <= @Rows+1 AND @hr=0) BEGIN SELECT @currentColumn = 1 WHILE (@currentColumn <= @Columns AND @hr=0) BEGIN IF @hr=0 SELECT @strErrorMessage= ‘getting the value from the query string’ + LTRIM(STR(@currentRow)) +‘,’ + LTRIM(STR(@currentRow))+‘)’, @objErrorObject=@objQueryResults, @ResultSetRow=@CurrentRow—1 IF @hr=0 EXEC @hr=sp_OAMethod @objQueryResults, ‘GetColumnString’, @value OUT, @ResultSetRow, @currentColumn IF @hr=0 SELECT @strErrorMessage= ‘assigning the value from the query string’ + LTRIM(STR(@CurrentRow—1)) +‘, ‘ + LTRIM(STR(@currentcolumn))+‘)’ , @objErrorObject=@objExcel, @command=‘Cells(‘+STR(@currentRow) +‘, ‘ + STR(@CurrentColumn)+‘).value’ IF @hr=0 EXEC @hr=sp_OASetProperty @objExcel, @command, @value SELECT @currentColumn = @currentColumn + 1 END SELECT @currentRow = @currentRow + 1 END —define the name range —Cells(1, 1).Resize(10, 5).Name = «TheData» IF @hr=0 SELECT @strErrorMessage=‘assigning a name to a range ‘ + LTRIM(STR(@CurrentRow—1)) +‘, ‘ + LTRIM(STR(@currentcolumn—1))+‘)’ , @objErrorObject=@objExcel, @command=‘Cells(1, 1).Resize(‘+STR(@currentRow—1) +‘, ‘ + STR(@CurrentColumn—1)+‘).Name’ IF @hr=0 EXEC @hr=sp_OASetProperty @objExcel, @command, @RangeName —Now autofilt the columns we’ve written to IF @hr=0 SELECT @strErrorMessage=‘Auto-fit the columns ‘, @objErrorObject=@objWorkSheet, @command=‘Columns(«A:’ +SUBSTRING(@alphabet,(@Columns / 26),1) +SUBSTRING(@alphabet,(@Columns % 26),1)+ ‘»).autofit’ IF @hr=0 —insert into @bucket(bucket) EXEC @hr=sp_OAMethod @objWorkSheet, @command, @output out IF @hr=0 SELECT @command =‘del «‘ + @filename + ‘»‘ IF @hr=0 EXECUTE master..xp_cmdshell @Command, no_output IF @hr=0 SELECT @strErrorMessage=‘Saving the workbook as «‘+@filename+‘»‘, @objErrorObject=@objRange, @command = ‘SaveAs(«‘ + @filename + ‘»)’ IF @hr=0 EXEC @hr=sp_OAMethod @objWorkBook, @command IF @hr=0 SELECT @strErrorMessage=‘closing Excel ‘, @objErrorObject=@objExcel EXEC @hr=sp_OAMethod @objWorkBook, ‘Close’ EXEC sp_OAMethod @objExcel, ‘Close’ IF @hr<>0 BEGIN DECLARE @Source VARCHAR(255), @Description VARCHAR(255), @Helpfile VARCHAR(255), @HelpID INT EXECUTE sp_OAGetErrorInfo @objErrorObject, @source output,@Description output, @Helpfile output,@HelpID output SELECT @hr, @source, @Description,@Helpfile,@HelpID output SELECT @strErrorMessage=‘Error whilst ‘ +COALESCE(@strErrorMessage,‘doing something’) +‘, ‘+COALESCE(@Description,») RAISERROR (@strErrorMessage,16,1) END EXEC sp_OADestroy @objServer EXEC sp_OADestroy @objQueryResults EXEC sp_OADestroy @objCurrentResultSet EXEC sp_OADestroy @objExcel EXEC sp_OADestroy @objWorkBookks EXEC sp_OADestroy @objWorkBook EXEC sp_OADestroy @objRange RETURN @hr |
Now we can create our pubs spreadsheet, and can do it from any of our servers.
Although this is a very handy stored procedure, you’ll probably need to modify and add to it for particular purposes.
We use the DMO method because we like to dump build data into Excel spreadsheets e.g. users, logins, Job Histories. However, an ADODB version is very simple to do and can be made much faster for reads and writes.
We have just inserted values, but you can insert formulae and formatting numberformat) and create or change borders. You can, in fact, manipulate the spreadsheet in any way you like. When we do this, we record macros in Excel and then convert these macros to TSQL! Using the above example, it should be simple.
For anyone coming here looking for how to do this in C#, I have tried the following method and had success in dotnet core 2.0.3 and entity framework core 2.0.3
First create your model class.
public class User
{
    public string Name { get; set; }
    public int Address { get; set; }
    public int ZIP { get; set; }
    public string Gender { get; set; }
}
Then install EPPlus Nuget package. (I used version 4.0.5, probably will work for other versions as well.)
Install-Package EPPlus -Version 4.0.5
The create ExcelExportHelper class, which will contain the logic to convert dataset to Excel rows. This class do not have dependencies with your model class or dataset.
public class ExcelExportHelper
    {
        public static string ExcelContentType
        {
            get
            { return "application/vnd.openxmlformats-officedocument.spreadsheetml.sheet"; }
        }

        public static DataTable ListToDataTable<T>(List<T> data)
        {
            PropertyDescriptorCollection properties = TypeDescriptor.GetProperties(typeof(T));
            DataTable dataTable = new DataTable();

            for (int i = 0; i < properties.Count; i++)
            {
                PropertyDescriptor property = properties[i];
                dataTable.Columns.Add(property.Name, Nullable.GetUnderlyingType(property.PropertyType) ?? property.PropertyType);
            }

            object[] values = new object[properties.Count];
            foreach (T item in data)
            {
                for (int i = 0; i < values.Length; i++)
                {
                    values[i] = properties[i].GetValue(item);
                }

                dataTable.Rows.Add(values);
            }
            return dataTable;
        }

        public static byte[] ExportExcel(DataTable dataTable, string heading = "", bool showSrNo = false, params string[] columnsToTake)
        {

            byte[] result = null;
            using (ExcelPackage package = new ExcelPackage())
            {
                ExcelWorksheet workSheet = package.Workbook.Worksheets.Add(String.Format("{0} Data", heading));
                int startRowFrom = String.IsNullOrEmpty(heading) ? 1 : 3;

                if (showSrNo)
                {
                    DataColumn dataColumn = dataTable.Columns.Add("#", typeof(int));
                    dataColumn.SetOrdinal(0);
                    int index = 1;
                    foreach (DataRow item in dataTable.Rows)
                    {
                        item[0] = index;
                        index++;
                    }
                }


                // add the content into the Excel file
                workSheet.Cells["A" + startRowFrom].LoadFromDataTable(dataTable, true);

                // autofit width of cells with small content
                int columnIndex = 1;
                foreach (DataColumn column in dataTable.Columns)
                {
                    int maxLength;
                    ExcelRange columnCells = workSheet.Cells[workSheet.Dimension.Start.Row, columnIndex, workSheet.Dimension.End.Row, columnIndex];
                    try
                    {
                        maxLength = columnCells.Max(cell => cell.Value.ToString().Count());
                    }
                    catch (Exception) //nishanc
                    {
                        maxLength = columnCells.Max(cell => (cell.Value +"").ToString().Length);
                    }

                    //workSheet.Column(columnIndex).AutoFit();
                    if (maxLength < 150)
                    {
                        //workSheet.Column(columnIndex).AutoFit();
                    }


                    columnIndex++;
                }

                // format header - bold, yellow on black
                using (ExcelRange r = workSheet.Cells[startRowFrom, 1, startRowFrom, dataTable.Columns.Count])
                {
                    r.Style.Font.Color.SetColor(System.Drawing.Color.White);
                    r.Style.Font.Bold = true;
                    r.Style.Fill.PatternType = OfficeOpenXml.Style.ExcelFillStyle.Solid;
                    r.Style.Fill.BackgroundColor.SetColor(Color.Brown);
                }

                // format cells - add borders
                using (ExcelRange r = workSheet.Cells[startRowFrom + 1, 1, startRowFrom + dataTable.Rows.Count, dataTable.Columns.Count])
                {
                    r.Style.Border.Top.Style = ExcelBorderStyle.Thin;
                    r.Style.Border.Bottom.Style = ExcelBorderStyle.Thin;
                    r.Style.Border.Left.Style = ExcelBorderStyle.Thin;
                    r.Style.Border.Right.Style = ExcelBorderStyle.Thin;

                    r.Style.Border.Top.Color.SetColor(System.Drawing.Color.Black);
                    r.Style.Border.Bottom.Color.SetColor(System.Drawing.Color.Black);
                    r.Style.Border.Left.Color.SetColor(System.Drawing.Color.Black);
                    r.Style.Border.Right.Color.SetColor(System.Drawing.Color.Black);
                }

                // removed ignored columns
                for (int i = dataTable.Columns.Count - 1; i >= 0; i--)
                {
                    if (i == 0 && showSrNo)
                    {
                        continue;
                    }
                    if (!columnsToTake.Contains(dataTable.Columns[i].ColumnName))
                    {
                        workSheet.DeleteColumn(i + 1);
                    }
                }

                if (!String.IsNullOrEmpty(heading))
                {
                    workSheet.Cells["A1"].Value = heading;
                   // workSheet.Cells["A1"].Style.Font.Size = 20;

                    workSheet.InsertColumn(1, 1);
                    workSheet.InsertRow(1, 1);
                    workSheet.Column(1).Width = 10;
                }

                result = package.GetAsByteArray();
            }

            return result;
        }

        public static byte[] ExportExcel<T>(List<T> data, string Heading = "", bool showSlno = false, params string[] ColumnsToTake)
        {
            return ExportExcel(ListToDataTable<T>(data), Heading, showSlno, ColumnsToTake);
        }
    }
Now add this method where you want to generate the excel file, probably for a method in the controller. You can pass parameters for your stored procedure as well. Note that the return type of the method is FileContentResult. Whatever query you execute, important thing is you must have the results in a List.
[HttpPost]
public async Task<FileContentResult> Create([Bind("Id,StartDate,EndDate")] GetReport getReport)
{
    DateTime startDate = getReport.StartDate;
    DateTime endDate = getReport.EndDate;

    // call the stored procedure and store dataset in a List.
    List<User> users = _context.Reports.FromSql("exec dbo.SP_GetEmpReport @start={0}, @end={1}", startDate, endDate).ToList();
    //set custome column names
    string[] columns = { "Name", "Address", "ZIP", "Gender"};
    byte[] filecontent = ExcelExportHelper.ExportExcel(users, "Users", true, columns);
    // set file name.
    return File(filecontent, ExcelExportHelper.ExcelContentType, "Report.xlsx");
}
More details can be found here
There are several ways to Export/Import SQL Server data to an Excel file. In this article, a couple of ways to import and export SQL Server data to an Excel file will be explained:
- Export SQL Server data to an Excel file using
- the SQL Server Import and Export Wizard
- T-SQL code
- Export to Excel from ApexSQL Complete
- Import SQL Server data into Excel using the Data Connection Wizard
In SQL Server Management Studio (SSMS), there is a feature that provides for exporting data from one data source to another data source; in this case, data from SQL Server will be copied to an Excel file trough Export Wizard.
To start to use this feature, go to Object Explorer, right click on any database (e.g. AdventureworksDW2016CTP3), under the Tasks, choose Export Data command:
This will open the SQL Server Import and Export Wizard window:
To proceed with exporting SQL Server data to an Excel file, click the Next button. This will open the Choose a Data Source window. On this window, a source from which you want to copy data can be chosen:
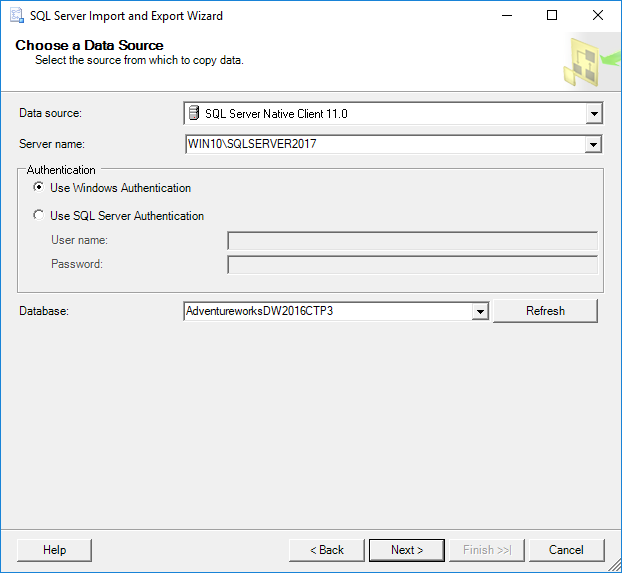
From the Data source drop down box, choose the SQL Server Native Client 11.0 item. Under the Server name drop down box, choose the SQL Server instance from which data need to be copied. In the Authentication section, choose the authentication mode for the data source connection and under the Database drop down box, choose the database from which the data will be copied. After all these options are set, click the Next button to proceed.
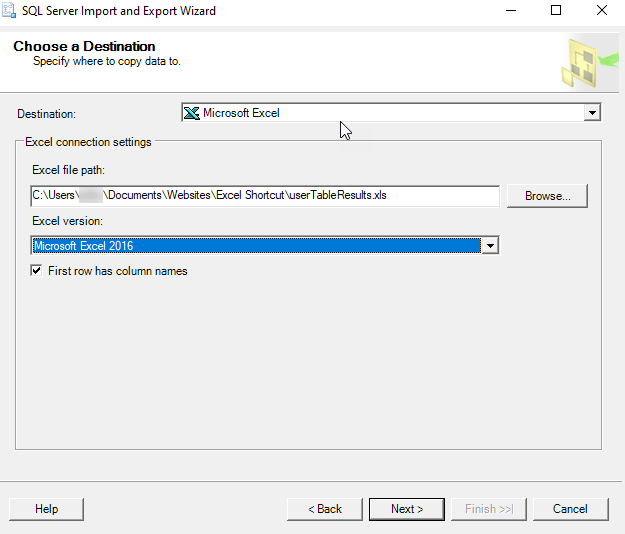
This will open the Choose a Destination window in which can be specified where to copy data from the data source:

In the Destination drop down box, choose the Microsoft Excel item. Under the Excel file path, choose the destination for copied data from SQL Server data source (SQL Data.xlsx). In the Excel version drop down box, choose the version of the Microsoft Excel worksheet. After these are all set, press the Next button to continue. But after pressing the Next button, the following warning message may appear:
The operation could not be completed.
ADDITIONAL INFORMATION:
The ‘Microsoft.ACE.OLEDB.12.0’ provider is not registered on the local machine. (System.Data)
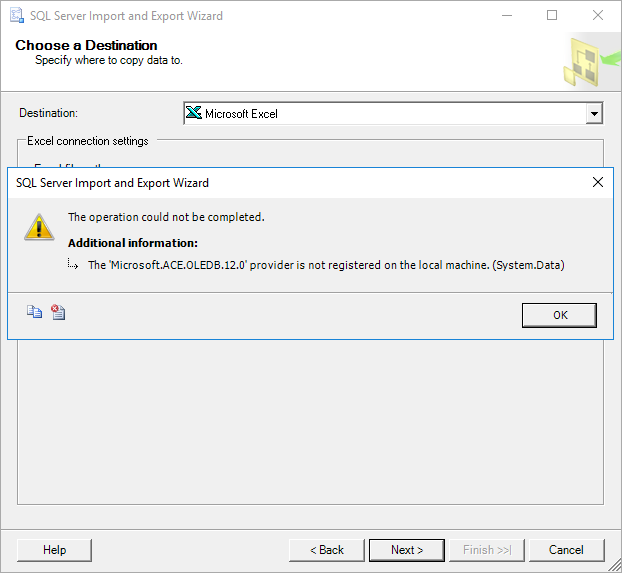
This happens because SSMS is a 32-bit application and when you launch the Export Wizard via SSMS, it launches a 32-bit version of Export Wizard. On the other hand, the machine (Operating system) on which SSMS is installed is a 64-bit version and the installed SQL Server is a 64-bit version.
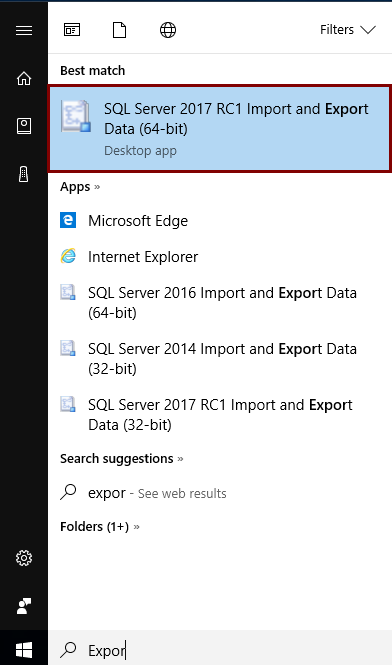
To solve this problem, close SSMS, go to the Start menu and find the 64-bit version of SQL Server Import and Export Data:
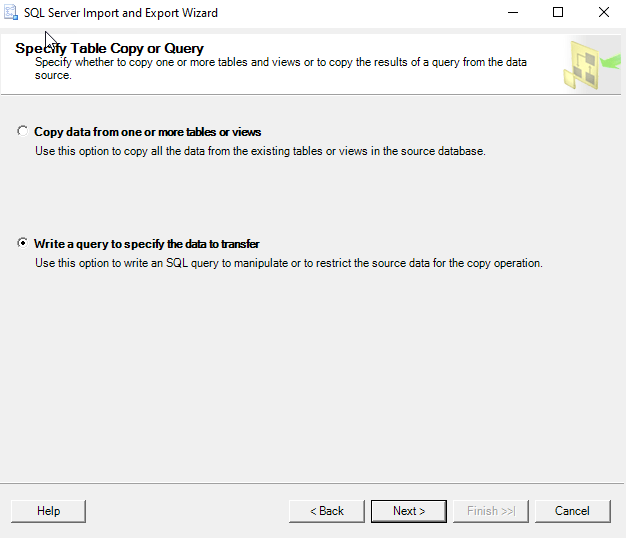
After launching this SQL Server Import and Export Wizard, it will be prompted with the same window that is used via SSMS. After setting all previous options, click the Next button. The Specify Table Copy or Query window will appear:
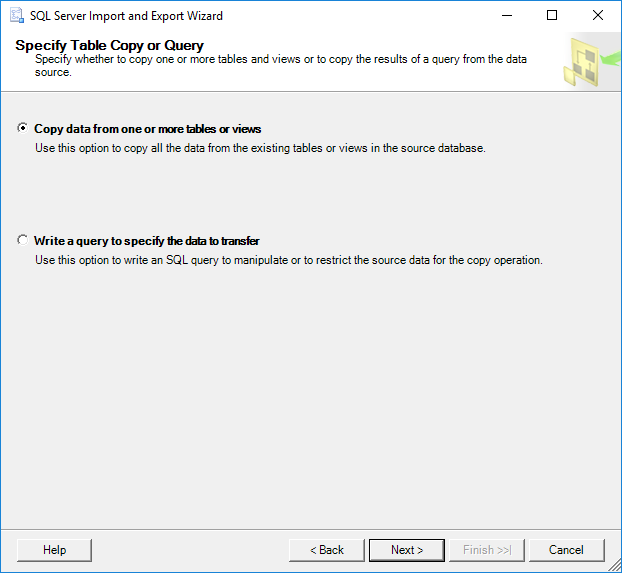
On this window, whether to copy data from one or more tables and views or to copy the results of a query can be specified.
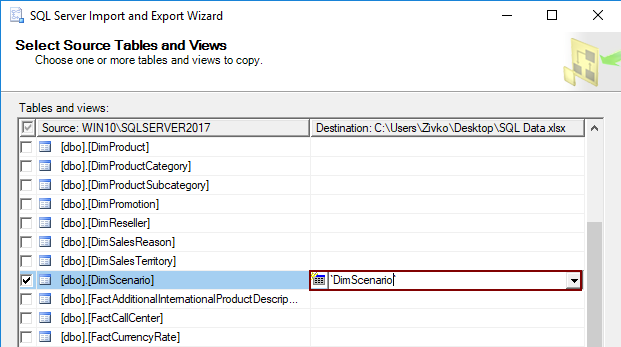
Select the Copy data from one or more tables or views radio button and click the Next button. The Select Source Table and Views window allows choosing one or more tables and views from which you want to export SQL Server data to an Excel file by clicking the check box next to the name of the table/view:
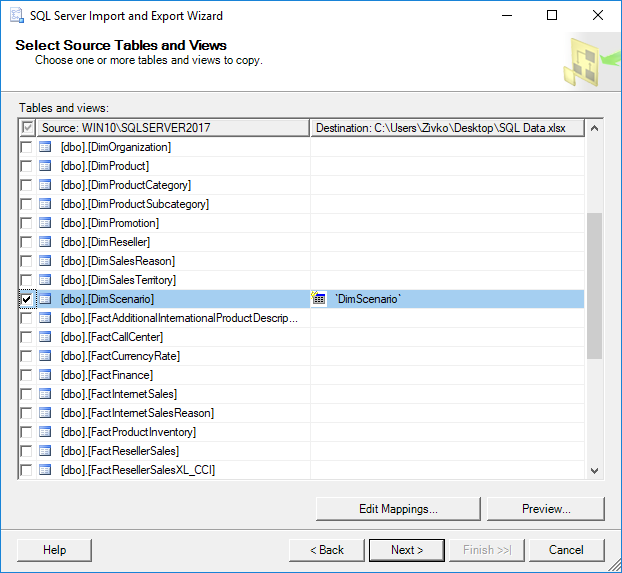
As it may be noticed, as soon as the check box next to a table/view is checked, the name of the table/view will be copied under the Destination column. This name represents the name of the sheet where the data from the table will be put, this name can be changed to whatever you like, but for now, it will be left as it is:
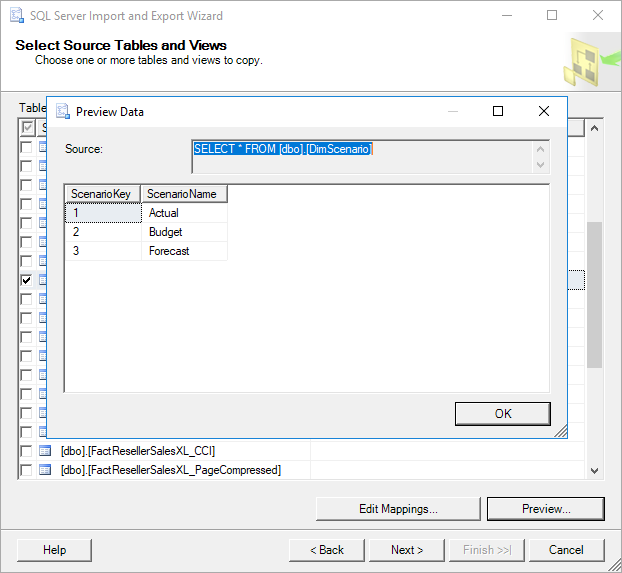
To preview which data will be generated to an Excel file, click the Preview button:
After choosing which tables/views data will be copied to an Excel file, click the Next button:
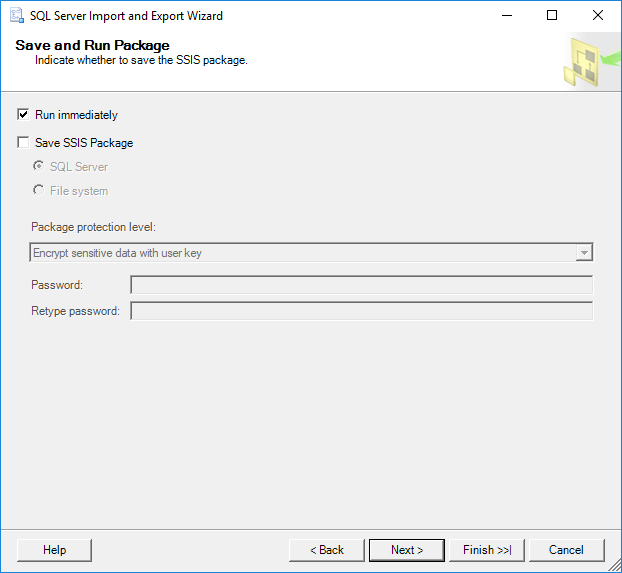
On the Save as Run Package window, check the Run immediately check box and click the Next button:
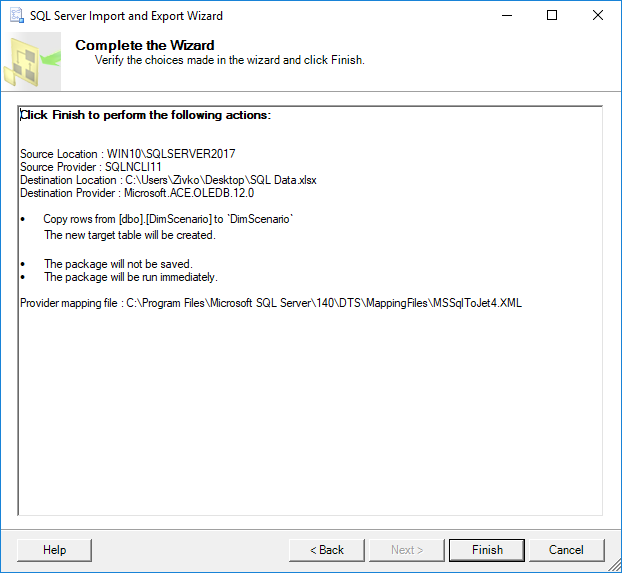
The Complete the Wizard window shows all options that are chosen for exporting operations. To finalize the process of export SQL Server data to an Excel file, click the Finish button. The last SQL Server Import and Export Wizard window shows the state of the data have been successfully exported or some errors occurred during exporting data:
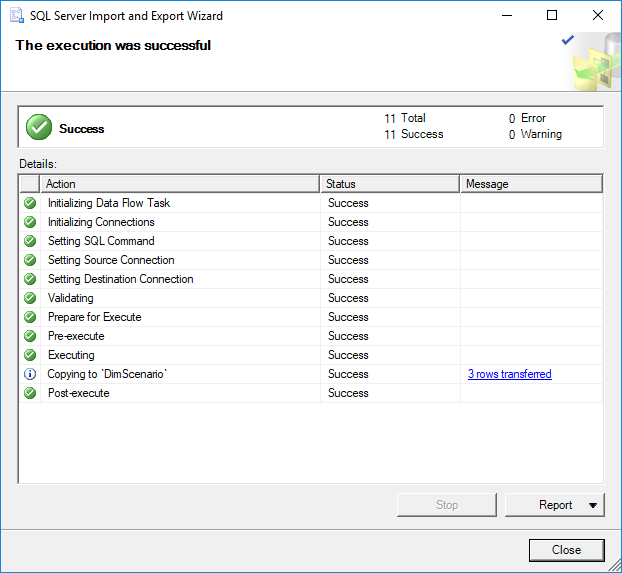
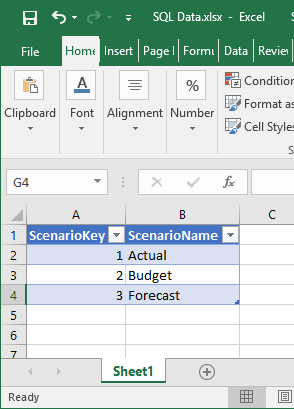
In our case, the data were successfully generated into the SQL Data.xlsx file in the DimScenario sheet:
Export SQL Server data to an Excel file using T-SQL code
The Transact-SQL OPENROWSET can be used to export SQL Server data to an Excel file via SSMS. In a query editor type and execute the following code:
INSERT INTO OPENROWSET('Microsoft.ACE.OLEDB.12.0','Excel 12.0;
Database=C:UsersZivkoDesktopSQL Data.xlsx;','SELECT * FROM [Sheet1$]')
SELECT * FROM dbo.DimScenario
But, when executing the above code, the following error may occur:
Msg 15281, Level 16, State 1, Line 1
SQL Server blocked access to STATEMENT ‘OpenRowset/OpenDatasource’ of component ‘Ad Hoc Distributed Queries’ because this component is turned off as part of the security configuration for this server. A system administrator can enable the use of ‘Ad Hoc Distributed Queries’ by using sp_configure. For more information about enabling ‘Ad Hoc Distributed Queries’, search for ‘Ad Hoc Distributed Queries’ in SQL Server Books Online.
To resolve this error the Ad Hoc Distributed Queries option should be enabled This can be done by using the sp_configure procedure and executing the following SQL code in a query editor:
EXEC sp_configure 'show advanced options', 1
RECONFIGURE
EXEC sp_configure 'Ad Hoc Distributed Queries', 1
RECONFIGURE
After executing the above code, the following message will appear that indicate that the show advanced options and Ad Hoc Distributed Queries options are enabled:
Configuration option ‘show advanced options’ changed from 0 to 1. Run the RECONFIGURE statement to install.
Configuration option ‘Ad Hoc Distributed Queries’ changed from 0 to 1. Run the RECONFIGURE statement to install.
Now, when again the code is executed:
INSERT INTO OPENROWSET('Microsoft.ACE.OLEDB.12.0','Excel 12.0;
Database=C:UsersZivkoDesktopSQL Data.xlsx;','SELECT * FROM [Sheet1$]')
SELECT * FROM dbo.DimScenario
The following error may appear:
OLE DB provider “Microsoft.ACE.OLEDB.12.0” for linked server “(null)” returned message “The Microsoft Access database engine cannot open or write to the file ”. It is already opened exclusively by another user, or you need permission to view and write its data.”.
Msg 7303, Level 16, State 1, Line 1
Cannot initialize the data source object of OLE DB provider “Microsoft.ACE.OLEDB.12.0” for linked server “(null)
This usually happens because of inadequate permissions.
More about how to resolving these issues can be found in the How to query Excel data using SQL Server linked servers page.
One way for resolving this issue is to open SSMS as an administrator and execute the code again. But this time, another error may appear:
Msg 213, Level 16, State 1, Line 1
Column name or number of supplied values does not match table definition.
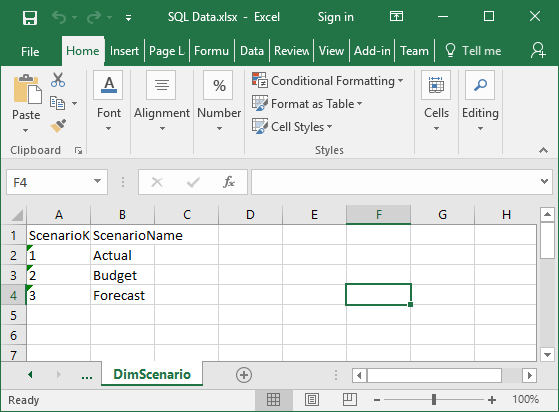
To resolved this, open excel file (e.g. SQL Data.xlsx) for which is planned to store the data from SQL Server table (e.g. dbo.DimScenario) and enter the column names which will represent the column names from the DimScenario table:
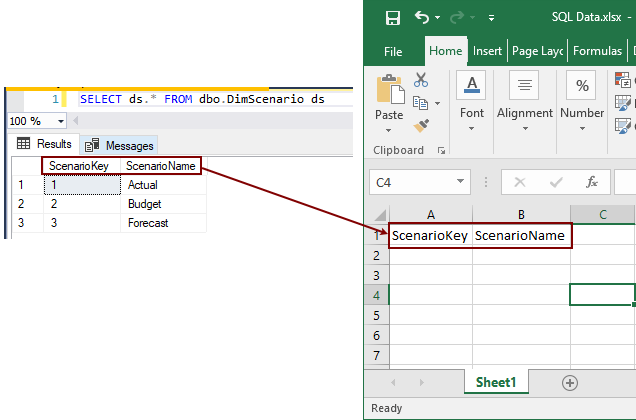
Close the SQL Data.xlsx file and once again execute the code:
Now, the following message will appear:
(3 rows affected)
Finally, the data from the SQL Server table are copied into the Excel file:
Import SQL Server data into Excel using the Data Connection Wizard dialog
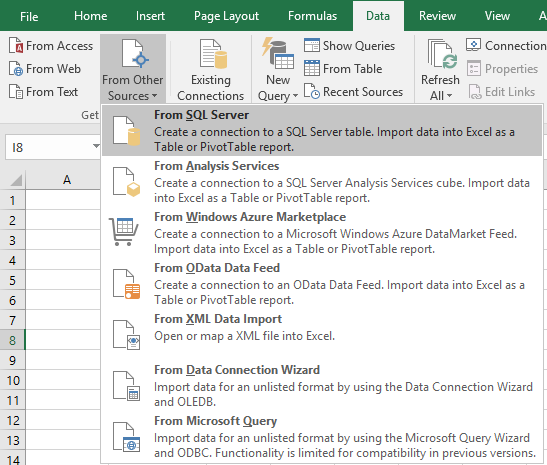
Another way to copy data from SQL Server table to an Excel file is to use the Data Connection Wizard dialog from Excel.
In order to achieve that, open an Excel file (e.g. SQL Data.xlsx) in which you want to import data. In the Data tab, under the From Other Source sub-menu, choose the From SQL Server command:
This will open the Data Connection Wizard dialog. In the Server name, enter a name of the SQL Server instance from which data need to be copied. In the Log on credentials section, choose the authentication mode for the data source connection and click the Next button:

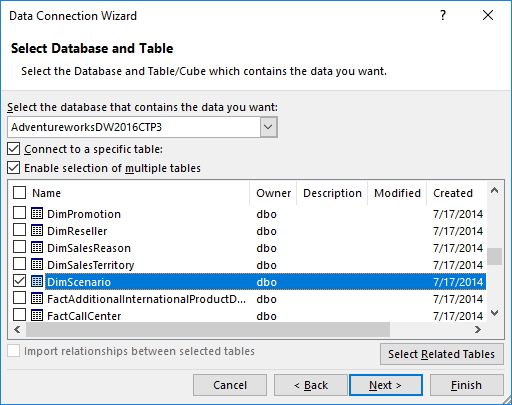
From the Select the database that contains the data you want drop down box, choose the database from which the data will be copied. In the grid, all available tables and views will be listed. Choose a desired table / view (e.g. DimScenario) and click the Next button to proceed.
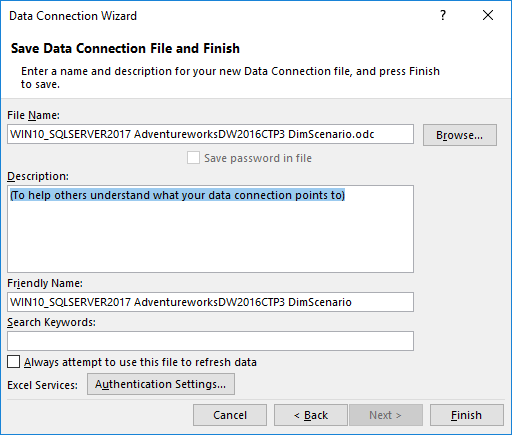
On this window, leave everything as it is and press the Finish button:
In the Import Data dialog, choose the Table radio button, under the Where do you want to put the data? section, choose the Existing worksheet radio button and press the OK button:
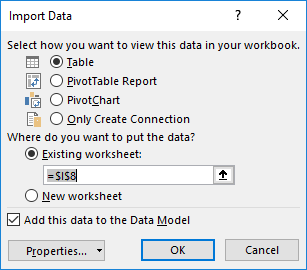
After pressing the OK button, the data from the DimScenario table will be copied to the SQL Data.xslx file:
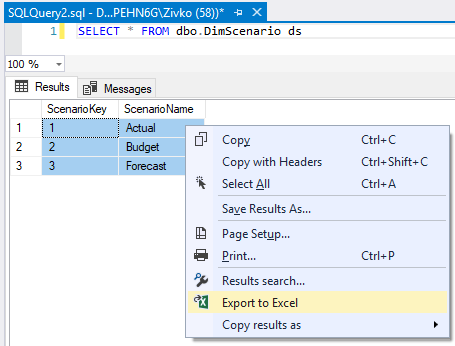
Export SQL Server data to an Excel file using Export to Excel from ApexSQL Complete
Using the Export to Excel feature from ApexSQL Complete, add-in for SSMS and Visual Studio, exporting data from the SQL Server table to an Excel file can be done by one click.
In a query editor, type and execute the following code:
SELECT * FROM dbo.DimScenario ds
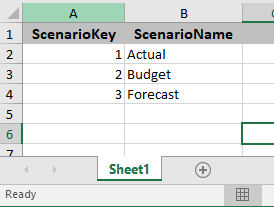
From the Results grid, select data that you want to export to an Excel file, right click in the Result grid and, from the context menu, choose the Export to Excel option:
This will open a new Excel workbook and the selected data from the Results grid will be copied in the first worksheet:
More about exporting to Excel via ApexSQL Complete can be found on the Export to Excel page.
See also:
- Tutorial: Import Data into Excel, and Create a Data Model
- Get started with this simple example of the Import and Export Wizard
- How to query Excel data using SQL Server linked servers
- Export to Excel
September 11, 2017
In the previous article, Learn SQL: SQL Server Pivot Tables, we’ve
discussed how to create a report using a PIVOT table query. We’ve created such a report directly in the SQL Server.
In this article, we’ll do the same, but this time we’ll use SQL Server export to Excel. So, let’s start.
Data model and the general idea
The data model we’ll use is the same that we’ve been using throughout this series. Even the queries used are the
ones we’ve analyzed in the previous article and therefore I won’t explain them in-depth here. In case, you’ve missed the previous article, I
strongly recommend taking a look at how these queries work.

The goal of this article is to show how we could combine data returned using SQL query and SQL Server export to Excel. This combination could prove to be very powerful. One of the main reasons is that MS Excel provides many additional options like graphs, calculations, formatting results. Also, you could use one “master” Excel workbook where you would join data from multiple sources, much easier than you could do it in case you read these data from original sources. And, worth to mention, that Excel is widespread and people are usually much more familiar with it than with databases.
SQL Server export to Excel – Using PIVOT Query
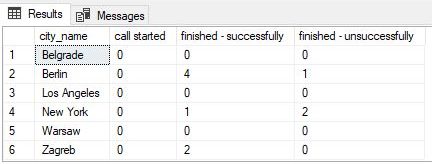
We want to create a report that contains a list of all cities from our database. For each city, we need to know a
number of calls grouped by their outcome.
To achieve that, we’ll use the final query from the previous article. This query shall always return all combinations of cities and call outcomes (we’ve used CROSS JOIN to create reporting categories). Also, we’ll be able to pivot by outcome (name), because our query is dynamic (we’re adding outcomes to the pivot part of the query based on the current contents of the dictionary). Therefore, our query shall work in all cases – even if we add new outcomes to the dictionary.
|
1 2 3 4 5 6 7 8 9 10 11 12 13 14 15 16 17 18 19 20 21 22 23 24 25 26 27 28 29 30 31 32 33 34 35 36 37 38 39 40 41 42 43 44 45 46 47 48 49 50 51 52 53 54 55 56 57 |
— 1 — report (including dynamic PIVOT) DECLARE @columns NVARCHAR(MAX) = », @query NVARCHAR(MAX) = »; — get all column names for the table we need for pivot SELECT @columns += QUOTENAME(TRIM(co.outcome_text)) + ‘,’ FROM call_outcome co ORDER BY co.outcome_text; — remove «,» from the end of the string SET @columns = LEFT(@columns, LEN(@columns) — 1); — dynamic SQL query SET @query =‘ SELECT * FROM ( SELECT — rc.city_id, rc.city_name, — rc.call_outcome_id, rc.outcome_text, rd.call_duration FROM ( SELECT c.id AS city_id, c.city_name, co.id AS call_outcome_id, co.outcome_text FROM call_outcome co CROSS JOIN city c ) rc LEFT JOIN ( SELECT ci.id AS city_id, co.id AS call_outcome_id, DATEDIFF(SECOND, c.start_time, c.end_time) AS call_duration FROM call c INNER JOIN call_outcome co ON c.call_outcome_id = co.id INNER JOIN customer cu ON c.customer_id = cu.id INNER JOIN city ci ON cu.city_id = ci.id ) rd ON rc.city_id = rd.city_id AND rc.call_outcome_id = rd.call_outcome_id ) report_data PIVOT( COUNT(call_duration) FOR outcome_text IN (‘+ @columns +‘) ) AS pivot_table;’; — execute dynamic query EXECUTE sp_executesql @query; |
Let’s take a look at the query result now. As expected, the result is the pivot table with all the data we need. Now
is the time to use SQL Server export to Excel.
SQL Server is a great tool and it has many addons you could use for specific purposes. Still, one of the frequently
used options are to simply copy the SQL Server query result to MS Excel and make desired additional transformations
there. The reason for that is that MS Excel provides a variety of options to present data. Some of the most commonly
used are tables, pivot tables, many different graph types, etc. Also, you could use MS Excel workbook as a central place where you will gather data from different sources (based on different formats or technologies) and combine
them to get an overall insight at your business. One more thing worth mentioning here is that MS Excel is widespread
and people are used to working with it. I don’t have an actual statistic related to SQL Server and MS Excel usage,
and I guess it would be hard to have actual numbers, so I’ll go with estimations available online. Around 750
million people worldwide use Excel, while in 2019 we had around 26.5 million developers (database developers are a small part of that number).
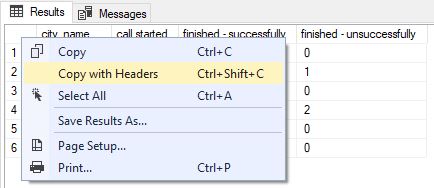
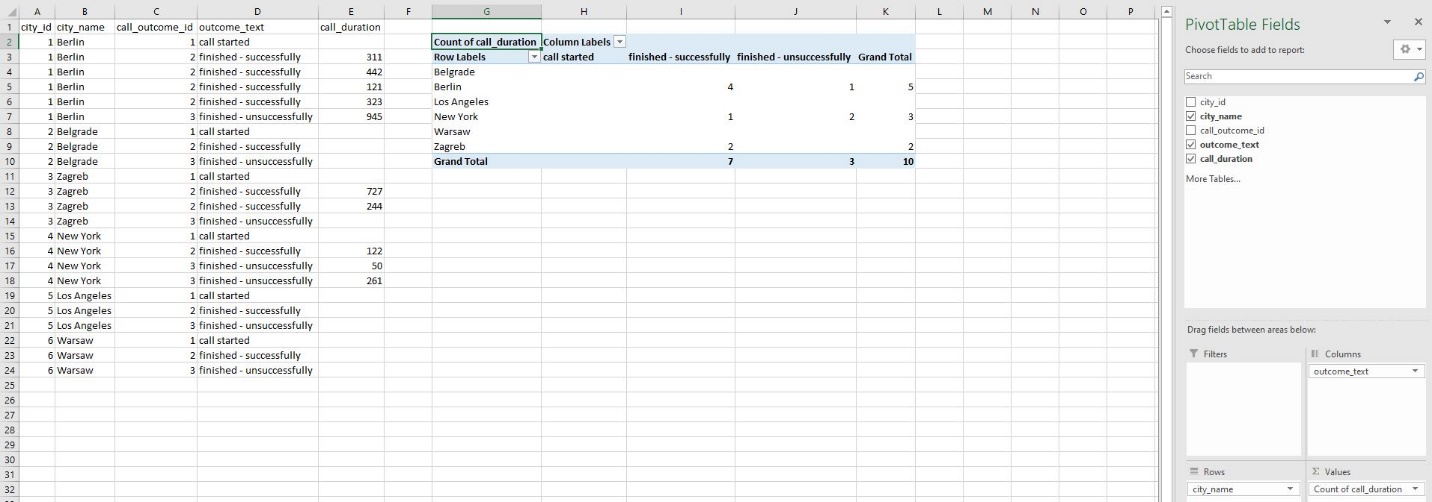
After you run the query, you can simply select the whole query result by clicking in the upper left corner (above
row numbers and left of the column names). The next thing to do is to select the “Copy with headers” option from the
drop-down list.
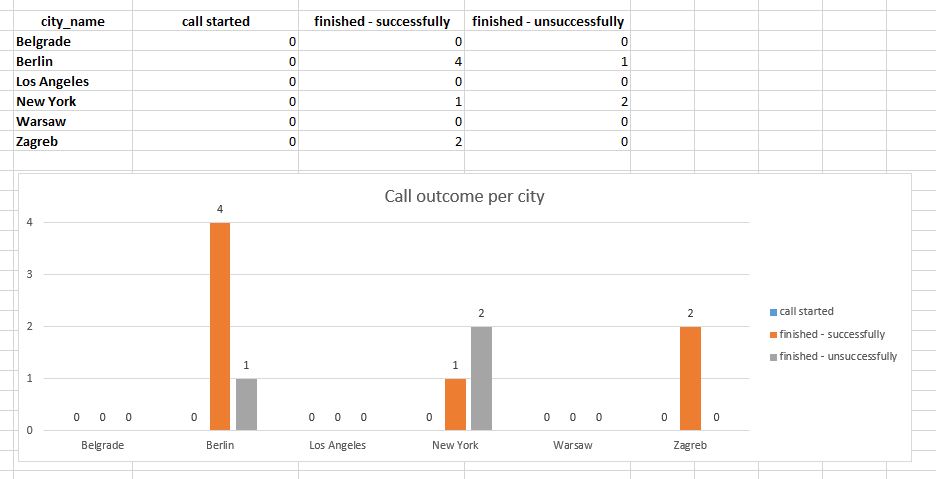
We’ve pasted the query result in the MS Excel worksheet. In real-life examples, we could have more formatting than
just applying bold to the categories. The graph below the table with data is prepared and formatted so it will
change accordingly changes in the data.
There are a few more things we could have done differently here:
-
We could paste data (pivot table) in a separate worksheet and have the “presentation” worksheet formatted
additionally -
In case we have more details, we could prepare several different graphs, as well as calculate parameters
relevant to our business
I’ve used this approach on real-world data as it enables you to create very complex dashboards after running a few
queries. Of course, you’ll spend a lot of time to prepare dashboards (and adjust them accordingly changes in
reporting requirements), but once you do that, you’ll profit a lot each time you need to create a new report.
And even better, this is not only limited to SQL Server export to Excel combination, but you could extract data from
different sources (other DBMSs, files, text…) and use your dashboard as a central place to get an overall insight.
SQL Server export to Excel – Without PIVOT Query
The final goal of our task is to create a pivot table as well as a graph to visually represent the result. The approach in the previous section was to create a PIVOT table query directly in SQL and paste this query to Excel.
There are (at least) 4 good reasons when you won’t always be able to use this approach:
-
You have the SQL query ready and you don’t want to waste additional time turning this query into the PIVOT table
query, but rather spend that time manipulating the result in the Excel -
Maybe you don’t use SQL Server (and MS Excel) and your DBMS simply doesn’t support PIVOT table queries (and
dynamic queries which is what we need) -
You want to have data in the raw format because you’ll need it for other purposes as well. Maybe you’ll create
more than 1 pivot table from the data returned. Maybe you’ll combine these data with other data directly in Excel -
You simply don’t know how to create a PIVOT table query in SQL Server but you know how to do it in MS Excel. OK,
this is not an excuse, but still, this is a common case in real life
Let’s now see what can be done if we go with the option that we don’t use the SQL Server pivot query. Once more
we’ll use the query described in the previous article. It’s almost the same as the previous query, with the main difference that we lack the PIVOT part of the query.
|
1 2 3 4 5 6 7 8 9 10 11 12 13 14 15 16 17 18 19 20 21 22 23 24 25 26 27 28 29 30 31 32 33 34 |
— 2 — report categories & data (without pivot) SELECT rc.city_id, rc.city_name, rc.call_outcome_id, rc.outcome_text, rd.call_duration FROM ( SELECT c.id AS city_id, c.city_name, co.id AS call_outcome_id, co.outcome_text FROM call_outcome co CROSS JOIN city c ) rc LEFT JOIN ( SELECT ci.id AS city_id, co.id AS call_outcome_id, DATEDIFF(SECOND, c.start_time, c.end_time) AS call_duration FROM call c INNER JOIN call_outcome co ON c.call_outcome_id = co.id INNER JOIN customer cu ON c.customer_id = cu.id INNER JOIN city ci ON cu.city_id = ci.id ) rd ON rc.city_id = rd.city_id AND rc.call_outcome_id = rd.call_outcome_id ORDER BY rc.city_id, rc.call_outcome_id; |
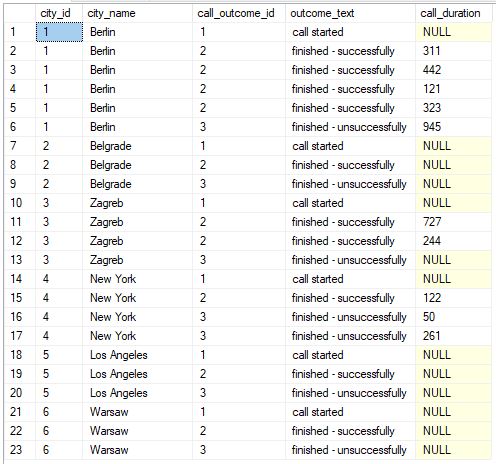
The first step is done. We’ve successfully returned all the data we need. Our result contains all combinations of
cities and possible outcomes (we’ve used CROSS JOIN) and one row per each call (NULL where we had no call).
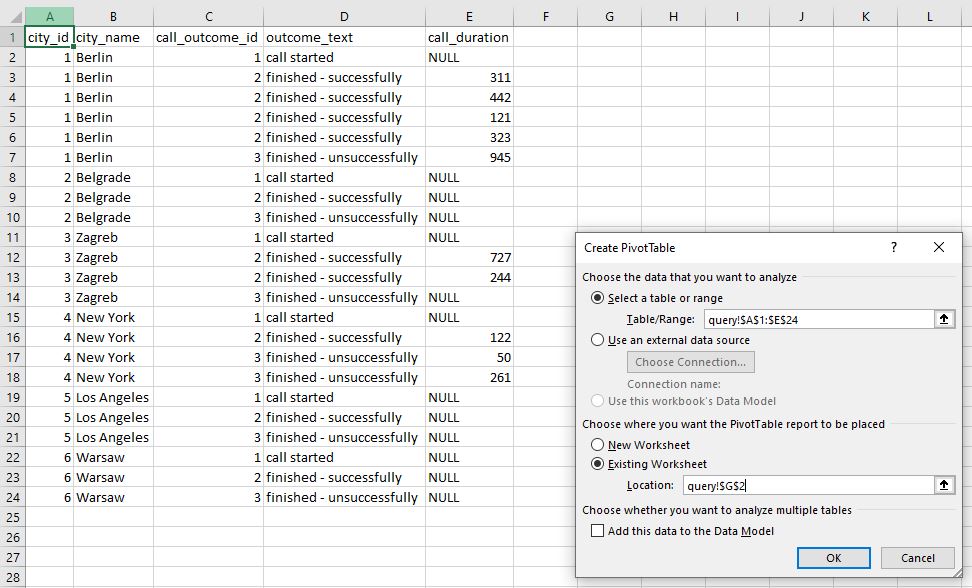
Now we’re ready to create a PIVOT table directly in Excel. After clicking on the “Insert” -> “Pivot Table” (in
Tab List and Ribbon) the window like the one on the picture above shall appear. We’ll “Select a table or range”
containing the data and the location where we want to place our pivot table (in our case that is “Existing
Worksheet”, starting from cell G2).
The next thing we did was to define what goes where. City names shall be “Rows” of our table, outcome texts shall go
into “Columns” and we’ll count call duration (“Values”). Please notice that in the original table (output), I’ve
replaced NULL values in column E, with blank spaces. This is important because the count function shall count 1 if
the row contains any non-empty value.
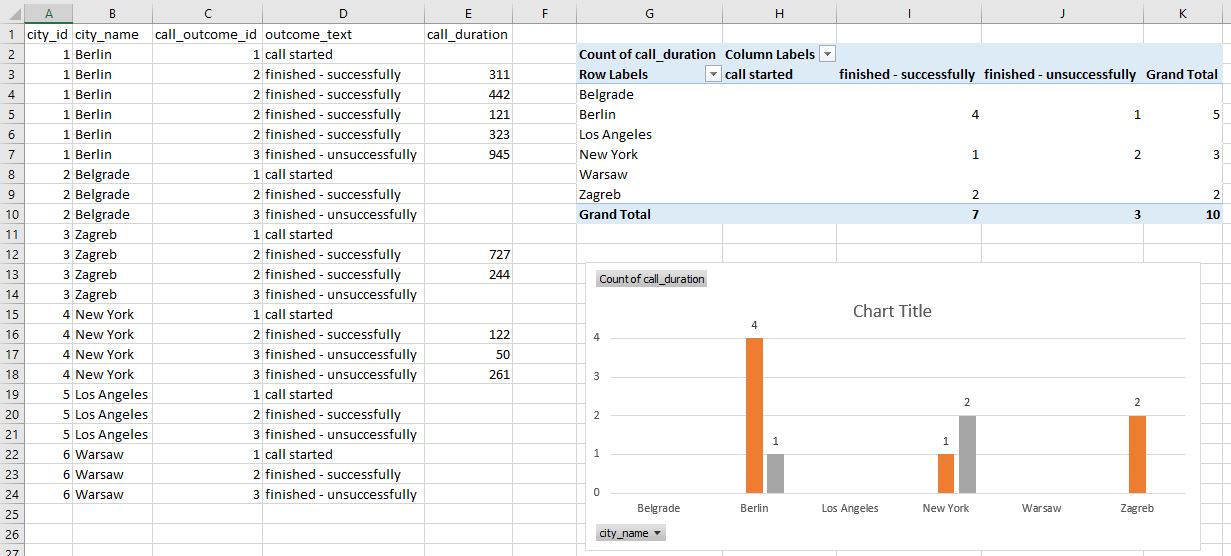
The last thing we’ll do is to create a graph. The data source for our graph is the pivot table created in the
previous step. We’ll apply formatting to our graph (graph style, labels, axis, etc.), and we’re done.
This approach could be applied more generally compared to the approach when the pivot table is created directly in
SQL Server. And that’s it – we’ve used SQL Server export to Excel to pull data from the database and create a simple
dashboard.
Conclusion
Today we’ve seen how we could combine the powers of SQL Server export to Excel – using the SQL query to grab data,
importing it to MS Excel, and making additional changes there. This is something you could easily do for various
purposes and the limit is only your imagination (and, of course, business needs). The next step could be automating
exports of tables or graphs created in MS Excel, directly to Word or PowerPoint.
Table of contents
| Learn SQL: CREATE DATABASE & CREATE TABLE Operations |
| Learn SQL: INSERT INTO TABLE |
| Learn SQL: Primary Key |
| Learn SQL: Foreign Key |
| Learn SQL: SELECT statement |
| Learn SQL: INNER JOIN vs LEFT JOIN |
| Learn SQL: SQL Scripts |
| Learn SQL: Types of relations |
| Learn SQL: Join multiple tables |
| Learn SQL: Aggregate Functions |
| Learn SQL: How to Write a Complex SELECT Query? |
| Learn SQL: The INFORMATION_SCHEMA Database |
| Learn SQL: SQL Data Types |
| Learn SQL: Set Theory |
| Learn SQL: User-Defined Functions |
| Learn SQL: User-Defined Stored Procedures |
| Learn SQL: SQL Views |
| Learn SQL: SQL Triggers |
| Learn SQL: Practice SQL Queries |
| Learn SQL: SQL Query examples |
| Learn SQL: Create a report manually using SQL queries |
| Learn SQL: SQL Server date and time functions |
| Learn SQL: Create SQL Server reports using date and time functions |
| Learn SQL: SQL Server Pivot Tables |
| Learn SQL: SQL Server export to Excel |
| Learn SQL: Intro to SQL Server loops |
| Learn SQL: SQL Server Cursors |
| Learn SQL: SQL Best Practices for Deleting and Updating data |
| Learn SQL: Naming Conventions |
| Learn SQL: SQL-Related Jobs |
| Learn SQL: Non-Equi Joins in SQL Server |
| Learn SQL: SQL Injection |
| Learn SQL: Dynamic SQL |
| Learn SQL: How to prevent SQL Injection attacks |
- Author
- Recent Posts

Emil is a database professional with 10+ years of experience in everything related to databases. During the years, he worked in the IT and finance industry and now works as a freelancer.
His past and present engagements vary from database design and coding to teaching, consulting, and writing about databases. Also not to forget, BI, creating algorithms, chess, philately, 2 dogs, 2 cats, 1 wife, 1 baby…
You can find him on LinkedIn
View all posts by Emil Drkusic