Some users are experiencing issues with Microsoft Excel. When they try to print from Excel, nothing happens. Whereas, some users have reported that a small window appears and disappears immediately after giving the print command to Excel. If you cannot print from Excel, the suggestions provided in this post may help you fix printing problems in Microsoft Excel.

Fix Excel printing problems of Windows 11/10
If you cannot print from Excel but Word can or maybe you see a Not enough memory error message then here are some suggestions to help you fix Excel printing problems. Before you proceed, make sure that you are using the latest version of Microsoft Office. You can also try to update Office manually and see if it fixes the problem. If the problem persists, try the solutions provided below.
- Try to print via Microsoft XPS Document writer
- Update your printer driver
- Edit permissions in the Registry Editor
- Troubleshoot Excel in Safe Mode
- Remove and add your printer again
- Repair Office
Let’s see all these solutions in detail.
1] Try to print via Microsoft XPS Document Writer
Before printing a spreadsheet, Excel shows us an option to select the printer. If you are unable to print from Excel via your default printer, try to print via Microsoft XPS Document Writer. The steps to do this are as follows:
- Launch Microsoft Excel and open your spreadsheet.
- Go to “File > Print.”
- Click on the Printer drop-down and select Microsoft XPS Document Writer.
- This will save your Excel spreadsheet in the XPS format.
Now, open the saved file. You should be able to print it.
2] Update your printer driver
You might be experiencing printing issues with Excel due to the corrupted or outdated printer driver. We suggest you update your printer driver and see what happens.
You have the following choices when it comes to updating the printer driver.
- Open the Windows Optional Update page and update your printer driver from there (if any update is available).
- Visit the official website of your printer manufacturer and download the latest version of your Printer driver. Now, double-click on the installer file to install the printer driver manually.
3] Edit permissions in the Registry Editor
Windows Registry is a hierarchical database that stores the Windows settings and configurations. Any mistake while modifying the Windows Registry can lead to serious damage to the system. Therefore, before you proceed, we recommend you create a System Restore Point and backup Windows Registry.
Follow the instructions carefully.
Press the Win + R keys. This will open the Run command box. Type regedit and click OK. Click Yes in the UAC prompt.
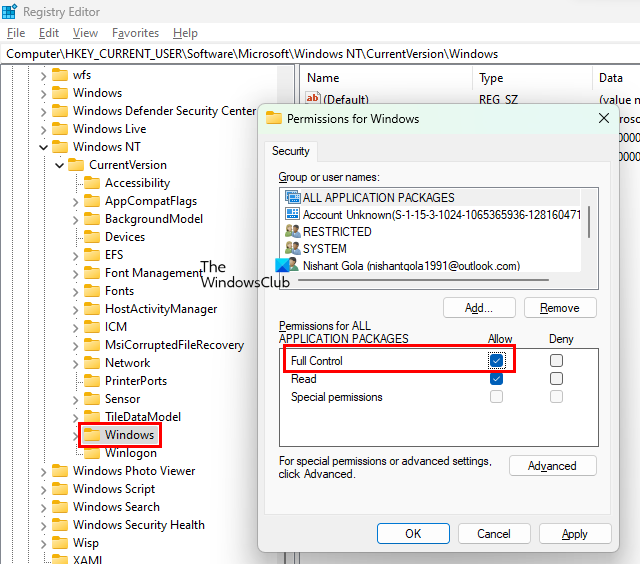
When the Registry Editor appears on your screen, go to the following path. Simply copy the path given below and paste it into the address bar of the Registry Editor. After that, press Enter.
ComputerHKEY_CURRENT_USERSoftwareMicrosoftWindows NTCurrentVersionWindows
Right-click on the Windows key and select Permissions. The Permissions dialog box will appear. Now, click on the Allow checkbox next to the Full Control option. Click Apply and then click OK.
4] Troubleshoot Excel in Safe Mode
If the problem still persists, there might be a problematic add-in. To confirm this, launch Excel in Safe Mode and print your spreadsheet. If you are able to print your spreadsheet in the Safe Mode, an add-in is causing the problem.
Now, close Excel and open it again in the normal mode. Start disabling all the COM add-ins one by one and print your spreadsheet every time you disable an add-in. This will let you know which add-in is causing the problem. According to the feedback of affected users, the Acrobat PDFMaker Office Com add-in was causing the problem. If you have installed such an add-in, disable it and then see if you can print the spreadsheet. If yes, remove that add-in.
The following steps will help you disable COM Add-ins in Excel:
- Open your spreadsheet in Excel.
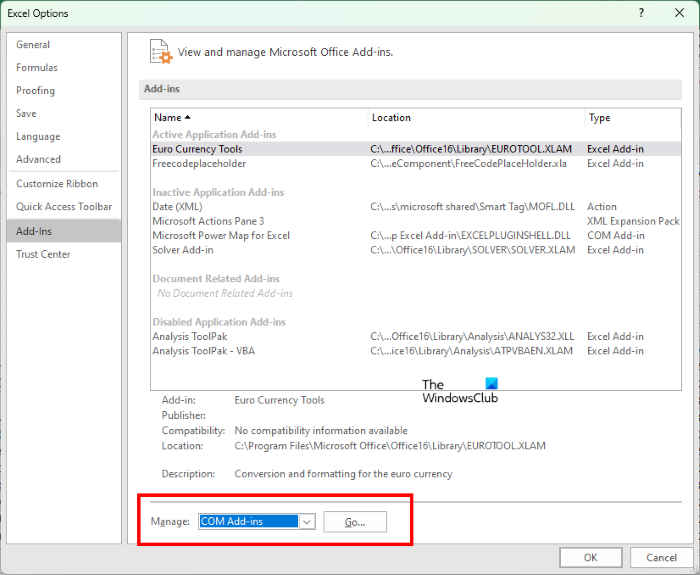
- Go to “File > Options > Add-Ins.”
- Select COM Add-ins in the drop-down at the bottom and click GO.
- The COM Add-ins dialog box will appear. Now, simply uncheck the checkbox to disable a particular add-in.
- Click OK.
Read: Fix Excel keeps flickering on Windows 11/10.
5] Remove and add your printer again
Sometimes, removing and adding the printer again fixes the printer-related issues. Completely remove or uninstall your printer and then add it again. Check if this helps. You can completely remove a printer from your Windows 11/10 machine via:
- Settings
- The Control Panel
- Print Server Properties
- The Command Prompt
- The Registry Editor
6] Repair Office
If nothing helps you, repair Microsoft Office. Sometimes, the problem occurs due to corrupted Office files. If this is the case with you, repairing Microsoft Office will fix the problem. First, run a Quick Repair. If this does not fix the problem, run an Online Office Repair.
Read: Microsoft Excel displays High CPU usage.
Fix Excel printing problems in Windows 11/10
Above, we have seen the solutions to fix the problem when Excel does not print on receiving the print command from the user. Now, let’s see some common printing problems that you may experience in Microsoft Excel. Sometimes, when we print a spreadsheet from Excel, we do not get the desired printout. Some of you might have experienced such a problem. Such types of problems occur when the print settings are incorrectly configured before printing a spreadsheet.
Here are some tweaks that you can do to avoid some common printing problems in Microsoft Excel.
- Fit your spreadsheet on one page
- Set the print area in Excel
- Configure print settings before printing the spreadsheet
1] Fit your spreadsheet on one page
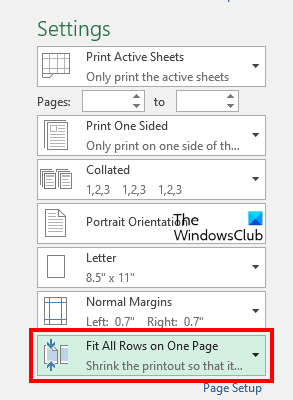
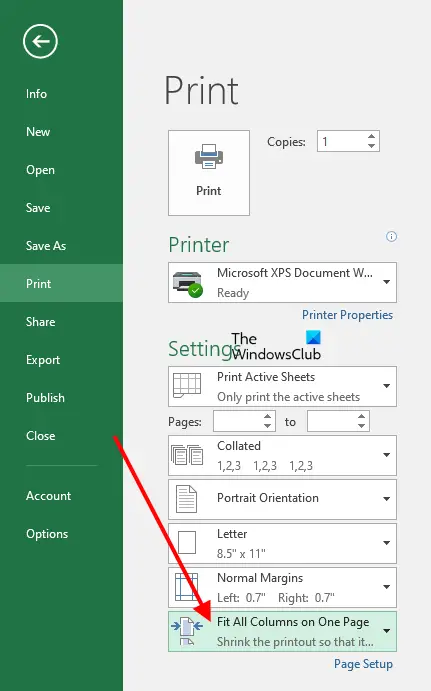
Some of you might have experienced that despite configuring the correct page settings, Excel prints a spreadsheet on more than one page. This problem can be fixed by changing the scaling in Excel. If you want to print all the rows or columns on one page in Excel, you have to change the No Scaling option in Excel to Fit all rows on one page and Fit all columns on one page option respectively.
2] Set the print area in Excel
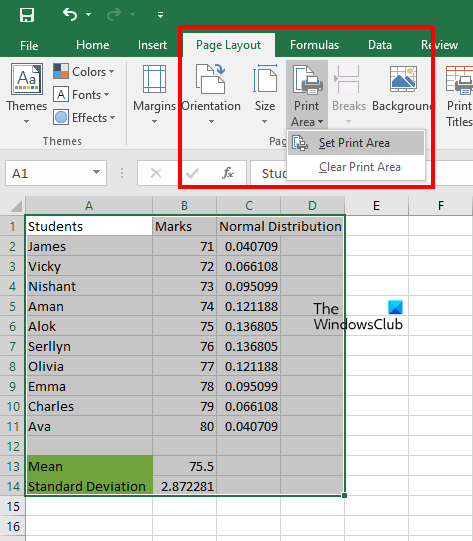
If you want to print selected cells in your spreadsheet, you can set the print area for the same. The steps to set the print area are as follows:
- Open Excel.
- Open your worksheet in Excel.
- Select the range of cells that you want to print.
- Go to “Print Layout > Print Area > Set Print Area.”
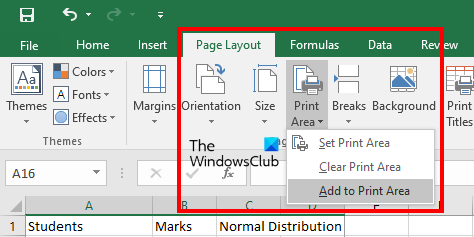
Now, when you give the print command to Excel, it will print only the selected cells on a page. You can extend the print area by adding more cells to it. If the cells that you want to add are adjacent to the existing print area, Excel will print them on the same page (if space is available). If the selected cells that you want to add are not adjacent to the existing print area, Excel will print them on another page, no matter whether the space is available on the existing print area or not.
To add cells to the existing print area, follow the steps below:
- Select the range of cells that you want to add to the existing print area.
- Go to “Page Layout > Print Area > Add to Print Area.”
To clear the print area, go to “Page Layout > Print Area > Clear Print Area.”
3] Configure print settings before printing the spreadsheet
You can configure the print settings before printing your spreadsheet. To do so, go to “File > Print” or simply press the Ctrl + P keys. There you will see different print settings. You can change the page orientation (landscape or portrait), select your paper size such as Letter, Legal, A4, A3, etc., change page margins, etc. Every time you make a change to the print settings, Excel will show you the print preview in the preview window.
Why can I print from Word but not from Excel?
If you are able to print from Word but not from Excel, there might be a problematic add-in in Excel. You can confirm this by opening Excel in the Safe Mode. If you will be able to print in the Safe Mode, one of the add-ins is the culprit. Now, disable add-ins installed in Excel one by one. Print your spreadsheet every time you disable an add-in. This will help you identify the problematic add-in.
Other solutions that you can try are removing and adding the printer again, updating your printer driver, etc.
Why won’t Excel print all the columns?
To print all the columns on one page in Excel, you have to configure the page settings before printing your spreadsheet. The steps for the same are as follows:
- Open your spreadsheet in Excel.
- Go to “File > Print.”
- By default, the page setup is set to No Scaling. You have to change this option. Click on it and select Fit all columns on one page.
After that, you will be able to print all the columns on one page in Excel.
Print preview is not available because Microsoft Excel could not connect to the selected printer
If you see the “Print preview is not available because Microsoft Excel could not connect to the selected printer” error message while printing a spreadsheet from Excel, make sure that your computer is running on the latest version of the Windows operating system. Open Windows 11/10 Settings and check for updates. If updates are available, download and install them.
We also suggest you update Microsoft Office manually and see if it helps. If the problem persists, repair Microsoft Office.
Cannot print from Excel, Not enough memory
Some of you might have seen the “Not enough memory” error message while printing a spreadsheet in Microsoft Excel. The error message is self-explanatory. When the printer from which you are printing the jobs does not have enough memory, you will see this error. However, there are other causes too that trigger this error. To fix this issue, you can try the following fixes.
- Copy the data from your spreadsheet to a new spreadsheet
- Change your default printer
- Update your printer driver
- Print in Draft Mode
- Save your Excel file in ODS format
- Reset your printer memory
- Clear print spooler
- Repair Office
Let’s see all these fixes in detail.
1] Copy the data from your spreadsheet to a new spreadsheet
This method has fixed the issue of some users. You can also try this. Copy the data from your spreadsheet to a new spreadsheet and see if it helps.
2] Change your default printer
If the problem still persists, change your default printer. You can set any virtual printer as a default printer, such as Microsoft Print to PDF, Microsoft XPS Document Writer, etc.
3] Update your printer driver
Sometimes the problem persists due to the outdated or malfunctioned printer driver. If this is the case with you, updating the printer driver will solve your problem. To do so, follow the steps written below:
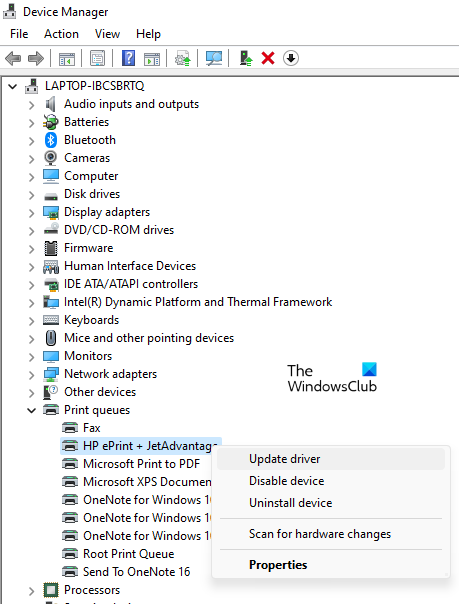
- Open the Device Manager.
- Expand the Print queues node.
- Right-click on your printer driver and select Update driver.
- Select the “Search automatically for drivers” option. Let Windows install the latest version of your printer driver.
If this does not work, visit the official website of your printer manufacturer and download the latest version of your printer driver from there. Now, run the installer file to install the latest version of your printer driver manually.
4] Print in Draft Mode
For some users, printing the spreadsheet in the Draft mode fixed their problem. You can also try this and see if it helps. To do so, you have to change the Fast mode to Draft mode. By default, the print quality is set to Fast mode. Open your print quality settings and change the Fast mode to Draft mode.
5] Save your Excel file in ODS format
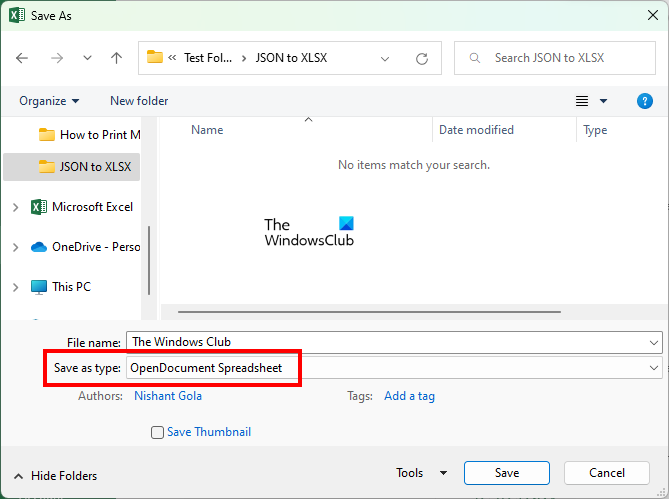
Another effective solution to fix this problem is to save the Excel spreadsheet in ODS (OpenDocument Spreadsheet) format. The steps to do this are as follows:
- Launch Microsoft Excel and open your spreadsheet.
- Go to “File > Save As.”
- Click on the Save as type drop-down menu and select OpenDocument Spreadsheet.
- Click Save.
Now, open the ODS file and print it. The problem should not appear this time.
6] Reset your printer memory
If your printer is running low on memory, resetting its memory will help fix the issue. Resetting the printer memory will clear the print jobs in the queue. To do so, follow the steps given below:
- Disconnect your printer from your computer.
- Turn off your printer.
- Disconnect the power cable of your printer and wait for a few minutes.
- Connect the power cables again and turn on your printer.
- Connect your printer to your computer.
If the above method did not help, cold reset your printer. The method to cold reset printers is different for the printers of different brands. Therefore, you have to refer to the user manual of your printer to know the correct way to cold reset your printer.
7] Clear the Print Spooler
In Windows, Print Spooler is a service that stores the printing jobs temporarily. If Excel is showing the “Not enough memory” message while printing a spreadsheet, clearing the Print Spooler may fix the problem. The steps to clear the Print Spooler are as follows:
- Press the Win + R keys to launch the Run command box.
- Type services.msc and click OK. This will launch the Services Management window.
- Scroll down and locate the Print Spooler service.
- Once you find it, right-click on it and select Stop.
- Open the File Explorer and go to the “C:WindowsSystem32spool” path. Simply copy this path and paste it into the address bar of the File Explorer. After that, hit Enter.
- Open the PRINTERS folder and delete all the files inside it. Do not delete the PRINTERS folder.
- Return to the Services Management window and right-click on the Print Spooler service.
- Select Start.
8] Repair Office
Check if you are getting the same error message in other Office apps, like Word. If not, some of the Excel files may be corrupted. To fix this problem, run an online repair for Microsoft Office.
Hope this helps.
Read next: Excel freezing, crashing, or not responding.
-
#1
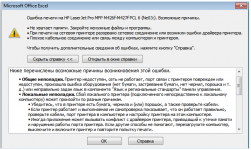
Здравствуйте. При печати из Excel в Microsoft Home and Business 2019 возникает ошибка:
«Ошибка печати на HP LaserJet Pro MFP M426f-427f
Возможные причины:
Не хватает памяти. Закройте не нужные файлы и программы.
При печати на сетевом принтере разорвано сетевое соединение или возникли ошибки драйвера принтера.
Плохое кабельное соединение или связь между компьютером и принтером.»
Скриншот прилагаю.
Если закрыть все экземпляры Excel и снова открыть то печать идет без проблем.
Памяти хватает (по крайней мере в диспетчере задач память не забита), сетевое соединение с МФУ в порядке (из других программ печать идет), МФУ подключено к компьютеру по сети.
В чем может быть причина?
Система Windows 10 Pro 64-bit.
-
27082021.png
31,4 КБ
· Просмотры: 4
-
#2
Хм.. интересно.
1. А принтер нормально пингуется, не перетоптан ли патчкорд ?
2. Попробуйте удалить принтер, с удалением текущего драйвера.
Попробуйте установить базовый драйвер:
HP LaserJet Pro MFP M426f-M427f PCL-6 V4 Print Driver (no installer)
HP LaserJet Pro MFP M426f-M427f Printer Series v3 PCL 6 Print Driver (no installer)
-
#3
1. Пингуется нормально. С подключением всё хорошо.
2. Удалил принтер, установил базовые драйверы. Всё работает, но дело в том что эта ошибка уходила, если закрыть все окна Excel и снова открыть документ. То есть понять, что проблема решилась не могу.
Последнее редактирование модератором: 27.08.2021
-
#4
Интересно какой event id у ошибки и Source
-
#5
попробуйте восстановить пакет MS Office
-
#6
Удалить порт принтера и создать заново, именно через ip адрес, не WSD или прочую х. Возможно какие то ненужные протоколы включены в МФУ
-
#7
Удалить порт принтера и создать заново, именно через ip адрес, не WSD или прочую х. Возможно какие то ненужные протоколы включены в МФУ
Порт через ip работает, не через WSD
-
#8
Всем доброго дня!
Та же беда. Два принтера выдают такую же ошибку. Оба принтера подключены локально. Windows11 x64. Закрытие всех документов помогает
When using Office 365 Excel application, you may receive an error that would point to “Excel cannot complete this task, Out of Memory or Not enough System Resources to Display Completely” condition. In this post, we are offering how you can resolve this problem and continue to use the Excel File.
Fix Excel Out of Memory error

Here is the list of errors that can show up under this situation:
- Excel cannot complete this task with available resources. Choose less data or close other applications.
- Out of Memory
- Not enough System Resources to Display Completely
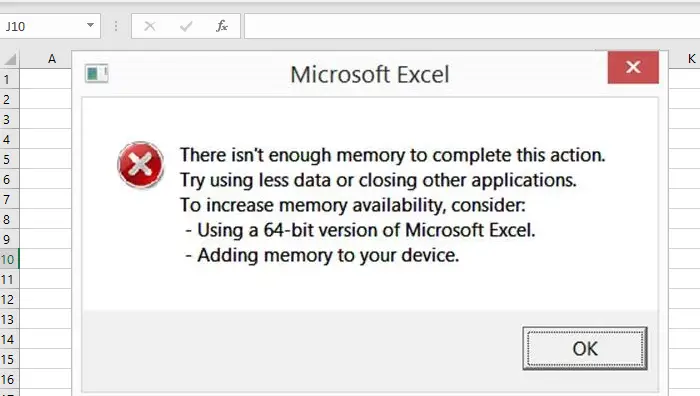
- There isn’t enough memory to complete this action. Try using less data or closing other applications. To increase memory availability, consider:
- Using a 64-bit version of Microsoft Excel.
- Adding memory to your device.
There isn’t enough memory to complete this action Excel error
It is important to note that the error message is general, but one thing is clear that the Excel app is not able to process large file sizes. The file is so huge that it consumes the whole memory available to the system. If your Excel file is large or has a lot of formulas and scripts, the system may run low on memory. That said, Microsoft has officially shared some limitations for Excel.
- Excel: Specifications and limits
- Excel Performance: Performance and Limit Improvements
- Excel: Memory usage in the 32-bit edition
Keeping this in mind, let us know how we can resolve the error message.
Excel cannot complete this task with available resources
- Install Updates
- File Specific Issue
- Interfering Add-ins
- Test with the 64-bit version of Excel
- Add Physical RAM
- Change the default Printer
- Test without Antivirus
It is apparent that you need more memory. You may look at the other applications that are consuming the memory and get rid of them. You can terminate such applications, and stop them from running in the background.
Similar: Not enough memory to run Microsoft Excel
Not enough System Resources to Display Completely Excel error
1] Install Updates
Sometimes it could be because of a previous update or Microsoft have released an update to handle these kinds of situations. I would highly recommend you to check for any update for your OS as well as Office software and install it before following any further suggestion.
2] File Specific Issue
If the error is occurring for only one file, then you may need to revisit the content of the files. It could be because of the high number of calculations when it happens when you copy-paste such cells, complex PivotTables, macros, and complex charts with many data points, custom views, and so on.
It is something you need to manually check by opening it in Protected View or disabling VPA features and so on. Remember, the error will not occur when you open a file, but it will happen when it performs a heavy calculation or when you insert new data goes beyond the capacity of Excel.
You may also want to break the excel file into smaller files to handle the situation in a better way.
3] Interfering Add-ins
If you have plugins or add-ins installed in Excel, it would be a good idea to disable and check if you still face the issue. If you do not face any problem, then you need to check if there is an update for the add-in available. Sometimes Add-ins take a high amount of resources to complete a task, which results in Out of Memory, Not enough System Resources to Display Completely problem.
4] Try with the 64-bit version of Excel
A 64-bit version of Microsoft Office can handle large files better than the 32 bit Excel application. It is because there is a limit of 2 GB for any 32-bit application. If you need to handle large files almost every day, it is better to download or move to Microsoft Excel 64 bit version. It will be able to access more RAM and get things done faster without resulting in Out of Memory issue.
5] Add more physical memory to your computer
If it is the physical memory you are running out of, then its time you add more RAM to your computer. If you are switching to a 64-bit version, then adding extra memory will help you process the Excel file a lot faster.
6] Change the default Printer
When Excel launches, it polls for the default printer. At times, it may get stuck with if the printer is not available or doesn’t respond because the data is too much to handle. We will recommend you to change your default printer to one of the virtual printers available on the computer such as PDF printer or XPS document writer.
- Open Windows Settings (WIn + I)
- Navigate to Devices > Printers and Scanners
- Uncheck the box which says Let Windows manage my default printer
- Select one of the virtual printers, and click on Manage button
- Click on Set as default button under Manage your device section
Try again, and see if it works fine this time.
7] Disable Antivirus
Antivirus software is known to cause these types of problems, especially if they end up scanning the file again and again. It can be a false positive as well if the antivirus things the file can harm the computer. Most of antivirus offer a temporary disable option. So try again after doing that or completely uninstall the AV to check if the issue is resolved.
Let us know if anything here helped you.
Недавно на работе обновили всю печатающую технику на HP LaserJet Pro MFP M125rnw. После чего начались проблемы с печатью некоторых документов Microsoft Office.
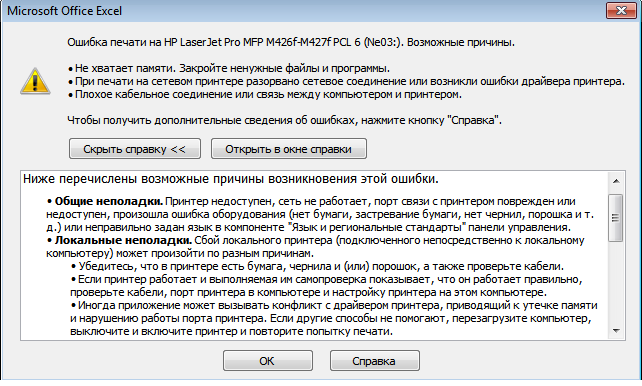
При попытки печати некоторых докуметов MS Excel на МФУ HP LaserJet M125rnw, выдаёт такую ошибку:
Ошибка печати на HP LaserJet Pro MFP M125rnw
Возможные причины:
- Не хватает памяти. Закройте не нужные файлы и программы.
- При печати на сетевом принтере разорвано сетевое соединение или возникли ошибки драйвера принтера.
- Плохое кабельное соединение или связь между компьютером и принтером.
Что страно, при печати документов из MS Word никакие сообщения не выводятся. Документы отправляются на печать, без всяких уведомлений, но не распечатываются.
Решение проблемы:
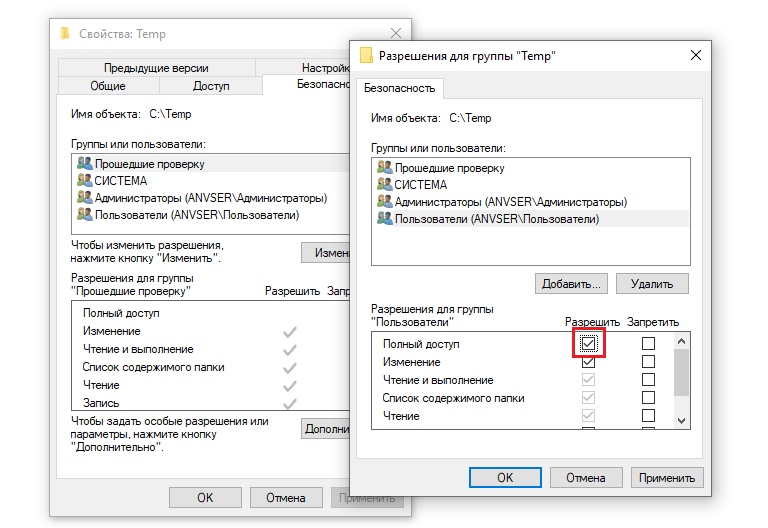
Для папок Temp и Tmp, во вкладке безопасность, необходимо предоставить полный доступ всем пользователям.
Папка Temp по умолчание находится по пути «C:UsersВаша учётная записьAppDataLocalTemp»
- Remove From My Forums
-
Вопрос
-
При открытии некоторых файлов .xls и .doc Word и Excel 2013 выдают сообщение:
«Приложению Microsoft Excel (Word) не удается открыть или сохранить документы из-за нехватки памяти или места на диске»
Ну и дальше предлагается список действий — «освободите память, удалите ненужные программы и т.д.»
В журнале событий такие сообщения:
Microsoft ExcelПриложению Microsoft Excel не удается открыть или сохранить документы из-за нехватки памяти или места на диске. • Чтобы освободить память, закройте ненужные книги или программы. • Чтобы освободить место на диске, удалите с этого диска ненужные файлы.P1: 100102P2: 15.0.4420.1017P3: 5afgP4:
(цифры после P1 — каждый раз разные).
Разумеется памяти достаточно (4 Гб), места на диске тоже навалом, компьютер сам по себе среднего современного уровня.
Происходит такая штука с определенными файлами — т.е. именно этот конкретный не открывается, но какой-то другой в это же время откроется без проблем. А те, которые не открывались, не откроются, сколько не пытайся.
Другой момент — замечал, что файлы которые не открывались вчера, открываются в другой день.
Проблема проявляется периодически на 3 разных машинах — на двух Windows 8 x64 (и 64-битный офис), на одной — Windows 8 32 бит (и 32-битный офис).
Ну и конечно — те же файлы отлично открываются в Libre Office или MS Office 2010. Файлики обычные, без каких-то макросов и тп., антивирус установлен (никаких признаков вирусных заражений, система — все обновления). Подскажите, куда копать? Не хочется сносить
2013-й (пусть пока и пробный), плюс скоро их ведь пользователям ставить будем (сам админ) — хочется разобраться в проблеме.-
Изменено
26 декабря 2012 г. 13:05
-
Изменено
Ответы
-
Да, я тоже уже разобрался — снял все галки в Центре управления безопасностью в разделе «Защищенный просмотр». После этого все проблемные файлы стали «нормальными» )
Аналогичный эффект давала также разблокировка файла через его свойства в проводнике.
При этом у меня эти файлы находились просто в локальных папках (не расшаренных).
Проблема фактически решена, хотя все-таки это именно баг, ведь программа при этом говорит о каком-то недостатке памяти и т.п. Да и вообще по сути файлы должны бы открываться, но с пометкой, что они заблокированы для редактирования (как это и было раньше
для защищенных)-
Помечено в качестве ответа
ЖукMVP, Moderator
8 января 2013 г. 14:07
-
Помечено в качестве ответа
-
Проблемы как таковой на самом деле нет. Всё дело в новых настройках безопасности.- Центр управления безопасностью /параметры центра управления безопасностью/ Надёжные расположения — добавить новое расположение — путь — обзор -(выбираем
диски С: , D: и т.д.) ставим галочку — Также доверять всем вложенным папкам/ жмём ОК……Всё.-
Предложено в качестве ответа
Alexsoft73
8 октября 2014 г. 23:34 -
Помечено в качестве ответа
ЖукMVP, Moderator
22 сентября 2017 г. 14:50
-
Предложено в качестве ответа
-
я вообще то, ещё вводил сетевой пароль доступа с включённой опцией «запомнить логин и пароль».
Да, я Жук, три пары лапок и фасеточные глаза :))
-
Помечено в качестве ответа
ЖукMVP, Moderator
10 января 2018 г. 13:27
-
Помечено в качестве ответа
-
Сетевой путь, так же должен быть внесён в список «Надёжные расположения» с отмеченной опцией «Так же доверять всем вложенным папкам».
Да, я Жук, три пары лапок и фасеточные глаза :))
-
Помечено в качестве ответа
ЖукMVP, Moderator
21 августа 2015 г. 10:52
-
Помечено в качестве ответа
-
Выбирать необходимо из той программы, к которой подключается сетевой диск через кнопку «Обзор» соответствующего окна программы. Путь пропишет сама программа, Вам остаётся только отметить
опцию «Так же доверять всем вложенным папкам».Предварительно, протокол IPv6 должен быть включён, и с компьютера эти сетевые папки должны быть доступны.
Да, я Жук, три пары лапок и фасеточные глаза :))
-
Изменено
ЖукMVP, Moderator
9 июня 2015 г. 9:58 -
Помечено в качестве ответа
ЖукMVP, Moderator
10 января 2018 г. 13:26
-
Изменено
-
Действительно, очень странное поведение программы.
Работаю с Ms Office 2016, возникла такая же проблема при открытии файлов из почты из браузера (браузер Mozilla, почта rambler).
Проблему удалось решить путем добавления папки с временными файлам в надежные расположения (здесь не все так просто, подробности ниже) и снятием всех галочек в Центре управления безопасностью в разделе «Защищенный
просмотр».Насчет добавления папки с временными файлами в надежные расположения: MS Office 2016 не разрешает напрямую добавить эту папку. Поэтому я создал новую папку для временных файлов, указал ее в Надежных расположениях, а затем
в настройках Windows 10 изменил путь со стандартной папки для временных файлов на новую, после чего перезагрузил компьютер.Совокупность этих действий позволила спокойно открыть документы MS Office из любой программы.-
Помечено в качестве ответа
ЖукMVP, Moderator
25 апреля 2017 г. 20:46
-
Помечено в качестве ответа



 я вообще то, ещё вводил сетевой пароль доступа с включённой опцией «запомнить логин и пароль».