
Принтер не печатает Excel файлы? Проверьте правильность выбора устройства, убедитесь в его активности, выберите новую область для печати, скопируйте файл на чистый лист или поменяйте формат. Также может помочь проверка на вирусы, добавление оперативной памяти, переустановка драйверов / офиса и другие шаги. Ниже рассмотрим, в чем могут быть причины такой неисправности, и как ее устранить своими силами без похода в сервисный центр.
Причины проблем, поему не печатает Excel
Первое, с чем стоит разобраться — почему не печатает Эксель, ведь от этого зависят дальнейшие шаги. Выделим основные решения.
Выделим основные:
- неправильно выбранное оборудование;
- приостановка устройства;
- ошибки в выборе области для печати;
- неправильный формат;
- негативное действие вирусов;
- недостаточный объем ОЗУ;
- сбои в ПО и т. д.
Существуют и другие причины, почему не распечатывается Excel, но приведенный выше список является основным.

Что делать, если не печатает Excel
С учетом сказанного можно принять решение, что делать для успешной распечатки Excel. Рассмотрим комплекс шагов, которые с большой вероятностью помогут в решении вопроса.
Проверьте правильность выбора оборудования
Если принтер не печатает Эксель документы, причиной могут быть ошибки в выборе устройства по умолчанию. Сделайте следующие шаги:
- Проверьте, чтобы была выбрана печать таблиц Excel на оборудовании по умолчанию. Для этого жмите на кнопку принтера в разделе «Печать» программы.
- Выберите нужное оборудование по умолчанию перед пуском. Если вы не уверены в правильности выбора, сделайте проверку с помощью сочетания Win+S и посредством ввода «принтер» в поисковую строку.
- Жмите «Изменить принтер по умолчанию» для открытия вкладки «Принтеры и сканеры» в разделе «Настройки».

Если принтер все равно не печатает Эксель, переходите к следующему шагу.
Убедитесь, что оборудование не приостановлено
На следующем шаге проверьте, чтобы девайс был активен и нормально работал. Иногда может потребоваться остановка работы техники для распечатки Эксель-документов. Если не распечатывает Excel по этой причине, сделайте следующее:
- Войдите в «Пуск» Виндовс 10.
- Выберите «Устройства и принтеры».

- Кликните правой кнопкой мышки на девайс по умолчанию и жмите на «Посмотреть, что печатается».
- Жмите «Принтер» и уберите значок с поля «Приостановить печать».
- Уберите отметку «Использовать принтер в автономном режиме» (если она стоит).

Замените область для печати
Одна из причин, почему Эксель не распечатывает — неправильный выбор рабочей области. Ее изменение часто позволяет вернуть работоспособность девайсу и напечатать документы. Сделайте следующие шаги:
- Сбросьте область печати путем выбора вкладки «Макет страницы» и нажатия на «Область печати».

- Выберите показатель «Очистить область …».
- Установите новую область и укажите ячейки для включения в распечатанный вывод курсором.
- Кликните на «Область печати».
- Выберите «Задать область …».
В случае, если все равно не печатает Эксель документ, попробуйте какой-то другой способ решения вопроса.
Копируйте таблицу Эксель на чистый лист и сохранитесь
Некоторые пользователи отмечают, что для решения проблемы они исправили таблицу Эксель, копировали ее на чистый лист и сохранились, и после этого документы нормально печатались.
Для решения вопроса сделайте следующие шаги:
- Кликните на пункт «Файл».
- Выберите «Создать».
- Жмите на пункт «Пустая книга».
- Выделите все ячейки в таблице, которую не удается напечатать, а после жмите Ctrl+C для копирования.
- Выберите ячейку на чистом листе файла Эксель и жмите Ctrl+V для вставки.
- Кликните Файл, а после Сохранить как для открытия окна.
- Придумайте новое имя для электронной таблицы и жмите «Сохранить».
- Попробуйте, печатает ли этот файл Excel оборудование.

Сохраните файл Эксель как XPS
Одна из причин, почему не печатает Excel документы компьютер / ноутбук — несоответствующий формат. Для исправления ситуации можно попробовать его заменить на XPS, после чего повторить попытку. Для этого войдите в «Тип файла» в Excel, после чего в окне «Сохранить как…» выберите формат XPS и подтвердите сохранение.

Переустановите драйвер
В ситуации, когда не распечатывает Эксель документ, попробуйте обновит ПО. Для этого сделайте следующее:
- Жмите «Мой компьютер» правой кнопкой мышки.
- Войдите в «Свойства», а после — «Диспетчер устройств».
- Найдите в списке драйвер принтера и обновите его.
Как вариант, можно установить ПО непосредственно с сайта Microsoft.

Проверьте ПК на вирусы
Если по какой-то причине принтер не печатает Excel файлы, причиной может быть обычное вирусное ПО. Для решения проблемы попробуйте установить специальную программу (к примеру, Касперски), обновите базы данных и сканируйте систему. Все лишний файлы необходимо удалить или отправить в карантин.
Воспользуйтесь помощью инспектора
В ситуации, когда оборудование не печатает Excel файлы, воспользуйтесь помощью инспектора документов. Для этого сделайте следующее:
- Войдите в раздел «Файл».
- Жмите «Сведения».
- Кликните на «Поиск проблем».
- Выберите пункт «Инспектор документов».
- Жмите «Проверить».
Во многих случаях этих действий достаточно для восстановления работоспособности.

Дополнительные шаги
В ситуации, когда принтер не печатает Excel файлы, в качестве решения можно воспользоваться другими рекомендациями:
- Сохранение файла в 97-03 формате.
- Изменение файла подкачки.
- Добавление оперативной памяти.
- Запуск Эксель в безопасном режиме.
- Переустановка Майкрософт Офис.
Теперь вы знаете, почему распечатывается Excel файлы, и что с этим делать. В комментариях расскажите, какое из решений вам помогло справиться с неисправностью, а также поделитесь дополнительными рекомендациями для решения проблемы.
Отличного Вам дня!
Some users are experiencing issues with Microsoft Excel. When they try to print from Excel, nothing happens. Whereas, some users have reported that a small window appears and disappears immediately after giving the print command to Excel. If you cannot print from Excel, the suggestions provided in this post may help you fix printing problems in Microsoft Excel.

Fix Excel printing problems of Windows 11/10
If you cannot print from Excel but Word can or maybe you see a Not enough memory error message then here are some suggestions to help you fix Excel printing problems. Before you proceed, make sure that you are using the latest version of Microsoft Office. You can also try to update Office manually and see if it fixes the problem. If the problem persists, try the solutions provided below.
- Try to print via Microsoft XPS Document writer
- Update your printer driver
- Edit permissions in the Registry Editor
- Troubleshoot Excel in Safe Mode
- Remove and add your printer again
- Repair Office
Let’s see all these solutions in detail.
1] Try to print via Microsoft XPS Document Writer
Before printing a spreadsheet, Excel shows us an option to select the printer. If you are unable to print from Excel via your default printer, try to print via Microsoft XPS Document Writer. The steps to do this are as follows:
- Launch Microsoft Excel and open your spreadsheet.
- Go to “File > Print.”
- Click on the Printer drop-down and select Microsoft XPS Document Writer.
- This will save your Excel spreadsheet in the XPS format.
Now, open the saved file. You should be able to print it.
2] Update your printer driver
You might be experiencing printing issues with Excel due to the corrupted or outdated printer driver. We suggest you update your printer driver and see what happens.

You have the following choices when it comes to updating the printer driver.
- Open the Windows Optional Update page and update your printer driver from there (if any update is available).
- Visit the official website of your printer manufacturer and download the latest version of your Printer driver. Now, double-click on the installer file to install the printer driver manually.
3] Edit permissions in the Registry Editor
Windows Registry is a hierarchical database that stores the Windows settings and configurations. Any mistake while modifying the Windows Registry can lead to serious damage to the system. Therefore, before you proceed, we recommend you create a System Restore Point and backup Windows Registry.
Follow the instructions carefully.
Press the Win + R keys. This will open the Run command box. Type regedit and click OK. Click Yes in the UAC prompt.

When the Registry Editor appears on your screen, go to the following path. Simply copy the path given below and paste it into the address bar of the Registry Editor. After that, press Enter.
ComputerHKEY_CURRENT_USERSoftwareMicrosoftWindows NTCurrentVersionWindows
Right-click on the Windows key and select Permissions. The Permissions dialog box will appear. Now, click on the Allow checkbox next to the Full Control option. Click Apply and then click OK.
4] Troubleshoot Excel in Safe Mode
If the problem still persists, there might be a problematic add-in. To confirm this, launch Excel in Safe Mode and print your spreadsheet. If you are able to print your spreadsheet in the Safe Mode, an add-in is causing the problem.
Now, close Excel and open it again in the normal mode. Start disabling all the COM add-ins one by one and print your spreadsheet every time you disable an add-in. This will let you know which add-in is causing the problem. According to the feedback of affected users, the Acrobat PDFMaker Office Com add-in was causing the problem. If you have installed such an add-in, disable it and then see if you can print the spreadsheet. If yes, remove that add-in.

The following steps will help you disable COM Add-ins in Excel:
- Open your spreadsheet in Excel.
- Go to “File > Options > Add-Ins.”
- Select COM Add-ins in the drop-down at the bottom and click GO.
- The COM Add-ins dialog box will appear. Now, simply uncheck the checkbox to disable a particular add-in.
- Click OK.
Read: Fix Excel keeps flickering on Windows 11/10.
5] Remove and add your printer again
Sometimes, removing and adding the printer again fixes the printer-related issues. Completely remove or uninstall your printer and then add it again. Check if this helps. You can completely remove a printer from your Windows 11/10 machine via:
- Settings
- The Control Panel
- Print Server Properties
- The Command Prompt
- The Registry Editor
6] Repair Office
If nothing helps you, repair Microsoft Office. Sometimes, the problem occurs due to corrupted Office files. If this is the case with you, repairing Microsoft Office will fix the problem. First, run a Quick Repair. If this does not fix the problem, run an Online Office Repair.
Read: Microsoft Excel displays High CPU usage.
Fix Excel printing problems in Windows 11/10
Above, we have seen the solutions to fix the problem when Excel does not print on receiving the print command from the user. Now, let’s see some common printing problems that you may experience in Microsoft Excel. Sometimes, when we print a spreadsheet from Excel, we do not get the desired printout. Some of you might have experienced such a problem. Such types of problems occur when the print settings are incorrectly configured before printing a spreadsheet.
Here are some tweaks that you can do to avoid some common printing problems in Microsoft Excel.
- Fit your spreadsheet on one page
- Set the print area in Excel
- Configure print settings before printing the spreadsheet
1] Fit your spreadsheet on one page

Some of you might have experienced that despite configuring the correct page settings, Excel prints a spreadsheet on more than one page. This problem can be fixed by changing the scaling in Excel. If you want to print all the rows or columns on one page in Excel, you have to change the No Scaling option in Excel to Fit all rows on one page and Fit all columns on one page option respectively.
2] Set the print area in Excel
If you want to print selected cells in your spreadsheet, you can set the print area for the same. The steps to set the print area are as follows:

- Open Excel.
- Open your worksheet in Excel.
- Select the range of cells that you want to print.
- Go to “Print Layout > Print Area > Set Print Area.”
Now, when you give the print command to Excel, it will print only the selected cells on a page. You can extend the print area by adding more cells to it. If the cells that you want to add are adjacent to the existing print area, Excel will print them on the same page (if space is available). If the selected cells that you want to add are not adjacent to the existing print area, Excel will print them on another page, no matter whether the space is available on the existing print area or not.
To add cells to the existing print area, follow the steps below:

- Select the range of cells that you want to add to the existing print area.
- Go to “Page Layout > Print Area > Add to Print Area.”
To clear the print area, go to “Page Layout > Print Area > Clear Print Area.”
3] Configure print settings before printing the spreadsheet
You can configure the print settings before printing your spreadsheet. To do so, go to “File > Print” or simply press the Ctrl + P keys. There you will see different print settings. You can change the page orientation (landscape or portrait), select your paper size such as Letter, Legal, A4, A3, etc., change page margins, etc. Every time you make a change to the print settings, Excel will show you the print preview in the preview window.
Why can I print from Word but not from Excel?
If you are able to print from Word but not from Excel, there might be a problematic add-in in Excel. You can confirm this by opening Excel in the Safe Mode. If you will be able to print in the Safe Mode, one of the add-ins is the culprit. Now, disable add-ins installed in Excel one by one. Print your spreadsheet every time you disable an add-in. This will help you identify the problematic add-in.
Other solutions that you can try are removing and adding the printer again, updating your printer driver, etc.
Why won’t Excel print all the columns?
To print all the columns on one page in Excel, you have to configure the page settings before printing your spreadsheet. The steps for the same are as follows:

- Open your spreadsheet in Excel.
- Go to “File > Print.”
- By default, the page setup is set to No Scaling. You have to change this option. Click on it and select Fit all columns on one page.
After that, you will be able to print all the columns on one page in Excel.
Print preview is not available because Microsoft Excel could not connect to the selected printer
If you see the “Print preview is not available because Microsoft Excel could not connect to the selected printer” error message while printing a spreadsheet from Excel, make sure that your computer is running on the latest version of the Windows operating system. Open Windows 11/10 Settings and check for updates. If updates are available, download and install them.
We also suggest you update Microsoft Office manually and see if it helps. If the problem persists, repair Microsoft Office.
Cannot print from Excel, Not enough memory
Some of you might have seen the “Not enough memory” error message while printing a spreadsheet in Microsoft Excel. The error message is self-explanatory. When the printer from which you are printing the jobs does not have enough memory, you will see this error. However, there are other causes too that trigger this error. To fix this issue, you can try the following fixes.
- Copy the data from your spreadsheet to a new spreadsheet
- Change your default printer
- Update your printer driver
- Print in Draft Mode
- Save your Excel file in ODS format
- Reset your printer memory
- Clear print spooler
- Repair Office
Let’s see all these fixes in detail.
1] Copy the data from your spreadsheet to a new spreadsheet
This method has fixed the issue of some users. You can also try this. Copy the data from your spreadsheet to a new spreadsheet and see if it helps.
2] Change your default printer
If the problem still persists, change your default printer. You can set any virtual printer as a default printer, such as Microsoft Print to PDF, Microsoft XPS Document Writer, etc.
3] Update your printer driver
Sometimes the problem persists due to the outdated or malfunctioned printer driver. If this is the case with you, updating the printer driver will solve your problem. To do so, follow the steps written below:
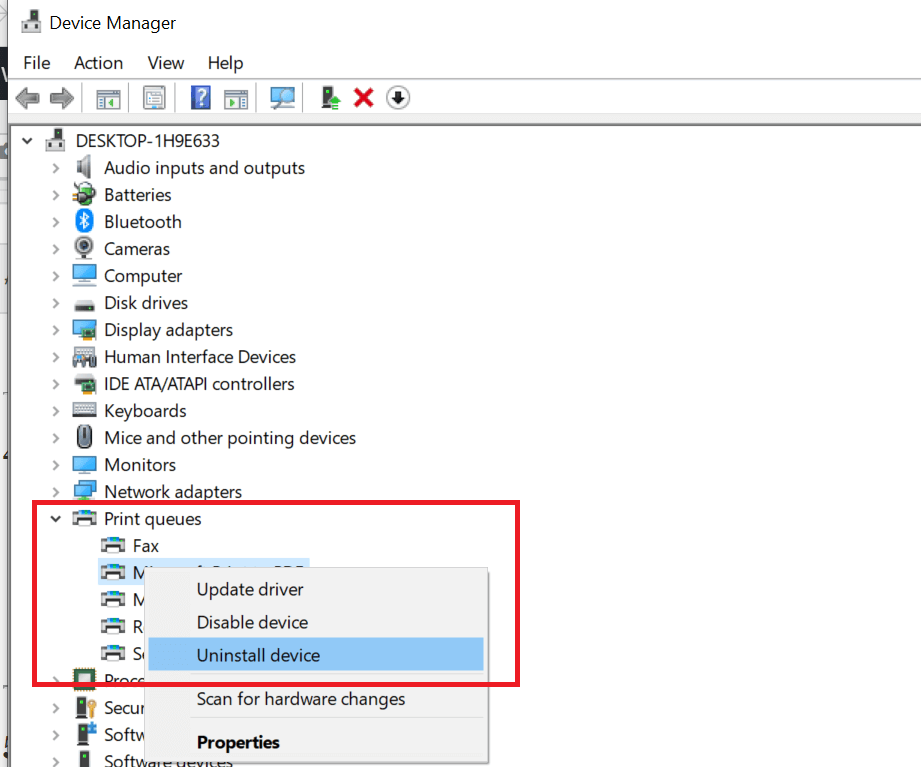
- Open the Device Manager.
- Expand the Print queues node.
- Right-click on your printer driver and select Update driver.
- Select the “Search automatically for drivers” option. Let Windows install the latest version of your printer driver.
If this does not work, visit the official website of your printer manufacturer and download the latest version of your printer driver from there. Now, run the installer file to install the latest version of your printer driver manually.
4] Print in Draft Mode
For some users, printing the spreadsheet in the Draft mode fixed their problem. You can also try this and see if it helps. To do so, you have to change the Fast mode to Draft mode. By default, the print quality is set to Fast mode. Open your print quality settings and change the Fast mode to Draft mode.
5] Save your Excel file in ODS format
Another effective solution to fix this problem is to save the Excel spreadsheet in ODS (OpenDocument Spreadsheet) format. The steps to do this are as follows:

- Launch Microsoft Excel and open your spreadsheet.
- Go to “File > Save As.”
- Click on the Save as type drop-down menu and select OpenDocument Spreadsheet.
- Click Save.
Now, open the ODS file and print it. The problem should not appear this time.
6] Reset your printer memory
If your printer is running low on memory, resetting its memory will help fix the issue. Resetting the printer memory will clear the print jobs in the queue. To do so, follow the steps given below:
- Disconnect your printer from your computer.
- Turn off your printer.
- Disconnect the power cable of your printer and wait for a few minutes.
- Connect the power cables again and turn on your printer.
- Connect your printer to your computer.
If the above method did not help, cold reset your printer. The method to cold reset printers is different for the printers of different brands. Therefore, you have to refer to the user manual of your printer to know the correct way to cold reset your printer.
7] Clear the Print Spooler
In Windows, Print Spooler is a service that stores the printing jobs temporarily. If Excel is showing the “Not enough memory” message while printing a spreadsheet, clearing the Print Spooler may fix the problem. The steps to clear the Print Spooler are as follows:
- Press the Win + R keys to launch the Run command box.
- Type services.msc and click OK. This will launch the Services Management window.
- Scroll down and locate the Print Spooler service.
- Once you find it, right-click on it and select Stop.
- Open the File Explorer and go to the “C:WindowsSystem32spool” path. Simply copy this path and paste it into the address bar of the File Explorer. After that, hit Enter.
- Open the PRINTERS folder and delete all the files inside it. Do not delete the PRINTERS folder.
- Return to the Services Management window and right-click on the Print Spooler service.
- Select Start.
8] Repair Office
Check if you are getting the same error message in other Office apps, like Word. If not, some of the Excel files may be corrupted. To fix this problem, run an online repair for Microsoft Office.
Hope this helps.
Read next: Excel freezing, crashing, or not responding.
If Excel is not responding while printing, try to open in Safe Mode
by Tashreef Shareef
Tashreef Shareef is a software developer turned tech writer. He discovered his interest in technology after reading a tech magazine accidentally. Now he writes about everything tech from… read more
Updated on December 8, 2022
Reviewed by
Alex Serban

After moving away from the corporate work-style, Alex has found rewards in a lifestyle of constant analysis, team coordination and pestering his colleagues. Holding an MCSA Windows Server… read more
- Windows users report experiencing issues with the Excel app while trying to print.
- The app stops responding and is not able to carry out the task until the end.
- The root of this problem can be the fact that you run an outdated version of Microsoft Office, so make sure to check that first.
- There are other things you can do. See how to start Excel in safe mode, repair the workbook, fix your printer drivers, and more.
XINSTALL BY CLICKING THE DOWNLOAD FILE
This software will keep your drivers up and running, thus keeping you safe from common computer errors and hardware failure. Check all your drivers now in 3 easy steps:
- Download DriverFix (verified download file).
- Click Start Scan to find all problematic drivers.
- Click Update Drivers to get new versions and avoid system malfunctionings.
- DriverFix has been downloaded by 0 readers this month.
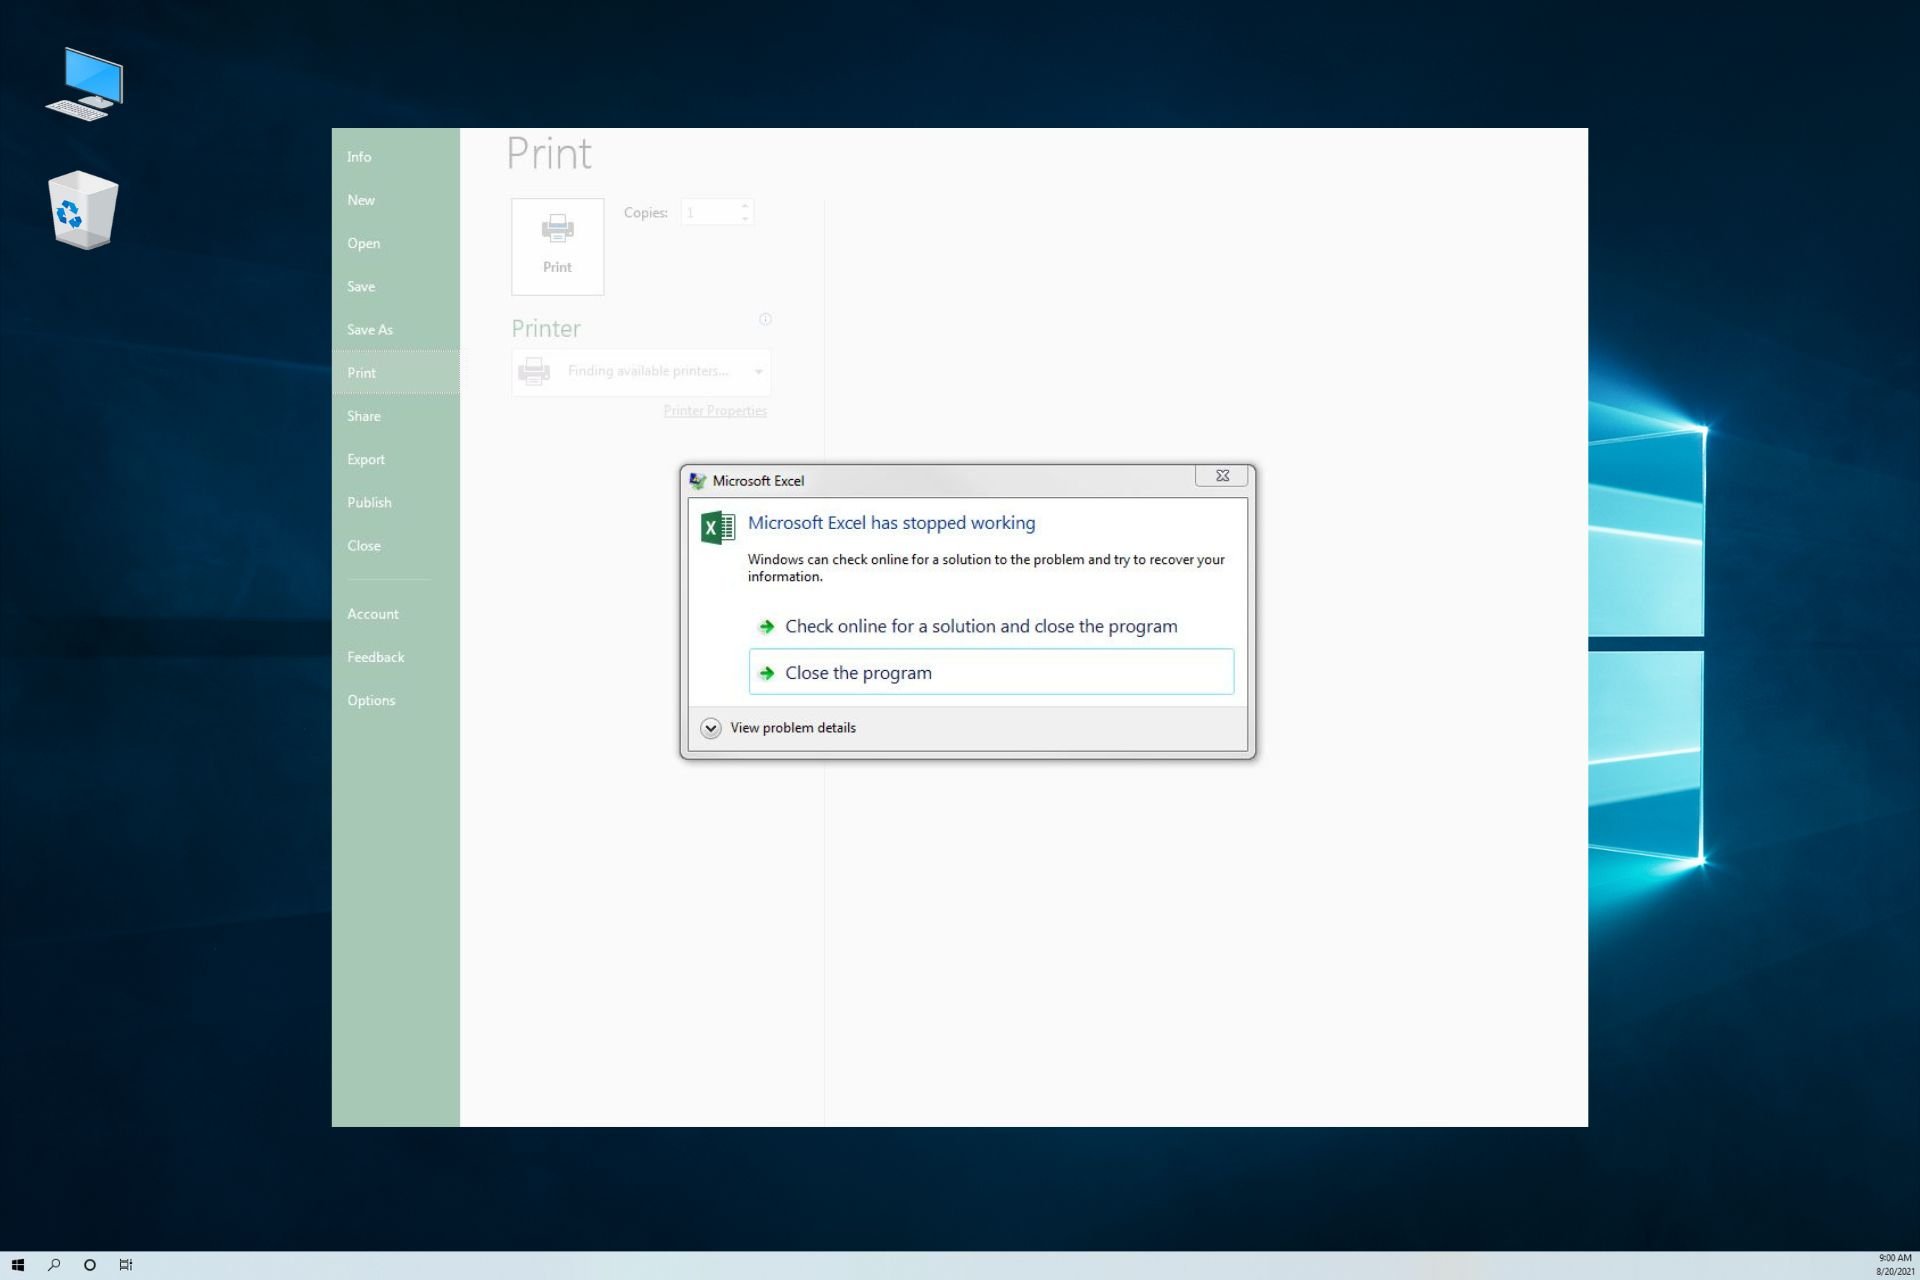
Microsoft Excel is a popular spreadsheet application with powerful data visualization and analysis tools. However, multiple users have reported Excel crashes while printing and Excel freeze when printing issues on their Windows devices.
This issue usually occurs if the printer drivers are outdated or if the Microsoft office files are corrupted. Many users have reported similar issues in the Microsoft community.
This is the latest version of Windows 10 and the latest versions of Word and Excel with an Office 365 Subscription.
Every time the Print screen is opened, either manually or by Ctrl+P, the program freezes and crashes.
Why does Excel crash when I try to print?
First of all, Excel crashes when trying to print may appear for multiple reasons that have to do with the Microsoft Office app itself or even with your Windows 10 operating system.
- The printer in-use is set on pause.
- Your printer drivers are out-of-date or corrupted
- Due to add-ons included in your Excel program
- The Excel version is not updated to the latest version
If you are also troubled by this issue, here are a couple of troubleshooting to fix Excel crashing when printing problems.
What to do if the Excel freezes or crashes when printing?
- Why does Excel crash when I try to print?
- What to do if the Excel freezes or crashes when printing?
- 1. Update Microsoft Office
- 2. Start Excel in Safe Mode
- 3. Repair the corrupted workbook
- 4. Uninstall and reinstall the printer driver
- 5. Repair Microsoft Office
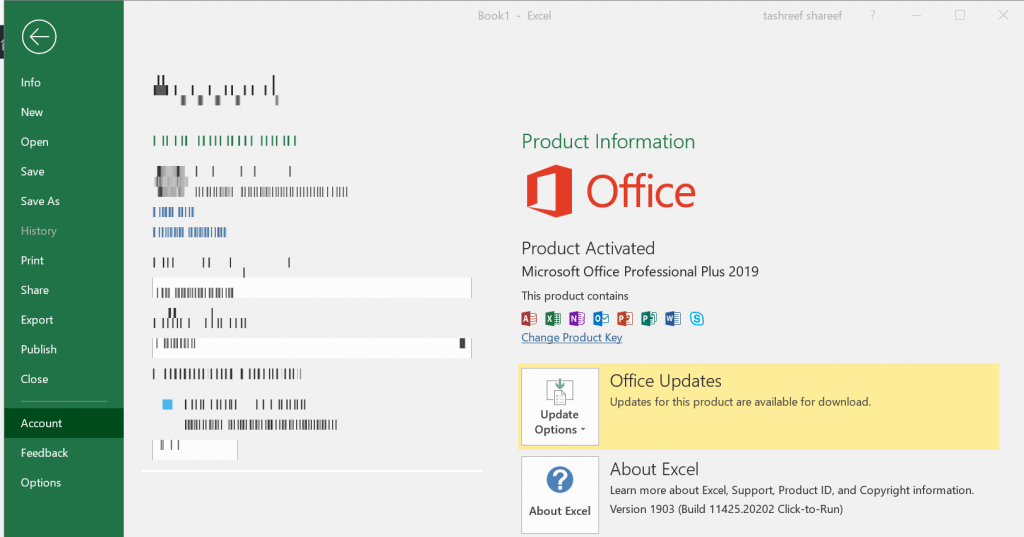
1. Update Microsoft Office
- Check if your Microsoft Office program has any pending updates. Microsoft releases updates fixing bugs in the program, so make sure it is up to date.
- Launch any of the Microsoft Office apps.
- Click on File and click on Account.
- Click on the Update Option and select Enable updates if it is not already enabled.

- Again click on Update Options and select Update Now.
- Microsoft Office will check for any pending updates and download it. Go through the installation process.
- Once the update is installed, launch the Excel app again and check if the print functionality is working.
2. Start Excel in Safe Mode
It’s very probable that accessing printer Excel freeze can happen due to corrupted files. Thus, open the program in Safe Mode to fix it.
1. Press and hold the Ctrl key on your keyboard and then click on the Excel icon.

2. Confirm safe mode action when prompted.
Some PC issues are hard to tackle, especially when it comes to corrupted repositories or missing Windows files. If you are having troubles fixing an error, your system may be partially broken.
We recommend installing Restoro, a tool that will scan your machine and identify what the fault is.
Click here to download and start repairing.
3. Try to print any document and check if it goes through.
4. If the print job is successful, you may have a third-party app causing issues with the Excel program.
5. Check your computer for recently installed apps or add-ons for Excel and uninstall any suspicious app.
Starting the Excel app in Safe Mode can help you identify if the problem is with the program or third-party app.
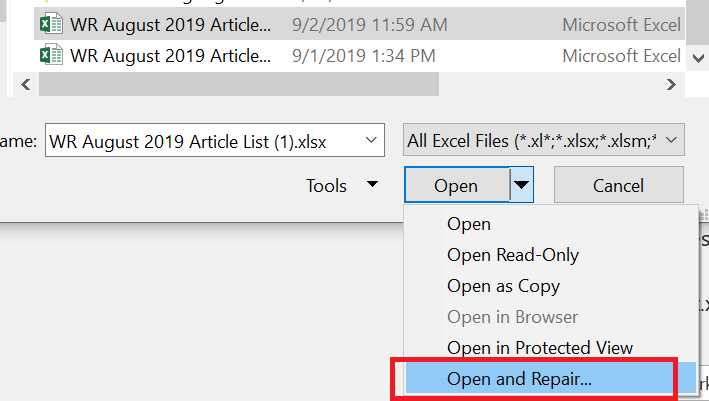
3. Repair the corrupted workbook
- Open the Excel app.
- Click on File and select Open.

- Navigate to the location where the workbook is located and select it.
- Click the drop-down button beside the Open button and select Open and Repair.
- This should resolve any issues with the Workbook and allow for printing.
- 0x80020010 Windows Update Error: 4 Ways to Fix It
- AMDRSServ.exe: What Is It & How to Fix It in 7 Easy Steps
- The 2023 April Patch Tuesday comes with fixes for 97 CVEs
- Windows 10 & 11 April Patch Tuesday [DIRECT DOWNLOAD LINKS]
- 6 Ways to Fix Office Update Error 30015-26
4. Uninstall and reinstall the printer driver
- You can uninstall the printer from the Device Manager or Settings.
- Type Device Manager in Windows Search bar

- In Device Manager navigate to Print queques and select Uninstall device

- Restart your PC to reinstall the driver
- Reinstall the printer and check if the Excel crashes while printing error is resolved.
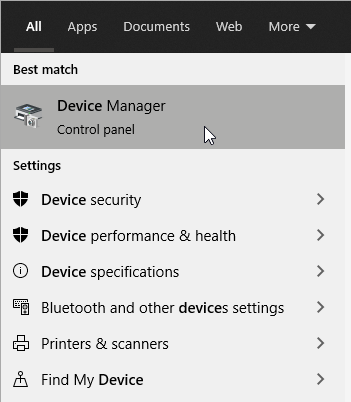
If the issue is with your printer, uninstalling and reinstalling the printer can resolve the issue.
In order to find your drivers more easily and install them accordingly, you can use a driver update third-party solution.
⇒ Get DriverFix
5. Repair Microsoft Office
- Press Windows Key + R to open Run.
- Type control and click OK.
- Go to Programs > Programs and Features.

- Select Microsoft Office and click on Change.
- From the Repair screen, first, select Quick Repair and click Next. If that does not work, select Online Repair and try again.

So these are the best tips to help you fix Excel crashing issue while printing the documents. Do let us know which fix worked for you in the comments.
![]()
Newsletter
Попробуйте следующие варианты, чтобы определить проблему:
Тестовая печать в других программах
-
Откройте WordPad.
-
В новом документе введите Это тест.
-
В меню Файл выберите Печать.
-
Нажмите кнопку ОК или Печать , чтобы распечатать файл.
Если не удается выполнить печать из WordPad, проблема с печатью не связана с приложением Microsoft 365. Вы можете попытаться устранить проблему, выполнив действия, описанные в статье Устранение проблем с подключением принтера и печатью в Windows.
Если вы смогли печатать из WordPad, перейдите к следующему шагу.
Проверка печати другого файла
-
В том же приложении Microsoft 365 откройте новый пустой файл.
-
Введите следующий текст: Это тест.
-
Сохраните файл и попытайтесь напечатать.
Если у вас нет проблем с печатью тестового файла, попробуйте изменить шрифт, чтобы он совпадал с исходным файлом. Кроме того, если исходный файл содержит таблицу, картинку или объект документа, убедитесь, что этот файл также включает в себя.
После внесения этих изменений сохраните файл и попробуйте напечатать.
Если вы можете распечатать тестовый файл, исходный файл может быть поврежден. Сведения об устранении неполадок с поврежденными файлами Microsoft 365 см. в одной из следующих статей:
-
Для Excel: Восстановление поврежденной книги Excel.
-
Для Word: устранение неполадок с поврежденными документами в Word
-
Для PowerPoint: устранение неполадок с поврежденной презентацией в PowerPoint
Если у вас возникли проблемы с печатью тестового файла и исходного файла, перейдите к следующему шагу.
Запуск оперативного восстановления
Выполните действия, описанные в разделе Восстановление приложения Office , чтобы запустить восстановление в сети, а затем попытаться распечатать файл.
В этой статье мы предположим, что вы уже проверили несколько очевидных вещей, таких как:
-
Включен ли принтер?
-
Есть ли в нем бумага, чернила или тонер?
-
Все ли кабели надежно подключены к принтеру и компьютеру?
Примечание: Если принтер выводит сообщение об ошибке, обратитесь в службу поддержки его изготовителя.
Эта статья посвящена проблемам с печатью. Если у вас есть вопросы о печати документа в Office для Mac или о том, как выполнять специальные действия, такие как печать с обеих сторон страницы (дуплексный режим), см. статью Печать документа в Word для Mac.
Убедитесь, что установлены все обновления программного обеспечения Apple
Прежде всего нужно убедиться в том, что установлены все обновления программного обеспечения Apple. Для этого нажмите кнопку Apple в левом верхнем углу и выберите команду Обновление ПО. Следуйте инструкциям мастера обновления программного обеспечения и установите все нужные обновления.
После завершения обновления перезагрузите компьютер, а затем повторите попытку печати. Если проблема не устранилась, возможно, принтер приостановлен или в очереди находится другое задание печати.
Убедитесь, что принтер не приостановлен
-
Щелкните значок принтера на панели Dock, чтобы открыть окно очереди печати
 .
. -
Если вы видите кнопку Возобновить на панели инструментов
, что означает, что принтер приостановлен. Нажмите кнопку Продолжить для печати.
 .
. , что означает, что принтер приостановлен. Нажмите кнопку Продолжить для печати.
Если принтер не приостановлен, но документы не отправляются на печать, возможно, в очереди есть другое задание с ошибкой. Чтобы удалить такое задание, выберите его, а затем нажмите кнопку Удалить задание справа  .
.
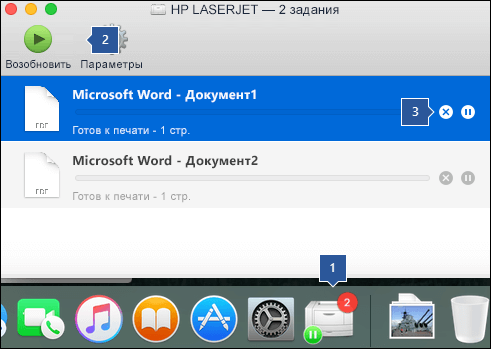
Попробуйте распечатать другой документ
Возможно, проблема заключается в самом документе, поэтому попробуйте распечатать что-либо другое.
-
Создайте новый файл в программе Office (Word, Excel, PowerPoint и т. д.), из которой не удается выполнить печать. Для этого выберите Файл > Создать.
-
Введите несколько любых слов.
-
Попробуйте распечатать документ.
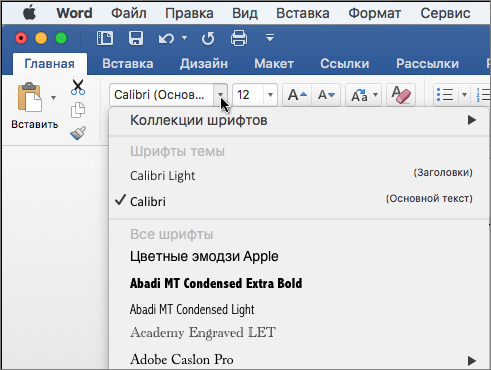
Если он успешно печатается, это говорит нам о том, что проблема находится в существующем документе. Узнайте, как восстановить файлы и документы Word.
Если документ не удается распечатать, попробуйте изменить шрифт текста, выделив его фрагмент и выбрав другое значение в раскрывающемся списке Шрифт. Повторите попытку печати. Если печать пройдет успешно, значит проблема заключается в шрифте. Проще всего заменить шрифт, используемый в тексте.
Попробуйте выполнить печать из другой программы
Чтобы проверить, может ли другая программа подключиться к принтеру и работает ли его драйвер, попробуйте выполнить печать из другой программы, например Заметок. Запустите приложение «Заметки» на Mac, откройте существующую заметку или создайте новую, а затем щелкните Файл > Печать.
Если он успешно печатается из примечаний, сообщающих нам, что у вас возникли проблемы с установкой Microsoft Office. В этом случае может потребоваться удалить Office 2016 с компьютера Mac, а затем переустановить его. См. статью Устранение проблем с Office 2016 для Mac путем полного удаления перед повторной установкой.
Если печать также не выполняется из других программ, возможно, возникла проблема с драйверами принтера или конфигурацией.
Удалите принтер, а затем переустановите его в OS X.
Чтобы удалить и добавить принтер, сделайте следующее:
-
Щелкните логотип Apple в левом верхнем углу экрана.
-
Выберите Системные настройки.
-
Щелкните Принтеры и сканеры.
-
Выберите принтер, который нужно удалить.
-
Нажмите кнопку Удалить (-)
-
Чтобы добавить и протестировать новый принтер, нажмите кнопку Добавить (+).
-
В списке Способ подключения выберите способ подключения, используемый принтером.
-
В списке Принтер выберите нужный принтер, а затем нажмите кнопку Добавить.
Вернитесь к приложению Microsoft Office и попробуйте снова выполнить печать. Если это не помогло, возможно, необходимо заменить файлы драйвера печати.
Удалите и повторно установите файлы драйвера печати
При удалении и повторной установке принтера сбрасываются его параметры, но файлы драйвера печати заменяются не всегда. Чтобы заменить их, сделайте следующее:
-
Щелкните логотип Apple в левом верхнем углу экрана.
-
Выберите Системные настройки.
-
Щелкните Принтеры и сканеры.
-
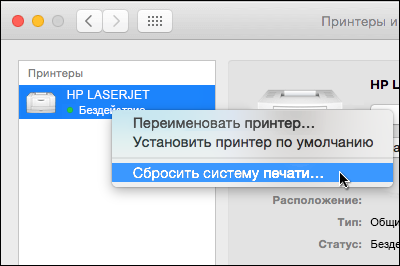
Нажмите клавишу CONTROL и щелкните в списке устройств. Выберите Сбросить систему печати в контекстном меню.
-
В Finder выберите Перейти > Переход к папке и выберите папку /Library/Printers/.
-
В появившемся каталоге Принтеры щелкните Изменить > Выбрать все , а затем выберите Файл > Создать папку с выделенным элементом, чтобы создать папку с этими драйверами. По умолчанию папка будет называться «Новая папка с элементами», что подходит для наших целей. По завершении вы можете удалить эту папку, чтобы сэкономить место.
-
Удалите и повторно установите принтер, как описано выше. На этот раз система также скачает и установит новые драйверы для принтера.
Снова откройте приложение Office и протестируйте печать. Если проблема не устранена, возможно, она связана с файлами настроек принтера.
Замените файлы настроек принтера
Проблемы с печатью могут быть вызваны поврежденными файлами настроек принтера. Чтобы заменить такие файлы, выполните следующие действия:
-
На рабочем столе щелкните Файл, выберите команду Новая папка, введите Настройки печати и нажмите клавишу RETURN.
-
В меню Перейти выберите пункт Личное.
-
Откройте папку Библиотека.
Примечание: В MAC OS X Lion эта папка скрыта. Чтобы отобразить ее, щелкните меню Перейти, удерживая нажатой клавишу OPTION.
-
Щелкните Настройки.
-
Удерживая нажатой клавишу APPLE или COMMAND, щелкните каждый файл com.apple.print.*.plist. Например, удерживайте нажатой клавишу APPLE и щелкните com.apple.print.PrintCenter.plist, а затем com.apple.print.PrintingPrefs.plist. Файлы com.apple.print.PrintCenter.plist и com.apple.print.PrintingPrefs.plist будут выделены.
-
Перетащите выделенные файлы в папку «Настройки печати», созданную в действии 1.
-
Перезагрузите компьютер Mac.
Снова попробуйте распечатать документ из Microsoft Office для Mac.
Дополнительные сведения
Решение проблем с работой принтеров на Mac
Оглавление:
- Почему я не могу распечатать таблицы Excel?
- 1. Проверьте выбор принтера
- 2. Проверьте, не приостановлен ли принтер
- 3. Выберите новую область печати
- 4. Скопируйте электронную таблицу Excel в чистый лист и сохраните ее
- 5. Сохраните электронную таблицу как файл XPS
Некоторые пользователи заявили в сообщениях на форуме, что они не могут печатать таблицы в Excel. Эти пользователи могут печатать документы из другого программного обеспечения, но их электронные таблицы Excel не печатаются. Пользователи обычно должны настроить параметры принтера или форматирование электронной таблицы, чтобы исправить файлы Excel, которые не печатаются.
Решите это раз и навсегда с помощью шагов, которые мы предоставили ниже.
Почему я не могу распечатать таблицы Excel?
1. Проверьте выбор принтера
- Убедитесь, что вы выбрали печать таблиц Excel на принтере по умолчанию. Для этого нажмите кнопку принтера на вкладке «Печать» в Excel, показанной на снимке экрана ниже.
- Затем выберите принтер по умолчанию перед печатью.
- Пользователи, которые не уверены, что их принтеры по умолчанию, могут проверить, нажав сочетание клавиш Windows + S и введя «принтер» в поле поиска.
- Нажмите « Изменить принтер по умолчанию», чтобы открыть вкладку «Настройки» «Принтеры и сканеры», которая показывает пользователям, каков принтер по умолчанию, как показано ниже.


2. Проверьте, не приостановлен ли принтер
- Некоторым пользователям может потребоваться приостановить работу своих принтеров, чтобы распечатать документы Excel. Пользователи могут сделать это, нажав кнопку « Настройки» в меню «Пуск» Windows 10.
- Выберите « Устройства» в «Настройках», а затем нажмите « Устройства и принтеры», чтобы открыть окно на снимке непосредственно ниже.
- Щелкните правой кнопкой мыши принтер по умолчанию и выберите « Посмотреть, что печатается».
- Затем нажмите «Принтер» и снимите флажок « Приостановить печать».
- Кроме того, снимите флажок « Использовать принтер в автономном режиме», если он выбран.


Если вам интересно, почему печатает только часть ваших таблиц Excel, это распространенная проблема. Вот исправление.
3. Выберите новую область печати
- Выбор новой области печати часто может решить проблемы печати Excel. Сначала сбросьте область печати, выбрав вкладку «Макет страницы» и нажав « Область печати».
- Затем выберите параметр « Очистить область печати».
- После этого выберите новую область печати. Выберите ячейки для включения в распечатанный вывод курсором.
- Нажмите кнопку « Область печати».
- Выберите параметр « Задать область печати».

4. Скопируйте электронную таблицу Excel в чистый лист и сохраните ее
- Некоторые пользователи говорят, что они исправили электронные таблицы Excel, которые не печатаются, копируя их в новые, чистые листы Excel и сохраняя их. Для этого нажмите Файл > Создать и выберите Пустая книга.
- Затем выделите все ячейки в электронной таблице, которая не печатается, и нажмите Ctrl + C, чтобы скопировать ее.
- Выберите ячейку на пустом листе Excel и нажмите Ctrl + V, чтобы вставить электронную таблицу в лист.
- Нажмите Файл > Сохранить как, чтобы открыть окно, показанное ниже.
- Введите новый заголовок для электронной таблицы и нажмите кнопку « Сохранить».
- Затем попробуйте распечатать недавно сохраненный документ электронной таблицы.

5. Сохраните электронную таблицу как файл XPS
- Пользователи также заявили, что сохранение электронных таблиц в виде файлов XPS может исправить печать в Excel.
- Пользователи могут сделать это, выбрав XPS в раскрывающемся меню Тип файла в окне Сохранить как. Затем нажмите кнопку Сохранить.

