
Время прочтения: 5 мин.
Excel файлы повсеместно применяются для хранения данных в виде таблиц, объем данных и хранение однотипных данных в разных файлах excel усложняют обработку их при помощи персонального компьютера.
Базы данных (БД) используются для хранения различной информации. Для извлечения информации из них используется SQL (structured query language — язык структурированных запросов). Для редактирования БД используют системы управления базами данных, через которые возможно манипулировать данными. Для рядового пользователя разбираться в синтаксисе SQL является трудозатратным процессом. В практике работы с БД встречаются однотипные запросы с изменением даты или количественных измерений.
Оптимальным вариантом для решения задачи обработки данных Excel файлов и предоставления данных по определенным критериям является создание приложения, которое будет обрабатывать заданные критерии и выдавать необходимые данные на стороне сервера. Для упрощения взаимодействия пользователя с создаваемым приложением необходимо обеспечить взаимодействие пользователя с приложением при помощи удобного интерфейса и легкого доступа.
В качестве интерфейса самым простым и понятным интерфейсом является web-интерфейс. Одним из распространённых фреймворков является “ADO.NET MVC”. Пользователь через браузер отправляет запрос, если необходима информация из БД, модель передает их в представление:

Для обработки excel файлов необходимо установить ExcelDataReader и ExcelDataReader.DataSet.

Excel файл выглядит следующим образом:

Модель
«M» в MVC обозначает модель. Модель для данных из Excel в простом виде будет записана следующим образом:
public class Worker
    {
        public int Id { get; set; }
        public string FullName { get; set; }
        public string Passport { get; set; }
        public string Address { get; set; }
        public string Birthday { get; set; }
        public string Sex { get; set; }
        public string Post { get; set; }
        public int Аmount_of_children { get; set; }
}
Контроллер
Буква «C» в MVC означает контроллер. Контроллер собирает данные и передает их в представление. Создадим контроллер для передачи файла:
public class WorkerController : Controller
        {
            private readonly WorkerDbContext dbContext;

            public WorkerController()
            {
                dbContext = new WorkerDbContext();
            }

            // GET: Workers
            public ActionResult Index()
            {
                return View();
            }

            [HttpPost]
            public async Task<ActionResult> ImportFile()
            {
                return View("Index");
            }
        }
Добавим в контроллер метод для обработки файла в данном примере будем использовать csv формат:
        private List<Worker> parsingFile(Stream stream)
        {
            var wrkList = new List<Worker>();
            try
            {
                using (var exRead = ExcelReaderFactory.CreateCsvReader(stream))
                {
                    var dSet = exRead.AsDataSet(new ExcelDataSetConfiguration
                    {
                        ConfigureDataTable = _ => new ExcelDataTableConfiguration
                        {
                            UseHeaderRow = true
                        }
                    });
                        var table = dSet.Tables[0];
                        foreach (DataRow dataRow in table.Rows)
                        {
                            if (dataRow.ItemArray.All(x => string.IsNullOrEmpty(x?.ToString()))) continue;
                            wrkList.Add(new Worker()
                            {
                                Id = Convert.ToInt32(dataRow["Табельный номер"].ToString()),
                                FullName = dataRow["ФИО"].ToString(),
                                Passport = dataRow["Паспорт"].ToString(),
                                Address = dataRow["Адрес"].ToString(),
                                Birthday = dataRow["Дата рождения"].ToString(),
                                Sex = dataRow["Пол"].ToString(),
                                Аmount_of_children = null,
                            });
                        }
                }
            }
            catch (Exception)
            {
                throw;
            }
            return wrkList;
        }
Представление
Буква «V» в MVC означает представление. Представление может быть самостоятельным, или обеспечивать различные способы представления данных, которые получены из модели. Представление может быть макетом и заполняться данными. Представления могут быть различными и контроллер выбирает, какой вид подходит для текущей ситуации.
Напишем представление для загрузки файла:
@{
    ViewBag.Title = "LoadFile";
}

<h2>LoadFile</h2>

<div class="row">
    <div class="col-sm-12" style="padding-bottom:15px">
        <div class="col-sm-2">
            <span>Select File  :</span>
        </div>
        <div class="col-sm-3">
            <input class="form-control" type="file" name="importFile" id="importFile" />
        </div>
        <div class="col-sm-3">
            <input class="btn btn-primary" id="btnUpload" type="button" value="Загрузить" />
        </div>
    </div>
</div>
В результате представления будут выглядеть следующим образом.
Форма загрузки файла:

Все данные вымышленные.
Просмотр работников:

В результате мы можем произвести фильтрацию по отделу на определенную дату, что поможет провести аналитику уже отфильтрованной информации, не используя вычислительные ресурсы персонального компьютера и обойдя поиск и совмещение этой информации из различных файлов.

В результате выбранных выше критериев мы получили уменьшенный объем информации:

Также в результате работы были сгруппированы сотрудники по отделам, что также облегчает просмотр данных объединённых одним критерием:

В результате создания web-приложения были выделены следующие преимущества:
- возможность обрабатывать большие файлы, не используя вычислительные ресурсы персонального компьютера
- простота создания подключения к БД
- использование группировки данных и вывод данных по заданным критериям из excel файлов по определенным столбцам
В дальнейшем данную технологию можно применять для получения файлов других форматов и последующей обработки данных при помощи машинного обучения и др.
В Excel 2010 появился новый компонент, Excel Web Applications, с помощью которого можно сохранить сводную таблицу вместе со всеми срезами и диаграммами на сервере Windows Live SkyDrive. Затем можно просматривать эту сводную таблицу в окне браузера, настраивать срезы, а также видеть обновления сводной таблицы и сводной диаграммы.
С одной стороны, возможность отображения диаграмм и срезов является существенным шагом вперед по сравнению с возможностями, доступными в Excel 2003. С другой стороны, интерактивные возможности Excel 2003, позволяющие перетаскивать поля во всех областях сводной таблицы, в веб-приложениях Excel 2010 недоступны. Для получения доступа к SkyDrive следует создать бесплатную учетную запись на сайте Live.com.
После регистрации на сервере SkyDrive щелкните на раскрывающемся списке More (Дополнительно) и выберите параметр SkyDrive. По умолчанию в качестве личной папки пользователя выбирается папка MyDocuments (Мои документы). На сервере SkyDrive можно создавать новые папки, доступ к которым будет предоставляться всем пользователям либо тем пользователям, учетные записи Windows Live которых находятся в определенном списке. На рис. 8.13 показан рабочий лист, отображенный в окне Excel 2010. Сводная таблица, находящаяся в строках АЗ:А12, суммирует приблизительно 600 строк данных. Фильтр сводной таблицы определяется с помощью одного среза. На основе самой сводной таблицы построена сводная диаграмма.

Рис. 8.13. Рабочая книга Excel 2010 включает сводную таблицу, срез и сводную диаграмму
Выберите команду Файл → Сохранить и отправить → Сохранить на веб-сайте (File → Share → Save to Web). Зарегистрируйтесь на сервере SkyDrive и щелкните на кнопке Сохранить как (Save As) для сохранения рабочей книги на сайте SkyDrive (рис. 8.14).

Рис. 8.14. Щелкните на кнопке Сохранить как для сохранения книги на сайте SkyDrive
На сайте SkyDrive выберите команду View (Просмотр). В окне браузера отобразятся сводная таблица, срез и сводная диаграмма. Теперь можно выбрать иные категории среза, по которым выполняется фильтрация. Сводная таблица и диаграмма отобразятся в окне браузера на несколько секунд, создавая эффект управляющей панели, созданной на основе Excel 2010 (рис. 8.15).

Рис. 8.15. Рабочая книга, включающая срез и сводную диаграмму, отображается в окне браузера, не требуя запуска Excel
Если рабочая книга была сохранена в общей папке, для предоставления общего доступа к ней следует воспользоваться URL-ссылкой, указанной в строке адреса. С помощью раскрывающегося списка Названия строк (Row Labels), находящегося в ячейке А4 (рис. 8.15), можно отсортировать данные в таблице по регионам либо величине продаж.
Посмотрите видеоролик, демонстрирующий публикацию сводной таблицы в Интернете с помощью Excel Web Applications. Несмотря на то что приложение Excel Web Applications позволяет изменять рабочие листы в окне браузера, с его помощью невозможно создать новую сводную таблицу либо поменять порядок следования полей.
|
0 / 0 / 0 Регистрация: 16.11.2013 Сообщений: 14 |
|
|
1 |
|
|
22.11.2013, 13:49. Показов 5002. Ответов 5
Дамы и господа! Вот такая есть проблема: Существует файл excel, куда пользователь вносит данные. Какие есть способы оперативно показать эти данные в веб-интерфейсе на удаленном сервере? И обратная ситуация — отобразить в файле excel те изменения, которые были внесены через веб-интерфейс на удаленном сервере. Мои соображения на уровне мифов и легенд пока такие: Заранее благодарю.
0 |

|
Programming Эксперт 94731 / 64177 / 26122 Регистрация: 12.04.2006 Сообщений: 116,782 |
22.11.2013, 13:49 |
|
Ответы с готовыми решениями: БД и веб-интерфейс Веб интерфейс Веб-интерфейс к почте Желаетльно… Не работает веб интерфейс 5 |
|
Модератор
34702 / 19224 / 4037 Регистрация: 12.02.2012 Сообщений: 32,180 Записей в блоге: 13 |
|
|
22.11.2013, 16:00 |
2 |
|
Существует файл excel, куда пользователь вносит данные. — где существует?
показать эти данные в веб-интерфейсе на удаленном сервере? — может, на удаленном компьютере? Если xls лежит на сервере и работа в локальной сети, то проще всего сгенерировать ссылку прямо на xls-файл. Браузер этот файл покажет (IE во всяком случае).
0 |

|
0 / 0 / 0 Регистрация: 16.11.2013 Сообщений: 14 |
|
|
22.11.2013, 16:32 [ТС] |
3 |
|
Уточню: excel-файл на компьютере пользователя. Вот допустим: Cells(1,1) = «содержимое X». Нажали button, и «содержимое X» уже прописалось в некую базу данных или таблицу, доступную онлайн и видимую через веб-интерфейс. Через браузер внесли изменение: «содержимое Y». Юзер в своем файле нажал button2 и теперь тоже видит «содержимое Y» в соответствующей ячейке. На какие действия или события прикрутить в vba синхронизацию — не принципиальный вопрос. А вот как подступиться к собственно синхронизации — не имею представления.
0 |
|
Модератор
34702 / 19224 / 4037 Регистрация: 12.02.2012 Сообщений: 32,180 Записей в блоге: 13 |
|
|
22.11.2013, 16:41 |
4 |
|
через интернет синхронизировать с базой sql или xml таблицей на удаленном компьютере — ты представляешь, как работает web-сервер? Тебе нужно создать т.н. web-сервис, который будет выполнять синхронизацию. Этого же эффекта можно добиться достаточно простыми средствами, если написать серверный asp-скрипт, который будет обновлять данные в БД. При этом web-сервер должен иметь доступ к БД.
1 |
|
0 / 0 / 0 Регистрация: 16.11.2013 Сообщений: 14 |
|
|
22.11.2013, 17:01 [ТС] |
5 |
|
Спасибо! Придется поближе познакомиться со скриптами, значит.
0 |
|
Модератор
34702 / 19224 / 4037 Регистрация: 12.02.2012 Сообщений: 32,180 Записей в блоге: 13 |
|
|
22.11.2013, 18:27 |
6 |
|
Если интересно, то в этой нити выложена моя статейка на тему «Excel как web-клиент»
0 |
24.04.20 — 11:38
Есть такой вопрос. Необходимо создать многостраничный файл excel.
Ньюанс, что это необходимо на вебклиенте.
Насколько это реализуемо?
В толстом клиенте без вопросов все работает.
Алгоритм таков:
-делаю несколько файлов в excel;
-потом их читаю и добавляю в один;
На вебклиенте проблемы такие:
-1.Всплывающие окна при первом проходе сохранения файлов.
ПолучитьФайл(АдресХранилища, ИмяФайла, Истина);
-2.Этап Как это можно сделать навебклиенте.
Рабочий код толстого клиента
Попытка
ДокЭксель = Новый COMОбъект(«Excel.Application»);
ДокЭксель.DisplayAlerts=Ложь;
ДокЭксель.visible = Ложь;
ОбщаяКнига= ДокЭксель.WorkBooks.Add();
Исключение
Сообщить(«Ошибка. Возможно неверно указан номер листа книги Excel.»);
Возврат ;
КонецПопытки;
УдалитьФайлы(Отчет.КаталогСохранения+»statistics.xls»);
Попытка
ОбщаяКнига.SaveAs(КаталогВременныхФайлов()+»statistics.xls»);
Исключение
Сообщить(ОписаниеОшибки()+» Файл не сохранен!»);
КонецПопытки;
ОбщаяКнига.close();
ОбщаяКнига2=ДокЭксель.WorkBooks.Open(КаталогВременныхФайлов()+»statistics.xls»);
Первый = истина;
ПрошлыйЛист = Неопределено;
МассивПутейФайловXLS = НайтиФайлы(Отчет.РабочийКаталог,»*.xls»,Ложь);
Для каждого ПутьКФайлуXLS Из МассивПутейФайловXLS Цикл
ИмяЛиста=»»;
Если ПутьКФайлуXLS.ИмяБезРасширения=»Итоговая» Тогда
ИмяЛиста = «Total»;
Иначе
Продолжить;
КонецЕсли;
Книга = ДокЭксель.WorkBooks.Open(ПутьКФайлуXLS.ПолноеИмя);
Книга.Worksheets(1).Cells.Select();
ДокЭксель.Selection.Copy();
Если Первый Тогда
НовыйЛист = ОбщаяКнига2.Worksheets(1);
Первый = Ложь;
Иначе
НовыйЛист = ОбщаяКнига2.Worksheets.Add(,ПрошлыйЛист);
КонецЕсли;
НовыйЛист.Paste();
НовыйЛист.Activate();
НовыйЛист.Name=ИмяЛиста;
ДокЭксель.Range(«A1»).Select();
ПрошлыйЛист = НовыйЛист;
Книга.Close();
КонецЦикла;
ОбщаяКнига2.close();
ДокЭксель.Quit();
ДокЭксель = Неопределено;
1 — 24.04.20 — 11:47
(0) 1. На веб-клиенте требуется чтобы стоял плагин в браузере «Расширение для работы с 1С:Предприятием»
2. Нафик это делать на клиенте? На сервере делай.
2 — 24.04.20 — 12:16
(1) Я в курсе. На сервер все работает.
Плагин при первом запуске у клиента устанавлюваю автоматически.
Наборка файлов по пункту 1 сохраняется.
Немогу собрать все страницы воедино на вебе)
Меня интересует этот гемор можно сделать навебклиенте, или сказать клиенту что это не решаемо?
3 — 24.04.20 — 12:17
Если веб-клиент ИЕ, то там все еще есть СОМ-объекты )
4 — 24.04.20 — 12:27
(3) Та я пробую сейчас на разных браузерах (firefox, ie,chrom, opera).
Наверное переделаю сейчас по другому. Пошла мысль)
Сделаю многостраничный таблдок на форме, а там пусть сохраняет и собирает.
5 — 24.04.20 — 12:34
(2) Так в чем проблема то сделать на сервере файлик экселя и отправить его на клиента и там сохранить куда нуна?
6 — 24.04.20 — 18:53
Сейчас вопрос про comобъект.
Почему наклиенте comобъект отрабатывает, а на вебклиенте выдает ошибку отказано в доступе?
Какого ему доступа не хватает?
В вебклиенте через сервер обращаюсь к com
&НаСервере
Функция ПоключитьсяКExcel(ИмяФайла)
//ИмяФайла = Полный путь к файлу Excel
Соотв = Новый Соответствие;
Попытка
Листы = Новый Массив;
Excel = Новый COMОбъект(«Excel.Application»);//выбивает с ошибкой :ошибка при вызове конструктора() — отказано в доступе
…
Исключение
Сообщить(«Ошибка создания обьекта Microsoft Excel» + ОписаниеОшибки());
лРезультат = Неопределено;
КонецПопытки;
Возврат лРезультат;
КонецФункции
на клиенте без веба все работает
…
Попытка
ДокЭксель = Новый COMОбъект(«Excel.Application»);
ДокЭксель.DisplayAlerts=Ложь;
ДокЭксель.visible = Ложь;
ОбщаяКнига= ДокЭксель.WorkBooks.Add();
Исключение
Сообщить(«Ошибка. Возможно неверно указан номер листа книги Excel.»);
Возврат ;
КонецПопытки;
…
7 — 24.04.20 — 19:10
8 — 24.04.20 — 19:41
(0) Все не читал, но нафига через COMОбъект(«Excel.Application»), если штатно все это можно через 1с-ный табличный документ сделать?
Сияющий в темноте
9 — 24.04.20 — 23:06
на Web-клиенте с excel можно подружиться через внешнюю компоненту,ну или через запуск excel из командной строки,по другому никак.
так что делать или на сервере или делать службу,к которой будет сервер обращаться и просить сделать ему документ ecxel.
- Download sample source code
Introduction
The adoption of XML as the native file format for Excel 2007 has opened up a whole host of new possibilities. Now for the first time we can create native Excel files on the server using standard tools. No longer is there a need to pollute your beautiful server room with a headless PC running Excel and an old VB6 app that uses OLE Automation to create reports. Such things can be consigned to the trash heap of IT history.
However, the new Office Open XML standard is so new there are precious few good code samples. This article aims to correct the situation by providing a flexible set of open source class libraries that you can use to create Excel spreadsheets on the server.
Why create Excel spreadsheets on the server?
Excel has long been recognized as the de facto standard when it comes to presenting management reports. The unique combination of great calculation engine, excellent charting facilities and the possibility to perform «what if» analysis, make it the «must have» business intelligence tool.
So when we came to replace our aging management reporting infrastructure, we set one key requirement: the new system must be Web-based and provide a «download in Excel» option. For our business intelligence project we built the data warehouse using SQL Server 2005 populated from our PeopleSoft and Novient implementations using SQL Server 2005 Integration Services (SSIS). The OLAP cube was built on SQL Server 2005 Analysis Services (SSAS). SQL Server 2005 Reporting Services (SSRS) provides the Web-based access to management reports and the all important «download in Excel» option. So why do we need to create Excel on the server?
The problem with SQL Server 2005 Reporting Services is that it the Excel spreadsheets it generates are «dumb». They contain no formula — just the raw data. So the recipient cannot perform a «what if» analysis by changing a few values and expecting the spreadsheet to recalculate.
We considered a number of ways to overcome this issue, but by far the most attractive is to create the Excel spreadsheet on the server, straight from the OLAP cube data. So we created a web-part for SharePoint Server 2007 so the user could enter their criteria and view the report on-line via Excel Services. Of course users can download the file for off-line viewing in Excel 2007 or even Excel 2003 file format. This SharePoint web-part and its associated web service that does the file format conversion will be the topic of another article.
The Open Source ExcelPackage Assembly
The ExcelPackage assembly is a set of classes and wrappers around the .NET 3.0 System.IO.Packaging API and the new SpreadsheetML file format. It extracts away the complexity of dealing with the individual XML components that make up the new Excel 2007 file format. The classes are published as an assembly called ExcelPackage which you can install in the GAC and use as the basis of your own applications. In the sprit of open source projects, if you wish to help extend the functionality offered by the ExcelPackage assembly then join the team over at the ExcelPackage Open XML project.
Creating an Excel spreadsheet from scratch
Sample 1 shows how to create a new Excel spreadsheet containing some basic data and calculations. So let’s see how this is achieved.
using OfficeOpenXml;
…
FileInfo newFile = new FileInfo(@"C:mynewfile.xlsx");
using (ExcelPackage xlPackage = new ExcelPackage(newFile)) { … }
This creates a new instance of the all important ExcelPackage class which gives you access to the Excel workbook and worksheets. If mynewfile.xlsx already exists, then ExcelPackage will open the existing file. Otherwise mynewfile.xlsx will be created from scratch.
Let’s start by adding a new worksheet called “Tinned Goods” and adding some basic data and a simple calculation:
ExcelWorksheet worksheet = xlPackage.Workbook.Worksheets.Add("Tinned Goods");

worksheet.Cell(1, 1).Value = "Product";
…
worksheet.Cell(4, 1).Value = "Peas";
worksheet.Cell(5, 1).Value = "Total";


worksheet.Cell(1, 2).Value = "Tins Sold";

ExcelCell cell = worksheet.Cell(2, 2);
cell.Value = "15";

string calcStartAddress = cell.CellAddress;
worksheet.Cell(3, 2).Value = "32";
…
worksheet.Cell(5, 2).Formula = string.Format("SUM({0}:{1})",
                                           calcStartAddress, calcEndAddress);
If all this seems a bit too easy — well yes it is! The ExcelPackage assembly does all the hard work of creating the XML elements that are needed to represent an Excel worksheet, the Excel rows, the Excel cells etc. All you need to do is connect in the data! The ExcelWorksheet class has all the properties and methods needed to create and manipulate worksheets. A number of supporting classes (such as ExcelCell, ExcelRow, ExcelColumn, ExcelHeaderFooter etc.) provide properties and methods of each worksheet component. They also provide helper functions that make it easy to manipulate Excel data. For example, the ExcelCell.GetCellAddress(iRow, iColumn) method turns your row and column integers into Excel-style cell addresses.
Ok, so in our sample some of the data is too wide for the column, so let’s change the column size:
worksheet.Column(1).Width = 15;
Next, add some headers and footers to the spreadsheet. Note how we use the PageNumber and NumberOfPages constants to insert codes into the footer text. This causes Excel to insert the page number and the number of pages in the document footer. worksheet.HeaderFooter.oddHeader.CenteredText = «Tinned Goods Sales»;
worksheet.HeaderFooter.oddFooter.RightAlignedText =
string.Format("Page {0} of {1}", ExcelHeaderFooter.PageNumber,
ExcelHeaderFooter.NumberOfPages);
OK, so let’s write some real hard code. Let’s insert a line into the worksheet so we can add some more data. This will screw up our formula as it will be referencing the wrong set of rows (i.e. the new row will not be included in the total).
worksheet.InsertRow(3);
Well hell no, the formula is correct. The InsertRow method not only updates all the row and cell references in the underlying XML, but also updates all the formulas in the spreadsheet! Ok, we now have our report, but we want to ensure our corporate search engine can find the file later. So let’s add some standard and custom document properties.
xlPackage.Workbook.Properties.Title = "Sample 1";
xlPackage.Workbook.Properties.Author = "John Tunnicliffe";
xlPackage.Workbook.Properties.SetCustomPropertyValue("EmployeeID", "1147");
Now save the file and all its components.
xlPackage.Save();
Below is a screenshot of the final output showing the header and the document properties.

Reading data from an Excel spreadsheet
Sample 2 shows how to read data from an existing Excel spreadsheet. We will use the spreadsheet generated by Sample 1 as the source document. To output the contents of column 2 to the console, this is all we need:
using (ExcelPackage xlPackage = new ExcelPackage(existingFile))
{

  ExcelWorksheet worksheet = xlPackage.Workbook.Worksheets[1];
  int iCol = 2;


  for (int iRow = 1; iRow < 6; iRow++)
    Console.WriteLine("Cell({0},{1}).Value={2}", iRow, iCol,
                       worksheet.Cell(iRow, iCol).Value);


  Console.WriteLine("Cell({0},{1}).Formula={2}", 6, iCol,

  worksheet.Cell(6, iCol).Formula);

}
Here is the output from the sample code:

Starting with a template
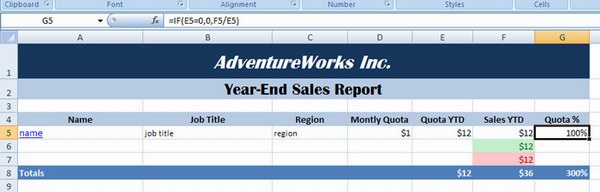
Sample 3 shows how to create a new Excel spreadsheet based on an existing file and populate it with data from a database. This is a much better approach as you can quickly create a spreadsheet with the right formula and the correct corporate ‘look and feel’ using Excel 2007. You can then have the calculations in your template validated by the business before starting to write any code. This whole approach saves a lot of coding time!
Before running the code sample, open the template and take a look at its content. You will see it already has the desired layout and all the formula and formatting required for the title and total lines. However, it only has room for three «data rows» (i.e. rows 5, 6 & 7). You will see how we cope with this later.
So let’s start by creating a new Excel spreadsheet based on a template.
using OfficeOpenXml;
assembly
…
FileInfo newFile = new
FileInfo(@"C:sample3.xlsx");
FileInfo template = new
FileInfo(@"C:sample3template.xlsx");
using (ExcelPackage xlPackage = new
ExcelPackage(newFile, template)) {…}
Behind the scenes, the ExcelPackage constructor simply copies the template and opens the new package. Now obtain a reference to the existing worksheet and initialize some variables:
ExcelWorksheet worksheet = xlPackage.Workbook.Worksheets["Sales"];
ExcelCell cell;
const int startRow = 5;
int row = startRow;
Next open a connection to the database and run the query. This example uses data from the AdventureWorks sample database, so you will need this installed if you want to run the sample.
while (sqlReader.Read())
{
  int col = 1;


  if (row > startRow) worksheet.InsertRow(row);


  for (int i = 0; i < sqlReader.FieldCount; i++)
  {

    if (sqlReader.GetName(i) == "EmailAddress")
    {

      string hyperlink = "mailto:" + sqlReader.GetValue(i).ToString();
      worksheet.Cell(row, 1).Hyperlink = new Uri(hyperlink, UriKind.Absolute);
    }
    else
    {


      if (sqlReader.GetValue(i) != null)
      worksheet.Cell(row, col).Value = sqlReader.GetValue(i).ToString();
      col++;
    }
  }
  row++;
}
So now we have filled our worksheet with the entire dataset. Note how we use the email address as a hyperlink. Using hyperlinks is useful when you want to link one report up with another.
The purist among you will notice that all the data is written into the cell as a string. However, the Cell(row, col).Value = "xxx" property assignment code checks if the value is a number or a string and sets the cell’s data type accordingly.
As mentioned earlier, the template only has room for three data rows. We cope with this by simply inserting rows into the template — thereby pushing the «Total» row down the sheet. The InsertRow method automatically updates the formula in the «Total» row so that they take into account the extra rows.
As we have inserted a whole set of rows into the spreadsheet, they will not have the correct style. We correct this by simply iterating through the new rows and copying the style from the first row to all the other rows.
for (int iCol = 1; iCol <= 7; iCol++)
{
  cell = worksheet.Cell(startRow, iCol);
  for (int iRow = startRow; iRow <= row; iRow++)
  {
    worksheet.Cell(iRow, iCol).StyleID = cell.StyleID;
  }
}
The Power of Named Styles
Anyone familiar with styling HTML with CSS will understand the power and flexibility of using named styles rather than updating the style of every individual element. With named styles, the look and feel of the whole spreadsheet can be altered by changing one style definition. This capability was introduced in Excel 2003, but Excel 2007 goes one step further and makes it a dream to create a template using named styles.
We apply two built-in named styles to highlight the top achieving and the worst performing sales reps.
worksheet.Cell(startRow, 6).Style = "Good";

worksheet.Cell(row, 6).Style = "Bad";
The biggest problem with named styles in Excel 2007 is that if they are not used in your template, then Excel strips out the definition when the file is saved. This is a real headache. There are two ways to cope with this (1) add extra rows that have styles applied and delete them later (which is the technique used in this sample) or (2) load your own style.xml file which contains all the definitions you want to use.
Shared formula
Excel 2007 has a neat feature which saves a lot of coding when it comes to applying the same formula to a range of cells. A formula in one cell can be marked as «shared» and all cells referenced by the shared formula obtain their own version of the formula. So if cell E5 has the formula D5*12, then cell E6 would have the formula D6*12 etc. etc. To set up a shared formula simply call the CreateSharedFormula method. In the following example, the formula in cell E5 is marked as «shared» and all the other cells in the range E5:E21 are assigned their own variation of the formula.
worksheet.CreateSharedFormula(worksheet.Cell(5, 5), worksheet.Cell(21, 5));
Ensuring your formula are recalculated on File-Open
One problem we came across with Excel 2007 is that it does not automatically re-calculate the spreadsheet when it is re-opened — even when the Calculate option set to automatic! This is because the existing cells in the template have both a formula and a value in the cell. So Excel just assumes the value is correct and does not attempt to re-compute the formula. Of course, we have just added twenty rows of data and updated the formula references in the XML — but Excel has no why of knowing this, so assumes the values must be right!
The only way to force the recalculation is to ensure the cell has no value — just a formula. So the RemoveValue() method becomes very useful for all formula in the worksheet. Hence:
worksheet.Cell(22, 5).RemoveValue();
Because of this phenomenon, we changed the ExcelCell.Formula property assignment code so that it removes the cell’s value when you assign the cell a formula.
The final output of Sample 3 code should look something like this — much more professional than anything that can be achieved starting from scratch.

Integrity issues
As soon as you start deleting rows or even worksheets from the package, you have potential for integrity issues. Your formulas will reference cells (or worksheets) that no longer exist. The ExcelPackage assembly does a good job of tidying up after you — but cannot cope with complex situations. You will soon know if you have an integrity problem — Excel will complain bitterly when opening the newly created file.
A classic problem is the calcChain.xml file. This tells Excel in what order the calculations should be processed. So if you delete a row that is referenced by the calcChain, Excel will complain. However, if you simply remove the calcChain.xml from the package, Excel re-creates it when the file is opened — and does not complain! So this is an easy fix. The ExcelPackage assembly does exactly that — deletes the calcChain.xml file from the template so that Excel simply re-creates it when the file is opened.
The ExcelPackage assembly also provides you with direct access to each of the XML documents that make up the package. So you can write your own code to manipulate the XML directly. However, if you choose to do this, be careful to ensure the XML conforms to the new Office Open XML standard. Otherwise, Excel will simply strip out your all hard work as «badly formed».
Debugging your application
If you want to understand exactly what is been written into each of the component XML files by the ExcelPackage assembly, then simply add the following line of code:
xlPackage.DebugMode = true;
This will cause the assembly to output the raw XML files in the same location as the output file. You will see a sub-folder called ‘xl’ and another callled ‘docProps’.
Summary
This article has demonstrated just how easy it is to create Excel-based reports on the server using the open source ExcelPackage assembly. We hope you will be able to join us in extending the functionality of the assembly over at the ExcelPackage Open XML project. There is plenty still to do; charting, conditional formatting, inserting comments, to name just a few!
Good luck with your project!
John is a senior business intelligence developer / designer based in London, UK who likes to get his hands dirty doing real code.