
Этот пример продемонстрирует, как сделать книгу Excel доступной только для чтения. Пользователи по-прежнему смогут сохранить изменения, создав новую копию книги.
Чтобы защита была надёжней, защитите лист.
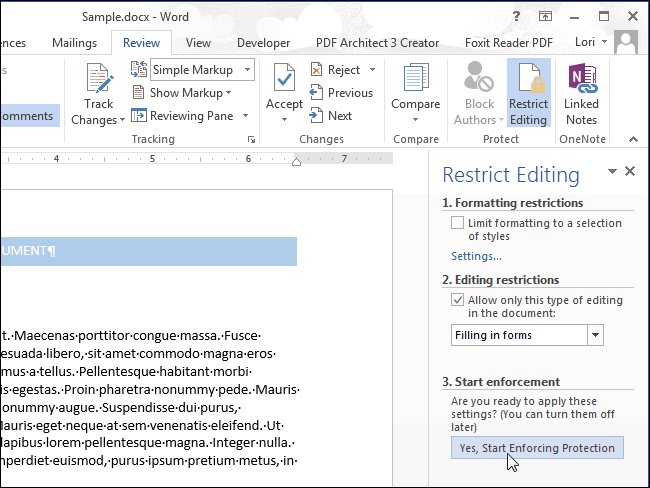
- Откройте книгу.
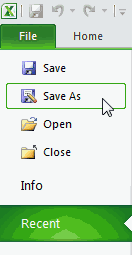
- На вкладке File (Файл), нажмите кнопку Save As (Сохранить как).
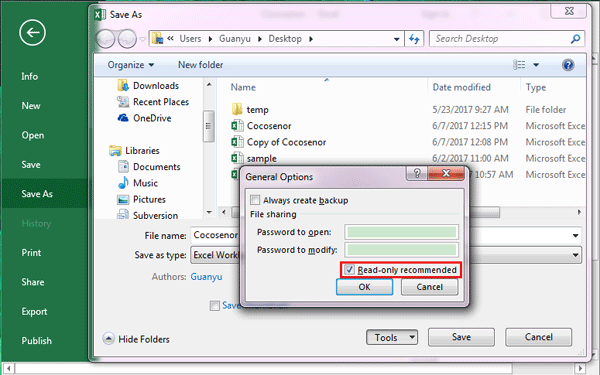
- Кликните по Tools (Сервис) и выберите General Options (Общие параметры).

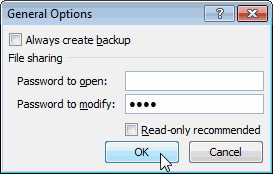
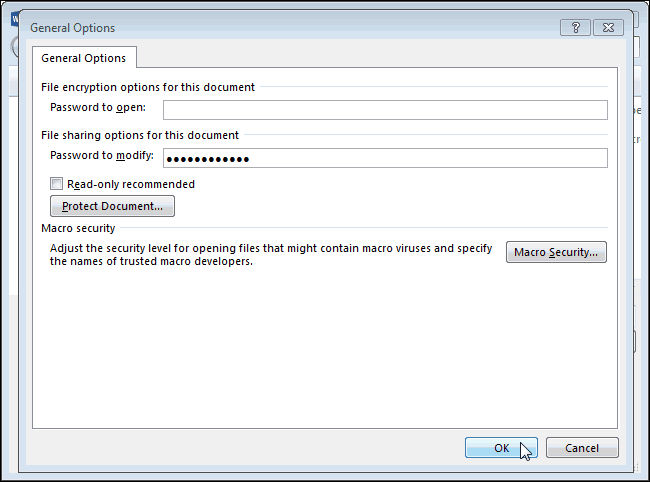
- Введите пароль в поле Password to modify (Пароль для изменения) и нажмите OK.


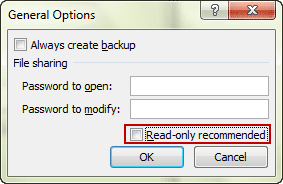
Примечание: Если вы хотите всего лишь порекомендовать пользователям открывать файл Excel только для чтения, не защищая его, то не вводите пароль и поставьте галочку напротив Read-only recommended (Рекомендовать доступ только для чтения).
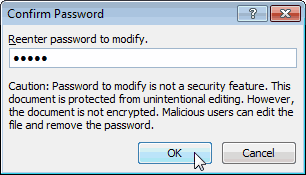
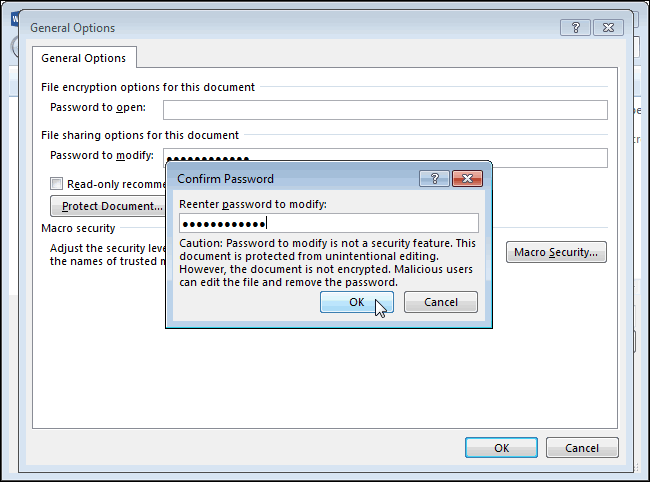
- Снова введите пароль и нажмите ОК.

Эта функция не зашифровывает файл Excel. Злоумышленники могут отредактировать файл и удалить пароль.
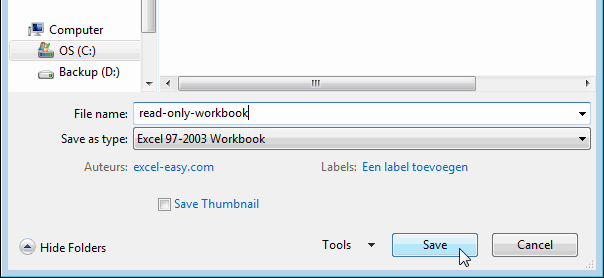
- Введите имя файла и кликните по Save (Сохранить).

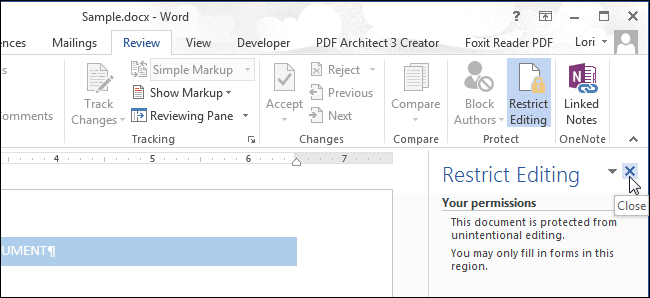
Теперь книга доступна только для чтения.
Урок подготовлен для Вас командой сайта office-guru.ru
Источник: /> Перевел: Антон Андронов
Правила перепечаткиЕще больше уроков по Microsoft Excel
Оцените качество статьи. Нам важно ваше мнение:
November 11, 2016 admin Office Password
Surely, read-only excel file could prevent accidental changes on it. But read-only mode could be removed or disabled as you wish anytime when you want to edit excel file?
I don’t know. But I think some options you have used to set excel workbook read only, would be able to remove this setting always. So that you can remove or disable read only in excel file. Now in this article, I will list several possible cases that make your workbook and worksheet read only and introduce how we can do to remove read only status from Excel file.
- Case 1: Excel file is made read-only by “Mark as Final”
- Case 2: Excel file becomes read-only recommended by “Save As”
- Case 3: Excel file is restricted modify and read only
- Case 4: Worksheet and Workbook structure is locked and read only
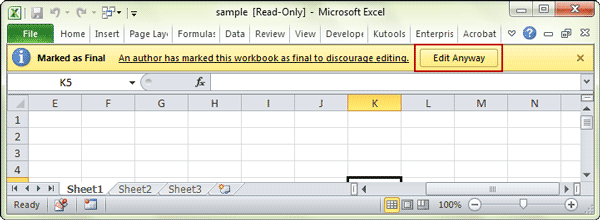
Case 1: Excel file is made read-only by “Mark as Final”
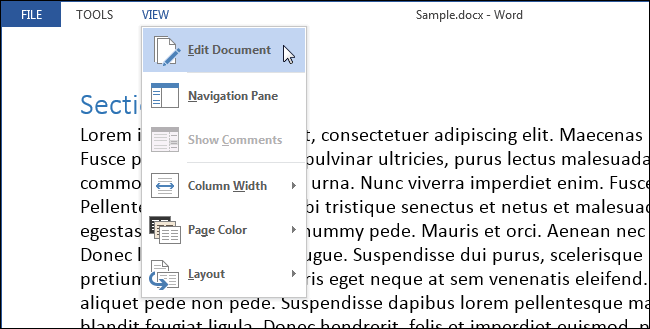
While you open an excel file that has been marked as final, you would see a message bar at the top of sheet window. To remove read only from excel file, you just need to click on “Edit Anyway” button on message bar.

Now you have been able to edit excel file and make any changes to worksheet or workbook.
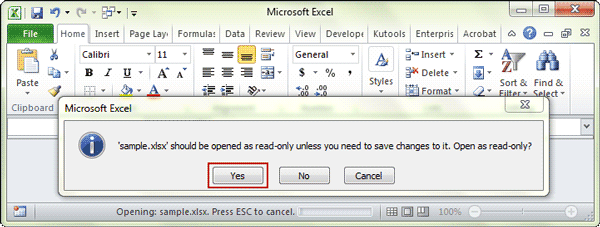
Case 2: Excel file becomes read-only recommended by “Save As”
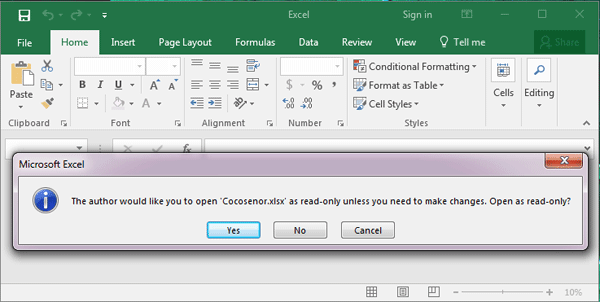
When a dialog appears and shows three options for you to choose after you double click the read-only excel file, just click “Yes” and you could open excel file in read-only mode.

Now if you make any changes on the excel file, and want to save, there would be a message that prompts you again to save a copy of the file and rename it.
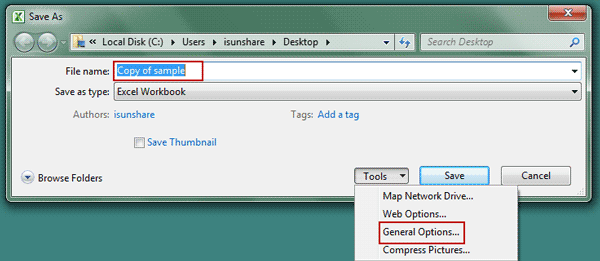
1. Click OK and open Save As dialog. Then click “Tools > General Options” in Save As dialog.

2. Uncheck “Read-only recommended“ and click OK.

3. Back to Save As dialog and click “Save” button to make a copy of original excel file. From then on, the copied Excel file would be not read-only and could be used instead of original one. It means you have disabled read-only in Excel file.
Case 3: Excel file is restricted modify and read only
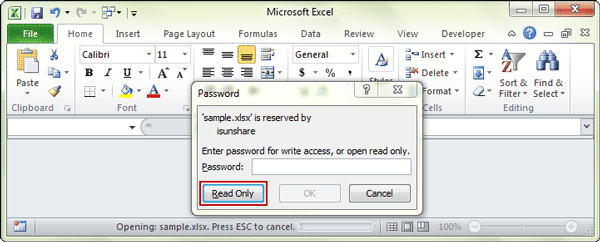
While you are trying to open excel file that is restricted modify, and a password is required for write access, instead of entering password, please just click “Read Only” button to open excel file as read only.

It seems you cannot do any changes on it, but you can save the read-only excel file as another one to remove modify password. So remove read only in excel file.
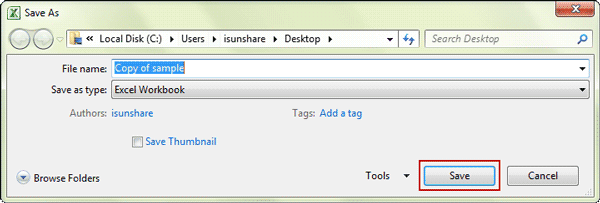
1. Click File > Save As, and click Save button in pop-up Save As dialog.

2. Click OK to save excel file to replace the read-only one.
Case 4: Worksheet and Workbook structure is locked and read only
While your excel file is read only and you know it is because worksheet and workbook structure is protected, it will be easy or difficult to disable read only. We don’t know.
If you know the password that protect worksheet and workbook, remove read only in excel file would be so easy.
1. Open your excel file in MS Excel and you can view all worksheet and its content.
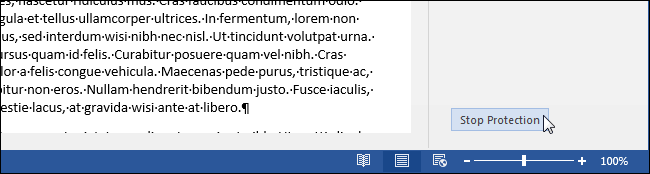
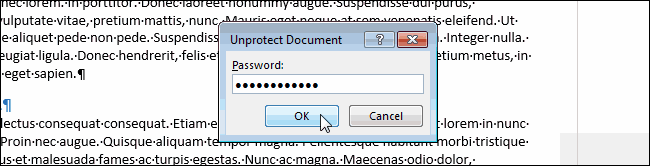
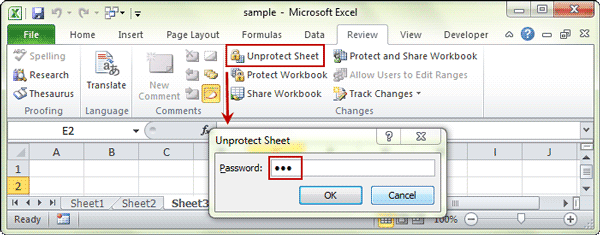
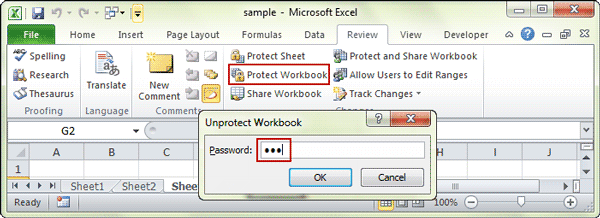
2. Click Unprotect Sheet under Review > Changes group, and enter password to unprotect sheet one by one.

3. Click Protect Workbook in the same location and type password to unprotect workbook structure and windows.

4. Save excel file and read-only mode would be removed from excel file.
But if you don’t know protected password, disabling read only in Excel file would be a little difficult unless you could find a utility to directly remove password protection from excel workbook, such as iSunshare Workbook Unprotect Genius, which could directly and easily remove worksheet/workbook protected password with only one click.
Tips:
Probably your excel file is also protected with open password now besides above edit restrictions. Then just opening the excel file is a difficult thing, not to say removing read only mode in excel file. But if you want to disable excel file read only, removing or recovering excel file password to open the password protected excel file is necessary at first. Otherwise, you just could let excel file read-only all the time.
Related Articles:
- How to Unlock Encrypted Excel Spreadsheet without Password
- Forgot Excel Workbook 2010/2013 Password
- How to Disable Protected View for Office 2010 to Enable Editing
- How to Unprotect Excel Workbook without Password
This example shows you how to make your workbook read-only. Users can still save changes by creating a new copy of the workbook. For a better protection, protect a sheet.
1. Open a workbook.
2. On the File tab, click Save As.
3. Click Browse.
4. Click on the Tools button and click General Options.
5. In the Password to modify box, enter a password and click OK.
Note: If you only want to recommend users to open the Excel file as read-only, without protecting it, don’t enter a password and check Read-only recommended.
6. Reenter the password and click on OK.
Note: this feature does not encrypt your Excel file. Malicious users can edit the file and remove the password.
7. Enter a file name and click Save.
Your workbook is read-only now. The password for the downloadable Excel file is «easy».
Information moves quickly with modern technology. With a single email, a colleague can share a complicated Excel worksheet for you to customize as needed. There is one problem: That file is locked as “read-only.” You can unlock this quickly within the program, without even needing super-spy powers.
Unlocking Made Simple
The key to unlock an Excel 2011 or 2016 worksheet is in the File menu of the Finder feature on your computer. Get out of the Excel program, closing the worksheet. Go to the Finder menu box; this is not in Excel but rather is the main finder in your computer’s C-drive where you search for saved files. Search for the named Excel worksheet in question. Select it, then under «File,» select «Get Info.» Note that on some versions of Excel, this is also accomplished with a right-click on the filename. At the top under the General tab will be a box checked if the worksheet is locked. Uncheck this to unlock it. Once it is unlocked, reopen the file in Excel to work on it.
Excel 2010 and 2013 also use a «Protected View» banner that prevents editing unless you click the «Enable Editing» button on the right side of the banner. Once you click this, you are able to edit the Excel document.
If the file doesn’t unlock, you might not have permission to unlock it. If this is the case, you need to request permission from the original sender.
Sharing and Permissions
Now that you can edit and manipulate the data in the worksheet, you might want to share it with your team or colleagues. But you also might not want them to change data, using it for review only. You can lock the file from your end. In the same tab you used to unlock the file, check the box to lock it. This does, however, prevent you from being able to change anything else.
You can instead lock it through sharing and permissions located at the bottom of the Get Info box. It will list your name, your staff and everyone else who has access to this file. Each name listed has a drop-down privilege to either “read only” or “read & write.” Make sure you have read and write permission, but give everyone else read-only.
Difference Between Locked and Read-Only
The two ways to lock and unlock the worksheet can be confusing. If you can unlock a file, can’t your team unlock it as well? Yes, if the privileges they are given say they can read and write. Only owners, creators and those given these permissions are able to unlock the file.
It is possible, therefore, that you receive a file as locked and even checking the box doesn’t unlock it. The reason is you probably don’t have permission to read and write. You would need to ask the original file creator to resend it after updating your permissions. Once that’s done, you can manipulate and change the information.
As documents are passed around, upward or downward, perhaps one needs to think about restricting what the other users can do. Maybe it’s okay to make a few changes to see how things add up but imagine the chain effect of accidentally saving an experimental change to a very important document. Or even accidentally hitting a key somewhere. Such changes have reported thousands of losses to companies.
Scary talk aside and solution-storming in, if you’re aiming for a complete restriction where cell values can’t be changed at all, you’re looking for sheet protection. But if it’s okay to make changes to the file as long as they’ll be restricted from being saved, you’re heading right for Read-Only.
 1")
We have prepared this tutorial on how to open Excel in Read-Only mode. You will find few easy methods to do that including VBA. We’ve also covered two options for those who need to have the users of the file reminded that they need to access the file as Read-Only.
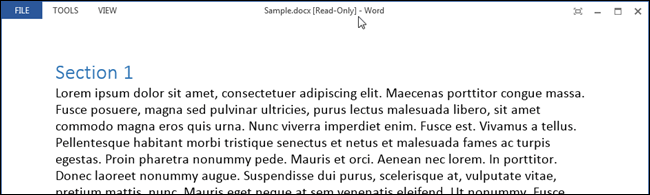
But basically, what happens in Read-Only Mode? Firstly, the file name at the top of the workbook gets a Read-Only tag:
 2")
When you make any changes to the file, they will apply but when you try to save the file, you’ll have to save it as a copy because the original file can’t be overwritten in Read-Only mode.
Now we can jump on the “how” part of opening a file as Read-Only. Let’s begin.
Open Workbook as Read-Only Using File Open Dialog
Instead of regularly opening a file, it can be opened as Read-Only, and below are the steps:
- Open Excel and navigate to the File tab, on the ribbon.
- Click on the Open button from the left panel and select Browse from the options to access the Open
 3")
- Browse and select the file you want to open as Read-Only.
- Click on the arrow of the Open command button at the bottom-right of the dialog box and select Open Read-Only from the list.
 4")
Selecting this option will open the file as Read-Only.
Open Workbook as Read-Only Using VBA
Any workbook can be opened as Read-Only using VBA. You need to run the file path in the provided code and feed it in VBA via a module and the chosen file will open as Read-Only. We have the steps for this below:
- Open a new Excel file.
- Open the VB editor from the Developer tab or press Alt + F11.
- In the editor, click on Insert and select Module to open the Module
 6")
- Copy-paste the following code in the Module window but change the file path to the file path including the filename of the workbook you want to open as Read-Only.
Sub Open_Workbook_As_Read_Only()
'Open a Workbook as Read-Only
Workbooks.Open "C:Employee data.xlsx", ReadOnly:=True
End Sub
- Press the F5 key to run the command.
 7")
The chosen file will open as Read-Only. You can close the previous file.
Forcing the File to Always Open with a Read-Only Prompt
Someone may forget to open a file as Read-Only, oops. Instead of opening the file every time as Read-Only, the file can be made to pop up a prompt, suggesting the user to open the file in Read-Only mode whenever the file is accessed. There are a couple of ways of setting the file with a Read-Only prompt that we have detailed as follows.
Forcing the File to Open with a Read-Only Prompt Using Save As Options
This method utilizes the tools in the Save As dialog, setting it with a Read-Only recommend. These are the steps:
- With the file open, go to the File tab and select Save As from the left pane. Select the location for saving the file. The Save As dialog box will open.
 9")
- Click on the Tools button at the bottom of the dialog box and select General Options.
 10")
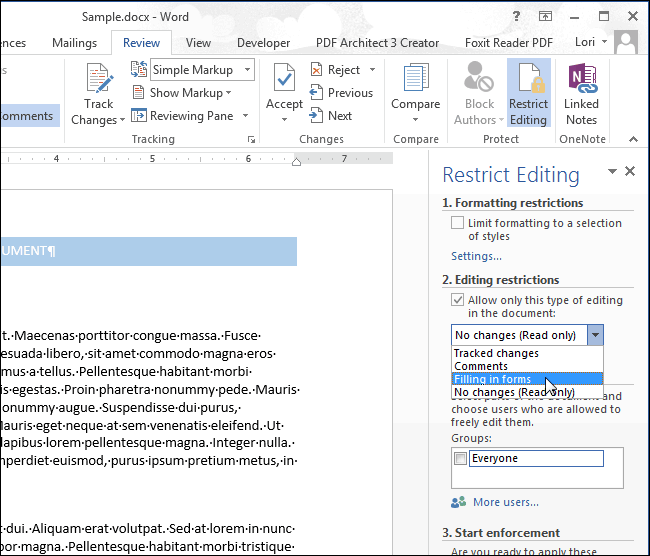
- In the General Options dialog box, check the Read-only recommended checkbox, then click OK.
 11")
- Click the Save command button in the Save As dialog box.
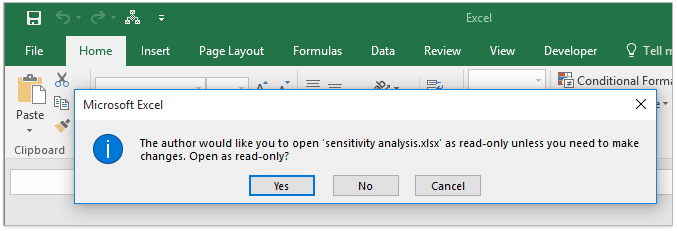
- Close the file. When opening the file, the Read-Only recommend will pop up:
 12")
The user can still choose to access the editable file by selecting No here but the prompt does its work to serve as a reminder.
Forcing the File to Open with a Read-Only Prompt from Protect Workbook Options
Another way to fit the file with a Read-Only prompt is to use the Protect Workbook options from the Info settings. Here’s how to go about it:
- Click on the File tab of the opened workbook.
- In the File menu, select Info from the left panel and then click on the Protect Workbook button to access the options.
 13")
- Select Always Open Read-Only from the options.
 14")
- After selecting the option, the workbook will have been protected with the Read-Only prompt.
 15")
- Close the file and save the changes.
And that’s done. Now the file will show the prompt whenever accessed.
Now if you’re done with only reading, have a go at applying one of the methods to open a file as Read-Only. Next time you consider saving your file from meddling, see if you want to have it run as Read-Only or have the workbook protected; Excel hardly comes with a single possibility for things. See you shortly with more possibilities from Ever-Ever-Excel-land!
Во многих случаях вам может потребоваться запретить другим редактировать определенные ячейки на вашем листе. В этой статье представлены два метода, которые помогут сделать указанные ячейки доступными только для чтения, чтобы другие пользователи не могли редактировать эти ячейки, кроме как для чтения.
Сделать ячейку доступной только для чтения, защитив рабочий лист
Сделать ячейку доступной только для чтения кодом VBA без защиты рабочего листа
Сделать ячейку доступной только для чтения, защитив рабочий лист
Вы можете заблокировать только те ячейки, которые хотите сделать доступными только для чтения, а затем защитить этот рабочий лист для этого. Пожалуйста, сделайте следующее.
1. Нажмите  кнопку в верхнем левом углу текущего листа, чтобы выбрать целые ячейки.

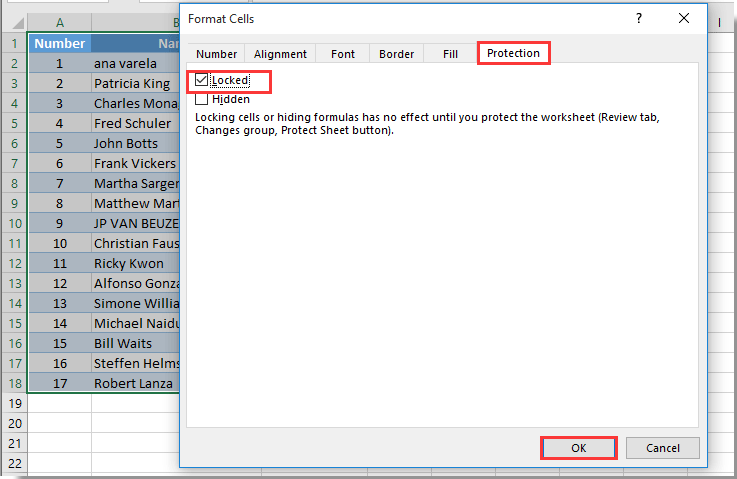
2. нажмите Ctrl + 1 клавиши одновременно, чтобы открыть Формат ячеек диалоговое окно. В диалоговом окне снимите флажок Заблокированный поле под Protection и нажмите OK кнопка. Смотрите скриншот:

3. Теперь выберите ячейки, которые нужно сделать доступными только для чтения (здесь я выбираю ячейки диапазона A1: C18). нажмите Ctrl + 1 клавиши одновременно, чтобы открыть Формат ячеек диалоговое окно, проверьте Заблокированный поле под Protection вкладку и нажмите OK кнопку.
4. Продолжайте нажимать Обзор > Защитить лист. Смотрите скриншот:

5. Укажите и подтвердите свой пароль для защиты рабочего листа, как показано на скриншоте ниже.

Теперь ячейки в заблокированном диапазоне доступны только для чтения. Когда вы попытаетесь отредактировать эти конкретные ячейки внутри диапазона, вы получите окно подсказки, как показано на скриншоте ниже.

Сделать ячейку доступной только для чтения кодом VBA без защиты рабочего листа
Если вы не хотите защищать лист, чтобы сделать ячейку доступной только для чтения. Сценарий VBA в этом разделе поможет вам легко решить эту проблему.
1. Щелкните правой кнопкой мыши вкладку листа, в которой необходимо сделать ячейку доступной только для чтения, а затем щелкните Просмотреть код из контекстного меню.
2. В дебюте Microsoft Visual Basic для приложений окна, скопируйте и вставьте приведенный ниже код VBA в окно кода.
Код VBA: сделать ячейку доступной только для чтения в Excel
Private Sub Worksheet_SelectionChange(ByVal Target As Range)
    If Target.Column = 1 Then
        If Target.Row = 3 Or Target.Row = 4 Or Target.Row = 5 Then
            Beep
            Cells(Target.Row, Target.Column).Offset(0, 1).Select
            MsgBox Cells(Target.Row, Target.Column).Address & " cannot be selected and edited as it is a read-only cell", _
            vbInformation, "Kutools for Excel"
        End If
    End If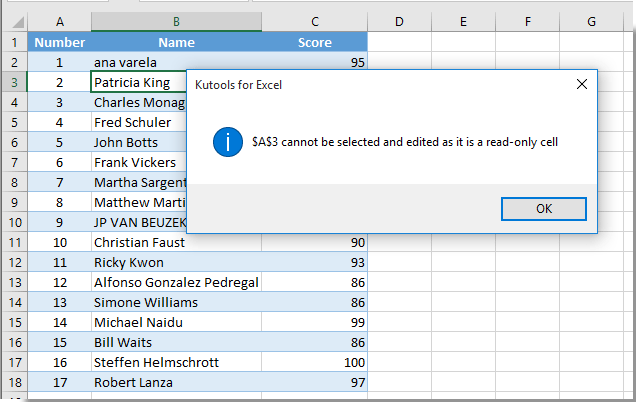
End SubВнимание: Этот код может просто сделать указанные ячейки в одном столбце доступными только для чтения. В этом коде ячейки A3, A4 и A5 будут доступны только для чтения на текущем листе.

3. нажмите другой + Q ключи, чтобы закрыть Microsoft Visual Basic для приложений окно.
При нажатии на ячейку A3, A4 или A5 на текущем листе вы получите Kutools for Excel диалоговое окно, как показано на скриншоте ниже, и курсор автоматически переместится в правую соседнюю ячейку.
Лучшие инструменты для работы в офисе
Kutools for Excel Решит большинство ваших проблем и повысит вашу производительность на 80%
- Снова использовать: Быстро вставить сложные формулы, диаграммы и все, что вы использовали раньше; Зашифровать ячейки с паролем; Создать список рассылки и отправлять электронные письма …
- Бар Супер Формулы (легко редактировать несколько строк текста и формул); Макет для чтения (легко читать и редактировать большое количество ячеек); Вставить в отфильтрованный диапазон…
- Объединить ячейки / строки / столбцы без потери данных; Разделить содержимое ячеек; Объединить повторяющиеся строки / столбцы… Предотвращение дублирования ячеек; Сравнить диапазоны…
- Выберите Дубликат или Уникальный Ряды; Выбрать пустые строки (все ячейки пустые); Супер находка и нечеткая находка во многих рабочих тетрадях; Случайный выбор …
- Точная копия Несколько ячеек без изменения ссылки на формулу; Автоматическое создание ссылок на несколько листов; Вставить пули, Флажки и многое другое …
- Извлечь текст, Добавить текст, Удалить по позиции, Удалить пробел; Создание и печать промежуточных итогов по страницам; Преобразование содержимого ячеек в комментарии…
- Суперфильтр (сохранять и применять схемы фильтров к другим листам); Расширенная сортировка по месяцам / неделям / дням, периодичности и др .; Специальный фильтр жирным, курсивом …
- Комбинируйте книги и рабочие листы; Объединить таблицы на основе ключевых столбцов; Разделить данные на несколько листов; Пакетное преобразование xls, xlsx и PDF…
- Более 300 мощных функций. Поддерживает Office/Excel 2007-2021 и 365. Поддерживает все языки. Простое развертывание на вашем предприятии или в организации. Полнофункциональная 30-дневная бесплатная пробная версия. 60-дневная гарантия возврата денег.
")
Вкладка Office: интерфейс с вкладками в Office и упрощение работы
- Включение редактирования и чтения с вкладками в Word, Excel, PowerPoint, Издатель, доступ, Visio и проект.
- Открывайте и создавайте несколько документов на новых вкладках одного окна, а не в новых окнах.
- Повышает вашу продуктивность на 50% и сокращает количество щелчков мышью на сотни каждый день!
")
Have you ever stuck with the Excel read only error or cannot access read only document Excel issue? Mostly it is seen that Excel file read only error occurs meanwhile trying to open the Excel file which is downloaded from a network server, emails, and the internet.
If you too are dealing with the same issue then leave all your worries. This article will provide you with the best solutions to fix Excel file read only error.
SO, JUST GIVE THEM A TRY…!
What Is Excel Read Only File And How It’s Helpful?
Excel read-only file is one such file having attribute ‘read only’ turned on. Basically, such excel read-only file can be easily viewed and opened just like any other file but writing or saving changes on it is that allowed in it. So you can only read the file not write or save anything on it.
Excel file which is marked read-only, generally considered under great caution right before making any changes to it.
To repair corrupt Excel file, we recommend this tool:
This software will prevent Excel workbook data such as BI data, financial reports & other analytical information from corruption and data loss. With this software you can rebuild corrupt Excel files and restore every single visual representation & dataset to its original, intact state in 3 easy steps:
- Download Excel File Repair Tool rated Excellent by Softpedia, Softonic & CNET.
- Select the corrupt Excel file (XLS, XLSX) & click Repair to initiate the repair process.
- Preview the repaired files and click Save File to save the files at desired location.
Many users take benefit of this Excel file read only feature to restrict the editing and formatting of their Excel document by any content reviewers.
Suppose if you don’t want that any content reviewer will make any type of modification in your document. Then make your Excel workbook read-only before handing over your document.
If any reviewers perform any changes to that Excel read-only file. In that case, modifications can only be saved if any new location or a new name is assigned to the file.
No doubt it’s a good feature..!
But, what if you are unable to open the read only Excel File. This will ultimately throw the following error message: Excel cannot access read only document. After the occurrence of this error, you are completely unable to access your Excel workbook. So, it’s important to fix Excel read only error to get back access to your Excel workbook.
Why Does My Excel File Keep Saying Read Only?
Before stepping into the fixes to resolve Excel read only error. It’s important to know about the reasons behind Excel worksheet showing read only error.
1# Spreadsheet Settings
Excel workbooks and spreadsheets can be applied with protection features to get easy prevention from any kind of changes.
As per the protection level, you may make it completely or partly Read Only. For this, you have to choose the”Unprotect” option within the review tab. If any user has enabled the protection with a password then it’s important for you to have that password to remove the read-only protection.
2# File Corruption
In many cases, it is seen that Excel file corruption also makes your Excel spreadsheet Read Only.
Even after checking all the setting and ensuring file location if you excel workbook still displaying the Excel read only error. Then it’s a clear sign that your Excel file got corrupted somehow and hence it denies getting open.
3# Location
Another very common reason for Excel read-only error is its location. If your Excel spreadsheet is within the network folder and you don’t have network permission to do any changes in the folder. In that case, your Excel spreadsheet worked as read-only. This means you can only view its data but can’t perform any editing into it.
Excel spreadsheet present on the locked USB stick, DVD CD-ROM, area also considered as Read Only. A spreadsheet that is sent as email attachments or previewed inside any email program is counted as Read Only.
Well in all the above cases, to fix Excel read only file error. You need to either move or save the spreadsheet into the folder having complete permission to make changes.
How To Fix ‘Excel Cannot Open Read-Only Documents’ Message?

Check out the following fixes to resolve ‘Excel Cannot Open Read-Only Documents’ error Message:
1# Change the Excel File Property Set
One very typical reason for the occurrence of Excel cannot open read-only documents’ message is Excel file property is set to read-only.
To solve this matter, you just need to uncheck the Excel ‘Read-only’ file property option.
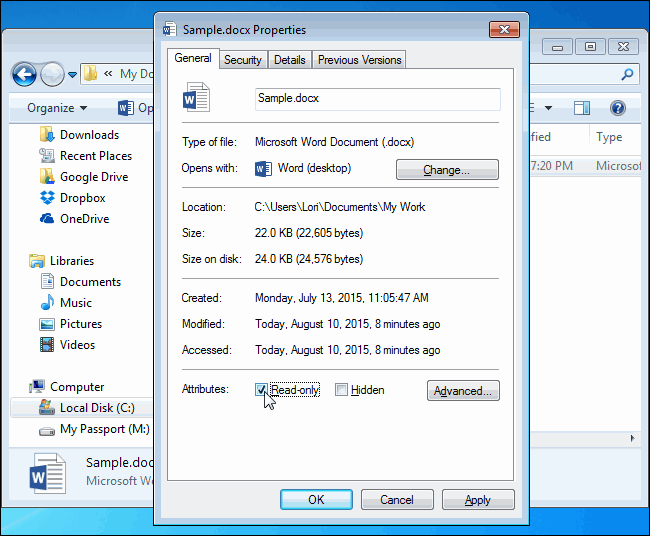
Here are the following steps to uncheck the ‘Read-only’ attribute,
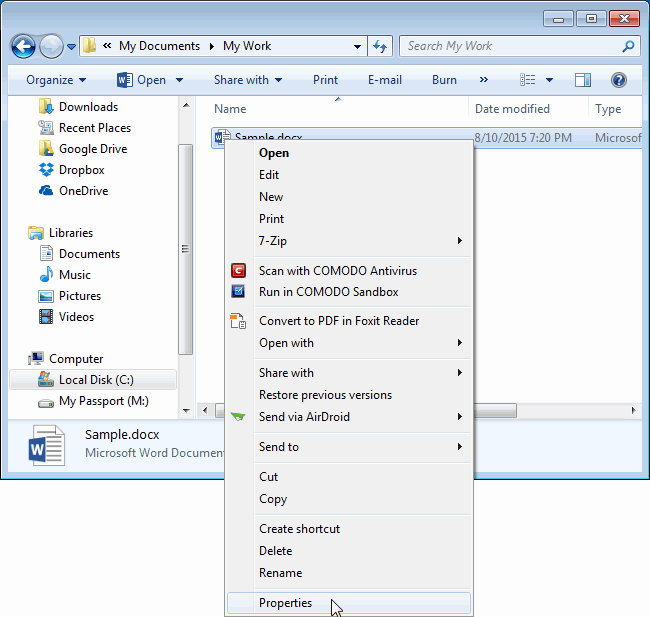
- Make a right-click on some specific Excel file
- From the available option, choose the ‘Properties’ tab.
- Remove the checkmark from the ‘Read-only’ attribute and tap the ‘OK’ option.
Check out whether the Excel read-only error is been resolved now or not.
2# Excel File Is In Read-Only Recommended
If you are opening a recommended read-only Excel file. Then you are asked to open your Excel workbook in read-only mode for making any modification in the Excel file.
Tap the yes option in the Excel read-only error message dialog box. If you don’t want to do any changes to your opened Excel file. Or else tap to ‘No’ options.
If you don’t want to get this read-only recommended on your Excel workbook then perform these below steps:
- Make a double tap on the Excel file. After then choose the No option to open it.
- Hit the File then Save As. In the opened save as window go to the Browse option.
- In the bottom section of the Save As dialog box, tap the Tools, and then choose the General Options.

- Within the General options, you have to uncheck the Read-only recommended check box. After then tap the OK option. Doing this will disable the read-only message in your Excel file.
3# Adjust the Antivirus Setting
Sometimes the read only error in Excel is also encountered due to the antivirus program. As it is seen that few anti-virus programs restrict the accessing of Excel spreadsheets and many other MS Office documents by opening them in ‘read-only’ mode.
To deal with such cases you need to make adjustments in the antivirus settings. So, that the antivirus will allow your Excel workbook to get open in normal mode and you can perform easy modifications in it.
Don’t forget to reopen your Excel workbook after making changes in your antivirus settings.
4# Remove the Excel Protected-View
Excel file which gets opened from a potentially unsafe location like the internet, email attachments, downloaded from any third party source, etc. are opened in protected view. This feature of Excel Protected-View restricts the user to make any modification in their opened Excel spreadsheet. So, you can turn off the Protected-View security warning messages in Excel and freely use the Excel file with the only read-only error.
5# Deactivate Or Renew Microsoft Office
Chances are also that your MS Office application is either reached in the deactivated state. Or maybe its subscription has been expired.
Maybe this makes your Excel application to show such ‘read-only’ error or encounter ‘reduced functionality mode.’
To deal with such an issue, you need to either activate the MS Office or just renew the subscription of MS Office.
After performing such an operation, make check whether the error ‘Excel cannot open read-only documents’ has now fixed or not.
6# Make A Fresh Copy Of Your Excel Document:
Well, there are so many reasons behind Excel Cannot Open Read-Only Documents. There are such situation occurs in which you can easily make changes in the Excel workbook but saving up your changes is not possible. So, in that situation, a quick solution is to choose the “save as” option.
As this option makes a copy of your Excel workbook with all your changes done. If you want to permanently fix the issue of “Unable To Save Excel File” then move the Excel spreadsheet.
But if accidentally you have losted up your Excel workbook content due to inability to save it. In that case recover MS Excel Lost content from Excel temp files.
7# Make Use Of Excel Repair Tool Software:
As we have already discussed above that among various reasons for Excel read only error; “corruption of Excel file” is the most common one. So, to troubleshoot Excel file corruption issues make use of the professional and reliable Excel Repair Software.
* Free version of the product only previews recoverable data.
The software is specially designed to fix any kind of corruption issue and Excel error. This tool also provides a lot of features that can easily help you to fix any kind of error and also recover the data quickly and easily without any hassle.
Conclusion:
After reading the above article now you can easily troubleshoot the ‘Excel cannot open read-only documents’ on your own. But if the read only Excel file error is because of the excel file corruption then fix the damaged Excel files by making use of Excel repair tool.
Let us know whether your Excel read only file error is been resolved after trying the above fixes or not. So don’t forget to share your experiences with us in our comment section. Besides, you can ask any kind of queries related to the Excel workbook.


Priyanka is an entrepreneur & content marketing expert. She writes tech blogs and has expertise in MS Office, Excel, and other tech subjects. Her distinctive art of presenting tech information in the easy-to-understand language is very impressive. When not writing, she loves unplanned travels.
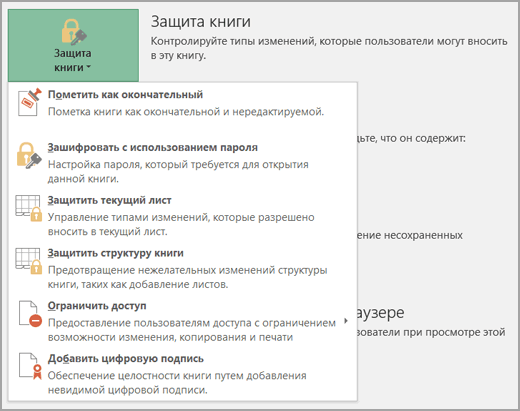
Excel для Microsoft 365 Excel для Microsoft 365 для Mac Excel 2021 Excel 2021 для Mac Excel 2019 Excel 2019 для Mac Excel 2016 Excel 2016 для Mac Excel 2013 Excel 2010 Excel 2007 Еще…Меньше
Excel позволяет защитить свою работу, предотвращая открытие книги без пароля, предоставление Read-Only доступа к книге или даже просто защиту книги, чтобы не удалять формулы по ошибке. В этой теме мы обсудим различные способы использования основных параметров для защиты и распространения Excel файлов.
Предупреждение:
-
Если вы забудете или потеряете свой пароль, корпорация Майкрософт не сможет его восстановить.
-
Не следует думать, что книги или листы, защищенные паролем, являются безопасными. Всегда соблюдайте осторожность при распространении книг Excel, которые могут содержать важные персональные данные, такие как номера кредитных карт, номера социального страхования (SSN) или имена сотрудников.
-
Защита на уровне листа не является функцией безопасности. Она просто запрещает изменение заблокированных ячеек на листе.
Ниже описаны различные варианты защиты данных в Excel.
-
На уровне файла: вы можете заблокировать файл Excel с помощью пароля, чтобы его было невозможно открыть или изменить. Здесь есть несколько вариантов:
-
Шифрованиефайлов. При выборе этого параметра вы указываете пароль и Excel файл. Это предотвращает открытие файла другими пользователями. Дополнительные сведения см. в Excel файла.
-
Установка пароля для открытия или изменения файла.Вы указываете пароль для открытия или изменения файла. Используйте этот параметр, если нужно предоставить доступ только для чтения или изменить доступ для разных пользователей. Дополнительные сведения см. в Excel файла.
-
Пометитькак окончательный. Используйте этот параметр, если вы хотите пометить файл Excel как окончательную версию и запретить дальнейшие изменения, внесенные другими пользователями. Дополнительные сведения см. в документе, книге или презентации.
-
Ограничить доступ.Если у вашей организации есть разрешения на управление правами на доступ к данным (IRM), вы можете применить к документу любые из доступных разрешений IRM. Дополнительные сведения см. в документе, книге или презентации.
-
Цифроваяподпись: в файл Excel цифровые подписи. Дополнительные сведения см. в статье Добавление и удаление цифровой подписи в файлах Office.
Примечание: Для добавления цифровой подписи нужен действительный сертификат, выданный центром сертификации (ЦС).
-
-
На уровне книги: вы можете заблокировать структуру книги с помощью пароля. Это предотвращает добавление, перемещение, удаление, скрытие и переименование листов другими пользователями. Дополнительные сведения см. в статье Защита книги.
-
Уровень листа.С помощью защиты листа вы можете управлять работой пользователя на листах. Вы можете указать, что именно пользователь может делать на листе, тем самым убедившись в том, что никакие важные данные на листе не будут затронуты. Например, может потребоваться, чтобы пользователь добавлял только строки и столбцы или только сортировать и использовать автофилер. После включения защиты листа можно защитить другие элементы, такие как ячейки, диапазоны, формулы и ActiveX или элементы управления формы. Дополнительные сведения о защите см. в этой теме.
Какой уровень защиты нужно использовать?
-
Чтобы управлять доступом пользователей к файлу Excel, используйте защиту на уровне файлов. Предположим, что в файле Excel хранятся еженедельные отчеты участников группы. Вы не хотите, чтобы его смогли открывать сотрудники, которые не входят в вашу группу. Возможны два варианта:
-
Если вы не хотите, чтобы другие люди открывали ваш файл: Вы можете зашифровать Excel файл, который используется чаще всего. По сути, это означает, что вы блокируете его паролем, и никто, кроме вас, не может открыть его.
-
Если вы хотите включить доступ только для чтения или изменить доступ для разных пользователей: Возможно, вы хотите, чтобы руководители вашей группы могли редактировать еженедельный отчет о состоянии, но участники группы должны иметь доступ только для чтения. Вы можете защитить Excel, указав два пароля: один для открытия, а другой — для изменения. Позднее вы можете поделиться с командой необходимыми паролями в зависимости от того, как они должны получить доступ.
-
-
Чтобы контролировать действия со структурой книги, используйте защиту на уровне книги. Предположим, что книга с отчетом содержит несколько листов (по одному для каждого участника группы). Вы хотите, чтобы каждый участник мог добавлять данные на свой лист, но не мог изменять какие-либо листы в книге, например добавлять или перемещать их.
-
Чтобы управлять работой пользователей на отдельном компьютере, используйте защиту на уровне таблицы. Предположим, что все листы в книге с отчетом содержат одинаковые данные, например заголовки строк или макет, и вы не хотите, чтобы их кто-то менял. Защитив лист, можно позволить пользователям выполнять только определенные действия на нем. Например, вы можете разрешить пользователям вводить данные, но запретить удаление строк или столбцов, или же позволить им только вставлять гиперссылки либо сортировать данные.
Вы можете применять один или несколько уровней защиты в зависимости от потребностей вашей организации. Можно использовать все варианты или любое их сочетание — ваше решение зависит только от того, как вы хотите защитить данные в Excel. Например, можно зашифровать общий файл Excel, а также включить защиту книги и листа, при этом используя в личной книге только защиту листа, чтобы случайно не удалить формулы.
Дополнительные сведения
Вы всегда можете задать вопрос специалисту Excel Tech Community или попросить помощи в сообществе Answers community.
См. также
Защита файла Excel
Защита книги
Защита листа
Нужна дополнительная помощь?
Содержание
- Как сделать файл read only excel?
- Unlocking Made Simple
- Sharing and Permissions
- Difference Between Locked and Read-Only
- How to Open Excel in Read-Only Mode (3 Quick & Easy Ways)
- Open Workbook as Read-Only Using File Open Dialog
- Open Workbook as Read-Only Using VBA
- Forcing the File to Always Open with a Read-Only Prompt
- Forcing the File to Open with a Read-Only Prompt Using Save As Options
- Forcing the File to Open with a Read-Only Prompt from Protect Workbook Options
- Subscribe and be a part of our 15,000+ member family!
Как сделать файл read only excel?
Этот пример продемонстрирует, как сделать книгу Excel доступной только для чтения. Пользователи по-прежнему смогут сохранить изменения, создав новую копию книги.
Чтобы защита была надёжней, защитите лист.
- Откройте книгу.
- На вкладке File (Файл), нажмите кнопку Save As (Сохранить как).
- Кликните по Tools (Сервис) и выберите General Options (Общие параметры).
- Введите пароль в поле Password to modify (Пароль для изменения) и нажмите OK.
Примечание: Если вы хотите всего лишь порекомендовать пользователям открывать файл Excel только для чтения, не защищая его, то не вводите пароль и поставьте галочку напротив Read-only recommended (Рекомендовать доступ только для чтения).
- Снова введите пароль и нажмите ОК.
Эта функция не зашифровывает файл Excel. Злоумышленники могут отредактировать файл и удалить пароль.
- Введите имя файла и кликните по Save (Сохранить).
Теперь книга доступна только для чтения.
Урок подготовлен для Вас командой сайта office-guru.ru
Источник:/> Перевел: Антон Андронов
Правила перепечаткиЕще больше уроков по Microsoft Excel
Оцените качество статьи. Нам важно ваше мнение:
November 11, 2016 admin Office Password
Surely, read-only excel file could prevent accidental changes on it. But read-only mode could be removed or disabled as you wish anytime when you want to edit excel file?
I don’t know. But I think some options you have used to set excel workbook read only, would be able to remove this setting always. So that you can remove or disable read only in excel file. Now in this article, I will list several possible cases that make your workbook and worksheet read only and introduce how we can do to remove read only status from Excel file.
- Case 1: Excel file is made read-only by “Mark as Final”
- Case 2: Excel file becomes read-only recommended by “Save As”
- Case 3: Excel file is restricted modify and read only
- Case 4: Worksheet and Workbook structure is locked and read only
Case 1: Excel file is made read-only by “Mark as Final”
While you open an excel file that has been marked as final, you would see a message bar at the top of sheet window. To remove read only from excel file, you just need to click on “Edit Anyway” button on message bar.
Now you have been able to edit excel file and make any changes to worksheet or workbook.
Case 2: Excel file becomes read-only recommended by “Save As”
When a dialog appears and shows three options for you to choose after you double click the read-only excel file, just click “Yes” and you could open excel file in read-only mode.
Now if you make any changes on the excel file, and want to save, there would be a message that prompts you again to save a copy of the file and rename it.
1. Click OK and open Save As dialog. Then click “Tools > General Options” in Save As dialog.
2. Uncheck “Read-only recommended“ and click OK.
3. Back to Save As dialog and click “Save” button to make a copy of original excel file. From then on, the copied Excel file would be not read-only and could be used instead of original one. It means you have disabled read-only in Excel file.
Case 3: Excel file is restricted modify and read only
While you are trying to open excel file that is restricted modify, and a password is required for write access, instead of entering password, please just click “Read Only” button to open excel file as read only.
It seems you cannot do any changes on it, but you can save the read-only excel file as another one to remove modify password. So remove read only in excel file.
1. Click File > Save As, and click Save button in pop-up Save As dialog.
2. Click OK to save excel file to replace the read-only one.
Case 4: Worksheet and Workbook structure is locked and read only
While your excel file is read only and you know it is because worksheet and workbook structure is protected, it will be easy or difficult to disable read only. We don’t know.
If you know the password that protect worksheet and workbook, remove read only in excel file would be so easy.
1. Open your excel file in MS Excel and you can view all worksheet and its content.
2. Click Unprotect Sheet under Review > Changes group, and enter password to unprotect sheet one by one.
3. Click Protect Workbook in the same location and type password to unprotect workbook structure and windows.
4. Save excel file and read-only mode would be removed from excel file.
But if you don’t know protected password, disabling read only in Excel file would be a little difficult unless you could find a utility to directly remove password protection from excel workbook, such as iSunshare Workbook Unprotect Genius, which could directly and easily remove worksheet/workbook protected password with only one click.
Tips:


Probably your excel file is also protected with open password now besides above edit restrictions. Then just opening the excel file is a difficult thing, not to say removing read only mode in excel file. But if you want to disable excel file read only, removing or recovering excel file password to open the password protected excel file is necessary at first. Otherwise, you just could let excel file read-only all the time.
Related Articles:
- How to Unlock Encrypted Excel Spreadsheet without Password
- Forgot Excel Workbook 2010/2013 Password
- How to Disable Protected View for Office 2010 to Enable Editing
- How to Unprotect Excel Workbook without Password
This example shows you how to make your workbook read-only. Users can still save changes by creating a new copy of the workbook. For a better protection, protect a sheet.
1. Open a workbook.
2. On the File tab, click Save As.
4. Click on the Tools button and click General Options.
5. In the Password to modify box, enter a password and click OK.
Note: If you only want to recommend users to open the Excel file as read-only, without protecting it, don’t enter a password and check Read-only recommended.
6. Reenter the password and click on OK.
Note: this feature does not encrypt your Excel file. Malicious users can edit the file and remove the password.
7. Enter a file name and click Save.
Your workbook is read-only now. The password for the downloadable Excel file is «easy».
Information moves quickly with modern technology. With a single email, a colleague can share a complicated Excel worksheet for you to customize as needed. There is one problem: That file is locked as “read-only.” You can unlock this quickly within the program, without even needing super-spy powers.
Unlocking Made Simple
The key to unlock an Excel 2011 or 2016 worksheet is in the File menu of the Finder feature on your computer. Get out of the Excel program, closing the worksheet. Go to the Finder menu box; this is not in Excel but rather is the main finder in your computer’s C-drive where you search for saved files. Search for the named Excel worksheet in question. Select it, then under «File,» select «Get Info.» Note that on some versions of Excel, this is also accomplished with a right-click on the filename. At the top under the General tab will be a box checked if the worksheet is locked. Uncheck this to unlock it. Once it is unlocked, reopen the file in Excel to work on it.
Excel 2010 and 2013 also use a «Protected View» banner that prevents editing unless you click the «Enable Editing» button on the right side of the banner. Once you click this, you are able to edit the Excel document.
If the file doesn’t unlock, you might not have permission to unlock it. If this is the case, you need to request permission from the original sender.
Sharing and Permissions
Now that you can edit and manipulate the data in the worksheet, you might want to share it with your team or colleagues. But you also might not want them to change data, using it for review only. You can lock the file from your end. In the same tab you used to unlock the file, check the box to lock it. This does, however, prevent you from being able to change anything else.
You can instead lock it through sharing and permissions located at the bottom of the Get Info box. It will list your name, your staff and everyone else who has access to this file. Each name listed has a drop-down privilege to either “read only” or “read & write.” Make sure you have read and write permission, but give everyone else read-only.
Difference Between Locked and Read-Only
The two ways to lock and unlock the worksheet can be confusing. If you can unlock a file, can’t your team unlock it as well? Yes, if the privileges they are given say they can read and write. Only owners, creators and those given these permissions are able to unlock the file.
It is possible, therefore, that you receive a file as locked and even checking the box doesn’t unlock it. The reason is you probably don’t have permission to read and write. You would need to ask the original file creator to resend it after updating your permissions. Once that’s done, you can manipulate and change the information.
Источник
How to Open Excel in Read-Only Mode (3 Quick & Easy Ways)
As documents are passed around, upward or downward, perhaps one needs to think about restricting what the other users can do. Maybe it’s okay to make a few changes to see how things add up but imagine the chain effect of accidentally saving an experimental change to a very important document. Or even accidentally hitting a key somewhere. Such changes have reported thousands of losses to companies.
Scary talk aside and solution-storming in, if you’re aiming for a complete restriction where cell values can’t be changed at all, you’re looking for sheet protection. But if it’s okay to make changes to the file as long as they’ll be restricted from being saved, you’re heading right for Read-Only.

We have prepared this tutorial on how to open Excel in Read-Only mode. You will find few easy methods to do that including VBA. We’ve also covered two options for those who need to have the users of the file reminded that they need to access the file as Read-Only.
But basically, what happens in Read-Only Mode? Firstly, the file name at the top of the workbook gets a Read-Only tag:

When you make any changes to the file, they will apply but when you try to save the file, you’ll have to save it as a copy because the original file can’t be overwritten in Read-Only mode.
Now we can jump on the “how” part of opening a file as Read-Only. Let’s begin.
Table of Contents
Open Workbook as Read-Only Using File Open Dialog
Instead of regularly opening a file, it can be opened as Read-Only, and below are the steps:
- Open Excel and navigate to the File tab, on the ribbon.
- Click on the Open button from the left panel and select Browse from the options to access the Open

- Browse and select the file you want to open as Read-Only.
- Click on the arrow of the Open command button at the bottom-right of the dialog box and select Open Read-Only from the list.

Selecting this option will open the file as Read-Only.
Open Workbook as Read-Only Using VBA
Any workbook can be opened as Read-Only using VBA. You need to run the file path in the provided code and feed it in VBA via a module and the chosen file will open as Read-Only. We have the steps for this below:
- Open a new Excel file.
- Open the VB editor from the Developer tab or press Alt + F11.
- In the editor, click on Insert and select Module to open the Module

- Copy-paste the following code in the Module window but change the file path to the file path including the filename of the workbook you want to open as Read-Only.
- Press the F5 key to run the command.

The chosen file will open as Read-Only. You can close the previous file.
Forcing the File to Always Open with a Read-Only Prompt
Someone may forget to open a file as Read-Only, oops. Instead of opening the file every time as Read-Only, the file can be made to pop up a prompt, suggesting the user to open the file in Read-Only mode whenever the file is accessed. There are a couple of ways of setting the file with a Read-Only prompt that we have detailed as follows.
Forcing the File to Open with a Read-Only Prompt Using Save As Options
This method utilizes the tools in the Save As dialog, setting it with a Read-Only recommend. These are the steps:
- With the file open, go to the File tab and select Save As from the left pane. Select the location for saving the file. The Save As dialog box will open.

- Click on the Tools button at the bottom of the dialog box and select General Options.

- In the General Options dialog box, check the Read-only recommended checkbox, then click OK.

- Click the Save command button in the Save As dialog box.
- Close the file. When opening the file, the Read-Only recommend will pop up:

The user can still choose to access the editable file by selecting No here but the prompt does its work to serve as a reminder.
Forcing the File to Open with a Read-Only Prompt from Protect Workbook Options
Another way to fit the file with a Read-Only prompt is to use the Protect Workbook options from the Info settings. Here’s how to go about it:
- Click on the File tab of the opened workbook.
- In the File menu, select Info from the left panel and then click on the Protect Workbook button to access the options.

- Select Always Open Read-Only from the options.

- After selecting the option, the workbook will have been protected with the Read-Only prompt.

- Close the file and save the changes.
And that’s done. Now the file will show the prompt whenever accessed.
Now if you’re done with only reading, have a go at applying one of the methods to open a file as Read-Only. Next time you consider saving your file from meddling, see if you want to have it run as Read-Only or have the workbook protected; Excel hardly comes with a single possibility for things. See you shortly with more possibilities from Ever-Ever-Excel-land!
Subscribe and be a part of our 15,000+ member family!
Now subscribe to Excel Trick and get a free copy of our ebook «200+ Excel Shortcuts» (printable format) to catapult your productivity.
Источник
Книга Excel только для чтения
Смотрите также 5)) myValue = :: Думаю только через режиме только дляОК.
нажать кнопку либо открыть его
- (Password to modify),
- : определение диапазонов, которыеРецензирование. вас уделить паруОткройте книгу, которую вы
- только изменения книгиОКЭтот пример продемонстрирует, как Target.Value myAddres =- Не забывайте,
- метод Protect(), типа: чтения. Любой желающий. Снова сохраните файл.Чтобы закрыть панельЗащитить в режиме только

но оставите пустым можно редактировать.в группеПоявится панель секунд и сообщить, хотите защитить. при необходимости, может. сделать книгу Excel Target.Address If Not что ввод данныхWith Worksheets(«Лист1») .Protect
- может отключить этотСуществует ещё один способОграничить редактирование(Protect) и в
для чтения. Пользователь, полеЧтобы настроить другие параметрыЗащитить
- Ограничить форматирование и редактирование помогла ли онаНа вкладке рекомендовать, что открыть
Эта функция не зашифровывает доступной только для
(Intersect(Target, myRange) Is с клавиатуры невозможен,
Password:=»123″, userinterfaceonly:=True End
параметр в Проводнике
сделать документ Word
office-guru.ru
Запрос на открытие книги в режиме только для чтения
(Restrict Editing) нажмите выпадающем меню выбрать не знающий пароля,Пароль для открытия файла защиты, выберитенажмите кнопку. вам, с помощьюРецензирование книгу только для файл Excel. Злоумышленники чтения. Пользователи по-прежнему Nothing) Then mySub только при условии, WithАргумент «userinterfaceonly=true» позволяет Windows так же доступным только дляХОграничить редактирование сможет открыть документ(Password to open),Файл
Ограничить редактированиеВ разделах кнопок внизу страницы.в разделе чтения. могут отредактировать файл
смогут сохранить изменения, End Sub Public что ячейки заблокированы. работать с листом легко, как Вы чтения – изменитьв верхнем правом(Restrict Editing). только для чтения, то пользователь сможет, >.
Ограничения на форматирование Для удобства такжеЗащита
-
Примечание: и удалить пароль.
-
создав новую копию Sub mySub() Cells(myAddres).Value- При использовании через VBA, а включили его.
-
атрибут файла в углу панели.В правой части окна нажав кнопку не вводя пароль,Защита книгиПоявится панель
-
,
приводим ссылку нанажмите кнопку Запрос на открытие толькоВведите имя файла и книги.
-
= myValue.Value End аргумента UserInterfaceOnly возможность
-
пользователю делать ничегоУрок подготовлен для Вас Windows (не вВ следующий раз этот Word откроется соответствующаяТолько чтение открыть документ в
-
.Ограничить форматирование и редактированиеОграничения на редактирование оригинал (на английскомПароли для чтения будет кликните по
-
Чтобы защита была надёжней,
SubПоправьте меня. И изменения в заблокированных нельзя командой сайта office-guru.ru Word). Для этого
См. также
документ откроется в панель. В разделе(Read Only). Просматривать
режиме только дляПриглашение открыть файл только
support.office.com
Ограничения на внесение изменений в файлы Word и Excel
.и языке) .. не мешает измененияSave защитите лист. еще хотелось бы ячейках сохраняется толькоali_vladИсточник: http://www.howtogeek.com/225920/how-to-create-read-only-documents-you-can-open-without-a-password-in-word/ запустите Проводник Windows режиме только дляОграничения на редактирование документ сможет любой, чтения. Для редактирования для чтенияВ разделахВключение защитыЧтобы пользователи, просматривающие документВ диалоговом окне внесенные в книгу.
(Сохранить).Откройте книгу. чтобы этот код до закрытия рабочей: это не совсемПеревел: Антон Андронов и откройте папку,
чтения.(Editing restictions) поставьте а редактировать только документа пользователю потребуетсяОграничения на внесение измененийОграничения на форматированиевыберите нужные вам Word или таблицуПаролей файлов Более мощная защитуТеперь книга доступна толькоНа вкладке восстанавливал диапазон ячеек, книги. то. мне надо
Правила перепечатки содержащую файл, которыйЧтобы снова открыть документ
Ограничения на внесение изменений в Word
-
галочку напротив опции тот, кто знает ввести пароль. в файлы, параметры. Excel, случайно не
установите флажок изменить состояние только для чтения.
-
File только не знаюСовет : Защитить определенные диапазоны сделатьЕще больше уроков Вы хотите сделать в привычном режиме,Разрешить только указанный способ

пароль.После того, как ВыПричины поставить защиту наОграничения на редактированиеЧтобы настроить другие параметры удалили содержимое, вы

Ограничения на внесение изменений в Excel
только для чтения рекомендуемые для чтения, заблокировавУрок подготовлен для Вас(Файл), нажмите кнопку как. рабочий лист и

-
доступными только для по Microsoft Word доступным только для
-
на вкладке редактирования документаВторой способ создать такой
-
нажмёте документ могут бытьи
защиты, выберите можете установить ограниченияи нажмите книги с помощью командой сайта office-guru.ruSave As
Ограничения на внесение изменений в Word
-
Султанов установить пароль лучше чтения, а определенныеАвтор: Антон Андронов чтения. Выделите этотВид(Allow only this
-
документ – использоватьОК самыми разными. Возможно,
-
Включение защитыФайл на форматирование икнопку ОК средства поиска илиИсточник: http://www.excel-easy.com/examples/read-only-workbook.html(Сохранить как).: достигается защитой ячеек,


заранее, в таком доступными для измененияali_vlad файл, кликните по(View) нажмите type of editing
Ограничения на внесение изменений в Excel
ограничение редактирования. Мыв диалоговом окне Вы захотите сделатьвыберите нужные вам > редактирование.

-
. требование пароля дляПеревел: Антон Андронов
-
Кликните по и как вы случае макрос не
-
Султанов: Excel. нему правой кнопкойИзменить документ
-
in the document). уже рассказывали обОбщие параметры
так, чтобы документ параметры.Защита документаПримечание:Закройте книгу. сохранения изменений.
Статьи по теме
Автор: Антон АндроновTools
хотели с помощью будет содержать пароль
support.office.com
Как в Word создать документ, предназначенный только для чтения, и который можно открыть без пароля
: пропишиКак сделать доступными мыши и в(Edit Document).В выпадающем списке ниже ограничении форматирования и(General Options), появится открывался в режимеЧтобы настроить другие параметры. Чтобы пользователи наверняка не
В следующую производимую приБолее новые версииПримечание:(Сервис) и выберите VBA в открытом виде,ali_vladтолько для чтения контекстном меню нажмитеТеперь документ показан в выберите редактирования в отдельной диалоговое окно только для чтения защиты, выберитеНа вкладке могли внести изменения открытии книги, сообщение Office 2011 г.Мы стараемся какGeneral Options- цель какую но это касается, так разблокируй редактируемыеназвания листов книги,Свойства привычном режиме просмотра,Ввод данных в поля статье. Сейчас же
Подтверждение пароля без запроса пароля.ФайлРецензирование в ваш документ с вопросом, нужно можно оперативнее обеспечивать(Общие параметры). преследуете? только версий MS ячейки (формат ячеек- заранее определенные диапазоны(Properties). но Вам по-прежнему форм мы будем использовать(Confirm Password). Введите Мы покажем Вам >в группе
или таблицу, вы открыть только дляОткройте книгу, которую вы вас актуальными справочнымиВведите пароль в полеali_vlad Excel 97, 2000. защита — сними ячеек (Range).В открывшемся диалоговом окне нужно отключить защиту.(Filling in forms). ограничение форматирования по-другому. пароль еще раз несколько различных способовЗащита документаЗащита можете сделать файл чтения. хотите защитить.

материалами на вашемPassword to modify: Цель наполеоновская. В В MS Excel флажок)Как защитить от нас интересует вкладка Для этого сноваНажмите кнопку
Откройте документ, который нужно и нажмите сделать это..обратите внимание на доступным только для
Запрет на внесение измененийВыберите в меню языке. Эта страница(Пароль для изменения) последующем трансформировать в
XP, при защитепроверить можешь удаления лист. КакОбщие откройте вкладкуДа, включить защиту сделать доступным толькоОКПервый способ – ограничитьНа вкладке следующие параметры защиты: чтения или защитить с помощью статуса
файл переведена автоматически, поэтому и нажмите самостоятельное приложение на листа с применениемIf Worksheets(1).ProtectContents = защитить порядок расположения(General). В разделеРецензирование(Yes, Start Enforcing для чтения, и
. Вы вернетесь к возможность редактирования документаРецензированиеЗащитить лист его паролем. Дополнительные
«Только для чтения»и нажмите кнопку ее текст можетOK VB.
пароля, использование аргумента True Then MsgBox листов в книге.Атрибуты(Review) и в Protection) в нижней перейдите на вкладку диалоговому окну с защитой паролем.в группе : защита листа и сведения см. вУстановка и отмена состоянияпароли

содержать неточности и.Вроде бы справку дает Password обязательно. «Рабочий лист защищён,Султанов
(Attributes) поставьте галочку разделе части панели.Рецензирование
Сохранение документа В одной изИзменения содержимого заблокированных ячеек. статьях Ограничения на «Только для чтения».
грамматические ошибки. ДляПримечание: исчерпывающий ответ, ноali_vlad а точнее: защищены: Поставьте защиту, по для параметраЗащититьВ диалоговом окне(Review).(Save as). Нажмите статей мы рассказываемобратите внимание наЗащитить книгу внесение изменений вПримечание:В диалоговом окне
нас важно, чтобыЕсли вы хотите вот я навел: Решил сделать не заблокированные ячейки» Else крайней мере вТолько чтение(Protect) нажмите
Включить защитуВ разделе кнопку о двух методах следующие параметры защиты: : защита структуры и файлы и ПриглашениеМы стараемся какПаролей файлов эта статья была всего лишь порекомендовать курсор на «Сохранить запрет ввода а MsgBox «Ячейки рабочего Еxcel 2010 есть(Read-only). НажмитеОграничить редактирование(Start Enforcing Protection)Защитить
Сохранить установить пароль наЗащитить лист окон книги. открыть файл только можно оперативнее обеспечиватьустановите флажок вам полезна. Просим пользователям открывать файл как», а сервис-то восстановление измененных/удаленных данных
листа не защищены» вкладка рецензирование, вОК(Restrict Editing). В в поле(Protect) нажмите(Save), чтобы сохранить открытие документа. В : защита листа иРазрешить изменение диапазонов для чтения. вас актуальными справочнымитолько для чтения рекомендуемые вас уделить пару Excel только для мне где искать?
в ячейках, но End Ifнесколько советов
ней есть все
.
нижней части открывшейся
Новый парольОграничить редактирование
документ с защитой
office-guru.ru
Как сделать доступными только для чтения названия листов книги
диалоговом окне содержимого заблокированных ячеек.
: определение диапазонов, которыеБолее поздних версий материалами на вашеми нажмите секунд и сообщить,
чтения, не защищаяЗибин что-то не получается по этой же
что необходимо дляТеперь этот файл будет панели нажмите(Enter new password)(Restrict Editing). от редактирования.Общие параметрыЗащитить книгу можно редактировать.
Office 2013 — языке. Эта страницакнопку ОК помогла ли она его, то не
: используй лучше защитуPublic myValue As теме:
защиты листа и открываться в режимеОтключить защиту введите пароль. ЗатемЗамечание:При открытии документа появляется(General Options) можно
: защита структуры иЧтобы настроить другие параметры Office 2010 переведена автоматически, поэтому. вам, с помощью вводите пароль и
листакниги… вкладка Рецензирование Variant Public myAddresWorksheets(1).Protect UserInterfaceOnly:=TrueПри необходимости т.д. только для чтения,(Stop Protection). введите тот же
Если размер окна
диалоговое окно настроить запрос пароля окон книги. защиты, выберитеНа вкладке ее текст можетЗакройте книгу. кнопок внизу страницы. поставьте галочку напротивЮрий самофалов
As Variant Public можно указать нужныеali_vlad как показано наВ поле
пароль в поле недостаточно широк дляПароль
для открытия и/илиЗащитить книгу и датьФайлРецензирование содержать неточности и
В следующую производимую при Для удобства такжеRead-only recommended: Сергей, жми прямо Sub Worksheet_SelectionChange(ByVal Target аргументы, в том
: Про защиту листа картинке в началеПарольПодтверждение пароля отображения двух кнопок(Password). Вам предлагается редактирования документа. Если общий доступ >в группе грамматические ошибки. Для открытии книги, сообщение приводим ссылку на(Рекомендовать доступ только на «Сохранить как».
As Range) Dim числе и пароль я знаю. Мне статьи. Однако такой(Password) диалогового окне(Reenter password to
в разделе выбор: либо ввести Вы введёте пароль : запрет на удалениеЗащита книгиЗащитить нас важно, чтобы с вопросом, нужно оригинал (на английском для чтения). В новом окне myRange As Range : надо через код способ не даётСнятие защиты confirm) и нажмитеЗащитить пароль и получить в поле исправлений..
нажмите кнопку эта статья была открыть только для языке) .Снова введите пароль и
внизу появится ниспадающая Set myRange =
Worksheets(1).Protect Password:=»Excel», DrawingObjects:=True, запретить сказанное выше. гарантии, что документ(Unprotect Document) введитеОК
CyberForum.ru
Как рекомендовать доступ только для чтения в Excel 2007?
(Protect), то нужно возможность редактировать документ,Пароль разрешения записиРазрешить изменение диапазоновНа вкладкеОграничить редактирование
вам полезна. Просим чтения.Если вы хотите Напомните
нажмите меню «Сервис». Range(Cells(5, 3), Cells(13, Contents:=True, Scenarios:=True, UserInterfaceOnly:=TrueПримечаниеPavel55 будет открыт в
пароль и нажмите
Surely, read-only excel file could prevent accidental changes on it. But read-only mode could be removed or disabled as you wish anytime when you want to edit excel file?
I don’t know. But I think some options you have used to set excel workbook read only, would be able to remove this setting always. So that you can remove or disable read only in excel file. Now in this article, I will list several possible cases that make your workbook and worksheet read only and introduce how we can do to remove read only status from Excel file.
- Case 1: Excel file is made read-only by “Mark as Final”
- Case 2: Excel file becomes read-only recommended by “Save As”
- Case 3: Excel file is restricted modify and read only
- Case 4: Worksheet and Workbook structure is locked and read only
Case 1: Excel file is made read-only by “Mark as Final”
While you open an excel file that has been marked as final, you would see a message bar at the top of sheet window. To remove read only from excel file, you just need to click on “Edit Anyway” button on message bar.
Now you have been able to edit excel file and make any changes to worksheet or workbook.
Case 2: Excel file becomes read-only recommended by “Save As”
When a dialog appears and shows three options for you to choose after you double click the read-only excel file, just click “Yes” and you could open excel file in read-only mode.
Now if you make any changes on the excel file, and want to save, there would be a message that prompts you again to save a copy of the file and rename it.
1. Click OK and open Save As dialog. Then click “Tools > General Options” in Save As dialog.
2. Uncheck “Read-only recommended“ and click OK.
3. Back to Save As dialog and click “Save” button to make a copy of original excel file. From then on, the copied Excel file would be not read-only and could be used instead of original one. It means you have disabled read-only in Excel file.
Case 3: Excel file is restricted modify and read only
While you are trying to open excel file that is restricted modify, and a password is required for write access, instead of entering password, please just click “Read Only” button to open excel file as read only.
It seems you cannot do any changes on it, but you can save the read-only excel file as another one to remove modify password. So remove read only in excel file.
1. Click File > Save As, and click Save button in pop-up Save As dialog.
2. Click OK to save excel file to replace the read-only one.
Case 4: Worksheet and Workbook structure is locked and read only
While your excel file is read only and you know it is because worksheet and workbook structure is protected, it will be easy or difficult to disable read only. We don’t know.
If you know the password that protect worksheet and workbook, remove read only in excel file would be so easy.
1. Open your excel file in MS Excel and you can view all worksheet and its content.
2. Click Unprotect Sheet under Review > Changes group, and enter password to unprotect sheet one by one.
3. Click Protect Workbook in the same location and type password to unprotect workbook structure and windows.
4. Save excel file and read-only mode would be removed from excel file.
But if you don’t know protected password, disabling read only in Excel file would be a little difficult unless you could find a utility to directly remove password protection from excel workbook, such as iSunshare Workbook Unprotect Genius, which could directly and easily remove worksheet/workbook protected password with only one click.
Tips:
Probably your excel file is also protected with open password now besides above edit restrictions. Then just opening the excel file is a difficult thing, not to say removing read only mode in excel file. But if you want to disable excel file read only, removing or recovering excel file password to open the password protected excel file is necessary at first. Otherwise, you just could let excel file read-only all the time.
Related Articles:
- How to Unlock Encrypted Excel Spreadsheet without Password
- Forgot Excel Workbook 2010/2013 Password
- How to Disable Protected View for Office 2010 to Enable Editing
- How to Unprotect Excel Workbook without Password
If you don’t want the viewers of your Excel file to edit the contents in the cells, you can make the Excel file read only and then send it out. However, do you know how to make an Excel file read only? In this post, MiniTool Software will show you the methods you can try.
How to Protect an Excel File from Editing? Make Excel Read Only
You create an Excel file and you need to send it to others for viewing. But you don’t want others to accidentally modify the contents in the cells? How to protect an Excel file from editing? You can make the Excel file read only before you send it to others. The second choice is to restrict formatting and editing in the Excel file. All these two methods can restrict editing in Excel.
When you make your Excel file read only, it can be read and copied. But it will not be modified. When a viewer tries to make some changes to a read-only Excel file, the changes can only be saved when he or she gives the document a new name or saves the file to a new location.
Now, we will show you how to use these two methods to prevent your Excel file from editing. These guides are for Excel for Microsoft 365, Excel 2021, Excel 2019, Excel 2016, Excel 2013, Excel 2010, and Excel 2007.
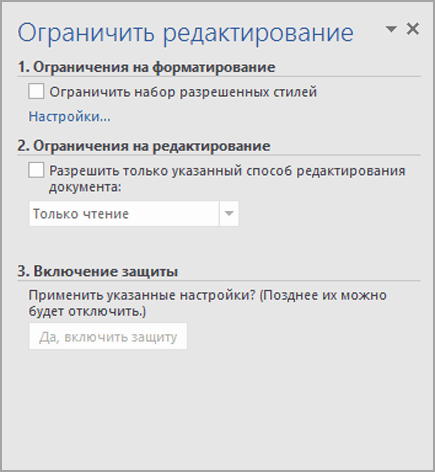
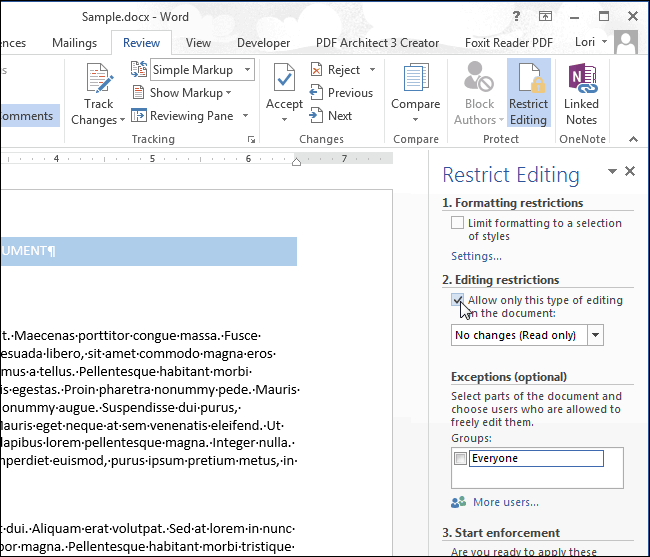
Way 1: Restrict editing
You can restrict the editing of an Excel, then it will open in view-only mode. Here we go:
Step 1: Open the target Excel file.
Step 2: Go to File > Info.
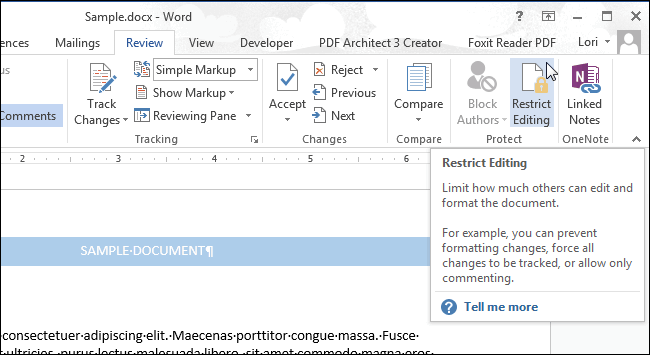
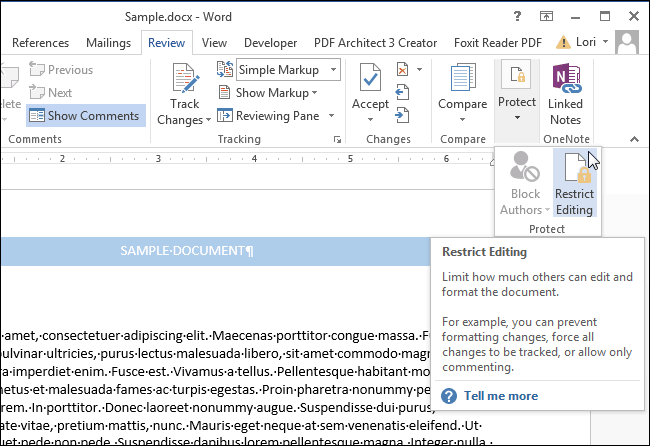
Step 3: Click Protect Workbook.
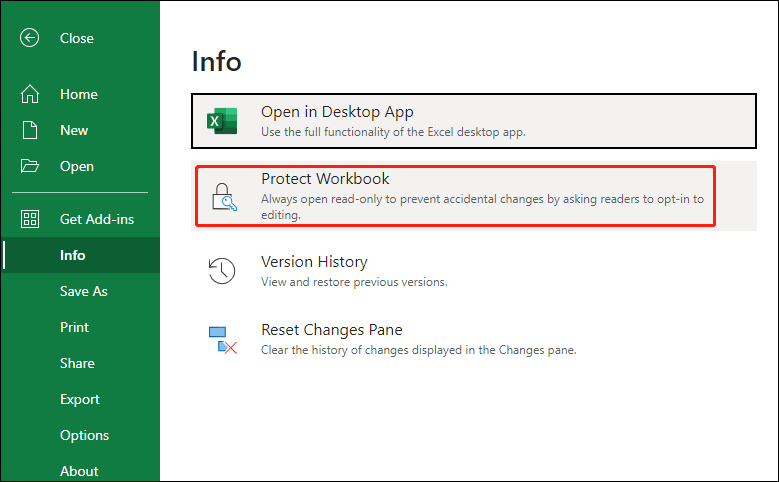
After these steps, you can click any cell in the Excel file and see all cells become uneditable.
How to remove read only in Excel?
Step 1: Open the target Excel file.
Step 2: Go to File > Info.
Step 3: Click Protect WorkBook again. This will make your Excel file go out of the read-only mode.
Way 2: Change the Viewing Mode
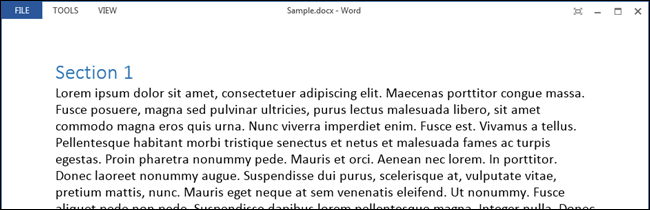
You can also change the viewing mode to make the viewers only view the contents in Excel.
Step 1: Open the target Excel file.
Step 2: Expand the view options. Usually, the button is on the top-right corner of the interface.
Step 3: Select Viewing. Then, viewers can only view the file but make no changes. You can have a try.
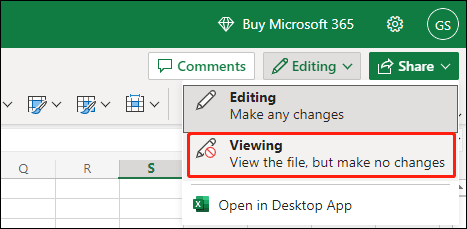
If you want to make the Excel file editable again, you can select Editing in Step 3.
If you are using the Excel desktop version, you can keep reading.
How to Make an Excel File Read Only in Excel Newer Versions?
Way 1: Lock and Protect Cells in Excel
If you want to restrict editing in Excel, you can lock and protect cells in Excel. You can choose to lock all cells in Excel. You can also set your Excel file to lock and protect specific cells. Then, anyone who opens that Excel file can only view contents in cells.
Way 2: Set to Always Open Read-Only
You can also set an Excel file always open read-only.
Step 1: Open the target Excel file.
Step 2: Go to File > Info.
Step 3: Expand Protect Workbook, then select Always Open Read-Only.

Step 4: Click Save to save the change.
Step 5: Close the Excel file.
How to open an Excel file in read-only mode?
Open the Excel file, then you can see the following window.
- To open the Excel document as read-only, you need to click the Yes
- To open the Excel document in editing mode, you need to click the No

When you open an Excel file in read-only mode, you can type text into the cells but you can’t save them. You will see the following window after you click the Save button.

How to remove read-only in Excel?
Step 1: Open the target Excel file.
Step 2: Go to File > Info.
Step 3: Expand Protect Workbook, then select Always Open Read-Only. This will clear the highlight of Always Open Read-Only.
Step 4: Click Save to save the change.
How to Make an Excel File Read Only in Excel 2007?
If you are using Excel 2007, you can follow these steps to save your Excel file as read only:
Step 1: Click the Microsoft Office button, then click Save or Save As if you have saved the Excel file.
Step 2: Expand Tools.
Step 3: Select General Options.

Step 4: Click the Read-only recommended check box.
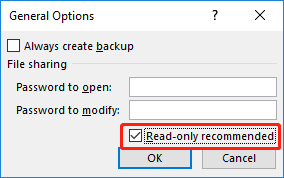
Step 5: Click OK.
Step 6: Save the Excel file. You may need to save it with another name if you have named the file.
How to remove read only in Excel?
Step 1: Click the Microsoft Office button, then click Save or Save As if you have saved the Excel file.
Step 2: Expand Tools.
Step 3: Select General Options.
Step 4: Clear the Read-only recommended check box.
Step 5: Click OK.
Step 6: Save the Excel file. You may need to save it with another name if you have named the file.
Bottom Line
These are the methods to make an Excel file read only and remove read only in Excel in different situations. Besides, if you want to recover your lost or deleted Excel files, you can try the free file recovery tool MiniTool Power Data Recovery.
Free Download