
Содержание
- С оператором
- Синтаксис
- Замечания
- Пример
- См. также
- Поддержка и обратная связь
- Как открыть Word из Excel макросом VBA? Запуск Word из Excel
- Макрос, запускающий Word из Excel и открывающий новый документ
- Макрос, запускающий Word из Excel и открывающий существующий документ
- Макрос для передачи данных из Excel в Word
- VBA Excel. Управление приложением Word
- Создание объекта Word.Application
- Раннее связывание приложения Word
- How to automate Word from Excel using VBA
- Enable the Word Developer menu
- Record a Word Macro
- Add the code to Excel VBA and amend
- Record macros in Excel (if necessary)
- Repeat the previous steps until macro complete
- Conclusion
С оператором
Выполняет последовательность операторов для отдельного объекта или пользовательского типа.
Синтаксис
Withobject [ statements ] End With
Синтаксис оператора With состоит из следующих частей:
| Part | Описание |
|---|---|
| object | Обязательно. Имя объекта или пользовательского типа. |
| Операторы | Необязательный параметр. Один или несколько операторов, которые выполняются в отношении объекта объект. |
Замечания
Оператор With позволяет выполнить последовательность операторов в отношении заданного объекта без повторной квалификации его имени. Например, чтобы изменить несколько свойств одного объекта, поместите операторы присваивания свойств в управляющую структуру With, которая ссылается на объекта; в этом случае вам не понадобится указывать ссылку на объект при каждом присваивании.
В следующем примере демонстрируется использование оператора With для присвоения значений нескольким свойствам одного объекта.
После входа в блок With элемент объект нельзя изменить. Соответственно, вы не можете использовать один оператор With для изменения нескольких объектов.
Вы можете вкладывать операторы With в другие структуры With. Тем не менее, поскольку элементы внешних блоков With маскируются во внутренних блоках With, во внутреннем блоке With необходимо указывать полную ссылку на любой элемент объекта во внешнем блоке With.
В общем случае не рекомендуется использовать переходы в блоки With или из них. Если выполнены операторы в блоке With, однако оператор With или End With остался невыполненным, после выхода из процедуры временная переменная со ссылкой на объект останется в памяти.
Пример
В этом примере используется оператор With для выполнения последовательности операторов в отношении одного объекта. Объект и его свойства являются универсальными именами, используемыми только в целях иллюстрации.
См. также
Поддержка и обратная связь
Есть вопросы или отзывы, касающиеся Office VBA или этой статьи? Руководство по другим способам получения поддержки и отправки отзывов см. в статье Поддержка Office VBA и обратная связь.
Источник
Как открыть Word из Excel макросом VBA? Запуск Word из Excel
Если есть необходимость обратиться к данным, хранящимся в текстовом файле приложения Word, или наоборот, передать данные из Excel в такой файл, то возникнет необходимость запуска приложения, в формате которого сохранен файл. Ниже приведен п рограммный код макроса VBA для Microsoft Excel, запускающий приложение Word.
Макрос, запускающий Word из Excel и открывающий новый документ
Если для передачи данных из Excel в Word необходим новый документ, можно воспользоваться примером кода, приведенного ниже. Макрос проверяет запущен ли Word и если он запущен, то добавляет новый документ, если же не запущен, то сначала запускает Word, а затем добавляет новый документ.
Для того, чтобы перенести этот программный код на свой компьютер, наведите курсор мыши на поле с программным кодом, нажмите на одну из двух кнопкок  в правом верхнем углу этого поля, скопируйте программный код и вставьте его в модуль проекта на своем компьютере (подробнее о том, как сохранить программный код макроса).
Макрос, запускающий Word из Excel и открывающий существующий документ
Если для передачи данных из Word в Excel, необходимо открыть файл с заданным именем, то можно использовать аналогичный код, в котором вместо добавления нового документа открывается документ существующий:
При копировании этого кода на свой компьютер, не забудьте изменить путь к файлу и его имя. Запуск приложения можно сделать невидимым, если в коде изменить True на False.
Макрос для передачи данных из Excel в Word
Ниже приведен программный код макроса, копирующий в активной рабочей книге Excel диапазон с данными A1:E2 и вставляющий его в открытый документ Word. После передачи данных из Excel в Word производится закрытие документа с сохранением изменений и выход из приложения.
Источник
VBA Excel. Управление приложением Word
Создание нового экземпляра приложения Word из кода VBA Excel или подключение к открытому для работы с документами. Функции CreateObject и GetObject.
Работа с Word из кода VBA Excel
Часть 1. Управление приложением Word
[Часть 1] [Часть 2] [Часть 3] [Часть 4] [Часть 5] [Часть 6]
Создание объекта Word.Application
Экземпляр приложения Word необходим для того, чтобы с его помощью создавать новые документы или открывать существующие для редактирования из кода VBA Excel.
Создать новый экземпляр объекта Word.Application можно при помощи раннего или позднего связывания, используя при позднем связывании функцию CreateObject. Подключиться к открытому экземпляру приложения Word можно только при помощи позднего связывания, используя функцию GetObject.
Раннее связывание приложения Word
Создание нового экземпляра Word.Application и присвоение ссылки на него переменной myWord:
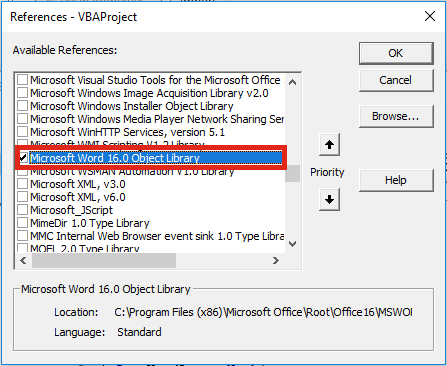
Для раннего связывания переменной с объектом Word.Application необходимо подключить в редакторе VBA Excel ссылку на библиотеку Microsoft Word Object Library, если она не подключена. Подключается ссылка в окне «References VBAproject», перейти в которое можно через главное меню редактора: Tools–>References…

Раннее связывание позволяет при написании кода использовать лист подсказок для выбора и вставки свойств и методов привязанных объектов (Auto List Members). Если проект VBA Excel создается на заказ, то, после его завершения, раннее связывание следует заменить на позднее, так как на компьютере пользователя может не оказаться нужной библиотеки, и код работать не будет.
Источник
How to automate Word from Excel using VBA

This post is the second in a series about controlling other applications from Excel using VBA. In the first part we looked at the basics of how to reference other applications using Early Binding or Late Binding. In this post, we will look at how we can automate Word from Excel even though we don’t know any VBA code for Word… yet. The process we will use for this is as follows:
- Enable the Word Developer menu
- Record a Word macro
- Add the code to Excel VBA and amend
- Record macros in Excel if necessary
- Repeat the previous steps until macro complete
I am not an Excel VBA expert (I’m more of an Excel VBA tinkerer), and I am certainly not a Word VBA expert. The process I am about to show you may not create the most efficient code, but I know this process works, because I have used it myself to automate lots tasks using Microsoft Word.
If you have enabled the Excel Developer menu it is the same process in Word.
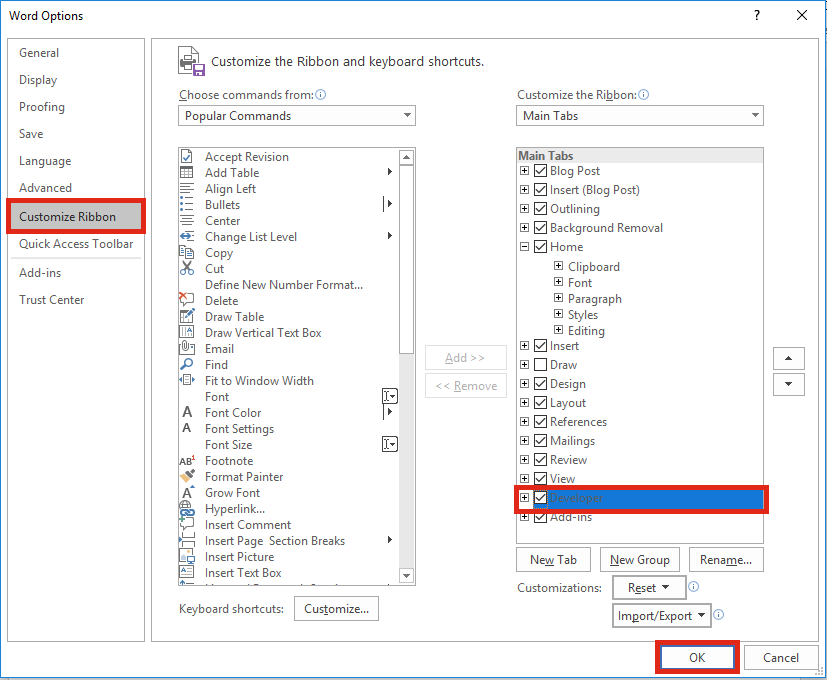
In Word: File -> Options -> Customize Ribbon
Then tick the Developer Ribbon option, OK.
Record a Word Macro
The key to the success of this method is taking small sections of code and building up a complex macro bit by bit. Using the Word Macro Recorder is again, similar to the Excel Macro recorder.
Click on: Developer -> Record Macro

For the example in this post, we will create a macro which will open a new Word document, then copy a chart from Excel and paste it into that Word document. We will tackle this one stage at a time. Firstly, lets create the macro to open a new word document.
Click – Developer -> Record Macro. The Record Macro window will open.
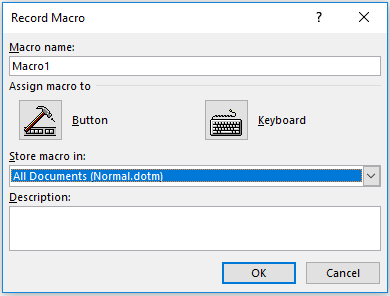
Make a note of the “Store macro in” option, as we will need to know where to find the recorded code later. Normal.dotm is fine for now. Click OK – the Macro Recorder is now running.
Open a new Word Document – File -> New -> Blank Document
Stop the Macro from recording – Developer -> Stop Recording

We can now view the code for opening a new Word Document in the Visual Basic Editor. Click: Developer -> Visual Basic.

Find the location of your recorded code in the Visual Basic Editor. In this example: Normal -> Modules -> NewMacros.
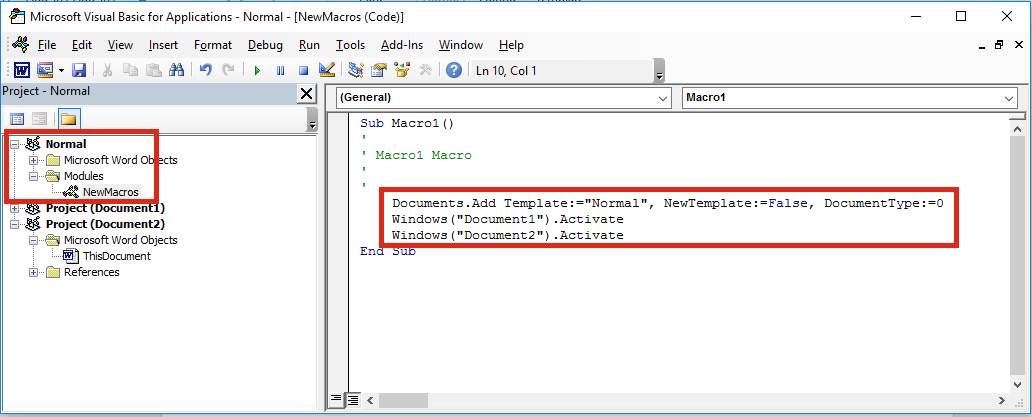
Your code should look like the following. It may be slightly different, but not significantly.
Add the code to Excel VBA and amend
Let’s head back to the Excel VBA Editor and use the Early Binding method to control to Microsoft Word. In the Visual Basic Editor click Tools -> References select Microsoft Word x.xx Object Library. Then click OK.
As we are using Early Binding we need to declare the Application as a variable as follows:
Now copy and paste the code from the Word VBA Editor into the Excel VBA Editor.
The Word VBA code started with Documents.Add, all we have to do is add our application variable to the front of that line of code. Now becomes WordApp.Documents.Add . . .
Often, Selecting and Activating Objects is not required in VBA code, so I have not copied those statements into the code below.
A point to note, when an application is opened with VBA, it is normally opened in the background. To make the Word document visible I have added the following code:
Record macros in Excel (if necessary)
If we want to copy Excel content into a Word document, we will need to copy that content using Excel VBA. We can use the Macro Recorder in Excel to obtain the VBA code for copying, then we can use the Word Macro Recorder to obtain the VBA code for pasting.
Macro Recording from Excel – selecting a worksheet and copying chart
Macro Recording from Word – pasting a chart into a document
We can add both Macro recordings into our Excel macro. Remember to add WordApp. at the start of each statement of Word VBA code.
This code is not particularly efficient; it contains a few unnecessary sections code. However… it works!
Repeat the previous steps until macro complete
By repeating the same steps above; recording short actions, then transferring the code into Excel, we can slowly build up much more complex Macros. The key is to keep the actions short, if you do too many actions with the Macro Recorder, code starts to look long and scary.
If you’ve you tried to use the Macro Recorder before you will know that this is not as easy as it seems. And this simple tutorial may make you think it is easy, when it’s not. Sometimes, it can be quite frustrating trying to find out where the issues and errors are. The key to success is recording very short actions, such as those below and copying them into the Visual Basic Editor.
You will soon build up a standard library of code that you can use to control Word for most basic tasks.
In recorded VBA code from Word, the word “Selection” in the code often refers to the document itself. It is possible to make the code a little bit more efficient by declaring the document as a variable. If we were opening a specific document, we could include this at the start, just below the declaration of the application.
Or, if we created a new document we could include the following below the declaration of the application variable.
If we have created the document as a variable we can then reference the specific document. This code:
Would become this code:
Would become this code:
This method is much better, as it doesn’t rely on the Selection of the user being in the right place.
Conclusion
We have seen in this post that it is possible to create complex Macros to automate Word from Excel using VBA. By understanding how to declare variables for the application and documents we can create much more robust macros, even without knowing a lot of VBA code.
Related Posts:

About the author
Hey, I’m Mark, and I run Excel Off The Grid.
My parents tell me that at the age of 7 I declared I was going to become a qualified accountant. I was either psychic or had no imagination, as that is exactly what happened. However, it wasn’t until I was 35 that my journey really began.
In 2015, I started a new job, for which I was regularly working after 10pm. As a result, I rarely saw my children during the week. So, I started searching for the secrets to automating Excel. I discovered that by building a small number of simple tools, I could combine them together in different ways to automate nearly all my regular tasks. This meant I could work less hours (and I got pay raises!). Today, I teach these techniques to other professionals in our training program so they too can spend less time at work (and more time with their children and doing the things they love).
Do you need help adapting this post to your needs?
I’m guessing the examples in this post don’t exactly match your situation. We all use Excel differently, so it’s impossible to write a post that will meet everybody’s needs. By taking the time to understand the techniques and principles in this post (and elsewhere on this site), you should be able to adapt it to your needs.
But, if you’re still struggling you should:
- Read other blogs, or watch YouTube videos on the same topic. You will benefit much more by discovering your own solutions.
- Ask the ‘Excel Ninja’ in your office. It’s amazing what things other people know.
- Ask a question in a forum like Mr Excel, or the Microsoft Answers Community. Remember, the people on these forums are generally giving their time for free. So take care to craft your question, make sure it’s clear and concise. List all the things you’ve tried, and provide screenshots, code segments and example workbooks.
- Use Excel Rescue, who are my consultancy partner. They help by providing solutions to smaller Excel problems.
What next?
Don’t go yet, there is plenty more to learn on Excel Off The Grid. Check out the latest posts:
Источник
Создание нового документа Word или открытие существующего из кода VBA Excel. Методы Documents.Add и Documents.Open. Сохранение и закрытие документа.
Работа с Word из кода VBA Excel
Часть 2. Создание и открытие документов Word
[Часть 1] [Часть 2] [Часть 3] [Часть 4] [Часть 5] [Часть 6]
Новый документ Word создается из кода VBA Excel с помощью метода Documents.Add:
|
Sub Test1() Dim myWord As New Word.Application Dim myDocument As Word.Document Set myDocument = myWord.Documents.Add myWord.Visible = True End Sub |
Переменную myDocument можно объявить с типом Object, но тогда не будет ранней привязки к типу Word.Document и подсказок при написании кода (Auto List Members).
Открытие существующего документа
Существующий документ Word открывается из кода VBA Excel с помощью метода Documents.Open:
|
Sub Test2() Dim myWord As New Word.Application Dim myDocument As Word.Document Set myDocument = _ myWord.Documents.Open(«C:Документ1.docx») myWord.Visible = True End Sub |
Замените в этой процедуре строку «C:Документ1.docx» на адрес своего файла.
Подключение к открытому документу
Присвоение переменной ссылки на существующий экземпляр Word.Application осуществляется в VBA Excel с помощью функции GetObject:
|
Sub Test3() Dim myWord As Object, myDoc As Word.Document On Error GoTo Instr Set myWord = GetObject(, «Word.Application») Set myDoc = myWord.Documents(«Документ1.docx») myDoc.Range.InsertAfter «Добавляем новый текст, подтверждающий подключение к открытому документу.» Exit Sub Instr: MsgBox «Произошла ошибка: « & Err.Description End Sub |
Если открытого приложения Word нет, выполнение функции GetObject приведет к ошибке. Также произойдет ошибка, если не будет найден указанный документ (в примере — «Документ1.docx»).
Сохранение и закрытие документа
Сохранение нового документа
Чтобы сохранить из кода VBA Excel новый документ Word, используйте метод SaveAs2 объекта Document:
|
myDocument.SaveAs2 («C:Документ2.docx») |
Замените «C:Документ2.docx» на путь к нужному каталогу с именем файла, под которым вы хотите сохранить новый документ.
Сохранение изменений в открытом документа
Сохраняйте изменения в существующем документе с помощью метода Document.Save или параметра SaveChanges метода Document.Close:
|
‘Сохранение изменений документа myDocument.Save ‘Сохранение изменений документа ‘при закрытии myDocument.Close ‘по умолчанию True myDocument.Close True myDocument.Close wdSaveChanges ‘Закрытие документа без ‘сохранения изменений myDocument.Close False myDocument.Close wdDoNotSaveChanges |
Закрытие любого сохраненного документа
Метод Document.Close закрывает документ, но не приложение. Если работа с приложением закончена, оно закрывается с помощью метода Application.Quit.
This post is the second in a series about controlling other applications from Excel using VBA. In the first part we looked at the basics of how to reference other applications using Early Binding or Late Binding. In this post, we will look at how we can automate Word from Excel even though we don’t know any VBA code for Word… yet. The process we will use for this is as follows:
- Enable the Word Developer menu
- Record a Word macro
- Add the code to Excel VBA and amend
- Record macros in Excel if necessary
- Repeat the previous steps until macro complete
I am not an Excel VBA expert (I’m more of an Excel VBA tinkerer), and I am certainly not a Word VBA expert. The process I am about to show you may not create the most efficient code, but I know this process works, because I have used it myself to automate lots tasks using Microsoft Word.
Enable the Word Developer menu
If you have enabled the Excel Developer menu it is the same process in Word.
In Word: File -> Options -> Customize Ribbon
Then tick the Developer Ribbon option, OK.
Record a Word Macro
The key to the success of this method is taking small sections of code and building up a complex macro bit by bit. Using the Word Macro Recorder is again, similar to the Excel Macro recorder.
Click on: Developer -> Record Macro
For the example in this post, we will create a macro which will open a new Word document, then copy a chart from Excel and paste it into that Word document. We will tackle this one stage at a time. Firstly, lets create the macro to open a new word document.
Click – Developer -> Record Macro. The Record Macro window will open.
Make a note of the “Store macro in” option, as we will need to know where to find the recorded code later. Normal.dotm is fine for now. Click OK – the Macro Recorder is now running.
Open a new Word Document – File -> New -> Blank Document
Stop the Macro from recording – Developer -> Stop Recording
We can now view the code for opening a new Word Document in the Visual Basic Editor. Click: Developer -> Visual Basic.
Find the location of your recorded code in the Visual Basic Editor. In this example: Normal -> Modules -> NewMacros.
Your code should look like the following. It may be slightly different, but not significantly.
Sub Macro1()
'
' Macro1 Macro
'
'
    Documents.Add Template:="Normal", NewTemplate:=False, DocumentType:=0
    Windows("Document1").Activate
    Windows("Document2").Activate
End Sub
Add the code to Excel VBA and amend
Let’s head back to the Excel VBA Editor and use the Early Binding method to control to Microsoft Word. In the Visual Basic Editor click Tools -> References select Microsoft Word x.xx Object Library. Then click OK.
As we are using Early Binding we need to declare the Application as a variable as follows:
Dim WordApp As Word.Application
Set WordApp = New Word.Application
Now copy and paste the code from the Word VBA Editor into the Excel VBA Editor.
The Word VBA code started with Documents.Add, all we have to do is add our application variable to the front of that line of code. Now becomes WordApp.Documents.Add . . .
Often, Selecting and Activating Objects is not required in VBA code, so I have not copied those statements into the code below.
Sub CreateWordDocument()

'Connect using Early Binding.
'Remember to set the reference to the Word Object Library
'In VBE Editor Tools -> References -> Microsoft Word x.xx Object Library
Dim WordApp As Word.Application
Set WordApp = New Word.Application

WordApp.Documents.Add Template:="Normal", NewTemplate:=False, DocumentType:=0
WordApp.Visible = True 'New Apps will be hidden by default, so make visible

Set WordApp = Nothing 'release the memory

End Sub
A point to note, when an application is opened with VBA, it is normally opened in the background. To make the Word document visible I have added the following code:
WordApp.Visible = True
Record macros in Excel (if necessary)
If we want to copy Excel content into a Word document, we will need to copy that content using Excel VBA. We can use the Macro Recorder in Excel to obtain the VBA code for copying, then we can use the Word Macro Recorder to obtain the VBA code for pasting.
Macro Recording from Excel – selecting a worksheet and copying chart
Sheets("Sheet1").Select
ActiveSheet.ChartObjects("Chart 1").Activate
ActiveChart.ChartArea.Copy
Macro Recording from Word – pasting a chart into a document
Selection.PasteSpecial Link:=False, DataType:=wdPasteEnhancedMetafile, _
        Placement:=wdInLine, DisplayAsIcon:=False
We can add both Macro recordings into our Excel macro. Remember to add WordApp. at the start of each statement of Word VBA code.
Sub CreateWordDocument()

'Connect using Early Binding.
'Remember to set the reference to the Word Object Library
'In VBE Editor Tools -> References -> Microsoft Word x.xx Object Library
Dim WordApp As Word.Application
Set WordApp = New Word.Application

WordApp.Documents.Add Template:="Normal", NewTemplate:=False, DocumentType:=0
WordApp.Visible = True 'New Apps will be hidden by default, so make visible

'code copied from Excel Macro recorder
Sheets("Sheet1").Select
Selection.ChartObjects("Chart 1").ChartArea.Copy

'code copied from Word Macro recorder with WordApp. added to the front.
WordApp.Selection.PasteSpecial Link:=False, DataType:=wdPasteEnhancedMetafile, _
        Placement:=wdInLine, DisplayAsIcon:=False

Set WordApp = Nothing 'release the memory

End Sub
This code is not particularly efficient; it contains a few unnecessary sections code. However… it works!
Repeat the previous steps until macro complete
By repeating the same steps above; recording short actions, then transferring the code into Excel, we can slowly build up much more complex Macros. The key is to keep the actions short, if you do too many actions with the Macro Recorder, code starts to look long and scary.
If you’ve you tried to use the Macro Recorder before you will know that this is not as easy as it seems. And this simple tutorial may make you think it is easy, when it’s not. Sometimes, it can be quite frustrating trying to find out where the issues and errors are. The key to success is recording very short actions, such as those below and copying them into the Visual Basic Editor.
'Pressing the Enter Key to move to a new line in Word
WordApp.Selection.TypeParagraph

'Turn on/off Bold Text
WordApp.Selection.Font.Bold = wdToggle

'Change Font Size
WordApp.Selection.Font.Size = 16

'Type some text
WordApp.Selection.TypeText Text:="Here is some text"
You will soon build up a standard library of code that you can use to control Word for most basic tasks.
In recorded VBA code from Word, the word “Selection” in the code often refers to the document itself. It is possible to make the code a little bit more efficient by declaring the document as a variable. If we were opening a specific document, we could include this at the start, just below the declaration of the application.
'Declare a specific document as a variable
Dim WordDocument As Object
Set WordDocument = WordApp.Documents.Open(sourceFileName)
Or, if we created a new document we could include the following below the declaration of the application variable.
'Delcare a new document as a variable
Dim WordDocument As Object
Set WordDocument = WordApp.Documents.Add Template:="Normal", _
NewTemplate:=False, DocumentType:=0
If we have created the document as a variable we can then reference the specific document. This code:
WordApp.Selection.TypeParagraph
Would become this code:
WordDocument.TypeParagraph
Or this code:
WordApp.Selection.TypeText Text:="Here is some text"
Would become this code:
WordDocument.TypeText Text:="Here is some text"
This method is much better, as it doesn’t rely on the Selection of the user being in the right place.
Conclusion
We have seen in this post that it is possible to create complex Macros to automate Word from Excel using VBA. By understanding how to declare variables for the application and documents we can create much more robust macros, even without knowing a lot of VBA code.
Related Posts:
- 5 quick ways to embed a Word document in Excel
- Controlling Powerpoint from Excel using VBA
- Edit links in Word using VBA
- How to link Excel to Word
About the author
Hey, I’m Mark, and I run Excel Off The Grid.
My parents tell me that at the age of 7 I declared I was going to become a qualified accountant. I was either psychic or had no imagination, as that is exactly what happened. However, it wasn’t until I was 35 that my journey really began.
In 2015, I started a new job, for which I was regularly working after 10pm. As a result, I rarely saw my children during the week. So, I started searching for the secrets to automating Excel. I discovered that by building a small number of simple tools, I could combine them together in different ways to automate nearly all my regular tasks. This meant I could work less hours (and I got pay raises!). Today, I teach these techniques to other professionals in our training program so they too can spend less time at work (and more time with their children and doing the things they love).
Do you need help adapting this post to your needs?
I’m guessing the examples in this post don’t exactly match your situation. We all use Excel differently, so it’s impossible to write a post that will meet everybody’s needs. By taking the time to understand the techniques and principles in this post (and elsewhere on this site), you should be able to adapt it to your needs.
But, if you’re still struggling you should:
- Read other blogs, or watch YouTube videos on the same topic. You will benefit much more by discovering your own solutions.
- Ask the ‘Excel Ninja’ in your office. It’s amazing what things other people know.
- Ask a question in a forum like Mr Excel, or the Microsoft Answers Community. Remember, the people on these forums are generally giving their time for free. So take care to craft your question, make sure it’s clear and concise. List all the things you’ve tried, and provide screenshots, code segments and example workbooks.
- Use Excel Rescue, who are my consultancy partner. They help by providing solutions to smaller Excel problems.
What next?
Don’t go yet, there is plenty more to learn on Excel Off The Grid. Check out the latest posts:
This post will show you how to open a word document from Excel using VBA. This is a great technique for Excel developers building dashboards or reports when you want to open a specific word document containing additional notes.
Introduction
Excel VBA can help you automate the creation of Excel dashboards and reports but it can do almost anything you want, including opening up documents from other software sources like Microsoft Word.
A great example of why you might want to use Excel VBA to open up a Word document is when you are creating Excel dashboards that have additional commentary or notes contained in Word, or perhaps more detailed guidance to match your dashboard.
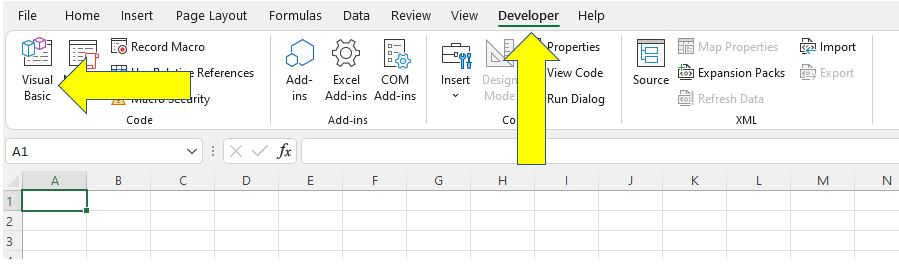
To begin with you need to be in the Excel VBA editor, this can be done either by selecting Developer > Visual Basic on the Excel ribbon or just press ALT and F11 (pressed together) to use a shortcut command.
With the Visual Basic Editor window now insert a new module by clicking Insert then Module from the drop down menu bar at the top of the window.
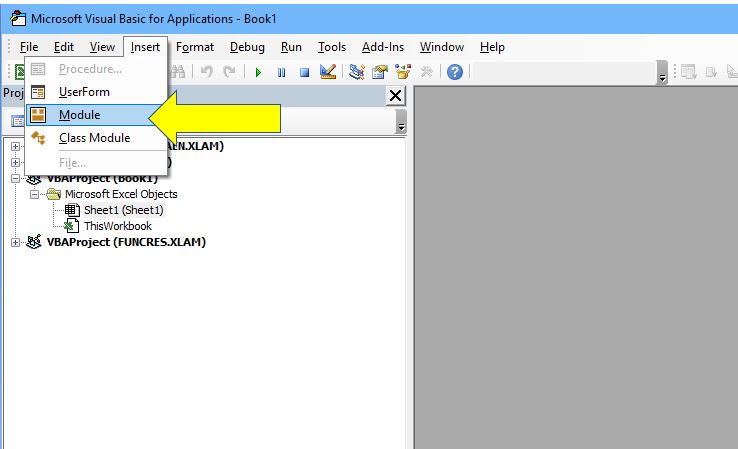
This enables a new code window where we can include the VBA code required to open a word document from Excel.
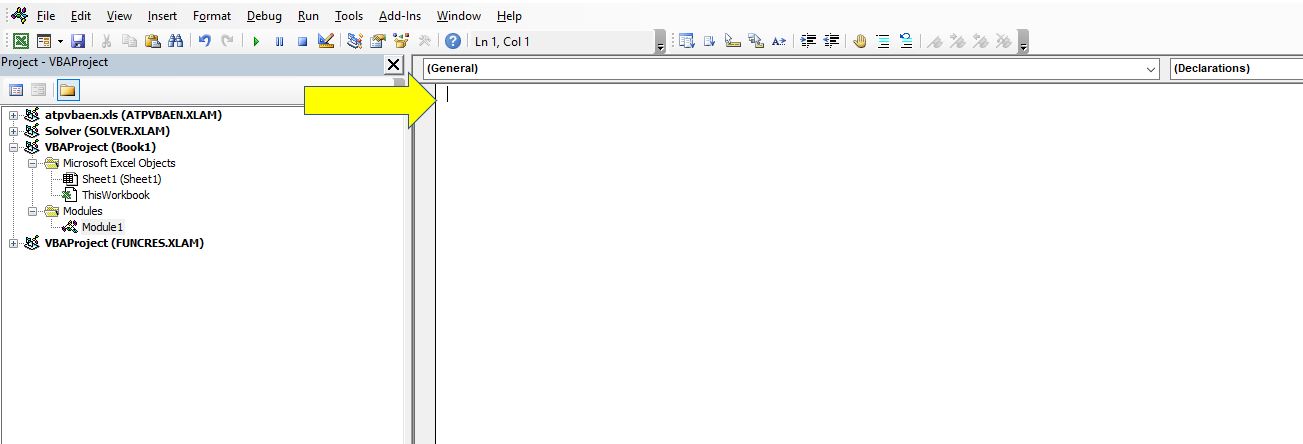
In the code window insert the following script, remember to change the INSERT FILE NAME section to the full path and document name of your word document. You must include the file type at the end so for word this will either be .doc or .docx depending on what version of word you use.
For example if your word document is stored in C:MyDocuments and called MyWordDocument then you would replace INSERT FILE NAME with “C:MyDocumentsMyWordDocument.docx”
Sub OpnWord()

Dim oAPP As Object

Set oAPP = CreateObject(Class:="Word.Application")

oAPP.Visible = True

oAPP.Documents.Open Filename:="INSERT FILE NAME"

End Sub
Next save the Excel file (remember to save as a Macro-Enabled file) and you now have a script that will open up the specified word document when it is run.
Understanding the VBA code
Each line of the VBA performs a specific task, understanding what each line does will help you to edit the VBA if needed.
- Sub OpnWord()
This line starts and name the procedure, if you don’t like the name “OpnWord” you can change it.
- Dim oAPP as Object
This tells Excel that the name “oAPP” will be an object when we define it. It is common practice in VBA scripts to take longer pieces of code and shorten them to a smaller name, in this case oAPP is my way of shortening Office Application.
- Set oAPP = CreateObject(Class:=”Word.Application”)
Now we have defined the object oAPP this line tells Excel what oAPP is. oAPP refers to the line of script CreateObject(Class:=”Word.Application”) and that is telling Excel that oAPP is the application Microsoft Word.
- oAPP.Visible = True
Once Excel knows that oAPP is the application Microsoft Word this line tells Excel to open Word and make it visible to the user.
- oAPP.Documents.Open Filename:=”INSERT FILE NAME”
This line specifies the Microsoft Word filename to open, remember to change the INSERT FILE NAME section to include the full path, file name and document type of the Word file to open.
- End Sub
This tells Excel the VBA script ends.
Practical uses for this script
When you have created the macro using the script above it can be assigned to buttons or other objects in your Excel dashboard, that way a word document of your choosing will automatically open for the user when they click on the button.
This code also acts as a base to take things further. Now that you can open a word document from Excel VBA it is possible to populate that Word document with charts, tables and data from Excel. This is a very useful technique to learn as it helps you automate management reports from an Excel dashboard. The possibilities are endless!
Keep Excelling,

Please check out the other posts on this site to learn even more amazing things you can do with Excel. For those of you who would love a good book covering all these techniques and more then I highly recommend VBA and Macros for Excel. You can check out a copy on Amazon by clicking the image below.
Хитрости »
24 Февраль 2012 91379 просмотров
Иногда бывает необходимо перенести что-то из Excel в другое приложение. Я возьму для примера Word. Например скопировать ячейки и вставить. Обычно мы это так и делаем — скопировали в Excel, открыли Word — вставили. Но сделать это при помощи кода чуть сложнее, хотя если разобраться никаких сложностей нет. Ниже приведен пример кода, который открывает Word, открывает в нем определенный документ, копирует данные из Excel и вставляет в открытый документ Word.
Sub OpenWord()
    Dim objWrdApp As Object, objWrdDoc As Object
    'создаем новое приложение Word
    Set objWrdApp = CreateObject("Word.Application")
    'Можно так же сделать приложение Word видимым. По умолчанию открывается в скрытом режиме
    'objWrdApp.Visible = True
    'открываем документ Word - документ "Doc1.doc" должен существовать
    Set objWrdDoc = objWrdApp.Documents.Open("C:Doc1.doc")
    'Копируем из Excel диапазон "A1:A10"
    Range("A1:A10").Copy
    'вставляем скопированные ячейки в Word - в начала документа
    objWrdDoc.Range(0).Paste
    'закрываем документ Word с сохранением
    objWrdDoc.Close True    ' False - без сохранения
    'закрываем приложение Word - обязательно!
    objWrdApp.Quit
    'очищаем переменные Word - обязательно!
    Set objWrdDoc = Nothing: Set objWrdApp = Nothing
End Sub
Скачать пример:
 Tips_Macro_OpenWord.xls (49,5 KiB, 6 261 скачиваний)
В файле-примере, приложенном к данной статье, в комментариях к коду есть несколько добавлений. Например, как вставить текст из ячеек в определенные закладки Word-а и как добавить новый документ, а не открывать уже имеющийся. Так же так есть код проверки — открыто ли приложение Word в данный момент. Порой это тоже может пригодиться, чтобы работать с запущенным приложением Word, а не создавать новое:
Sub Check_OpenWord()
    Dim objWrdApp As Object
    On Error Resume Next
    'пытаемся подключится к объекту Word
    Set objWrdApp = GetObject(, "Word.Application")
    If objWrdApp Is Nothing Then
        'если приложение закрыто - создаем новый экземпляр
        Set objWrdApp = CreateObject("Word.Application")
        'делаем приложение видимым. По умолчанию открывается в скрытом режиме
        objWrdApp.Visible = True
    Else
        'приложение открыто - выдаем сообщение
        MsgBox "Приложение Word уже открыто", vbInformation, "Check_OpenWord"
    End If
End Sub
В принципе, активировать или вызвать(если закрыто) другое приложение Офиса можно одной строкой:
Sub Open_AnotherApp()
    Application.ActivateMicrosoftApp xlMicrosoftWord
End Sub
но данный метод может пригодиться только в том случае, если Вам необходимо действительно лишь активировать другое приложение, но дальше обращаться к этому приложению Вы уже не сможете.
По сути, методами CreateObject и GetObject можно обратиться к любому стороннему приложению(например Internet Explorer). Куда важнее при обращении к этим объектам знать объектную модель того приложения, к которому обращаетесь. Чтобы увидеть свойства и методы объектной модели приложения, можно в редакторе VBA подключить необходимую библиотеку, объявить переменную, назначив ей тип приложения. Покажу на примере того же Word-а.
Для начала открываем меню Tools -References:

Подключаем библиотеку:

Затем объявляем переменную и присваиваем ей тип нужного приложения:
Sub OpenWord()
    Dim objWrdApp As Word.Application
    Set objWrdApp = New Word.Application
    objWrdApp.Visible = True
End Sub
Если теперь в редакторе, внутри этой процедуры в любом месте ниже объявления переменной набрать objWrdApp и точку, то сразу после ввода точки выпадет меню, в котором будут перечислены все доступные методы и свойства этого приложения.

Так же можно нажать F2 и через поиск найти Word и просмотреть все методы и свойства данного приложения.
Метод установки ссылки на библиотеку приложения через Tools—References называют еще ранним связыванием. Подобный метод позволяет создать ссылку на приложение быстрее и, как описано выше, предоставляет разработчику доступ к визуальному отображению свойств и методов объекта. Но есть существенный минус: если в своем коде Вы установите ссылку на Word 12 Object Libbary(Word 2007), то на ПК с установленным Word 2003 получите ошибку MISSING, т.к. Word 2003 относится к библиотеке Word 11 Object Libbary. Подробнее можно прочитать в статье Ошибка — Cant find project or library.
Метод же CreateObject еще называется методом позднего связывания. Применяя его не возникнет проблем с MISSING, очень часто возникающих при раннем связывании. Поэтому я рекомендовал бы при разработке использовать раннее связывание для удобства использования свойств и методов(если Вы их не знаете), а перед распространением приложения в коде заменить все именованные константы(типа wdLine) на числовые константы(для wdLine это 5) и применить позднее связывание. Посмотреть числовое значение константы можно просто записав её в коде, начать выполнение кода через F8 и навести курсор мыши на эту константу. Всплывающая подсказка покажет числовое значение. Так же можно отобразить окно Immediate(View —Immediate Window или сочетание клавиш Ctrl+G), записать вопросительный знак и вставить эту константу и нажать Enter:
?wdLine
ниже будет выведено числовое представление этой константы.
А заменять эти константы их числовыми значениями в случае с поздним связыванием необходимо, т.к. Excel не знает их значений.
Попробую пояснить поподробнее про эти константы и почему их надо заменять какими-то числами: при подключении библиотеки Wordа(Word 12 Object Libbary) мы так же подключаем и все свойства, методы и константы, которые доступны из Wordа. И их использование напрямую становится доступно из Excel и мы можем смело написать что-то вроде wbLine и Excel поймет эту константу. При позднем же связывании мы уже не подключаем библиотеки Word(во избежание ошибок совместимости) и как следствие — методы, свойства и константы Wordа для Excel становятся чем-то неизвестным и не документированным и мы получим ошибку «Variable not defined»(если включена директива Option Explicit) при попытке назначить свойство через wdLine. Если же Option Explicit не включена — то хоть ошибки не будет, но и код будет работать неверно, т.к. для неизвестной для Excel переменной wbLine будет назначено значение 0(Empty). Поэтому и надо все константы другого приложения заменять их числовыми значениями.
Главная ошибка новичка
И хочу так же упомянуть про ошибку, которую очень часто совершают при обращении к одному приложению из другого. Допустим, необходимо скопировать из Word все данные в Excel. Часто начинающие делают это так:
Sub OpenWord()
    Dim objWrdApp As Object, objWrdDoc As Object
    'создаем новое приложение Word
    Set objWrdApp = CreateObject("Word.Application")
    'Можно так же сделать приложение Word видимым. По умолчанию открывается в скрытом режиме
    'objWrdApp.Visible = True
    'открываем документ Word - документ "Doc1.doc" должен существовать
    Set objWrdDoc = objWrdApp.Documents.Open("C:Doc1.doc")
    'Копируем из Word все данные, обращаясь к объекту Range документа
    Range.Copy
    'вставляем скопированное в ячейку А1 активного листа Excel
    ActiveSheet.Paste
    'закрываем документ Word без сохранения
    objWrdDoc.Close False
    'закрываем приложение Word
    objWrdApp.Quit
    'очищаем переменные Word - обязательно!
    Set objWrdDoc = Nothing: Set objWrdApp = Nothing
End Sub
На строке Range.Copy обязательно получите ошибку от VBA, указывающую, что нужен аргумент для объекта. Можно попробовать добавить этот аргумент: Range(1).Copy. Но все равно получим ошибку. Можно, конечно, указать даже ячейки: Range(«A1»).Copy. Но это приведет к тому, что скопирована будет ячейка А1 активного листа Excel.
Все дело в том, что мы хотим скопировать данные из Word-а, выполняя при этом код из Excel. А у Excel тоже есть объект Range с другими аргументами. И если не указать какому приложению, листу или документу принадлежит Range, то по умолчанию он будет отнесен к тому приложению, из которого выполняется код. Т.е. к Excel. Если совсем кратко об этом — всегда надо указывать какому приложению или объекту принадлежит используемый объект или свойство. Правильно код должен выглядеть так:
Sub OpenWord()
    Dim objWrdApp As Object, objWrdDoc As Object
    'создаем новое приложение Word
    Set objWrdApp = CreateObject("Word.Application")
    'Можно так же сделать приложение Word видимым. По умолчанию открывается в скрытом режиме
    'objWrdApp.Visible = True
    'открываем документ Word - документ "Doc1.doc" должен существовать
    Set objWrdDoc = objWrdApp.Documents.Open("C:Doc1.doc")
    'Копируем из Word все данные, обращаясь к объекту Range документа
    'при этом перед Range явно указываем откуда его брать - из документа Word -objWrdDoc("C:Doc1.doc")
    objWrdDoc.Range.Copy
    'вставляем скопированное из Word в активную ячейку активного листа Excel
    ActiveSheet.Paste
    'закрываем документ Word без сохранения
    objWrdDoc.Close False
    'закрываем приложение Word
    objWrdApp.Quit
    'очищаем переменные Word - обязательно!
    Set objWrdDoc = Nothing: Set objWrdApp = Nothing
End Sub
Вместо Range ту же ошибку делают и с Selection(потому что Selection часто присутствует в записанных макрорекордером макросах), т.к. этот объект есть и в Excel и в Word и без явного указания приложения будет относится к приложению, в котором записано.
В приложенном файле код немного отличается от представленных выше — в нем можно посмотреть как вставить текст из ячеек в определенные(созданные заранее) закладки Word-а. Это удобно для создания бланков в Word и заполнения их через Excel
Скачать пример:
Tips_Macro_OpenWord.xls (49,5 KiB, 6 261 скачиваний)
А в архиве ниже — практически готовое решение заполнения всевозможных бланков Word из Excel. Как это работает. У нас есть таблица Excel с данными для заполнения бланков заявлений на пособия:

Обращаю внимание, что в первой строке расположены метки. Они нужны для того, чтобы код мог понять значения какого столбца в какое место шаблона Word должны попасть. А в самом шаблоне Word мы должны проставить эти самые метки:

Фигурные скобки сделаны для того, чтобы код 100% искал и заменял только метку в шаблоне, исключая при этом замену случайного текста вне скобок(ведь слово «Должность» может встречаться и само по себе).
А здесь я схематично привел то, как будут происходить замены:

Сначала программа создаст новую папку, в которую и будет сохранять создаваемые файлы(имя папки состоит из даты и времени запуска кода). Далее программа циклом пройдется по каждой строке таблицы, создаст на основании шаблона Word(«Шаблон.doc») новый файл для этой строки, заполнит этот шаблона данными на основании меток, и сохранит созданный файл под новым именем. Сам файл шаблона при этом не изменяется — все метки в нем сохраняются как были настроены до запуска кода. Конкретно в приложенном коде значение для имени нового файла берется из первого столбца «ФИО с инициалами». Но это можно изменить в коде при необходимости. Делается это в этой строке:
'считываем фамилию с инициалами
sWDDocName = .Cells(lr, 1).Value
Что еще важно: файл шаблона Word должен находиться в той же папке, что и файл с кодом. Название файла в приложенном к статье файле должно быть «Шаблон.doc». Но его так же можно изменить, не забыв изменив его в коде в этой строке:
'имя шаблона Word с основным текстом и метками
Const sWDTmpl As String = "Шаблон.doc"
В общем-то, если хоть чуть-чуть разбираетесь, то поменять можно многое. А для тех, кто не разбирается достаточно будет просто создавать метки в файле Word и обозначать ими столбца в таблице Excel. Количество столбцов и строк в таблице код определяет автоматически и при изменении размеров таблицы ничего изменять не надо. Главное, чтобы метки находились в первой строке, вторая строка — заголовок(необязательно), а с третьей строки начинаются данные, которые и используются для наполнения шаблонов.
Скачать пример:
 Автосоздание бланков Word из таблицы Excel.zip (37,6 KiB, 1 468 скачиваний)
Примеры работы с тем же Outlook можно посмотреть в моих статьях:
Как отправить письмо из Excel?
Сохранить вложения из Outlook в указанную папку
Статья помогла? Поделись ссылкой с друзьями!
![]() Видеоуроки
Видеоуроки
Поиск по меткам
Access
apple watch
Multex
Power Query и Power BI
VBA управление кодами
Бесплатные надстройки
Дата и время
Записки
ИП
Надстройки
Печать
Политика Конфиденциальности
Почта
Программы
Работа с приложениями
Разработка приложений
Росстат
Тренинги и вебинары
Финансовые
Форматирование
Функции Excel
акции MulTEx
ссылки
статистика