
Применение оператора With для упрощения кода VBA Excel и ускорения его работы. Синтаксис оператора With, параметры, поясняющие примеры.
Оператор With предназначен для выполнения последовательности операторов (строк кода) для отдельного объекта или пользовательского типа данных.
Применение оператора With упрощает написание и восприятие кода VBA Excel, а также ускоряет его работу.
Синтаксис
Синтаксис оператора With в VBA Excel:
|
With object [statements] End With |
Параметры
Параметры оператора With:
| Параметр | Описание |
|---|---|
| object | Имя объекта или пользовательского типа данных. |
| statements | Один или несколько операторов (строк кода), которые выполняются в отношении указанного объекта. |
Примеры
В следующей процедуре выполняется несколько идущих подряд операторов (строк кода) в отношении одного и того же объекта Range("A1:E5"):
|
Sub Primer1() Range(«A1:E5»).Value = «Тест» Range(«A1:E5»).Interior.Color = vbMagenta Range(«A1:E5»).Font.Size = 14 Range(«A1:E5»).Font.Color = vbYellow Range(«A1:E5»).Font.Italic = True Range(«A1:E5»).Borders.LineStyle = True End Sub |
Если в процедуре выполняется несколько идущих подряд операторов в отношении одного и того же объекта, то оператор With позволяет указать объект только один раз:
|
Sub Primer2() With Range(«A1:E5») .Value = «Тест» .Interior.Color = vbMagenta .Font.Size = 14 .Font.Color = vbYellow .Font.Italic = True .Borders.LineStyle = True End With End Sub |
Такое написание кода делает его более понятным, а выполнение – более быстрым.
Конструкции с оператором With можно вкладывать одну в другую:
|
Sub Primer3() With Range(«A1:E5») .Value = «Тест» .Interior.Color = vbMagenta With .Font .Size = 14 .Color = vbYellow .Italic = True End With .Borders.LineStyle = True End With End Sub |
Такой код удобен, когда необходимо выполнить ряд операторов по отношению к некоторому объекту [Range("A1:E5")], а также по отношению к одному из содержащихся в нем объектов [Range("A1:E5").Font].
Примечания
Примечания от разработчика:
- После входа в блок With параметр object изменить нельзя. Следовательно, один оператор With не может быть использован для изменения нескольких объектов.
- Во вложенном блоке With необходимо указывать полные ссылки на любые элементы объекта из внешнего блока With.
- Не рекомендуется использовать переходы в блоки With или из них.
Home / VBA / VBA With Statement (With – End With)
Key Points
- Use the VBA With Statement to minimize the code.
- You can use a single object at a time while using the With Statement.
What is VBA With Statement
VBA With is a statement to specify an object for once and then run multiple statements for it. In simple words, by using the “WITH” statement to specify an object, and after that, you can access all the properties and methods in one go. It starts with the “With” and ends with “End With”.
Syntax of VBA With Statement
Following is the syntax that you need to use for using With statement in VBA:
With [OBJECT]
      [Statement]
End With
- With: It’s the starting keyword for the statement that tells VBA that you are specifying the object mentioned.
- Object: Here, you need to specify the object that you want to use.
- Statement: A statement(s) that you want to run with the specified object.
- End With: It’s the ending keyword for the statement.
Example to understand the VBA With Statement
Let’s take an example to understand with the statement in depth. Let’s say you want to change, the font color, size, and font name of cell A1. For doing all these three things you need to access three different properties of VBA font and the code would be:
Range("A1").Font.Color = RGB(0, 0, 255)
Range("A1").Font.Size = 16
Range("A1").Font.Name = "Consolas"
But here we going to use the With Statement instead of the above code. To use the VBA With Statement, you can use the following steps:
- First, type the keyboard “With”.
- After that, use the VBA Range to specify the cell A1 with using the font object to specify the font object.

- Next, you need to enter the code for all three properties and the values that you want to apply.

- In the end, use the keyword “End With” to end the statement.


Here’s the code that you have just written.
Sub MyMacro()

With Range("A1").Font
        .Color = RGB(0, 0, 255)
        .Size = 16
        .Name = "Consolas"
End With

End Sub
Now let’s have a look at both codes and try to understand what is the difference that we have got by using the “With” statement.

In the first code, you have used the font object three times and then further used the property that you want to access and want to make changes to it.
But in the second code, you have used the With statement and specified the font object at once. And then three lines of code within the “With” statement to access all three properties.
When you use the “With” statement and specify an object, it tells VBA that all the statements that you have written need to run with the object mentioned. It not only gives you a structured code but also makes a macro run faster and gives it greater efficiency.
Nested With Statement
I told you in the starting that you can only specify a single object to use the With statement. But there is a way to use more than one or even multiple objects with it. That’s by using VBA LOOPS, and we are going to use FOR EACH LOOP to loop through multiple objects and use the “With”.
Let me tell you an example; you need to loop through all the worksheets and do apply all the following things to all the cells in each worksheet.
- Font Size: 16
- Font: Verdena
And in the workbook, you have five worksheets, as I have in the following example:

Use the following steps to write a nested “With” statement.
- First, you need to declare a variable to use a worksheet object.

- After that, as I said, you need to use For Each Loop. So, you need to write a code with the loop that can loop through all the worksheets.

- Now, enter the with statement which can apply font setting that we have discussed above. For referrring to all the cells in the worksheet you can use the “Cells” while specifing the object.


Here’s the full code that you have just written.
Sub MyMacro()

Dim ws As Worksheet

For Each ws In ActiveWorkbook.Worksheets
    With Cells
        .Font.Size = 16
        .Font.Name = "Verdena"
    End With
Next ws

End Sub
With Statement in Excel VBA
In this article, we will see an outline on Excel VBA With. With is a statement in programming languages. It is one of the most commonly used statement which is used with an END statement. The object which is referred to is mentioned after the with keyword and the whole process is ended with End With statement. A VBA With Statement cannot be without an end with a statement so it is mandatory to close the series of statements. The key feature of the with the statement is that we can access the properties of the object without referring to the object multiple times. The method to access the properties of the object lies in the dot keyword. When we put a dot keyword we can see a multiple number of options to access the properties of the object. Let us learn how to use With statement in some of the examples below.
How to Use With Statement in Excel VBA?
We will learn how to use the With Statement in Excel by using the VBA Code.
You can download this VBA With Excel Template here – VBA With Excel Template
VBA With – Example #1
Let us first begin with a basic example in which we will use the With statement for accessing the range value of an object and then assign a custom value to it. For this, follow the steps below:
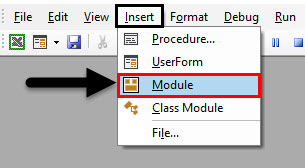
Step 1: Insert a new module inside Visual Basic Editor (VBE). Click on Insert tab > select Module.
Step 2: Define a new subprocedure within the inserted module that can hold your macro.
Code:
Sub Example1()

End Sub

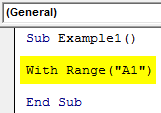
Step 3: Since we are beginning with the most basic with statement.
Code:
Sub Example1()

With Range("A1")

End Sub
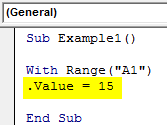
Step 4: When we type a dot (.) we can see a range of different functions associated with the object.
Code:
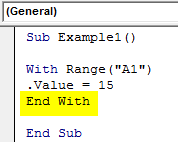
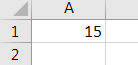
Sub Example1()

With Range("A1")
.Value = 15

End Sub
Step 5: Always remember to close the with statement with an End statement.
Code:
Sub Example1()

With Range("A1")
.Value = 15
End With

End Sub
Step 6: Now, run this code by hitting the Run button or F5.
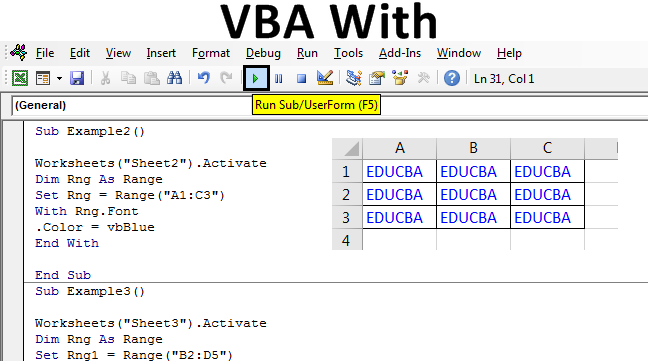
VBA With – Example #2
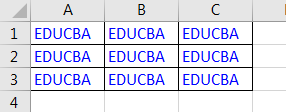
In this example, we will see how to change one of the fonts or the color of the property of the object. I have some data in Sheet 2 in the cells A1 to C3 in normal black color and I want to change the text font to blue using With Statement. First, let us see the current data in sheet 2 as follows. For this, follow the steps below:
Step 1: Now in the same module declare another subprocedure as follows.
Code:
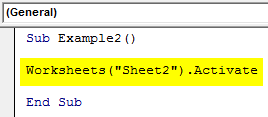
Sub Example2()

End Sub
Step 2: Also we have now more than one sheet in this workbook so let us activate sheet 2 with the following code.
Code:
Sub Example2()

Worksheets("Sheet2").Activate

End Sub
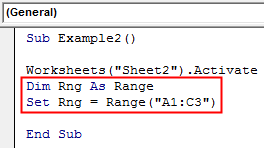
Step 3: Now declare a variable as Range data type which will store the range for our data as shown below and set the range to the range which has our data in sheet 2.
Code:
Sub Example2()

Worksheets("Sheet2").Activate
Dim Rng As Range
Set Rng = Range("A1:C3")

End Sub
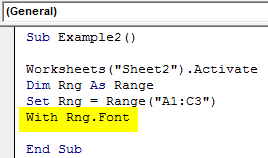
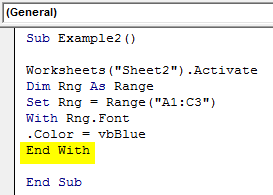
Step 4: Access the Font property of the Rng variable using the with statement with the following code shown below.
Code:
Sub Example2()

Worksheets("Sheet2").Activate
Dim Rng As Range
Set Rng = Range("A1:C3")
With Rng.Font

End Sub
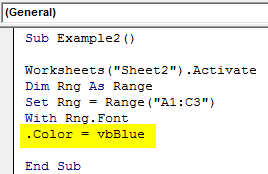
Step 5: Now we can use the dot (.) operator to change the color of the range using the following code and change the color of the text in the cell range.
Code:
Sub Example2()

Worksheets("Sheet2").Activate
Dim Rng As Range
Set Rng = Range("A1:C3")
With Rng.Font
.Color = vbBlue

End Sub
Step 6: Now let us end the with statement with the END WITH statement as follows.
Code:
Sub Example2()

Worksheets("Sheet2").Activate
Dim Rng As Range
Set Rng = Range("A1:C3")
With Rng.Font
.Color = vbBlue
End With

End Sub
Step 7: When we execute the code we get the following result in sheet 2.
VBA With – Example #3
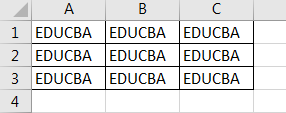
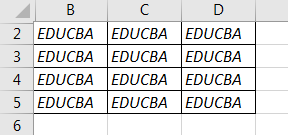
In this very basic example, we will see another font feature to manipulate using the With statement. For this example, we have similar text in cells B2 to D5 and they are in normal fonts. We want to change the font to Bold and Italic using the With statement. First, let us look at the data in sheet 3 as follows. For this, follow the steps below:
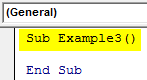
Step 1: Now in the same module declare another subprocedure as follows.
Code:
Sub Example3()

End Sub
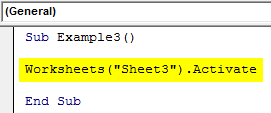
Step 2: Also we have now more than one sheet in this workbook so let us activate sheet 3 with the following code.
Code:
Sub Example3()

Worksheets("Sheet3").Activate

End Sub
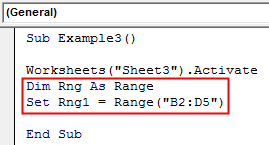
Step 3: Now declare a variable as Range data type which will store the range for our data as shown below and set the range to the range which has our data in sheet 3.
Code:
Sub Example3()

Worksheets("Sheet3").Activate
Dim Rng As Range
Set Rng1 = Range("B2:D5")

End Sub
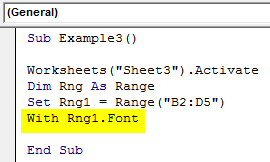
Step 4: Access the Font property of the Rng variable using the with statement.
Code:
Sub Example3()

Worksheets("Sheet3").Activate
Dim Rng As Range
Set Rng1 = Range("B2:D5")
With Rng1.Font

End Sub
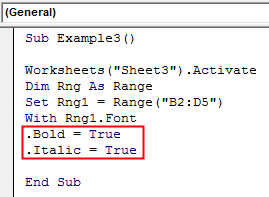
Step 5: Now again we use the dot (.) operator in the code to change the font to Bold and Italic.
Code:
Sub Example3()

Worksheets("Sheet3").Activate
Dim Rng As Range
Set Rng1 = Range("B2:D5")
With Rng1.Font
.Bold = True
.Italic = True

End Sub
Step 6: Let us end the Statements using the End statement as shown below.
Code:
Sub Example3()

Worksheets("Sheet3").Activate
Dim Rng As Range
Set Rng1 = Range("B2:D5")
With Rng1.Font
.Bold = True
.Italic = True
End With

End Sub
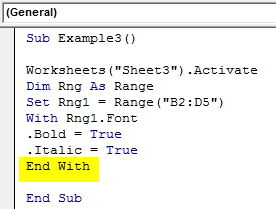
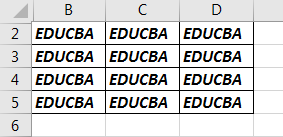
Step 7: When we execute the above code we can see the result in sheet 3 as follows.
As with the above examples, we can see how important with statement is in our day to day coding. Also, it removes the repetitive steps involved when we are trying to access the properties of an object. We can also use Loop statements in the With statements to define the criteria which we want to access for the object.
How to Use VBA With (Real Example)?
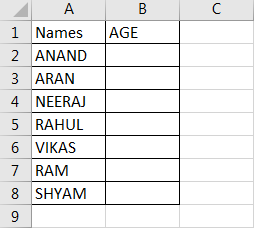
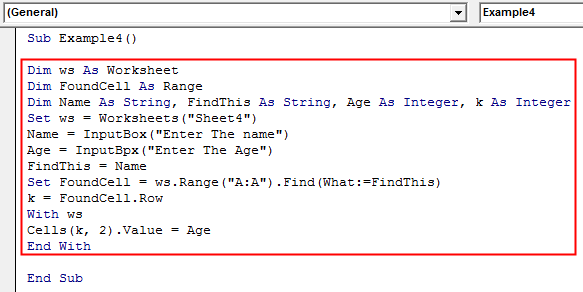
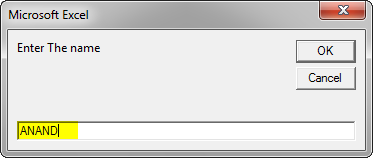
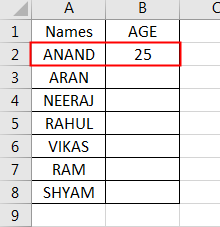
We have seen the basic uses of With statement in the above examples. Now let us use With statement for a real-life problem. We will make a code that will ask for a Name from user and Age, the code will then check the name in the list and paste the value of age beside the corresponding name. The data is in sheet 4 as follows.
So the code we will be using for this as shown below and we will execute it and then understand it step by step.
Code:
Sub Example4()

Dim ws As Worksheet
Dim FoundCell As Range
Dim Name As String, FindThis As String, Age As Integer, k As Integer
Set ws = Worksheets("Sheet4")
Name = InputBox("Enter The name")
Age = InputBox("Enter The Age")
FindThis = Name
Set FoundCell = ws.Range("A:A").Find(What:=FindThis)
k = FoundCell.Row
With ws
Cells(k, 2).Value = Age
End With

End Sub
When we execute the code we get the following two pop-ups:
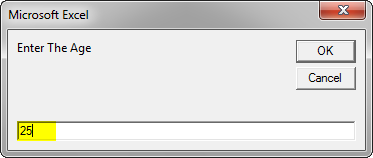
When we press OK for Age we can see the result displayed in Sheet 4 as follows.
Now let us understand the code step by step:
- When we ask the user to input the name the code finds it in column A.
- When the value provided by the user is found the row for the value is stored in a variable.
- Now in the With statement, we use the Cells Properties to change the values adjacent to the cells found with the values with the age provided by the user.
Things to Remember
There are few things which we need to remember about With statement in VBA:
- With Statement starts with referencing the Object property.
- With Statements are always ended with End With Statement.
- The properties of the object are accessed by the dot (.) keyword.
With Statements can also be used with the Loop statements.
Recommended Articles
This is a guide to VBA With. Here we discuss How to Use the With Statement in Excel VBA along with practical examples and downloadable excel template. You can also go through our other suggested articles –
- VBA Collection
- VBA Square Root
- VBA SendKeys
- VBA Name Worksheet
In this Article
- Creating a Function without Arguments
- Calling a Function from a Sub Procedure
- Creating Functions
- Single Argument
- Multiple Arguments
- Optional Arguments
- Default Argument Value
- ByVal and ByRef
- Exit Function
- Using a Function from within an Excel Sheet
This tutorial will teach you to create and use functions with and without parameters in VBA
VBA contains a large amount of built-in functions for you to use, but you are also able to write your own. When you write code in VBA, you can write it in a Sub Procedure, or a Function Procedure. A Function Procedure is able to return a value to your code. This is extremely useful if you want VBA to perform a task to return a result. VBA functions can also be called from inside Excel, just like Excel’s built-in Excel functions.
Creating a Function without Arguments
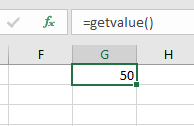
To create a function you need to define the function by giving the function a name. The function can then be defined as a data type indicating the type of data you want the function to return.
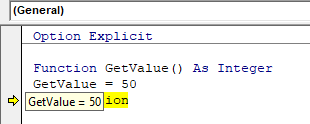
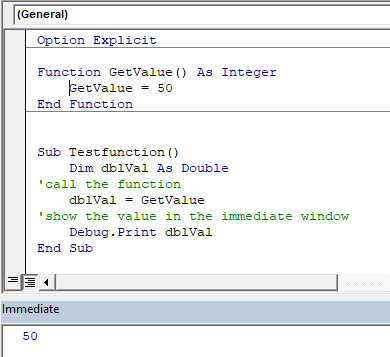
You may want to create a function that returns a static value each time it is called – a bit like a constant.
Function GetValue() As Integer
   GetValue = 50
End Function
If you were to run the function, the function would always return the value of 50.
You can also create functions that refer to objects in VBA but you need to use the Set Keyword to return the value from the function.
Function GetRange() as Range
  Set GetRange = Range("A1:G4")
End Function
If you were to use the above function in your VBA code, the function would always return the range of cells A1 to G4 in whichever sheet you are working in.
Calling a Function from a Sub Procedure
Once you create a function, you can call it from anywhere else in your code by using a Sub Procedure to call the function.
The value of 50 would always be returned.
You can also call the GetRange function from a Sub Procedure.
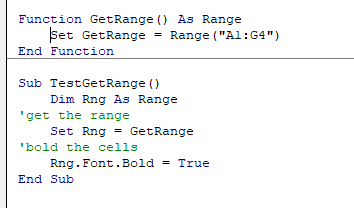
In the above example, the GetRange Function is called by the Sub Procedure to bold the cells in the range object.
Creating Functions
Single Argument
You can also assign a parameter or parameters to your function. These parameters can be referred to as Arguments.
Function ConvertKilosToPounds (dblKilo as Double) as Double
   ConvertKiloToPounds = dblKilo*2.2
End Function
We can then call the above function from a Sub Procedure in order to work out how many pounds a specific amount of kilos are.
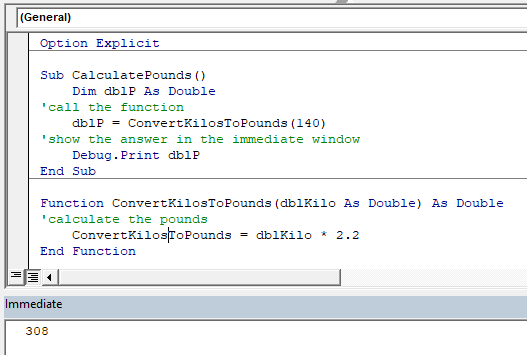
A function can be a called from multiple procedures within your VBA code if required. This is very useful in that it stops you from having to write the same code over and over again. It also enables you to divide long procedures into small manageable functions.
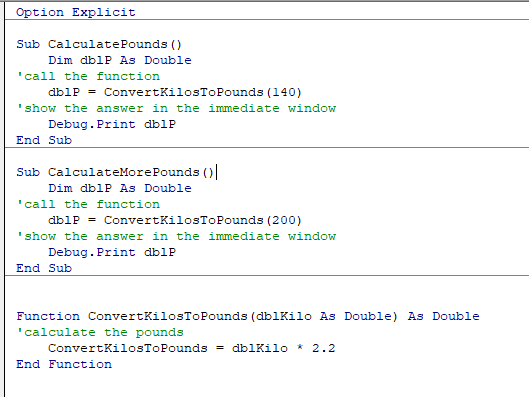
In the above example, we have 2 procedures – each of them are using the Function to calculate the pound value of the kilos passed to them in the dblKilo Argument of the function.
Multiple Arguments
You can create a Function with multiple arguments and pass the values to the Function by way of a Sub Procedure.
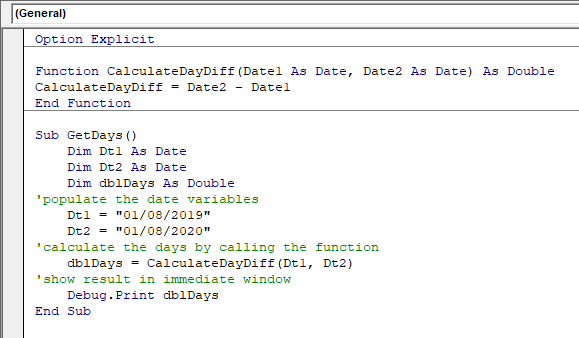
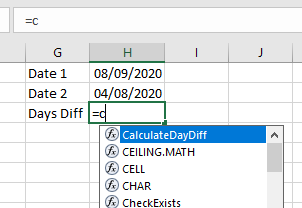
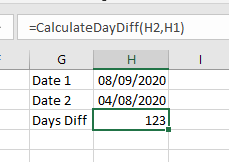
Function CalculateDayDiff(Date1 as Date, Date2 as Date) as Double
   CalculateDayDiff = Date2-Date1
End Function
We can then call the function to calculate the amount of days between 2 dates.
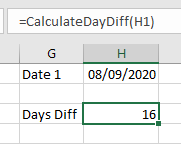
Optional Arguments
You can also pass Optional arguments to a Function. In other words, sometimes you may need the argument, and sometimes you may not – depending on what code you are using the Function with .
Function CalculateDayDiff(Date1 as Date, Optional Date2 as Date) as Double
'check for second date and if not there, make Date2 equal to today's date.
   If Date2=0 then Date2 = Date
'calculate difference
   CalculateDayDiff = Date2-Date1
End Function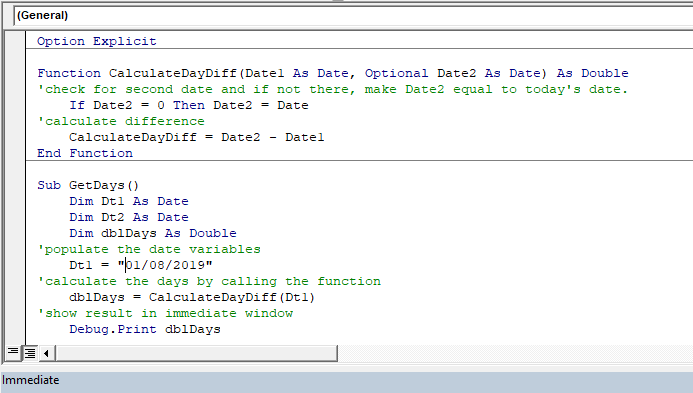
VBA Coding Made Easy
Stop searching for VBA code online. Learn more about AutoMacro — A VBA Code Builder that allows beginners to code procedures from scratch with minimal coding knowledge and with many time-saving features for all users!

Learn More
Default Argument Value
You can also set the default value of the Optional arguments when you are creating the function so that if the user omits the argument, the value that you have put as default will be used instead.
Function CalculateDayDiff(Date1 as Date, Optional Date2 as Date="06/02/2020") as Double
'calculate difference
   CalculateDayDiff = Date2-Date1
End Function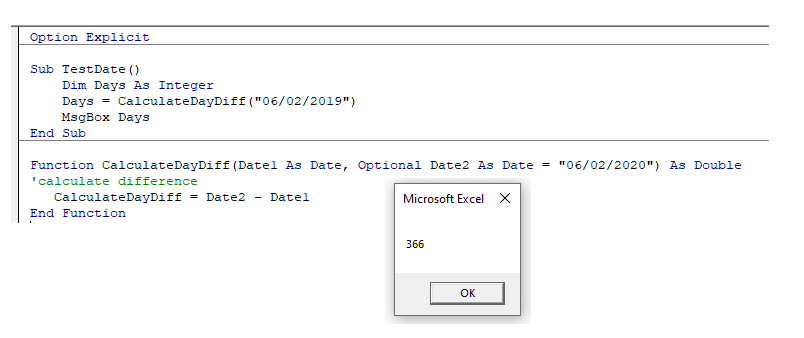
ByVal and ByRef
When you pass values to a function, you can use the ByVal or ByRef keywords. If you omit either of these, the ByRef is used as the default.
ByVal means that you are passing a copy of the variable to the function, whereas ByRef means you are referring to the original value of the variable. When you pass a copy of the variable (ByVal), the original value of the variable is NOT changed, but when you reference the variable, the original value of the variable is changed by the function.
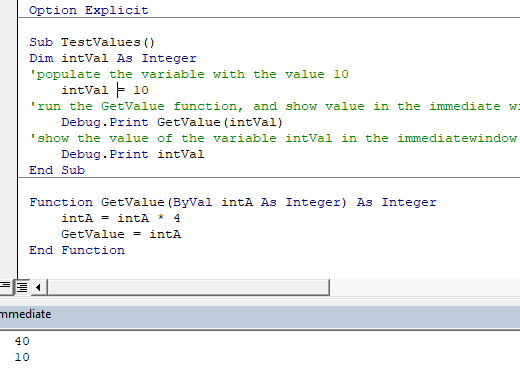
Function GetValue(ByRef intA As Integer) As Integer
   intA = intA * 4
   GetValue = intA
End Function
In the function above, the ByRef could be omitted and the function would work the same way.
Function GetValue(intA As Integer) As Integer
   intA = intA * 4
   GetValue = intA
End Function
To call this function, we can run a sub-procedure.
Sub TestValues()
   Dim intVal As Integer
'populate the variable with the value 10
   intVal = 10
'run the GetValue function, and show the value in the immediate window
   Debug.Print GetValue(intVal)
'show the value of the intVal variable in the immediate window
   Debug.Print  intVal
End Sub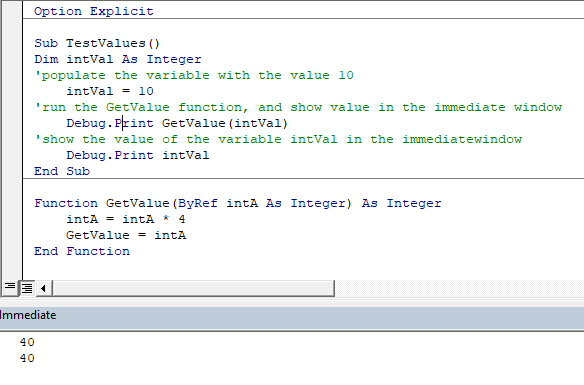
Note that the debug windows show the value 40 both times. When you pass the variable IntVal to the function – the value of 10 is passed to the function, and multiplied by 4. Using the ByRef keyword (or omitting it altogether), will AMEND the value of the IntVal variable. This is shown when you show first the result of the function in the immediate window (40), and then the value of the IntVal variable in the debug window (also 40).
If we do NOT want to change the value of the original variable, we have to use ByVal in the function.
Function GetValue(ByVal intA As Integer) As Integer
intA = intA * 4
GetValue = intA
End Function
Now if we call the function from a sub-procedure, the value of the variable IntVal will remain at 10.
Exit Function
If you create a function that tests for a certain condition, and once the condition is found to be true, you want return the value from the function, you may need to add an Exit Function statement in your Function in order to exit the function before you have run through all the code in that function.
Function FindNumber(strSearch As String) As Integer
   Dim i As Integer
'loop through each letter in the string
   For i = 1 To Len(strSearch)
   'if the letter is numeric, return the value to the function
      If IsNumeric(Mid(strSearch, i, 1)) Then
         FindNumber= Mid(strSearch, i, 1)
   'then exit the function
         Exit Function
      End If
   Next
   FindNumber= 0
End Function
The function above will loop through the string that is provided until it finds a number, and then return that number from the string. It will only find the first number in the string as it will then Exit the function.
The function above can be called by a Sub routine such as the one below.
Sub CheckForNumber()
   Dim NumIs as Integer
'pass a text string to the find number function
   NumIs = FindNumber("Upper Floor, 8 Oak Lane, Texas")
'show the result in the immediate window
   Debug.Print NumIs
End Sub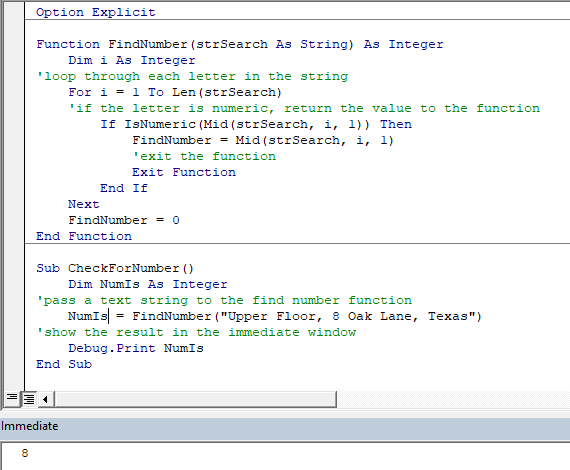
VBA Programming | Code Generator does work for you!
Using a Function from within an Excel Sheet
In addition to calling a function from your VBA code using a sub procedure, you can also call the function from within your Excel sheet. The functions that you have created should by default appear in your function list in the User Defined section of the function list.
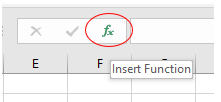
Click on the fx to show the Insert Function dialog box.
Select User Defined from the Category List
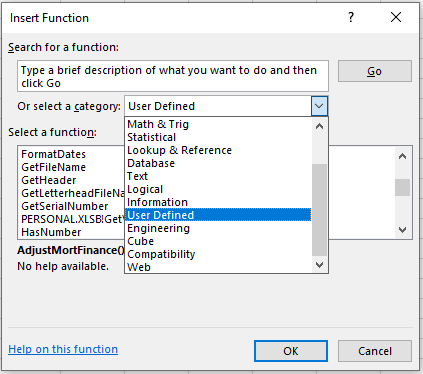
Select the function you require from the available User Defined Functions (UDF’s).

Alternatively, when you start writing your function in Excel, the function should appear in the drop down list of functions.
If you do not want the function to be available inside an Excel sheet, you need to put the Private word in front of the word Function when you create the function in your VBA code.
Private Function CalculateDayDiff(Date1 as Date, Date2 as Date) as Double
   CalculateDayDiff = Date2-Date1
End Function
It will now not appear in the drop down list showing the Excel functions available.

Interestingly enough, however, you can still use the function – it just will not appear in the list when looking for it!
If you have declared the second argument as Optional, you can omit it within the Excel sheet as well as within the VBA code.
You can also use the a function that you have created without arguments in your Excel sheet.
Содержание
- Использование функций листов Excel в Visual Basic
- Вызов функции листа из Visual Basic
- Вставка функции листа в ячейку
- Пример
- См. также
- Поддержка и обратная связь
- Объект Worksheet (Excel)
- Замечания
- Пример
- События
- Методы
- Свойства
- См. также
- Поддержка и обратная связь
- Using Excel worksheet functions in Visual Basic
- Calling a worksheet function from Visual Basic
- Inserting a worksheet function into a cell
- Example
- See also
- Support and feedback
- Свойство Worksheet.Cells (Excel)
- Синтаксис
- Замечания
- Пример
- Поддержка и обратная связь
- Worksheet object (Excel)
- Remarks
- Example
- Events
- Methods
- Properties
- See also
- Support and feedback
Использование функций листов Excel в Visual Basic
В операторах Visual Basic можно использовать большинство функций листов Microsoft Excel. Список функций листов, которые можно использовать, см. в статье Список функций листов, доступных для Visual Basic.
Некоторые функции листов не используются в Visual Basic. Например, не требуется функция Concatenate, так как в Visual Basic можно использовать оператор & для объединения нескольких текстовых значений.
Вызов функции листа из Visual Basic
В Visual Basic функции листов Excel доступны через объект WorksheetFunction.
В следующей процедуре Sub используется функция листа Min для определения наименьшего значения в диапазоне ячеек. Сначала переменная myRange объявляется как объект Range, а затем ей присваивается диапазон A1:C10 на листе Sheet1. Другой переменной, answer , назначается результат применения функции Min к myRange . В конце значение answer отображается в окне сообщения.
Если вы используете функцию листа, для которой требуется ссылка на диапазон в качестве аргумента, необходимо указать объект Range. Например, можно использовать функцию листа Match (ПОИСКПОЗ) для поиска диапазона ячеек. В ячейке листа потребовалось бы ввести формулу, например =ПОИСКПОЗ (9;A1:A10;0). Однако в процедуре Visual Basic необходимо указать объект Range, чтобы получить такой же результат.
Функции Visual Basic не используют квалификатор WorksheetFunction. Функция может иметь такое же имя, что и функция Microsoft Excel, но работать по-другому. Например, Application.WorksheetFunction.Log и Log возвращают разные значения.
Вставка функции листа в ячейку
Чтобы вставить функцию листа в ячейку, укажите функцию в качестве значения свойства Formula соответствующего объекта Range. В следующем примере функция листа RAND (создающая случайное число), назначается свойству Formula диапазона A1:B3 на листе Sheet1 в активной книге.
Пример
В этом примере используется функция листа Pmt, чтобы рассчитать кредитный платеж по ипотечной ссуде. Обратите внимание, что в этом примере используется метод InputBox вместо функции InputBox, чтобы метод мог выполнять проверку типов. Операторы Static приводят к тому, что Visual Basic сохраняет значения трех переменных; они отображаются как значения по умолчанию при следующем запуске программы.
См. также
Поддержка и обратная связь
Есть вопросы или отзывы, касающиеся Office VBA или этой статьи? Руководство по другим способам получения поддержки и отправки отзывов см. в статье Поддержка Office VBA и обратная связь.
Источник
Объект Worksheet (Excel)
Замечания
Объект Worksheet является членом коллекции Worksheets . Коллекция Worksheets содержит все объекты Worksheet в книге.
Объект Worksheet также является членом коллекции Sheets . Коллекция Листов содержит все листы книги (как листы диаграмм, так и листы).
Пример
Используйте worksheets (index), где index — это номер или имя индекса листа, чтобы вернуть один объект Worksheet . В следующем примере лист скрыт в активной книге.
Номер индекса листа обозначает положение листа на панели вкладок книги. Worksheets(1) — это первый (самый левый) лист в книге, а Worksheets(Worksheets.Count) — последний. Все листы включаются в число индексов, даже если они скрыты.
Имя листа отображается на вкладке листа. Используйте свойство Name , чтобы задать или вернуть имя листа. В следующем примере выполняется защита сценариев на Листе 1.
Если лист является активным листом, можно использовать свойство ActiveSheet , чтобы ссылаться на него. В следующем примере используется метод Activate для активации Sheet1, задает ориентацию страницы в альбомный режим, а затем выводит лист.
В этом примере событие BeforeDoubleClick используется для открытия указанного набора файлов в Блокноте. Чтобы использовать этот пример, лист должен содержать следующие данные:
- Ячейка A1 должна содержать имена файлов для открытия, разделенные запятой и пробелом.
- Ячейка D1 должна содержать путь к расположению файлов Блокнота.
- Ячейка D2 должна содержать путь к расположению программы Блокнота.
- Ячейка D3 должна содержать расширение файла без точки для файлов Блокнота (txt).
При двойном щелчке ячейки A1 файлы, указанные в ячейке A1, открываются в Блокноте.
События
Методы
Свойства
См. также
Поддержка и обратная связь
Есть вопросы или отзывы, касающиеся Office VBA или этой статьи? Руководство по другим способам получения поддержки и отправки отзывов см. в статье Поддержка Office VBA и обратная связь.
Источник
Using Excel worksheet functions in Visual Basic
Use most Microsoft Excel worksheet functions in your Visual Basic statements. For a list of the worksheet functions you can use, see List of worksheet functions available to Visual Basic.
Some worksheet functions are not useful in Visual Basic. For example, the Concatenate function is not needed because in Visual Basic you can use the & operator to join multiple text values.
Calling a worksheet function from Visual Basic
In Visual Basic, the Excel worksheet functions are available through the WorksheetFunction object.
The following Sub procedure uses the Min worksheet function to determine the smallest value in a range of cells. First, the variable myRange is declared as a Range object, and then it is set to range A1:C10 on Sheet1. Another variable, answer , is assigned the result of applying the Min function to myRange . Finally, the value of answer is displayed in a message box.
If you use a worksheet function that requires a range reference as an argument, you must specify a Range object. For example, you can use the Match worksheet function to search a range of cells. In a worksheet cell, you would enter a formula such as =MATCH(9,A1:A10,0). However, in a Visual Basic procedure, you would specify a Range object to get the same result.
Visual Basic functions don’t use the WorksheetFunction qualifier. A function may have the same name as a Microsoft Excel function and yet work differently. For example, Application.WorksheetFunction.Log and Log will return different values.
Inserting a worksheet function into a cell
To insert a worksheet function into a cell, you specify the function as the value of the Formula property of the corresponding Range object. In the following example, the RAND worksheet function (which generates a random number) is assigned to the Formula property of range A1:B3 on Sheet1 in the active workbook.
Example
This example uses the worksheet function Pmt to calculate a home mortgage loan payment. Notice that this example uses the InputBox method instead of the InputBox function so that the method can perform type checking. The Static statements cause Visual Basic to retain the values of the three variables; these are displayed as default values the next time you run the program.
See also
Support and feedback
Have questions or feedback about Office VBA or this documentation? Please see Office VBA support and feedback for guidance about the ways you can receive support and provide feedback.
Источник
Свойство Worksheet.Cells (Excel)
Возвращает объект Range , представляющий все ячейки на листе (а не только используемые в данный момент ячейки).
Синтаксис
выражение.Cells
Выражение Переменная, представляющая объект Worksheet .
Замечания
Так как элемент по умолчанию объекта Range направляет вызовы с параметрами в свойство Item, можно указать индекс строки и столбца сразу после ключевого слова Cells, вместо явного вызова свойства Item.
При использовании этого свойства без квалификатора объекта возвращается объект Range, который представляет все ячейки на активном листе.
Пример
В этом примере размер шрифта ячейки C5 на листе 1 активной книги устанавливается в 14 пунктов.
В этом примере формула очищается в ячейке 1 на листе 1 активной книги.
В этом примере шрифт и размер шрифта для каждой ячейки на листе Sheet1 устанавливается значение Arial из 8 точек.
В этом примере выполняется переключение сортировки между порядком по возрастанию и убыванию при двойном щелчке любой ячейки в диапазоне данных. Данные сортируются по столбцу ячейки, дважды щелкнув которую.
В этом примере выполняется просмотр столбца C активного листа, и для каждой ячейки с комментарием текст примечания помещается в столбец D и удаляется комментарий из столбца C.
Поддержка и обратная связь
Есть вопросы или отзывы, касающиеся Office VBA или этой статьи? Руководство по другим способам получения поддержки и отправки отзывов см. в статье Поддержка Office VBA и обратная связь.
Источник
Worksheet object (Excel)
Represents a worksheet.
The Worksheet object is a member of the Worksheets collection. The Worksheets collection contains all the Worksheet objects in a workbook.
The Worksheet object is also a member of the Sheets collection. The Sheets collection contains all the sheets in the workbook (both chart sheets and worksheets).
Example
Use Worksheets (index), where index is the worksheet index number or name, to return a single Worksheet object. The following example hides worksheet one in the active workbook.
The worksheet index number denotes the position of the worksheet on the workbook’s tab bar. Worksheets(1) is the first (leftmost) worksheet in the workbook, and Worksheets(Worksheets.Count) is the last one. All worksheets are included in the index count, even if they are hidden.
The worksheet name is shown on the tab for the worksheet. Use the Name property to set or return the worksheet name. The following example protects the scenarios on Sheet1.
When a worksheet is the active sheet, you can use the ActiveSheet property to refer to it. The following example uses the Activate method to activate Sheet1, sets the page orientation to landscape mode, and then prints the worksheet.
This example uses the BeforeDoubleClick event to open a specified set of files in Notepad. To use this example, your worksheet must contain the following data:
- Cell A1 must contain the names of the files to open, each separated by a comma and a space.
- Cell D1 must contain the path to where the Notepad files are located.
- Cell D2 must contain the path to where the Notepad program is located.
- Cell D3 must contain the file extension, without the period, for the Notepad files (txt).
When you double-click cell A1, the files specified in cell A1 are opened in Notepad.
Events
Methods
Properties
See also
Support and feedback
Have questions or feedback about Office VBA or this documentation? Please see Office VBA support and feedback for guidance about the ways you can receive support and provide feedback.
Источник