
Элемент управления пользовательской формы TextBox в VBA Excel. Использование текстового поля для ввода и вывода информации, основные свойства, примеры. Привязка текстового поля к ячейке.
UserForm.TextBox – это элемент управления пользовательской формы, предназначенный для ввода, редактирования и вывода информации в текстовом формате.

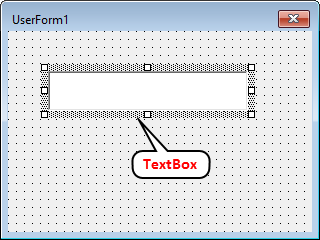
Текстовое поле незаменимо, когда необходимо заполнить пользовательскую форму новой информацией. Например, это может быть ФИО нового сотрудника и его паспортные данные, сумма выручки за день, новый электронный адрес и многое-многое другое.
Если с помощью текстового поля требуется вводить заранее известную информацию, элементы которой можно сгруппировать в список, то в этом случае удобнее вместо элемента управления TextBox использовать ListBox или ComboBox.
Вводить информацию в TextBox на открытой форме можно не только с помощью клавиатуры, но и вставкой текста из буфера обмена. Когда текстовое поле применяется для ввода пароля, есть возможность отобразить все его знаки замещающим символом, например, звездочкой.
Иногда, если на пользовательской форме используется только одно текстовое поле и кнопка «OK» (или кнопки «OK» и «Отмена»), для ввода информации такую форму можно заменить функцией InputBox, а для вывода информации, когда не требуется редактирование отображаемого текста, – функцией MsgBox.
Свойства текстового поля
| Свойство | Описание |
|---|---|
| AutoSize* | Автоподбор размера текстового поля. True – размер автоматически подстраивается под длину размещаемой строки. False – размер элемента управления определяется свойствами Width и Height. |
| AutoTab | Включение автоматической табуляции – передачи фокуса следующему элементу управления при достижении максимального числа символов при значениях свойства MaxLenght > 0. True – автоматическая табуляция включена, False – выключена. |
| ControlSource | Ссылка на источник данных для поля TextBox. |
| ControlTipText | Текст всплывающей подсказки при наведении курсора на TextBox. |
| Enabled | Возможность ввода, редактирования, копирования, вставки, удаления текста. True – все перечисленные опции включены, False – выключены (цвет текста в поле становится серым). |
| Font | Шрифт, начертание и размер текста в поле. |
| Height | Высота текстового поля. |
| Left | Расстояние от левого края внутренней границы пользовательской формы до левого края текстового поля. |
| Locked | Запрет ввода, редактирования, удаления текста. True – перечисленные опции запрещены (разрешено выделение и копирование текста), False – перечисленные опции разрешены. |
| MaxLenght | Максимальная длина строки. По умолчанию – 0, что означает – ограничений нет. |
| Multiline | Устанавливает многострочный (True) или однострочный (False) режим ввода-вывода текста. |
| PasswordChar | Задает символ, который будет отображаться при вводе знаков пароля. |
| TabIndex | Определяет позицию элемента управления в очереди на получение фокуса при табуляции, вызываемой свойством AutoTab или нажатием клавиш «Tab», «Enter». Отсчет начинается с 0. |
| Text** | Текстовое содержимое (значение) поля (=Value). |
| TextAlign | Выравнивание текста: 1 (fmTextAlignLeft) – по левому краю, 2 (fmTextAlignCenter) – по центру, 3 (fmTextAlignRight) – по правому краю. |
| Top | Расстояние от верхнего края внутренней границы пользовательской формы до верхнего края текстового поля. |
| Value** | Текстовое содержимое (значение) поля (=Text). |
| Visible | Видимость текстового поля. True – TextBox отображается на пользовательской форме, False – TextBox скрыт. |
| Width | Ширина текстового поля. |
| WordWrap | Актуально при Multiline = True. Переход на новую строку при достижении границы текстового поля. True – переход включен, False – переход выключен. |
* При использовании свойства AutoSize в значении True следует учитывать, что автоматическое изменение размеров поля при вводе текста может нарушить дизайн пользовательской формы.
** Text и Value — это два обозначения одного и того же свойства. Если в окне Properties элемента управления TextBox в поле свойства Text начать ввод строки, в поле Value ввод будет дублироваться. И наоборот, при вводе текста в поле свойства Value, дублирование произойдет в поле Text.
В таблице перечислены только основные, часто используемые свойства текстового поля. Все доступные свойства отображены в окне Properties элемента управления TextBox.
Свойства BackColor, BackStyle, BorderColor, BorderStyle отвечают за внешнее оформление текстового поля и его границ. Попробуйте выбирать доступные значения этих свойств в окне Properties, наблюдая за изменениями внешнего вида элемента управления TextBox на проекте пользовательской формы.
Привязка текстового поля к ячейке
Привязать элемент управления TextBox к ячейке на рабочем листе можно двумя способами.
1. В окне Properties элемента управления TextBox в поле свойства ControlSource необходимо указать адрес ячейки:

2. Присвоить свойству ControlSource адрес ячейки в коде VBA Excel:
|
UserForm1.TextBox1.ControlSource = «C5» |
Теперь ячейка C5 активного листа будет привязана к элементу управления TextBox1. При открытии формы текстовое поле будет заполнено значением ячейки C5.
Чтобы наглядно ознакомиться с взаимозависимостью значения ячейки C5 и содержимого текстового поля, разместите на пользовательской форме еще какой-нибудь элемент управления и откройте ее в немодальном* окне:
|
Sub Test() UserForm1.TextBox1.ControlSource = «C5» UserForm1.Show 0 End Sub |
Измените значение ячейки C5 и нажмите клавишу «Tab» или «Enter» – изменения будут продублированы в текстовом поле на форме. Измените содержимое поля TextBox1, нажмите клавишу «Tab» или «Enter», передав фокус другому элементу управления, – изменения продублируются в ячейке C5.
Чтобы привязать текстовое поле к ячейке неактивного листа, необходимо в адресе указать имя листа по ярлыку с разделителем «!»:
|
UserForm1.TextBox1.ControlSource = «Лист2!A3» |
Если имя листа содержит пробел, заключите его в одинарные кавычки:
|
UserForm1.TextBox1.ControlSource = «‘Мой лист’!B6» |
Точно также адрес ячейки конкретного листа можно указать непосредственно в окне Properties элемента управления TextBox в поле свойства ControlSource (без парных кавычек).
* Отображение пользовательской формы в немодальном окне позволяет редактировать ячейки на рабочем листе Excel, не закрывая форму.
Примеры использования TextBox
Пример 1
Обмен содержимым между текстовым полем, переменной и ячейкой на рабочем листе:
|
‘Присвоение текстовому полю значения ‘ячейки A2 и переменной a1 UserForm1.TextBox1.Text = Range(«A2») UserForm1.TextBox1.Text = a1 ‘Присвоение ячейке B3 и переменной a2 ‘значения текстового поля Cells(3, 2) = UserForm1.TextBox1.Text a2 = UserForm1.TextBox1.Value ‘Свойства Text и Value элемента ‘управления TextBox равнозначны |
Пример 2
Программное создание элемента управления TextBox, размещение его по центру пользовательской формы, добавление всплывающей подсказки и текста по умолчанию.
Предположим, что текстовое поле предназначено для ввода даты, поэтому добавляем соответствующую подсказку, а в качестве текста по умолчанию – текущую дату.
Создаем новую пользовательскую форму с именем UserForm2. Если у вас другое имя формы, это не имеет значения, так как обращаться к ней будем с помощью ключевого слова «Me». Открываем модуль созданной формы и вставляем в него следующий код VBA Excel:
|
1 2 3 4 5 6 7 8 9 10 11 12 13 14 15 16 17 18 19 20 21 22 23 24 25 |
Private Sub UserForm_Initialize() Dim myTextBox As Control ‘Создаем новый TextBox и присваиваем его переменной Set myTextBox = Me.Controls.Add(«Forms.TextBox.1») ‘Задаем размеры и заголовок пользовательской формы With Me .Height = 100 .Width = 220 .Caption = «Форма №2» End With ‘Присваиваем значения свойствам текстового поля With myTextBox .Width = 100 .Height = 20 ‘Left и Top рассчитаны для Excel 2016* .Left = 60 — 5 .Top = 40 — 15 ‘Добавляем всплывающую подсказку .ControlTipText = «Введите дату подписания договора» ‘Вставляем в поле текущую дату .Text = Format(Now, «DD.MM.YYYY») ‘Выравниваем текст по центру .TextAlign = 2 End With End Sub |
В результате выполнения кода откроется следующая форма с всплывающей подсказкой при наведении на TextBox курсора:

* Значения свойств Left и Top рассчитаны для Excel 2016. Вычитаемые числа зависят от толщины границ пользовательской формы, которые в других версиях Excel могут отличаться.
Содержание
- VBA TextBox
- Creating Text Boxes on VBA forms
- Writing Code Behind Forms
- Creating Text Boxes in an Excel Worksheet
- VBA Coding Made Easy
- VBA Code Examples Add-in
- VBA Excel. Элемент управления TextBox (текстовое поле)
- Элемент управления TextBox
- Свойства текстового поля
- Привязка текстового поля к ячейке
- Объект TextBox (Outlook Forms Script)
- Замечания
- Советы по использованию текстовых полей
- Методы
- Свойства
- Поддержка и обратная связь
VBA TextBox
In this Article
This article will demonstrate how to use a Text Box in Excel VBA.
VBA has the ability to create forms that the user can interact with such as Invoice forms, or Contact details. Text Boxes are controls that can be used within these forms, or Text boxes can be created directly within Excel itself.
Creating Text Boxes on VBA forms
To insert a Text Box into a VBA form, we first need to create the form. This is done in the VBE Editor.
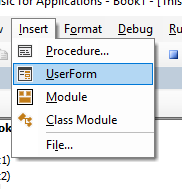
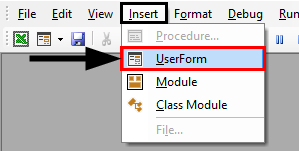
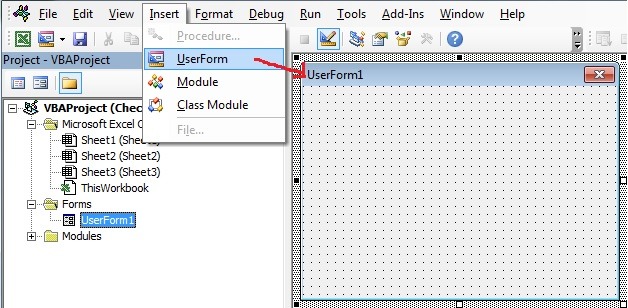
To insert a new user form into your code, select the UserForm option from the Insert Menu.
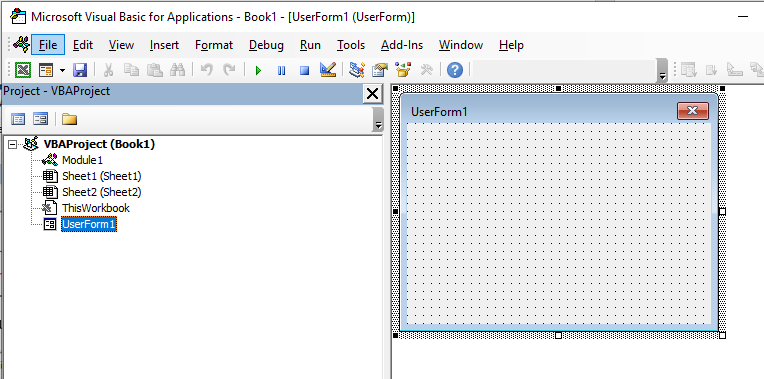
A new user form will appear in the Project Explorer and will be shown in the Code Window on the right.
You can rename your form using the Properties box. This should appear below your Project Explorer.
If it is how visible, Press F4 or click View, Properties Window.
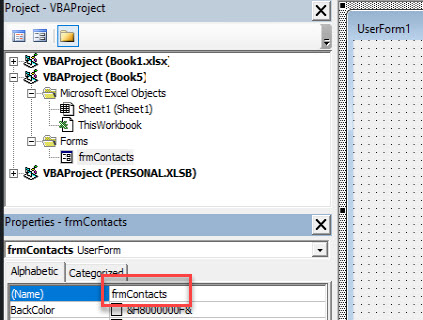
Click in the Name property and rename your form.
We can now start populating our form with controls – the text box control is the most popular control along with the label control.
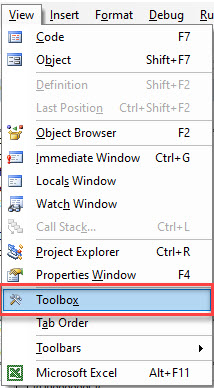
To populate the form with controls, we need to switch on the Toolbox.
In the Menu, select View > Toolbox.
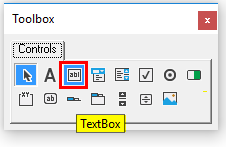
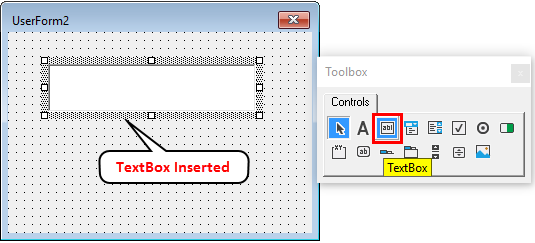
To create a Text Box on your form, select the Text Box control in the Toolbox.
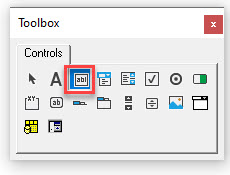
Drag a box shape on the form with your mouse, holding the left button down, and then release the mouse button.

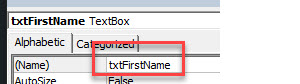
As this is the first Text Box we are creating, it will be named TextBox1. As with the form, you can use the Properties window to rename the text box.
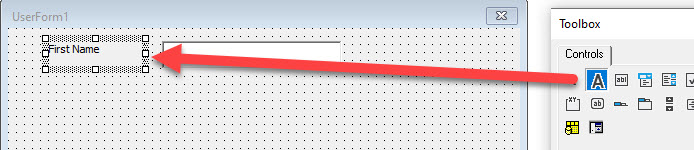
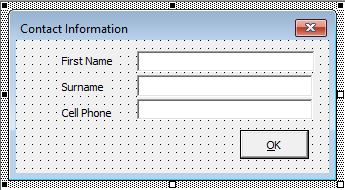
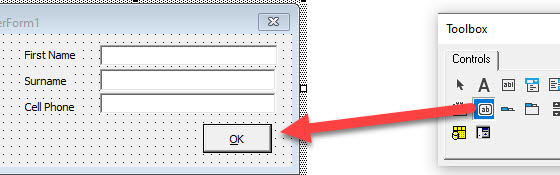
You might need to also create a label for your text box on the form. This is done with a label control. You drag on the form in the same way as you do for a Text Box, and then you can type the required text within the label control eg: First Name as shown below.
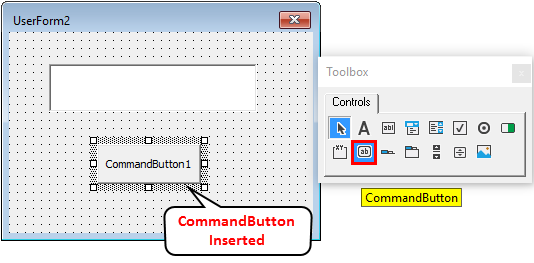
To use the form within VBA Code, we would need to add a command button to the form. This is done by selecting the Command Button control in the Toolbox and dragging the button onto your form.
You can then continue to create your form using textboxes, labels and command buttons, renaming them as appropriate.
Writing Code Behind Forms
Once we have created our form, we need to write VBA code to insert the information in our form onto our Excel worksheet. This code is called CBF (Code Behind Forms).
In the the VBE, double-click on the command button to go to the code behind the button.
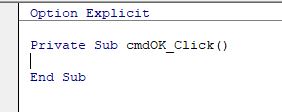
A sub-routine for the click event for the button will be created. We can type our VBA code in this routine. For example:
This routine will put the details typed in the text boxes into Excel, and then close the form.
Creating Text Boxes in an Excel Worksheet
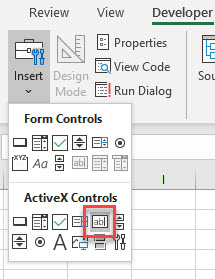
It is also possible to create text boxes within the Excel spreadsheet. In order to do this, you need to have your Developer Ribbon switched on.
Note: If you don’t see the Developer Ribbon, you’ll need to enable it.
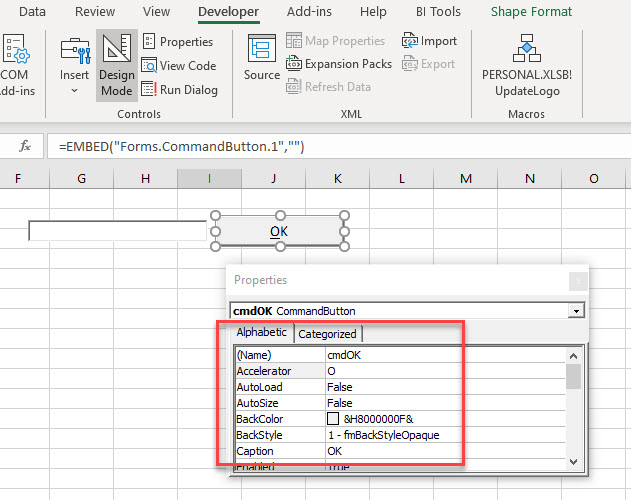
In the Ribbon, select Developer > Insert > ActiveX Controls > TextBox.
Click and drag in your Excel worksheet to draw the text box in the worksheet at the desired position. Release the mouse button to complete drawing the text box.
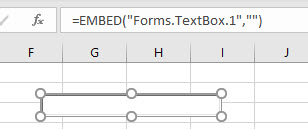
The text box will be in Design Mode. While in this mode, we can size the box, and select the Properties of the text box.
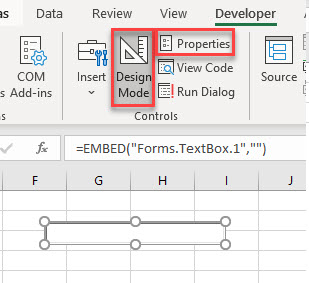
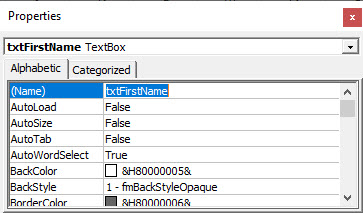
Click on the Properties button to show the Property Window for the text box. In this window, we can change a variety of properties of the text box such as the name of the box, the color of the text, background or border, the border style and the font used for the text in the text box for example.
To use the text box direct in Excel as we have used it in the VBA form above, we need a way to return the data typed into the text box to the Excel sheet. This can be done by adding a ActiveX command button to the worksheet, and using the click_event of this command button to return the information in the text box to the Excel sheet.
In the Ribbon, select Developer > Insert > ActiveX Controls > Command Button to add a command button to your Excel sheet. Switch on the Properties window and change the name of the button, the caption of the button and the Accelerator of the button as shown in the image below.
Double-click on the button to go to the VBA click event of the button and type the following code:
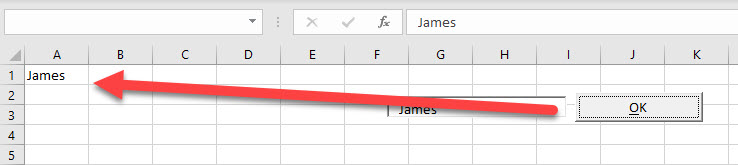
Switch back to the Excel worksheet, make sure Design Mode is switched off and then type in the created text box.

Click the command button to return the text to Excel.
VBA Coding Made Easy
Stop searching for VBA code online. Learn more about AutoMacro — A VBA Code Builder that allows beginners to code procedures from scratch with minimal coding knowledge and with many time-saving features for all users! 

VBA Code Examples Add-in
Easily access all of the code examples found on our site.
Simply navigate to the menu, click, and the code will be inserted directly into your module. .xlam add-in.
Источник
VBA Excel. Элемент управления TextBox (текстовое поле)
Элемент управления пользовательской формы TextBox в VBA Excel. Использование текстового поля для ввода и вывода информации, основные свойства, примеры. Привязка текстового поля к ячейке.
Элемент управления TextBox
Текстовое поле незаменимо, когда необходимо заполнить пользовательскую форму новой информацией. Например, это может быть ФИО нового сотрудника и его паспортные данные, сумма выручки за день, новый электронный адрес и многое-многое другое.
Вводить информацию в TextBox на открытой форме можно не только с помощью клавиатуры, но и вставкой текста из буфера обмена. Когда текстовое поле применяется для ввода пароля, есть возможность отобразить все его знаки замещающим символом, например, звездочкой.
Свойства текстового поля
| Свойство | Описание |
|---|---|
| AutoSize* | Автоподбор размера текстового поля. True – размер автоматически подстраивается под длину размещаемой строки. False – размер элемента управления определяется свойствами Width и Height. |
| AutoTab | Включение автоматической табуляции – передачи фокуса следующему элементу управления при достижении максимального числа символов при значениях свойства MaxLenght > 0. True – автоматическая табуляция включена, False – выключена. |
| ControlSource | Ссылка на источник данных для поля TextBox. |
| ControlTipText | Текст всплывающей подсказки при наведении курсора на TextBox. |
| Enabled | Возможность ввода, редактирования, копирования, вставки, удаления текста. True – все перечисленные опции включены, False – выключены (цвет текста в поле становится серым). |
| Font | Шрифт, начертание и размер текста в поле. |
| Height | Высота текстового поля. |
| Left | Расстояние от левого края внутренней границы пользовательской формы до левого края текстового поля. |
| Locked | Запрет ввода, редактирования, удаления текста. True – перечисленные опции запрещены (разрешено выделение и копирование текста), False – перечисленные опции разрешены. |
| MaxLenght | Максимальная длина строки. По умолчанию – 0, что означает – ограничений нет. |
| Multiline | Устанавливает многострочный (True) или однострочный (False) режим ввода-вывода текста. |
| PasswordChar | Задает символ, который будет отображаться при вводе знаков пароля. |
| TabIndex | Определяет позицию элемента управления в очереди на получение фокуса при табуляции, вызываемой свойством AutoTab или нажатием клавиш «Tab», «Enter». Отсчет начинается с 0. |
| Text** | Текстовое содержимое (значение) поля (=Value). |
| TextAlign | Выравнивание текста: 1 (fmTextAlignLeft) – по левому краю, 2 (fmTextAlignCenter) – по центру, 3 (fmTextAlignRight) – по правому краю. |
| Top | Расстояние от верхнего края внутренней границы пользовательской формы до верхнего края текстового поля. |
| Value** | Текстовое содержимое (значение) поля (=Text). |
| Visible | Видимость текстового поля. True – TextBox отображается на пользовательской форме, False – TextBox скрыт. |
| Width | Ширина текстового поля. |
| WordWrap | Актуально при Multiline = True. Переход на новую строку при достижении границы текстового поля. True – переход включен, False – переход выключен. |
* При использовании свойства AutoSize в значении True следует учитывать, что автоматическое изменение размеров поля при вводе текста может нарушить дизайн пользовательской формы.
** Text и Value — это два обозначения одного и того же свойства. Если в окне Properties элемента управления TextBox в поле свойства Text начать ввод строки, в поле Value ввод будет дублироваться. И наоборот, при вводе текста в поле свойства Value, дублирование произойдет в поле Text.
В таблице перечислены только основные, часто используемые свойства текстового поля. Все доступные свойства отображены в окне Properties элемента управления TextBox.
Свойства BackColor, BackStyle, BorderColor, BorderStyle отвечают за внешнее оформление текстового поля и его границ. Попробуйте выбирать доступные значения этих свойств в окне Properties, наблюдая за изменениями внешнего вида элемента управления TextBox на проекте пользовательской формы.
Привязка текстового поля к ячейке
Привязать элемент управления TextBox к ячейке на рабочем листе можно двумя способами.
1. В окне Properties элемента управления TextBox в поле свойства ControlSource необходимо указать адрес ячейки:
2. Присвоить свойству ControlSource адрес ячейки в коде VBA Excel:
Источник
Объект TextBox (Outlook Forms Script)
Отображает пользовательскую информацию или информацию из упорядоченного набора данных.
Замечания
Элемент управления TextBox (текстовое поле) обычно используется для отображения информации, добавленной пользователем. Он также может отображать набор данных, таких как таблица, запрос, лист или результат подсчета. Если Элемент TextBox привязан к источнику данных, изменение содержимого TextBox также изменяет значение привязанного источника данных.
Форматирование любой части текста TextBox повлияет на весь текст элемента управления. Например, если изменить шрифт или размер любого символа элемента управления, изменение затронет все символы элемента управления.
По умолчанию для TextBox используется свойство Value .
Советы по использованию текстовых полей
TextBox — это гибкий элемент управления, управляемый следующими свойствами: Text, MultiLine, WordWrap и AutoSize.
Text содержит текст, отображаемый в текстовом поле.
MultiLine определяет способ отображения текста элементом управления TextBox (в виде одной строки или множества строк). Символы новой строки определяют конец одной строки и начало другой. Если параметр MultiLine имеет значение False (значение по умолчанию), текст усекается, а не упаковывается в оболочку.
WordWrap позволяет TextBox переносить строки текста, которые не помещаются в TextBox. Значение по умолчанию — True.
Если вы не используете WordWrap, элемент TextBox начинает новую строку текста при обнаружении символа новой строки в тексте. Если WordWrap отключен, вы можете иметь текстовые строки, которые не помещаются полностью в TextBox. Элемент TextBox отображает части текста, которые помещаются в его ширину, и усекает части текста, которые не помещаются. WordWrap можно использовать лишь в случае, если MultiLine присвоено значение True.
AutoSize определяет, полностью ли отображается текст в TextBox. При использовании AutoSize вместе с TextBox размер последнего элемента увеличивается или уменьшается в зависимости от количества текста и размера шрифта. Значение по умолчанию — False.
AutoSize удобно применять в таких случаях:
Отображение заголовка из одной или нескольких строк.
Отображение содержимого TextBox длиною в одну строку.
Отображение содержимого TextBox, состоящего из нескольких строк только для чтения.
Избегайте применять AutoSize к пустому элементу TextBox, который использует свойства MultiLine и WordWrap. В таком случае при вводе текста в TextBox этот элемент автоматически принимает вид поля шириною в один символ, отображающего весь текст одной строкой.
Методы
| Имя | Описание |
|---|---|
| Copy | Копирует содержимое объекта в буфер обмена. |
| Cut | Удаляет выбранную информацию из объекта и переносит ее в буфер обмена. |
| Paste | Передает содержимое буфера обмена объекту. |
Свойства
| Имя | Описание |
|---|---|
| AutoSize | Возвращает или задает логическое значение, указывающее, будет ли объект автоматически изменять размер для отображения всего содержимого. Для чтения и записи. |
| AutoTab | Возвращает или задает логическое значение, указывающее, происходит ли автоматическая вкладка, когда пользователь вводит максимально допустимое количество символов в TextBox. Для чтения и записи. |
| AutoWordSelect | Возвращает или задает логическое значение, указывающее, является ли базовая единица, используемая для расширения выделенного фрагмента, словом или одним символом. Для чтения и записи. |
| BackColor | Возвращает или задает значение Long , указывающее цвет фона объекта . Для чтения и записи. |
| BackStyle | Возвращает или задает целое число , задающее стиль фона для объекта . Для чтения и записи. |
| BorderColor | Возвращает или задает значение Long , указывающее цвет границы объекта. Для чтения и записи. |
| BorderStyle | Возвращает или задает целое число , указывающее тип границы элемента управления. Для чтения и записи. |
| CanPaste | Возвращает логическое значение, указывающее, содержит ли буфер обмена данные, поддерживаемые объектом. Только для чтения. |
| CurLine | Возвращает или задает значение Long , представляющее текущую строку элемента управления. Для чтения и записи. |
| CurTargetX | Возвращает значение Long , представляющее предпочтительную горизонтальную позицию точки вставки в многострочной области TextBox. Только для чтения. |
| CurX | Возвращает или задает значение Long , представляющее текущее горизонтальное положение точки вставки в многострочной области TextBox. Для чтения и записи. |
| DragBehavior | Возвращает или задает целое число , указывающее, включает ли система функцию перетаскивания для элемента управления . Для чтения и записи. |
| Enabled | Возвращает или задает логическое значение, указывающее, может ли элемент управления получать фокус и реагировать на события, созданные пользователем. Для чтения и записи. |
| EnterFieldBehavior | Возвращает или задает целое число , указывающее поведение выделения при вводе элемента TextBox. Для чтения и записи. |
| EnterKeyBehavior | Возвращает или задает логическое значение, определяющее эффект нажатия клавиши ВВОД в TextBox. Для чтения и записи. |
| ForeColor | Возвращает или задает значение Long , указывающее цвет переднего плана объекта. Для чтения и записи. |
| HideSelection | Возвращает или задает логическое значение, указывающее, остается ли выделенный текст выделенным, если элемент управления не имеет фокуса. Для чтения и записи. |
| IMEMode | Возвращает или задает целое число , указывающее режим времени выполнения по умолчанию редактора метода ввода (IME) для элемента управления. Для чтения и записи. |
| IntegralHeight | Возвращает или задает логическое значение, указывающее, отображает ли элемент TextBox полные строки текста или частичные строки. Для чтения и записи. |
| LineCount | Возвращает значение Long , указывающее количество текстовых строк в элементе TextBox. Только для чтения. |
| Locked | Возвращает или задает логическое значение, указывающее, можно ли изменять элемент управления. Для чтения и записи. |
| MaxLength | Возвращает или задает значение Long , указывающее максимальное число символов, которое пользователь может ввести в TextBox. Для чтения и записи. |
| MouseIcon | Возвращает значение String , представляющее полное имя пути настраиваемого значка, назначаемого элементу управления. Только для чтения. |
| MousePointer | Возвращает или задает целое число , указывающее тип указателя, отображаемого при наведении указателя мыши на определенный объект. Для чтения и записи. |
| MultiLine | Возвращает или задает логическое значение, указывающее, может ли элемент управления принимать и отображать несколько строк текста. Для чтения и записи. |
| PasswordChar | Возвращает или задает значение String , указывающее замещающий символ, который будет отображаться вместо символов, фактически введенных в TextBox. Для чтения и записи. |
| ScrollBars | Возвращает или задает целое число , указывающее, имеет ли элемент управления вертикальные полосы прокрутки, горизонтальные полосы прокрутки или и то, и другое. Для чтения и записи. |
| SelectionMargin | Возвращает или задает логическое значение, указывающее, может ли пользователь выделить строку текста, щелкнув область слева от текста. Для чтения и записи. |
| SelLength | Возвращает или задает значение Long , представляющее количество символов, выделенных в элементе TextBox. Для чтения и записи. |
| SelStart | Возвращает или задает значение Long , представляющее начальную точку выделенного текста, или точку вставки, если текст не выделен. Для чтения и записи. |
| SelText | Возвращает или задает значение String , представляющее выделенный текст элемента управления. Для чтения и записи. |
| SpecialEffect | Возвращает или задает целое число , указывающее внешний вид объекта. Для чтения и записи. |
| TabKeyBehavior | Возвращает или задает логическое значение, указывающее, разрешены ли вкладки в области редактирования. Для чтения и записи. |
| Текст | Возвращает или задает значение String , указывающее текст в элементе управления . Для чтения и записи. |
| TextAlign | Возвращает или задает целое число , указывающее способ выравнивания текста в элементе управления . Для чтения и записи. |
| TextLength | Возвращает значение Long , представляющее длину текста в количестве символов в области редактирования TextBox. Только для чтения. |
| Значение | Возвращает или задает значение Variant , указывающее текст в области редактирования. Для чтения и записи. |
| WordWrap | Возвращает или задает логическое значение, указывающее, будет ли содержимое элемента управления автоматически переноситься в конце строки, а элемент управления разворачивается в соответствии с текстом. Для чтения и записи. |
Поддержка и обратная связь
Есть вопросы или отзывы, касающиеся Office VBA или этой статьи? Руководство по другим способам получения поддержки и отправки отзывов см. в статье Поддержка Office VBA и обратная связь.
Источник
In this Article
- Creating Text Boxes on VBA forms
- Writing Code Behind Forms
- Creating Text Boxes in an Excel Worksheet
This article will demonstrate how to use a Text Box in Excel VBA.
VBA has the ability to create forms that the user can interact with such as Invoice forms, or Contact details. Text Boxes are controls that can be used within these forms, or Text boxes can be created directly within Excel itself.
Creating Text Boxes on VBA forms
To insert a Text Box into a VBA form, we first need to create the form. This is done in the VBE Editor.
First, Open the VBE Editor in Excel.
To insert a new user form into your code, select the UserForm option from the Insert Menu.
A new user form will appear in the Project Explorer and will be shown in the Code Window on the right.
You can rename your form using the Properties box. This should appear below your Project Explorer.
If it is how visible, Press F4 or click View, Properties Window.
Click in the Name property and rename your form.
We can now start populating our form with controls – the text box control is the most popular control along with the label control.
To populate the form with controls, we need to switch on the Toolbox.
In the Menu, select View > Toolbox.
To create a Text Box on your form, select the Text Box control in the Toolbox.
Drag a box shape on the form with your mouse, holding the left button down, and then release the mouse button.
As this is the first Text Box we are creating, it will be named TextBox1. As with the form, you can use the Properties window to rename the text box.
You might need to also create a label for your text box on the form. This is done with a label control. You drag on the form in the same way as you do for a Text Box, and then you can type the required text within the label control eg: First Name as shown below.
To use the form within VBA Code, we would need to add a command button to the form. This is done by selecting the Command Button control in the Toolbox and dragging the button onto your form.
You can then continue to create your form using textboxes, labels and command buttons, renaming them as appropriate.
Writing Code Behind Forms
Once we have created our form, we need to write VBA code to insert the information in our form onto our Excel worksheet. This code is called CBF (Code Behind Forms).
In the the VBE, double-click on the command button to go to the code behind the button.
A sub-routine for the click event for the button will be created. We can type our VBA code in this routine. For example:
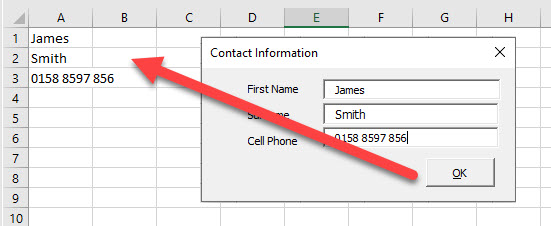
Private Sub cmdOK_Click()
  Range("A1") = Me.txtFirstName
  Range("A2") = Me.txtSurname
  Range("A3") = Me.txtCellPhone
  Unload Me
End Sub
This routine will put the details typed in the text boxes into Excel, and then close the form.
Creating Text Boxes in an Excel Worksheet
It is also possible to create text boxes within the Excel spreadsheet. In order to do this, you need to have your Developer Ribbon switched on.
Note: If you don’t see the Developer Ribbon, you’ll need to enable it.
In the Ribbon, select Developer > Insert > ActiveX Controls > TextBox.
Click and drag in your Excel worksheet to draw the text box in the worksheet at the desired position. Release the mouse button to complete drawing the text box.
The text box will be in Design Mode. While in this mode, we can size the box, and select the Properties of the text box.
Click on the Properties button to show the Property Window for the text box. In this window, we can change a variety of properties of the text box such as the name of the box, the color of the text, background or border, the border style and the font used for the text in the text box for example.
To use the text box direct in Excel as we have used it in the VBA form above, we need a way to return the data typed into the text box to the Excel sheet. This can be done by adding a ActiveX command button to the worksheet, and using the click_event of this command button to return the information in the text box to the Excel sheet.
In the Ribbon, select Developer > Insert > ActiveX Controls > Command Button to add a command button to your Excel sheet. Switch on the Properties window and change the name of the button, the caption of the button and the Accelerator of the button as shown in the image below.
Double-click on the button to go to the VBA click event of the button and type the following code:
Private Sub cmdOK_Click()
   Range("A1") = Me.txtFirstName
End Sub
Switch back to the Excel worksheet, make sure Design Mode is switched off and then type in the created text box.
Click the command button to return the text to Excel.
VBA Coding Made Easy
Stop searching for VBA code online. Learn more about AutoMacro — A VBA Code Builder that allows beginners to code procedures from scratch with minimal coding knowledge and with many time-saving features for all users!
Learn More!

What is VBA TextBox in Excel?
VBA TextBox is one of the many controls from UserForm controls in Excel. VBA TextBox can come handy when you want to have input from user like their name, age, address, salary, etc. Using TextBox control, you can allow users to input this kind of information and save many of your time as well as typo errors. VBA TextBox can consist of Static or Dynamic Data.
UserForm itself is a very useful tool which has different control options like TextBox, MsgBox, and InputBox, etc. which provide a more practical way to get data from user so that you can functionally process that data and find out some useful insights out of it.
In this article, you will be getting hands-on experience on Excel VBA TextBox.
Examples of Excel VBA TextBox
Below are the different examples of VBA TextBox in Excel.
You can download this VBA TextBox Excel Template here – VBA TextBox Excel Template
Example #1 – How to Insert TextBox in VBA?
Below are the steps to insert TextBox in Excel VBA.
Step 1: Open an excel file and hit Alt + F11 to navigate to VBA pane.
Step 2: As we already have discussed, TextBox is an option available in UserForm. So we need to insert UserForm in VBE. Go to Insert Menu > Click UserForm.
Step 3: As soon as you insert a UserForm in VBA you can see a Toolbox option associated with it and have different options associated with UserForm.

Step 4: In this toolbox select TextBox.
Step 5: Drag this TextBox on the user form.
Step 6: Hit F4 to see the properties of UserForm (Alternatively you can do this by right clicking on UserForm inserted). These properties allow you to make some necessary changes like changing the name of UserForm to be able to access it easily.

Some other basic changes you can do with properties pane of UserForm are like changing the Font, Changing the size, etc.
Step 7: Input the text as “Welcome to VBA TextBox!” in TextBox under UserForm.
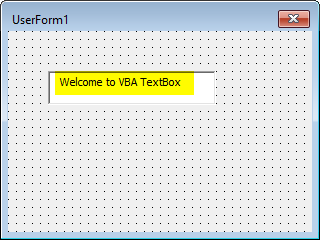
This is how you can create a VBA TextBox.
Example #2 – Setting Value to VBA TextBox
Let’s see how we can set the values for TextBox. It is sometimes mandatory to set the values otherwise, the user will input anything of their interest.
Step 1: Insert a New UserForm in VBE. Go to Insert menu > click on UserForm.

Step 2: From UserForm Tools, select TextBox and drag it to UserForm.
Step 3: Insert a CommandButton under UserForm in the same way you added TextBox.
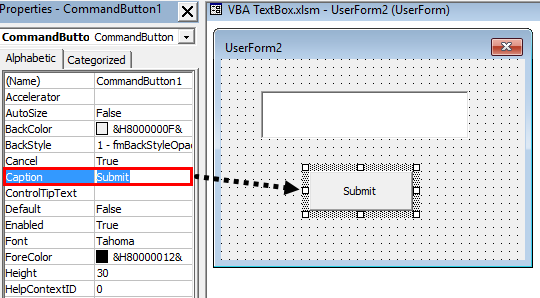
Step 4: Change the caption of the command button to “Submit” under properties. You can navigate to properties of command button by Right Click on Command Button > Click Properties.
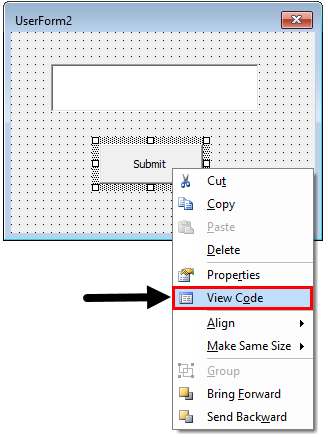
Step 5: Double click on the submit button or Right click on it and select View Code.
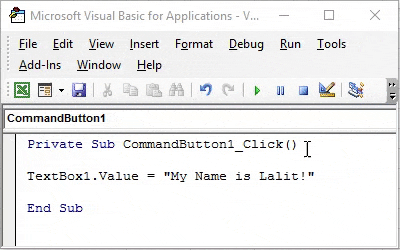
Step 6: In the code, insert a line of new code within sub-procedure as below.
Code:
Private Sub CommandButton1_Click()

TextBox1.Value = "My Name is Lalit!"

End Sub
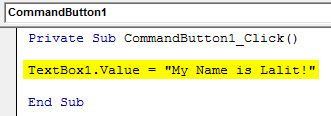
This highlighted code allows you to assign the value at right enclosed in double quotes to the TextBox. You can also use TextBox.Text property instead of TextBox.Values to set the value for TextBox.
Step 7: Hit F5 or Run button under VBE to run this code, you will see a UserForm with empty TextBox. As soon as you hit the submit button, the text assigned to TextBox will appear there in it.
Example #3 – Restrict TextBox Input to Accept only Numeric Values
Follow the below steps:
Step 1: Insert a new UserForm in your VBA and add TextBox in it.
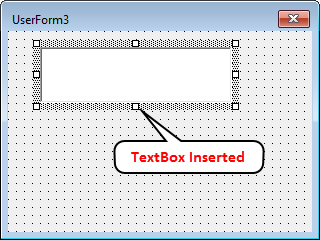
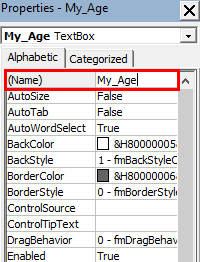
Step 2: Change the name of TextBox under Properties section to “My_Age”.
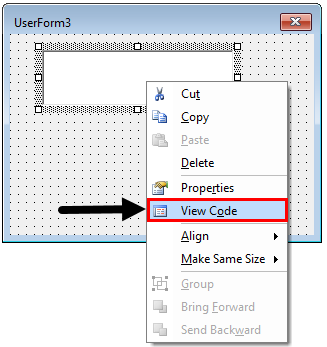
Step 3: Double click on TextBox or right click on it and select View Code.
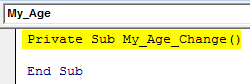
You’ll be able to see the initial sub-procedure as below:
Code:
Private Sub My_Age_Change()

End Sub
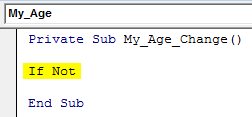
Step 4: Now, try to add an If the condition which starts with If Not.
Code:
Private Sub My_Age_Change()

If Not

End Sub
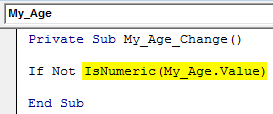
Step 5: Ask compiler to check if the value of TextBox “My_Age” is numeric or not using IsNumeric Keyword in front of If Not condition.
Code:
Private Sub My_Age_Change()

If Not IsNumeric(My_Age.Value)

End Sub
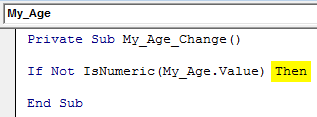
Step 6: As every IF condition asks, add a Then Keyword for it.
Code:
Private Sub My_Age_Change()

If Not IsNumeric(My_Age.Value) Then

End Sub
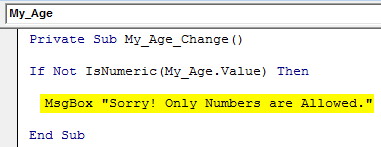
In this piece of code, you are asking the compiler to check whether the value inputted by the user under TextBox is numeric or not. If, it’s not numeric, then what to do? Follow the next step.
Step 7: With the use of MsgBox, add a comment like “Sorry! Only Numbers are Allowed.” to be displayed if, the value in TextBox is not numeric.
Code:
Private Sub My_Age_Change()

If Not IsNumeric(My_Age.Value) Then

  MsgBox "Sorry! Only Numbers are Allowed."

End Sub
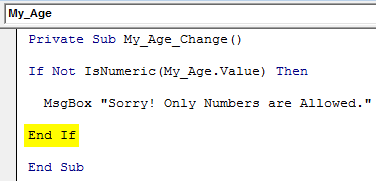
Step 8: Now, close this IF statement by using keyword End IF.
Code:
Private Sub My_Age_Change()

If Not IsNumeric(My_Age.Value) Then

  MsgBox "Sorry! Only Numbers are Allowed."

End If

End Sub
Step 9: Now, run this code by hitting the F5 button from your keyboard or Run button from VBE and see the output. You’ll get a TextBox as shown below:
Now, I try to input an Integer value in it and see whether it actually allows me to input the same or not.
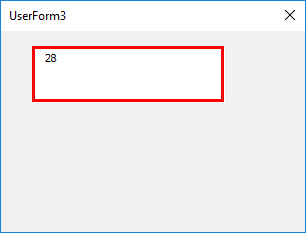
Bingo, it allows me to store the integer value.
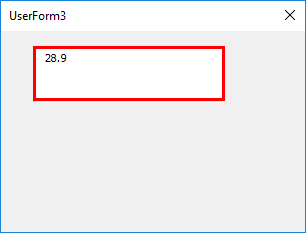
Now, let’s try to add some float (Value with Decimal points) to this text box and see whether it allows us to input the same.
Let’s check if this text box allows us to store some negative values under it or not. I will type some negative number and check.
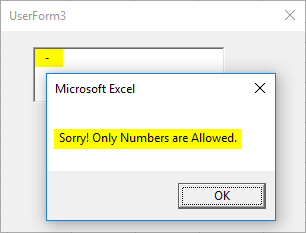
Well! Well!! Well!!!, it shoots a message me saying only numbers are allowed. It happened because this code written initially is with IF condition, it doesn’t have any workaround what to do if the number is non-positive. Moreover, Age can’t be negative. Right? Therefore, I am getting a warning message as you can see above. However, If you click OK in the message box and try inputting the number, it will allow you to do so. But I will not recommend breaking the rules over there.
Finally, let’s try some text string in the box and see if it allows the same to be stored under textbox or not.

As rightly expected, as soon as I entered the first string letter, the system prevented me to do so by throwing a message. This is because we have mentioned a condition in our code saying if the value is not numeric, please throw a message towards the user saying only numeric values are allowed.
Things to Remember
- VBA TextBox is a special option under UserForm. Which is designed to take input from the user itself.
- There are two methods to set the values for a TextBox: by using TextBox.Text and by using TextBox.Value.
- Sometimes it’s mandatory to restrict the user input so that we are getting the right type of data.
Recommended Articles
This is a guide to VBA TextBox. Here we discuss how to Create TextBox in Excel VBA along with practical examples and downloadable excel template. You can also go through our other suggested articles –
- VBA IsNumeric
- VBA UCASE
- VBA Close UserForm
- VBA Text

In Excel VBA tutorial 4 we learned how to add different tools to the user form. In today’s tutorials, we will learn about the properties of text boxes. We will learn about different formats of text boxes.
About User Form Properties In Tutorial 3, we saw some important points. In the same way every tool has its properties. Some tabs are more or less according to the tool.

1. Name – Any name can be given to the text box.
2. Text box Size – Option of drag and drop with the mouse is better to increase the size or more.
3. Control Tip Text – When the application is run, you have to type the text in the control tip text to show a text tip as soon as the mouse cursor is moved over the text box.

4. Enable – Many times the project has to show the text in the text box, but to ban it from editing, Select False Option in the option of enable, no user can edit the text of the text box.
5. Visible – To hide the text box, the text box will be hidden as soon as it is false in front of the Visible option.
6. Text – To show any text by default in the text box, you can type the words type in front of the text option.
7. With the option of Text Align, Back Color, Border Color, you can change the design of the text box.
8. Password Character – Type one of the special characters in the password char to show the text * or # or @ of the text box as such.
For example – When typing a text box password, all we need to do is to show * star *, type password Char * .

How to change the text box format?
1. Text box currency format
To change the text box Value to currency format, double click on the text box or right click to view code.
Private Sub TextBox1_Change()
End Sub
The text box name and change will appear. That means, while making any change in the text box, we can give the command in it. You can see multiple options in the drop down option by clicking above the change option above. We will be able to make any changes according to the behavior of the text box. We have to type the code of the format in the line below Private Sub TextBox1_Change ().

Private Sub TextBox1_Change()
Me.TextBox1.Text = Format(Me.TextBox1, “####,##”)
End Sub
Now run the project by pressing F5. And type any number in the text box. The value will be converted to currency format only while typing.
If you need a decimal number in the currency format, then click on the text Behavior After Update
Me.TextBox1.Text = Format (Me.TextBox1, “####, ##. 00”) Apply this code.
Private Sub TextBox1_AfterUpdate()
Me.TextBox1.Text = Format(Me.TextBox1, “####,##”)
End Sub
2. Text Box Date Format –
To convert a value to a date format, double-click on the text box and select Text Behavior After Update. And apply the format code below.
Private Sub TextBox2_AfterUpdate ()
Me.TextBox2.Text = Format (Me.TextBox2, “dd / mm / yyyy”)
End Sub

You can use dashes or slashes in the date format or you can use a different format.
dd-mm-yyyy
dd/mmm/yyyy
mmm/dd/yyyy
Similarly, you can apply any format in the text box.
Me. TextBox .Text = Format (TextBox, “Format”)
Excel VBA UserForm Textbox
TextBox is one of the UserForm control. You can select and drag TextBox on the UserForm. It is used to display text or edit existing text on the TextBox. TextBox can have static data or dynamic data. You can see how TextBox works and more details about UserForm TextBox Control on the UserForm in the following section.
- VBA TextBox Control on the UserForm
- Add Dynamic TextBox Control on the UserForm Using VBA
- Clear TextBox Control Using VBA
- Delete TextBox Control on the UserForm using VBA
VBA TextBox Control on the UserForm
Please find more details about VBA ActiveX TextBox Control on the UserForm.
-
- Go To Developer Tab and then click Visual Basic from the Code or Press Alt+F11.
- Go To Insert Menu, Click UserForm. Please find the screenshot for the same.
-
- Drag the TextBox control on the Userform from the Toolbox. Please find the screenshot for the same.

-
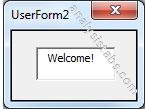
- Click on the properties.
- On the left side find ‘Text’ from the available properties.
- On the right side mention as ‘Welcome!’.
- Like this you can add number of Text Box controls on the UserForm according to your requirement.
Add ActiveX Dynamic Text Box Control on the UserForm Using VBA
Please find the following steps and example code, it will show you how to add dynamic TextBox control on the userform.
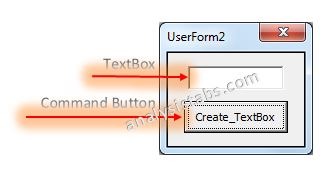
-
- Add Text Box and CommandButton on the userform from the toolbox.
- Right click on the CommandButton, click properties
- Change the CommandButton caption to ‘Create_TextBox ’
- Double click on the CommandButton
- Now, it shows the following code.
Private Sub CommandButton1_Click()

End Sub
-
- Call the below procedure named ‘Add_Dynamic_TextBox ’ and find the below procedure to run.
Private Sub CommandButton1_Click()
    Call Add_Dynamic_TextBox
End Sub
Procedure to call in the CommandButton:
Sub Add_Dynamic_TextBox()
    'Add Dynamic TextBox and assign it to object 'Lbl'
    Set lbl = UserForm2.Controls.Add("Forms.TextBox.1")

    'Assign TextBox Name
    lbl.Caption = "Dynamic TextBox"

    'TextBox Border Style
    lbl.BorderStyle = 2

    'TextBox Position
    lbl.Left = 10
    lbl.Top = 10
End Sub
-
- Now, click F5 to run the macro, click ‘Create_TextBox ’ button to see the result.
- You can see the created dynamic Text Box which is shown in the following screen shot.
Clear ActiveX TextBox Control Using VBA
Please find the below code it will show you how to clear ActiveX Text Box control. In the below example ‘TextBox1’ is the text box name.
Sub Clr_TxtBx()
    TextBox1.Text = ""
End Sub
Delete TextBox Control on the UserForm using VBA
Please find the below code, it will show you how to delete or remove the control on the UserForm. In the below example, its deleting the TextBox named ‘New TextBox’ which is on the UserForm named ‘UserForm4’. We can use Remove method to delete the controls which are created during run time. Controls which are created during design time cannot be deleted using this method. Please find the below example and screen shots for better understand.
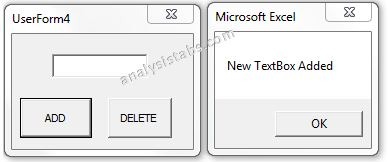
Code 1: Adding control During Run Time
Private Sub CommandButton1_Click()
    'We can use Add method to add the new controls on run time
    Set lblBtn = Me.Controls.Add("Forms.TextBox.1")
    With lblBtn
        .Top = 20
        .Left = 20
        .Caption = "New TextBox"
        .Name = "lblNew1"
    End With
    MsgBox "New TextBox Added"
End Sub
Please find the below screen shot for your reference for the above macro and its output.
When we click on Add Command Button:
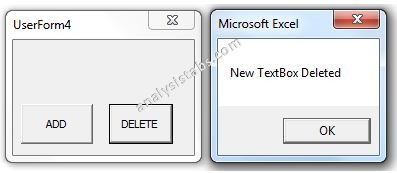
Code 1: Deleting or Removing Text Box control which is created during run time.
Private Sub CommandButton2_Click()
    'We can use Remove method to delete the controls which are created during run time
    'Note: Controls which are created on design time cannot be deleted using this method
    Me.Controls.Remove ("lblNew1")
    MsgBox "New TextBox Deleted"
End Sub
Please find the below screen shot for your reference for the above macro and its output.
When we click on Delete Command Button:
A Powerful & Multi-purpose Templates for project management. Now seamlessly manage your projects, tasks, meetings, presentations, teams, customers, stakeholders and time. This page describes all the amazing new features and options that come with our premium templates.
Save Up to 85% LIMITED TIME OFFER

All-in-One Pack
120+ Project Management Templates
Essential Pack
50+ Project Management Templates
Excel Pack
50+ Excel PM Templates
PowerPoint Pack
50+ Excel PM Templates
MS Word Pack
25+ Word PM Templates
Ultimate Project Management Template
Ultimate Resource Management Template
Project Portfolio Management Templates
VBA Reference
Effortlessly
Manage Your Projects
120+ Project Management Templates
Seamlessly manage your projects with our powerful & multi-purpose templates for project management.
120+ PM Templates Includes:
Effectively Manage Your
Projects and Resources
ANALYSISTABS.COM provides free and premium project management tools, templates and dashboards for effectively managing the projects and analyzing the data.
We’re a crew of professionals expertise in Excel VBA, Business Analysis, Project Management. We’re Sharing our map to Project success with innovative tools, templates, tutorials and tips.
Project Management
Excel VBA
Download Free Excel 2007, 2010, 2013 Add-in for Creating Innovative Dashboards, Tools for Data Mining, Analysis, Visualization. Learn VBA for MS Excel, Word, PowerPoint, Access, Outlook to develop applications for retail, insurance, banking, finance, telecom, healthcare domains.
Page load link
Go to Top