
Цикл For Each… Next в VBA Excel, его синтаксис и описание отдельных компонентов. Примеры использования цикла For Each… Next.
Цикл For Each… Next в VBA Excel предназначен для выполнения блока операторов по отношению к каждому элементу из группы элементов (диапазон, массив, коллекция). Этот замечательный цикл применяется, когда неизвестно количество элементов в группе и их индексация, в противном случае, более предпочтительным считается использование цикла For…Next.
|
For Each element In group [ statements ] [ Exit For ] [ statements ] Next [ element ] |
В квадратных скобках указаны необязательные атрибуты цикла For Each… Next.
Компоненты цикла For Each… Next
| Компонент | Описание |
|---|---|
| element | Обязательный атрибут в операторе For Each, необязательный атрибут в операторе Next. Представляет из себя переменную, используемую для циклического прохода элементов группы (диапазон, массив, коллекция), которая предварительно должна быть объявлена с соответствующим типом данных*. |
| group | Обязательный атрибут. Группа элементов (диапазон, массив, коллекция), по каждому элементу которой последовательно проходит цикл For Each… Next. |
| statements | Необязательный** атрибут. Операторы вашего кода. |
| Exit For | Необязательный атрибут. Оператор выхода из цикла до его окончания. |
*Если цикл For Each… Next используется в VBA Excel для прохождения элементов коллекции (объект Collection) или массива, тогда переменная element должна быть объявлена с типом данных Variant, иначе цикл работать не будет.
**Если не использовать в цикле свой код, смысл применения цикла теряется.
Примеры циклов For Each… Next
Цикл для диапазона ячеек
На активном листе рабочей книги Excel выделите диапазон ячеек и запустите на выполнение следующую процедуру:
|
Sub test1() Dim element As Range, a As String a = «Данные, полученные с помощью цикла For Each… Next:» For Each element In Selection a = a & vbNewLine & «Ячейка « & element.Address & _ » содержит значение: « & CStr(element.Value) Next MsgBox a End Sub |
Информационное окно MsgBox выведет адреса выделенных ячеек и их содержимое, если оно есть. Если будет выбрано много ячеек, то полностью информация по всем ячейкам выведена не будет, так как максимальная длина параметра Prompt функции MsgBox составляет примерно 1024 знака.
Цикл для коллекции листов
Скопируйте следующую процедуру VBA в стандартный модуль книги Excel:
|
Sub test2() Dim element As Worksheet, a As String a = «Список листов, содержащихся в этой книге:» For Each element In Worksheets a = a & vbNewLine & element.Index _ & «) « & element.Name Next MsgBox a End Sub |
Информационное окно MsgBox выведет список наименований всех листов рабочей книги Excel по порядковому номеру их ярлычков, соответствующих их индексам.
Цикл для массива
Присвоим массиву список наименований животных и в цикле For Each… Next запишем их в переменную a. Информационное окно MsgBox выведет список наименований животных из переменной a.
|
Sub test3() Dim element As Variant, a As String, group As Variant group = Array(«бегемот», «слон», «кенгуру», «тигр», «мышь») ‘или можно присвоить массиву значения диапазона ячеек ‘рабочего листа, например, выбранного: group = Selection a = «Массив содержит следующие значения:» & vbNewLine For Each element In group a = a & vbNewLine & element Next MsgBox a End Sub |
Повторим ту же процедуру VBA, но всем элементам массива в цикле For Each… Next присвоим значение «Попугай». Информационное окно MsgBox выведет список наименований животных, состоящий только из попугаев, что доказывает возможность редактирования значений элементов массива в цикле For Each… Next.
|
Sub test4() Dim element As Variant, a As String, group As Variant group = Array(«бегемот», «слон», «кенгуру», «тигр», «мышь») ‘или можно присвоить массиву значения диапазона ячеек ‘рабочего листа, например, выделенного: group = Selection a = «Массив содержит следующие значения:» & vbNewLine For Each element In group element = «Попугай» a = a & vbNewLine & element Next MsgBox a End Sub |
Этот код, как и все остальные в этой статье, тестировался в Excel 2016.
Цикл для коллекции подкаталогов и выход из цикла
В этом примере мы будем добавлять в переменную a названия подкаталогов на диске C вашего компьютера. Когда цикл дойдет до папки Program Files, он добавит в переменную a ее название и сообщение: «Хватит, дальше читать не буду! С уважением, Ваш цикл For Each… Next.».
|
1 2 3 4 5 6 7 8 9 10 11 12 13 14 15 16 17 18 19 20 21 22 |
Sub test5() Dim FSO As Object, myFolders As Object, myFolder As Object, a As String ‘Создаем новый FileSystemObject и присваиваем его переменной «FSO» Set FSO = CreateObject(«Scripting.FileSystemObject») ‘Извлекаем список подкаталогов на диске «C» и присваиваем ‘его переменной «myFolders» Set myFolders = FSO.GetFolder(«C:») a = «Папки на диске C:» & vbNewLine ‘Проходим циклом по списку подкаталогов и добавляем в переменную «a« ‘их имена, дойдя до папки «Program Files«, выходим из цикла For Each myFolder In myFolders.SubFolders a = a & vbNewLine & myFolder.Name If myFolder.Name = «Program Files» Then a = a & vbNewLine & vbNewLine & «Хватит, дальше читать не буду!» _ & vbNewLine & vbNewLine & «С уважением,» & vbNewLine & _ «Ваш цикл For Each... Next.« Exit For End If Next Set FSO = Nothing MsgBox a End Sub |
Информационное окно MsgBox выведет список наименований подкаталогов на диске C вашего компьютера до папки Program Files включительно и сообщение цикла о прекращении своей работы.
В результате работы программы будут выведены не только наименования подкаталогов, видимых при переходе в проводнике к диску C, но и скрытые и служебные папки. Для просмотра списка всех подкаталогов на диске C, закомментируйте участок кода от If до End If включительно и запустите выполнение процедуры в редакторе VBA Excel.
In this Article
- For Each Loop
- For Each: Basic Examples
- Loop Through Cells
- Loop Through Sheets
- Loop Through Workbooks
- Loop Through Shapes
- Loop Through Charts
- Loop Through PivotTables
- Loop Through Tables
- Loop Through Items in Array
- Loop Through Numbers
- For Each Loop Builder
- For Each – If
- For Each Cell in Range – If
- For Each Common Examples
- Close All Workbooks
- Hide All Sheets
- Unhide All Sheets
- Protect All Sheets
- Unprotect All Sheets
- Delete All Shapes On All Worksheets
- Refresh All PivotTables
- Using For Each in Access VBA
This tutorial will show you examples of using the For Each Loop in VBA. Click here to learn more about loops in general.
For Each Loop
The For Each Loop allows you to loop through each object in a collection:
- All cells in a range
- All worksheets in a workbook
- All open workbooks
- All shapes in a worksheet
- All items in an array
- and more!
For Each: Basic Examples
These examples will demonstrate how to set up For Each loops to loop through different types of objects.
Loop Through Cells
This procedure will loop through each cell in range A1:A10, setting the cell to it’s right equal to itself.
Sub ForEachCell()
    Dim Cell As Range

    For Each Cell In Sheets("Sheet1").Range("A1:A10")
        Cell.Offset(0, 1).value = Cell.value
    Next Cell

End Sub
Loop Through Sheets
This procedure will loop through each sheet in a Workbook, unhiding each sheet.
Sub ForEachSheets()
    Dim ws As Worksheet

    For Each ws In Sheets
        ws.Visible = True
    Next ws

End Sub
Loop Through Workbooks
This procedure will loop through each Workbook, closing each one.
Sub ForEachWorkbooks()
    Dim wb As Workbook

    For Each wb In Workbooks
        wb.Close
    Next wb

End Sub
Loop Through Shapes
This procedure will loop through each shape in Sheet1, deleting each one.
Sub ForEachShape()
    Dim Shp As Shape

    For Each Shp In Sheets("Sheet1").Shapes
        Shp.Delete
    Next Shp

End Sub
VBA Coding Made Easy
Stop searching for VBA code online. Learn more about AutoMacro — A VBA Code Builder that allows beginners to code procedures from scratch with minimal coding knowledge and with many time-saving features for all users!

Learn More
Loop Through Charts
This procedure will loop through each Chart in Sheet1, deleting each one.
Sub ForEachCharts()
    Dim cht As ChartObject

    For Each cht In Sheets("Sheet1").ChartObjects
        cht.Delete
    Next cht

End Sub
Loop Through PivotTables
This procedure will loop through each PivotTable in Sheet1, clearing each one
Sub ForEachPivotTables()
    Dim pvt As PivotTable

    For Each pvt In Sheets("Sheet1").PivotTables
        pvt.ClearTable
    Next pvt

End Sub
Loop Through Tables
This procedure will loop through each Table in Sheet1, deleting each one.
Sub ForEachTables()
    Dim tbl As ListObject

    For Each tbl In Sheets("Sheet1").ListObjects
        tbl.Delete
    Next tbl

End Sub
VBA Programming | Code Generator does work for you!
Loop Through Items in Array
This procedure will loop through each item in an Array, display each value in a msgbox,
Sub ForEachItemInArray()
    Dim arrValue As Variant
    Dim Item As Variant
    arrValue = Array("Item 1", "Item 2", "Item 3")

    For Each Item In arrValue
        MsgBox Item
    Next Item

End Sub
Loop Through Numbers
This procedure will loop through each number in an Array, display each value in a msgbox,
Sub ForEachNumberInNumbers()
    Dim arrNumber(1 To 3) As Integer
    Dim num As Variant

    arrNumber(1) = 10
    arrNumber(2) = 20
    arrNumber(3) = 30

    For Each num In arrNumber
        Msgbox num
    Next num

End Sub
For Each Loop Builder
The examples in this article were built with the Loop Builder in our VBA Add-in: AutoMacro.
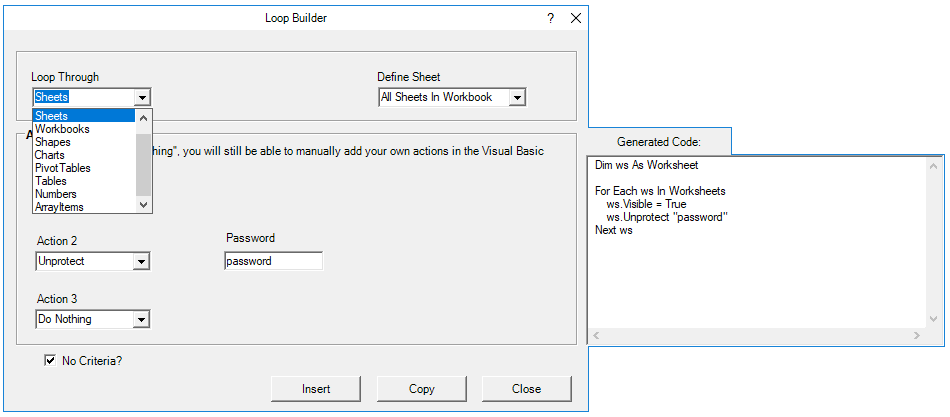
The Loop Builder makes it very easy to generate code to loop through objects. AutoMacro also contains many other Code Generators, an extensive Code Library, and powerful Coding Tools.
For Each – If
You can also use If Statements within Loops to test if objects meet certain criteria, only performing actions on those objects that meet the criteria. Here is an example of looping through each cell in a range:
For Each Cell in Range – If
Sub If_Loop()
Dim Cell as Range

  For Each Cell In Range("A2:A6")
    If Cell.Value > 0 Then
      Cell.Offset(0, 1).Value = "Positive"
    ElseIf Cell.Value < 0 Then
      Cell.Offset(0, 1).Value = "Negative"
    Else
      Cell.Offset(0, 1).Value = "Zero"
    End If
  Next Cell

End Sub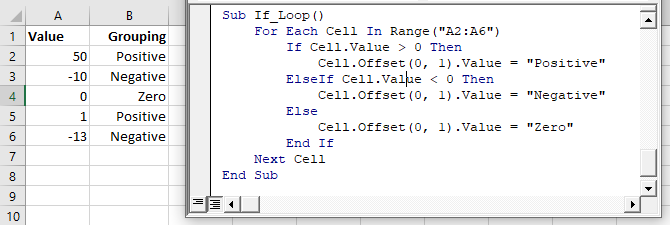
AutoMacro | Ultimate VBA Add-in | Click for Free Trial!
For Each Common Examples
Close All Workbooks
This procedure will close all open workbooks, saving changes.
Sub CloseAllWorkbooks()

    Dim wb As Workbook

    For Each wb In Workbooks
        wb.Close SaveChanges:=True
    Next wb

End Sub
Hide All Sheets
This procedure will hide all worksheets.
Sub HideAllSheets()
    Dim ws As Worksheet

    For Each ws In Sheets
        ws.Visible = xlSheetHidden
    Next ws

End Sub
Unhide All Sheets
This procedure will unhide all worksheets.
Sub UnhideAllSheets()
    Dim ws As Worksheet

    For Each ws In Sheets
        ws.Visible = xlSheetVisible
    Next ws

End Sub
AutoMacro | Ultimate VBA Add-in | Click for Free Trial!
Protect All Sheets
This procedure will protect all worksheets.
Sub ProtectAllSheets()
    Dim ws As Worksheet

    For Each ws In Sheets
        ws.Protect Password:="..."
    Next ws

End Sub
Unprotect All Sheets
This procedure will unprotect all worksheets.
Sub UnprotectAllSheets()
    Dim ws As Worksheet

    For Each ws In Sheets
        ws.Unprotect Password:="..."
    Next ws

End Sub
Delete All Shapes On All Worksheets
This procedure will delete all shapes in a workbook.
Sub DeleteAllShapesOnAllWorksheets()
    Dim Sheet As Worksheet
    Dim Shp As Shape


    For Each Sheet In Sheets
        For Each Shp In Sheet.Shapes
            Shp.Delete
        Next Shp
    Next Sheet

End Sub
Refresh All PivotTables
This procedure will refresh all PivotTables on a sheet.
Sub RefreshAllPivotTables()
    Dim pvt As PivotTable

    For Each pvt In Sheets("Sheet1").PivotTables
        pvt.RefreshTable
    Next pvt

End Sub
Using For Each in Access VBA
The For Each loop works the same way in Access VBA as it does in Excel VBA. The following example will remove all the tables in the current database.
Sub RemoveAllTables()
  Dim tdf As TableDef
  Dim dbs As Database
  Set dbs = CurrentDb
  For Each tdf In dbs.TableDefs
      DoCmd.DeleteObject tdf.Name
  Loop
  Set dbs = Nothing
End SubНа чтение 14 мин. Просмотров 18.5k.
Итог: циклы For Next — одни из самых мощных методов VBA для автоматизации общих задач в Excel. В этой статье объясняется, как работает цикл, повторяющий действия над коллекцией элементов, что экономит нам массу времени.
Уровень мастерства: Средний

Содержание
- Сила циклов VBA
- Как работает цикл For Next?
- Два типа циклов For Next
- The For Each Next Loop: цикл по коллекции элементов
- В каком порядке работает цикл For Each?
- Предметы / объекты НЕ выбираются в цикле
- The Next Loop: циклы через набор чисел
- Обратный цикл
- Как остановить цикл раньше
- Переменная не требуется после ключевого слова Next
- Примеры макросов VBA для циклов
- Какую задачу хотите зациклить вы?
Сила циклов VBA
В Excel мы тратим много времени на повторяющиеся простые задачи. Например, как: форматирование нескольких диапазонов, отображение нескольких листов, копирование и вставка в несколько рабочих книг, применение фильтров к нескольким таблицам или сводным таблицам, замена значений, обновление формул и т.д.
Можете ли вы вспомнить несколько задач, в которых вам
приходилось повторять один и тот же процесс снова и снова?
Эти задачи чрезвычайно трудоемкие и скучные!

К счастью, выход есть. Мы можем использовать циклы в наших
макросах VBA, чтобы очень быстро повторять действия. Задачи, выполнение которых
вручную может занять несколько часов, могут быть выполнены за несколько секунд
с помощью цикла.
Цикл For Next — это наиболее распространенный тип цикла,
который помогает нам выполнять эти повторяющиеся задания. В этой статье мы
рассмотрим два типа For Next Loops.
Загрузите файл примера
Загрузите бесплатный файл Excel, содержащий примеры макросов
с помощью цикла For Next.
![]() For Next Loop VBA Macro Examples.xlsm (79.0 KB)
For Next Loop VBA Macro Examples.xlsm (79.0 KB)
Скачать PDF версию статьи на английском для печати.
Как работает цикл For Next?
Цикл For Next позволяет нам просматривать коллекцию, элементами которой могут быть объекты или списки чисел.
Примеры коллекций:
- Клетки в ассортименте.
- Рабочие листы в рабочей тетради.
- Открытые рабочие тетради на компьютере.
- Сводные таблицы на листе.
- Сводные поля в сводной таблице.
- Формы на листе.
- И любой другой объект, с которым вы взаимодействуете в Excel.
Задача цикла For Next Loop состоит в том, чтобы выполнять
одинаковые действия (строки кода) для каждого элемента в коллекции.

В приведенном ниже примере содержится цикл For Next, который
проходит по каждому листу в книге и отображает каждый лист. Цикл начинается с
первого элемента в коллекции (первый лист в рабочей книге) и выполняет строку
кода между строками For и Next для каждого элемента в коллекции (каждый лист в
рабочей книге).
Sub Unhide_Multiple_Sheets()

Dim ws As Worksheet

    For Each ws In ActiveWorkbook.Worksheets
        ws.Visible = xlSheetVisible
    Next ws

End Sub
Конечно, мы можем использовать логические операторы, такие как операторы If, для проверки свойств и условий перед выполнением действий.
Следующий макрос отображает только те листы, которые имеют фразу «ABC Global Co.» в ячейке A1 каждого листа, и скрывает все остальные листы.
Sub Unhide_Report_Sheets()

Dim ws As Worksheet

    For Each ws In ActiveWorkbook.Worksheets
        If ws.Range("A1").Value = "ABC Global Co." Then
            ws.Visible = xlSheetVisible
        Else
            ws.Visible = xlSheetHidden
        End If
    Next ws

End Sub
Два типа циклов For Next
Действительно, существуют два типа For Next Loops.
- For Each Next
Loops циклически просматривает коллекцию элементов. - For Next Loops
цикл через набор чисел.
Давайте посмотрим, как работает
каждый.
The For Each Next Loop: цикл по коллекции элементов
Как мы видели выше, цикл «The For Each Next Loop» позволяет нам перебирать коллекцию предметов или объектов. Это, наверное, самый распространенный цикл, который мы используем в Excel, потому что мы работаем с коллекциями объектов. Опять же, эти коллекции представляют собой ячейки в диапазоне, рабочие таблицы в рабочей книге, сводные таблицы в рабочей таблице и т.д.

Мы будем использовать пример написания цикла «For Each Next Loop», чтобы просмотреть все рабочие листы в рабочей книге.

Существует четыре основных шага для написания цикла For Each Next в VBA:
- Объявите переменную для объекта.
- Напишите для каждой строки переменную и коллекцию
ссылок. - Добавьте строку (и) кода для повтора для каждого
элемента в коллекции. - Напишите следующую строку, чтобы закрыть цикл.
Давайте рассмотрим каждый из этих шагов подробно.
Шаг 1 — объявить переменную для объекта
Сначала нам нужно объявить переменную, которая будет
временно хранить ссылку на объект.
Строка Dim в верхней части макроса объявляет переменную, как объект. В этом случае объект является рабочим листом. Мы можем создать любое имя переменной, если захотим, если оно не совпадает с другой ссылкой в VBA. «Ws» — наиболее распространенное имя переменной для объекта листа, но вы можете изменить его.
Шаг 2 — Для каждой строки
Далее мы напишем оператор For Each. Это первая строка кода в цикле.
For Each ws In ActiveWorkbook.Worksheets
Первые два слова For Each. Затем мы вводим имя переменной, за которым следует слово In. Наконец, мы указываем, где располагается коллекция. В этом случае мы хотим просмотреть все рабочие листы в ActiveWorkbook. Итак, мы набираем ActiveWorkbook.Worksheets. Эта строка ссылается на все рабочие листы в ActiveWorkbook.
Если вы хотите пройтись по рабочим листам определенной
рабочей книги, вы можете использовать свойство Рабочие книги для ссылки на эту
рабочую книгу по имени.
For Each ws In Workbooks("Book2.xlsx").Worksheets
Просто помните, что рабочая книга, на которую вы ссылаетесь,
должна быть открыта до запуска строки кода For Next. Конечно, мы можем
использовать метод Workbooks.Open, чтобы открыть рабочую книгу.
Шаг 3 — Добавить код для повторения для каждой итерации
После строки «For Each» мы добавляем строку(и) кода, которая будет выполняться на каждом листе. В этом примере у нас есть только одна строка кода, которая показывает лист.
ws.Visible = xlSheetVisible
В этой строке кода мы используем переменную ws для ссылки на
текущий рабочий лист в цикле. Когда цикл выполняется, он устанавливает
временную ссылку на переменную ws для каждой итерации в цикле.
Это так же, как если бы мы установили переменную ws для определенного листа, используя следующую строку кода.
Однако нам НЕ нужна эта строка с циклом For Each Next. Цикл
заботится о настройке переменной для нас для каждой итерации в цикле.
Для первой итерации в цикле ws установлен на Worksheets (1).
На следующей итерации ws устанавливается в Worksheets (2). Это продолжается,
пока цикл перебирает все листы в рабочей книге. Это очень мощно, потому что мы
можем повторно использовать переменную для ссылки на лист в цикле несколько
раз.
Шаг 4 — Next закрывает цикл
Последняя строка кода в цикле — Next.
Когда макрос попадает в эту строку кода, он делает две вещи:
- Во-первых, он изменяет ссылку на переменную на следующий элемент коллекции. В этом примере переменная ws изменяется для ссылки на следующий лист в рабочей книге.
- Во-вторых, он возвращается к выполнению строки кода непосредственно под строкой For Each. Затем он выполняет все строки кода между строками For Each и Next в порядке сверху вниз.

Когда будет достигнут последний элемент в коллекции (рабочий лист в рабочей книге), цикл останавливается, и макрос переходит к следующей строке кода ниже строки Next.
В каком порядке работает цикл For Each?
Цикл For Each Loop всегда начинается с первого элемента в коллекции и переходит к последнему элементу в том порядке, в котором они отображаются в Excel. Это основано на номере индекса предметов в коллекции. Вот несколько примеров порядка выполнения цикла для общих объектов.
- Рабочие листы. Начинается с первой вкладки листа в рабочей книге и возвращается к последней в том порядке, в котором вкладки отображаются в рабочей книге.
- Рабочие книги. Начинается с первой открытой книги и циклически повторяется в порядке открытия рабочих книг. Рабочим книгам присваивается порядковый номер по мере их открытия.
- Клетки: циклы слева направо, затем вниз. Начинается с первой ячейки в диапазоне и возвращается к следующему столбцу в той же строке, затем переходит к следующей строке.
- Таблицы и сводные таблицы. Начинается с первого объекта, созданного на листе, и циклически повторяется в порядке создания объектов. Этот же принцип действует и для других объектов, которые вы создаете на листах, таких как фигуры, диаграммы, слайсеры и т.д.
Предметы / объекты НЕ выбираются в цикле
Важно отметить, что когда мы перебираем коллекцию объектов, каждый объект НЕ выделяется в Excel.

Цикл создает ссылку на элемент/объект с помощью переменной. Переменная временно установлена на ссылку на объект. Объект НЕ выбран и НЕ обязательно становится активным объектом. Для выбора объекта мы можем использовать методы Select или Activate. Вы также должны убедиться, что объекты родительского объекта выбраны первыми. Ознакомьтесь с моей статьей об объектной модели Excel и иерархии объектов в VBA, чтобы узнать больше об этом.
The Next Loop: циклы через набор чисел
Также можно использовать цикл For Next Loop для просмотра набора чисел. Это может быть полезно, когда мы перебираем элементы управления пользовательской формы, массивы или если мы хотим перебрать коллекцию в обратном направлении.

Основная операция цикла For Next такая же, как и для цикла
For Each. Разница заключается в формате строки For.
Шаг 1 — Объявление переменной для числа
Чтобы перебрать набор чисел, мы сначала должны объявить переменную для целого числа типа данных. Мы можем использовать Integer или Long integer.
Переменная называется счетчиком, потому что она увеличивается или уменьшается вверх/вниз для каждой итерации в цикле.
Дополнительное примечание к Long: тип данных Long (целое число) содержит большее число, чем Integer. Это занимает больше памяти, но для современного компьютера это не проблема. Мы можем использовать длинные переменные все время. Буква L выглядит как цифра 1 в VBA, поэтому я теперь использую i в качестве имени переменной, хотя я использую Long в качестве типа данных. Это все зависит от личных предпочтений, и вы можете назвать переменную как хотите.
Шаг 2 — Напишите строку For
Далее мы пишем строку For. Базовая конструкция — это ключевое слово For, за которым следует имя переменной (counter), затем знак равенства, начальное значение To end value.
Начальные и конечные значения могут быть указаны как числа, или мы можем использовать целочисленные / длинные переменные вместо них.
For i = 1 To ActiveWorkbook.Worksheets.Count
Эта строка кода возвращает количество листов в активной книге. Тем не менее, он не проходит по каждому листу. Цикл просто перебирает набор чисел. Мы должны создать ссылку на лист с переменной счетчика (i) в качестве номера индекса свойства Worksheets. Шаг 3 показывает эту ссылку.
Шаг 3 — Добавить код, который повторяется для каждой итерации
Остальная часть цикла работает так же, как цикл For Each. Мы можем добавить строки между строками For и Next, которые будут выполняться для каждой итерации цикла. Переменная counter может быть использована несколько раз в этих строках кода.
Worksheets(i).Visible = True
Шаг 4 — Строка Next закрывает цикл
Наконец, мы добавляем строку Next внизу.
Когда макрос запускается, он устанавливает переменную, равную первому числу в строке For. Когда макрос попадает в следующую строку, он добавляет 1 к значению переменной или увеличивает счет. Итак, я = 2 во второй итерации цикла. Он продолжает цикл, пока не будет достигнут последний номер в цикле.
По умолчанию 1 добавляется к счетчику переменных для каждой итерации в цикле. Это называется значением шага, и мы можем контролировать значение каждого шага в счетчике. Значение Step добавляется в конец строки For. Следующая строка добавит 2 к счетчику для каждой итерации в цикле.
Если вы хотите заштриховать все остальные строки на листе, вы можете использовать такой цикл.
Обратный цикл
Мы также можем использовать значение шага для обратной петли, указав отрицательное число.
Обратите внимание, что начальное значение теперь больше, а конечное значение меньше. Циклы начинаются с 100 (начальное значение) и вычитают 1 из переменной счетчика (шаг -1) для каждой итерации в цикле, пока не дойдут до 1 (конечное значение).
Ключевое слово Step не является обязательным. Если вы не укажете его, тогда VBA примет значение шага 1.
Цикл в обратном направлении — это хорошо, если вы удаляете элементы.
Я напишу отдельный пост об этом, но общая идея заключается в том, что когда мы перебираем коллекцию и удаляем элементы, размер коллекции уменьшается при удалении элементов. Цикл обычно выдает ошибку, как только достигает 10-го элемента, когда в коллекции теперь только 9 элементов. Цикл в обратном направлении предотвращает эту потенциальную ошибку.
Как остановить цикл раньше
Обычно цикл перебирает все элементы в коллекции, а затем переходит к следующей строке кода ниже следующей строки. Однако мы можем остановить цикл раньше с помощью оператора Exit For.
В следующем макросе оператор Exit For используется для выхода из цикла после того, как первый лист, начинающийся со слова «Отчет», будет найден скрытым.
Sub Unhide_First_Sheet_Exit_For()
' Отображает первый лист, который содержит определенную фразу
' в имени листа, затем выходит из цикла.

Dim ws As Worksheet

    For Each ws In ActiveWorkbook.Worksheets

        ' Найдите лист, который начинается со слова «Отчет»
        If Left(ws.Name, 6) = "Report" Then

            ws.Visible = xlSheetVisible

            ' Выход из цикла после того, как первый лист найден
            Exit For

        End If
    Next ws

End Sub
Переменная ws сохраняет ссылку на рабочий лист после
преждевременного выхода из цикла и может быть снова использована в коде под
циклом.

Переменная не требуется после ключевого слова Next
Возможно, вы заметили, что я добавил переменную после ключевого слова Next в нижней части цикла в приведенных выше примерах.
Это НЕ обязательно, и вы можете не увидеть его в других примерах, которые вы найдете в Интернете. Однако мне нравится включать переменную после Next по двум причинам.
- Мы можем использовать его при отладке кода,
чтобы увидеть значение переменной, наведя указатель мыши на переменную, когда
код остановлен. - Это облегчает понимание того, к какой строке For
подключена следующая строка. Это особенно верно, когда у вас есть несколько циклов
или вложенных циклов в ваших макросах.

Поэтому я рекомендую добавить переменную после ключевого слова Next в качестве лучшей практики. Немного дополнительной работы заранее сэкономит время и головную боль в будущем. Доверьтесь мне!
Примеры макросов VBA для циклов
Вот дополнительные статьи с макросами, в которых используется хотя бы один цикл For Next Loop.
3 способа показать несколько листов в учебнике по Excel + VBA
Автоматическое форматирование чисел по умолчанию в сводных таблицах Excel
3 совета, как сохранить и закрыть все открытые файлы книги Excel + макрос
Макрос метрики SUBTOTAL — создание сводной таблицы всех
типов функций
Как добавить оглавление Галерея изображений в файлы Excel
Скрыть и отобразить (отфильтровать) столбцы с помощью
слайсера или раскрывающегося меню фильтра
Фильтрация сводной таблицы или среза по самой последней дате или периоду
Как изменить размер панелей Excel для разных размеров экрана
Преобразование сводной таблицы в формулы SUMIFS + бесплатный макрос VBA
Макрос VBA, чтобы скрыть все столбцы, которые содержат
значение в ячейке
Как повторять задачи с помощью кода VBA — Looping — Отличная статья с большим количеством примеров от моего друга Криса Ньюмана из The Spreadsheet Guru.
Какую задачу хотите зациклить вы?
Я надеюсь, что эта статья поможет вам начать работу с циклами. Не забудьте скачать бесплатный файл Excel, содержащий примеры кода.
![]() For Next Loop VBA Macro Examples.xlsm (79.0 KB)
For Next Loop VBA Macro Examples.xlsm (79.0 KB)
Циклы, безусловно, являются промежуточной техникой кодирования, которая вынуждает нас выйти за рамки MacroRecorder. К сожалению, записанный макрос не может создавать петли. Тем не менее, это навык, который вы сможете использовать снова и снова на протяжении всей своей карьеры для автоматизации простых и сложных задач. Понимание того, как использовать циклы, даст вам волшебную силу с Excel.
Пожалуйста, оставьте комментарий ниже с задачей, которую вы хотите автоматизировать с помощью цикла. Спасибо!

Цикл For Loop в VBA – один из самых популярных циклов в Excel. Данный цикл имеет две формы – For Next и For Each In Next. Данные операторы используются для последовательного перемещения по списку элементов или чисел. Для завершения цикла мы можем в любой момент использовать команду выхода. Давайте подробнее рассмотрим каждый из этих циклов.
Цикл For Next имеет следующий синтаксис:
|
1 |
For счетчик = начало_счетчика To конец_счетчика |
То что мы делаем здесь, по существу, это создаем цикл, который использует переменную счетчик как хранитель времени. Устанавливаем его значение равным начало_счетчика, и увеличиваем (или уменьшаем) на 1 во время каждого витка. Цикл будет выполняться до тех пор, пока значение счетчик не станет равным конец_счетчика. Когда оба эти значения совпадут, цикл выполнится последний раз и остановится.
Пример цикла
|
1 |
Sub пример_цикла1() |
Последнее значение переменной счетчик будет равным 11
VBA обратный цикл For Loop с инструкцией STEP
Если у вас появилась необходимость перемещаться от большего значения к меньшему – вы можете использовать цикл в обратном направлении. Вот пример обратного цикла:
|
1 |
Sub пример_цикла2() |
Последнее значение переменной счетчик будет равным 1.
Как вы могли заметить, мы можем использовать инструкцию Step n для работы цикла как вперед, так и в обратном направлении. По умолчанию значение Step равно 1, но оно может быть изменено, если необходимо пропускать какие-либо значения, тогда значение n будет больше одного, или перемещаться в обратном направлении, тогда n будет отрицательным.
VBA цикл For Each … Next
Цикл For Each … Next имеет следующий цикл:
|
1 |
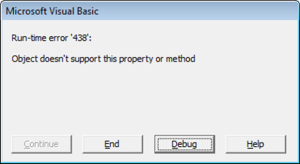
For Each элемент_группы In группа_элементов |
Здесь переменная элемент_группы принадлежит к группе_элементов (железная логика!!!). Я имею в виду, что объект группа_элементов должен быть коллекцией объектов. Вы не сможете запустить цикл For Each для отдельно объекта (Microsoft сразу оповестит вас об этом 438-й ошибкой).
Данный цикл перебирает все элементы какой-либо коллекции, начиная с самого первого. Вы можете использовать данный цикл, если вам необходимо, например, обойти все листы в книге, объекты на листе, сводные таблицы и т.д.
Ниже представлен пример, как можно воспользоваться циклом For Each для просмотра всех листов книги:
|
1 |
Sub пример_цикла4() |
… либо всех сводных таблиц на листе
|
1 |
Sub пример_цикла() |
Прерывание цикла VBA
Если вам необходимо выйти из цикла до момента, как будет достигнуто условие завершения цикла, воспользуйтесь командой End For в связке с инструкцией IF. В примере, приведенном ниже, мы выйдем из цикла до момента достижения условия завершения, в данном цикле выход будет осуществлен при условии, когда переменная счетчик будет равна 3.
|
1 |
Sub пример_цикла5() |
Пропуск части цикла в For Each
Пропускать часть цикла, а затем возвращаться назад – плохая практика. Тем не менее, давайте рассмотрим пример:
|
1 |
Sub пример_цикла6 () |
Здесь мы пропустили одну итерацию (когда j = 3). Как вы думаете, какой результат выдаст программа? 3? 5? Ну… на самом деле, ни один из вариантов не верный. Цикл будет выполняться бесконечно, пока память компьютера не переполнится.
Однако возможность пропустить шаг цикла без последствий существует. Вы можете увеличить значение счетчика на 1 (или другое значение), что приведет к пропуску операций, находящихся между этими значениями. Вот пример:
|
1 |
Sub пример_цикла7() |
Но опять же, это плохая практика написания кода, и может привести к нежелательным последствиям при написании кода в будущем. Вместо этого, при необходимости пропуска некоторых итераций, попробуйте использовать функцию If или Select Case.
Just like the For Next statement, For Each is a loop.
For Each is a type of loop that is normally used with arrays, matrices or collections (advanced topic). It works similarly to the For Next loop, however it performs an iteration for each element available in the array, array, or collection.
    Dim AnArray(2) As String

    AnArray(0) = "One"
    AnArray(1) = "Two"
    AnArray(2) = "Three"

    For Each Element In AnArray
        Msgbox Element
    Next Element
Element is just a chosen name for the example. Any variable name will work for the For Each statement (as long as it respects the variable naming rules).
For each iteration, the variable Element will assume the value of an element of the array: In the first iteration, Element will assume the value of AnArray(0), which is «One». In the second iteration it will assume the value of AnArray(1), which is «Two» and so on.
Be careful because the For Each statement will go through all elements of the array, matrix or collection, even those without value.
  Dim AnArray(4) As String 'array with 5 elements

  AnArray(0) = "One"
  AnArray(1) = "Two"
  AnArray(2) = "Three"
  'AnArray(3) = ""
  'AnArray(4) = ""

  For Each Element In AnArray
      Msgbox Element
  Next Element
  'The last MsgBox will come empty equal to AnArray(4)
To avoid this kind of problem, we can add an If Then function to check if the element has a value.
  Dim AnArray(4) As String

  AnArray(0) = "One"
  AnArray(1) = "Two"
  AnArray(2) = "Three"

  For Each Element In AnArray
      If Element <> "" Then
          Msgbox Element
      End If
  Next Element
  'The last MsgBox will come empty equal to AnArray(2)
Remember that a String with undeclared value is equal to «».
Show Advanced Topics
SuperExcelVBA.com is learning website. Examples might be simplified to improve reading and basic understanding. Tutorials, references, and examples are constantly reviewed to avoid errors, but we cannot warrant full correctness of all content. All Rights Reserved.
Excel ® is a registered trademark of the Microsoft Corporation.
© 2023 SuperExcelVBA | ABOUT
![]()
A For Each loop is used to execute a statement or a set of statements for each element in an array or collection.
Syntax:
For Each element In group
[ statements ]
[ Exit For ]
[ statements ]
Next [ element ]
The For…Each…Next statement syntax has the following three parts:
| Part | Description |
|---|---|
| element | Required (Must be mentioned). Variable is used to iterate through the elements of the collection or array. For collections, the element can only be a Variant variable, a generic object variable, or any specific object variable. For arrays, the element can only be a Variant variable. |
| group | Required(Must be mentioned). Name of an object collection or array (except an array of user-defined types). |
| statement | Optional (May or may not be mentioned). One or more statements are executed on each item in the group. |
There are 4 basic steps to writing a For Each Next Loop in VBA:
- Declare a variable.
- Write the For Each Line with the variable and collection references.
- Add line(s) of code to repeat for each item in the collection.
- Write the Next line to terminate the loop.
The For…Each block is entered if there is at least one element in the group. Upon entering the loop, all the statements in the loop are executed for each element. When there are no more elements in the group, the loop is exited and execution continues with the statement following the Next statement. The next statement line terminates the loop.
Any number of Exit For statements may be placed anywhere in the loop as an alternative way to exit. Exit For is often used after evaluating some condition, for example, If…Then, and transfers control to the statement immediately following Next.
You can also nest For…Each…Next loops by placing one For…Each…Next loop within another. However, each loop element must be unique in its way.
NOTE
- Execution continues as if element is included, if you omit element in a Next statement.
- An error occurs, If a Next statement is encountered before its corresponding For statement,
You can’t use the For…Each…Next statement with an array of user-defined types because a Variant can’t contain a user-defined type.
Example 1
Private Sub Demo_Loop()
students is an array
students = Array(“Akshit”, “Nikita”, “Ritesh”) //Initialising Array-> students
Dim studentnames As Variant // Variable is assigned
‘iterating using For each loop.
For Each Item In students
studentnames =studentnames & Item & Chr(10)
Next
MsgBox studentnames
End Sub
It would look somewhat like below:
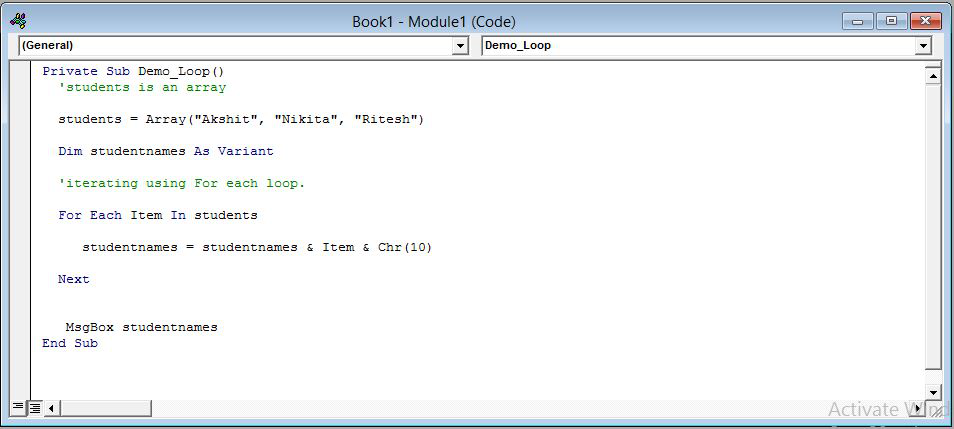
When the above code is executed, it prints all the student names with one item in each line.
To get the most out of Excel and VBA, you need to know how to use loops efficiently.
In VBA, loops allow you to go through a set of objects/values and analyze it one by one. You can also perform specific tasks for each loop.
Here is a simple example of using VBA loops in Excel.
Suppose you have a dataset and you want to highlight all the cells in even rows. You can use a VBA loop to go through the range and analyze each cell row number. If it turns out to be even, you give it a color, else you leave it as is.
Now this, of course, is very simple of looping in Excel VBA (and you can also do this using conditional formatting).
In real life, you can do a lot more with VBA loops in Excel that can help you automate tasks.
Here are some more practical examples where VBA loops can be useful:
- Looping through a range of cells and analyzing each cell (highlight cells with a specific text in it).
- Looping through all the worksheets and do something with each (such as protect/unprotect it).
- Loop through all the open workbooks (and save each workbook or close all except the active workbook).
- Loop through all the characters in a cell (and extract the numeric part from a string).
- Loop through all the values an array.
- Loop through all the charts/objects (and give a border or change the background color).
Now to best use loops in Excel VBA, you need to know about the different kinds that exist and the correct syntax of each.

In this tutorial, I’ll showcase different types of Excel VBA loops and cover a few examples for each loop
Note: This is going to be a huge tutorial, where I will try and cover each VBA loop in some detail. I recommend you bookmark this page for future reference.
If you’re interested in learning VBA the easy way, check out my Online Excel VBA Training.
For Next Loop
The ‘For Next’ loop allows you to go through a block of code for the specified number of times.
For example, if I ask you to add the integers from 1 to 10 manually, you would add the first two numbers, then add the third number to the result, then add the fourth number to the result, as so on..
Isn’t it?
The same logic is used in the For Next loop in VBA.
You specify how many times you want the loop to run and also specify what you want the code to do each time the loop is run.
Below is the syntax of the For Next loop:
For Counter = Start To End [Step Value]
[Code Block to Execute]
Next [counter]
In the For Next loop, you can use a Counter (or any variable) that will be used to run the loop. This counter allows you to run this loop for a required number of times.
For example, if I want to add the first 10 positive integers, then my Counter value would be from 1 to 10.
Let’s have a look at a few examples to better understand how For Next loop works.
Example 1 – Adding the first 10 positive integers
Below is the code that will add the first 10 positive integers using a For Next loop.
It will then display a message box showing the sum of these numbers.
Sub AddNumbers()
Dim Total As Integer
Dim Count As Integer
Total = 0
For Count = 1 To 10
Total = Total + Count
Next Count
MsgBox Total
End Sub
In this code, the value of Total is set to 0 before getting into the For Next loop.
Once it gets into the loop, it holds the total value after every loop. So after the first loop, when Counter is 1, ‘Total’ value becomes 1, and after the second loop it becomes 3 (1+2), and so on.
And finally, when the loop ends, ‘Total’ variable has the sum of the first 10 positive integers.
A MsgBox then simply displays the result in a message box.
Example 2 – Adding the first 5 Even Positive Integers
To sum the first five even positive integers (i.e, 2,4,6,8, and 10), you need a similar code with a condition to only consider the even numbers and ignore the odd numbers.
Here is a code that will do it:
Sub AddEvenNumbers()
Dim Total As Integer
Dim Count As Integer
Total = 0
For Count = 2 To 10 Step 2
Total = Total + Count
Next Count
MsgBox Total
End Sub
Note that we started the Count value from 2 and also used ‘Step 2‘.
When you use ‘Step 2’, it tells the code to increment the ‘Count’ value by 2 every time the loop is run.
So the Count value starts from 2 and then becomes 4, 6, 8 and 10 as the looping occurs.
NOTE: Another way of doing this could be to run the loop from 1 to 10 and within the loop check whether the number is even or odd. However, using Step, in this case, is a more efficient way as it does not require the loop to run 10 times, but only 5 times.
The Step value can also be negative. In such as case, the Counter starts at a higher value and keeps getting decremented by the specified Step value.
Example 3 – Entering Serial Number in the Selected Cells
You can also use the For Next loop to go through a collection of objects (such as cells or worksheets or workbooks),
Here is an example that quickly enters serial numbers in all the selected cells.
Sub EnterSerialNumber()
Dim Rng As Range
Dim Counter As Integer
Dim RowCount As Integer
Set Rng = Selection
RowCount = Rng.Rows.Count
For Counter = 1 To RowCount
ActiveCell.Offset(Counter - 1, 0).Value = Counter
Next Counter
End Sub
The above code first counts the number of selected rows and then assigns this value to the variable RowCount. We then run the loop from ‘1 to RowCount’.
Also note that since selection can be any number of rows, we have Set the variable Rng to Selection (with the line ‘Set Rng = Selection’). Now we can use the ‘Rng’ variable to refer to the selection in our code.
Example 4 – Protect All Worksheets in the Active Workbook
You can use the ‘For Next’ loop to go through all the worksheets in the active workbook, and protect (or unprotect) each of the worksheets.
Below is the code that will do this:
Sub ProtectWorksheets()
Dim i As Integer
For i = 1 To ActiveWorkbook.Worksheets.Count
Worksheets(i).Protect
Next i
End Sub
The above code counts the number of sheets by using ActiveWorkbook.Worksheets.Count. This tells VBA how many times the loop needs to be run.
In each instance, it refers to the Ith workbook (using Worksheets(i)) and protects it.
You can use this same code to Unprotect worksheets too. Just change the line Worksheets(i).Protect to Worksheets(i).UnProtect.
Nested ‘For Next’ Loops
You can use nested ‘For Next’ loops to get more complex automation done in Excel. A nested ‘For Next’ loop would mean that there is a ‘For Next’ loop within a ‘For Next’ loop.
Let me show you how to use this using an example.
Suppose I have 5 workbooks open in my system and I want to protect all the worksheets in all these workbooks.
Below is the code that will do this:
Sub ProtectWorksheets()
Dim i As Integer
Dim j As Integer
For i = 1 To Workbooks.Count
For j = 1 To Workbooks(i).Worksheets.Count
Workbooks(i).Worksheets(j).Protect
Next j
Next i
End Sub
The above is a nested For Next loop as we have used one For Next loop within another.
‘EXIT For’ Statements in For Next Loops
‘Exit For’ statement allows you to exit the ‘For Next’ loop completely.
You can use it in cases where you want the For Next loop to end when a certain condition is met.
Let’s take an example where you have a set of numbers in Column A and you want to highlight all the negative numbers in red font. In this case, we need to analyze each cell for its value and then change the font color accordingly.
But to make the code more efficient, we can first check if there are any negative values in the list or not. If there are no negative values, we can use the Exit For the statement to simply come out of the code.
Below is the code that does this:
Sub HghlightNegative()
Dim Rng As Range
Set Rng = Range("A1", Range("A1").End(xlDown))
Counter = Rng.Count
For i = 1 To Counter
If WorksheetFunction.Min(Rng) >= 0 Then Exit For
If Rng(i).Value < 0 Then Rng(i).Font.Color = vbRed
Next i
End Sub
When you use the ‘Exit For’ statement within a nested ‘For Next’ loop, it will come out of the loop in which it is executed and go on to execute the next line in the code after the For Next loop.
For example, in the below code, the ‘Exit For’ statement will get you out of the inner loop, but the outer loop would continue to work.
Sub SampleCode()
For i = 1 To 10
For j = 1 to 10
Exit For
Next J
Next i
End Sub
Do While Loop
A ‘Do While’ loop allows you to check for a condition and run the loop while that condition is met (or is TRUE).
There are two types of syntax in the Do While Loop.
Do [While condition]
[Code block to Execute]
Loop
and
Do
[Code block to Execute]
Loop [While condition]
The difference between these two is that in the first, the While condition is checked first before any code block is executed, and in the second case, the code block is executed first and then the While condition is checked.
This means that if the While condition is False is both the cases, the code will still run at least once in the second case (as the ‘While’ condition is checked after the code has been executed once).
Now let’s see some examples of using Do While loops in VBA.
Example 1 – Add First 10 Positive Integers using VBA
Suppose you want to add the first ten positive integers using the Do While loop in VBA.
To do this, you can use the Do While loop until the next number is less than or equal to 10. As soon as the number is greater than 1o, your loop would stop.
Here is the VBA code that will run this Do While loop and the show the result in a message box.
Sub AddFirst10PositiveIntegers()
Dim i As Integer
i = 1
Do While i <= 10
Result = Result + i
i = i + 1
Loop
MsgBox Result
End Sub
The above loop continues to work until the value of ‘i’ becomes 11. As soon as it becomes 11, the loop ends (as the While condition becomes False).
Within the loop, we have used a Result variable that holds the final value Once the loop is completed, a message box shows the value of the ‘Result’ variable.
Example 2 – Enter Dates For the Current Month
Let’s say you want to enter all the dates of the current month into a worksheet column.
You can do that by using the following Do While loop code:
Sub EnterCurrentMonthDates()
Dim CMDate As Date
Dim i As Integer
i = 0
CMDate = DateSerial(Year(Date), Month(Date), 1)
Do While Month(CMDate) = Month(Date)
Range("A1").Offset(i, 0) = CMDate
i = i + 1
CMDate = CMDate + 1
Loop
End Sub
The above code would enter all the dates in the first column of the worksheet (starting from A1). The loops continue till the Month value of the variable ‘CMDate’ matches that of the current month.
Exit Do Statement
You can use the Exit Do statement to come out of the loop. As soon as the code executes the ‘Exit Do’ line, it comes out of the Do While loop and passes the control to the next line right after the loop.
For example, if you want to enter the first 10 dates only, then you can exit the loop as soon as the first 10 dates are entered.
The below code will do this:
Sub EnterCurrentMonthDates()
Dim CMDate As Date
Dim i As Integer
i = 0
CMDate = DateSerial(Year(Date), Month(Date), 1)
Do While Month(CMDate) = Month(Date)
Range("A1").Offset(i, 0) = CMDate
i = i + 1
If i >= 10 Then Exit Do
CMDate = CMDate + 1
Loop
End Sub
In the above code, the IF statement is used to check if the value of i is greater than 10 or not. As soon as the value of ‘i’ becomes 10, Exit Do statement is executed and the loop ends.
Do Until Loop
‘Do Until’ loops are very much like the ‘Do While’ loops.
In ‘Do While’, the loop runs till the given condition is met, while in ‘Do Until’, it loops until the specified condition is met.
There are two types of syntax in the Do Until Loop.
Do [Until condition]
[Code block to Execute]
Loop
and
Do
[Code block to Execute]
Loop [Until condition]
The difference between these two is that in the first, the Until condition is checked first before any code block is executed, and in the second case, the code block is executed first and then the Until condition is checked.
This means that if the Until condition is TRUE is both cases, the code will still run at least once in the second case (as the ‘Until’ condition is checked after the code has been executed once).
Now let’s see some examples of using Do Until loops in VBA.
Note: All the examples for Do Until are the same as that of Do While. These have been modified to show you how the Do Until loop works.
Example 1 – Add First 10 Positive Integers using VBA
Suppose you want to add the first ten positive integers using the Do Until loop in VBA.
To do this, you need to run the loop until the next number is less than or equal to 10. As soon as the number is greater than 1o, your loop would stop.
Here is the VBA code that will run this loop and show the result in a message box.
Sub AddFirst10PositiveIntegers()
Dim i As Integer
i = 1
Do Until i > 10
Result = Result + i
i = i + 1
Loop
MsgBox Result
End Sub
The above loop continues to work until the value of ‘i’ becomes 11. As soon as it becomes 11, the loop ends (as the ‘Until’ condition becomes True).
Example 2 – Enter Dates For the Current Month
Let’s say you want to enter all the dates of the current month into a worksheet column.
You can do that by using the following Do Until loop code:
Sub EnterCurrentMonthDates()
Dim CMDate As Date
Dim i As Integer
i = 0
CMDate = DateSerial(Year(Date), Month(Date), 1)
Do Until Month(CMDate) <> Month(Date)
Range("A1").Offset(i, 0) = CMDate
i = i + 1
CMDate = CMDate + 1
Loop
End Sub
The above code would enter all the dates in the first column of the worksheet (starting from A1). The loop continues until the Month of variable CMDate is not equal to that of the current month.
Exit Do Statement
You can use the ‘Exit Do’ statement to come out of the loop.
As soon as the code executes the ‘Exit Do’ line, it comes out of the Do Until loop and passes the control to the next line right after the loop.
For example, if you want to enter the first 10 dates only, then you can exit the loop as soon as the first 10 dates are entered.
The below code will do this:
Sub EnterCurrentMonthDates()
Dim CMDate As Date
Dim i As Integer
i = 0
CMDate = DateSerial(Year(Date), Month(Date), 1)
Do Until Month(CMDate) <> Month(Date)
Range("A1").Offset(i, 0) = CMDate
i = i + 1
If i >= 10 Then Exit Do
CMDate = CMDate + 1
Loop
End Sub
In the above code, as soon as the value of ‘i’ becomes 10, Exit Do statment is executed and the loop ends.
For Each
In VBA, you can loop through a set of collections using the ‘For Each’ loop.
Here are some examples of collections in Excel VBA:
- A collection of all the open Workbooks.
- A collection of all worksheets in a workbook.
- A collection of all the cells in a range of selected cells.
- A collection of all the charts or shapes in the workbook.
Using the ‘For Each’ loop, you can go through each of the objects in a collection and perform some action on it.
For example, you can go through all the worksheets in a workbook and protect these, or you can go through all the cells in the selection and change the formatting.
With the ‘For Each’ loop (also referred to as the ‘For Each-Next’ loop), you don’t need to know how many objects are there in a collection.
‘For Each’ loop would automatically go through each object and perform the specified action. For example, if you want to protect all the worksheets in a workbook, the code would be the same whether you have a workbook with 3 worksheets or 30 worksheets.
Here is the syntax of For Each-Next loop in Excel VBA.
For Each element In collection
[Code Block to Execute]
Next [element]
Now let’s see a couple of examples of using the For Each Loop in Excel.
Example 1 – Go through All the Worksheets in a Workbook (and Protect it)
Suppose you have a workbook where you want to protect all the worksheets.
Below For Each-Next loop can do this easily:
Sub ProtectSheets()
Dim ws As Worksheet
For Each ws In ActiveWorkbook.Worksheets
ws.Protect
Next ws
End Sub
In the above code, we have defined ‘ws’ variable as a Worksheet object. This tells VBA that ‘ws’ should be interpreted as a worksheet object in the code.
Now we use the ‘For Each’ statement to go through each ‘ws’ (which is a worksheet object) in the collection of all the worksheets in the active workbook (given by ActiveWorkbook.Worksheets).
Note that unlike other loops where we have tried to protect all the worksheets in a workbook, here we don’t need to worry about how many worksheets are there in the workbook.
We don’t need to count these to run the loop. For Each loop ensures that all the objects are analyzed one by one.
Example 2 – Go through All the Open Workbooks (and Save All)
If you work with multiple workbooks at the same time, it can come in handy to be able to save all these workbooks at once.
Below VBA code can do this for us:
Sub SaveAllWorkbooks()
Dim wb As Workbook
For Each wb In Workbooks
wb.Save
Next wb
End Sub
Note that in this code, you don’t get a prompt that asks you to save the workbook in a specific location (if saving it for the first time).
It saves it in the default folder (it was the ‘Documents’ folder in my case). This code works best when these files are already saved and you’re making changes and you want to save all the workbooks quickly.
Example 3 – Go through All the Cells in a Selection (Highlight negative values)
Using the ‘For Each’ loop, you can loop through all the cells in a specific range or in the selected range.
This can be helpful when you want to analyze each cell and perform an action based on it.
For example, below is the code that will go through all the cells in the selection and change the cell color of the cells with negative values to red.
Sub HighlightNegativeCells()
Dim Cll As Range
For Each Cll In Selection
If Cll.Value < 0 Then
Cll.Interior.Color = vbRed
End If
Next Cll
End Sub
(Note I’ve used Cll as a short variable name for Cell. It’s advisable not to use object names such as Sheets or Range as variable names)
In the above code, the For Each-Next loop goes through the collection of cells in the selection. IF statement is used to identify if the cell value is negative or not. In case it is, the cell is given a red interior color, else it goes to the next cell.
In case you don’t have a selection, and instead want VBA to select all the filled cells in a column, starting from a specific cell (just like we use Control + Shift + Down arrow key to select all filled cells), you can use the below code:
Sub HighlightNegativeCells()
Dim Cll As Range
Dim Rng As Range
Set Rng = Range("A1", Range("A1").End(xlDown))
For Each Cll In Rng
If Cll.Value < 0 Then
Cll.Interior.Color = vbRed
End If
Next Cll
End Sub
In the above example, it doesn’t matter how many filled cells are there. It will start from cell A1 and analyze all the contiguous filled cells in the column.
You also don’t need to have cell A1 selected. You can have any far-off cell selected and when the code runs, it will still consider all the cells in column A (starting from A1) and color the negative cells.
‘Exit For’ Statment
You can use the ‘Exit For’ statement in the For Each-Next loop to come out of the loop. This is usually done in case a specific condition is met.
For example, in Example 3, as we are going through a set of cells, it can be more efficient to check if there are any negative values or not. In case there are no negative values, we can simply exit the loop and save some VBA processing time.
Below is the VBA code that will do this:
Sub HighlightNegativeCells()
Dim Cll As Range
For Each Cll In Selection
If WorksheetFunction.Min(Selection) >= 0 Then Exit For
If Cll.Value < 0 Then
Cll.Interior.Color = vbRed
End If
Next Cll
End Sub
Where to Put the VBA Code
Wondering where the VBA code goes in your Excel workbook?
Excel has a VBA backend called the VBA editor. You need to copy and paste the code in the VB Editor module code window.
Here are the steps to do this:
- Go to the Developer tab.

- Click on the Visual Basic option. This will open the VB editor in the backend.
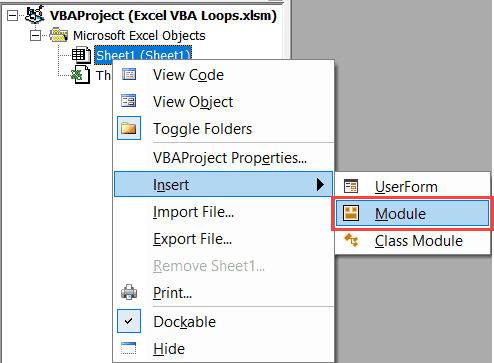
- In the Project Explorer pane in the VB Editor, right-click on any object for the workbook in which you want to insert the code. If you don’t see the Project Explorer go to the View tab and click on Project Explorer.
- Go to Insert and click on Module. This will insert a module object for your workbook.

- Copy and paste the code in the module window.


You May Also Like the Following Excel Tutorials:
- How to record a macro in Excel.
- Creating User-defined functions in Excel.
- Excel VBA Msgbox
- How to Run a Macro in Excel.
- How to Create and Use Add-ins in Excel.
- Excel VBA Events – An Easy (and Complete) Guide.
- How to Sort Data in Excel using VBA (A Step-by-Step Guide).
- 24 Useful Excel Macro Examples for VBA Beginners (Ready-to-use).
- How to Use Excel VBA InStr Function (with practical EXAMPLES).
- Excel Personal Macro Workbook | Save & Use Macros in All Workbooks.
- Using Select Case in Excel VBA.
Loops are used in VBA for repeating a set of statements multiple times. Loops form an essential part of any programming language, and VBA is no exception. There are five different types of loops that can be used in VBA. These are as follows:
- For Loop
- For Each Loop
- Do While Loop
- Do Until Loop
- Wend Loop (obsolete)
In this post, I will explain all these VBA Loops with examples. But before jumping into the topic, let’s understand what a loop is and why it is used.
What is a loop, and what are its uses?
Loop is an instruction that can continually repeat a set of statements until a particular condition is reached.
Loops can serve the following purposes:
- It helps in iterating a set of statements.
- It helps in checking a particular condition multiple times.
- It can also help in developing custom sleep and wait logic in code.

VBA FOR LOOP
For loop is one of the most important and frequently used loop in VBA. For Loop is sometimes also called ‘For Next Loop’.
For Loops allow you to iterate a set of statements for a specified number of times.
Syntax of VBA For Loop
The basic syntax of a VBA For loop or structure of For Loop is as follows:
For loop_ctr = start_num To end_num [step_increment]
'Statements to be executed inside the loop
Next loop_ctr
Here, ‘loop_ctr’ stands for the loop counter. It is the backbone of the ‘For Next Loop,’ and hence it is also called ‘loop timekeeper’. This variable gets incremented after each iteration until the loop ends.
‘start_num’ is the number from which the loop should begin.
‘end_num’ is the number till which the loop should continue.
‘step_increment’ is an optional parameter. It denotes by how much value the ‘loop_ctr’ should be incremented after each iteration. By default, the value of ‘step_increment’ is 1. This means that with each iteration, the ‘loop_ctr’ value is incremented by 1.
How does a VBA For Loop Work?
Let’s say we have a simple For Loop in VBA as shown below:
For loop_ctr = 1 To 100
'Statements to be executed inside the loop
Next loop_ctr
- When the program control reaches the statement ‘For loop_ctr = 1 To 100’, it reserves a space for the variable ‘loop_ctr’ in the memory and initializes it to 1.
- After this, it executes the statements inside the For Loop sequentially.
- Finally, the program control reaches the statement ‘Next loop_ctr’, here it increments the variable ‘loop_ctr’ by 1. And the control again goes to the statement ‘For loop_ctr = 1 To 100’, where it checks if the value of ‘loop_ctr’ has reached 100 or not. If the value is less than 100, then it continues the next iteration; otherwise, the loop stops.
Still not clear with the working of a For Loop? No Worries. Let’s try to understand this with the help of a flow diagram.
VBA For Next Loop Flow Diagram

Let’s try to understand the control flow as depicted in the above flow chart:
- First of all, the FOR statement is executed. This step allows the ‘loop_ctr’ and ‘step_increment’ values to be initialized.
- After this, the condition is evaluated. If the condition is TRUE, all the statements inside the loop ‘Code Block’ are executed. However, If the condition evaluates to FALSE, then the control flow jumps to the next statement outside the For loop.
- When the ‘code block’ inside the For Loop executes, the loop starts to get ready for the next iteration and increments the ‘loop_ctr’ value.
- Finally, the condition is again evaluated with the incremented ‘loop_ctr,’ and the process repeats itself.
Few Simple Examples of For Loop In VBA
Let’s see some simple examples of For Loop in VBA.
Example 1: Use VBA For Loop to print numbers from 1 to 10 in excel.
In this example, we have a range «A1:A10”, and we have to fill this range with numbers from 1-10.
To accomplish this, we can use the below code:
Sub ForLoopPrintNumbers()
Dim loop_ctr As Integer
For loop_ctr = 1 To 10
ActiveSheet.Range("A1").Offset(loop_ctr - 1, 0).Value = loop_ctr
Next loop_ctr
MsgBox "For Loop Completed!"
End Sub
Explanation:
In the above code, first of all, we have declared the loop counter ‘loop_ctr’ for our For loop. Next, along with the For statement, we have initialized the ‘loop_ctr’ to 1 and set the ‘end_num’ as 10.
Inside the For Loop body, we have written the code to write the loop_ctr value on the excel sheet in the A column. After this, there is a statement that increments the ‘loop_ctr’ for the next iteration.
Note that since we have not specified an explicit ‘step_increment’ value, so every iteration, the ‘loop_ctr’ will be incremented by 1. The For loop in the above code iterates 10 times and populates the cells in the range A1:A10 with numbers from 1-10 serially.
Example 2: Use For Loop in VBA to find the sum of all the numbers between 1 to 10.
In this example, we will loop through all the numbers between 1 to 10 and sum them. Finally, we will be displaying the sum of the numbers from 1 to 10 on the screen.
To do this we can use the following code:
Sub ForLoopSumNumbers()
Dim loop_ctr As Integer
Dim result As Integer
result = 0
For loop_ctr = 1 To 10
result = result + loop_ctr
Next loop_ctr
MsgBox "Sum of numbers from 1-10 is : " & result
End Sub
Explanation:
In the above code, first of all, we have declared the loop counter ‘loop_ctr’ for our For loop. Next, we have declared another integer variable as ‘result’ for storing the sum of numbers from 1 to 10.
After this, along with the For statement, we have initialized the ‘loop_ctr’ to 1 and set the ‘end_num’ as 10.
Inside the For Loop body, we have added the value of ‘loop_ctr’ along with the result. This means that in the first iteration, the result will be: 1, and in the second iteration, it will be : (1+2) = 3. Similarly, in the third iteration, the value will be: (3 + 3) = 6 and so on.
After the For loop body, there is a statement that increments the ‘loop_ctr’ for the next iteration.
Note that since we have not specified an explicit ‘step_increment’ value, hence with every iteration, the ‘loop_ctr’ will be incremented by 1.
The For loop in the above code iterates 10 times and sums all the numbers from 1 to 10, and finally displays the sum of these numbers in msgbox.
Example 3: Use VBA For Loop to print numbers, all even numbers from 1 to 10.
In this example, we will fill all the even numbers between 1 and 10 into cells A1 to A5.
To do this, we can use the below code:
Sub ForLoopToPrintEvenNumbers()
Dim loop_ctr As Integer
Dim cell As Integer
cell = 1For loop_ctr = 1 To 10
If loop_ctr Mod 2 = 0 Then
ActiveSheet.Range("A1").Offset(cell - 1, 0).Value = loop_ctr
cell = cell + 1
End If
Next loop_ctrMsgBox "For Loop Completed!"
End Sub
Explanation:
In the above code, first of all, we have declared the loop counter ‘loop_ctr’ for our For loop. After that, we have declared another variable ‘cell’. This variable is initialized with a value of 1.
Next, along with the For statement, we have initialized the ‘loop_ctr’ to 1 and set the ‘end_num’ as 10.
Inside the For Loop body, we have used an IF statement to check if the ‘loop_ctr’ value is even or not.
If the ‘loop_ctr’ value is Even then, we have written a statement to print the value out to the spreadsheet in the A column.
After this, we are incrementing the cell variable by 1. We have used the cell variable in our loop to print the values in the appropriate cell in the A column.
Next, there is a statement that increments the ‘loop_ctr’ for the next iteration.
Note that since we have not specified an explicit ‘step_increment’ value, after every iteration, the ‘loop_ctr’ will be incremented by 1.
The For loop in the above code iterates 10 times and populates the cells in the range A1:A5 with even numbers from 2-10.
Alternate Logic
There is another better way to accomplish the same, let’s see how.
Sub ForLoopToPrintEvenNumbers()
Dim loop_ctr As Integer
Dim cell As Integer
cell = 1For loop_ctr = 2 To 10 Step 2
ActiveSheet.Range("A1").Offset(cell - 1, 0).Value = loop_ctr
cell = cell + 1
Next loop_ctrMsgBox "For Loop Completed!"
End Sub
Explanation:
In the above code, we have looped through all the numbers between 2 to 10. Instead of the default ‘step_increment’ of 1, we are using an explicit ‘step_increment’ of 2.
In the first iteration of the for loop, the ‘loop_ctr’ value is 2, which is what gets printed in cell A1. In the second iteration, the ‘loop_ctr’ value becomes 4 (earlier value : 2 + step_increment : 2) and this number gets printed on cell A2.
Similarly, in the third iteration, the ‘loop_ctr’ value is 6 (earlier value: 4 + step_increment: 2) and it gets printed on the cell A3 and so on.
Writing a Nested For Loop
There are times when you might need to use a for loop within another for loop; this is called nesting of for loops.
VBA For loops can be nested within one another to perform complex tasks in excel. Let’s understand a nested loop with an example:
Example 4: Print numbers from 1 to 10 in all the worksheets in an excel spreadsheet using a For Loop.
In this example, we need to print numbers from 1 to 10 in all the worksheets in an excel workbook.
To do this, we can make use of the following code:
Sub ForLoopPrintNumbers()
Dim loop_ctr As Integer
Dim sheet As IntegerFor sheet = 1 To Worksheets.Count
For loop_ctr = 1 To 10
Worksheets(sheet).Range("A1").Offset(loop_ctr - 1, 0).Value = loop_ctr
Next loop_ctr
Next sheetMsgBox "For Loop Completed!"
End Sub
Explanation:
In this example, there are two For Loops, one inside another. The Outer For Loop iterates over the variable ‘sheet’, and the Inner For Loop iterates over ‘loop_ctr’ that determines the cell position.
Inside the body of the Inner For loop, we have a statement that prints the numbers between 1 to 10 in each worksheet (as per the outer loop).
The outer loop iterates over all the available sheets in the spreadsheet, whereas the inner loop iterates over the A1 to A10 for the current sheet. This makes it possible to print numbers from 1 – 10 in all the available worksheets.
Reverse For Loop in VBA
In all our previous examples, we have only seen those For loops in which the loop counter variable gets incremented from a lower value to a higher value (with each iteration).
But this is not necessary, you can also have a For Loop where the loop counter moves from a higher value to a lower value (with each iteration).
Example 5: Use a Reverse For Loop to print numbers from 1 to 10 in descending order.
Sub ReverseForLoop()
Dim loop_ctr As Integer
Dim cell As Integer
cell = 1For loop_ctr = 10 To 1 Step -1
ActiveSheet.Range("A1").Offset(cell - 1, 0).Value = loop_ctr
cell = cell + 1
Next loop_ctrMsgBox "For Loop Completed!"
End Sub
Explanation:
In this example, the loop starts with the value of ‘loop_ctr’ as 10. And then, with each iteration, the value of the loop counter is decremented by 1 (since the ‘step_increment’ is -1).
Inside the For Loop body, we print the value of the loop counter variable in the active sheet from A1:A10.
Infinite Loop Using a For Loop
An infinite loop is also sometimes called an Endless Loop. An Infinite Loop is a loop whose ending condition (often due to a logic error by the programmer) never becomes true. The loop iterates an infinite number of times or until halted by programmer/user action.
Although in the case of FOR loop, generally due to the clear start and end conditions, it is not easy to make an endless loop by logical mistake. However, there can be cases where you can by mistake reset the loop counter variable inside the loop, thereby making the loop infinite.
Below is an example of an endless for loop:
'Do not run this code
Sub InfiniteForLoop()
Dim loop_ctr As Integer
Dim cell As IntegerFor loop_ctr = 1 To 10
ActiveSheet.Range("A1").Offset(loop_ctr - 1, 0).Value = loop_ctr
loop_ctr = loop_ctr - 1
Next loop_ctrMsgBox "For Loop Completed!"
End Sub
The statement ‘loop_ctr = loop_ctr – 1’ makes the above VBA loop infinite since it resets the value of the loop_ctr with every iteration, and hence the end condition is never reached.
Tip: It is always good to not make any changes to the loop counter variable value inside the loop body.
How to Break Out or Exit of a For Loop
I believe many of you will wonder, «Why do we need to break a loop during execution»? The answer is simple: Breaking or exiting a loop can sometimes optimize the code and reduce the resource overhead.
To break a For Loop we can use the ‘Exit For’ statement.
Let’s try to see this in action with an example:
Example 6: Use a FOR loop in VBA to find the sum of the first 20 odd numbers between 1 to 100.
In this example, we have to find the first 20 odd numbers from 1 to 100 and then calculate their sum. Below is the code to do this:
Sub SumFirst20OddNumbers()
Dim loop_ctr As Integer
Dim odd_number_counter As Integer
Dim sum As IntegerFor loop_ctr = 1 To 100
If (loop_ctr Mod 2 <> 0) Then
sum = sum + loop_ctr
odd_number_counter = odd_number_counter + 1
End IfIf (odd_number_counter = 20) Then
Exit For
End If
Next loop_ctrMsgBox "Sum of top 20 odd numbers is : " & sum
End Sub
Explanation:
In this example, we have three variables – ‘loop_ctr’, ‘odd_number_counter’, and ‘sum’. The variable ‘loop_ctr’ is used as a loop counter, the ‘odd_number_counter’ variable holds the count of odd numbers that have been summed (because we only need to sum the first 20 odd numbers), and the ‘sum’ variable holds the sum of the first 20 odd numbers.
Inside the loop, we iterate all the numbers from 1 to 100, one by one (step_increment is 1 as default), and check if the number is odd. If the number is odd, we sum it and increment the ‘odd_number_counter’ by 1.
After the first IF block, another IF condition checks if the ‘odd_number_counter’ variable value is 20. If the value of ‘odd_number_counter’ is 20, then using the ‘Exit For’ statement, we are exiting out of the loop as there is no point in continuing the loop further.
Few Practical Examples of VBA For Loop
Now let’s have a look at some of the practical examples where For Loop can be used:
Example 7: Highlight alternate rows on a spreadsheet using the VBA For Loop.
In this example, we need to highlight alternate rows in a spreadsheet. To do this we can use the below code:
Sub HighlightAlternateRows()
Dim loop_ctr As Integer
Dim Max As Integer
Dim clm As Integer
Max = ActiveSheet.UsedRange.Rows.Count
clm = ActiveSheet.UsedRange.Columns.CountFor loop_ctr = 1 To Max
If loop_ctr Mod 2 = 0 Then
ActiveSheet.Range(Cells(loop_ctr, 1), Cells(loop_ctr, clm)).Interior.ColorIndex = 28
End If
Next loop_ctrMsgBox "For Loop Completed!"
End Sub
Explanation:
In the above code, we have started the loop from 1 to the number of rows in our sheet. We are then using the if statement to find the even-numbered rows for highlighting them.
Example 8: Use VBA For Loop Protect all sheets in Workbook.
In this example, we will try to create a VBA macro that loops through all the worksheets in the active workbook and protects all the worksheets.
Below is the code to do this:
Sub ProtectWorksheets()
Dim loop_ctr As Integer
For loop_ctr = 1 To ActiveWorkbook.Worksheets.Count
Worksheets(loop_ctr).Protect
Next loop_ctr
End Sub
Explanation:
In the above code, we are using a VBA for loop and iterating over all the worksheets in the open workbook. Inside the For Loop, we are trying to protect the current instance of the worksheet.
The above code can also be used to unprotect the sheets as well. Just replace the ‘Worksheets(loop_ctr).Protect’ with ‘Worksheets(loop_ctr).UnProtect’.
Example 9: Loop Over an Array of Numbers and Find the Largest and Smallest Numbers from the Array.
In this example, we have an array of numbers, and using a FOR Loop we have to iterate the array and find the smallest and the Largest numbers from the array. Below is the code to do this:
Sub ForLoopWithArrays()
Dim arr() As Variant
arr = Array(10, 12, 8, 19, 21, 5, 16)Dim min_number As Integer
Dim max_number As Integermin_number = arr(0)
max_number = arr(0)Dim loop_ctr As Integer
For loop_ctr = LBound(arr) To UBound(arr)
If arr(loop_ctr) > max_number Then
max_number = arr(loop_ctr)
End IfIf arr(loop_ctr) < min_number Then
min_number = arr(loop_ctr)
End IfNext loop_ctr
MsgBox "Largest Number: " & max_number _
& " Smallest Number: " & min_number
End Sub
Explanation:
In the above code, we have an array of numbers declared as ‘arr’ variable. In addition to that, we have two variables, ‘min_number’ and ‘max_number’, that are used for holding the minimum and maximum numbers from the array.
We initialize both the ‘min_number’ and ‘max_number’ variables to the array’s first element. Next, inside the For loop, we loop through all the array elements and check –
If the current number is greater than the ‘max_number’, then set the ‘max_number’ value equal to the current number. The next condition that we check is – If the current number is less than the ‘min_number’, then set the ‘min_number’ value equal to the current number.
Finally, we are showing the largest and the smallest numbers inside the array with the help of a msgbox.
VBA For Each Loop
For each is a more sophisticated type of For Loop. It can be used for iterating a collection of objects.
Here you don’t have to worry about the loop counter, your job is to simply pass a collection of objects, and the loop itself identifies the objects and iterates them.
Syntax of a VBA For Each Loop
The syntax of For Each Loop resembles closely to For Loop. Below is the syntax:
For Each item In collection_of_items
'Statements to be executed inside the loop
Next item
Here, ‘collection_of_items’ refers to a group of objects that you need to iterate. If you supply a single object to this parameter, it throws a «run-time error 438».
‘item’ specifies the objects inside the ‘collection_of_items’. At any particular instant inside the loop, ‘item’ contains a single object from the ‘collection_of_items’.
How a For Each Loop Works
Let’s say we have a For Each Loop as:
For Each cl In ActiveSheet.Range("A1:A10")
'Statements to be executed inside the loop
Next cl
- When the program control reaches the statement ‘For Each cl In ActiveSheet.Range(«A1:A10»)’ it evaluates the object collection and then initializes the variable ‘cl’ with the first object in the collection, i.e., cell $A$1.
- After this, it executes the statements inside the loop.
- Next, it fetches the second object from the collection and dumps it in the variable ‘cl’. And the process continues till it has fetched all objects from the collection.
Flow Diagram of a For Each Loop In VBA

Let’s try to understand the control flow as depicted in the above flow chart:
- First of all, the FOR EACH statement is executed and checks if there are any elements in the collection.
- If there are any elements present in the collection, the ‘item’ variable is initialized to the first element of the collection, and the statements inside the loop ‘Code Block’ is executed. However, If the condition evaluates to FALSE, then the control flow jumps to the next statement outside the For Each loop.
- When the ‘code block’ inside the For Each Loop executes, the loop starts to get ready for the next iteration. The ‘item’ variable is re-initialized to the next element in the collection, and the loop continues.
Few Simple Examples of VBA For Each Loop
Now let’s move to some simple examples of For Each loop.
Example 1 – Use VBA For Each Loop to display the names of all the Active Worksheets.
In this example, we will use a For Each loop to iterate through all the worksheets in the ActiveWorkbook and display the names of all the sheets using a msg box.
Sub ForEachDisplaySheetNames()
Dim sheetNames As String
For Each sht In ActiveWorkbook.Sheets
sheetNames = sheetNames & vbNewLine & sht.Name
Next shtMsgBox "The Sheet names are : " & vbNewLine & sheetNames
End Sub
Explanation:
In this example, the For Each loop takes the collection of sheets from ‘ActiveWorkbook.Sheets’ it then iterates the sheets one by one and initializes the ‘sht’ variable with the current sheet instance.
Inside the For Each block, the sheet name for each worksheet is appended to a string, and finally, outside the loop, all the sheet names are displayed using a message box.
Example 2: Use VBA For Each Loop to Sum all the Elements of an Array.
In this example, with the help of a VBA For Each loop, we will be iterating an array of numbers and find the sum of all of its elements. Below is the code to do this:
Sub ForEachSumArrayElements()
Dim arr As Variant
Dim sum As Integer
arr = Array(1, 10, 15, 17, 19, 21, 23, 27)For Each element In arr
sum = sum + element
Next elementMsgBox "The Sum is : " & sum
End Sub
Explanation:
In the above code, we have declared two variables, ‘arr’ and ‘sum’. The ‘arr’ variable is used for storing the array of numbers, and the ‘sum’ variable represents the sum of the array elements.
Inside the For Each loop, we are iterating the array elements one by one, summing them up, and storing the total in the ‘sum’ variable.
Finally, outside the For Each loop, we show the sum of the array elements using a message box.
Example 3: Use VBA For Each Loop to display the names of all the Open Workbooks.
In this example, using a For Each loop, we will loop through all the open workbooks and display their name using a message box.
Below is the code to do this:
Sub ForEachDisplayWorkbookNames()
Dim workBookNames As StringFor Each wrkbook In Workbooks
workBookNames = workBookNames & vbNewLine & wrkbook.Name
Next wrkbookMsgBox "The Workbook names are : " & vbNewLine & workBookNames
End Sub
Explanation:
In this example, the For Each loop takes the collection of workbooks, then iterates the workbooks one by one and initializes the ‘wrkbook’ variable with the current workbook instance.
Inside the For Each block, the workbook name for each workbook is appended to a string, and finally, outside the loop, all the workbook names are displayed using a message box.
Nested VBA For Each Loop
Two For Each loops can be nested within one another to perform complex tasks. Let’s understand For Each nested loop with an example:
Example 4: Display the names of all open workbooks along with their corresponding worksheets.
In this example, we will be iterating through all the open workbooks and then iterate through each workbook’s worksheets and finally display them using a message box.
Below is the code to do this:
Sub ForEachLoopNesting()
Dim result As String
For Each wrkbook In Workbooks
For Each sht In wrkbook.Sheets
result = result & vbNewLine & " Workbook : " & wrkbook.Name & " Worksheet : " & sht.Name
Next sht
Next wrkbookMsgBox result
End Sub
Explanation:
In the above code, we have used two For Each loops, one inside another. The outer For Each loop iterates through the workbooks, and the inner For Each loop iterates through the worksheets.
Inside the inner For Each block, a statement concatenates the names of the workbooks and the worksheets and stores them in a variable called ‘result’.
With each iteration, the ‘result’ variable’s new value is appended to the existing value. Finally, the value of the ‘result’ variable is displayed inside a msgbox.
How to Break Out or Exit of a For Each Loop
To break out of a For Each loop, we can use the ‘Exit For’ statement. So, ‘Exit For’ statement can break both a For loop as well as a For Each loop.
Let’s see this with an example:
Example 5: Use VBA For Each Loop to display the names of the first 3 sheets in the active workbook.
In this example, we will loop through the worksheets inside the active workbook and only display the first 3 worksheet names. Below is the code to do this:
Sub ForEachDisplayFirstThreeSheetNames()
Dim sheetNames As String
Dim sheetCounter As IntegerFor Each sht In ActiveWorkbook.Sheets
sheetNames = sheetNames & vbNewLine & sht.Name
sheetCounter = sheetCounter + 1If sheetCounter >= 3 Then
Exit For
End If
Next shtMsgBox "The Sheet names are : " & vbNewLine & sheetNames
End Sub
Explanation:
In the above code, we have a For Each loop that iterates over the worksheets inside the active workbook. Inside the loop, we are appending and storing the sheet names within the ‘sheetNames’ variable. Also, we have a ‘sheetCounter’ variable that gets incremented on each iteration.
After that, inside the loop, we also check if the value of the ‘sheetCounter’ variable has reached 3 (because we only want to display 3 sheet names).
If the ‘sheetCounter’ variable’s value has reached 3, we exit the loop using the ‘Exit For’ statement. Finally, we are displaying the value of the ‘sheetNames’ variable using a msgbox.
VBA Do While Loop
VBA Do While is another type of loop that repeatedly executes a set of statements while a condition continues to be True. The loop ends when the condition becomes false.
Syntax of Do While Loop In VBA
Do while loop has two syntaxes in VBA, these are as follows:
Syntax 1:
Do While condition
'Statements to be executed inside the loop
Loop
Or
Syntax 2:
Do
'Statements to be executed inside the loop
Loop While condition
In both the syntaxes, ‘condition’ is used as the loop backbone. On each iteration ‘While’ statement checks if the ‘condition’ evaluates to True or False. If the ‘condition’ is True, then the loop continues; otherwise, the loop terminates.
Before everything else, let’s try to understand the difference between these two syntaxes.
Difference Between the two Do While Syntaxes
As we can see in the first, do-while loop syntax, the ‘condition’ is checked as the first statement. This means if the condition is false, the do-while loop in syntax 1 will not perform any iterations.
Whereas in the second syntax, the ‘condition’ is checked as the last statement inside the loop. This means that even if the condition is false, the do-while loop in syntax 2 will perform at least 1 iteration. Only after that, the condition will be evaluated, and the next iteration will not happen.
So, syntax 2 guarantees to have at least 1 iteration irrespective of the condition being true or false.
Now, let’s try to understand how a do-while loop works.
How Does a Do While Loop Work
Syntax 1 –
Let’s say we have a Do While loop as follows:
Dim loop_ctr as Integer
loop_ctr = 1
Do While loop_ctr < 10
'Statements to be executed inside the loop
loop_ctr = loop_ctr + 1
Loop
- In the first two statements, the variable ‘loop_ctr’ is declared and initialized as 1.
- When the program control reaches the statement «Do While loop_ctr < 10», it checks if the value of the ‘loop_ctr’ is less than 10.
- If the ‘loop_ctr’ value is less than 10, the statements inside the body of the loop get executed sequentially, and finally, the ‘loop_ctr’ is incremented by 1.
- After this, the control again moves to the loop «Do While loop_ctr < 10», and the loop continues till the value of ‘loop_ctr’ becomes equal to 10.
- When the value of ‘loop_ctr’ becomes equal to 10, then the do while condition fails, and the control moves to the next statement after the do-while loop.
Syntax 2 –
Let’s say we have a Do While loop as follows:
Dim loop_ctr as Integer
loop_ctr = 1
Do
'Statements to be executed inside the loop</em>
loop_ctr = loop_ctr + 1
Loop While loop_ctr < 10
- In the first two statements, the variable ‘loop_ctr’ is declared and initialized as 1.
- When the program control reaches the «Do» statement, as there are no checks (like syntax 1), it just comes inside the loop and starts executing the statements inside the loop one by one and increments the ‘loop_ctr’ by 1.
- After executing the statements inside the loop body, it checks if the ‘loop_ctr’ is less than 10. If the ‘loop_ctr’ value is less than 10, another iteration starts.
- If the value of ‘loop_ctr’ becomes equal to 10, then the do while condition fails, and the control moves to the next statement after the do-while loop.
Note: In the second syntax, the Do-While Loop always iterates at-least-once since the condition to be checked is placed at the end of the loop.
Flow Diagram of a Do While Loop In VBA:

Let’s try to understand the control flow as depicted in the above flow chart:
Syntax 1 –
- In this Do-While syntax, the loop condition is checked along with the Do statement.
- If the condition is true, then the ‘code block’ inside the do-while loop is executed, and the next iteration begins. Each iteration before beginning checks the loop condition, and the ‘code block’ inside the do-while loop is only executed when the condition evaluates to true.
- When the loop condition becomes false, then no more loop iterations occur, and the control flow jumps to the next statement outside the Do While loop.
Syntax 2 –
- In this Do-While syntax, the loop condition is not checked along with the Do statement.
- Since for the first iteration, no condition is checked. Hence the code block inside the do-while body gets executed.
- After the first iteration, each subsequent iteration, before beginning, checks the loop condition, and the ‘code block’ inside the do-while loop is only executed when the condition evaluates to true.
- When the loop condition becomes false, then no more loop iterations occur, and the control flow jumps to the next statement outside the Do While loop.
Few Simple Examples of Do While Loop In VBA
Example 1: Use VBA Do While Loop to print numbers from 1 to 10 in excel.
In this example, we have a range «A1:A10,» and we have to fill this range with numbers from 1-10. To do this we can use the below code:
Sub DoWhileLoopPrintNumbers()
Dim loop_ctr As Integer
loop_ctr = 1Do While loop_ctr <= 10
ActiveSheet.Range("A1").Offset(loop_ctr - 1, 0).Value = loop_ctr
loop_ctr = loop_ctr + 1
LoopMsgBox ("Loop Ends")
End Sub
Explanation:
In the above code, we have declared and initialized the ‘loop_ctr’ variable for our Do While loop. Next, along with the Do while statement, we have a condition to run the loop till the ‘loop_ctr’ value is less than or equal to 10.
Inside the Do While Loop body, we have written the code to write the ‘loop_ctr’ value on the excel sheet in the A column.
After this, there is a statement that increments the ‘loop_ctr’ for the next iteration.
Example 2: Use Do While Loop in VBA to find the sum of all the numbers between 1 to 20.
In this example, we will loop through all the numbers between 1 to 20 and sum them. Finally, we will be displaying the sum of the numbers from 1 to 20 on the screen.
To do this we can use the following code:
Sub WhileLoopSumNumbers()
Dim loop_ctr As Integer
Dim result As Integer
loop_ctr = 1
result = 0Do While loop_ctr <= 20
result = result + loop_ctr
loop_ctr = loop_ctr + 1
LoopMsgBox "Sum of numbers from 1-20 is : " & result
End Sub
Explanation:
In the above code, we have declared the loop counter ‘loop_ctr’ for our Do While loop. Next, we have declared another integer variable as ‘result’ for storing the sum of numbers from 1 to 20.
After this, along with the Do while statement, we have a condition to run the loop till the ‘loop_ctr’ value is less than or equal to 20.
Inside the Do While Loop body, we have added the value of ‘loop_ctr’ along with the result. This means that in the first iteration, the result’s value will be: 1, and in the second iteration, it will be : (1+2) = 3. Similarly, in the third iteration, the value will be: (3 + 3) = 6 and so on.
After this, there is a statement that increments the ‘loop_ctr’ for the next iteration.
The Do While loop in the above code iterates 20 times, sums all the numbers from 1 to 20, and finally displays the sum of these numbers in msgbox.
Example 3: Show the unique behavior of Do While Loop (In Syntax 2) to execute at-least-once even if the condition to be checked is False.
Sub DoWhileLoopTest()
Dim loop_ctr As Integer
loop_ctr = 100Do
MsgBox "Loop Counter : " & loop_ctr
loop_ctr = loop_ctr + 1
Loop While loop_ctr <= 10End Sub
Explanation:
In the above example, we have initialized the ‘loop_ctr’ as 100 and inside the loop condition we are checking ‘loop_ctr < 10’. This means the loop is only designed to iterate when the value of ‘loop_ctr’ is less than 10. But you will notice that despite the condition this do-while loop executes once.
The reason for this is: because according to syntax 2 of the Do While loop, there is no way to check conditions at the beginning of the loop. You can only check conditions at the end of the loop.
Note: We can fix this issue by simply using the Do While loop in Syntax 1 as shown:
Sub DoWhileLoopTest()
Dim loop_ctr As Integer
loop_ctr = 100Do While loop_ctr <= 10
MsgBox "Loop Counter : " & loop_ctr
loop_ctr = loop_ctr + 1
LoopEnd Sub
Writing a Nested Do While Loop
Similar to other loops, nesting is very much possible in Do While Loops. Let’s understand nested Do While loops this with an example.
Example 4: Print numbers from 1 to 10 in all the worksheets in an excel spreadsheet using a Do While Loop.
In this example, we need to print numbers from 1 to 10 in all the worksheets in an excel workbook using a do-while loop. To do this, we can make use of the following code:
Sub NestedDoWhileLoop()
Dim loop_ctr As Integer
Dim sheet As Integer
sheet = 1Do While sheet <= Worksheets.Count
loop_ctr = 1
Do While loop_ctr <= 10
Worksheets(sheet).Range("A1").Offset(loop_ctr - 1, 0).Value = loop_ctr
loop_ctr = loop_ctr + 1
Loop
sheet = sheet + 1
LoopMsgBox "Nested While Loop Completed!"
End Sub
Explanation:
In this example, there are two Do While Loops, one inside another. The Outer Do While Loop iterates over the variable ‘sheet’ and iterates till the value of the ‘sheet’ variable is less than or equal to ‘Worksheets.Count’ (i.e., the total count of worksheets in a workbook).
Inner Do While Loop iterates over the variable ‘loop_ctr’ and iterates till the value of ‘loop_ctr’ is less than or equal to 10. This helps us to print the numbers in a sequence.
Inside the body of the Inner Do While loop, we have a statement that prints the numbers between 1 to 10 in each worksheet (as per the outer loop).
The outer loop iterates over all the available worksheets sheets in the spreadsheet, whereas the inner loop iterates over the numbers from 1 to 10 for the current sheet.
This makes it possible to print numbers from 1 – 10 in all the available worksheets.
Infinite Loop Using a Do While Loop
Unlike a For Loop, a Do While Loop does not have a clear ‘start’, ‘end’ or ‘step_increments’, so it is very easy to make logical errors resulting in an infinite or an endless loop. Below is an example of a Do While endless loop:
'Do not run this code
Sub InfiniteDoWhileLoop()
Dim loop_ctr As Integer
loop_ctr = 1Do While loop_ctr <= 10
ActiveSheet.Range("A1").Offset(loop_ctr - 1, 0).Value = loop_ctr
LoopMsgBox ("Loop Ends")
End Sub
In the above code, we have simply missed the line to increment the loop counter i.e. ‘loop_ctr = loop_ctr + 1’ and this has made the loop infinite because the value of ‘loop_ctr’ will always be 1 (since it is never incremented) and hence the loop condition ‘While loop_ctr <= 10’ will always evaluate to true.
Tip: It is always a good idea to use a For Each or For Next loop over a Do While or Do Until loop (whenever possible).
How to Break Out or Exit of a Do While Loop
To break out of a Do While loop, we can use the ‘Exit Do’ statement. As soon as the VBA engine executes the ‘Exit Do’ statement, it exits the loop and takes the control to the next statement after the Do while loop.
Let’s see this with an example:
Example 5: Use a Do While loop in VBA to find the sum of the first 15 odd numbers between 1 to 100.
In this example, we have to find the first 15 odd numbers from 1 to 100 and then calculate their sum. Below is the code to do this:
Sub SumFirst15OddNumbers()
Dim loop_ctr As Integer
Dim odd_number_counter As Integer
Dim sum As Integerloop_ctr = 1
Do While loop_ctr <= 100
If (loop_ctr Mod 2 <> 0) Then
sum = sum + loop_ctr
odd_number_counter = odd_number_counter + 1
End IfIf (odd_number_counter = 15) Then
Exit Do
End Ifloop_ctr = loop_ctr + 1
LoopMsgBox "Sum of top 15 odd numbers is : " & sum
End Sub
Explanation:
In this example, we have three variables – ‘loop_ctr’, ‘odd_number_counter’, and ‘sum’. ‘loop_ctr’ is the loop counter variable, ‘odd_number_counter’ variable holds the count of odd numbers that have been summed and the ‘sum’ variable holds the sum of the first 15 odd numbers.
Inside the Do While loop, we loop through all the numbers from 1 to 100, one by one, and check if the number is odd. If the number is odd, we sum it and increment the ‘odd_number_counter’ by 1.
After the first IF block, another IF condition checks if the ‘odd_number_counter’ variable value is 15. If the value of ‘odd_number_counter’ is 15, then using the ‘Exit Do’ statement, we are breaking the loop as there is no point in continuing the loop further.
Finally, we are displaying the value of the ‘sum’ variable using a msgbox.
VBA Do Until Loop
Do Until loop is very similar to Do While loop; the only difference between them is that –
- A ‘do-while’ loop iterates as long as a certain condition is true.
- On the other hand, a ‘do-until’ loop iterates until a condition is no longer true.
Let’s try to understand this difference in simple terms:
For Instance: If we want to write a Do Loop that iterates from 1 to 10, with while keyword, the condition would be ‘Do While loop_ctr <= 10’ and with until keyword, the same condition can be written as ‘Do Until loop_ctr > 10’.
Which means:
- Until – repeat Until the count is greater than ten
- While – repeat While the count is less than or equal to ten
With these examples, you can clearly see – using Until and While is just the opposite way of writing the same condition.
Now, let’s have a look at the syntax of Do Until Loop.
Syntax of Do Until Loop In VBA
Similar to Do While loop, Do Until also has two syntaxes:
Syntax 1 –
Do Until condition
'Statements to be executed inside the loop
Loop
Or
Syntax 2 –
Do
'Statements to be executed inside the loop
Loop Until condition
Here, ‘condition’ is used as the loop backbone, the same as in the case of Do While Loop. On each iteration, Until statement checks, if the ‘condition’ evaluates to True or False. If the ‘condition’ is False, then the loop continues. Otherwise, the loop ends.
Now, let’s try to understand the difference between these two syntaxes.
Difference Between the two Do Until Syntaxes
As we can see in the first do until loop syntax, the ‘condition’ is checked as the first statement. This means if the condition is true, the do-until loop in syntax 1 will not perform any iterations.
Whereas in the second syntax, the ‘condition’ is checked as the last statement inside the loop. This means that even if the condition is true, the do-until loop in syntax 2 will perform at least 1 iteration. Only after that, the condition will be evaluated, and the next iteration will not happen.
So, syntax 2 guarantees to have at least 1 iteration irrespective of the condition being true or false.
How a Do Until Loop Works
Syntax 1 –
Let’s say we have a Do Until loop as follows:
Dim loop_ctr As Integer
loop_ctr = 1
Do Until loop_ctr > 10
'Statements to be executed inside the loop
loop_ctr = loop_ctr + 1
Loop
- In the first two statements, a variable ‘loop_ctr’ is declared and initialized as 1.
- When the program control reaches the statement «Do Until loop_ctr > 10», it checks if the value of the ‘loop_ctr’ is greater than 10.
- If the ‘loop_ctr’ value is less than or equal to 10, the statements inside the body of the loop get executed sequentially, and finally, the ‘loop_ctr’ is incremented by 1.
- After this, the control again moves to check the condition «Do Until loop_ctr > 10», and the loop continues till the value of ‘loop_ctr’ is less than or equal to 10.
Syntax 2 –
Dim loop_ctr As Integer
loop_ctr = 1
Do
'Statements to be executed inside the loop
loop_ctr = loop_ctr + 1
Loop Until loop_ctr > 10
- In the first two statements, a variable ‘loop_ctr’ is declared and initialized as 1.
- When the program control reaches the statement Do, it simply moves to the next statement as the Do statement doesn’t force the program to check any condition.
- After this, in the following statement, a variable ‘loop_ctr’ is incremented by 1.
- Next, ‘Loop Until loop_ctr > 10’ statement checks if the value of ‘loop_ctr’ is greater than 10 or not. If it is less than or equal to 10, then the program control again jumps to the Do statement, but if the value of ‘loop_ctr’ is greater than 10, it terminates the loop and the program control moves to the next statement.
Note: Syntax 2 of Do Until Loop always iterates at-least-once since the condition that is to be checked is placed at the end of the loop.
Flow Diagram of a Do Until Loop In VBA

Let’s try to understand the control flow as depicted in the above flow chart:
Syntax 1 –
- In this Do-Until syntax, the loop condition is checked along with the Do statement.
- If the condition is false, then the ‘code block’ inside the do-until loop is executed, and the next iteration begins. Each iteration before beginning checks the loop condition, and the ‘code block’ inside the do-until loop is only executed when the condition evaluates to false.
- When the loop condition becomes true, then no more loop iterations occur, and the control flow jumps to the next statement outside the Do Until loop.
Syntax 2 –
- In this Do-Until syntax, the loop condition is not checked along with the Do statement.
- Since for the first iteration, no condition is checked. Hence the code block inside the do-until body gets executed.
- After the first iteration, each subsequent iteration, before beginning, checks the loop condition, and the ‘code block’ inside the do-until loop is only executed when the condition evaluates to false.
- When the loop condition becomes true, then no more loop iterations occur, and the control flow jumps to the next statement outside the Do Until loop.
Few Simple Examples of Do Until Loop In VBA
Example 1: Print numbers from 1 to 10 in excel using a VBA Do Until Loop.
In this example, we have a range «A1:A10,» and we have to fill this range with numbers from 1-10. To do this we can use the below code:
Sub DoUntilLoopPrintNumbers()
Dim loop_ctr As Integer
loop_ctr = 1Do Until loop_ctr < 10
ActiveSheet.Range("A1").Offset(loop_ctr - 1, 0).Value = loop_ctr
loop_ctr = loop_ctr + 1
LoopMsgBox ("Loop Ends")
End Sub
Explanation:
In the above code, first of all, we have declared and initialized the ‘loop_ctr’ variable for our Do Until loop. Next, along with the Do until statement, we have a condition to run the loop till ‘loop_ctr’ value is greater than 10.
Inside the Do Until Loop body, we have written the code to write the ‘loop_ctr’ value on the excel sheet in the A column.
After this, there is a statement that increments the ‘loop_ctr’ for the next iteration. As soon as the value of the ‘loop_ctr’ variable becomes greater than 10, the loop ends.
Example 2: Use Do Until Loop in VBA to find the sum of all the numbers between 1 to 20.
In this example, using a do until loop, we will iterate all the numbers between 1 to 20 and sum them. Finally, we will be displaying the sum of the numbers from 1 to 20 on the screen. To do this we can use the following code:
Sub DoUntilLoopSumNumbers()
Dim loop_ctr As Integer
Dim result As Integer
loop_ctr = 1
result = 0Do Until loop_ctr > 20
result = result + loop_ctr
loop_ctr = loop_ctr + 1
LoopMsgBox "Sum of numbers from 1-20 is : " & result
End Sub
Explanation:
In the above code, we have declared the loop counter ‘loop_ctr’ for our Do Until loop. Next, we have declared another integer variable as ‘result’ for storing the sum of numbers from 1 to 20.
After this, along with the Do Until statement, we have a condition to run the loop until the ‘loop_ctr’ becomes greater than 20.
Inside the Do Until Loop body, we have added the value of ‘loop_ctr’ along with the result. This means in the first iteration, the value of the result will be: 1, and in the second iteration, it will be : (1+2) = 3; similarly, in the third iteration, the value will be: (3 + 3) = 6 and so on.
After this, there is a statement that increments the ‘loop_ctr’ for the next iteration.
The Do Until loop in the above code iterates 20 times and sums all the numbers from 1 to 20, and finally displays the sum of these numbers in msgbox.
Example 3: Show the unique behavior of Do Until Loop (In Syntax 2) to execute at-least-once even if the condition to be checked is True.
Sub DoUntilLoopTest()
Dim loop_ctr As Integer
loop_ctr = 100Do
MsgBox "Loop Counter : " & loop_ctr
loop_ctr = loop_ctr + 1
Loop Until loop_ctr > 10
End Sub
Explanation:
In the above example, we have initialized the ‘loop_ctr’ as 100 and inside the loop condition we are checking ‘loop_ctr > 10’. This means the loop is only designed to iterate when the value of ‘loop_ctr’ is less than 10. But you will notice that despite the condition this do-until loop executes once.
The reason for this is: because according to syntax 2 of the Do Until loop, there is no way to check conditions at the beginning of the loop. The condition can only be checked at the end of the loop.
Note: We can fix this issue by simply using the Do Until loop in Syntax 1 as shown:
Sub DoUntilLoopTest()
Dim loop_ctr As Integer
loop_ctr = 100Do Until loop_ctr > 10
MsgBox "Loop Counter : " & loop_ctr
loop_ctr = loop_ctr + 1
Loop
End Sub
Writing a Nested Do Until Loop
Similar to other loops nesting is very much possible in Do Until Loop. Let’s see how to write a nested Do Until loop:
Example 4: Print numbers from 1 to 5 in all the worksheets in an excel spreadsheet using a Do Until Loop.
In this example, we need to print numbers from 1 to 5 in all the worksheets in an excel workbook using a do until loop. To do this, we can make use of the following code:
Sub NestedDoUntilLoop()
Dim loop_ctr As Integer
Dim sheet As Integer
sheet = 1Do Until sheet > Worksheets.Count
loop_ctr = 1
Do Until loop_ctr > 5
Worksheets(sheet).Range("A1").Offset(loop_ctr - 1, 0).Value = loop_ctr
loop_ctr = loop_ctr + 1
Loop
sheet = sheet + 1
LoopMsgBox "Nested Do Until Loop Completed!"
End Sub
Explanation:
In this example, there are two Do Until Loops, one inside another. The Outer Do Until Loop iterates over the variable ‘sheet’ and iterates until the value of the ‘sheet’ variable becomes greater than ‘Worksheets.Count’ (i.e., the total count of worksheets in a workbook).
Inner Do Until Loop iterates over the variable ‘loop_ctr’ and iterates until the value of ‘loop_ctr’ becomes greater than 5. This helps us to print the numbers in a sequence.
Inside the body of the Inner Do Until loop, we have a statement that prints the numbers between 1 to 5 in each worksheet (as per the outer loop).
The outer loop iterates over all the available worksheets in the spreadsheet, whereas the inner loop iterates over the numbers from 1 to 5 for the current sheet.
This makes it possible to print numbers from 1 – 5 in all the available worksheets.
Infinite Loop Using a Do Until Loop
Syntactically, Do Until Loop is very different from a For Loop since it does not provide a clear ‘start’, ‘end’ or ‘step_increments’, so it is very easy to make logical errors resulting in an infinite or an endless loop.
Below is an example of a Do Until endless loop:
'Do not run this code
Sub InfiniteDoUntilLoop()
Dim loop_ctr As Integer
loop_ctr = 1Do Until loop_ctr > 10
ActiveSheet.Range("A1").Offset(loop_ctr - 1, 0).Value = loop_ctr
LoopMsgBox ("Loop Ends")
End Sub
In the above code, we have simply missed the line to increment the loop counter i.e. ‘loop_ctr = loop_ctr + 1’ and this has made the loop infinite because the value of ‘loop_ctr’ will always be 1 (since it is never incremented) and hence the loop condition ‘Until loop_ctr > 10’ will always evaluate to false.
Tip: It is always a good idea to use a For Each or For Next loop over a Do While or Do Until loop (whenever possible).
How to Break Out or Exit of a Do Until Loop
Similar to a Do While Loop, a Do Until loop can also be exited using an ‘Exit Do’ statement. As soon as the VBA engine executes the ‘Exit Do’ statement, it exits the loop and takes control to the next statement after the Do Until loop.
Let’s see this with an example:
Example 5: Use a Do Until loop in VBA to find the sum of the first 20 even numbers between 1 to 100.
In this example, we must find the first 20 even numbers from 1 to 100 and then calculate their sum.
Below is the code to do this:
Sub SumFirst20EvenNumbers()
Dim loop_ctr As Integer
Dim even_number_counter As Integer
Dim sum As Integerloop_ctr = 1
Do Until loop_ctr < 100
If (loop_ctr Mod 2 = 0) Then
sum = sum + loop_ctr
even_number_counter = even_number_counter + 1
End IfIf (even_number_counter = 20) Then
Exit Do
End Ifloop_ctr = loop_ctr + 1
LoopMsgBox "Sum of top 20 even numbers is : " & sum
End Sub
Explanation:
In this example, we have three variables – ‘loop_ctr’, ‘even_number_counter’, and ‘sum’. ‘loop_ctr’ is the loop counter variable, ‘even_number_counter’ variable holds the count of even numbers that have been summed (because we only need to sum the first 20 even numbers) and ‘sum’ variable holds the sum of the first 20 even numbers.
Inside the Do Until loop, we loop through all the numbers from 1 to 100, one by one, and check if the number is even. If the number is even, we sum it and increment the ‘even_number_counter’ by 1.
After the first IF block, another IF condition checks if the ‘even_number_counter’ variable value is 20. If the value of ‘even_number_counter’ is 20, then using the ‘Exit Do’ statement, we break the loop as there is no point in running the loop further.
While Wend Loop In VBA (Obsolete)
While Wend loop was added in VBA just to make it backward compatible, Microsoft recommends using Do While Loop in place of While Wend Loop.
While Wend Loop is not as structured and flexible like a Do While Loop, it also doesn’t support the idea of prematurely exiting out of the loop.
Tip: If you are learning loops in VBA, then you can skip this topic. However, if you are dealing with a legacy code with While Wend statements, I would recommend you change them and start using the Do while loops instead.
Syntax of While Wend Loops
The syntax of While Wend Loop is as follows:
While condition
'Statements to be executed inside the loop
Wend
‘condition’ is used as the loop backbone. On each iteration, the While statement checks if the ‘condition’ evaluates to True or False. If the ‘condition’ is True, then the loop continues; otherwise, the loop terminates.
Example: Write a While Wend loop to print numbers from 1 to 10.
To do this, we can write the below code:
Sub WhileWendExample()
Dim loop_ctr As Integer
loop_ctr = 1While loop_ctr <= 10
ActiveSheet.Range("A1").Offset(loop_ctr - 1, 0).Value = loop_ctr
loop_ctr = loop_ctr + 1
WendMsgBox "Loop Ends!"
End Sub
Explanation:
In the above code, first of all, we are declaring and initializing a loop counter variable ‘loop_ctr’ as 1. Next, there is a While statement along with the condition ‘While loop_ctr <= 10’.
This means that we need to iterate until the value of the ‘loop_ctr’ variable is less than or equal to 10. After this, we are printing the value of ‘loop_ctr’ in the active worksheet and then incrementing the loop counter. When the Wend statement is encountered, the next iteration starts.
The loop in the above example iterates 10 times, and after that, the value of ‘loop_ctr’ becomes 11, and hence the loop condition becomes false, and the control moves to the statement after the while when loop.
Finally, a message’ Loop Ends!’ is presented on the screen to notify the user that the loop has ended.
How To Write VBA Code In Excel
VBA code can be added to a spreadsheet using the Visual Basic Editor. To open the Visual Basic Editor in Excel, follow the below steps:
- If you are on Windows, press the keys (ALT + F11). If you are on MAC, press the keys (Opt + F11). This will open the Visual Basic Editor.

- After the Visual Basic Editor is opened. Go to «Insert» and click the «Module» option as shown in the image. This will insert a module object for your workbook.

- Now you can copy-paste the above codes in the module and run them using the execute button as shown.
Debugging Tips
- Use the F5 key to run the code.
- Use the F9 key to insert or remove a breakpoint.
- Use the F8 key to ‘step-into’ or run the code line by line. It can be used to debug the code and execute it line by line.
So, this was all about VBA Loops. Do let us know in case you have any queries related to the topic.
VBA For Each Loop goes through the collection of objects or items and performs similar activities. It will consider all the available specified objects and perform instructed activity in each object.
In VBA, it is mandatory to understand the loopsA VBA loop in excel is an instruction to run a code or repeat an action multiple times.read more. A loop allows you to conduct the same activity for many cells or objects in excel. Today’s article will concentrate on the For Each Loop mechanism.
Table of contents
- Excel VBA For Each Loop
- Syntax
- How to use For Each Loop in VBA? (Examples)
- Example #1 – Insert Same Text in All the Sheets
- Example #2 – Hide All the Sheets
- Example #3 – Unhide All the Sheets
- Example #4 – Protect and UnProtect All the Sheets
- Things to Remember
- Recommended Articles
Syntax
VBA For Each Loop can loop through all the set collections of objects or items. For example, a group means “All the opened workbooks,” “All the worksheets in a workbook,” and “All the collection of shapes and charts in the workbook.”
Let us look at the syntax.
For Each Object In Collection

     What to Do?

Next Object
For example, you have 10 sheets in your workbook. You want to hide all the worksheets except the one you are in. Can you hide it manually? Yes, you can, but what if you have 100 sheets? Isn’t that a tedious and time-consuming task to do? So instead, you can do this using VBA For Each Loop.

How to use For Each Loop in VBA? (Examples)
You can download this VBA For Each Loop Template here – VBA For Each Loop Template
Example #1 – Insert Same Text in All the Sheets
We will see how to use FOR EACH in VBA withIn VBA, the With statement is used to gain access to all of an object’s properties and methods.read more a simple example. Assume you have 5 worksheets in a workbook, and you want to insert the word “Hello” in all the worksheets in cell A1.

We can do this with FOR EACH LOOP. You must remember that we are performing this activity on each worksheet, not on the same worksheet. Follow the below steps to write the VBA codeVBA code refers to a set of instructions written by the user in the Visual Basic Applications programming language on a Visual Basic Editor (VBE) to perform a specific task.read more.
Step 1: Start the excel macroA macro in excel is a series of instructions in the form of code that helps automate manual tasks, thereby saving time. Excel executes those instructions in a step-by-step manner on the given data. For example, it can be used to automate repetitive tasks such as summation, cell formatting, information copying, etc. thereby rapidly replacing repetitious operations with a few clicks.
read more.
Code:
Sub For_Each_Example1()

End Sub

Step 2: Since we are referring to the worksheets, declare the variable “Worksheet.”
Code:
Sub For_Each_Example1()

  Dim Ws As Worksheet

End Sub

Step 3: Now, using FOR EACH LOOP, we need to refer to each worksheet in the active workbook.
Code:
Sub For_Each_Example1()

   Dim Ws As Worksheet

   For Each Ws In ActiveWorkbook.Worksheets

   Next Ws

End Sub

Step 4: Write what we want to do on each worksheet. In each worksheet, we need to put the word “Hello” in cell A1.
Code:
Sub For_Each_Example1()

   Dim Ws As Worksheet

   For Each Ws In ActiveWorkbook.Worksheets
   Ws.Range("A1").Value = "Hello"
   Next Ws

End Sub

Step 5: Run this code manually through the option or press shortcut key F5. It does not matter how many sheets you have; it will insert the word “Hello” in all the worksheets.
Example #2 – Hide All the Sheets
As told earlier in the post, what if you have hundreds of sheets to hide except the one you are in? Using VBA For Each Loop, we can hide all the sheets in Excel.
Step 1: Start the macro with your name.
Code:
Sub For_Each_Example2()

End Sub

Step 2: Declare the variable as “Ws.”
Code:
Sub For_Each_Example2()

  Dim Ws As Worksheet

End Sub

Step 3: Now, in each worksheet, you need to hide the sheet.
Code:
Sub For_Each_Example2()

  Dim Ws As Worksheet

  For Each Ws In ActiveWorkbook.Worksheets
  Ws.Visible = xlSheetVeryHidden
  Next Ws

End Sub

Step 4: Running the above code will hide all the sheets, but Excel needs at least one sheet visible. So, we need to tell which sheet not to hide.
Code:
Sub For_Each_Example2()

  Dim Ws As Worksheet

  For Each Ws In ActiveWorkbook.Worksheets

  If Ws.Name <> "Main Sheet" Then
  Ws.Visible = xlSheetVeryHidden
  End If
  Next Ws

End Sub

The operator symbol <> means not equal to in VBA.
So, the code says when you are looping through all the worksheets in the active workbook, hide if the sheet name is not equal to the “Main Sheet.”
We can do this by using the IF statement in VBAIF OR is not a single statement; it is a pair of logical functions used together in VBA when we have more than one criteria to check, and when we use the if statement, we receive the true result if either of the criteria is met.read more. First, write the code as IF Ws.Name <> “Main Sheet” Then hide, or if it is equal to the sheet name “Main Sheet,” then do not hide.
Step 5: Run the code using the F5 key or manually. Then, it will hide all the worksheets except the one named “Main Sheet.”
Example #3 – Unhide All the Sheets
We have seen how to hide all sheets except the one we are in. Similarly, we can unhide all the worksheets as well.
We need to change the code from xlSheetVeryHidden to xlSheetVisible.
Code:
Sub For_Each_Example3()

Dim Ws As Worksheet

For Each Ws In ActiveWorkbook.Worksheets
Ws.Visible = xlSheetVisible
Next Ws

End Sub

We do not need the IF condition here because we are unhiding all the sheets. However, if you do not want to unhide any specific sheet, you can use the IF condition and supply the sheet name.

Example #4 – Protect and UnProtect All the Sheets
Protect All Sheets: We can protect all the sheets in the workbook with just a piece of code. All the principles are the same, the only thing we need to do here is instead of Ws. Visible, we need to put the code Ws. Then, protect and type the password.
Code:
Sub For_Each_Example4()

  Dim Ws As Worksheet

  For Each Ws In ActiveWorkbook.Worksheets
    Ws.Protect Password:="[email protected]"
  Next Ws

End Sub

Unprotect All the Sheets: We can also unprotect all sheetsVBA unprotect sheet helps you unprotect a protected sheet. A protected sheet secures the data and information on a sheet if anyone tries to edit, access, change or manipulate it, usually protected by a password. You can unprotect a sheet using VBA coding.read more protected in the workbook using VBA. We need to put the words “Unprotect” and “Password.”
Code:
Sub For_Each_Example6()

  Dim Ws As Worksheet

  For Each Ws In ActiveWorkbook.Worksheets
  Ws.Unprotect Password:="[email protected]"
  Next Ws

End Sub

Things to Remember
- VBA For Each Loop is for the collection of objects.
- It will consider all the specified objects in the specified workbook.
- While declaring the variable, we need to know which object we refer to—for example, worksheet, workbook, chart, etc.
Recommended Articles
This article has been a guide to VBA For Each Loop. Here, we learn how to use VBA For Each Loop to insert text, hide or unhide sheets and protect an unprotect workbook in Excel, along with practical examples and a downloadable template. Below you can find some useful Excel VBA articles: –
- List of VBA Functions
- Do Until Loop in VBA
- For Next Loop in VBA
- Not Function in Excel VBA