
This is one of those things that I’m sure there’s a built-in function for (and I may well have been told it in the past), but I’m scratching my head to remember it.
How do I loop through each row of a multi-column range using Excel VBA? All the tutorials I’ve been searching up seem only to mention working through a one-dimensional range…
![]()
asked Sep 22, 2009 at 23:53
![]()
1
Dim a As Range, b As Range

Set a = Selection

For Each b In a.Rows
    MsgBox b.Address
Next
![]()
answered Sep 23, 2009 at 0:19
![]()
MikeMike
2,9751 gold badge18 silver badges14 bronze badges
0
Something like this:
Dim rng As Range
Dim row As Range
Dim cell As Range

Set rng = Range("A1:C2")

For Each row In rng.Rows
  For Each cell in row.Cells
    'Do Something
  Next cell
Next row
![]()
answered Sep 22, 2009 at 23:58
![]()
David AndresDavid Andres
31.2k7 gold badges45 silver badges36 bronze badges
1
Just stumbled upon this and thought I would suggest my solution. I typically like to use the built in functionality of assigning a range to an multi-dim array (I guess it’s also the JS Programmer in me).
I frequently write code like this:
Sub arrayBuilder()

myarray = Range("A1:D4")

'unlike most VBA Arrays, this array doesn't need to be declared and will be automatically dimensioned

For i = 1 To UBound(myarray)

    For j = 1 To UBound(myarray, 2)

    Debug.Print (myarray(i, j))

    Next j

Next i

End Sub
Assigning ranges to variables is a very powerful way to manipulate data in VBA.
answered Dec 9, 2015 at 1:33
![]()
tc_NYCtc_NYC
1921 gold badge2 silver badges11 bronze badges
1
In Loops, I always prefer to use the Cells class, using the R1C1 reference method, like this:
Cells(rr, col).Formula = ...
This allows me to quickly and easily loop over a Range of cells easily:
Dim r As Long
Dim c As Long

c = GetTargetColumn() ' Or you could just set this manually, like: c = 1

With Sheet1 ' <-- You should always qualify a range with a sheet!

    For r = 1 To 10 ' Or 1 To (Ubound(MyListOfStuff) + 1)

        ' Here we're looping over all the cells in rows 1 to 10, in Column "c"
        .Cells(r, c).Value = MyListOfStuff(r)

        '---- or ----

        '...to easily copy from one place to another (even with an offset of rows and columns)
        .Cells(r, c).Value = Sheet2.Cells(r + 3, 17).Value


    Next r

End With
answered Aug 20, 2015 at 16:50
![]()
LimaNightHawkLimaNightHawk
6,5033 gold badges40 silver badges60 bronze badges
0
Содержание
- Циклический просмотр списка данных на листе с помощью макросов в Excel
- Аннотация
- Дополнительная информация
- Поиск списка с постоянным, известным числом строк
- Поиск динамического списка или списка с неизвестным количеством строк
- Поиск списка для конкретной записи
- Проход по диапазону ячеек
- Поддержка и обратная связь
- VBA For Each примеры
- Сила циклов VBA
- Как работает цикл For Next?
- Два типа циклов For Next
- The For Each Next Loop: цикл по коллекции элементов
- В каком порядке работает цикл For Each?
- Предметы / объекты НЕ выбираются в цикле
- The Next Loop: циклы через набор чисел
- Обратный цикл
- Как остановить цикл раньше
- Переменная не требуется после ключевого слова Next
- Примеры макросов VBA для циклов
- Какую задачу хотите зациклить вы?
Циклический просмотр списка данных на листе с помощью макросов в Excel
Аннотация
При написании макроса Microsoft Visual Basic для приложений (VBA), возможно, придется выполнять циклический просмотр список данных на листе. Существует несколько методов выполнения этой задачи. Раздел “Дополнительная информация” этой статьи содержит сведения о методах, которые можно использовать для поиска в списках следующих типов:
- Список, содержащий известное, постоянное количество строк.
- Динамический список или список с неизвестным числом строк.
- Список, содержащий определенную запись.
Дополнительная информация
Корпорация Майкрософт предоставляет примеры программирования только в целях демонстрации без явной или подразумеваемой гарантии. Данное положение включает, но не ограничивается этим, подразумеваемые гарантии товарной пригодности или соответствия отдельной задаче. Эта статья предполагает, что пользователь знаком с представленным языком программирования и средствами, используемыми для создания и отладки процедур. Специалисты технической поддержки Майкрософт могут пояснить работу той или иной процедуры, но модификация примеров и их адаптация к задачам разработчика не предусмотрена. В следующих примерах кода предполагается, что в списке есть строка заголовка, которая начинается в ячейке A1, и данные, которые начинаются в ячейке A2.
Поиск списка с постоянным, известным числом строк
Этот код перемещает столбец А в конец списка:
Поиск динамического списка или списка с неизвестным количеством строк
Этот код перемещает столбец А в конец списка. (Этот код предполагает, что каждая ячейка в столбце А содержит запись до конца.)
Примечание Если в столбце A в данных есть пустые ячейки, измените этот код, чтобы он был указан в этом условии. Убедитесь, что пустые ячейки находятся на одинаковом расстоянии друг от друга. Например, если каждая другая ячейка в столбце А пуста (например, такая ситуация может возникнуть, если каждая запись «Record» использует две строки с отступом второй строки), этот цикл может быть изменен следующим образом:
Поиск списка для конкретной записи
Этот код перемещает столбец А в конец списка:
Источник
Проход по диапазону ячеек
При использовании Visual Basic часто требуется выполнить один и тот же блок операторов в каждой ячейке диапазона. Для этого необходимо объединить оператор цикла и один или несколько методов для идентификации каждой ячейки по отдельности и выполнить операцию.
Один из способов пройти по диапазону — использовать цикл For. Next со свойством Cells. С помощью свойства Cells можно заменить номера индексов ячеек счетчиком циклов (или другими переменными или выражениями). В следующем примере индекс строки заменяется переменной counter . Процедура проходит по диапазону ячеек C1:C20, присваивая значение 0 (ноль) каждому числу, абсолютное значение которого меньше 0,01.
Еще один простой способ пройти по диапазону — использовать цикл For Each. Next с коллекцией ячеек, указанной в свойстве Range. Visual Basic автоматически присваивает объектную переменную для следующей ячейки при каждом выполнении цикла. Следующая процедура проходит по диапазону ячеек A1:D10, присваивая значение 0 (ноль) каждому числу, абсолютное значение которого меньше 0,01.
Если вы не знаете границы диапазона, по которому нужно пройти, можно использовать свойство CurrentRegion, чтобы возвратить диапазон, окружающий активную ячейку. Например, при запуске на листе следующая процедура выполняет проход по диапазону, окружающему активную ячейку, присваивая значение 0 (ноль) каждому числу, абсолютное значение которого меньше 0,01.
Поддержка и обратная связь
Есть вопросы или отзывы, касающиеся Office VBA или этой статьи? Руководство по другим способам получения поддержки и отправки отзывов см. в статье Поддержка Office VBA и обратная связь.
Источник
VBA For Each примеры
Итог: циклы For Next — одни из самых мощных методов VBA для автоматизации общих задач в Excel. В этой статье объясняется, как работает цикл, повторяющий действия над коллекцией элементов, что экономит нам массу времени.
Уровень мастерства: Средний

Сила циклов VBA
В Excel мы тратим много времени на повторяющиеся простые задачи. Например, как: форматирование нескольких диапазонов, отображение нескольких листов, копирование и вставка в несколько рабочих книг, применение фильтров к нескольким таблицам или сводным таблицам, замена значений, обновление формул и т.д.
Можете ли вы вспомнить несколько задач, в которых вам приходилось повторять один и тот же процесс снова и снова?
Эти задачи чрезвычайно трудоемкие и скучные!

К счастью, выход есть. Мы можем использовать циклы в наших макросах VBA, чтобы очень быстро повторять действия. Задачи, выполнение которых вручную может занять несколько часов, могут быть выполнены за несколько секунд с помощью цикла.
Цикл For Next — это наиболее распространенный тип цикла, который помогает нам выполнять эти повторяющиеся задания. В этой статье мы рассмотрим два типа For Next Loops.
Загрузите файл примера
Загрузите бесплатный файл Excel, содержащий примеры макросов с помощью цикла For Next.
For Next Loop VBA Macro Examples.xlsm (79.0 KB)
Скачать PDF версию статьи на английском для печати.
Как работает цикл For Next?
Цикл For Next позволяет нам просматривать коллекцию, элементами которой могут быть объекты или списки чисел.
- Клетки в ассортименте.
- Рабочие листы в рабочей тетради.
- Открытые рабочие тетради на компьютере.
- Сводные таблицы на листе.
- Сводные поля в сводной таблице.
- Формы на листе.
- И любой другой объект, с которым вы взаимодействуете в Excel.
Задача цикла For Next Loop состоит в том, чтобы выполнять одинаковые действия (строки кода) для каждого элемента в коллекции.

В приведенном ниже примере содержится цикл For Next, который проходит по каждому листу в книге и отображает каждый лист. Цикл начинается с первого элемента в коллекции (первый лист в рабочей книге) и выполняет строку кода между строками For и Next для каждого элемента в коллекции (каждый лист в рабочей книге).
Конечно, мы можем использовать логические операторы, такие как операторы If, для проверки свойств и условий перед выполнением действий.
Следующий макрос отображает только те листы, которые имеют фразу «ABC Global Co.» в ячейке A1 каждого листа, и скрывает все остальные листы.
Два типа циклов For Next
Действительно, существуют два типа For Next Loops.
- For Each Next Loops циклически просматривает коллекцию элементов.
- For Next Loops цикл через набор чисел.
Давайте посмотрим, как работает каждый.
The For Each Next Loop: цикл по коллекции элементов
Как мы видели выше, цикл «The For Each Next Loop» позволяет нам перебирать коллекцию предметов или объектов. Это, наверное, самый распространенный цикл, который мы используем в Excel, потому что мы работаем с коллекциями объектов. Опять же, эти коллекции представляют собой ячейки в диапазоне, рабочие таблицы в рабочей книге, сводные таблицы в рабочей таблице и т.д.

Мы будем использовать пример написания цикла «For Each Next Loop», чтобы просмотреть все рабочие листы в рабочей книге.

Существует четыре основных шага для написания цикла For Each Next в VBA:
- Объявите переменную для объекта.
- Напишите для каждой строки переменную и коллекцию ссылок.
- Добавьте строку (и) кода для повтора для каждого элемента в коллекции.
- Напишите следующую строку, чтобы закрыть цикл.
Давайте рассмотрим каждый из этих шагов подробно.
Шаг 1 — объявить переменную для объекта
Сначала нам нужно объявить переменную, которая будет временно хранить ссылку на объект.
Строка Dim в верхней части макроса объявляет переменную, как объект. В этом случае объект является рабочим листом. Мы можем создать любое имя переменной, если захотим, если оно не совпадает с другой ссылкой в VBA. «Ws» — наиболее распространенное имя переменной для объекта листа, но вы можете изменить его.
Шаг 2 — Для каждой строки
Далее мы напишем оператор For Each. Это первая строка кода в цикле.
Первые два слова For Each. Затем мы вводим имя переменной, за которым следует слово In. Наконец, мы указываем, где располагается коллекция. В этом случае мы хотим просмотреть все рабочие листы в ActiveWorkbook. Итак, мы набираем ActiveWorkbook.Worksheets. Эта строка ссылается на все рабочие листы в ActiveWorkbook.
Если вы хотите пройтись по рабочим листам определенной рабочей книги, вы можете использовать свойство Рабочие книги для ссылки на эту рабочую книгу по имени.
Просто помните, что рабочая книга, на которую вы ссылаетесь, должна быть открыта до запуска строки кода For Next. Конечно, мы можем использовать метод Workbooks.Open, чтобы открыть рабочую книгу.
Шаг 3 — Добавить код для повторения для каждой итерации
После строки «For Each» мы добавляем строку(и) кода, которая будет выполняться на каждом листе. В этом примере у нас есть только одна строка кода, которая показывает лист.
В этой строке кода мы используем переменную ws для ссылки на текущий рабочий лист в цикле. Когда цикл выполняется, он устанавливает временную ссылку на переменную ws для каждой итерации в цикле.
Это так же, как если бы мы установили переменную ws для определенного листа, используя следующую строку кода.
Однако нам НЕ нужна эта строка с циклом For Each Next. Цикл заботится о настройке переменной для нас для каждой итерации в цикле.
Для первой итерации в цикле ws установлен на Worksheets (1). На следующей итерации ws устанавливается в Worksheets (2). Это продолжается, пока цикл перебирает все листы в рабочей книге. Это очень мощно, потому что мы можем повторно использовать переменную для ссылки на лист в цикле несколько раз.
Шаг 4 — Next закрывает цикл
Последняя строка кода в цикле — Next.
Когда макрос попадает в эту строку кода, он делает две вещи:
- Во-первых, он изменяет ссылку на переменную на следующий элемент коллекции. В этом примере переменная ws изменяется для ссылки на следующий лист в рабочей книге.
- Во-вторых, он возвращается к выполнению строки кода непосредственно под строкой For Each. Затем он выполняет все строки кода между строками For Each и Next в порядке сверху вниз.

Когда будет достигнут последний элемент в коллекции (рабочий лист в рабочей книге), цикл останавливается, и макрос переходит к следующей строке кода ниже строки Next.
В каком порядке работает цикл For Each?
Цикл For Each Loop всегда начинается с первого элемента в коллекции и переходит к последнему элементу в том порядке, в котором они отображаются в Excel. Это основано на номере индекса предметов в коллекции. Вот несколько примеров порядка выполнения цикла для общих объектов.
- Рабочие листы. Начинается с первой вкладки листа в рабочей книге и возвращается к последней в том порядке, в котором вкладки отображаются в рабочей книге.
- Рабочие книги. Начинается с первой открытой книги и циклически повторяется в порядке открытия рабочих книг. Рабочим книгам присваивается порядковый номер по мере их открытия.
- Клетки: циклы слева направо, затем вниз. Начинается с первой ячейки в диапазоне и возвращается к следующему столбцу в той же строке, затем переходит к следующей строке.
- Таблицы и сводные таблицы. Начинается с первого объекта, созданного на листе, и циклически повторяется в порядке создания объектов. Этот же принцип действует и для других объектов, которые вы создаете на листах, таких как фигуры, диаграммы, слайсеры и т.д.
Предметы / объекты НЕ выбираются в цикле
Важно отметить, что когда мы перебираем коллекцию объектов, каждый объект НЕ выделяется в Excel.

Цикл создает ссылку на элемент/объект с помощью переменной. Переменная временно установлена на ссылку на объект. Объект НЕ выбран и НЕ обязательно становится активным объектом. Для выбора объекта мы можем использовать методы Select или Activate. Вы также должны убедиться, что объекты родительского объекта выбраны первыми. Ознакомьтесь с моей статьей об объектной модели Excel и иерархии объектов в VBA, чтобы узнать больше об этом.
The Next Loop: циклы через набор чисел
Также можно использовать цикл For Next Loop для просмотра набора чисел. Это может быть полезно, когда мы перебираем элементы управления пользовательской формы, массивы или если мы хотим перебрать коллекцию в обратном направлении.

Основная операция цикла For Next такая же, как и для цикла For Each. Разница заключается в формате строки For.
Шаг 1 — Объявление переменной для числа
Чтобы перебрать набор чисел, мы сначала должны объявить переменную для целого числа типа данных. Мы можем использовать Integer или Long integer.
Переменная называется счетчиком, потому что она увеличивается или уменьшается вверх/вниз для каждой итерации в цикле.
Дополнительное примечание к Long: тип данных Long (целое число) содержит большее число, чем Integer. Это занимает больше памяти, но для современного компьютера это не проблема. Мы можем использовать длинные переменные все время. Буква L выглядит как цифра 1 в VBA, поэтому я теперь использую i в качестве имени переменной, хотя я использую Long в качестве типа данных. Это все зависит от личных предпочтений, и вы можете назвать переменную как хотите.
Шаг 2 — Напишите строку For
Далее мы пишем строку For. Базовая конструкция — это ключевое слово For, за которым следует имя переменной (counter), затем знак равенства, начальное значение To end value.
Начальные и конечные значения могут быть указаны как числа, или мы можем использовать целочисленные / длинные переменные вместо них.
Эта строка кода возвращает количество листов в активной книге. Тем не менее, он не проходит по каждому листу. Цикл просто перебирает набор чисел. Мы должны создать ссылку на лист с переменной счетчика (i) в качестве номера индекса свойства Worksheets. Шаг 3 показывает эту ссылку.
Шаг 3 — Добавить код, который повторяется для каждой итерации
Остальная часть цикла работает так же, как цикл For Each. Мы можем добавить строки между строками For и Next, которые будут выполняться для каждой итерации цикла. Переменная counter может быть использована несколько раз в этих строках кода.
Шаг 4 — Строка Next закрывает цикл
Наконец, мы добавляем строку Next внизу.
Когда макрос запускается, он устанавливает переменную, равную первому числу в строке For. Когда макрос попадает в следующую строку, он добавляет 1 к значению переменной или увеличивает счет. Итак, я = 2 во второй итерации цикла. Он продолжает цикл, пока не будет достигнут последний номер в цикле.
По умолчанию 1 добавляется к счетчику переменных для каждой итерации в цикле. Это называется значением шага, и мы можем контролировать значение каждого шага в счетчике. Значение Step добавляется в конец строки For. Следующая строка добавит 2 к счетчику для каждой итерации в цикле.
Если вы хотите заштриховать все остальные строки на листе, вы можете использовать такой цикл.
Обратный цикл
Мы также можем использовать значение шага для обратной петли, указав отрицательное число.
Обратите внимание, что начальное значение теперь больше, а конечное значение меньше. Циклы начинаются с 100 (начальное значение) и вычитают 1 из переменной счетчика (шаг -1) для каждой итерации в цикле, пока не дойдут до 1 (конечное значение).
Ключевое слово Step не является обязательным. Если вы не укажете его, тогда VBA примет значение шага 1.
Цикл в обратном направлении — это хорошо, если вы удаляете элементы.
Я напишу отдельный пост об этом, но общая идея заключается в том, что когда мы перебираем коллекцию и удаляем элементы, размер коллекции уменьшается при удалении элементов. Цикл обычно выдает ошибку, как только достигает 10-го элемента, когда в коллекции теперь только 9 элементов. Цикл в обратном направлении предотвращает эту потенциальную ошибку.
Как остановить цикл раньше
Обычно цикл перебирает все элементы в коллекции, а затем переходит к следующей строке кода ниже следующей строки. Однако мы можем остановить цикл раньше с помощью оператора Exit For.
В следующем макросе оператор Exit For используется для выхода из цикла после того, как первый лист, начинающийся со слова «Отчет», будет найден скрытым.
Переменная ws сохраняет ссылку на рабочий лист после преждевременного выхода из цикла и может быть снова использована в коде под циклом.

Переменная не требуется после ключевого слова Next
Возможно, вы заметили, что я добавил переменную после ключевого слова Next в нижней части цикла в приведенных выше примерах.
Это НЕ обязательно, и вы можете не увидеть его в других примерах, которые вы найдете в Интернете. Однако мне нравится включать переменную после Next по двум причинам.
- Мы можем использовать его при отладке кода, чтобы увидеть значение переменной, наведя указатель мыши на переменную, когда код остановлен.
- Это облегчает понимание того, к какой строке For подключена следующая строка. Это особенно верно, когда у вас есть несколько циклов или вложенных циклов в ваших макросах.

Поэтому я рекомендую добавить переменную после ключевого слова Next в качестве лучшей практики. Немного дополнительной работы заранее сэкономит время и головную боль в будущем. Доверьтесь мне!
Примеры макросов VBA для циклов
Вот дополнительные статьи с макросами, в которых используется хотя бы один цикл For Next Loop.
Макрос метрики SUBTOTAL — создание сводной таблицы всех типов функций
Как добавить оглавление Галерея изображений в файлы Excel
Скрыть и отобразить (отфильтровать) столбцы с помощью слайсера или раскрывающегося меню фильтра
Как изменить размер панелей Excel для разных размеров экрана
Макрос VBA, чтобы скрыть все столбцы, которые содержат значение в ячейке
Как повторять задачи с помощью кода VBA — Looping — Отличная статья с большим количеством примеров от моего друга Криса Ньюмана из The Spreadsheet Guru.
Какую задачу хотите зациклить вы?
Я надеюсь, что эта статья поможет вам начать работу с циклами. Не забудьте скачать бесплатный файл Excel, содержащий примеры кода.
For Next Loop VBA Macro Examples.xlsm (79.0 KB)
Циклы, безусловно, являются промежуточной техникой кодирования, которая вынуждает нас выйти за рамки MacroRecorder. К сожалению, записанный макрос не может создавать петли. Тем не менее, это навык, который вы сможете использовать снова и снова на протяжении всей своей карьеры для автоматизации простых и сложных задач. Понимание того, как использовать циклы, даст вам волшебную силу с Excel.
Пожалуйста, оставьте комментарий ниже с задачей, которую вы хотите автоматизировать с помощью цикла. Спасибо!
Источник
|
Добрый день. Нужна помощь в создании макроса, а точнее цикла. Я в этом деле новенький и пока есть проблемы и пробелы в знания. Есть скрипт для работы в SAP. Его необходимо вставить в макрос и что б макрос по очереди брал данные из строк с листа EXCEL. Я это вижу так. В скрипте есть переменные типа n1.n2.n3.n4….. Все они находятся в первой строке таблицы. Макрос берет скрипт с переменными в первой строке, выполняет все действия из скрипта и переходит к второй строке (переменные стоят в тех же столбцах но на одну строку ниже) берет их, опять вставляет в скрипт и выполняет его. И так весь цикл пока данные не кончатся. Количество строк может меняться. От 200 и до 1000. За любую помощь буду очень благодарен. |
|
|
Roman M  Пользователь Сообщений: 58 |
Добрый день. А почему не использовать этот скрипт в макросе ? Почему именно в скрипт вставлять переменные ? |
|
Roman M
, Наверное я не очень корректно описал проблему. Скрипт должен быть в макросе и при запуске макроса скрипт должен по очереди брать данные из таблицы. Скрипт взял данные из первой строки сделал все действия потом данные из второй строки и так по кругу. |
|
|
Roman M Пользователь Сообщений: 58 |
Т.е. вам нужен пример скрипта в Excel, который что-то делал бы в SAP? |
|
Mershik  Пользователь Сообщений: 8277 |
Evgenii Kov, спрошу так ? ЗАЧЕМ ЗДЕСЬ УПОМИНАНИЕ SAP? Вам нужно работа в файле EXCEL? ЦИКЛЫ ТУТ если какой-то конкретный вопрос — то ознакомитесь с правилами там есть что почитать (про файл-пример например) Изменено: Mershik — 02.10.2020 15:31:26 Не бойтесь совершенства. Вам его не достичь. |
|
Roman M, нет. С САПом у меня все нормально. Нужен макрос который будет построчно брать данные с листа экселя (с каждым новым циклом смещаться на одну строку вниз) и подставлять их в скрипт в места где стоят переменные типа n1. n2. n3. |
|
|
Mershik, SAP вписал машинально. спасибо за ссылку. Буду пробовать искать подходящий. Файл пример скинуть нет возможности. Он на рабочем компе. Там все заблокировано. Изменено: Evgenii Kov — 02.10.2020 15:33:41 |
|
|
Mershik Пользователь Сообщений: 8277 |
#8 02.10.2020 15:38:33 плохо прочитали там файл-пример, а не Ваш рабочий документ…
Не бойтесь совершенства. Вам его не достичь. |
||
|
Roman M Пользователь Сообщений: 58 |
У вас есть скрипт (.vbs ?), который что-то делает и вам в него нужно передать переменные из Excel? |
|
Да. и что переменные после каждого цикла брались со следующей строки. |
|
|
Roman M Пользователь Сообщений: 58 |
#11 02.10.2020 16:10:18 Будет примерно так В Excel макрос
В скрипте добавляете в начале
и дальше в скрипте подставляете эти переменные. К модераторам: тему можно поменять на «Передать циклом переменные в скрипт/vbs» |
||||
|
Roman M
спасибо. буду пробовать. |
|
|
Jack Famous  Пользователь Сообщений: 10846 OS: Win 8.1 Корп. x64 | Excel 2016 x64: | Browser: Chrome |
#13 02.10.2020 16:55:27
этот
я бы не был так уверен. Поэтому Roman M и обратился к модераторам По вопросу: уверены, что хорошая идея передавать из приложения переменные в скриптовый файл? Почему не сделать всё из Excel? Будет и проще, и быстрее, и надёжнее Во всех делах очень полезно периодически ставить знак вопроса к тому, что вы с давних пор считали не требующим доказательств (Бертран Рассел) ►Благодарности сюда◄ |
||||
|
Evgenii Kov  Пользователь Сообщений: 56 |
#14 02.10.2020 17:15:01 Jack Famous, у меня все в Excel. есть макрос в который вставлен скрипт. Макрос заходит в САП, идет по шагам скрипта, в нужных шагах вставляет данные с листа Excel (данные расположены в виде строк). Когда скрипт заканчивается он должен вернутся в начало и опять идти по темже шагам скрипта только брать данные из стоки ниже. И так по кругу. Некоторые шаги типа session.findById(«wnd[0]») я заменю на переменные.
Изменено: Evgenii Kov — 05.10.2020 08:03:51 |
||
|
Юрий М  Модератор Сообщений: 60570 Контакты см. в профиле |
Evgenii Kov, код следует оформлять соответствующим тегом: ищите такую кнопку (см. скрин) и исправьте своё сообщение. |
|
Evgenii Kov Пользователь Сообщений: 56 |
#16 05.10.2020 19:03:14 Roman M, Пожалуйста, подскажите где ошибка ))
|
||
|
Evgenii Kov Пользователь Сообщений: 56 |
#17 05.10.2020 19:06:45 Jack Famous, я попробовал добавить все в макрос. и вот что получилось. работать не хочет. уже не знаю что делать. |
In this Article
- VBA Loop Quick Examples
- For Each Loops
- For Next Loops
- Do While Loops
- Do Until Loops
- VBA Loop Builder
- VBA For Next Loop
- For Loop Syntax
- For Loop Step
- For Loop Step – Inverse
- Nested For Loop
- Exit For
- Continue For
- VBA For Each Loop
- For Each Cell in Range
- For Each Worksheet in Workbook
- For Each Open Workbook
- For Each Shape in Worksheet
- For Each Shape in Each Worksheet in Workbook
- For Each – IF Loop
- VBA Do While Loop
- Do While
- Loop While
- VBA Do Until Loop
- Do Until
- Loop Until
- Exit Do Loop
- End or Break Loop
- More Loop Examples
- Loop Through Rows
- Loop Through Columns
- Loop Through Files in a Folder
- Loop Through Array
- Loops in Access VBA
To work effectively in VBA, you must understand Loops.
Loops allow you to repeat a code block a set number of times or repeat a code block on a each object in a set of objects.
First we will show you a few examples to show you what loops are capable of. Then we will teach you everything about loops.
VBA Loop Quick Examples
For Each Loops
For Each Loops loop through every object in a collection, such as every worksheet in workbook or every cell in a range.
Loop Through all Worksheets in Workbook
This code will loop through all worksheets in the workbook, unhiding each sheet:
Sub LoopThroughSheets()
Dim ws As Worksheet

    For Each ws In Worksheets
        ws.Visible = True
    Next

End Sub
Loop Through All Cells in Range
This code will loop through a range of cells, testing if the cell value is negative, positive, or zero:
Sub If_Loop()
Dim Cell as Range

  For Each Cell In Range("A2:A6")
    If Cell.Value > 0 Then
      Cell.Offset(0, 1).Value = "Positive"
    ElseIf Cell.Value < 0 Then
      Cell.Offset(0, 1).Value = "Negative"
    Else
      Cell.Offset(0, 1).Value = "Zero"
     End If
  Next Cell

End Sub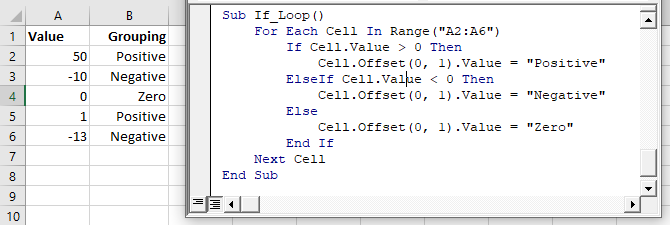
For Next Loops
Another type of “For” Loop is the For Next Loop. The For Next Loop allows you to loop through integers.
This code will loop through integers 1 through 10, displaying each with a message box:
Sub ForLoop()
    Dim i As Integer
    For i = 1 To 10
        MsgBox i
    Next i
End Sub
Do While Loops
Do While Loops will loop while a condition is met. This code will also loop through integers 1 through 10, displaying each with a message box.
Sub DoWhileLoop()
    Dim n As Integer
    n = 1
    Do While n < 11
        MsgBox n
        n = n + 1
    Loop
End Sub
Do Until Loops
Conversely, Do Until Loops will loop until a condition is met. This code does the same thing as the previous two examples.
Sub DoUntilLoop()
    Dim n As Integer
    n = 1
    Do Until n >= 10
        MsgBox n
        n = n + 1
    Loop
End Sub
We will discuss this below, but you need to be extremely careful when creating Do While or Do Until loops so that you don’t create a never ending loop.
VBA Loop Builder
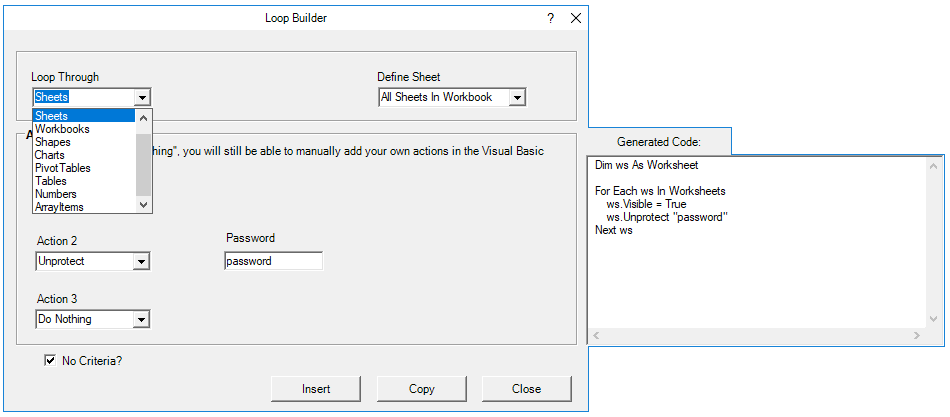
This is a screenshot of the “Loop Builder” from our Premium VBA Add-in: AutoMacro. The Loop Builder allows you to quickly and easily build loops to loop through different objects, or numbers. You can perform actions on each object and/or select only objects that meet certain criteria.
The add-in also contains many other code builders, an extensive VBA code library, and an assortment of coding tools. It’s a must have for any VBA developer.
Now we will cover the different types of loops in depth.
VBA Coding Made Easy
Stop searching for VBA code online. Learn more about AutoMacro — A VBA Code Builder that allows beginners to code procedures from scratch with minimal coding knowledge and with many time-saving features for all users!

Learn More
VBA For Next Loop
For Loop Syntax
The For Next Loop allows you to repeat a block of code a specified number of times. The syntax is:
[Dim Counter as Integer]

For Counter = Start to End [Step Value]
    [Do Something]
Next [Counter]
Where the items in brackets are optional.
- [Dim Counter as Long] – Declares the counter variable. Required if Option Explicit is declared at the top of your module.
- Counter – An integer variable used to count
- Start – The start value (Ex. 1)
- End – The end value (Ex. 10)
- [Step Value] – Allows you to count every n integers instead of every 1 integer. You can also go in reverse with a negative value (ex. Step -1)
- [Do Something] – The code that will repeat
- Next [Counter] – Closing statement to the For Next Loop. You can include the Counter or not. However, I strongly recommend including the counter as it makes your code easier to read.
If that’s confusing, don’t worry. We will review some examples:
Count to 10
This code will count to 10 using a For-Next Loop:
Sub ForEach_CountTo10()

Dim n As Integer
For n = 1 To 10
    MsgBox n
Next n

End Sub
For Loop Step
Count to 10 – Only Even Numbers
This code will count to 10 only counting even numbers:
Sub ForEach_CountTo10_Even()

Dim n As Integer
For n = 2 To 10 Step 2
    MsgBox n
Next n

End Sub
Notice we added “Step 2”. This tells the For Loop to “step” through the counter by 2. We can also use a negative step value to step in reverse:
VBA Programming | Code Generator does work for you!
For Loop Step – Inverse
Countdown from 10
This code will countdown from 10:
Sub ForEach_Countdown_Inverse()

Dim n As Integer
For n = 10 To 1 Step -1
    MsgBox n
Next n
MsgBox "Lift Off"

End Sub
Delete Rows if Cell is Blank
I’ve most frequently used a negative step For-Loop to loop through ranges of cells, deleting rows that meet certain criteria. If you loop from the top rows to the bottom rows, as you delete rows you will mess up your counter.
This example will delete rows with blank cells (starting from the bottom row):
Sub ForEach_DeleteRows_BlankCells()

Dim n As Integer
For n = 10 To 1 Step -1
    If Range("a" & n).Value = "" Then
        Range("a" & n).EntireRow.Delete
    End If
Next n

End Sub
Nested For Loop
You can “nest” one For Loop inside another For Loop. We will use Nested For Loops to create a multiplication table:
Sub Nested_ForEach_MultiplicationTable()

Dim row As Integer, col As Integer

For row = 1 To 9
    For col = 1 To 9
        Cells(row + 1, col + 1).Value = row * col
    Next col
Next row

End Sub
Exit For
The Exit For statement allows you to exit a For Next loop immediately.
You would usually use Exit For along with an If Statement, exiting the For Next Loop if a certain condition is met.
For example, you might use a For Loop to find a cell. Once that cell is found, you can exit the loop to speed up your code.
This code will loop through rows 1 to 1000, looking for “error” in column A. If it’s found, the code will select the cell, alert you to the found error, and exit the loop:
Sub ExitFor_Loop()

Dim i As Integer

For i = 1 To 1000
    If Range("A" & i).Value = "error" Then
        Range("A" & i).Select
        MsgBox "Error Found"
        Exit For
    End If
Next i

End Sub
Important: In the case of Nested For Loops, Exit For only exits the current For Loop, not all active Loops.
Continue For
VBA does not have the “Continue” command that’s found in Visual Basic. Instead, you will need to use “Exit”.
AutoMacro | Ultimate VBA Add-in | Click for Free Trial!
VBA For Each Loop
The VBA For Each Loop will loop through all objects in a collection:
- All cells in a range
- All worksheets in a workbook
- All shapes in a worksheet
- All open workbooks
You can also use Nested For Each Loops to:
- All cells in a range on all worksheets
- All shapes on all worksheets
- All sheets in all open workbooks
- and so on…
The syntax is:
For Each Object in Collection
[Do Something]
Next [Object]
Where:
- Object – Variable representing a Range, Worksheet, Workbook, Shape, etc. (ex. rng)
- Collection – Collection of objects (ex. Range(“a1:a10”)
- [Do Something] – Code block to run on each object
- Next [Object] – Closing statement. [Object] is optional, however strongly recommended.
For Each Cell in Range
This code will loop through each cell in a range:
Sub ForEachCell_inRange()

Dim cell As Range

For Each cell In Range("a1:a10")
    cell.Value = cell.Offset(0,1).Value
Next cell

End Sub
For Each Worksheet in Workbook
This code will loop through all worksheets in a workbook, unprotecting each sheet:
Sub ForEachSheet_inWorkbook()

Dim ws As Worksheet

For Each ws In Worksheets
    ws.Unprotect "password"
Next ws

End Sub
For Each Open Workbook
This code will save and close all open workbooks:
Sub ForEachWB_inWorkbooks()

Dim wb As Workbook

For Each wb In Workbooks
    wb.Close SaveChanges:=True
Next wb

End Sub
AutoMacro | Ultimate VBA Add-in | Click for Free Trial!
For Each Shape in Worksheet
This code will delete all shapes in the active sheet.
Sub ForEachShape()

Dim shp As Shape

For Each shp In ActiveSheet.Shapes
    shp.Delete
Next shp

End Sub
For Each Shape in Each Worksheet in Workbook
You can also nest For Each Loops. Here we will loop through all shapes in all worksheets in the active workbook:
Sub ForEachShape_inAllWorksheets()

Dim shp As Shape, ws As Worksheet

For Each ws In Worksheets
    For Each shp In ws.Shapes
        shp.Delete
    Next shp
Next ws

End Sub
For Each – IF Loop
As we’ve mentioned before, you can use an If statement within a loop, performing actions only if certain criteria is met.
This code will hide all blank rows in a range:
Sub ForEachCell_inRange()

Dim cell As Range

For Each cell In Range("a1:a10")
    If cell.Value = "" Then _
       cell.EntireRow.Hidden = True
Next cell

End Sub
VBA Do While Loop
The VBA Do While and Do Until (see next section) are very similar. They will repeat a loop while (or until) a condition is met.
The Do While Loop will repeat a loop while a condition is met.
Here is the Do While Syntax:
Do While Condition
[Do Something]
Loop
Where:
- Condition – The condition to test
- [Do Something] – The code block to repeat
You can also set up a Do While loop with the Condition at the end of the loop:
Do
[Do Something]
Loop While Condition
We will demo each one and show how they differ:
AutoMacro | Ultimate VBA Add-in | Click for Free Trial!
Do While
Here is the Do While loop example we demonstrated previously:
Sub DoWhileLoop()
    Dim n As Integer
    n = 1
    Do While n < 11
        MsgBox n
        n = n + 1
    Loop
End Sub
Loop While
Now let’s run the same procedure, except we will move the condition to the end of the loop:
Sub DoLoopWhile()
    Dim n As Integer
    n = 1
    Do
        MsgBox n
        n = n + 1
    Loop While n < 11
End Sub
VBA Do Until Loop
Do Until Loops will repeat a loop until a certain condition is met. The syntax is essentially the same as the Do While loops:
Do Until Condition
[Do Something]
Loop
and similarly the condition can go at the start or the end of the loop:
Do
[Do Something]
Loop Until Condition
Do Until
This do Until loop will count to 10, like our previous examples
Sub DoUntilLoop()
    Dim n As Integer
    n = 1
    Do Until n > 10
        MsgBox n
        n = n + 1
    Loop
End Sub
AutoMacro | Ultimate VBA Add-in | Click for Free Trial!
Loop Until
This Loop Until loop will count to 10:
Sub DoLoopUntil()
    Dim n As Integer
    n = 1
    Do
        MsgBox n
        n = n + 1
    Loop Until n > 10
End Sub
Exit Do Loop
Similar to using Exit For to exit a For Loop, you use the Exit Do command to exit a Do Loop immediately
Exit DoHere is an example of Exit Do:
Sub ExitDo_Loop()

Dim i As Integer
i = 1

Do Until i > 1000
    If Range("A" & i).Value = "error" Then
        Range("A" & i).Select
        MsgBox "Error Found"
        Exit Do
    End If
    i = i + 1
Loop

End Sub
End or Break Loop
As we mentioned above, you can use the Exit For or Exit Do to exit loops:
Exit ForExit DoHowever, these commands must be added to your code before you run your loop.
If you are trying to “break” a loop that’s currently running, you can try pressing ESC or CTRL + Pause Break on the keyboard. However, this may not work. If it doesn’t work, you’ll need to wait for your loop to end or, in the case of an endless loop, use CTRL + ALT + Delete to force close Excel.
This is why I try to avoid Do loops, it’s easier to accidentally create an endless loop forcing you to restart Excel, potentially losing your work.
More Loop Examples
AutoMacro | Ultimate VBA Add-in | Click for Free Trial!
Loop Through Rows
This will loop through all the rows in a column:
Public Sub LoopThroughRows()

Dim cell As Range

For Each cell In Range("A:A")
    If cell.value <> "" Then MsgBox cell.address & ": " & cell.Value
Next cell

End Sub
Loop Through Columns
This will loop through all columns in a row:
Public Sub LoopThroughColumns()

Dim cell As Range

For Each cell In Range("1:1")
    If cell.Value <> "" Then MsgBox cell.Address & ": " & cell.Value
Next cell

End Sub
Loop Through Files in a Folder
This code will loop through all files in a folder, creating a list:
Sub LoopThroughFiles ()

Dim oFSO As Object
Dim oFolder As Object
Dim oFile As Object
Dim i As Integer

Set oFSO = CreateObject("Scripting.FileSystemObject")

Set oFolder = oFSO.GetFolder("C:Demo)

i = 2

For Each oFile In oFolder.Files
    Range("A" & i).value = oFile.Name
    i = i + 1
Next oFile

End Sub
Loop Through Array
This code will loop through the array ‘arrList’:
For i = LBound(arrList) To UBound(arrList)
    MsgBox arrList(i)
Next i
The LBound function gets the “lower bound” of the array and UBound gets the “upper bound”.
Loops in Access VBA
Most of the examples above will also work in Access VBA. However, in Access, we loop through the Recordset Object rather than the Range Object.
Sub LoopThroughRecords()
   On Error Resume Next
   Dim dbs As Database
   Dim rst As Recordset
   Set dbs = CurrentDb
   Set rst = dbs.OpenRecordset("tblClients", dbOpenDynaset)
   With rst
      .MoveLast
      .MoveFirst
      Do Until .EOF = True
         MsgBox (rst.Fields("ClientName"))
        .MoveNext
     Loop
   End With
   rst.Close
   Set rst = Nothing
   Set dbs = Nothing
End SubЦикл For… Next в VBA Excel, его синтаксис и описание отдельных компонентов. Примеры использования цикла For… Next.
Цикл For… Next в VBA Excel предназначен для выполнения группы операторов необходимое количество раз, заданное управляющей переменной цикла — счетчиком. При выполнении цикла значение счетчика после каждой итерации увеличивается или уменьшается на число, указанное выражением оператора Step, или, по умолчанию, на единицу. Когда необходимо применить цикл к элементам, количество которых и индексация в группе (диапазон, массив, коллекция) неизвестны, следует использовать цикл For Each… Next.
|
For counter = start To end [ Step step ] [ statements ] [ Exit For ] [ statements ] Next [ counter ] |
|
For счетчик = начало To конец [ Step шаг ] [ операторы ] [ Exit For ] [ операторы ] Next [ счетчик ] |
В квадратных скобках указаны необязательные атрибуты цикла For… Next.
Компоненты цикла For… Next
| Компонент | Описание |
|---|---|
| counter | Обязательный атрибут. Числовая переменная, выполняющая роль счетчика, которую еще называют управляющей переменной цикла. |
| start | Обязательный атрибут. Числовое выражение, задающее начальное значение счетчика. |
| end | Обязательный атрибут. Числовое выражение, задающее конечное значение счетчика. |
| Step* | Необязательный атрибут. Оператор, указывающий, что будет задан шаг цикла. |
| step | Необязательный атрибут. Числовое выражение, задающее шаг цикла. Может быть как положительным, так и отрицательным. |
| statements | Необязательный** атрибут. Операторы вашего кода. |
| Exit For | Необязательный атрибут. Оператор выхода из цикла до его окончания. |
| Next [ counter ] | Здесь counter — необязательный атрибут. Это то же самое имя управляющей переменной цикла, которое можно здесь не указывать. |
*Если атрибут Step отсутствует, цикл For… Next выполняется с шагом по умолчанию, равному 1.
**Если не использовать в цикле свой код, смысл применения цикла теряется.
Примеры циклов For… Next
Вы можете скопировать примеры циклов в свой модуль VBA, последовательно запускать их на выполнение и смотреть результаты.
Простейший цикл
Заполняем десять первых ячеек первого столбца активного листа Excel цифрами от 1 до 10:
|
Sub test1() Dim i As Long For i = 1 To 10 Cells(i, 1) = i Next End Sub |
Простейший цикл с шагом
В предыдущий цикл добавлен оператор Step со значением 3, а результаты записываем во второй столбец:
|
Sub test2() Dim i As Long For i = 1 To 10 Step 3 Cells(i, 2) = i Next End Sub |
Цикл с отрицательными аргументами
Этот цикл заполняет десять первых ячеек третьего столбца в обратной последовательности:
|
Sub test3() Dim i As Long For i = 0 To —9 Step —1 Cells(i + 10, 3) = i + 10 Next End Sub |
Увеличиваем размер шага до -3 и записываем результаты в четвертый столбец активного листа Excel:
|
Sub test4() Dim i As Long For i = 0 To —9 Step —3 Cells(i + 10, 4) = i + 10 Next End Sub |
Вложенный цикл
Внешний цикл последовательно задает индексы первых десяти строк активного листа, а вложенный цикл складывает числа в первых четырех ячейках строки с текущем индексом и записывает сумму в ячейку пятого столбца. Перед запуском вложенного цикла с накопительным сложением, пятую ячейку соответствующей строки обнуляем, чтобы в случае нахождения в ней какого-либо числа, оно не прибавилось к итоговой сумме.
|
Sub test5() Dim i1 As Long, i2 As Long For i1 = 1 To 10 ‘Пятой ячейке в строке i1 присваиваем 0 Cells(i1, 5) = 0 For i2 = 1 To 4 Cells(i1, 5) = Cells(i1, 5) + Cells(i1, i2) Next Next End Sub |
Выход из цикла
В шестой столбец активного листа запишем названия десяти животных, конечно же, с помощью цикла For… Next:
|
Sub test6() Dim i As Long For i = 1 To 10 Cells(i, 6) = Choose(i, «Медведь», «Слон», «Жираф», «Антилопа», _ «Крокодил», «Зебра», «Тигр», «Ящерица», «Лев», «Бегемот») Next End Sub |
Следующий цикл будет искать в шестом столбце крокодила, который съел галоши. В ячейку седьмого столбца цикл, пока не встретит крокодила, будет записывать строку «Здесь был цикл», а когда обнаружит крокодила, запишет «Он съел галоши» и прекратит работу, выполнив команду Exit For. Это будет видно по ячейкам рядом с названиями животных ниже крокодила, в которых не будет текста «Здесь был цикл».
|
Sub test7() Dim i As Long For i = 1 To 10 If Cells(i, 6) = «Крокодил» Then Cells(i, 7) = «Он съел галоши» Exit For Else Cells(i, 7) = «Здесь был цикл» End If Next End Sub |
Результат работы циклов For… Next из примеров:

Результат работы циклов For… Next
Такие данные на активном листе Excel вы получите, если последовательно запустите на выполнение в редакторе VBA все семь подпрограмм из примеров, демонстрирующих работу циклов For… Next.
Цикл с дробными аргументами
Атрибуты start, end и step могут быть представлены числом, переменной или числовым выражением:
|
For i = 1 To 20 Step 2 For i = a To b Step c For i = a — 3 To 2b + 1 Step c/2 |
В результате вычисления значения переменной вне цикла или выражения внутри его может получиться дробный результат. VBA Excel округлит его до целого числа, используя бухгалтерское округление:
|
‘Значения атрибутов до округления For i = 1.5 To 10.5 Step 2.51 ‘Округленные значения атрибутов For i = 2 To 10 Step 3 |
Старайтесь не допускать попадания в тело цикла For… Next неокругленных значений аргументов, чтобы не получить непредсказуемые результаты его выполнения. Если без дробных чисел не обойтись, а необходимо использовать обычное округление, применяйте в коде VBA функцию рабочего листа WorksheetFunction.Round для округления числа перед использованием его в цикле For… Next.
This post provides a complete guide to the standard VBA For Loop and the VBA For Each Loop.
If you are looking for information about the VBA While and VBA Do Loop then go here.
If you want some quick info about the For loops then check out the Quick Guide table in the section below.
If you are looking for information on a particular topic then check out the Table of Contents below.
“History is about loops and continuums” – Mike Bidlo.
Related Links for the VBA For Loop
The Complete Guide to Ranges in Excel VBA.
The Complete Guide to Copying Data in Excel VBA.
VBA Do While Loop.
A Quick Guide to the VBA For Loop
| Loop format | Description | Example |
|---|---|---|
| For … Next | Run 10 times | For i = 1 To 10 Next |
| For … Next | Run 5 times. i=2,4, 6 etc. | For i = 2 To 10 Step 2 Next |
| For … Next | Run in reverse order | For i = 10 To 1 Step -1 Debug.Print i Next |
| For … Next | Go through Collection | For i = 1 To coll.Count Debug.Print coll(i) Next |
| For … Next | Go through array | For i = LBound(arr) To UBound(arr) Debug.Print arr(i) Next i |
| For … Next | Go through 2D array | For i = LBound(arr) To UBound(arr) For j = LBound(arr,2) To UBound(arr,2) Debug.Print arr(i, j) Next j Next i |
| For Each … Next | Go through Collection | Dim item As Variant For Each item In coll Debug.Print item Next item |
| For Each … Next | Go through array | Dim item As Variant For Each item In arr Debug.Print item Next item |
| For Each … Next | Go through 2D array | Dim item As Variant For Each item In arr Debug.Print item Next item |
| For Each … Next | Go through Dictionary | Dim key As Variant For Each key In dict.Keys Debug.Print key, dict(key) Next key |
| Both types | Exit Loop | For i = 1 To 10 If Cells(i,1) = «found» Then Exit For End If Next i |
The VBA For Loop Webinar
If you are a member of the website, click on the image below to view the webinar for this post.
(Note: Website members have access to the full webinar archive.)

Introduction to the VBA For Loop
Loops are by far the most powerful component of VBA. They are the rocket fuel of your Macros. They can perform tasks in milliseconds that would take humans hours. They also dramatically reduce the lines of code your applications need.
For Loops have been part of all major programming languages since they were first used with Fortan in 1957.
If you have never used loops before then this post is a great place to start. It provides an in-depth guide to loops, written in plain English without the jargon.
Let’s start with a very important question – what are loops and why do we need them?
What are VBA For Loops?
A loop is simply a way of running the same lines of code a number of times. Obviously running the same code over and over would give the same result.
So what is important to understand is that the lines of code normally contain a variable that changes slightly each time the loop runs.
For example, a loop could write to cell A1, then cell A2, A3 and so on. The slight change each time is the row.
Let’s look at a simple example.
VBA For Loop Example 1
The following code prints the values 1 to 5 in the Immediate Window(Ctrl + G to view).
Debug.Print 1
Debug.Print 2
Debug.Print 3
Debug.Print 4
Debug.Print 5
The Immediate Window
If you have not used the Immediate Window before then this section will get you up to speed quickly.
The function Debug.Print writes values to the Immediate Window. To view this window select View->Immediate Window from the menu( the shortcut is Ctrl + G)


VBA For Loop Example 2
Now imagine we want to print out the numbers 1 to 20. We would need to add 15 more lines to the example above.
However, using a loop we only need to write Debug.Print once.
    For i = 1 To 20
        Debug.Print i
    Next i
The output is:

Output
If we needed print the numbers 1 to 1000 then we only need to change the 20 to 1000.
Normally when we write code we would use a variable instead of a number like 20 or 1000. This gives you greater flexibility. It allows you to decide the number of times you wish to run the loop when the code is running. The following example explains this.
VBA For Loop Example 3
A common task in Excel is read all the rows with with data.
The way you approach this task is as follows
- Find the last row with data
- Store the value in variable
- Use the variable to determine how many times the loop runs
Using a variable in the loop makes your code very flexible. Your will work no matter how many rows there are.
Let’s have a look at an example. Imagine you receive a sheet with a list of fruit types and their daily sales. You want to count the number of Oranges sold and this list will vary in size depending on sales.
The following screenshot shows an example of this list

Sample Data of Fruit Sales
We can use the code to count the oranges
' https://excelmacromastery.com/
Sub CountFruit()

    ' Get the last row with text
    Dim LastRow As Long
    LastRow = Sheet1.Cells(Sheet1.Rows.Count, 1).End(xlUp).Row

    Dim i As Long, Total As Long
    ' Use LastRow in loop
    For i = 2 To LastRow
        ' Check if cell has text "Orange"
        If Sheet1.Cells(i, 1).Value = "Oranges" Then
            ' Add value in column B to total
            Total = Total + Sheet1.Cells(i, 2).Value
        End If
    Next i

    ' Print total
    Debug.Print "Total oranges sold was:"; Total

End Sub
You can try this code for yourself. Change the number of fruit items and you will see that the code still works fine.
If you were to increase the number fruit items to a large value like 10,000 then you will hardly notice the difference in the time it takes to run – almost instantly.
Loops are super fast. This is what makes them so powerful. Imagine performing a manual task on 10,000 cells. It would take a considerable amount of time.
Advantages of the VBA For Loop
4To conclude this section we will list the major advantages of using loops
- They reduce the lines code you need
- They are flexible
- They are fast
In the next sections we will look at the different types of loops and how to use them.
The Standard VBA For Loop
The VBA For loop is the most common loop you will use in Excel VBA. The For Loop is used when you can determine the number of times it will be run. For example, if you want to repeat something twenty times.
YouTube Video For Loop
Check out this YouTube Video of the For Loop:
Get the workbook and code for this video here
Format of the Standard VBA For Loop
The Standard VBA For Loop has the following format:
For <variable> = <start value> to <end value>
Next <variable>
The start and end values can be variables. Also the variable after Next is optional but it is useful and it makes it clear which for loop it belongs to.
How a For Loop Works
Let’s look at a simple for loop that prints the numbers 1 to 3
    Dim i As Long
    For i = 1 To 3
        Debug.Print i
    Next i
How this code works is as follows
i is set to 1
The value of i(now 1) is printed
i is set to 2
The value of i(now 2) is printed
i is set to 3
The value of i(now 3) is printed
If we did not use a loop then the equivalent code would be
    Dim i As Long
    i = i + 1
    Debug.Print i
    i = i + 1
    Debug.Print i
    i = i + 1
    Debug.Print i
The i = i + 1 line is used to add 1 to i and is a common way in programming to update a counter.
Using Step with the VBA For Loop
You can see that i is increased by one each time. This is the default. You can specify this interval using Step keyword.
The next example shows you how to do this:
    ' Prints the even numbers i.e. 2,4,6,8 ... 20
    For i = 2 To 20 Step 2
        Debug.Print i
    Next i
You can use a negative number with Step which will count in reverse
    ' Prints the even numbers in reverse i.e. 20,18,16,14 ... 2
    For i = 20 To 2 Step -2
        Debug.Print i
    Next i
Note: if Step is positive then your starting number must be lower than you ending number. The following loop will not run because the starting number 20 is greater than 10. VBA therefore, thinks it has already reached the target value 10.
    ' Will not run as starting number already greater than 10
    For i = 20 To 10 Step 1
        Debug.Print i
    Next i
If Step is negative then the start number must be greater than the end number.
Exit the For Loop
Sometimes you may want to leave the loop earlier if a certain condition occurs. For example if you read bad data.
You can use Exit For to automatically leave the loop as shown in the following code
    For i = 1 To 1000

        ' If cell is blank then exit for
        If Cells(i, 1) = "" Then
            MsgBox "Blank Cell found - Data error"
            Exit For
        End If

    Next i
Using the VBA For Loop with a Collection
The For loop can also be used to read items in a Collection.
In the following example, we display the name of all the open workbooks
    Dim i As Long
    For i = 1 To Workbooks.Count
        Debug.Print Workbooks(i).FullName
    Next i
Using Nested For Loops
Sometimes you may want to use a loop within a loop. An example of this would be where you want to print the names of the worksheets of each open workbook.
The first loop would go through each workbook. Each time this loop runs it would use a second loop to go through all the worksheets of that workbook. It is actually much easier to do than it sounds.
The following code shows how:
' https://excelmacromastery.com/
Sub ListWorksheets()

    Dim i As Long, j As Long
    ' First Loop goes through all workbooks
    For i = 1 To Workbooks.Count

        ' Second loop goes through all the worksheets of workbook(i)
        For j = 1 To Workbooks(i).Worksheets.Count
            Debug.Print Workbooks(i).Name + ":" + Worksheets(j).Name
        Next j

    Next i

End Sub
This works as follows:
The first loop sets i to 1
The second loop then uses the workbook at 1 to go through the worksheets.
The first loop sets i to 2
The second loop then uses the workbook at 2 to go through the worksheets.
and so on
It the next section we will use a For Each loop to perform the same task. You will find the For Each version much easier to read.
The VBA For Each Loop
The VBA For Each loop is used to read items from a collection or an array. We can use the For Each loop to access all the open workbooks. This is because Application.Workbooks is a collection of open workbooks.
This is a simple example of using the For Each Loop
    Dim wk As Workbook
    For Each wk In Workbooks
        Debug.Print wk.FullName
    Next wk
Format of the VBA For Each Loop
You can see the format of the VBA for each loop here(See Microsoft For Each Next documentation):
For Each <variable> in <collection>
Next <variable>
To create a For Each loop we need a variable of the same type that the collection holds. In the example here we created a variable of type Workbook.
If the collection has different types of items we can declare the variable as a variant.
VBA contains a collection called Sheets. This is a collection of sheets of type Worksheet(normal) and Chart(when you move a chart to be a full sheet). To go through this collection you would declare the variable as a Variant.
The following code uses For Each to print out the name of all the sheets in the current workbook
    Dim sh As Variant
    For Each sh In ThisWorkbook.Sheets
        Debug.Print sh.Name
    Next sh
Order of Items in the For Loop
For Each goes through items in one way only.
For example, if you go through all the worksheets in a workbook it will always go through from left to right. If you go through a range it will start at the lowest cell e.g. Range(“A1:A10”) will return A1,A2,A3 etc.
This means if you want any other order then you need to use the For loop.
Both loops in the following example will read the worksheets from left to right:
    ' Both loops read the worksheets from left to right
    Dim wk As Worksheet
    For Each wk In ThisWorkbook.Worksheets
        Debug.Print wk.Name
    Next

    Dim i As Long
    For i = 1 To ThisWorkbook.Worksheets.Count
        Debug.Print ThisWorkbook.Worksheets(i).Name
    Next
As you can see the For Each loop is neater to write. However if you want to read the sheets in any other order e.g. right to left then you have to use the for loop:
    ' Reading the worksheets from right to left
    Dim i As Long
    For i = ThisWorkbook.Worksheets.Count To 1 Step -1
        Debug.Print ThisWorkbook.Worksheets(i).Name
    Next
Using the VBA For Each Loop With Arrays
One thing to keep in my is that the For Each loop is that it is read-only when you use it with arrays.
The following example demonstrates this:
' https://excelmacromastery.com/
Sub UseForEach()

    ' Create array and add three values
    Dim arr() As Variant
    arr = Array("A", "B", "C")

    Dim s As Variant
    For Each s In arr
        ' Changes what s is referring to - not value of array item
        s = "Z"
    Next

    ' Print items to show the array has remained unchanged
    For Each s In arr
        Debug.Print s
    Next

End Sub
In the first loop we try to assign s to “Z”. When happens is that s is now referring the string “Z” and no longer to the item in the array.
In the second loop we print out the array and you can see that none of the values have changed.
When we use the For Loop we can change the array item. If we change the previous code to use the For Loop you it will change all the array values to “Z”
' https://excelmacromastery.com/
Sub UsingForWithArray()

    ' Create array and add three values
    Dim arr() As Variant
    arr = Array("A", "B", "C")

    Dim i As Long
    For i = LBound(arr) To UBound(arr)
        ' Changes value at position to Z
        arr(i) = "Z"
    Next

    ' Print items to show the array values have change
    For i = LBound(arr) To UBound(arr)
        Debug.Print arr(i)
    Next

End Sub
If your Collection is storing Objects the you can change the items using a For Each loop.
Using Nested For Each Loops
We saw already that you can have a loop inside other loops. Here is the example from above:
' https://excelmacromastery.com/
Sub ListWorksheets()

    Dim i As Long, j As Long
    ' First Loop goes through all workbooks
    For i = 1 To Workbooks.Count

        ' Second loop goes through all the worksheets of workbook(i)
        For j = 1 To Workbooks(i).Worksheets.Count
            Debug.Print Workbooks(i).Name + ":" + Worksheets(j).Name
        Next j

    Next i

End Sub
This time we will use the For Each loop to perform the same task:
' https://excelmacromastery.com/
Sub ReadAllWorksheets()

    Dim wk As Workbook, sh As Worksheet
    ' Read each workbook
    For Each wk In Workbooks

        ' Read each worksheet in the wk workbook
        For Each sh In wk.Worksheets
            ' Print workbook name and worksheet name
            Debug.Print wk.Name + ": " + sh.Name
        Next sh

    Next wk

End Sub
As you can see this is a neater way of performing this task than using the For Loop:
This code run as follows:
- Get the first Workbook from the Workbooks collection
- Go through all the worksheets in this workbook
- Print the workbook/worksheet details
- Get the next workbooks in the collection
- Repeat steps 2 to 3
- Continue until no more workbooks are left in the collection
How to Loop Through a Range
In Excel VBA, the most common use of a For Loop is to read through a range.
Imagine we have the data set in the screenshot below. Our task is to write code that will read through the data and copy the amounts to the column J. We are only going to copy amounts that are greater than 200,000.

The following example shows how we do it:
' Read through an Excel Range using the VBA For Loop
' https://excelmacromastery.com/
Sub ForLoopThroughRange()

    ' Get the worksheet
    Dim sh As Worksheet
    Set sh = ThisWorkbook.Worksheets("Sheet1")

    ' Get the Range
    Dim rg As Range
    Set rg = sh.Range("A1").CurrentRegion

    ' Delete existing output
    sh.Range("J1").CurrentRegion.ClearContents

    ' Set the first output row
    Dim row As Long
    row = 1

    ' Read through all the rows using the For Loop
    Dim i As Long
    For i = 2 To rg.Rows.Count

        ' Check if amount is greater than 200000
        If rg.Cells(i, 4).Value > 200000 Then

            ' Copy amount to column m
            sh.Cells(row, "J").Value = rg.Cells(i, 4).Value

            ' Move to next output row
            row = row + 1

        End If

    Next i

End Sub
This is a very basic example of copying data using Excel VBA. If you want a complete guide to copying data using Excel VBA then check out this post
Summary of the VBA For Loops
The Standard VBA For Loop
- The For loop is slower than the For Each loop.
- The For loop can go through a selection of items e.g. 5 to 10.
- The For loop can read items in reverse e.g. 10 to 1.
- The For loop is not as neat to write as the For Each Loop especially with nested loops.
- To exit a For loop use Exit For.
The VBA For Each Loop
- The For Each loop is faster than the For loop.
- The For Each loop goes through all items in the collectionarray.
- The For Each loop can go through items in one order only.
- The For Each loop is neater to write than a For Loop especially for nested loops.
- To exit a For Each loop use Exit For.
What’s Next?
Free VBA Tutorial If you are new to VBA or you want to sharpen your existing VBA skills then why not try out the The Ultimate VBA Tutorial.
Related Training: Get full access to the Excel VBA training webinars.
(NOTE: Planning to build or manage a VBA Application? Learn how to build 10 Excel VBA applications from scratch.)
How to use VBA/Macros to iterate through each cell in a range, either a row, a column, or a combination of both. This is for when you need to look into each cell or do something with each cell in a range; if you just need to search for a piece of data within a range, use the Find method (link coming soon).
Sections:
How to Loop Through a Range of Cells
Loop through a User-Selected Range
Selecting Multiple Contiguous Rows and Columns
Proper Technique (Doesn’t Matter)
Notes
How to Loop Through a Range of Cells
Here I will hard-code a specific range in Excel and create the code needed to loop or iterate through that range.
Code:
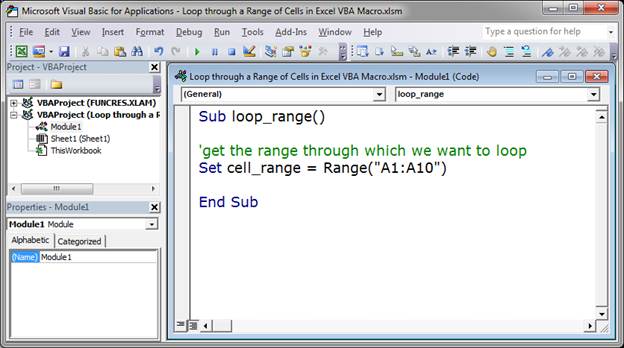
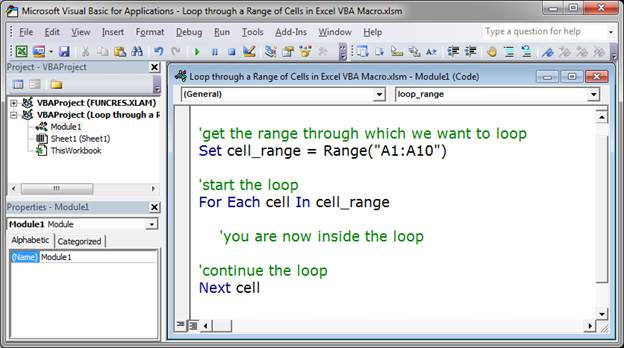
This is the full code. Below, I will explain it.
'get the range through which we want to loop
Set cell_range = Range("A1:A10")

'start the loop
For Each cell In cell_range

    'you are now inside the loop
    MsgBox "Cell value = " & cell.Value

'continue the loop
Next cell
Get the Range to Loop Through
Set cell_range = Range("A1:A10")
Here, the range A1:A10 has been assigned to the variable cell_range. You can name the variable whatever you want basically but not «Range».
I have hard-coded the range here but, below, I will show you another way to get the range, including by user selection.
Loop through the Range
Now that we have a range, we can loop through it.
There are a few ways to do this and I will show you the easiest method here.
We use the For EachNext loop. It looks like this:
'start the loop
For Each cell In cell_range

    'you are now inside the loop

'continue the loop
Next cell
Put this under the code we already have like this:
This is the most basic way to loop through a range of cells in Excel using VBA/Macros.
The loop always has this format:
For Each current_cell_variable_name In range_reference(can also be a variable like in this example)
What you want to do in the loop here.
Next current_cell_variable_name
The only thing that you need to understand about this loop is where to put two variables. You need a variable that will represent the current cell that you are looping through, I called this cell in my example, and you need a variable that contains a range reference, I called this cell_range in my example.
cell_range is just what contains the range reference. You can use an actual range reference here if you want instead of using a variable that contains a range reference, but putting it into a variable like in this example will make it easier to maintain in the future.
cell is just a variable that you use ONLY for this loop. You can name it what you want, but make sure to put it after where it says «For Each» AND after where you put «Next».
Test the Loop
I will output a simple message box that shows the value of each cell so you can see that it works.
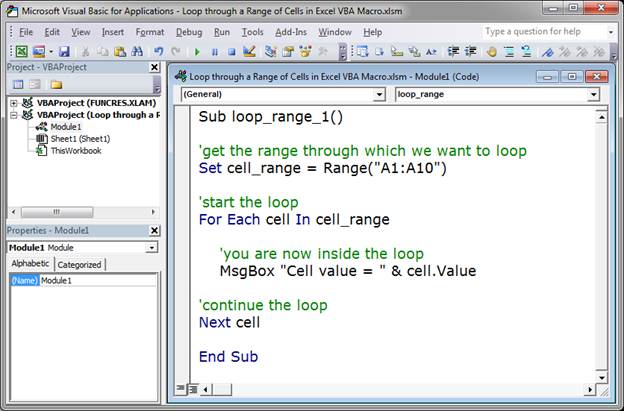
Here is the complete code (the macro has been named loop_range_1 now):
'get the range through which we want to loop
Set cell_range = Range("A1:A10")

'start the loop
For Each cell In cell_range

    'you are now inside the loop
    MsgBox "Cell value = " & cell.Value

'continue the loop
Next cell
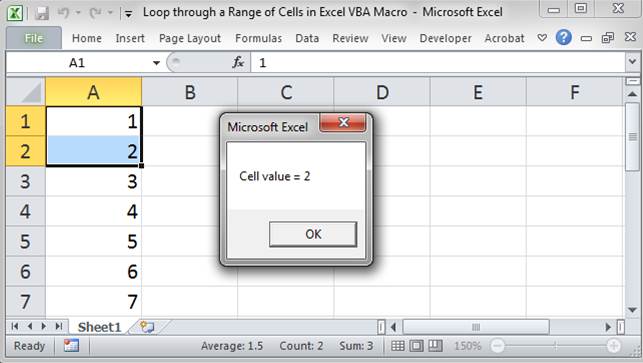
Go back to Excel, hit Alt + F8 and select the macro and hit Run and we see this:
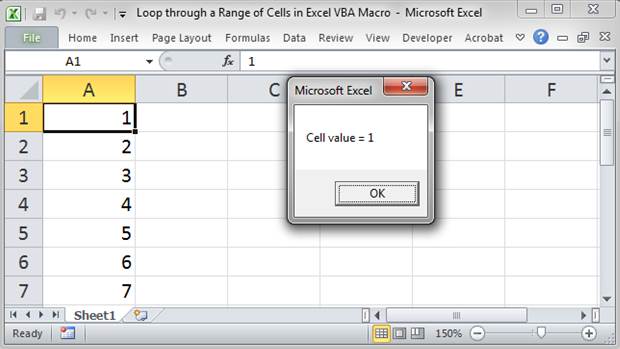
The box will iterate through all 10 cells in the range and display the value from each cell.
Loop through a User-Selected Range
We follow the example from above but change one little thing:
'get the range through which we want to loop
Set cell_range = Selection

'start the loop
For Each cell In cell_range

    'you are now inside the loop
    MsgBox "Cell value = " & cell.Value

'continue the loop
Next cell
I replaced Range(«A1:A10») with Selection. Nothing else was changed.
Now, go back to Excel, select a range of cells, hit Alt + F8 and click the macro loop_range_selection and hit run and you will see it work.
Selecting Multiple Contiguous Rows and Columns
This works exactly the same as the previous examples. Excel doesn’t care if you select data from one row, one column, or multiples of each. It will iterate through the cells from left-to-right until it hits the end of the range and then it will go down to the next row and do the same thing.
Proper Technique (Doesn’t Matter)
Technically, you are supposed to declare all variables at the top of the macro but, for such simple things as Excel macros, this is almost never important. As such, I left that out here. If you want, you can read about variables in our other tutorials and add those, but, trust me, it is probably not worth your time and, if it is, then you are creating a macro so sophisticated that you already know about variables and won’t be reading this tutorial in the first place.
Notes
This is a pretty basic technique in Excel. It has only two parts, figuring out the range through which to loop and looping through that range.
In this example, if you select empty cells and iterate through them, there will be nothing after the «Cell value = » text in the pop-up message box.
(If you don’t know how to install/create a macro, read this tutorial: Install a Macro in Excel)
Download the accompanying Excel file to use the macros from this tutorial.