
Excel for Microsoft 365 Excel 2021 Excel 2019 Excel 2016 Excel 2013 More…Less
If the file size of your spreadsheet is too large, try the following tips to make it more manageable.
Save your spreadsheet in binary (.xslb) format
You can reduce your file size by saving your spreadsheet as a binary workbook (.xslb) instead of the default format (.xslx). The default format is XML based, which is important if you’re using your data with third-party programs because XML is an open standard. However, for most purposes, the binary format is sufficient and saves to a smaller file.
-
Go to File > Options > Save.
-
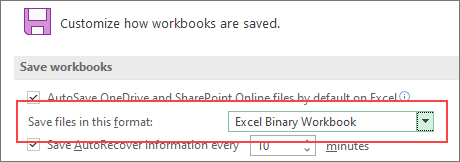
Under Save workbooks, in the Save files in this format list, select Excel Binary Workbook.

This option sets binary format as the default. If you want to keep the default to Excel Workbook (.xlsx) but save the current file as binary, select the option in the Save As dialog.
Note: If the file is located in a SharePoint library, you might not see the Save As option. If this is the case, you can save a copy to your local drive, save that copy as a binary, and then replace the original file with the new binary.
-
Go to File > Save As, and if this is the first time you are saving the file, select a location.
-
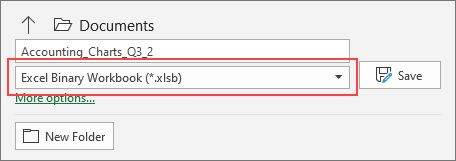
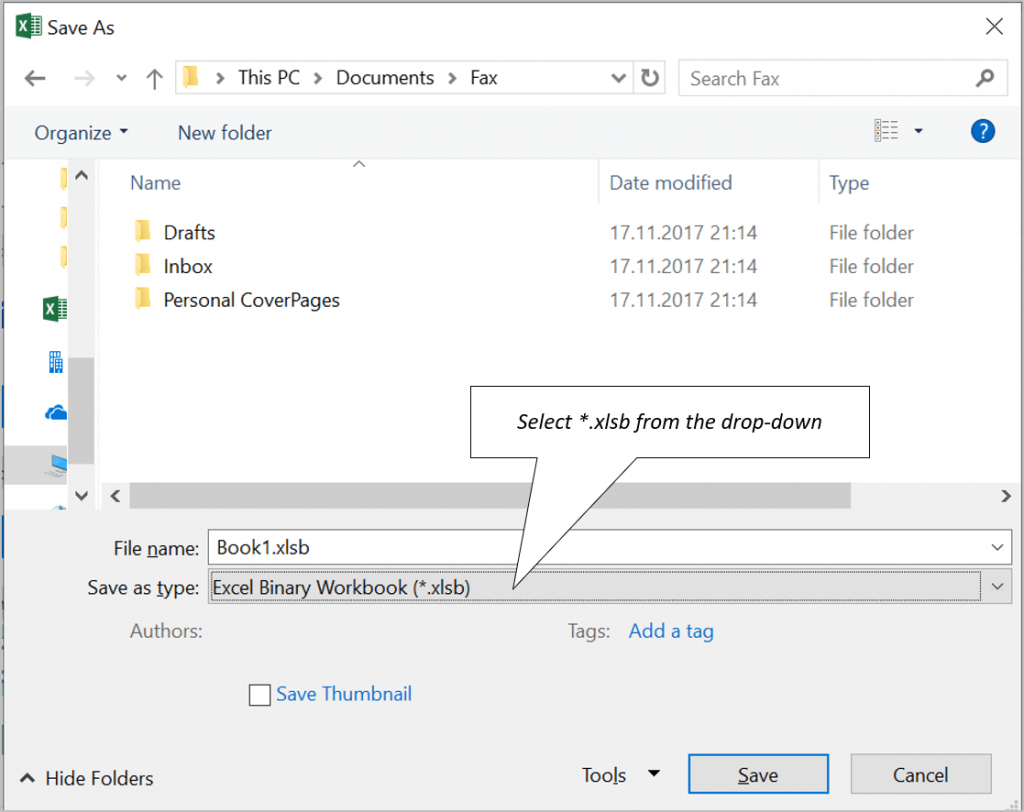
From the list of file types, select Excel Binary Workbook (*.xlsb).
Save your spreadsheet in binary (.xslb) format
You can reduce your file size by saving your spreadsheet as a binary workbook (.xslb) instead of the default format (.xslx). The default format is XML based, which is important if you’re using your data with third-party programs because XML is an open standard. However, for most purposes, the binary format is sufficient and saves to a smaller file.
-
Go to File > Options > Save.
-
Under Save workbooks, in the Save files in this format list, select Excel Binary Workbook.
This option sets binary format as the default.
If you want to keep the default to Excel Workbook (.xlsx) but save the current file as binary, select the option in the Save As dialog box:
-
Go to File > Save As.
-
In the Save as type list, select Excel Binary Workbook (*.xlsb).
Reduce the number of worksheets
If you have worksheets with data that you’re not using—and that don’t contain any formulas you’re using—delete them from the spreadsheet.
The more data points you have in your workbook, the larger your file size will be. Removing unused data will reduce your file size.
Save pictures at lower resolutions
-
Go to File > Options > Advanced.
-
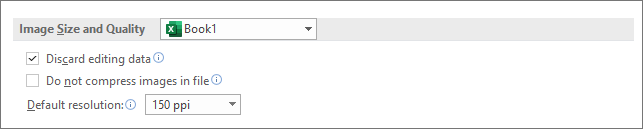
Under Image Size and Quality, do the following:
-
Select Discard editing data. This option removes stored data that’s used to restore the image to its original state after it’s been edited. Note that if you discard the editing data, you won’t be able to restore the image.
-
Make sure that Do not compress images in file is not selected.
-
In the Default resolution list, select a resolution of 150ppi or lower. In most cases, you won’t need the resolution to be higher than that.
-
Compress pictures
-
Select a picture in your document. The Picture Format tab appears on the ribbon.
-
On the Picture Format tab, in the Adjust group, select Compress Pictures.
-
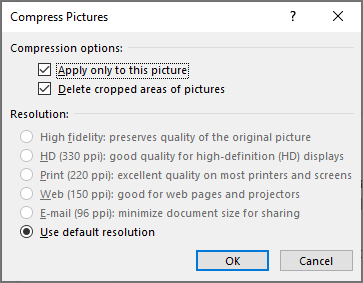
Under Compression options, do the following:
-
To compress all the pictures in the file, clear Apply only to this picture. If this option is selected the changes you make here will only affect the selected picture.
-
Select Delete cropped areas of pictures. This option removes the cropped picture data, but note that you won’t be able to restore it.
-
-
Under Resolution, do the following:
-
Select Use default resolution.
-
Don’t save the pivot cache with the file
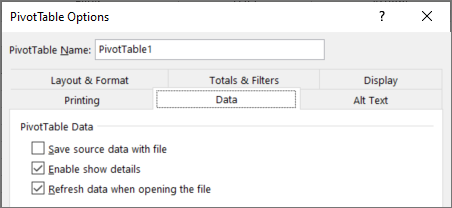
If your spreadsheet contains a pivot table, you can reduce the file size by not saving the pivot table source data cache with the file and instead having the data cache refresh when you open the spreadsheet.
-
Select any cell in the pivot table.
-
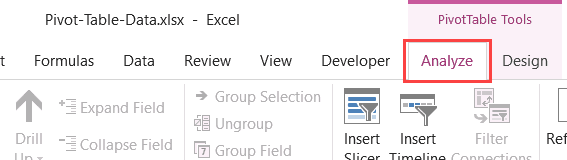
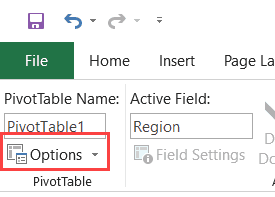
On the PivotTable Analyze tab, in the PivotTable group, select Options.
-
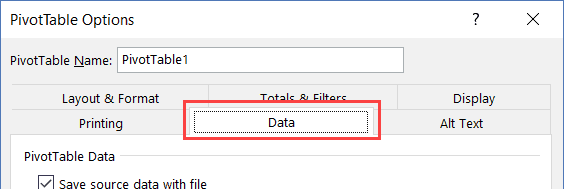
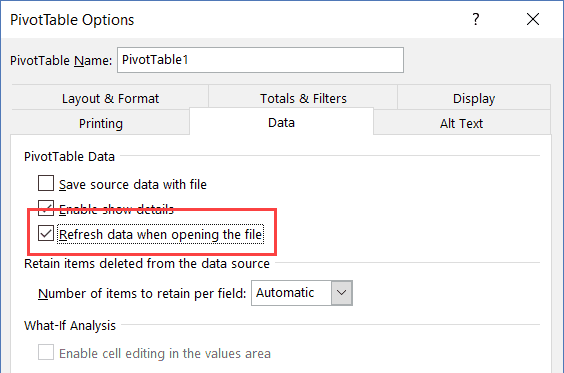
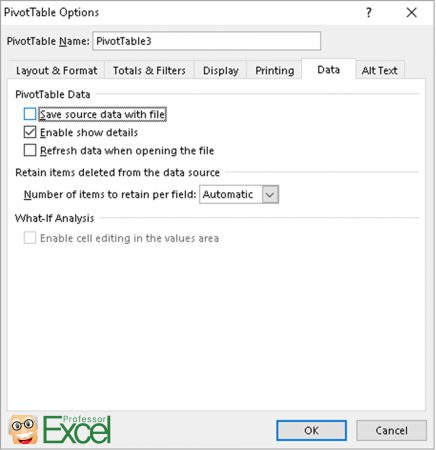
In the PivotTable Options dialog box, select the Data tab, and do the following:
-
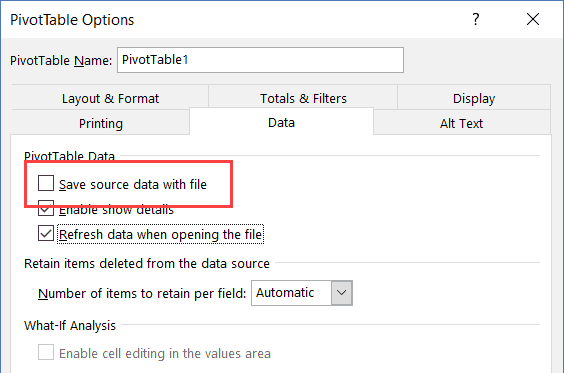
Uncheck Save source data with file.
-
Select Refresh data when opening the file.
-
See Also
Reduce the file size of your PowerPoint presentations
Reduce the file size of your Word documents
Need more help?
Want more options?
Explore subscription benefits, browse training courses, learn how to secure your device, and more.
Communities help you ask and answer questions, give feedback, and hear from experts with rich knowledge.
Excel is an amazing tool for analyzing and visualizing data sets. To visualize and make report we often need to save small chunks of data. These small chunks of data grow over time and make the files heavier. But data is not the only reason behind the large size of your excel file. There are many more things you need consider if you want to reduce the file size of your Excel file.
It is important to have small size of excel file. The first reason is loading time. If your excel file is large (2 mb or larger) you will notice longer loading time, reduced performance, unresponsiveness, etc. All this can be avoided if you keep your file size reasonable. These are the few effective methods to reduce the file size.
7 Ways to Reduce the Excel File Size
1: Remove Unused Data From File
It happens many times that we import data in excel file for temporary use but forget to remove it. This increases the size of the Excel file.
To reduce the size of excel file identify the data that you don’t really need. Delete those ranges and save the file. This will reduce the file size.
Pro tip: if you right somewhere down in the sheet and then delete it, excel remembers it and takes all that range in used range and save the file. For example, if your data is in range A2:B10. And for some reason you temporarily write something in cell A100000. Then Excel will take used range as A2:B100000. This increases the file size. Delete such ranges.
2: Remove non essential formulas/calculation.
This is one of the biggest reason for the large size of data. The excel function take memory and CPU time for calculations. They engage the memory in calculations. Although Excel formulas are fast and light but they make file heavy if there are too many complex formulas.
We often use formulas to pull or calculate some calculations that is only for one time and does not need to be dynamic. Identify such formulas and value paste them. This will reduce the file size.
If you got to have a large number of formulas in your excel file than try to have a VBA sub routine for that calculations. Remove the formulas from the worksheet and do those calculations in a VBA subroutine. This will make your file too much lighter than before.
If you don’t want to use VBA for calculations and want to have formulas on the sheet, disable the automatic calculations. If you have too many complex formula on sheet, every time you make a change in Excel file those calculations will be recalculated. This will take time and memory and can make your Excel file unresponsive. To avoid this, disable the automatic workbook calculation and set it to manual.
To set formula calculation to manual:
Go to File —> Options —> Formulas.
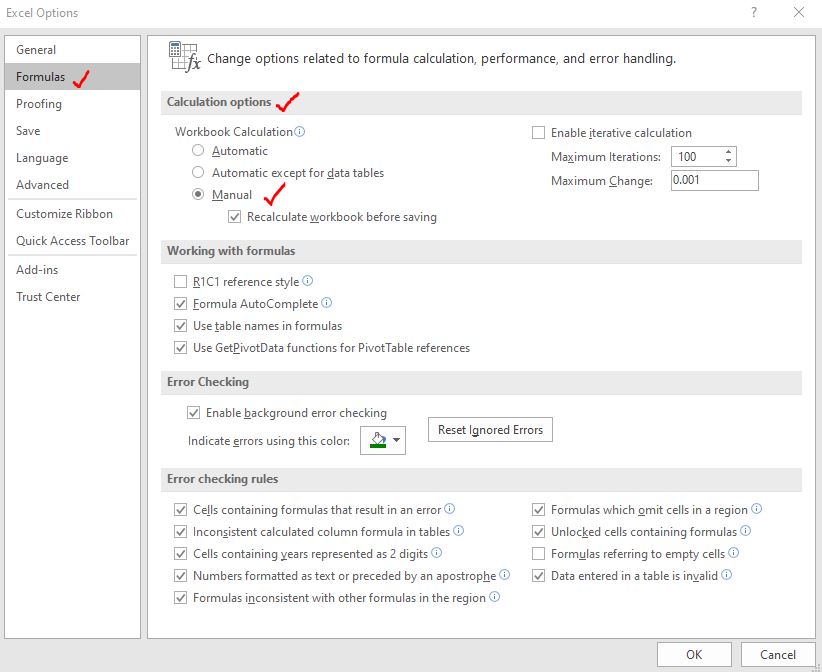
Now the workbook will be calculated only when you want. To recalculate the workbook use the F9 key on the keyboard.
Using this method, you can reduce the burden on the CPU.
Pro Note: Try not to use Volatile functions like OFFSET, RAND, RANDBETWEEN, etc.
3. Delete Unused Hidden Sheets
When we work a long time on an Excel file, we create many temporary sheets that is required for a short period of time. When we don’t use them, we hide them in order to use them later. But we often forget about those sheets. These hidden sheets increase the file size. Identify such hidden sheets and get the rid of them. This will decrease the Excel file size.
4. Remove Unused Pivot Table and Charts
For quick summery of data I create pivot tables. Once I have used them, I delete those pivot tables. Because pivot tables increase the file size. If a pivot table is for one time use, it is better use and scrap them at earliest. Same goes for the charts. Charts are graphics and they increase the size of Excel file significantly. Until and unless the chart is necessary, I suggest to not have a chart in excel file.
5. Remove Unnecessary Formatting from the Large Excel File.
The formatting is done in Excel files to make data easy to understand and readable. But sometimes we do formatting to please the eyes only. There’s nothing bad in that but if the size of file increases that it creates problem, we should avoid unnecessary formatting.
By the unnecessary formatting, I mean formatting on the data sheet. The sheet that contains the source data, does not need to be formatted that much. So we should avoid implementing borders and colors to that data sheet. You can do the formatting on the reports and dashboard sheet/
6: See if you can save source data in a Data Base
If you have a large amount of data that you process in Excel but Excel hangs and gets unresponsive while processing that much of data than you should reconsider using excel for saving data. Excel is not a database tool. It is an analytical tool. To save large amount of data that can grow overtime, you should use database tools like Microsoft Access, Microsoft SQL Server, CSV etc.
You can use the Excel’s External Data Source feature or Power Query to process that much data. This can help you reduce the file size of Excel Workbook significantly.
7: Save as Excel Binary File
The Excel is evolved to work with other tools and that kind of file takes a large space. This type of Excel file has extension .xlsx that you are familiar with. But if your Excel file does not need to interact with other tools than save the Excel file as Excel Binary File. The extension of this type of file is .xlsb. This has lesser features but has all the essential features of Excel and size of file is significantly lesser than the .xlsx file.
Pro Tip: Always keep a copy of original file before trying to reduce the size of file. So that your data is intact if you do some mistake in duplicate file. Sometimes the reason of big size of excel file is unknown. Try to recreate the file. Do not external JPEG images for beautification of the reports if size is increasing too much.
So yeah guys, these are the ways to reduce the file size of large excel files. I hope it was explanatory enough and helpful for you. If you have any doubts or specific requirement, ask me in the comments section below. Till then keep Excelling.
Related Articles:
Center Excel Sheet Horizontally and Vertically on Excel Page : Microsoft Excel allows you to align worksheet on a page, you can change margins, specify custom margins, or center the worksheet horizontally or vertically on the page. Page margins are the blank spaces between the worksheet data and the edges of the printed page
Split a Cell Diagonally in Microsoft Excel 2016 : To split cells diagonally we use the cell formatting and insert a diagonally dividing line into the cell. This separates the cells diagonally visually.
How do I Insert a Check Mark in Excel 2016 : To insert a checkmark in Excel Cell we use the symbols in Excel. Set the fonts to wingdings and use the formula Char(252) to get the symbol of a check mark.
How to disable Scroll Lock in Excel : Arrow keys in excel move your cell up, down, Left & Right. But this feature is only applicable when Scroll Lock in Excel is disabled.
Scroll Lock in Excel is used to scroll up, down, left & right your worksheet not the cell. So this article will help you how to check scroll lock status and how to disable it?
What to do If Excel Break Links Not Working : When we work with several excel files and use formula to get the work done, we intentionally or unintentionally create links between different files. Normal formula links can be easily broken by using break links option.
Popular Articles:
50 Excel Shortcuts to Increase Your Productivity | Get faster at your task. These 50 shortcuts will make you work even faster on Excel.
How to use Excel VLOOKUP Function| This is one of the most used and popular functions of excel that is used to lookup value from different ranges and sheets.
How to use the Excel COUNTIF Function| Count values with conditions using this amazing function. You don’t need to filter your data to count specific value. Countif function is essential to prepare your dashboard.
How to Use SUMIF Function in Excel | This is another dashboard essential function. This helps you sum up values on specific conditions.
Excel workbooks have been known to become painfully slow and heavy as more data/formulas/images are added to it.
Sometimes, it’s easy to get rid of the extra flab and keep the excel file size in check, and sometimes, it isn’t.
And since Excel is not a web-based tool, most of us work and collaborate by sending Excel files via email. And a large Excel file that weighs 50 MB can be hard to share with your colleagues/clients.
In my last job, we used Lotus Notes email client, which is snail-slow, and sending heavy Excel files over that was torture.
While there is no magical way to reduce the size of an Excel workbook, there are a few techniques that you can use to cut down some flab.
Note: The impact of these techniques to reduce Excel file size would depend on your data. For some, it may help reduce the size by 50% and for some, it may only end up reducing the size by 5%.
Tips to Reduce Excel File Size
Below are the techniques you can use to reduce the file size of your Excel workbook.
For each tip, I have done some testing and have added the snapshots to show you the impact on file size. The results you get would vary depending upon your data and files.
Based on your workbook, you can use one or more of these tips.
Remove Unnecessary Worksheets/Data
The best solutions are often the easiest ones.
And this technique is more of common sense and less of any Excel wizardry.
If you have an Excel workbook that has some worksheets that are not needed (and are not being used in any formulas), see if you can get rid of those.
This has a direct correlation with the Excel file size. So as soon as you delete some of the worksheets and save the workbook, you will instantly see a reduced file size.
Test Results:
I created an Excel file with 10 worksheets where each worksheet has 2.6 million data points (26 columns with 100,000 data points in each column).
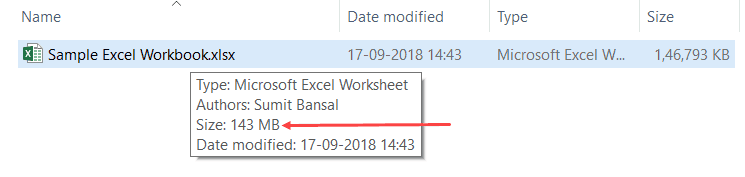 The resulting size of this workbook is 143 MB (and it’s taking quite some time to save and open).
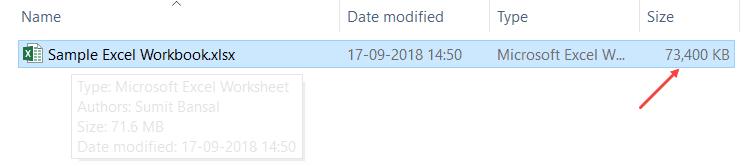
Now when I deleted five sheets, the size reduced by half (duh).
As you can see, data that you have your worksheet has a direct correlation with the file size.
Convert to Binary Format (XLSB)
Do you know that just by saving an Excel file in the XLSB format can reduce the file size?
Yes, it’s true.
All you have to do is while saving a workbook, use the .xlsb format.
Here are the steps to do this:
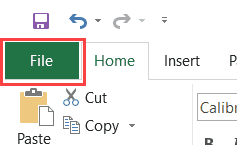
- Click the File tab.

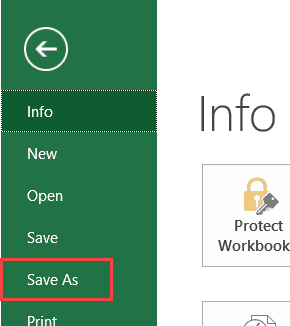
- Click on Save As.

- Click on Browse.

- In the Save As dialog box, change the file type to Excel Binary Workbook (.xlsb)


Test Results
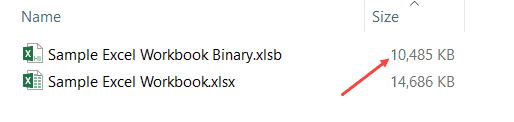
I had an Excel workbook that took 14.6 MB of space.
After converting the same file to the XLSB format, I was able to reduce the size to 10.4 MB (a size reduction of ~28%).
What is XLSB?
When you save an Excel file (.xlsx or .xlsm), it gets saved in the XML format.
For example, if I change the file extension of the XLSX file to ZIP and then open it, this is what I get.
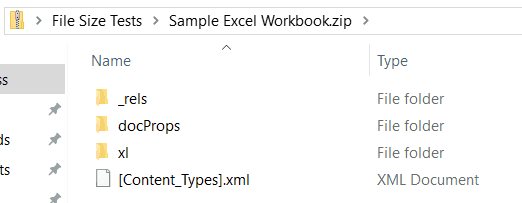
And if I further go in the ‘xl’ folder and then go in the worksheet folder, it shows me the worksheets in that workbook (and these worksheets are saved as an XML document).

Now let’s do the same with an XLSB file.
So I first change the file extension to ZIP, then open it and locate sheet1. Here is what you get:
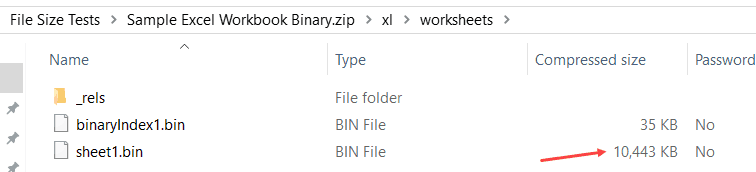
You’ll notice that both XLSX and XLSB saves the worksheet in a different format.
XLSX/XLSM saves it as an XML file and XLSB saves it as a binary (.bin) file.
And without getting too technical, XML files are large in size as compared to a binary file.
So when you save your Excel workbook in the XLSB format, the file size is reduced. In our above example, the size reduction was ~30%.
XLSB Vs XLSX/XLSM
When it comes to using the XLSB format, size reduction is a huge benefit. But you need to be a bit cautious when working with the XLSB format.
Advantages of XLSB format:
- It reduces the Excel file size. This can be helpful when you have large files and you want to share it over email. You can quickly reduce the size by saving it in XLSB.
- XLSB files tend to open and save faster than XML file. Based on the limited tests I did, XLSB files were opening and saving 25%-50% faster. This difference is noticeable in large Excel files only. With smaller files, both XLSB and XLSX are fast.
While XLSB looks great, there are a few reasons you should stick to using XLSX/XLSM files:
- With XLSB format, you have no way of knowing whether it has a macro or not. This makes it riskier as someone can use it to execute malicious code.
- XLSB files are encoded in proprietary bin file format while XML is an open-source readable file format. This means that if you’re using third-party tools with Excel, it’s better to use XML format.
- Power Query cannot read data from an XLSB file. So if you use Power Query, it’s better to have your data in XLSX/XLSM formats.
As a general rule, if your file size is small (less than 5 MB), it’s better to stick to XLSX/XLSM formats.
Based on what I heard from people and read on many forums, a lot of people prefer to use XLSB as the file format when it comes to using Excel.
Here is a good article on understanding the XLSB format.
Remove Unnecessary Formulas
Too many formulas will bloat your workbook file size.
So if you have a data set that you need, but don’t need the formulas in it, it’s better to convert these formulas into values.
Here are the steps to quickly convert formulas to values in Excel:
- Select the entire worksheet/dataset.
- Press the F5 key.
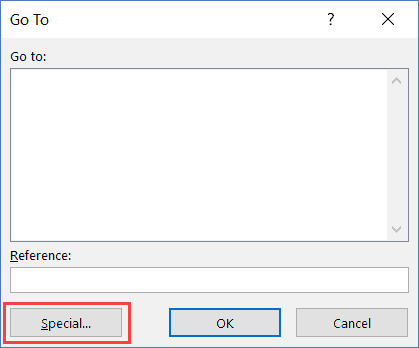
- In the Go To dialog box, click on ‘Special’.

- In the Go To Special dialog box, select Formulas.

- Click OK.
The above steps would select all the cells that have a formula in it.
Now use the below steps to convert these formulas into values:
- Copy the selected cells (control + C)
- Click the Home tab.

- In the Clipboard group, click on Paste.

- Click on Paste Value icon.

The above steps would convert all the cells with formulas into values.
Test Results
I created an Excel file with 2.7 million data points (1048576*26) and then added three columns with formulas (SUM, COUNT and AVERAGE).
Then I converted these formulas into values and saved the file with a different name.
Below is the result:

The file with no formulas is ~8% less in size (and note that I only had 3 columns of formulas).
In case you have a lot of formulas, it can add to the size.
NOTE: Volatile formulas can really bloat your file size. As a part of the test, when I replaced the SUM formula with a volatile formula (OFFSET), it lead to a jump in the file size (from 186 MB to 198 MB). So if you have volatile formulas that you can replace with non-volatile formulas, or can convert these into values, it will help you reduce the file size.
Compress Images (Before and After Uploading)
If you work with Excel files that have images in it, you need to optimize these images and make sure the size is less.
The problem with images is that as you compress these, there is also a reduction in quality, which you may not want.
When working with images, the best way to keep the size of your Excel file low is by compressing the images before you insert it into Excel.
A good online tool to do this is TinyPNG (or you can use Photoshop or any other similar tool).
It’s a free tool that can reduce the size of an image by up to 90% and still maintains decent image quality.
Below is the screenshot where I was able to compress an image with the size of 3.9 MB to 331 KB with minimal loss in quality.

Once you have uploaded these compressed images to Excel, you can further compress it using the inbuilt option in Excel.
Here are the steps to compress an image in Excel:
- Select the image that you want to compress.
- Click on the Picture Tools Format tab. This is a contextual tab that only appears when you click on a picture.

- In the Adjust group, click on ‘Compress Picture’ option.
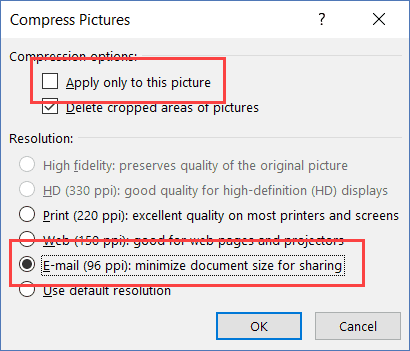
- In the Compress Pictures dialog box:
- Deselect ‘Apply only to this picture’ if you want to compress all the images in the workbook.
- Select Email (96 ppi) for maximum compression.

- Click OK.
- Save the file.


This will compress all the images and help you reduce the file size of your Excel workbook.
Test Results:
I used the compress imge option in Excel using one image.
Below are the results:

By using the compress image option, file size reduced from 445 KB to 43 KB (~90% reduction in file size).
This would depend on the image as well. An image that is already compressed may not lead to a huge size reduction.
Remove Pivot Cache to Save Space
If you work with Pivot tables and struggle with large Excel files, knowing about Pivot cache can be useful.
When you create a pivot table using a data set, Excel automatically creates the Pivot Cache.
Pivot cache is an object that holds a replica of the data source.
While you can’t see it, it is a part of the workbook and is connected to the Pivot Table. When you make any changes in the Pivot Table, it does not use the data source, rather it uses the Pivot Cache.
While you think that you are directly linked to the source data, in reality, you access the pivot cache (and not the source data) when you make changes in the pivot table.
Now since you’re creating a replica of the data set, it takes some space.
So as soon as you create a Pivot table, you will notice that the size of the Excel file increase.

In the above example, as soon as I add the Pivot table, the size of the file increases two-fold.
Now, there are two ways you can reduce the file size when working with Pivot tables.
- Keep the source data and delete the Pivot Cache
- Keep the Pivot Cache and delete the source data
Let’s look at both these techniques.
Keep the Source Data and Delete Pivot Cache
When you’re done with the Pivot table and are saving it, you can force Excel to only save the source data and the resulting Pivot Table, and not the Pivot Cache.
Doing this will make your Excel file lighter, and you have a way to recreate the Pivot cache when you need it the next time.
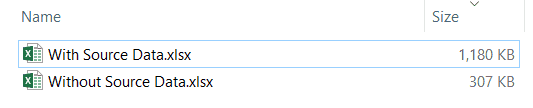
Below is the difference in size when you save an Excel file with and without Pivot Cache.

Here are the steps to NOT save the Pivot Cache:
- Select any cell in the Pivot Table.
- Click the Analyze tab.

- Click on Pivot Table ‘Options’ icon.

- In the Pivot Table Options dialog box, click on Data tab.

- In the Pivot Table Data options, uncheck ‘Save source data with file’. This option ensures that the Pivot Cache is not saved when you save the workbook (and helps in reducing Excel file size).

- Check the option – ‘Refresh data when opening the file’. This option ensures that soon as you open the workbook, the Pivot Table is refreshed and the Pivot Cache is automatically generated. If you don’t check this option, you’ll have to refresh the Pivot table manually to generate the Pivot Cache.
- Click OK.
Now when you save the file with the Pivot table, you’ll notice a reduced file size.
Keep the Pivot Cache and Delete the Source Data
Another way reduce Excel file size is to delete the source data of a Pivot Table and keep the Pivot Cache only.
This works as a Pivot Cache is a mirror image of your data and you don’t access the source data when making changes to the Pivot Table, instead, you use the Pivot Cache.
Below is are results when I saved the Excel file without the source data.
To do this, just delete the data (either by deleting the data or the worksheet that has the data).
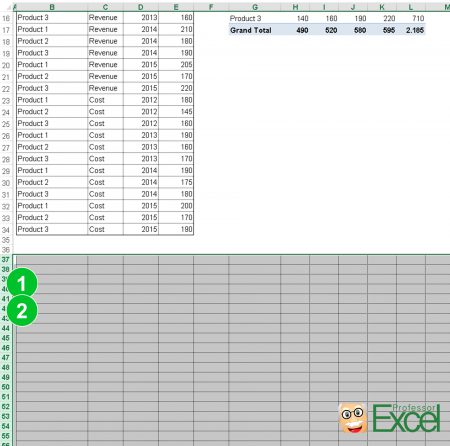
When you want to get the source data back, double-click on the ‘Grand Total’ cell of the Pivot table and it will instantly generate the entire data set in a new worksheet.
Compress the File (ZIP IT)
This is something you can do outside of the Excel application.
When you zip an Excel file, you’ll see a size reduction of about 10-15% immediately.
You can then share this zipped file to via email, and the person receiving this can unzip the file and use the Excel workbook.
Here are the steps to Zip an Excel file (for Windows):
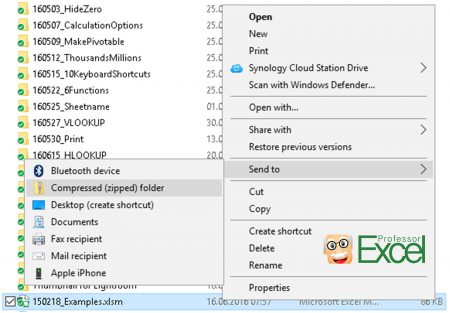
- Right-click on the Excel File
- Hover your cursor on the Send to option.
- Click on the ‘Compressed (zipped) folder’ option.

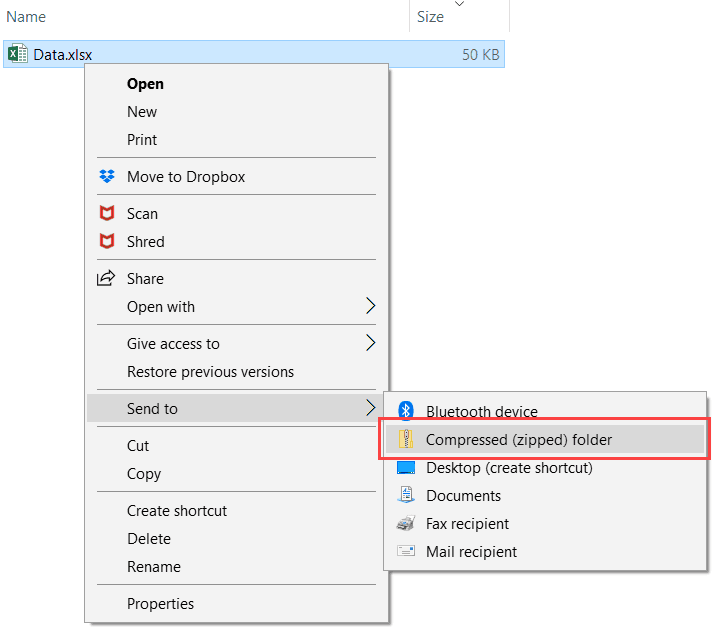
This will create a zipped file for the selected Excel workbook.
You’ll also notice a reduction in file size (as shown below).
Test Results
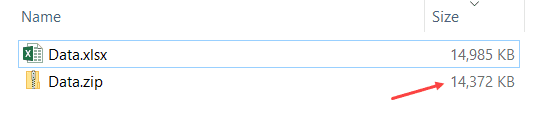
With this technique, I was able to reduce the file size of the Excel workbook by 8%.
This technique works better for files that are in the 20-50 MB range. As the file size increases, the percentage reduction is not very high.
Remove Data formatting
Data formatting such as applying a background color, or adding borders, or changing font style can all add to the file size.
Although, based on my tests, I noticed that it doesn’t have a huge impact.
Below are the sizes of two Excel workbooks, one with 2.6 million data points (in one worksheet), and the other with the same data but formatting applied to it (cell color, border, and italicized).
Test Results
You can see the difference between the two files is not that huge (although it does make an impact when you have a lot of data).
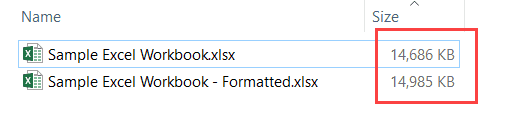
The file with data is 14.6 MB and the file with data and formatting is 14.9 MB.
So if you want to reduce the file size of your Excel workbook, you can look for formatting you don’t need. Removing it can save you some disk space.
Here are the steps to instantly remove all the formatting, while keeping the data intact:
- Select the entire dataset (from which you want to remove formatting).
- Click the Home tab.
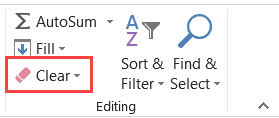
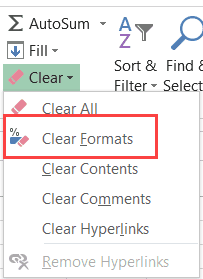
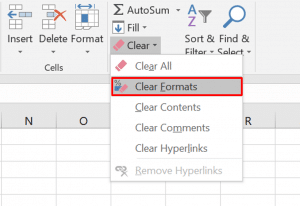
- In the Editing group, click on ‘Clear’.

- Click on ‘Clear Formats’.

- Save the workbook.
Remove Conditional formatting
Just like regular data formatting, conditional formatting also adds to the file size.
However, based on my tests, I noticed that the difference is less (unless you have multiple rules applied to multiple sheets with huge datasets).
Nevertheless, it’s a good idea to remove conditional formatting from any dataset where you don’t need it.
Apart from the size, there is another good reason to remove conditional formatting – SPEED.
Conditional formatting is volatile and whenever there is any change in the worksheet, it recalculates. This can lead to a slower workbook.
Test Results
I created a file with 27.2 million data points and applied 5 conditional formatting rules to it.
The difference in size seems to be only a few KBs.

Also Read: Tips to Make Slow Excel Spreadsheets Fast
Excel Performance Booster Tips
While the above methods will help you reduce Excel file size, here are some additional tips to improve the performance of Excel Workbooks:
- Avoid using volatile formulas. Apart from increasing the file size, volatile formulas also make you workbooks slow. Examples of volatile functions include RAND, TODAY, OFFSET, INDIRECT, etc.
- If you have a need to create summaries of a large dataset, instead of using formulas, see if you can use a Pivot Table instead. A Pivot table is fast and very intuitive as compared to formulas.
- If you extract data from multiple sources or combine data from multiple files, use Power Query to get and transform the data. You can save the data as a Power Query connection instead of keeping it in the worksheet. You can easily create Pivot Table using the connections created using Power Query.
- Convert your tabular data into an Excel table and use the Excel table in formulas. It makes your workbook perform faster and formulas created using Excel Table structured references are easier to manage (as these are more intuitive).
- Avoid referencing entire row or column in a formula. This will help your formulas be more efficient.
- If you have a lot of formulas in your workbook, turn off Automatic calculation and switch to manual calculation. By doing this, every time there is a change in the worksheets, the formulas wouldn’t recalculate. You can make this change by going to the Formula tab and changing the ‘Calculation Options’.
Hope you find the method and tips in this tutorial useful.
What else I could add to this tutorial to make it more useful? Please let me know in the comments section.
You May Also Like the Following Excel Tutorials:
- How to Recover Unsaved Excel Files.
- 100+ Excel Interview Questions.
- Best Excel Books (to Level up your Excel Skills).
- 200+ Excel Keyboard Shortcuts.
- 10 Ways to Clean Data in Excel.
- How to Turn On AutoSave in Excel

In this post I will explain various ways to reduce Excel file size. Large Excel files slow down your system, increase the likelihood of the file crashing as well as obviously use more drive space.![]()
Microsoft Excel was designed to be a tool for managing relatively small datasets for Finance & Accounting purposes, today we see that Excel is used often for large data analysis, prototyping of complex solutions (built often with VBA Marcos). You probably wondered here struggling with bloated Excel file, frustrated with having to wait for calculations to complete or constantly crashing Excel file.
Reduce Excel file size… or change the tool
Before we start working to reduce the Excel this is a good moment to ask yourself the question…
Is Excel the right tool for the job?
If you are convinced so proceed further, otherwise consider that Microsoft Excel has built several tools dedicated to managing with challenges that appear when working with larger data sets:
- PowerQuery – this Microsoft AddIn for Excel was created specifically for pulling and running queries on large datasets in Excel. You can easily merge worksheets, csv files or run complex relationship queries across your worksheets
- PowerBI – Microsoft PowerBI is a free application you can download from the Microsoft Store that allows you to create custom dashboards, run complex analytics… and easily publish your dashboards and reports online
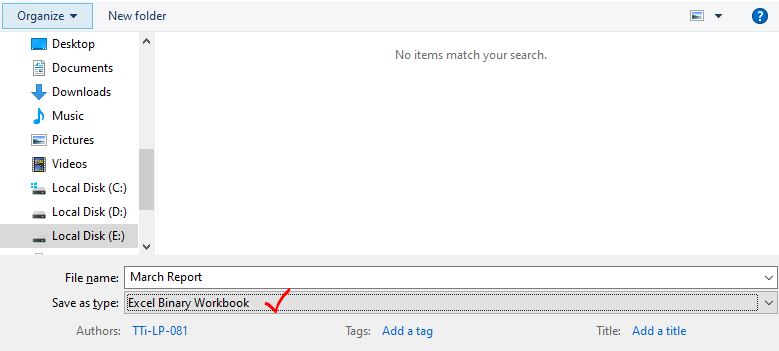
Save file as Binary (XLSB)

Saving a file in XLSB from my experience often resulted in reducing file size even by 70%. If you don’t know the difference between a XLSX (OpenXML format) and XLSX (Binary Excel format) file format I encourage you read my post on XLSB.
Since Excel 2007 Microsoft was pressured to open up the Excel format so other applications could use it. This meant moving away from the binary file format which was storage friendly and would open efficiently, to the more heavy file format (XMLs files compressed to a ZIP file). In effect the XSLX file format will always be larger than the XLSB.
To save a file in binary format go to FILE click on Save As and select Excel Binary Workbook (*.xlsb) as shown below.
Remove Used Cell Range
A troublesome thing that can increase your Excel file size is Used Range. Imagine the worksheet below. Let us assume at some point I added some data into cell G16, and afterwards I deleted it. Although de facto I am only now using A1:C4, de jure Excel will keep in memory the entire range of A1:G12 expanding the file size.
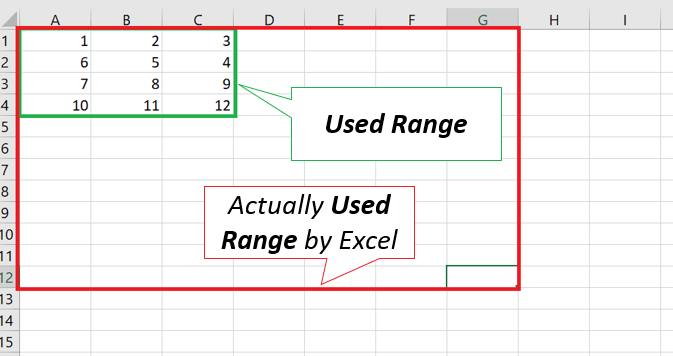
How to check your Excel Used Range? Use the CTRL+END key combo. You will be moved to the last cell in your Worksheets Used Range
Removing Unused Ranged
So what to do to reduce your Used Range only to the actual range you are using? Follow the steps below:
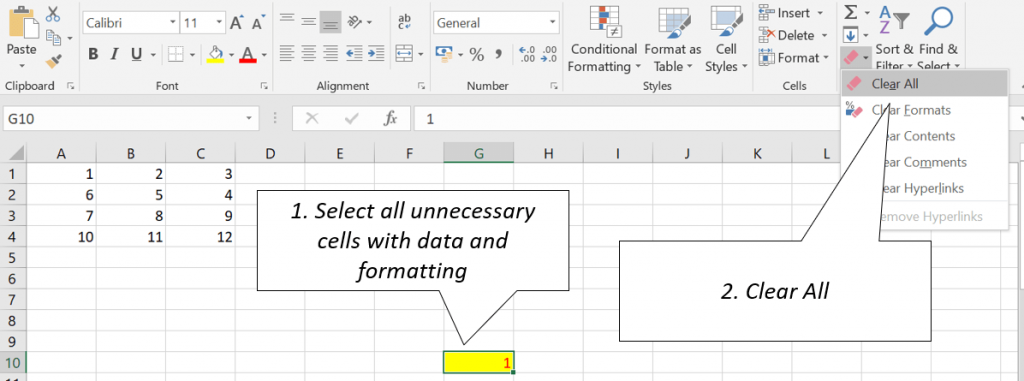
Remove data and formatting from unused cells
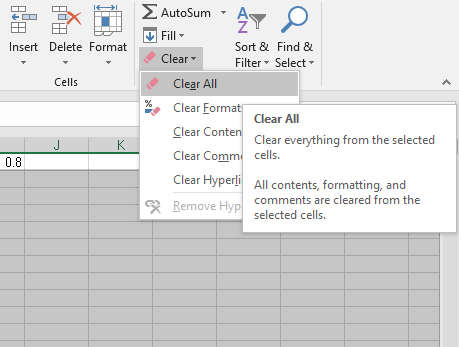
Select all unneccesary cells that contain data or formatting and go to Home->Editing->Clear and select Clear All:
Reset Worksheet Used Range
Now we need to update the Used Range property in your Worksheet. Go to the Developer Tab and open the VBE. Next add the following VBA Macro to any VBA Module.
Sub ReduceRangeActiveWorksheet()
     Debug.Print ActiveSheet.UsedRange.Rows.Count
End Sub
Next run the Macro (or use the F5 shortcut). The Used Range should be now updated.
Remove Hidden / Unused Worksheets
Another reason for large file size is having many unused or hidden worksheets in your Workbook. Each Excel Worksheet has it’s own share of metadata, more importantly, however, you may be keeping sheets with similar datasets, copies or unnecessary Pivot Tables that also take up a lot of space. Follow steps below to show and delete unnecessary hidden worksheets.
Unhide hidden worksheets
To unhide hidden worksheets right-click on a Worksheet and select Unhide: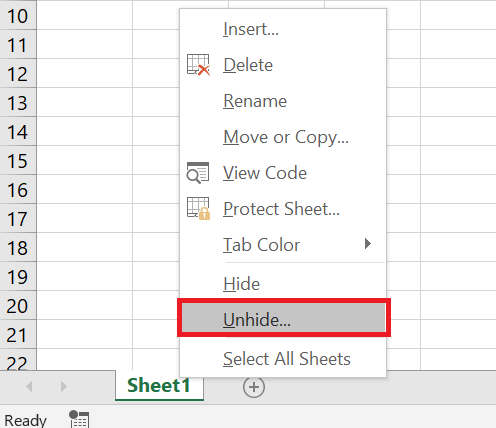
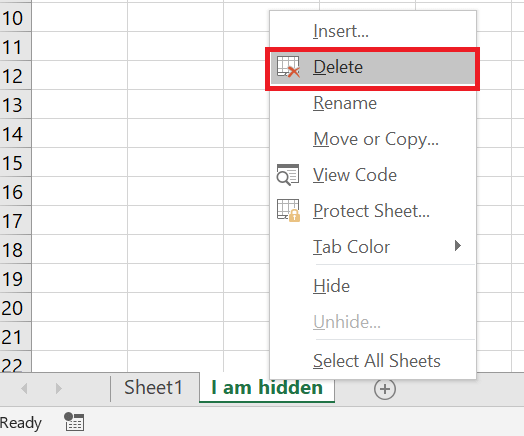
Delete unused Worksheets
To delete an unused Worksheet right-click and select Delete:
Remove Formatting
Formatting adds additional kilobytes to your Excel file size. A good approach is to remove any formatting from cells that don’t need formatting.
To remove cell formatting you can read this MSDN article or follow below:
Select Cells and click Clear Formats
Select Cells for which you want to remove formats. Look for the Editing section in the Home ribbon and select Clear Formats:
Compress Images
Another reason for Excel to have an unreasonable file size is due to media, especially Images. Although you may think cropping and Image and resizing reduce its size, in fact Excel still keeps the entire image in memory. Hence the only way to free Image memory is to Compress Pictures.
Crop and Compress Images in Excel
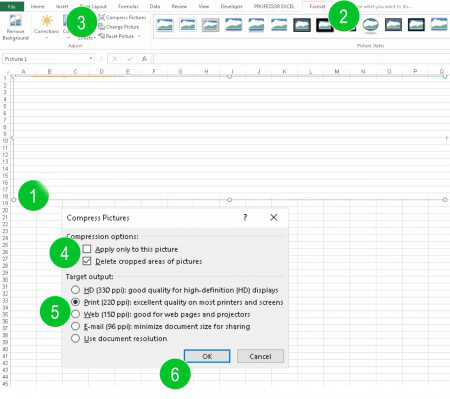
To Compress your Images click on your Image(s) in Excel and go to Format->Adjust->Compress Pictures. Next select your preffered options. Select Delete cropped Areas of pictures to remove the unseen cropped areas of your images as well as the preffered resolution (the lower the more pixelated the image will seem):

Other options
Other honorable mentions to reduce your Excel file size may be:
- Remove unused Pivot Tables
- Remove Pivot Cache
- Replace Formulas with Data (Copy Paste as Data)
Feel free to comment below and add your ideas!

By Edouard Ouaknine, 17/02/2022,
5 min
Want to know how to reduce your Excel file size?
We all have an Excel file that’s too large. The kind that takes minutes to open or save, so everything takes twice as long.

Florence, Senior Consultant at UpSlide, has a few easy hacks up her sleeve that will help you reduce your Excel file size within seconds.
Discover seven easy ways to compress Excel files in the article below.
How to audit a large Excel file
Before we show you how to reduce your Excel file size, we’d first like to share a quick tip on auditing an Excel workbook.
For finance professionals working in Transactional Services or Investment Banking, building models with tons of formulas, tables and sheets is the norm. However, the more comments, formulas, conditional formatting and hidden sheets you add, the heavier the Excel file gets.
You can easily discover which sheets are the heaviest in your Excel file. To do so, make a copy of your Excel file and follow these steps:
- Open the File Explorer where your Excel is saved
- Display file name extensions in the “View” tab
- Change your Excel file copy’s extension to “.zip”
- Then open the zipped folder and go to xl > worksheets
- Sort by size


Spotting the heaviest Excel sheets can help you choose which one to start with. For instance, “sheet26.xml” accounts for almost one-third of the global volume. Usually, it corresponds to the n+1 sheet in your Excel file. So, in the above example, we could start by trimming the twenty-seventh sheet.
Be careful! The n+1 rule takes into account hidden sheets. If you have a lot of hidden sheets, it can become tricky to find the right one. One way to know for certain you have the right sheet is to get the exact name. Here is the detailed guide for finding a sheet’s name.
Now, it’s time to dive into our seven tips for reducing an Excel file size:
Tip #1: Remove conditional formatting
Conditional formatting comes in handy when you need to highlight specific data. But it can quickly make your Excel file heavy. We suggest removing conditional formatting from your spreadsheet as soon as you are done with it. To do so, you must:
- Select some formatted cells on your sheet
- Go to the Home tab > Conditional formatting > Clear Rules > Clear from Selected Cells

If you want to remove conditional formatting from all of your cells, pick Clear Rules from Entire Sheet.
Tip #2: Crop each worksheet to its used range
Did you know that Excel sheets can have up to one million rows? A good way to reduce your Excel file size is to get rid of the empty rows and columns. Here’s how to do that:
- Select all unused rows and columns (Shortcut = Ctrl+Shift+Right/Down Arrow)
- Right-click > Delete

Tip #3: Remove unnecessary formulas
We all use Excel formulas to manipulate and combine data dynamically. But we often forget to remove them when they’re no longer needed.
Be sure to replace your formulas with their values to downsize your file and keep a record of your data. Here’s a quick way to do it:
- Select the cells you are working with (you can use the shortcut Ctrl+A to select your entire sheet)
- Copy and Paste Special: Values

This will also remove hyperlinks, which make your file heavy.
Discover 16 basic Excel tips
Tip #4: Compress pictures in Excel
The golden rule is to avoid having pictures in Excel. If you have to use pictures, it’s best practice to always compress them. Here’s how:
- Select the picture you wish to lighten
- Go to the Picture Format tab
- Click on Compress
- We recommend unchecking the first box Apply only on this picture to compress all pictures inside your Excel file
- Optional: you can choose the resolution you want (we recommend email).

Tip #5: Clear data formatting
Formatting enables the eye to naturally structure information. However, formatting your data also weighs your sheets down. If you’re running into difficulties loading a file, we recommend removing your formatting. Follow these few easy steps:
- Select all formatted rows, columns and cells that do not contain data
- Home > Editing > Clear Format
Want to learn the Top 6 Excel financial functions?
Tip #6: Delete watches
People who work on large files with many sheets and formulas know what watches are (not the one on your wrist!) Numerous watches will weigh down your spreadsheets. Once you’re done with them, a good practice is to remove them from your files:
- Go to Formula tab > Watch Window
- Select all and click Delete

Tip #7: Eliminate hidden data (sheets, rows and columns)
IMPORTANT: We recommend you apply this step last, as it can break formulas and cannot be reversed! Make a copy beforehand.
Let’s start with sheets!
- Right-click on a sheet
- Select Unhide
- Repeat the previous steps for every sheet
Now let’s do the same with columns and rows:
- Select your entire sheet (Ctrl+A)
- Right-click on your rows/columns
- Click Unhide

Now that you can see your entire Excel file, you can delete all unnecessary sheets, columns and rows. Moreover, you can easily audit your Excel file to spot heavy sheets with the method we used at the beginning of the article.
✨BONUS TIP: Reduce your Excel file size in one click
At UpSlide, we like to work on light files. That is why we created a feature that does the work for you: Smart Clean! It applies all the above tips in the blink of an eye. A single click on the UpSlide tab in Excel and your file will be as light as a feather.
This feature can reduce your Excel file size up to 99% of its initial weight!

Want to find out more about UpSlide’s features and how we help you save time on Microsoft Office?
Summary:
Today through this post you will get to know what’s the reason for your oversized Excel file. or what’s making your Excel file size too large. Moreover, the blog also emphasizes on how to reduce Excel File Size without deleting data.
There are many causes that can help an Excel file to become huge, sometimes Excel spreadsheet becomes so huge while it actually containing very little information.
A large-sized Excel workbook may generate lots of issues while dealing with the file, such as file will respond very slow, take more time to save any changes, take time to upload, and more.
What’s Making Your Excel File Size Too Big?
The main question is “What part of an Excel file causes the big file size. If you don’t know what’s making your Excel file size too big then keep reading the following facts and you will surely get the answer to your query.
Huge information: Generally a worksheet having more than 100,000 rows and many columns demands a large memory to store.
Pivot Tables: Yes, the Pivot table may also affect the file size. Pivot Tables store the original data hence in each of the Pivot Table have its own data set.
Add-ons and plugins: Some plug-ins significantly drop down your Excel workbook performance. If you are running or installing several plug-ins in your Excel workbook then stop doing that.
Formatting: In case the sheets are formatted though cell ranges aren’t in use then the file size might increase.
Hyperlinks: Sometimes excessive external sources links cause frequent crashing of your Excel application.so find out whether your Excel file is getting crashed or other files linked to it causing such a problem.
Media files: If your Excel file containing images/pictures/logo then it can turn your small excel file into a big one.
Compatibility issues: Some attributes of Excel won’t work well on all Excel versions. The chances are high that your excel file is undergoing some compatibility issues. So you need to fix it first.
Sometimes Excel file’s Meta-data and other hidden contents may also boost the file size.
So, there are several causes of a big MS Excel file size hence we have to apply different tricks to reduce it. The solution may depend on the contents of the Excel workbook if you are not sure that which one is affecting your excel file then you should apply them one by one.
Let’s start applying the below-given tricks one by one to convert a large Excel file into a compatible size by reducing Excel file size.
Method 1# Remove Cell Formatting
While creating an Excel file we apply several formatting over the spreadsheet, hence deleting formatting will help you to reduce size of Excel file and boost the spreadsheet performance.
Steps to clear the Excel formatting
Step 1: First, choose the range over which you want to clear the formatting.
Step 2: Then go through the: Home Tab > Editing Group > Clear > Clear Formats
If the excel spreadsheet containing lots of text then it is the best option.
Method 2# Reduce The Size Of The Image File Added In Microsoft Excel
Steps to compress or change the resolution of the image. Compressing doesn’t affect the quality of your excel file. If you don’t want every single pixel in a picture then you can go with the compress option and make the file size smaller.
- Open your excel file that contains an image or logo and then choose the picture or pictures for compressing.
- Now, go to the Picture Tools -> Format tab, and in the Adjust group how to reduce Excel file size you have to click on the Compress Pictures.
Note: If you are unable to see the Picture Tools – Format tab then confirms that you have selected a picture. Double-click on the image to choose it and open the Format tab.
- If you only seeing the Adjust group then the Compress Pictures button may appear without a label.
- In order to decrease the size of a specific image and leave all of the other images present in the document, mark the Apply only to this picture check box.
- If you unmark the Apply only to this picture checkbox then it will override any previous modifications you have done for other images present in this document.
- Now, go to the Resolution and then select the resolution that you want and click OK.

Method 3# Convert File type to Binary Format (XLSB)
By converting an excel file to the binary format can reduce size of Excel file with ease. So, follow the given steps and save an Excel file in the XLSB format to decrease the file size.
1: Click on the File tab and then go to the Save As option.
2: Now, click on the Browse button to change the file type.
3: From the Save As dialog box, you need to pick the Excel Binary Workbook (.xlsb) file type. Click Save.
Method 4# Remove Unnecessary Formulas
Having lots of complicated formulas can affect the file size of an Excel file, so in this method, we will try to remove unwanted formulas from an excel workbook.
Sometimes when you have a data set and don’t need the formulas in it then it is better to replace these formulas into values. Follow the below-given steps to do this:
- Open the Excel file and press the ctrl + A keys to select the entire worksheet/dataset then press the F5 key.
- Open the Go To option and click on the ‘Special’.
- Select the Formulas and then click OK.
- Now, you have selected all the cells that have a formula.
- After it, follow the below steps to convert the selected formulas into values:
- Press the ctrl + C to copy the selected cells.
- Then click on the Home tab, and from the Clipboard group, click on the Paste.
- After that click on the Paste Value icon.
So, all the cells with formulas now get converted into the values.
Method 5# Optimize The Used Formulas
After removing the unwanted formulas, now we will optimize the used formulas by using the following steps:
Skip using a volatile or unstable function such as –
TODAY, NOW, INDIRECT, RAND, RANDBETWEEN, CELL, OFFSET, INFO.
You need to replace the VLOOKUP, HLOOKUP and LOOKUP function with INDEX & MATCH
You should also replace the nested IF functions with any of the below given:
REPT, INDEX & MATCH, SUMIF(s) or Boolean logic
Method 6# Compress The File (ZIP IT)
This method is a little different, using the zip file option you can compress the excel file with ease. By compressing an Excel file, you can reduce file size of about 10-15%.
Steps to Zip an Excel file:
Step 1: First you have to right-click on the Excel File that you want to zip
Step 2: Now, take your mouse cursor to the Send to option and click on the ‘Compressed (zipped) folder’ option.
That’s it, after creating a zipped file share it with others and the receiver will unzip the file to access the Excel file.
Method 7# Delete The Unused Cells
In order to delete the visible unused table, columns and formatted cells follow the below-given step.
- First, you have to select all the rows to present below your last row having content.
- Then Press Ctrl + ‘–’ from the keyboard to delete the rows.

- After it, click on the rubber button present at the right-hand side of the Home ribbon.
- And then click on ‘Clear All’.

- You have to repeat the above steps on every worksheet as well as for the columns.
- At last, save the workbook and check that the file size is reduced or not
Method 8# Reduce Condition Formatting From Excel File
- To do this, you have to choose the entire worksheet by pressing the Ctrl + A keys from the keyword.
- Now, go to the Home / Conditional Formatting / Manage Roles

- At last, select the irrelevant roles and erase the Rule.

Method 9# How To Reduce Excel File Size Without Opening
In this method, you will get to know how to reduce Excel file size without opening. This method is different from the zip compressing,
This trick is not present on Microsoft Excel but this option is present on every Windows system to compact the size of various files that include Microsoft Excel.
- In order to compact your Excel file, you have to find your excel file using Windows Explorer and then right-click on the file.
- Choose Properties from the context menu and then select the Advanced Button
- At last, choose the “compress contents to save disk space…”


Method 10# Reduce The Size Of Pivot Tables
As we have already discussed that the Pivot Tables consume a lot of memory and may increase the file size. So, we will try to reduce the size of the pivot tables.
There are mainly 3 options to reduce the Size of Pivot Tables:
Option 1: Sometimes, Pivot Tables are created to check data or seeing an overview. If you don’t need these Pivot Tables in your workbook, then remove the unused pivot table.
Option 2: Instead of creating several Pivot Tables having the same source code you should copy and use them where you need. Through this, you can share the same data cache.
Option 3: Avoid saving the source data of the Pivot Table with the file. To do this, right-click on the Pivot Table and then go to the Pivot Table Options. Now, from the data tab unmark the tick from ‘Save source data with file’.
Method 11# Check And Delete Unnecessary Hidden Cells
Hidden cells may also add some extra burden to your Excel file. Unwanted hidden cells can boost the size of the Excel file. Microsoft cells get hidden accidentally while working on the rows or columns of the Excel worksheet.
If you find out that your file contains unwanted hidden elements then you need to unhide the rows and columns of your Excel worksheet and analyze you need them or not. Delete unwanted hidden cells to reduce Excel file size.
What Is The Maximum Excel File Size?
If you never want to face this oversized excel file issue again in the future then it’s important to have the right knowledge of maximum Excel file size limit.
To know this, you must read this informative post specifically written on Excel specifications and limits.
At last, I also want to conclude that make a proper backup of your Excel data first before performing any of these methods to reduce Excel file size.
So that if in case the, fixes you have applied haven’t worked then at least you have the option to revert back your original data.
Conclusion:
All the above-given methods are very effective and will help you to reduce size of Excel file.
So, it is hoped that after applying all the above discussed 11 methods to reduce Excel file size you can easily troubleshoot Excel “Maximum Memory or File Size Exceeded” error. If you have any queries or suggestions about this article or suffering from any other kind of issue while using the Microsoft Excel file then share your issue in the comment section of this blog.


Priyanka is an entrepreneur & content marketing expert. She writes tech blogs and has expertise in MS Office, Excel, and other tech subjects. Her distinctive art of presenting tech information in the easy-to-understand language is very impressive. When not writing, she loves unplanned travels.
- Remove From My Forums
-
Вопрос
-
I have an user that have excel files that are 6 to 9 MB on a shared drive. When the user try to open on the files, the get the circling cursor for a hour then it says not responding. I have tried to the user open the file in safe mode, no joy same error.
I had the user to copy a file to the desktop and same result. I also uninstall and reinstall and the same error. The user is using Excel 2016. Okay the good news is that the user can open any files that are 10KB or 1MB. So my question is there size limit on
Excel. My user is using windows 7.
Posted on: 07/13/2021

Sometimes working in Excel, moving data around, creating worksheets and removing, copy pasting, all that work can lead to huge file sizes, without realizing. I’ve had a situation like this recently, with an Excel spreadsheet that didn’t have a lot of data, but the file size on disk was more than 15 times larger than it should have been.
Reducing the file size of your Excel worksheets is easy, all you have to do is identify what is causing the problem. Sometimes you work on an Excel file with one or more Worksheets and when you save, you notice the saving is slower, takes longer to move around or open the right-click menus, etc. All these are symptoms that the file has a size problem — in-memory or on disk.
Let’s have a look at how you can check the size of your Excel workbook, how to inspect the worksheets to figure out which worksheet is too large or is causing the size issue, then look at a few cool keyboard shortcuts to help you move around and diagnose the problem and make your excel spreadsheet smaller. Finally, with a few keystrokes, I show you how you can clear the problem, reduce your excel file size and delete unnecessary or blank rows and columns in your Excel workbook so that it is optimized.
How to check the file size of your Excel spreadsheet?
With your spreadsheet open, go to File > Info, and on the right-side you should see the size on disk of your workbook:
Check your Excel file size easily, from Excel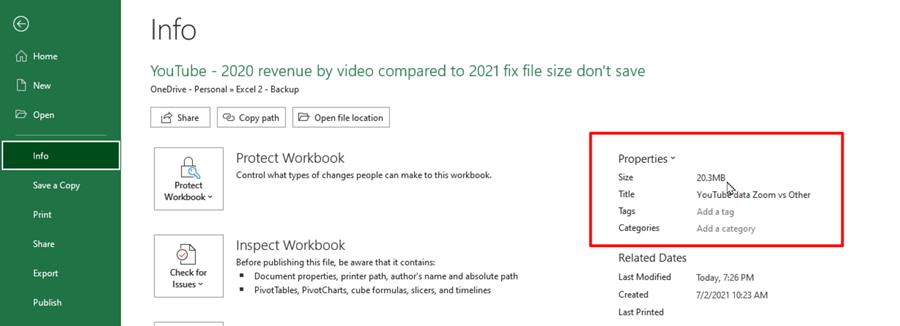
To further investigate the problem and see some data about your entire workbook, you can go to the Workbook statistics in the Review tab in Excel, and look at the workbook statistics. This should show you what’s going on in your current worksheet as well as how many cells with data are in your workbook, how many worksheets you have and other useful info:
Workbook Statistics shows useful info about your Excel workbook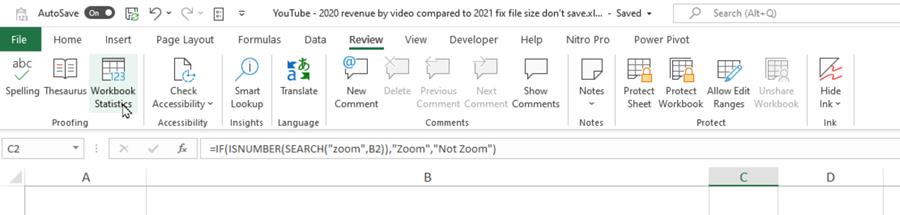
Start cleaning up your Excel file
The first thing I would do is check which worksheets I don’t need and delete them. Whether they are blank or you think they are blank, if you don’t need them, remove them.
Then save your document again and once the Excel file has saved, check the size again in File > Info, as described above. Maybe the file size went down. If not, keep reading…
Useful keyboard shortcuts to find problem areas in Excel
If removing unnecessary worksheets doesn’t help, here are a few keyboard shortcuts to help you move around your worksheet faster and see what the problem is:
| CTRL + HOME | This shortcuts takes you to the first cell in your worksheet. Or the top-left cell in case you have some frozen panes at the top, like headers. This shows where your data range STARTS in your current Excel worksheet. |
| CTRL + END | This should take you to the bottom of the worksheet. This helps to see if your worksheet ends where the data ends or if you have invisible data or cells that Excel thinks have data in them. |
In my example problem file, the CTRL + END shortcut took me all the way to more than 1 million rows (I don’t have that much data!):
Empty cells that Excel thinks are filled with data can be the cause of an over-inflated file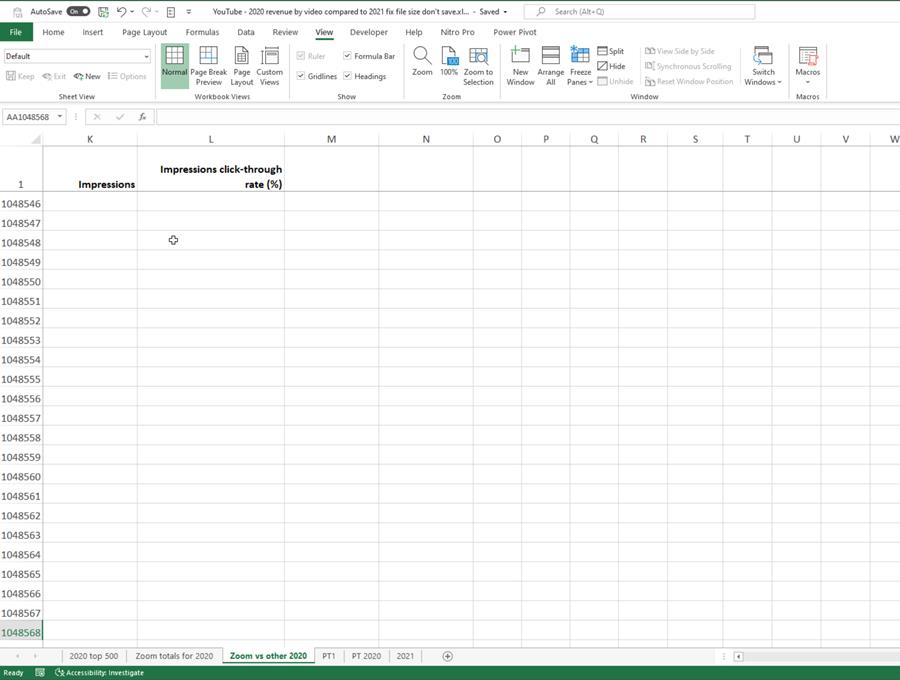
This is what makes the file so large: Excel is picking up a lot of empty cells and thinks there’s data in them, which then it tries to save into the XLSX file on disk, and because it needs to keep references to all those hundreds or thousands of cells, the file size gets overblown.
So we’ve identified the problem, but how can we optimize the Excel file?
I have two more shortcut combinations for you, and this time, these will show you where the data in your Excel spreadsheet ACTUALLY ends:
| CTRL + DOWN ARROW | Go to the last row that has data in it. |
| CTRL + RIGHT ARROW | Go to the last column with data in it. |
So these keyboard shortcuts help identify the extent of your data and not what Excel thinks is data.
To remove all empty cells, follow these steps:
- Go to the column next to the last one with data in it, in my example it’s column M, and select that column.
- Press CTRL + SHIFT + RIGHT ARROW key to select all the columns after this one, up to the end of the empty columns
- Then press right-click and select Delete.
Select the first column without data at the end of your data range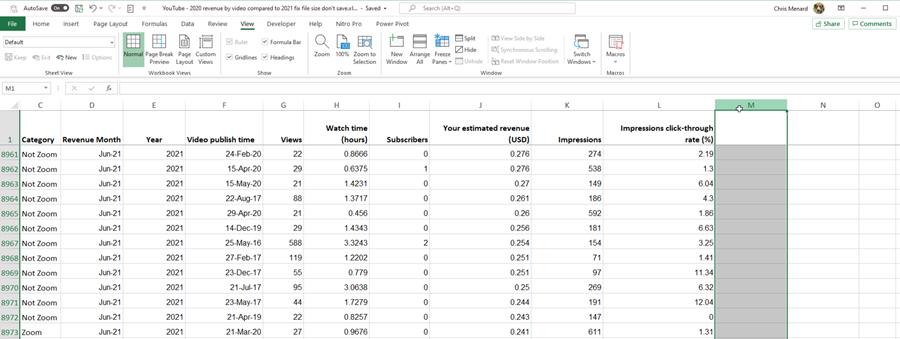
This should have removed all the ‘data’ in those empty columns.
Now repeat the same procedure for the rows with no data:
- Use the shortcut CTRL + DOWN ARROW to find the last row with data in it
- Select the row immediately AFTER that row
- Press CTRL + SHIFT + DOWN ARROW to select all the empty cells up to the end of the sheet
- Right-click and select Delete on these cells to remove them (this might take a while, for me on a powerful computer it took a while because I had more than 1 million rows!)
This should take care of it.
Start a selection after the data rows end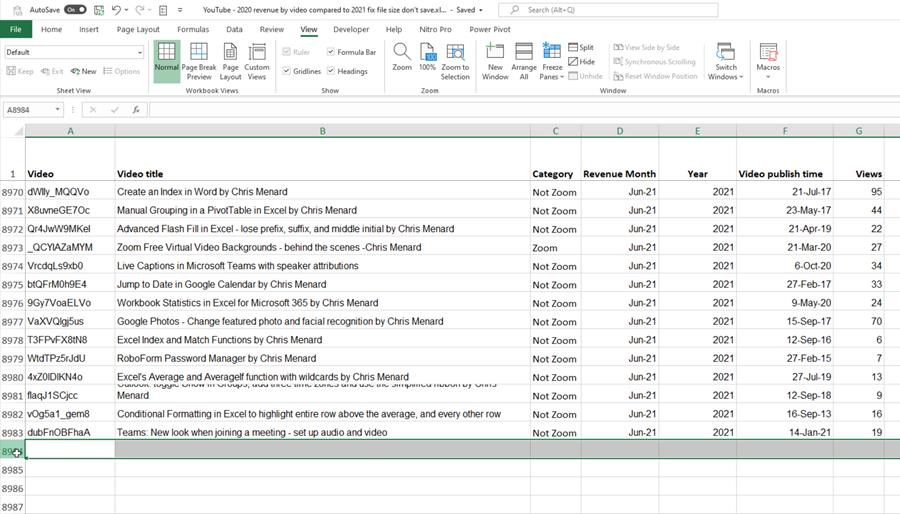
Check if the file has shrunk
After the procedures above, save your file again. This time the file size should have gone way down, if all the empty cells have been removed.
If the file size doesn’t reduce as much as you think it should, make sure you don’t have other worksheets in the same situation and repeat the steps above on those ones too.
If this was useful, let me know and check out my YouTube channel for more Excel tutorials!
Related articles

Chris Menard
Chris Menard is a Microsoft Certified Trainer (MCT) and is employed full-time as a Trainer for BakerHostetler, one of the nation’s largest law firms. Menard has a YouTube channel with over 900 technology videos covering Excel, Word, Zoom, Teams, Outlook, Gmail, Google Calendar, and other resources that over 15 million viewers have appreciated. Menard also does public speaking at conferences for CPAs and Administrative Professionals. Connect with Chris on LinkedIn at chrismenardtraining.com/linked or on YouTube at chrismenardtraining.com/youtube
Categories
-
Blog
»
Microsoft
»
Microsoft Excel
»
Basic
Excel workbooks usually have an acceptable file size. But sometimes, they are unreasonably large. There are several reasons for a big file size coming with different way of how to reduce it. Depending on the content of your Excel workbook some methods will work better than others. So, let’s try them one by one.
Preparations: Check which worksheet causes the large file size
The important question: What part of your Excel workbook causes the large file size. Basically, there are several options:
- Large data, usually worksheets with more than 100,000 rows and/or many columns.
- Pictures: Do you have any images in your file?
- Pivot Tables: Pivot Tables store the underlying data so (depending on the number of Pivot Tables) in worst case, each Pivot Table contains the data set.
- Formatting: If sheets are formatted although cell ranges aren’t used, the file size might increase.
- Others: Meta-data, other invisible contents.
For each of these types, the approach of reducing the file size is different. So how do you find out, which type(s) might be the case for you?
Either, you just go ahead and try the following methods. Or – and that’s the recommended way – you do it more systematically. We recommend you to check the file size of each worksheet. Then you just start with the largest worksheet and depending on the type, you just do the specific methods.
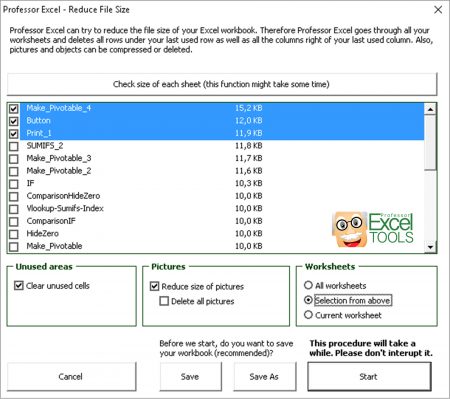
How do you get to know the file size of each worksheet? There is no simple built-in way in Excel. But our Excel add-in helps (7-day free trial without sign-up): Just press the “Reduce File Size” button and then click on “Check size of each worksheet”.

This function is included in our Excel Add-In ‘Professor Excel Tools’
(No sign-up, download starts directly)
Method 1: Reduce the size of pictures

One common reason for large Excel files are pictures within the workbook. Fortunately Excel offers a function for compressing images: The resolution will be decreased and the invisible areas can be removed. Just follow these steps (the numbers are corresponding to the picture on the right hand side):
- Select one image in your workbook.
- Activate the Format ribbon which is now available (Mac: ‘Picture Format’).
- Click on ‘Compress Pictures’ so that a new window opens for defining the compression settings.
- If you want to compress all pictures in your current workbook remove the first tick. Excel can also delete the cropped areas of pictures if you’ve used the cropping tool.
- Select the resolution. Maybe you try the highest resolution first and go down step by step. Monitor the impact on the file size by saving the workbook after each compression.
- Click OK to confirm.
This method could reduce the file size – depending on your images – by app. 22% as for a test workbook.
Method 2: Remove the formatting from unused cell ranges
When you apply a cell format to whole rows or columns, Excel often needs a lot of disk space. You can try to delete all the unused areas below and on the right hand side of your data:
- For rows: Select all rows below your last row with content.
- Press Ctrl + ‘–’ on the keyboard for deleting the rows. Sometimes, this doesn’t remove the formatting. For making sure that the formatting is really deleted continue with step 3 and 4.
- Click on the rubber button on the right hand side of the Home ribbon.
- Click on ‘Clear All’.
Repeat these steps on every worksheet, also for the columns. Save the workbook afterwards for checking, if the file size is reduced.
This method could reduce the file size – depending on your formatting and style – by max. 94%.
Method 3: Zip or split the workbook
3a) Zip your workbook
If your Excel workbook contains large amounts of data, zipping the whole file after you are done editing often helps a lot. Basically, Excel files are zip files already (you can try it by just replacing .xlsx by .zip), but surprisingly, zipping the files again helps.
- On a Windows computer: Right click on the file in the Windows Explorer. Click on ‘Send to’ and then on ‘Compressed (zipped) folder’.
- On a Mac: Search for the file in the finder, right click on it and click on ‘Compress [filename]’.
This method could reduce the file size – again depending on your file – by app. 15%.
3b) Split the workbook
Depending on how urgent you need to reduce the file size of your workbook you might consider splitting the file: Divide the workbook into two or more files, for example the first workbook for all the inputs and one sheet for consolidating the inputs. The second workbook has the actual calculations based on just the consolidation sheet from workbook 1.
Do you want to boost your productivity in Excel?
Get the Professor Excel ribbon!

Add more than 120 great features to Excel!
Method 4: Reduce the size of Pivot Tables
Pivot Tables sometimes consume a lot of space: They use a cache in which the data is stored. There are basically three options to reduce the size of Pivot Tables:
- In many cases, Pivot Tables are created for quickly checking data or gaining an overview. Do you still need all the Pivot Tables in your workbook? If no, remove some and check the impact on the file size.
- When creating several Pivot Tables with exactly the same source data, don’t create them from the scratch but rather copy them. That way you can make sure that the data cache is shared.
- Try this option: Don’t save the source data with the file. Right click on the Pivot Table and then click on Pivot Table Options. On the data tab remove the tick from ‘Save source data with file’.
Two PivotTables with the same shared cache use app. 13% less space than two PivotTables with separate caches.
Method 5: Remove unused content
This is the most obvious step so you’ve probably considered it already: Do you have any unused contents which you can delete? Are there hidden sheets which are not needed any more? If there is anything you don’t need any longer (if you are not sure, save a backup copy of the file), please go forward and remove the sheets or cell ranges.
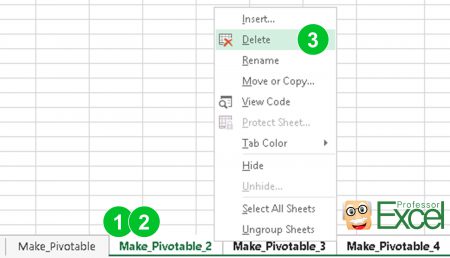
In case of worksheets, follow these steps:
- Select the worksheets you don’t necessarily need any longer by holding the Ctrl key
 and clicking on each sheet.
 - Right click on any of them.
- Click on Delete.
Method 6: Reduce the file size with Professor Excel Tools
Probably the most comfortable way of reducing the file size of your Excel workbook is with the Excel add-in ‘Professor Excel Tools‘. It provides the following functionalities:
- Create a list of all worksheets and their size.
- Delete all the unused areas.
- Compress or remove the pictures from the workbook.
Please use the free trial version for checking if it works for you (download button below).
This function is included in our Excel Add-In ‘Professor Excel Tools’
(No sign-up, download starts directly)
Method 7: Use the XLSB file format
This is one of the easiest methods of reducing the file size and at the same time the opening time of Excel workbooks: Save your Excel file in the XLSB file format. Besides these two obvious advantages, the XLSB format has some (usually minor) disadvantages though: The main disadvantage of XLSB files is that they can contain VBA macros (for more information please refer to this article: XLSX, XLSM or XLSB: Which File Type Is the Best for You?)
Changing the file format of your Excel file is very simple:
- Click on “File” next to the “Home” ribbon.
- Click on “Save As” on the left side.
- On the bottom of the “Save As” window change the drop-down field “Save as type” from XLSX to XSLB.
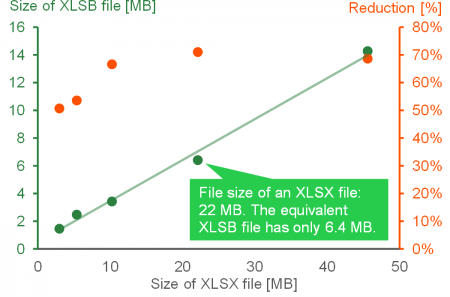
The effect: You can easily reduce the file size by 70%. A quick test with a file containing mostly formulas and hard values showed a reduction of the file size between 60% and 70%. As you can see in the figure on the right side, it’s especially worth changing the file format for XLSX files larger than 10 MB. On the horizontal x-axis, you have the file size of a XLSX file. If you change the file format to XLSB, the file size reduces significantly, shown on the vertical y-axis.
Excel worksheet files can be too large sometimes. Such files need a lot of patience when dealing with them as they take a lot of time to update when you make changes. They also respond slow when opening, which in short makes them time waters especially when you have limited time to handle the document. To make matters worse, sharing the file by Email can be difficult. So, reducing the file’s size at times is the most realistic approach to take. There are different ways of lowering your Excel file size.
We will discuss reducing file size by removing some formatting, the best saving format, and compressing images. Please read this article to learn about some of the best options and methods to select.
Method 1: remove conditional formatting
We use conditional formatting when we need to highlight specific data by visualization for easy understanding. It is advisable to remove this feature when done using it by clearing rules from the entire worksheet. Here are the steps to follow;
1. In your open worksheet file, go to the Home tab at the top of the main menu ribbon.

2. Go to the Styles group and click on Conditional Formatting.

3. From the drop-down menu, select the Clear Rules option.

4. Click on Clear Rules from Entire Sheet.

Method 2: save as a Binary File
Instead of using the default format to save your file, you can reduce your file size by saving it in binary format. This format saves files to a smaller size.
1. In your open worksheet, you need to reduce the size and go to the File tab.

2. Click on Save As option.

3. Please type in the file name, and when it comes to the Save as type option, click on the drop-down arrow and select Excel Binary Workbook.

4. Click Save to save the file on your computer.
Method 3: removing formatting from empty Cells
1. In your open workbook, go to the Home tab.
2. Under the Editing group, click on Find & Select.

3. From the given options, select go To Special.

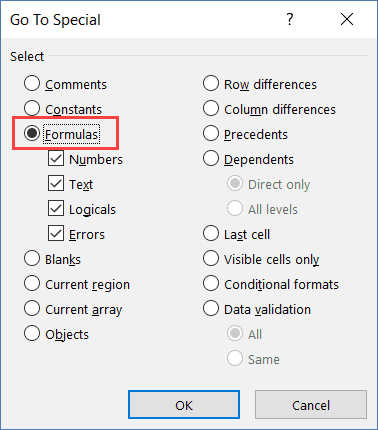
4. In the dialog box displayed, click the Specials tab and select the Blanks button.

5. Click OK to highlight all empty cells in your worksheet.
6. In the Editing group, click Clear and select Clear All.

Method 4: compressing images and pictures
1. Select the image you want to compress.

2. Go to the Picture Tools Format tab that will appear once you click on the picture.

3. Under the Adjust group, click on the Compress Picture option.

4. From the dialog box that appears, deselect ‘Apply only to this picture and select ‘Delete cropped areas of pictures.’

3. Next, select Email (96 PPI) for maximum compression.

4. Click OK.
5. save the file, and all images will be compressed.
Method 5: crop each worksheet to its used range
1. Select all the unused rows and columns
2. Right-click on them and select Delete.

Method 6: remove unnecessary formulas
Any avid excel user knows that we use formulas to manipulate and combine data dynamically. At times we forget to replace them with values which is a more reasonable option when reducing file size.
1. Open the large excel file and go to the Home tab.
2. Under the Editing group, click on Find & Select drop-down arrow.
3. From the options given, select go to Special.
4. Check the ‘Formulas’ box, which is unchecked from the displayed dialog box by default.

5. Click OK.
6. After this, copy all the formula cells by pressing Ctrl + C.
7. To paste them as values go to the Home tab>> Clipboard>> Paste Values >> 123.

Method 7: Delete watches
1. In your open worksheet, click on the Formulas tab on the main menu ribbon.
2. Click on Watch Window.

3. Select all and click Delete.
Method 8: eliminate hidden sheets, rows, and columns
4. In an open worksheet, select all the empty rows and columns. Press on Ctrl+ Shift + downward arrow + right key arrow.
5. Go to the Home tab. Under the Editing Group, click on Clear.
6. Select Clear All.
Conclusion
There are many more ways to reduce the file size than the ones mentioned above. You can apply any or more than one of these methods when it comes to lowering your large-size file.