
This is a code which could create only create xls file. But I want to create xlsx (Excel) file; how can I do that from this code or else can I have another code which I could use to create xlsx files.
using Excel = Microsoft.Office.Interop.Excel;
using System.Runtime.InteropServices;


Excel.Application xlApp = new Microsoft.Office.Interop.Excel.Application();

            if (xlApp == null)
            {
                MessageBox.Show("Excel is not properly installed!!");
                return;
            }


            Excel.Workbook xlWorkBook;
            Excel.Worksheet xlWorkSheet;
            object misValue = System.Reflection.Missing.Value;

            xlWorkBook = xlApp.Workbooks.Add(misValue);
            xlWorkSheet = (Excel.Worksheet)xlWorkBook.Worksheets.get_Item(1);

            xlWorkSheet.Cells[1, 1] = "ID";
            xlWorkSheet.Cells[1, 2] = "Name";
            xlWorkSheet.Cells[2, 1] = "1";
            xlWorkSheet.Cells[2, 2] = "One";
            xlWorkSheet.Cells[3, 1] = "2";
            xlWorkSheet.Cells[3, 2] = "Two";


            xlWorkBook.SaveAs("d:\vdfgdfg.xls", Excel.XlFileFormat.xlWorkbookNormal, misValue, misValue, misValue, misValue, Excel.XlSaveAsAccessMode.xlExclusive, misValue, misValue, misValue, misValue, misValue);
            xlWorkBook.Close(true, misValue, misValue);
            xlApp.Quit();

            Marshal.ReleaseComObject(xlWorkSheet);
            Marshal.ReleaseComObject(xlWorkBook);
            Marshal.ReleaseComObject(xlApp);

            MessageBox.Show("Excel file created , you can find the file d:\csharp-Excel.xls");
        }
![]()
asked Jan 12, 2017 at 5:21
![]()
Malinda PeirisMalinda Peiris
5732 gold badges7 silver badges22 bronze badges
3
Please try below updated code.
    public void CreateExcel()
    {
      Microsoft.Office.Interop.Excel.Application xlApp = new Microsoft.Office.Interop.Excel.Application();

        if (xlApp == null)
        {
            MessageBox.Show("Excel is not properly installed!!");
            return;
        }


        Microsoft.Office.Interop.Excel.Workbook xlWorkBook;
        Microsoft.Office.Interop.Excel.Worksheet xlWorkSheet;
        object misValue = System.Reflection.Missing.Value;

        xlWorkBook = xlApp.Workbooks.Add(misValue);
        xlWorkSheet = (Microsoft.Office.Interop.Excel.Worksheet)xlWorkBook.Worksheets.get_Item(1);

        xlWorkSheet.Cells[1, 1] = "ID";
        xlWorkSheet.Cells[1, 2] = "Name";
        xlWorkSheet.Cells[2, 1] = "1";
        xlWorkSheet.Cells[2, 2] = "One";
        xlWorkSheet.Cells[3, 1] = "2";
        xlWorkSheet.Cells[3, 2] = "Two";

                  //Here saving the file in xlsx
                xlWorkBook.SaveAs("d:\vdfgdfg.xlsx", Microsoft.Office.Interop.Excel.XlFileFormat.xlOpenXMLWorkbook, misValue,
                misValue, misValue, misValue, Microsoft.Office.Interop.Excel.XlSaveAsAccessMode.xlExclusive, misValue, misValue, misValue, misValue, misValue);


        xlWorkBook.Close(true, misValue, misValue);
        xlApp.Quit();

        Marshal.ReleaseComObject(xlWorkSheet);
        Marshal.ReleaseComObject(xlWorkBook);
        Marshal.ReleaseComObject(xlApp);

        MessageBox.Show("Excel file created , you can find the file d:\csharp-Excel.xlsx");
    }
answered Jan 12, 2017 at 5:25
![]()
2
Take a look at my SwiftExcel library. It was design for quick and easy excel output and what is more important — performance.
using (var ew = new ExcelWriter("C:\temp\test.xlsx"))
{
    ew.Write("ID", 1, 1);
    ew.Write("Name", 2, 1);

    ew.Write("1", 1, 2);
    ew.Write("One", 2, 2);

    ew.Write("2", 1, 3);
    ew.Write("Two", 2, 3);
}
answered Jan 5, 2020 at 4:40
![]()
Roman.PavelkoRoman.Pavelko
1,5052 gold badges14 silver badges17 bronze badges
1
Take a look on EasyXLS. It is a library that creates xlsx files.
    ExcelDocument workbook = new ExcelDocument(1);

    // Set the sheet name
    workbook.easy_getSheetAt(0).setSheetName("Sheet1");

   // Add data
   ExcelTable xlsTable = ((ExcelWorksheet)workbook.easy_getSheetAt(0)).easy_getExcelTable();
   xlsTable.easy_getCell(0, 0).setValue("ID");
   xlsTable.easy_getCell(0, 1).setValue("Name");
   xlsTable.easy_getCell(1, 0).setValue("1");
   xlsTable.easy_getCell(1, 1).setValue("One");
   xlsTable.easy_getCell(2, 0).setValue("2");
   xlsTable.easy_getCell(2, 1).setValue("Two");

    // Create Excel file
    workbook.easy_WriteXLSXFile("d:\vdfgdfg.xlsx");
See more at:
http://www.easyxls.com/manual/basics/create-excel-file.html
answered Jan 12, 2017 at 7:22
![]()
alex.pulveralex.pulver
2,0892 gold badges32 silver badges31 bronze badges
Replace the following line:
xlWorkBook.SaveAs("d:\vdfgdfg.xls", Excel.XlFileFormat.xlWorkbookNormal, misValue, misValue, misValue, misValue, Excel.XlSaveAsAccessMode.xlExclusive, misValue, misValue, misValue, misValue, misValue);
with this line: xlWorkBook.SaveAs("d:\vdfgdfg.xlsx");
answered Oct 5, 2020 at 17:56
![]()
In this short tutorial, I am going to explain how to create a new Excel file and write some data in a C# application.
First of all, you need to add a reference to the Microsoft.Office.Interop.Excel library to your project. You can do it by clicking with the right mouse button on the Reference folder in your project in the Solution Explorer and selecting the option Add Reference. In the Reference Manager use the search field to search for the mentioned library. Likely, you find multiple versions of the library. For this tutorial, I used the version (15.0.0.0). Select the library by placing a tick in the checkbox left of the library name and click OK.
To create a new Excel file, we first need to execute a new instance of the Excel application (alternatively, you can also search for an existing one, yet we do not consider thís option here). A new instance of the Excel application can be created as follows:
Microsoft.Office.Interop.Excel.Application app = new Microsoft.Office.Interop.Excel.Application();
Having the instance of the Excel application, we can create a new workbook and access the worksheet. The created workbook contains per default one worksheet that has the index 1 in the Worksheets array:
Microsoft.Office.Interop.Excel.Workbook workbook = app.Workbooks.Add();
Microsoft.Office.Interop.Excel.Worksheet worksheet = workbook.Worksheets[1];
Now, we can write some data into the worksheet. We are going to create a 10×10 times table:
worksheet.Name = "TimesTable";
for (int row = 1; row < 10; row++)
{
    for(int column = 1; column < 10; column++)
    {
        worksheet.Cells[row, column].Value = row * column;
    }
}
Finally, we save the workbook and close the Excel application.
workbook.SaveAs("E:TimesTable.xls");
workbook.Close();
app.Quit();
That’s all!
Содержание
- Создать Excel в visual studio c#
- How to create Excel file in C#
- Excel Library
- How to use COM Interop to Create an Excel Spreadsheet
- How to create an Excel Document Programmatically
- Save Excel file (SaveAs() method)t
- How to properly clean up Excel interop objects
- How to Create an Excel File in C#
- What is an Excel File?
- What is IronXL?
- A Step-by-Step Guide to Creating Excel Files
- Step1: Create a Visual Studio Project
- Step 2: Install the NuGet Package in Visual Studio
- Step 3: Create an Excel Workbook
- Step 4: Set a Default Worksheet
- Step 5: Save the Workbook
- Output File
- Step 6: Setting Cell Values
- Setting Cell Values Manually:
- Output File
- Setting Cell Values Dynamically
- Output
- Adding Data Directly from a Database
- Output File
- Summary
Создать Excel в visual studio c#
Давайте научимся быстро и просто создавать и записывать файлы Excel с помощью visual studio c#. Наше самое простое приложение Windows Forms будет брать из текстбокса текст и заносить его в первую ячейку. Статья написана специально для Сергея =).
Начать необходимо с подключения библиотеки Microsoft.Office.Interop.Excel. Выглядеть это должно так:

Если у вас при открытии обозревателя решений – Ссылки – правая кнопка – Добавить ссылку – Сборки – в списке нет Microsoft.Office.Interop.Excel, то добавьте её через Nuget. Проект – управление пакетами NuGet – в строке поиска Excel:
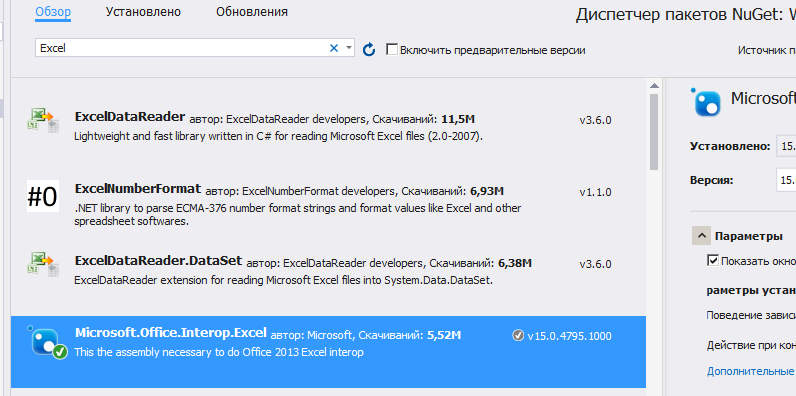
Теперь создайте новый проект Windows Forms и на форму закиньте текстбокс и кнопку. На кнопки кликните два раза, откроется исходный код. В самом верху допишите следующее:
А в методе button1_Click замените так:
Вот, собственно говоря и все. Текст из текстбокса запишется в ячейку A1. Обратите внимание, что папка temp на диске уже должна существовать.
Дополнение. Прочитать первую ячейку
Это тоже просто:

Автор этого материала — я — Пахолков Юрий. Я оказываю услуги по написанию программ на языках Java, C++, C# (а также консультирую по ним) и созданию сайтов. Работаю с сайтами на CMS OpenCart, WordPress, ModX и самописными. Кроме этого, работаю напрямую с JavaScript, PHP, CSS, HTML — то есть могу доработать ваш сайт или помочь с веб-программированием. Пишите сюда.
 заметки, си шарп, excel
Источник
How to create Excel file in C#
The following C# code example shows how to use COM interop to create an Excel file. Before going to create new Excel file programmatically in C#, you must have Excel installed on your system for this code to run properly.
Excel Library
To access the object model from Visual C# .NET, you have to add the Microsoft Excel 15.0 Object Library to you project.
Create a new project in your Visual Studio and add a Command Button to your C# Form.
How to use COM Interop to Create an Excel Spreadsheet
Form the following pictures you can find how to add Excel reference library in your project.
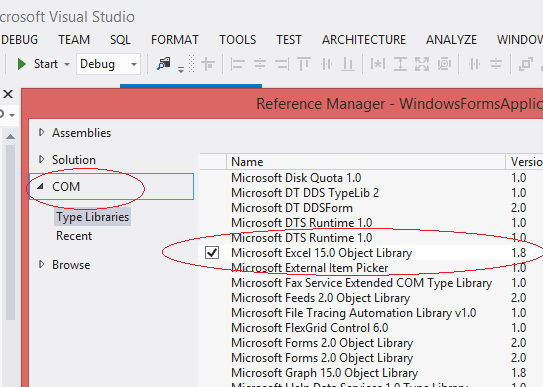
Select Add Reference dialogue from Project menu of your Visual Studio.
Select Microsoft Excel 15.0 Object Library of COM leftside menu and click OK button.
How to create an Excel Document Programmatically
First we have to initialize the Excel application Object.
Before creating new Excel Workbook, you should check whether Excel is installed in your system.
Then create new Workbook
After creating the new Workbook, next step is to write content to worksheet
In the above code we write the data in the Sheet1, If you want to write data in sheet 2 then you should code like this.
Save Excel file (SaveAs() method)t
After write the content to the cell, next step is to save the excel file in your system.
How to properly clean up Excel interop objects

Interop marshaling governs how data is passed in method arguments and return values between managed and unmanaged memory during calls. Most data types have common representations in both managed and unmanaged memory. The interop marshaler handles these types for you. Other types can be ambiguous or not represented at all in managed memory.
It is important to note that every reference to an Excel COM object had to be set to null when you have finished with it, including Cells, Sheets, everything.
The Marshal class is in the System.Runtime.InteropServices namespace, so you should import the following namespace.
Creating an Excel Spreadsheet Programmatically
Copy and paste the following source code in your C# project file
Note : You have to add Microsoft.Office.Interop.Excel to your source code.
When you execute this program , it will create an excel file in you D:
Источник
How to Create an Excel File in C#
In this tutorial I will show you how to create an Excel file using the C# programming language. This tutorial consists of a step-by-step guide specially designed for beginners and intermediate developers. Experts can skip the “project creation” section and jump directly to the “code” section. I will use the IronXL Library to create Excel files.
We will cover the following topics:
- What is an Excel File?
- What is IronXL?
- A Step-by-Step Guide to Creating Excel Files
- Step 1: Create a Visual Studio Project
- Step 2: Install the NuGet Package
- Step 3: Create an Excel Workbook
- Step 4: Set a Default Worksheet
- Step 5: Save the Workbook
- Step 6: Set Cell Values
- Set Cell Values Manually
- Set Cell Values Dynamically
- Set Cell Values from the Database
- Summary
What is an Excel File?
Excel is a spreadsheet application developed and published by Microsoft. It is part of the Microsoft Office suite of productivity software.
Excel is a tool for both organizing data and making calculations with it. The software can analyze data, calculate statistics, generate pivot tables, and represent data as charts or graphs.
For example, you could create an Excel spreadsheet that calculates a monthly budget, tracks associated expenses, and interactively sorts the data by various criteria.
Unlike a word processor, such as Microsoft Word, Excel organizes data in columns and rows. Rows and columns intersect at a space called a cell. Each cell contains data, such as text, numerical values, or formulas.
What is IronXL?
IronXL is an intuitive C# & VB Excel API that allows you to read, edit and create Excel spreadsheet files in .NET with lightning-fast performance. There is no need to install MS Office or even Excel Interop. This library can also be used for manipulating Excel documents.
IronXL fully supports .NET Core, .NET Framework, Xamarin, Mobile, Linux, MacOS and Azure. 
A Step-by-Step Guide to Creating Excel Files
Firstly, we have to create a new Visual Studio Project. I will use the Console Application template for the demonstration. You can use any template that best suits your requirements.
You may also use a current project that would benefit from the capacity to create Excel files.
Step1: Create a Visual Studio Project
Open Microsoft Visual Studio 2019 or any other version. However, the latest version is recommended. Click on “Create New Project”. Select the C# Console Application for the application template. Click on the “Next” button.
Assign a name to your project. I have named mine «Excel Tutorial». You can select any name you wish. Click the “Next” button, and set the target framework. I have set my target framework to «.Net 5.0», the latest and most stable version. Click the “Create” button, and a new project will be created for you.
(adsbygoogle = window.adsbygoogle || []).push(<>);
Step 2: Install the NuGet Package in Visual Studio
Our next step is to install the IronXL NuGet Package for our project. Click on “Tools” on the menu bar. A new drop-down menu will appear. Click on «NuGet Package Manager» and then «Manage Nuget Packages for Solution», as shown below. 
Click on “Browse” and search for IronXL in the search bar. 
Click on “IronXL.Excel” and press the “Installed” button. This will install IronXL in your project. Now you are free to use any of its functions in your project.
Now that the IronXL Library has been installed, let’s go to the next step.
Step 3: Create an Excel Workbook
Firstly, add the namespace of IronXL into your project.
Exit fullscreen mode
It could not be easier to create a new Excel Workbook using IronXL! We need just one line of code. Yes, really!
Exit fullscreen mode
Both the XLS (older Excel file versions) and XLSX (current and newer file versions) file formats can be created with IronXL.
Step 4: Set a Default Worksheet
Let’s create an Excel spreadsheet. I have just created one. You can create as many Excel spreadsheets as you need.
Exit fullscreen mode
«Sheet» in the above code snippet represents the worksheet, and you can use it to set cell values and almost everything else Excel can do.
If you are confused about the difference between a Workbook and a Worksheet, let me explain: a Workbook contains Worksheets. This means that you can add as many Worksheets as you like into one Workbook. I will explain how to do this in a later article. A Worksheet contains rows and columns. The intersection of a row and a column is called a cell, and these cells are what we manipulate whilst working with Excel.
Step 5: Save the Workbook
To save the xlsx format Workbook, use the following code:
Exit fullscreen mode
Run the program to see the output.
Output File
This program will create a new workbook. You can find it in your project bin folder. You can also specify the path with the “Save As” function. Open your Excel document with Microsoft Excel. Below is the Excel worksheet we have just created. 
Step 6: Setting Cell Values
Now that our workbook is created and saved, let’s add some data to the cell.
Setting Cell Values Manually:
To set cell values manually, you simply indicate which cell you are working with and set its value, as in the following example:
Exit fullscreen mode
Here, I have populated Columns A to L, and the first row of each to the names of various courses related to software engineering.
Run the program to see the output:
Output File

Setting Cell Values Dynamically
To set values dynamically we employ instructions that are very similar to those under the previous heading. The advantage here is that you do not have to hard-code the cell location. In the next code example, you will create a new random object to create random numbers, and then make use of a loop to iterate through the range of cells you’d like to populate with values.
Exit fullscreen mode
Every cell from A2 to L11 contains a unique value that was randomly generated.
Let’s run the program. It will create an excel file for us. Open this with Microsoft Excel to see the output.
Output

Talking about dynamic values, how about learning how to dynamically add data into cells directly from a database? The next code snippet quickly shows how this is done, assuming you have set up your database connections correctly.
Adding Data Directly from a Database
I will get the data from the table and assign those values to the cells of my spreadsheet. Here is a snapshot of my “Marks” table: 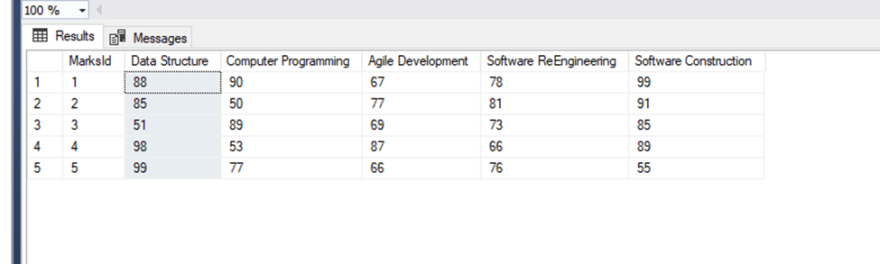
I will get the data from that tables and assign those values to the cells of my spreadsheet. Here is the snapshot of my Marks Table.
Exit fullscreen mode
In the above code, I first set the connection string of my database, and then I read the data from the table. Next, I assigned the column name to the Excel spreadsheet in the first loop, and values of the table in the second loop.
You simply have to set the value property of the particular cell to the field name, so that it can be entered into the cell.
Output File
Let’s run the program. It will create an Excel file for us. Open this with Microsoft Excel to see the output. 
Summary
IronXL allow us to generate new Excel files in C#, create new worksheets inside them, set font sizes, use formulas and much more. There are too many functions and details to describe here. For more detailed information, please click here.
Iron software provides other libraries such as IronPdf for creating Pdf documents, Iron Barcode for generating, reading and manipulating barcode, and so forth. If you purchase the complete Iron suite, you will be eligible to receive all 5 products for the price of just two. For more details, please click here.
I hope this article was helpful and easy to read. Feel free to comment with your queries and feedback.
You can download a file project from this link.
Источник

Overview
Creating report files in Excel format is a feature that many users need out of their software applications.
In this article, we’ll cover creating an Excel spreadsheet in C# using a third-party library called EPPlus.
EPPlus is a .NET library that reads and writes Excel files using the Open Office XML format (*.xlsx). It is licensed under GNU Library General Public License (LGPL) so it can be freely used in commercial software.
Installation
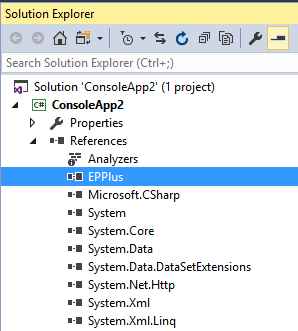
In Visual Studio 2017, go to Tools -> NuGet Package Manager -> Package Manager Console
In the console window that appears, type the following at the prompt to install it into the current project:
PM > Install-Package EPPlus
After it is finished, check the References under Solution Explorer and verify that the EPPlus assembly is listed.
Add to Project
We add line 7 below so we can use the types inside the namespace:
using System;
using System.Collections.Generic;
using System.Linq;
using System.Text;
using System.Threading.Tasks;

using OfficeOpenXml;

namespace ConsoleApp2
{
    class Program
    {
        static void Main(string[] args)
        {
        }
    }
}
Create a Workbook
We call the ExcelPackage class constructor to create a workbook. In the below code, we do this within a using block so we don’t have to explicitly dispose of the object.
We add 3 blank worksheets to the workbook by using the Add() method in the Worksheets class. Finally, we save the file to a path using the SaveAs() method.
using (ExcelPackage excel = new ExcelPackage())
{
  excel.Workbook.Worksheets.Add("Worksheet1");
  excel.Workbook.Worksheets.Add("Worksheet2");
  excel.Workbook.Worksheets.Add("Worksheet3");

  FileInfo excelFile = new FileInfo(@"C:UsersamirDesktoptest.xlsx");
  excel.SaveAs(excelFile);
}
The SaveAs method will throw an exception if there are no worksheets defined.
Select a Worksheet
Let’s say we want to add some data to Worksheet1. How can we target it?
var excelWorksheet = excel.Workbook.Worksheets["Worksheet1"];Add a Row
Spreadsheets typically have header rows. Let’s add a header row to Worksheet1.
For this, we create a List containing an array of strings:
List<string[]> headerRow = new List<string[]>()
{
  new string[] { "ID", "First Name", "Last Name", "DOB" }
};
Before we can pass this object into our worksheet, we must figure out the cell range for the header row:
// Determine the header range (e.g. A1:E1)
string headerRange = "A1:" + Char.ConvertFromUtf32(headerRow[0].Length + 64) + "1";
Here’s how we load the data into the worksheet:
// Popular header row data
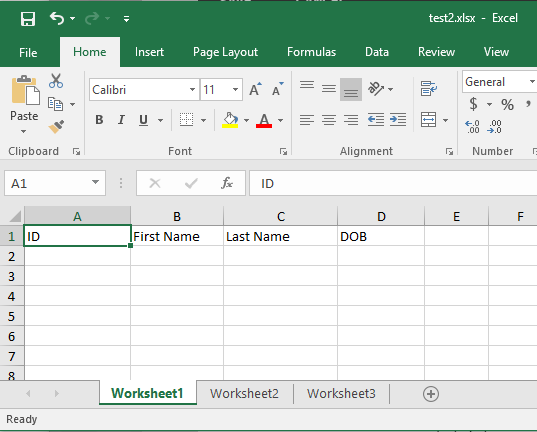
excelWorksheet.Cells[headerRange].LoadFromArrays(headerRow);Putting it all together here is the code block:
using (ExcelPackage excel = new ExcelPackage())
{
  excel.Workbook.Worksheets.Add("Worksheet1");
  excel.Workbook.Worksheets.Add("Worksheet2");
  excel.Workbook.Worksheets.Add("Worksheet3");

  var headerRow = new List<string[]>()
  {
    new string[] { "ID", "First Name", "Last Name", "DOB" }
  };

  // Determine the header range (e.g. A1:D1)
  string headerRange = "A1:" + Char.ConvertFromUtf32(headerRow[0].Length + 64) + "1";

  // Target a worksheet
  var worksheet = excel.Workbook.Worksheets["Worksheet1"];

  // Popular header row data
  worksheet.Cells[headerRange].LoadFromArrays(headerRow);

  FileInfo excelFile = new FileInfo(@"C:UsersamirDesktoptest.xlsx");
  excel.SaveAs(excelFile);
}
If we open the file in Excel, we see that the header row appears in the first worksheet:
Row Styling
We can easily change the font size, color, and weight of any row.
worksheet.Cells[headerRange].Style.Font.Bold = true;
worksheet.Cells[headerRange].Style.Font.Size = 14;
worksheet.Cells[headerRange].Style.Font.Color.SetColor(System.Drawing.Color.Blue);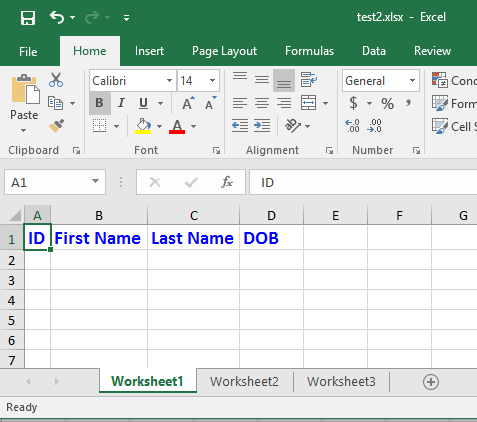
Add Data to Specific Cell
We can easily add data to a cell by setting the Value property of the Cell element.
worksheet.Cells["A1"].Value = "Hello World!";Add Data to Multiple Cells
Inserting data into multiple cells is also straightforward. We can populate a list containing an array that corresponds to each row.
var cellData= new List()
{
  new object[] {0, 0, 0, 1},
  new object[] {10,7.32,7.42,1},
  new object[] {20,5.01,5.24,1},
  new object[] {30,3.97,4.16,1},
  new object[] {40,3.97,4.16,1},
  new object[] {50,3.97,4.16,1},
  new object[] {60,3.97,4.16,1},
  new object[] {70,3.97,4.16,1},
  new object[] {80,3.97,4.16,1},
  new object[] {90,3.97,4.16,1},
  new object[] {100,3.97,4.16,1}
};

excelWorksheet.Cells[2, 1].LoadFromArrays(cellData);
Here we add the data from cellData into the worksheet starting on row 2, column 1. Remember that we already inserted a header row on row 1.
Check if Excel is installed
We can use this line of code to determine if Excel is installed:
bool isExcelInstalled = Type.GetTypeFromProgID("Excel.Application") != null ? true : false;
If the expression evaluates to true, then we can safely open the file using the below code:
if (isExcelInstalled)
{
  System.Diagnostics.Process.Start(excelFile.ToString());
}
What about Microsoft.Office.Interop.Excel?
If the user has Excel installed on their machine, we could tap into the Microsoft.Office.Interop.Excel assembly which instructs .NET on how to call the Excel COM libraries.
This approach has a couple flaws though. Excel file generation would fail if the user didn’t have Excel installed. Also, what happens when the version of the assembly we’re using is incompatible with the latest version of Excel?
A software application shouldn’t rely on an Excel installation in order to create a spreadsheet which is why I discourage using Microsoft.Office.Interop.Excel.
Содержание
- Введение
- Добавление необходимых ссылок в решение
- Работа с объектом Application (Excel)
- Запуск и остановка Microsoft Excel в C#
- Создание рабочей книги Excel в C#
- Работа с листами Excel в C#. Hello Excel
- Итого
уважаемые посетители блога, если Вам понравилась, то, пожалуйста, помогите автору с лечением. Подробности тут.
При разработки различных программ для анализа данных нередко требуется не только обрабатывать большие массивы данных, но и предоставить конечному пользователю удобно оформленный отчёт о работе программного обеспечения. В сегодняшних реалиях экономия килобайт оперативной памяти при разработке программного обеспечения уже не так важна по сравнению с удобством работы программного продукта. Не секрет, что при работе в Windows для наиболее удобного представления табличных данных является Microsoft Excel. В этой и других статьях, посвященных работе с Excel в .NET Core и C# я постараюсь рассмотреть наиболее частые задачи по импорту и экспорту данных между приложением и Microsoft Excel. Сегодня мы рассмотрим как использовать MS Excel в .NET Core, используя технологию COM.
Введение
Разработка программ, взаимодействующих с пакетом Microsoft Office, вне зависимости от среды разработки, будь то Visual Studio С# или Delphi, основана на применении так называемой объектной модели Microsoft Office. Взаимодействие с объектами такой модели базируется на технологии OLE (Object Linking and Embedding, связывание и внедрение объектов), которая, в свою очередь, использует технологический стандарт COM (Component Object Model — модель компонентного объекта).
Существует достаточно много решений, позволяющих работать с Microsoft Excel в Visual Studio .NET о которых мы, вполне возможно, поговорим позднее. Сейчас же мы будем учиться использовать возможности Microsoft Excel, опираясь исключительно на объектную модель Microsoft Office и те возможности, которые она предоставляет разработчикам, так сказать, «из коробки».
Добавление необходимых ссылок в решение
Для подключения в решение библиотек для взаимодействия с Microsoft Excel необходимо добавить добавьте следующие ссылки:
- Microsoft Excel 16.0 Object Library
- Microsoft Office 16.0 Object Library
В Visual Studio это делается следующим образом:
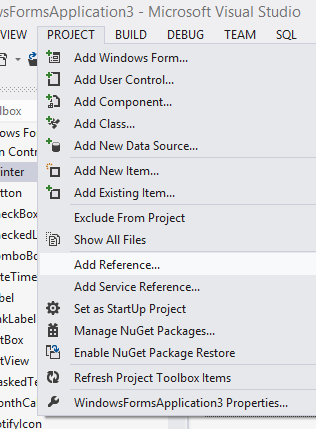
1. В «Обозревателе решений» кликаем правой кнопкой мыши по строке «Зависимости» и выбираем пункт «Добавить ссылку на модель COM»

2. В открывшемся окне в строке поиска набираем «Microsoft», выбираем необходимые ссылки, то есть Microsoft Excel 16.0 Object Library и Microsoft Office 16.0 Object Library и жмем «Ok»:

После этого, в обозревателе решений для нашего проекта в зависимостях появятся следующие ссылки:
Зависимости
COM
Interop.Microsoft.Office.Core
Interop.Microsoft.Office.Interop.Excel
Платформы
Microsoft.NetCore.App

Теперь, чтобы наше решение для .NET Core могло полноценно использовать возможности Microsoft Excel необходимо указать в решении, что все типы, используемые в объектной модели Microsoft Office будут использоваться в нашей сборке. Чтобы это сделать выбираем в зависимостях нашего решения каждую ссылку из раздела COM и в разделе «Свойства» указываем напротив пункта «Внедрить типы взаимодействия» значение «Да». На рисунке ниже представлен пример для ссылки Interop.Microsoft.Office.Core

Если не выполнить эти действия, то при разработки приложения .NET Core при попытке работы с Excel вы получите следующую ошибку:
System.IO.FileNotFoundException HResult=0x80070002
Сообщение = Could not load file or assembly ‘office, Version=15.0.0.0, Culture=neutral, PublicKeyToken=71e9bce111e9429c’. Не удается найти указанный файл.
Источник = <Не удается определить источник исключения>
Трассировка стека: <Не удается определить трассировку стека исключения>
Работа с объектом Application (Excel)
Объект Application представляет всё приложение Microsoft Excel. С помощью этого объекта в C# мы можем запускать и останавливать работу Excel, получать доступ к рабочим книгам Excel и так далее. Посмотрим, как можно взаимодействовать с Excel в C#, используя объект Application.
Запуск и остановка Microsoft Excel в C#
Чтобы продемонстрировать запуск и остановку Excel в C# подключим в наше решение пространство имен Microsoft.Office.Interop.Excel, используя псевдоним:
using Excel = Microsoft.Office.Interop.Excel;
Теперь напишем следующий код для метода Main():
using System;
using Excel = Microsoft.Office.Interop.Excel;
using System.Runtime.InteropServices;

namespace ExcelApp
{
    class Program
    {
        static void Main(string[] args)
        {
            Excel.Application application = new Excel.Application();
            Console.WriteLine("Объект Excel.Application создан");
            Console.ReadKey();
            application.Visible = true;
            Console.WriteLine("Окно Excel видно пользователю");

            Console.ReadKey();
            Console.WriteLine("Закрываем Excel");

            application.Quit();
            Marshal.ReleaseComObject(application);
        }
    }
}
Разберемся с тем, что происходит в нашем приложении при запуске. Вначале мы создаем объект application типа Excel.Application (Excel — псевдоним пространства имен Microsoft.Office.Interop.Excel). После выполнения этой строки кода происходит запуск процесса Microsoft Excel. Убедиться в этом можно, открыв диспетчер задач Windows и заглянув в раздел «Фоновые процессы»:

Чтобы показать главное окно Excel пользователю, мы устанавливаем значение true свойству Visible:
application.Visible = true;
И, наконец, для того, чтобы закрыть Excel и освободить память, занятую процессом Excel мы вызываем метод Quit().
application.Quit()
Таким образом, всё, что пока делает наше приложение .NET Core — это запускает процесс Microsoft Excel, показывает окно Excel и закрывает приложение. При этом, стоит обратить внимание на следующий момент: так как чаще всего мы будем взаимодействовать с Excel в C# в фоновом режиме без показа главного окна, то по окончанию взаимодействия необходимо обязательно вызывать метод Quit() объекта Application и вызвать метод объекта Marshal.ReleaseComObject(application) из пространства имен System.Runtime.InteropServices. Если этого не сделать, то после N запусков нашего приложения мы рискуем «забить» оперативную память компьютера неиспользуемыми процессами Excel, так как после остановки нашего приложения и вызова Quit() внешний процесс (Excel) автоматически не завершается. Продемонстрировать это можно, написав всего две строки кода:
static void Main(string[] args)
  {
      Excel.Application application = new Excel.Application();
      application.Quit();
  }
и запустить приложение несколько раз. Например, на рисунке ниже показан диспетчер задач после трех запусков нашего приложения:

Создание рабочей книги Excel в C#
Следующий пример демонстрирует создание новой рабочей книги Excel в C#:
using System;
using Excel = Microsoft.Office.Interop.Excel;
using System.Runtime.InteropServices;

namespace ExcelApp
{
    class Program
    {
        static void Main(string[] args)
        {
            //Объявляем переменную приложения Excel
            Excel.Application application = null;
            //объявляем переменные для коллекции рабочих книг
            //и одной рабочей книги
            Excel.Workbooks workbooks = null;
            Excel.Workbook workbook = null;
            try
            {
                //создаем объект Application
                application = new Excel.Application();
                Console.WriteLine("Объект Excel.Application создан");
                Console.ReadKey();
                //показываем окно Excel пользователю
                application.Visible = true;
                Console.WriteLine("Окно Excel видно пользователю");
                //получаем ссылку на коллекцию рабочих книг
                workbooks = application.Workbooks;
                //добавляем новую рабочую книгу в коллекцию
                workbook = workbooks.Add();
                Console.ReadKey();
                Console.WriteLine("Закрываем Excel");
                application.Quit();
            }
            finally
            {
                //освобождаем память, занятую объектами
                Marshal.ReleaseComObject(workbook);
                Marshal.ReleaseComObject(workbooks);
                Marshal.ReleaseComObject(application);

            }
        }
    }
}
На первый взгляд, может показаться, что этот код вполне можно упростить, например, избавившись от «лишних» переменной workbooks, например так:
workbook = application.Workbooks.Add();
Такой код, безусловно, будет короче и рабочая книга также будет создана, НО при этом, память выделенная для процесса Excel не будет освобождена по причине того, что в приведенной выше строке кода мы на самом деле создаем не один, а два объекта: объект типа Excel.Workbooks и объект типа Excel.Workbook и, соответственно, оба эти объекта нам необходимо освободить после работы с ними.
Исходя из вышеизложенного, можно определить для себя два следующих правила работы с COM в C#:
Никогда не использовать две и более точек при работе с COM
О том, из-за чего процесс Excel может зависать — смотрите в этой статье.
Работа с листами Excel в C#. Hello Excel
В следующем примере демонстрируется то, как получить доступ к первому листу рабочей книги и записи в ячейку A1 строки «Hello Excel«:
using Excel = Microsoft.Office.Interop.Excel;
using System.Runtime.InteropServices;

namespace ExcelApp
{
    class Program
    {
        static void Main(string[] args)
        {
            Excel.Application application = null;
            Excel.Workbooks workbooks = null;
            Excel.Workbook workbook = null;
            Excel.Sheets worksheets = null;
            Excel.Worksheet worksheet = null;
            //переменная для хранения диапазона ячеек
            //в нашем случае - это будет одна ячейка
            Excel.Range cell = null;
            try
            {
                application = new Excel.Application
                {
                    Visible = true
                };
                workbooks = application.Workbooks;
                workbook = workbooks.Add();
                worksheets = workbook.Worksheets; //получаем доступ к коллекции рабочих листов
                worksheet = worksheets.Item[1];//получаем доступ к первому листу
                cell = worksheet.Cells[1, 1];//получаем доступ к ячейке
                cell.Value = "Hello Excel";//пишем строку в ячейку A1
                application.Quit();
            }
            finally
            {
                //освобождаем память, занятую объектами
                Marshal.ReleaseComObject(cell);
                Marshal.ReleaseComObject(worksheet);
                Marshal.ReleaseComObject(worksheets);
                Marshal.ReleaseComObject(workbook);
                Marshal.ReleaseComObject(workbooks);
                Marshal.ReleaseComObject(application);

            }
        }
    }
}
После запуска этого приложения откроется Excel, создастся рабочая книга, на первом листе рабочей книги в ячейке А1 появится строка «Hello Excel» после чего Excel попросит сохранить книгу. После отказа сохранения Excel закроется и память процесса Microsoft Excel будет освобождена.
Итого
Итак, сегодня мы рассмотрели основные моменты по работе с Microsoft Excel в C# и .NET Core: научились создавать процесс Microsoft Excel, создавать рабочую книгу, записывать текст в ячейки листа Excel и корректно освобождать память после работы с Excel в C#. В следующий раз мы продолжим разбираться с темой использования возможностей Excel в .NET Core и более детально познакомимся с объектной моделью Microsoft Office.
уважаемые посетители блога, если Вам понравилась, то, пожалуйста, помогите автору с лечением. Подробности тут.
Давайте научимся быстро и просто создавать и записывать файлы Excel с помощью visual studio c#. Наше самое простое приложение Windows Forms будет брать из текстбокса текст и заносить его в первую ячейку. Статья написана специально для Сергея =).
Начать необходимо с подключения библиотеки Microsoft.Office.Interop.Excel. Выглядеть это должно так:
Если у вас при открытии обозревателя решений – Ссылки – правая кнопка – Добавить ссылку – Сборки – в списке нет Microsoft.Office.Interop.Excel, то добавьте её через Nuget. Проект – управление пакетами NuGet – в строке поиска Excel:
Теперь создайте новый проект Windows Forms и на форму закиньте текстбокс и кнопку. На кнопки кликните два раза, откроется исходный код. В самом верху допишите следующее:
using Excel = Microsoft.Office.Interop.Excel;
А в методе button1_Click замените так:
private void button1_Click(object sender, EventArgs e)
        {
            string fileName = "D:\temp\test.xls";

            try
            {
                var excel = new Excel.Application();

                var workBooks = excel.Workbooks;
                var workBook = workBooks.Add();
                var workSheet = (Excel.Worksheet)excel.ActiveSheet;

                workSheet.Cells[1, "A"] = textBox1.Text;

                workBook.SaveAs(fileName);
                workBook.Close();
            }
            catch (Exception ex) {
                MessageBox.Show("Ошибка: "+ ex.ToString());
            }

            MessageBox.Show("Файл "+ Path.GetFileName (fileName) + " записан успешно!");

        }
Вот, собственно говоря и все. Текст из текстбокса запишется в ячейку A1. Обратите внимание, что папка temp на диске уже должна существовать.
Дополнение. Прочитать первую ячейку
Это тоже просто:
 string fileName = "D:\temp\test.xls";

Excel.Application xlApp = new Excel.Application();
Excel.Workbook xlWorkbook = xlApp.Workbooks.Open(fileName, 0, true, 5, "", "", true, Excel.XlPlatform.xlWindows, "t", false, false, 0, true, 1, 0);
Excel._Worksheet xlWorksheet = (Excel._Worksheet)xlWorkbook.Sheets[1];
Excel.Range xlRange = xlWorksheet.UsedRange;

string temp = (string)(xlRange.Cells[1, 1] as Excel.Range).Value2;// 1 1 - адрес 1-й ячейки
MessageBox.Show(temp);
Автор этого материала — я — Пахолков Юрий. Я оказываю услуги по написанию программ на языках Java, C++, C# (а также консультирую по ним) и созданию сайтов. Работаю с сайтами на CMS OpenCart, WordPress, ModX и самописными. Кроме этого, работаю напрямую с JavaScript, PHP, CSS, HTML — то есть могу доработать ваш сайт или помочь с веб-программированием. Пишите сюда.
![]() заметки, си шарп, excel
заметки, си шарп, excel