
Ok, so I’m trying to set the value of a cell with the excel interop library. I am able to do it with the following:
sheet.Cells[row, col] = value;
but it’s terribly slow for how many I’m setting. So I’m trying to go this route:
Range excelRange = sheet.UsedRange;
excelRange.Cells.set_Item(row, col, value);
The code executes, but no data is put in the cell. Any suggestions on what I’m missing? Thanks!
asked Jan 27, 2011 at 0:10
![]()
Arthurdent510Arthurdent510
1,2806 gold badges18 silver badges32 bronze badges
2
Your first method should work fine for any reasonable (and a lot of unreasonable) amounts of cells, provided you have disabled screen updating (Application.ScreenUpdating = false). The Knowledgebase Article describing how to set cells using C# accesses by row and column as well.
answered Jan 27, 2011 at 0:20
![]()
Have you tried setting all of the values at once, rather than iterating through your array and setting one cell at a time? That way you only have to pass data over the COM boundary once, rather than once per cell.
Excel is very flexible in this regard. Try the following:
int[] intArray = new int[] { 1, 2, 3, 4, 5, 6, 7, 8, 9, 10 };
Range rng = excelApp.get_Range("A1", "J1");
rng.Value = intArray;
You should this faster than iterating over each of the cells you’re wanting to set.
Other than that, turn off ScreenUpdated as Andy suggests and also consider setting calculation to manual until you’ve finished your copy process.
answered Jan 27, 2011 at 9:47
![]()
Chris SpicerChris Spicer
2,1341 gold badge13 silver badges22 bronze badges
4
Simple solution but here you will need to install Package Microsoft.Office.Interop.Excel by writting in nuget console
Install-Package Microsoft.Office.Interop.Excel
   //test excel file
   Microsoft.Office.Interop.Excel.Application excel = new Microsoft.Office.Interop.Excel.Application();

        Workbook workbook = excel.Workbooks.Open(System.Windows.Forms.Application.StartupPath + "/TrainedFaces/AttendanceLog.xlsx", ReadOnly: false, Editable: true);
        Worksheet worksheet = workbook.Worksheets.Item[1] as Worksheet;
        if (worksheet == null)
            return;

        var abc = worksheet.Cells[2, 1].Value;
        Range row1 = worksheet.Rows.Cells[1, 1];
        Range row2 = worksheet.Rows.Cells[2, 1];

        row1.Value = "Test100";
        row2.Value = "Test200";


        excel.Application.ActiveWorkbook.Save();
        excel.Application.Quit();
        excel.Quit();
answered Mar 9, 2017 at 5:05
![]()
SaifSaif
3943 silver badges13 bronze badges
Please try
[excelWorksheet].Cells[1, 1] = "[String you want]";
![]()
answered Aug 13, 2014 at 7:11
![]()
Содержание
- Работа с Excel с помощью C# (Microsoft.Office.Interop.Excel)
- Расстановка рамок.
- Формулы
- Выделение ячейки или диапазона ячеек
- Авто ширина и авто высота
- Получаем значения из ячеек
- Добавляем лист в рабочую книгу
- Добавление разрыва страницы
- Сохраняем документ
- Как открыть существующий документ Excel
- Комментарии
- Работа с Excel с помощью C# (Microsoft.Office.Interop.Excel): 11 комментариев
- Range Interface
- Definition
- Properties
- Methods
Работа с Excel с помощью C# (Microsoft.Office.Interop.Excel)
Оставляю заметку по работе с Excel с помощью C#.
Привожу фрагменты кода, которые искал когда-то сам для работы с Excel документами.
Наработки очень пригодились в работе для формирования отчетности.
Прежде всего нужно подключить библиотеку Microsoft.Office.Interop.Excel.
 Visual Studio здесь довольно старой версии. Если у вас версия новая, отличаться будет только вид окна.
Далее создаем псевдоним для работы с Excel:
using Excel = Microsoft.Office.Interop.Excel;
Расстановка рамок.
Расставляем рамки со всех сторон:
Цвет рамки можно установить так:
Выравнивания в диапазоне задаются так:
Формулы
Определим задачу: получить сумму диапазона ячеек A4:A10.
Для начала снова получим диапазон ячеек:
Excel.Range formulaRange = sheet.get_Range(sheet.Cells[4, 1], sheet.Cells[9, 1]);
Далее получим диапазон вида A4:A10 по адресу ячейки ( [4,1]; [9;1] ) описанному выше:
string adder = formulaRange.get_Address(1, 1, Excel.XlReferenceStyle.xlA1, Type.Missing, Type.Missing);
Теперь в переменной adder у нас хранится строковое значение диапазона ( [4,1]; [9;1] ), то есть A4:A10.
Выделение ячейки или диапазона ячеек
Так же можно выделить ячейку или диапазон, как если бы мы выделили их мышкой:
Авто ширина и авто высота
Чтобы настроить авто ширину и высоту для диапазона, используем такие команды:
Получаем значения из ячеек
Чтобы получить значение из ячейки, используем такой код:
Добавляем лист в рабочую книгу
Чтобы добавить лист и дать ему заголовок, используем следующее:
Добавление разрыва страницы
Сохраняем документ
Как открыть существующий документ Excel
Комментарии
При работе с Excel с помощью C# большую помощь может оказать редактор Visual Basic, встроенный в Excel.
Для этого в настройках ленты надо добавить пункт «Разработчик». Далее начинаем запись макроса, производим действия и останавливаем запись.
Далее заходим в редактор Visual Basic и смотрим код, который туда записался:

В данном макросе записаны все действия, которые мы выполнили во время его записи. Эти методы и свойства можно использовать в C# коде.
Данный метод так же может оказать помощь в формировании относительных формул, например, выполнить сложение чисел, находящиеся слева от текущей ячейки на 4 столбца, и т.п. Пример:
Так же во время работы может возникнуть ошибка: метод завершен неверно. Это может означать, что не выбран лист, с которым идет работа.
Чтобы выбрать лист, выполните sheetData.Select(Type.Missing); где sheetData это нужный лист.
Работа с Excel с помощью C# (Microsoft.Office.Interop.Excel): 11 комментариев
Как прочитать данные из ячейки excel,и записать эти данные в sql server?
Добрый день.
Отправил на почту.
Добрый день.
А мне можно тоже самое?)
Здравствуйте, как изменить цвет диаграммы при работе в C#?(круговая диаграмма)
Вы можете записать макрос на изменение цвета в Visual Basic и списать получившийся код. Затем использовать его в своей программе.
Здравствуйте.
Можете подсказать, как «заставить» приложение работать с разными версиями MS Office? На машине разработчика стоит Office 2010, при запуске на машине с 2003-м — увы — ошибка.
Microsoft.Office.Interop.Excel это довольно старый способ работать с Excel документами.
Что касается версии Office 2003, то он использует совсем другой драйвер.
Соответственно версия Microsoft.Office.Interop.Excel.dll нужна старая, плюс драйвер microsoft jet 4.0, который на новых системах (Win 8, 10) работает неправильно.
Единственное, что могу посоветовать, так это скачать Microsoft Office Compatibility Pack для Office 2003, чтобы научить его открывать xslx документы.
А в своей программе использовать не Interop.Excel, а библиотеку EPPlus. Она работает с excel документами, используя технологию OpenXml и не надо париться по поводу драйверов.
Код будет очень похож на Interop.Excel-ный.
Очень полезная штука, спасибо за удобное представление информации на Вашем сайте!
Скажите пожалуйста, как прочитать данные из ячейки Excel и записать их в SQL Server?
Источник
Range Interface
Definition
Some information relates to prerelease product that may be substantially modified before it’s released. Microsoft makes no warranties, express or implied, with respect to the information provided here.
Represents a cell, a row, a column, a selection of cells containing one or more contiguous blocks of cells, or a 3-D range.
Properties
Reserved for internal use.
Determines if text is automatically indented when the text alignment in a cell is set to equal distribution either horizontally or vertically.
Returns the range reference.
Returns the range reference for the specified range in the language of the user.
Determines if the range can be edited on a protected worksheet.
Returns an Application object that represents the Microsoft Excel application.
Returns an Areas collection that represents all the ranges in a multiple-area selection.
Returns a Borders collection that represents the borders of a style or a range of cells (including a range defined as part of a conditional format).
Returns a Range object that represents the cells in the specified range.
Returns a Characters object that represents a range of characters within the object text.
Returns the number of the first column in the first area in the specified range.
Returns a Range object that represents the columns in the specified range.
Returns or sets the width of all columns in the specified range.
Returns a Comment object that represents the comment associated with the cell in the upper-left corner of the range.
Returns the number of objects in the collection.
Counts the largest value in a given Range of values. Read-only.
Returns a 32-bit integer that indicates the application in which this object was created.
If the specified cell is part of an array, returns a Range object that represents the entire array.
Returns a Range object that represents the current region.
Returns a Range object that represents the range containing all the dependents of a cell.
Returns a Range object that represents the range containing all the direct dependents of a cell.
Returns a Range object that represents the range containing all the direct precedents of a cell.
Gets a DisplayFormat object that represents the display settings for the specified range.
Returns a Range object that represents the cell at the end of the region that contains the source range.
Returns a Range object that represents the entire column (or columns) that contains the specified range.
Returns a Range object that represents the entire row (or rows) that contains the specified range.
Allows the user to access error checking options.
Returns a Font object that represents the font of the specified object.
Returns a FormatConditions collection that represents all the conditional formats for the specified range.
Returns or sets the object’s formula in A1-style notation and in the language of the macro.
Returns or sets the array formula of a range.
Determines if the formula will be hidden when the worksheet is protected.
Returns or sets the formula label type for the specified range.
Returns or sets the formula for the object, using A1-style references in the language of the user.
Returns or sets the formula for the object, using R1C1-style notation in the language of the macro.
Returns or sets the formula for the object, using R1C1-style notation in the language of the user.
Determines if the specified cell is part of an array formula.
Determines if all cells in the range contain formulas.
The height of the range.
Determines if the rows or columns are hidden.
Returns or sets the horizontal alignment for the specified object.
Returns a Hyperlinks collection that represents the hyperlinks for the range.
Returns or sets the identifying label for the specified cell when the page is saved as a Web page.
Returns or sets the indent level for the cell or range.
Returns an Interior object that represents the interior of the specified object.
Returns a Range object that represents a range at an offset to the specified range.
The distance from the left edge of column A to the left edge of the range.
Returns the number of header rows for the specified range.
Returns a ListObject object for the Range object or QueryTable object.
Returns a constant that describes the part of the PivotTable report that contains the upper-left corner of the specified range.
Determines if the object is locked.
Returns the MDX name for the specified Range object. Read-only.
Returns a Range object that represents the merged range containing the specified cell.
Determines if the range or style contains merged cells.
Returns or sets the name of the object.
Returns a Range object that represents the next cell.
Returns or sets the format code for the object.
Returns or sets the format code for the object as a string in the language of the user.
Returns a Range object that represents a range that’s offset from the specified range.
Returns the text orientation.
Returns or sets the current outline level of the specified row or column.
Returns or sets the location of a page break.
Returns the parent object for the specified object.
Returns the Phonetic object which contains information about a specific phonetic text string in a cell.
Returns the Phonetics collection of the range.
Returns a PivotCell object that represents a cell in a PivotTable report.
Returns a PivotField object that represents the PivotTable field containing the upper-left corner of the specified range.
Returns a PivotItem object that represents the PivotTable item containing the upper-left corner of the specified range.
Returns a PivotTable object that represents the PivotTable report containing the upper-left corner of the specified range, or the PivotTable report associated with the PivotChart report.
Returns a Range object that represents all the precedents of a cell.
Returns the prefix character for the cell.
Returns a Range object that represents the previous cell.
Returns a QueryTable object that represents the query table that intersects the specified Range object.
Returns a Range object that represents a cell or a range of cells.
Returns or sets the reading order for the specified object.
Resizes the specified range.
Returns the number of the first row of the first area in the range.
Returns the height of all the rows in the range specified, measured in points.
Returns a Range object that represents the rows in the specified range.
Specifies the actions that can be performed on the SharePoint server for a Range object.
Returns True if the outline is expanded for the specified range (so that the detail of the column or row is visible).
Determines if text automatically shrinks to fit in the available column width.
Returns a SmartTags object representing the identifier for the specified cell.
This property should not be used. Sound notes have been removed from Microsoft Excel.
Gets a SparklineGroups object that represents an existing group of sparklines from the specified range.
Returns a Style object that represents the style of the specified range.
Determines if the range is an outlining summary row or column.
Returns or sets the text for the specified object.
Returns the distance, in points, from the top edge of row 1 to the top edge of the range.
Determines if the row height of the Range object equals the standard height of the sheet.
Determines if the column width of the Range object equals the standard width of the sheet.
Returns the Validation object that represents data validation for the specified range.
Returns or sets the value of the specified range.
Returns or sets the cell value.
Returns or sets the vertical alignment of the specified object.
The width, in points, of the range.
Returns a Worksheet object that represents the worksheet containing the specified range.
Determines if Microsoft Excel wraps the text in the object.
Returns an XPath object that represents the Xpath of the element mapped to the specified Range object.
Methods
Reserved for internal use.
Reserved for internal use.
Activates a single cell, which must be inside the current selection.
Adds a comment to the range.
Filters or copies data from a list based on a criteria range.
Performs a writeback operation for all edited cells in a range based on an OLAP data source.
Applies names to the cells in the specified range.
Applies outlining styles to the specified range.
Returns an AutoComplete match from the list.
Performs an autofill on the cells in the specified range.
Filters a list using the AutoFilter.
Changes the width of the columns in the range or the height of the rows in the range to achieve the best fit.
Automatically formats the specified range, using a predefined format.
Automatically creates an outline for the specified range.
Adds a border to a range and sets the Color, LineStyle, and Weight properties for the new border.
Reserved for internal use.
Calculates a specified range of cells on a worksheet.
Calculates a specfied range of cells.
Checks the spelling of an object.
Clears the entire object.
Clears all cell comments from the specified range.
Clears the formulas from the range.
Clears the formatting of the object.
Removes all hyperlinks from the specified range.
Clears notes and sound notes from all the cells in the specified range.
Clears the outline for the specified range.
Returns a Range object that represents all the cells whose contents are different from the comparison cell in each column.
Consolidates data from multiple ranges on multiple worksheets into a single range on a single worksheet.
Copies the range to the specified range or to the Clipboard.
Copies the contents of an ADO or DAO Recordset object onto a worksheet, beginning at the upper-left corner of the specified range.
Copies the selected object to the Clipboard as a picture.
Creates names in the specified range, based on text labels in the sheet.
You have requested Help for a keyword used only on the Macintosh. For information about this keyword, consult the language reference Help included with Microsoft Office Macintosh Edition.
Cuts the object to the Clipboard or pastes it into a specified destination.
Creates a data series in the specified range.
Deletes the object.
Displays a dialog box defined by a dialog box definition table on a Microsoft Excel 4.0 macro sheet.
Designates a range to be recalculated when the next recalculation occurs.
Discards all changes in the edited cells of the range.
You have requested Help for a keyword used only on the Macintosh. For information about this keyword, consult the language reference Help included with Microsoft Office Macintosh Edition.
Exports to a file of the specified format.
Fills down from the top cell or cells in the specified range to the bottom of the range.
Fills left from the rightmost cell or cells in the specified range.
Fills right from the leftmost cell or cells in the specified range.
Fills up from the bottom cell or cells in the specified range to the top of the range.
Finds specific information in a range and returns a Range object that represents the first cell where that information is found.
TRUE indicates that the Excel Flash Fill feature has been enabled and active.
Starts the Function Wizard for the upper-left cell of the range.
Calculates the values necessary to achieve a specific goal.
When the Range object represents a single cell in a PivotTable field’s data range, the Group method performs numeric or date-based grouping in that field.
Inserts a cell or a range of cells into the worksheet or macro sheet and shifts other cells away to make space.
Adds an indent to the specified range.
Rearranges the text in a range so that it fills the range evenly.
Pastes a list of all displayed names onto the worksheet, beginning with the first cell in the range.
Creates a merged cell from the specified Range object.
Navigates a tracer arrow for the specified range to the precedent, dependent, or error-causing cell or cells.
Returns or sets the cell note associated with the cell in the upper-left corner of the range.
Parses a range of data and breaks it into multiple cells.
Pastes a Range from the Clipboard into the specified range.
Prints the object.
Reserved for internal use.
Shows a preview of the object as it would look when printed.
Removes duplicate values from a range of values.
Removes subtotals from a list.
Returns a Boolean indicating characters in cells within the specified range.
Returns a Range object that represents all the cells whose contents are different from those of the comparison cell in each row.
Runs the Microsoft Excel macro at this location.
Selects the object.
Creates Phonetic objects for all the cells in the specified range.
Scrolls through the contents of the active window to move the range into view.
Draws tracer arrows to the direct dependents of the range.
Draws tracer arrows through the precedents tree to the cell that’s the source of the error and returns the range that contains that cell.
Draws tracer arrows to the direct precedents of the range.
Sorts a PivotTable report, a range, or the active region if the specified range contains only one cell.
Uses East Asian sorting methods to sort the range or a PivotTable report, or uses the method for the active region if the range contains only one cell. For example, Japanese sorts in the order of the Kana syllabary.
Causes the cells of the range to be spoken in row order or column order.
Returns a Range object that represents all the cells that match the specified type and value.
You have requested Help for a keyword used only on the Macintosh. For information about this keyword, consult the language reference Help included with Microsoft Office Macintosh Edition.
Creates subtotals for the range (or the current region, if the range is a single cell).
Creates a data table based on input values and formulas that you define on a worksheet.
Parses a column of cells that contain text into several columns.
Promotes a range in an outline (that is, decreases its outline level).
Separates a merged area into individual cells.
Источник
Оставляю заметку по работе с Excel с помощью C#.
Привожу фрагменты кода, которые искал когда-то сам для работы с Excel документами.
Наработки очень пригодились в работе для формирования отчетности.
Прежде всего нужно подключить библиотеку Microsoft.Office.Interop.Excel.
Далее создаем псевдоним для работы с Excel:
using Excel = Microsoft.Office.Interop.Excel;
//Объявляем приложение
Excel.Application ex = new Microsoft.Office.Interop.Excel.Application();

//Отобразить Excel
ex.Visible = true;

//Количество листов в рабочей книге
ex.SheetsInNewWorkbook = 2;

//Добавить рабочую книгу
Excel.Workbook workBook = ex.Workbooks.Add(Type.Missing);

//Отключить отображение окон с сообщениями
ex.DisplayAlerts = false;

//Получаем первый лист документа (счет начинается с 1)
Excel.Worksheet sheet = (Excel.Worksheet)ex.Worksheets.get_Item(1);

//Название листа (вкладки снизу)
sheet.Name = "Отчет за 13.12.2017";

//Пример заполнения ячеек
for (int i = 1; i <= 9; i++)
{
  for (int j = 1; j < 9; j++)
  sheet.Cells[i, j] = String.Format("Boom {0} {1}", i, j);
}

//Захватываем диапазон ячеек
Excel.Range range1 = sheet.get_Range(sheet.Cells[1, 1], sheet.Cells[9, 9]);

//Шрифт для диапазона
range1.Cells.Font.Name = "Tahoma";
//Размер шрифта для диапазона
range1.Cells.Font.Size = 10;

//Захватываем другой диапазон ячеек
Excel.Range range2 = sheet.get_Range(sheet.Cells[1, 1], sheet.Cells[9, 2]);
range2.Cells.Font.Name = "Times New Roman";

//Задаем цвет этого диапазона. Необходимо подключить System.Drawing
range2.Cells.Font.Color = ColorTranslator.ToOle(Color.Green);
//Фоновый цвет
range2.Interior.Color = ColorTranslator.ToOle(Color.FromArgb(0xFF, 0xFF, 0xCC));
Расстановка рамок.
Расставляем рамки со всех сторон:
range2.Borders.get_Item(Excel.XlBordersIndex.xlEdgeBottom).LineStyle = Excel.XlLineStyle.xlContinuous;
range2.Borders.get_Item(Excel.XlBordersIndex.xlEdgeRight).LineStyle = Excel.XlLineStyle.xlContinuous;
range2.Borders.get_Item(Excel.XlBordersIndex.xlInsideHorizontal).LineStyle = Excel.XlLineStyle.xlContinuous;
range2.Borders.get_Item(Excel.XlBordersIndex.xlInsideVertical).LineStyle = Excel.XlLineStyle.xlContinuous;
range2.Borders.get_Item(Excel.XlBordersIndex.xlEdgeTop).LineStyle = Excel.XlLineStyle.xlContinuous;
Цвет рамки можно установить так:
range2.Borders.Color = ColorTranslator.ToOle(Color.Red);
Выравнивания в диапазоне задаются так:
rangeDate.VerticalAlignment = Excel.XlVAlign.xlVAlignCenter;
rangeDate.HorizontalAlignment = Excel.XlHAlign.xlHAlignLeft;
Формулы
Определим задачу: получить сумму диапазона ячеек A4:A10.
Для начала снова получим диапазон ячеек:
Excel.Range formulaRange = sheet.get_Range(sheet.Cells[4, 1], sheet.Cells[9, 1]);
Далее получим диапазон вида A4:A10 по адресу ячейки ( [4,1]; [9;1] ) описанному выше:
string adder = formulaRange.get_Address(1, 1, Excel.XlReferenceStyle.xlA1, Type.Missing, Type.Missing);
Теперь в переменной adder у нас хранится строковое значение диапазона ( [4,1]; [9;1] ), то есть A4:A10.
Вычисляем формулу:
//Одна ячейка как диапазон
Excel.Range r = sheet.Cells[10, 1] as Excel.Range;
//Оформления
r.Font.Name = "Times New Roman";
r.Font.Bold = true;
r.Font.Color = ColorTranslator.ToOle(Color.Blue);
//Задаем формулу суммы
r.Formula = String.Format("=СУММ({0}", adder);
Выделение ячейки или диапазона ячеек
Так же можно выделить ячейку или диапазон, как если бы мы выделили их мышкой:
sheet.get_Range("J3", "J8").Activate();
//или
sheet.get_Range("J3", "J8").Select();
//Можно вписать одну и ту же ячейку, тогда будет выделена одна ячейка.
sheet.get_Range("J3", "J3").Activate();
sheet.get_Range("J3", "J3").Select();
Авто ширина и авто высота
Чтобы настроить авто ширину и высоту для диапазона, используем такие команды:
range.EntireColumn.AutoFit();
range.EntireRow.AutoFit();
Получаем значения из ячеек
Чтобы получить значение из ячейки, используем такой код:
//Получение одной ячейки как ранга
Excel.Range forYach = sheet.Cells[ob + 1, 1] as Excel.Range;
//Получаем значение из ячейки и преобразуем в строку
string yach = forYach.Value2.ToString();
Добавляем лист в рабочую книгу
Чтобы добавить лист и дать ему заголовок, используем следующее:
var sh = workBook.Sheets;
Excel.Worksheet sheetPivot = (Excel.Worksheet)sh.Add(Type.Missing, sh[1], Type.Missing, Type.Missing);
sheetPivot.Name = "Сводная таблица";
Добавление разрыва страницы
//Ячейка, с которой будет разрыв
Excel.Range razr = sheet.Cells[n, m] as Excel.Range;
//Добавить горизонтальный разрыв (sheet - текущий лист)
sheet.HPageBreaks.Add(razr);
//VPageBreaks - Добавить вертикальный разрыв
Сохраняем документ
ex.Application.ActiveWorkbook.SaveAs("doc.xlsx", Type.Missing,
  Type.Missing, Type.Missing, Type.Missing, Type.Missing, Excel.XlSaveAsAccessMode.xlNoChange,
  Type.Missing, Type.Missing, Type.Missing, Type.Missing, Type.Missing);
Как открыть существующий документ Excel
ex.Workbooks.Open(@"C:UsersMyuserDocumentsExcel.xlsx",
  Type.Missing, Type.Missing, Type.Missing, Type.Missing,
  Type.Missing, Type.Missing, Type.Missing, Type.Missing,
  Type.Missing, Type.Missing, Type.Missing, Type.Missing,
  Type.Missing, Type.Missing);
Комментарии
При работе с Excel с помощью C# большую помощь может оказать редактор Visual Basic, встроенный в Excel.
Для этого в настройках ленты надо добавить пункт «Разработчик». Далее начинаем запись макроса, производим действия и останавливаем запись.
Далее заходим в редактор Visual Basic и смотрим код, который туда записался:
Например:
Sub Макрос1()
'
' Макрос1 Макрос
'

'
    Range("E88").Select
    ActiveSheet.ListObjects.Add(xlSrcRange, Range("$A$1:$F$118"), , xlYes).Name = _
        "Таблица1"
    Range("A1:F118").Select
    ActiveSheet.ListObjects("Таблица1").TableStyle = "TableStyleLight9"
    Range("E18").Select
    ActiveWindow.SmallScroll Down:=84
End Sub
В данном макросе записаны все действия, которые мы выполнили во время его записи. Эти методы и свойства можно использовать в C# коде.
Данный метод так же может оказать помощь в формировании относительных формул, например, выполнить сложение чисел, находящиеся слева от текущей ячейки на 4 столбца, и т.п. Пример:
//Складываем значения предыдущих 12 ячеек слева
rang.Formula = "=СУММ(RC[-12]:RC[-1])";
Так же во время работы может возникнуть ошибка: метод завершен неверно. Это может означать, что не выбран лист, с которым идет работа.
Чтобы выбрать лист, выполните sheetData.Select(Type.Missing); где sheetData это нужный лист.
Просмотрено:
81 944
Все привет, в этой статье опишу исчерпывающие примеры работы с excel на языке C#.
Для начала работы нам необходимо подключить библиотеку COM как на рисунке ниже:
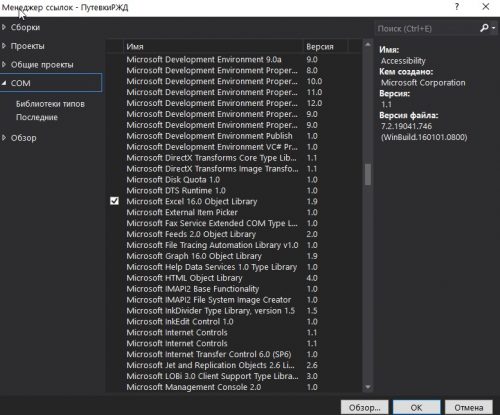
Для этого добавляем ссылку в проект, надеюсь вы знаете как это делается) Выбираем пункт COM ищем библиотеку Microsoft Excel 16.0 Object Library ставим галочку и жмем Ок.
Далее нам не обходимо для сокращения записи и удобства создать алиас.
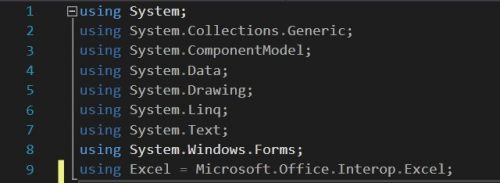
|
using Excel = Microsoft.Office.Interop.Excel; |
Теперь нам нужно объявить объект Excel задать параметры и приступать к работе.
|
//Объявляем приложение Excel.Application app = new Excel.Application { //Отобразить Excel Visible = true, //Количество листов в рабочей книге SheetsInNewWorkbook = 2 }; //Добавить рабочую книгу Excel.Workbook workBook = app.Workbooks.Add(Type.Missing); //Отключить отображение окон с сообщениями app.DisplayAlerts = false; //Получаем первый лист документа (счет начинается с 1) Excel.Worksheet sheet = (Excel.Worksheet)app.Worksheets.get_Item(1); //Название листа (вкладки снизу) sheet.Name = «Имя должно быть не больше 32сим»; |
Пример заполнения ячейки:
|
//Пример заполнения ячеек №1 for (int i = 1; i <= 9; i++) { for (int j = 1; j < 9; j++) sheet.Cells[i, j] = String.Format(«nookery {0} {1}», i, j); } //Пример №2 sheet.Range[«A1»].Value = «Пример №2»; //Пример №3 sheet.get_Range(«A2»).Value2 = «Пример №3»; |
Захват диапазона ячеек:
|
//Захватываем диапазон ячеек Вариант №1 Excel.Range r1 = sheet.Cells[1, 1]; Excel.Range r2 = sheet.Cells[9, 9]; Excel.Range range1 = sheet.get_Range(r1, r2); //Захватываем диапазон ячеек Вариант №2 Excel.Range range2 = sheet.get_Range(«A1»,«H9» ); |
Оформление, шрифт, размер, цвет, толщина.
|
//Шрифт для диапазона range.Cells.Font.Name = «Tahoma»; range2.Cells.Font.Name = «Times New Roman»; //Размер шрифта для диапазона range.Cells.Font.Size = 10; //Жирный текст range.Font.Bold = true; //Цвет текста range.Font.Color = ColorTranslator.ToOle(Color.Blue); |
Объединение ячеек в одну
|
//Объединение ячеек с F2 по K2 Excel.Range range3 = sheet.get_Range(«F2», «K2»); range3.Merge(Type.Missing); |
Изменяем размеры ячеек по ширине и высоте
|
//увеличиваем размер по ширине диапазон ячеек Excel.Range range2 = sheet.get_Range(«D1», «S1»); range2.EntireColumn.ColumnWidth = 10; //увеличиваем размер по высоте диапазон ячеек Excel.Range rowHeight = sheet.get_Range(«A4», «S4»); rowHeight.EntireRow.RowHeight = 50;range.EntireColumn.AutoFit();range.EntireColumn.AutoFit(); //авторазмер |
Создаем обводку диапазона ячеек
|
Excel.Range r1 = sheet.Cells[countRow, 2]; Excel.Range r2 = sheet.Cells[countRow, 19]; Excel.Range rangeColor = sheet.get_Range(r1, r2); rangeColor.Borders.Color = ColorTranslator.ToOle(Color.Black); |
Производим выравнивания содержимого диапазона ячеек.
|
Excel.Range r = sheet.get_Range(«A1», «S40»); //Оформления r.Font.Name = «Calibri»; r.Cells.Font.Size = 10; r.VerticalAlignment = Excel.XlVAlign.xlVAlignCenter; r.HorizontalAlignment = Excel.XlHAlign.xlHAlignCenter; |
Примеры вычисления формул, все вставки формул были скопированы из самой Excel без изменений. Позиция ячейки взята из счетчика переменно и подставлен к букве ячейки
|
sheet.Cells[countRow, countColumn] = $«=G{countRow}-F{countRow}»; sheet.Cells[countRow, countColumn].FormulaLocal = $«=ЕСЛИ((H{countRow}*O{countRow})+(I{countRow}*P{countRow})/100<=0;J{countRow}*O{countRow}/100;((H{countRow}*O{countRow})+(I{countRow}*P{countRow}))/100)»; sheet.Cells[countRow, countColumn] = $«=K{countRow}+N{countRow}-R{countRow}»; sheet.Cells[33, 22].FormulaLocal = «=СУММ(V3:V32)»; |
Добавляем разрыв страницы.
|
//Ячейка, с которой будет разрыв Excel.Range razr = sheet.Cells[n, m] as Excel.Range; //Добавить горизонтальный разрыв (sheet — текущий лист) sheet.HPageBreaks.Add(razr); //VPageBreaks — Добавить вертикальный разрыв |
Как открыть фаил Excel
|
app.Workbooks.Open(@»C:UsersUserDocumentsExcel.xlsx», Type.Missing, Type.Missing, Type.Missing, Type.Missing, Type.Missing, Type.Missing, Type.Missing, Type.Missing, Type.Missing, Type.Missing, Type.Missing, Type.Missing, Type.Missing, Type.Missing); |
Сохраняем документ Excel
|
app.Application.ActiveWorkbook.SaveAs(«MyFile.xlsx», Type.Missing, Type.Missing, Type.Missing, Type.Missing, Type.Missing, Excel.XlSaveAsAccessMode.xlNoChange, Type.Missing, Type.Missing, Type.Missing, Type.Missing, Type.Missing); |
Завершение работы с объектом Excel.Application
|
app.Quit(); System.Runtime.InteropServices.Marshal.ReleaseComObject(app); |
Пример как выбрать фаил и загрузив его и узнать количество заполненных строк и колонок в одном конкретном листе по имени.
|
1 2 3 4 5 6 7 8 9 10 11 12 13 14 15 16 17 18 19 20 21 22 23 24 25 |
//поиск файла Excel OpenFileDialog ofd = new OpenFileDialog(); ofd.Multiselect =false; ofd.DefaultExt = «*.xls;*.xlsx»; ofd.Filter = «Microsoft Excel (*.xls*)|*.xls*»; ofd.Title = «Выберите документ Excel»; if (ofd.ShowDialog() != DialogResult.OK) { MessageBox.Show(«Вы не выбрали файл для открытия», «Внимание», MessageBoxButtons.OK, MessageBoxIcon.Information); return; } string xlFileName = ofd.FileName; //имя нашего Excel файла //рабоата с Excel Excel.Range Rng; Excel.Workbook xlWB; Excel.Worksheet xlSht; int iLastRow, iLastCol; Excel.Application xlApp = new Excel.Application(); //создаём приложение Excel xlWB = xlApp.Workbooks.Open(xlFileName); //открываем наш файл xlSht = xlWB.Worksheets[«Лист1»]; //или так xlSht = xlWB.ActiveSheet //активный лист iLastRow = xlSht.Cells[xlSht.Rows.Count, «A»].End[Excel.XlDirection.xlUp].Row; //последняя заполненная строка в столбце А iLastCol = xlSht.Cells[1, xlSht.Columns.Count].End[Excel.XlDirection.xlToLeft].Column; //последний заполненный столбец в 1-й строке |
Получаем список всех загруженных книг «листов» из файла
|
1 2 3 4 5 6 7 8 9 10 11 12 13 14 15 16 17 18 19 |
//поиск файла Excel OpenFileDialog ofd = new OpenFileDialog(); ofd.Multiselect = false; ofd.DefaultExt = «*.xls;*.xlsx»; ofd.Filter = «Microsoft Excel (*.xls*)|*.xls*»; ofd.Title = «Выберите документ Excel»; if (ofd.ShowDialog() != DialogResult.OK) { MessageBox.Show(«Вы не выбрали файл для открытия», «Внимание», MessageBoxButtons.OK, MessageBoxIcon.Information); return; } string xlFileName = ofd.FileName; //имя нашего Excel файла Excel.Workbook xlWB = ex.Workbooks.Open(xlFileName); ///загружаем список всех книг foreach (object item in xlWB.Sheets) { Excel.Worksheet sheet = (Excel.Worksheet)item; } |
Working with C# and Excel has been discussed on this site before with tips on preventing Excel.exe from hanging and converting integers into Excel column headings. Today’s post is a very brief example on how we can extract data from specific cells of an Excel worksheet.
Obtaining a value from a specific cell
Assuming we have a value in cell B16 that we wish to have out as a string in our C# code, we can use the following code:
String myString = ((Range)worksheet.Cells[16, 2]).Value2.ToString();
Where:
- Range comes from the Excel interop namespace (‘Microsoft.Office.Interop’)
- worksheet refers to the Excel worksheet you’re working on (see example below)
Obtaining a range of values from a range of cells
Assuming we have values in the range B16 to C20 inclusive, we can create a new range to obtain the values from into an array of objects, like so:
object[,] myObjects;

Range range = worksheet.Range[worksheet.Cells[16, 2], worksheet.Cells[20, 3]];
myObjects = range.Value;
Once you have the array of objects you can then cast them to other data types in the usual manner.
Extended example
Here’s a quick example of setting up an Excel application, opening a worksheet and obtaining a value using both of the above methods.
Application excelApp = new Application();
Workbook workbook = excelApp.Workbooks.Open(@"C:MyWorkbook.xlsx");
Worksheet worksheet = workbook.ActiveSheet;
String b16 = ((Range)worksheet.Cells[16, 2]).Value2.ToString();
object[,] objects = ((Range)worksheet.Range[worksheet.Cells[16, 2], worksheet.Cells[20, 3]]).Value;
About Author

FraserG
Computer Scientist currently undertaking an Engineering Doctorate degree discussing computing, programming, research and racing.
Время на прочтение
7 мин
Количество просмотров 69K
В современном мире разработки приложений нередко встает необходимость работы с Excel документами. Чаще всего это разного рода отчеты, но иногда xls/x файлы используются в качестве хранилища данных. Например, если пользователь должен иметь возможность загрузить данные в приложение или выгрузить, в человеко-читаемом виде, Excel де-факто является стандартом. Относительно дружелюбный интерфейс, прозрачная структура, в купе с его распространенностью… трудно навскидку назвать решение лучше.

Однако, у многих Excel до сих пор ассоциируется с чем-то тяжелым, неповоротливым и сложным. Давайте посмотрим, как мы — обычные C# разработчики, можем легко сформировать простой Excel документ, на примере табличного отчета.
Историческая справка
Времена, когда доминировал проприетарный формат .xls(Excel Binary File Format) давно прошли и сейчас мы имеем только .xlsx(Excel Workbook), в рамках Office Open XML. Последний представляет собой обычный .zip архив с XML файлами. Не будем углубляться в его структуру, я искренне надеюсь что вам это никогда не понадобится.
На github, и не только, можно найти ряд библиотек, бесплатных и не только. Пожалуй самой популярной является EPPlus. До определенной степени, она довольно хорошо отражает концепцию Excel, именно по этому я всегда использую EPPlus. Версия 4 полностью бесплатна, начиная с 5‐й версии вам потребуется приобрести лицензию для коммерческого использования.
Задача
Итак, предположим, продукт-мэнеджеру ударила в голову идея того, что возможность выгружать некий отчет в формате Excel увеличит кол-во пользователей на 100500%. Проджет-менеджер решает выкатить эту киллер-фичу как хотфикс прямо сегодня — ведь работы всего на пару часов.

Сам по себе, отчет содержит краткое описание компании и историю изменения некоторых экономических показателей. Для простоты все свойства компании — строки. Экономические показатели — большие целые числа и числа с плавающей точкой, а также даты. Предположим, что где-то в недрах микросервисного backend-да есть сервис-генератор подобных отчетов, например по id компании. Однако, поскольку id нет смысла выводить пользователю, идентификатор отсутствует в самой модели отчета.
Аналитик, в свою очередь, выдает задачу с феноменально точным описанием — «Сгенерировать excel отчет на базе данных MarketReport». Что ж, для нашего примера, создадим заглушку — генератор фейковых данных:

Первый запуск
Подключим EPPlus версии 4.5.3.3 и создадим базовую обвязку для будущего генератора.

Сердцем генератора будет метод Generate. ExcelPackage это модель документа, через которую мы и будем осуществлять все взаимодействия с ним. Также имеется конструктор для передачи пути к файлу или потока.

В методе main создается генератор отчетов, а также генератор Excel файлов. Далее полученный файл просто записывается на диск.
При попытке запустить приложение, получаем exception:InvalidOperationException: The workbook must contain at least one worksheet
Все правильно, Excel документ не может существовать без страниц, должна быть хотя бы одна. Добавляем ее, все интуитивно понятно:
var sheet = package.Workbook.Worksheets
		.Add("Market Report");
Запускаем снова и… вот оно! Теперь наше приложение генерирует документ и, хотя там еще ничего нет, он уже весит 2,5KB — значит мы работаем с Excel правильно и все идет как надо.
Вывод данных
Давайте выведем основную информацию по компании в шапку. Для доступа к конкретной ячейки объект Cells на странице пакета снабжен удобным индексатором. При этом, до конкретной ячейки можно достучаться как через номер строки и столбца, так и по привычному всем буквенно-числовому коду:
sheet.Cells["B2"].Value = "Company:";
sheet.Cells[2, 3].Value = report.Company.Name;
Полный код вывода шапки.
sheet.Cells["B2"].Value = "Company:";
sheet.Cells[2, 3].Value = report.Company.Name;
sheet.Cells["B3"].Value = "Location:";
sheet.Cells["C3"].Value = $"{report.Company.Address}, " +
  												$"{report.Company.City}, " +
  												$"{report.Company.Country}";
sheet.Cells["B4"].Value = "Sector:";
sheet.Cells["C4"].Value = report.Company.Sector;
sheet.Cells["B5"].Value = report.Company.Description;
Для вывода исторических данных понадобится как минимум шапка таблицы и цикл по массиву History:
sheet.Cells[8, 2, 8, 4].LoadFromArrays(new object[][]{ new []{"Capitalization", "SharePrice", "Date"} });
var row = 9;
var column = 2;
foreach (var item in report.History)
{
  sheet.Cells[row, column].Value = item.Capitalization;
  sheet.Cells[row, column + 1].Value = item.SharePrice;
  sheet.Cells[row, column + 2].Value = item.Date;
  row++;
}
Предлагаю обратить внимание на метод LoadFromArrays, который заполняет диапазон ячеек рваным(зубчатым) массивом. Здесь мы можем видеть, что типизация теряется и передавая массив object мы ожидаем что EPPlus в конечном итоге использует ToString, чтобы записать переданное в ячейки.
Стилизация
Если вы прямо сейчас откроете документ, то вы возможно увидите не то, что хотелось бы отдать в продакшн в пятницу вечером.
Как это выглядит

Во-первых, шапка никак не выделяется, во-вторых таблица не имеет границ… выравнивание пляшет, даты отображаются магическими числами, а капитализация «уходит в какую-то математику» — как это прокомментировал аналитик.
Да, на все эти красивости у нас уйдет больше года кода, чем на сам вывод данных, и, в конечном тоге, получившаяся каша из логики вывода данных и разметки заставит некоторых усомниться в их компетентности… но, мы же backend разработчики, так давайте сверстаем Excel Sheet!
Размер ячеек
Из коробки у нас есть возможность сделать автофит а так же вручную выставить ширину в соответствии с нашей ситуацией. А ситуация у нас не самая хорошая — по задумке аналитика в шапке у ячеек должен быть автофит, а у ячеек таблицы — тоже автофит. Так в чем же подвох?
Если вы когда-нибудь до этого открывали Excel, то возможно знаете, что ширина ячеек не может отличаться в рамках столбца и автофит будет по самому широкому контенту ячейки. Однако, простые вещи бывает нетак то просто объяснить… Но если вы справитесь, то вот как это будет выглядеть в коде:
sheet.Cells[1, 1, row, column + 2].AutoFitColumns();
sheet.Column(2).Width = 14;
sheet.Column(3).Width = 12;
Формат данных
Как и большая часть стиля ячейки, он задается через одноименное свойство Style. Обратите внимание на вычисление 3-го аргумента индексатора. Это звоночек некачественного кода, но к этому мы вернемся в позже…
sheet.Cells[9, 4, 9 + report.History.Length, 4].Style.Numberformat.Format = "yyyy";
sheet.Cells[9, 2, 9 + report.History.Length, 2].Style.Numberformat.Format =  "### ### ### ##0";
Выравнивание
Его можно задать как на ячейке, так и на диапазоне. На самом деле, для EPPlus, это одна и та же сущность — некий ExcelRange, описывающий диапазон ячеек, в том числе и со всего 1 ячейкой.
sheet.Column(2).Style.HorizontalAlignment = ExcelHorizontalAlignment.Left;
sheet.Cells[8, 3, 8 + report.History.Length, 3].Style.HorizontalAlignment = ExcelHorizontalAlignment.Center;
Стиль текста
Также легко задается, используя Style.Font, кстати, здесь, на 2-й строчке, мы впервые указываем диапазон так, как привыкли его видеть пользователи Excel:
sheet.Cells[8, 2, 8, 4].Style.Font.Bold = true;
sheet.Cells["B2:C4"].Style.Font.Bold = true;
Границы
Задаем стиль линии, а также ее толщину. К этому моменту от кол-ва магических чисел-параметров индексатора уже рябит в глазах, но мы уже на финишной прямой… не так ли?
sheet.Cells[8, 2, 8 + report.History.Length, 4].Style.Border.BorderAround(ExcelBorderStyle.Double);
sheet.Cells[8, 2, 8, 4].Style.Border.Bottom.Style = ExcelBorderStyle.Thin;
График
«Ну что за отчет без графиков, верно, Карл?» — ловко подметит специалист по тестированию, и не важно, что этого не было в ТЗ а на часах уже половина 9-го…
Хотя график как сущность сам по себе сложнее таблиц и с графиками мы не работаем каждый день, EPPlus предоставляет довольно понятный API. Давайте добавим простейший график, отражающий рост капитализации:
var capitalizationChart = sheet.Drawings.AddChart("FindingsChart", OfficeOpenXml.Drawing.Chart.eChartType.Line);
capitalizationChart.Title.Text = "Capitalization";
capitalizationChart.SetPosition(7, 0, 5, 0);
capitalizationChart.SetSize(800, 400);
var capitalizationData = (ExcelChartSerie)(capitalizationChart.Series.Add(sheet.Cells["B9:B28"], sheet.Cells["D9:D28"]));
capitalizationData.Header = report.Company.Currency;
Еще, может понадобиться защитить страницу от редактирования:
sheet.Protection.IsProtected = true;На этом все, репозиторий с рабочим приложением находится здесь.
Заключение
О чем говорит финальная версия метода Generate?
public byte[] Generate(MarketReport report)
{
  var package = new ExcelPackage();

  var sheet = package.Workbook.Worksheets
    	.Add("Market Report");

  sheet.Cells["B2"].Value = "Company:";
  sheet.Cells[2, 3].Value = report.Company.Name;
  sheet.Cells["B3"].Value = "Location:";
  sheet.Cells["C3"].Value = $"{report.Company.Address}, " +
    												$"{report.Company.City}, " +
    												$"{report.Company.Country}";
  sheet.Cells["B4"].Value = "Sector:";
  sheet.Cells["C4"].Value = report.Company.Sector;
  sheet.Cells["B5"].Value = report.Company.Description;

  sheet.Cells[8, 2, 8, 4].LoadFromArrays(new object[][]{ new []{"Capitalization", "SharePrice", "Date"} });
  var row = 9;
  var column = 2;
  foreach (var item in report.History)
  {
    	sheet.Cells[row, column].Value = item.Capitalization;
   		sheet.Cells[row, column + 1].Value = item.SharePrice;
   		sheet.Cells[row, column + 2].Value = item.Date;
    	row++;
  }

  sheet.Cells[1, 1, row, column + 2].AutoFitColumns();
  sheet.Column(2).Width = 14;
  sheet.Column(3).Width = 12;

  sheet.Cells[9, 4, 9+ report.History.Length, 4].Style.Numberformat.Format = "yyyy";
  sheet.Cells[9, 2, 9+ report.History.Length, 2].Style.Numberformat.Format =  "### ### ### ##0";

  sheet.Column(2).Style.HorizontalAlignment = ExcelHorizontalAlignment.Left;
  sheet.Cells[8, 3, 8 + report.History.Length, 3].Style.HorizontalAlignment = ExcelHorizontalAlignment.Center;
  sheet.Column(4).Style.HorizontalAlignment = ExcelHorizontalAlignment.Right;

  sheet.Cells[8, 2, 8, 4].Style.Font.Bold = true;
  sheet.Cells["B2:C4"].Style.Font.Bold = true;

  sheet.Cells[8, 2, 8 + report.History.Length, 4].Style.Border.BorderAround(ExcelBorderStyle.Double);
  sheet.Cells[8, 2, 8, 4].Style.Border.Bottom.Style = ExcelBorderStyle.Thin;

  var capitalizationChart = sheet.Drawings.AddChart("FindingsChart", OfficeOpenXml.Drawing.Chart.eChartType.Line);
  capitalizationChart.Title.Text = "Capitalization";
  capitalizationChart.SetPosition(7, 0, 5, 0);
  capitalizationChart.SetSize(800, 400);
  var capitalizationData = (ExcelChartSerie)(capitalizationChart.Series.Add(sheet.Cells["B9:B28"], sheet.Cells["D9:D28"]));
  capitalizationData.Header = report.Company.Currency;

  sheet.Protection.IsProtected = true;

  return package.GetAsByteArray();
}
Во-первых, прежде всего, о том, что мы успешно справились с задачей, а именно, сгенерировали свой первый Excel отчет, поработали со стилями и даже решили пару попутных проблем.
Во-вторых, возможно имеет смысл искать новою работу, но, забегая вперед, я бы с этим не спешил… Если данная публикация наберет 1+ просмотров, то во второй части мы поговорим о том, как можно отделить стилизацию от логики заполнения данными, упростить манипуляции над ячейками и в целом сделаем код боле поддерживаемым.
- Remove From My Forums
-
Question
-
Hi Team,
I’ve one concern i getting the Cell’s Value which has the Formulas as below.
From the Sheet i need to get the FR1 Cells address and as well as Estimates Sales Tax i.e, $B$123 or $B$126.
When i clicked on the Cell, its showing the address as the IF(((…. some thing like that.

And i am using the below code to get the FR1 or Estimated Sales Tax as below and its returning the Cell’s Address as null.
private string OrderLabor_TotalTaxRange(string strEstimatedSalesTax, ExcelTools.Interop.Excel.Worksheet wsOrderLabor)
{
string strCellAddress = null;try
{
Microsoft.Office.Interop.Excel.Range ColRange = wsOrderLabor.get_Range(«B:B»);
Microsoft.Office.Interop.Excel.Range RowRange = ColRange.Find(strEstimatedSalesTax, Type.Missing,
Microsoft.Office.Interop.Excel.XlFindLookIn.xlFormulas,
Microsoft.Office.Interop.Excel.XlLookAt.xlWhole,
Microsoft.Office.Interop.Excel.XlSearchOrder.xlByColumns,
Microsoft.Office.Interop.Excel.XlSearchDirection.xlNext,
false, false, false);return strCellAddress = RowRange.Address;
}
catch (Exception ex)
{
LogError(ex);
}return strCellAddress;
}Kindly Suggest.
Regards,
Sureshbabu-
Edited by
Monday, August 8, 2016 2:28 PM
-
Edited by
Answers
-
Hi suresh,
use the code below to get the cell address of FR1. and with the same steps you can also get the cell address of another values in sheet.
private void DemoFind()
{
    string rngadd;
    Excel.Range currentFind = null;
    Excel.Range rng = Application.get_Range("A:A");
    currentFind = rng.Find("Fr1", missing,
        Excel.XlFindLookIn.xlValues, Excel.XlLookAt.xlPart,
        Excel.XlSearchOrder.xlByRows, Excel.XlSearchDirection.xlNext, false,
        missing, missing);
    rngadd = currentFind.Address;
    MessageBox.Show("Range Address of FR1=" + rngadd);
}
Regards
Deepak
We are trying to better understand customer views on social support experience, so your participation in this interview project would be greatly appreciated if you have time. Thanks for helping make community forums a great place.
Click
HERE to participate the survey.-
Marked as answer by
Sureshbabu Yadavalli
Tuesday, August 9, 2016 9:30 AM
-
Marked as answer by
- Download SetExcelCell-noexe.zip — 30.2 KB
- Download SetExcelCell.zip — 39.4 KB
Automate the process of set value to the Excel cells, assigning a cell
name that match the query result column name, leaving the end user the
possibility to change the layout template.
Introduction
For
work activity, I need to create a report like in the figure below:

The
template can be modified from the user, changing the cell’s position, removing cells
and adding new cells that will get the value from the query result.
Desiderata
I want to
have the possibility to define a cell name equal to the column name returned
from a query result, so I will be able to get the cell matching its name with
the column name in query result. In this way I can loop over every column in
the query result and get the Excel cells, independently by its position:
foreach (DataRow dataRow in dataTable.Rows)
{
  foreach (DataColumn dataColumn in dataTable.Columns)
  {

    Excel.Range cell = ws.Cells[dataColumn.ColumnName];
    cell.Value = dataRow[dataColumn.ColumnName];
  }
}
The above code, unfortunately, does not work.
Solution
To get the desired result, we must use the Evaluate() method,
defined in the WorkSheet Excel object. This method takes a string and start looking for a cell (or a range of cells) that match that string.
When evaluate positively, it returns an instance of an Excel.Range object, that is the requested cell:
foreach (DataRow dataRow in dataTable.Rows)
{
  foreach (DataColumn dataColumn in dataTable.Columns)
  {
    Excel.Range cell = ws.Evaluate(dataColumn.ColumnName);
    if (cell != null) cell.Value = dataRow[dataColumn.ColumnName];
  }
}
Define cell name
To correctly run the above code, we must specify the cell names.
To do that, right click on the cell and choose the Define Name item menu, like show below:

This will open a popup window where you can define the cell name:

The Scope option, give you the possibility to choose the name visibility: this name must be unique in the chosen scope: unique per entire
Excel document (Workbook) or unique per sheet (worksheet). Once you have assigned the cell name, you can see it in the left up corner:

After you have set the cell name, it can still be get using the classic mode that is use the coordinates, like show below:
Excel.Worksheet workSheet = workbookReport.Worksheets[1];
Excel.Range cell = workSheet.Cells[1, 2];
Delete or change the cell name
To remove a cell name or simply change it, you must use the Name Manager menu item under the Formulas tab:

This will open the following page that reports all the cell’s names allowing you to delete or change their names:

Choosing a name in the list, you can modify it simply clicking on the Edit or Delete button.
Create tabular report
Starting from a query result, loaded within a DataTable:

We want to create an Excel tabular report like:

As you can see, we need a sort of Pivot table, because we have the records organized row by row. We can easily solve it, applying a cell name that is related
to the month: so, for every cell we can assign a name that is identic to the DataTable column’s name plus the month number:

Now, we can simply use the following code to get the automatic set for every cell matching the datatable’s columns name:
foreach (DataRow dataRow in dataTable.Rows)
{
  DateTime period = Convert.ToDateTime(dataRow["PERIOD_START_DATE"]);

  foreach (DataColumn dataColumn in dataTable.Columns)
  {
    string cellName = dataColumn.ColumnName + "_" + period.Month.ToString("d2"));
    Excel.Range cell = workSheet.Evaluate(cellName) as Excel.Range;
    if (cell != null) cell.Value = value;
  }
}
Attached project
The attached project in this article, include an Excel file used like template. In this template I have defined the cell names, according to the DataTable’s
column name: using this template I create a new Excel report on which I set the cell’s values.
Requirements
The project must reference Microsoft.Office.Interop.Excel.
Get Microsoft Excel Cell Value Using C# And Office.Interop.Excel
Hello,
In this article, I’ll show you two options to get the cell value of excel using C#. Given that you are using VSTO and have referenced the assembly Microsoft.Office.Interop.Excel.
1 2 3 |
var cellValue = (string)(xlWorkSheet.Cells[3, 6] as Excel.Range).Value2; //or this var cellValue = xlWorkSheet.get_Range("F3", Type.Missing).Value2; |
Note: xlWorkSheet is an Excel Worksheet object.
Popular Posts From This Blog
WPF CRUD Application Using DataGrid, MVVM Pattern, Entity Framework, And C#.NET

Good day to all! Here’s an example of a WPF CRUD (Create,Update and Delete) project using the DataGrid control, ADO.NET Entity Framework 6.x, C#.NET and Model–View–Viewmodel(MVVM) architectural pattern. This post was based from this tutorial WPF CRUD With DataGrid, Entity Framework And C#.NET except that we are now using the MVVM framework. The steps below are pretty straightforward and easy to follow. I. Project Setup 1. Add a table called Students in you database. The complete script is found in this post WPF CRUD With DataGrid, Entity Framework And C#.NET 2. Create a WPF Project and add four folders called DataAccess, Model, View and ViewModel. 3. Your project structure may look similar with the screenshot provided below. II. Coding The Model and Repository Class 1. Inside the Model folder, add an ADO.NET Entity Data Model that connects to the Students table in your database. On my part, I named it StudentModel . 2. For the connectionstring name, I changed it to Stude
How To Insert Or Add Emojis In Microsoft Teams Status Message

Good day Gents! I was trying to update my Microsoft Teams status and was wondering if I can add or insert emoji. For editing or adding new teams status, only text fields are available and there’s no emoji icon similar to writing a teams message. After googling for a few minutes, I found this link Emoji’s in status which is a feature request in Microsoft Teams User’s Voice Forum. So far this upgrade request only has thirty votes which is relatively small and may be considered a low priority for the product team to implement. Given the limitations at hand, I tried several approach including copying an emoji in a chat message which didn’t work and later found a solution using Microsoft Outlook 365. First is to create a new email message in Microsoft Outlook and press (Window Key + .). The emoji dropdown control will appear. Next is to select the emoji that you wanted to add to Teams. Copy the emoji from the newly created email message template and paste that to Micr
How To Install Or Add Icons In ASP.NET Core MVC Pages Using Font Awesome

This post illustrates on how to install or add icons to your ASP.NET Core MVC website pages using Font Awesome. If you added Bootstrap 4.x to your project, you might noticed that when you typed glyphicon in a class attribute of an html element, the intellisense does’nt show the glyphicons from Bootstrap 3.x. It’s because Bootstrap 4.x does not support glyphicons anymore but instead encourage us to use Font Awesome. Given that you have already created your ASP.NET Core MVC project, the next thing to do is install via Libman the Font Awesome library. When installed, this will be mapped to your wwwroot folder. In Layout.cshtml page, reference these three files specifically fontawesome.css, regular.min.css and solid.min.css. In that way, Font Awesome is accessible globally in your project. <link rel= «stylesheet» href= «~/lib/font-awesome/css/fontawesome.css» /> <link rel= «stylesheet» href= «~/lib/Font-Awesome/css/regular.min.css&