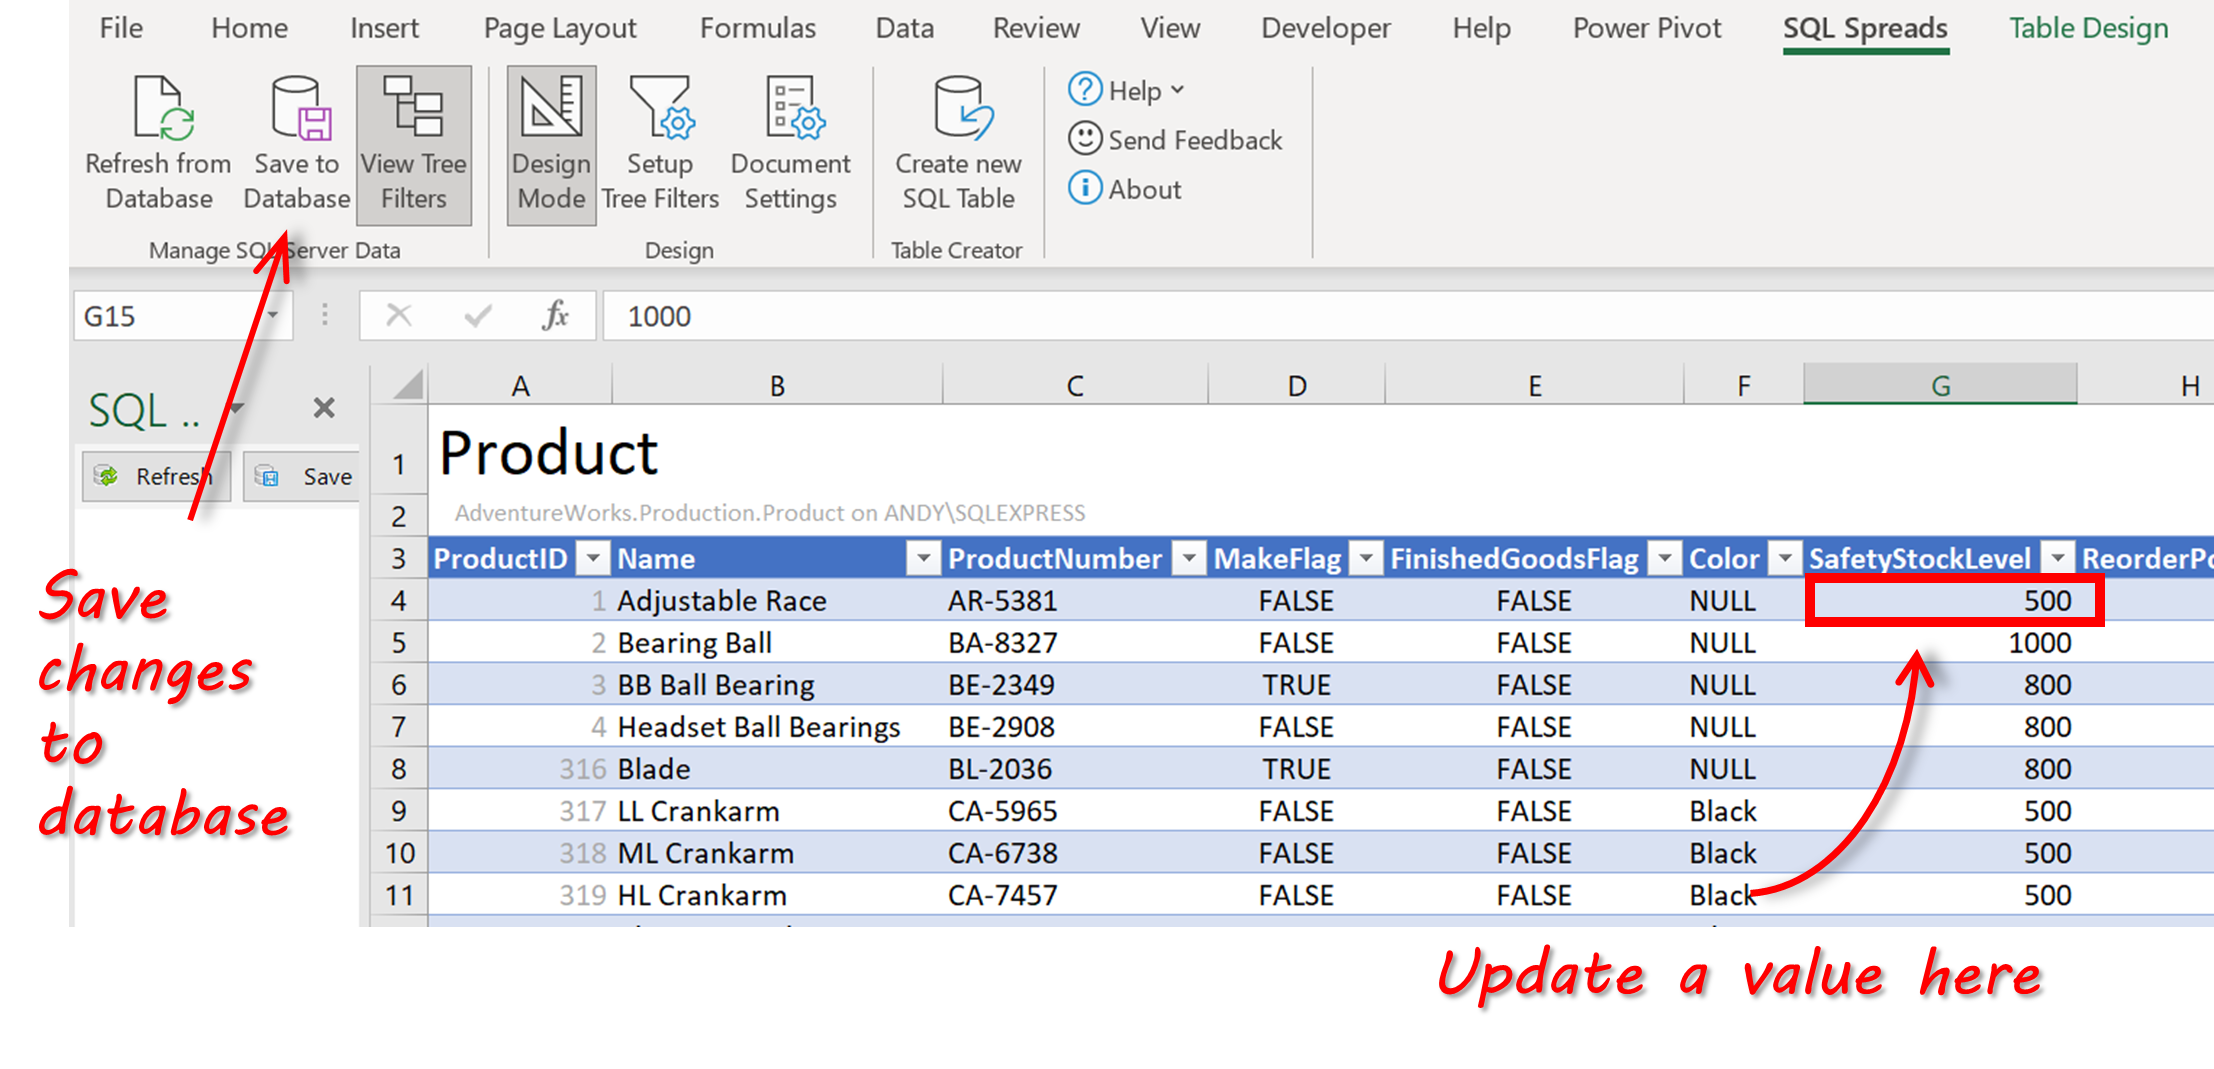
In this article, you’re going to learn 2 easy ways to perform one of the most useful data management tasks: how to insert data from Excel to SQL Server.
Table of contents
- 1. Background
- 2. How to import data from Excel to SQL Server – Copy and Paste method
- a. Step-by-step instructions
- b. How to insert data from Excel to SQL Server with an identity column
- c. Copy and paste data from Excel to SQL Server Views
- d. Excel to SQL Server import on a remote machine
- e. Tips when copying and pasting data from Excel to SQL server
- f. Excel to SQL Server performance
- g. Copy and paste – a quick reference
- 3. How to import data from Excel to SQL Server – SQL Spreads method
- a. Install the SQL Spreads Add-In for Excel
- b. Connect to your database and insert data from Excel
- c. Inserting new rows into SQL Server
- d. Updating existing data in SQL Server
- 4. Other tools and techniques
- 5. Summary – insert data from Excel to SQL Server
Background
Before I founded SQL Spreads (an Excel Add-In to Import and Update SQL Server data from within Excel), I worked as a Business Intelligence consultant for many years using Microsoft’s BI-tools, such as SQL Server, SSIS, Reporting Services, Excel, etc.
I’ve found that when working on different projects, I tend to snap up a number of great-to-know things that I can re-use over and over again. One of these things that I re-use in almost every project is the ability to copy and paste data from Excel into a table in SQL Server.
It’s a really simple and convenient way to quickly import data into a table via SQL Server Management Studio. For example, populating a new dimension table, adding some test data, or inputting any other data that you need to quickly get into a table in SQL Server.
But what if you want to insert data from Excel to SQL without using Management Studio? What if there was a way to do this directly from Excel? This is where the SQL Spreads Excel Add-In that I’ve been working with over the last few years comes in. It makes your Excel to SQL Server import tasks much easier to do!
In this article, I’m therefore going to explain how to insert data from Excel to SQL Server using these 2 easy methods:
- Copy and paste from Excel to SQL tables via SQL Server Management Studio
- Insert directly from Excel to SQL tables using SQL Spreads
How to import data from Excel to SQL Server – Copy and Paste method
Step-by-step Instructions
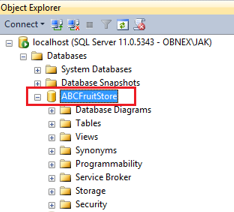
- Open SQL Server Management Studio and connect to your SQL Server database.
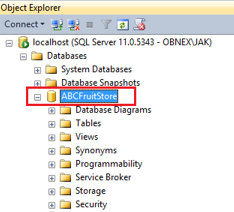
- Expand the Databases and the Tables folders for the table where you would like to insert your data from Excel.
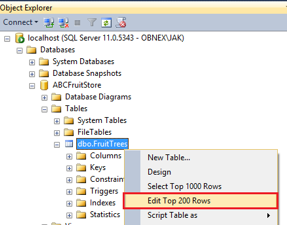
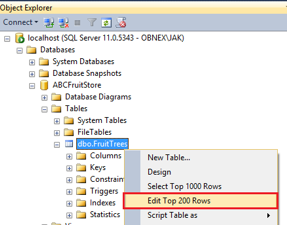
- Right-click the table and select the fourth option – Edit Top 200 Rows.
- The data will be loaded and you will see the first 200 rows of data in the table.
- Switch to Excel and select the rows and columns to insert from Excel to SQL Server.
Right-click the selected cells and select Copy.
- Switch back to SQL Server Management Studio and scroll down to the last row at the bottom and locate the row with a star in the left-most column.
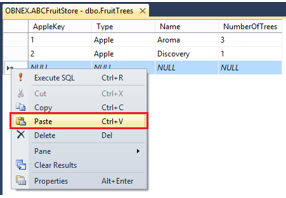
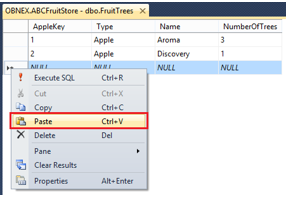
- Right click the star in the column header and select Paste.
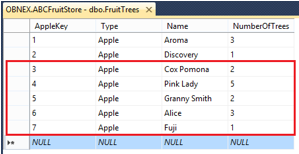
- You have now completed your SQL Server import, and your data from Excel is now in a table in SQL Server!
Remember: Always start with copying and pasting a single row of data from Excel to SQL Server. This is to check that there are no mismatches between your data from Excel and the SQL Server table (such as the number of columns) and that your data in Excel validates with the data types in the SQL Server table. See the section “Tips and tricks” below for more details.
How to insert data from Excel to SQL Server with an identity column
The same technique can also be used to copy and paste data into tables that have an auto-incrementing ID column (identity column).
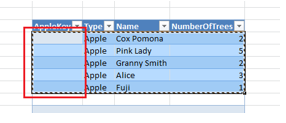
The thing to keep in mind here is to also include an extra left-most blank column in Excel when copying the data from Excel to SQL Server.
Follow these steps to copy and paste the data from Excel to SQL Server using a table with an auto-incrementing ID column:
- Open SQL Server Management Studio and connect to your SQL Server database.
- Expand the Databases and the Tables folders for the table where you would like to paste the Excel data.
- Right-click the table name and select Edit Top 200 Rows, the fourth option from the top.
- This will bring up a grid with the first 200 rows of data in the table.
- Switch to Excel and select the rows and columns to copy. Do not include the header row.
Now, also remember to include an extra blank left-most column in your selection.
Then, right-click the selected cells and select Copy. - Switch back to SQL Server Management Studio, and select the tab with the 200 rows from your table.
Go to the last row at the bottom and locate the row with a star in the left-most column.
- Right-click on the star and select Paste.
- Your data from Excel is now pasted into your table in SQL Server, and SQL Server will automatically create the values in the ID/key column for you:
Copy and paste data from Excel to SQL Server Views
The copy and paste method also works when your Excel to SQL Server import is to a View as opposed to a Table. The only requirement is that the View should only contain data from one table.
In a View in SQL Server that contains data from several joined tables you cannot insert new rows, but you can update the data, as long as you only update columns that originate from the same base table.
Excel to SQL Server import on a remote machine
When working with SQL Server databases on a remote machine, where you connect to the remote machine using a Remote Desktop Connection, you can still use the same copy and paste technique to move the data from your local machine’s Excel to the SQL Server database on your remote machine.
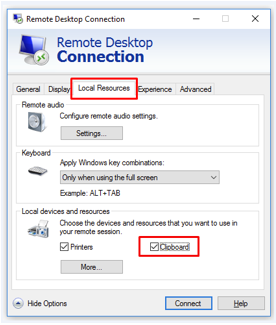
If you are not able to copy and paste the data into your SQL Server when connected using a Remote Desktop Connection, first check that copy and paste is enabled for the Remote Desktop Connection:
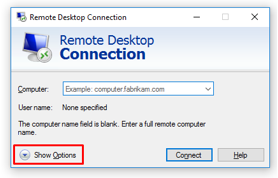
- Open the Remote Desktop Connection.
- Click the Show Options…
- Select the Local Resources tab, and then check that the Clipboard property is checked:
If you still cannot copy and paste data between Excel on your local machine and SQL Server on your remote database server, verify with your server administrator that the copy and paste feature is enabled for the Remote Desktop Connection on the server.
Tips when copying and pasting data from Excel to SQL server
Validating your data – start with one row of data
If the data that you copy from your Excel document does not match the data types of the columns in your SQL Server table, the inserting of the data will be canceled and you will get a warning message. This will happen for every row you paste from Excel to SQL Server. If you paste 500 rows from Excel with the wrong number of columns, you will get one warning message for each and every row that you paste.
To avoid this, the trick is to start to copy only a single row of data and paste it into the SQL Server table. If you get a warning message for incorrect data types, you can correct the mismatch and repeat the copy and paste procedure until all your Excel columns fit into the table in SQL Server. When all columns match, select the remaining rows and paste them all into the SQL Server table in one step.
Inserting NULL values from Excel into a SQL Server table
When you have columns in your SQL Server table that allow NULL values, and you want to insert a NULL value into the table, just enter the text NULL into the cell in Excel, and then copy and paste the data from Excel into SQL Server:
The NULL values will be inserted into the table in SQL Server:
Tables with computed columns
For SQL Server tables containing computed columns, you can paste data from Excel into that table simply by leaving the data for the computed column blank in Excel, and then copying and pasting the data from Excel into the SQL Server table.
How to get the column names from the table in SQL Server to Excel
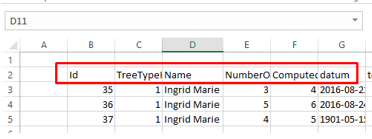
When you prepare the data in Excel for import into an existing SQL Server table, it is useful to have the column headings and a few rows of sample data as a reference in Excel.
There is a technique where you can copy existing data in SQL Server to Excel and include the table column names as header names.
Follow these steps to also include the column names when copying a few rows of data from a SQL Server table into Excel:
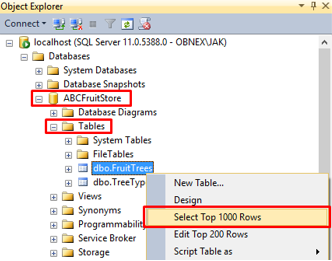
- In SQL Server Management Studio, locate your database and expand the Tables folder.
- Right-click your table name and select the third option – Select Top 1000 rows.
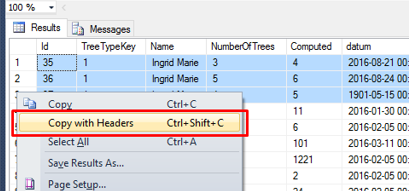
- Select the rows to copy to Excel by holding down the CTRL button and clicking the row numbers on the left side.
- When your rows are selected, right-click one row and select the Copy with Headers option:
- Go to Excel and paste the data into a cell. The headers from the table in SQL Server will now be added as the first row:
Excel to SQL Server performance
Copying and pasting data from Excel to SQL Server is a really simple method to import data from Excel into your SQL Server database. One of the drawbacks is that it is not the fastest method if you need to insert larger amounts of data, such as several hundred thousand rows of data or more.
To get a reference to the performance limits, I have run a few tests on my local i7 machine with 8 GB of RAM with Microsoft Excel and SQL Server installed on the same machine.
I had the following results: copy data in Excel with 10 columns of mixed data types to SQL Server took about 2 seconds for 100 rows, about 30 seconds for 1000 rows, and about 10 minutes for 20,000 rows.
So, I would say that the limit to use the copy and paste feature is around a few thousand up to a few tens of thousands of rows of data. If you need to perform an Excel to SQL Server import with more data, then you should use the SQL Server Import and Export Wizard.
Copy and paste – a quick reference
- First, copy the data from Excel, and then paste it into the SQL Server table using the Database > Table > Edit top 200 rows menu option.
- Always start by copying and pasting a single row of data to validate the data types.
- For SQL Server tables with an identity column, add an extra blank left-most column before copying from Excel.
- Copy and paste from Excel to SQL Server can be used to insert up to a few tens of thousands of rows of data.
- To get the SQL Server column headers into Excel, right-click the table in SQL Server and select Copy with headers.
- Don’t forget that the technique also works great over Remote Desktop Connections!
How to import data from Excel to SQL Server – SQL Spreads method
This method is ideal for users that don’t want to insert data using SQL Server Management Studio.
Install the SQL Spreads Add-In for Excel
You can download a free trial of SQL Spreads from here.
- Run the SQLSpreadsSetup.exe file and follow the instructions.
- Restart Excel and accept the Add-In confirmation.
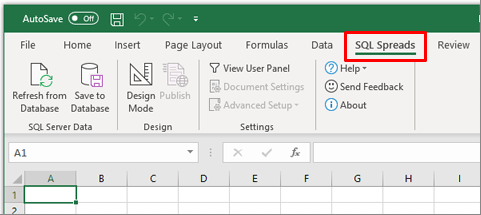
- You will find SQL Spreads in the tab menu in Excel:
For more details about installation, check out the Installing SQL Spreads section of our Knowledgebase.
Connect to your SQL Server database
Once SQL Spreads is installed, you’ll see that it has been added as a new ribbon tab.
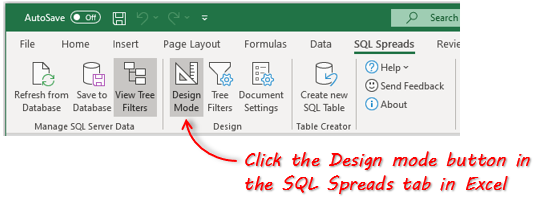
- Click on SQL Spreads and then click the Design Mode button
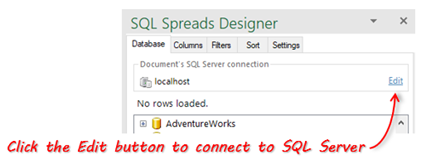
- In the SQL Spreads Designer panel on the right side, click the Edit button to open the SQL Server connection dialog.
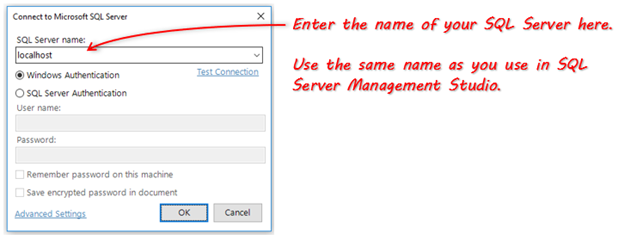
- Enter the name of your SQL Server into the SQL Server name field:
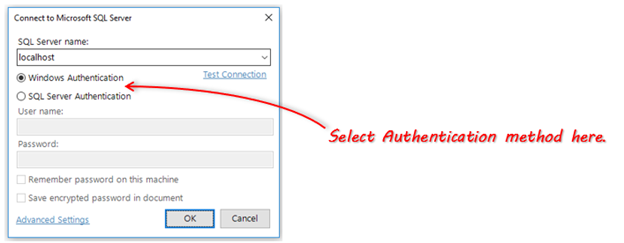
- Select if you should connect using your Windows-login (Windows Authentication) or enter a user name and password (SQL Server Authentication). Windows authentication is the more secure of the two options.
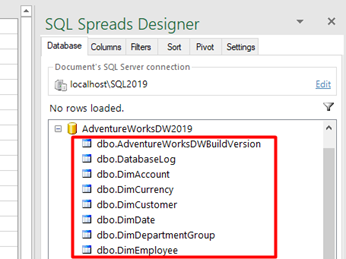
- Click OK. SQL Spreads will try to connect to the database. If the connection is successful, your databases will show up in the SQL Spreads Designer panel.
- Now that we’ve created the connection from Excel to SQL Server, we can select which table of data we want to use in Excel. In the SQL Spreads Designer, click on the database and then select your table.
As soon as you select a table, the data in the table is populated in the Excel sheet. You can now see all the data in your SQL Server table and use it in your Excel workbook. The real power with SQL Spreads is the ability to update or add to the data in SQL Server direct from Excel.
Inserting new rows into SQL Server
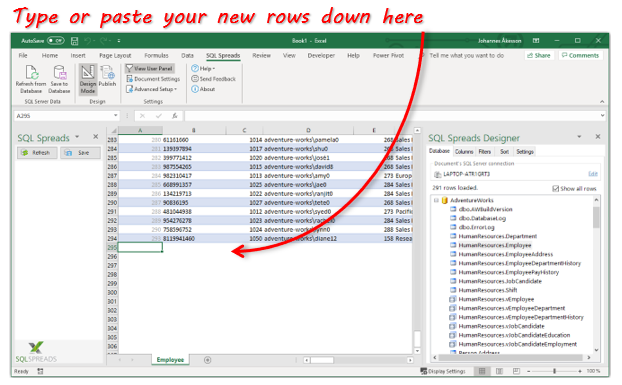
To import new data into SQL Server, scroll down to the first empty row and either type in your new data or paste a set of rows copied from another Excel workbook:
Once you’ve added or pasted the new rows, click the ‘Save to Database’ button to get the changes written to the table in SQL Server.
Updating existing data in SQL Server
You can also update the prices in the product table directly in Excel, and save the changes back to SQL Server. To do this you simply make the edits in the table in Excel and then click on the ‘Save to Database’ button to get the changes written to the table in SQL Server.
Other tools and techniques
There are some other ways to import an Excel file to a table in SQL Server. Here are some of the other methods.
- SQL Server Import Wizard – a wizard-based import tool inside SQL Server Management Studio. Ideal for one-time imports when you have an Excel document that you need to import into a table in SQL Server. The pros include flexibility and lots of settings to finetune the import. The biggest drawback is that you need to run through a dozen Wizard dialogs with lots of settings each time you need to import the data. More info about the SQL Server Import Wizard is available here.
- SSIS – this is the oil tanker for moving data between different sources. You can do almost any task you like, but you will need to put in lots of time to get started, and it will take still more time to maintain and change the solution down the line. The pros include good versatility and plenty of available features; the main con is the time you will have to put in to learn the tool. More info about SSIS is available here.
- The BCP utility – a command line-based tool that offers a huge number of settings – if you are a coder, this is the tool to use. More info about the BCP utility is available here.
Summary – insert data from Excel to SQL Server
In this article, we’ve looked at 2 easy ways to insert data from Excel to SQL Server.
If you know how to use SQL Server Management Studio, the copy and paste feature is a great option when you need to quickly and easily import data from Excel to SQL Server. The process is simple and doesn’t require any special knowledge or tools, and can be used in tables with up to a few tens of thousands of rows of data. It can also cater for scenarios such as tables with an auto-incrementing identity key, or if you need to connect to SQL Server on a remote machine using a Remote Desktop Connection.
If you don’t have access to SQL Server Management Studio, you can use the SQL Spreads Excel Add-In to insert data from Excel to SQL. It’s quick and easy to use for non-technical users. For more advanced users, there are some cool features such as lookup columns, pivot options, and data validation which allow you to create robust data management solutions.
Download your free trial of SQL Spreads and get in touch with us if you have any questions.
Johannes Åkesson
Worked in the Business Intelligence industry for the last 15+ years.
Founder of SQL Spreads – the data management
solution to import, update and manage
SQL Server data from within Excel.
I have developed an Excel VBA Macro for cutting and pasting any selection from Excel into SQL Server, creating a new table. The macro is great for quick and dirty table creations up to a few thousand rows and multiple columns (It can theoretically manage up to 200 columns). The macro attempts to automatically detect header names and assign the most appropriate datatype to each column (it handles varchar columns upto 1000 chars).
Recommended Setup procedure:
- Make sure Excel is enabled to run macros. (File->Options->Trust Center->Trust Center Settings->Macro Settings->Enable all macros..)
- Copy the VBA code below to the module associated with your personal workbook (So that the Macro will be available for all worksheets)
- Assign an appropriate keystroke to the macro ( I have assigned Ctrl Shift X)
- Save your personal workbook
Use of Macro
- Select the cells in Excel (including column headers if they exist) to be transferred to SQL
- Press the assigned keyword combination that you have assigned to run the macro
- Follow the prompts. (Default table name is ##Table)
- Paste the clipboard contents into a SSMS window and run the generated SQL code.
BriFri 238
VBA Code:
'------------------------------------------------------------------------------

Public Sub TransferToSQL()
' TransferToSQL Macro
'
' This macro prepares data for pasting into SQL Server and posts it to the clipboard for inserting into SSMS.
' It attempts to automatically detect header rows and does a basic analysis of the first 15 rows to determine
' the most appropriate datatype to use handling text entries up to 1000 chars.
'
'
' Use of Macro
'
' 1. Select the cells in Excel (including column headers if they exist) to be transferred to SQL
' 2. Press the assigned keyword combination that you have assigned to run the macro
' 3. Follow the prompts. (Default table name is ##Table)
' 4. Paste the clipboard contents into a SSMS window and run the generated SQL code.
'
' Max Number of Columns: 200
'
' Created by BriFri238 - https://stackoverflow.com/a/26219806/1898524
'
' Keyboard Shortcut: Ctrl+Shift+X
'
' ver   Date    Reason
' ===   ====    ======
' 1.7   07/2018 Added prompt for "Append to existing table?" so SELECT INTO is not used.
'               Added strInsertHeader to hold the list of columns which are used with the INSERT (field1, field2, ...)
'               to support IDENTITY_INSERT.
' 1.6   06/2012 Fixed bug that prevented auto exit if no selection made / auto exit if blank Tablename entered or 'cancel' button pressed
' 1.5   02/2012 made use of function fn_ColLetter to retrieve the Column Letter for a specified column
' 1.4   02/2012 Replaces any Tabs in text data to spaces to prevent Double quotes being output in final results
' 1.3   02/2012 Place the 'drop table if already exists' code into a separate batch to prevent errors when inserting new table with same name but different shape and > 100 rows
' 1.2   01/2012 If null dates encountered code to cast it as Null rather than '00-Jan-1900'
' 1.1   10/2011 Code to drop the table if already exists
' 1.0   03/2011 Created

    Dim intLastRow       As Long
    Dim intlastColumn    As Integer
    Dim intRow           As Long
    Dim intDataStartRow  As Long
    Dim intColumn        As Integer
    Dim strKeyWord       As String
    Dim intPos           As Integer
    Dim strDataTypeLevel(4) As String
    Dim strColumnHeader(200) As String
    Dim strDataType(200) As String
    Dim intRowCheck      As Integer
    Dim strFormula(20)   As String
    Dim intHasHeaderRow  As Integer
    Dim strCellRef       As String
    Dim intFormulaCount  As Integer
    Dim strSQLTableName  As String
    Dim strSQLTableName_Encap As String
    Dim intdataTypelevel As Integer
    Const strConstHeaderKeyword As String = "ID,URN,name,Title,Job,Company,Contact,Address,Post,Town,Email,Tele,phone,Area,Region,Business,Total,Month,Week,Year,"
    Const intConstMaxBatchSize As Integer = 100
    Const intConstNumberRowsToAnalyse As Integer = 100
    Dim strInsertHeader  As String
    Dim i                As Integer
    Dim bolAppendToSQLTable As Boolean    ' True if the table exists and you want to append to it.

    On Error GoTo ErrorHandler

    intHasHeaderRow = vbNo

    strDataTypeLevel(1) = "VARCHAR(1000)"
    strDataTypeLevel(2) = "FLOAT"
    strDataTypeLevel(3) = "INTEGER"
    strDataTypeLevel(4) = "DATETIME"

    ' Use current selection and paste to new temp worksheet

    Selection.Copy
    Workbooks.Add       ' add temp 'Working' Workbook
    ' Paste "Values Only" back into new temp workbook
    Range("A3").Select  ' Goto 3rd Row
    Selection.PasteSpecial Paste:=xlFormats, Operation:=xlNone, SkipBlanks:=False, Transpose:=False    ' Copy Format of Selection
    Selection.PasteSpecial Paste:=xlValues, Operation:=xlNone, SkipBlanks:=False, Transpose:=False  ' Copy Values of Selection
    ActiveCell.SpecialCells(xlLastCell).Select  ' Goto last cell
    intLastRow = ActiveCell.row
    intlastColumn = ActiveCell.Column


    ' Check to make sure that there are cells which are selected
    If intLastRow = 3 And intlastColumn = 1 Then
        Application.DisplayAlerts = False       ' Temporarily switch off Display Alerts
        ActiveWindow.Close                      ' Delete newly created worksheet
        Application.DisplayAlerts = True        ' Switch display alerts back on
        MsgBox "*** Please Make selection before running macro - Terminating ***", vbOKOnly, "Transfer Data to SQL Server"
        Exit Sub
    End If

    ' Prompt user for Name of SQL Server table
    strSQLTableName = InputBox("SQL Server Table Name?", "Transfer Excel Data To SQL", "##Table")

    ' if blank table name entered or 'Cancel' selected then exit
    If strSQLTableName = "" Then
        Application.DisplayAlerts = False       ' Temporarily switch off Display Alerts
        ActiveWindow.Close                      ' Delete newly created worksheet
        Application.DisplayAlerts = True        ' Switch display alerts back on
        Exit Sub
    End If

    Application.ScreenUpdating = False

    ' encapsulate tablename with square brackets if user has not already done so
    strSQLTableName_Encap = Replace(Replace(Replace("[" & Replace(strSQLTableName, ".", "].[") & "]", "[]", ""), "[[", "["), "]]", "]")

    ' Try to determine if the First Row is a header row or contains data and if a header load names of Columns
    Range("A3").Select
    For intColumn = 1 To intlastColumn
        ' first check to see if the first row contains any pure numbers or pure dates
        If IsNumeric(ActiveCell.Value) Or IsDate(ActiveCell.Value) Then
            intHasHeaderRow = vbNo
            intDataStartRow = 3
            Exit For
        Else
            strColumnHeader(intColumn) = ActiveCell.Value
            ActiveCell.Offset(1, 0).Range("A1").Select  ' go to the row below
            If IsNumeric(ActiveCell.Value) Or IsDate(ActiveCell.Value) Then
                intHasHeaderRow = vbYes
                intDataStartRow = 4
            End If
            ActiveCell.Offset(-1, 0).Range("A1").Select  ' go back up to the first row
            If intHasHeaderRow = vbNo Then     ' if still not determined if header exists: Look for header using keywords
                intPos = 1
                While intPos < Len(strConstHeaderKeyword) And intHasHeaderRow = vbNo
                    strKeyWord = Mid$(strConstHeaderKeyword, intPos, InStr(intPos, strConstHeaderKeyword, ",") - intPos)
                    If InStr(1, ActiveCell.Value, strKeyWord) > 0 Then
                        intHasHeaderRow = vbYes
                        intDataStartRow = 4
                    End If
                    intPos = InStr(intPos, strConstHeaderKeyword, ",") + 1
                Wend
            End If
        End If
        ActiveCell.Offset(0, 1).Range("A1").Select  ' Goto next column
    Next intColumn

    ' If auto header row detection has failed ask the user to manually select
    If intHasHeaderRow = vbNo Then
        intHasHeaderRow = MsgBox("Does current selection have a header row?", vbYesNo + vbQuestion, "Auto header row detection failure")
        If intHasHeaderRow = vbYes Then
            intDataStartRow = 4
        Else
            intDataStartRow = 3
        End If

    End If


    ' *** Determine the Data Type of each Column ***

    ' Go thru each Column to find Data types
    If intLastRow < intConstNumberRowsToAnalyse Then              ' Check the first intConstNumberRowsToAnalyse  rows or to end of selection whichever is less
        intRowCheck = intLastRow
    Else
        intRowCheck = intConstNumberRowsToAnalyse
    End If

    For intColumn = 1 To intlastColumn
        intdataTypelevel = 5

        For intRow = intDataStartRow To intRowCheck
            Application.GoTo Reference:="R" & CStr(intRow) & "C" & CStr(intColumn)
            If ActiveCell.Value = "" Then   ' ignore blank (null) values
            ElseIf IsDate(ActiveCell.Value) = True And Len(ActiveCell.Value) >= 8 Then
                If intdataTypelevel > 4 Then intdataTypelevel = 4
            ElseIf IsNumeric(ActiveCell.Value) = True And InStr(1, CStr(ActiveCell.Value), ".") = 0 And (Left(CStr(ActiveCell.Value), 1) <> "0" Or ActiveCell.Value = "0") And Len(ActiveCell.Value) < 10 Then
                If intdataTypelevel > 3 Then intdataTypelevel = 3
            ElseIf IsNumeric(ActiveCell.Value) = True And InStr(1, CStr(ActiveCell.Value), ".") >= 1 Then
                If intdataTypelevel > 2 Then intdataTypelevel = 2
            Else
                intdataTypelevel = 1
                Exit For
            End If
        Next intRow
        If intdataTypelevel = 5 Then intdataTypelevel = 1
        strDataType(intColumn) = strDataTypeLevel(intdataTypelevel)

        If intHasHeaderRow = vbYes Then
            ' Build a string of the column headings to be used by the INSERT (field1, field2, ...)
            strInsertHeader = strInsertHeader & ", [" & strColumnHeader(intColumn) & "]"
        End If
    Next intColumn
    If intHasHeaderRow = vbYes Then
        strInsertHeader = Mid(strInsertHeader, 3)    ' Remove prefix

        ' Ask user if they want to Append to an existing table or DROP and CREATE a new table.  BS 7/19/2018
        bolAppendToSQLTable = MsgBox("Do you want to APPEND to this table?", vbYesNo + vbQuestion, "Append to " & strSQLTableName) = vbYes
    End If

    ' *** Build up the SQL
    intFormulaCount = 1
    If intHasHeaderRow = vbYes Then     ' *** Header Row ***
        Application.GoTo Reference:="R4" & "C" & CStr(intlastColumn + 1)    ' Goto next column in first data row of selection
        strFormula(intFormulaCount) = "= ""SELECT "
        For intColumn = 1 To intlastColumn
            If strDataType(intColumn) = "DATETIME" Then         ' Code to take Excel Dates back to text
                strCellRef = "Text(" & fn_ColLetter(intColumn) & "4,""dd-mmm-yyyy hh:mm:ss"")"
            ElseIf strDataType(intColumn) = "VARCHAR(1000)" Then
                strCellRef = "SUBSTITUTE(" & fn_ColLetter(intColumn) & "4,""'"",""''"")"    ' Convert any single ' to double ''
            Else
                strCellRef = fn_ColLetter(intColumn) & "4"
            End If

            strFormula(intFormulaCount) = strFormula(intFormulaCount) & "CAST('""& " & strCellRef & " & ""' AS " & strDataType(intColumn) & ") AS [" & strColumnHeader(intColumn) & "]"
            If intColumn < intlastColumn Then
                strFormula(intFormulaCount) = strFormula(intFormulaCount) + ", "
            Else
                strFormula(intFormulaCount) = strFormula(intFormulaCount) + " UNION ALL """
            End If
            ' since each cell can only hold a maximum no. of chars if Formula string gets too big continue formula in adjacent cell
            If Len(strFormula(intFormulaCount)) > 700 And intColumn < intlastColumn Then
                strFormula(intFormulaCount) = strFormula(intFormulaCount) + """"
                intFormulaCount = intFormulaCount + 1
                strFormula(intFormulaCount) = "= """
            End If
        Next intColumn

        ' Assign the formula to the cell(s) just right of the selection
        For intColumn = 1 To intFormulaCount
            ActiveCell.Value = strFormula(intColumn)
            If intColumn < intFormulaCount Then ActiveCell.Offset(0, 1).Range("A1").Select  ' Goto next column
        Next intColumn

        ' Auto Fill the formula for the full length of the selection
        ActiveCell.Offset(0, -intFormulaCount + 1).Range("A1:" & fn_ColLetter(intFormulaCount) & "1").Select
        If intLastRow > 4 Then Selection.AutoFill Destination:=Range(fn_ColLetter(intlastColumn + 1) & "4:" & fn_ColLetter(intlastColumn + intFormulaCount) & CStr(intLastRow)), Type:=xlFillDefault

        ' Go to start row of data selection to add 'Select into' code

        If bolAppendToSQLTable = True Then
            ' When appending to an existing table, use this syntax
            ActiveCell.Value = "INSERT " & strSQLTableName_Encap & " ( " & strInsertHeader & " )" & " SELECT * FROM (" & ActiveCell.Value
            ActiveCell.Offset(-1, 0).Range("A1").Select  ' go to the row above
            ActiveCell.Value = "SET IDENTITY_INSERT " & strSQLTableName_Encap & " ON;"
            ActiveCell.Offset(-1, 0).Range("A1").Select  ' go to the row above
            ActiveCell.Value = "--BEGIN TRANSACTION;   COMMIT; SET IDENTITY_INSERT " & strSQLTableName_Encap & " OFF;"
        Else
            ' If creating a new table, use this syntax
            ActiveCell.Value = "SELECT * INTO " & strSQLTableName_Encap & " FROM (" & ActiveCell.Value

            ' Go to cells above data to insert code for deleting old table with the same name in separate SQL batch
            ActiveCell.Offset(-1, 0).Range("A1").Select  ' go to the row above
            ActiveCell.Value = "GO"
            ActiveCell.Offset(-1, 0).Range("A1").Select  ' go to the row above
            If Left(strSQLTableName, 1) = "#" Then      ' temp table
                ActiveCell.Value = "IF OBJECT_ID('tempdb.." & strSQLTableName & "') IS NOT NULL DROP TABLE " & strSQLTableName_Encap
            Else
                ActiveCell.Value = "IF OBJECT_ID('" & strSQLTableName & "') IS NOT NULL DROP TABLE " & strSQLTableName_Encap
            End If
        End If
        ' For Big selections (i.e. several 100 or 1000 rows) SQL Server takes a very long time to do a multiple union - Split up the table creation into many inserts
        intRow = intConstMaxBatchSize + 4   ' add 4 to make sure 1st batch = Max Batch Size
        While intRow < intLastRow
            Application.GoTo Reference:="R" & CStr(intRow - 1) & "C" & CStr(intlastColumn + intFormulaCount)  ' Goto Row before intRow and the last column in formula selection
            ActiveCell.Value = Replace(ActiveCell.Value, " UNION ALL ", " ) a")    ' Remove last 'UNION ALL'

            Application.GoTo Reference:="R" & CStr(intRow) & "C" & CStr(intlastColumn + 1)    ' Goto intRow and the first column in formula selection

            ' BS 7/19/2018:  Updated to include the list of fields so that IDENTITY_INSERT can be used.
            ActiveCell.Value = "INSERT " & strSQLTableName_Encap & " ( " & strInsertHeader & " )" & " SELECT * FROM (" & ActiveCell.Value
            ' ActiveCell.Value = "INSERT " & strSQLTableName_Encap & " SELECT * FROM (" & ActiveCell.Value

            intRow = intRow + intConstMaxBatchSize   ' increment intRow by intConstMaxBatchSize
        Wend

        ' Delete the last 'UNION AlL' replacing it with brackets to mark the end of the last insert
        Application.GoTo Reference:="R" & CStr(intLastRow) & "C" & CStr(intlastColumn + intFormulaCount)
        ActiveCell.Value = Replace(ActiveCell.Value, " UNION ALL ", " ) a")

        ' Select all the formula cells
        ActiveCell.Offset(-intLastRow + 2, 1 - intFormulaCount).Range("A1:" & fn_ColLetter(intFormulaCount + 1) & CStr(intLastRow - 1)).Select

    Else    ' *** No Header Row ***
        Application.GoTo Reference:="R3" & "C" & CStr(intlastColumn + 1)    ' Goto next column in first data row of selection
        strFormula(intFormulaCount) = "= ""SELECT "

        For intColumn = 1 To intlastColumn
            If strDataType(intColumn) = "DATETIME" Then
                strCellRef = "Text(" & fn_ColLetter(intColumn) & "3,""dd-mmm-yyyy hh:mm:ss"")"   ' Format Excel dates into a text Date format that SQL will pick up
            ElseIf strDataType(intColumn) = "VARCHAR(1000)" Then
                strCellRef = "SUBSTITUTE(" & fn_ColLetter(intColumn) & "3,""'"",""''"")"         ' Change all single ' to double ''
            Else
                strCellRef = fn_ColLetter(intColumn) & "3"
            End If

            ' Since no column headers: Name each column "Column001",Column002"..
            strFormula(intFormulaCount) = strFormula(intFormulaCount) & "CAST('""& " & strCellRef & " & ""' AS " & strDataType(intColumn) & ") AS [Column" & CStr(intColumn) & "]"
            If intColumn < intlastColumn Then
                strFormula(intFormulaCount) = strFormula(intFormulaCount) + ", "
            Else
                strFormula(intFormulaCount) = strFormula(intFormulaCount) + " UNION ALL """
            End If

            ' since each cell can only hold a maximum no. of chars if Formula string gets too big continue formula in adjacent cell
            If Len(strFormula(intFormulaCount)) > 700 And intColumn < intlastColumn Then
                strFormula(intFormulaCount) = strFormula(intFormulaCount) + """"
                intFormulaCount = intFormulaCount + 1
                strFormula(intFormulaCount) = "= """
            End If
        Next intColumn

        ' Assign the formula to the cell(s) just right of the selection
        For intColumn = 1 To intFormulaCount
            ActiveCell.Value = strFormula(intColumn)
            If intColumn < intFormulaCount Then ActiveCell.Offset(0, 1).Range("A1").Select  ' Goto next column
        Next intColumn

        ' Auto Fill the formula for the full length of the selection
        ActiveCell.Offset(0, -intFormulaCount + 1).Range("A1:" & fn_ColLetter(intFormulaCount) & "1").Select
        If intLastRow > 4 Then Selection.AutoFill Destination:=Range(fn_ColLetter(intlastColumn + 1) & "3:" & fn_ColLetter(intlastColumn + intFormulaCount) & CStr(intLastRow)), Type:=xlFillDefault

        ' Go to start row of data selection to add 'Select into' code
        ActiveCell.Value = "SELECT * INTO " & strSQLTableName_Encap & " FROM (" & ActiveCell.Value

        ' Go to cells above data to insert code for deleting old table with the same name in separate SQL batch
        ActiveCell.Offset(-1, 0).Range("A1").Select  ' go to the row above
        ActiveCell.Value = "GO"
        ActiveCell.Offset(-1, 0).Range("A1").Select  ' go to the row above
        If Left(strSQLTableName, 1) = "#" Then      ' temp table
            ActiveCell.Value = "IF OBJECT_ID('tempdb.." & strSQLTableName & "') IS NOT NULL DROP TABLE " & strSQLTableName_Encap
        Else
            ActiveCell.Value = "IF OBJECT_ID('" & strSQLTableName & "') IS NOT NULL DROP TABLE " & strSQLTableName_Encap
        End If

        ' For Big selections (i.e. serveral 100 or 1000 rows) SQL Server takes a very long time to do a multiple union - Split up the table creation into many inserts
        intRow = intConstMaxBatchSize + 3        ' add 3 to make sure 1st batch = Max Batch Size
        While intRow < intLastRow
            Application.GoTo Reference:="R" & CStr(intRow - 1) & "C" & CStr(intlastColumn + intFormulaCount)  ' Goto Row before intRow and the last column in formula selection
            ActiveCell.Value = Replace(ActiveCell.Value, " UNION ALL ", " ) a")    ' Remove last 'UNION ALL'

            Application.GoTo Reference:="R" & CStr(intRow) & "C" & CStr(intlastColumn + 1)    ' Goto intRow and the first column in formula selection
            ActiveCell.Value = "INSERT " & strSQLTableName_Encap & " SELECT * FROM (" & ActiveCell.Value
            intRow = intRow + intConstMaxBatchSize   ' increment intRow by intConstMaxBatchSize
        Wend

        ' Delete the last 'UNION AlL'
        Application.GoTo Reference:="R" & CStr(intLastRow) & "C" & CStr(intlastColumn + intFormulaCount)
        ActiveCell.Value = Replace(ActiveCell.Value, " UNION ALL ", " ) a")

        ' Select all the formula cells
        ActiveCell.Offset(-intLastRow + 1, 1 - intFormulaCount).Range("A1:" & fn_ColLetter(intFormulaCount + 1) & CStr(intLastRow)).Select
    End If


    ' Final Selection to clipboard and Cleaning of data
    Selection.Copy
    Selection.PasteSpecial Paste:=xlValues, Operation:=xlNone, SkipBlanks:=False, Transpose:=False              ' Repaste "Values Only" back into cells
    Selection.Replace What:="CAST('' AS", Replacement:="CAST(NULL AS", LookAt:=xlPart, SearchOrder:=xlByRows, MatchCase:=False  ' convert all blank cells to NULL
    Selection.Replace What:="'00-Jan-1900 00:00:00'", Replacement:="NULL", LookAt:=xlPart, SearchOrder:=xlByRows, MatchCase:=False  ' convert all blank Date cells to NULL
    Selection.Replace What:="'NULL'", Replacement:="NULL", LookAt:=xlPart, SearchOrder:=xlByRows, MatchCase:=False  ' convert all 'NULL' cells to NULL
    Selection.Replace What:=vbTab, Replacement:=" ", LookAt:=xlPart, SearchOrder:=xlByRows, MatchCase:=False        ' Replace all Tabs in cells to Space to prevent Double Quotes occuring in the final paste text
    Selection.Copy

    Application.GoTo Reference:="R1" & "C" & CStr(intlastColumn + 1), Scroll:=True    ' Goto next column in first data row of selection

    Application.ScreenUpdating = True

    If MsgBox("SQL Code has been added to clipboard - Please Paste into SSMS window." _
              & vbCrLf & vbCrLf & "Do you want to close this temporary sheet?", vbYesNo + vbQuestion, "Transfer to SQL") = vbYes Then

        Application.DisplayAlerts = False       ' Temporarily switch off Display Alerts
        ActiveWindow.Close                      ' Delete newly created worksheet
        Application.DisplayAlerts = True        ' Switch display alerts back on
    End If

Exit_Sub:
    Application.DisplayAlerts = True
    Application.ScreenUpdating = True
    Exit Sub

ErrorHandler:
    MsgBox "Error #" & Err.Number & " - " & Err.Description & vbCrLf & "in procedure TransferToSQL of basMisc"
    GoTo Exit_Sub
    Resume Next
    Resume

End Sub


Function fn_ColLetter(Col As Integer) As String

Dim strColLetter As String

If Col > 26 Then
    ' double letter columns
    strColLetter = Chr(Int((Col - 1) / 26) + 64) & _
        Chr(((Col - 1) Mod 26) + 65)
Else
    ' single letter columns
    strColLetter = Chr(Col + 64)
End If
fn_ColLetter = strColLetter
End Function
| title | description | author | ms.author | ms.date | ms.service | ms.subservice | ms.topic | monikerRange |
|---|---|---|---|---|---|---|---|---|
|
Import data from Excel to SQL Server or Azure SQL Database |
This article describes methods to import data from Excel to SQL Server or Azure SQL Database. Some use a single step, others require an intermediate text file. |
rwestMSFT |
randolphwest |
03/30/2023 |
sql |
data-movement |
conceptual |
=azuresqldb-current||>=sql-server-2016||>=sql-server-linux-2017||=azuresqldb-mi-current |
Import data from Excel to SQL Server or Azure SQL Database
[!INCLUDE SQL Server Azure SQL Database]
There are several ways to import data from Excel files to [!INCLUDE ssnoversion-md] or to Azure SQL Database. Some methods let you import data in a single step directly from Excel files; other methods require you to export your Excel data as text (CSV file) before you can import it.
This article summarizes the frequently used methods and provides links for more detailed information. A complete description of complex tools and services like SSIS or Azure Data Factory is beyond the scope of this article. To learn more about the solution that interests you, follow the provided links.
List of methods
There are several ways to import data from Excel. You may need to install SQL Server Management Studio (SSMS) to use some of these tools.
You can use the following tools to import data from Excel:
| Export to text first ([!INCLUDE ssnoversion-md] and SQL Database) | Directly from Excel ([!INCLUDE ssnoversion-md] on-premises only) |
|---|---|
| Import Flat File Wizard | SQL Server Import and Export Wizard |
| BULK INSERT statement | SQL Server Integration Services (SSIS) |
| BCP | OPENROWSET function |
| Copy Wizard (Azure Data Factory) | |
| Azure Data Factory |
If you want to import multiple worksheets from an Excel workbook, you typically have to run any of these tools once for each sheet.
[!IMPORTANT]
To learn more, see limitations and known issues for loading data to or from Excel files.
Import and Export Wizard
Import data directly from Excel files by using the [!INCLUDE ssnoversion-md] Import and Export Wizard. You also can save the settings as a SQL Server Integration Services (SSIS) package that you can customize and reuse later.
-
In [!INCLUDEssManStudioFull], connect to an instance of the [!INCLUDEssNoVersion] [!INCLUDEssDE].
-
Expand Databases.
-
Right-click a database.
-
Select Tasks.
-
Choose to Import Data or Export Data:
:::image type=»content» source=»../../integration-services/import-export-data/media/start-wizard-ssms.jpg» alt-text=»Start wizard SSMS»:::
This launches the wizard:
:::image type=»content» source=»media/excel-connection.png» alt-text=»Connect to an Excel data source»:::
To learn more, review:
- Start the SQL Server Import and Export Wizard
- Get started with this simple example of the Import and Export Wizard
Integration Services (SSIS)
If you’re familiar with SQL Server Integration Services (SSIS) and don’t want to run the [!INCLUDE ssnoversion-md] Import and Export Wizard, create an SSIS package that uses the Excel Source and the [!INCLUDE ssnoversion-md] Destination in the data flow.
To learn more, review:
- Excel Source
- SQL Server Destination
To start learning how to build SSIS packages, see the tutorial How to Create an ETL Package.
:::image type=»content» source=»media/excel-to-sql-data-flow.png» alt-text=»Components in the data flow»:::
OPENROWSET and linked servers
[!IMPORTANT]
In Azure SQL Database, you cannot import directly from Excel. You must first export the data to a text (CSV) file.
[!NOTE]
The ACE provider (formerly the Jet provider) that connects to Excel data sources is intended for interactive client-side use. If you use the ACE provider on [!INCLUDE ssnoversion-md], especially in automated processes or processes running in parallel, you may see unexpected results.
Distributed queries
Import data directly into [!INCLUDE ssnoversion-md] from Excel files by using the Transact-SQL OPENROWSET or OPENDATASOURCE function. This usage is called a distributed query.
[!IMPORTANT]
In Azure SQL Database, you cannot import directly from Excel. You must first export the data to a text (CSV) file.
Before you can run a distributed query, you have to enable the ad hoc distributed queries server configuration option, as shown in the following example. For more info, see ad hoc distributed queries Server Configuration Option.
sp_configure 'show advanced options', 1;
RECONFIGURE;
GO
sp_configure 'ad hoc distributed queries', 1;
RECONFIGURE;
GO
The following code sample uses OPENROWSET to import the data from the Excel Sheet1 worksheet into a new database table.
USE ImportFromExcel;
GO
SELECT * INTO Data_dq
FROM OPENROWSET('Microsoft.ACE.OLEDB.12.0',
    'Excel 12.0; Database=C:TempData.xlsx', [Sheet1$]);
GO
Here’s the same example with OPENDATASOURCE.
USE ImportFromExcel;
GO
SELECT * INTO Data_dq
FROM OPENDATASOURCE('Microsoft.ACE.OLEDB.12.0',
    'Data Source=C:TempData.xlsx;Extended Properties=Excel 12.0')...[Sheet1$];
GO
To append the imported data to an existing table instead of creating a new table, use the INSERT INTO ... SELECT ... FROM ... syntax instead of the SELECT ... INTO ... FROM ... syntax used in the preceding examples.
To query the Excel data without importing it, just use the standard SELECT ... FROM ... syntax.
For more info about distributed queries, see the following articles:
- Distributed Queries (Distributed queries are still supported in [!INCLUDE sssql19-md], but the documentation for this feature hasn’t been updated.)
- OPENROWSET
- OPENDATASOURCE
Linked servers
You can also configure a persistent connection from [!INCLUDE ssnoversion-md] to the Excel file as a linked server. The following example imports the data from the Data worksheet on the existing Excel linked server EXCELLINK into a new [!INCLUDE ssnoversion-md] database table named Data_ls.
USE ImportFromExcel;
GO
SELECT * INTO Data_ls FROM EXCELLINK...[Data$];
GO
You can create a linked server from SQL Server Management Studio (SSMS), or by running the system stored procedure sp_addlinkedserver, as shown in the following example.
DECLARE @RC INT;
DECLARE @server NVARCHAR(128);
DECLARE @srvproduct NVARCHAR(128);
DECLARE @provider NVARCHAR(128);
DECLARE @datasrc NVARCHAR(4000);
DECLARE @location NVARCHAR(4000);
DECLARE @provstr NVARCHAR(4000);
DECLARE @catalog NVARCHAR(128);

-- Set parameter values
SET @server = 'EXCELLINK';
SET @srvproduct = 'Excel';
SET @provider = 'Microsoft.ACE.OLEDB.12.0';
SET @datasrc = 'C:TempData.xlsx';
SET @provstr = 'Excel 12.0';

EXEC @RC = [master].[dbo].[sp_addlinkedserver] @server,
    @srvproduct,
    @provider,
    @datasrc,
    @location,
    @provstr,
    @catalog;
For more info about linked servers, see the following articles:
- Create Linked Servers
- OPENQUERY
For more examples and info about both linked servers and distributed queries, see the following article:
- How to use Excel with SQL Server linked servers and distributed queries
Prerequisite — Save Excel data as text
To use the rest of the methods described on this page — the BULK INSERT statement, the BCP tool, or Azure Data Factory — first you have to export your Excel data to a text file.
In Excel, select File | Save As and then select Text (Tab-delimited) (*.txt) or CSV (Comma-delimited) (*.csv) as the destination file type.
If you want to export multiple worksheets from the workbook, select each sheet, and then repeat this procedure. The Save as command exports only the active sheet.
[!TIP]
For best results with data importing tools, save sheets that contain only the column headers and the rows of data. If the saved data contains page titles, blank lines, notes, and so forth, you may see unexpected results later when you import the data.
The Import Flat File Wizard
Import data saved as text files by stepping through the pages of the Import Flat File Wizard.
As described previously in the Prerequisite section, you have to export your Excel data as text before you can use the Import Flat File Wizard to import it.
For more info about the Import Flat File Wizard, see Import Flat File to SQL Wizard.
BULK INSERT command
BULK INSERT is a Transact-SQL command that you can run from SQL Server Management Studio. The following example loads the data from the Data.csv comma-delimited file into an existing database table.
As described previously in the Prerequisite section, you have to export your Excel data as text before you can use BULK INSERT to import it. BULK INSERT can’t read Excel files directly. With the BULK INSERT command, you can import a CSV file that is stored locally or in Azure Blob storage.
USE ImportFromExcel;
GO
BULK INSERT Data_bi FROM 'C:Tempdata.csv'
   WITH (
      FIELDTERMINATOR = ',',
      ROWTERMINATOR = 'n'
);
GO
For more info and examples for [!INCLUDE ssnoversion-md] and SQL Database, see the following articles:
- Import Bulk Data by Using BULK INSERT or OPENROWSET(BULK…)
- BULK INSERT
BCP tool
BCP is a program that you run from the command prompt. The following example loads the data from the Data.csv comma-delimited file into the existing Data_bcp database table.
As described previously in the Prerequisite section, you have to export your Excel data as text before you can use BCP to import it. BCP can’t read Excel files directly. Use to import into [!INCLUDE ssnoversion-md] or SQL Database from a test (CSV) file saved to local storage.
[!IMPORTANT]
For a text (CSV) file stored in Azure Blob storage, use BULK INSERT or OPENROWSET. For an examples, see Example.
bcp.exe ImportFromExcel..Data_bcp in "C:Tempdata.csv" -T -c -t ,
For more info about BCP, see the following articles:
- Import and Export Bulk Data by Using the bcp Utility
- bcp Utility
- Prepare Data for Bulk Export or Import
Copy Wizard (ADF)
Import data saved as text files by stepping through the pages of the Azure Data Factory (ADF) Copy Wizard.
As described previously in the Prerequisite section, you have to export your Excel data as text before you can use Azure Data Factory to import it. Data Factory can’t read Excel files directly.
For more info about the Copy Wizard, see the following articles:
- Data Factory Copy Wizard
- Tutorial: Create a pipeline with Copy Activity using Data Factory Copy Wizard.
Azure Data Factory
If you’re familiar with Azure Data Factory and don’t want to run the Copy Wizard, create a pipeline with a Copy activity that copies from the text file to [!INCLUDE ssnoversion-md] or to Azure SQL Database.
As described previously in the Prerequisite section, you have to export your Excel data as text before you can use Azure Data Factory to import it. Data Factory can’t read Excel files directly.
For more info about using these Data Factory sources and sinks, see the following articles:
- File system
- SQL Server
- Azure SQL Database
To start learning how to copy data with Azure data factory, see the following articles:
- Move data by using Copy Activity
- Tutorial: Create a pipeline with Copy Activity using Azure portal
Common errors
Microsoft.ACE.OLEDB.12.0″ hasn’t been registered
This error occurs because the OLEDB provider isn’t installed. Install it from Microsoft Access Database Engine 2010 Redistributable. Be sure to install the 64-bit version if Windows and [!INCLUDE ssnoversion-md] are both 64-bit.
The full error is:
Msg 7403, Level 16, State 1, Line 3
The OLE DB provider "Microsoft.ACE.OLEDB.12.0" has not been registered.
Cannot create an instance of OLE DB provider «Microsoft.ACE.OLEDB.12.0» for linked server «(null)»
This indicates that the Microsoft OLEDB hasn’t been configured properly. Run the following Transact-SQL code to resolve this:
EXEC sp_MSset_oledb_prop N'Microsoft.ACE.OLEDB.12.0', N'AllowInProcess', 1;
EXEC sp_MSset_oledb_prop N'Microsoft.ACE.OLEDB.12.0', N'DynamicParameters', 1;
The full error is:
Msg 7302, Level 16, State 1, Line 3
Cannot create an instance of OLE DB provider "Microsoft.ACE.OLEDB.12.0" for linked server "(null)".
The 32-bit OLE DB provider «Microsoft.ACE.OLEDB.12.0» cannot be loaded in-process on a 64-bit SQL Server
This occurs when a 32-bit version of the OLD DB provider is installed with a 64-bit [!INCLUDE ssnoversion-md]. To resolve this issue, uninstall the 32-bit version and install the 64-bit version of the OLE DB provider instead.
The full error is:
Msg 7438, Level 16, State 1, Line 3
The 32-bit OLE DB provider "Microsoft.ACE.OLEDB.12.0" cannot be loaded in-process on a 64-bit SQL Server.
The OLE DB provider «Microsoft.ACE.OLEDB.12.0» for linked server «(null)» reported an error.
Cannot initialize the data source object of OLE DB provider «Microsoft.ACE.OLEDB.12.0» for linked server «(null)»
Both of these errors typically indicate a permissions issue between the [!INCLUDE ssnoversion-md] process and the file. Ensure that the account that is running the [!INCLUDE ssnoversion-md] service has full access permission to the file. We recommend against trying to import files from the desktop.
The full errors are:
Msg 7399, Level 16, State 1, Line 3
The OLE DB provider "Microsoft.ACE.OLEDB.12.0" for linked server "(null)" reported an error. The provider did not give any information about the error.
Msg 7303, Level 16, State 1, Line 3
Cannot initialize the data source object of OLE DB provider "Microsoft.ACE.OLEDB.12.0" for linked server "(null)".
Next steps
- Get started with this simple example of the Import and Export Wizard
- Import data from Excel or export data to Excel with SQL Server Integration Services (SSIS)
- bcp Utility
- Move data by using Copy Activity
There are many ways to import data from an Excel file to a SQL Server database using:
- SQL Server Integration Services (SSIS)
- the OPENROWSET and OPENDATASOURCE functions
- SQL Server linked servers
- the SQL Server Import and Export Wizard
In this article, steps for importing data from an Excel file to a SQL Server database will be explained using the SQL Server Import and Export Wizard including some of problems that can occur during the processes.
To start the process of importing data from an Excel file to a SQL Server database using the SQL Server Import and Export Wizard the SQL Server Import and Export Wizard needs to be launched. There are several ways to do that, and this can be seen on the How to import/export data to SQL Server using the SQL Server Import and Export Wizard page
The first page that appears when the SQL Server Import and Export Wizard launched is Welcome page:
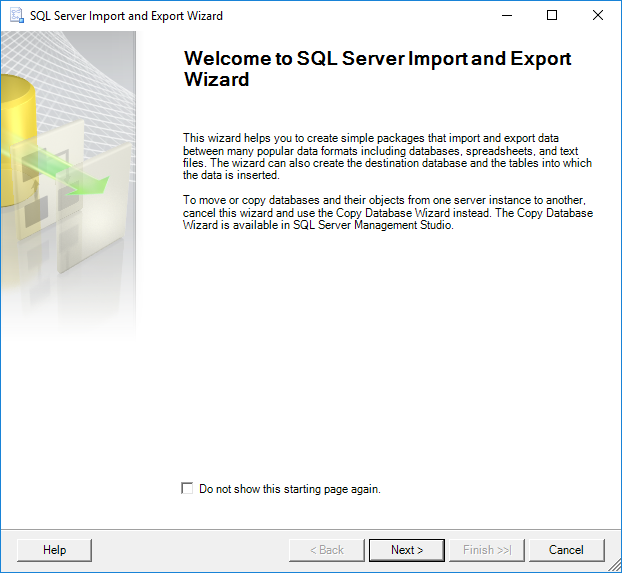
On this page, only a quick introduction of the SQL Server Import and Export Wizard is shown.
Click the Next button to continue. The next page in the SQL Server Import and Export Wizard is Choose a Data Source page:
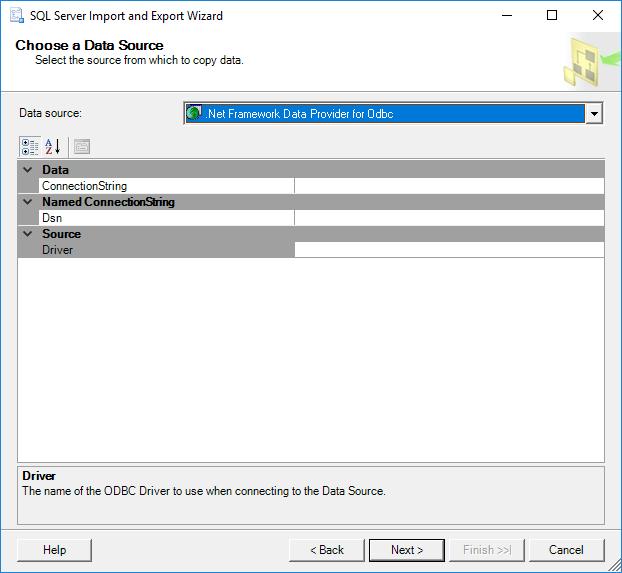
In the Choose a Data Source page, in order to continue with importing data from Excel to SQL Server the data source provider and way of connecting with data source must be provided. In our case, the provider for connecting to the Excel file is the Microsoft Excel provider.
From the Data source drop down box, select the Microsoft Excel provider:
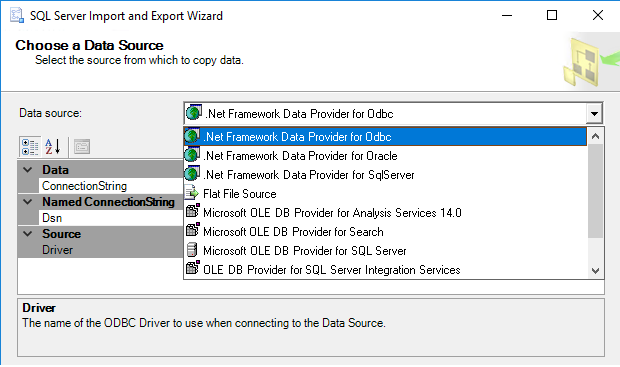
As you can see, there is no Microsoft Excel provider in the list of the Data source drop down box. There are several reasons for this. The first reason could be that Microsoft Office isn’t installed. But there is no need to install Microsoft Office (Microsoft Excel) in order to see the Microsoft Excel provider in the Data source drop down box list.
To see the Microsoft Excel provider in the list, install Microsoft Access Database Engine 2016 Redistributable. The latest version of Microsoft Access Database Engine can open the earlier version of Excel, so make sure that you have the latest one.
The Microsoft Access Database Engine 2016 Redistributable comes with two versions:
- AccessDatabaseEngine.exe is 32-bit version
- AccessDatabaseEngine_X64.exe is 64-bit version
Now, when Microsoft Access Database Engine 2016 Redistributable is installed, we should see the Microsoft Excel provider in the list, but unfortunately the Microsoft Excel provider does not show in the list of the Data source drop down box.
This is because you may run a wrong version of the SQL Server Import and Export Wizard. For example, the AccessDatabaseEngine.exe is installed and the SQL Server Import and Export Wizard 64-bit version is launched. In this case, in order to see the Microsoft Excel provider in the list of the Data source drop down box, launch the SQL Server Import and Export Wizard 32-bit version and the Microsoft Excel provider will appear in the list:
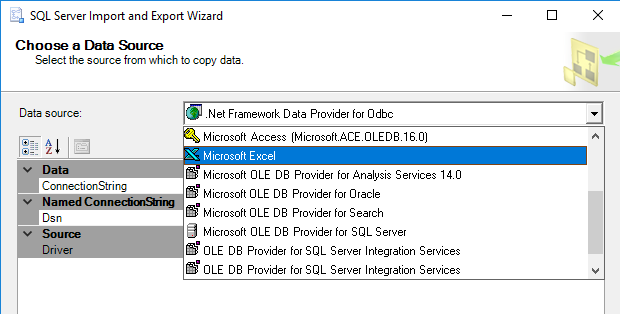
Now, when all is installed, from the list, select the Microsoft Excel provider. On the Choose a Data Source page, additional options appear:
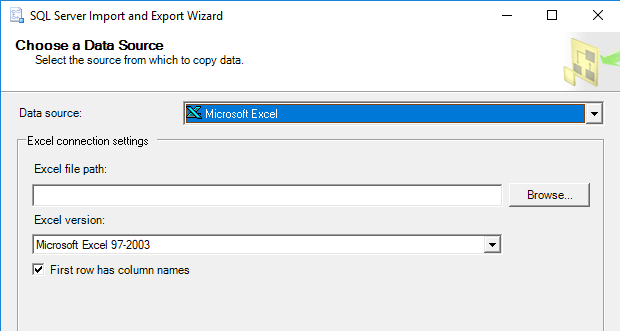
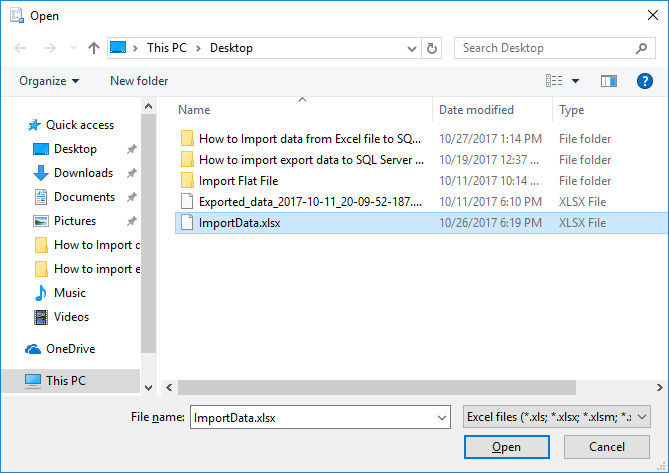
In the Excel file path box, type the location to the Excel file or use the Browse button to navigate to the location:
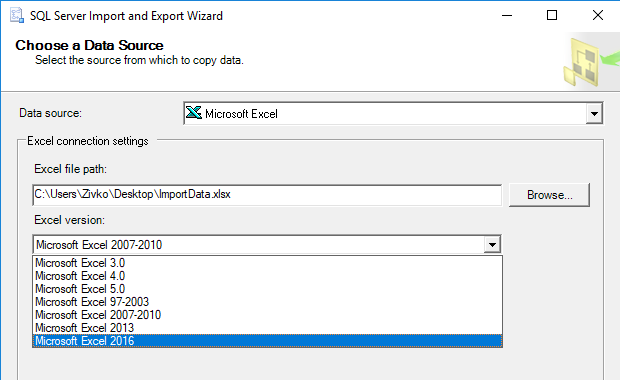
From the Excel version drop down box, choose the version of Excel that uses the source workbook. In our case, that is the Microsoft Excel 2016 version:
The latest option on this page is the First row has column names check box:
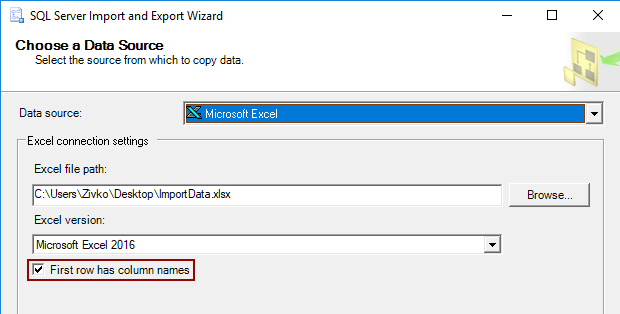
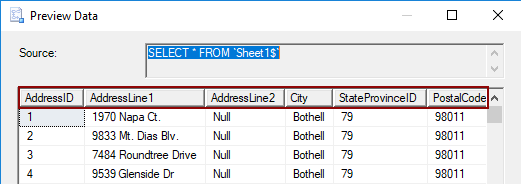
By default, this option is checked. It treads the first rows of the data source as the column names:
But if this option is enabled and data source does not contain column names, the SQL Server Import and Export Wizard will add the column names, starting with the name F1 for the first column name:
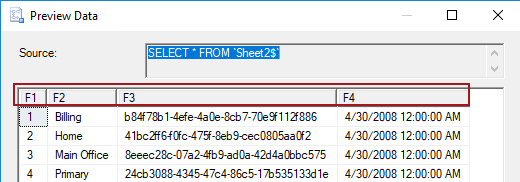
If this option is disabled and data source contain the column names the SQL Server Import and Export Wizard treats these columns as the first row of data:
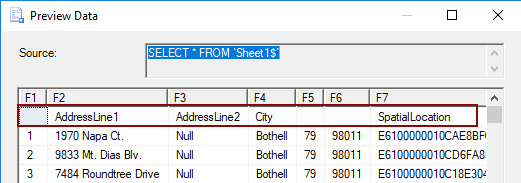
Now, when everything is set on the Choose a Data Source page of the SQL Server Import and Export Wizard, click the Next button to continue.
The following warning message may appear after clicking the Next button:
The operation could not be completed.
Additional information:
The ‘Microsoft.ACE.OLEDB.16.0’ provider is not registered on the local machine. (System.Data)
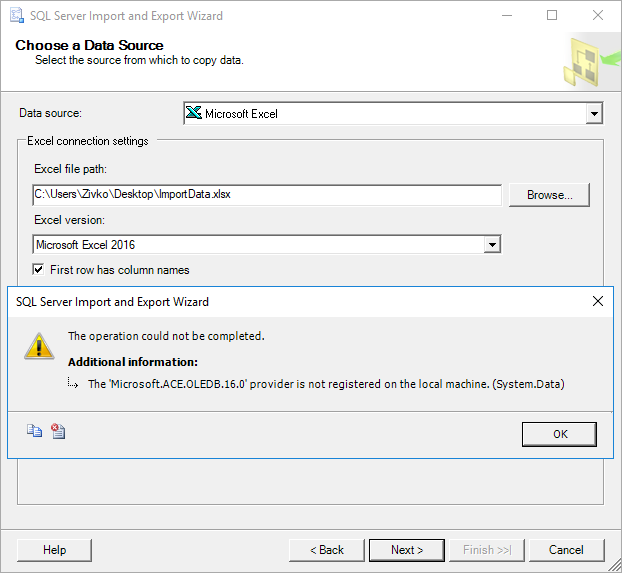
Typically, this warning message appears when the SQL Server Import and Export Wizard is launched via SQL Server Management Studio (SSMS) which is a 32-bit application and the 32-bit version of the SQL Server Import and Export Wizard is launched, but you have installed the Microsoft Access Database Engine 2016 Redistributable 64 bit version.
There are two solutions for resolving this problem:
- The first is to launch the 64-bit version of the SQL Server Import and Export Wizard via the Start menu
- The second resolution is to install the Microsoft Access Database Engine 2016 Redistributable 32 bit version and continue using the SQL Server Import and Export Wizard via SSMS, but first, you need to uninstall the 64-bit version of Microsoft Access Database Engine 2016 Redistributable, otherwise the following warning message will appear when launching the installation package:
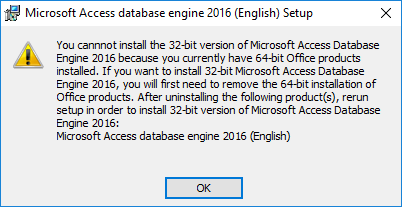
Note: The Microsoft Access Database Engine 2016 Redistributable can be installed in quiet mode.
Open the Command Prompt window and run the following:
For 32-bit version
C:Users<User_Name>DownloadsAccessDatabaseEngine.exe /quiet
For 64-bit version
C:Users<User_Name>DownloadsAccessDatabaseEngine_X64.exe /quiet

The next page on the SQL Server Import and Export Wizard is the Choose a Destination page:
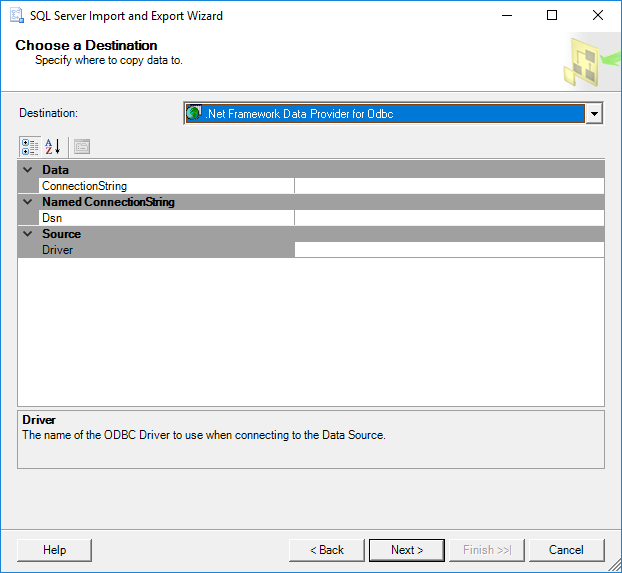
On this page, determine the destination where data from the data source (Excel file) will be placed. In our case, the destination will be a SQL Server database.
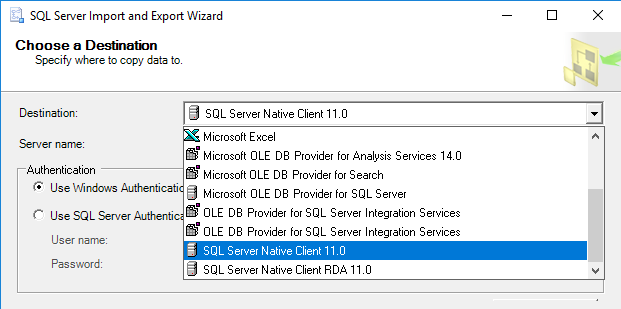
Under the Destination drop down box, choose a provider that can connect to a SQL Server database.
One of providers that can connect to SQL Server is:
- .NET Framework Data Provider for SqlServer
- Microsoft OLE DB Provider for SQL Server
- SQL Server Native Client 11.0
In this case, the SQL Server Native Client 11.0 will be selected from the Destination list:
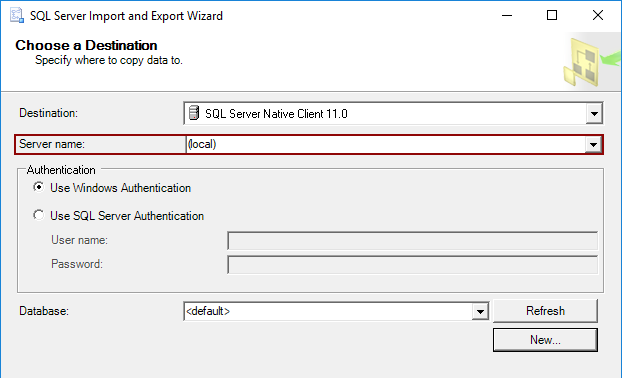
From the Server name combo box, select the SQL Server instance:
In the Authentication section, determine how it will be connected to SQL Server by using Windows or SQL Server Authentication mode.
From the Database drop down box, pick a database in which data from data source (Excel file) will be placed:
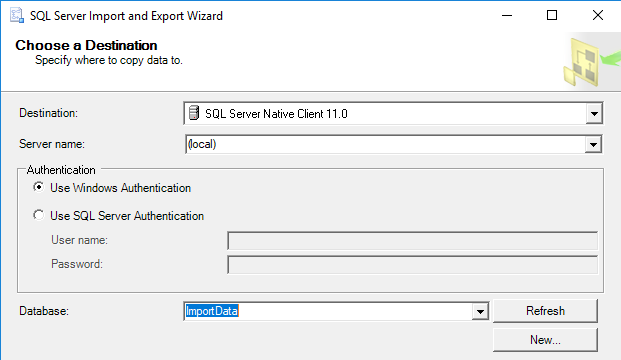
Or, create a new database as a destination for data from data source.
To do that, click the New button and in the Create Database dialog, set the parameters for the new SQL Server destination database:
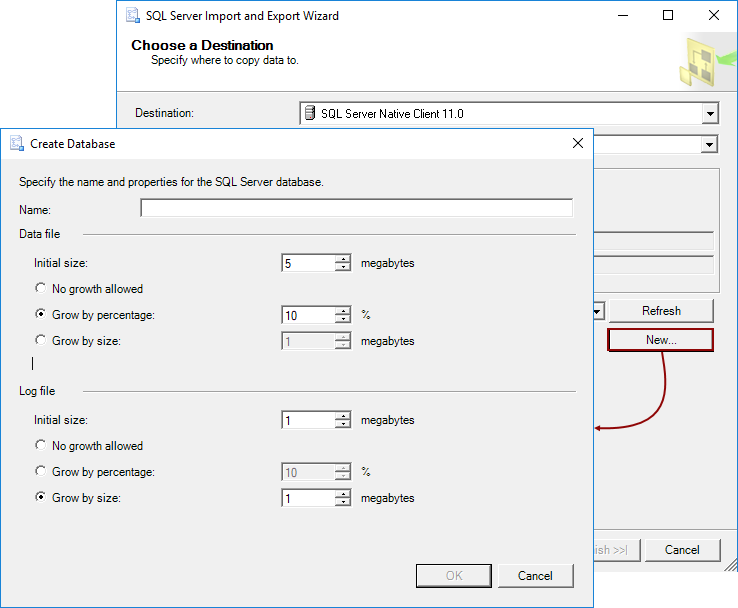
When everything is set on the Choose a Destination page, click the Next button to proceed.
On the Specify Table Copy or Query page, determine how data from the data source will be copied to the destination:
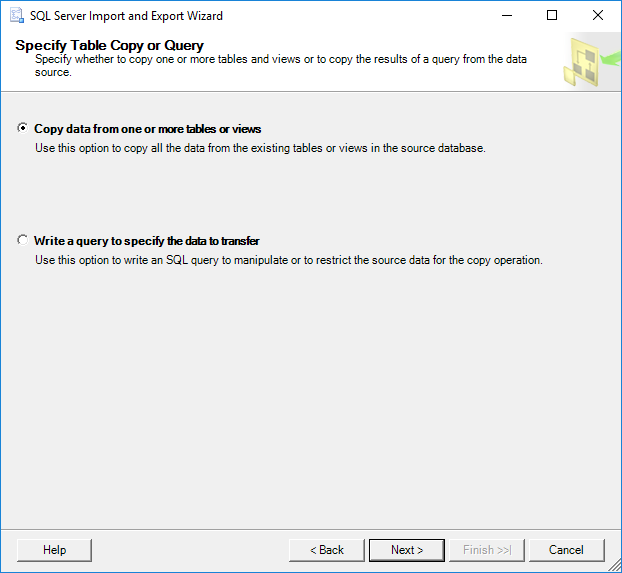
If the Copy data from one or more tables or views radio button is selected then all data from the chosen worksheets will be copied.
If the Write a query to specify the data to transfer is chosen, then only data that are specified in a SQL query will be copied from an Excel worksheet to a destination SQL Server database.
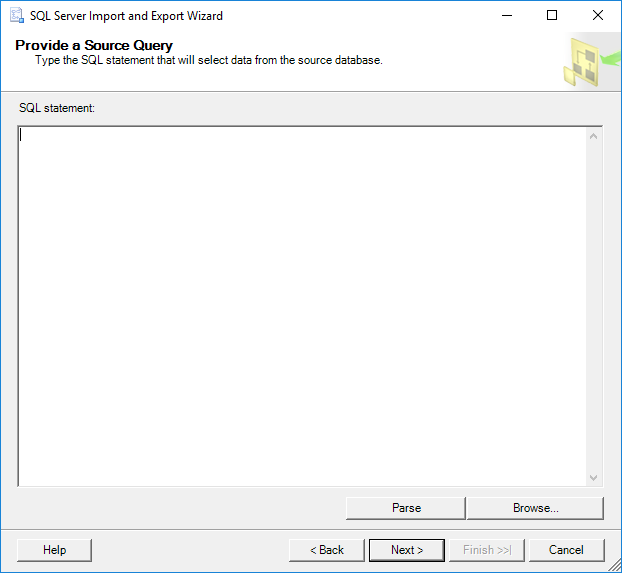
If the Write a query to specify the data to transfer in the Choose a Destination page is chosen, then the Provide a Source Query page will be shown when the Next button is pressed:
In the SQL statement text box, type the query that will select the data to copy form the Excel file to the SQL Server database or load a query using the Browse button.
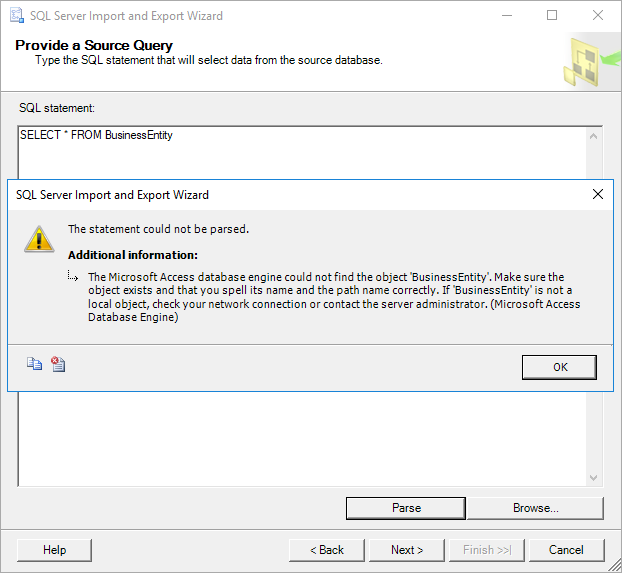
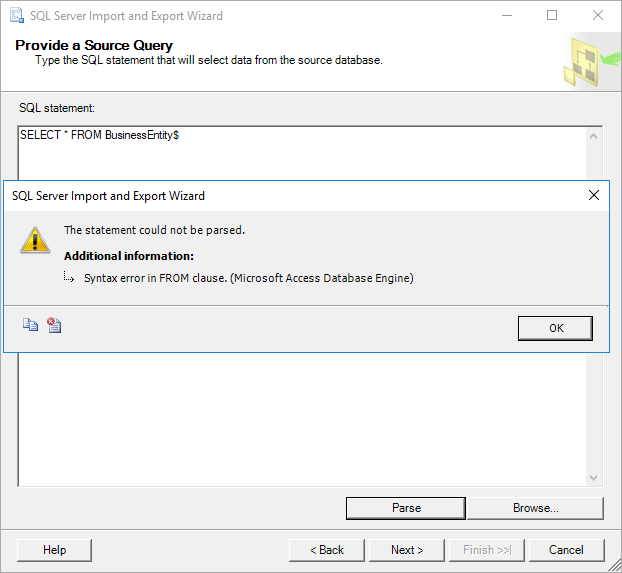
To successfully query a worksheet the $ to the end of the sheet name and the brackets around sheet name, ([BusinessEntity$]) must be added, otherwise the following warning messages may appear:
The statement could not be parsed.
Additional information:
The Microsoft Access database engine could not find the object ‘BusinessEntity’. Make sure the object exists and that you spell its name and the path name correctly. If ‘BusinessEntity’ is not a local object, check your network connection or contact the server administrator. (Microsoft Access Database Engine)
Or this:
The statement could not be parsed.
Additional information:
Syntax error in FROM clause. (Microsoft Access Database Engine)
If the Copy data from one or more tables or views radio button is chosen, when the Next button is pressed, the Select Source Tables and Views page will be shown:
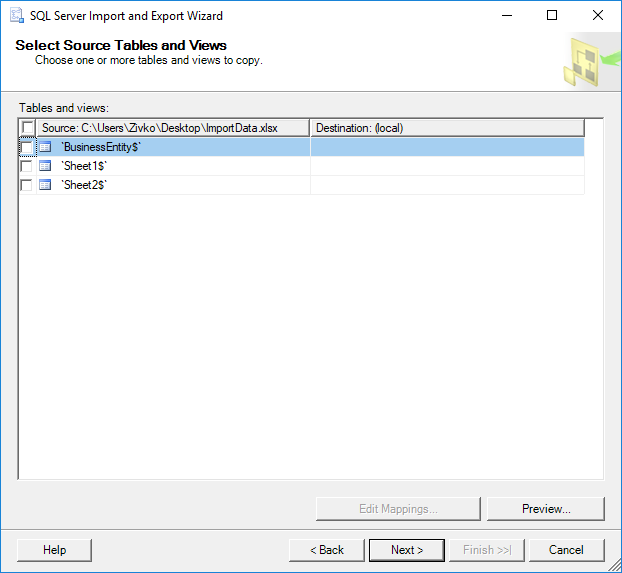
On this page, all worksheets for the Excel file (ImportData.xlsx) will be listed under the Source column. From the Source list, choose from which worksheets you want to import data to the SQL Server database by clicking the check box next to the name of the worksheets. The selected worksheets will appear in the Destination column:
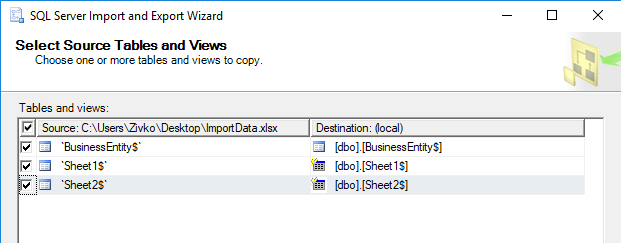
The name of the tables in the SQL Server database by default will be the names of the selected worksheets from the Source column, but these names can be changed by clicking on the name in the Destination column:
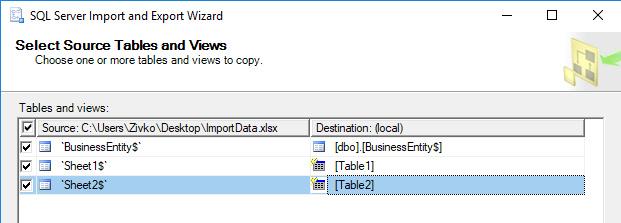
As it may be noticed, the icon in the Destination column for the BusinessEntity$ field is different from the Table1 and Table2 fields. This is because the table in the SQL Server database that is chosen as a destination already exists and for the Table1 and Table2 fields, new tables will be created.
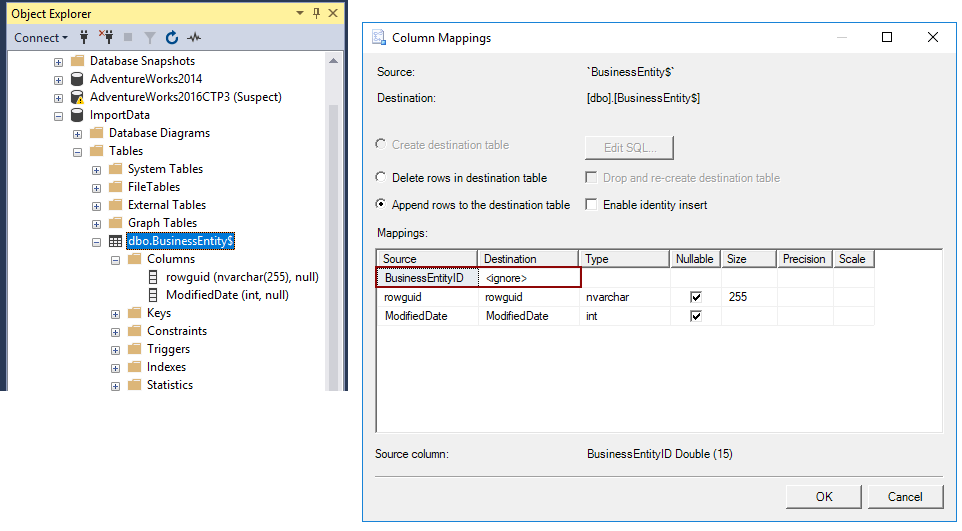
When using an existing table, make sure that the destination table has the same number of columns that have data source, otherwise the columns from the data source that does not have an adequate destination column will be by default ignored (<ignore>) and the data from that columns will not be imported to a destination table:
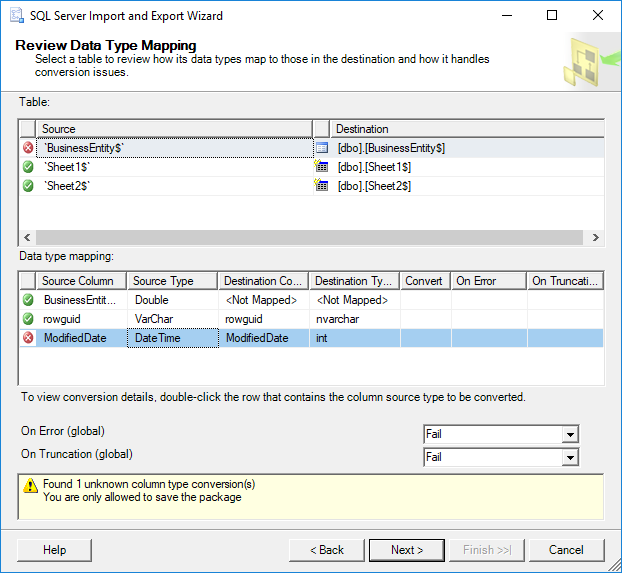
Also, make sure that columns in the destination table have data types that are compatible with the data types in the columns of the source data, otherwise the following error may appear:
Found 1 unknown column type conversion(s) You are only allowed to save the package
When the appropriate columns and the data types are set, click the Next button, the Save and Run Package page of the SQL Server Import and Export Wizard will appear:
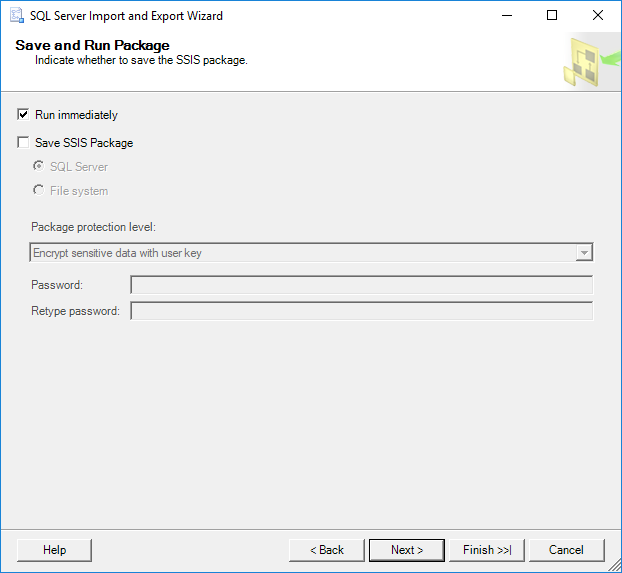
Click the Next button if want to import data from an Excel file to a SQL Server database, but if want to save the SSIS package for the later use, check the Save SSIS Package button.
On the Complete the Wizard page, choices that are made in the previous wizard pages are shown:
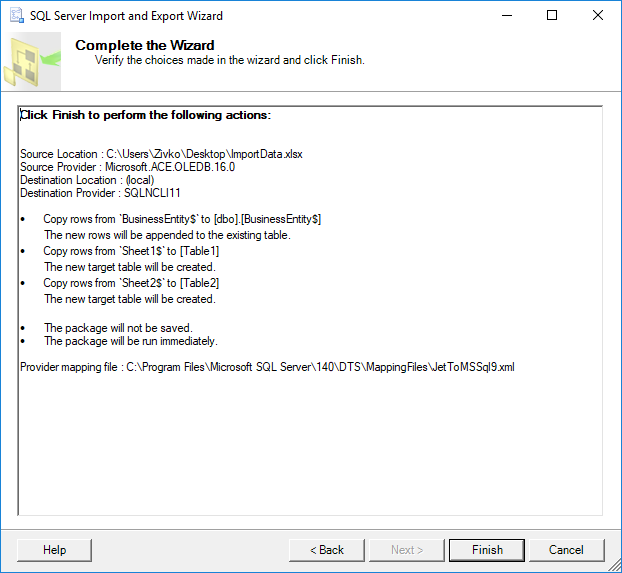
Click the Next button to import data from an Excel file to a SQL Server database. The Performing Operation page shows the status of the importing process if it is finished successfully or with the errors:
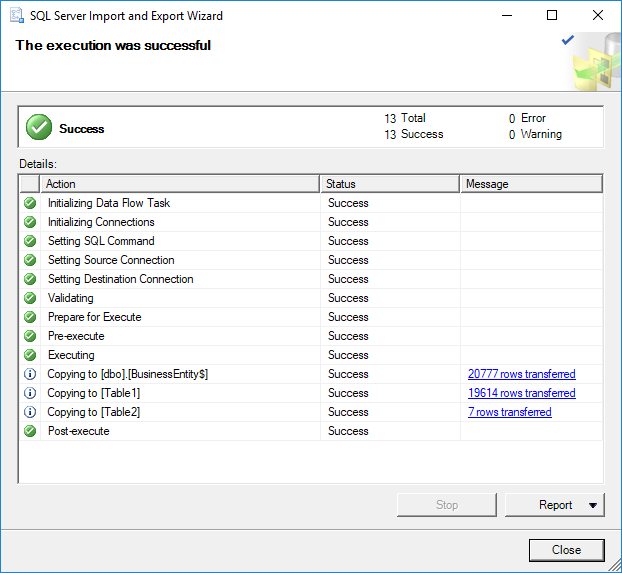
If the error occurs during the process of importing data from Excel file to the SQL Server database the Messages… word will appear in the Message column for the action that failed:
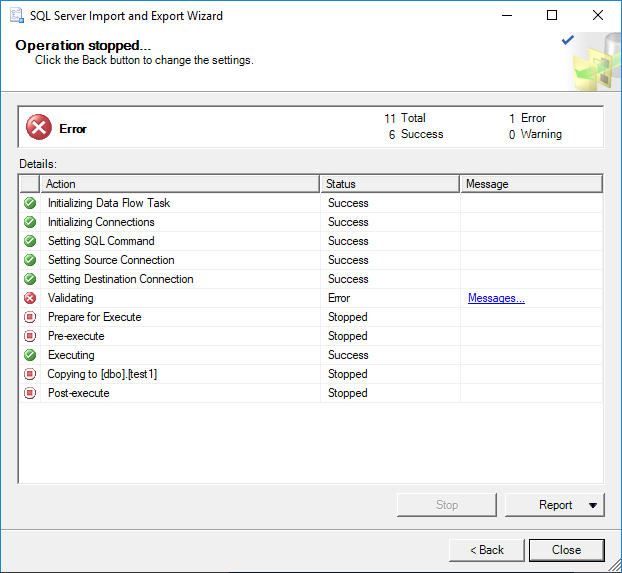
When click on the Messages…, the View Report dialog will appear with detailed information about the error:
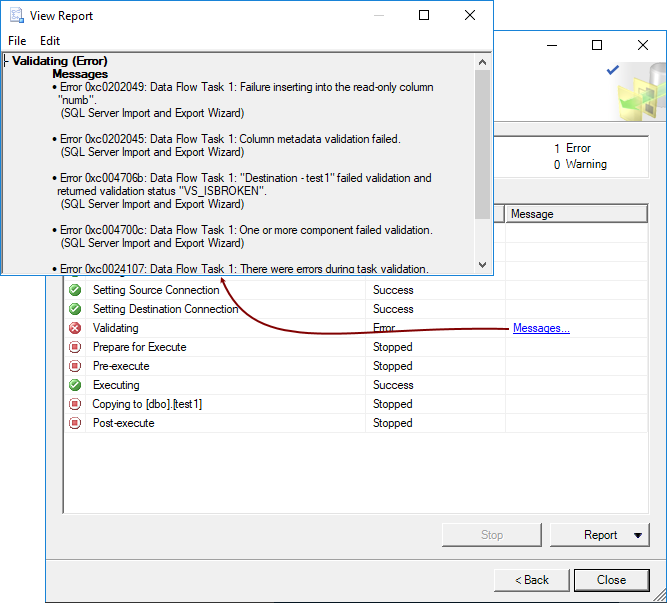
This error:
– Validating (Error)
Messages
- Error 0xc0202049: Data Flow Task 1: Failure inserting into the read-only column “numb”.
(SQL Server Import and Export Wizard)
- Error 0xc0202045: Data Flow Task 1: Column metadata validation failed.
(SQL Server Import and Export Wizard)
- Error 0xc004706b: Data Flow Task 1: “Destination – test1” failed validation and returned validation status “VS_ISBROKEN”.
(SQL Server Import and Export Wizard)
- Error 0xc004700c: Data Flow Task 1: One or more component failed validation.
(SQL Server Import and Export Wizard)
- Error 0xc0024107: Data Flow Task 1: There were errors during task validation.
(SQL Server Import and Export Wizard)
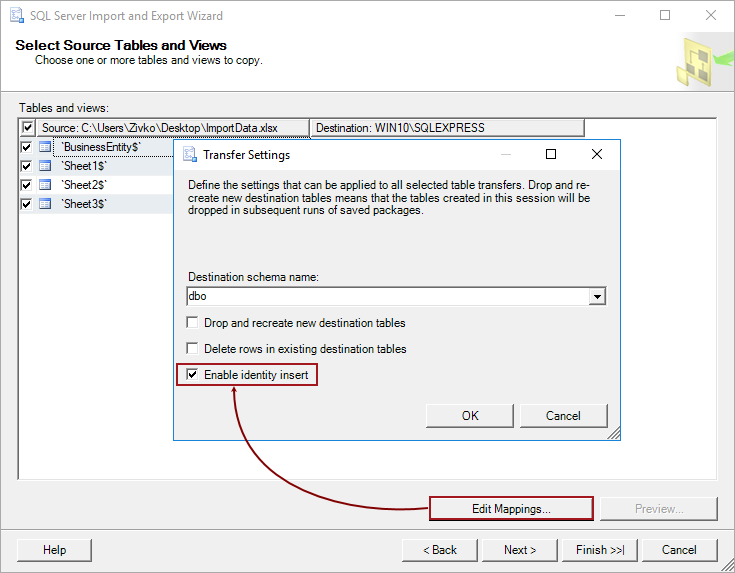
Typically, it appears when the destination table has an IDENTITY column. To resolve this, turn back to the Select Source Tables and Views page, select the tables that have identity property and press the Edit Mappings button. From the Transfer Settings dialog, select the Enable identity insert check box:
Also, another common problem that may appear when importing data from data source to the destination SQL Server tables is the FOREIGN KEY Constraints problem. In the error below two destination tables test1 and test2 are shown. The test2 table is referenced to the test1 table:
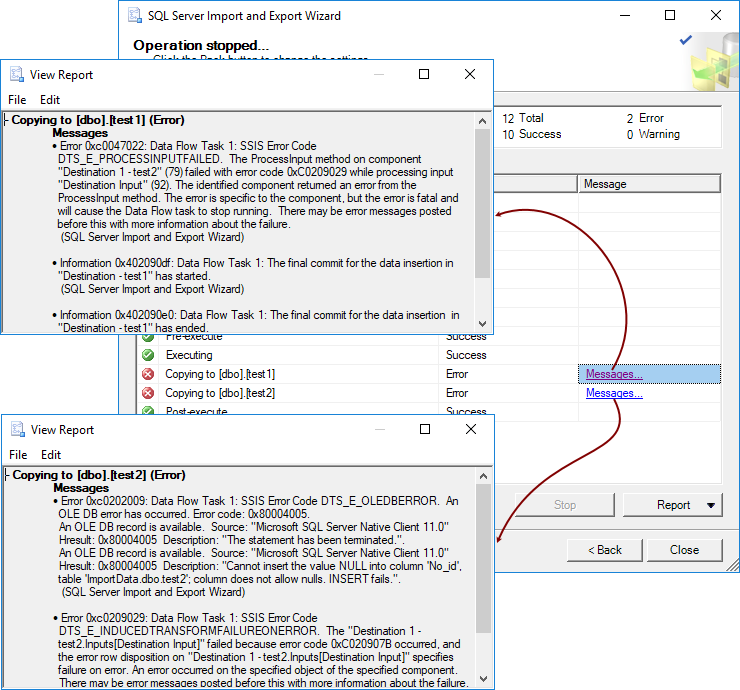
– Copying to [dbo].[test1] (Error)
Messages
- Error 0xc0047022: Data Flow Task 1: SSIS Error Code DTS_E_PROCESSINPUTFAILED. The ProcessInput method on component “Destination 1 – test2” (79) failed with error code 0xC0209029 while processing input “Destination Input” (92). The identified component returned an error from the ProcessInput method. The error is specific to the component, but the error is fatal and will cause the Data Flow task to stop running. There may be error messages posted before this with more information about the failure.
(SQL Server Import and Export Wizard)
- Information 0x402090df: Data Flow Task 1: The final commit for the data insertion in “Destination – test1” has started.
(SQL Server Import and Export Wizard)
- Information 0x402090e0: Data Flow Task 1: The final commit for the data insertion in “Destination – test1” has ended.
(SQL Server Import and Export Wizard)
– Copying to [dbo].[test2] (Error)
Messages
- Error 0xc0202009: Data Flow Task 1: SSIS Error Code DTS_E_OLEDBERROR. An OLE DB error has occurred. Error code: 0x80004005.
An OLE DB record is available. Source: “Microsoft SQL Server Native Client 11.0” Hresult: 0x80004005 Description: “The statement has been terminated.”.
An OLE DB record is available. Source: “Microsoft SQL Server Native Client 11.0” Hresult: 0x80004005 Description: “Cannot insert the value NULL into column ‘No_id’, table ‘ImportData.dbo.test2’; column does not allow nulls. INSERT fails.”.
(SQL Server Import and Export Wizard)
-
Error 0xc0209029: Data Flow Task 1: SSIS Error Code DTS_E_INDUCEDTRANSFORMFAILUREONERROR. The “Destination 1 – test2.Inputs[Destination Input]” failed because error code 0xC020907B occurred, and the error row disposition on “Destination 1 – test2.Inputs[Destination Input]” specifies failure on error. An error occurred on the specified object of the specified component. There may be error messages posted before this with more information about the failure.
(SQL Server Import and Export Wizard)
To resolve this problem, disable constraint for referenced table (test2) by executing the following code in SSMS:
|
ALTER TABLE test2 NOCHECK CONSTRAINT ALL |
After importing data from data source to the destination SQL Server database, execute the following code in SSMS to enable constraint for the test2 table:
|
ALTER TABLE test2 WITH CHECK CHECK CONSTRAINT ALL |
In some cases, the warning message like from the image below may appear:
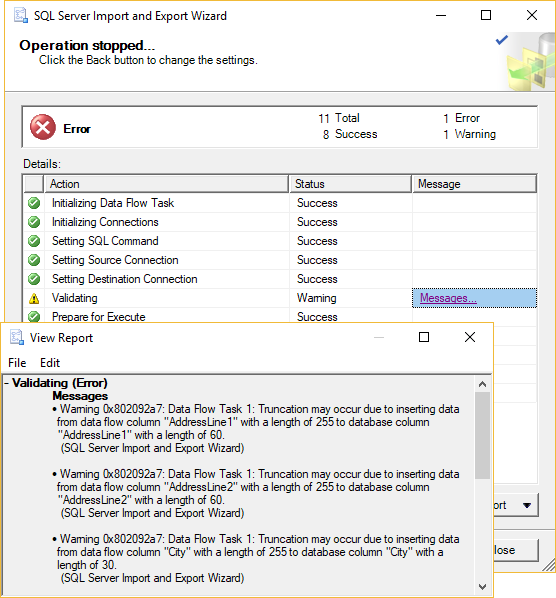
– Validating (Warning)
Messages
- Warning 0x802092a7: Data Flow Task 1: Truncation may occur due to inserting data from data flow column “AddressLine1” with a length of 255 to database column “AddressLine1” with a length of 60.
(SQL Server Import and Export Wizard)
- Warning 0x802092a7: Data Flow Task 1: Truncation may occur due to inserting data from data flow column “AddressLine2” with a length of 255 to database column “AddressLine2” with a length of 60.
(SQL Server Import and Export Wizard)
- Warning 0x802092a7: Data Flow Task 1: Truncation may occur due to inserting data from data flow column “City” with a length of 255 to database column “City” with a length of 30.
(SQL Server Import and Export Wizard)
- Warning 0x80049304: Data Flow Task 1: Warning: Could not open global shared memory to communicate with performance DLL; data flow performance counters are not available. To resolve, run this package as an administrator, or on the system’s console.
(SQL Server Import and Export Wizard)
To resolve this, go to the SQL Server destination table and increase the column size for the columns that are listed in the warning message.
To verify that the data from the Excel file are imported to the SQL Server database, go to SSMS, find the database in which data are imported and list all data from the tables:

References:
- Import data from Excel to SQL Server or Azure SQL Database
- How to import/export data to SQL Server using the SQL Server Import and Export Wizard
- How to query Excel data using SQL Server linked servers
- Import and Export Data with the SQL Server Import and Export Wizard
- Author
- Recent Posts
Marko aka “Zivko” is a senior software analyst from Nis, Serbia focusing on SQL Server and MySQL as well as client technologies like SSMS, Visual Studio, and VSCode. He has extensive experience with quality assurance, issue escalation/resolution, and product evangelism.
He is a prolific author of authoritative content related to SQL Server including a number of “platinum” articles (top 1% in terms of popularity and engagement). His writing covers a range of topics on MySQL and SQL Server including remote/linked servers, import/export, LocalDB, SSMS, and more.
In his part-time, Zivko likes basketball, foosball (table-soccer), and rock music.
See more about Marko at LinkedIn
View all posts by Marko Zivkovic
Table of Contents
- Introduction
- Building the Environment for Testing
- Creating an Excel File to test
- Installing the necessary components in Windows Server
- Enabling SQL Server Instance to Read File
- Querying and Importing the Spreadsheet
- Conclusion
- References
- See Also
- Other Languages
Introduction
We often have to perform data integration in SQL Server, with different data sources such as «.txt» files (tabular text or with separator character), «.csv» files or «.xls» (Excel) files.
It is always not possible to create a SSIS package to do this data import, a useful alternative is to use OPENROWSET method for importing data.
In this article, we will use data import from Excel files (.xls e .xlsx).
Building the Environment for Testing
So that we see the data import process steps from an Excel file to a table from database, we need:
- Create an Excel file to import sample;
- Configure Windows Server, installing the necessary components;
- Configure the necessary permissions to the SQL instance that we need to obtain data files.
Let’s prepare environment for data import!
Creating an Excel File to test
In this step, we will create an Excel file sample with just a few rows to demo.
Add a header row, to explicitly define the data: «ID», «Item Name» and «Date Created».
The data sequences is only to facilitate the visualization of the content that is being manipulated.
See this Excel file in the image below (click to enlarge)
Installing the necessary components in Windows Server
To get the data through a query inside SQL Server, use an OLE DB Data Provider.
Most files can now use the
Microsoft.ACE.OLEDB.12.0 Data Provider that can be obtained free through Data Connectivity Components.
This package will provide all ODBC and OLEDB drivers for data manipulation, as follow below:
| File Type (extension) | Extended Properties |
| Excel 97-2003 Workbook (.xls) | Excel 8.0 |
| Excel 2007-2010 Workbook (.xlsx) | Excel 12.0 XML |
| Excel 2007-2010 Macro-enabled workbook (.xlsm) | Excel 12.0 Macro |
| Excel 2007-2010 Non-XML binary workbook (.xlsb) | Excel 12.0 |
There are two versions of this package: «AccessDatabaseEngine.exe» for x86 platform and other «AccessDatabaseEngine_x64.exe» for x64 platform.
The minimum system requirements for this installation can be obtained in the same
download package page.
If you are installing the x86 package you must ensure that your user is allowed access to the Temporary directory of your Windows OS.
To know what your Temporary directory open the «Control Panel», click «Advanced System Settings» option. A window will open, select the «Advanced» tab and click the «Environment Variables» button.
A new window will open with your environment variables, including «TEMP» and «TMP» variables, indicating your Temporary directory.
See this windows in the image below (click to enlarge)
So if your operating system is Windows 32-bit (x86) is necessary to include read and write access to the user of your SQL Server instance.
It’s important to remember that the user of your SQL Server instance must be a local user or the default «Local System» account to grant this access.
See this window Service Properties in the image below
Enabling SQL Server Instance to Read File
The settings and permissions to execute a query external data has some details that should be performed to be able to get the data from an Excel files (.xls ou .xlsx) and also other formats.
The execution of distributed queries as OPENROWSET is only possible when the SQL Server instance has the
Ad Hoc Distributed Queries configuration enabled. By default, every SQL Server instance maintains this permission denied.
 Note Note |
|---|
|
The Advanced Settings should only be changed by an experienced professional or a certified professional in SQL Server. It’s important to note not use these commands in Production Databases without previous analysis. |
To enable this feature just use the sp_configure system stored procedure in your SQL instance to display its Advanced Settings in
show advanced options parameter and soon to follow, enable the Ad Hoc Distributed Queries setting to enabling the use of distributed queries.
USE [master]
GO
—CONFIGURING SQL INSTANCE TO ACCEPT ADVANCED OPTIONS
EXEC
sp_configure ‘show advanced options’, 1
RECONFIGURE
GO
—ENABLING USE OF DISTRIBUTED QUERIES
EXEC
sp_configure ‘Ad Hoc Distributed Queries’, 1
RECONFIGURE
GO
These changes in the Advanced settings only take effect after the execution of the RECONFIGURE command.
To get permission granted to use the Data Provider through sp_MSset_oledb_prop system stored procedure to link Microsoft.ACE.OLEDB.12.0 in
SQL Server using AllowInProcess parameter so we can use the resources of the Data Provider and also allow the use of dynamic parameters in queries through of
DynamicParameters parameter for our queries can use T-SQL clauses.
USE [master]
GO
—ADD DRIVERS IN SQL INSTANCE
EXEC
master.dbo.sp_MSset_oledb_prop
N’Microsoft.ACE.OLEDB.12.0′,
N’AllowInProcess’, 1
GO
EXEC
master.dbo.sp_MSset_oledb_prop
N’Microsoft.ACE.OLEDB.12.0′,
N’DynamicParameters’, 1
GO
See
this output SQL script in the image below
After setting up your SQL instance to use the
Microsoft.ACE.OLEDB.12.0 Data Provider and make the appropriate access permissions, we can implement the distributed queries of other data sources,
in this case to Excel files.
Querying and Importing the Spreadsheet
As this demo is for Excel files (.xls) we will perform a query using an OPENROWSET method with the Excel test file that was created earlier in this article.
We use some parameters for this method to be able to data query:
- Data Provider — In this case, using Microsoft.ACE.OLEDB.12.0
- BULK Options — File Version;Where it’s stored; Header (HDR); Import Mode (IMEX)
- Query —
T-SQL statement with or without clauses to data filter and process.
—CONSULTING A SPREADSHEET
SELECT
* FROM
OPENROWSET(‘Microsoft.ACE.OLEDB.12.0’,
‘Excel 12.0; Database=C:MicrosoftTest.xls; HDR=YES; IMEX=1’,
‘SELECT * FROM [Plan1$]’)
GO
See
this output SQL script in the image below
To data group and perform other tasks for data manipulation, the ideal is always load the data into the database. You can insert data into an existing table using the INSERT statement or you can create a table through of INTO command in SELECT statement.
—CONSULTING A SPREADSHEET
SELECT *
INTO
TB_EXAMPLE
FROM OPENROWSET(‘Microsoft.ACE.OLEDB.12.0’,
‘Excel 12.0; Database=C:MicrosoftTest.xls; HDR=YES; IMEX=1’,
‘SELECT * FROM [Plan1$]’)
GO
SELECT * FROM TB_EXAMPLE
GO
See
this output SQL script in the image below
It’s also important to check if the SQL Server Service user has access in Windows directory where Excel files
are stored.
Conclusion
Have the possibility to use an alternative resource for importing data with T-SQL command is very useful, especially when we have to manipulate files in proprietary formats, as for .xlsx files where it’s necessary to use the Data Provider appropriate to obtain
the data correctly and with ease use.
It’s important to watch out that only users that have actually need to manipulate these files can use these resources, while minimizing the vulnerability of their environment through a permission in your SQL Server.
References
- OPENROWSET (Transact-SQL)
- Import Bulk Data by Using BULK INSERT or OPENROWSET(BULK…) (SQL Server)
- OLE DB Providers Tested with SQL Server
- Excel Source
See Also
- Transact-SQL Portal
- Wiki: Portal of TechNet Wiki Portals
Other Languages
- Importando uma planilha Excel para um Banco de Dados SQL Server (pt-BR)
This article was awarded the silver medal in the TechNet
Guru of April 2014
Dear readers of our blog, we’d like to recommend you to visit the main page of our website, where you can learn about our product SQLS*Plus and its advantages.
SQLS*Plus — best SQL Server command line reporting and automation tool! SQLS*Plus is several orders of magnitude better than SQL Server sqlcmd and osql command line tools.
Enteros UpBeat offers a patented database performance management SaaS platform. It proactively identifies root causes of complex revenue-impacting database performance issues across a growing number of RDBMS, NoSQL, and deep/machine learning database platforms. We support Oracle, SQL Server, IBM DB2, MongoDB, Casandra, MySQL, Amazon Aurora, and other database systems.
18 August 2020
Microsoft SQL Server allows you to import data from an Excel file into a database using the built-in T-SQL language in an SQL query. Today I will tell you in detail how it is done, what conditions need to be fulfilled to make this operation successful, tell you about the features of import for the most common cases of SQL server configurations and give specific procedures and practical examples.
I will start by saying that you can import data from Excel to Microsoft SQL Server using “Distributed Queries” and “Linked Servers”. You probably already know this, as I have written about it more than once (references to the relevant materials are given above).
You can access the Excel file and import data into Microsoft SQL Server using T-SQL instructions OPENDATASOURCE, OPENROWSET or OPENQUERY.
However, in the above articles I have missed several important points, one of which is that all SQL Server configurations are different, due to which many have different problems and errors during the execution of distributed queries and calls to related servers.
I also described the way to download data from Excel, which is now outdated, so today I will try to give you a little more information on how to import data from Excel file to Microsoft SQL Server in T-SQL language.
Introduction
So, as I said, the configuration of the SQL server plays a very important role here, in particular, which version of the server is installed, x86 or x64.
If we talk about the latest versions of Microsoft SQL Server 2016-2019, they are only x64 and are installed on 64-bit versions of Windows.
On this basis, I will divide the article into several parts, in each of which I will tell you about features of importing data from Excel for the most common configuration cases and give you a specific order of action.
In order to quickly find out which version of SQL Server is installed on your computer, you can make a simple SQL query
SELECT @@VERSION;
Access to the Excel file and, accordingly, data import into Microsoft SQL Server is performed by special providers (vendors). To work with Excel in Microsoft SQL Server are usually used:
- Jet.OLEDB.4.0
- ACE.OLEDB.12.0
In all examples below, I will send a simple SELECT query to select data from an Excel file to check access to the data in the Excel file. To import data (upload data to the database), you can use any method convenient for you, e.g. SELECT INTO or INSERT INTO construction.
In addition, it is recommended to close the Excel file when accessing it in distributed queries, as well as to specify the path to the file without spaces (although modern SQL server can work with spaces).
Import data from Excel 2003 (xls file) into Microsoft SQL Server x86
Step 1 – Check for Microsoft.Jet.OLEDB.4.0 provider on SQL Server
The first thing we need to start with is to check if Microsoft.Jet.OLEDB.4.0 provider is registered on SQL Server, because in this case we need to use that provider. This can be done using the following SQL instruction
EXEC sp_enum_oledb_providers;
The resulting dataset should contain a string with Microsoft.Jet.OLEDB.4.0. If there is no such provider, then most likely there is no Excel 2003 installed in the system and, accordingly, it should be installed.
Step 2 – Granting user rights to a temporary directory
The peculiarity of distributed queries and work with related Excel servers in x86 versions of SQL Server is that regardless of the name of which account sends an SQL query to Excel, this account must have rights to write to the temporary directory of the account under which the SQL Server service itself operates.
Since the OLE DB vendor creates a temporary file during the query in the temporary directory of SQL Server using the credentials of the user executing the query.
Thus, if the SQL Server service runs on behalf of either a local or a network service, it is necessary to give the appropriate permissions to the temporary directory of these services to all users who will send distributed queries and contact the associated Excel server (if the server runs on behalf of the user who sends SQL queries, then such permissions are not required, it already has them).
This can be done using the built-in command line utility icacls.
For example, for a local service, the command will look like this.
icacls C:WindowsServiceProfilesLocalServiceAppDataLocalTemp /grant UserName:(R,W)
For network service
icacls C:WindowsServiceProfilesNetworkServiceAppDataLocalTemp /grant UserName:(R,W)
In place of UserName, provide the name of the user who sends the request.
Step 3 – Enable distributed queries on SQL Server
By default, the ability to use distributed queries, particularly the OPENDATASOURCE and OPENROWSET functions, is prohibited in Microsoft SQL Server, so this feature must be enabled first.
It is enabled using the system stored procedure sp_configure, which is responsible for system parameters of the server. We need to set the Ad Hoc Distributed Queries parameter to 1, to do this we execute the following SQL instruction.
sp_configure 'show advanced options', 1;
RECONFIGURE;
GO
sp_configure 'Ad Hoc Distributed Queries', 1;
RECONFIGURE;
GO
Step 4 – Execute SQL query, access to Excel file
Below I will give you some options for accessing the Excel file (TestExcel.xls).
OPENROWSET
SELECT * FROM OPENROWSET
(
'Microsoft.Jet.OLEDB.4.0',
'Excel 8.0; Database=D:TestExcel.xls',
'SELECT * FROM [List 1$]'.
);
OPENDATASOURCE
SELECT * FROM OPENDATASOURCE('Microsoft.Jet.OLEDB.4.0'),
'Data Source=D:TestExcel.xls;
Extended Properties=Excel 8.0')...[List1$];
Linked Server
--Creation of a linked server
EXEC sp_addlinkedserver @server = 'TEST_EXCEL',
@srvproduct = 'Excel',
@provider = 'Microsoft.Jet.OLEDB.4.0',
@datasrc = 'D:TestExcel.xls',
@provstr = 'Excel 8.0;IMEX=1;HDR=YES;';
--Security settings (authorization)
EXEC dbo.sp_addlinkedsrvlogin @rmtsrvname='TEST_EXCEL',
@useself= 'False',
@locallogin=NULL,
@rmtuser=NULL,
@rmtpassword=NULL;
-- Address to the associated server
SELECT * FROM OPENQUERY (TEST_EXCEL, 'SELECT * FROM [List1$]');
--or
SELECT * FROM TEST_EXCEL...[List1$];
Import of data from Excel 2007 and higher (xlsx file) into Microsoft SQL Server x86
Step 1 – Check for Microsoft.ACE.OLEDB.12.0 provider on SQL Server
Just like in the previous example, we first check if we have the ISP we need installed, in this case we need Microsoft.ACE.OLEDB.12.0.
EXEC sp_enum_oledb_providers;
Step 2 – Installing Microsoft.ACE.OLEDB.12.0 (32-bit) Provider
If there is no provider, it must be installed. Here’s a link to the ISP download: https://www.microsoft.com/en-us/download/details.aspx?id=13255
Select and download the file corresponding to the x86 architecture (i.e. in the name without x64).
Step 3 – Granting user rights to a temporary directory
In this case, we also give rights to the temporary directory of local or network service to all users who will send SQL queries to the Excel file.
We use the same command line utility icacls.
For local service:
icacls C:WindowsServiceProfilesLocalServiceAppDataLocalTemp /grant UserName:(R,W)
For network service:
icacls C:WindowsServiceProfilesNetworkServiceAppDataLocalTemp /grant UserName:(R,W)
In place of UserName, provide the name of the user who sends the request.
Step 4 – Enable Distributed Queries on SQL Server
Enable the ability to use OPENDATASOURCE and OPENROWSET on Microsoft SQL Server, I repeat that this feature is disabled by default.
sp_configure 'show advanced options', 1;
RECONFIGURE;
GO
sp_configure 'Ad Hoc Distributed Queries', 1;
RECONFIGURE;
GO
Step 5 – Configuring Microsoft.ACE.OLEDB.12.0 provider
In this case you will need to additionally configure the provider Microsoft.ACE.OLEDB.12.0. To do this, enable the following provider parameters (specify 0 instead of 1 to disable).
EXEC sp_MSset_oledb_prop N'Microsoft.ACE.OLEDB.12.0', N'AllowInProcess', 1
GO
EXEC sp_MSset_oledb_prop N'Microsoft.ACE.OLEDB.12.0', N'DynamicParameters', 1
GO
If these parameters are not included, an error is likely to appear, approximately the following
“Message 7399, level 16, state 1, line 25.
The provider of OLE DB “Microsoft.ACE.OLEDB.12.0” for the associated server “(null)” reported an error. The provider did not provide the error data.
Message 7330, level 16, state 2, line 25
We failed to get the string from the OLE DB provider “Microsoft.ACE.OLEDB.12.0” for the associated server “(null)”.
Step 6 – Execute SQL query, access to Excel file
Examples of accessing the Excel file (TestExcel.xlsx).
OPENROWSET
SELECT * FROM OPENROWSET
(
'Microsoft.ACE.OLEDB.12.0',
'Excel 12.0;
Database=D:TestExcel.xlsx',
'SELECT * FROM [List 1$]'.
);
OPENDATASOURCE
SELECT * FROM OPENDATASOURCE('Microsoft.ACE.OLEDB.12.0'),
'Data Source=D:TestExcel.xlsx;
Extended Properties=Excel 12.0')...[List1$];
Linked Server
--Creation of a linked server
EXEC sp_addlinkedserver @server = 'TEST_EXCEL',
@srvproduct = 'Excel',
@provider = 'Microsoft.ACE.OLEDB.12.0',
@datasrc = 'D:TestExcel.xlsx',
@provstr = 'Excel 12.0;IMEX=1;HDR=YES;';
--Security settings (authorization)
EXEC dbo.sp_addlinkedsrvlogin @rmtsrvname='TEST_EXCEL',
@useself= 'False',
@locallogin=NULL,
@rmtuser=NULL,
@rmtpassword=NULL;
-- Address to the associated server
SELECT * FROM OPENQUERY (TEST_EXCEL, 'SELECT * FROM [List1$]');
-or
SELECT * FROM TEST_EXCEL...[List1$];
Import of data from Excel (any files) into Microsoft SQL Server x64
Step 1 – Check for Microsoft.ACE.OLEDB.12.0 provider on SQL Server
In this case we also use Microsoft.ACE.OLEDB.12.0 provider, first check if it is registered on the server.
EXEC sp_enum_oledb_providers;
Step 2 – Installing Microsoft.ACE.OLEDB.12.0 (64-bit) provider
In case the provider is not installed, it must be downloaded and installed: https://www.microsoft.com/en-us/download/details.aspx?id=13255
Download the x64 file.
Step 3 – Enable distributed queries on SQL Server
There is also a need to enable the ability to use distributed queries (OPENDATASOURCE and OPENROWSET) on Microsoft SQL Server x64, so first enable it by following exactly the same instruction.
sp_configure 'show advanced options', 1;
RECONFIGURE;
GO
sp_configure 'Ad Hoc Distributed Queries', 1;
RECONFIGURE;
GO
Step 4 – Configuring Microsoft.ACE.OLEDB.12.0 provider
In this case, most likely, the provider configuration is not required, so first try to execute SQL queries (refer to data in Excel), and if an error occurs (all with the same message 7399 and 7330), then try to enable the parameters AllowInProcess and DynamicParameters (to disable, specify 0 instead of 1).
EXEC sp_MSset_oledb_prop N'Microsoft.ACE.OLEDB.12.0', N'AllowInProcess', 1
GO
EXEC sp_MSset_oledb_prop N'Microsoft.ACE.OLEDB.12.0', N'DynamicParameters', 1
GO
Step 5 – Execute SQL query, access to Excel file
Here the same parameters are used in SQL queries as in the previous example. For convenience, I will duplicate them once again.
Examples of accessing the Excel file (TestExcel.xlsx):
OPENROWSET
SELECT * FROM OPENROWSET
(
'Microsoft.ACE.OLEDB.12.0',
'Excel 12.0;
Database=D:TestExcel.xlsx',
'SELECT * FROM [List 1$]'.
);
OPENDATASOURCE
SELECT * FROM OPENDATASOURCE('Microsoft.ACE.OLEDB.12.0'),
'Data Source=D:TestExcel.xlsx;
Extended Properties=Excel 12.0')...[List1$];
Linked Server
--Creation of a linked server
EXEC sp_addlinkedserver @server = 'TEST_EXCEL',
@srvproduct = 'Excel',
@provider = 'Microsoft.ACE.OLEDB.12.0',
@datasrc = 'D:TestExcel.xlsx',
@provstr = 'Excel 12.0;IMEX=1;HDR=YES;';
--Security settings (authorization)
EXEC dbo.sp_addlinkedsrvlogin @rmtsrvname='TEST_EXCEL',
@useself= 'False',
@locallogin=NULL,
@rmtuser=NULL,
@rmtpassword=NULL;
--Address to the associated server
SELECT * FROM OPENQUERY (TEST_EXCEL, 'SELECT * FROM [List1$]');
--or
SELECT * FROM TEST_EXCEL...[List1$];
Summing up
Finally, I will group the actions to be performed depending on the release of SQL Server (x68 or x64) and the version of the Excel file (xls or xlsx) into one table for your convenience.
| Action / Configure | Import Excel 2003 (xls file) into SQL Server x86 | Import Excel 2007 (xlsx file) into SQL Server x86 | Import Excel (any files) into SQL Server x64 |
| Installing Excel 2003 | Yes | No | No |
| Installing Microsoft.ACE.OLEDB.12.0 provider | No | Yes (x86) | Yes (x64) |
| Granting rights to a temporary service directory (if the SQL server is running on behalf of services) | Yes | Yes | No |
| Configuring Microsoft.ACE.OLEDB.12.0 provider | No | Yes | No (as required) |
| Connection parameters in SQL queries | Microsoft.Jet. OLEDB.4.0 and Excel 8.0 | Microsoft.ACE. OLEDB.12.0 and Excel 12.0 | Microsoft.ACE. OLEDB.12.0 and Excel 12.0 |
| Enabling distributed queries on SQL Server | Yes | Yes | Yes |
That’s all for today, good luck in learning T-SQL!
Import data from Excel to SQL Server table
Tags: Microsoft SQL Server, SQL, sql server, sqls, sqls ms, T-SQL, TSQL

