Insert or delete rows and columns
Insert and delete rows and columns to organize your worksheet better.

Note: Microsoft Excel has the following column and row limits: 16,384 columns wide by 1,048,576 rows tall.
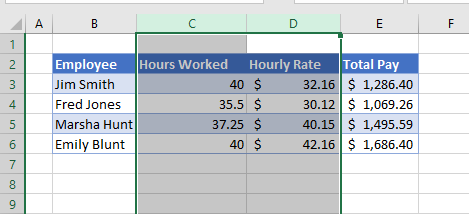
Insert or delete a column
-
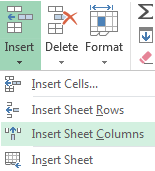
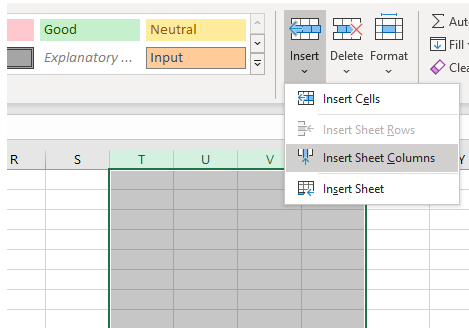
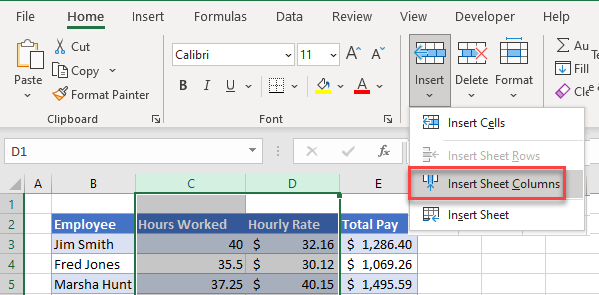
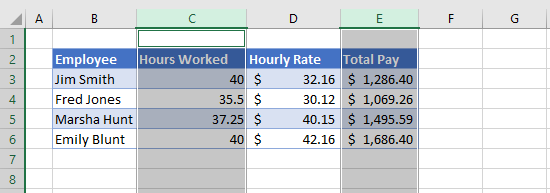
Select any cell within the column, then go to Home > Insert > Insert Sheet Columns or Delete Sheet Columns.
-
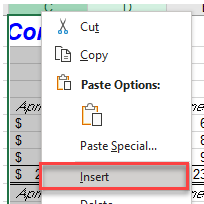
Alternatively, right-click the top of the column, and then select Insert or Delete.
Insert or delete a row
-
Select any cell within the row, then go to Home > Insert > Insert Sheet Rows or Delete Sheet Rows.
-
Alternatively, right-click the row number, and then select Insert or Delete.
Formatting options
When you select a row or column that has formatting applied, that formatting will be transferred to a new row or column that you insert. If you don’t want the formatting to be applied, you can select the Insert Options button after you insert, and choose from one of the options as follows:
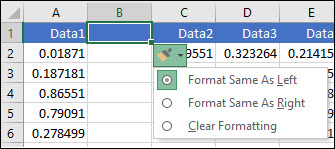
If the Insert Options button isn’t visible, then go to File > Options > Advanced > in the Cut, copy and paste group, check the Show Insert Options buttons option.
Insert rows
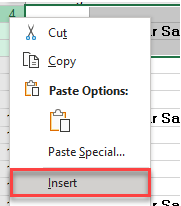
To insert a single row: Right-click the whole row above which you want to insert the new row, and then select Insert Rows.
To insert multiple rows: Select the same number of rows above which you want to add new ones. Right-click the selection, and then select Insert Rows.
Insert columns
To insert a single column: Right-click the whole column to the right of where you want to add the new column, and then select Insert Columns.
To insert multiple columns: Select the same number of columns to the right of where you want to add new ones. Right-click the selection, and then select Insert Columns.
Delete cells, rows, or columns
If you don’t need any of the existing cells, rows or columns, here’s how to delete them:
-
Select the cells, rows, or columns that you want to delete.
-
Right-click, and then select the appropriate delete option, for example, Delete Cells & Shift Up, Delete Cells & Shift Left, Delete Rows, or Delete Columns.
When you delete rows or columns, other rows or columns automatically shift up or to the left.
Tip: If you change your mind right after you deleted a cell, row, or column, just press Ctrl+Z to restore it.
Insert cells
To insert a single cell:
-
Right-click the cell above which you want to insert a new cell.
-
Select Insert, and then select Cells & Shift Down.
To insert multiple cells:
-
Select the same number of cells above which you want to add the new ones.
-
Right-click the selection, and then select Insert > Cells & Shift Down.
Need more help?
You can always ask an expert in the Excel Tech Community or get support in the Answers community.
See Also
Basic tasks in Excel
Overview of formulas in Excel
Need more help?
Want more options?
Explore subscription benefits, browse training courses, learn how to secure your device, and more.
Communities help you ask and answer questions, give feedback, and hear from experts with rich knowledge.
Creating new tables, reports and pricelists of different types, we cannot predict the number of necessary rows and columns. Using Excel program implies to a great extent creating and setting up spreadsheets, which requires inserting and deleting different elements.
First, let’s consider the methods of inserting sheet rows and columns when creating spreadsheets.
Note that in this tutorial we indicate hot keys for adding or deleting rows and columns. They should be used after highlighting the whole row or column. To highlight the row where the cursor is placed, press the combination of hot keys: SHIFT+SPACEBAR. Hot keys for highlighting a column are CTRL+SPACEBAR.
How to insert a column between other columns?
Assuming you have a pricelist lacking line item numbering:
To insert a column between other columns for filling in pricelist items numbering you can use one of the two ways:
- Move the cursor to activate A1 cell. Then go to tab «HOME», tool section «Cells» and click «Insert», in the popup menu select «Insert Sheet Columns» option.
- Right-click the heading of column A. Select «Insert» option on the shortcut menu.
- Select the column, and press the hotkey combination CTRL+SHIFT+PLUS.
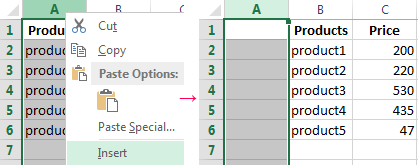
Now you can type the numbers of pricelist line items.
Simultaneous insertion of several columns
The pricelist still lacks two columns: quantity and units (items, kilograms, liters, packs). To add simultaneously, highlight the two-cell range (C1:D1). Then use the same tool on the «Insert»-«Insert Sheet Columns» main tab.

Alternatively, highlight two headings of columns C and D, right-click and select «Insert» option.
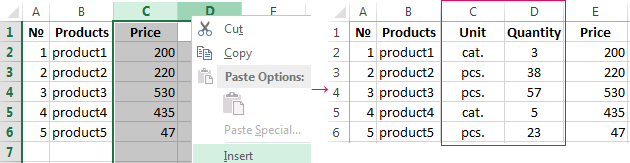
Note. Columns are always added to the left side. There appear as many new columns as many old ones have been highlighted. The order of inserted also depends on the order of highlighting. For example, next but one etc.
How to insert a row between rows in Excel?
Now let’s add a heading and a new goods line item «All for the garden» to the pricelist. To this end, let’s insert two new rows simultaneously.
Highlight the nonadjacent range of two cells A1,A4 (note that character “,” is used instead of character “:” – it means that two nonadjacent ranges should be highlighted; to make sure, type A1; A4 in the name field and press Enter). You know from the previous tutorials how to highlight nonadjacent ranges.
Now once again use the tool «HOME»-«Insert»-«Insert Sheet Columns». The picture shows how to insert a blank row between other rows in Excel.
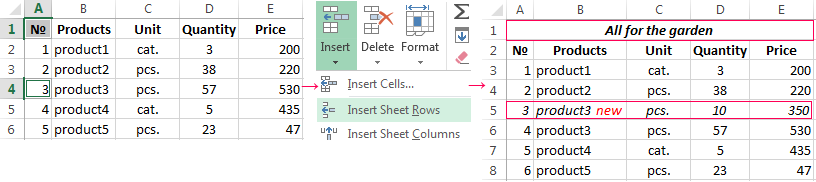
It is easy to guess the second way. You need to highlight headings of rows 1 and 3, right-click on one of the highlighted rows and select «Insert» option.
To add a row or a column in Excel use hot keys CTRL+SHIFT+PLUS having highlighted the appropriate row or column.
Note. New rows are always added above the highlighted rows.
Deleting rows and columns
When working with Excel you need to delete rows and columns as often as to insert them. Therefore, you have to practice.
By way of illustration, let’s delete from our pricelist the numbering of goods line items and the unit column simultaneously.
Highlight the nonadjacent range of cells A1; D1 and select «HOME»-«Delete»-«Delete Sheet Rows». The shortcut menu can also be used for deleting if you highlight headings A1 and D1 instead of cells.
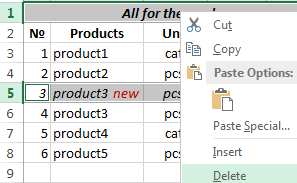
Row deleting is performed in the similar way. You only need to select a tool in the appropriate menu. Applying a shortcut menu is the same. You only have to highlight the rows correspondingly by row numbers.
To delete a row or a column in Excel, use hot keys CTRL+MINUS having preliminary highlighted them.
Note. Inserting new columns and rows is in fact substitution, as the number of rows (1 048 576) and columns (16 384) doesn’t change. The new just replace the old ones. You should consider this fact when filling in the sheet with data by more than 50% — 80%.
To insert multiple rows in Excel, we must first select the number of rows. Then, based on that, we can insert those rows. Once the rows are inserted, we can use the F4 key to repeat the last action and insert as many rows as needed.
Table of contents
- How to Insert Multiple Rows in Excel?
- Top 4 Useful Methods to Insert Rows in Excel (Discussed with an Example)
- Method #1 – Using INSERT option
- Method #2 – Using Excel Short Cut (Shift+Space Bar)
- Method 3: Using the Name Box.
- Method 4: Using the Copy & Paste Method
- Alternative Coolest Technique
- Things to Remember
- Recommended Articles
- Top 4 Useful Methods to Insert Rows in Excel (Discussed with an Example)
Top 4 Useful Methods to Insert Rows in Excel (Discussed with an Example)
- Insert Row using INSERT Option
- Insert Multiple Rows in Excel using Short Cut Key (Shift+Space Bar)
- Insert Multiple Rows Using the Name Box
- Insert Multiple Rows Using the Copy & Paste Method
Let us Discuss each method in detail along with an example –
You can download this Insert Multiple Rows Excel Template here – Insert Multiple Rows Excel Template
Method #1 – Using INSERT option
We need to select the row first, but it depends on how many rows we insert. For example, if we want to insert two rows, we need to select two rows. If we need to insert three multiple rows, we need to choose three rows, and so on.
In the above image, we have selected three rows, and now we will right-click on the column header and click on “Insert.” It would insert three multiple rows in a single shot.
Method #2 – Using Excel Short Cut (Shift+Space Bar)
Below are the steps to insert rows in Excel using the Excel shortcut (Shift + Spacebar).
- We must first select the cell above which we want to insert the row.

- We must use the shortcut key to select the entire row instantly. The shortcut keyboard key is “Shift + Spacebar.”

- If we want to insert two to three rows, select those many rows by using the “Shift + Down Arrow” key. In the below image, we have chosen four rows.

- Now, we must click on another keyboard “Ctrl + “(plus key) shortcut key to insert a row in Excel.

Now we have inserted four multiple rows. Suppose we need to insert another Four rows; Click on Ctrl + if the rows are selected, or instead, we can use the key F4, which repeats the previous action in excel.


Method 3: Using the Name Box.
Suppose we need to insert 150 rows above the cell we have selected. It will take some time because we need to choose those many rows first and then insert them using the Excel shortcut.
Selecting 150 rows instantly is not possible in the above two methods. We can select those name box in excel.In Excel, the name box is located on the left side of the window and is used to give a name to a table or a cell. The name is usually the row character followed by the column number, such as cell A1.read more
- Step 1: Select the cell above we need to insert rows.
- Step 2: We must mention the row range on the name box. We have mentioned 5:155 because we have to insert 150 rows in this case.
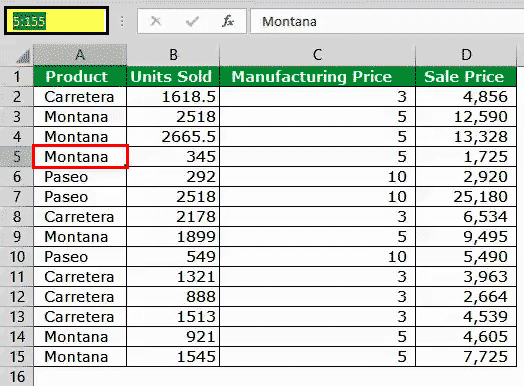
- Step 3: After typing the range, hit the enter key; this will select the cells from 5:155 instantly.
- Step 4: Once the range is selected, we must use the “Ctrl +” shortcut key to insert a row in Excel. It will insert 150 rows in just a click.
Alternative Shortcut Key to Insert Row in Excel: ALT + H + I + R is another shortcut key to insert a row in Excel.

Method 4: Using the Copy & Paste Method
Microsoft Excel is so flexible. For example, can you believe we can insert rows by copy-paste?
Yes! You heard it right. We can insert rows just by copying and pasting another blank row.
- Step 1: Select the blank row and copy.

- Step 2: Now select the cell above you want to insert rows.
- Step 3: Once the desired cell is selected, select the number of rows you wish to insert and right-click and choose Insert Copied Cells.

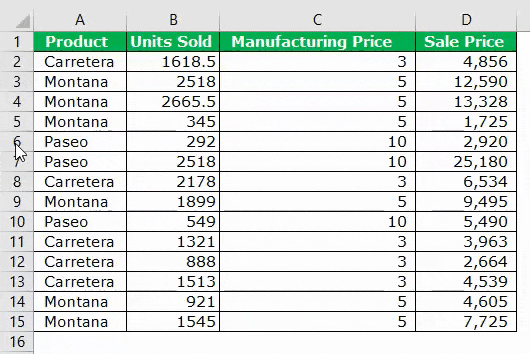
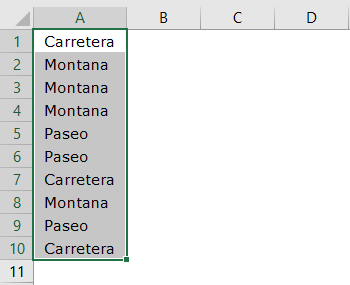
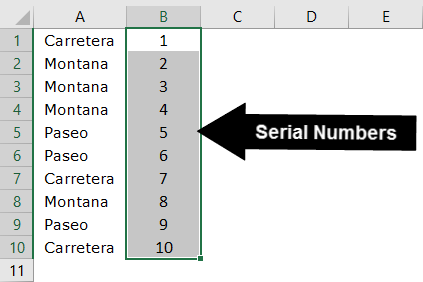
Case Study: I have data from A1: A10, as shown in the below image.
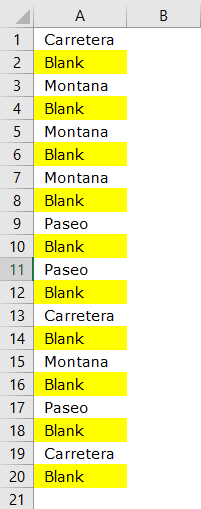
We want to insert one blank row after every row, as shown in the below image.
Alternative Coolest Technique
In the above example, we have only ten rows. What if we have to do it for 100 cells? It will take a lot of time. However, we have the coolest technique you have ever seen.
Follow the below steps to learn.
- Step 1: First, Insert serial numbers next to the data.
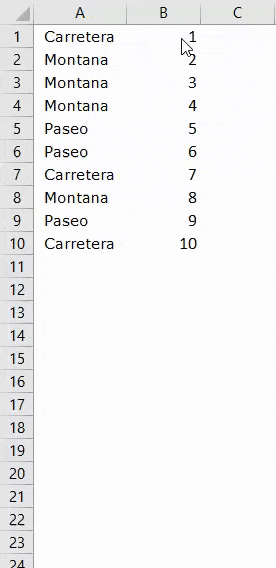
- Step 2: Copy those serial numbers and paste them after the last serial number.
- Step 3: Now, select the entire data, including serial numbers, and press Alt + D + S.
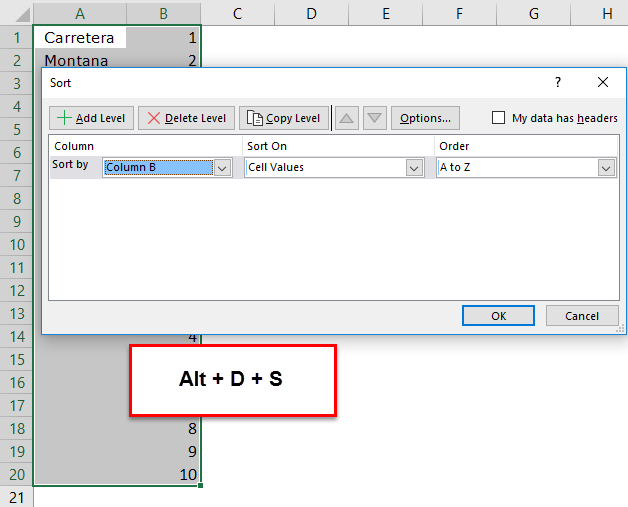
- Step 4: Select the second column from the dropdown list and ensure the smallest to highest is selected.

- Step 5: Now, click on the Ok. This would instantly insert the blank row after every row.
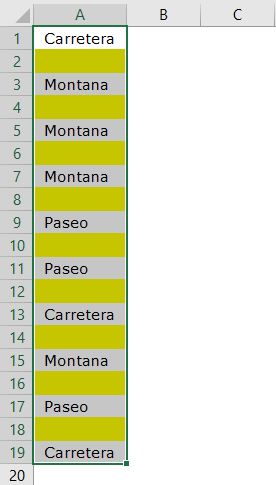
Amazing. Probably the coolest and the most intelligent technique you have learned to date.
Things to Remember
- The shortcut key to insert a row in excel is “Alt + H + I + R, Ctrl +.”
- We must always insert new rows after selecting the entire row (s) first. Otherwise, there are chances that the data may shuffle.
Recommended Articles
This article is a guide to Insert Multiple Rows in Excel. Here, we learn to insert multiple rows in Excel using Excel insert shortcuts, Excel examples, and downloadable Excel templates. You may also look at these useful functions in Excel: –
- Count Rows in ExcelThere are numerous ways to count rows in Excel using the appropriate formula, whether they are data rows, empty rows, or rows containing numerical/text values. Depending on the circumstance, you can use the COUNTA, COUNT, COUNTBLANK, or COUNTIF functions.read more
- VBA Insert RowTo insert rows we use worksheet method with the insert command to insert a row, we also provide a row reference where we want to insert another row similar to the columns.read more
- Copy Paste in VBAIn VBA, we use the copy method with range property to copy a value from one cell to another. To paste the value, we use the worksheet function paste exceptional or paste method.read more
- Insert Row Shortcut in ExcelThe insertion of an excel row is simply the addition of a new (blank) row to the worksheet. The insertion of a row is eased with the help of shortcuts.read more
- Break Links in ExcelIn the excel worksheet, there are two different methods to break external links. The first method is to copy and paste as a value method, and the second method is to go to the DATA tab, click Edit Links, and choose the break the link option.read more
![]()
Download Article
A simple guide to adding one or more rows to your spreadsheet
![]()
Download Article
- Using Keyboard Shortcuts
- Inserting a Row
- Inserting Multiple Rows
- Inserting Nonadjacent Rows
- Video
|
|
|
|
Trying to insert or delete rows in your Microsoft Excel worksheet? Whether you have new data or you’re removing duplicate entries, adding and removing rows is easy! You can add one or more rows using a keyboard shortcut. Or, if you’re trying to delete rows, you can select them and use the right-click menu to remove them from your spreadsheet. This wikiHow guide will show you how to insert and delete rows in Microsoft Excel.
Things You Should Know
- Click and select the row number above which you want to insert a new row.
- Select multiple rows to insert multiple new rows.
- Press Ctrl + Shift + + on your keyboard to insert new rows.
- Or, right-click the selected rows and select “Insert” to add new rows.
-

1
Click the row number above which you want to insert a row. This will select and highlight the entire row. After making a spreadsheet in Excel, you sometimes need to insert rows between existing rows. This method does exactly that.
- You can select multiple rows to insert that amount of rows above the selection.
- For example, if you want to insert 3 blank rows above row 17, select rows 17, 18, and 19.
-
2
Press Ctrl+⇧ Shift++. This will insert one or more rows (depending on how many you selected) above the selected rows.


Advertisement
-
1
Select the sheet you’ll insert rows into. In your Excel workbook file, at the lower-left corner of the worksheet are some tabs. These tabs can either be labeled Sheet1, Sheet2, etc., or renamed to a name you prefer. Click on the sheet you will insert rows into.
-
2
Select a row. Do this by clicking on the number of the row found on the left of the screen.
- For example, if you’re tracking your bills in Excel and want to add a purchase that you forgot to input, you can select the row below where you want to insert the new line.
-
3
Right-click the selected row. A context menu will pop out.
-
4
Select Insert. A row will be inserted above the one you selected.
- Select Delete instead if you want to delete the selected row.


Advertisement
-
1
Select the sheet you’ll insert rows into. In your Excel workbook file, at the lower-left corner of the worksheet are some tabs. These tabs can either be labeled Sheet1, Sheet2, etc., or renamed to a name you prefer. Click on the sheet you will insert rows into.
-
2
Select the number of rows you want to insert. To insert multiple rows, highlight the rows below where you want to insert rows. Highlight the same number of rows as you want to insert.
- For example, if you want to insert four new rows, select four rows.
- You can select multiple rows by clicking the first row number, holding ⇧ Shift, then clicking the last row number.
-
3
Right-click the selected rows. A context menu will pop out.
-
4
Select Insert. The number of rows you highlighted will be inserted above the rows you selected.
- Select Delete instead if you want to delete the selected rows.
- Functions like the SUM Function will change their cell reference range when you insert rows. If you’re using a VLOOKUP function, you may need to re-enter the range depending on the structure of your formula.


Advertisement
-
1
Select the sheet you’ll insert rows into. In your Excel workbook file, at the lower-left corner of the worksheet are some tabs. These tabs can either be labeled Sheet1, Sheet2, etc., or renamed to a name you prefer. Click on the sheet you will insert rows into.
-
2
Select the rows. To insert nonadjacent rows, hold down the CTRL key and select nonadjacent rows by left-clicking the row numbers using your mouse.
- For example, you could select 3 nonadjacent rows to insert a new row above each selected row.
-
3
Right-click the selected rows. A context menu will pop out.
-
4
Select Insert. The number of rows you highlighted will be inserted above the rows you selected.
- Select Delete instead if you want to delete the selected rows.


Advertisement
Ask a Question
200 characters left
Include your email address to get a message when this question is answered.
Submit
Advertisement
Video
Thanks for submitting a tip for review!
About This Article
Thanks to all authors for creating a page that has been read 75,715 times.
Is this article up to date?
When you need a new sheet row in Excel, how do you handle it? Let’s learn how to Insert sheet rows in Excel.
When you need a new sheet row in Excel, how do you handle it? Instead of completely re-arranging all of the data, it’s better to use Excel’s features to insert new areas to work with.
In this tutorial, you’ll learn to insert sheet rows in Excel. This will help give you new space to work with without creating a complete redesign.
Remember that rows are the horizontal areas that you see in Excel, each of which has a unique number. Rows and columns (shown with letters at the top of Excel) intersect and create cells.
When you need a new row, right-click on a row and choose Insert. This will add a new row above the one you selected.

As you can see, the spreadsheet adapts by moving everything else down a single row. No matter how large your spreadsheet is, Excel will handle rewriting the the formula references so that the spreadsheet works normally.
Insert Multiple Sheet Rows in Excel
Let’s say that you need more than a single row added to your spreadsheet. Maybe you’re completely redesigning the structure of your workbook and need much more room to work. In that case, it helps to know how to insert multiple sheet rows with one swift command.
The approach is similar. In this case, we’re going to highlight as many rows as we wish to add. In the example below, notice that we start by highlighting two rows, rows 8 and 9. Then, I’ll use the right-click Insert menu to add new rows. Two new rows are added, and all other content shifts accordingly.

That’s all there is to it: highlight the number of rows you need to add, then right-click and choose Insert. Excel reshuffles your workbook, shifting the cells down so that you have the new space you need to work within.
In the last few decades, Microsoft has grown by leaps and bounds and so are its fabulous products. Microsoft Excel is one such product that has grown immensely. It has wonderful features and options to make your tasks easier. But one feature that it lacks is the ability to insert multiple rows. The default insert option that Excel has allows you to insert only one row at a time.
This can be very annoying in cases where you have to insert multiple rows in your spreadsheet. And this is what I am going to write today. In this post, I will present a few ways which allow you to insert multiple rows.
Method 1 – By making use of the repeat functionality of excel:
This is the simplest way to insert multiple rows in your excel spreadsheet. In this method, we will first add one row manually to the excel sheet then repeat that action multiple times. Follow the below steps to use this method:
- Open your spreadsheet, and first of all insert one row to your excel sheet manually.
- Then simply repeatedly press the “F4” key on your keyboard, till the required number of rows are inserted.
- This will repeat your last action and the rows will be added.
Method 2 – By using the insert functionality:
In this method, we will use a hidden feature that excel offers to insert multiple rows to your sheet. Follow the below steps to use this method:
- Open your spreadsheet and select the number of rows that you want to insert to your sheet. It doesn’t matter if the rows are empty but they must include the place where you want to perform the insert.

- Now simply right-click anywhere in the previously selected range and select the ‘Insert’ option.
- Now excel will ask you whether to shift the cells down or shift them to right. Select the option ‘Shift Cells Down’ and multiple cells will be inserted in the location.
Method 3 – By using the insert copied cells functionality:
In this method, we are going to take the advantage of the “Insert Copied Cells” functionality that excel has. Follow the below steps to use this method:
- First of all select multiple rows in your spreadsheet, by multiple I mean they should be equal to the number of rows that you want to insert.
- Next, copy these rows and scroll to the place where you want to insert multiple rows.

- Right-click and select the option ‘Insert Copied Cells’ and this will insert multiple rows at that place.
Method 4 – Programmatically inserting multiple rows in excel:
Although this method is a bit complex than the first three, still this can be used if you are more inclined towards the coding side. Follow the below steps to use this method:
- Navigate to the ‘View’ tab on the top ribbon, click on the ‘Macros’ button.
- Now type the name for the macro say “Insert_Lines” (without quotes) and hit the create button.
- Next, a VBA editor will be opened, simply paste the below macro code after the first line.
Sub Insert_Lines()
Dim CurrentSheet As Object
' Loop through all selected sheets.
For Each CurrentSheet In ActiveWindow.SelectedSheets
' Insert 5 rows at top of each sheet.
CurrentSheet.Range("A20:A69").EntireRow.Insert
Next CurrentSheet
End Sub

- Now comes the important thing, in the above macro the range is (“A20:A69”). The first parameter i.e. A20 tells the position from where you wish to insert the rows and the second parameter .i.e. A69 is the number of rows to be inserted added with the start position and subtracted by 1 (for instance: If you want to insert 50 rows starting from A20 then the second parameter of the range should be (50+20-1), so the range will be (“A20:A69”))
- After adding the code you can press the “F5” key and the code will insert the required rows.
- This macro is referenced from the Microsoft article: http://support.microsoft.com/kb/291305
So, these were the few methods to insert multiple rows in excel. If you know some other ways then feel free to comment below.
Skip to content
![]()
How to insert a single row in a worksheet using Excel, VBA and Shortcut methods
METHOD 1. Insert a row by selecting an entire row
EXCEL
Select an entire row > Right-click anywhere on the selected row > Click Insert
| 1. Select an entire row where you want to insert a new row. Note: in this example we are inserting a new row as a second row. To select an entire row, click either on the row heading number or select the first cell of the row, press and hold the Ctrl and Shift keys and press the Right key. |
 |
| 2. Right-click anywhere on the selected row and click Insert. |  |
METHOD 2. Insert a row using the ribbon option
EXCEL
Select a cell in the row where you want to insert a new row > Home tab > Cells group > Insert > Insert Sheet Rows
| 1. Select any cell in the same row where you want to insert a new row. Note: in this example a new row will be inserted as row 2, given we have selected a cell in the second row. |
 |
| 2. Select the Home tab. |  |
| 3. Click Insert in the Cells group. 4. Click Insert Sheet Rows. |
 |
METHOD 3. Insert a row using the cell option
EXCEL
Right-click on a cell in the row where you want to insert a new row > Insert > Entire row > OK
| 1. Right-click on any cell in the row where you want to insert a new row. 2. Click Insert Note: in this example a new row will be inserted as row 2, given we have right-clicked on a cell in the second row. |
 |
| 3. Select the Entire row option and click OK group. |  |
METHOD 1. Insert a row using VBA by selecting a single cell
VBA
Sub Insert_a_Row()
‘insert a new row as row 2
Worksheets(«Sheet1»).Range(«A2»).EntireRow.Insert
End Sub
OBJECTS
Worksheets: The Worksheets object represents all of the worksheets in a workbook, excluding chart sheets.
ADJUSTABLE PARAMETERS
Row Selection: Select where you want to insert a new row by changing the row number in the cell reference («A2»). You can also change the column reference to any column as this will have no impact on where the row will be inserted.
Worksheet Selection: Select the worksheet where you want to insert a new row by changing the Sheet1 worksheet name.
METHOD 2. Insert a row using VBA by selecting a range of cells
VBA
Sub Insert_a_Row()
‘insert a new row as row 2
Worksheets(«Sheet1»).Range(«A2:D2»).EntireRow.Insert
End Sub
OBJECTS
Worksheets: The Worksheets object represents all of the worksheets in a workbook, excluding chart sheets.
ADJUSTABLE PARAMETERS
Row Selection: Select where you want to insert a new row by changing the row number reference («A2:D2»). You can also change the column reference to any column as this will have no impact on where the row will be inserted.
Worksheet Selection: Select the worksheet where you want to insert a new row by changing the Sheet1 worksheet name.
METHOD 3. Insert a row using VBA by selecting an entire row
VBA
Sub Insert_a_Row()
‘insert a new row as Row 2
Worksheets(«Sheet1»).Range(«2:2»).EntireRow.Insert
End Sub
OBJECTS
Worksheets: The Worksheets object represents all of the worksheets in a workbook, excluding chart sheets.
ADJUSTABLE PARAMETERS
Row Selection: Select where you want to insert a new row by changing the row number reference («2:2»).
Worksheet Selection: Select the worksheet where you want to insert a new row by changing the Sheet1 worksheet name.
Insert a row using a Shortcut
SHORTCUT
WINDOWS SHORTCUT
Method 1
Method 2
NOTES
To insert a row using these shortcut methods you will need to select an entire row. If you select a single cell or a range of cells and action this shortcut an Insert dialog box will appear and you will need to select Entire row and click OK.
The Plus Sign key in the first method refers to the key on the top of the keyboard. The Plus Sign key in the second method refers to the key to the right of the keyboard, which some devices will not have. The reason why the first method requires the use of the Shift key is because the Plus Sign key is used for both Plus and Equal Signs, therefore, to activate the Plus Sign you are required to use the Shift key.
Explanation about how to insert a row
EXPLANATION
EXPLANATION
This tutorial explains and provides step by step instructions on how to insert a single row in a worksheet using Excel, VBA and Shortcut methods.
Excel Methods: Using Excel you can insert a new row by selecting an entire row or a single cell and using a ribbon or cell option.
VBA Methods: Using VBA you can insert a new row by referencing to a single cell, a range of cells or an entire row. If you want to insert a single row by referencing to a range of cells you need to ensure that the range of cells only references to a single row. As per the example in this tutorial the VBA code references to only row 2 across multiple columns («A2:D2»).
Shortcut Methods: Using a Shortcut you can instantly insert a new row by selecting the entire row where you want to insert a new row and actioning the shortcut.
ADDITIONAL NOTES
Note 1: Inserting a new row will move the existing rows that are below the new row downward. In this this tutorial every row below row 2 will be moved down.
Note 2: If the last row in a worksheet has a cell that is not empty, you will not be able to insert a new row. To insert a row you will need to ensure that every cell in the last row is clear of any content.
| Related Topic | Description | Related Topic and Description |
|---|---|---|
| Insert a column | How to insert a single column in a worksheet using Excel, VBA and Shortcut methods | |
| Delete a column | How to delete a single column in a worksheet using Excel, VBA and Shortcut methods | |
| Delete multiple columns | How to delete multiple columns in a worksheet using Excel, VBA and Shortcut methods | |
| Insert multiple columns | How to insert multiple columns in a worksheet using Excel, VBA and Shortcut methods | |
| Insert multiple rows | How to insert multiple rows in a worksheet using Excel, VBA and Shortcut methods |
This tutorial demonstrates how to insert multiple rows and columns in Excel and Google Sheets.
By selecting multiple rows or columns in Excel, you can quickly insert several new blank rows or columns. This tutorial covers how to insert cells with the right mouse button or the Excel Ribbon. To learn how to use VBA to insert cells, see VBA Insert Row or Column.
Insert Multiple Adjacent Rows
To insert multiple adjacent blank rows into a worksheet, select the number of rows you wish to insert into your worksheet at the position where you wish to insert the rows. The rows selected are moved down by the selected number of blank rows inserted. (e.g., existing Row 4 becomes Row 7).

Option 1: Right-click on the row headers to obtain the Quick Menu and click Insert.
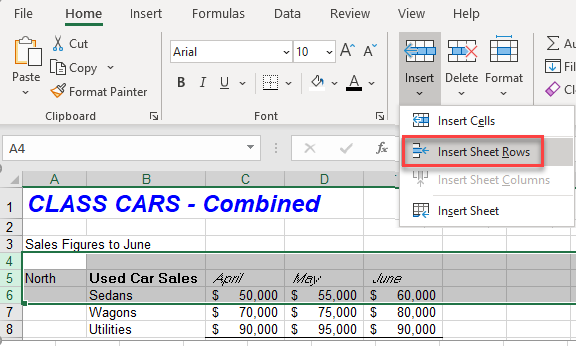
Option 2: In the Ribbon, select Home > Cells > Insert > Insert Sheet Rows.
Option 3: To use a keyboard shortcut, press CTRL + + (Ctrl–plus sign).
Three additional rows are quickly inserted into to the worksheet all at once.
Inserting Multiple Non-Adjacent Rows
To insert multiple non-adjacent blank rows into a worksheet, select the first row you where you wish your new row to be inserted by clicking on the row selector, and then, holding down the CTRL key, select the next non-adjacent row.
You can then use the methods above (quick menu insert; insert sheet rows; or Ctrl-plus) to insert non-adjacent rows into your worksheet.
Inserting Multiple Adjacent Columns
To insert multiple blank columns into your worksheet, select the number of columns you wish to insert into your worksheet at the position where you wish to insert columns. The columns selected are moved to the right.
Option 1: Right-click on the row headers to obtain the Quick Menu and then click Insert.
Option 2: In the Ribbon, select Home > Cells > Insert > Insert Sheet Columns.
Option 3: To use a keyboard shortcut, press CTRL + +.
Three additional columns are quickly inserted into your worksheet all at once.
Inserting Multiple Non-Adjacent Columns
To insert multiple non-adjacent blank columns into a worksheet, select the first column you where you wish your new column to be inserted by clicking on the row selector, and then, holding down the CTRL key, select the next non-adjacent column.
You can then use the methods above (quick menu insert; insert sheet rows; or Ctrl-plus) to insert non-adjacent columns into your worksheet.
Insert Cells in Google Sheets
You can use the right-click option in Google Sheets to quickly insert rows or columns into your sheet as well.
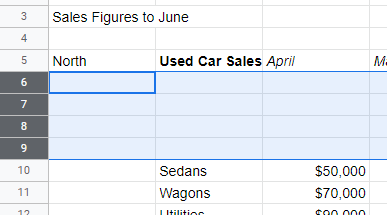
Insert Multiple Rows
Select the rows where you wish to insert the extra rows into your sheet.
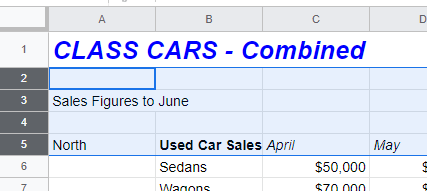
Option 1: Right-click on the row headers.
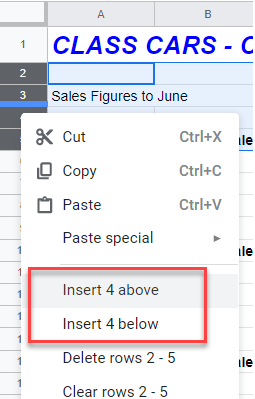
Option 2: In the Menu, select Insert.
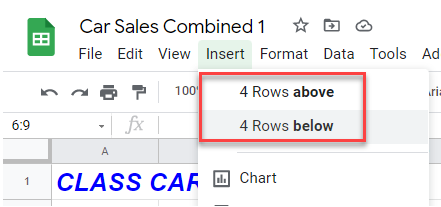
In both instances, you are given the options to insert the new blank rows either above or below the selected rows. Select an option, and rows are quickly inserted into your worksheet.
Insert Multiple Columns
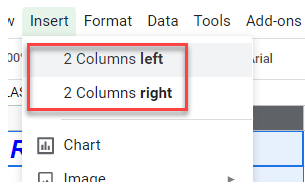
You can insert multiple columns in the same way, either by right-clicking on the column headers, or by using the Insert option on the Menu.
Select the columns where you wish the new columns to be inserted.
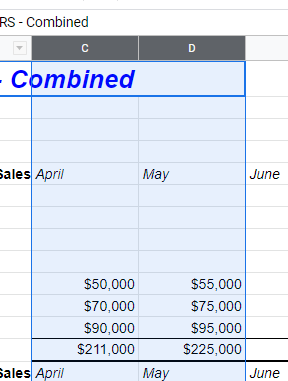
Option 1: Right-click on the column headers.
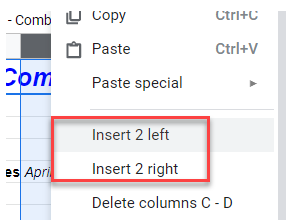
Option 2: In the Menu, select Insert.
As with inserting rows, in both instances, you are given the option to insert the same number of columns as the number of columns you have selected to either the left or right of the selected columns.