
Не секрет, что Excel довольно мощный инструмент для работы с числовыми табличными данными. Однако средства, которые предоставляет Microsoft для интеграции с ним, далеки от идеала. В частности, сложно интегрировать в Excel современные пользовательские интерфейсы. Нам нужно было дать пользователям Excel возможность работать с довольно насыщенным и функциональным интерфейсом. Мы пошли несколько другим путем, который в итоге показал хороший результат. В этой статье я расскажу, как можно организовать интерактивное взаимодействие Excel c веб-приложением на Angular и расшить Excel практически любым функционалом, который реализуем в современном веб-приложении.

Итак, меня зовут Михаил и я CTO в Exerica. Одна из проблем которые мы решаем — облегчение работы финансовых аналитиков с числовыми данными. Обычно они работают как с исходными документами финансовой и статистической отчетности, так и каким-либо инструментом для создания и поддержания аналитических моделей. Так сложилось, что 99% аналитиков работают в Microsoft Excel и делают там довольно сложные вещи. Поэтому перевести их с Excel на другие решения не эффективно и практически невозможно. Объективно, «облачные» сервисы электронных таблиц до функционала Excel пока не дотягивают. Но в современном мире инструменты должны быть удобны и соответствовать ожиданиям пользователей: открываться по клику мышки, иметь удобный поиск. А реализация в виде разных несвязанных приложений будет довольно далека от ожиданий пользователя.
То с чем работает аналитик выглядит примерно так:

Основные данные тут — это числовые «финансовые показатели», например, доход за 1 квартал 2020 года. Для простоты буду называть их дальше просто «числами». Как видно, почти никакой связи между числами в документе и в аналитической модели нет, все только в голове у аналитика. И работа с заполнением и поддержанием модели занимает часы поиска и перебивания чисел из документа в таблицы, а потом поиск ошибок ввода. Вместе этого мы хотели бы предложить пользователю привычные инструменты: «перетаскивание», вставка через клипборд и так далее, а также быстрый просмотр исходных данных.
Что у нас уже было
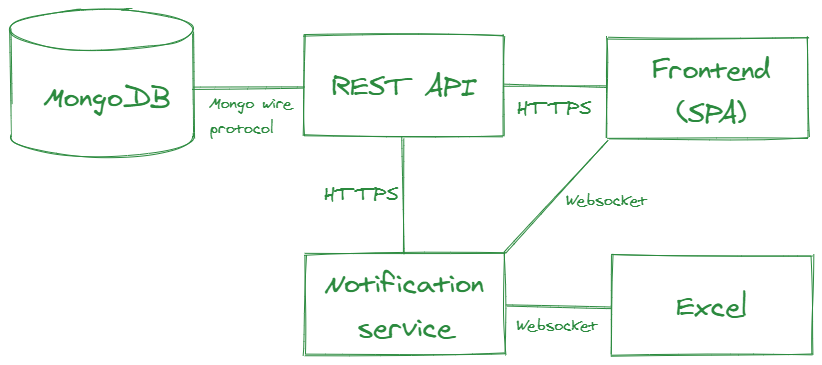
К моменту, когда мы начали реализацию интерактивного взаимодействия с Excel в виде, изложенном в этой статье, у нас уже была база данных на MongoDB, бэкэнд в виде REST API на .NET Core, фронтовое SPA на Angular и некоторые другие сервисы. Мы к этому моменту уже пробовали разные варианты интеграции в приложения электронных таблиц, в том числе и в Excel, и все они не пошли дальше MVP, но это тема отдельной статьи.

Связываем данные
В Excel существует два распространенных инструмента, с помощью которых можно решить задачу связывания данных в таблице с данными в системе: RTD (RealTimeData) и UDF (User-Defined Functions). Чистый RTD менее удобен для пользователя в плане синтаксиса и ограничивает гибкость решения. С помощью UDF можно создать кастомную функцию, которая будет работать привычным для Excel-пользователя образом. Ее можно использовать в других функциях, она понимает ссылки типа A1 или R1C1 и вообще ведет себя как надо. При этом никто не мешает использовать механизм RTD для обновления значения функции (что мы и сделали). UDF мы разрабатывали в виде Excel addin с использованием привычного нам C# и .NET Framework. Для ускорения разработки мы использовали библиотеку Excel DNA.
Кроме UDF наш addin реализует ribbon (панель инструментов) с настройками и некоторыми полезными функциями по работе с данными.
Добавляем интерактивность
Для передачи данных в Excel и налаживания интерактива мы разработали отдельный сервис, который предоставляет подключение по Websocket при помощи библиотеки SignalR и фактически является брокером для сообщений о событиях, которыми должны обмениваться «фронтовые» части системы в реальном времени. Он у нас называется Notification Service.
Вставляем данные в Excel
В нашем SPA мы подсвечиваем все числа, которые обнаружила система. Пользователь может выделять их, навигировать по ним и т.п. Для вставки данных мы реализовали 3 механизма, чтобы закрыть различные варианты использования:
- Перетаскивание (drag-and-drop)
- Автоматическая вставка по клику в SPA
- Копирование и вставка через клипборд
Когда пользователь инициирует drag’n’drop некоторого числа из SPA, для перетаскивания формируется ссылка с идентификатором этого числа из нашей системы (.../unifiedId/005F5549CDD04F8000010405FF06009EB57C0D985CD001). При вставке в Excel наш addin перехватывает событие вставки и парсит регэкспом вставляемый текст. При обнаружении валидной ссылки на лету подменяет ее на соответствующую формулу =ExrcP(...).
При клике на числе в SPA через Notification Service отправляется сообщение в addin, содержащее все необходимые данные для вставки формулы. Далее формула просто вставляется в текущую выделенную ячейку.
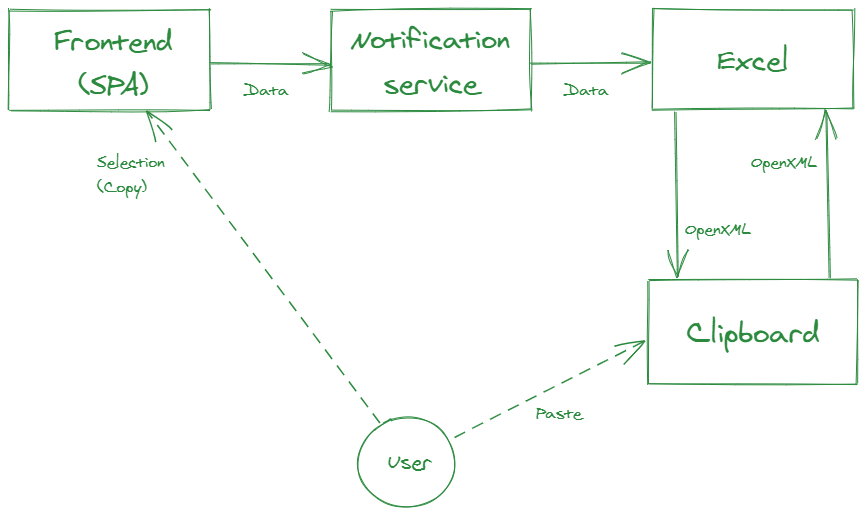
Эти способы хороши, когда пользователю нужно вставлять в свою модель по одному числу, но если надо перенести целую таблицу или ее часть, необходим другой механизм. Наиболее привычным для пользователей представляется копирование через клипборд. Однако этот способ оказался сложнее первых двух. Дело в том, что для удобства вставляемые данные должны быть представлены в нативном для Excel формате — OpenXML Spreadsheet. Наиболее просто это реализуется используя объектную модель Excel, то есть из addin’а. Поэтому процесс формирования клипборда у нас выглядит так:
- Пользователь выделяет область с числами в SPA
- Массив выделенных чисел передается на Notification Service
- Notification Service передает его в addin
- Addin формирует OpenXML и вставляет его в клипборд
- Пользователь может вставить данные из клипборда в любое место любой Excel-таблицы.
Несмотря на то, что данные проделывают довольно долгий путь, благодаря SignalR и RTD происходит это довольно быстро и абстрагированно от пользователя.
Распространяем данные
После того, как пользователь выбрал начальные данные для своей модели, их надо «распространить» все периоды (года, полугодия и кварталы), которые представляют интерес. Для этих целей одним из параметров нашей UDF является дата (период) данного числа (вспоминаем: «доход за 1 квартал 2020 года»). В Excel существует нативный механизм «распространения» формул, который позволяет заполнить ячейки той же формулой с учетом ссылок, заданных в параметрах. То есть вместо конкретной даты в формулу вставлена ссылка на нее, а далее пользователь «распространяет» ее на другие периоды, при этом в таблицу автоматически загружаются «те же» числа из других периодов.
А что это там за число?
Теперь у пользователя есть модель на несколько сотен строк и несколько десятков столбцов. И у него может возникнуть вопрос, что же там за число в ячейке L123? Чтобы получить ответ, у нас ему достаточно кликнуть на эту ячейку и в нашем SPA откроется тот самый отчет, на той самой странице, где записано кликнутое число, а число в отчете будет выделено. Вот так:
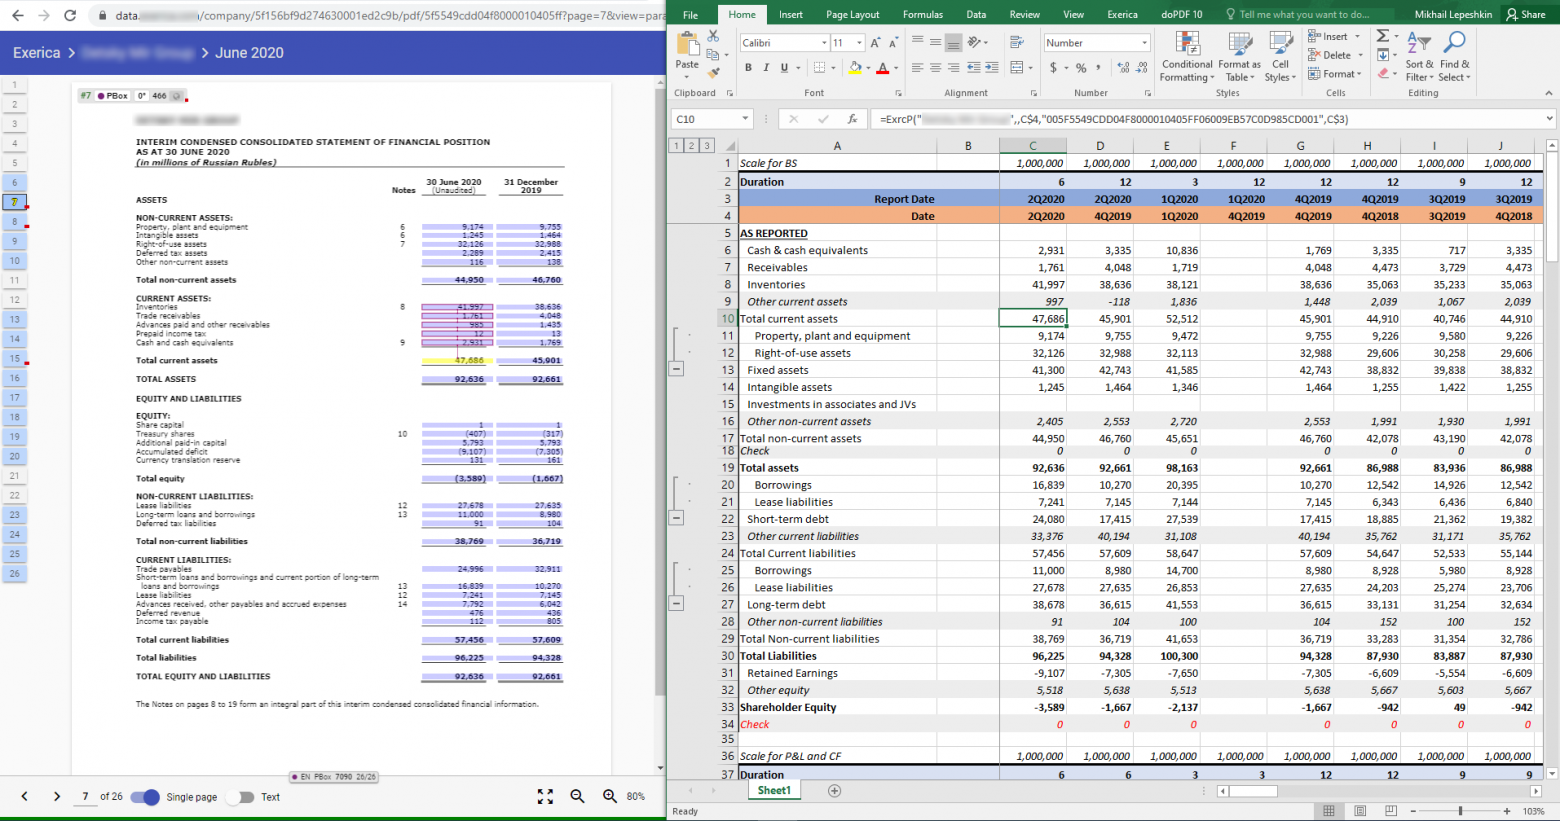
А если это не просто одно число из отчета, а результат некоторых вычислений на числах, взятых из отчета, то мы подсветим все числа, входящие в вычисляемое в Excel выражение. При этом не происходит загрузки всего приложения и подгрузки всех необходимых данных, как в случае перехода по ссылке.
В качестве заключения
Вот такая, на мой взгляд, нестандартная реализация взаимодействия между Excel и веб-приложением получилась довольно удобной для пользователя. Благодаря использованию Excel порог входа для пользователей из целевой аудитории довольно низкий. При этом мы получаем также всю мощь Excel по работе с числовыми данными. Сами данные всегда остаются связанными с источником, а также связанными во времени. Для целевых клиентов нет необходимости встраивать в бизнес-процесс работы с данными абсолютно новые внешние системы. Наше решение встраивается как дополнительный «инструмент» внутри Excel, что является стандартом де-факто для провайдеров финансовых данных.
Подобный архитектурный подход к интеграции веб-приложений с Microsoft Excel может быть применим и для решения других задач, требующих интерактива и сложных пользовательских интерфейсов при работе с числовыми и табличными данными.
Many companies have operated their business with Excel for decades. It is powerful yet easy to use, however, one of the biggest issues with Excel is that it is hard to integrate an Excel file with other systems and services, especially with a database. If you upload an Excel file as an attachment to a system and have to download it and open it up in Excel whenever you need to edit the file, you are just using Excel in a standalone manner. This is not an integrated solution.
In this article, I will show you how you can make your Excel file work seamlessly in a database-driven web application.
Database Table Access Application
Assume you have a table containing trade records in a database and you need to show these trade records in a spreadsheet-like UI so that users can edit, filter, and calculate the data with Excel formulas. Besides, your users are capricious — the color, format, and style of the UI may need to be changed from time to time, so it should be easy to update in the future.
You may also like: Turn Your Excel File Into a Web Application
Template-Based Approach
To fulfill the requirements above, I’d like to introduce you to a template-based approach: use an Excel file as a template and populate the data from the database into the template.
In an architectural view, I divide the application into 3 parts: Model, View, Controller.
- Model: the data from the database
- View: the template file
- Controller: listener to events from the View and populate data from the database
Mapping them to my implementation, it is:
Keikai Spreadsheet (View) — DatabaseComposer (Controller) — MyDataService (Model)
Implementation
Overview
Assume there is a trade record table:
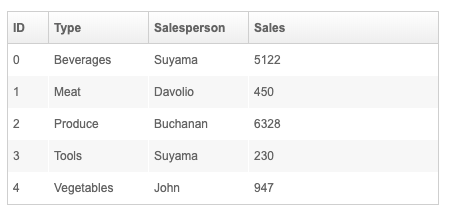
Prepare an Excel file as a template:
Combining the template and the data, my resulting web application will look like:
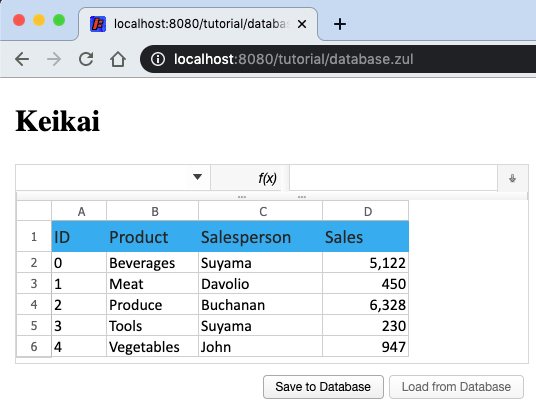
An end-user can:
- edit cells and save back to the database
- reload the data from the database
Build the UI
In this application, I rely on an open source web spreadsheet component Keikai. Keikai is based on ZK UI framework, hence I can build the UI in a ZUL, leveraging other ZK components as well. ZUL is an XML format language where each tag represents a component, so I can create the UI like:
Line 4: you can load a file dynamically via Java API, Spreadsheet::setSrc or Importer.
Keikai can load an Excel file and render its content in a browser. Once rendered, end users can view and edit the spreadsheet in the browser in an Excel-like manner.
Controller
The controller for Keikai is a Java class that extends ZK SelectorComposer, and it interacts with the database via MyDataService.
line 4: With @Wire on a member field, the underlying ZK framework can inject keikai Spreadsheet object created according to the zul, so that you can control keikai with its method.
Apply to the Page
We need to link DatabaseComposer with the ZUL page (database.zul) so that the controller can listen to events and control components via API.
Specify the fully-qualified class name at apply attribute, then Keikai will instantiate it automatically when you visit the page. The controller can control the root component, <hlayout>, and all its children components (those inner tags).
Range API
For each cell/row/column operation, you need to get a Range object first. It can represent one or more cells, a row, a column, a sheet, or a book. Just like you need to select a cell with your mouse before you take any edit action.
The helper class Ranges supports various methods to create a Range object like:
Getting a Range for one cell requires a sheet, row index, and column index as the coordinate, and getting multiple cells requires starting and end row/column index.
With a Range object, you can perform an action like setValue() or getValue().
Populate Data Into Cells
After you query one or more Trade from the database, you can populate it into the target cells with Range setter:
Listen to Events
There are 2 buttons on the page that we need to listen to their click event and implement related application logic. Specify 2 buttons’ id so that you can easily listen to their events.
Annotate a method with @Listen to turn it as an event listener method with CSS selector-like syntax below:
That means you want to listen to onClick event on #load which represents a component whose ID is load. For more syntax, please refer to SelectorComposer Javadoc. Therefore, when a user clicks “Load from Database” button, DatabaseComposer::load() will be invoked.
Then, you can implement related application logic in each listener according to the requirements.
Save Data Into a Table
Before you save a Trade, you need to extract user input from cells with getter. You still need a Range, but you will call better this time, like:
line 12: Beware — if a cell is blank, CellData::getDoubleValue() returns null.
Persistence Layer Class
To make things easy to understand, I created a class MyDataService to handle queries and updates for the (simulated) database. It can query a collection of Trade objects for us to populate into Keikai and save Trade objects into the database.
In your real application, you can implement your persistence layer classes according to your preference. There’s no limitation here, you can use Hibernate or JDBC or any Java solutions you like.
This wraps up the example application.
Why Template-Based Approach?
Before finishing the article I would like to talk a bit about why I decided to use this template-based approach.
Maintain Templates by Domain Experts
If you are building a finance system, obviously it’s better to let the finance experts to create their sheets and models instead of asking a software developer to do so. With the template-based approach, domain experts can create/maintain Excel templates by themselves without trying to explain everything to the software developers. Plus, after an Excel file is modified, you can simply replace the template file with the new one without updating your Java code.
Decouple the Display and Data
In this example, since the data is not stored in the file, it’s effortless to change both sides: template and data. You can either apply another template or import a different set of trade records according to different contexts.
Easy to Integrate With Other Backend Systems
Because Keikai is controlled by a Java controller class, it’s straightforward to integrate it with any Java-based backend, and there is no limitation for connecting to a database.
Source Code
I hope you enjoyed reading my article. Visit GitHub to get the complete source code mentioned in this article.
Database
application
Web application
Web Service
Build (game engine)
Data (computing)
Java (programming language)
Template
Opinions expressed by DZone contributors are their own.

Learning how to Integrate Excel into your web applications will improve your presence on the Internet. Savvy online consumers are looking for quick, easy-to-understand information on products and services, our Excel specialists have a lot of experience in this field and are pleased to offer the following advice on integration.
What Is A Web Application?
A web application is a software program that is stored on a remote server and accessed over the Internet through a web browser.
The most popular web applications are those that allow users to interact with each other, such as social networking sites, blogs, and forums. Other popular web applications include e-commerce platforms, content management systems, and customer relationship management software.
How Can I Use Excel To Improve My Web Application?
There are some ways that you can use Excel to improve your web application:
- Use Excel to create graphs and charts that will help users to understand your data more easily.
- Use Excel to perform calculations that would otherwise be too time-consuming for users to do themselves.
- Use Excel to create forms that can be used to collect data from users.
- Use Excel to generate reports that give users an overview of your data.

What Are The Benefits Of Using Excel To Improve My Web Application?
There are several benefits to using Excel to improve your web application:
- Users will appreciate the ability to interact with your data in a more user-friendly way.
- You will be able to collect more accurate data from users thanks to the use of forms.
- You will be able to save time by automating calculations and generating reports.
- Your web application will have a more professional look and feel thanks to the use of charts and graphs.
How To Integrate Excel Web Applications
Now that you know the benefits of using Excel to improve your web application, you may be wondering how to go about integrating Excel into your web app.
Here are a few tips:
Use an Excel Web Application template
There are many templates available online that can help you get started with using Excel in your web application.
Use a web development framework
Many web development frameworks allow you to integrate Excel into your web application with ease such as Django, Ruby on Rails, and ASP.NET.
Use an Excel Web Add-In
An Excel Web Add-In is a software program that allows you to use Excel within your web browser.
With an Excel Web Add-In, you can perform all the same functions that you can in the desktop version of Excel, such as creating charts and graphs, performing calculations, and generating reports.

Transferring Data Via Excel
Although transferring data via Excel sounds complicated, it only takes a few minutes to send data directly to a web page of your choice. Excel programmers have already done the hard work. Simply follow the directions.
Once you have all the required information on the spreadsheet, do not forget to save your data. Then, click on “File” in the upper left corner. Among the options, scroll down to “Publish”. The program will ask for a selection of the material to be published. Then, type in the URL where the data will be uploaded. In seconds, your site will display professionally crafted information.
Working with Web APIs
Working with web APIs does not necessarily require a professional programmer. Everyone familiar with the Internet has probably used an Application Programming Interface. An interface is simply the connection between a web page and an interactive application.
For example, Websites sell products online. For consumers to pay for purchases, an interactive application is necessary. Rather than programming their interactive software, a business may ask PayPal, or a credit card company, for the code needed to place their interactive application on a web page.
The customer is directed to the payment site. Once the transaction is complete, the buyer is automatically redirected back to the seller’s web page. In many cases, API code is free to use, based on the mutual benefit to all parties.
Converting Excel Workbooks to Web Applications
For consumers to interact with the data provided, an Excel workbook must become a web application. Once again, Excel developers have anticipated the need to manipulate information on the Web. Simply select the document to be published as a web page. Then, the program provides a box to be checked, if the page is to be interactive.
Once the document is titled, and uploaded, a visitor can use the Excel menu tools to rearrange the data to his/her specifications. The program asks if the data should revert to the original setting, once an individual is done using the application.
Integrating Excel into your web applications is easy and a definite boost for your web page.
Existing Spreadsheets As Web Applications
It is not only possible to create a brand new web application in Excel, but you can also use existing spreadsheet models as a web app. If you already have a complex model that users need to interact with, you can simply publish it as a web app with a few clicks.
There are a few things to keep in mind when using an existing spreadsheet as a web app, however.
First, make sure that your model is properly set up and easy to use. If it is too complicated, users will not be able to figure out how to use it.
Second, you need to ensure that your model is secure. If you are using sensitive data, make sure that only authorized users have access to it.
Finally, make sure that your model is compatible with the web app platform. Some platforms, such as Sharepoint, have specific requirements that your model needs to meet to be published.

Creating a New Web App in Excel Spreadsheets
Creating a new web app in Excel is just as easy as using an existing spreadsheet. Simply open up a new workbook and start building your model.
When you are done, simply click the “Publish” button and follow the instructions. You will need to give your app a name, choose a platform, and select whether or not it should be interactive.
Once you have published your app, anyone with the link can access it and use it.
Making Your Web App Interactive
One of the great things about using Excel as a web app platform is that you can easily make your app interactive. This means that users can input data into your model and see the results in real-time.
To make your app interactive, simply check the “Make this app interactive” box when you are publishing it. Once you have done this, users will be able to input data into your model using the input form that is generated.
You can also specify what data you want users to be able to input. This can be done by selecting the “Input Parameters” option when you are publishing your app.
Conclusion
Excel is a great platform for creating web applications. It is easy to use, has a lot of features, and is compatible with a variety of platforms.
If you are looking for an easy way to create a web app, Excel is the way to go!
FAQs
How to integrate an API into excel?
There are a few different ways to integrate an API into Excel. One way is to use the Web Query tool. This tool allows you to enter a URL and then select the data you want to import into your spreadsheet.
Another way to integrate an API into Excel is to use an add-in. There are a variety of add-ins that you can use to connect to different APIs.
Can I use an existing spreadsheet as a web app?
Yes, you can use an existing spreadsheet as a web app. Simply open up the spreadsheet and click the “Publish” button. Follow the instructions to choose a platform and whether or not your app should be interactive.
Does Excel have a web app platform?
Yes, Excel has a web app platform. You can use this platform to create new web apps or publish existing spreadsheet models.
What is an Excel web connection?
An Excel web connection is a way to connect to data that is stored on a website. This data can then be imported into your spreadsheet for further analysis.
Многие пользователи считают, что самым лучшим программным продуктом Microsoft за всю историю существования компании, является десктопная версия Excel. Это, конечно, очень спорно, но тот факт, что большое количество пользователей так высоко оценивают данный продукт, определенно заслуживает внимания. Но смогла ли веб-версия Excel соответствовать оригиналу? Попробуем разобраться.
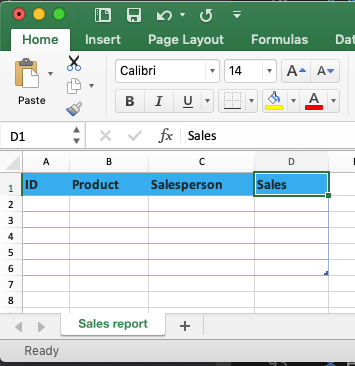
Сразу же после запуска Excel Web App на экране появляются две вкладки в ленточном интерфейсе программы: Home и Insert. Негусто, конечно, но они содержат достаточно большое количество функций, что несколько сглаживает первое впечатление.
![]()
На вкладке Home, кроме банальностей вроде настройки шрифта, его стиля, цвета, выравнивания текста, присутствуют также достаточно интересные вещи:
- форматирование данных: числа, валюта, дата (в нескольких вариантах), время, проценты, текст и так далее;
- сортировка и фильтрации в стиле таблицы;
- вставка новых строк, колонок;
- удаление строк и колонок;
В общем, работа с ячейками реализовано на достаточно хорошем уровне. Конечно, пользователи обычной версии Excel будут негодовать количеству функций в этой версии. Но что же вы хотели, друзья? Это всего лишь облегченная версия продукта, не призванная заменить оригинал. И в такой роли программа кажется гораздо симпатичнее, чем можно подумать. Среди вставки данных можно обнаружить различные виды графиков и диаграмм. Не каждый десктопный вариант аналога Excel для Mac OS X может похвастаться таким количеством. При этом старая добрая работа с формулами также поддерживается, хотя и реализована не так удобно, как в десктопной версии.
Достоинства и минусы Excel Web App
Одним из важных преимуществ перед некоторыми конкурентами является то, что Excel Web App поддерживает совместную работу. Т.е. несколько пользователей могут одновременно редактировать один и тот же документ и видеть изменения, которые будет вносить каждый из них. Вероятно, эта функция может оказаться очень полезной. В конце концов, некоторые документы действительно требуют работы нескольких человек. И в данном случае это возможно. Естественно, как и в случае с Word, с помощью одного клика можно перейти к редактированию документа в полной десктоп-версии (при условии, что она установлена на вашем компьютере).
Если говорить о минусах приложения, то в первую очередь, конечно, бросается функционал. Если вы привыкли к десктопной версии Excel, то веб-вариант наверняка покажется вам очень бедным. Во-вторых, некоторые возможности, реализованные в обычном Excel не поддерживаются в его веб-версии. И если эти вещи присутствуют в документе (например, какой-нибудь Smart-Art объект), то вы просто не сможете его редактировать в браузере. Только открыть, после чего будет выдано сообщение о том, что некоторые элементы, присутствующие в документе, не поддерживаются данной версией Excel. К счастью, есть решение – нужно сохранить копию файла через веб-интерфейс. После этого с документом можно будет работать, а все неподдерживаемые элементы просто будут удалены из него. Это, конечно, половинчатое решение, но других вариантов пока нет.
Что же в итоге можно сказать о Microsoft Excel Web App? Ну, уже сейчас очевидно, что хардкорные пользователи Excel вряд ли примут облегченную веб-версию программы. Им явно будет не уютно в рамках столь ограниченного функционала. Для применения в крупных организациях веб-версия Excel тоже подходит не на 100%. Особенно в том случае, если некоторые пользователи будут работать с документами в обычных настольных версиях приложения. Не факт, что итоговый документ будет совместим с вебом.
Тем не менее, своего почитателя данный продукт должен найти: фрилансеры, частные предприниматели, менеджеры небольших компаний. Все они в той или иной мере могут использовать данный продукт, который определенно подкупает своей бесплатностью, набором базовых функций и, конечно, возможностью совместной работы. Остается лишь ждать обновление Excel Web App и понять вектор его развития, который будет зависеть лишь от желаний компании Microsoft.
Microsoft Excel is the spreadsheet management software for individuals and businesses, with tools to help you organize and store vast amounts of data for any kind of use case.
But, Excel spreadsheets have limitations — which you may have noticed if yours is one of the millions of teams that finds itself often working with multiple versions of the same document, leading to data errors and wasted time.
Today, there’s a more modern approach to data management, and it’s just as easy to build as putting together an Excel sheet.
Keep reading to learn more.
The Downsides of Excel Sheets
While Excel spreadsheets may work very well for personal use, teams often struggle to navigate and maintain them because of their archaic structure. There’s also no real form of version control with Microsoft Excel, meaning that one spreadsheet quickly turns into a bunch of different versions created by multiple people across your organization.
When it comes to collaborating with team members, there’s really no beating a web app in terms of functionality. Web apps are easy to access from a majority of different devices — all you need is a stable internet connection. They’re also way more legible and interactive for end users. Any changes you make are also updated globally, so you can rest easy knowing that you’ve always got the latest version of your data.
Sadly, building a web application from scratch requires some serious coding and design skills. Not every business owner has the time and energy to invest in learning an entirely new skill set, and hiring developers to do it for you can be ridiculously expensive (up to $72,000 USD).
Thankfully, there’s a better way to build web apps that requires zero coding skills. No-code app builders use automation to handle all the coding and design for you, so it’s just a matter of plugging in your existing spreadsheet and watching it turn into a launch-ready app in minutes.
Introducing: Glide Pages
Glide is a no-code app builder that lets you turn your spreadsheets into highly functional apps for work. Powered by an active community of developers and designers, Glide offers a massive collection of resources, assets, and templates to build powerful apps for web and mobile.
You can build your app from scratch using a spreadsheet and drag-and-drop, or you can choose from among our carefully curated collection of community templates to give you a head start. Each template can be customized on a granular level to meet your exact needs.
Glide Pages, launched in 2021, is our brand new no-code tool built from the ground up for web-based app development. It lets you build everything from landing pages to admin portals without having to learn any programming languages like HTML, CSS, or Javascript. The best part is that the apps you build with Pages work great on every device — including phones, tablets, laptops, and desktops.
Today, we’re going to cover everything you need to know to build your own Excel-based web app with Glide Pages.

How to Use Glide to Create Your Excel-Based Web App
Unlike many other low and no-code app builders on the market, with Glide, you really can be up and running in minutes. All you need is a spreadsheet with some existing data on it and you’re ready to begin!
Step 1: Import Your Spreadsheet
Let’s start by correctly organizing your spreadsheet to make it easier for the app builder to read. Check out our step-by-step guide on organizing your spreadsheet for details on how to properly format your spreadsheet.
Then, sign up for an account with Glide if you haven’t already.
Inside your Glide dashboard, click on “New Project” and choose the “Glide Pages” option to start creating your web app with Glide. Up next, you’ll be prompted to choose a starting template for your app. Once you’re done, click on “Continue”.
Now is the time to plug in your Excel file so that Glide Pages can import all the data before turning it into a web app. At the moment, Glide Pages doesn’t support importing offline files in .csv or .xlsx format. So, follow the on-screen prompts to log into your Microsoft account and import an existing Excel workbook directly from your cloud storage. Choose the spreadsheet you want to import and click on “Create Page”.
Step 2: Design Your Web App
Now comes the fun part! Glide Pages lets you choose from four starter templates when you create your new app: Directory, Portal, Form, and Blank. You can also choose from a bigger collection of page templates by heading to the Glide dashboard. From there, you can customize your app on a granular level with loads of components and custom design assets.
The app builder lets you easily switch from Data view to Editor view to Customize view. You can also preview your app across different screen sizes, such as desktop, mobile, and tablet.
Data view lets you make changes directly to your source data using Glide Tables. Any changes you make here are automatically synced to your Excel spreadsheet. You can edit existing information, add new columns and rows, as well as create new tables for the app.
The Editor is the drag-and-drop interface that lets you add new pages and components to your web page or app. Every app is made of at least one Collection page and multiple Details pages. You can customize each of them by choosing from an extensive collection of pre-built components ranging from hero sections to image blocks to contact forms. You can also customize each component with a number of built-in options.
Finally, Customize view lets you access useful settings that control your app’s overall appearance, change your privacy settings, and add powerful third-party integrations. You can add your own custom branding by choosing a logo, a background, and an accent color for your web app. You can also connect a variety of third-party integrations through Zapier to enhance your app even further.
Step 3: Publish and Share
Once you’ve finished building your app, it’s time to hit “Publish”. Glide Pages offers a free plan that lets you publish your app to a .glide.io subdomain, whereas all paid plans come with a free custom domain. The app is hosted on Glide’s servers, so you don’t have to spend a fortune on self-hosting your web app either.
Pages comes with loads of options to share your app and control user access after publishing. Users can access your web app by scanning a QR code, getting a text message, or just copy/pasting the app link.
You can also restrict access to your published app so that not everyone can make changes to its data source. Under the Customize tab, you can adjust your privacy settings to choose who can sign in to your app and whether a sign-in is required to access your app at all. You can also let users sign in using their Google accounts.

Convert Excel Spreadsheets Into Web Apps Today With Glide
Ready to take control of your workflow with powerful web apps for work? Glide Pages lets you convert your Excel worksheets into fully-functioning web pages within as little as 15 minutes.
With Glide, you can create web-based portals, dashboards, and directories for a variety of work-related use cases — all without writing a single line of code. If you’re a startup founder or the owner of an SMB, there’s really no better way to build custom apps without learning an entirely new skill or burning a hole through your pocket.
But that’s not all. Our in-depth documentation and community-made assets let you get started quickly even if you don’t have any experience with no-code app builders. As long as you have a spreadsheet with some data on it, or know how to work with a spreadsheet management tool like Google Sheets or Microsoft Excel, you’ll have no problem using Glide Pages.
So, what are you waiting for?
Sign up for a free account with Glide to get started. We can’t wait to see what you build!
Работа с типом файлов Microsoft Excel на сайте – это довольно частая задача. Импорт/экспорт прайса или номенклатуры товаров в интернет-магазине, выгрузка отчета из базы данных в виде таблицы, да все что угодно. В этом уроке посмотрим, как можно обрабатывать файлы такого типа.
На сегодняшний день существует достаточно много готовых решений (библиотек) для взаимодействия с файлами Excel, чтобы не работать напрямую с системными GridView и DataTable. Не будем изобретать велосипед и рассмотрим одну из популярных и удобных библиотек, которой я пользуюсь чаще других.
Данная библиотека называется ClosedXML. По этой ссылке находится официальный адрес проекта на GitHub. Библиотека позволяет легко манипулировать файлами MS Excel в удобной объектно-ориентированной манере. Она может быть использована на любом .NET языке программирования (C#, VisualBasic.NET), а также в проектах не только типа WebApplication.
Представим ситуацию, что у нас есть под рукой вот такой Excel-файл с ценами на ремонт телефонов, в котором на листах расположены отдельные бренды, колонки на листе представляют конкретные модели для этого бренда, а строки представляют конкретные неисправности и сколько будет стоить ремонт для той или иной модели.

Прайс-лист на услуги в виде Excel-файла
Давайте создадим веб-приложение, которое сможет распарсить этот файл так, чтобы мы могли работать с записями в объектно-ориентированной манере, например, сохранять/обновлять бренды, модели и позиции в прайсе в базу данных. Или, например, представлять этот прайс в виде обычной html-таблицы в браузере пользователя.
Создаем в Visual Studio проект типа MVC, открываем Nuget Manager и скачиваем нужный нам пакет.

Добавляем пакет ClosedXML в проект
Создадим все доменные классы-модели, которые описывают предметную область.
Кстати, внизу страницы есть ссылка на архив с исходным кодом проекта.
namespace WebApplication2.Models
{
    public class PricePosition
    {
        //Неисправность
        public string Problem { get; set; }

        //Стоимость ремонта
        public string Price { get; set; }
    }

    public class PhoneModel
    {
        public PhoneModel()
        {
            PricePositions = new List<PricePosition>();
        }

        //Название модели телефона
        public string Title { get; set; }

        public List<PricePosition> PricePositions { get; set; }
    }

    public class PhoneBrand
    {
        public PhoneBrand()
        {
            PhoneModels = new List<PhoneModel>();
        }

        //Название бренда
        public string Title { get; set; }

        public List<PhoneModel> PhoneModels { get; set; }
    }
}
Описанные модели максимально простые, чтобы не усложнять пример. В них нет и не отслеживается уникальных идентификаторов, все свойства типа String и т.д.
Также определим т.н. ViewModel, то есть модель для представления. В нее заключим все объекты доменной модели, которые мы хотим показать пользователю в браузере:
public class PriceViewModel
{
    public PriceViewModel()
    {
        PhoneBrands = new List<PhoneBrand>();
    }

    public List<PhoneBrand> PhoneBrands { get; set; }

    //кол-во ошибок при импорте
    public int ErrorsTotal { get; set; }
}
Далее в вашем проекте определите какое-нибудь действие в нужном контроллере, которое будет отвечать за загрузку Excel-файла из браузера на сервер. Пример кода с html-формой в соответствующем представлении:
<div>
    @using (Html.BeginForm("Import", "Home", FormMethod.Post, new { enctype = "multipart/form-data", id = "frm-excel" }))
    {
        <div>
            Загрузите Excel-файл:
            <input type="file" name="fileExcel" id="fileExcel" />
            <div>
                <input type="submit" value="Загрузить" />
            </div>
        </div>
    }
</div>
Из примера видно, что в форме мы обращаемся к методу Import в контроллере Home. Создадим подобный метод:
[HttpPost]
public ActionResult Import(HttpPostedFileBase fileExcel)
{
    if (ModelState.IsValid)
    {
        PriceViewModel viewModel = new PriceViewModel();
        using (XLWorkbook workBook = new XLWorkbook(fileExcel.InputStream, XLEventTracking.Disabled))
        {
            foreach (IXLWorksheet worksheet in workBook.Worksheets)
            {
                PhoneBrand phoneBrand = new PhoneBrand();
                phoneBrand.Title = worksheet.Name;

                foreach (IXLColumn column in worksheet.ColumnsUsed().Skip(1))
                {
                    PhoneModel phoneModel = new PhoneModel();
                    phoneModel.Title = column.Cell(1).Value.ToString();

                    foreach (IXLRow row in worksheet.RowsUsed().Skip(1))
                    {
                        try
                        {
                            PricePosition pricePosition = new PricePosition();
                            pricePosition.Problem = row.Cell(1).Value.ToString();
                            pricePosition.Price = row.Cell(column.ColumnNumber()).Value.ToString();
                            phoneModel.PricePositions.Add(pricePosition);

                        }
                        catch (Exception e)
                        {
                            //logging
                            viewModel.ErrorsTotal++;
                        }
                    }

                    phoneBrand.PhoneModels.Add(phoneModel);
                }
                viewModel.PhoneBrands.Add(phoneBrand);
            }
        }
        //например, здесь сохраняем все позиции из прайса в БД

        return View(viewModel);
    }
    return RedirectToAction("Index");
}
В этом методе мы парсим Excel-файл и манипулируем записями в объектно-ориентированной манере. Код в методе довольно простой. Более подробно он объясняется в видео-версии этой статьи. Здесь отмечу основные моменты:
- в нескольких циклах foreach{ } мы пробегаемся по всем записям в файле, параллельно создавая объекты классов наших доменных моделей;
- получается сформированная коллекция брендов телефонов, в каждом из которых содержится коллекция конкретных моделей, в каждой из которых содержится коллекция позиций прайса с ценами на ремонт;
- также создается ViewModel, где мы считаем количество ошибок при импорте и в которую вкладываем заполненную коллекцию брендов;
- в итоге мы можем либо сохранить полученные объекты в базу данных, либо отправить ViewModel в представление.
В качестве интерактива Вы можете в соответствующем представлении создать HTML-таблицу с прайсом и отправить ее в браузер пользователя.
Также возможна другая ситуация, когда у нас нет исходного Excel-файла, вместо этого веб-приложение должно сформировать его динамически, и пользователь сайта сможет его скачать. Например, тот же список брендов и моделей телефонов.
Создадим соответствующее действие в контроллере:
public ActionResult Export()
{
    List<PhoneBrand> phoneBrands = new List<PhoneBrand>();
    phoneBrands.Add(new PhoneBrand()
    {
        Title = "Apple",
        PhoneModels = new List<PhoneModel>()
    {
        new PhoneModel() { Title = "iPhone 7"},
        new PhoneModel() { Title = "iPhone 7 Plus"}
    }});
    phoneBrands.Add(new PhoneBrand()
    {
        Title = "Samsung",
        PhoneModels = new List<PhoneModel>()
    {
        new PhoneModel() { Title = "A3"},
        new PhoneModel() { Title = "A3 2016"},
        new PhoneModel() { Title = "A3 2017"}
    }});

    using (XLWorkbook workbook = new XLWorkbook(XLEventTracking.Disabled))
    {
        var worksheet = workbook.Worksheets.Add("Brands");

        worksheet.Cell("A1").Value = "Бренд";
        worksheet.Cell("B1").Value = "Модели";
        worksheet.Row(1).Style.Font.Bold = true;

        //нумерация строк/столбцов начинается с индекса 1 (не 0)
        for (int i = 0; i < phoneBrands.Count; i++)
        {
            worksheet.Cell(i + 2, 1).Value = phoneBrands[i].Title;
            worksheet.Cell(i + 2, 2).Value = string.Join(", ", phoneBrands[i].PhoneModels.Select(x => x.Title));
        }

        using (var stream = new MemoryStream())
        {
            workbook.SaveAs(stream);
            stream.Flush();

            return new FileContentResult(stream.ToArray(),
                "application/vnd.openxmlformats-officedocument.spreadsheetml.sheet")
            {
                FileDownloadName = $"brands_{DateTime.UtcNow.ToShortDateString()}.xlsx"
            };
        }
    }
}
Отмечу ключевые моменты из листинга выше:
- в нашем простом примере список брендов и моделей мы жестко закодировали, но его также можно получить и из БД;
- к ячейкам на рабочем листе можно обращаться как по литеральному значению, так и по индексу. Нумерация строк/столбцов начинается с индекса 1 (не 0);
- в качестве MIME-type для файлов Excel следует указывать application/vnd.openxmlformats-officedocument.spreadsheetml.sheet;
Вывод: В этой статье мы рассмотрели основные возможности библиотеки ClosedXML. Ее функционала вполне хватает для обработки большинства сценариев, когда данные представлены в формате MS Excel файлов.
First, the Excel assembly must be added to the project. To do this you must add a reference to the Microsoft.Office.Interop.Excel library by going to the Project -> Add Reference menu item. Go to the .NET tab of the dialog box that pops up and scroll down the Microsoft.Office.Interop.Excel list item. Double click on it and press OK. This adds the reference to your project. In the «using» section of your code, type
using Excel = Microsoft.Office.Interop.Excel;
Once the assembly is added to the project, a new application needs to be created:
Excel.Application excelApp = new Excel.Application();
If you want to make Excel visible to the user you have to set the Visible property to true, the default is false.
excelApp.Visible = true;
The code above opens the Excel application, in order to use the application, you have to open a workbook by creating a Workbook object. You can open a new blank workbook by using the following code:
Excel.Workbook newWorkbook = excelApp.Workbooks.Add();
The preceding code opens a blank workbook with one sheet. The .Add method optionally takes a template object. If the parameter is left blank, the default template will be used (like when you open Excel manually).
If you want to open an existing document for editing instead of creating a new one, you can use the following code to open the Workbook object:
   string workbookPath = "c:/SomeWorkBook.xls";
   Excel.Workbook excelWorkbook = excelApp.Workbooks.Open(workbookPath,
    0, false, 5, "", "", false, Excel.XlPlatform.xlWindows, "",
    true, false, 0, true, false, false);
The preceding code may need a little explanation. The workbookPath is of course the path to the existing spreadsheet that you want to open, and if using .NET 4.0 and the Office 2007 library (Microsoft.Office.Interop.Excel library), it is the only parameter required. The rest of the excelApp.Workbooks.open parameters are a little less obvious. The following is the list of parameters that are passed to the function:
WorkBooks.open(string Filename, object UpdateLinks, object ReadOnly, object Format,
object Password, object WriteResPassword, object ReadOnlyRecommend, object Origin,
object Delimiter, object Editable, object Notify, object Converter, object AddToMru,
object Local, object CorruptLoad )
To view the documentation on this function, follow the link to Microsoft’s website for further explanation of the function at: enter link description here
Once the workbook is either created or opened, you must create a Sheets object that holds the Worksheets within the workbook. The following code will get all of the sheets in the workbook you previously opened.
Excel.Sheets excelSheets = excelWorkbook.Worksheets;
Now that you have the collection of Worksheets, you must get an individual sheet edit data within.
string currentSheet = "Sheet1";
Excel.Worksheet excelWorksheet = (Excel.Worksheet)excelSheets.get_Item(currentSheet);
In the preceding code, you have to type cast the excelSheets.get_Item(string) method because it returns an object. Now that you have the sheet you are ready to access individual cells with the following code:
     Excel.Range excelCell =
    (Excel.Range)excelWorksheet.get_Range("A1", "A1");
The get_Range function must take two parameters. If the two parameters are equal, a single cell is selected; otherwise a range of cells will be selected. Again you have to type cast the return value of the method. Once you have a cell object, your can set its value using the .Value2 property, or use any of the other properties to manipulate ranges of cells.