
Use ExcelReaderFactory to read excel
You can use the below code
VB.net Code
Dim stream As FileStream = File.Open("YouExcelFilePath.xls", FileMode.Open, FileAccess.Read)
Dim excelReader As IExcelDataReader = ExcelReaderFactory.CreateBinaryReader(stream)
Dim result As DataSet = excelReader.AsDataSet()
excelReader.Close()
result.Dispose()
C# Code
FileStream stream = File.Open("YouExcelFilePath.xls", FileMode.Open, FileAccess.Read);
IExcelDataReader excelReader = ExcelReaderFactory.CreateBinaryReader(stream);
DataSet result = excelReader.AsDataSet();
excelReader.Close();
result.Dispose();
Now use can do bulk import using Bulkcopy class.
or
create xml and send to database
or
Use OPENROWSET to read the excel file in Stored Procedure and insert/update the data.
Please follow the below article to implement it.
Read excel in SQL stored Procedure
- Remove From My Forums
-
Question
-
OS: Windows 7
File: Excel 2007
SQL Server 2008 X64
How do I import excel file to SQL Server 2008 via stored procedure? I used this statement:
*
INTO Table
FROM
OPENDATASOURCE(‘Microsoft.Jet.OLEDB.4.0’,‘Data Source=C:something.xls; Extended Properties=Excel 8.0’)…[xxxxx$]
When I try to execute I got this error:
SQL Server blocked access to STATEMENT ‘OpenRowset/OpenDatasource’ of component ‘Ad Hoc Distributed Queries’ because this component is turned off as part of the security configuration for this server. A system administrator can enable the use of ‘Ad Hoc
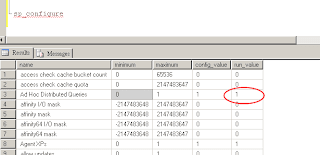
Distributed Queries’ by using sp_configure. For more information about enabling ‘Ad Hoc Distributed Queries’, see «Surface Area Configuration» in SQL Server Books Online.Then, I reconfigured Ad Hoc settings like this:
sp_configure
sp_configure ‘show advanced options’, 1
reconfigure
sp_configure ‘Ad Hoc Distributed Queries’, 1
reconfigure
This did not help either; I got this error:
OLE DB provider ‘Microsoft.Jet.OLEDB.4.0’ cannot be used for distributed queries because the provider is configured to run in single-threaded apartment mode.
Any help would be appreciated!
Thanks!
SELECT
Answers
-
Hi,
However, there is a beta 64 bit version of Jet available. If the beta doesn’t work for you, the following workaround may help you to resolve the issue.
You can install a 32-bit SQL Server Express on your 64-bit environment as a medium. Create a linked server with Microsoft.Jet.OLEDB.4.0 provider to your Excel/Access file on your SQL Server Express instance, and then create a linked server to your SQL Server
Express instance on your 64-bit SQL Server instance.Here are the detailed steps for your reference:
1. Install SQL Server Express 2008 in your 64-bit environment. SQL Server Express 2008 is freely available for download from Microsoft Downloads:
SQL Server Express 2008
http://www.microsoft.com/downloads/details.aspx?familyid=01AF61E6-2F63-4291-BCAD-FD500F6027FF&displaylang=en
2. Open SQL Server Management Studio (SSMS), connect to the 32-bit SQL Server instance MYSERVERSQLEXPRESS, create a linked server to your Excel file by running the following T-SQL statements:
—Create a linked server.
EXEC master.dbo.sp_addlinkedserver
@server = N’MYACCESS’,
@srvproduct=N’Access’,
@provider=N’Microsoft.Jet.OLEDB.4.0′,
@datasrc=N’ D: test.xls’
Go
—Create a mapping to use the current user credentials to connect to the linked server.
EXEC master.dbo.sp_addlinkedsrvlogin
@rmtsrvname=N’MYACCESS’,
@useself=N’True’
GO
3. Connect to the 64-bit SQL Server instance MYSERVER from SSMS, create a linked server to the 32-bit instance with the following T-SQL statements:
EXEC sp_addlinkedserver
@server=’MYEXPRESS’,
@srvproduct=»,
@provider=’SQLNCLI’,
@datasrc=’MYSERVERSQLEXPRESS’
GO
EXEC sp_addlinkedsrvlogin
@rmtsrvname=N’MYEXPRESS’,
@useself=N’True’
GO
4. Create a new query in your 64-bit SQL Server instance and run the following T-SQL statement to query the Sheet1in the Excel:
SELECT * FROM OPENQUERY(MYEXPRESS, ‘SELECT * FROM MYACCESS…Sheet1$)If there are any more problems, please let me know.
Thanks.
***Xiao Min Tan***Microsoft Online Community***
-
Marked as answer by
Friday, April 30, 2010 9:40 AM
-
Marked as answer by
В СУБД Microsoft SQL Server 2008 существует отличный функционал по импорту и экспорту данных, причем в разные форматы и разные базы данных. Его можно также использовать для простого переноса данных из одной базы в другую или с одного сервера на другой. Сегодня мы рассмотрим примеры использования данного средства, и, как мне кажется, это очень удобно.
Мы с Вами уже не раз затрагивали тему импорта и экспорта данных в MS SQL Server 2008, например, в статьях:
- Access – Импорт данных в базу Microsoft SQL Server 2008
- Выгрузка данных в текстовый файл из MS SQL Server 2008 клиентом Access 2003
- Выгрузка данных из Access в шаблон Word и Excel
Но так или иначе, это было связанно с клиентским приложением, т.е. Access, другими словами, мы это делали для пользователей, чтобы они могли выгружать или загружать данные в базу. А теперь пришло время поговорить о том, чем может, и, наверное, должен пользоваться системный администратор или программист для подобного рода задач.
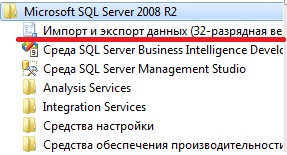
Примечание! Далее подразумевается, что у Вас уже установлена СУБД Microsoft SQL Server 2008 и средство импорта и экспорта данных, так как оно идет в комплекте, и на примере Windows 7 Вы можете наблюдать в меню «Пуск-> Все программы-> Microsoft SQL Server 2008 R2-> Импорт и экспорт данных (32-разрядная версия)». У меня это выглядит следующим образом:
И для того чтобы рассмотреть функционал по импорту и экспорту данных, давайте разберем два примера, первый по импорту данных, а второй по экспорту данных.
Содержание
- Импорт данных из Excel документа в MSSql 2008
- Создаем тестовые данные в документе Excel
- Шаг 1
- Шаг 2
- Шаг 3
- Шаг 4
- Шаг 5
- Шаг 6
- Шаг 7
- Шаг 8
- Экспорт данных из Microsoft SQL Server 2008 в файл Excel
- Шаг 1
- Шаг 2
- Шаг 3
- Шаг 4
- Шаг 5
- Шаг 6
- Шаг 7
Импорт данных из Excel документа в MSSql 2008
Создаем тестовые данные в документе Excel
Мы будем использовать старый, но проверенный Excel 2003 и формат файла у нас будет xls.
Данные будут вот такие, файл я назвал test_file.xls:

Сразу скажу, что в данном примере мы будем импортировать данные в новую таблицу, поэтому на название полей мы не обращаем внимания. Но если бы мы импортировали уже в существующую таблицу, то нам в процессе импорта пришлось бы задавать соответствие этих полей или изначально в файле создать столько полей с тем же названием и в той же последовательности, как и в таблице. А если этого не сделать, то те поля, которые отсутствуют в таблице в базе, будут со значением null. Как задать соответствие этих полей и как импортировать данные в уже существующую таблицу я покажу в процессе импорта.
Примечание! Сервер располагается локально, база данных называется test.
Шаг 1
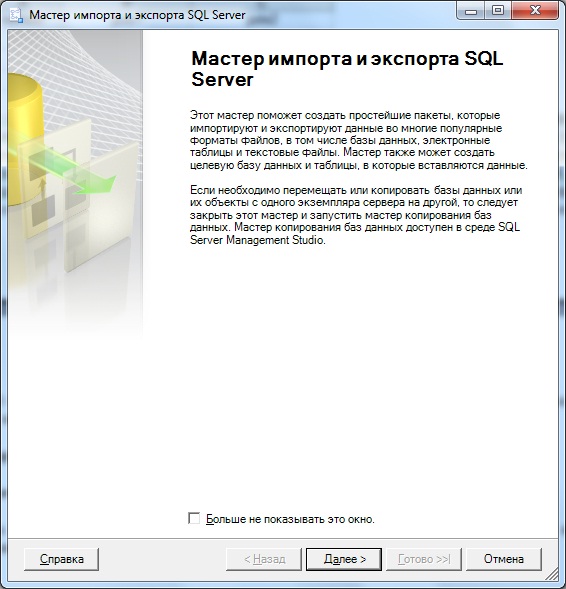
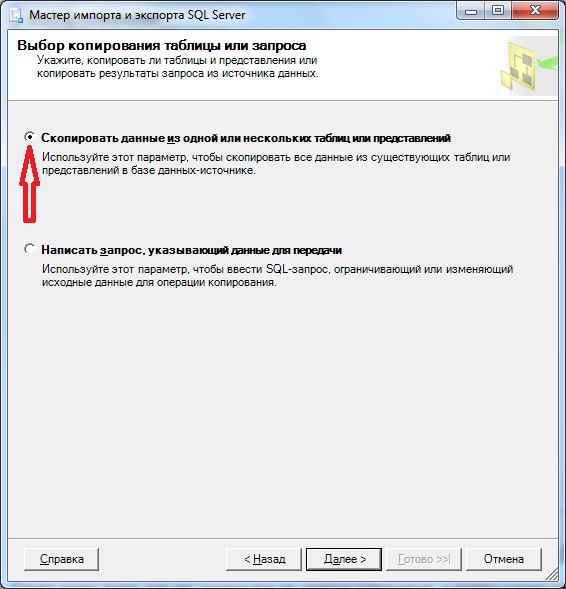
Итак, приступим, у нас есть файл, теперь запускаем средство импорта, и у нас открывается следующее окно:
Шаг 2
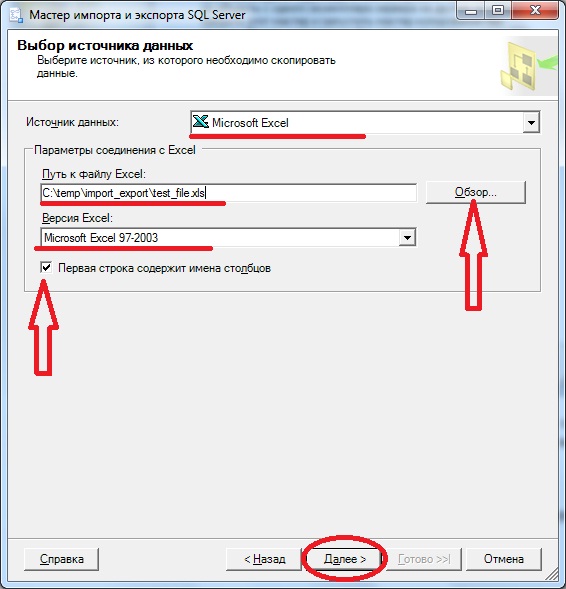
Нажимаем далее, где нам предлагают выбрать источник данных, в нашем случае это Excel, мы выбираем файл, версию excel и ставим галочку, что первая строка — это заголовок:
Шаг 3
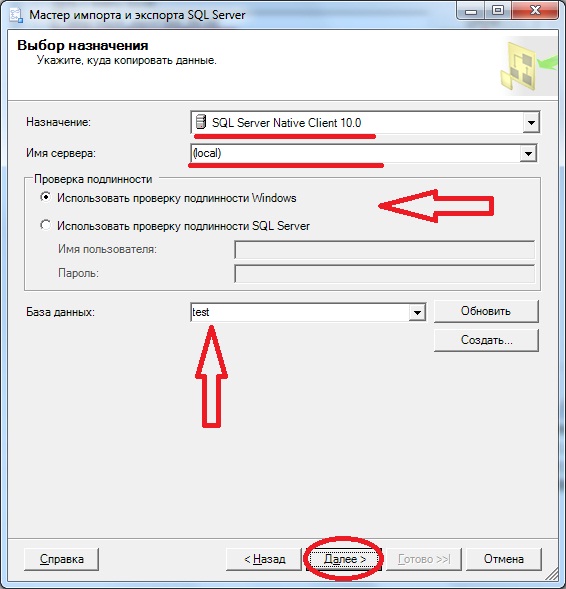
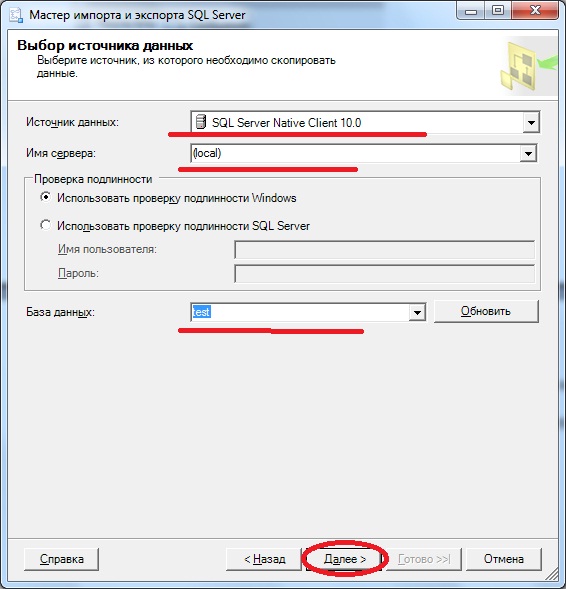
Жмем далее, нам предлагают выбрать назначение, куда копировать эти данные, мы выбираем SQL Server, указываем имя сервера, т.е. его адрес, в нашем случае, как я уже сказал, он расположен локально. Также не забудьте про проверку подлинности, выбирайте тот метод, который у Вас настроен на сервере, и, конечно же, про базу данных, в которую копировать:
Шаг 4
Снова жмем далее, где мы укажем все ли данные копировать, в нашем случае мы говорим что все:
Шаг 5
Жмем далее, и попадаем на окно выбора листа с данными и задания названия таблицы в нашей базе, я выбрал лист 1 и назвал таблицу test_table:
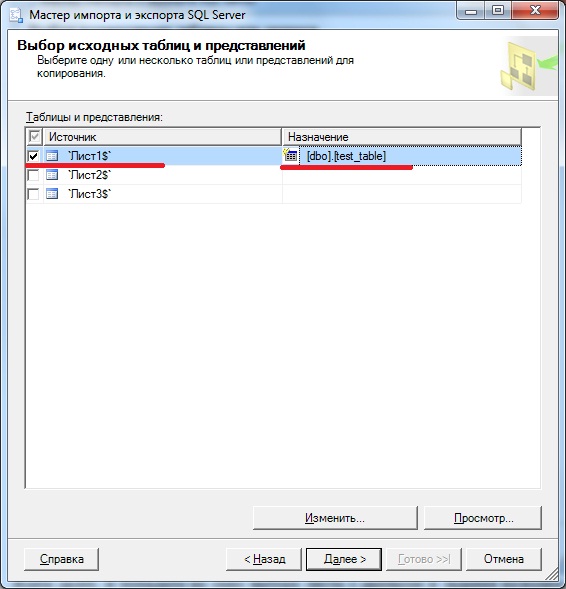
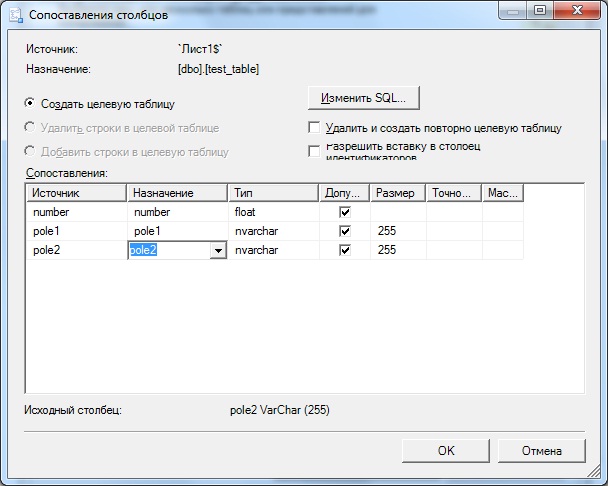
И, кстати, вот на этом этапе можно задать соответствие полей. В случае если Вы импортируете данные в существующую таблицу, для соответствия полей Вам необходимо выбрать таблицу из выпадающего списка и нажать изменить, где Вы также можете задать такие параметры как назначение, тип данных и другие, для примера вот это окно:
Шаг 6
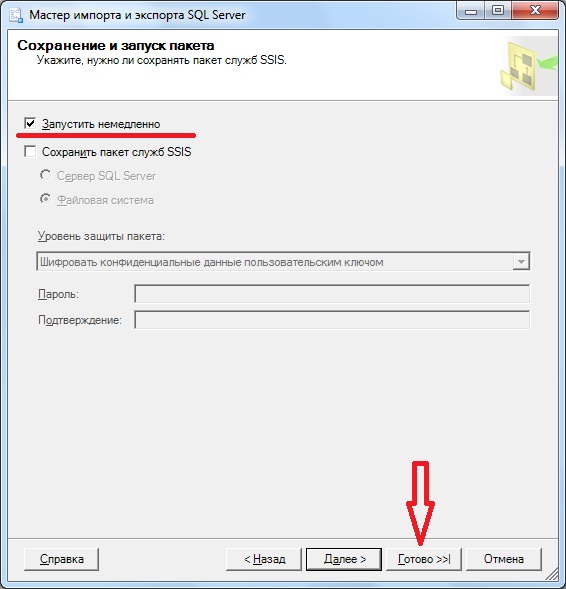
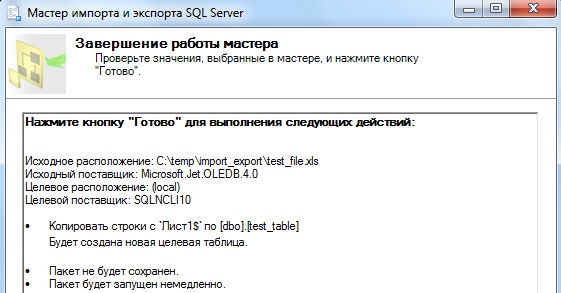
Это было небольшое отступление, а в нашем примере мы жмем далее, и попадаем в окно, в котором можно сохранить все наше действия в пакет, но мы этого делать не будем, а сразу же нажмем готово:

Шаг 7
После появится окно, где мы все проверяем и жмем готово:
Шаг 8
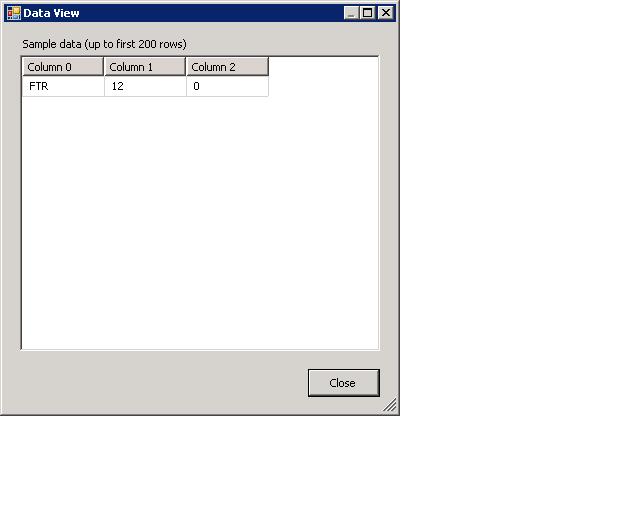
И в заключение у нас появится еще одно окно, так сказать результат наших действий, жмем закрыть:
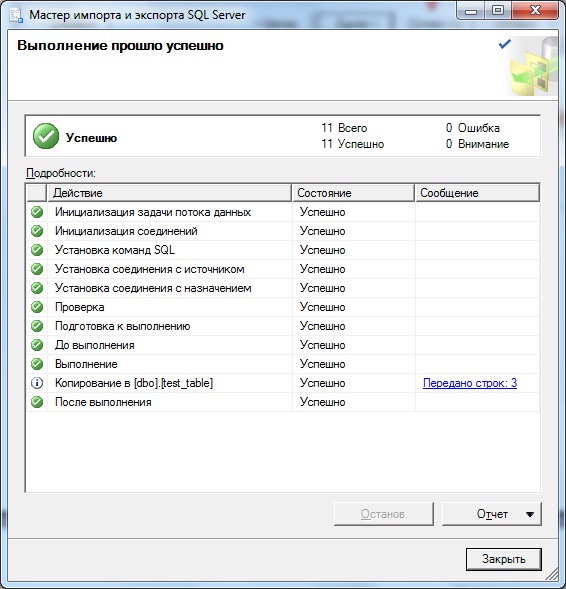
Как видно, передано 3 строки, т.е. импортировано — это означает, что все наши данные, которые были в файле, импортировались.
И для того, чтобы проверить какие данные у нас импортировались, выполним в Management Studio простой запрос select.
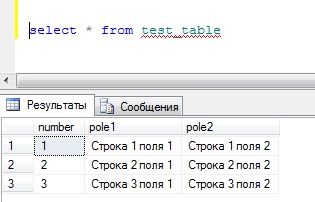
И как видите все хорошо!
А теперь давайте рассмотрим пример экспорта данных из нашей только что созданной таблицы в Excel документ.
Шаг 1
Для этого делаем практически то же самое, открываем средство экспорта, но уже здесь в качестве источника указываем нашу базу:
Шаг 2
Жмем далее, где нам предлагают указать назначение экспорта, мы соответственно выбираем Excel, и задаем путь и название выгружаемого файла:
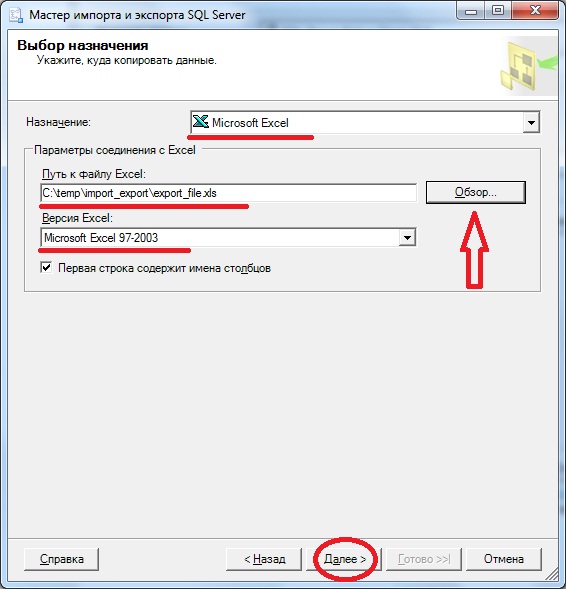
Шаг 3
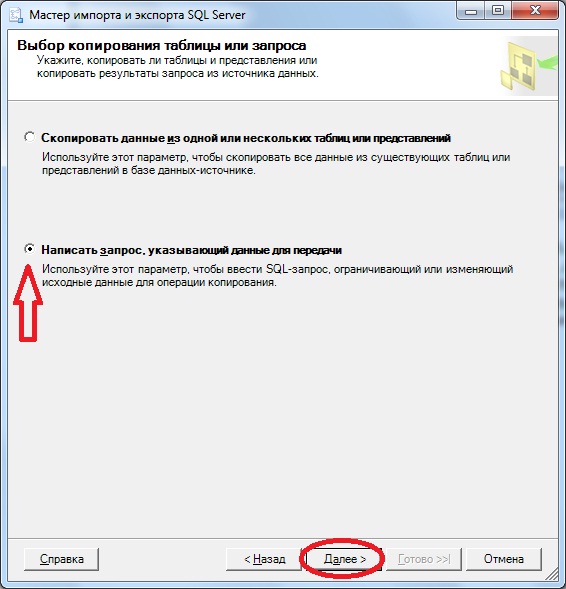
После того как Вы нажмете далее, Вы попадете в окно выбора данных, т.е. какие именно данные мы будем выгружать, и здесь давайте укажем — выгружать данные на основе запроса. Так как, когда мы импортировали данные, мы выбрали все, а теперь для примера выберем не все, а на основе запроса, можно также выбрать все и указать таблицу или представление VIEWS, в котором уже будут отфильтрованные данные, но мы напишем SQL запрос:
Шаг 4
И в следующем окне вставляем свой запрос, например, я написал вот такой:
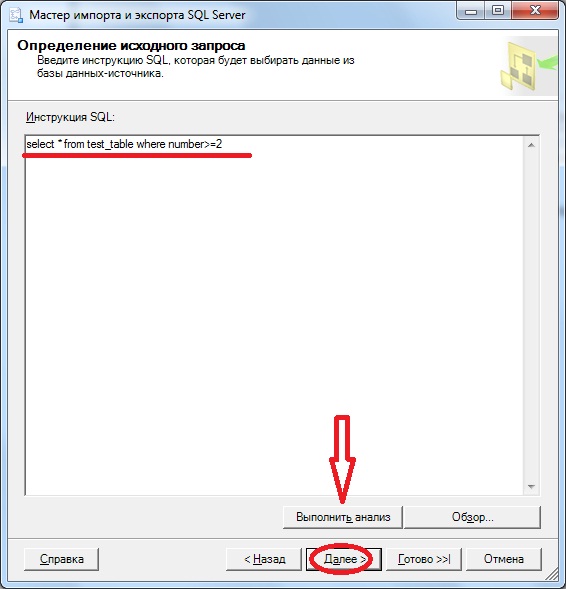
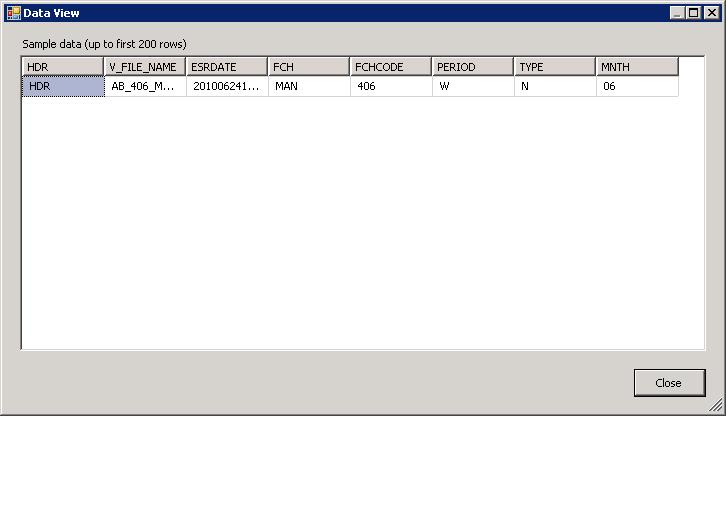
Также в этом окне Вы можете выполнить анализ своего запроса, на предмет наличия ошибок или выбрать файл, который содержит текст запроса, и, если все хорошо, жмем далее.
Шаг 5
На следующем окне сразу же можем нажимать далее, если конечно Вы не хотите задать свои названия полей в выгружаемом файле.
Шаг 6
Затем на следующем окне все проверяем и жмем готово.
Шаг 7
Далее, как и в импорте, жмем последний раз готово. И все, после этого у Вас в той папке, которую Вы указали, появится документ Excel с Вашими данными.
После рассмотрения этих примеров, я думаю стало понятно, как можно осуществлять импорт и экспорт данных в MS SQL Server 2008. Использовать можно не только Excel, но и другие источники данных, ну я думаю, дальше Вы разберетесь сами, так как это не так сложно, но если у Вас все равно возникают вопросы, можете задавать их в комментариях.
Заметка! Если Вас интересует SQL и T-SQL, рекомендую посмотреть мои видеокурсы по T-SQL, с помощью которых Вы «с нуля» научитесь работать с SQL и программировать с использованием языка T-SQL в Microsoft SQL Server.
Пока!
Introduction
This article describes the complete steps for Microsoft Excel data import to SQL Server using linked servers technique.
The article describes the steps for all modern platforms:
- Microsoft SQL Server 2005-2016 on the x86/x64 platform.
- Microsoft Excel 2003-2016 files like *.xls, *.xlsx, *.xlsm, *.xlsb.
Bonus
You can develop amazing Microsoft Excel applications for working with Microsoft SQL Server using database development skills only!
Visit www.savetodb.com, download and install SaveToDB Add-In for Microsoft Excel.
That’s all!
Connect to tables, views, and stored procedures, edit the data and save it back to a database.
Add features to your Microsoft Excel applications step by step configuring apps via SQL.
Table of Contents
- Introduction
- The basics of Excel data import to SQL Server using linked servers
- Configuration steps for Excel data import to SQL Server using linked servers
- Install Microsoft.ACE.OLEDB.12.0 driver
- Grant rights to TEMP directory
- Configure ACE OLE DB properties
- Configure linked servers
- How-To: Import Excel 2003 to SQL Server x86
- How-To: Import Excel 2007 to SQL Server x86
- How-To: Import Excel 2003/2007 to SQL Server x64
- Conclusion
- See Also
The Basics of Excel Data Import to SQL Server Using Linked Servers
To import data from Microsoft Excel 2003 files to 32-bit SQL Server the Microsoft.Jet.OLEDB.4.0 provider can be used. Use the T-SQL code like this to add a linked server to Excel 2003 workbook:
EXEC sp_addlinkedserver
    @server = 'ExcelServer1',
    @srvproduct = 'Excel',
    @provider = 'Microsoft.Jet.OLEDB.4.0',
    @datasrc = 'C:Testexcel-sql-server.xls',
    @provstr = 'Excel 8.0;IMEX=1;HDR=YES;'
To import data from Microsoft Excel 2007 to 32-bit SQL Server or from any Microsoft Excel files to 64-bit SQL Server the Microsoft.ACE.OLEDB.12.0 provider should be used. Use the T-SQL code like this:
EXEC sp_addlinkedserver
    @server = 'ExcelServer2',
    @srvproduct = 'Excel',
    @provider = 'Microsoft.ACE.OLEDB.12.0',
    @datasrc = 'C:Testexcel-sql-server.xlsx',
    @provstr = 'Excel 12.0;IMEX=1;HDR=YES;'
IMEX=1 defines to import all Excel column data including data of mixed types.
HDR=YES defines that Excel data contain column headers.
The way to modify a linked server is to drop and create it again. Use the T-SQL code like this:
EXEC sp_dropserver
    @server = N'ExcelServer1',
    @droplogins='droplogins'
There are two ways to use linked server data. The first way is like this:
SELECT * FROM ExcelServer1...[Sheet1$]
and the second one is the use of the OPENQUERY function:
SELECT * FROM OPENQUERY(ExcelServer1, 'SELECT * FROM [Sheet1$]')
The use of the OPENQUERY function is more flexible because queries can contain Excel ranges unlike the entire sheet in the first case.
Configuration Steps for Excel Data Import to SQL Server Using Linked Servers
Install Microsoft.ACE.OLEDB.12.0 driver
To import Excel 2007-2016 files to SQL Server the Microsoft.ACE.OLEDB.12.0 driver should be installed.
To download the driver use the following link:
Microsoft Access Database Engine 2010 Redistributable
Don’t worry about «Access» in the name.
Warning! x64 driver cannot be installed if Microsoft Office 2007-2016 x86 is already installed!
So, there is no way to import Excel data to SQL Server x64 using Linked Servers technique on a machine with Microsoft Office x86!
The SQL Server Error Message if Microsoft.ACE.OLEDB.12.0 is not installed
OLE DB provider "Microsoft.ACE.OLEDB.12.0" for linked server "ExcelServer2" returned message "The Microsoft Access database engine cannot open or write to the file ''.
It is already opened exclusively by another user, or you need permission to view and write its data.".
Msg 7303, Level 16, State 1, Line 1
Cannot initialize the data source object of OLE DB provider "Microsoft.ACE.OLEDB.12.0" for linked server "ExcelServer2".
Grant rights to TEMP directory
This step is required only for 32-bit SQL Server with any OLE DB provider.
The main problem is that an OLE DB provider creates a temporary file during the query in the SQL Server temp directory using credentials of a user who run the query.
The default directory for SQL Server is a default directory for SQL Server service account.
If SQL Server is run under the Network Service account the temp directory is like:
C:WindowsServiceProfilesNetworkServiceAppDataLocalTemp
If SQL Server is run under the Local Service account the temp directory is like:
C:WindowsServiceProfilesLocalServiceAppDataLocalTemp
Microsoft recommends two ways for the solution:
- A change of SQL Server TEMP directory and a grant of full rights for all users to this directory.
- Grant of read/write rights to the current SQL Server TEMP directory.
See details: PRB: «Unspecified error» Error 7399 Using OPENROWSET Against Jet Database
Usually, only a few accounts are used for import operations. So, we can just add the rights for these accounts.
For example, icacls utility can be used for the rights setup:
icacls C:WindowsServiceProfilesNetworkServiceAppDataLocalTemp /grant vs:(R,W)
if SQL Server is started under Network Service and login «vs» is used to run the queries.
The SQL Server Error Message if a user has no rights for SQL Server TEMP directory
OLE DB provider "Microsoft.Jet.OLEDB.4.0" for linked server "ExcelServer1" returned message "Unspecified error".
Msg 7303, Level 16, State 1, Line 1
Cannot initialize the data source object of OLE DB provider "Microsoft.Jet.OLEDB.4.0" for linked server "ExcelServer1".
or the message for Microsoft.ACE.OLEDB.12.0 provider:
OLE DB provider "Microsoft.ACE.OLEDB.12.0" for linked server "ExcelServer2" returned message "Unspecified error".
Msg 7303, Level 16, State 1, Line 1
Cannot initialize the data source object of OLE DB provider "Microsoft.ACE.OLEDB.12.0" for linked server "ExcelServer2".
Configure ACE OLE DB properties
This step is required only if the Microsoft.ACE.OLEDB.12.0 provider is used.
Use the following T-SQL code:
EXEC sp_MSset_oledb_prop N'Microsoft.ACE.OLEDB.12.0', N'AllowInProcess', 1
GO
EXEC sp_MSset_oledb_prop N'Microsoft.ACE.OLEDB.12.0', N'DynamicParameters', 1
GO
The SQL Server Error Messages if OLE DB properties are not configured
Msg 7399, Level 16, State 1, Line 1
The OLE DB provider "Microsoft.ACE.OLEDB.12.0" for linked server "ExcelServer2" reported an error. The provider did not give any information about the error.
Msg 7330, Level 16, State 2, Line 1
Cannot fetch a row from OLE DB provider "Microsoft.ACE.OLEDB.12.0" for linked server "ExcelServer2".
Configure linked servers
The configuring of linked servers is discussed in the Basics topic.
Use the T-SQL code like this for Excel 2003 linked servers:
EXEC sp_addlinkedserver
    @server = 'ExcelServer1',
    @srvproduct = 'Excel',
    @provider = 'Microsoft.Jet.OLEDB.4.0',
    @datasrc = 'C:Testexcel-sql-server.xls',
    @provstr = 'Excel 8.0;IMEX=1;HDR=YES;'
Use the T-SQL code like this for Excel 2007 linked servers or on SQL Server x64:
EXEC sp_addlinkedserver
    @server = 'ExcelServer2',
    @srvproduct = 'Excel',
    @provider = 'Microsoft.ACE.OLEDB.12.0',
    @datasrc = 'C:Testexcel-sql-server.xlsx',
    @provstr = 'Excel 12.0;IMEX=1;HDR=YES;'
How-To: Import Excel 2003 to SQL Server x86
Step 1. Grant rights to TEMP directory
icacls C:WindowsServiceProfiles<SQL Server Account>AppDataLocalTemp /grant <User>:(R,W)
The most commonly used paths:
C:WindowsServiceProfilesNetworkServiceAppDataLocalTemp
C:WindowsServiceProfilesLocalServiceAppDataLocalTemp
Step 2. Configure linked server using Microsoft.Jet.OLEDB.4.0 provider
EXEC sp_addlinkedserver
    @server = 'ExcelServer1',
    @srvproduct = 'Excel',
    @provider = 'Microsoft.Jet.OLEDB.4.0',
    @datasrc = 'C:Testexcel-sql-server.xls',
    @provstr = 'Excel 8.0;IMEX=1;HDR=YES;'
How-To: Import Excel 2007 to SQL Server x86
Step 1. Install the 32-bit Microsoft.ACE.OLEDB.12.0 driver
Microsoft Access Database Engine 2010 Redistributable
Step 2. Grant rights to TEMP directory
icacls C:WindowsServiceProfiles<SQL Server Account>AppDataLocalTemp /grant <User>:(R,W)
The most commonly used paths:
C:WindowsServiceProfilesNetworkServiceAppDataLocalTemp
C:WindowsServiceProfilesLocalServiceAppDataLocalTemp
Step 3. Configure ACE OLE DB properties
EXEC sp_MSset_oledb_prop N'Microsoft.ACE.OLEDB.12.0', N'AllowInProcess', 1
GO
EXEC sp_MSset_oledb_prop N'Microsoft.ACE.OLEDB.12.0', N'DynamicParameters', 1
GO
Step 4. Configure linked server using Microsoft.ACE.OLEDB.12.0 provider
EXEC sp_addlinkedserver
    @server = 'ExcelServer2',
    @srvproduct = 'Excel',
    @provider = 'Microsoft.ACE.OLEDB.12.0',
    @datasrc = 'C:Testexcel-sql-server.xlsx',
    @provstr = 'Excel 12.0;IMEX=1;HDR=YES;'
How-To: Import Excel 2003/2007 to SQL Server x64
Step 1. Install 64-bit Microsoft.ACE.OLEDB.12.0 driver
Microsoft Access Database Engine 2010 Redistributable
Step 2. Configure ACE OLE DB properties
EXEC sp_MSset_oledb_prop N'Microsoft.ACE.OLEDB.12.0', N'AllowInProcess', 1
GO
EXEC sp_MSset_oledb_prop N'Microsoft.ACE.OLEDB.12.0', N'DynamicParameters', 1
GO
Step 3. Configure linked server using Microsoft.ACE.OLEDB.12.0 provider
EXEC sp_addlinkedserver
    @server = 'ExcelServer2',
    @srvproduct = 'Excel',
    @provider = 'Microsoft.ACE.OLEDB.12.0',
    @datasrc = 'C:Testexcel-sql-server.xlsx',
    @provstr = 'Excel 12.0;IMEX=1;HDR=YES;'
Conclusion
Using the described techniques you can import data from Microsof Excel 2003-2016 to SQL Server 2005-2016 on the 32-bit or 64-bit platform.
See Also
- References
- OPENQUERY (Transact-SQL)
- How-To
- How to use Excel with SQL Server linked servers and distributed queries
- Downloads
- Microsoft Access Database Engine 2010 Redistributable
- Microsoft Access Database Engine 2016 Redistributable
Over the past few days I have been migrating all the DTS package on SQL Server 2000 to SQL Server 2008 64-bit machine. This article will provide insight into how DTS or SSIS packages using excel automation/excel source or destination can be migrated from SQL Server 2000/2005 32-bit environment to 64-bit SQL Server 2008.
Many of you will be aware that Excel doesn’t have a 64-bit engine and more often than not we run into numerous issues while migrating from a 32-bit machine to a 64-bit machine.The biggest hurdle that a DBA/Developer faces while debugging is that the COM subsystem doesn’t provided us with a helpful error message. When we run into trouble we need as much information as possible to rectify the issue.
So let us get started with migrating a DTS package that has quiet a few Excel components(Destination/source) and an activex script that opens up Excel and saves the data in Excel.
A typical example is given below:
My client requires a feed from our database and the feed should be of the format header,data and footer. The header contains the following information:
The DATA contains all the information required by our client.

Finally,the footer
All the retrieved information is stored in a 3 individual text files.I use an ActiveX script to concatenate the file Header + Data + Footer and create a DAT file.In Visual Studio 2008 I replaced the ActiveX script in the DTS package with a Script Task,which allows a script to be written in C# or VB. I managed to write the code that would convert the DAT file into a CSV and a CSV file to an Excel file by using the «Open» and «SaveAs» function.This is done within a C# script shown below.
/*
Microsoft SQL Server Integration Services Script Task
Write scripts using Microsoft Visual C# 2008.
The ScriptMain is the entry point class of the script.
*/using System;
using System.Data;
using Microsoft.SqlServer.Dts.Runtime;
using System.Windows.Forms;
using Microsoft.Office.Interop.Excel;
//using System.Data.OleDb;
using System.IO;
using System.Collections.Generic;
using System.Runtime.InteropServices; namespace ST_860f215ab01e4f2196719b52df49af29.csproj
{
[System.AddIn.AddIn("ScriptMain", Version = "1.0", Publisher = "", Description = "")]
public partial class ScriptMain : Microsoft.SqlServer.Dts.Tasks.ScriptTask.VSTARTScriptObjectModelBase
{ #region VSTA generated code
enum ScriptResults
{
Success = Microsoft.SqlServer.Dts.Runtime.DTSExecResult.Success,
Failure = Microsoft.SqlServer.Dts.Runtime.DTSExecResult.Failure
};
#endregion /*
The execution engine calls this method when the task executes.
To access the object model, use the Dts property. Connections, variables, events,
and logging features are available as members of the Dts property as shown in the following examples. To reference a variable, call Dts.Variables["MyCaseSensitiveVariableName"].Value;
To post a log entry, call Dts.Log("This is my log text", 999, null);
To fire an event, call Dts.Events.FireInformation(99, "test", "hit the help message", "", 0, true); To use the connections collection use something like the following:
ConnectionManager cm = Dts.Connections.Add("OLEDB");
cm.ConnectionString = "Data Source=localhost;Initial Catalog=AdventureWorks;Provider=SQLNCLI10;Integrated Security=SSPI;Auto Translate=False;"; Before returning from this method, set the value of Dts.TaskResult to indicate success or failure.To open Help, press F1.
*/public void Main()
{
// TODO: Add your code here
//Dts.TaskResult = (int)ScriptResults.Success;
// TODO: Add your code here
//Dts.TaskResult = (int)ScriptResults.Success;
Microsoft.Office.Interop.Excel.Application excelApp = null;
Microsoft.Office.Interop.Excel.Workbook excelWorkbook = null;
string s_workbookpath = null;
string s_report_file_name_temp = Dts.Variables["s_report_file_name_temp"].Value.ToString();
string s_report_file_name = Dts.Variables["s_report_file_name"].Value.ToString();
try
{string s_filename = Dts.Variables["s_text_file_name"].Value.ToString(); string s_newfilename = s_report_file_name_temp + s_filename.ToUpper();
string s_sourcefilename; //read data from header file
s_sourcefilename = s_report_file_name_temp + "header.txt";
string text = File.ReadAllText(s_sourcefilename);
File.WriteAllText(s_newfilename, text); //read the data file s_sourcefilename = s_report_file_name_temp + "data.txt";
text = File.ReadAllText(s_sourcefilename);
File.AppendAllText(s_newfilename, text); //read the footer file s_sourcefilename = s_report_file_name_temp + "footer.txt";
text = File.ReadAllText(s_sourcefilename);
File.AppendAllText(s_newfilename, text); s_newfilename = s_filename.Substring(0, (s_filename.Length - 3)) + "csv"; File.Copy(s_report_file_name_temp + s_filename, s_report_file_name_temp + s_newfilename, true);
File.Copy(s_report_file_name_temp + s_filename, s_report_file_name + s_newfilename, true); if (File.Exists(s_report_file_name_temp + s_filename.Substring(0, (s_filename.Length - 3)) + "xls"))
{
File.Delete(s_report_file_name_temp + s_filename.Substring(0, (s_filename.Length - 3)) + "xls");
}//open the Excel application
excelApp = new Microsoft.Office.Interop.Excel.ApplicationClass(); //Set the path of the file that needs to be opened
s_workbookpath = s_report_file_name_temp + s_newfilename; //Open the CSV file
excelWorkbook = excelApp.Workbooks.Open(s_workbookpath,
0,
false,
Type.Missing,//leave the formatting as it is.changing this will cause error.
Type.Missing,
Type.Missing,
true,
Microsoft.Office.Interop.Excel.XlPlatform.xlWindows,
"",
false,
false,
0,
false,
false,
false); //Set the file name to have xls extension.
s_workbookpath = s_report_file_name_temp + s_filename.Substring(0, (s_filename.Length - 3)) + "xls"; //Save the file with the "s_workbookpath" name
excelWorkbook.SaveAs(s_workbookpath,
Type.Missing,
Type.Missing,
Type.Missing,
Type.Missing,
Type.Missing,
Microsoft.Office.Interop.Excel.XlSaveAsAccessMode.xlShared,
Type.Missing,
true,
Type.Missing,
Type.Missing,
Type.Missing); //Copy the saved file to non-temporary location
File.Copy(s_workbookpath, s_report_file_name + s_filename.Substring(0, (s_filename.Length - 3)) + "xls", true); string queryString;
queryString = "exec [PR_SEND_NOC_ESR_FILES] @ATTACHMENTS =";queryString = queryString + "'" + s_report_file_name + s_filename.Substring(0, (s_filename.Length - 3)) + "xls;" + s_report_file_name_temp + s_filename + "'"; //+ ";" + s_report_file_name + "CancelledAbsences\CancelledAbsences.xls'";
//queryString = queryString + "'" + s_report_file_name_temp + s_filename.Substring(0, (s_filename.Length - 3)) + "csv;" + s_report_file_name_temp + s_filename + "'"; //+ ";" + s_report_file_name + "CancelledAbsences\CancelledAbsences.xls'";Dts.Variables["s_sql_send_noc_esr_files"].Value = queryString;
Dts.TaskResult = (int)ScriptResults.Success;
}
catch (Exception e)
{
Dts.Events.FireError(0, String.Empty, e.Message, String.Empty, 0);
Dts.TaskResult = (int)ScriptResults.Failure; }
finally
{
//Cleanup
GC.Collect();
GC.WaitForPendingFinalizers(); //Close the workbook
excelWorkbook.Close(true, s_workbookpath, false);
Marshal.FinalReleaseComObject(excelWorkbook);
excelWorkbook = null;
//Quit the application
excelApp.Quit();
Marshal.FinalReleaseComObject(excelApp);
excelApp = null; }
}
}
}
The above code reads the three text files(Header,Data and Footer) concatenates the files into one file with the extension «.DAT».In the next phase the «.DAT» file is renamed to «.CSV».The last phase is to open the file using Excel and save it as an «.xls» file. I saved the SSIS package and while debugging I obtained an error message which stated «Excel is 32-bit and can’t be run on a 64-bit machine».
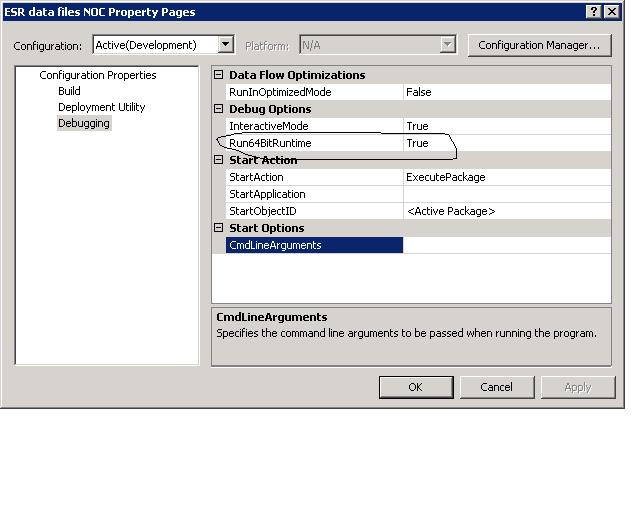
While debugging any SSIS package that uses Excel make sure that the «Run64BitRuntime» setting is always set to false.
One way to do this is Go to the Solution Explorer,right click on the Project and click properties or go to the project Menu click on the Properties option(the last option in the Project Menu) and you will stumble on Property page. Run64BitRuntime needs to be set to false. Refer to the images below.
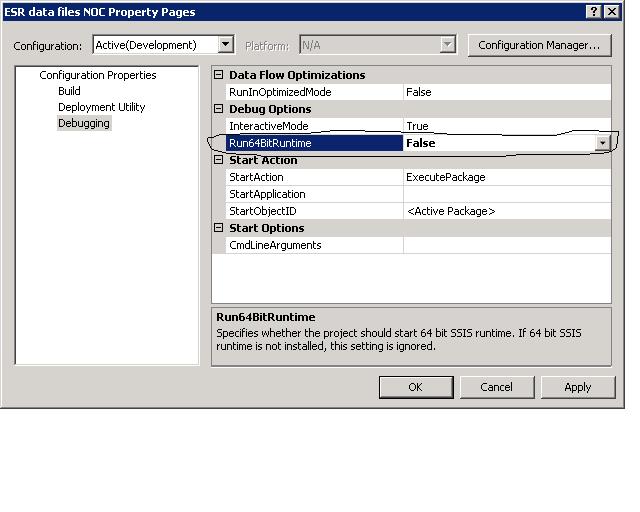
Once this option was set to false the error message didn’t appear. Now when I implemented the SSIS package as a job I had to alter the Execution option to be 32-bit runtime.
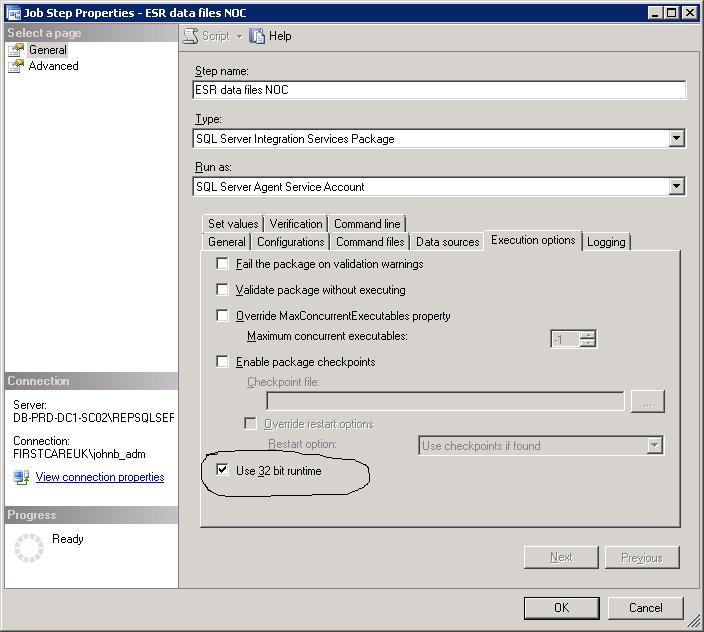
The SSIS package worked fine while I was debugging, so why did it fail when I ran it as a job? I have changed the execution mode to 32-bit still it didn’t work. Why???
I tried various things to get it working but alas I failed miserably. I found out that the Open and Save As commands in C# were the cause of the problem.
//Open the CSV file
 excelWorkbook = excelApp.Workbooks.Open(s_workbookpath,
 0,
 false,
 Type.Missing,//leave the formatting as it is.changing this will cause error.
 Type.Missing,
 Type.Missing,
 true,
 Microsoft.Office.Interop.Excel.XlPlatform.xlWindows,
 "",
 false,
 false,
 0,
 false,
 false,
 false);
//Save the file with the "s_workbookpath" name
 excelWorkbook.SaveAs(s_workbookpath,
 Type.Missing,
 Type.Missing,
 Type.Missing,
 Type.Missing,
 Type.Missing,
 Microsoft.Office.Interop.Excel.XlSaveAsAccessMode.xlShared,
 Type.Missing,
 true,
 Type.Missing,
 Type.Missing,
 Type.Missing);
The solution to this is simple ,in Windows 2008 x64 machine the systemprofile should have a ‘Desktop’ folder (Windows 2003 had such a folder). I created the folder «C:WindowsSysWOW64configsystemprofileDesktop» and after this the job ran without any problems.
Here is a link that discusses the need for creating the Desktop folder in 64-bit Windows 2008: http://social.msdn.microsoft.com/Forums/en/innovateonoffice/thread/b81a3c4e-62db-488b-af06-44421818ef91
Conclusion
Migrating DTS packages that have Excel Automation or use Excel as the source or destination can be tricky. Some of the steps shown here will help overcome few of the issues that one may face while recreating,testing and implementing the SSIS package on a 64-bit Windows 2008 system.
Despite its benefits, SQL Server Integration Services‘ Import Export Wizard has a number of limitations, resulting in part from a new set of rules that eliminate implicit data type conversion mechanisms present in Data Transformation Services. This article discusses a method that addresses such limitations, focusing in particular on importing the content of Excel spreadsheets into SQL Server.
As we have demonstrated in our recent articles covering the most relevant features of Import and Export Wizard (included in the SQL Server 2008 and 2008 R2 Integration Services), its capabilities are quite helpful in simplifying extraction, transformation, and loading tasks. On the other hand, we also pointed out some of its limitations resulting from a new set of rules, (on which its latest version is based) that eliminate implicit data type conversion mechanisms present in Data Transformation Services. This conscious design decision prevents confusion (and, more importantly, a potential data loss) caused by unanticipated (and difficult to control) changes to data types and their characteristics. On the other hand, restricting extent to which the Import and Export Wizard made arbitrary decisions on your behalf is likely to force you to take over some of its former responsibilities, effectively making the process of creating packages more challenging. One of the most common scenarios that pose such challenges involves importing the content of Excel spreadsheets into SQL Server. In this article, we will discuss a method that assists with their resolution.
The underlying reason for such issues is the limited number of data types supported by OLE DB Provider for Jet 4.0, which provides the interface between Excel and SQL Server 2008 Integration Services. In particular, content of individual columns of a spreadsheet (appearing on the left) can be categorized as one of the following SSIS data types (listed on the right):
- Boolean – corresponding to Boolean (DT_BOOL),
- Currency – corresponding to Currency (DT_CY),
- Date/Time – corresponding to Date (DT_DATE),
- Numeric – corresponding to Double-Precision Float (DT_R8),
- Memo – corresponding to Unicode Text Stream (DT_NTEXT) – if the length of column values exceed 255 characters,
- String – corresponding to Unicode String (DT_WSTR) – if the length of column values does not exceed 255 characters.
Note that in the last two cases, character-based entries are always treated as Unicode, which triggers conversion error if you try to copy them directly to a varchar column in a SQL Server-based table. Similarly, attempts to copy String data to nvarchar columns, which size is shorter than 255 characters will generate a validation warning about the possibility of truncation. While you have an option to ignore these warnings (assuming that you are confident that they provide no basis for concern), you will not be able to do use the same approach when it comes to errors.
One way to handle such cases gracefully is to take advantage of Data Conversion Transformation. This component of Data Flow Task is typically automatically added to packages created by Import and Export Wizard when copying data stored in an Excel spreadsheet into a SQL Server 2008-based table (which you can easily determine by saving such packages and viewing them in the Designer interface of Business Intelligence Development Studio). Let’s step through an example that follows this approach.
First, create a sample spreadsheet that will serve as a source of data in our import operation. For the sake of simplicity, we will limit it to two columns with strings of characters shorter than 255 characters each (which, according to our expectations, should be represented as SSIS Unicode String DT_WSTR data type when viewed in Business Intelligence Development Studio). Its content will consist of the following entries:
Fear and Loathing in Las Vegas	Terry Gilliam
The Saragossa Manuscript	Wojciech Hass
Once you have saved them in the spreadsheet, create a target table in an arbitrarily chosen user database (we assume that you are logged on with the dbo privileges). To make our example a bit more interesting, we will define its first column (Title) as varchar and the second one (Director) as nvarchar, with both limited to 100 (respectively, non-Unicode and Unicode) characters. We will accomplish this by executing the following T-SQL statement:
CREATE TABLE [dbo].[TwoThumbsUp](
	[Title][varchar](100) NOT NULL,
	[Director][nvarchar](100) NOT NULL
)ON [PRIMARY]
With both the source Excel spreadsheet (including its data) and target SQL Server-based table in place, invoke a 32-bit version of Import and Export Data Wizard. On the Choose a Data Source page, select Microsoft Excel from the Data source drop-down list and specify the path to the .xlsx file (make sure to clear First row has column names checkbox). On the Choose a Destination page, ensure that SQL Server Native Client 10.0 is designated as the Destination, provide the Server name and Database, and chose an appropriate Authentication method. Accept the Copy data from one or more tables or views option on the Specify Table Copy or Query page, mark checkbox next to the ‘Sheet 1$’ entry in the Source column and assign [dbo.].[TwoThumbsUp] as its Destination. Once you click on Next > command button, you will be given a chance to Review Data Type Mapping. The lower portion of the window you are presented with displays individual entries representing source data columns, along with an action to be carried out during data transfer. As you can easily verify, the first one will be the subject to conversion (as indicated by the marked checkbox in the Convert column). Double-clicking on that entry will provide Column Conversion Details, which in our case, include a change from DT_WSTR to DT_STR SSIS data type. After confirming that this is the desired outcome, you will be given an option to Save SSIS Package (as well as Run it immediately). Select it and pick an arbitrary file system location as its store.
Executing the package should populate the target table ([dbo].[TwoThumbsUp] with two rows of data from the Excel spreadsheet. However, we are primarily interested in the content of our package. To view it, create a new solution in the Business Intelligence Development Studio. Next, use the Add Existing Package option in the context-sensitive menu of the SSIS Packages node displayed in Solution Explorer window to include in the solution the DTSX file saved in the previous step.
Displaying the Designer interface will reveal that the package consists of one SourceConnectionExcel facilitating communication with Excel driver, one DestinationConnectionOLEDB providing connectivity to the SQL Server database hosting the target table, and a single Data Flow Task. If you double-click on it, you will be presented with its content (displayed on the Data Flow tab). You will notice that in addition to the Excel Source and OLE DB Destination components, there is also Data Conversion Transformation, which serves as intermediary between the first two. Its purpose is to implement the data type mapping in a manner that will prevent any potential data loss. Let’s analyze more closely how this is accomplished.
Open Advanced Editor for Source and switch to its Input and Output Properties tab. Under the Excel Source Output node in the Inputs and outputs section of the window, there are two subnodes, labeled respectively External Columns and Output Columns. The first of them represents metadata associated with the content of Excel spreadsheet, while the latter is its internal SSIS representation (you can determine mappings between them by referring to the Column Mappings tab). As you can see, both columns representing our sample data are identified as having Unicode string (DT_WSTR) data type of 255 characters in length (as expected). Now launch the Data Conversion Transformation Editor by selecting the Edit… option from its context sensitive menu (or by using the Show Editor link in its Properties window). Note that in this case, the data type of the first input column is set to string [DT_STR] of length 100 and available as an aliased output column. This effectively eliminates the cause of error messages due to incompatibility between Unicode and non-Unicode characters. You can also view and modify the same setting by launching the Advanced Editor window and switching to its Input and Output Properties tab, where you will locate the DataType entry of the Output Column under the Data Conversion Output node of the Inputs and outputs section. Finally, by opening the Advanced Editor for Destination dialog box and switching to its Column Mappings tab, you will be able to verify that the output column of the Data Conversion Transformation (represented here as one of available input columns) is mapped to the Title destination column.
While we have eliminated the reason for the error, we are still receiving the warning due to a mismatch between lengths of the other column at the source and destination. If you want to get rid of it (assuming you are certain that truncation will not lead to data loss), open the Data Conversion Transformation Editor window, mark the checkbox next to the other entry in the Available Input Columns window (which represents the second column), ensure that Unicode string [DT_WSTR] appears in the Data Type column, and set the value of Length to 100. Close the editor by clicking on the OK button, launch the Advanced Editor for Destination, and switch to its Column Mappings tab. Finally, delete the current mapping to the Director column and assign it to our newly created input column (representing the additional output column of the Data Conversion Transformation).
In our next article, we will demonstrate how the same result can be accomplished by using Derived Column Transformation, as well as discuss other functionality provided by this Data Flow component.
MSDN Data Conversion Transformation
MSDN Data Type Conversion in Expressions
MSDN Connectivity and SQL Server 2005 Integration Services
MSDNConvert Types without Conversion Checking (SQL Server Import and Export Wizard)
» See All Articles by Columnist Marcin Policht

Marcin Policht
Being a long time reader, I’m proud to join the crowd of technology gurus gathered here. I have a fair share of Microsoft exams behind me, a couple of acronyms after my name — MCSE, MCSD, and MCT, decent familiarity with majority of MS BackOffice products (SMS, SQL, Exchange, IIS), programming and scripting languages (VB, C++, VBScript with wsh) and several years of practical experience with Windows environment administration and engineering. My focus these days is on SQL Server and Windows 2000, and I’ll attempt to share the most interesting experiences with these products.
According to Microsoft, we may have these approaches to dump Excel data into SQL Server:
A. Use DTS or SSIS
B. Import vs. Append
SELECT…INTO…FROM syntax
INSERT INTO…SELECT…FROM syntax
Of course, we need to use to use the below method to actually let the excel file accessible by SQL server:
1. Use a Linked Server
e.g. SELECT * INTO XLImport1 FROM EXCELLINK…[Customers$]
e.g. SELECT * INTO XLImport2 FROM OPENQUERY(EXCELLINK,
‘SELECT * FROM [Customers$]’)
2. Use Distributed Queries
In this article, I will concentrate on using distributed queries. The advantage is simple and not depends on a SSIS/DTS package. Moreover, in some case, the Excel file name will be changed daily (e.g. Myfile YYYYMMDD.xlsx), using this method can provide the flexibility on the file name by using program logic.
A: Use «64-Bit OLEDB Provider for ODBC (MSDASQL)»
Since SQL server is 64-bit, but the «Microsoft.Jet.OLEDB.4.0» driver is 32-bit. It is not usable. To use it, we need a native 64-bit dirver
- Go to Microsoft to download the «64-Bit OLEDB Provider for ODBC (MSDASQL)».
- Install the driver.
- You may run the query like this:
SELECT * FROM OPENROWSET(‘MSDASQL’,
‘DRIVER=Microsoft Excel Driver (*.xls, *.xlsx, *.xlsm, *.xlsb);UID=admin;UserCommitSync=Yes;Threads=3;SafeTransactions=0;ReadOnly=1;PageTimeout=5;MaxScanRows=8;MaxBufferSize=2048;FIL=excel 12.0;DriverId=1046;DefaultDir=Y:myfolder;DBQ=Y:myfoldermyexcel.xlsx’, ‘SELECT * FROM [area_list$]’) - For some SQL servers, you may receive the following error:
SQL Server blocked access to STATEMENT ‘OpenRowset/OpenDatasource’ of component ‘Ad Hoc Distributed Queries’ because this component is turned off as part of the security configuration for this server. A system administrator can enable the use of ‘Ad Hoc Distributed Queries’ by using sp_configure. For more information about enabling ‘Ad Hoc Distributed Queries’, see «Surface Area Configuration» in SQL Server Books Online - The default security settings prevent direct access to the file system. In this case, we need to relax the setting:(Please run the below command at SQL one by one:)
sp_configure ‘show advanced options’, 1
reconfigure
sp_configure ‘Ad Hoc Distributed Queries’, 1reconfigureYou will receive the below message which indicates a successful change on the server option:
Configuration option ‘Ad Hoc Distributed Queries’ changed from 0 to 1. Run the RECONFIGURE statement to install.Please re-run sp_configure to make sure the change is effective:

- TODO: The excel driver requires a installation of MS Excel.
B: Use Office 2010 64-bit + Office 2010 Database Engine
- Check if ODBC driver for Excel 2007 has been installed:
- Go to Control Panel — Administrative Tools — Data Sources (ODBC)
- Open «Drivers». Check if Excel 2007 driver has been installed.

- Since the driver is 32 bit, if you are using a 64 bit system, you will need to open the 32-bit ODBC page using the below command:
c:windowssysWOW64odbcad32.exe - If the driver is not found, you need to install ODBC driver for Excel 2007 file (ACE OLEDB Provider). Please download it from Microsoft (2007 Office System Driver: Data Connectivity Components):
ODBC for Office 2007 (32-bit engine only): http://www.microsoft.com/download/en/details.aspx?id=23734
ODBC for Office 2010 (both 32-bit and 64-bit engine): http://www.microsoft.com/download/en/details.aspx?id=13255
SP1 for Office 2010 Database Engine:
http://support.microsoft.com/kb/2460011(You need to have )
- Then we may try to run the below command:
SELECT *
FROM OPENDATASOURCE(‘Microsoft.ACE.OLEDB.12.0’,
‘Data Source=Y:myfile.xlsx;
Extended Properties=Excel 12.0 xml;HDR=YES;’)…[Sheet1$]or
SELECT *
FROM
OPENROWSET(‘Microsoft.ACE.OLEDB.12.0’, ‘Data Source=Y:datamyExcel.xlsx;
Extended Properties=Excel 12.0 xml;HDR=YES’,’select * from [st_list$]’) - For some SQL servers, you may receive the following error:
SQL Server blocked access to STATEMENT ‘OpenRowset/OpenDatasource’ of component ‘Ad Hoc Distributed Queries’ because this component is turned off as part of the security configuration for this server. A system administrator can enable the use of ‘Ad Hoc Distributed Queries’ by using sp_configure. For more information about enabling ‘Ad Hoc Distributed Queries’, see «Surface Area Configuration» in SQL Server Books Online - The default security settings prevent direct access to the file system. In this case, we need to relax the setting:(Please run the below command at SQL one by one:)
sp_configure ‘show advanced options’, 1
reconfigure
sp_configure ‘Ad Hoc Distributed Queries’, 1reconfigureYou will receive the below message which indicates a successful change on the server option:
Configuration option ‘Ad Hoc Distributed Queries’ changed from 0 to 1. Run the RECONFIGURE statement to install.Please re-run sp_configure to make sure the change is effective:

- In some SQL server, when retry with the original SQL statement, we will encounter the below error:
Msg 7399, Level 16, State 1, Line 1
The OLE DB provider «Microsoft.ACE.OLEDB.12.0» for linked server «(null)» reported an error. Access denied.
Msg 7350, Level 16, State 2, Line 1
Cannot get the column information from OLE DB provider «Microsoft.ACE.OLEDB.12.0» for linked server «(null)».
In this case, we might try to use the below command::
USE [master]
GO
EXEC master . dbo. sp_MSset_oledb_prop N’Microsoft.ACE.OLEDB.12.0′ , N’AllowInProcess’ , 1
GO
EXEC master . dbo. sp_MSset_oledb_prop N’Microsoft.ACE.OLEDB.12.0′ , N’DynamicParameters’ , 1
GO - You should be able to access the Excel file.


Skip to content
In this Article, I perform following steps to Import Excel 2007(.xlsx) Sheet into SQL Server 2008.
First: To Import Excel (.xls) to database you need to install Microsoft.Jet.OLEDB.4.0 and for Excel 2007 (.xlsx) need 2007 Office System Driver: Data Connectivity Components. You can download from here.
Step 1: Select Destination Database where you would like to Import Excel 2007 Sheet.
Right click database > Tasks > Select Import data… as shown in following figure.

Step 2: Select “Microsoft Office 12.0 Access Database Engine OLE DB Provider” from data source selection drop down. Click on “Properties…” button as shown in figure.

Step 3: Properties dialog box appears.
Enter Excel 2007 file path in Data source text box. Then Click on “All Tab”.

Step 4: Double Click on “Extended Properties” appears Edit value dialog box.

Step 5: Enter “Excel 12.0” in Property value textbox and click OK button

Step 6: Press Test Connection button to make sure everything is working good.
Finally press OK button.

After that you need to follow usual procedure to import excel sheet data into sql server.
here is my another article Import/Export Excel (.Xlsx) or (.Xls) File into SQL Server Using SQL Query
Thanks.
Leave a Reply