Excel for Microsoft 365 Excel 2021 Excel 2019 Excel 2016 Excel 2013 Excel 2010 Excel 2007 Excel Starter 2010 More…Less
Although you can’t export to Excel directly from a text file or Word document, you can use the Text Import Wizard in Excel to import data from a text file into a worksheet. The Text Import Wizard examines the text file that you are importing and helps you ensure that the data is imported in the way that you want.
Go to the Data tab > Get External Data > From Text. Then, in the Import Text File dialog box, double-click the text file that you want to import, and the Text Import Wizard dialog will open.
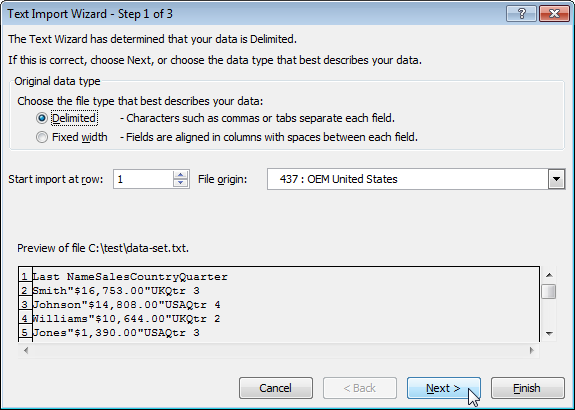
Step 1 of 3
Original data type If items in the text file are separated by tabs, colons, semicolons, spaces, or other characters, select Delimited. If all of the items in each column are the same length, select Fixed width.
Start import at row Type or select a row number to specify the first row of the data that you want to import.
File origin Select the character set that is used in the text file. In most cases, you can leave this setting at its default. If you know that the text file was created by using a different character set than the character set that you are using on your computer, you should change this setting to match that character set. For example, if your computer is set to use character set 1251 (Cyrillic, Windows), but you know that the file was produced by using character set 1252 (Western European, Windows), you should set File Origin to 1252.
Preview of file This box displays the text as it will appear when it is separated into columns on the worksheet.
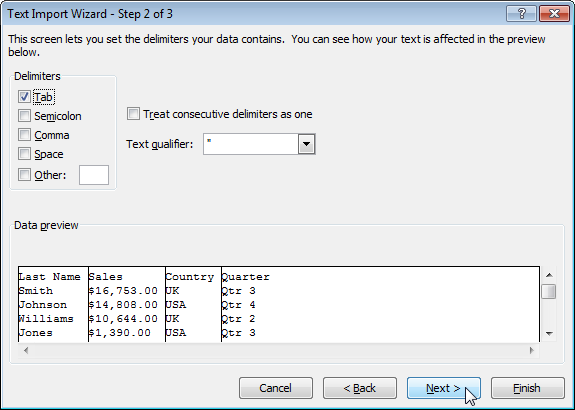
Step 2 of 3 (Delimited data)
Delimiters Select the character that separates values in your text file. If the character is not listed, select the Other check box, and then type the character in the box that contains the cursor. These options are not available if your data type is Fixed width.
Treat consecutive delimiters as one Select this check box if your data contains a delimiter of more than one character between data fields or if your data contains multiple custom delimiters.
Text qualifier Select the character that encloses values in your text file. When Excel encounters the text qualifier character, all of the text that follows that character and precedes the next occurrence of that character is imported as one value, even if the text contains a delimiter character. For example, if the delimiter is a comma (,) and the text qualifier is a quotation mark («), «Dallas, Texas» is imported into one cell as Dallas, Texas. If no character or the apostrophe (‘) is specified as the text qualifier, «Dallas, Texas» is imported into two adjacent cells as «Dallas and Texas».
If the delimiter character occurs between text qualifiers, Excel omits the qualifiers in the imported value. If no delimiter character occurs between text qualifiers, Excel includes the qualifier character in the imported value. Hence, «Dallas Texas» (using the quotation mark text qualifier) is imported into one cell as «Dallas Texas».
Data preview Review the text in this box to verify that the text will be separated into columns on the worksheet as you want it.
Step 2 of 3 (Fixed width data)
Data preview Set field widths in this section. Click the preview window to set a column break, which is represented by a vertical line. Double-click a column break to remove it, or drag a column break to move it.
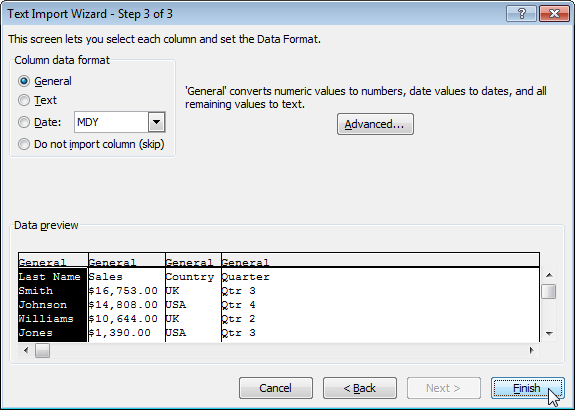
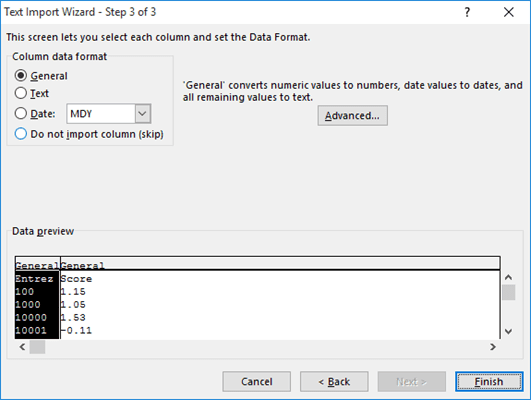
Step 3 of 3
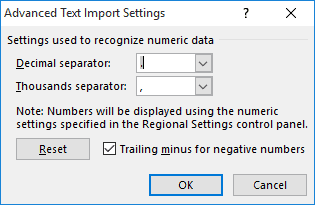
Click the Advanced button to do one or more of the following:
-
Specify the type of decimal and thousands separators that are used in the text file. When the data is imported into Excel, the separators will match those that are specified for your location in Regional and Language Options or Regional Settings (Windows Control Panel).
-
Specify that one or more numeric values may contain a trailing minus sign.
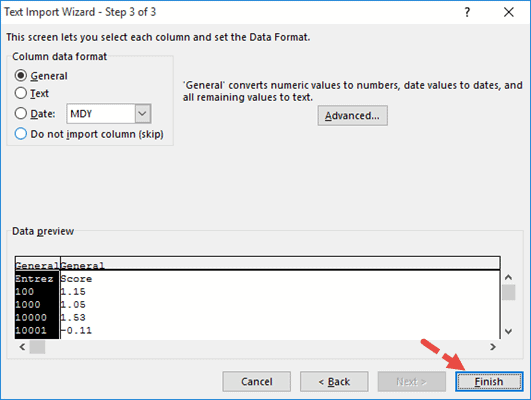
Column data format Click the data format of the column that is selected in the Data preview section. If you do not want to import the selected column, click Do not import column (skip).
After you select a data format option for the selected column, the column heading under Data preview displays the format. If you select Date, select a date format in the Date box.
Choose the data format that closely matches the preview data so that Excel can convert the imported data correctly. For example:
-
To convert a column of all currency number characters to the Excel Currency format, select General.
-
To convert a column of all number characters to the Excel Text format, select Text.
-
To convert a column of all date characters, each date in the order of year, month, and day, to the Excel Date format, select Date, and then select the date type of YMD in the Date box.
Excel will import the column as General if the conversion could yield unintended results. For example:
-
If the column contains a mix of formats, such as alphabetical and numeric characters, Excel converts the column to General.
-
If, in a column of dates, each date is in the order of year, month, and date, and you select Date along with a date type of MDY, Excel converts the column to General format. A column that contains date characters must closely match an Excel built-in date or custom date formats.
If Excel does not convert a column to the format that you want, you can convert the data after you import it.
-
Convert numbers stored as text to numbers
-
Convert dates stored as text to dates
-
TEXT function
-
VALUE function
When you have selected the options you want, click Finish to open the Import Data dialog and choose where to place your data.
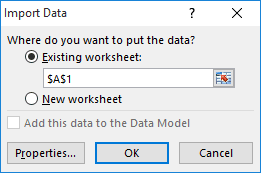
Import Data
Set these options to control how the data import process runs, including what data connection properties to use and what file and range to populate with the imported data.
-
The options under Select how you want to view this data in your workbook are only available if you have a Data Model prepared and select the option to add this import to that model (see the third item in this list).
-
Specify a target workbook:
-
If you choose Existing Worksheet, click a cell in the sheet to place the first cell of imported data, or click and drag to select a range.
-
Choose New Worksheet to import into a new worksheet (starting at cell A1)
-
-
If you have a Data Model in place, click Add this data to the Data Model to include this import in the model. For more information, see Create a Data Model in Excel.
Note that selecting this option unlocks the options under Select how you want to view this data in your workbook.
-
Click Properties to set any External Data Range properties you want. For more information, see Manage external data ranges and their properties.
-
Click OK when you’re ready to finish importing your data.
Notes: The Text Import Wizard is a legacy feature, which may need to be enabled. If you haven’t already done so, then:
-
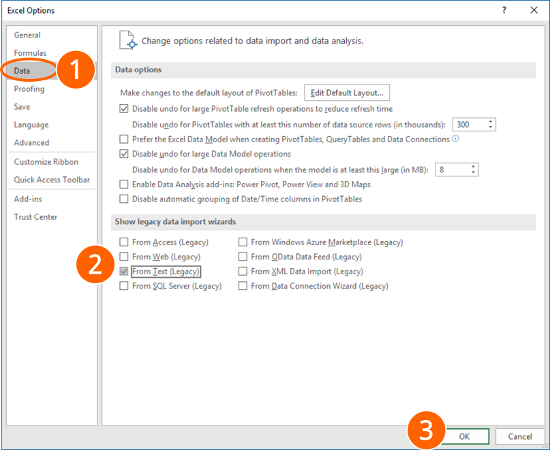
Click File > Options > Data.
-
Under Show legacy data import wizards, select From Text (Legacy).
Once enabled, go to the Data tab > Get & Transform Data > Get Data > Legacy Wizards > From Text (Legacy). Then, in the Import Text File dialog box, double-click the text file that you want to import, and the Text Import Wizard will open.
Step 1 of 3
Original data type If items in the text file are separated by tabs, colons, semicolons, spaces, or other characters, select Delimited. If all of the items in each column are the same length, select Fixed width.
Start import at row Type or select a row number to specify the first row of the data that you want to import.
File origin Select the character set that is used in the text file. In most cases, you can leave this setting at its default. If you know that the text file was created by using a different character set than the character set that you are using on your computer, you should change this setting to match that character set. For example, if your computer is set to use character set 1251 (Cyrillic, Windows), but you know that the file was produced by using character set 1252 (Western European, Windows), you should set File Origin to 1252.
Preview of file This box displays the text as it will appear when it is separated into columns on the worksheet.
Step 2 of 3 (Delimited data)
Delimiters Select the character that separates values in your text file. If the character is not listed, select the Other check box, and then type the character in the box that contains the cursor. These options are not available if your data type is Fixed width.
Treat consecutive delimiters as one Select this check box if your data contains a delimiter of more than one character between data fields or if your data contains multiple custom delimiters.
Text qualifier Select the character that encloses values in your text file. When Excel encounters the text qualifier character, all of the text that follows that character and precedes the next occurrence of that character is imported as one value, even if the text contains a delimiter character. For example, if the delimiter is a comma (,) and the text qualifier is a quotation mark («), «Dallas, Texas» is imported into one cell as Dallas, Texas. If no character or the apostrophe (‘) is specified as the text qualifier, «Dallas, Texas» is imported into two adjacent cells as «Dallas and Texas».
If the delimiter character occurs between text qualifiers, Excel omits the qualifiers in the imported value. If no delimiter character occurs between text qualifiers, Excel includes the qualifier character in the imported value. Hence, «Dallas Texas» (using the quotation mark text qualifier) is imported into one cell as «Dallas Texas».
Data preview Review the text in this box to verify that the text will be separated into columns on the worksheet as you want it.
Step 2 of 3 (Fixed width data)
Data preview Set field widths in this section. Click the preview window to set a column break, which is represented by a vertical line. Double-click a column break to remove it, or drag a column break to move it.
Step 3 of 3
Click the Advanced button to do one or more of the following:
-
Specify the type of decimal and thousands separators that are used in the text file. When the data is imported into Excel, the separators will match those that are specified for your location in Regional and Language Options or Regional Settings (Windows Control Panel).
-
Specify that one or more numeric values may contain a trailing minus sign.
Column data format Click the data format of the column that is selected in the Data preview section. If you do not want to import the selected column, click Do not import column (skip).
After you select a data format option for the selected column, the column heading under Data preview displays the format. If you select Date, select a date format in the Date box.
Choose the data format that closely matches the preview data so that Excel can convert the imported data correctly. For example:
-
To convert a column of all currency number characters to the Excel Currency format, select General.
-
To convert a column of all number characters to the Excel Text format, select Text.
-
To convert a column of all date characters, each date in the order of year, month, and day, to the Excel Date format, select Date, and then select the date type of YMD in the Date box.
Excel will import the column as General if the conversion could yield unintended results. For example:
-
If the column contains a mix of formats, such as alphabetical and numeric characters, Excel converts the column to General.
-
If, in a column of dates, each date is in the order of year, month, and date, and you select Date along with a date type of MDY, Excel converts the column to General format. A column that contains date characters must closely match an Excel built-in date or custom date formats.
If Excel does not convert a column to the format that you want, you can convert the data after you import it.
-
Convert numbers stored as text to numbers
-
Convert dates stored as text to dates
-
TEXT function
-
VALUE function
When you have selected the options you want, click Finish to open the Import Data dialog and choose where to place your data.
Import Data
Set these options to control how the data import process runs, including what data connection properties to use and what file and range to populate with the imported data.
-
The options under Select how you want to view this data in your workbook are only available if you have a Data Model prepared and select the option to add this import to that model (see the third item in this list).
-
Specify a target workbook:
-
If you choose Existing Worksheet, click a cell in the sheet to place the first cell of imported data, or click and drag to select a range.
-
Choose New Worksheet to import into a new worksheet (starting at cell A1)
-
-
If you have a Data Model in place, click Add this data to the Data Model to include this import in the model. For more information, see Create a Data Model in Excel.
Note that selecting this option unlocks the options under Select how you want to view this data in your workbook.
-
Click Properties to set any External Data Range properties you want. For more information, see Manage external data ranges and their properties.
-
Click OK when you’re ready to finish importing your data.
Note: If your data is in a Word document, you must first save it as a text file. Click File > Save As, and choose Plain Text (.txt) as the file type.
Need more help?
You can always ask an expert in the Excel Tech Community or get support in the Answers community.
See Also
Introduction to Microsoft Power Query for Excel
Need more help?
Want more options?
Explore subscription benefits, browse training courses, learn how to secure your device, and more.
Communities help you ask and answer questions, give feedback, and hear from experts with rich knowledge.
Excel для Microsoft 365 Excel 2021 Excel 2019 Excel 2016 Excel 2013 Excel 2010 Excel 2007 Excel Starter 2010 Еще…Меньше
Хотя вы не можете экспортировать данные в Excel текстового файла или документа Word, вы можете импортировать данные из текстового файла на Excel с помощью мастера импорта текста в word. Мастер импорта текста проверяет импортируемый текстовый файл и гарантирует, что данные будут импортироваться нужным образом.
Примечание: Мастер импорта текста — это устаревшая функция, которая по-прежнему поддерживается для обеспечения совместимости с текстом. Кроме того, вы можете импортировать текстовый файл, подключившиськ ним с помощью Power Query.
Перейдите на вкладку Данные и > Внешние данные > из текста. Затем в диалоговом окне Импорт текстового файла дважды щелкните текстовый файл, который вы хотите импортировать, и откроется диалоговое окно Мастер импорта текста.
Шаг 1 из 3
Исходный тип данных Если элементы текстового файла разделены знаками табули, двоеточиями, за двоеточиями, пробелами или другими символами, выберите разделимы. Если все элементы в каждом столбце имеют одинаковые длину, выберите Фиксированная ширина.
Начало импорта в строке Введите или выберите номер строки, чтобы указать первую строку данных, которые нужно импортировать.
Источник файла Выберите набор символов, используемый в текстовом файле. В большинстве случаев этот параметр можно оставить по умолчанию. Если вы знаете, что текстовый файл был создан с использованием не того набора символов, который используется на компьютере, необходимо изменить этот параметр в зависимости от набора символов. Например, если на компьютере установлен набор символов 1251 (кириллица, Windows), но известно, что файл был произведен с использованием набора символов 1252 (западноевропейский, Windows), необходимо установить для файла 1252.
Предварительный просмотр файла В этом поле текст будет отображаться так, как он будет отображаться при разделении на столбцы на этом сайте.
Шаг 2 из 3 (данные с делегами)
Разделители Выберите знак, который разделяет значения в текстовом файле. Если символа нет в списке, выберите другой и введите символ в поле, содержа которое содержит курсор. Эти параметры недоступны, если ваш тип данных имеет тип Фиксированная ширина.
Обрабатывать последовательные седиметры как один Если данные содержат несколько символов между полями данных или данные содержат несколько настраиваемого разного знака, выберите этот вариант.
Квалификатор текста Вы можете выбрать символ, который должен быть заключен в текстовый файл. При Excel знака квалификатора текста весь текст, следующий за ним и предшествующий следующему вхождению этого знака, импортируется как одно значение, даже если текст содержит знак с замещением. Например, если в качестве запятой является запятая (,), а квалификатор текста — кавычка («), «Даллас, Штат» импортируется в одну ячейку, например Даллас,штат Техас. Если в качестве квалификатора текста не указан символ или апостроф (‘), «Даллас, Штат» импортируется в две смежные ячейки, например «Даллас и Техас».
Если между текстовыми квалификаторами есть знак с Excel, Excel опустить квалификаторы в импортируемом значении. Если между текстовыми квалификаторами нет знака Excel квалификатор включается в импортируемом значении. Следовательно, «Даллас, Техас» (с помощью квалификатора текста кавычка) импортируется в одну ячейку с искомым названием «Даллас Штата».
Предварительный просмотр данных Просмотрите текст в этом поле, чтобы убедиться, что текст будет разделен на столбцы на нужном вам поле.
Шаг 2 из 3 (данные фиксированной ширины)
Предварительный просмотр данных Установите ширину полей в этом разделе. Щелкните окно предварительного просмотра, чтобы установить разрыв столбца, который представлен вертикальной линией. Дважды щелкните разрыв столбца, чтобы удалить его, или перетащите разрыв столбца, чтобы переместить его.
Шаг 3 из 3
Нажмите кнопку «Дополнительные», чтобы сделать следующее:
-
Укажите тип десятичных и тысячных сепараторов, используемых в текстовом файле. При импорте данных в Excel будут совпадать с теми, которые указаны в параметрах языка и региональных параметров или региональных Параметры (Windows панели управления).
-
Укажите, что одно или несколько числных значений могут содержать знак «минус».
Формат данных столбца Выберите формат данных столбца, выбранного в разделе Предварительный просмотр данных. Если вы не хотите импортировать выбранный столбец, выберите не импортировать столбец (пропустить).
После выбора формата данных для выбранного столбца в заголовке столбца в области Предварительный просмотр данных отображается формат. Если вы выбрали Дата, выберите формат даты в поле Дата.
Выберите формат данных, который полностью соответствует предварительным данным, Excel правильно преобразовать импортируемые данные. Например:
-
Чтобы преобразовать столбец всех номеров валюты в формат Excel, выберите Общий.
-
Чтобы преобразовать столбец со всеми числами знаков в формат Excel текст, выберите Текстовый.
-
Чтобы преобразовать столбец всех знаков даты, каждой даты в порядке года, месяца и дня, в формат даты Excel, выберите Дата ,а затем в поле Дата выберите тип ДАТЫ.
Excel импортировать столбец как общий, если преобразование может привести к непредвиденным результатам. Например:
-
Если столбец содержит сочетание форматов, таких как буквы и цифры, Excel преобразует столбец в общий.
-
Если в столбце дат каждая дата упорядочена по году, месяцу и дате, а вы выбрали Date вместе с типом даты MDY,Excel преобразует столбец в общий формат. Столбец, содержащий символы даты, должен полностью соответствовать Excel или пользовательским форматам даты.
Если Excel не преобразует столбец в нужный формат, вы можете преобразовать данные после импорта.
-
Преобразование чисел из текстового формата в числовой
-
Преобразование дат из текстового формата в формат даты
-
ТЕКСТ
-
ЗНАЧЕН
Выбрав нужные параметры, нажмите кнопку Готово, чтобы открыть диалоговое окно Импорт данных и выберите место для хранения данных.
Импорт данных
Эти параметры можно настроить для управления процессом импорта данных, включая свойства подключения к данным, а также файл и диапазон для заполнения импортируемыми данными.
-
Параметры в списке Выберите способ просмотра этих данных в книге доступны только в том случае, если у вас подготовлена модель данных, и вы можете добавить этот импорт в эту модель (см. третий элемент в этом списке).
-
Укажите целевую книгу:
-
Если вы выбрали ВариантНа существующий лист, щелкните ячейку на листе, чтобы разместить первую ячейку импортируемых данных, или щелкните и перетащите, чтобы выбрать диапазон.
-
Выберите элемент «Новый таблица», чтобы импортировать его на новый (начиная с ячейки A1)
-
-
Если у вас есть модель данных, щелкните Добавить эти данные в модель данных, чтобы включить этот импорт в модель. Дополнительные сведения см. в статье Создание модели данных в Excel.
Обратите внимание, что при выборе этого параметра параметры в области Выберите способ просмотра данных в книге будут разблокированы.
-
Нажмите кнопку Свойства, чтобы настроить нужные свойства диапазона внешних данных. Дополнительные сведения см. в управлении диапазонами внешних данных и их свойствами.
-
Когда вы будете готовы завершить импорт данных, нажмите кнопку ОК.
Примечания: Мастер импорта текста — это устаревшая функция, которую может потребоваться включить. Если вы еще не сделали этого, то:
-
Щелкните Параметры > > данных.
-
В области Показать устаревшие мастеры импорта данныхвыберите Из текста (устаревшие).
После включения перейдите на вкладку Данные > Получить & Transform Data > Get Data > Legacy Wizards > From Text (Legacy). Затем в диалоговом окне Импорт текстового файла дважды щелкните текстовый файл, который нужно импортировать, и откроется мастер импорта текста.
Шаг 1 из 3
Исходный тип данных Если элементы текстового файла разделены знаками табули, двоеточиями, за двоеточиями, пробелами или другими символами, выберите разделимы. Если все элементы в каждом столбце имеют одинаковые длину, выберите Фиксированная ширина.
Начало импорта в строке Введите или выберите номер строки, чтобы указать первую строку данных, которые нужно импортировать.
Источник файла Выберите набор символов, используемый в текстовом файле. В большинстве случаев этот параметр можно оставить по умолчанию. Если вы знаете, что текстовый файл был создан с использованием не того набора символов, который используется на компьютере, необходимо изменить этот параметр в зависимости от набора символов. Например, если на компьютере установлен набор символов 1251 (кириллица, Windows), но известно, что файл был произведен с использованием набора символов 1252 (западноевропейский, Windows), необходимо установить для файла 1252.
Предварительный просмотр файла В этом поле текст будет отображаться так, как он будет отображаться при разделении на столбцы на этом сайте.
Шаг 2 из 3 (данные с делегами)
Разделители Выберите знак, который разделяет значения в текстовом файле. Если символа нет в списке, выберите другой и введите символ в поле, содержа которое содержит курсор. Эти параметры недоступны, если ваш тип данных имеет тип Фиксированная ширина.
Обрабатывать последовательные седиметры как один Если данные содержат несколько символов между полями данных или данные содержат несколько настраиваемого разного знака, выберите этот вариант.
Квалификатор текста Вы можете выбрать символ, который должен быть заключен в текстовый файл. При Excel знака квалификатора текста весь текст, следующий за ним и предшествующий следующему вхождению этого знака, импортируется как одно значение, даже если текст содержит знак с замещением. Например, если в качестве запятой является запятая (,), а квалификатор текста — кавычка («), «Даллас, Штат» импортируется в одну ячейку, например Даллас,штат Техас. Если в качестве квалификатора текста не указан символ или апостроф (‘), «Даллас, Штат» импортируется в две смежные ячейки, например «Даллас и Техас».
Если между текстовыми квалификаторами есть знак с Excel, Excel опустить квалификаторы в импортируемом значении. Если между текстовыми квалификаторами нет знака Excel квалификатор включается в импортируемом значении. Следовательно, «Даллас, Техас» (с помощью квалификатора текста кавычка) импортируется в одну ячейку с искомым названием «Даллас Штата».
Предварительный просмотр данных Просмотрите текст в этом поле, чтобы убедиться, что текст будет разделен на столбцы на нужном вам поле.
Шаг 2 из 3 (данные фиксированной ширины)
Предварительный просмотр данных Установите ширину полей в этом разделе. Щелкните окно предварительного просмотра, чтобы установить разрыв столбца, который представлен вертикальной линией. Дважды щелкните разрыв столбца, чтобы удалить его, или перетащите разрыв столбца, чтобы переместить его.
Шаг 3 из 3
Нажмите кнопку «Дополнительные», чтобы сделать следующее:
-
Укажите тип десятичных и тысячных сепараторов, используемых в текстовом файле. При импорте данных в Excel будут совпадать с теми, которые указаны в параметрах языка и региональных параметров или региональных Параметры (Windows панели управления).
-
Укажите, что одно или несколько числных значений могут содержать знак «минус».
Формат данных столбца Выберите формат данных столбца, выбранного в разделе Предварительный просмотр данных. Если вы не хотите импортировать выбранный столбец, выберите не импортировать столбец (пропустить).
После выбора формата данных для выбранного столбца в заголовке столбца в области Предварительный просмотр данных отображается формат. Если вы выбрали Дата, выберите формат даты в поле Дата.
Выберите формат данных, который полностью соответствует предварительным данным, Excel правильно преобразовать импортируемые данные. Например:
-
Чтобы преобразовать столбец всех номеров валюты в формат Excel, выберите Общий.
-
Чтобы преобразовать столбец со всеми числами знаков в формат Excel текст, выберите Текстовый.
-
Чтобы преобразовать столбец всех знаков даты, каждой даты в порядке года, месяца и дня, в формат даты Excel, выберите Дата ,а затем в поле Дата выберите тип ДАТЫ.
Excel импортировать столбец как общий, если преобразование может привести к непредвиденным результатам. Например:
-
Если столбец содержит сочетание форматов, таких как буквы и цифры, Excel преобразует столбец в общий.
-
Если в столбце дат каждая дата упорядочена по году, месяцу и дате, а вы выбрали Date вместе с типом даты MDY,Excel преобразует столбец в общий формат. Столбец, содержащий символы даты, должен полностью соответствовать Excel или пользовательским форматам даты.
Если Excel не преобразует столбец в нужный формат, вы можете преобразовать данные после импорта.
-
Преобразование чисел из текстового формата в числовой
-
Преобразование дат из текстового формата в формат даты
-
ТЕКСТ
-
ЗНАЧЕН
Выбрав нужные параметры, нажмите кнопку Готово, чтобы открыть диалоговое окно Импорт данных и выберите место для хранения данных.
Импорт данных
Эти параметры можно настроить для управления процессом импорта данных, включая свойства подключения к данным, а также файл и диапазон для заполнения импортируемыми данными.
-
Параметры в списке Выберите способ просмотра этих данных в книге доступны только в том случае, если у вас подготовлена модель данных, и вы можете добавить этот импорт в эту модель (см. третий элемент в этом списке).
-
Укажите целевую книгу:
-
Если выбрать на существующемлисте , щелкните ячейку на листе, чтобы разместить первую ячейку импортируемых данных, или щелкните и перетащите, чтобы выбрать диапазон.
-
Выберите элемент «Новый таблица», чтобы импортировать его на новый (начиная с ячейки A1)
-
-
Если у вас есть модель данных, щелкните Добавить эти данные в модель данных, чтобы включить этот импорт в модель. Дополнительные сведения см. в статье Создание модели данных в Excel.
Обратите внимание, что при выборе этого параметра параметры в области Выберите способ просмотра данных в книге будут разблокированы.
-
Нажмите кнопку Свойства, чтобы настроить нужные свойства диапазона внешних данных. Дополнительные сведения см. в управлении диапазонами внешних данных и их свойствами.
-
Когда вы будете готовы завершить импорт данных, нажмите кнопку ОК.
Примечание: Если данные есть в документе Word, сначала сохраните их в виде текстового файла. Щелкните Файл > сохранить каки выберите тип файла .txt (обычный текст).
Дополнительные сведения
Вы всегда можете задать вопрос специалисту Excel Tech Community или попросить помощи в сообществе Answers community.
См. также
Общие сведения о Microsoft Power Query для Excel
Нужна дополнительная помощь?
Skip to content
![]()
Microsoft quietly replaced the comfortable Text Import Wizard from Excel and replaced it with the “Get & Transform” tools. The “Get & Transform” tools offer a lot of options and are very powerful. Unfortunately, they are quite complicated to use. Here is what you should now.
In a hurry? Click on “File” –> “Options” –> “Data” and set the corresponding checkmarks for reactivating the “Text Import Wizard” in Excel. Start the text import by clicking on “Data” –>”Get Data” –> “Legacy Wizards” –> “From Text (Legacy)”.
Introduction
In Excel 365 (only) 2016 (since version 1704) the “Text Import Wizard” was removed. It was replaced by the powerful “Get & Transform” tools. The “Get & Transform” tools also provide a function to import text and CSV files into Excel.
You have the following two options:
- Luckily, the comfortably “Text Import Wizard” still exists. You can re-activate and use it for importing text and csv files into Excel.
- Use the import function of the “Get & Transform” tools.
Restore the “Text Import Wizard”
The good news: You can easily restore the “Text Import Wizard”. Unfortunately, the option for re-activating them is hidden.
Follow these steps:
- Click on File and then on “Options”. Go to “Data” on the left-hand side.
- In the lower section of the window you can select the wizard you’d like to restore. For only importing text- or csv-files, select “From Text (Legacy)”. Feel free to also activate the corresponding wizard for importing Access files, files from web, from SQL servers and so on.
- Confirm with OK.
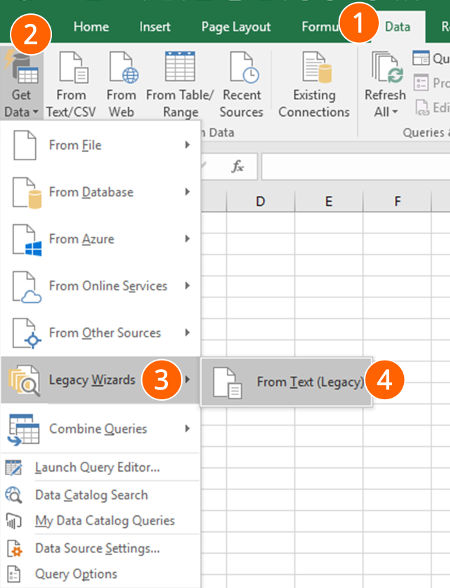
Now, you can find the so-called “Legacy Wizards” in the “Get Data” drop-down menu. In order to use them, follow these steps:
- Go to the “Data” ribbon.
- Click on “Get Data” on the left-hand side.
- Next, go to “Legacy Wizards”.
- Click on “From Text (Legacy)”.
How to use the “Text Import Wizard”
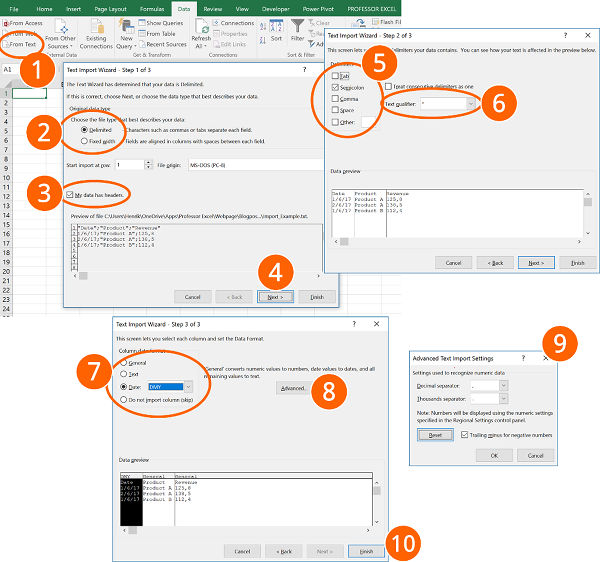
The steps for using the “Text Import Wizard” in Excel are shown in the screenshots.
- Go to the “Data” ribbon and click on “From Text”. If you have a recent Excel version and there is no button called “From Text” (but instead “From Text/CSV”), click on “Get Data”, then on “Legacy Wizards” and then on “From Text (Legacy)”. Please refer to the paragraph above if this option is missing.
- Select how you want to define the columns: Either with a character as a separator or with a fixed width.
- If the first row contains headers, check the corresponding box.
- Continue with “Next >”.
- Select the delimiter. This is the character dividing the data into columns, for example “Tab”, “Semicolon” or “Comma”.
- Usually text fields use quotation marks marking the beginning and end of a text field.
- For each column, you can choose the data format. For dates, you could define the order of days, months and years.
- Click on “Advanced”…
- …for defining decimals and thousands separators.
- Finalize the import by clicking on “Finish”.
Import text and csv files with the “Get & Transform” tools
Importing text files in Excel with the “Get & Transform” tools requires many steps. Please refer to the numbers on the screenshots:
- Click on “From Text/CSV” on the “Data” ribbon in order to start the import process.
- Choose the delimiter (e.g. semi-colon, comma etc.). Here you can also switch to “Fixed Width”. If you want to separate your import data with the “Fixed Width” option, you have to type the numbers of characters, after which you want to data to be divided.
- For further options (e.g. switching thousands- and decimal separators) click on “Edit”.
- If you data is not represented correctly, delete the automatically created step “Changed Type”.
- Change the date format: Right-click on a column that contains a date. Alternatively click on the small “ABC” symbol in the top left corner of the column heading.
- Move the mouse to “Change Type”.
- Click on “Using Locale…”.
- Select “Date”.
- Select the locale format for dates. In this example, the German date format is used.
- Confirm with OK. Repeat the steps 5 to 10 for each date column.
Recommendation: Select several date columns at the same time by pressing and holding the Ctrl key while selecting the columns. - Change the decimal and thousand separators: Right-click again on a column with decimal numbers.
- Move the mouse to “Change Type”.
- Click on “Using Local…”.
- Choose “Decimal Number”.
- Select the local number format. Please refer to this article for a list of local number formats.
- Confirm with “OK”.
- Last step: Insert the data into a worksheet. In order to achieve this, click on “Close & Load” in the top-left corner.

Henrik Schiffner is a freelance business consultant and software developer. He lives and works in Hamburg, Germany. Besides being an Excel enthusiast he loves photography and sports.
We use cookies on our website to give you the most relevant experience by remembering your preferences and repeat visits. By clicking “Accept”, you consent to the use of ALL the cookies.
.
Перейти к содержанию
На чтение 2 мин Опубликовано 21.06.2015
- Импорт
- Экспорт
Эта статья описывает, как импортировать или экспортировать текстовые файлы. Текстовые файлы могут быть разделены запятыми (.csv) или знаками табуляции (.txt).
Импорт
Чтобы импортировать текстовые файлы, следуйте нашей инструкции:
- На вкладке File (Файл) кликните Open (Открыть).
- Из выпадающего списка выберите Text Files (Текстовые файлы).

- Чтобы импортировать файл …
- CSV, выберите документ с расширением .csv и нажмите кнопку Open (Открыть). Это всё.
- TXT, выберите документ с расширением .txt и кликните по Open (Открыть). Excel запустит Text Import Wizard (Мастер текстов (импорт)).
- Выберите Delimited (С разделителями) и нажмите Next (Далее).
- Уберите все галочки кроме той, что напротив Tab (Знак табуляции) и кликните Next (Далее).
- Нажмите Finish (Готово).
Результат:

Экспорт
Чтобы экспортировать книгу Excel в текстовый файл, сделайте следующее:
- Откройте документ Excel.
- На вкладке File (Файл) нажмите Save As (Сохранить как).
- Из выпадающего списка выберите Text (Tab delimited) (Текстовые файлы (с разделителями табуляции)) или CSV (Comma delimited) (CSV (разделители – запятые)).
- Нажмите Save (Сохранить).
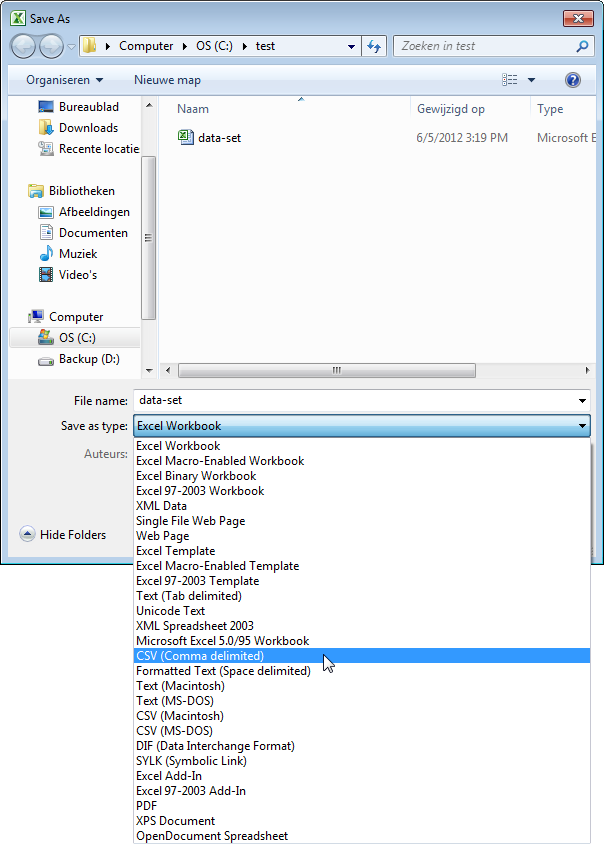
Результат: CSV файл (разделенный запятыми) и TXT файл (разделённый знаками табуляции).

Оцените качество статьи. Нам важно ваше мнение:
In the last section, you saw how to do a basic text import. The Text Import Wizard offers a lot of options to customize this type of import. You can specify how you’d your text data to be imported, minimizing the amount of cleanup that you need to do on the data.
In this section, we’ll use Ideal_Gas_Property_Data.txt as the data source. Go to Data > Get External Data > From Text, and open that file. The first window of the Text Import Wizard will open.
There are two main types of data files that you’ll import into Excel. Delimited files have a character separating the columns (i.e. a tab stop). Fixed width files have a specific number of characters in each column.
First, we’ll see how this data looks with the Delimited option. Choose it, then click Next.
Delimiters can be virtually any character. Tab, comma and space are the most common. The tab character is selected by default. However, in the preview window, there are no black lines separating the column – this tells us that Excel hasn’t found any tab delimiters. Unselect Tab, and choose Space. Now, black lines will appear between the columns:
Excel recognizes that the columns of data are separated by spaces. It automatically checks the box for “Treat consecutive delimiters as one.” In this text file, there are multiple spaces between the columns of data. If this box was not checked, each space would indicate a new column.
Click Next, then Finish. Choose a location on the worksheet to store the data and click OK.
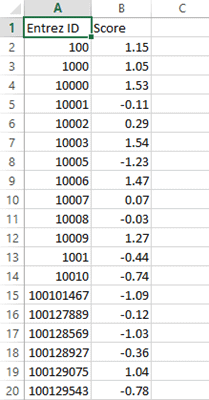
Viewing the data in the spreadsheet exposes a flaw in selecting the space delimiting option. Gas names such as “carbon dioxide” and “carbon monoxide” are composed of two words separated by a space. Excel interprets this space as a column separator, so those rows have an extra column and all of the data is shifted:
Although we could manually clean up the data, those changes would be lost if the data were refreshed.
Instead, we’ll choose better options in the Text Import Wizard. Right-click on the data and select Edit Text Import.
Next, double-click on the file Ideal_Gas_Property_Data.txt.
This time, instead of the Delimited option, choose Fixed width. Click Next. Excel will automatically determine where the columns should be, and places break lines as separators between them. To move a break line, click and drag it to a new position.
You can also add or remove break lines. To add one, click at the top of the preview window, below the ruler (where the arrowheads are showing for the existing break lines). To delete one, double-click on it, or drag it away from the preview window.
Don’t worry about any excess spaces before or after an entry. Excel will clean those up. Just adjust the break lines so that each column includes all of the intended data. In this case, the defaults are fine. Click Next.
The third window of the Text Import Wizard contains options to set a data format for each column. The General format is appropriate for most data. It treats numeric values as numbers, date values as dates, and everything else as text. You can also specify a date or text format. Click each column in the preview window and set its type.
You also have the option of omitting columns. Sometimes, data files contain more information than you need. You can select any of these columns and choose Do not import column (skip) to remove it from the data table. For example, if you only need the columns containing the gas name and the constant pressure specific heat, you can remove the other columns. Select the Formula column, then click Do not import column (skip). The header will change from “General” to “Skip Column” (see the headers in the image below). Repeat for the other unnecessary columns.
Click Finish, and you’ll have a table containing only the pertinent data, with no additional cleanup required.
Содержание
- Import or export text (.txt or .csv) files
- Import a text file by opening it in Excel
- Import a text file by connecting to it (Power Query)
- Export data to a text file by saving it
- Import a text file by connecting to it
- Export data to a text file by saving it
- Need more help?
- Import or export text (.txt or .csv) files
- Import a text file by opening it in Excel
- Import a text file by connecting to it (Power Query)
- Export data to a text file by saving it
- Import a text file by connecting to it
- Export data to a text file by saving it
- Need more help?
Import or export text (.txt or .csv) files
There are two ways to import data from a text file with Excel: you can open it in Excel, or you can import it as an external data range. To export data from Excel to a text file, use the Save As command and change the file type from the drop-down menu.
There are two commonly used text file formats:
Delimited text files (.txt), in which the TAB character (ASCII character code 009) typically separates each field of text.
Comma separated values text files (.csv), in which the comma character (,) typically separates each field of text.
You can change the separator character that is used in both delimited and .csv text files. This may be necessary to make sure that the import or export operation works the way that you want it to.
Note: You can import or export up to 1,048,576 rows and 16,384 columns.
Import a text file by opening it in Excel
You can open a text file that you created in another program as an Excel workbook by using the Open command. Opening a text file in Excel does not change the format of the file — you can see this in the Excel title bar, where the name of the file retains the text file name extension (for example, .txt or .csv).
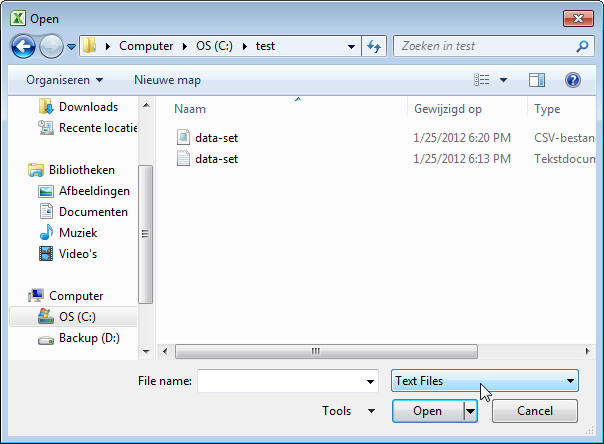
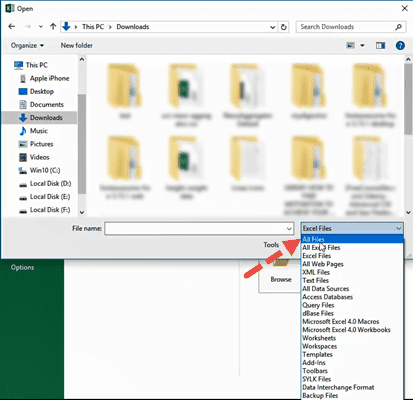
Go to File > Open and browse to the location that contains the text file.
Select Text Files in the file type dropdown list in the Open dialog box.
Locate and double-click the text file that you want to open.
If the file is a text file (.txt), Excel starts the Import Text Wizard. When you are done with the steps, click Finish to complete the import operation. See Text Import Wizard for more information about delimiters and advanced options.
If the file is a .csv file, Excel automatically opens the text file and displays the data in a new workbook.
Note: When Excel opens a .csv file, it uses the current default data format settings to interpret how to import each column of data. If you want more flexibility in converting columns to different data formats, you can use the Import Text Wizard. For example, the format of a data column in the .csv file may be MDY, but Excel’s default data format is YMD, or you want to convert a column of numbers that contains leading zeros to text so you can preserve the leading zeros. To force Excel to run the Import Text Wizard, you can change the file name extension from .csv to .txt before you open it, or you can import a text file by connecting to it (for more information, see the following section).
Import a text file by connecting to it (Power Query)
You can import data from a text file into an existing worksheet.
On the Data tab, in the Get & Transform Data group, click From Text/CSV.
In the Import Data dialog box, locate and double-click the text file that you want to import, and click Import.
In the preview dialog box, you have several options:
Select Load if you want to load the data directly to a new worksheet.
Alternatively, select Load to if you want to load the data to a table, PivotTable/PivotChart, an existing/new Excel worksheet, or simply create a connection. You also have the choice of adding your data to the Data Model.
Select Transform Data if you want to load the data to Power Query, and edit it before bringing it to Excel.
If Excel doesn’t convert a particular column of data to the format that you want, then you can convert the data after you import it. For more information, see Convert numbers stored as text to numbers and Convert dates stored as text to dates.
Export data to a text file by saving it
You can convert an Excel worksheet to a text file by using the Save As command.
Go to File > Save As.
In the Save As dialog box, under Save as type box, choose the text file format for the worksheet; for example, click Text (Tab delimited) or CSV (Comma delimited).
Note: The different formats support different feature sets. For more information about the feature sets that are supported by the different text file formats, see File formats that are supported in Excel.
Browse to the location where you want to save the new text file, and then click Save.
A dialog box appears, reminding you that only the current worksheet will be saved to the new file. If you are certain that the current worksheet is the one that you want to save as a text file, click OK. You can save other worksheets as separate text files by repeating this procedure for each worksheet.
You may also see an alert below the ribbon that some features might be lost if you save the workbook in a CSV format.
For more information about saving files in other formats, see Save a workbook in another file format.
Import a text file by connecting to it
You can import data from a text file into an existing worksheet.
Click the cell where you want to put the data from the text file.
On the Data tab, in the Get External Data group, click From Text.
In the Import Data dialog box, locate and double-click the text file that you want to import, and click Import.
Follow the instructions in the Text Import Wizard. Click Help  on any page of the Text Import Wizard for more information about using the wizard. When you are done with the steps in the wizard, click Finish to complete the import operation.
In the Import Data dialog box, do the following:
Under Where do you want to put the data?, do one of the following:
To return the data to the location that you selected, click Existing worksheet.
To return the data to the upper-left corner of a new worksheet, click New worksheet.
Optionally, click Properties to set refresh, formatting, and layout options for the imported data.
Excel puts the external data range in the location that you specify.
If Excel does not convert a column of data to the format that you want, you can convert the data after you import it. For more information, see Convert numbers stored as text to numbers and Convert dates stored as text to dates.
Export data to a text file by saving it
You can convert an Excel worksheet to a text file by using the Save As command.
Go to File > Save As.
The Save As dialog box appears.
In the Save as type box, choose the text file format for the worksheet.
For example, click Text (Tab delimited) or CSV (Comma delimited).
Note: The different formats support different feature sets. For more information about the feature sets that are supported by the different text file formats, see File formats that are supported in Excel.
Browse to the location where you want to save the new text file, and then click Save.
A dialog box appears, reminding you that only the current worksheet will be saved to the new file. If you are certain that the current worksheet is the one that you want to save as a text file, click OK. You can save other worksheets as separate text files by repeating this procedure for each worksheet.
A second dialog box appears, reminding you that your worksheet may contain features that are not supported by text file formats. If you are interested only in saving the worksheet data into the new text file, click Yes. If you are unsure and would like to know more about which Excel features are not supported by text file formats, click Help for more information.
For more information about saving files in other formats, see Save a workbook in another file format.
The way you change the delimiter when importing is different depending on how you import the text.
If you use Get & Transform Data > From Text/CSV, after you choose the text file and click Import, choose a character to use from the list under Delimiter. You can see the effect of your new choice immediately in the data preview, so you can be sure you make the choice you want before you proceed.
If you use the Text Import Wizard to import a text file, you can change the delimiter that is used for the import operation in Step 2 of the Text Import Wizard. In this step, you can also change the way that consecutive delimiters, such as consecutive quotation marks, are handled.
See Text Import Wizard for more information about delimiters and advanced options.
If you want to use a semi-colon as the default list separator when you Save As .csv, but need to limit the change to Excel, consider changing the default decimal separator to a comma — this forces Excel to use a semi-colon for the list separator. Obviously, this will also change the way decimal numbers are displayed, so also consider changing the Thousands separator to limit any confusion.
Clear Excel Options > Advanced > Editing options > Use system separators.
Set Decimal separator to , (a comma).
Set Thousands separator to . (a period).
When you save a workbook as a .csv file, the default list separator (delimiter) is a comma. You can change this to another separator character using Windows Region settings.
Caution: Changing the Windows setting will cause a global change on your computer, affecting all applications. To only change the delimiter for Excel, see Change the default list separator for saving files as text (.csv) in Excel.
In Microsoft Windows 10, right-click the Start button, and then click Settings.
Click Time & Language, and then click Region in the left panel.
In the main panel, under Regional settings, click Additional date, time, and regional settings.
Under Region, click Change date, time, or number formats.
In the Region dialog, on the Format tab, click Additional settings.
In the Customize Format dialog, on the Numbers tab, type a character to use as the new separator in the List separator box.
In Microsoft Windows, click the Start button, and then click Control Panel.
Under Clock, Language, and Region, click Change date, time, or number formats.
In the Region dialog, on the Format tab, click Additional settings.
In the Customize Format dialog, on the Numbers tab, type a character to use as the new separator in the List separator box.
Note: After you change the list separator character for your computer, all programs use the new character as a list separator. You can change the character back to the default character by following the same procedure.
Need more help?
You can always ask an expert in the Excel Tech Community or get support in the Answers community.
Источник
Import or export text (.txt or .csv) files
There are two ways to import data from a text file with Excel: you can open it in Excel, or you can import it as an external data range. To export data from Excel to a text file, use the Save As command and change the file type from the drop-down menu.
There are two commonly used text file formats:
Delimited text files (.txt), in which the TAB character (ASCII character code 009) typically separates each field of text.
Comma separated values text files (.csv), in which the comma character (,) typically separates each field of text.
You can change the separator character that is used in both delimited and .csv text files. This may be necessary to make sure that the import or export operation works the way that you want it to.
Note: You can import or export up to 1,048,576 rows and 16,384 columns.
Import a text file by opening it in Excel
You can open a text file that you created in another program as an Excel workbook by using the Open command. Opening a text file in Excel does not change the format of the file — you can see this in the Excel title bar, where the name of the file retains the text file name extension (for example, .txt or .csv).
Go to File > Open and browse to the location that contains the text file.
Select Text Files in the file type dropdown list in the Open dialog box.
Locate and double-click the text file that you want to open.
If the file is a text file (.txt), Excel starts the Import Text Wizard. When you are done with the steps, click Finish to complete the import operation. See Text Import Wizard for more information about delimiters and advanced options.
If the file is a .csv file, Excel automatically opens the text file and displays the data in a new workbook.
Note: When Excel opens a .csv file, it uses the current default data format settings to interpret how to import each column of data. If you want more flexibility in converting columns to different data formats, you can use the Import Text Wizard. For example, the format of a data column in the .csv file may be MDY, but Excel’s default data format is YMD, or you want to convert a column of numbers that contains leading zeros to text so you can preserve the leading zeros. To force Excel to run the Import Text Wizard, you can change the file name extension from .csv to .txt before you open it, or you can import a text file by connecting to it (for more information, see the following section).
Import a text file by connecting to it (Power Query)
You can import data from a text file into an existing worksheet.
On the Data tab, in the Get & Transform Data group, click From Text/CSV.
In the Import Data dialog box, locate and double-click the text file that you want to import, and click Import.
In the preview dialog box, you have several options:
Select Load if you want to load the data directly to a new worksheet.
Alternatively, select Load to if you want to load the data to a table, PivotTable/PivotChart, an existing/new Excel worksheet, or simply create a connection. You also have the choice of adding your data to the Data Model.
Select Transform Data if you want to load the data to Power Query, and edit it before bringing it to Excel.
If Excel doesn’t convert a particular column of data to the format that you want, then you can convert the data after you import it. For more information, see Convert numbers stored as text to numbers and Convert dates stored as text to dates.
Export data to a text file by saving it
You can convert an Excel worksheet to a text file by using the Save As command.
Go to File > Save As.
In the Save As dialog box, under Save as type box, choose the text file format for the worksheet; for example, click Text (Tab delimited) or CSV (Comma delimited).
Note: The different formats support different feature sets. For more information about the feature sets that are supported by the different text file formats, see File formats that are supported in Excel.
Browse to the location where you want to save the new text file, and then click Save.
A dialog box appears, reminding you that only the current worksheet will be saved to the new file. If you are certain that the current worksheet is the one that you want to save as a text file, click OK. You can save other worksheets as separate text files by repeating this procedure for each worksheet.
You may also see an alert below the ribbon that some features might be lost if you save the workbook in a CSV format.
For more information about saving files in other formats, see Save a workbook in another file format.
Import a text file by connecting to it
You can import data from a text file into an existing worksheet.
Click the cell where you want to put the data from the text file.
On the Data tab, in the Get External Data group, click From Text.
In the Import Data dialog box, locate and double-click the text file that you want to import, and click Import.
Follow the instructions in the Text Import Wizard. Click Help on any page of the Text Import Wizard for more information about using the wizard. When you are done with the steps in the wizard, click Finish to complete the import operation.
In the Import Data dialog box, do the following:
Under Where do you want to put the data?, do one of the following:
To return the data to the location that you selected, click Existing worksheet.
To return the data to the upper-left corner of a new worksheet, click New worksheet.
Optionally, click Properties to set refresh, formatting, and layout options for the imported data.
Excel puts the external data range in the location that you specify.
If Excel does not convert a column of data to the format that you want, you can convert the data after you import it. For more information, see Convert numbers stored as text to numbers and Convert dates stored as text to dates.
Export data to a text file by saving it
You can convert an Excel worksheet to a text file by using the Save As command.
Go to File > Save As.
The Save As dialog box appears.
In the Save as type box, choose the text file format for the worksheet.
For example, click Text (Tab delimited) or CSV (Comma delimited).
Note: The different formats support different feature sets. For more information about the feature sets that are supported by the different text file formats, see File formats that are supported in Excel.
Browse to the location where you want to save the new text file, and then click Save.
A dialog box appears, reminding you that only the current worksheet will be saved to the new file. If you are certain that the current worksheet is the one that you want to save as a text file, click OK. You can save other worksheets as separate text files by repeating this procedure for each worksheet.
A second dialog box appears, reminding you that your worksheet may contain features that are not supported by text file formats. If you are interested only in saving the worksheet data into the new text file, click Yes. If you are unsure and would like to know more about which Excel features are not supported by text file formats, click Help for more information.
For more information about saving files in other formats, see Save a workbook in another file format.
The way you change the delimiter when importing is different depending on how you import the text.
If you use Get & Transform Data > From Text/CSV, after you choose the text file and click Import, choose a character to use from the list under Delimiter. You can see the effect of your new choice immediately in the data preview, so you can be sure you make the choice you want before you proceed.
If you use the Text Import Wizard to import a text file, you can change the delimiter that is used for the import operation in Step 2 of the Text Import Wizard. In this step, you can also change the way that consecutive delimiters, such as consecutive quotation marks, are handled.
See Text Import Wizard for more information about delimiters and advanced options.
If you want to use a semi-colon as the default list separator when you Save As .csv, but need to limit the change to Excel, consider changing the default decimal separator to a comma — this forces Excel to use a semi-colon for the list separator. Obviously, this will also change the way decimal numbers are displayed, so also consider changing the Thousands separator to limit any confusion.
Clear Excel Options > Advanced > Editing options > Use system separators.
Set Decimal separator to , (a comma).
Set Thousands separator to . (a period).
When you save a workbook as a .csv file, the default list separator (delimiter) is a comma. You can change this to another separator character using Windows Region settings.
Caution: Changing the Windows setting will cause a global change on your computer, affecting all applications. To only change the delimiter for Excel, see Change the default list separator for saving files as text (.csv) in Excel.
In Microsoft Windows 10, right-click the Start button, and then click Settings.
Click Time & Language, and then click Region in the left panel.
In the main panel, under Regional settings, click Additional date, time, and regional settings.
Under Region, click Change date, time, or number formats.
In the Region dialog, on the Format tab, click Additional settings.
In the Customize Format dialog, on the Numbers tab, type a character to use as the new separator in the List separator box.
In Microsoft Windows, click the Start button, and then click Control Panel.
Under Clock, Language, and Region, click Change date, time, or number formats.
In the Region dialog, on the Format tab, click Additional settings.
In the Customize Format dialog, on the Numbers tab, type a character to use as the new separator in the List separator box.
Note: After you change the list separator character for your computer, all programs use the new character as a list separator. You can change the character back to the default character by following the same procedure.
Need more help?
You can always ask an expert in the Excel Tech Community or get support in the Answers community.
Источник
На онлайн курсах Excel, проводимых мной по Skype, я объясняю не только принципы создания таблиц в самом Excel, но и интеграцию данной программы пакета Microsoft Office с другими программами. В частности, рассматривается вопрос обмена данными.
Смотрите видео после статьи
видео может дополнять статью или содержать её полностью
Как известно, часто встречаются случаи, когда данные для обработки уже есть. В этом случае требуется их поместить на лист Excel и обработать нужным образом. Самый плохой вариант — перепечатать вручную. На самом деле это в большинстве случаев не нужно, поскольку можно использовать функции импорта данных, встроенные в Excel.
Если вы пользуетесь программой 1С, то вам также будет полезно узнать как сделать экспорт данных в Excel из 1С.
Когда допустимо использовать импорт в Excel
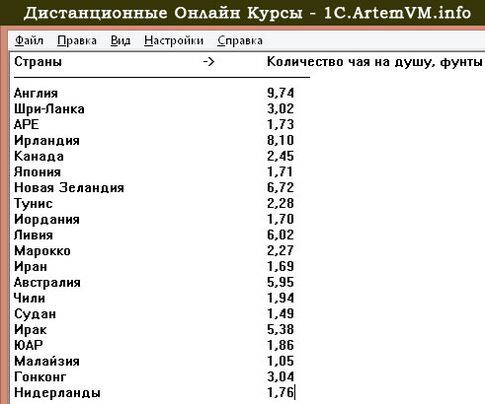
Далеко не всегда. Дело в том, что любой лист Excel состоит из отдельных ячеек, а значит данные из внешнего источника нужно вставить на лист так, чтобы они нужным образом расположились в ячейках. Как подсказывает логика, это возможно только в том случае, когда импортируемые данные имеют вполне определённую структуру. Например, это могут быть регулярно повторяющиеся блоки данных (строки).
Если данные не имеют выраженной структуры, то автоматизировать процесс их импорта в Excel не получится.
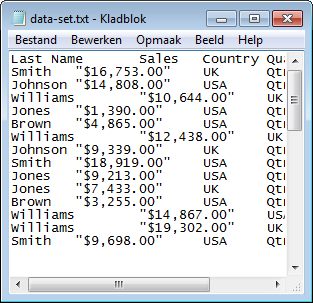
Пример хорошо структурированных данных показан на рисунке ниже (текст в блокноте).
[нажмите на картинку для увеличения]
Справка: как сохранять фото с сайтов
В данном примере текст разделён на столбцы и строки. Также обратите внимание на то, что в качестве разделителей целой и дробной частей чисел везде использована запятая. Если бы использовалась то точка, то запятая, пришлось бы предварительно привести текст к некоторому единообразию посредством поиска и замены.
Как использовать мастер импорта текста в Excel
Чтобы преобразовать таблицу в блокноте в таблицу Excel, копируем текст и вставляем его на лист Excel. При этом получается следующая картина.

[нажмите на картинку для увеличения]
Справка: как сохранять фото с сайтов
Оставлять в таком виде таблицу нельзя. Нажимаем на значок меню в правом нижнем углу и выбираем пункт «Использовать мастер импорта текста«. Назначение данного инструмента — указать Excel, как именно структурирован вставляемый текст, чтобы программа могла его разбить на ячейки так, как нам нужно (если значок пропал, то просто отменить вставку и повторить заново).
[нажмите на картинку для увеличения]
Справка: как сохранять фото с сайтов
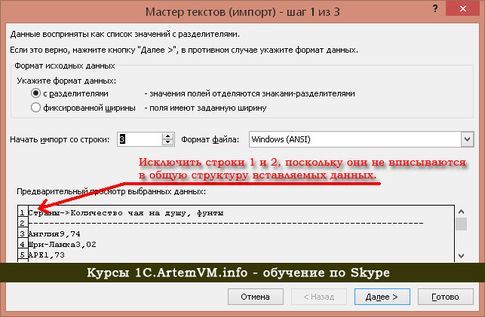
В нижней части окна отображается текст, структуру которого мы пока ещё не объяснили программе. Именно поэтому он выглядит не так, как нужно. Сразу можно заметить, что заголовок таблицы отличается по форматированию от данных под ним, поскольку вместе с пробелами (или табуляциями) там есть ещё символы «->». Строка под заголовком также нам не нужна, поэтому начинаем импорт с третьей строки. И переходим к следующему шагу в мастере импорта текста.
[нажмите на картинку для увеличения]
Справка: как сохранять фото с сайтов
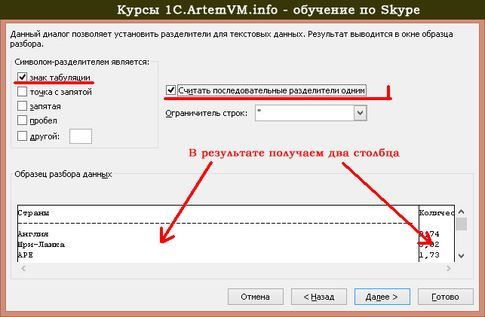
Здесь потребуется указать, какой символ (или символы) является разделителем столбцов в таблице, скопированной из блокнота. В данном случае я определил, что это табуляция, причём, как правило, несколько, поэтому настройки будут выглядеть так, как показано на рисунке выше.
Вопрос: а вы умеете различать символы табуляции и пробел? (я имею ввиду уже кем-то написанный текст!). На онлайн курсах Word мы это разбираем.
Нажимаем Далее и переходим к следующему шагу.

[нажмите на картинку для увеличения]
Справка: как сохранять фото с сайтов
На заключительном этапе требуется указать тип данных в каждом столбце. По умолчанию — Общий. Какой тип данных указывать, зависит от того, что в столбцах, а также для чего потом будет использоваться эта таблица. Я это подробно рассматриваю на курсах Microsoft Excel. Сейчас для простоты данный шаг просто пропускаю, поскольку в данном случае (почему?) это не обязательно. В результате получим следующее.

[нажмите на картинку для увеличения]
Справка: как сохранять фото с сайтов
Добавим заголовок (можно также импортом, а можно вручную) и отформатируем таблицу. И вот конечный результат.

[нажмите на картинку для увеличения]
Справка: как сохранять фото с сайтов
Подведём итоги
Функция импорта текста в Microsoft Excel позволяет экономить время при создании таблиц в том случае, если данные для таблицы уже есть в другой программе.
Уникальная метка публикации: 73E6AC6D-8C0B-9484-3676-3590E5F10B3F
Источник: //artemvm.info/information/uchebnye-stati/microsoft-office/import-teksta-v-excel/
Often you need to import data to the Excel spreadsheet from a text file. Microsoft Excel offers a Text Import Wizard to import data from different text file formats:
- Comma-separated files (.csv) or tab-separated files (.txt), see how to import data from a structured text file,
- Files with fixed-width columns without delimiters between data columns where data starts at fixed positions of the line:

To import data from a text file, do the following:
1. On the File tab, click Open (or click
Ctrl+O).
2. On the Open pane, click the Browse button:

3. On the Open dialog box:
- Select the path to the text file you want to import,
- From the File Type dropdown list, select All Files or Text Files:

- Click the Open button.

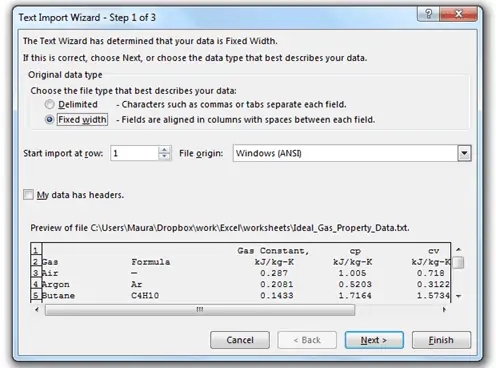
4. In the Text Import Wizard – Step 1 of 3 dialog box:
4.1. In the Original data type group, choose the Fixed width option:

Note: If you see delimiters, leave the option Delimited selected and follow the steps of importing a structured text file.
4.2. You can change the File origin to use another encoding to display the data (you need to know the character encoding for the data or try other encodings until you see the correct data in the preview section):

4.3. Click the Next > button.
5. In the Text Import Wizard – Step 2 of 3 dialog box:

5.1. Create, move, and delete break lines:

5.2. Click the Next > button.
6. In the Text Import Wizard – Step 3 of 3 dialog box:
6.1. Select the column and the appropriate data format for this column in the Column data format group:

Notes:
- You can skip this step and format columns after importing.
- You can click the Advanced… button to select the correct Decimal separator and Thousands separator (see how to change the used by default decimal symbol and digit grouping symbol):

- You can ignore some columns for importing by selecting the Do not import column (skip) in the Column data format group (the second column Session in the previous example).

6.2. Repeat the previous step for all columns you want to import and click Finish.
Excel imports all the data you selected:

See also this tip in French:
Comment importer un fichier texte dans la feuille de calcul Excel.
Different applications generate data in different forms.
A SaaS application might generate a report in the form of a PDF, while another application might generate data in the form of a TXT or CSV file.
The challenge lies in consolidating the data into a single application that can work with all the data to produce the required results.
Microsoft Excel is one application that is frequently used for this, owing to its versatility in importing data from files with a wide variety of extensions.
For example, if you have a list of items saved in a Text file (or in Notepad), Excel allows you to import this list so that you can process it further.
In this tutorial we will show you two ways to convert a text file to Excel:
- By using the Text Import Wizard
- By opening the file directly in Excel
What is a Text File?
A Text file is one that contains text with no special formatting (as in bold, italic, images, etc.).
These files are identified with the ‘.txt’ extension and can be opened in any text editor, like Notepad or word processor, like Microsoft Word.
But in many cases, you can have data in a text file that you need to open in Excel and analyze there.
Thankfully, you can easily open text files in Microsoft Excel and then further work on it.
Let’s see how to do that!
Let us look at two ways in which we can convert a Text file (.txt) to Excel.
Method 1: Using the Text Import Wizard to Convert a Text File to Excel
If you have a spreadsheet open in Excel and want to import the contents of a Text file at a specific area of your spreadsheet, the Text Import Wizard might be the best way to go.
This wizard scans your text file and ensures that the data in the file is imported the way you want.
To use the Text Import Wizard, select the Data tab, followed by ‘From Text’ (which you will find under the ‘Get External Data’ group.
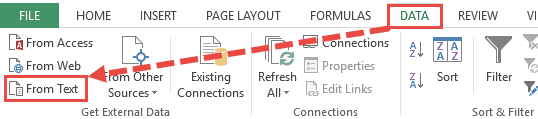
After this, select the text file that you want to import.
Your Text Import Wizard should now open automatically.

The Text Import Wizard guides you in providing the best settings to import your text file data through 3 steps:
Step 1 of 3
In this step you can provide the settings for the following:
- Original Data Type: Here you can choose how you want your data to be separated into columns. You have two options:
- Delimited: Select this if your text file data is separated by tabs, colons, semicolons or other characters.
- Fixed width: Select this if all items in each column of your data are the same width.
- Start import at row: Type or select the first row of your data from where you want to start importing.
- File origin: Select the character set that your text file uses, for example 437 (for the OEM United States character set). Usually, it’s fine to leave this at the default setting.
- My data has headers: Keep this field checked if your Text file’s dataset contains headers.

Step 2 of 3
If you had selected the ‘Delimited’ radio button in Step 1, then this step lets you specify the delimiters that your data contains (for example tabs, commas, semicolons, etc.) You can also specify if you want consecutive delimiters to be counted as one.
Moreover, if your text values are enclosed in a special set of characters (for example in single or double quotes), then you can specify the character in this step.
These characters are known as ‘Text qualifiers’ and help specify if you want a set of values to be imported as one.
For example, “Scott, Steve” is imported as a single value, even though the words are separated by a comma delimiter.

At the bottom of the screen, you can see a preview of how your data will get affected in the spreadsheet after conversion.
If you had selected the ‘Fixed Width’ radio button in Step 1, on the other hand, then Step 2 lets you specify widths for each column.
You can introduce a new column break in the preview window by simply clicking at the appropriate point on the scale.
A line with an arrow should appear to represent the column break.

Place line breaks wherever you need to in the preview window.
If you want to move a line break, simply drag it across. If you want to remove a line, simply double-click on it.
Step 3 of 3
This lets you specify the data format for each column.
You can specify if you want a column to remain in the default format set by the Text Import Wizard or if you want to set the format to be General, Text, or Date.
Simply select a column from the preview window and select the format you want.
If you want to remove a selected column, select the last radio button option (which says ‘Do not import column‘).
The Advanced button in this step opens the Advanced Text Import Settings dialog box.
This dialog box lets you specify advanced formatting options.
For example, you can use the Advanced Text Import Settings to specify what decimal or thousands separators have been used in the text file, so that they can be made to match your computer’s regional settings.
Once you’re done providing all the settings for your imported text data, click on the Finish button.
This will open the Import Data dialog box.
In this box, you can select where you want your text file’s data imported.
If you want to import it into the existing worksheet, you can select or type in a reference to the cell where you want Excel to start displaying the imported data.
If you want to open it in a new worksheet, however, then select the radio button next to ‘New Worksheet’.
Click OK.
Your text file should now get imported to your selected location in Excel, with the format settings that you had specified in the Text Import Wizard.

Also read: How to Open XML Files in Excel?
Method 2: Opening a Text File Directly in Excel
You can also choose to simply open the text file directly in Excel.
While opening, Excel recognizes a text file and automatically converts it into a format that can be displayed in a spreadsheet.
All you need to do is click on the File tab, select Open and then browse and select the text file that you want to open.
One issue that you are likely to face when trying to open a text file directly in Excel is trying to locate the file in the folder.
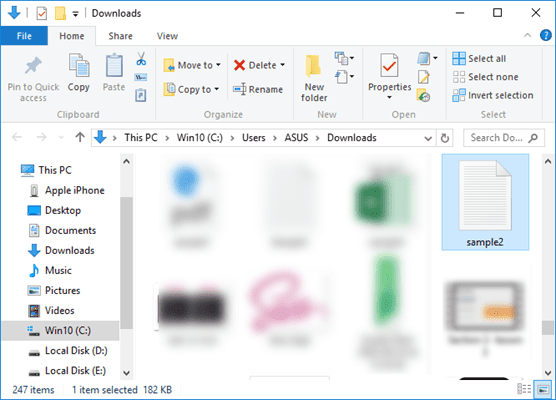
This is because Excel’s ‘Open File’ dialog box, by default, filters, and displays only Excel files like those with extensions ‘.xls’, ‘.xlsx’, etc.
It also displays CSV files, if your computer is set up to use Excel as the default application to open CSV files.
So if you don’t see your required text file in the folder when trying to open it in Excel, simply select ‘All Files’ from the ‘File Types’ drop-down, as shown below:
This will display the Text Import Wizard from where you can set up how you want your Text file’s data to be displayed in Excel (as shown in method 1).

You should now see your text file converted and displayed in Excel.
Once the file opens, if you still find some of the columns (or individual cells) not converted to your required format, you can convert them manually.
While this method to open the Text file directly in Excel works well, the benefit of using the first method (using Text Import Wizard) allows you to make some adjustments even before getting the data in Excel.
In this tutorial, we showed you two ways to convert and open a Text file in Excel.
A third method could be by using online tools like Online2pdf, but we did not dwell too much on this because Excel’s Text Import Wizard provides much more flexibility, allowing you to adjust your data, and format them exactly how you want them.
We hope this tutorial was helpful for you.
Other Excel tutorials you may also like:
- How to Convert a CSV File to Excel?
- How to Open VCF File in Excel?
- How to Open Excel File [xls, xlsx] Online (for FREE)
- Why does Excel Open on Startup (and How to Stop it)
- How to Make Excel File Read Only
- How to Insert an Excel file into MS Word
- How to Save Selection in Excel as PDF (3 Easy Methods)
- How to Merge Two Excel Files?
- How to Convert PDF to Excel without Software?
- How to Open DAT Files in Excel?
Your data could be in any form from PDF, TXT, PNG, JPG, to CSV files. Some applications create files in the form of a PDF whereas other apps generate data files in the form of a TXT or CSV file. On the whole, you must be struggling to convert a Text file to an Excel spreadsheet because switching data into a single file can work differently instead of multiple files.
With Microsoft Excel, you can do this task frequently because it has many features that can help you execute multiple functions. Suppose, you are having a list of items in a TXT file, with Excel you can easily import the list to process it differently.
Here you will get to know exactly how converting a text file to an Excel spreadsheet could be an easygoing thing.
You can do this by:
- Using the Text Import Wizard
- Opening the file directly in Excel
So, before getting into the boat let’s have a look at what a text file basically is?
What is a Text File?
In a text file, as the name shows, you will see the text without special formattings such as italic, bold, images, or other formats. A text file appears with a .txt extension and you can view this file in any text editor such as Notepad or a word processor like Microsoft Word. However, you can open a text file in Excel to make further changes.
Let’s get to know how it all happens:
Converting a Text File to Excel Spreadsheet – How it Works
Normally, two methods exist for this as mentioned earlier:
- Text Import Wizard
- Direct File open in Excel
Using the Text Import Wizard to Convert a Text File to Excel
The Text Import Wizard feature could be one of the best tools when you need to import the data of a text file at some specific place on the spreadsheet of Excel.
Your text file gets scanned using the Wizard tool and it ensures that the data in the file is imported exactly as you want it to.
To make this tool functional, simply choose the Data tab given in the “From Text” menu located under the “Get External Data” group.

Later on, choose the text file you need to import.

Now, you will see the Text Import Wizard appears automatically.
Here are 3 steps that will guide you further to import the text file:
Step 1:
At first, you may need to provide the settings for the following:
Original Data Type:
In this option, you have to choose how your data should be separated into columns. You have two options:
Delimited: If the text file data is being separated using tabs, colons, semicolons, or other characters, you will have to choose this option.
Fixed Width: If each item in the columns of your data has similar width then you should choose this option.
Start Import at Row:
Type or choose the first row of the data right from you want to start importing.
File Origin:
Choose the character set that your text files use such as 437. Generally, you can leave it in the default setting.
My Data has Headers:
If the data set of your Text file has headers, then you have to check this field.
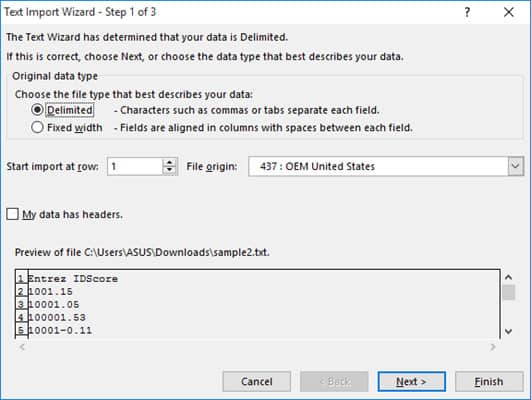
Step 2:
In case, if you had selected the “Delimited” button in the earlier step, then it is the time to indicate the delimiters in your data such as commas, tabs, semicolons, etc. You can even specify the consecutive delimiters in the data to be as one.
Further in this step, you can indicate the character if the text values are covered in a special set of characters such as single or double quotes. Do you know these characters are known as “Text qualifiers” that can help in indicating the set of values to be counted as one? For instance, “Scott, Steve” is considered as a single value, whereas a comma delimiter separates both words.

Once the conversion is done, at the bottom of the screen a preview of how your data is affected in the sheet will appear. In this step, you can identify widths for all columns if you had selected the “Fixed Width” button in the earlier step. If you click at some useful pointers on the scale, you can bring in a new column break in the preview window.
The column break is represented with a line having an arrow. To move a line break, you will have to drag it and if you want to remove it, just double click on it.
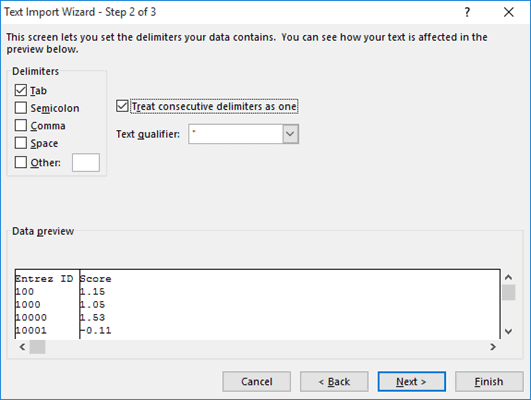
Step 3:
Once you are done specifying the values, now you should specify the data format for all columns. It’s up to you whether you need the column to be in the default format that the Text Import Wizard has set for you or you may want to set the format to be General, Text, or Date.
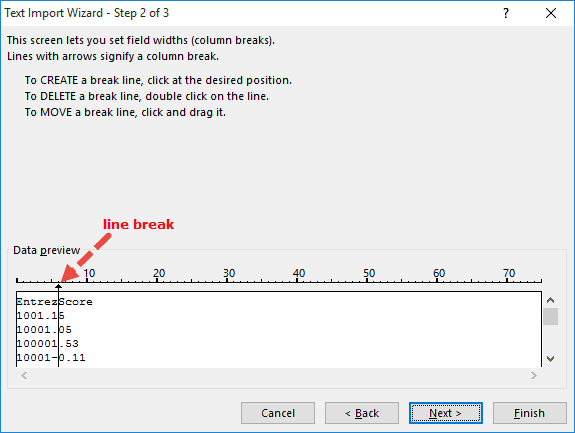
To select the format you need, just select a column from the preview window. To remove a selected column, just choose the last radio button saying, “Do not import column”.
By pressing the “Advanced” button, a dialog box of the Advanced Text Import Settings will pop up.

From this dialog box, you will find options to specify advanced formatting. For instance, to specify what decimal or separators have been used in the text file, you may use the Advanced Text Import Settings. It is because they must be compatible with the regional settings of your computer.
Click on the Finish button once you are done with all the settings for the imported text data.

Clicking on the finish button will pop up the Import Data dialog box.
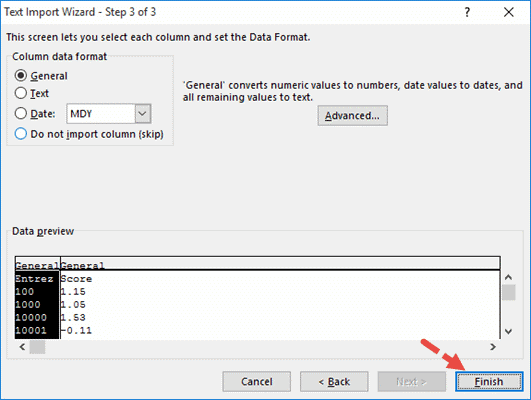
From this box, you can then choose where you need the data of your text file imported. You have to choose or type in a reference to the cell if you need to import this data into the current worksheet. On the other hand, if you need it to open in a new worksheet, then choose the radio button next to “New Worksheet.”

Now, click on the OK button and the file will start importing to the designated location in Excel.
Using the Direct File Open to Convert a Text or CSV File into Excel
In Excel 2007, 2010, 2013, and 2016, you will see all the steps are similar to importing a TXT or CSV file into Excel.
Go to the Excel spreadsheet that is needed to have the data and click on the Data tab.
Choose the “From Text” option given in the Get External Data group.
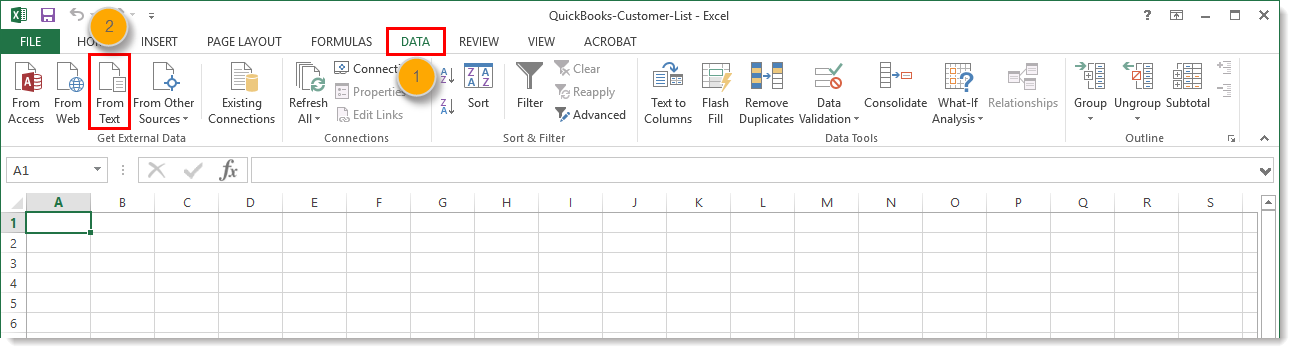
Choose the TXT or CSV file that is needed to convert and click on the Import option.
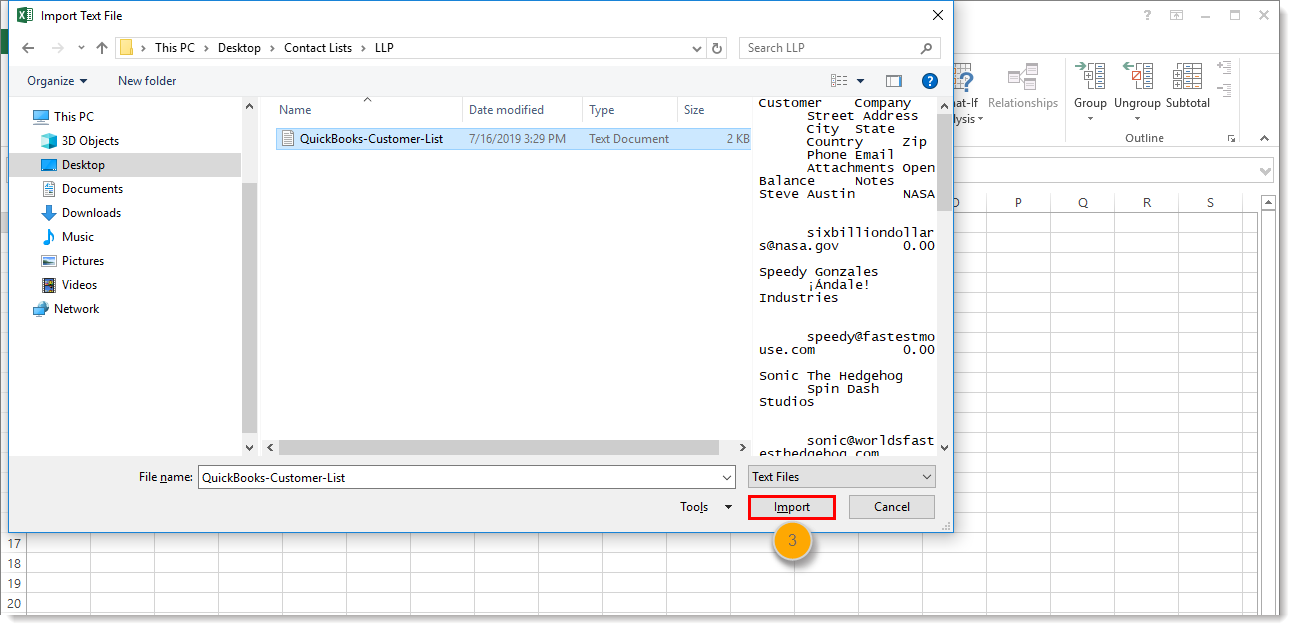
Now, choose “Delimited”. As you know a delimiter is just a new way that explains you TXT file has tabs or the CSV file has commas to separate and group the data.
Choose the Next option.
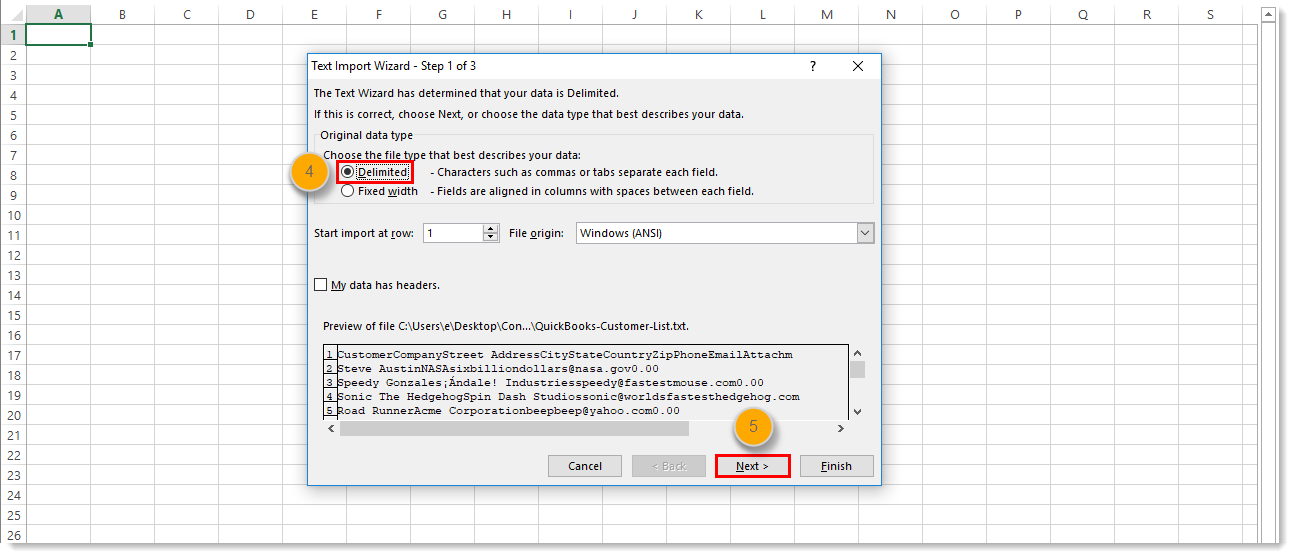
In the Data preview field, choose the delimiter that helps in grouping the data in a separate column. Basically, you have to choose “Tab” while converting a TXT file to Excel spreadsheet and “Comma” while converting a CSV file.
Also, note that selecting the “Space” option could split a single column into multiple columns at times when the header has more than one word.
Now, click on the Next option.
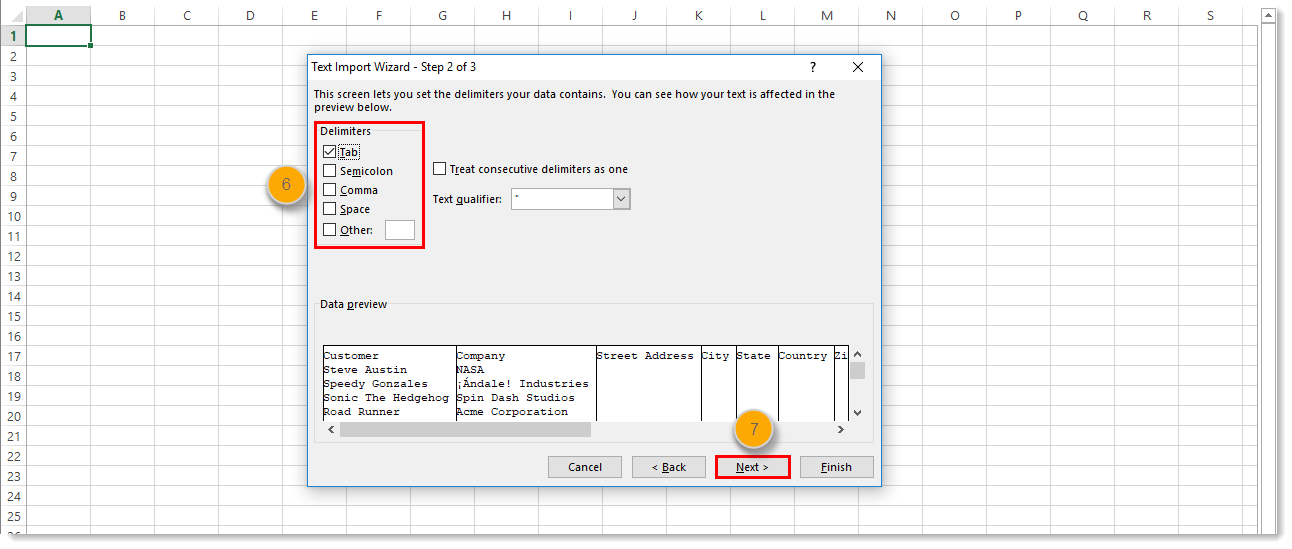
Choose “General”.
Click on the “Finish” button.
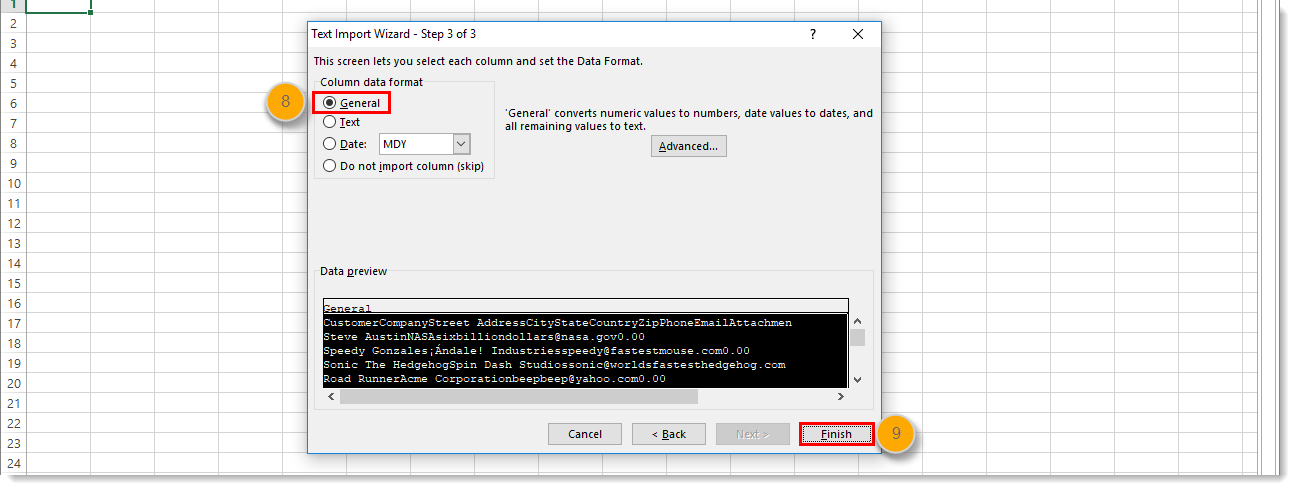
Select “Existing Worksheet” and add “=$A$1” to the field. It will make sure that data starts in Row 1, Column A of the spreadsheet. Having a blank row in the sheet could lead to a file import error.
Click on the OK button.

Click Save.