
Note: Microsoft Access doesn’t support importing Excel data with an applied sensitivity label. As a workaround, you can remove the label before importing and then re-apply the label after importing. For more information, see Apply sensitivity labels to your files and email in Office.
You can bring the data from an Excel workbook into Access databases in many ways. You can copy data from an open worksheet and paste it into an Access datasheet, import a worksheet into a new or existing table, or link to a worksheet from an Access database.
This topic explains in detail how to import or link to Excel data from Access desktop databases.
What do you want to do?
-
Understand importing data from Excel
-
Import data from Excel
-
Troubleshoot missing or incorrect values
-
Link to data in Excel
-
Troubleshoot #Num! and other incorrect values in a linked table
Understand importing data from Excel
If your goal is to store some or all of your data from one or more Excel worksheets in Access, you should import the contents of the worksheet into a new or existing Access database. When you import data, Access creates a copy of the data in a new or existing table without altering the source Excel worksheet.
Common scenarios for importing Excel data into Access
-
You are a long-time user of Excel but, going forward, you want to use Access to work with this data. You want to move the data in your Excel worksheets into one or more new Access databases.
-
Your department or workgroup uses Access, but you occasionally receive data in Excel format that must be merged with your Access databases. You want to import these Excel worksheets into your database as you receive them.
-
You use Access to manage your data, but the weekly reports you receive from the rest of your team are Excel workbooks. You would like to streamline the import process to ensure that data is imported every week at a specific time into your database.
If this is the first time you are importing data from Excel
-
There is no way to save an Excel workbook as an Access database. Excel does not provide functionality to create an Access database from Excel data.
-
When you open an Excel workbook in Access (in the File Open dialog box, change the Files of Type list box to Microsoft Office Excel Files and select the file you want), Access creates a link to the workbook instead of importing its data. Linking to a workbook is fundamentally different from importing a worksheet into a database. For more information about linking, see the section Link to data in Excel, later in this article.
Import data from Excel
The steps in this section explain how to prepare for and run an import operation, and how to save the import settings as a specification for later reuse. As you proceed, remember that you can import data from only one worksheet at a time. You cannot import all the data from a whole workbook at the same time.
Prepare the worksheet
-
Locate the source file and select the worksheet that contains the data that you want to import to Access. If you want to import only a portion of a worksheet, you can define a named range that includes only the cells that you want to import.
Define a named range (optional)
-
Switch to Excel and open the worksheet that has data that you want to import.
-
Select the range of cells that contain the data that you want to import.
-
Right-click within the selected range and then click Name a Range or Define Name.
-
In the New Name dialog box, specify a name for the range in the Name box and click OK.
Remember that you can import only one worksheet at a time during an import operation. To import data from multiple worksheets, repeat the import operation for each worksheet.
-
-
Review the source data and take action as described in this table.
Element
Description
Number of columns
The number of source columns that you want to import cannot exceed 255, because Access does not support more than 255 fields in a table.
Skipping columns and rows
It is a good practice to include only the rows and columns that you want to import in the source worksheet or named range.
Rows You cannot filter or skip rows during the import operation.
Columns You cannot skip columns during the operation if you choose to add the data to an existing table.
Tabular format
Ensure that the cells are in tabular format. If the worksheet or named range includes merged cells, the contents of the cell are placed in the field that corresponds to the leftmost column, and the other fields are left blank.
Blank columns, rows, and cells
Delete all unnecessary blank columns and blank rows in the worksheet or range. If the worksheet or range contains blank cells, try to add the missing data. If you are planning to append the records to an existing table, ensure that the corresponding field in the table accepts null (missing or unknown) values. A field will accept null values if its Required field property is set to No and its ValidationRule property setting doesn’t prevent null values.
Error values
If one or more cells in the worksheet or range contain error values, such as #NUM and #DIV, correct them before you start the import operation. If a source worksheet or range contains error values, Access places a null value in the corresponding fields in the table. For more information about ways to correct those errors, see the section Troubleshoot missing or incorrect values, later in this article.
Data type
To avoid errors during importing, ensure that each source column contains the same type of data in every row. Access scans the first eight source rows to determine the data type of the fields in the table. We highly recommend that you ensure that the first eight source rows do not mix values of different data types in any of the columns. Otherwise, Access might not assign the correct data type to the column.
Also, it is a good practice to format each source column in Excel and assign a specific data format to each column before you start the import operation. Formatting is highly recommended if a column includes values of different data types. For example, the FlightNo column in a worksheet might contain numeric and text values, such as 871, AA90, and 171. To avoid missing or incorrect values, do the following:
-
Right-click the column header and then click Format Cells.
-
On the Number tab, under Category, select a format. For the FlightNo column, you would probably choose Text.
-
Click OK.
If the source columns are formatted, but still contain mixed values in the rows following the eighth row, the import operation might still skip values or convert values incorrectly. For troubleshooting information, see the section Troubleshoot missing or incorrect values.
First row
If the first row in the worksheet or named range contains the names of the columns, you can specify that Access treat the data in the first row as field names during the import operation. If your source worksheet or range doesn’t include the names, it is a good idea to add them to the source before you start the import operation.
Note: If you plan to append the data to an existing table, ensure that the name of each column exactly matches the name of the corresponding field. If the name of a column is different from the name of the corresponding field in the table, the import operation will fail. To see the names of the fields, open the table in Design view in Access.
-
-
Close the source workbook, if it is open. Keeping the source file open might result in data conversion errors during the import operation.
Prepare the destination database
-
Open the Access database where the imported data will be stored. Ensure that the database is not read-only, and that you have permissions to make changes to the database.
-or-
If you don’t want to store the data in any of your existing databases, create a blank database. To do so:
Click the File tab, click New, and then click Blank Database.
-
Before you start the import operation, decide whether you want to store the data in a new or existing table.
Create a new table If you choose to store the data in a new table, Access creates a table and adds the imported data to this table. If a table with the specified name already exists, Access overwrites the contents of the table with the imported data.
Append to an existing table If you choose to add the data to an existing table, the rows in the Excel worksheet are appended to the specified table.
Remember that most failures during append operations occur because the source data does not match the structure and field settings of the destination table. To avoid this, open the destination table in Design view and review the following:
-
First row If the first row of the source worksheet or named range does not contain column headings, ensure that the position and data type of each column in the source worksheet matches those of the corresponding field in the table. If the first row contains column headings, the order of columns and fields do not need to match, but the name and data type of each column must exactly match those of its corresponding field.
-
Missing or extra fields If one or more fields in the source worksheet do not exist in the destination table, add them before you start the import operation. However, if the table contains fields that don’t exist in the source, you do not need to delete those fields from the table if they accept null values.
Tip: A field will accept null values if its Required property is set to No and its ValidationRule property setting doesn’t prevent null values.
-
Primary key If the table contains a primary key field, the source worksheet or range must have a column that contains values that are compatible with the primary key field, and the imported key values must be unique. If an imported record contains a primary key value that already exists in the destination table, the import operation displays an error message.
-
Indexed fields If the Indexed property of a field in the table is set to Yes (No Duplicates), the corresponding column in the source worksheet or range must contain unique values.
Go to the next steps to run the import operation.
-
Start the import operation
-
The location of the import/link wizard differs slightly depending upon your version of Access. Choose the steps that match your Access version:
-
If you’re using the latest version of the Microsoft 365 subscription version of Access or Access 2019, on the External Data tab, in the Import & Link group, click New Data Source > From File > Excel.
-
If you’re using Access 2016, Access 2013, or Access 2010, on the External Data tab, in the Import & Link group, click Excel.
Note: The External Data tab is not available unless a database is open.
-
-
In the Get External Data — Excel Spreadsheet dialog box, in the File name box, specify the name of the Excel file that contains the data that you want to import.
-or-
Click Browse and use the File Open dialog box to locate the file that you want to import.
-
Specify how you want to store the imported data.
To store the data in a new table, select Import the source data into a new table in the current database. You will be prompted to name this table later.
To append the data to an existing table, select Append a copy of the records to the table and select a table from the drop-down list. This option is not available if the database has no tables.
To link to the data source by creating a linked table, see the section Link to data in Excel, later in this article.
-
Click OK.
The Import Spreadsheet Wizard starts, and leads you through the import process. Go to the next set of steps.
Use the Import Spreadsheet wizard
-
On the first page of the wizard, select the worksheet that contains the data that you want to import, and then click Next.
-
On the second page of the wizard, click either Show Worksheets or Show Named Ranges, select either the worksheet or the named range that you want to import, and then click Next.
-
If the first row of the source worksheet or range contains the field names, select First Row Contains Column Headings and click Next.
If you are importing the data into a new table, Access uses these column headings to name the fields in the table. You can change these names either during or after the import operation. If you are appending the data to an existing table, ensure that the column headings in the source worksheet exactly match the names of the fields in the destination table.
If you are appending data to an existing table, skip directly to step 6. If you are adding the data to a new table, follow the remaining steps.
-
The wizard prompts you to review the field properties. Click a column in the lower half of the page to display the corresponding field’s properties. Optionally, do any of the following:
-
Review and change, if you want, the name and data type of the destination field.
Access reviews the first eight rows in each column to suggest the data type for the corresponding field. If the column in the worksheet contains different types of values, such as text and numbers, in the first eight rows of a column, the wizard suggests a data type that is compatible with all the values in the column — most often, the text data type. Although you can choose a different data type, remember that values that are incompatible with the data type that you choose will be either ignored or converted incorrectly during the import process. For more information about how to correct missing or incorrect values, see the section Troubleshoot missing or incorrect values, later in this article.
-
To create an index on the field, set Indexed to Yes.
-
To completely skip a source column, select the Do not import field (Skip) check box.
Click Next after you finish selecting options.
-
-
In the next screen, specify a primary key for the table. If you select Let Access add primary key, Access adds an AutoNumber field as the first field in the destination table, and automatically populates it with unique ID values, starting with 1. Click Next.
-
In the final wizard screen, specify a name for the destination table. In the Import to Table box, type a name for the table. If the table already exists, Access displays a prompt that asks whether you want to overwrite the existing contents of the table. Click Yes to continue or No to specify a different name for the destination table, and then click Finish to import the data.
If Access was able to import some or all the data, the wizard displays a page that shows you the status of the import operation. In addition, you can save the details of the operation for future use as a specification. Conversely, if the operation completely failed, Access displays the message An error occurred trying to import file.
-
Click Yes to save the details of the operation for future use. Saving the details helps you repeat the operation at a later time without having to step through the wizard each time.
See Save the details of an import or export operation as a specification to learn how to save your save your specification details.
See Run a saved import or export specification to learn how to run your saved import or link specifications.
See Schedule an import or export specification to learn how to schedule import and link tasks to run at specific times.
Troubleshoot missing or incorrect values
If you receive the message An error occurred trying to import file, the import operation completely failed. Conversely, if the import operation displays a dialog box that prompts you to save the details of the operation, the operation was able to import all or some of the data. The status message also mentions the name of the error log table that contains the description of any errors that occurred during the import operation.
Important: Even if the status message indicates a completely successful operation, you should review the contents and structure of the table to ensure that everything looks correct before you start using the table.
-
Open the destination table in Datasheet view to see whether all data was added to the table.
-
Open the table in Design view to review the data type and other property settings of the fields.
The following table describes the steps that you can take to correct missing or incorrect values.
Tip: While you are troubleshooting the results, if you find just a few missing values, you can add them to the table manually. Conversely, if you find that entire columns or a large number of values are either missing or were not imported properly, you should correct the problem in the source file. After you have corrected all known problems, repeat the import operation.
|
Issue |
Resolution |
||||||||||||
|---|---|---|---|---|---|---|---|---|---|---|---|---|---|
|
Graphical elements |
Graphical elements, such as logos, charts, and pictures cannot be imported. Manually add them to the database after completing the import operation. |
||||||||||||
|
Calculated values |
The results of a calculated column or cells are imported, but not the underlying formula. During the import operation, you can specify a data type that is compatible with the formula results, such as Number. |
||||||||||||
|
TRUE or FALSE and -1 or 0 values |
If the source worksheet or range includes a column that contains only TRUE or FALSE values, Access creates a Yes/No field for the column and inserts -1 or 0 values in the field. However, if the source worksheet or range includes a column that contains only -1 or 0 values, Access, by default, creates a numeric field for the column. You can change the data type of the field to Yes/No during the import operation to avoid this problem. |
||||||||||||
|
Multivalued fields |
When you import data to a new table or append data to an existing table, Access does not enable support for multiple values in a field, even if the source column contains a list of values separated by semicolon (;). The list of values is treated as a single value and is placed in a text field. |
||||||||||||
|
Truncated data |
If data appears truncated in a column in the Access table, try increasing the width of the column in Datasheet view. If that doesn’t resolve the issue, the data in a numeric column in Excel is too large for the field size of the destination field in Access. For example, the destination field might have the FieldSize property set to Byte in an Access database but the source data contains a value greater than 255. Correct the values in the source file and try importing again. |
||||||||||||
|
Display format |
You might have to set the Format property of certain fields in design view to ensure that the values are displayed correctly in Datasheet view. For example:
Note: If the source worksheet contains rich text formatting such as bold, underline, or italics, the text is imported, but the formatting is lost. |
||||||||||||
|
Duplicate values (key violation error) |
Records that you are importing might contain duplicate values that cannot be stored in the primary key field of the destination table or in a field that has the Indexed property set to Yes (No Duplicates). Eliminate the duplicate values in the source file and try importing again. |
||||||||||||
|
Date values off by 4 years |
The date fields that are imported from an Excel worksheet might be off by four years. Excel for Windows can use two date systems:
You can set the date system in Excel Options: File > Options > Advanced > Use 1904 date system. Note If you import from a .xlsb workbook, it always uses the 1900 Date System regardless of the Date System setting. Before you import the data, change the date system for the Excel workbook or, after appending the data, perform an update query that uses the expression [date field name] + 1462 to correct the dates. Excel for the Macintosh only uses the 1904 Date System. |
||||||||||||
|
Null values |
You might see an error message at the end of the import operation about data that was deleted or lost during the operation, or when you open the table in Datasheet view, you might see that some field values are blank. If the source columns in Excel are not formatted, or the first eight source rows contain values of different data types, open the source worksheet and do the following:
The preceding steps can help minimize the appearance of null values. The following table lists cases in which you will still see null values:
|
||||||||||||
|
Date values replaced by numeric values |
You will see seemingly random five-digit numbers instead of the actual date values in the following situations:
|
||||||||||||
|
Numeric values replaced by date values |
You will see seemingly random date values instead of the actual numeric values in the following situations:
To avoid this, replace the numeric values with date values in the source column and then try importing again. |
In addition, you might want to review the error log table (mentioned in the last page of the wizard) in Datasheet view. The table has three fields — Error, Field, and Row. Each row contains information about a specific error, and the contents of the Error field should help you troubleshoot the problem.
Error strings and troubleshooting hints
|
Error |
Description |
|---|---|
|
Field Truncation |
A value in the file is too large for the FieldSize property setting for this field. |
|
Type Conversion Failure |
A value in the worksheet is the wrong data type for this field. The value might be missing or might appear incorrect in the destination field. See the previous table for more information how to troubleshoot this issue. |
|
Key Violation |
This record’s primary key value is a duplicate — it already exists in the table. |
|
Validation Rule Failure |
A value breaks the rule set by using the ValidationRule property for this field or for the table. |
|
Null in Required Field |
A null value isn’t allowed in this field because the Required property for the field is set to Yes. |
|
Null value in AutoNumber field |
The data that you are importing contains a Null value that you attempted to append to an AutoNumber field. |
|
Unparsable Record |
A text value contains the text delimiter character (usually double quotation marks). Whenever a value contains the delimiter character, the character must be repeated twice in the text file; for example: 4 1/2″» diameter |
Top of Page
Link to data in Excel
By linking an Access database to data in another program, you can use the querying and reporting tools that Access provides without having to maintain a copy of the Excel data in your database.
When you link to an Excel worksheet or a named range, Access creates a new table that is linked to the source cells. Any changes that you make to the source cells in Excel appear in the linked table. However, you cannot edit the contents of the corresponding table in Access. If you want to add, edit, or delete data, you must make the changes in the source file.
Common scenarios for linking to an Excel worksheet from within Access
Typically, you link to an Excel worksheet (instead of importing) for the following reasons:
-
You want to continue to keep your data in Excel worksheets, but be able to use the powerful querying and reporting features of Access.
-
Your department or workgroup uses Access, but data from external sources that you work with is in Excel worksheets. You don’t want to maintain copies of external data, but want to be able to work with it in Access.
If this is the first time you are linking to an Excel worksheet
-
You cannot create a link to an Access database from within Excel.
-
When you link to an Excel file, Access creates a new table, often referred to as a linked table. The table shows the data in the source worksheet or named range, but it doesn’t actually store the data in the database.
-
You cannot link Excel data to an existing table in the database. This means that you cannot append data to an existing table by performing a linking operation.
-
A database can contain multiple linked tables.
-
Any changes that you make to the data in Excel are automatically reflected in the linked table. However, the contents and structure of a linked table in Access are read-only.
-
When you open an Excel workbook in Access (in the File Open dialog box, change the Files of Type list box to Microsoft Excel, and select the file you want), Access creates a blank database and automatically starts the Link Spreadsheet Wizard.
Prepare the Excel data
-
Locate the Excel file and the worksheet or range that has the data you want to link to. If you don’t want to link to the entire worksheet, consider defining a named range that includes only the cells you want to link to.
Create a named range in Excel (optional – useful if you only want to link to some of the worksheet data)
-
Switch to Excel and display the worksheet in which you want to define a named range.
-
Select the range of cells that contain the data you want to link to.
-
Right-click within the selected range and click Name a Range or Define Name.
-
In the New Name dialog box, specify a name for the range in the Name box and then click OK.
Note that you can link to only one worksheet or range at a time during a link operation. To link to data in multiple places in a workbook, repeat the link operation for each worksheet or range.
-
-
Review the source data, and take action as described in the following table:
Element
Description
Tabular format
Ensure that the cells are in tabular format. If the range includes merged cells, the contents of the cell are placed in the field that corresponds to the leftmost column and the other fields are left blank.
Skipping columns and rows
You cannot skip source columns and rows during the linking operation. However, you can hide fields and filter records by opening the linked table in Datasheet view after you have imported them into Access.
Number of columns
The number of source columns cannot exceed 255, because Access does not support more than 255 fields in a table.
Blank columns, rows, and cells
Delete all unnecessary blank columns and blank rows in the Excel worksheet or range. If there are blank cells, try to add the missing data.
Error values
If one or more cells in a worksheet or range contain error values, correct them before you start the import operation. Note that if a source worksheet or range contains error values, Access inserts a null value in the corresponding fields in the table.
Data type
You cannot change the data type or size of the fields in the linked table. Before you start the linking operation, you must verify that each column contains data of a specific type.
We highly recommend that you format a column if it includes values of different data types. For example, the FlightNo column in a worksheet might contain numeric and text values, such as 871, AA90, and 171. To avoid missing or incorrect values, do the following:
-
Right-click the column and then click Format Cells.
-
On the Number tab, under Category, select a format.
-
Click OK.
First row
If the first row in the worksheet or named range contains the names of the columns, you can specify that Access should treat the data in the first row as field names during the link operation. If there are no column names in the worksheet, or if a specific column name violates the field naming rules in Access, Access assigns a valid name to each corresponding field.
-
-
Close the source file, if it is open.
Prepare the destination database
-
Open the database in which you want to create the link. Ensure that the database is not read-only and that you have the necessary permissions to make changes to it.
-
If you don’t want to store the link in any of your existing databases, create a blank database: Click the File tab, click New, and then click Blank Database. Note, if you’re using Access 2007, click the Microsoft Office Button and then click New.
You are now ready to start the linking operation.
Create the link
-
The location of the import/link wizard differs slightly depending upon your version of Access. Choose the steps that match your Access version:
-
If you’re using the latest version of the Microsoft 365 subscription version of Access or Access 2019, on the External Data tab, in the Import & Link group, click New Data Source > From File > Excel.
-
If you’re using Access 2016, Access 2013, or Access 2010, on the External Data tab, in the Import & Link group, click Excel.
Note: The External Data tab is not available unless a database is open.
-
-
In the Get External Data — Excel Spreadsheet dialog box, in the File name box, specify the name of the Excel source file.
-
Select Link to the data source by creating a linked table, and then click OK.
The Link Spreadsheet Wizard starts and guides you through the linking process.
-
On the first page of the wizard, select a worksheet or a named range and click Next.
-
If the first row of the source worksheet or range contains the field names, select First row contains column headings. Access uses these column headings to name the fields in the table. If a column name includes certain special characters, it cannot be used as a field name in Access. In such cases, an error message is displayed that tells you that Access will assign a valid name for the field. Click OK to continue.
-
On the final page of the wizard, specify a name for the linked table and then click Finish. If the table with the name you specify already exists, you are asked if you want to overwrite the existing table or query. Click Yes if you want to overwrite the table or query, or click No to specify a different name.
Access tries to create the linked table. If the operation succeeds, Access displays the Finished linking table message. Open the linked table and review the fields and data to ensure that you see the correct data in all the fields.
If you see error values or incorrect data, you must troubleshoot the source data. For more information about how to troubleshoot error values or incorrect values, see the next section.
Top of Page
Troubleshoot #Num! and other incorrect values in a linked table
Even if you receive the message Finished linking table, you should open the table in Datasheet view to ensure that the rows and columns show the correct data.
If you see errors or incorrect data anywhere in the table, take correct action as described in the following table, and then try linking again. Remember that you cannot add the values directly to the linked table, because the table is read-only.
|
Issue |
Resolution |
|---|---|
|
Graphical elements |
Graphical elements in an Excel worksheet, such as logos, charts, and pictures, cannot be linked to in Access. |
|
Display format |
You might have to set the Format property of certain fields in Design view to ensure that the values are displayed correctly in Datasheet view. |
|
Calculated values |
The results of a calculated column or cells are displayed in the corresponding field, but you cannot view the formula (or expression) in Access. |
|
Truncated text values |
Increase the width of the column in Datasheet view. If you still don’t see the entire value, it could be because the value is longer than 255 characters. Access can only link to the first 255 characters, so you should import the data instead of linking to it. |
|
Numeric field overflow error message |
The linked table might appear to be correct, but later, when you run a query against the table, you might see a Numeric Field Overflow error message. This can happen because of a conflict between the data type of a field in the linked table and the type of data that is stored in that field. |
|
TRUE or FALSE and -1 or 0 values |
If the source worksheet or range includes a column that contains only TRUE or FALSE values, Access creates a Yes/No field for the column in the linked table. However, if the source worksheet or range includes a column that contains only -1 or 0 values, Access, by default, creates a numeric field for the column, and you will not be able to change the data type of the corresponding field in the table. If you want a Yes/No field in the linked table, ensure that the source column includes TRUE and FALSE values. |
|
Multivalued fields |
Access does not enable support for multiple values in a field, even if the source column contains a list of values separated by semicolon (;). The list of values will be treated as a single value, and placed in a text field. |
|
#Num! |
Access displays the #Num! error value instead of the actual data in a field in the following situations:
Do the following to minimize the instances of null values in the table:
|
|
Numeric values instead of date values |
If you see a seemingly random five-digit number in a field, check to see if the source column contains mostly numeric values but also includes a few date values. Date values that appear in numeric columns get incorrectly converted to a number. Replace the date values with numeric values and then try linking again. |
|
Date values instead of numeric values |
If you see a seemingly random date value in a field, check to see if the source column contains mostly date values but also includes a few numeric values. Numeric values that appear in date columns get incorrectly converted to a date. Replace the numeric values with date values and then try linking again. |
Top of Page
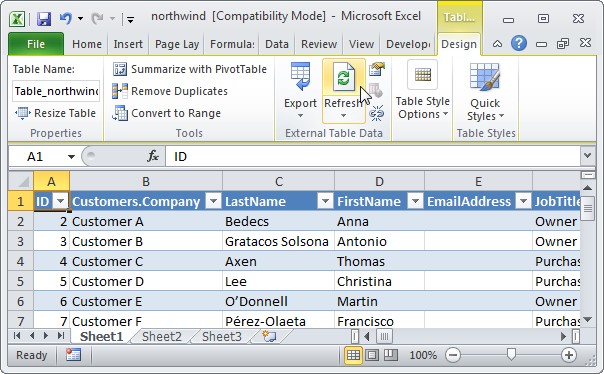
This example teaches you how to import data from a Microsoft Access database. In Excel, when you import data, you make a permanent connection that can be refreshed.
1. On the Data tab, in the Get & Transform Data group, click Get Data.

2. Click From Database, From Microsoft Access Database.

3. Select the Access file.

4. Click Import.
5. Select a table on the left side of the Navigator window and click Load.

Result. Your database records in Excel.

6. When your Access data changes, you can easily refresh the data in Excel. First, select a cell inside the table. Next, on the Table Design tab, in the External Table Data group, click Refresh.

How to Import Data in Excel?
Importing the data from another file or another source file is often required in Excel. For example, sometimes people need data directly from very complicated servers, and sometimes we may need to import data from a text file or even from an Excel workbook.
If you are new to Excel data importing, then in this article, we will take a tour of importing data from text files, different Excel workbooks, and MS Access. Follow this article to learn the process involved in importing the data.
Table of contents
- How to Import Data in Excel?
- #1 – Import Data from Another Excel Workbook
- #2 – Import Data from MS Access to Excel
- #3 – Import Data from Text File to Excel
- Things to Remember
- Recommended Articles
#1 – Import Data from Another Excel Workbook
You can download this Import Data Excel Template here – Import Data Excel Template
Let us start.
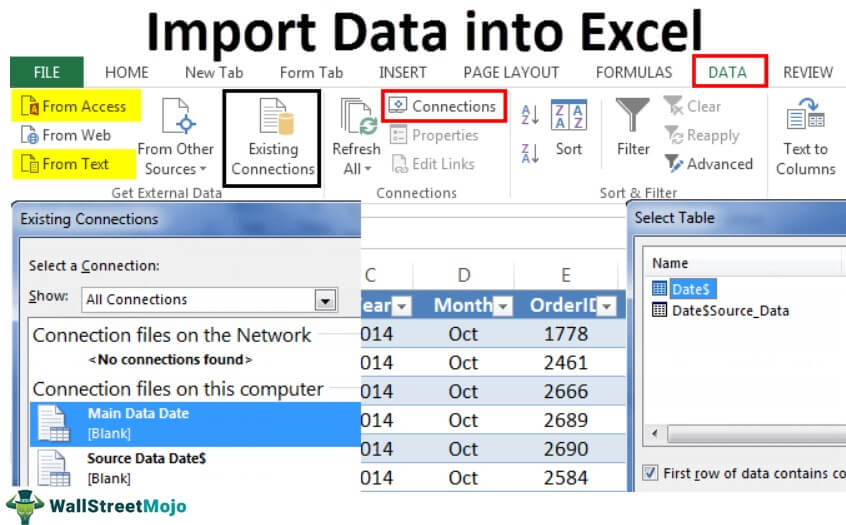
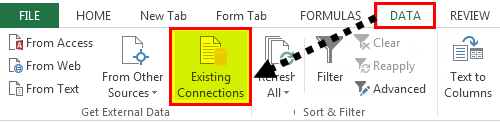
- First, we must go to the DATA tab. Then, under the DATA tab, click on Connections.

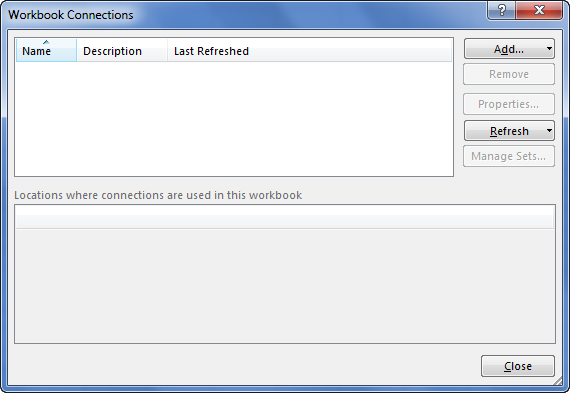
- As soon as we click on Connections, we may see the below window separately.

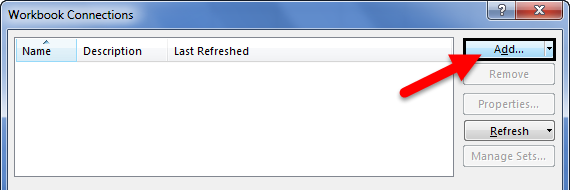
- Now, click on Add.

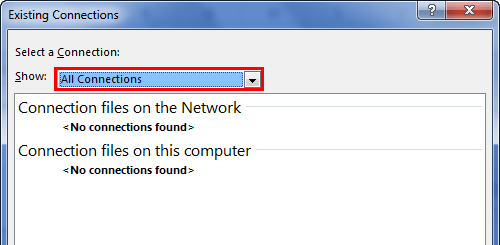
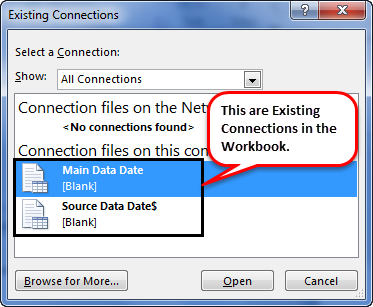
- It will open up a new window. In the below window, select All Connections.

- If there are any connections in this workbook, it will show what those connections are here.

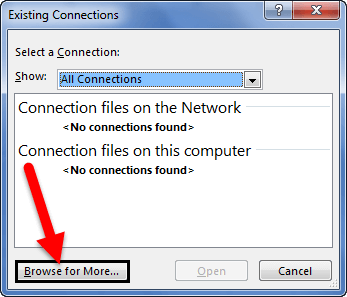
- Since we are connecting to a new workbook, click on Browse for more.

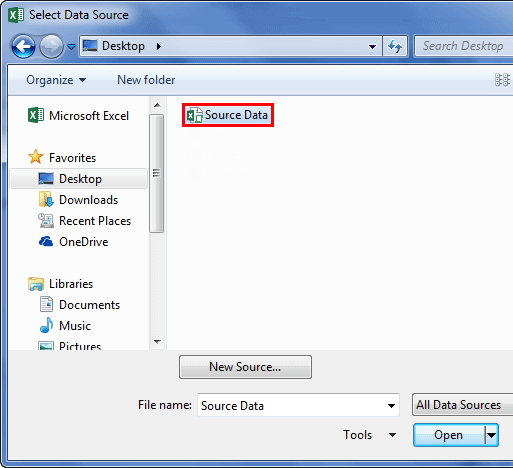
- In the below window, browse the file location. Then, click on Open.

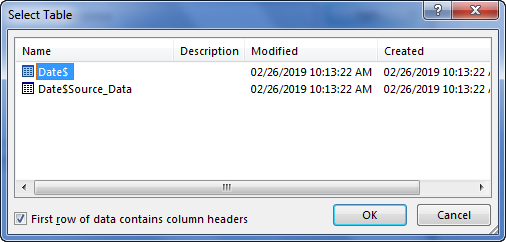
- After clicking on Open, it shows the below window.

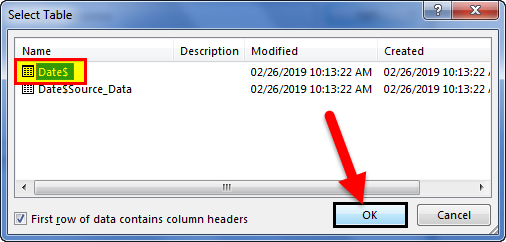
- Here, we need to select the required table to be imported to this workbook. Select the table and click on OK.
After clicking on OK, close the Workbook Connection window.
- Then, go to Existing Connections under the DATA tab.

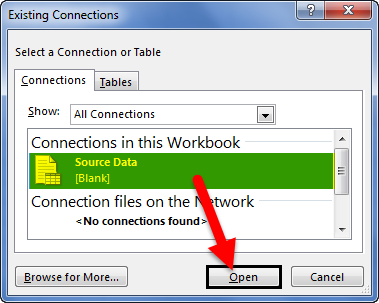
- Here, we will see all the existing connections. Select the connection we have just made and click on Open.

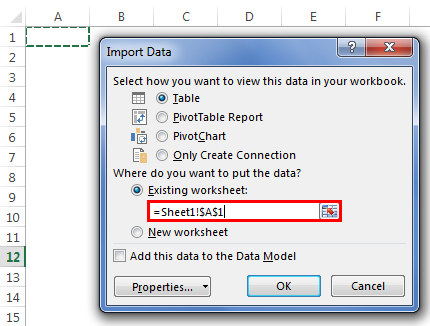
- Once we click on Open, it will ask us where to import the data. First, we need to select the cell reference here. Then, click on the OK button.

- It will import the data from the selected or connected workbook.


Like this, we can connect to the other workbook and import the data.
#2 – Import Data from MS Access to Excel
MS Access is the main platform to store the data safely. We can import the data directly from the MS Access File itself whenever the data is required.
Step 1: Go to the “DATA” ribbon in excelThe ribbon is an element of the UI (User Interface) which is seen as a strip that consists of buttons or tabs; it is available at the top of the excel sheet. This option was first introduced in the Microsoft Excel 2007.read more and select “From Access.“
Step 2: Now, it will ask us to locate the desired file. Select the desired file path. Then, click on “Open.”
Step 3: Now, it will ask us to select the desired destination cell where we want to import the data. Then, click on “OK.”
Step 4: It will import the data from access to the A1 cell in Excel.
#3 – Import Data from Text File to Excel
In almost all the corporations, whenever we ask for the data from the IT team, they will write a query and get the file in TEXT format. But unfortunately, TEXT file data is not the ready format to use in Excel; we need to make some modifications to work on it.
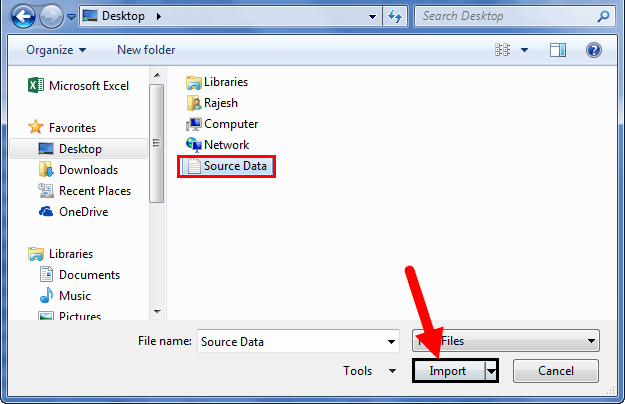
Step 1: Go to the “DATA” tab and click on “From Text.”

Step 2: Now, it will ask us to choose the file location on the computer or laptop. Select the targeted file, then click on “Import.”
Step 3: It will open up a “Text Import Wizard.”
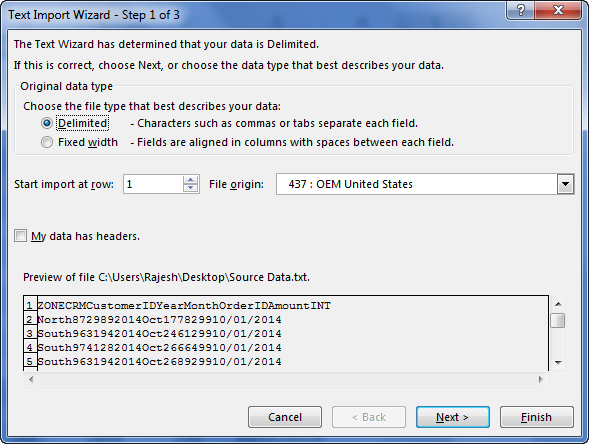
Step 4: By selecting the “Delimited,” click on “Next.”
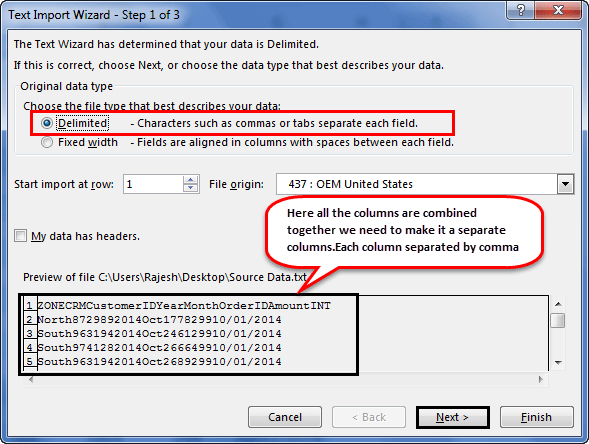
Step 5: In the next window, select the other and mention comma (,) because, in the text file, each column is separated by a comma (,). Then click on “Next.”
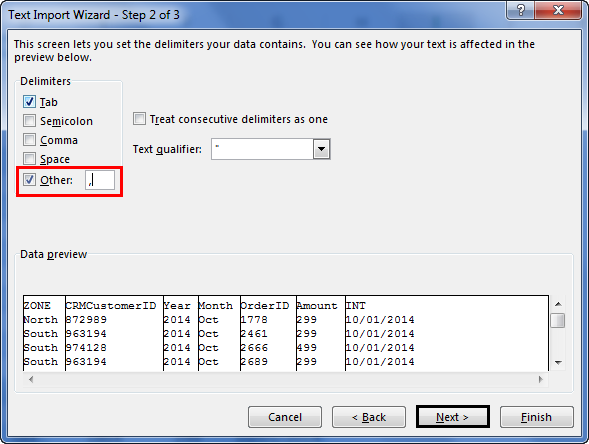
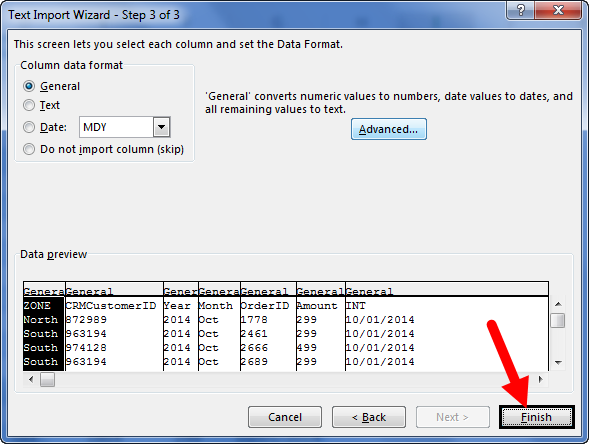
Step 6: In the next window, click on “Finish.”
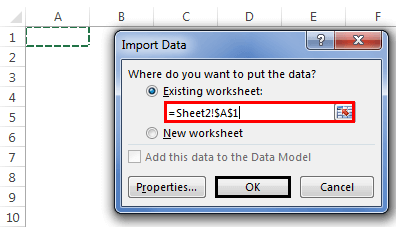
Step 7: Now, it will ask us to select the desired destination cell where we want to import the data. Select the cell and click on “OK.”
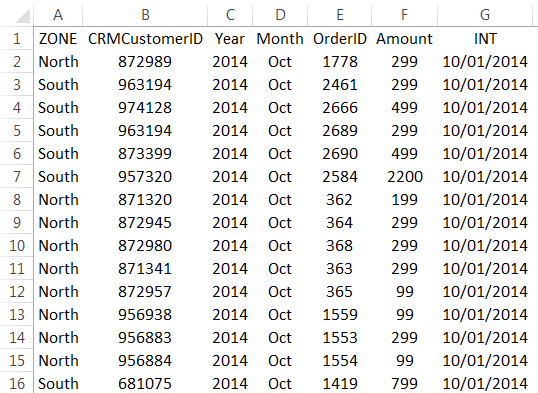
Step 8: It will import the data from the text file to the A1 cell in Excel.
Things to Remember
- If there are many tables, we must specify which table data we need to import.
- If we want the data in the current worksheet, we need to select the desired cell. Else, if we need data in a new worksheet, we must choose the new worksheet as the option.
- We need to separate the column in the TEXT file by identifying the common column separators.
Recommended Articles
This article is a guide to Import Data in Excel. Here, we discuss how to import data from 1) Excel Workbook, 2) MS Access, 3) Text File, practical examples, and a downloadable Excel template. You may learn more about Excel from the following articles: –
- KPI Dashboard in Excel
- Insert Image in Excel Cell
- How to Insert New Worksheet In Excel?
- Create a Dashboard in Excel
- Page Numbers in Excel
Importing data to Excel from other programs and sources enables you to further analyse and generate reports or dashboards from what is often 1000’s of rows of data.
On the Data tab of the ribbon in the section Get External Data there are four options:
- From Access – a Microsoft Access Database
- From Web – from a web page
- From Text – from a .csv or .txt file
- From Other Sources – like an SQL, XML or other database

1. Importing Data from Access
I’m not going to go into a lot of detail on Access because this can be a topic all on its own insofar as you can either import data into Excel from Access, or export from Access to Excel.
And then there are options as to how you go about this, for example you can cut or copy and paste data, write a macro or Visual Basic (VBA), or export the Access data to an XML file form importing to Excel.
Having said that; if you follow the prompts in Excel to import data from Access it’s fairly self explanatory:
To import data into Excel from Access:
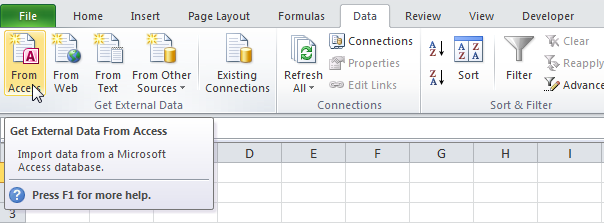
a. Choose the From Access option from the Get External Data group on the Data tab of the ribbon.
b. Browse to your Access file location and follow the prompts.
2. Importing Data from a Web Page
When you click on the From Web button on the ribbon a mini web browser opens in Excel.

From here you can browse to the page that contains the data you want to import.
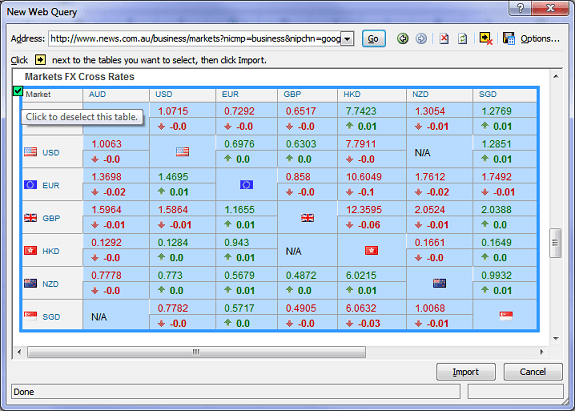
You can see in the above image there are arrows in yellow boxes indicating the tables in the web page. Some pages will have lots of these and some will have only one.
When you hover your mouse pointer over the arrows a box is shown around the data in the table. Click the arrows on the tables you want to import. You’ll notice the arrows change to a tick in a green box.
I’m going to import currency cross rates as you can see in the image below:
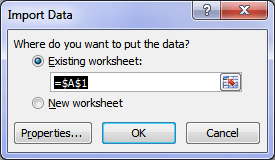
Once I click on the Import button Excel will ask me where I want to place the data:
After a few seconds it will load the data from the web page and you can see the Get External Data group of icons is now inactive and the Properties button in the Connections group is active.
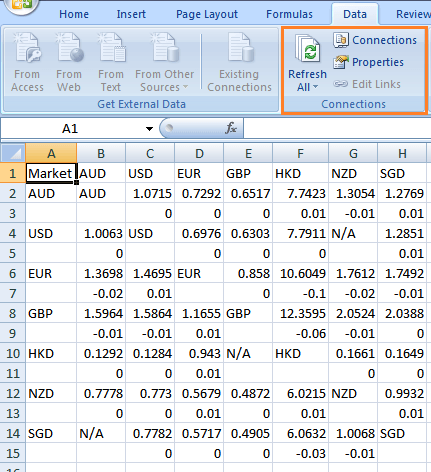
You can now use the data to create charts, or insert formulas to the right or below to the data to analyse it further.
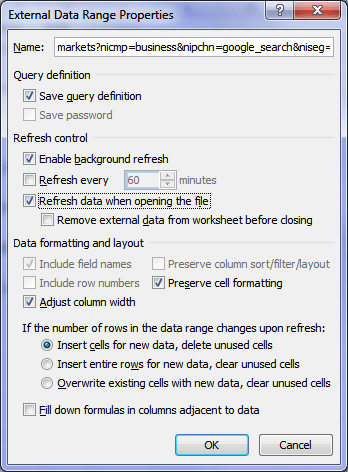
Refreshing Your Imported Data
You can set when you want to refresh your data by modifying the External Data Range Properties. You’ll find the properties button on the Data tab of the ribbon under Connections (see image above).
You can set it to refresh when you open the file, or if you’re looking at stock or currency prices you might want to update it every minute.
There are also other options here with regards to the formatting and layout of the data you import.
3. Importing Data from a Text File
This is possibly one of the most common ways to import data since often data exported from other systems is saved as a .txt (text file) or a .csv (comma separated file).
A .csv file contains one page of text with little or no formatting. Each column of data is separated by a delimiter. A delimiter is a character like a forward slash, semi colon or it can even be a tab or a space which separates each column of data.
A .txt file is the same as a .csv file except the data is not always separated by a delimiter, however you may find that the data in each column is exactly the same width. This allows you to manually insert columns where you want. More on this later.
With both file types each new line of text is imported into a separate row in Excel.
How to Import Data from a .CSV File
You can either browse to the file location as you normally would (changing the view to file types Text Files *.prn; *.txt; *.csv) or you can go to the Data tab on the ribbon and select From Text and then browse to your file location that way.
When you’ve selected your file the Text Import Wizard will open.
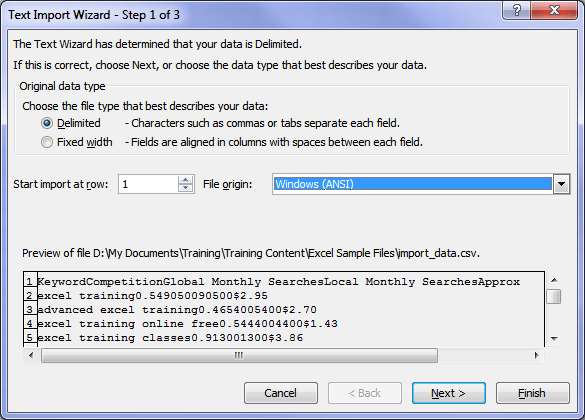
Since I’m opening a .csv file I want to choose the file type as Delimited.
You can see a preview of the data you’re going to import in its raw form i.e. without any columns separating the data.
Click Next.
You can now tell Excel what type of delimiter is used in the file. Often you won’t know which delimiter was used but Excel will typically choose the correct one. You can change it by selecting another one, or more than one in step 2 of the wizard.
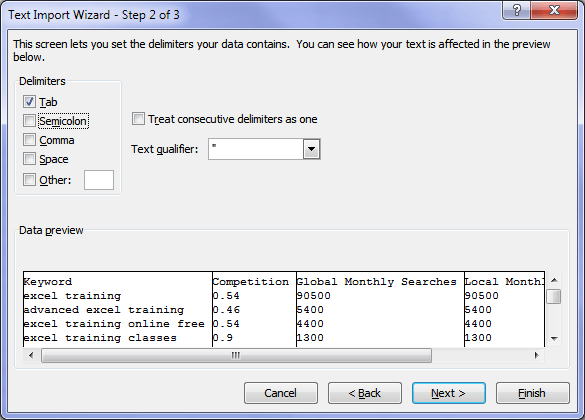
You can see in the preview pane above that Excel has now inserted columns into the data. Use the scroll bars to check for any anomalies.
Click Next when you’re happy with the delimiters.
In step 3 of the wizard you can tell Excel what type of data occupies each column.
In turn select each column by clicking on the heading in the preview pane (the selected column will be highlighted in black). Then select the data format from the Column data format box.
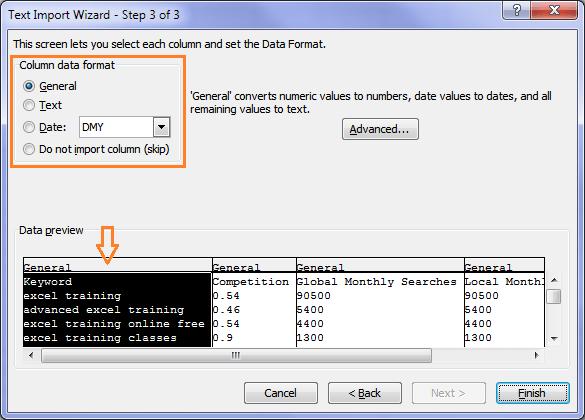
Tip: Make sure you set the correct format for date columns and set any number columns to General.
Click Finish and tell Excel where you want your data inserted.
Note: if you open the file, as opposed to importing it through the Get External Data group on the ribbon, when you save your file Excel will give you an error message and ask you if you want to change the file type to the latest Excel format. I recommend you choose ‘Yes’ otherwise any formulas, formatting or additional sheets you insert while working with the data will be lost.
Opening a .txt File Without Delimiters
If your .txt file doesn’t have a delimiter but the text is still in a tabular format you can choose Fixed width in step 1 of the wizard.

Click next and Excel will allow you to insert columns where you want by clicking anywhere in the data preview pane:
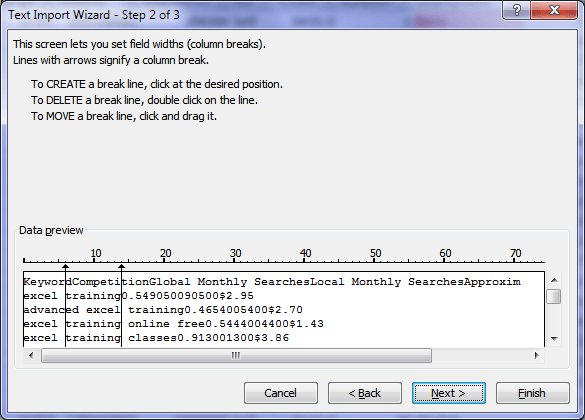
You can then move the lines by clicking and dragging them into place.
Or delete them by double clicking on them.
Be extra careful to use the scroll bars in the preview pane to check for any data that has been truncated by your columns. This is particularly common with numbers.
Step 3 is the same as stated earlier.
4. Importing Data from Other Sources
This is where you connect to an external system, for example your finance department’s accounting software. You will need to contact your IT department to co-ordinate importing data from these types of systems as they typically have security in place to prevent access to the data.
CopyFromRecordset is probably the easiest method of getting data from an Access table to an Excel worksheet.
Sub DAOCopyFromRecordSet(DBFullName As String, TableName As String, _
    FieldName As String, TargetRange As Range)
' Example: DAOCopyFromRecordSet "C:FolderNameDataBaseName.mdb", _
    "TableName", "FieldName", Range("C1")
Dim db As Database, rs As Recordset
Dim intColIndex As Integer
    Set TargetRange = TargetRange.Cells(1, 1)
    Set db = OpenDatabase(DBFullName)
    Set rs = db.OpenRecordset(TableName, dbOpenTable) ' all records
    'Set rs = db.OpenRecordset("SELECT * FROM " & TableName & _
        " WHERE " & FieldName & _
        " = 'MyCriteria'", dbReadOnly) ' filter records
    ' write field names
    For intColIndex = 0 To rs.Fields.Count - 1
        TargetRange.Offset(0, intColIndex).Value = rs.Fields(intColIndex).Name
    Next
    ' write recordset
    TargetRange.Offset(1, 0).CopyFromRecordset rs
    Set rs = Nothing
    db.Close
    Set db = Nothing
End Sub
If you want more control with the data import, you can customize the macro below:
Sub DAOFromAccessToExcel(DBFullName As String, TableName As String, _
    FieldName As String, TargetRange As Range)
' Example: DAOFromAccessToExcel "C:FolderNameDataBaseName.mdb", _
    "TableName", "FieldName", Range("B1")
Dim db As Database, rs As Recordset
Dim lngRowIndex As Long
    Set TargetRange = TargetRange.Cells(1, 1)
    Set db = OpenDatabase(DBFullName)
    Set rs = db.OpenRecordset(TableName, dbOpenTable) ' all records
    'Set rs = DB.OpenRecordset("SELECT * FROM " & _
        TableName & " WHERE " & FieldName & _
        " = 'MyCriteria'", dbReadOnly) ' filter records
    lngRowIndex = 0
    With rs
        If Not .BOF Then .MoveFirst
        While Not .EOF
            TargetRange.Offset(lngRowIndex, 0).Formula = .Fields(FieldName)
            .MoveNext
            lngRowIndex = lngRowIndex + 1
        Wend
    End With
    Set rs = Nothing
    db.Close
    Set db = Nothing
End Sub
The macro examples assumes that your VBA project has added a reference to the DAO object library.
You can do this from within the VBE by selecting the menu Tools, References and selecting Microsoft DAO x.xx Object Library.
Use ADO if you can choose between ADO and DAO for data import or export.
There are many ways you can import Access data into Excel, the simplest way is via the Data Import wizard contained within Excel. Read on and learn the fast way to import Access data into Excel…
The problem
As an Excel analyst there will be occasions when the data you need lives on another software system, Microsoft Access databases are a common place for that data to live as many businesses use it as part of the Microsoft Office suite.
When creating reports and dashboards in Excel, which use data from Access, it is not practical to copy and paste the data directly from a table, especially when tens of thousands of rows exist or a regular update is required, the best solution is to import the Access data into Excel using the import wizard and create a connection.
The Solution
Let’s jump right in:
1) Locate your Access database and data table. If you are importing data from Access into Excel then you need to know what you are trying to import (the Access table) and where that file is located (the location and name of the Access database). These things are always best completed at the outset.
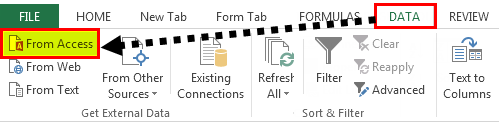
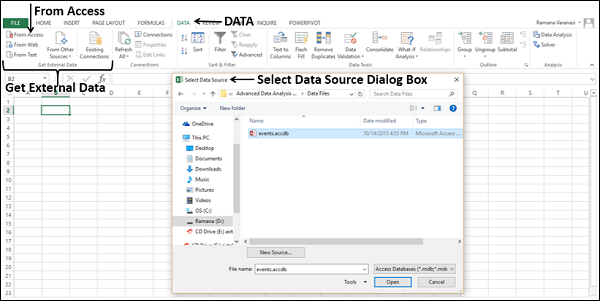
2) Now you know what you are going to get from Access you can open up your Excel file and select the “Data” option from the ribbon, followed by the option “From Access” (as shown in the below image):

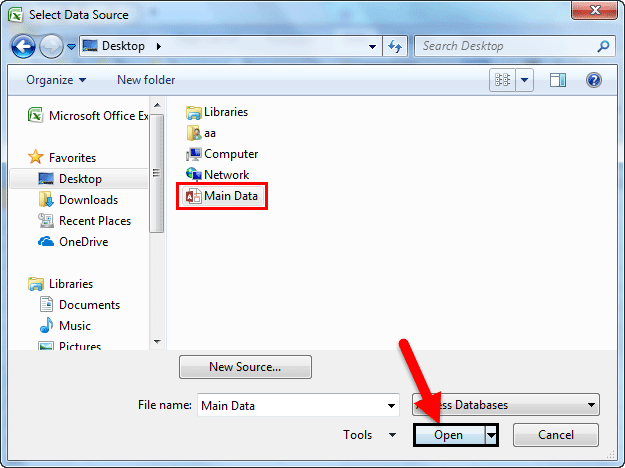
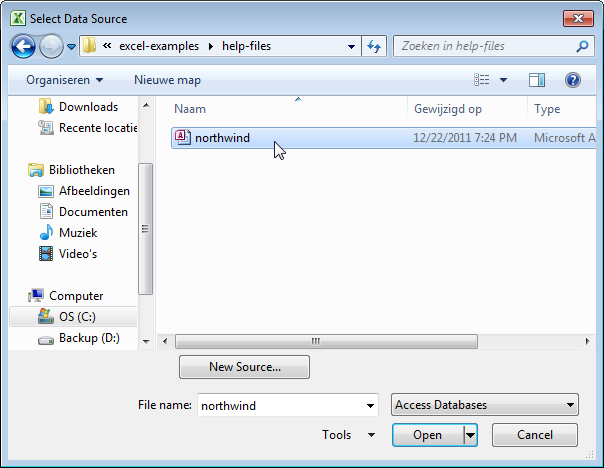
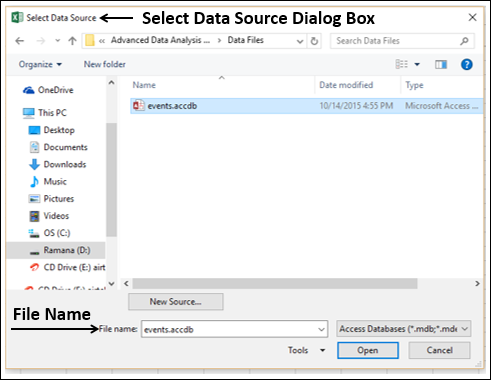
3) When you select “From Access” a new window will open up called “Select Data Source”, this is where you must navigate to the Access database that contains your data, when you have found it either double click to make the selection or left click the name once to highlight the database, then select “Open”:

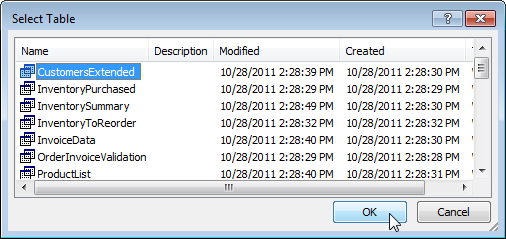
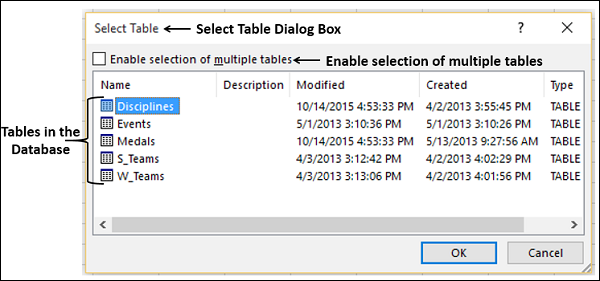
4) The next window is the “Select Table” window. From the list select the Access table that you want to import into Excel and click OK. It’s worth noting that if there is only one table in the Access database this part will be skipped automatically:

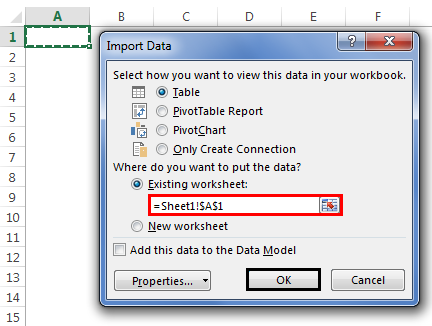
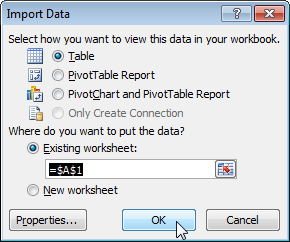
5) After you select your table the “Import Data” window appears. This is where you can toggle with some last minute options such as where you want to place the data, you can even use the data straight in a Pivot Table or chart, for this example just click OK to go ahead and import the Access data into Excel:

6) After you have clicked OK your Access data will import into Excel. Depending on the size of the table it might take a few seconds to complete:

Now you can manipulate the Access data within Excel or build reports and create charts from the data.
Very useful tip
By importing the data this way you create a direct connection to the Access data, that means if your Access table changes, i.e. the data inside it grows, all you have to do is refresh the table in Excel and the latest data will update. This is extremely useful for setting up frequent reports or dashboards.
One of the useful features often ignored is within the “Properties” of the import. When you are on stage 5 and are faced with this window:
Select the “Properties” item and then you will be faced with the “Connection Properties” window. Here you can check the box to refresh the data when opening the file which is a useful technique if the Access database is frequently updated and you want your Excel version of the data to stay up-to-date:

Hopefully you will find this method one of the easiest ways to import Access data into Excel, there are lots of great uses for this technique in connected Excel dashboards or advanced reporting so it is a great process to understand for all Excel analysts.
Keep Excelling,

Перейти к содержанию
На чтение 1 мин Опубликовано 19.06.2015
Этот пример научит вас импортировать информацию из базы данных Microsoft Access. Импортируя данные в Excel, вы создаёте постоянную связь, которую можно обновлять.
- На вкладке Data (Данные) в разделе Get External Data (Получение внешних данных) кликните по кнопке From Access (Из Access).

- Выберите файл Access.
- Кликните Open (Открыть).
- Выберите таблицу и нажмите ОК.
- Выберите, как вы хотите отображать данные в книге, куда их следует поместить и нажмите ОК.
Результат: Записи из базы данных Access появились в Excel.
Примечание: Когда данные Access изменятся, Вам достаточно будет нажать Refresh (Обновить), чтобы загрузить изменения в Excel.
Оцените качество статьи. Нам важно ваше мнение:
July 2013
Many people (especially in Finance) use Excel and Access almost interchangeably, feeding data between both applications. But if you’ve never done it, then how do you? There are several ways to import data from Access to Excel, and you don’t even need to have Access open. You can import Tables, as well as most queries (Crosstab queries aren’t supported), so it’s up to you to determine which you want to import. In general, since you use Access to store large amounts of data in tables, then use its fantastic querying ability to pare that data down into manageable chunks, you’ll find yourself importing query results most of the time.
In this article we’ll discuss the easiest way to import Access data into Excel whether from Tables or Queries. To get started go to Excel’s Data menuàGet External DataàFrom Access (this was a new option with Excel 2007 and the Ribbon Interface), although if you’re familiar with it, the old MSQuery option is still there, which we’ll discuss in another article.

From there, select the database that you want to use as your import source. Excel will then display a list of the available Tables and Queries that can be imported:
 In this case we’ll import the Customers table. Once you’ve selected the Table/Query that you want to import, Excel will ask you how you want to import it. For this example we’re just going to import the Access data as a table, although you can see that Excel gives you several options for importing the data. You should note here that while you can’t currently import Crosstab queries from Access, you can import the data that supports the Crosstab as a Pivot Table report (after all, a Pivot Table is essentially Excel’s version of an Access Crosstab query).
Sidenote: If you’re using Excel 2013 you’ll see a check box at the bottom to “Add this data to the Data Model”. This is an exciting new feature that the Excel team developed that allows you to create relationships between tables (a lot like you’d do in Access when building queries). If you’re interested, then make sure to check out this article from Diego Oppenheimer, Program Manager for the Excel development team at Microsoft: http://blogs.office.com/b/microsoft-excel/archive/2012/08/23/introduction-to-the- data-model-and-relationships.aspx.
 Properties – While you can certainly get detailed with Import Properties, for this article I just wanted to point out a feature that’s handy if you have a data set that refreshes at regular intervals: you can tell Excel to automatically refresh your Access data whenever you want.
Skipping past the Data Model and Properties, if you hit OK your table data will be immediately returned to Excel:
 If you’re at all familiar with Excel’s Tables, then you’ll recognize this format, which you can modify in the Table Tools Design tab, which will become active when you select any range in the table.

 If you haven’t taken advantage of the Refresh options in the Properties dialog, you can refresh on demand from the Table Tools Design tab or the Data tab.
Note: The database examples used in this article were from Microsoft’s Northwind database for Access 2010, which you can find under FileàNewàSamples.
This tutorial will cover the ways to import data from Excel into an Access Table and ways to export Access objects (Queries, Reports, Tables, or Forms) to Excel.
Import Excel File Into Access
To import an Excel file to Access, use the acImport option of DoCmd.TransferSpreadsheet :
DoCmd.TransferSpreadsheet acImport, acSpreadsheetTypeExcel12, "Table1", "C:TempBook1.xlsx", TrueOr you can use DoCmd.TransferText to import a CSV file:
DoCmd.TransferText acLinkDelim, , "Table1", "C:TempBook1.xlsx", TrueImport Excel to Access Function
This function can be used to import an Excel file or CSV file into an Access Table:
Public Function ImportFile(Filename As String, HasFieldNames As Boolean, TableName As String) As Boolean
' Example usage: call ImportFile ("Select an Excel File",  "Excel Files", "*.xlsx",  "C:" , True,True, "ExcelImportTest", True, True,false,True)

    On Error GoTo err_handler

    If (Right(Filename, 3) = "xls") Or ((Right(Filename, 4) = "xlsx")) Then
                DoCmd.TransferSpreadsheet acImport, acSpreadsheetTypeExcel12, TableName, Filename, blnHasFieldNames
            End If
    If (Right(Filename, 3) = "csv") Then
                DoCmd.TransferText acLinkDelim, , TableName, Filename, True
    End If

Exit_Thing:

    'Clean up
    'Check if our linked in Excel table already exists... and delete it if so
    If ObjectExists("Table", TableName) = True Then DropTable (TableName)
    Set colWorksheets = Nothing

    Exit Function

err_handler:
    If (Err.Number = 3086 Or Err.Number = 3274 Or Err.Number = 3073) And errCount < 3 Then
        errCount = errCount + 1

    ElseIf Err.Number = 3127 Then
        MsgBox "The fields in all the tabs are the same. Please make sure that each sheet has the exact column names if you wish to import mulitple", vbCritical, "MultiSheets not identical"
        ImportFile = False
        GoTo Exit_Thing
    Else
        MsgBox Err.Number & " - " & Err.Description
        ImportFile = False
        GoTo Exit_Thing
        Resume
    End If
End Function
You can call the function like this:
Private Sub ImportFile_Example()
 Call VBA_Access_ImportExport.ImportFile("C:TempBook1.xlsx", True, "Imported_Table_1")
End Sub
Access VBA Export to New Excel File
To export an Access object to a new Excel file, use the DoCmd.OutputTo method or the DoCmd.TransferSpreadsheet method:
Export Query to Excel
This line of VBA code will export a Query to Excel using DoCmd.OutputTo:
DoCmd.OutputTo acOutputQuery, "Query1", acFormatXLSX, "c:tempExportedQuery.xls"Or you can use the DoCmd.TransferSpreadsheet method instead:
DoCmd.TransferSpreadsheet acExport, acSpreadsheetTypeExcel8, "Query1", "c:tempExportedQuery.xls", TrueNote: This code exports to XLSX format. Instead you can update the arguments to export to a CSV or XLS file format instead (ex. acFormatXLSX to acFormatXLS).
Export Report to Excel
This line of code will export a Report to Excel using DoCmd.OutputTo:
DoCmd.OutputTo acOutputReport, "Report1", acFormatXLSX, "c:tempExportedReport.xls"Or you can use the DoCmd.TransferSpreadsheet method instead:
DoCmd.TransferSpreadsheet acExport, acSpreadsheetTypeExcel8, "Report1", "c:tempExportedReport.xls", TrueExport Table to Excel
This line of code will export a Table to Excel using DoCmd.OutputTo:
DoCmd.OutputTo acOutputTable, "Table1", acFormatXLSX, "c:tempExportedTable.xls"Or you can use the DoCmd.TransferSpreadsheet method instead:
DoCmd.TransferSpreadsheet acExport, acSpreadsheetTypeExcel8, "Table1", "c:tempExportedTable.xls", TrueVBA Coding Made Easy
Stop searching for VBA code online. Learn more about AutoMacro — A VBA Code Builder that allows beginners to code procedures from scratch with minimal coding knowledge and with many time-saving features for all users!

Learn More
Export Form to Excel
This line of code will export a Form to Excel using DoCmd.OutputTo:
DoCmd.OutputTo acOutputForm, "Form1", acFormatXLSX, "c:tempExportedForm.xls"Or you can use the DoCmd.TransferSpreadsheet method instead:
DoCmd.TransferSpreadsheet acExport, acSpreadsheetTypeExcel8, "Form1", "c:tempExportedForm.xls", TrueExport to Excel Functions
These one line commands work great to export to a new Excel file. However, they will not be able to export into an existing workbook. In the section below we introduce functions that allow you to append your export to an existing Excel file.
Below that, we’ve included some additional functions to export to new Excel files, including error handling and more.
Export to Existing Excel File
The above code examples work great to export Access objects to a new Excel file. However, they will not be able to export into an existing workbook.
To export Access objects to an existing Excel workbook we’ve created the following function:
Public Function AppendToExcel(strObjectType As String, strObjectName As String, strSheetName As String, strFileName As String)

    Dim rst As DAO.Recordset
    Dim ApXL As Excel.Application
    Dim xlWBk As Excel.Workbook
    Dim xlWSh As Excel.Worksheet
    Dim intCount As Integer
    Const xlToRight As Long = -4161
    Const xlCenter As Long = -4108
    Const xlBottom As Long = -4107
    Const xlContinuous As Long = 1

    Select Case strObjectType

    Case "Table", "Query"
        Set rst = CurrentDb.OpenRecordset(strObjectName, dbOpenDynaset, dbSeeChanges)
    Case "Form"
        Set rst = Forms(strObjectName).RecordsetClone
    Case "Report"
        Set rst = CurrentDb.OpenRecordset(Reports(strObjectName).RecordSource, dbOpenDynaset, dbSeeChanges)
    End Select

    If rst.RecordCount = 0 Then
        MsgBox "No records to be exported.", vbInformation, GetDBTitle
    Else
        On Error Resume Next
        Set ApXL = GetObject(, "Excel.Application")
        If Err.Number <> 0 Then
            Set ApXL = CreateObject("Excel.Application")
        End If
        Err.Clear

        ApXL.Visible = False

        Set xlWBk = ApXL.Workbooks.Open(strFileName)
        Set xlWSh = xlWBk.Sheets.Add
        xlWSh.Name = Left(strSheetName, 31)


        xlWSh.Range("A1").Select
        Do Until intCount = rst.fields.Count
            ApXL.ActiveCell = rst.fields(intCount).Name
            ApXL.ActiveCell.Offset(0, 1).Select
            intCount = intCount + 1
        Loop

        rst.MoveFirst

        xlWSh.Range("A2").CopyFromRecordset rst

        With ApXL
            .Range("A1").Select
            .Range(.Selection, .Selection.End(xlToRight)).Select
            .Selection.Interior.Pattern = xlSolid
            .Selection.Interior.PatternColorIndex = xlAutomatic
            .Selection.Interior.TintAndShade = -0.25
            .Selection.Interior.PatternTintAndShade = 0
            .Selection.Borders.LineStyle = xlNone
            .Selection.AutoFilter
            .Cells.EntireColumn.AutoFit
            .Cells.EntireRow.AutoFit
            .Range("B2").Select
            .ActiveWindow.FreezePanes = True
            .ActiveSheet.Cells.Select
            .ActiveSheet.Cells.WrapText = False
            .ActiveSheet.Cells.EntireColumn.AutoFit
            xlWSh.Range("A1").Select
            .Visible = True
        End With

        'xlWB.Close True
        'Set xlWB = Nothing
        'ApXL.Quit
        'Set ApXL = Nothing
    End If
End Function
You can use the function like this:
Private Sub AppendToExcel_Example()
    Call VBA_Access_ImportExport.ExportToExcel("Table", "Table1", "VBASheet", "C:TempTest.xlsx")
End Sub
Notice you are asked to define:
- What to Output? Table, Report, Query, or Form
- Object Name
- Output Sheet Name
- Output File Path and Name.
VBA Programming | Code Generator does work for you!
Export SQL Query to Excel
Instead you can export an SQL query to Excel using a similar function:
Public Function AppendToExcelSQLStatemet(strsql As String, strSheetName As String, strFileName As String)
    Dim strQueryName As String
    Dim ApXL As Excel.Application
    Dim xlWBk As Excel.Workbook
    Dim xlWSh As Excel.Worksheet
    Dim intCount As Integer
    Const xlCenter As Long = -4108
    Const xlBottom As Long = -4107
    Const xlVAlignCenter = -4108
    Const xlContinuous As Long = 1
    Dim qdf As DAO.QueryDef
    Dim rst As DAO.Recordset

    strQueryName = "tmpQueryToExportToExcel"

    If ObjectExists("Query", strQueryName) Then
        CurrentDb.QueryDefs.Delete strQueryName
    End If
    Set qdf = CurrentDb.CreateQueryDef(strQueryName, strsql)
    Set rst = CurrentDb.OpenRecordset(strQueryName, dbOpenDynaset)

    If rst.RecordCount = 0 Then
        MsgBox "No records to be exported.", vbInformation, GetDBTitle
    Else
        On Error Resume Next
        Set ApXL = GetObject(, "Excel.Application")
        If Err.Number <> 0 Then
            Set ApXL = CreateObject("Excel.Application")
        End If
        Err.Clear

        ApXL.Visible = False

        Set xlWBk = ApXL.Workbooks.Open(strFileName)
        Set xlWSh = xlWBk.Sheets.Add
        xlWSh.Name = Left(strSheetName, 31)


        xlWSh.Range("A1").Select
        Do Until intCount = rst.fields.Count
            ApXL.ActiveCell = rst.fields(intCount).Name
            ApXL.ActiveCell.Offset(0, 1).Select
            intCount = intCount + 1
        Loop

        rst.MoveFirst

        xlWSh.Range("A2").CopyFromRecordset rst

        With ApXL
            .Range("A1").Select
            .Range(.Selection, .Selection.End(xlToRight)).Select
            .Selection.Interior.Pattern = xlSolid
            .Selection.Interior.PatternColorIndex = xlAutomatic
            .Selection.Interior.TintAndShade = -0.25
            .Selection.Interior.PatternTintAndShade = 0
            .Selection.Borders.LineStyle = xlNone
            .Selection.AutoFilter
            .Cells.EntireColumn.AutoFit
            .Cells.EntireRow.AutoFit
            .Range("B2").Select
            .ActiveWindow.FreezePanes = True
            .ActiveSheet.Cells.Select
            .ActiveSheet.Cells.WrapText = False
            .ActiveSheet.Cells.EntireColumn.AutoFit
            xlWSh.Range("A1").Select
            .Visible = True
        End With


        'xlWB.Close True
        'Set xlWB = Nothing
        'ApXL.Quit
        'Set ApXL = Nothing
    End If
End Function
Called like this:
Private Sub AppendToExcelSQLStatemet_Example()
    Call VBA_Access_ImportExport.ExportToExcel("SELECT * FROM Table1", "VBASheet", "C:TempTest.xlsx")
End Sub
Where you are asked to input:
- SQL Query
- Output Sheet Name
- Output File Path and Name.
Function to Export to New Excel File
These functions allow you to export Access objects to a new Excel workbook. You might find them more useful than the simple single lines at the top of the document.
Public Function ExportToExcel(strObjectType As String, strObjectName As String, Optional strSheetName As String, Optional strFileName As String)

    Dim rst As DAO.Recordset
    Dim ApXL As Object
    Dim xlWBk As Object
    Dim xlWSh As Object
    Dim intCount As Integer
    Const xlToRight As Long = -4161
    Const xlCenter As Long = -4108
    Const xlBottom As Long = -4107
    Const xlContinuous As Long = 1

    On Error GoTo ExportToExcel_Err
    DoCmd.Hourglass True

    Select Case strObjectType

    Case "Table", "Query"
        Set rst = CurrentDb.OpenRecordset(strObjectName, dbOpenDynaset, dbSeeChanges)
    Case "Form"
        Set rst = Forms(strObjectName).RecordsetClone
    Case "Report"
        Set rst = CurrentDb.OpenRecordset(Reports(strObjectName).RecordSource, dbOpenDynaset, dbSeeChanges)
    End Select

    If rst.RecordCount = 0 Then
        MsgBox "No records to be exported.", vbInformation, GetDBTitle
        DoCmd.Hourglass False
    Else
        On Error Resume Next
        Set ApXL = GetObject(, "Excel.Application")
        If Err.Number <> 0 Then
            Set ApXL = CreateObject("Excel.Application")
        End If
        Err.Clear
        On Error GoTo ExportToExcel_Err

        Set xlWBk = ApXL.Workbooks.Add
        ApXL.Visible = False

        Set xlWSh = xlWBk.Worksheets("Sheet1")
        If Len(strSheetName) > 0 Then
            xlWSh.Name = Left(strSheetName, 31)
        End If

        xlWSh.Range("A1").Select
        Do Until intCount = rst.fields.Count
            ApXL.ActiveCell = rst.fields(intCount).Name
            ApXL.ActiveCell.Offset(0, 1).Select
            intCount = intCount + 1
        Loop

        rst.MoveFirst

        xlWSh.Range("A2").CopyFromRecordset rst

        With ApXL
            .Range("A1").Select
            .Range(.Selection, .Selection.End(xlToRight)).Select
            .Selection.Interior.Pattern = xlSolid
            .Selection.Interior.PatternColorIndex = xlAutomatic
            .Selection.Interior.TintAndShade = -0.25
            .Selection.Interior.PatternTintAndShade = 0
            .Selection.Borders.LineStyle = xlNone
            .Selection.AutoFilter
            .Cells.EntireColumn.AutoFit
            .Cells.EntireRow.AutoFit
            .Range("B2").Select
            .ActiveWindow.FreezePanes = True
            .ActiveSheet.Cells.Select
            .ActiveSheet.Cells.WrapText = False
            .ActiveSheet.Cells.EntireColumn.AutoFit
            xlWSh.Range("A1").Select
            .Visible = True
        End With

retry:
        If FileExists(strFileName) Then
            Kill strFileName
        End If
        If strFileName <> "" Then
            xlWBk.SaveAs strFileName, FileFormat:=56
        End If

        rst.Close
        Set rst = Nothing
        DoCmd.Hourglass False
    End If

ExportToExcel_Exit:
    DoCmd.Hourglass False
    Exit Function

ExportToExcel_Err:
    DoCmd.SetWarnings True
    MsgBox Err.Description, vbExclamation, Err.Number
    DoCmd.Hourglass False
    Resume ExportToExcel_Exit

End Function
The function can be called like this:
Private Sub ExportToExcel_Example()
 Call VBA_Access_ImportExport.ExportToExcel("Table", "Table1", "VBASheet")
End SubВозможно, вам придется использовать данные из различных источников для анализа. В Excel вы можете импортировать данные из разных источников данных. Некоторые из источников данных следующие:
- База данных Microsoft Access
- Страница интернета
- Текстовый файл
- Таблица SQL Server
- SQL Server Analysis Cube
- XML-файл
Вы можете импортировать любое количество таблиц одновременно из базы данных.
Импорт данных из базы данных Microsoft Access
Мы научимся импортировать данные из базы данных MS Access. Следуйте инструкциям ниже
Шаг 1 – Откройте новую пустую книгу в Excel.
Шаг 2 – Перейдите на вкладку ДАННЫЕ на ленте.
Шаг 3 – Нажмите « Доступ» в группе «Получить внешние данные». Откроется диалоговое окно « Выбор источника данных ».
Шаг 4 – Выберите файл базы данных Access, который вы хотите импортировать. Файлы базы данных Access будут иметь расширение .accdb.
Откроется диалоговое окно «Выбор таблицы», в котором отображаются таблицы, найденные в базе данных Access. Вы можете импортировать все таблицы в базе данных одновременно или импортировать только выбранные таблицы на основе ваших потребностей анализа данных.
Шаг 5 – Установите флажок Включить выбор нескольких таблиц и выберите все таблицы.
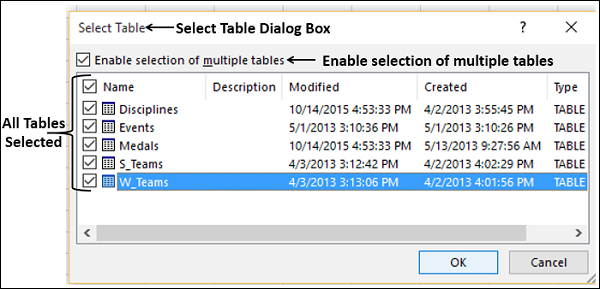
Шаг 6 – Нажмите ОК. Откроется диалоговое окно « Импорт данных ».
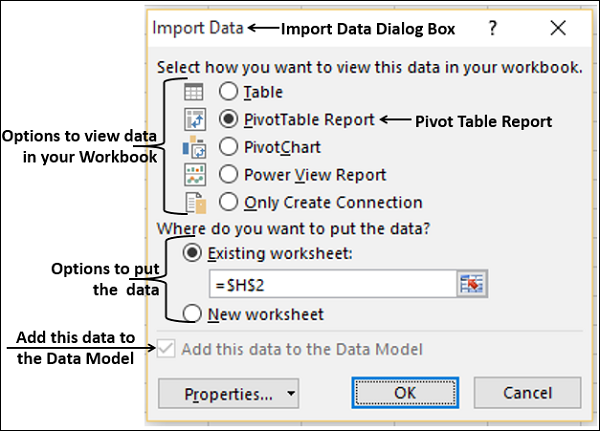
Как вы заметили, у вас есть следующие опции для просмотра данных, которые вы импортируете в свою рабочую книгу:
- Таблица
- Отчет сводной таблицы
- PivotChart
- Power View Report
У вас также есть возможность – только создать соединение . Далее отчет по сводной таблице выбран по умолчанию.
Excel также дает вам возможность поместить данные в вашу книгу –
- Существующий лист
- Новый лист
Вы найдете еще один флажок, который установлен и отключен. Добавьте эти данные в модель данных . Каждый раз, когда вы импортируете таблицы данных в свою книгу, они автоматически добавляются в модель данных в вашей книге. Вы узнаете больше о модели данных в следующих главах.
Вы можете попробовать каждый из вариантов, чтобы просмотреть импортируемые данные и проверить, как эти данные отображаются в вашей рабочей книге.
-
Если вы выберете « Таблица» , опция «Существующая рабочая таблица» будет отключена, будет выбрана опция « Новая рабочая таблица», и Excel создаст столько таблиц, сколько будет импортировано таблиц из базы данных. Таблицы Excel отображаются в этих таблицах.
-
Если вы выберете Отчет сводной таблицы , Excel импортирует таблицы в рабочую книгу и создаст пустую сводную таблицу для анализа данных в импортированных таблицах. У вас есть возможность создать сводную таблицу на существующем листе или новом листе.
Таблицы Excel для импортированных таблиц данных не будут отображаться в книге. Однако вы найдете все таблицы данных в списке полей сводной таблицы вместе с полями в каждой таблице.
-
Если вы выберете PivotChart , Excel импортирует таблицы в рабочую книгу и создаст пустую PivotChart для отображения данных в импортированных таблицах. У вас есть возможность создать сводную диаграмму на существующем или новом листе.
Таблицы Excel для импортированных таблиц данных не будут отображаться в книге. Однако вы найдете все таблицы данных в списке полей PivotChart вместе с полями в каждой таблице.
-
Если вы выберите Power View Report , Excel импортирует таблицы в рабочую книгу и создаст Power View Report в новой рабочей таблице. В последующих главах вы узнаете, как использовать отчеты Power View для анализа данных.
Таблицы Excel для импортированных таблиц данных не будут отображаться в книге. Однако вы найдете все таблицы данных в списке полей Power View Report вместе с полями в каждой таблице.
-
Если вы выберете опцию – Только создать соединение , между базой данных и вашей книгой будет установлено соединение для передачи данных. Таблицы или отчеты не отображаются в книге. Однако импортированные таблицы по умолчанию добавляются в модель данных в вашей книге.
Вам необходимо выбрать любой из этих параметров в зависимости от вашего намерения импортировать данные для анализа данных. Как вы заметили выше, независимо от выбранной вами опции, данные импортируются и добавляются в модель данных в вашей рабочей книге.
Если вы выберете « Таблица» , опция «Существующая рабочая таблица» будет отключена, будет выбрана опция « Новая рабочая таблица», и Excel создаст столько таблиц, сколько будет импортировано таблиц из базы данных. Таблицы Excel отображаются в этих таблицах.
Если вы выберете Отчет сводной таблицы , Excel импортирует таблицы в рабочую книгу и создаст пустую сводную таблицу для анализа данных в импортированных таблицах. У вас есть возможность создать сводную таблицу на существующем листе или новом листе.
Таблицы Excel для импортированных таблиц данных не будут отображаться в книге. Однако вы найдете все таблицы данных в списке полей сводной таблицы вместе с полями в каждой таблице.
Если вы выберете PivotChart , Excel импортирует таблицы в рабочую книгу и создаст пустую PivotChart для отображения данных в импортированных таблицах. У вас есть возможность создать сводную диаграмму на существующем или новом листе.
Таблицы Excel для импортированных таблиц данных не будут отображаться в книге. Однако вы найдете все таблицы данных в списке полей PivotChart вместе с полями в каждой таблице.
Если вы выберите Power View Report , Excel импортирует таблицы в рабочую книгу и создаст Power View Report в новой рабочей таблице. В последующих главах вы узнаете, как использовать отчеты Power View для анализа данных.
Таблицы Excel для импортированных таблиц данных не будут отображаться в книге. Однако вы найдете все таблицы данных в списке полей Power View Report вместе с полями в каждой таблице.
Если вы выберете опцию – Только создать соединение , между базой данных и вашей книгой будет установлено соединение для передачи данных. Таблицы или отчеты не отображаются в книге. Однако импортированные таблицы по умолчанию добавляются в модель данных в вашей книге.
Вам необходимо выбрать любой из этих параметров в зависимости от вашего намерения импортировать данные для анализа данных. Как вы заметили выше, независимо от выбранной вами опции, данные импортируются и добавляются в модель данных в вашей рабочей книге.
Импорт данных с веб-страницы
Иногда вам может понадобиться использовать данные, которые обновляются на веб-сайте. Вы можете импортировать данные из таблицы на веб-сайте в Excel.
Шаг 1 – Откройте новую пустую книгу в Excel.
Шаг 2 – Перейдите на вкладку ДАННЫЕ на ленте.
Шаг 3 – Нажмите « Из Интернета» в группе « Получить внешние данные ». Откроется диалоговое окно « Новый веб-запрос ».
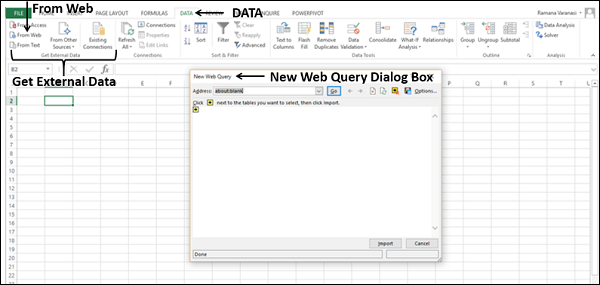
Шаг 4 – Введите URL-адрес веб-сайта, с которого вы хотите импортировать данные, в поле рядом с адресом и нажмите «Перейти».
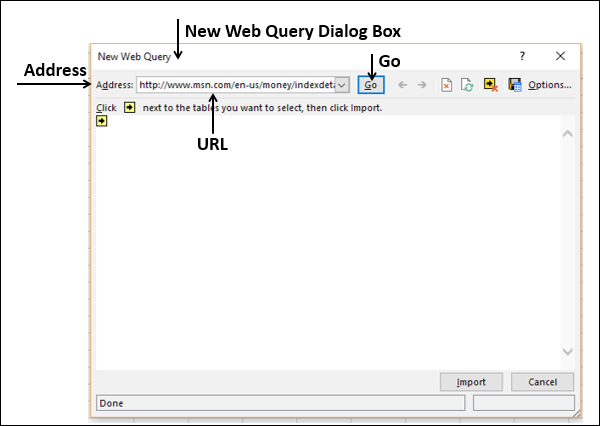
Шаг 5 – Данные на сайте появляются. Рядом с данными таблицы будут отображаться желтые значки со стрелками, которые можно импортировать.

Шаг 6 – Нажмите желтые значки, чтобы выбрать данные, которые вы хотите импортировать. Это превращает желтые значки в зеленые поля с галочкой, как показано на следующем снимке экрана.

Шаг 7 – Нажмите кнопку «Импорт» после того, как вы выбрали то, что вы хотите.

Откроется диалоговое окно « Импорт данных ».
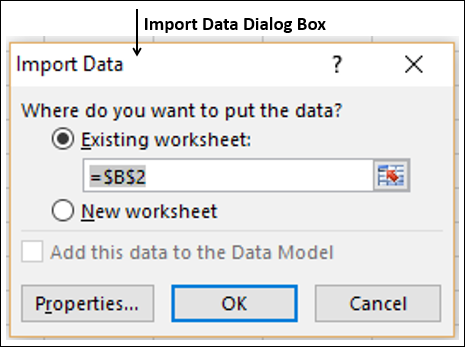
Шаг 8 – Укажите, куда вы хотите поместить данные и нажмите Ok.
Шаг 9 – Организовать данные для дальнейшего анализа и / или представления.
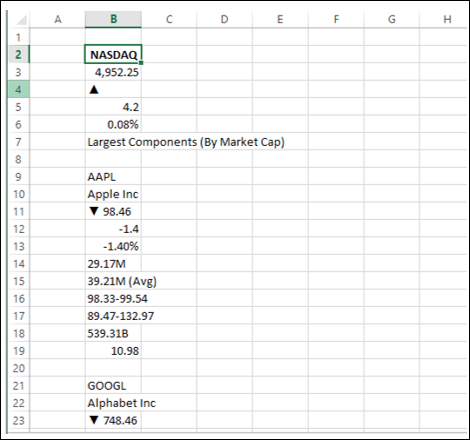
Копировать-вставить данные из Интернета
Другой способ получения данных с веб-страницы – копирование и вставка необходимых данных.
Шаг 1 – Вставьте новый лист.
Шаг 2 – Скопируйте данные с веб-страницы и вставьте их на лист.
Шаг 3 – Создайте таблицу с вставленными данными.
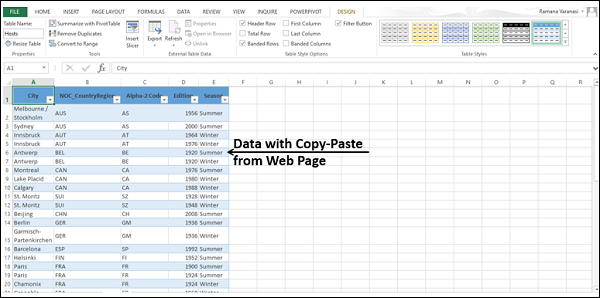
Импорт данных из текстового файла
Если у вас есть данные в файлах .txt или .csv или .prn , вы можете импортировать данные из этих файлов, рассматривая их как текстовые файлы. Следуйте инструкциям ниже
Шаг 1 – Откройте новый лист в Excel.
Шаг 2 – Перейдите на вкладку ДАННЫЕ на ленте.
Шаг 3 – Нажмите « Из текста» в группе «Получить внешние данные». Откроется диалоговое окно « Импорт текстового файла ».
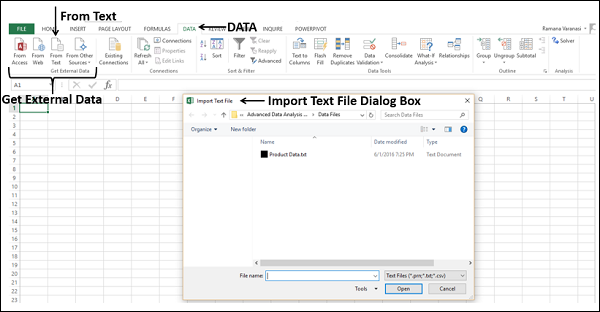
Вы можете видеть, что текстовые файлы с расширениями .prn, .txt и .csv принимаются.
Шаг 4 – Выберите файл. Имя выбранного файла появится в поле Имя файла. Кнопка «Открыть» изменится на кнопку «Импорт».
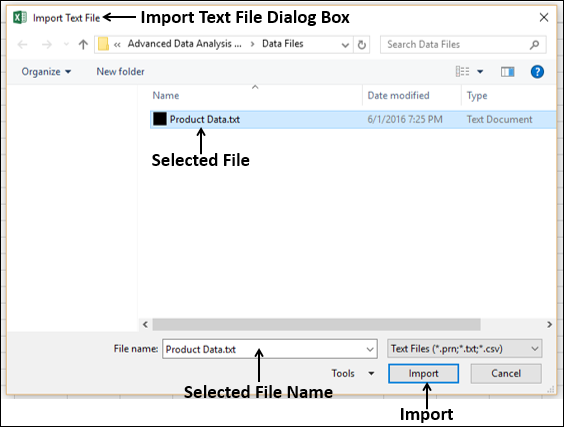
Шаг 5 – Нажмите кнопку «Импорт». Мастер импорта текста – появляется диалоговое окно « Шаг 1 из 3 ».
Шаг 6 – Выберите опцию «С разделителями», чтобы выбрать тип файла, и нажмите «Далее».
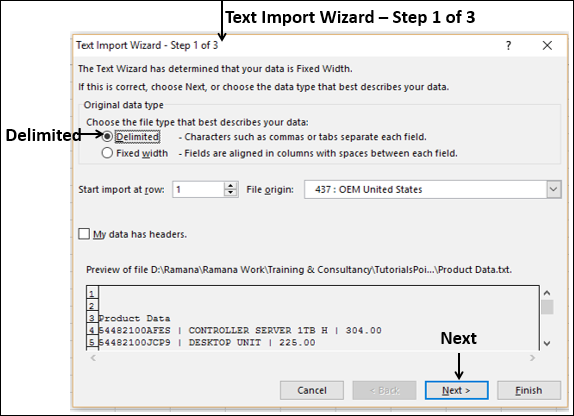
Откроется мастер импорта текста – шаг 2 из 3 .
Шаг 7 – В разделе «Разделители» выберите « Другое» .
Шаг 8 – В поле рядом с Другой введите | (Это разделитель в текстовом файле, который вы импортируете).
Шаг 9 – Нажмите Далее.
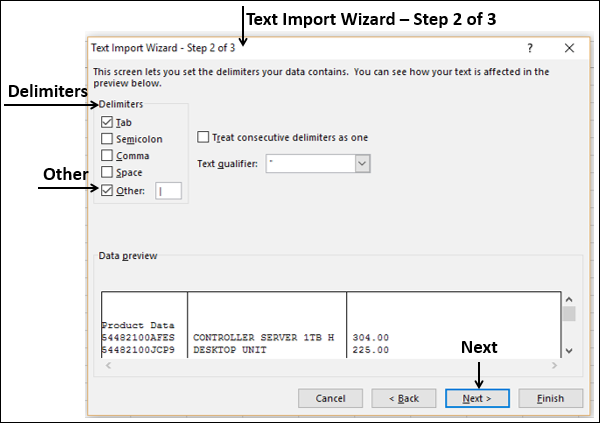
Откроется мастер импорта текста – шаг 3 из 3 .
Шаг 10 – В этом диалоговом окне вы можете установить формат данных столбца для каждого из столбцов.
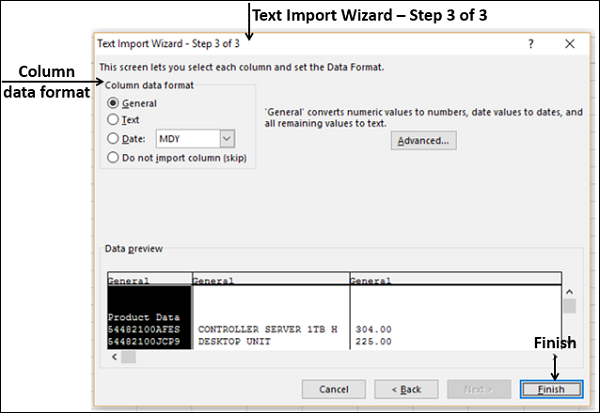
Шаг 11. После завершения форматирования данных столбцов нажмите кнопку «Готово». Откроется диалоговое окно « Импорт данных ».
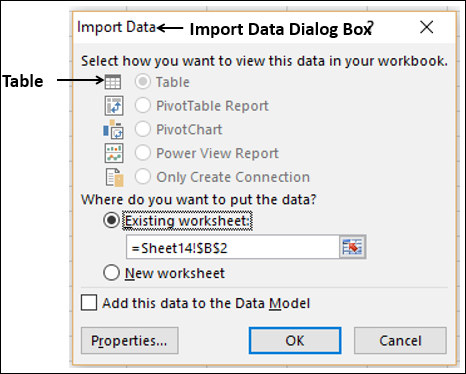
Вы увидите следующее –
-
Таблица выбрана для просмотра и отображается серым цветом. Таблица – единственный вариант просмотра, который у вас есть в этом случае.
-
Вы можете поместить данные либо в существующий рабочий лист, либо в новый рабочий лист.
-
Вы можете установить или не устанавливать флажок Добавить эти данные в модель данных.
-
Нажмите OK после того, как вы сделали выбор.
Таблица выбрана для просмотра и отображается серым цветом. Таблица – единственный вариант просмотра, который у вас есть в этом случае.
Вы можете поместить данные либо в существующий рабочий лист, либо в новый рабочий лист.
Вы можете установить или не устанавливать флажок Добавить эти данные в модель данных.
Нажмите OK после того, как вы сделали выбор.
Данные появятся на указанном вами листе. Вы импортировали данные из текстового файла в книгу Excel.
Импорт данных из другой книги
Возможно, вам придется использовать данные из другой книги Excel для анализа данных, но кто-то другой может поддерживать другую книгу.
Чтобы получать последние данные из другой книги, установите соединение данных с этой книгой.
Шаг 1 – Нажмите DATA> Соединения в группе Соединения на ленте.
Откроется диалоговое окно « Подключения к книге».
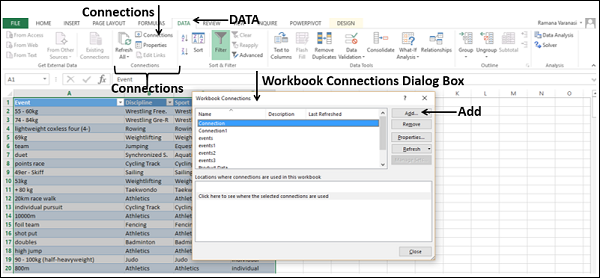
Шаг 2. Нажмите кнопку «Добавить» в диалоговом окне «Подключения к книге». Откроется диалоговое окно « Существующие подключения ».

Шаг 3 – Нажмите кнопку Обзор для более … Откроется диалоговое окно « Выбор источника данных ».

Шаг 4 – Нажмите кнопку « Новый источник» . Откроется диалоговое окно мастера подключения к данным .
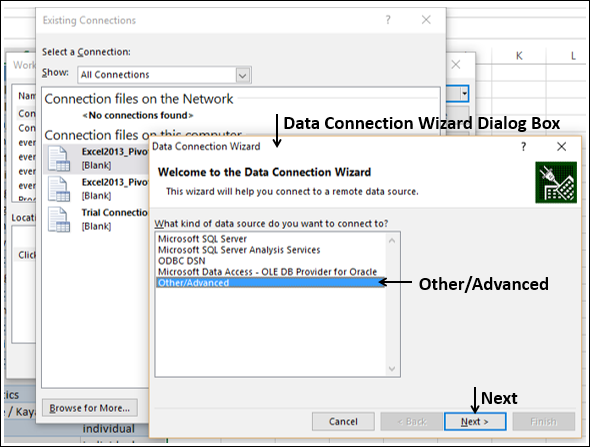
Шаг 5 – Выберите Other / Advanced в списке источников данных и нажмите Next. Откроется диалоговое окно «Свойства ссылки на данные».
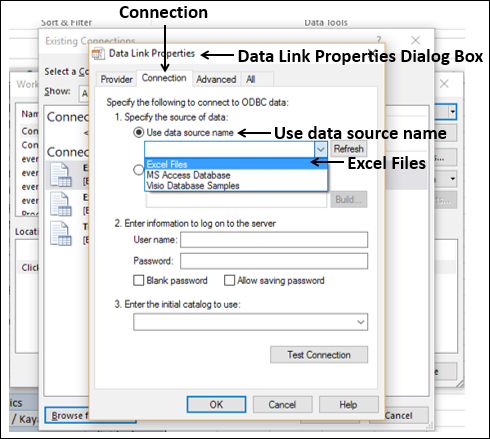
Шаг 6 – Установите свойства канала передачи данных следующим образом –
-
Перейдите на вкладку « Соединение ».
-
Нажмите Использовать имя источника данных.
-
Нажмите стрелку вниз и выберите « Файлы Excel» в раскрывающемся списке.
-
Нажмите ОК.
Перейдите на вкладку « Соединение ».
Нажмите Использовать имя источника данных.
Нажмите стрелку вниз и выберите « Файлы Excel» в раскрывающемся списке.
Нажмите ОК.
Откроется диалоговое окно « Выбрать рабочую книгу ».
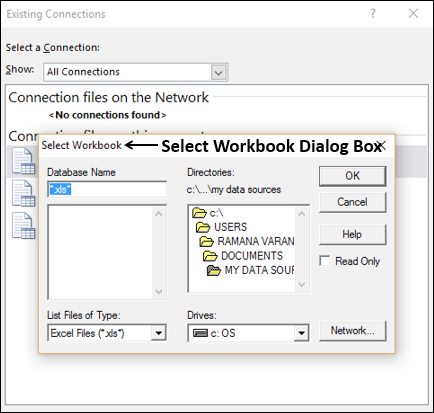
Шаг 7 – Найдите место, где у вас есть рабочая книга для импорта. Нажмите ОК.
Откроется диалоговое окно « Мастер подключения к данным » с выбором базы данных и таблицы.
Примечание. В этом случае Excel обрабатывает каждый рабочий лист, который импортируется, как таблицу. Имя таблицы будет именем рабочего листа. Таким образом, чтобы иметь значимые имена таблиц, назовите / переименуйте рабочие листы в зависимости от ситуации.
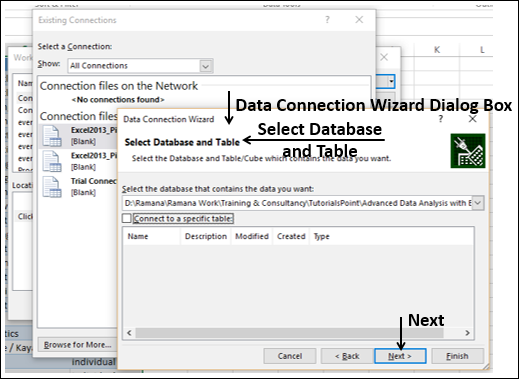
Шаг 8 – Нажмите Далее. Откроется диалоговое окно мастера подключения к данным с сохранением файла подключения к данным и завершением.
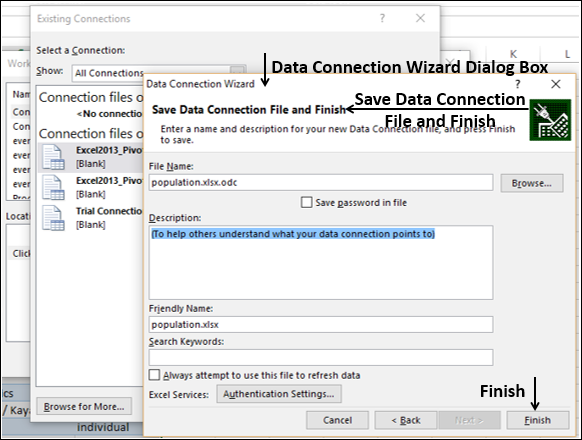
Шаг 9 – Нажмите кнопку Готово. Откроется диалоговое окно « Выбор таблицы ».
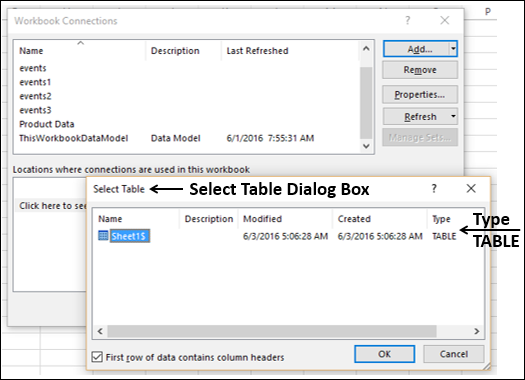
Как вы заметили, Name – это имя листа, которое импортируется как тип TABLE. Нажмите ОК.
Соединение данных с выбранной вами рабочей книгой будет установлено.
Импорт данных из других источников
Excel предоставляет вам возможность выбора различных других источников данных. Вы можете импортировать данные из них в несколько шагов.
Шаг 1 – Откройте новую пустую книгу в Excel.
Шаг 2 – Перейдите на вкладку ДАННЫЕ на ленте.
Шаг 3 – Нажмите Из других источников в группе Получить внешние данные.
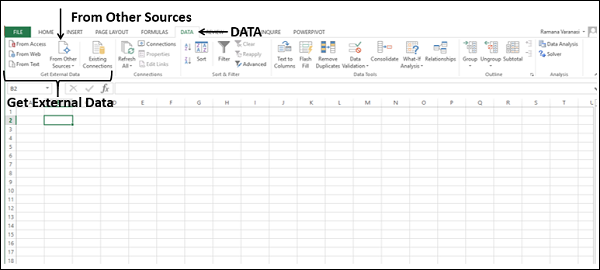
Появляется выпадающий список с различными источниками данных.
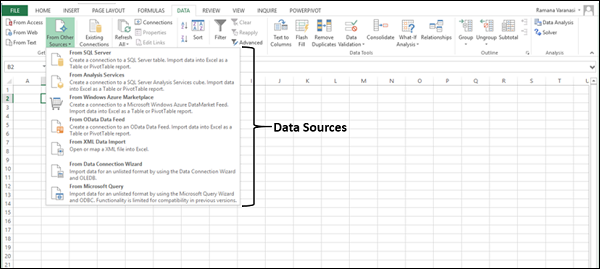
Вы можете импортировать данные из любого из этих источников данных в Excel.
Импорт данных с использованием существующего соединения
В предыдущем разделе вы установили соединение для передачи данных с книгой.
Теперь вы можете импортировать данные, используя это существующее соединение.
Шаг 1 – Перейдите на вкладку ДАННЫЕ на ленте.
Шаг 2 – Нажмите Существующие соединения в группе Получить внешние данные. Откроется диалоговое окно «Существующие подключения».
Шаг 3 – Выберите соединение, из которого вы хотите импортировать данные, и нажмите «Открыть».
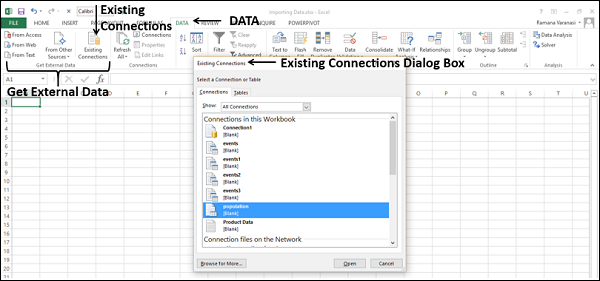
Переименование соединений данных
Будет полезно, если у подключений к данным, которые есть в вашей книге, есть понятные имена для простоты понимания и определения местоположения.
Шаг 1 – Перейдите в DATA> Соединения на ленте. Откроется диалоговое окно « Подключения к книге».
Шаг 2 – Выберите соединение, которое вы хотите переименовать, и нажмите Свойства.
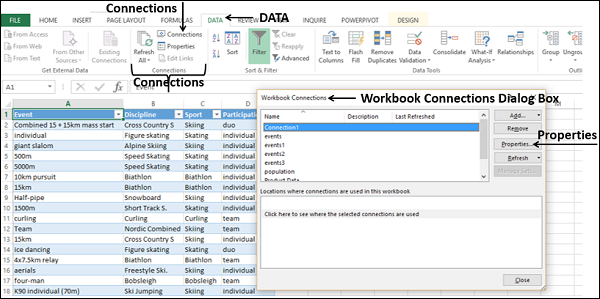
Откроется диалоговое окно « Свойства соединения ». Текущее имя появится в поле Имя соединения –
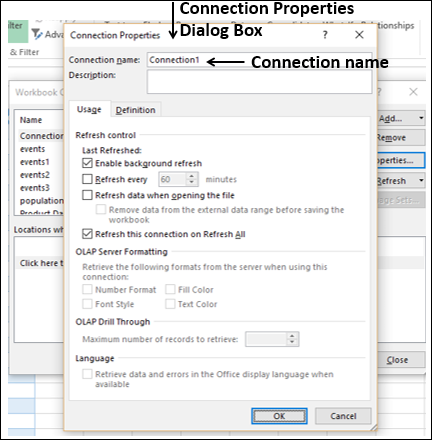
Шаг 3 – Измените имя соединения и нажмите ОК. Передача данных будет иметь новое имя, которое вы дали.
Обновление подключения к внешним данным
Когда вы подключаете свою книгу Excel к внешнему источнику данных, как вы видели в предыдущих разделах, вы хотели бы регулярно обновлять данные в своей книге, отражая изменения, вносимые во внешний источник данных время от времени.
Вы можете сделать это, обновив соединения данных, которые вы сделали с этими источниками данных. Всякий раз, когда вы обновляете соединение данных, вы видите самые последние изменения данных из этого источника данных, включая все, что является новым, или которое было изменено, или которое было удалено.
Вы можете обновить только выбранные данные или все подключения данных в книге одновременно.
Шаг 1 – Перейдите на вкладку ДАННЫЕ на ленте.
Шаг 2 – Нажмите « Обновить все» в группе «Подключения».
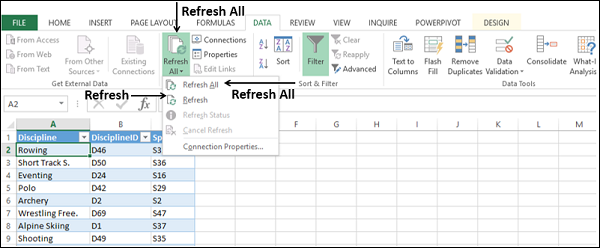
Как вы заметили, в выпадающем списке есть две команды – Обновить и Обновить все.
-
Если вы нажмете Обновить , выбранные данные в вашей рабочей книге будут обновлены.
-
Если вы нажмете Обновить все , все подключения к данным в вашей книге будут обновлены.
Если вы нажмете Обновить , выбранные данные в вашей рабочей книге будут обновлены.
Если вы нажмете Обновить все , все подключения к данным в вашей книге будут обновлены.
Обновление всех соединений данных в рабочей книге
У вас может быть несколько подключений к вашей книге. Вам необходимо время от времени обновлять их, чтобы ваша рабочая книга имела доступ к самым последним данным.
Шаг 1 – Нажмите любую ячейку в таблице, которая содержит ссылку на импортированный файл данных.
Шаг 2 – Перейдите на вкладку «Данные» на ленте.
Шаг 3 – Нажмите «Обновить все» в группе «Подключения».

Шаг 4 – Выберите Обновить все из выпадающего списка. Все подключения к данным в рабочей книге будут обновлены.
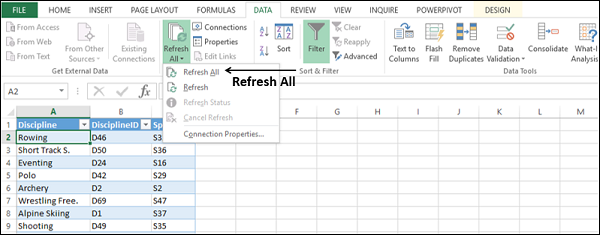
Автоматически обновлять данные при открытии рабочей книги
Возможно, вы захотите иметь доступ к последним данным из подключений к вашей книге при каждом открытии вашей книги.
Шаг 1 – Нажмите любую ячейку в таблице, которая содержит ссылку на импортированный файл данных.
Шаг 2 – Перейдите на вкладку «Данные».
Шаг 3 – Нажмите «Подключения» в группе «Подключения».
Откроется диалоговое окно «Подключения к книге».
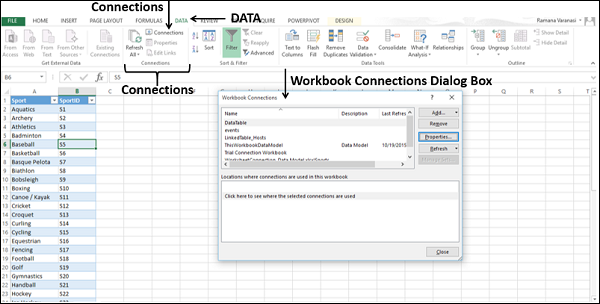
Шаг 4 – Нажмите кнопку Свойства. Откроется диалоговое окно «Свойства соединения».
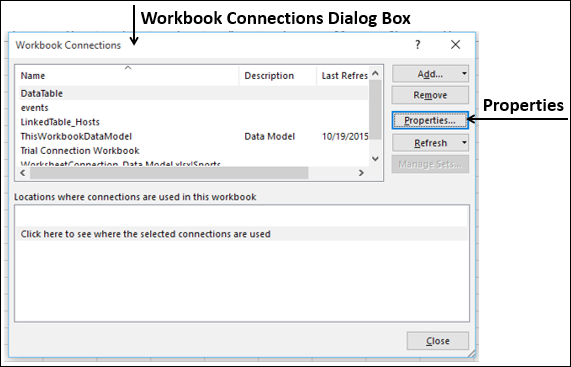
Шаг 5 – Перейдите на вкладку «Использование».
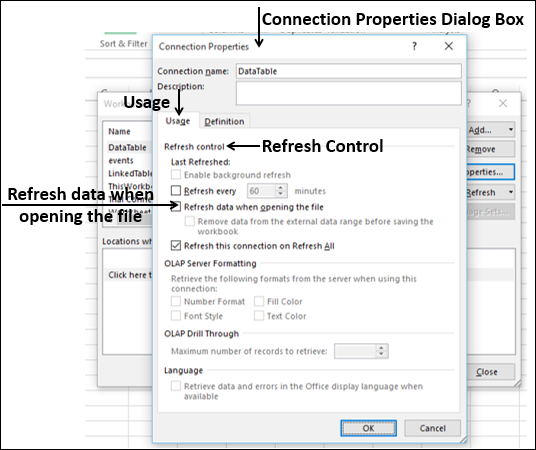
Шаг 6 – Отметьте опцию – Обновить данные при открытии файла.
У вас есть и другой вариант – удалить данные из диапазона внешних данных перед сохранением книги . Вы можете использовать эту опцию, чтобы сохранить книгу с определением запроса, но без внешних данных.
Шаг 7 – Нажмите ОК. Всякий раз, когда вы открываете свою рабочую книгу, в вашу рабочую книгу загружаются самые свежие данные.
Автоматически обновлять данные через регулярные интервалы
Возможно, вы используете свою рабочую книгу, чтобы держать ее открытой в течение более длительного времени. В таком случае вы можете периодически обновлять данные без какого-либо вмешательства с вашей стороны.
Шаг 1 – Нажмите любую ячейку в таблице, которая содержит ссылку на импортированный файл данных.
Шаг 2 – Перейдите на вкладку «Данные» на ленте.
Шаг 3 – Нажмите «Подключения» в группе «Подключения».
Откроется диалоговое окно «Подключения к книге».
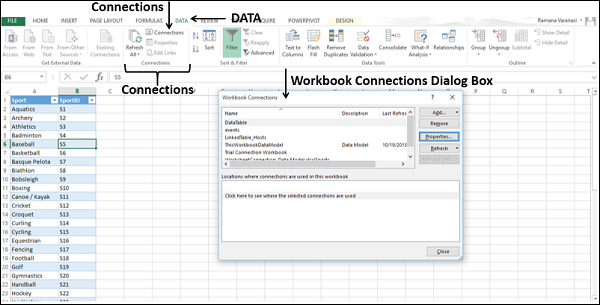
Шаг 4 – Нажмите кнопку Свойства.

Откроется диалоговое окно «Свойства соединения». Установите свойства следующим образом –
-
Перейдите на вкладку « Использование ».
-
Установите флажок Обновить каждый .
-
Введите 60 в качестве количества минут между каждой операцией обновления и нажмите Ok.
Перейдите на вкладку « Использование ».
Установите флажок Обновить каждый .
Введите 60 в качестве количества минут между каждой операцией обновления и нажмите Ok.
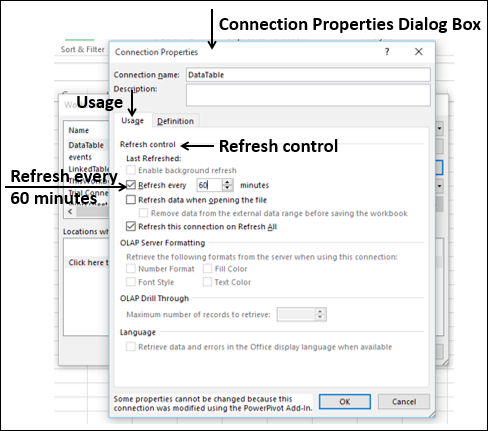
Ваши данные будут автоматически обновляться каждые 60 минут. (т.е. каждый час).
Включение фонового обновления
Для очень больших наборов данных рекомендуется запустить фоновое обновление. Это возвращает управление Excel вместо того, чтобы заставлять вас ждать несколько минут или более, пока обновление не закончится. Вы можете использовать эту опцию, когда вы выполняете запрос в фоновом режиме. Однако в течение этого времени нельзя выполнить запрос для любого типа соединения, который извлекает данные для модели данных.
-
Щелкните в любой ячейке таблицы, содержащей ссылку на импортированный файл данных.
-
Перейдите на вкладку «Данные».
-
Нажмите Подключения в группе Подключения. Откроется диалоговое окно «Подключения к книге».
Щелкните в любой ячейке таблицы, содержащей ссылку на импортированный файл данных.
Перейдите на вкладку «Данные».
Нажмите Подключения в группе Подключения. Откроется диалоговое окно «Подключения к книге».
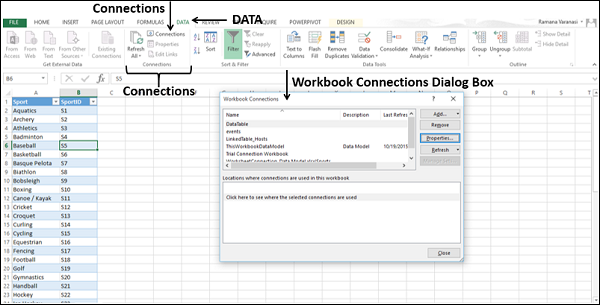
Нажмите кнопку Свойства.

Откроется диалоговое окно «Свойства соединения». Перейдите на вкладку «Использование». Появятся параметры управления обновлением.