
Excel for the web SharePoint in Microsoft 365 Office for business More…Less
Sharing from OneDrive? Go here.
Because embedded Excel for the web workbooks are now enabled on SharePoint Online, you can use them in your web page or blog, where other people can view and interact with them without having to log into SharePoint Online. You can get a URL for Microsoft 365-hosted workbooks, and use it to embed them directly in your web page or blog by setting the SRC attribute of an <iframe> element on the web page.
Follow the instructions below to embed your SharePoint Online-hosted Excel for the web BI Workbooks in your web page or blog.
-
Set workbook permissions
-
Get the URL to the public workbook
-
Specify additional parameters
-
Set the frame size
-
Test the published workbook
-
Embedded workbook limits
Set workbook permissions
Before you embed a workbook in your web page or blog, make sure it’s shared with all relevant people. For example, if you run a public blog, you’ll want to share the workbook with everyone, including people who aren’t part of your organization. Here’s how you share a workbook:
-
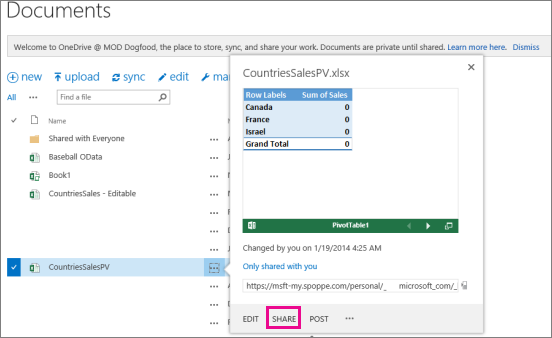
In SharePoint Online, select the More menu (…) next to the workbook you want to share, and click Share.

-
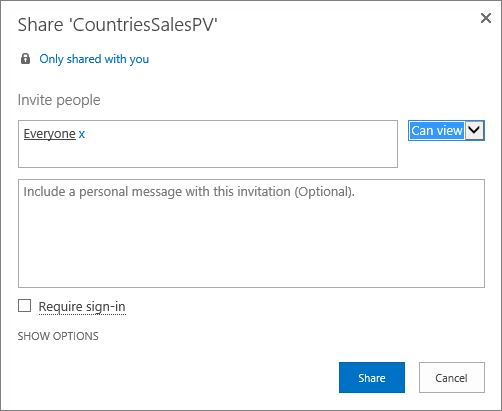
In the Invite people box, select Everyone, and pick Can view.
Notes:
-
It’s possible that a SharePoint admin will block the option to invite Everyone to view a workbook. In that case, select Everyone except external users instead or consult with your admin.
The Require Sign-in box should be unchecked regardless of the above selection for public anonymous access.
-
It’s possible that a SharePoint admin will block anonymous access by removing the Require Sign-in box and defaulting it to True. In that case, please consult with your admin.
-
You can’t edit an embedded Excel for the web workbook, but people with the right permission may be able to open the embedded workbook in Excel, where they can edit the data.
-
-
To enable sharing the workbook with guests, uncheck the Require sign-in box and click Share.
Get the URL to the public workbook
-
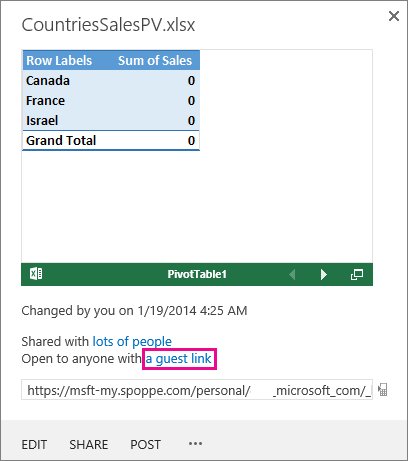
Select the More menu (…) next to the workbook again and click a guest link.
-
Select the guest link URL, copy it, and then paste it into Notepad.
-
To enable the embedded workbook, change the URL as follows:
-
To present the workbook as an embedded workbook, add the URL parameter action=embedview at the end of the URL string.
-
To allow interactivity with filters and Pivot tables in the workbook, add the URL parameter wdAllowInteractivity=True.
-
To have BI features such as Power View visualizations, PivotTables, and Data Model-based slicers work in the embedded workbook, add the string &wdbipreview=True.
-
Tips:
-
The final URL should be similar to this one:
-
https://host/personal/user/_layouts/15/guestaccess.aspx?guestaccesstoken=2UdAHGlFpWVaJjkI32xuisKCQsULG6M6b%2fIjG1LYpRM%3d&docid=166d02b42f5a1443781a1de428d9518ee&action=embedview&wdbipreview=true
Specify additional parameters
Additional URL parameters can change the way the embedded workbook is presented.
Here’s an example of a URL with additional parameters:
<iframe width=»500″ height=»200″ frameborder=»0″ scrolling=»no» src=» https://host/personal/user/_layouts/15/guestaccess.aspx?guestaccesstoken=2UdAHGlFpWVaJjkI32xuisKCQsULG6M6b%2fIjG1LYpRM%3d&docid=166d02b42f5a1443781a1de428d9518ee&action=embedview&wdbipreview=true&wdHideSheetTabs=true&wdAllowInteractivity=True& Item=PivotTable1& ActiveCell=B4&wdHideGridlines=True &wdHideHeaders=True& wdDownloadButton=True”>
The following table shows the parameters we used in this example URL and briefly describes their effect on the presentation of the workbook. And here’s a list of the default parameter settings:
|
URL Parameter |
Effect |
Default |
|---|---|---|
|
wdHideSheetTabs=True |
Hides the sheet tabs that are displayed at the bottom of all sheets in a workbook. |
False |
|
wdAllowInteractivity=True |
Lets you interact with the data if your workbook has a table or PivotTable that can be sorted and filtered. |
True |
|
Item=itemName |
Displays a specific item. If your workbook includes a chart, table, PivotTable, or named range, and you want to display only one of the items in your web page, use the Item parameter to specify that item. For information about named ranges and named items in Excel workbooks see Define and use names in formulas. |
Not set |
|
ActiveCell=CellName |
Specifies the active (selected) cell in the embedded workbook when the web page opens. You can specify the active cell by cell reference (such as A1) or by name. You can also use this parameter to define the active sheet by selecting a cell in that sheet. If you want to select a Power View sheet as active, set this parameter to A1, even though there is no grid on a Power View sheet. If you don’t specify the active cell, the last saved view will be shown. |
The last saved view will be shown. |
|
wdHideGridlines=True |
Hides worksheet gridlines for a cleaner look. |
False |
|
wdHideHeaders=True |
Hides the column and row headers. |
False |
|
wdDownloadButton=True |
Includes the Download button so viewers can download their own copy of the workbook.
|
False |
Set the frame size
You can resize the frame that displays the workbook on your web page by using standard HTML iframe properties. Look for width and height values (in pixels) inside the iframe tag, and change the values to get the frame size you want.
<iframe width=»201″ height=»173″ frameborder=»0″ scrolling=»no»
Test the published workbook
As a blogger, you’ll want to test that the embedded workbook you published is accessible to anonymous people. Here are some considerations to think about:
-
Power View full support requires Silverlight. HTML5 might limit some of Power View features.
-
A license plan that gives the iframe creator or file owner privileged access that other people might not have. To make sure that public viewers can view the embedded workbook, run an unauthenticated test by opening the browser in a private mode and accessing the embedded workbook. Here’s how:
-
Open a browser in a private mode. For example, click Start in private browsing in IE or New incognito window in Chrome.
-
Navigate to the published blog.
-
View and interact with the embedded workbook.
-
Embedded workbook limits
|
Feature |
Maximum Limit |
|---|---|
|
Workbook size |
10 Mbytes |
|
Number of concurrent viewers |
1000 Notes:
|
See Also
Power View interactive visualizations and PivotTables can now be embedded in blogs and websites
Need more help?
Like you, I cannot get MS Office Web Components to work. I would not consider Google Docs since Google seems to think they own anything that passes through their hands. I have tried MS Publish Objects but the quality of the generated html/css is truely awful.
The secret of converting an Excel worksheet to html that will display correctly on a smartphone is to create clean, lean html/css.
The structure of the HTML is:
<!DOCTYPE html PUBLIC "-//W3C//DTD XHTML 1.0 Frameset//EN"
          "http://www.w3.org/TR/xhtml1/DTD/xhtml1-frameset.dtd">
<html xmlns="http://www.w3.org/1999/xhtml" xml:lang="en" lang="en">
  <head><meta http-equiv="Content-Type" content="text/html; charset=utf-8"/>
    HEAD
  </head>
  <body>
    BODY
  </body>
</html>
There are useful html elements that can replace «HEAD» but it is not clear to me how you would generate them from an Excel worksheet. They would need to be added separately.
The obvious output for a worksheet or a range is an html table so the following assumes BODY will be replaced by an html table.
The structure of an html table is:
<table TABLE-ATTRIBUTES>
  <tr TABLE-ROW-ATTRIBUTES>
    <td TABLE-CELL-ATTRIBUTES>CELL-VALUE</td>
    More <td>...</td> elements as necessary
  </tr>
  More <tr>...</tr> as necessary
</table>
Include as few TABLE-ATTRIBUTES, TABLE-ROW-ATTRIBUTES and TABLE-CELL-ATTRIBUTES as possible. Do not set column widths in pixels. Use css attributes rather than html attributes.
A table attribute worth considering is style = "border-collapse: collapse;". The default is separate with a gap around each cell. With collapse the cells touch as they do with Excel.
Three table attribute worth considering are style="background-color:aliceblue;", style="color:#0000FF;" and style="text-align:right;". With the first, you can specify the background colour to be any of the fifty or so named html colours. With the second, you can specify the font colour to be any of 256*256*256 colours. With the third you can right-align numeric values.
The above covers only a fraction of the formatting information that could be converted from Excel to html/css. I am developing an add-in that will convert as much Excel formatting as possible but I hope the above helps anyone with simple requirements.
See all How-To Articles
This tutorial will demonstrate how to embed Excel or Google Sheets tables into HTML.
Save Excel File as HTML
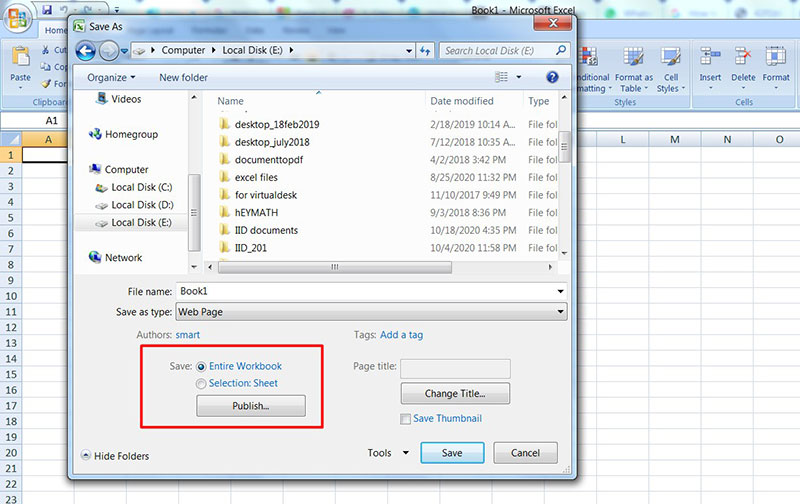
- With the workbook that you wish to save as an HTML file open in Excel, in the Ribbon, select File > Save As.
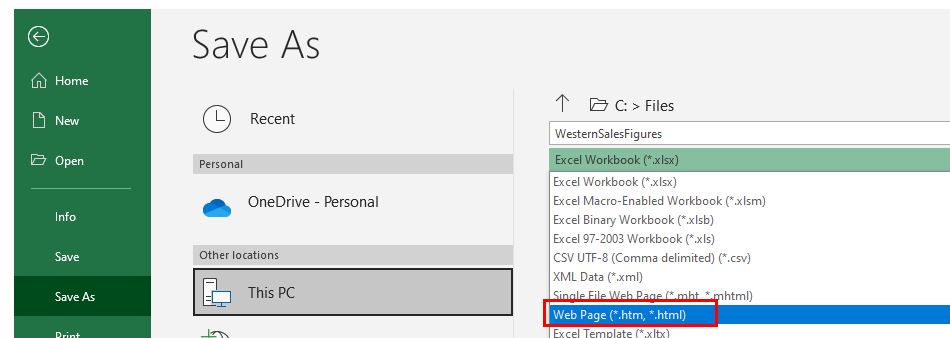
- From the drop-down list below the file name, select Web Page (*.htm, *.html) and then click Save.
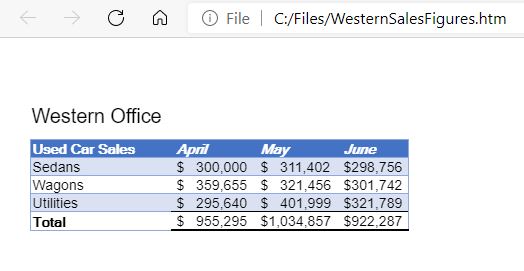
- The file will then be saved as an HTML file. Switch to the Windows Explorer to view the HTML file.

- Double-click on the HTML file to open it in the default browser.
Embed Excel Sheet With Office Live
Excel on Office Live can be more flexible, as it creates a link.
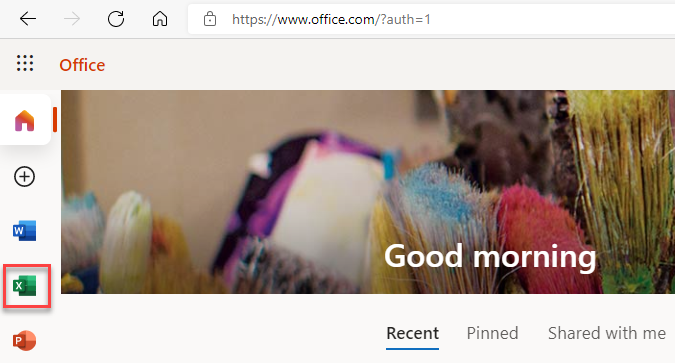
- Log onto Office 365 in the browser with Office Live and select the Excel Icon.
- Select New blank workbook to create a new workbook.
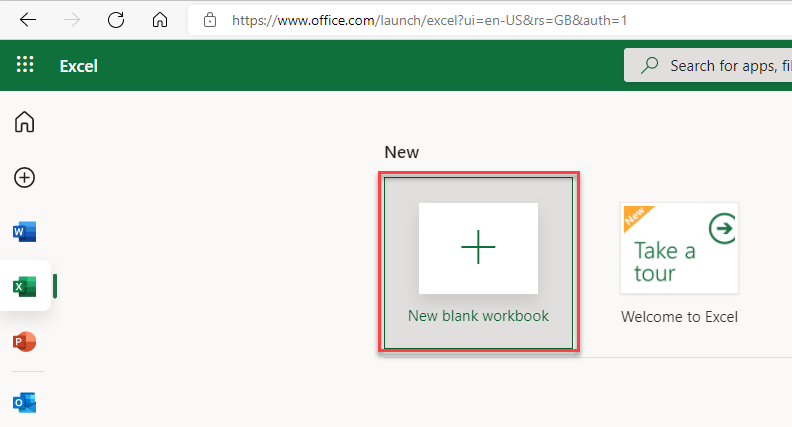
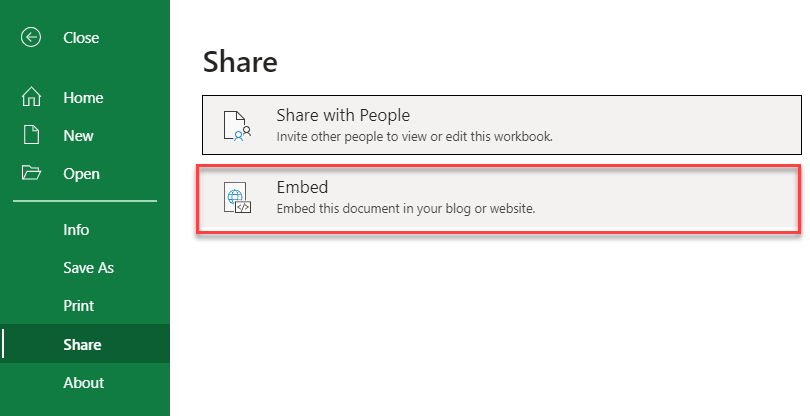
- Fill in the worksheet as needed, and then, in the Ribbon, select File > Share > Embed.
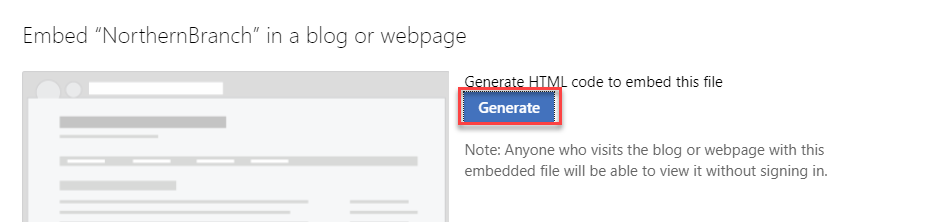
- Click Generate to generate the HTML code.
- In the Ribbon, click once again File > Share > Embed.
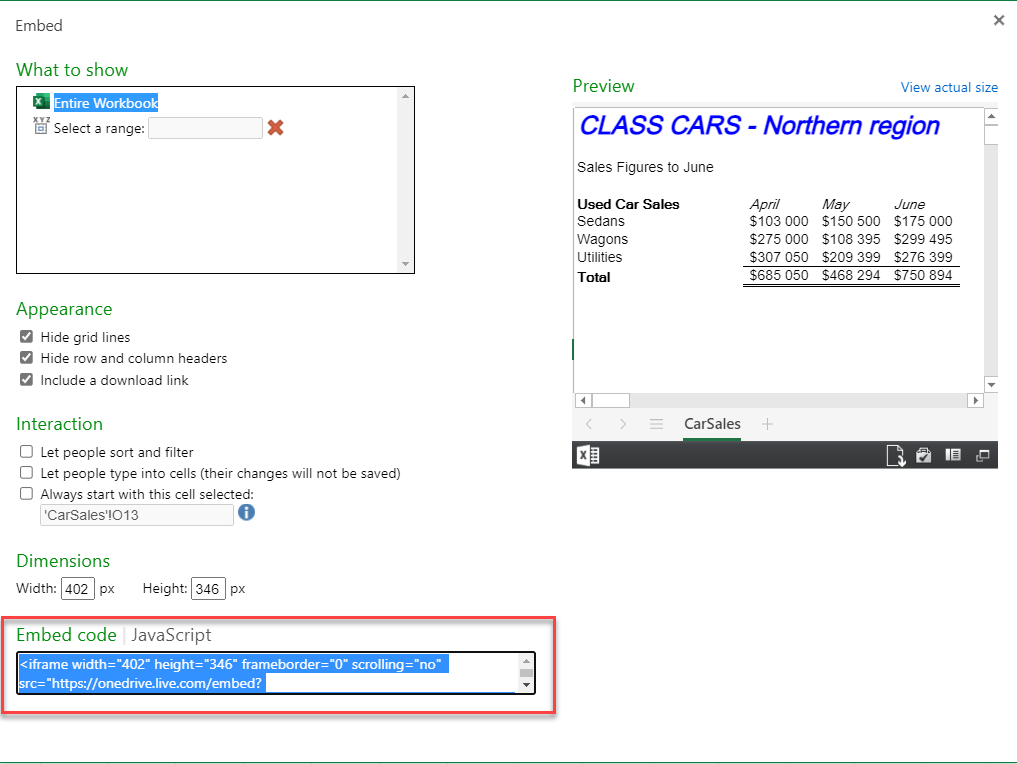
A form will open showing the layout of the embedded Excel worksheet. Amend accordingly, and the copy the Embed Code (which is in JavaScript) into the required web page to embed the Excel file into that web page.
Embed Google Sheets Tables Into HTML
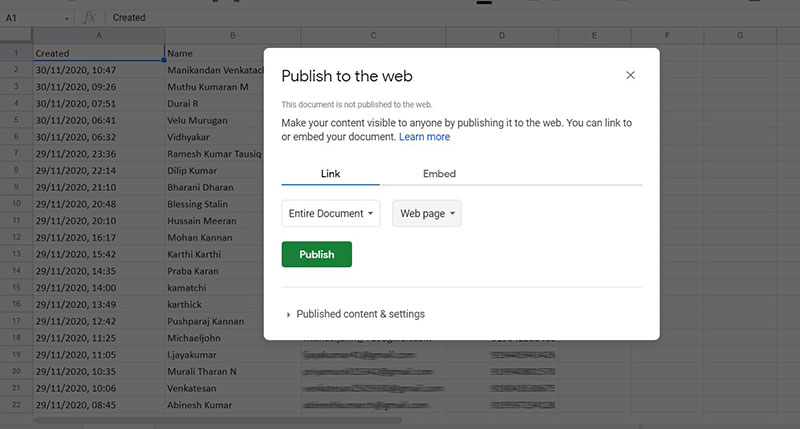
Once you’ve created a Google Sheets file, you can publish it to the web and share the sheet with multiple users by sending the users a link to the sheet itself.
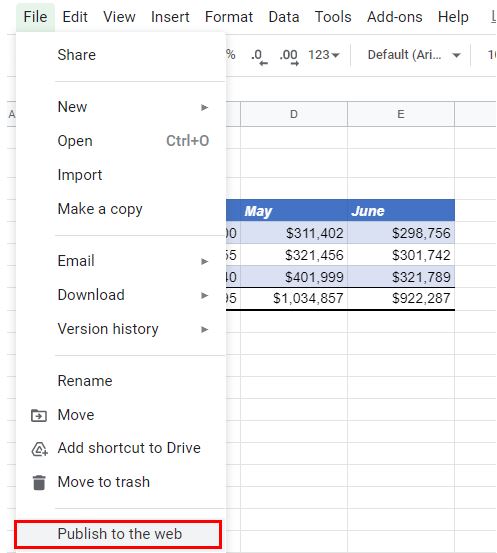
- In the File menu, select Publish to the web.
- Select from either Link or Embed.
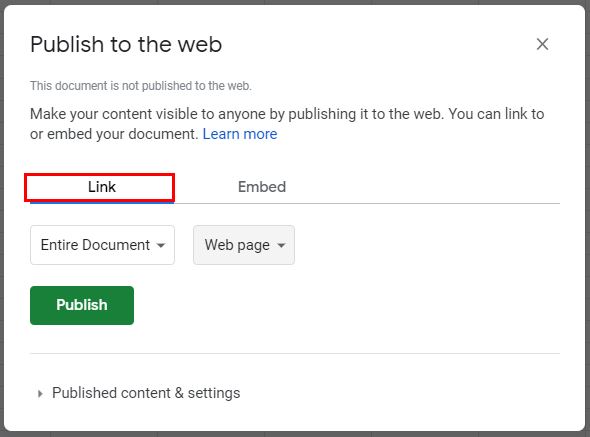
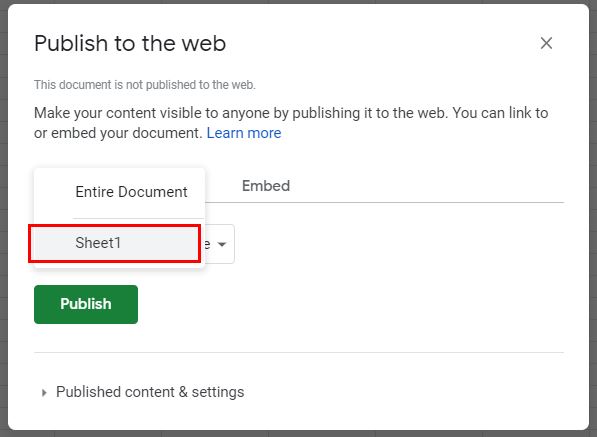
- Select either the Entire Document, or the sheet required.
- Click Publish.
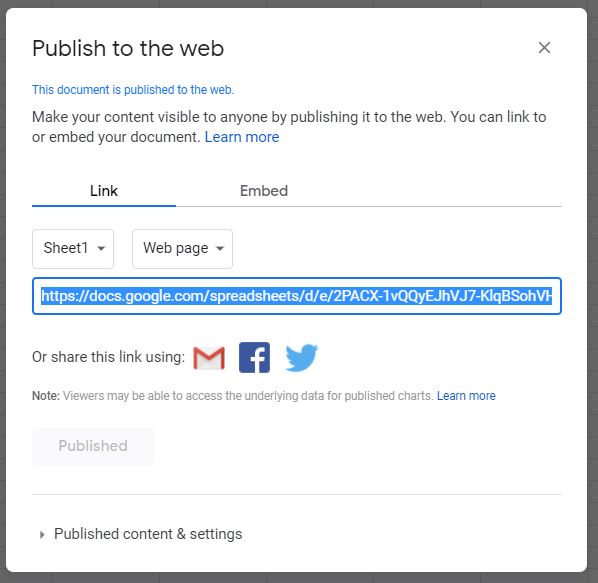
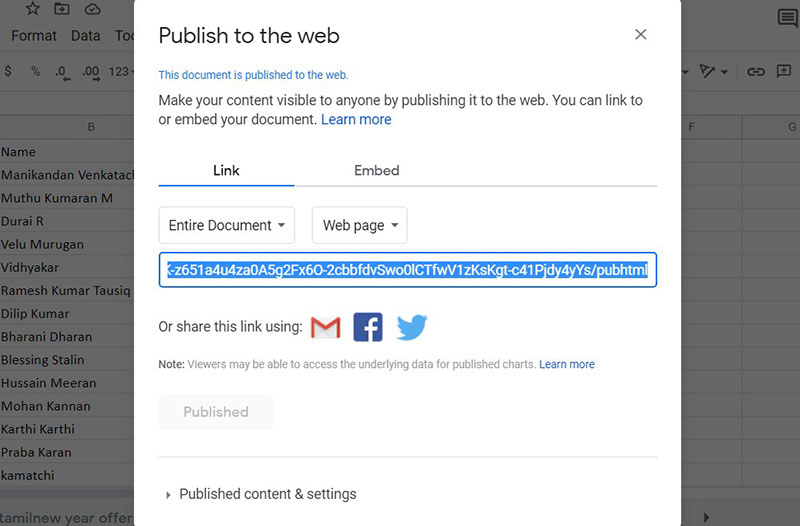
You can now send the generated link to any users you want to open the file on the web.
- To remove the file from the web, select Published content and settings > Stop publishing.
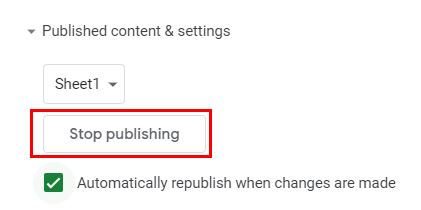
- Click OK on the Google message that pops up to remove the document from the web.
Note: If you had selected Embed, it would have generated HTML code to included in your own web site or blog. This HTML code would then embed the Google Sheets data into your website.
People use spreadsheets so often because they are useful for presenting data. They use them in their personal lives, but even more in business.
Customers, vendors, investors, government agencies, and others ask for them.
It is always possible to send a copy of the file to them. But it is not guaranteed that they have a copy of Microsoft Office Excel.
Another option is to attach it to an email as a printable PDF file. Check out these raw file converters that can be of much help. An easy solution is to make the spreadsheet accessible as a web page that anyone can open with a web browser.
This post shows how to publish an Excel sheet on the web. It also shows how to publish a Google Sheets document on a public website.
It goes over the entire process, and it is not as hard as it seems. The good thing is that there are no special tricks or requirements needed.
Why Publish Excel Spreadsheets on the Web?
Many businesses use Excel files. They store customer records, financial information, sales data, and more within these files.
Most of the time they store this information locally, or sometimes on an external server.
Sharing data often involves a tedious process of sending emails back and forth. Sometimes the attachment is not included, or the wrong file or the wrong version is sent.
Because these documents go to and fro, no one is sure whether the document they have is the most up-to-date one. The solution to all these problems is a local intranet or a secure internet site for publishing data.
This ensures that everybody has access to current information. This may be inventory data, monthly sales figures, or something else.
Automatic updates to the information on the secure website or the intranet is a must. A secure website also makes it possible to access information from a mobile device, at any time and place.
That all sounds fantastic, but there remains one practical question. How to publish an Excel spreadsheet on the web?
Data Format Options
Excel spreadsheets may contain different types of data. These data types include currencies, numbers, text, and even visual data.
Excel also has different ways of visualizing information. It uses chart types like waterfalls and doughnuts.
To make it more complicated, sometimes it is necessary to export a combination of these data types. An example is stock prices that are shown in conjunction with a graph of last month’s performance.
Exporting this is possible in different formats.
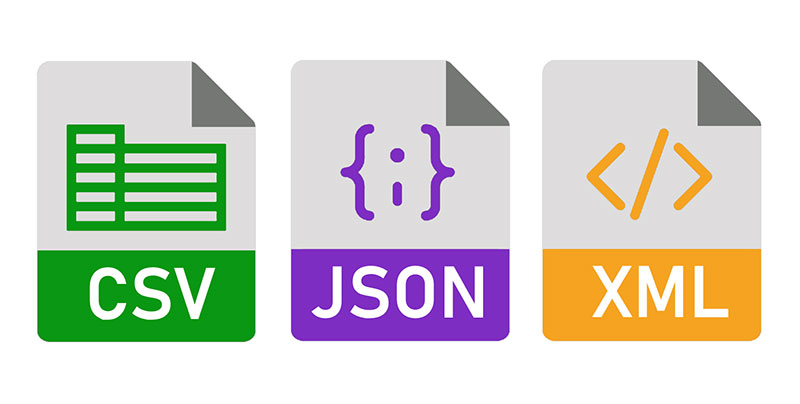
Useful formats are JPG, PDF, HTML, and others. It’s possible to store numerical data as CSV, JSON, or XML.
HTML Web Markup
HTML, or HyperText Markup Language, is the coding language used for every website. The browser on a local computer is able to read the code and convert it to a visual representation on the screen.
It is possible to convert any kind of data format to HTML, including tables, graphs, and headings. Converting an Excel table to HTML means that a web browser can now read it and display it.
JSON Format
JSON is short for JavaScript Object Notation. It is an alternative method for sharing and transferring information via the Internet.
JSON is based on a system that pairs keys and values. It is especially suited for coding Excel data for online purposes.
JSON works directly with a web page and the data is also easy to import into a database.
XML Format
XML is similar to the JSON format but has a longer history. In appearance, it is like HTML but it describes spreadsheet data.
In fact, Excel stores all workbook data in this format. This is an open standard so anyone can use it.
This makes it very practical. Anyone can open, edit, and import the information in an XML file.
CSV Files
The CSV format is the oldest of the spreadsheet formats that are still in common use. CSV stands for Comma Separated Values.
In this format, commas separate the fields. Instead of commas, it is also possible to use different symbols, like tabs.
CSV files are still commonly used. For example, MySQL databases make use of it.

Start by opening the desired Excel spreadsheets in Microsoft Office Excel.
- Open the File
- Click Save As.
- At the bottom of the window, click on the down arrow of the drop-down menu.
- Select Web Page from the list.
- In the File Name box, type an appropriate name for the file.
- Click Publish.
Sheet Option Button
Change the Selection Option depending on whether part of the sheet is selected. If changes to the sheet are being saved, the button changes to Republish: Sheet.
If nothing is selected, Excel will by default save the entire workbook. It will include all the data in the HTML file.
To limit what gets included in the HTML file, select the appropriate items in the Choose List. It is possible to publish only one item at a time.
To continue publishing, select a different element and follow the procedure outlined above.
These are the publishable elements and a description of how to publish them:
- The whole workbook.
Select the whole workbook. Excel will publish it with all the associated interactivity.
It is not possible to publish it with the interactive elements.
- Complete worksheets.
Select the sheet names, then select All Content of the sheet.
- Items.
Under Sheet Name select the desired items. Examples include PivotTable or a chart.
Items do not include cell ranges.
- Cell Ranges.
Select the cell ranges.
To select the right range, click on the worksheet. The dialog box will now collapse.
Now, select the range by clicking and dragging. Then click on the Expand Dialog Button:
- Charts.
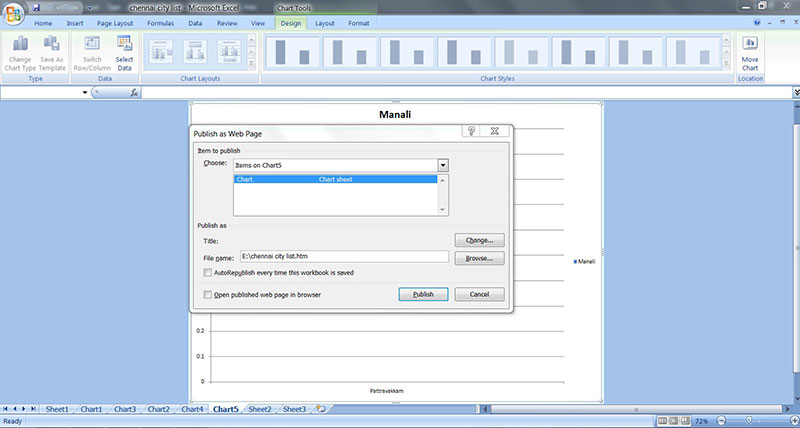
Select Items on Sheet. Then select the appropriate Chart.
- Filtered ranges.
Click Select Items on Sheet and then apply the AutoFilter.
- External data ranges.
Select Items on Sheet name. Then select the query item
To republish part of a previously published workbook, click Previously Published Items. Select the elements to republish.
Alternatively, select Remove to prevent an element from publishing again. Finally, click a different item on the list to continue publishing.
It is also possible to add a page to the HTML file:
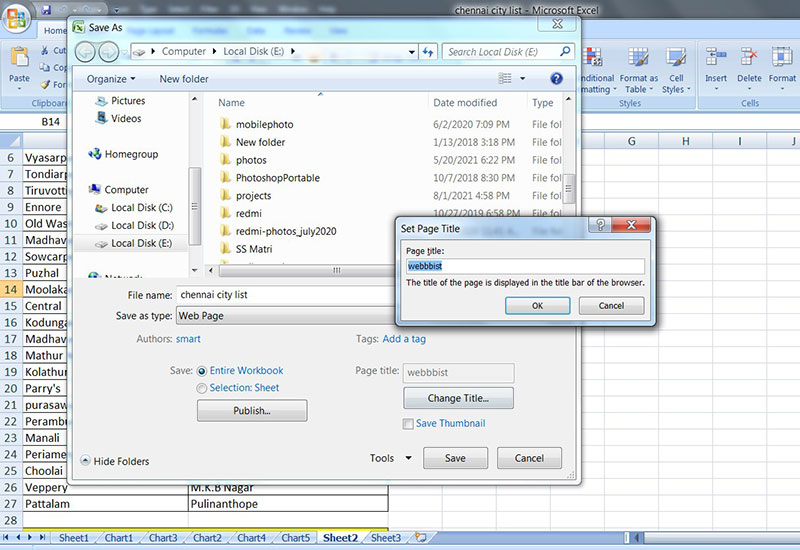
- Click the Change
- Type a heading in the Page Title text box in the Set Page Title box.
- Click OK. The title will appear in the middle at the top of the page.
This header is not the same as the web page title.
- Click Save.
- Close the Save As box.
By default, Excel saves a single worksheet as HTM, a Hypertext Markup file. It uses the .mht extension if publishing multiple worksheets.
Some file servers, in particular the ones that run on UNIX, are case-sensitive. So, keep the effect of capitalization in mind when choosing a file name.
Publishing with Interactivity
Adding interactivity allows visitors to work with the data in their browsers.
For example, it’s possible to publish an interactive sheet that calculates loan information. A visitor can use the sheet to calculate monthly payments by entering information like interest rate and loan amount.
To add interactivity, tick the box Add Interactivity. Then select the kind of interactivity.
The choices that Excel offers depend on the kind of document.
For a worksheet with formulas, an option is Spreadsheet Functionality. Users then use the web page to enter new values and make certain calculations.
PivotTable is an interactivity option for PivotTable. Users can rearrange data by changing the layout of columns and rows.
This allows them to have a different view of the data. The Spreadsheet functionality is available for filtered range Excel spreadsheets.
The Chart option will appear for PivotChart reports. The chart will not appear on the web page when an interactive chart is published through Excel.
Publish the chart separately to include the chart on the web page.
Use Google Docs
In recent years Google Docs has become more and more popular. It is another great option for embedding spreadsheets into a web page.
It is simple and is very convenient to work with when there are many changes to make to the spreadsheet.
Changes made to the Google Sheets document are reflected on the web page. So it is not necessary to perform any additional tasks.
To use Google Sheets for publishing spreadsheets:
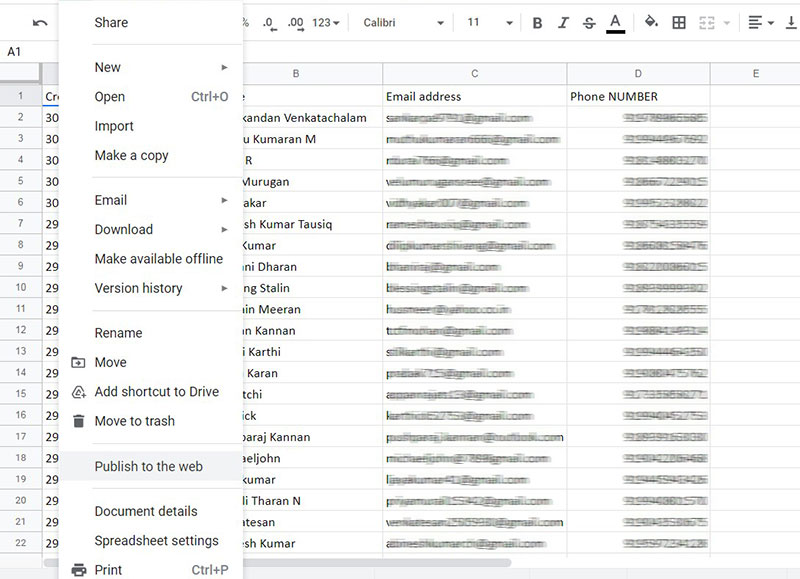
- Open the Google Sheets document.
- Update the data as needed.
- Go to File.
- Click Publish to the Web.
- Start posting.
- Copy and paste the shortcode that it generates.
The best way to publish an Excel sheet on the web is with WordPress and wpDataTables
The most classy way for publishing Excel with WordPress is through wpDataTables, the best WordPress plugin for tables and charts.
Here’s how easy it is to import Excel in WordPress:
And you can get more info about the process through our documentation page for importing data from Excel, CSV, or Google Spreadsheets.
If you enjoyed reading this article on how to publish an excel spreadsheet on the web, you should check out this one on how to delete WordPress themes.
We also wrote about a few related subjects like how to watermark images, how to check the WordPress version, creating a comparison table with WordPress plugins, how to upload an HTML file in WordPress, where are WordPress pages stored and why is WordPress so hard to use.