

In this article we will implement Excel import and Export in ASP.Net Core 5
You can also watch the full Video on Youtube
And you can find the full source code on GitHub:
https://github.com/mohamadlawand087/v27-ExcelImportExport
Ingredients
Visual Studio Code (https://code.visualstudio.com/)
.Net 5 SDK (https://dotnet.microsoft.com/download)
The first thing we are going to do is check the dotnet version installed
dotnet --version
Enter fullscreen mode
Exit fullscreen mode
Now we need to create our application
dotnet new mvc -n "SampleExcel"
Enter fullscreen mode
Exit fullscreen mode
Now let us open our source code
The first thing we are going to do is build the application and run it so we can see that everything is running as it should be.
dotnet run
Enter fullscreen mode
Exit fullscreen mode
The next step is for us to install the excel package that we want to utilise and for this we are going to be using EPP
dotnet add package EPPlus.Core --version 1.5.4
Enter fullscreen mode
Exit fullscreen mode
Once the package is installed we are going to create our Model which will handle the information output.
In the root directory inside that folder let us create a new class called User
public class User
{
    public string Name { get; set; }
    public string Email { get; set; }
    public string Phone { get; set; }
}
Enter fullscreen mode
Exit fullscreen mode
Now let us create a new controller which will be responsible to handle the excel import and export, inside the controllers folder lets create a new Controller called UsersController and will add the export to excel functionality
public class UsersController : Controller
{
    private readonly ILogger<UsersController> _logger;

    public UsersController(ILogger<UsersController> logger)
    {
        _logger = logger;
    }

    public IActionResult Index()
    {
        var users = GetlistOfUsers();

        return View(users);
    }

    public IActionResult ExportToExcel()
    {
        // Get the user list
        var users = GetlistOfUsers();

        var stream = new MemoryStream();
        using (var xlPackage = new ExcelPackage(stream))
        {
            var worksheet = xlPackage.Workbook.Worksheets.Add("Users");
            var namedStyle = xlPackage.Workbook.Styles.CreateNamedStyle("HyperLink");
            namedStyle.Style.Font.UnderLine = true;
            namedStyle.Style.Font.Color.SetColor(Color.Blue);
            const int startRow = 5;
            var row = startRow;

            //Create Headers and format them
            worksheet.Cells["A1"].Value = "Sample";
            using (var r = worksheet.Cells["A1:C1"])
            {
                r.Merge = true;
                r.Style.Font.Color.SetColor(Color.White);
                r.Style.HorizontalAlignment = OfficeOpenXml.Style.ExcelHorizontalAlignment.CenterContinuous;
                r.Style.Fill.PatternType = OfficeOpenXml.Style.ExcelFillStyle.Solid;
                r.Style.Fill.BackgroundColor.SetColor(Color.FromArgb(23, 55, 93));
            }

            worksheet.Cells["A4"].Value = "Name";
            worksheet.Cells["B4"].Value = "Email";
            worksheet.Cells["C4"].Value = "Phone";
            worksheet.Cells["A4:C4"].Style.Fill.PatternType = ExcelFillStyle.Solid;
            worksheet.Cells["A4:C4"].Style.Fill.BackgroundColor.SetColor(Color.FromArgb(184, 204, 228));
            worksheet.Cells["A4:C4"].Style.Font.Bold = true;

            row = 5;
            foreach (var user in users)
            {
                    worksheet.Cells[row, 1].Value = user.Name;
                    worksheet.Cells[row, 2].Value = user.Email;
                    worksheet.Cells[row, 3].Value = user.Phone;

                    row++;
            }

            // set some core property values
            xlPackage.Workbook.Properties.Title = "User List";
            xlPackage.Workbook.Properties.Author = "Mohamad Lawand";
            xlPackage.Workbook.Properties.Subject = "User List";
            // save the new spreadsheet
            xlPackage.Save();
            // Response.Clear();
        }
        stream.Position = 0;
        return File(stream, "application/vnd.openxmlformats-officedocument.spreadsheetml.sheet", "users.xlsx");
    }

    // Mimic a database operation
    private List<User> GetlistOfUsers()
    {
        var users = new List<User>()
        {
            new User {
                Email = "mohamad@email.com",
                Name = "Mohamad",
                Phone = "123456"
            },
            new User {
                Email = "donald@email.com",
                Name = "donald",
                Phone = "222222"
            },
            new User {
                Email = "mickey@email.com",
                Name = "mickey",
                Phone = "33333"
            }
        };

        return users;
    }
}
Enter fullscreen mode
Exit fullscreen mode
Now let us update the views inside the Views folder let us create a new folder called Users and inside the Users folder we will create a new file Index.cshtml
@model List<SampleExcel.Models.User>

<div class="row">
    <div class="col-md-16">
        <a asp-action="ExportToExcel" asp-controller="Users" class="btn btn-primary">Export to Excel</a>
    </div>
    <div class="col-md-16">
        <a asp-action="BatchUserUpload" asp-controller="Users" class="btn btn-primary">Import from Excel</a>
    </div>
</div>

<div class="row">
    <div class="col-md-12">
        <table class="table">
            <thead>
                <tr>
                    <th>Name</th>
                    <th>Email</th>
                    <th>Phone</th>
                </tr>
            </thead>
            <tbody>
                @foreach (var item in Model)
                {
                    <tr>
                        <td>@item.Name</td>
                        <td>@item.Email</td>
                        <td>@item.Phone</td>
                    </tr>
                }
            </tbody>
        </table>
    </div>
</div>
Enter fullscreen mode
Exit fullscreen mode
Now let us update the controller with an import functionality
[HttpGet]
public IActionResult BatchUserUpload()
{
    return View();
}

[HttpPost]
[ValidateAntiForgeryToken]
public IActionResult BatchUserUpload(IFormFile batchUsers)
{

    if (ModelState.IsValid)
    {
        if (batchUsers?.Length > 0)
        {
            var stream = batchUsers.OpenReadStream();
            List<User> users = new List<User>();
            try
            {
                using (var package = new ExcelPackage(stream))
                {
                    var worksheet = package.Workbook.Worksheets.First();//package.Workbook.Worksheets[0];
                    var rowCount = worksheet.Dimension.Rows;

                    for (var row = 2; row <= rowCount; row++)
                    {
                        try
                        {

                            var name = worksheet.Cells[row, 1].Value?.ToString();
                            var email = worksheet.Cells[row, 2].Value?.ToString();
                            var phone = worksheet.Cells[row, 3].Value?.ToString();

                            var user = new User()
                            {
                                Email = email,
                                Name = name,
                                Phone = phone
                            };

                            users.Add(user);

                        }
                        catch(Exception ex)
                        {
                            Console.WriteLine("Something went wrong");
                        }
                    }
                }

                return View("Index", users);

            }
            catch(Exception e)
            {
                return View();
            }
        }
    }

    return View();
}
Enter fullscreen mode
Exit fullscreen mode
As well we need to update the view inside the Views ⇒ Users folders we need to create a new file called BatchUserUpload.cshtml and add the following
<div class="row">
    <div class="col-md-12">
        <form asp-action="BatchUserUpload" asp-controller="Users" method="post" id="create-form" enctype="multipart/form-data">
            <div class="form-group">
                <label class="control-label">
                        Upload File:
                </label>
                <input id="batchUsers" name="batchUsers" class="form-control" type="file" tabindex="14">
                <span class="form-text text-muted">Allowed file types:  xlsx, xls.</span>
            </div>
            <div class="card-footer">
                <center>
                    <button type="submit" class="btn btn-primary mr-2">Upload Users</button>
                    <a asp-action="Index" asp-controller="Users" class="btn btn-secondary">Cancel</a>
                </center>
            </div>
        </form>
    </div>
</div>
Enter fullscreen mode
Exit fullscreen mode
Thank you for reading, please ask your questions in the comments.
This article explains how to export data to excel using the EPPlus package with examples in simple steps.

Table of Contents
- Getting Started
- Project structure
- Installing NuGet Package Microsoft.EntityFrameworkCore
- Installing NuGet Package Microsoft.EntityFrameworkCore.SqlServer
- Installing NuGet Package EPPlus
- Setting License Property of EPPlus Via code
- Configuring Connection string in appsettings.json
- appsettings.json file
- Adding DbContext
- Added UserMasterModel
- Adding Dbset to DbContext
- Registering AddDbContext in ConfigureServices Method
- Adding Interface and Concrete Class
- Adding IReporting Interface
- Adding ReportingConcrete Class
- Registering Service with DI Container
- Adding Controller
- Adding Method Private Method ExporttoExcel
- Adding ExporttoExcel Feature in Reporting Controller
- Adding View DownloadReport
- Run and Test
- Output
Getting Started
We are going to create a new application, as shown below.

Next, we are going to set Project Name DemoExportApp and location. In the last part, we will choose the .Net Core framework and ASP.NET Core Version 5.0 as the framework for application and a few advanced settings for such as configuring HTTPS and enabling docker; we are not going to enable docker settings for this project.

Project structure
The project structure is generated according to the configuration.

After creating the project next, we are going to install NuGet Packages.
Installing NuGet Package
- Microsoft.EntityFrameworkCore
- Microsoft.EntityFrameworkCore.SqlServer
- EPPlus
Installing Microsoft.EntityFrameworkCore

Installing Microsoft.EntityFrameworkCore.SqlServer

Installing EPPlus Package from NuGet Package

Next after installing the EPPlus package next, we need to set the license parameter.
There are 2 types of licenses
- Commercial
- Non-Commercial
For this demo, we are going to use a Non-Commercial License if you want a commercial License then click on https://www.epplussoftware.com/en/LicenseOverview/.
We are going to add this Property Via appSettings.json
"EPPlus": {
    "ExcelPackage": {
      "LicenseContext": "NonCommercial" //The license context used
    }
  }
Setting License Property Via code
// If you are a commercial business and have
// purchased commercial licenses use the static property
// LicenseContext of the ExcelPackage class :
ExcelPackage.LicenseContext = LicenseContext.Commercial;

// If you use EPPlus in a noncommercial context
// according to the Polyform Noncommercial license:
ExcelPackage.LicenseContext = LicenseContext.NonCommercial;
After setting license Property next we need to get data from the database to export for that we are going to configure the connection string in the appsettings.json file.
Configuring Connection string in appsettings.json
Here in ASP.NET core, we don’t have a web.config file which was there in the older version of ASP.NET and ASP.NET MVC here we have an appsettings.json file where we are going to keep application-level settings, and this file is Json based.
appsettings.json file
In this file, we have added the ConnectionStrings section inside that we have added DatabaseConnection key and other is value.
Notice: – here I am using SQL based authentication for database connection that why I have added the User Id and password of the SQL server.
{
  "Logging": {
    "LogLevel": {
      "Default": "Information",
      "Microsoft": "Warning",
      "Microsoft.Hosting.Lifetime": "Information"
    }
  },
  "EPPlus": {
    "ExcelPackage": {
      "LicenseContext": "NonCommercial" //The license context used
    }
  },
  "ConnectionStrings": {
    "DatabaseConnection": "Data Source=DESKTOP-DUM6D15\MSSQLSERVERSTD; initial catalog=OneFitnessVueDB; user id=sa; password=Pass$123"
  },
  "AllowedHosts": "*"
}
Adding DbContext
using Microsoft.EntityFrameworkCore;

namespace DemoExportApp.EFContext
{
    public class DatabaseContext: DbContext
    {
        public DatabaseContext(DbContextOptions<DatabaseContext> options) : base(options)
        {

        }
    }
}
Added UserMasterModel
In this part, we are going to add Model UserMaster.
using System;
using System.ComponentModel.DataAnnotations;
using System.ComponentModel.DataAnnotations.Schema;

namespace DemoExportApp.Models
{
    [Table("Usermaster")]
    public class UserMasterModel
    {
        [Key]
        public int UserId { get; set; }
        public string UserName { get; set; }
        public string FirstName { get; set; }
        public string LastName { get; set; }
        public string EmailId { get; set; }
        public string MobileNo { get; set; }
        public string Gender { get; set; }
        public bool Status { get; set; }
        public string PasswordHash { get; set; }
        public bool IsFirstLogin { get; set; } = false;
        public DateTime IsFirstLoginDate { get; set; }
        public DateTime? CreatedOn { get; set; } = DateTime.Now;
        public DateTime? ModifiedOn { get; set; }
        public int? CreatedBy { get; set; }
        public int? ModifiedBy { get; set; }
        public int DesignationId { get; set; }
    }
}

Adding Dbset to DbContext
DbSet corresponds to a table or view in your database.
using DemoExportApp.Models;
using Microsoft.EntityFrameworkCore;

namespace DemoExportApp.EFContext
{
    public class DatabaseContext : DbContext
    {
        public DatabaseContext(DbContextOptions<DatabaseContext> options) : base(options)
        {
        }
        public DbSet<UserMasterModel> UserMasters { get; set; }
    }
}
Registering AddDbContext in ConfigureServices Method
public void ConfigureServices(IServiceCollection services)
  {
      var connection = Configuration.GetConnectionString("DatabaseConnection");
      services.AddDbContext<DatabaseContext>(options => options.UseSqlServer(connection));
      services.AddControllersWithViews();
  }
After Registering next, we are going to add a Repository Folder.
Adding Interface and Concrete Class
In this part, we are adding Interface with Name IReporting and Concrete Class with Name ReportingConcrete.

ReportingConcrete class will inherit IReporting Interface. In ReportingConcrete class we are going to write a method for getting data from a database which we are going to pass to the excel library to export as Excel.
Same time we need to Add ViewModel with Name UserViewModel where we are going to Add only that property which we are going to export.
using System;

namespace DemoExportApp.Models
{
    public class UserMasterViewModel
    {
        public string UserName { get; set; }
        public string FirstName { get; set; }
        public string LastName { get; set; }
        public string EmailId { get; set; }
        public string MobileNo { get; set; }
        public string Gender { get; set; }
        public DateTime? CreatedOn { get; set; }
        public string Status { get; set; }
    }
}
Adding IReporting Interface
we have added the IReporting interface and declared GetUserwiseReport method init.
using DemoExportApp.Models;
using System.Collections.Generic;

namespace DemoExportApp.Repository
{
    public interface IReporting
    {
        List<UserMasterViewModel> GetUserwiseReport();
    }
}
Adding ReportingConcrete Class
Here we are going to Add Class ReportingConcrete Class which will inherit the IReporting interface and implement GetUserwiseReport Methods in it.
using DemoExportApp.EFContext;
using DemoExportApp.Models;
using Microsoft.EntityFrameworkCore;
using Microsoft.Extensions.Configuration;
using System;
using Microsoft.Data.SqlClient;
using System.Collections.Generic;
using System.Linq;

namespace DemoExportApp.Repository
{
    public class ReportingConcrete : IReporting
    {
        private readonly DatabaseContext _databaseContext;
        private readonly IConfiguration _configuration;
        public ReportingConcrete(DatabaseContext databaseContext, IConfiguration configuration)
        {
            _databaseContext = databaseContext;
            _configuration = configuration;
        }
        public List<UserMasterViewModel> GetUserwiseReport()
        {
            try
            {
                var listofusers = (from usermaster in _databaseContext.UserMasters.AsNoTracking()
                                   select new UserMasterViewModel()
                                   {
                                       UserName = usermaster.UserName,
                                       FirstName = usermaster.FirstName,
                                       LastName = usermaster.LastName,
                                       CreatedOn = usermaster.CreatedOn,
                                       EmailId = usermaster.EmailId,
                                       Gender = usermaster.Gender == "M" ? "Male" : "Female",
                                       MobileNo = usermaster.MobileNo,
                                       Status = usermaster.Status == true ? "Active" : "InActive",

                                   }).ToList();

                return listofusers;
            }
            catch (Exception ex)
            {
                throw;
            }
        }
    }
}
After Adding the Interface and Concrete class next we are going to register them in ConfigureServices Method.
Registering Service with DI Container
public void ConfigureServices(IServiceCollection services)
{
    var connection = Configuration.GetConnectionString("DatabaseConnection");
    services.AddDbContext<DatabaseContext>(options => options.UseSqlServer(connection));
    services.AddTransient<IReporting, ReportingConcrete>();
    services.AddControllersWithViews();
}
Adding Controller
We are going to add a controller with the name Report. In this controller, we are going to add the Action method which will be used to export Excel.

After adding the controller next, we are going to add 2 Action methods with the name “DownloadReport”.
using DemoExportApp.Repository;
using Microsoft.AspNetCore.Http;
using Microsoft.AspNetCore.Mvc;
using OfficeOpenXml;
using OfficeOpenXml.Table;
using System.Collections.Generic;

namespace DemoExportApp.Controllers
{
    public class ReportController : Controller
    {
        readonly IReporting IReporting;

        public ReportController(IReporting iReporting)
        {
            IReporting = iReporting;
        }


        [HttpGet]
        public IActionResult DownloadReport()
        {
            return View();
        }

        [HttpPost]
        public IActionResult DownloadReport(IFormCollection obj)
        {
            return View();
        }

    }
}
Adding Method Private Method ExporttoExcel
ExporttoExcel Method will take 2 input List of Collection (List<UserMasterViewModel>) and filename and it will return Bytes.
 private byte[] ExporttoExcel<T>(List<T> table, string filename)
 {
     using ExcelPackage pack = new ExcelPackage();
     ExcelWorksheet ws = pack.Workbook.Worksheets.Add(filename);
     ws.Cells["A1"].LoadFromCollection(table, true, TableStyles.Light1);
     return pack.GetAsByteArray();
 }
Adding ExporttoExcel Feature in Reporting Controller
In Reporting Controller, we are going to use constructor injection to inject IReporting Interface.
Using IReporting we can access the GetUserwiseReport method which will return the List of Usermaster which we are going to pass to the ExporttoExcel Method along with filename which will return us bytes that bytes we are going to pass to FileContentResult and other 2 parameters such as content type, file download name.
File(exportbytes, "application/vnd.openxmlformats-officedocument.spreadsheetml.sheet", reportname);using DemoExportApp.Models;
using DemoExportApp.Repository;
using Microsoft.AspNetCore.Http;
using Microsoft.AspNetCore.Mvc;
using OfficeOpenXml;
using OfficeOpenXml.Table;
using System;
using System.Collections.Generic;
namespace DemoExportApp.Controllers
{
public class ReportController : Controller
{
readonly IReporting _IReporting;
public ReportController(IReporting iReporting)
{
_IReporting = iReporting;
}
[HttpGet]
public IActionResult DownloadReport()
{
return View();
}
[HttpPost]
public IActionResult DownloadReport(IFormCollection obj)
{
string reportname = $"User_Wise_{Guid.NewGuid():N}.xlsx";
var list = _IReporting.GetUserwiseReport();
if (list.Count > 0)
{
var exportbytes = ExporttoExcel<UserMasterViewModel>(list, reportname);
return File(exportbytes, "application/vnd.openxmlformats-officedocument.spreadsheetml.sheet", reportname);
}
else
{
TempData["Message"] = "No Data to Export";
return View();
}
}
private byte[] ExporttoExcel<T>(List<T> table, string filename)
{
using ExcelPackage pack = new ExcelPackage();
ExcelWorksheet ws = pack.Workbook.Worksheets.Add(filename);
ws.Cells["A1"].LoadFromCollection(table, true, TableStyles.Light1);
return pack.GetAsByteArray();
}
}
}
Adding View DownloadReport
In this part, we are going to add View and on View, we are going to add a Form tag with submit button in it. On click on Submit button, it will call DownloadReport Post Method which will export data to excel.
@{
    ViewData["Title"] = "Export Excel";
}


<div class="col-md-12">
    <div class="card">
        <div class="card-header">
            <h3 class="card-title">Download Report</h3>
        </div>
        <form autocomplete="off" asp-controller="Report" asp-antiforgery="true" asp-action="DownloadReport" method="post">
            <div class="card-body register-card-body">
                <div class="form-row">
                    <button type="submit" id="btnsubmit" class="btn btn-success">Export to Excel</button>
                </div>

            </div>
            <div class="card-footer">
            </div>
        </form>
    </div>
</div>
Lets Run and Test

Output

Summary
We have learned how to export data to excel in ASP.NET Core using the EPPlus package in simple steps.
Работа с типом файлов Microsoft Excel на сайте – это довольно частая задача. Импорт/экспорт прайса или номенклатуры товаров в интернет-магазине, выгрузка отчета из базы данных в виде таблицы, да все что угодно. В этом уроке посмотрим, как можно обрабатывать файлы такого типа.
На сегодняшний день существует достаточно много готовых решений (библиотек) для взаимодействия с файлами Excel, чтобы не работать напрямую с системными GridView и DataTable. Не будем изобретать велосипед и рассмотрим одну из популярных и удобных библиотек, которой я пользуюсь чаще других.
Данная библиотека называется ClosedXML. По этой ссылке находится официальный адрес проекта на GitHub. Библиотека позволяет легко манипулировать файлами MS Excel в удобной объектно-ориентированной манере. Она может быть использована на любом .NET языке программирования (C#, VisualBasic.NET), а также в проектах не только типа WebApplication.
Представим ситуацию, что у нас есть под рукой вот такой Excel-файл с ценами на ремонт телефонов, в котором на листах расположены отдельные бренды, колонки на листе представляют конкретные модели для этого бренда, а строки представляют конкретные неисправности и сколько будет стоить ремонт для той или иной модели.

Прайс-лист на услуги в виде Excel-файла
Давайте создадим веб-приложение, которое сможет распарсить этот файл так, чтобы мы могли работать с записями в объектно-ориентированной манере, например, сохранять/обновлять бренды, модели и позиции в прайсе в базу данных. Или, например, представлять этот прайс в виде обычной html-таблицы в браузере пользователя.
Создаем в Visual Studio проект типа MVC, открываем Nuget Manager и скачиваем нужный нам пакет.

Добавляем пакет ClosedXML в проект
Создадим все доменные классы-модели, которые описывают предметную область.
Кстати, внизу страницы есть ссылка на архив с исходным кодом проекта.
namespace WebApplication2.Models
{
    public class PricePosition
    {
        //Неисправность
        public string Problem { get; set; }

        //Стоимость ремонта
        public string Price { get; set; }
    }

    public class PhoneModel
    {
        public PhoneModel()
        {
            PricePositions = new List<PricePosition>();
        }

        //Название модели телефона
        public string Title { get; set; }

        public List<PricePosition> PricePositions { get; set; }
    }

    public class PhoneBrand
    {
        public PhoneBrand()
        {
            PhoneModels = new List<PhoneModel>();
        }

        //Название бренда
        public string Title { get; set; }

        public List<PhoneModel> PhoneModels { get; set; }
    }
}
Описанные модели максимально простые, чтобы не усложнять пример. В них нет и не отслеживается уникальных идентификаторов, все свойства типа String и т.д.
Также определим т.н. ViewModel, то есть модель для представления. В нее заключим все объекты доменной модели, которые мы хотим показать пользователю в браузере:
public class PriceViewModel
{
    public PriceViewModel()
    {
        PhoneBrands = new List<PhoneBrand>();
    }

    public List<PhoneBrand> PhoneBrands { get; set; }

    //кол-во ошибок при импорте
    public int ErrorsTotal { get; set; }
}
Далее в вашем проекте определите какое-нибудь действие в нужном контроллере, которое будет отвечать за загрузку Excel-файла из браузера на сервер. Пример кода с html-формой в соответствующем представлении:
<div>
    @using (Html.BeginForm("Import", "Home", FormMethod.Post, new { enctype = "multipart/form-data", id = "frm-excel" }))
    {
        <div>
            Загрузите Excel-файл:
            <input type="file" name="fileExcel" id="fileExcel" />
            <div>
                <input type="submit" value="Загрузить" />
            </div>
        </div>
    }
</div>
Из примера видно, что в форме мы обращаемся к методу Import в контроллере Home. Создадим подобный метод:
[HttpPost]
public ActionResult Import(HttpPostedFileBase fileExcel)
{
    if (ModelState.IsValid)
    {
        PriceViewModel viewModel = new PriceViewModel();
        using (XLWorkbook workBook = new XLWorkbook(fileExcel.InputStream, XLEventTracking.Disabled))
        {
            foreach (IXLWorksheet worksheet in workBook.Worksheets)
            {
                PhoneBrand phoneBrand = new PhoneBrand();
                phoneBrand.Title = worksheet.Name;

                foreach (IXLColumn column in worksheet.ColumnsUsed().Skip(1))
                {
                    PhoneModel phoneModel = new PhoneModel();
                    phoneModel.Title = column.Cell(1).Value.ToString();

                    foreach (IXLRow row in worksheet.RowsUsed().Skip(1))
                    {
                        try
                        {
                            PricePosition pricePosition = new PricePosition();
                            pricePosition.Problem = row.Cell(1).Value.ToString();
                            pricePosition.Price = row.Cell(column.ColumnNumber()).Value.ToString();
                            phoneModel.PricePositions.Add(pricePosition);

                        }
                        catch (Exception e)
                        {
                            //logging
                            viewModel.ErrorsTotal++;
                        }
                    }

                    phoneBrand.PhoneModels.Add(phoneModel);
                }
                viewModel.PhoneBrands.Add(phoneBrand);
            }
        }
        //например, здесь сохраняем все позиции из прайса в БД

        return View(viewModel);
    }
    return RedirectToAction("Index");
}
В этом методе мы парсим Excel-файл и манипулируем записями в объектно-ориентированной манере. Код в методе довольно простой. Более подробно он объясняется в видео-версии этой статьи. Здесь отмечу основные моменты:
- в нескольких циклах foreach{ } мы пробегаемся по всем записям в файле, параллельно создавая объекты классов наших доменных моделей;
- получается сформированная коллекция брендов телефонов, в каждом из которых содержится коллекция конкретных моделей, в каждой из которых содержится коллекция позиций прайса с ценами на ремонт;
- также создается ViewModel, где мы считаем количество ошибок при импорте и в которую вкладываем заполненную коллекцию брендов;
- в итоге мы можем либо сохранить полученные объекты в базу данных, либо отправить ViewModel в представление.
В качестве интерактива Вы можете в соответствующем представлении создать HTML-таблицу с прайсом и отправить ее в браузер пользователя.
Также возможна другая ситуация, когда у нас нет исходного Excel-файла, вместо этого веб-приложение должно сформировать его динамически, и пользователь сайта сможет его скачать. Например, тот же список брендов и моделей телефонов.
Создадим соответствующее действие в контроллере:
public ActionResult Export()
{
    List<PhoneBrand> phoneBrands = new List<PhoneBrand>();
    phoneBrands.Add(new PhoneBrand()
    {
        Title = "Apple",
        PhoneModels = new List<PhoneModel>()
    {
        new PhoneModel() { Title = "iPhone 7"},
        new PhoneModel() { Title = "iPhone 7 Plus"}
    }});
    phoneBrands.Add(new PhoneBrand()
    {
        Title = "Samsung",
        PhoneModels = new List<PhoneModel>()
    {
        new PhoneModel() { Title = "A3"},
        new PhoneModel() { Title = "A3 2016"},
        new PhoneModel() { Title = "A3 2017"}
    }});

    using (XLWorkbook workbook = new XLWorkbook(XLEventTracking.Disabled))
    {
        var worksheet = workbook.Worksheets.Add("Brands");

        worksheet.Cell("A1").Value = "Бренд";
        worksheet.Cell("B1").Value = "Модели";
        worksheet.Row(1).Style.Font.Bold = true;

        //нумерация строк/столбцов начинается с индекса 1 (не 0)
        for (int i = 0; i < phoneBrands.Count; i++)
        {
            worksheet.Cell(i + 2, 1).Value = phoneBrands[i].Title;
            worksheet.Cell(i + 2, 2).Value = string.Join(", ", phoneBrands[i].PhoneModels.Select(x => x.Title));
        }

        using (var stream = new MemoryStream())
        {
            workbook.SaveAs(stream);
            stream.Flush();

            return new FileContentResult(stream.ToArray(),
                "application/vnd.openxmlformats-officedocument.spreadsheetml.sheet")
            {
                FileDownloadName = $"brands_{DateTime.UtcNow.ToShortDateString()}.xlsx"
            };
        }
    }
}
Отмечу ключевые моменты из листинга выше:
- в нашем простом примере список брендов и моделей мы жестко закодировали, но его также можно получить и из БД;
- к ячейкам на рабочем листе можно обращаться как по литеральному значению, так и по индексу. Нумерация строк/столбцов начинается с индекса 1 (не 0);
- в качестве MIME-type для файлов Excel следует указывать application/vnd.openxmlformats-officedocument.spreadsheetml.sheet;
Вывод: В этой статье мы рассмотрели основные возможности библиотеки ClosedXML. Ее функционала вполне хватает для обработки большинства сценариев, когда данные представлены в формате MS Excel файлов.
In this article, we will see different ways to export data to Excel from a web application. It is very common task for web developers. Here are different approaches to do it in ASP.NET – C#:
Approach 1:
Using the Excel PIA (primary interop assemblies) to generate a spreadsheet server-side.
It needs Microsoft Office suite installed on your server which is not good. So it is NOT recommended.
Approach 2:
Using CSV/TSV content and save it to a file with a .xls extension.
If you don’t need control over formatting, styles, or workbook structure, only need data in excel, this approach is good for you.
To convert Generic data to TSV (Tab Separated Values) Format, use following method:
  public void WriteTsv<T>(IEnumerable<T> data, TextWriter output)
        {
            PropertyDescriptorCollection props = TypeDescriptor.GetProperties(typeof(T));
            foreach (PropertyDescriptor prop in props)
            {
                output.Write(prop.DisplayName); // header
                output.Write("t");
            }
            output.WriteLine();
            foreach (T item in data)
            {
                foreach (PropertyDescriptor prop in props)
                {
                    output.Write(prop.Converter.ConvertToString(
                         prop.GetValue(item)));
                    output.Write("t");
                }
                output.WriteLine();
            }
        }
and use following ASP.NET MVC action to generate excel:
 public void ExportListFromTsv()
        {
            var data = new[]{
                                new{ Name="Ram", Email="ram@techbrij.com", Phone="111-222-3333" },
                                new{ Name="Shyam", Email="shyam@techbrij.com", Phone="159-222-1596" },
                                new{ Name="Mohan", Email="mohan@techbrij.com", Phone="456-222-4569" },
                                new{ Name="Sohan", Email="sohan@techbrij.com", Phone="789-456-3333" },
                                new{ Name="Karan", Email="karan@techbrij.com", Phone="111-222-1234" },
                                new{ Name="Brij", Email="brij@techbrij.com", Phone="111-222-3333" }
                       };

			Response.ClearContent();
            Response.AddHeader("content-disposition", "attachment;filename=Contact.xls");
            Response.AddHeader("Content-Type", "application/vnd.ms-excel");
            WriteTsv(data, Response.Output);
            Response.End();
        }
For simplicity, I am using hard-coded sample data.

Read Also: Upload and Read Excel File (.xls, .xlsx) in ASP.NET MVC
Approach 3:
Generating HTML content and save it to a file with a .xls extension.
To convert Generic data to HTML Format with Table control, use following method:
        public void WriteHtmlTable<T>(IEnumerable<T> data, TextWriter output)
        {
            //Writes markup characters and text to an ASP.NET server control output stream. This class provides formatting capabilities that ASP.NET server controls use when rendering markup to clients.
            using (StringWriter sw = new StringWriter())
            {
                using (HtmlTextWriter htw = new HtmlTextWriter(sw))
                {

                    //  Create a form to contain the List
                    Table table = new Table();
                    TableRow row = new TableRow();
                    PropertyDescriptorCollection props = TypeDescriptor.GetProperties(typeof(T));
                    foreach (PropertyDescriptor prop in props)
                    {
                        TableHeaderCell hcell = new TableHeaderCell();
                        hcell.Text = prop.Name;
                        hcell.BackColor = System.Drawing.Color.Yellow;
                        row.Cells.Add(hcell);
                    }

                    table.Rows.Add(row);

                    //  add each of the data item to the table
                    foreach (T item in data)
                    {
                        row = new TableRow();
                        foreach (PropertyDescriptor prop in props)
                        {
                            TableCell cell = new TableCell();
                            cell.Text = prop.Converter.ConvertToString(prop.GetValue(item));
                            row.Cells.Add(cell);
                        }
                        table.Rows.Add(row);
                    }

                    //  render the table into the htmlwriter
                    table.RenderControl(htw);

                    //  render the htmlwriter into the response
                    output.Write(sw.ToString());
                }
            }

        }
In above method, we defined yellow header background color. use the above method to export data like below
 public void ExportListFromTable()
        {
            var data = new[]{
                                new{ Name="Ram", Email="ram@techbrij.com", Phone="111-222-3333" },
                                new{ Name="Shyam", Email="shyam@techbrij.com", Phone="159-222-1596" },
                                new{ Name="Mohan", Email="mohan@techbrij.com", Phone="456-222-4569" },
                                new{ Name="Sohan", Email="sohan@techbrij.com", Phone="789-456-3333" },
                                new{ Name="Karan", Email="karan@techbrij.com", Phone="111-222-1234" },
                                new{ Name="Brij", Email="brij@techbrij.com", Phone="111-222-3333" }
                       };

            Response.ClearContent();
            Response.AddHeader("content-disposition", "attachment;filename=Contact.xls");
            Response.AddHeader("Content-Type", "application/vnd.ms-excel");
            WriteHtmlTable(data, Response.Output);
            Response.End();
        }

You can use ASP.NET GridView directly(instead of table).
        public void ExportListFromGridView()
        {

            var data = new[]{
                                new{ Name="Ram", Email="ram@techbrij.com", Phone="111-222-3333" },
                                new{ Name="Shyam", Email="shyam@techbrij.com", Phone="159-222-1596" },
                                new{ Name="Mohan", Email="mohan@techbrij.com", Phone="456-222-4569" },
                                new{ Name="Sohan", Email="sohan@techbrij.com", Phone="789-456-3333" },
                                new{ Name="Karan", Email="karan@techbrij.com", Phone="111-222-1234" },
                                new{ Name="Brij", Email="brij@techbrij.com", Phone="111-222-3333" }
                       };


            Response.ClearContent();
            Response.AddHeader("content-disposition", "attachment;filename=Contact.xls");
            Response.AddHeader("Content-Type", "application/vnd.ms-excel");
            using (System.IO.StringWriter sw = new System.IO.StringWriter())
            {
                using (System.Web.UI.HtmlTextWriter htw = new System.Web.UI.HtmlTextWriter(sw))
                {
                    GridView grid = new GridView();
                    grid.DataSource = data;
                    grid.DataBind();
                    grid.RenderControl(htw);
                    Response.Write(sw.ToString());
                }
            }

            Response.End();
        }

If you want to export to excel from ASP.NET Razor View then use following action:
        public ActionResult ExportView()
        {
            Response.AddHeader("content-disposition", "attachment;filename=Report1.xls");
            Response.AddHeader("Content-Type", "application/vnd.ms-excel");
            return View(data);
        }
add a razor view of above action and use following code:
@model IEnumerable<ImportExcel.Models.Contact>
@{
    Layout = null;
}

<!DOCTYPE html>

<html>
<head>
    <meta name="viewport" content="width=device-width" />
    <title>ExportView</title>
</head>
<body>
    <div>
        <table>
            <tr>
                <th>
                    @Html.DisplayNameFor(model => model.Name)
                </th>
                <th>
                    @Html.DisplayNameFor(model => model.Email)
                </th>
             <th>
                    @Html.DisplayNameFor(model => model.Phone)
                </th>
           </tr>

            @foreach (var item in Model)
            {
                <tr>
                    <td>
                        @Html.DisplayFor(modelItem => item.Name)
                    </td>
                    <td>
                        @Html.DisplayFor(modelItem => item.Email)
                    </td>
                     <td>
                        @Html.DisplayFor(modelItem => item.Phone)
                    </td>
                </tr>
            }

        </table>
    </div>
</body>
</html>
In this approach, the logic is same to generate HTML, but the ways are different.
Approach 4:
When you open .xls file generated with Approach 2 & 3, you will get warning because of format difference. It is a bit annoyance.
EPPlus for .XLS
In this Approach, we will use free open source library EPPlus to export the content. It writes Excel 2007/2010 files using the Open Office Xml format (xlsx) only.
Run following command in the Package Manager Console to install EPPlus:
install-package epplus
Use following method for exporting data:
 public void ExportListUsingEPPlus()
        {
            var data = new[]{
                                new{ Name="Ram", Email="ram@techbrij.com", Phone="111-222-3333" },
                                new{ Name="Shyam", Email="shyam@techbrij.com", Phone="159-222-1596" },
                                new{ Name="Mohan", Email="mohan@techbrij.com", Phone="456-222-4569" },
                                new{ Name="Sohan", Email="sohan@techbrij.com", Phone="789-456-3333" },
                                new{ Name="Karan", Email="karan@techbrij.com", Phone="111-222-1234" },
                                new{ Name="Brij", Email="brij@techbrij.com", Phone="111-222-3333" }
                       };

            ExcelPackage excel = new ExcelPackage();
            var workSheet = excel.Workbook.Worksheets.Add("Sheet1");
            workSheet.Cells[1, 1].LoadFromCollection(data, true);
            using (var memoryStream = new MemoryStream())
            {
                Response.ContentType = "application/vnd.openxmlformats-officedocument.spreadsheetml.sheet";
                Response.AddHeader("content-disposition", "attachment;  filename=Contact.xlsx");
                excel.SaveAs(memoryStream);
                memoryStream.WriteTo(Response.OutputStream);
                Response.Flush();
                Response.End();
            }
        }
You can see how easy it is in .xlsx format. This library allows you to set worksheet properties, custom and conditional formatting, Cell Ranges and Cell styling (Border, Color, Fill, Font, Number, Alignments),Formula calculation ..etc.
If you have datatable as datasource, use following to load it
workSheet.Cells[1, 1].LoadFromDataTable(myDataTable, true);
NPOI for .XLS & .XLSX
If you want to generate both .xls and .xlsx files from single library then use NPOI library. This project is the .NET version of POI from Apache Foundation. NPOI can read and write xls (Excel 97-2003), xlsx(Excel 2007+). To install NPOI, run the following command in the Package Manager Console:
Install-Package NPOI
Add following method:
  public void WriteExcelWithNPOI(DataTable dt, String extension)
        {

            IWorkbook workbook;

            if (extension == "xlsx") {
                workbook = new XSSFWorkbook();
            }
            else if (extension == "xls")
            {
                workbook = new HSSFWorkbook();
            }
            else {
                throw new Exception("This format is not supported");
            }

            ISheet sheet1 = workbook.CreateSheet("Sheet 1");

            //make a header row
            IRow row1 = sheet1.CreateRow(0);

            for (int j = 0; j < dt.Columns.Count; j++)
            {

                ICell cell = row1.CreateCell(j);
                String columnName = dt.Columns[j].ToString();
                cell.SetCellValue(columnName);
            }

            //loops through data
            for (int i = 0; i < dt.Rows.Count; i++)
            {
                IRow row = sheet1.CreateRow(i + 1);
                for (int j = 0; j < dt.Columns.Count; j++)
                {

                    ICell cell = row.CreateCell(j);
                    String columnName = dt.Columns[j].ToString();
                    cell.SetCellValue(dt.Rows[i][columnName].ToString());
                }
            }

            using (var exportData = new MemoryStream())
            {
                Response.Clear();
                workbook.Write(exportData);
                if (extension == "xlsx") //xlsx file format
                {
                    Response.ContentType = "application/vnd.openxmlformats-officedocument.spreadsheetml.sheet";
                    Response.AddHeader("Content-Disposition", string.Format("attachment;filename={0}", "ContactNPOI.xlsx"));
                    Response.BinaryWrite(exportData.ToArray());
                }
                else if (extension == "xls")  //xls file format
                {
                    Response.ContentType = "application/vnd.ms-excel";
                    Response.AddHeader("Content-Disposition", string.Format("attachment;filename={0}", "ContactNPOI.xls"));
                    Response.BinaryWrite(exportData.GetBuffer());
                }
                Response.End();
            }
        }
Note: In above method, It is clearly visible response syntax differences (ContentType, Header and Write) between xls and xlsx.
Consider following datatable as datasource:
			DataTable dt = new DataTable();

            dt.Columns.Add("UserId", typeof(Int32));
            dt.Columns.Add("Name", typeof(string));
            dt.Columns.Add("Email", typeof(string));
            dt.Columns.Add("Phone", typeof(string));

            dt.Rows.Add(1, "Ram", "ram@techbrij.com", "111-222-3333");
            dt.Rows.Add(2, "Shyam", "shyam@techbrij.com", "159-222-1596");
            dt.Rows.Add(3, "Mohan", "mohan@techbrij.com", "456-222-4569");
            dt.Rows.Add(4, "Sohan", "sohan@techbrij.com", "789-456-3333");
            dt.Rows.Add(5, "Karan", "karan@techbrij.com", "111-222-1234");
            dt.Rows.Add(6, "Brij", "brij@techbrij.com", "111-222-3333");
To export in .xls format:
WriteExcelWithNPOI(dt, "xls");
To export in .xlsx format:
WriteExcelWithNPOI(dt, "xlsx");
Conclusion:
This post explains the different ways to export data in excel (.xls and .xlsx) format and their pros and cons. If you want your plain data in spreadsheet then approach 2 is good. If you are exporting data from any HTML element or you need some data formatting then approach 3 is good. If you need xlsx format then I recommend EPPlus. If you have to do a lot of operations on Excel and need support of both formats then NPOI is the best option for you, but it is very heavy.
Hope, It helps. Feel free to share your opinion in comment box.
In this article I will explain with an example, how to export to Excel file in ASP.Net MVC Razor.
The data from the database is fetched using Entity Framework and then the data is exported and downloaded as Microsoft Excel file using ClosedXML Excel Library which is a wrapper for OpenXml Excel library.
Database
Here I am making use of Microsoft’s Northwind Database. You can download it from here.
Installing and adding reference of ClosedXML Library
In order to install and add reference of ClosedXML library, you will need to:-
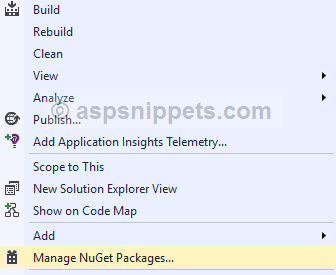
1. Right Click the Project in Solution Explorer and click Manage NuGet Packages from the Context Menu.
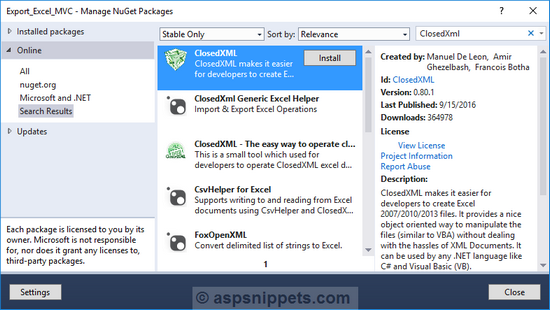
2. Now you will need to look for ClosedXML package and once found, you need to click the Install Button.
Configuring and connecting Entity Framework to database
Now I will explain the steps to configure and add Entity Framework and also how to connect it with the database.
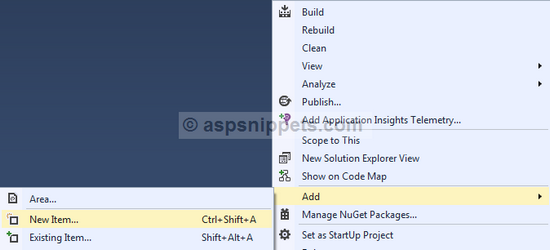
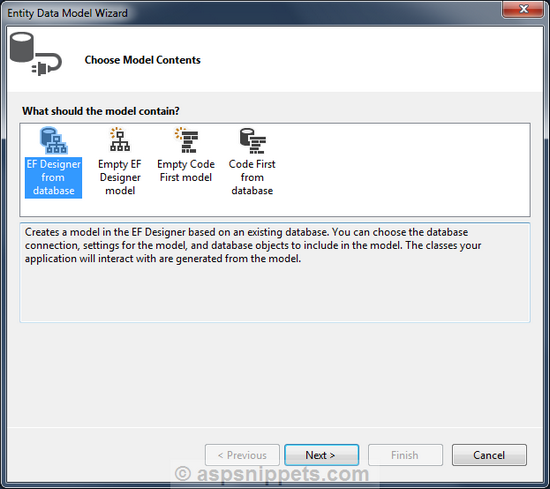
You will need to add Entity Data Model to your project by right clicking the Solution Explorer and then click on Add and then New Item option of the Context Menu.
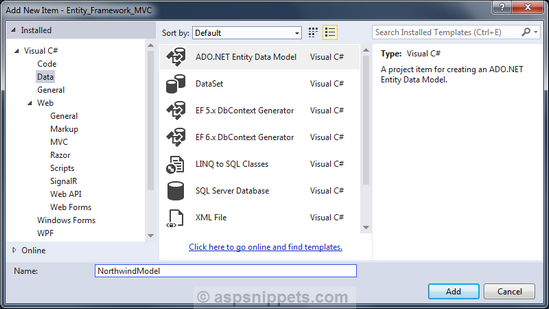
From the Add New Item window, select ADO.NET Entity Data Model and set its Name as NorthwindModel and then click Add.
Then the Entity Data Model Wizard will open up where you need to select EF Designer database option.
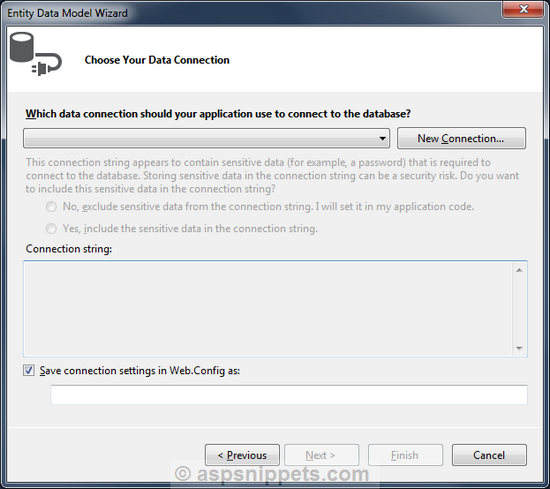
Now the wizard will ask you to connect and configure the Connection String to the database.
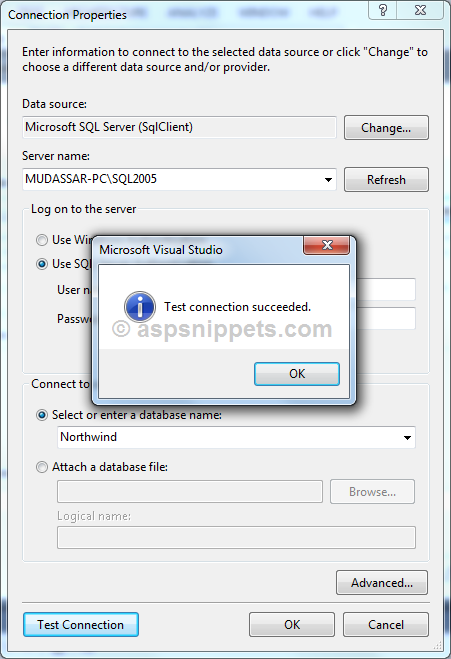
You will need to select the
1. SQL Server Instance
2. Database
And then click Test Connection to make sure all settings are correct.
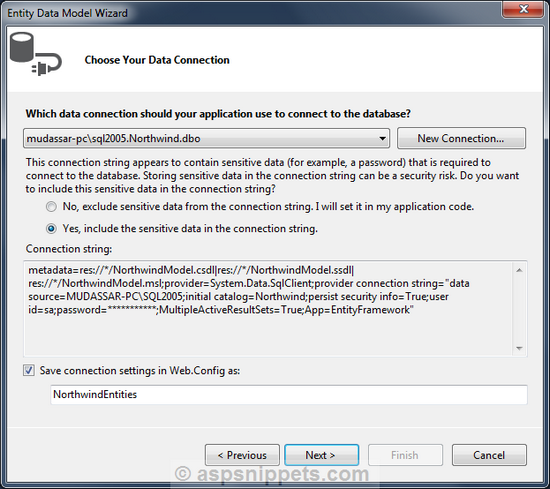
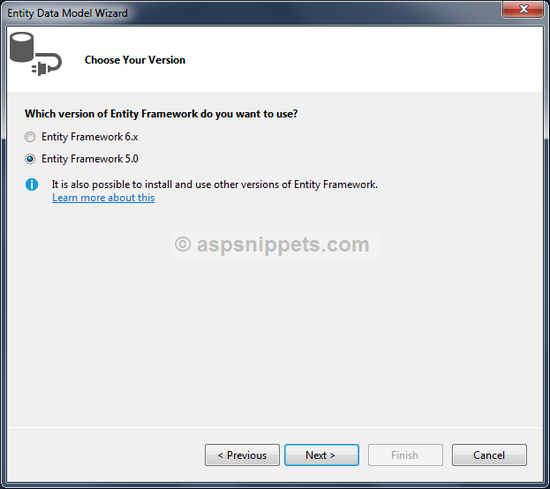
Once the Connection String is generated, click Next button to move to the next step.
Next you will need to choose the Entity Framework version to be used for connection.
Now you will need to choose the Tables you need to connect and work with Entity Framework. Here Customers Table is selected.
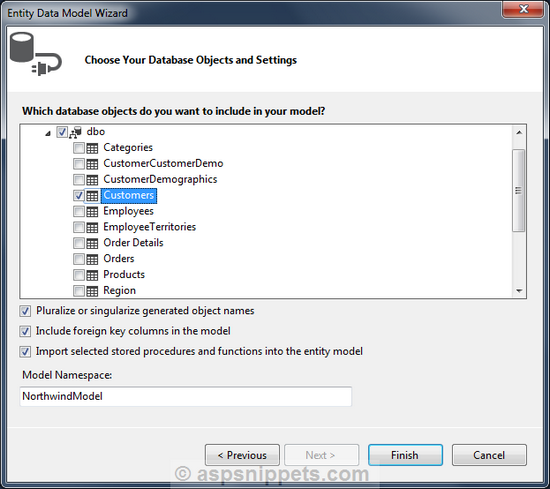
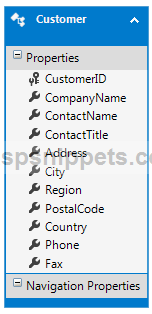
The above was the last step and you should now have the Entity Data Model ready with the Customers Table of the Northwind Database.
Namespaces
You will need to import the following namespaces.
using System.IO;
using System.Data;
using System.Linq;
using System.Web;
using System.Web.Mvc;
using ClosedXML.Excel;
Controller
The Controller consists of two Action methods.
Action method for handling GET operation
Inside this Action method, the Top 10 Customer records are fetched and returned to the View.
Action method for handling the Excel File Export and Download operation
This Action method is executed when the Export Submit button is clicked.
Note: The following Action method performs File Download and hence the return type is set to FileResult.
The Top 10 Customer records are fetched from the Customers Table using Entity Framework and are added to a dynamic DataTable. Then the DataTable is added to the Worksheets collection of the ClosedXML’s XLWorkbook object.
Then XLWorkbook object is saved to a MemoryStream object which then is converted to Byte Array and exported and downloaded as Excel file using the File function.
public class HomeController : Controller
{
// GET: Home
public ActionResult Index()
{
NorthwindEntities entities = new NorthwindEntities();
return View(from customer in entities.Customers.Take(10)
select customer);
}
[HttpPost]
public FileResult Export()
{
NorthwindEntities entities = new NorthwindEntities();
DataTable dt = new DataTable(«Grid»);
dt.Columns.AddRange(new DataColumn[4] { new DataColumn(«CustomerId»),
new DataColumn(«ContactName»),
new DataColumn(«City»),
new DataColumn(«Country») });
var customers = from customer in entities.Customers.Take(10)
select customer;
foreach (var customer in customers)
{
dt.Rows.Add(customer.CustomerID, customer.ContactName, customer.City, customer.Country);
}
using (XLWorkbook wb = new XLWorkbook())
{
wb.Worksheets.Add(dt);
using (MemoryStream stream = new MemoryStream())
{
wb.SaveAs(stream);
return File(stream.ToArray(), «application/vnd.openxmlformats-officedocument.spreadsheetml.sheet», «Grid.xlsx»);
}
}
}
}
View
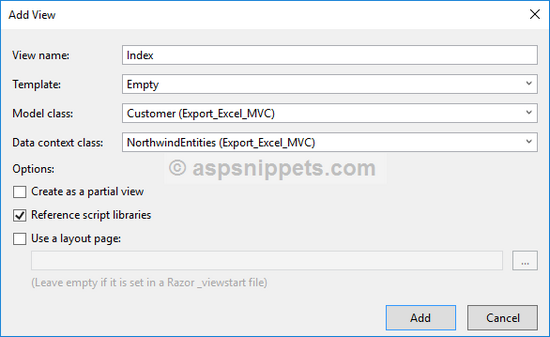
Now you will need to Right Click inside the Controller class and click on the Add View option in order to create a View for the Controller.
The Name of the View is set to Index, the Template option is set to Empty, the Model class is set to Customer Entity (the one we have generated using Entity Framework) and finally the Data context class is set to NorthwindEntities.
Inside the View, in the very first line the Customer Entity is declared as IEnumerable which specifies that it will be available as a Collection.
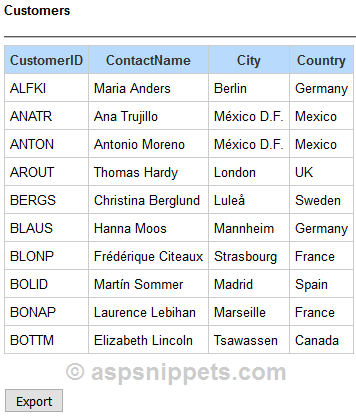
For displaying the records, an HTML Table is used. A loop will be executed over the Model which will generate the HTML Table rows with the Customer records.
Finally there’s an HTML Submit button enclosed inside a Form with the Action method specified as Export.
When this Button will be clicked, the Grid (Html Table) data will be exported and downloaded as Excel file.
@model IEnumerable<Export_Excel_MVC.Customer>
@{
Layout = null;
}
<!DOCTYPE html>
<html>
<head>
<meta name=»viewport» content=»width=device-width»/>
<title>Index</title>
</head>
<body>
<h4>Customers</h4>
<hr/>
<table cellpadding=»0″ cellspacing=»0″>
<tr>
<th>CustomerID</th>
<th>Contact Name</th>
<th>City</th>
<th>Country</th>
</tr>
@foreach (Customer customer in Model)
{
<tr>
<td>@customer.CustomerID</td>
<td>@customer.ContactName</td>
<td>@customer.City</td>
<td>@customer.Country</td>
</tr>
}
</table>
<br/>
<br/>
@using (Html.BeginForm(«Export», «Home», FormMethod.Post))
{
<input type=»submit» value=»Export»/>
}
</body>
</html>
Screenshots
Grid (Html Table)
Exported Excel File

Downloads