
If you want to change the selection direction after pressing the Enter button in the Excel spreadsheet, then this post will show you how to do it. Although it moves the selection to the bottom cell, you can select any other direction with the help of this guide.
Let’s assume that the C6 cell is selected in a spreadsheet opened in Microsoft Excel. At this moment, if you press the Enter button on your keyboard, it will move the cursor to the C7 cell. However, there could be times when you might want to move the cursor to another direction, such as D6 or B6, or C5. In such situations, you can use these guides to get the job done.

To change the cursor movement direction or change selection direction after pressing Enter key in Microsoft Excel spreadsheet, follow these steps:
- Open Microsoft Excel on your computer.
- Click on the File > Options.
- Switch to the Advanced tab.
- Make sure the After pressing Enter, move selection option is ticked.
- Expand the drop-down menu and choose a direction.
- Click the OK button.
Let’s delve into these steps in detail.
First, you need to open Microsoft Excel on your computer and click on the File in the top menu bar. Then, click the Options visible in the bottom-left corner.
Next, switch to the Advanced tab and make sure that After pressing Enter, move selection option is checked. Following that, expand the respective drop-down menu and choose a direction as per your requirements.
Click the OK button to save the change.
Change selection direction after pressing Enter in Excel using Group Policy
To change selection direction after pressing Enter in Excel using Group Policy, follow these steps:
- Press Win+R to display the Run dialog.
- Type gpedit.msc and hit the Enter button.
- Navigate to Advanced in User Configuration.
- Double-click on the Move selection after Enter direction setting.
- Choose the Enabled option.
- Choose the direction from the drop-down list.
- Click the OK button.
To know more about these aforementioned steps, continue reading.
First, you need to open the Local Group Policy Editor. For that, press Win+R, type gpedit.msc, and hit the Enter button. Then, follow this path:
User Configuration > Administrative Templates > Microsoft Excel 2016 > Excel Options > Advanced
Double-click on the Move selection after Enter direction setting on the right-hand side and choose the Enabled option.

Then, expand the drop-down list, and select a direction to which you want to move the selection when you press the Enter button. Once done, click the OK button to save the change.
If you cannot find the mentioned path in the GPEDIT, it implies that the Group Policy template is not installed. In that case, you need to download the administrative template for Office.
Change the cursor movement direction after pressing Enter in Excel using Registry
To change selection direction after pressing Enter in Excel using Registry, follow these steps:
- Search for registry editor in the Taskbar search box.
- Click on the individual search result.
- Click the Yes button.
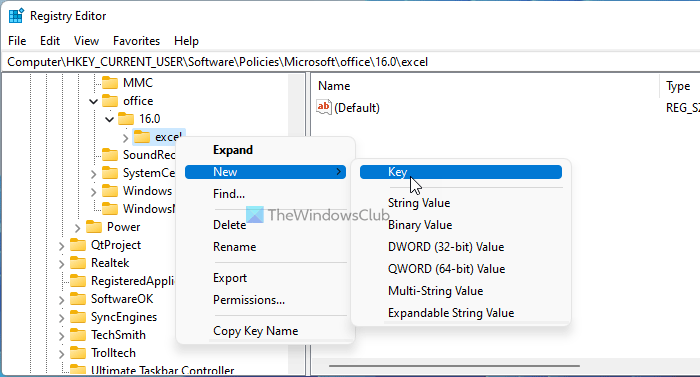
- Navigate to excel in HKCU.
- Right-click on excel > New > Key.
- Name it as options.
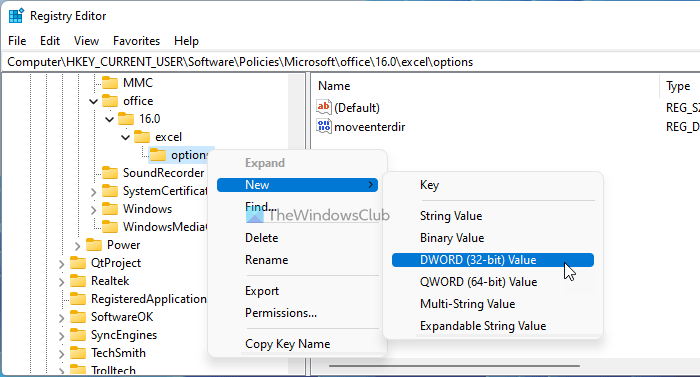
- Right-click on options > New > DWORD (32-bit) Value.
- Set the name as moveenterdir.
- Double-click on it to set the Value data as 1, 2, or 3.
- Click the OK button and restart your PC.
To learn more about these steps, keep reading.
To get started, search for registry editor in the Taskbar search box, click on the individual search result and click the Yes button to open the Registry Editor. After that, navigate to the following path:
HKEY_CURRENT_USERSoftwarePoliciesMicrosoftoffice16.0excel
Right-click on the excel key, select New > Key and name it options.
Here you need to create a REG_DWORD value. For that, right-click the options key, select New > DWORD (32-bit) Value, and name it as moveenterdir.
Next, you need to set the Value data. If you want to move the cursor to the right, enter 1 as the Value data. Enter 2 if you want to move the cursor to the up. Similarly, enter 3 if you want to move it to the left.

Once done, click the OK button and restart your computer.
Read: How to open two Excel files in separate windows.
How do you make Enter go to the right in Excel?
To make Enter go to the right in Excel, you have three options. However, the Excel Options panel method is probably the easiest one. For that, open Excel, click on the File > Options, and switch to the Advanced tab. Then, expand the After pressing Enter, move selection drop-down list, and choose the Right option.
How do you press Enter in Excel without going to the next cell?
If you want to press Enter in Excel but do not want to go to the next cell, you need to disable the After pressing Enter, move selection option. To do that, open Excel and go to File > Options. Then, switch to the Advanced tab, and remove the tick from the After pressing Enter, move selection checkbox.
That’s all! Hope this guide has helped you.
Bottom Line: Learn to change what happens when the Enter key is pressed after editing a cell. The cell below is typically selected, but we can change this behavior.
Skill Level: Beginner
Video Tutorial
![]()
Preventing the Enter Key from Moving Down
Typically when you are editing a cell and press the Enter key, the cell below is selected. This is the default behavior in Excel, but there are a few ways to change this.
About a month ago, we received a comment on one of our YouTube tutorials from a viewer called DRSteele, who indcated that their preference for the Enter key is that it doesn’t make the active cell move at all.

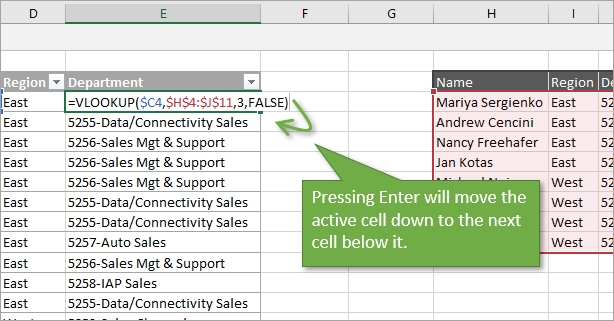
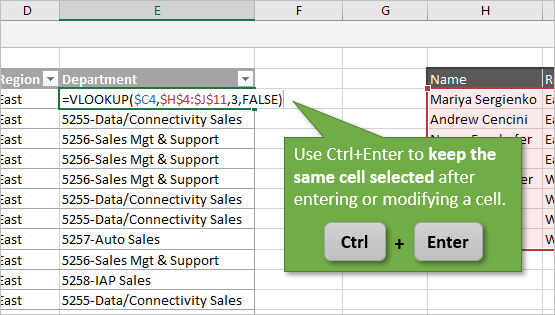
Fellow commenter Joe M suggested a great one-at-a-time solution. If you don’t want your selected cell to move down, you can press Ctrl + Enter instead of just Enter.

That’s a really good tip for individual instances, and one I use often.
Altering Enter Key Behavior
If you want to change the behavior of your Enter key for the long term, DRSteele’s recommendation to change the setting in Excel Options is great.
You can make it so that the Enter key makes the active cell stay where it is. You can also make it so that the Enter key moves the selected cell in another direction. It’s a setting that is very easy to adjust.
Start by choosing the File tab, and then selection Options (at the bottom of the left menu). This will bring up the Excel Options window, where you’ll want to select the Advanced Tab.
The first option in this menu controls how the Enter key behaves. You can uncheck the box if you don’t want the Enter key to move the selection at all. Or you can use the drop-down menu to select another direction for the Enter key to move the active cell (up, down, left, or right).
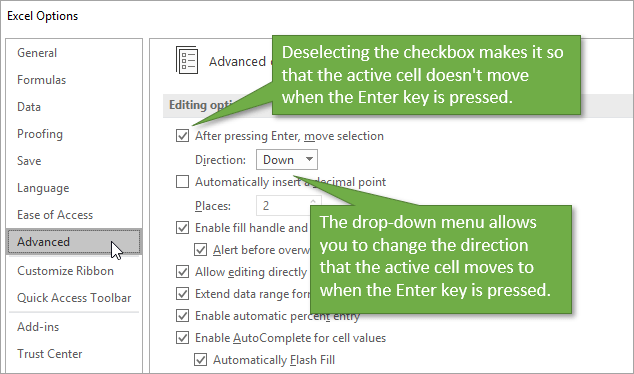
If you’ve turned off the option to move the active cell, you can to use your arrow keys to move the highlighted cell instead of Enter.
Bonus Tip: Use the Tab Key for Tables
If you are entering data in a block that is set up as a table, you might want to use the Tab key instead of Enter. This moves your selection to the right, and as you get to the rightmost column of the table, the Tab key will move you down to the leftmost entry of the next row of the table.
This pattern of movement is the same way your eyes move when you read a book in English. Therefore, it’s probably a familiar pattern to your brain, which may allow you to enter data faster.
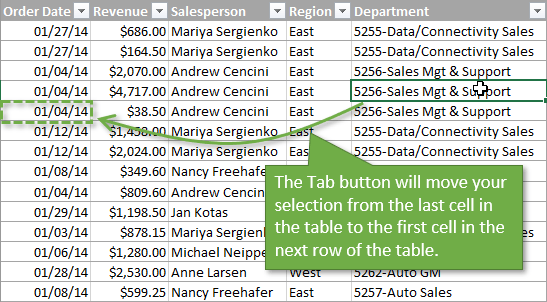
Selecting Shift + Tab will move you in the opposite direction.
Conclusion
Thanks again to everyone for the suggestions. Your comments inspire videos and help us all learn. So don’t be shy; please leave a comment or suggestion below if this tip has been helpful or you have other recommendations for changing the behavior of the Enter key.
In this article, you will learn how to Enter and Move Right with a shortcut in Microsoft Excel. You will also get to know the shortcut to Enter and Move Right on Mac. The easy key combinations will make you operate Microsoft Excel smoothly.
Enter and Move Right With Shortcut in Microsoft Excel
Here we will show you how to enter and move right in Microsoft Excel. Like many other programs Microsoft Excel also uses similar key combinations while using shortcuts.
You can use the key combinations given below to enter and move right using the shortcut. You can consider this shortcut as an alternative to enter/return keys while you enter the data. It’s useful when the next value you want to enter is at right. So, here we go:
How to Enter and Move Right With Shortcut in Microsoft Excel?

It is used to enter and move right in Microsoft Excel. You can consider this shortcut as an alternative to enter/return keys while you enter the data. It’s useful when the next value you want to enter is at right. This way you can easily enter and move right using this shortcut.
Did this page help you?
|
Enter Text And Move Down
This Excel Shortcut saves the active cell and selects the next cell below.
PC Shorcut:Enter
Mac Shorcut:Return
Enter Text And Move Right
This Excel Shortcut saves the active cell and selects the next cell to the right.
PC Shorcut:Tab
Mac Shorcut:Tab
Enter Text And Move Up
This Excel Shortcut saves the active cell and selects the previous cell above.
PC Shorcut:Shift+Enter
Mac Shorcut:⇧+Return
Enter Text And Move Left
This Excel Shortcut saves the active cell and selects the next cell to the left.
PC Shorcut:Shift+Tab
Mac Shorcut:⇧+Tab
You could use VBA to change the Enter key’s behavior when a sheet is activated (when you click a tab).
To do this go to your VBE (Ctrl+F11) and find your Workbook’s code:

And double click «ThisWorkbook» to add code to the Workbook object.
In there you can use something like:
Private Sub Workbook_SheetActivate(ByVal Sh As Object)
    If Sh.Name = "Sheet1" Or Sh.Name = "Sheet3" Then
        Application.MoveAfterReturnDirection = xlToRight
    ElseIf Sh.Name = "Sheet2" Or Sh.Name = "sheet4" Then
        Application.MoveAfterReturnDirection = xlDown
    End If
End Sub
This will run anytime a sheet/tab is activated. It will flip the Enter key’s behavior similar to you manually going into options and changing it yourself.